Category: AI Video

  • YouTube Copyright and Licensing for AI Videos: Beginner Guide (2026)

    YouTube Copyright and Licensing for AI Videos: Beginner Guide (2026)

    Estimated reading time: 22 minutes

    Last updated: August 8, 2026

    Creating an AI-assisted YouTube video does not automatically mean that every image, music track, voice, video clip, sound effect, or other asset is free to use. Copyright and licensing still matter.

    Copyright generally protects original creative works such as videos, music, photographs, illustrations, and written material. For a faceless YouTube video, copyright questions can arise when you use AI-generated media, stock footage, photographs, music, sound effects, screenshots, clips from other videos, Creative Commons material, templates, fonts, or other people’s recordings.

    The important question is not simply “Can I download this?” A better question is: Do I have the right or licence to use this asset in this particular video, including commercial use if I plan to monetize it?

    AI adds another layer of complexity. Copyright protection for AI-generated material can depend on the country, the amount of human creative contribution, the AI provider’s terms, source inputs, real-person likenesses, and other rights.

    Because copyright law differs between countries and AI-related legal questions continue to develop, this guide provides general educational information, not legal advice.

    You will learn practical ways to check copyright ownership, licences, commercial-use rights, Creative Commons conditions, music and stock-media permissions, AI-generated assets, Content ID, fair use and fair dealing, and how to keep reliable licence records.

    A careful workflow cannot guarantee that you will never receive a claim or dispute. However, checking licences, permissions, ownership, attribution requirements, and commercial-use conditions before publication can reduce avoidable problems.

    The goal is simple: Before using an asset, know where it came from, what permission or licence applies, and keep a record of it.

    Before Learning

    Before learning about copyright and licensing for AI-assisted YouTube videos, understand one basic principle: Every asset in your video should have a clear source and a clear reason why you are allowed to use it.

    An asset can be music, sound effects, stock footage, photographs, AI-generated images, AI-generated video, voice recordings, fonts, templates, screenshots, graphics, clips from other videos, or other creative material.

    For each important asset, be able to answer:

    • Where did I get it?
    • Who created or provided it?
    • What licence or permission applies?
    • Does the licence allow YouTube use?
    • Does it allow commercial use if I plan to monetize?
    • Is attribution required?
    • Are there restrictions on modification or redistribution?

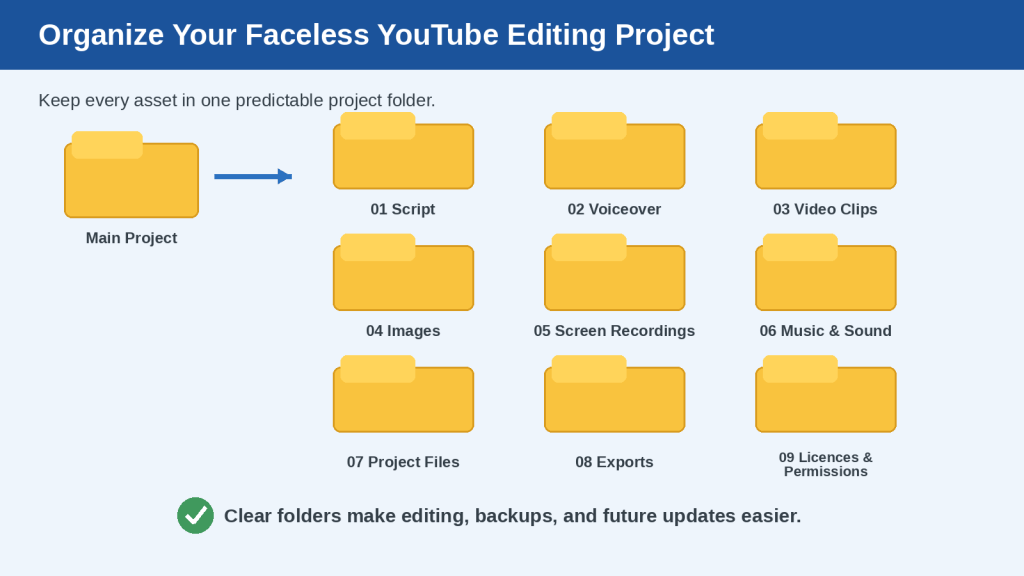
    Create a project folder called Licences and Permissions and save useful records such as licence files, receipts, permission emails, screenshots of terms, source pages, download dates, creator names, original filenames, and subscription or plan information when relevant.

    Reality: The word “free” does not always mean free to use anywhere for any purpose. An asset may be free to download, free for personal use, free with attribution, free under a Creative Commons licence, or free only under certain plans.

    Reality: “Royalty-free” does not mean copyright-free. It normally means that, under the applicable licence, ongoing royalties are not required for the permitted use. The asset can still be copyrighted and subject to conditions.

    If you hope to monetize the channel now or later, check commercial-use rights. A licence suitable for a personal project may not cover a monetized or business use.

    Before publishing, create a simple asset list. For example: voiceover — own recording; background music — licensed music library; scene 1 — stock footage; scene 2 — AI image; font — licensed font; screenshot — own demonstration account.

    Ownership and permission are different. You do not always need to own an asset, but when you do not own it you need a licence, permission, valid public-domain status, or another applicable legal basis.

    Public availability on YouTube is not the same as permission to download and republish. Adding AI narration or editing does not automatically make somebody else’s video yours.

    For real people, voices, photographs, or video, also consider consent, privacy, impersonation, publicity or personality rights, and platform rules. Avoid making a real person appear to say or endorse something they did not actually say or endorse.

    Preserve the final master project, scripts, source files, editing files, licence records, permissions, AI generation records, final description, credits, and publication date.

    Use this beginner sequence: Source → Licence or Permission → Commercial Use → Attribution → Save the Record.

    What You’ll Learn

    By the end of this guide, you should understand the main copyright and licensing issues that can affect AI-assisted YouTube videos.

    • Understand copyright in simple language
    • Recognize the difference between copyright ownership and permission
    • Understand what a licence does
    • Understand what royalty-free means
    • Understand Creative Commons licences
    • Check commercial-use rights and attribution
    • Review music, stock footage, images, fonts, templates, and AI-generated media
    • Understand Content ID claims and copyright strikes
    • Understand why fair use and fair dealing are not automatic permission
    • Keep licence, permission, AI-generation, and publication records
    • Avoid common copyright myths and mistakes

    The practical workflow is: Identify the Asset → Find the Source → Check the Licence or Permission → Check Commercial Use → Check Attribution → Save the Record → Review Before Publishing.

    What Copyright Means in Simple Language

    Copyright is a legal protection for original creative work. In Canada, copyright protects original literary, musical, dramatic, and artistic works, and protection generally arises automatically when an original work is created and fixed in a form such as a saved file.

    For a YouTube creator, copyright can apply to videos, photographs, illustrations, music, written scripts, graphics, sound recordings, and animations.

    Copyright generally protects creative expression, not the basic idea itself. The idea “make a beginner video explaining AI” is different from the particular script, narration, graphics, and editing used to express that idea.

    Copyright owners have legal rights over certain uses of their work. Do not assume you can take somebody else’s photograph, song, video, illustration, recording, or writing and publish it simply because you found it online.

    Publicly available does not mean free to use. Something can be easy to view, copy, screenshot, or save while still being protected.

    Copyright protection can be automatic. Do not assume a work has no copyright because it lacks a copyright symbol or registration notice.

    Copyright registration and copyright protection are different. In Canada, registration is optional and can provide evidence of ownership, but it is not generally what creates copyright.

    A finished YouTube video can contain several different copyright owners. You may own your script and narration while using stock footage and music under licence.

    Editing somebody else’s work does not automatically make it yours. Cropping, recolouring, adding captions, changing speed, applying filters, or adding AI narration does not automatically remove the original copyright.

    Copyright rules vary by country. Fair use in the United States and fair dealing in Canada are not identical. Do not assume advice written for one jurisdiction automatically applies everywhere.

    Beginner Rule: When you see an asset you want to use, ask: Who created or owns this, and what gives me permission to use it?

    The Difference Between Copyright Ownership and a Licence

    Copyright ownership and a licence are related but different. A copyright owner controls certain rights in a protected work. A licence gives somebody else permission to use that work according to specified conditions.

    For example, a musician may own a music track while a music library licenses you to use the track in your YouTube video. You may have permission to use it without becoming its copyright owner.

    A licence can contain conditions involving commercial use, monetization, attribution, number of projects, number of channels, client work, territory, duration, modification, redistribution, advertising, or subscription status.

    Commercial use is especially important if you plan to earn money from your videos. Do not assume “free download” means “commercial licence.”

    Attribution is not the same as permission. Writing “Credit to the original creator” does not automatically give you the right to use protected material. Check permission first, then provide attribution if required.

    Permission can also be direct. If a photographer, musician, or creator gives you written permission, keep a clear record showing which asset is covered, what use is allowed, whether commercial use is permitted, whether edits are allowed, and what attribution is required.

    Buying an asset does not always mean buying its copyright. A stock purchase commonly gives you licensed usage rights rather than ownership of the underlying work.

    Subscription services can have special rules about active plans, project registration, continued use after cancellation, or new projects. Save the terms that applied when you obtained important assets.

    YouTube’s Creative Commons upload option is different from its standard licence. Eligible videos can be marked under CC BY, but this does not mean every video on YouTube is Creative Commons content.

    Beginner Rule: Copyright ownership = who owns the protected rights. Licence = permission to use the work under specified conditions.

    What “Royalty-Free” Really Means

    The term royalty-free is often misunderstood. It does not mean that nobody owns the content or that you can do anything you want with it.

    A royalty is a payment connected with the use of intellectual property. A royalty-free licence generally allows licensed use without ongoing royalty payments for each permitted use, but the licence can still contain important conditions.

    Royalty-free is not the same as copyright-free, public domain, or free download. A royalty-free photograph can still be copyrighted. A public-domain work may be usable without a copyright licence when its status is valid. A free download only tells you the price unless usage rights are also explained.

    YouTube monetization still requires the necessary commercial-use rights. If you plan to monetize a video, confirm that the licence permits your intended commercial YouTube use.

    Royalty-free material can still require attribution, restrict redistribution, limit client work, or depend on a subscription. A one-time payment does not automatically mean unlimited rights.

    Do not depend only on a search result describing an asset as royalty-free. Open the original provider page and verify the licence.

    Do not assume AI-generated music is automatically royalty-free. Check the AI provider’s current plan and terms.

    Beginner Rule: Whenever you see royalty-free, translate it in your mind to: I still need to check the licence.
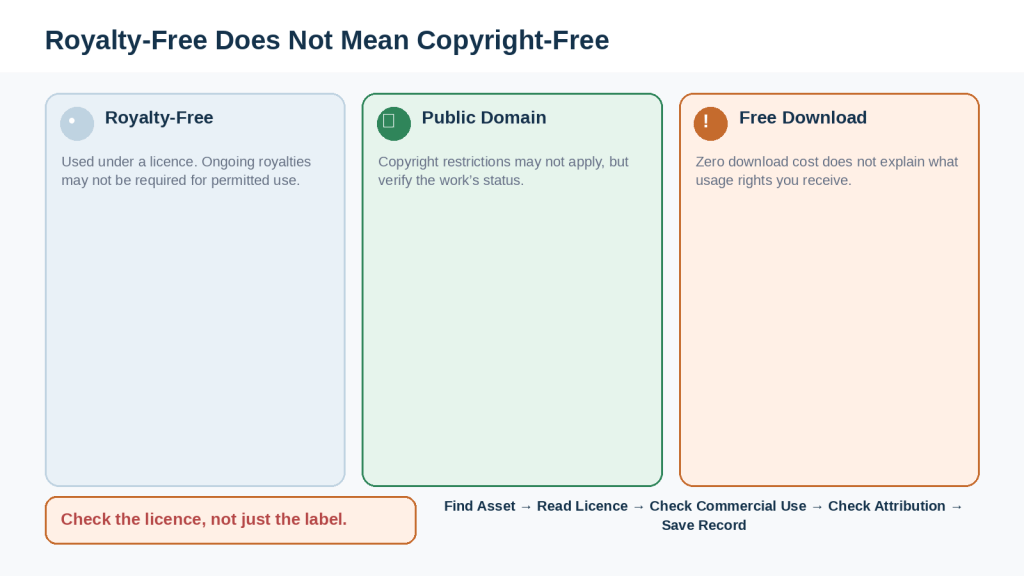
    Figure 1. Royalty-free, public-domain, and free-download material can have very different usage conditions.

    Explanation: The words used to describe an asset do not replace the licence check. Before using music, video, images, or other material, identify the source and confirm the rights that apply to your intended YouTube use.

    How Creative Commons Licences Work

    Creative Commons licences are standardized copyright licences that creators can use to give the public permission to reuse work under defined conditions. Creative Commons currently provides six main licence types.

    Creative Commons does not mean “there is no copyright.” The creator usually retains copyright while granting specified permissions.

    The key abbreviations are BY — Attribution, SA — ShareAlike, NC — NonCommercial, and ND — NoDerivatives.

    CC BY allows sharing and adaptation, including commercial use, with attribution. CC BY-SA adds a ShareAlike requirement for adaptations. CC BY-ND permits redistribution, including commercial use, but shared adaptations are restricted. CC BY-NC permits reuse and adaptation for noncommercial purposes with attribution. CC BY-NC-SA combines NonCommercial and ShareAlike. CC BY-NC-ND is the most restrictive of the six main licences, allowing noncommercial sharing of the unadapted work with attribution.

    CC0 is separate from the six licences. It is a public-domain dedication tool designed to waive copyright and related rights to the fullest extent permitted by law. Even with CC0, verify the source and remember that privacy, trademarks, or personality rights may still matter.

    YouTube’s Creative Commons option is specifically CC BY for eligible uploads. Do not assume every YouTube video uses that licence.

    For attribution, preserve the exact licence name, creator, source, and information about changes when required. Keep the licence version, such as CC BY 4.0, rather than recording only “Creative Commons.”

    If you plan to monetize, pay particular attention to NC — NonCommercial licences.

    Common Beginner Mistake: “I found a Creative Commons image, so I can use it however I want.”
    Reality: Creative Commons licences have different conditions.
    How to Avoid This Mistake: Record the complete licence name and check commercial use, adaptations, ShareAlike, and attribution.

    Beginner Rule: Which Creative Commons licence is it? → Attribution → Commercial Use → Adaptation → ShareAlike → Save the Record.
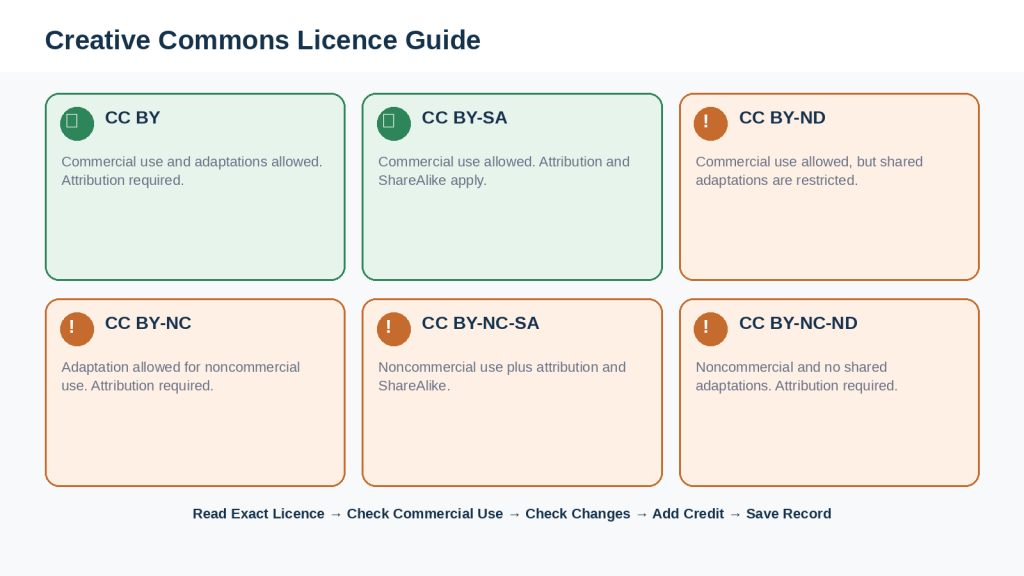
    Figure 2. Creative Commons licences provide different permissions for attribution, commercial use, adaptation, and sharing.

    Explanation: The words “Creative Commons” are not enough to determine whether an asset fits your YouTube project. Check the complete licence name and follow every condition that applies.

    How to Check Whether Commercial Use Is Allowed

    If you plan to make money from a YouTube video, pay particular attention to commercial-use rights. A licence that allows use does not automatically mean it allows a monetized project.

    For beginners, commercial use can include advertising revenue, promotion of a business, affiliate content, sponsorships, client work, or other money-making activity, but the exact definition depends on the licence.

    YouTube monetization approval and copyright permission are separate questions. You need both the necessary rights in third-party material and compliance with YouTube’s monetization rules.

    Check licence information before downloading when practical. Look for “Licence,” “Terms of Use,” “Commercial Licence,” “Usage Rights,” or provider FAQs.

    Do not assume “YouTube use allowed” necessarily means monetization is allowed. Look for clear commercial-use language and check the specific asset, not only the website as a whole.

    Some plans have different rights. Record the plan you used and whether commercial use was included. Save the terms when the asset matters to your project.

    For stock footage, check source, licence, commercial use, editorial status, attribution, modification, redistribution, and restrictions involving people or brands.

    For Creative Commons, confirm whether the specific licence permits commercial use. CC BY does; CC BY-NC does not.

    YouTube’s Audio Library can be useful because its creator-focused licence information is shown per track. Check whether attribution is required.

    Creator Music, where available, can use different track-specific arrangements. Always check the individual track and current availability.

    Common Beginner Mistake: “I paid for the asset, so commercial use must be included.”
    Reality: Payment does not define the scope of the licence.
    How to Avoid This Mistake: Read the licence and confirm your intended monetized YouTube use.

    Use this check: Who provides it? → What licence applies? → Commercial use? → Monetization? → Modification? → Attribution? → Restrictions? → Saved proof?
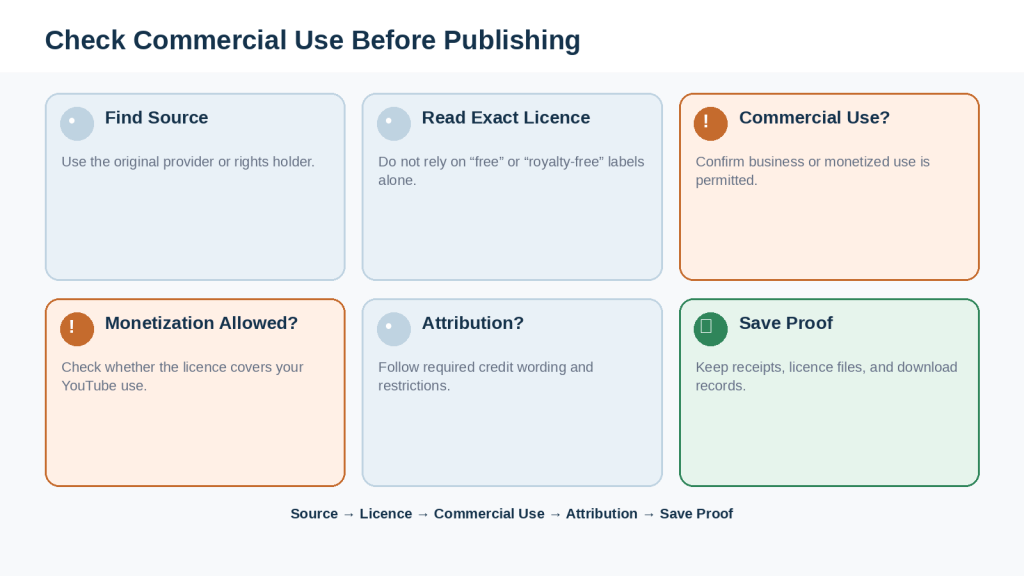
    Figure 3. A commercial-use check helps confirm that an asset’s licence fits the way you plan to use it in a YouTube video.

    Explanation: Do not rely on labels such as free, licensed, or royalty-free alone. Check the exact licence, intended use, monetization rights, attribution requirements, restrictions, and saved proof before publishing.

    How to Check Attribution Requirements

    Attribution means giving credit to a creator or rights holder when the licence requires it. On YouTube, attribution commonly appears in the video description.

    Attribution does not replace permission. Writing “Credit to the original creator” does not automatically create rights.

    Look for wording such as “Attribution required,” “Credit required,” “CC BY,” or specific provider instructions. Do not assume every asset from one site uses the same rules.

    Creative Commons recommends the TASL approach: Title, Author, Source, Licence. When required, also indicate relevant changes you made.

    Do not suggest that the original creator sponsors, endorses, or approves your use unless that is true.

    For YouTube Audio Library tracks requiring Creative Commons attribution, copy and preserve the provided credit information.

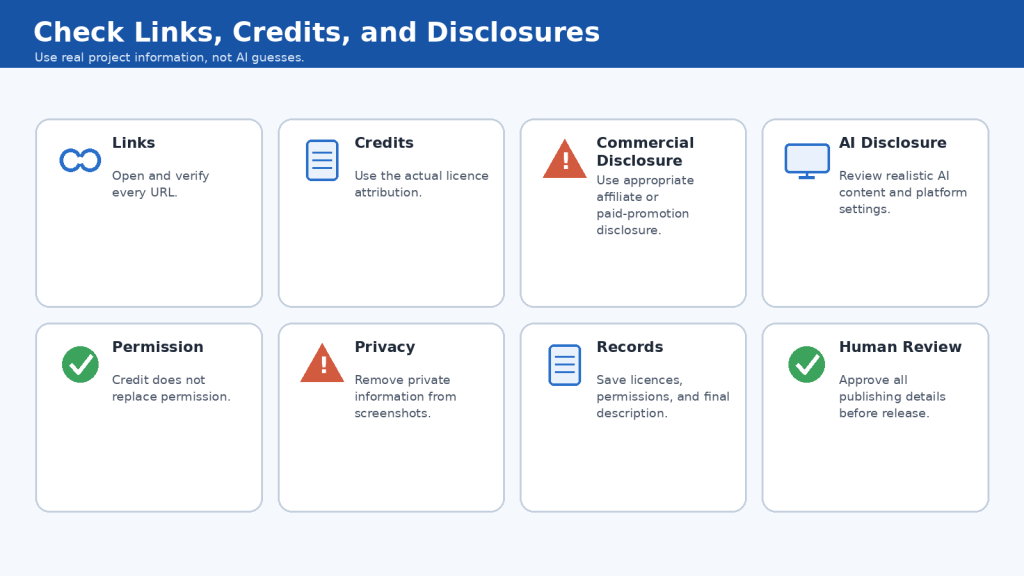
    Create a Credits and Licences section in the video description when useful. Keep verified attribution with the asset licence record.

    AI can help organize licence details you provide, but do not ask AI to invent creator names, licence types, or URLs.

    Common Beginner Mistake: “I wrote credit to the owner, so I am safe.”
    Reality: Generic credit does not automatically provide permission or satisfy the licence.
    How to Avoid This Mistake: Identify the real licence and use the required attribution accurately.

    Beginner Rule: Permission first. Attribution second.
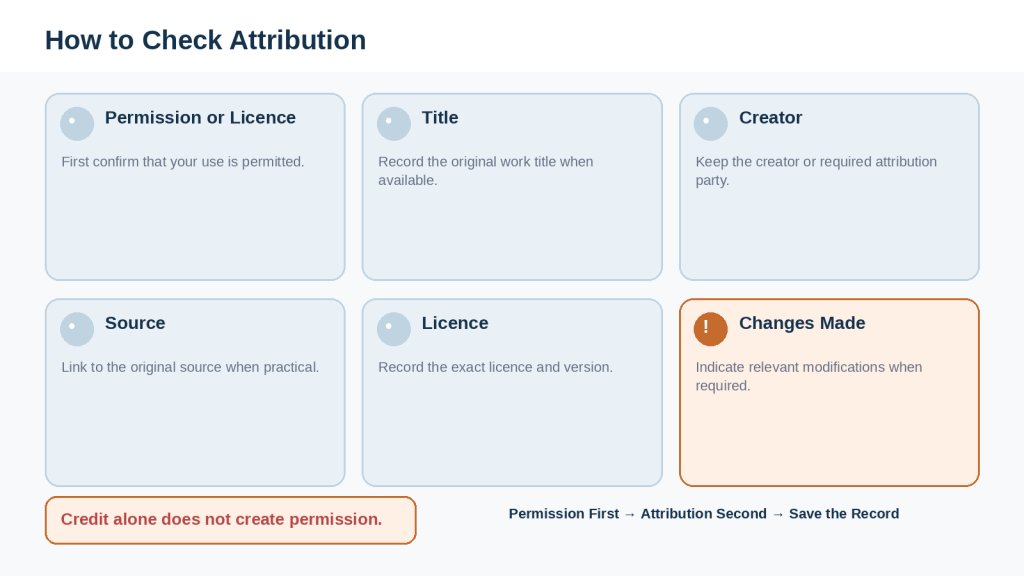
    Figure 4. A good attribution record identifies the asset, creator, source, licence, and relevant changes.

    Explanation: Attribution should be based on verified licence information. Giving credit alone does not automatically provide permission to use copyrighted material.

    How to Use Music and Sound Effects Legally in YouTube Videos

    Music and sound effects are common sources of copyright problems. The safest beginner approach is to use audio you created yourself or audio from a source that clearly grants the rights needed for your YouTube project.

    Do not assume audio is safe because you found it online, somebody else used it, it was labelled free, you bought it for listening, you credited the artist, you used only a short part, or AI edited it.

    A song can involve rights in the composition, lyrics, recording, and performance. Buying access for personal listening does not automatically provide video-use rights.

    Options include your own original music, the YouTube Audio Library, third-party licensed libraries, and Creator Music where available. Each source has its own conditions.

    With the YouTube Audio Library, check whether attribution is required for the individual track and save the track details. For third-party libraries, confirm commercial use, monetization, attribution, number of projects or channels, client work, subscription status, and what happens after cancellation.

    Content ID automatically compares uploads with reference material. Even licensed music can sometimes be identified, which is why licence certificates, receipts, track IDs, and provider instructions should be preserved.

    Do not dispute a Content ID claim simply because you dislike it. First inspect the matched content and confirm your actual rights.

    There is no universal “five-second” or “ten-second” rule. A short clip is not automatically permitted. Speeding up, slowing down, pitch shifting, adding effects, or using AI to remix does not automatically create permission.

    AI-generated music also needs a provider-term and source-input review. Avoid deliberately presenting synthetic music as if a real artist created or endorsed it.

    Sound effects need licence checks too. Do not copy short effects from movies, games, or other videos without a clear right to use them.

    Before export, identify every music track and third-party sound effect, verify the licence, commercial use, attribution, and records, and replace unclear audio.

    Beginner Rule: Source → Licence → YouTube Use → Commercial Use → Attribution → Save Proof.
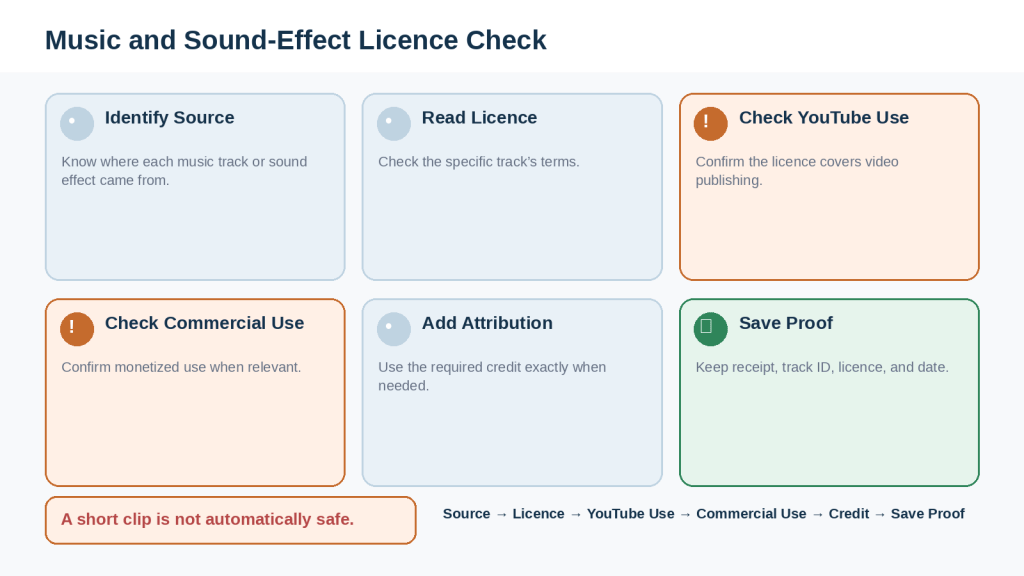
    Figure 5. Music and sound effects should be checked for source, licence, commercial-use rights, attribution requirements, and saved proof before publication.

    Explanation: Finding a music or sound file online does not establish permission to use it. A simple licence check before editing can prevent many avoidable copyright problems.

    How to Use Stock Footage and Stock Images Safely

    Stock footage and stock images can save time, but downloading a stock asset does not automatically mean you can use it in every type of project.

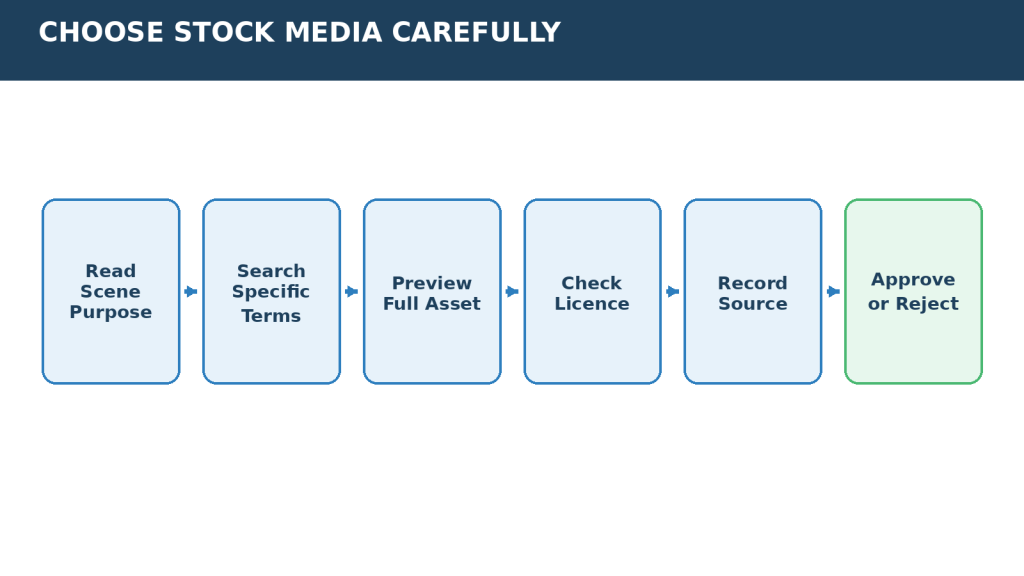
    Use the original provider when possible and check the exact licence for YouTube use, commercial use, monetization, editing, attribution, client work, redistribution, and asset-specific restrictions.

    Commercial stock and editorial-only stock are different. Editorial material may contain recognizable brands, public events, celebrities, or other content not cleared for ordinary promotional use.

    When stock content contains identifiable people, model releases can matter. Property releases can also matter for recognizable private property, artwork, or distinctive locations. As a customer, you normally rely on the provider’s licensing classification, but you should still read the restrictions.

    A model release does not mean every context is appropriate. Do not make a stock model appear to endorse a product, admit to a medical condition, commit a crime, hold a political opinion, or participate in an event when that is untrue.

    Watch for logos, trademarks, product packaging, and branded interfaces. Choose another asset if a brand element creates unnecessary risk.

    Do not redistribute raw stock files unless the licence permits it. Editing a stock asset does not remove the underlying licence.

    If you use a stock asset as an AI reference, check whether the stock licence and AI provider terms permit that use, especially when people are identifiable.

    Stock libraries can also contain AI-generated material. Check how it is labelled, what licence applies, and whether realistic synthetic content requires disclosure in your final video.

    Licensed stock content does not guarantee YouTube monetization. Copyright permission and monetization eligibility are separate.

    Common Beginner Mistake: “If it is on a stock website, it must be safe for any commercial use.”
    Reality: Stock providers can have different licences and editorial restrictions.
    How to Avoid This Mistake: Check the individual asset’s licence and status.

    Use this workflow: Find Stock Asset → Check Licence → Check Commercial or Editorial Status → Review People, Property, and Brands → Check Attribution → Save Proof → Add to Video.
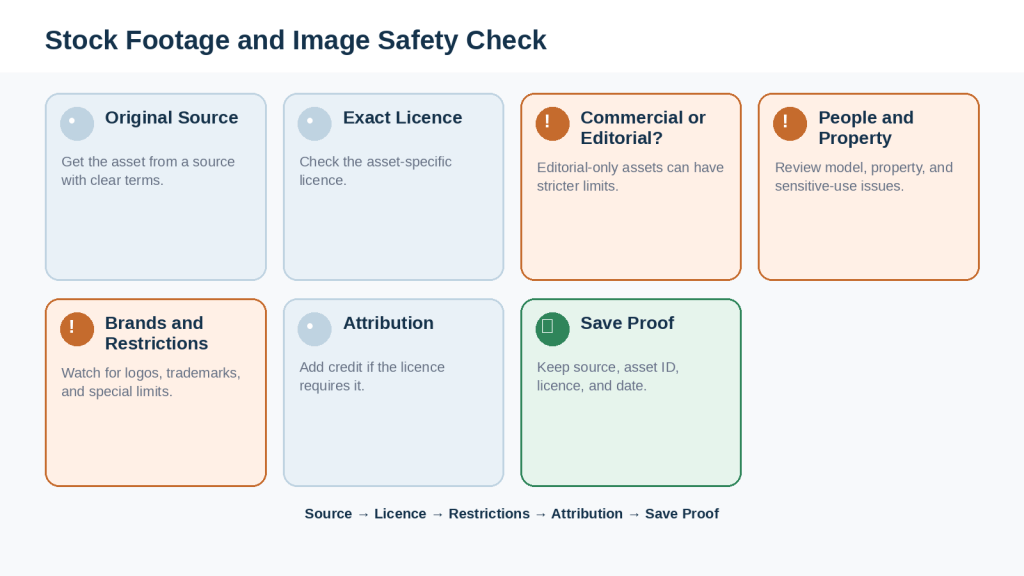
    Figure 6. Stock images and footage should be checked for licence type, commercial or editorial status, restrictions, attribution, and saved proof.

    Explanation: A stock provider can make licensing easier, but the creator still needs to check the specific asset and licence. Commercial-use rights, editorial restrictions, recognizable people, property, brands, and redistribution rules may affect whether the asset fits the project.

    How to Use Fonts, Templates, Graphics, and Other Design Assets Safely

    Faceless YouTube videos often use fonts, icons, templates, motion graphics, backgrounds, transitions, illustrations, and thumbnail layouts. These can also have licence conditions.

    Fonts have licences. “Free font” may mean free for personal use, open-source, trial use, or commercial use. Check the original source and exact licence.

    Many open fonts use the SIL Open Font License, but open-source does not mean “no conditions.” Do not redistribute font files unless the licence permits it.

    Templates can include photographs, fonts, icons, illustrations, and other elements with their own licence conditions. Check commercial use, modification, included assets, attribution, and redistribution.

    Design platforms can have different rules. Do not assume one simple rule applies to every asset in every platform.

    A licence may allow you to use an asset inside a finished design without allowing you to redistribute the standalone source file.

    Be cautious with company logos, trademarks, recognizable characters, downloaded SVGs, and vector assets. The ability to edit a file does not remove its licence.

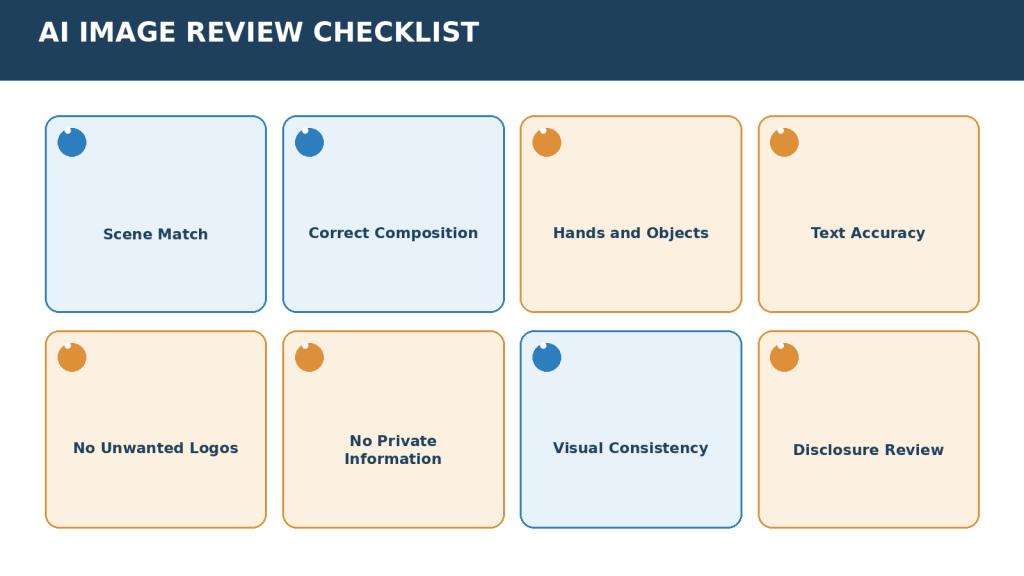
    AI-generated graphics also require provider-term review and a manual check for logos, copyrighted characters, misspelled text, duplicated objects, or unintended resemblance to protected material.

    Preserve the original downloaded file, source URL, licence record, edited project, and final export.

    Beginner Rule: Find Design Asset → Check Source → Read Licence → Check Commercial Use → Review Included Elements → Check Attribution → Save Proof.
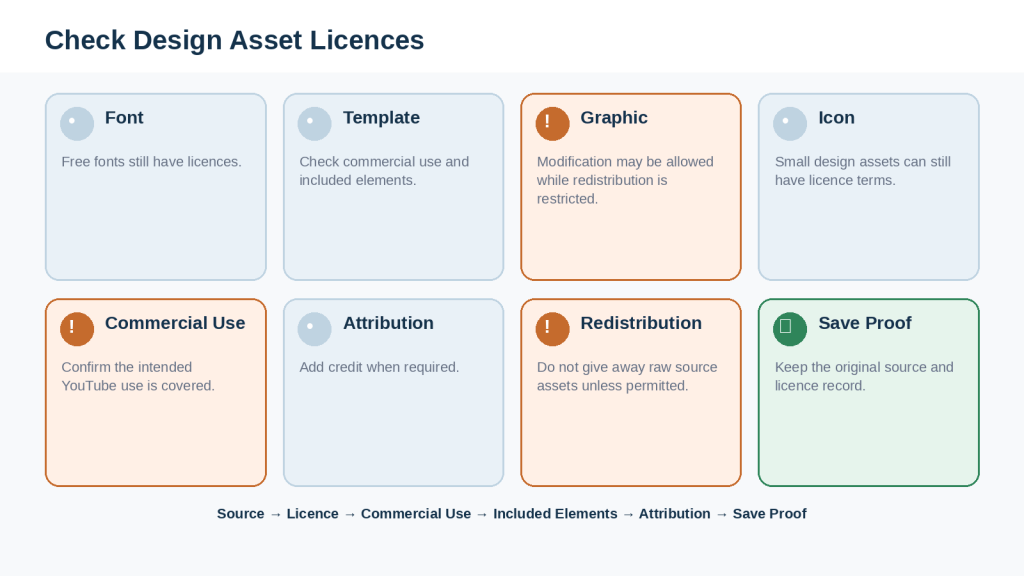
    Figure 7. Fonts, templates, graphics, and icons can each have licence conditions that should be checked before commercial use.

    Explanation: Design assets are easy to overlook because they may be small or included inside a template. Checking the original source, commercial-use rights, modification rules, attribution, and redistribution restrictions helps keep the finished project documented.

    Copyright and Licensing Questions for AI-Generated Images, Video, Music, and Voices

    AI-generated does not automatically mean copyright-free, unrestricted, or legally owned by you in every country.

    Separate the questions: What does copyright law say? What rights does the AI provider give you? Did you upload copyrighted source material? Does the output resemble protected material? Does it depict or imitate a real person? Is commercial use allowed? Does YouTube require disclosure?

    Provider terms and copyright law are different. A service may permit commercial use under its contract while the copyright status of the output is still a separate legal question.

    In the United States, the U.S. Copyright Office’s current guidance distinguishes copyrightable human-authored expression from material generated entirely by AI. Human selection, arrangement, or modification can matter, while prompting alone does not automatically settle authorship.

    Canada has also examined authorship, ownership, infringement, AI training, and licensing in its consultation on copyright and generative AI. The legal position continues to develop.

    Do not assume uncertain copyright protection means unrestricted use. Provider terms, source-material rights, trademarks, privacy, personality rights, platform policies, and contracts can still matter.

    For AI-generated images, check the tool, plan, commercial rights, reference files, similarity to existing works or characters, real-person likenesses, and disclosure needs.

    Technical ability to upload a reference image does not grant rights in that image. Use your own or appropriately licensed material and save the source record.

    For AI-generated video, realistic synthetic scenes can be mistaken for real footage. YouTube requires disclosure for realistic content that has been meaningfully altered or synthetically generated in situations covered by its policy.

    AI disclosure does not create copyright permission or consent. It is a transparency step.

    For AI-generated music, review commercial rights, source audio, imitation risks, and provider conditions. Avoid presenting synthetic music as if a real artist created or endorsed it.

    For AI voices, use your own voice, a properly licensed generic synthetic voice, or another real person’s voice with appropriate permission. Real-person cloning creates added privacy, impersonation, and likeness concerns.

    Realistic AI content is not evidence that an event actually occurred. Use clear disclosure when viewers could reasonably mistake synthetic content for authentic footage or when the platform requires it.

    Keep AI generation records: tool, model or feature, date, prompt, reference files, original output, edited version, final version, terms, plan, and permissions.

    Beginner Rule: Check Tool Terms → Check Source Inputs → Create → Review Output → Check Real People and Protected Material → Check Commercial Use → Add Required Disclosure → Save Records.
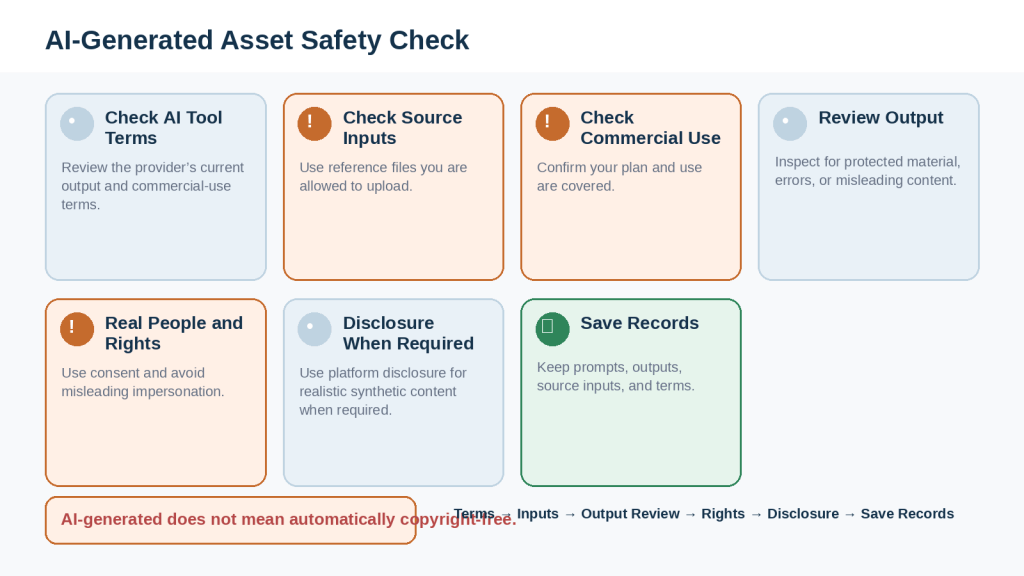
    Figure 8. AI-generated images, video, music, and voices require checks covering tool terms, source inputs, commercial use, real people, disclosure, and record keeping.

    Explanation: AI generation is only one part of the publishing process. Creators should also review the provider’s terms, permissions for source material, the finished output, realistic synthetic content, and any required disclosure before publishing.

    How to Handle Screenshots, Clips, and Content From Other YouTube Videos

    Screenshots and short clips can be useful for explanation, review, criticism, or teaching, but content being visible on YouTube does not automatically mean you can copy it into your own video.

    Publicly viewable does not mean free to reuse. A valid basis might come from your own content, permission, a suitable licence, public-domain status, an authorized platform feature, or an applicable legal exception.

    A screenshot is simply a capture of what appeared on screen. It may still contain somebody else’s photograph, video, artwork, interface, or logo.

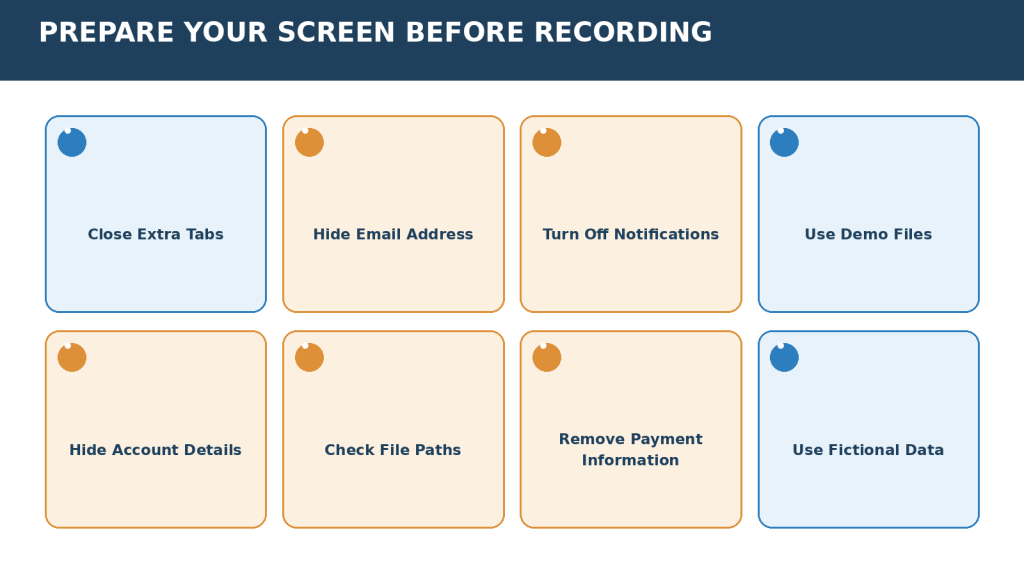
    For software tutorials, create your own screenshots when practical. Remove private information, close unrelated tabs, hide email addresses, account numbers, personal messages, and payment details, and crop to the area the viewer actually needs.

    There is no universal five-second rule for clips. Length alone does not decide whether reuse is allowed.

    Under U.S. law, fair use can apply to some commentary, criticism, teaching, research, or news reporting, but courts ultimately decide based on the specific facts. Canada uses fair dealing under a different legal framework.

    Adding captions, music, borders, colour changes, or AI narration does not automatically transform the legal status of somebody else’s footage.

    For ordinary background visuals, original or clearly licensed stock footage is usually simpler than copying another creator’s video.

    Permission can be the simplest solution. If another creator gives permission, keep it in writing and make sure it covers your intended YouTube and commercial use.

    YouTube has built-in remix tools for eligible content. Follow those platform rules rather than assuming the ability to remix extends to downloading and reusing content elsewhere.

    Copyright removal requests are more serious than ordinary Content ID claims and can lead to a strike when valid.

    Beginner Rule: What am I using? → Who owns it? → Why do I need it? → What permission, licence, platform feature, or legal exception applies? → Have I protected privacy? → Have I saved records?
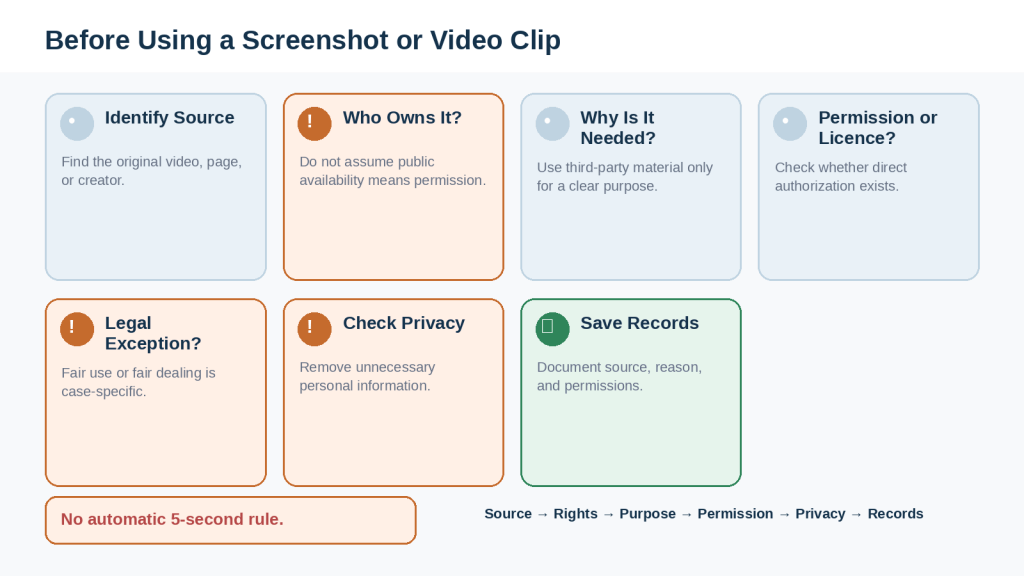
    Figure 9. Screenshots and third-party video clips require a clear source, a valid basis for reuse, privacy review, and saved records.

    Explanation: Publicly viewable content is not automatically free to copy. Before reusing a screenshot or clip, identify why the use is necessary and what permission, licence, platform feature, or applicable legal exception supports it.

    Understanding YouTube Content ID, Copyright Claims, and Copyright Strikes

    On YouTube, a Content ID claim, a copyright removal request, and a copyright strike are different processes.

    Content ID is YouTube’s automated rights-management system. Participating copyright owners supply reference files, and uploaded videos are scanned for matches.

    Depending on the rights owner’s settings, a Content ID claim can monetize, track, or block the matched video. A Content ID claim is not automatically a copyright strike.

    When a claim appears, check which video and segment are affected, whether the match involves audio or video, who the claimant is, what restriction applies, and whether you have a licence or permission.

    If a valid claim identifies material you do not have rights to use, available options can include leaving the claim in place, trimming the segment, replacing the music, or removing claimed audio, depending on YouTube’s current tools.

    If you licensed the material, retrieve the licence certificate, receipt, track ID, download date, and provider instructions. Some providers have specific procedures for clearing claims.

    Dispute only when you have a genuine basis, such as ownership, permission, a licence, misidentification, or another valid legal basis. Do not dispute simply because you gave credit or used a short portion.

    A copyright removal request is a formal legal process. When YouTube acts on a valid removal request, content can be removed and a copyright strike can result.

    A copyright strike is more serious for the channel. YouTube’s procedures can change, so always follow the current notice in YouTube Studio and official Help guidance.

    A counter notification is a formal legal response and should not be used casually. Seek qualified legal advice if you do not understand the consequences.

    Content ID is a platform system, not a court. No Content ID claim does not prove your content is legally safe, and a Content ID match does not by itself resolve every legal question.

    Keep records of copyright notices, claimant name, matched asset, timestamps, date, licence or permission, your response, and the outcome.

    Beginner Rule: Content ID claim → usually a video-level rights-management issue. Valid copyright removal request → content can be removed and a copyright strike can result.
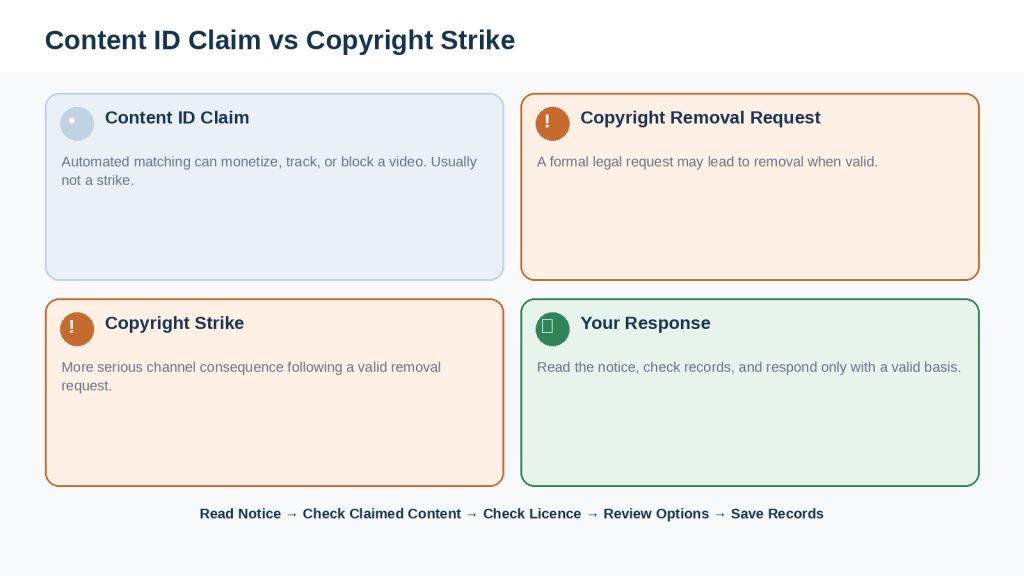
    Figure 10. A Content ID claim and a copyright strike are different YouTube copyright processes with different consequences.

    Explanation: A Content ID claim usually affects an individual video’s use, monetization, tracking, or availability. A copyright strike is more serious and can result when YouTube acts on a valid copyright removal request.

    Why Fair Use and Fair Dealing Are Not Automatic Permission

    Creators often hear terms such as fair use, fair dealing, educational use, commentary, review, or criticism. These can be important legal exceptions, but they are not automatic licences and the rules differ by country.

    In the United States, fair use can permit certain uses without permission depending on the circumstances. The four statutory factors are generally the purpose and character of the use, the nature of the copyrighted work, the amount and substantiality used, and the effect on the market for the original.

    There is no fixed number of words, notes, seconds, or percentage that automatically qualifies. A short portion can still contain an important part of the work.

    Writing “fair use” or “no infringement intended” in the description does not determine the legal result. Giving credit also does not create fair use.

    Adding captions, AI narration, music, borders, or colour changes does not automatically make reuse fair. Meaningful commentary, criticism, or a genuinely different purpose is more relevant than cosmetic editing.

    Canada uses fair dealing, not the U.S. four-factor fair-use test. Canadian fair dealing applies to specified purposes such as research, private study, education, parody, satire, criticism or review, and news reporting, subject to Canadian legal requirements.

    Fair dealing and fair use should not be treated as identical. If the use is important, disputed, or commercially significant, professional legal advice may be appropriate.

    For many beginner faceless videos, original or clearly licensed material is simpler than building the project around an uncertain exception.

    Beginner Rule: What exception might apply? → Which country’s law applies? → Why is the material necessary? → How much is needed? → Is permission or licensing a clearer option?
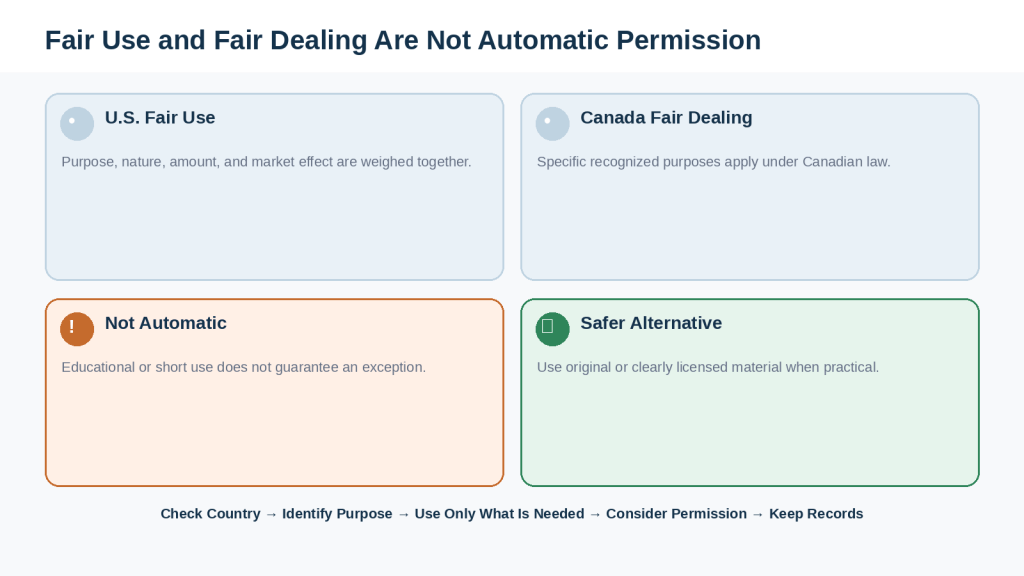
    Figure 11. Fair use in the United States and fair dealing in Canada are copyright exceptions with different legal requirements.

    Explanation: Educational, critical, or noncommercial use does not automatically provide permission. Creators should understand the applicable country’s rules and consider whether permission or a clear licence offers a simpler basis.

    How to Create and Maintain a Copyright and Licence Record for Every Video

    Keeping rights records can be simple. The goal is to answer: Where did this asset come from, and why was I allowed to use it?

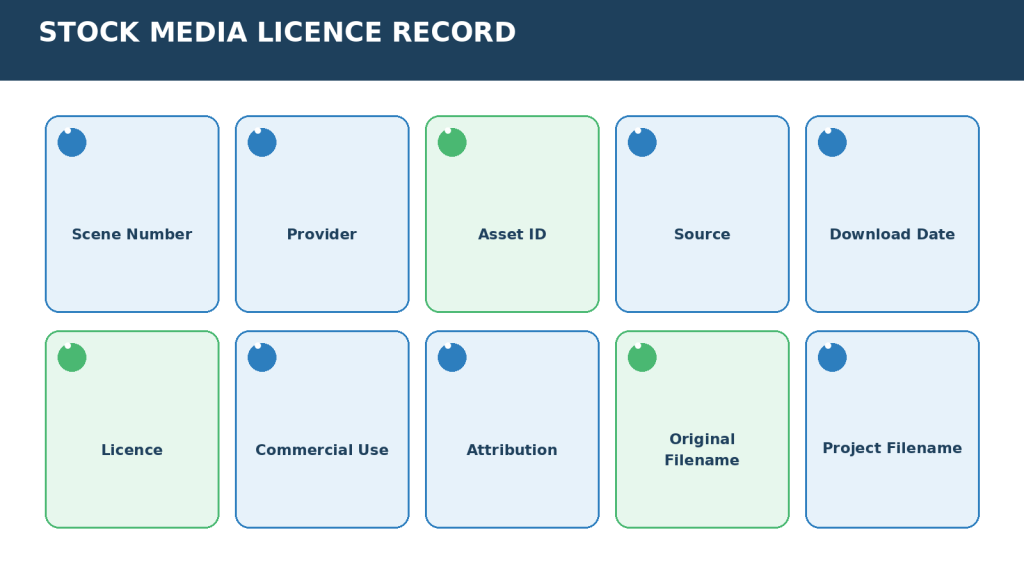
    Create a Licences and Permissions folder inside each project and save licence certificates, receipts, invoices, permission emails, screenshots of terms, source URLs, creator names, asset IDs, original filenames, attribution instructions, AI prompts, original outputs, and release information when relevant.

    Create an asset register with fields such as asset number, description, type, creator or provider, source, licence, commercial use, attribution, date obtained, where used, evidence saved, and notes.

    Use simple asset codes such as IMG-01, VID-01, MUSIC-01, SFX-01, FONT-01, or AI-01. Record where the asset appears in the video so it can be replaced quickly if needed.

    Keep the original source URL and download date. For paid assets, save receipts and order information. For direct permissions, preserve the full written conversation and the exact scope of permission.

    Record attribution when you obtain the asset instead of waiting until upload day. Mark commercial-use status as Yes, No, or Unclear; investigate anything important marked Unclear before publishing.

    For AI-generated material, keep the tool name, model or feature, creation date, prompt, source inputs, original output, edited output, and relevant provider terms.

    Save the final YouTube description because it can contain credits, licence information, affiliate disclosures, sponsorship disclosures, and AI disclosures. Save the final master export and publication details too.

    Back up important records. Protect private permission documents and do not publish personal information merely to prove permission exists.

    Use clear filenames such as music-01-licence.pdf instead of document1.pdf.

    Create a final Copyright and Licence Summary for the project describing original content, licensed content, AI-generated content, attribution, permissions, and unresolved items.

    Beginner Rule: The best time to save copyright information is when you obtain the asset.
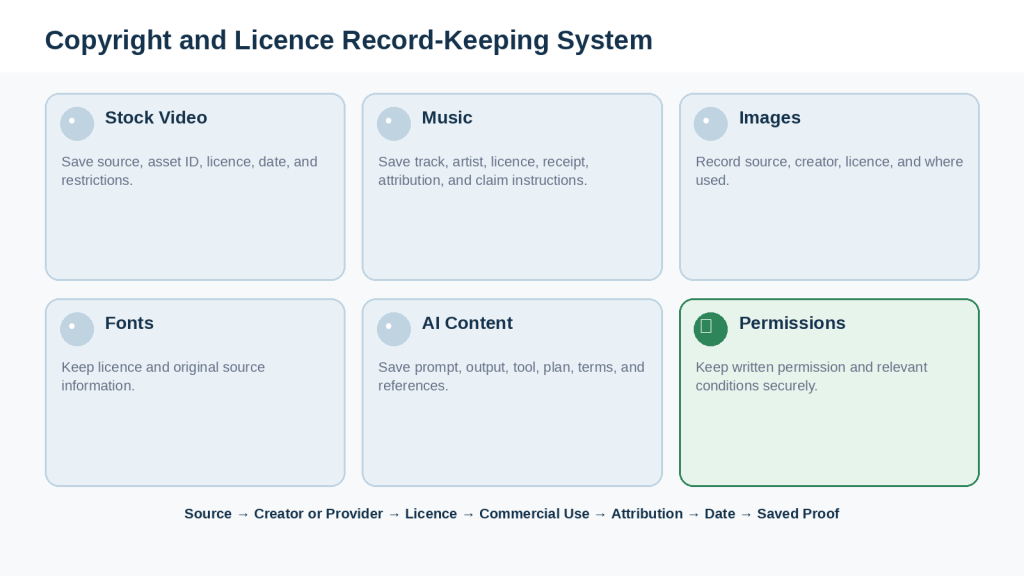
    Figure 12. A simple asset register and organized project folders make copyright and licence information easier to find later.

    Explanation: Record the source, licence, commercial-use rights, attribution requirements, dates, and proof when you obtain an asset. Keeping these records with the final project can help if a licensing or copyright question appears after publication.

    Common Copyright and Licensing Mistakes for AI YouTube Creators

    Copyright problems often begin with simple assumptions. The following mistakes are especially important for beginners.

    Mistake 1: Assuming Anything Found Online Is Free to Use

    Reality: Public access is not permission.

    How to Avoid This Mistake: Find the original source and check the licence, permission, public-domain status, or other legal basis.

    Mistake 2: Thinking Giving Credit Automatically Gives Permission

    Reality: Attribution can be required, but it does not replace permission.

    How to Avoid This Mistake: Check permission first, then give accurate credit.

    Mistake 3: Treating Royalty-Free as Copyright-Free

    Reality: Royalty-free content can still be copyrighted and licensed.

    How to Avoid This Mistake: Read the commercial-use, attribution, modification, and redistribution terms.

    Mistake 4: Assuming a Free Download Allows Commercial Use

    Reality: Price and permission are separate questions.

    How to Avoid This Mistake: Check the exact commercial-use conditions.

    Mistake 5: Using Creative Commons Without Checking the Exact Licence

    Reality: CC BY, CC BY-SA, CC BY-ND, CC BY-NC, CC BY-NC-SA, and CC BY-NC-ND have different permissions.

    How to Avoid This Mistake: Record the full licence name and version.

    Mistake 6: Ignoring Attribution Requirements

    Reality: Required attribution is a licence condition.

    How to Avoid This Mistake: Save the attribution text when you obtain the asset.

    Mistake 7: Assuming Paying for an Asset Means You Own Its Copyright

    Reality: Payment often buys a licence.

    How to Avoid This Mistake: Check what the purchase actually grants.

    Mistake 8: Using Music Purchased for Listening in a Video

    Reality: Listening rights do not automatically include video-use rights.

    How to Avoid This Mistake: Use music specifically licensed for your intended YouTube use.

    Mistake 9: Believing There Is a Safe Five-Second or Ten-Second Rule

    Reality: No universal safe duration exists.

    How to Avoid This Mistake: Use licensed material or evaluate the actual legal basis.

    Mistake 10: Writing “Fair Use” in the Description and Assuming That Solves Copyright

    Reality: A disclaimer does not create an exception.

    How to Avoid This Mistake: Evaluate the real use and applicable law.

    Mistake 11: Assuming Fair Use and Fair Dealing Are the Same

    Reality: They are different legal frameworks.

    How to Avoid This Mistake: Check the law relevant to your situation.

    Mistake 12: Using Another Creator’s Video as Background Footage

    Reality: Public availability does not establish permission.

    How to Avoid This Mistake: Use your own or clearly licensed visuals.

    Mistake 13: Assuming AI Narration Makes Copied Footage Original

    Reality: AI editing does not create a licence.

    How to Avoid This Mistake: Check rights in the underlying footage first.

    Mistake 14: Assuming AI-Generated Content Is Automatically Copyright-Free

    Reality: Tool terms, human authorship, source inputs, commercial rights, and real-person issues can all matter.

    How to Avoid This Mistake: Check provider terms and inputs.

    Mistake 15: Uploading Someone Else’s Image Into an AI Generator Without Checking Permission

    Reality: An upload feature does not grant rights.

    How to Avoid This Mistake: Use your own or appropriately licensed reference material.

    Mistake 16: Cloning a Real Person’s Voice Without Permission

    Reality: Voice cloning can raise consent, privacy, impersonation, and platform issues.

    How to Avoid This Mistake: Use your own voice or a properly licensed voice.

    Mistake 17: Assuming a Stock Website Makes Every Asset Commercially Safe

    Reality: Stock libraries can include different licences and editorial restrictions.

    How to Avoid This Mistake: Check the individual asset.

    Mistake 18: Forgetting Fonts, Icons, and Templates

    Reality: Small design elements can have licences too.

    How to Avoid This Mistake: Include them in your rights review.

    Mistake 19: Redistributing a Licensed Asset as a Standalone File

    Reality: Use inside a finished project and source-file redistribution are different.

    How to Avoid This Mistake: Check redistribution rights.

    Mistake 20: Assuming Commercial Permission Guarantees Monetization

    Reality: Copyright permission and YouTube monetization eligibility are separate.

    How to Avoid This Mistake: Treat licensing as one part of the publishing workflow.

    Mistake 21: Panicking When a Content ID Claim Appears

    Reality: A Content ID claim is not automatically a copyright strike.

    How to Avoid This Mistake: Open the details and check your records.

    Mistake 22: Disputing Every Claim Automatically

    Reality: A dispute should have a genuine basis.

    How to Avoid This Mistake: Verify ownership, permission, licence, or another valid basis first.

    Mistake 23: Treating a Copyright Removal Request Like a Normal Claim

    Reality: A valid removal request can lead to removal and a strike.

    How to Avoid This Mistake: Read the notice carefully.

    Mistake 24: Deleting Licence Records After Publishing

    Reality: Questions can arise later.

    How to Avoid This Mistake: Keep records with the archived project.

    Mistake 25: Trusting AI to Say an Asset Is “Copyright-Safe”

    Reality: AI cannot grant rights owned by somebody else.

    How to Avoid This Mistake: Verify against original sources and licences.

    Mistake 26: Assuming CC0 or Public-Domain Labels Never Need Verification

    Reality: Labels can be applied incorrectly and other rights may exist.

    How to Avoid This Mistake: Verify the source and provenance.

    Mistake 27: Copying Another Creator’s Licence Information

    Reality: Their permission may depend on their own purchase or subscription.

    How to Avoid This Mistake: Obtain and document your own rights.

    Mistake 28: Assuming No Content ID Claim Means No Copyright Problem

    Reality: Content ID does not contain every copyrighted work.

    How to Avoid This Mistake: Complete the licence review before upload.

    Mistake 29: Ignoring Licence Changes

    Reality: Terms, plans, and usage rules can change.

    How to Avoid This Mistake: Recheck on first use, plan changes, update notices, new uses, and periodically.

    Mistake 30: Failing to Keep a Rights Record

    Reality: Old projects are difficult to reconstruct.

    How to Avoid This Mistake: Maintain an asset register.

    Use a better workflow: Where did this asset come from? → Who owns or provides it? → What licence or permission applies? → Does it cover my use? → Is attribution required? → Are privacy, brands, real people, or AI disclosure involved? → Have I saved proof?
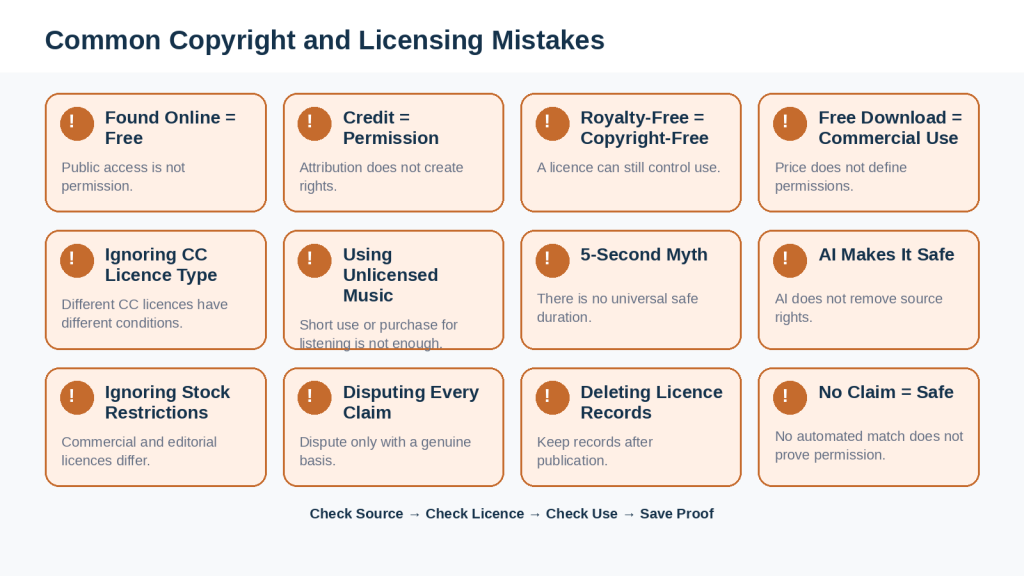
    Figure 13. Many copyright problems begin with assumptions about free content, attribution, short clips, AI generation, licences, and Content ID.

    Explanation: A consistent source-and-licence check is more reliable than guessing. Confirm the rights for each important asset before publication and preserve supporting records with the finished project.

    Benefits of a Careful Copyright and Licensing Workflow

    A careful copyright and licensing workflow may seem like extra work, but it can make YouTube production more organized and easier to manage.

    • Fewer last-minute replacements: Check licences before editing so you do not discover problems after the video is finished.
    • Clearer commercial-use decisions: Distinguish personal, commercial, monetized, client, and redistribution rights.
    • Better attribution: Save credits when you obtain the asset.
    • Better Content ID preparation: Keep licence certificates, receipts, track IDs, and provider instructions.
    • Easier asset replacement: Record where each asset appears in the video.
    • Better project organization: Keep sources, licences, permissions, AI prompts, receipts, and exports together.
    • Safer stock-media use: Check editorial status, releases, attribution, and restrictions.
    • Safer AI use: Record tools, plans, prompts, inputs, outputs, real-person issues, and disclosure.
    • Better protection of your own work: Preserve scripts, narration, editing files, original media, and master exports.
    • Easier collaboration and client work: Make approved assets and restrictions clear.
    • Easier channel audits: Know which videos use licensed music, stock footage, Creative Commons, or AI content.
    • Reduced dependence on memory: Written records are more reliable.
    • Better responses to copyright questions: Check actual evidence instead of guessing.
    • Better understanding of what you own: Separate original work from licensed third-party material.
    • More responsible AI use: Avoid unexplained references, copied characters, and unauthorized voice cloning.
    • Better publishing confidence: Know the source and rights basis for important assets.
    • Easier future updates: Reuse rights can be checked when making Shorts, translations, or new versions.
    • Better decision-making: Prefer assets with clear rights over uncertain sources.
    • A repeatable publishing process: Make copyright checking part of production rather than an emergency task.

    Important Limitation: This workflow reduces avoidable mistakes but cannot guarantee no claims, disputes, legal uncertainty, or platform changes.

    Beginner Rule: Add one more production category to your normal files: Rights Records.
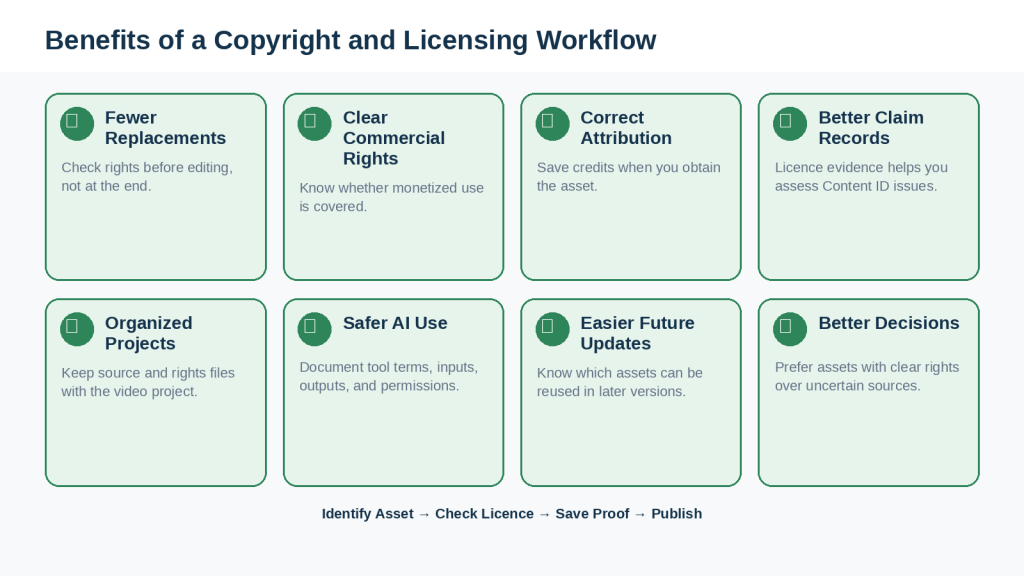
    Figure 14. A consistent copyright and licensing workflow improves organization, attribution, commercial-use checks, record keeping, and future project management.

    Explanation: The purpose of a rights workflow is not to guarantee that no copyright issue will ever occur. It helps creators make better decisions, document permissions, and reduce avoidable mistakes.

    Limitations of Copyright and Licensing Checks

    A careful workflow can reduce avoidable mistakes, but it cannot guarantee that a copyright owner will never object, Content ID will never match your video, licences will never be disputed, or laws and policies will never change.

    Licence Terms Can Be Difficult to Understand

    How to Reduce This Limitation: Start with the provider’s official explanation and FAQ. Contact the provider or get qualified advice when an important commercial use remains unclear.

    Different Providers Use Different Rules

    How to Reduce This Limitation: Check the actual provider and asset instead of applying rules from another service.

    Licence Terms Can Change

    How to Reduce This Limitation: Recheck when first using a service, changing plans, receiving an update notice, beginning a new type of use, or periodically. Save important evidence.

    A Saved Screenshot Does Not Guarantee Your Interpretation

    How to Reduce This Limitation: Save the relevant context, licence name, provider, date, and source page, not only one isolated sentence.

    A Licence May Not Cover Every Right

    How to Reduce This Limitation: Review privacy, trademarks, likeness, impersonation, and platform rules separately when relevant.

    Commercial Use Can Be Difficult to Classify

    How to Reduce This Limitation: If the project may become commercial, choose assets with clear commercial-use permission.

    Content ID Can Still Identify Licensed Material

    How to Reduce This Limitation: Keep licence, receipt, asset ID, and provider instructions.

    Content ID Cannot Decide Every Legal Question

    How to Reduce This Limitation: Treat Content ID as a platform system, not a final legal judgment.

    No Content ID Claim Does Not Prove Safety

    How to Reduce This Limitation: Complete your licence review before upload.

    Rights Holders Can Disagree With Your Interpretation

    How to Reduce This Limitation: Keep detailed records and obtain legal advice when consequences are significant.

    Fair Use Is Not Completely Predictable

    How to Reduce This Limitation: Use original or clearly licensed material when practical.

    Fair Dealing Is Different From U.S. Fair Use

    How to Reduce This Limitation: Use current guidance for the relevant jurisdiction.

    AI Copyright Rules Continue to Develop

    How to Reduce This Limitation: Avoid absolute claims and check current official guidance plus provider terms.

    AI Cannot Verify Every Copyright Status

    How to Reduce This Limitation: Use AI for organization, not as the source of permission.

    Creative Commons Labels Still Need Verification

    How to Reduce This Limitation: Prefer original source pages and record the exact licence.

    Permission Records Can Be Incomplete

    How to Reduce This Limitation: Ask for permission that clearly identifies the asset, use, editing, commercial status, and attribution.

    A Licence Cannot Prevent Every Platform Problem

    How to Reduce This Limitation: Review other YouTube policies separately.

    Records Can Be Lost

    How to Reduce This Limitation: Back up licences, permissions, receipts, source files, and master exports.

    Providers Can Remove Assets

    How to Reduce This Limitation: Save asset IDs, source details, licence evidence, and dates.

    A Licence Check Takes Time

    How to Reduce This Limitation: Build a small set of trusted providers whose systems you understand.

    Legal Advice Can Be Necessary

    How to Reduce This Limitation: Seek qualified professional advice for high-risk disputes, strikes, counter notifications, substantial third-party footage, real-person digital replicas, or significant commercial consequences.

    Important Reality: A copyright workflow is a risk-reduction and documentation system, not a legal guarantee, Content ID guarantee, monetization guarantee, or substitute for professional advice.
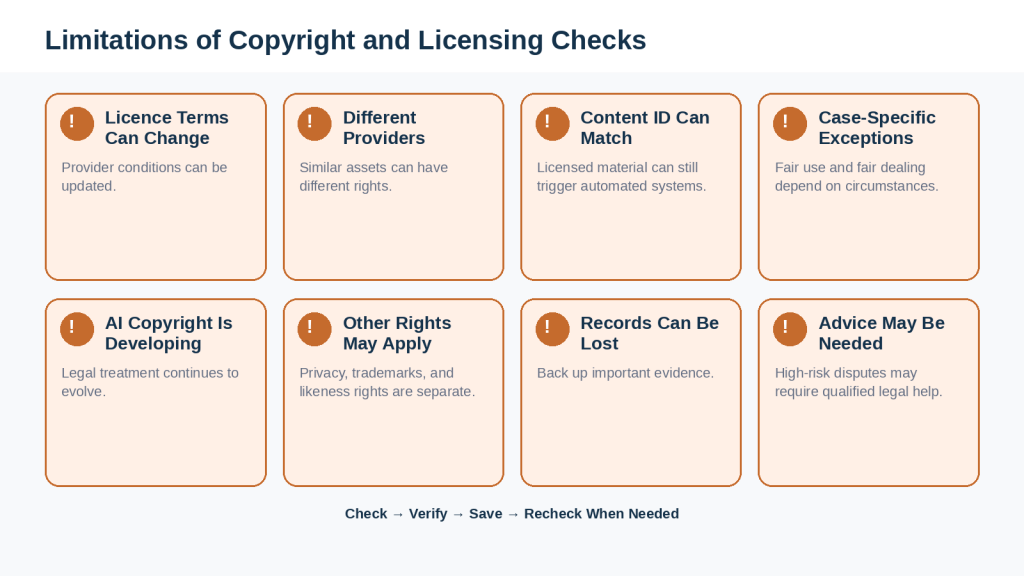
    Figure 15. Copyright and licensing checks reduce uncertainty but cannot guarantee that every legal, platform, or rights-management issue will be avoided.

    Explanation: Licences, laws, platform systems, and AI-related rules can change or involve interpretation. Good records and careful verification improve the workflow, while important unresolved legal questions may require qualified professional advice.

    Myths About Copyright, Licensing, and AI YouTube Videos

    Copyright and licensing are surrounded by myths. Avoid these shortcuts:

    • Myth: If it is online, it is free to use. Reality: Public access is not permission.
    • Myth: If I give credit, I can use anything. Reality: Credit does not create permission.
    • Myth: Royalty-free means copyright-free. Reality: A licence can still control use.
    • Myth: Free download means commercial use. Reality: Price and rights are separate.
    • Myth: Creative Commons means unrestricted. Reality: CC licences have different conditions.
    • Myth: CC0 never needs checking. Reality: Verify source and provenance.
    • Myth: I paid for the asset, so I own it. Reality: You often bought a licence.
    • Myth: I bought the song, so I can put it in my video. Reality: Listening rights are not video-use rights.
    • Myth: Five seconds is always safe. Reality: No universal duration rule exists.
    • Myth: Ten percent is always fair use. Reality: No automatic percentage rule exists.
    • Myth: Educational means automatic fair use. Reality: Purpose alone does not decide the outcome.
    • Myth: Nonprofit means copyright does not apply. Reality: Noncommercial status is not a universal exemption.
    • Myth: Monetization makes fair use impossible. Reality: Commercial character is only one factor in U.S. analysis.
    • Myth: Fair use and fair dealing are the same. Reality: They are different legal frameworks.
    • Myth: A disclaimer protects me. Reality: “No infringement intended” does not create rights.
    • Myth: AI narration makes copied footage mine. Reality: Source rights still matter.
    • Myth: AI-generated means copyright-free. Reality: Provider terms, source inputs, and legal rules matter.
    • Myth: My prompt automatically gives me copyright. Reality: Prompting alone does not settle the legal question.
    • Myth: If an AI tool accepts a reference, I can upload anything. Reality: Technical capability is not permission.
    • Myth: AI disclosure gives me permission. Reality: Disclosure is separate from copyright, likeness, and privacy rights.
    • Myth: Stock means safe for everything. Reality: Commercial, editorial, and other restrictions can differ.
    • Myth: Editorial use means commercial use. Reality: Editorial-only content is generally more restricted.
    • Myth: Fonts do not need licences. Reality: Fonts have licence terms.
    • Myth: If I edit it, the licence disappears. Reality: Editing does not erase source rights.
    • Myth: I can share the source file because I paid for it. Reality: Redistribution may be restricted.
    • Myth: Content ID claim means strike. Reality: They are different.
    • Myth: Content ID claim proves infringement. Reality: A licensed use can still match.
    • Myth: If I have a licence I should dispute every claim. Reality: Confirm the licence actually covers the use.
    • Myth: No Content ID claim means safe. Reality: No automated match does not establish permission.
    • Myth: Someone else used it, so I can too. Reality: Their licence may differ.
    • Myth: AI can tell me whether an asset is legally safe. Reality: AI cannot grant third-party rights.
    • Myth: Once published, I can delete records. Reality: Copyright questions can arise later.

    Use: Source → Rights → Licence or Permission → Commercial Use → Attribution → Other Restrictions → Save Records.
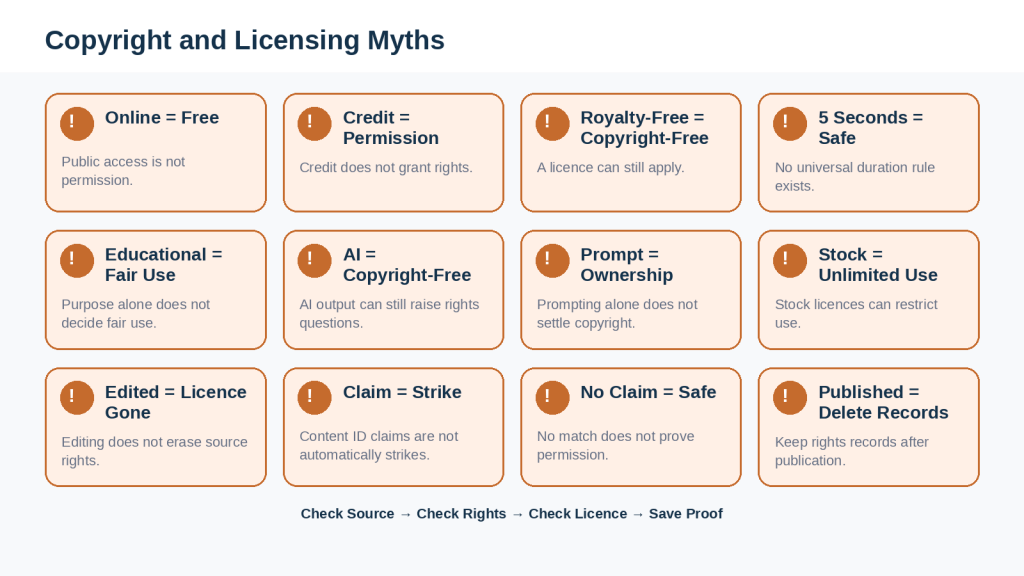
    Figure 16. Copyright myths can lead beginners to make unsafe assumptions about online content, attribution, short clips, AI generation, stock assets, and Content ID.

    Explanation: Simple slogans rarely explain copyright accurately. A source-and-rights check provides a more dependable way to decide whether an asset belongs in a YouTube project.

    Frequently Asked Questions About YouTube Copyright and Licensing for AI Videos

    Can I use any image I find on Google in a YouTube video?

    No. Google Images is a search tool, not a copyright licence. Find the original source and check the licence or permission.

    Is giving credit enough to use copyrighted material?

    No. Credit can be required, but it does not create permission.

    Can I use copyrighted music if I use only five or ten seconds?

    There is no universal five-second or ten-second rule. Use music you created, properly licensed music, or another source that clearly permits the intended use.

    Can I use a song if I bought it?

    Buying a song for listening does not normally grant video-use rights.

    Is royalty-free music completely free from copyright?

    No. Royalty-free music can still be copyrighted and licensed.

    Can I monetize a video containing royalty-free music?

    Possibly, if the licence clearly permits commercial or monetized use.

    Is music from the YouTube Audio Library safe to use?

    It is designed for creator use, but check each track’s information and attribution requirements.

    Does Creative Commons mean I can use an asset however I want?

    No. The exact Creative Commons licence determines commercial use, adaptation, ShareAlike, and attribution requirements.

    Can I monetize Creative Commons content?

    Only when the specific licence permits commercial use and you follow its other conditions.

    What does attribution mean?

    Attribution is required credit to the creator or rights holder. It can include title, author, source, licence, and changes.

    Where should I put attribution on YouTube?

    The description is often a practical place. A Credits and Licences section can keep it organized.

    Can I use a stock photo in a monetized YouTube video?

    Possibly, if the individual stock licence permits commercial YouTube use and the asset is not restricted to editorial use.

    Does buying a stock image mean I own its copyright?

    Usually not. You generally receive a licence.

    Can I edit a stock photo and ignore its licence?

    No. Editing does not automatically remove the licence.

    Can I give a stock image file to someone else?

    Not automatically. Redistribution can be restricted.

    Are free fonts automatically allowed in commercial videos?

    No. Check the font licence.

    Can I use a template I bought for my YouTube thumbnail?

    Only according to the template licence and the licences for included elements.

    Is AI-generated content automatically copyright-free?

    No. Provider terms, source inputs, human authorship, applicable law, and other rights can matter.

    Do I automatically own copyright because I wrote the AI prompt?

    Not necessarily. The legal treatment of AI-assisted works is still developing.

    Can I use an image from the internet as an AI reference image?

    Only when you have an appropriate right to use it that way.

    Can I make an AI image of a famous character for my thumbnail?

    The ability to generate it does not give unrestricted rights to use protected characters. Original visual concepts are usually clearer for ordinary educational content.

    Can I clone a celebrity’s voice with AI?

    Do not assume you can. Consent, privacy, impersonation, likeness rights, and platform rules can all matter.

    Does disclosing AI use give me copyright permission?

    No. Disclosure and permission are separate.

    Can I use clips from another YouTube video if I add commentary?

    Possibly depending on the circumstances and applicable law, but commentary does not automatically grant permission.

    Does adding AI narration make another creator’s footage mine?

    No.

    What is fair use?

    A U.S. legal doctrine that can permit some uses without permission depending on the facts. It is not an automatic licence.

    Is an educational video always fair use?

    No.

    What is fair dealing?

    A Canadian copyright exception for specified purposes under Canadian law. It is not identical to U.S. fair use.

    Does “No Copyright Infringement Intended” protect my video?

    No.

    What is YouTube Content ID?

    An automated rights-management system that compares uploads against reference files supplied by participating rights owners.

    Is a Content ID claim the same as a copyright strike?

    No. They are different processes.

    Should I dispute every Content ID claim?

    No. Dispute only when you have a genuine basis.

    What should I do if licensed music receives a claim?

    Check the track, licence, receipt, asset ID, provider instructions, and whether the licence covers the specific video and channel.

    Does a Content ID claim prove infringement?

    No. It identifies a match; it does not answer every legal question.

    Does having no Content ID claim prove my video is safe?

    No.

    What is a copyright removal request?

    A formal legal process by which a copyright owner or authorized representative asks YouTube to remove allegedly infringing content.

    Can I remove a copyright strike by deleting my video?

    Not necessarily. Follow the specific YouTube notice and available resolution process.

    Should I file a counter notification?

    Only when you genuinely have a valid legal basis and understand the consequences. Seek qualified legal advice when uncertain.

    How long should I keep licence records?

    Keep important rights records for as long as the published project remains relevant to you.

    Do I need to reread every licence before every video?

    No. Check carefully on first use, when using a new asset type, changing plans, receiving updates, changing your use, when something is unclear, and periodically.

    Can AI check all my copyright permissions for me?

    AI can organize information and identify questions, but it should not be treated as the final authority on ownership, licences, permission, fair use, fair dealing, or legal disputes.

    What is the safest beginner approach?

    Create Your Own Material When Practical → Use Trusted Sources → Check the Exact Licence → Confirm Commercial Use → Add Required Attribution → Check AI and Real-Person Issues → Save Proof → Review Before Publishing.

    Key Takeaways

    • Copyright can protect videos, music, photographs, illustrations, scripts, recordings, and other original creative works.
    • Publicly available content is not automatically free to reuse.
    • Copyright ownership and a licence are different.
    • Royalty-free does not mean copyright-free.
    • Free download does not automatically mean commercial use.
    • Creative Commons includes different licences with different conditions.
    • Attribution can be required, but credit does not create permission.
    • Check commercial or monetized use when relevant.
    • Music, sound effects, stock footage, photographs, fonts, templates, icons, and graphics all need appropriate rights checks.
    • Buying a song for listening does not automatically grant video-use rights.
    • There is no universal five-second, ten-second, or percentage rule.
    • AI-generated content is not automatically copyright-free or commercially unrestricted.
    • Check AI-provider terms, source inputs, real-person likenesses, and disclosure requirements.
    • Screenshots and clips from other videos are not automatically free to reuse.
    • Fair use in the United States and fair dealing in Canada are different and neither is automatic permission.
    • Content ID claims are not automatically copyright strikes.
    • Copyright removal requests and strikes are more serious.
    • Keep licences, receipts, permissions, attribution, AI records, source files, master exports, and publication records.
    • Recheck provider terms when first using a service, changing plans or features, receiving updates, starting a new type of use, or periodically.
    • A careful workflow reduces avoidable mistakes but cannot guarantee that no claim or dispute will arise.

    The simplest repeatable workflow is: Identify Asset → Find Original Source → Check Licence or Permission → Check Commercial Use → Check Attribution → Check Other Restrictions → Save Proof → Review Before Publishing.

    For AI-generated assets, add: Check Tool Terms → Check Source Inputs → Review Real People and Protected Material → Add Disclosure When Required.

    For every asset, keep asking: What gives me the right to use this in this particular YouTube video?

    Final Tip

    Do not wait until upload day to think about copyright. The easiest time to check an asset is before you build it into the video.

    When you choose music, footage, an image, a font, a template, or an AI-generated asset, immediately record where it came from, what licence or permission applies, whether commercial use is allowed, whether attribution is required, what other restrictions apply, and where you saved the proof.

    If something is unclear, replace it with an asset whose rights are easier to understand rather than building an important project around an uncertain licence.

    For AI-generated material, also save the tool, prompt, original output, reference material, relevant terms, and edited final version.

    The goal is not to become afraid of copyright. The goal is to develop one repeatable publishing habit: Know the source. Check the rights. Save the proof. Then publish.

    Copyright laws, AI rules, licensing terms, and YouTube procedures can change, so periodically review the official information that applies to the tools and services you use.

    For an important copyright dispute or a legal question you cannot resolve confidently, obtain advice from a qualified professional rather than relying on guesses, slogans, or an AI-generated legal conclusion.

    Continue Learning

    Article 065 is part of the Faceless YouTube Video Creation Series.

    How to Create YouTube Thumbnails, Titles, and Descriptions with AI: Beginner Guide (2026)

    Use it to prepare the title, thumbnail, description, credits, links, chapters, and disclosures that accompany the finished video.

    How to Edit Faceless YouTube Videos and Audio: Beginner Guide (2026)

    Use it to combine voiceover, visuals, music, sound effects, captions, and transitions. Apply licence checks during editing rather than after the project is finished.

    How to Create Visuals for Faceless YouTube Videos with AI Images, Stock Footage, and Screen Recordings: Beginner Guide (2026)

    Use it together with Article 065 when collecting stock footage, AI-generated images, and screenshots.

    How to Create Storyboards and Plan Scenes for Faceless YouTube Videos with AI: Beginner Guide (2026)

    Planning assets early gives you more time to check licences before they are built into the final edit.

    How to Add Voice, Music, and Captions to AI Videos: Beginner Step-by-Step Guide (2026)

    Use it for additional help with voice, music, and captions while applying the licence and permission checks in this guide.

    AI Image Generation for Beginners: Complete Guide (2026)

    Use it to learn the basics of AI image generation while remembering to check provider terms, source inputs, commercial use, and real-person issues.

    Reused Content, AI Disclosure, and Monetization for Faceless Videos: Beginner Guide (2026)

    Use this guide to understand reused content, AI disclosure, originality, and monetization requirements for faceless YouTube videos.

    Recommended learning order: Article 061 → Article 062 → Article 063 → Article 064 → Article 065→ Article 066.

    Article 065 can also be used as a reference during earlier production stages whenever you choose music, stock footage, images, fonts, templates, AI-generated media, third-party clips, or real-person voices or likenesses.

    Sources and References

    Sources reviewed: August 8, 2026

    Official sources were used for changeable YouTube procedures, copyright guidance, Creative Commons licence conditions, AI copyright developments, and Canadian copyright information.

    1. YouTube Help — Copyright on YouTube

    Copyright basics, original works, ownership, ideas versus protected expression.

    2. YouTube Help — Common Copyright Myths

    Credit, purchased content, disclaimers, and editing do not automatically create permission.

    3. YouTube Help — Fair Use on YouTube

    U.S. fair-use factors and the case-specific nature of fair use.

    4. YouTube Help — License Types on YouTube

    YouTube’s Creative Commons Attribution (CC BY) option.

    5. YouTube Help — What Kind of Content Can I Monetize?

    Commercial-use rights for third-party, royalty-free, and Creative Commons content.

    6. YouTube Help — Use Music and Sound Effects from the Audio Library

    Audio Library licensing and attribution guidance.

    7. YouTube Help — How Content ID Works

    Automatic scanning and Content ID matching.

    8. YouTube Help — Learn About Content ID Claims

    Differences between Content ID claims and copyright strikes.

    9. YouTube Help — Dispute a Content ID Claim

    When and how Content ID disputes can be used.

    10. YouTube Help — Submit a Copyright Removal Request

    Formal copyright removal process.

    11. YouTube Help — Understand Copyright Strikes

    Copyright strike process.

    12. YouTube Help — Creator Music

    Creator Music availability and track-specific licensing arrangements.

    13. YouTube Help — Disclosing Use of GenAI Content

    Disclosure requirements for realistic altered or synthetic content.

    14. YouTube Help — Protecting Your Identity

    Privacy and realistic synthetic likeness concerns.

    15. Canadian Intellectual Property Office — A Guide to Copyright

    Canadian copyright basics and protection.

    16. Government of Canada — Consultation on Copyright in the Age of Generative AI

    Canadian consultation findings on AI, authorship, ownership, infringement, and licensing.

    17. U.S. Copyright Office — Copyright and Artificial Intelligence

    Current Copyright Office AI study and reports.

    18. U.S. Copyright Office — Part 2: Copyrightability

    Human authorship and copyrightability of AI-assisted output.

    19. U.S. Copyright Office — Fair Use Index

    U.S. fair-use framework.

    20. U.S. Copyright Office — Fair Use FAQ

    No fixed amount or percentage automatically qualifies as fair use.

    21. Creative Commons — About CC Licences

    The six principal Creative Commons licences and their conditions.

    22. Creative Commons — Recommended Practices for Attribution

    TASL attribution guidance.

    23. Creative Commons — CC0 1.0 Universal

    CC0 public-domain dedication.

    24. WIPO — IP Assignment and Licensing

    General distinction between ownership and licensing.

    Important Policy and Legal Note: Copyright laws differ between countries, and the treatment of AI-generated or AI-assisted works continues to develop. YouTube features, copyright procedures, music programs, AI-disclosure settings, and other platform policies can also change.

    Readers do not need to reread every policy before every publication. Recheck official information when first using a tool or provider, changing plans or features, receiving an important policy or licence update, beginning a new type of commercial use, when a specific condition is unclear, and periodically.

    This article provides general educational information. It is not legal advice. Copyright, licensing, fair use, fair dealing, privacy, personality rights, trademarks, contracts, and related issues can depend on the facts and jurisdiction. For an important dispute or commercially significant legal question, consult a qualified professional.
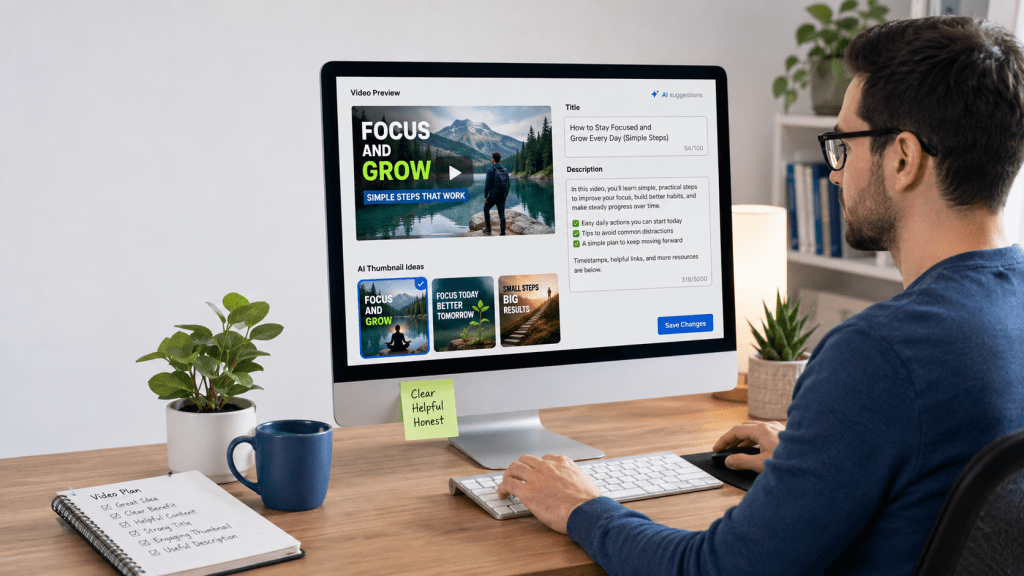
  • How to Create YouTube Thumbnails, Titles, and Descriptions with AI (2026)

    How to Create YouTube Thumbnails, Titles, and Descriptions with AI (2026)

    Estimated reading time: 20 minutes

    Last updated: August 8, 2026

    AI can help beginners brainstorm and improve YouTube thumbnails, titles, and descriptions while the creator reviews the final result for clarity and accuracy.

    Introduction

    Finishing a faceless YouTube video is not the end of the publishing process. Before viewers discover the video, you still need three important publishing elements: a thumbnail, a title, and a description.

    • A thumbnail is the image viewers see before opening the video.
    • A title tells viewers what the video is about.
    • A description gives additional information, useful links, credits, disclosures, and other details.

    AI tools can help you brainstorm, draft, compare, and improve these elements. They can suggest thumbnail concepts, short thumbnail text, title options, description structures, chapter names, and proofreading improvements. However, AI should not be used to invent results, links, credits, or claims.

    A strong thumbnail and title should attract attention without misleading the viewer. A clear description should accurately explain the video and include important information such as relevant links, sources, credits, licence information when needed, chapters when useful, and disclosures when appropriate.

    The goal is not to create the most dramatic thumbnail or sensational title. The goal is to create a clear and trustworthy presentation that helps the right viewer understand why the video may be useful.

    Before Learning

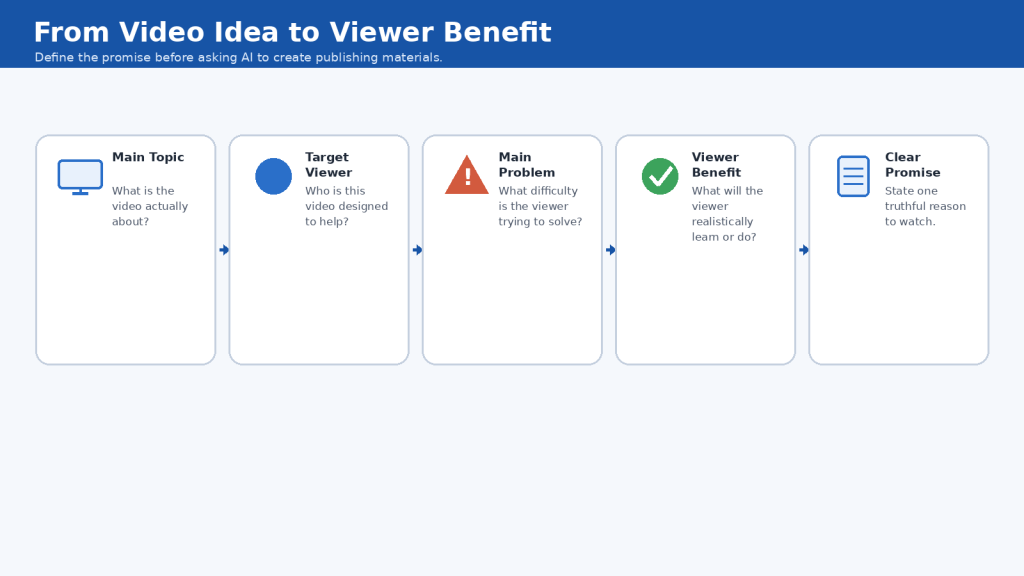
    Before creating a final thumbnail, title, or description with AI, make sure the video itself is mostly finished. You should already know what the video is about, who it is for, the main problem it solves, the most important benefit, the main sections, and whether credits or disclosures may be needed.

    Finish the Main Video First

    • Script
    • Voiceover
    • Visuals
    • Editing
    • Captions
    • Final review
    • Export

    You can brainstorm title and thumbnail ideas earlier, but final versions should match the finished video. If the final edit changes, the publishing materials may need to change as well.

    Identify the Main Viewer Benefit

    Ask: What will the viewer understand, learn, or accomplish after watching? A realistic benefit is stronger than a guarantee. For example: Learn a simple workflow for arranging visuals, improving narration, adding music and captions, reviewing the finished project, and exporting it.

    Write a One-Sentence Video Summary

    Write one simple sentence that accurately explains the finished video. This gives AI useful context and reduces the chance that it will invent topics or benefits that are not actually present.

    Gather Information for the Description

    • Main video summary
    • Relevant website and related-video links
    • Sources
    • Music or stock-media credits
    • Affiliate or sponsorship disclosures when applicable
    • AI-related disclosure information when applicable
    • Chapters or timestamps when useful

    Do not invent credits, licences, links, or disclosures. Use the actual information from your project records.

    Do Not Start With Clickbait

    A better starting question is: What is the clearest truthful reason someone would want to watch this video? That question produces a stronger foundation for AI-assisted brainstorming.

    What You’ll Learn

    By the end of this guide, you should understand how to create a complete YouTube publishing package for a faceless video using AI as an assistant.

    • Understand the different jobs of the thumbnail, title, and description
    • Identify the main idea and viewer benefit before using AI
    • Create simple thumbnail concepts that remain readable on small screens
    • Generate and compare title options
    • Avoid exaggerated or misleading wording
    • Write a beginner-friendly description
    • Add useful links, credits, disclosures, and chapters
    • Review AI-generated thumbnails for visual errors and misleading implications
    • Protect privacy and check permissions and licences
    • Keep the thumbnail, title, description, and actual video consistent
    • Perform a final quality check before publishing

    The basic workflow is: Understand the Video -> Define the Viewer Benefit -> Create Thumbnail Ideas -> Draft Titles -> Write the Description -> Add Credits and Disclosures -> Review Everything -> Publish.

    What Makes a Good YouTube Thumbnail, Title, and Description

    A YouTube thumbnail, title, and description should work together. Each has a different job, but all three should describe the same video accurately.

    The Thumbnail Should Attract Attention Clearly

    • Easy to understand at a glance
    • Readable on a small screen
    • One clear visual idea
    • Strong contrast
    • Minimal clutter
    • Accurate to the actual video
    • No misleading visual claims

    The thumbnail does not need to explain the entire lesson. Its job is to communicate the main idea quickly.

    Keep Thumbnail Text Short

    Instead of placing the full title in the thumbnail, use a short phrase such as “Create Better Thumbnails” or “Edit Faceless Videos.” The full explanation can appear in the title.

    The Title Should Explain the Video Clearly

    A good beginner-friendly title is usually clear, specific, accurate, and easy to understand. Avoid promises that the video cannot support, such as guaranteed success or instant results.

    The Description Should Add Useful Information

    The description can explain what the video covers, who it is for, related resources, chapters, credits, sources, and disclosures. It should add context rather than simply repeat the title.

    Maintain Consistency Across All Three Elements

    If the thumbnail says “5 AI Editing Tools,” the video should actually cover five AI editing tools. If the description promises a specific tutorial step, the video should provide it.

    Use AI for Options, Not Automatic Final Decisions

    1. Ask AI for several ideas.

    2. Remove inaccurate or exaggerated options.

    3. Choose the clearest candidates.

    4. Compare them with the finished video.

    5. Rewrite where necessary.

    6. Perform a final human review.

    How to Identify the Main Video Idea and Viewer Benefit

    Before asking AI to create titles, thumbnail ideas, or a description, define the main idea in simple language.

    Start With the Main Topic

    Write one short sentence describing the video topic.

    Identify the Main Viewer

    Decide who the video is designed for. For AI Mastery, this is often a complete beginner who wants practical, step-by-step guidance.

    Identify the Main Problem

    Ask what difficulty the viewer is trying to solve.

    Identify the Main Benefit

    Ask what the viewer will realistically be able to understand or do after watching.

    Separate Topic From Benefit

    The topic describes what the video covers. The benefit describes what the viewer gains. A title may emphasize the topic while short thumbnail text emphasizes the benefit.

    Create a Simple Video Brief for AI

    • Video topic
    • Audience
    • Main problem
    • Main benefit
    • Style
    • Words or claims to avoid

    Example AI Prompt

    Generate 10 clear YouTube title ideas for a beginner video about [topic]. The audience is complete beginners. Keep the titles accurate, simple, and useful. Avoid hype, guarantees, exaggerated claims, fake urgency, and clickbait.

    Keep the Promise Realistic

    If the video is an introduction, do not call it an advanced masterclass. If it teaches one method, do not claim it covers every method.

    Figure 1. Start with the video topic, identify the viewer and problem, then define the realistic benefit before creating the title, thumbnail, or description.

    Explanation: A clear viewer benefit gives AI better context and helps keep all publishing elements accurate and consistent with the finished video.

    How to Create YouTube Thumbnail Ideas with AI

    AI can be useful for brainstorming thumbnail concepts before you design the final image. Give it enough context to suggest ideas that accurately represent the finished video.

    Ask for Concepts Before Generating the Image

    Ask for several thumbnail concepts first. Request one main visual idea and only a few words of thumbnail text. This makes it easier to compare meaningful alternatives before spending time on final design.

    Choose One Main Idea

    A thumbnail should normally communicate one dominant idea quickly, such as a video-editing timeline, a beginner at a computer, or separate assets becoming one finished video.

    Create Clearly Different Concepts

    • Workspace concept – beginner at a computer
    • Timeline concept – close-up of clips, narration, music, and captions
    • Before-and-after concept – separate files becoming a finished video
    • Simple workflow concept – a few large symbols combining into one result

    Keep Thumbnail Text Very Short

    • Create Better Thumbnails
    • Edit Faceless Videos
    • From Clips to Video
    • Better Thumbnails with AI

    Design for Small Screens

    • Use one main subject
    • Use large readable text
    • Keep text short
    • Use strong contrast
    • Leave generous spacing
    • Avoid tiny interface details
    • Keep important elements away from the edges

    Use AI-Generated People Carefully

    Do not imitate a real person without permission or create a false endorsement. Generic illustrative people are safer when they are not presented as a real expert or celebrity.

    Check AI-Generated Screens

    AI image generators can create convincing but inaccurate interfaces. For educational thumbnails, use a generic representation rather than pretending an AI-generated interface is an exact screenshot of real software.

    Do Not Use Fake Results

    Avoid fake earnings, fabricated analytics, invented subscriber counts, false before-and-after comparisons, or anything else that implies results the video does not demonstrate.

    Current YouTube Thumbnail Guidance

    Current YouTube Help guidance recommends 3840 x 2160 pixels, a minimum width of 640 pixels, common formats such as JPG or PNG, and a 16:9 aspect ratio for custom thumbnails. Technical recommendations can change, so check official Help if an upload fails or your workflow changes.

    YouTube Can Test Different Thumbnails and Titles

    Eligible creators can currently compare up to three different titles, thumbnails, or title-and-thumbnail combinations in YouTube Studio. Beginners can still compare two or three strong concepts manually.

    Figure 2. Start with several thumbnail concepts, choose one clear idea, then review the finished design at a small size before publishing.

    Explanation: AI can speed up thumbnail brainstorming, but the creator should choose the concept that best represents the actual video and check that the final design remains clear, readable, accurate, and non-misleading.

    How to Write YouTube Titles with AI

    AI can generate title ideas quickly, but the goal is not to choose the most dramatic option. The best title is clear, accurate, specific, and relevant to the finished video.

    Give AI Enough Context

    Provide the topic, audience, main problem, viewer benefit, important subjects, preferred tone, and claims to avoid.

    Ask for Different Title Styles

    • Straightforward
    • Step-by-step
    • Benefit-focused
    • Question-based
    • Workflow-focused

    Keep the Main Topic Clear

    For beginner educational content, clarity is usually more useful than vague curiosity. The viewer should not have to guess what the video covers.

    Put Important Words Reasonably Early

    YouTube currently allows video titles up to 100 characters. You do not need to use the full limit. Important topic words should appear reasonably early because longer titles may be shortened in some interfaces.

    Do Not Stuff the Title With Keywords

    Use one or two important topic phrases naturally. Repeating similar keywords makes titles awkward and less readable.

    Use the Year When Freshness Matters

    Adding a year can be useful for AI tools, software features, or platform policies. Do not update the year without reviewing the actual content for accuracy.

    Avoid Unsupported Superlatives and Fake Urgency

    • Best
    • Ultimate
    • Perfect
    • Guaranteed
    • Fastest
    • Watch Before It Is Too Late
    • Secret Method Nobody Knows

    Use strong claims only when you can reasonably support them.

    Do Not Invent Results

    Never let AI invent earnings, subscriber counts, view counts, time savings, success rates, or test results.

    Compare AI Suggestions Manually

    • Is the topic immediately clear?
    • Does it match the finished video?
    • Is the benefit realistic?
    • Is anything exaggerated?
    • Does it work with the thumbnail?
    • Would a complete beginner understand it?

    Example Reusable Prompt

    Generate 10 YouTube title options for this video. Keep each title clear, accurate, natural, and within the current 100-character limit. Put the main topic reasonably early. Avoid clickbait, guarantees, unsupported superlatives, fake urgency, invented numbers, and misleading claims.

    Figure 3. AI can generate and compare title ideas, but the final title should remain clear, accurate, natural, and consistent with the actual video.

    Explanation: Use AI to create options rather than to make the final decision automatically. Checking each title against the finished video helps prevent exaggeration, keyword stuffing, invented claims, and misleading promises.

    How to Write a YouTube Description with AI

    A YouTube description gives viewers more information about the video and can help YouTube understand the topic. Current YouTube guidance allows up to 5,000 characters and recommends unique descriptions for individual videos.

    Start With a Clear Video Summary

    Use the first one or two sentences to explain what the viewer will learn. Avoid beginning with long promotional messages, unrelated links, or repeated keywords.

    Give AI the Finished Video Information

    Provide the title, audience, main topic, viewer benefit, important sections, related resources, credits, disclosures, and preferred writing style. Tell AI not to invent links, credits, licences, timestamps, or claims.

    Use Main Topic Terms Naturally

    Identify one or two main phrases that describe the video and use them naturally in the title and description instead of repeating them mechanically.

    Make Every Video Description Unique

    You can reuse a small standard footer, but the opening summary and main topic section should describe that specific video.

    Organize the Description Into Useful Sections

    • About This Video
    • What You Will Learn
    • Chapters
    • Continue Learning
    • Sources and Credits
    • Disclosure

    You do not need every section for every video. Use only what helps the viewer.

    Add Related Links Carefully

    Check every link before publishing and never allow AI to invent a URL.

    Add Chapters When They Help

    Use verified timestamps from the finished video. AI can shorten chapter names but should not guess real timing.

    Add Credits When Required

    Use the actual attribution wording from the applicable licence or permission record.

    Add Disclosure Information When Necessary

    Depending on the video, you may need affiliate, sponsorship, paid-promotion, or AI-related disclosure. A sentence in the description does not replace YouTube built-in settings when those settings are required.

    Final Description Check

    • First lines explain the video clearly
    • Description matches the finished video
    • Important terms appear naturally
    • Links are correct
    • Chapter timestamps are accurate
    • Credits are complete
    • Required disclosures are handled
    • No invented claims remain
    • Spelling and grammar are checke
    • Private information is not included

    Figure 4. AI can help draft and organize a YouTube description, but links, chapters, credits, disclosures, and factual details should be verified before publication.

    Explanation: A useful description starts with a clear summary, adds relevant information in an organized way, and avoids invented details. Human review is especially important for links, timestamps, licensing credits, and disclosures.

    How to Create YouTube Chapters and Timestamps with AI Assistance

    YouTube chapters divide a longer video into clearly labelled sections and can help viewers find specific topics or return to an important step.

    Current Manual Chapter Requirements

    • First timestamp starts at 00:00
    • At least three timestamps
    • Timestamps listed in ascending order
    • Each chapter at least 10 seconds long

    Create Timestamps From the Finished Video

    Editing changes timing, so create or verify chapters using the final exported video rather than the script alone.

    Simple Manual Method

    1. Open the final exported video.

    2. Start at 00:00.

    3. Write down the time when each major section begins.

    4. Give each section a short descriptive name.

    5. Continue until the end.

    6. Review every timestamp again.

    Let AI Help Shorten Chapter Names

    AI can turn long headings into shorter labels while preserving meaning.

    Do Not Ask AI to Guess Timestamps

    AI does not know exact pause lengths, scene timing, transitions, or editing changes unless you give it reliable timing information.

    Add Chapters in YouTube Studio

    1. Sign in to YouTube Studio.

    2. Select Content.

    3. Select the video.

    4. Add the timestamps and titles in the Description.

    5. Save.

    Review Every Chapter After Publishing

    Open each chapter and confirm that it starts at the intended point and accurately describes the section.

    Figure 5. Create chapter times from the finished video, use AI only to help organize or shorten the labels, then test every chapter after adding it to YouTube.

    Explanation: AI can assist with chapter wording, but accurate timestamps must come from the final video. Current manual chapter rules require 00:00 first, at least three timestamps in order, and chapters at least 10 seconds long.

    How to Add Links, Credits, and Disclosures to the Description

    A YouTube description can include website links, related resources, source links, credits, affiliate relationships, sponsorship information, and AI-related disclosure information.

    Add Only Useful Links

    Include links that genuinely help the viewer, such as your website, related tutorials, playlists, official sources, or resources mentioned in the video.

    Check Every Link Before Publishing

    1. Open the link.

    2. Confirm the destination.

    3. Check that the page still exists.

    4. Confirm you copied the complete address.

    5. Make sure it does not lead somewhere unexpected.

    Follow YouTube External Links Policy

    Current YouTube policy applies to clickable URLs and other ways creators direct viewers off the platform. Check every destination before publishing.

    Be Careful With Affiliate Links

    If you may receive a commission from a qualifying action, make the relationship clear when required and follow applicable rules. This article provides general education, not legal advice.

    Use YouTube Paid-Promotion Setting When Required

    Current YouTube guidance requires creators to select the paid-promotion setting when a video includes qualifying paid product placements, sponsorships, endorsements, or similar commercial relationships.

    Add Credits When a Licence Requires Them

    Attribution can require a creator name, asset title, source, licence name, licence link, or other wording. Use the actual licence record, not AI guesses.

    Do Not Confuse Credit With Permission

    Writing “credit to the original creator” does not automatically give permission to use someone else’s work.

    Add AI Disclosure When Appropriate

    Current YouTube guidance provides an AI use setting for qualifying realistic AI-generated or meaningfully altered content. A description note can add context but does not replace the built-in setting when required.

    Preserve Your Records

    • Final description
    • Links
    • Credits
    • Affiliate disclosure
    • Sponsorship disclosure
    • AI disclosure
    • Licence records
    • Permission records

    Final Links, Credits, and Disclosure Check

    • Every link opened and checked
    • No AI-generated URL accepted without verification
    • Affiliate relationships disclosed appropriately
    • Paid promotions use the applicable platform setting
    • Required licence credits complete
    • Credit not confused with permission
    • AI disclosure considered based on the finished content
    • Real people, voices, and likenesses used responsibly
    • Important records saved

    Figure 6. Verify links, follow licence requirements, disclose relevant commercial relationships, and review whether the finished video requires YouTube’s AI-content disclosure setting.

    Explanation: Links, credits, and disclosures should be based on real project information rather than AI guesses. Keeping accurate records makes the description easier to maintain.

    How to Make Thumbnails Accessible and Easy to Read

    A thumbnail should remain understandable even when it appears very small. Good design helps viewers recognize the topic without struggling with tiny text or clutter.

    Use Large, Simple Text

    Use large lettering, short phrases, simple fonts, and generous spacing. The full explanation belongs in the title.

    Use Strong Contrast

    Text should stand out clearly from the background. Avoid placing text over a busy area where it disappears into the image.

    Do Not Rely on Colour Alone

    Use labels, check marks, warning symbols, or other cues so meaning is not communicated only by colour.

    Keep Important Elements Large

    Make the main person, object, screen, or concept large enough to recognize immediately.

    Avoid Tiny Screenshots

    A full software interface often becomes unreadable at thumbnail size. Use a simplified interface or zoom into the important area.

    Check AI-Generated Hands, Faces, and Objects

    Inspect hands, fingers, faces, eyes, computer screens, keyboards, and repeated objects for distortions.

    Avoid Unreadable AI-Generated Text

    When practical, generate the main visual first and add final thumbnail text separately using a design or image-editing tool.

    Test at Small Size and on More Than One Device

    Shrink the image significantly and, when practical, preview it on desktop, phone, and tablet.

    Thumbnail Accessibility Checklist

    • Main idea is obvious
    • Text is large and short
    • Contrast is strong
    • Meaning does not rely only on colour
    • Main subject is recognizable
    • Design is not cluttered
    • Text stays away from edges
    • AI-generated text and objects are checked
    • Thumbnail remains clear at small size
    • Thumbnail matches the actual video

    Figure 7. An accessible thumbnail uses large text, strong contrast, one clear visual focus, and enough spacing to remain understandable on smaller screens.

    Explanation: Thumbnail accessibility is mainly about clarity. A simple design that remains readable and recognizable at small size helps more viewers understand the video’s topic before clicking.

    How to Review AI-Generated Thumbnails for Accuracy and Safety

    AI-generated thumbnails can look polished while containing incorrect text, distorted objects, fake interface elements, invented statistics, misleading scenes, or unauthorized use of a real person’s likeness.

    Check Whether the Thumbnail Matches the Video

    Ask whether the thumbnail represents something the viewer will actually see or learn in the video.

    Check AI-Generated Text

    Zoom in and inspect every visible word. Add important text separately when possible.

    Inspect Hands, Faces, and Objects

    Look for extra or missing fingers, duplicated objects, distorted equipment, impossible shapes, or strange facial details.

    Check Screens and Software Interfaces

    AI-generated interfaces may contain invented buttons and nonsense text. Generic representations are safer than pretending they are exact screenshots.

    Check Numbers and Statistics

    Never trust generated money, views, subscribers, percentages, dates, or rankings without verification.

    Avoid Fake Earnings and Results

    Do not use fictional analytics or performance figures as genuine evidence.

    Check Real People Carefully

    Do not create the false impression that a real person appears, endorses, supports, or participates when they do not.

    Disclosure Does Not Replace Permission

    AI disclosure does not automatically make misleading impersonation or unauthorized use acceptable.

    Check Realistic AI Scenes

    A realistic synthetic image is not proof that an event occurred. If viewers could mistake it for reality, review current disclosure requirements and make the illustrative nature clear when appropriate.

    Check Private Information

    Inspect real screenshots and photographs for email addresses, account names, messages, notifications, file names, payment details, and other private information.

    AI Thumbnail Review Checklist

    • Thumbnail matches the actual video
    • Main claim is accurate
    • Visible text is checked
    • Numbers are genuine and verified
    • Hands, faces, and important objects are not distorted
    • Screens do not falsely represent a real interface
    • No fake earnings or analytics presented as genuine
    • No real person falsely shown as participating or endorsing
    • Private information removed
    • Realistic AI scenes not presented as proof of an event
    • Disclosure considered where applicable
    • Thumbnail and title make the same truthful promise

    Figure 8. AI-generated thumbnails should be checked for accuracy, visual errors, misleading claims, privacy problems, real-person implications, and appropriate disclosure before publication.

    Explanation: A polished AI thumbnail can still contain factual or visual problems. A final human review helps ensure that the image accurately represents the video and does not mislead viewers.

    How to Compare and Choose the Best Thumbnail and Title Combination

    A thumbnail and title should be judged together. The best combination should make one clear, accurate promise about the video.

    Start With Three Strong Options

    Reduce brainstorming results to a small shortlist of clearly different thumbnail-title pairs.

    Compare Clarity First

    Ask whether a complete beginner can understand the subject without solving a puzzle.

    Check Repetition

    The thumbnail and title should complement each other without repeating the entire same phrase.

    Check the Promise

    Ask what a viewer would reasonably expect, then compare that expectation with the finished video.

    Remove Exaggeration

    Reject combinations based on guaranteed results, fake urgency, unsupported superlatives, invented statistics, false earnings, unrelated famous people, or results the video does not demonstrate.

    Compare Visual Balance and Mobile Readability

    Make sure the thumbnail has one clear focus and the title explains what the image cannot. Check that important title words appear early enough and thumbnail text remains legible at small size.

    Use a Simple Scoring Method

    • Clarity
    • Accuracy
    • Beginner friendliness
    • Thumbnail readability
    • Title readability
    • Consistency
    • Viewer benefit

    Keep Alternative Versions

    Save other strong options with descriptive filenames so they can be tested or restored later.

    Final Combination Checklist

    • Video topic is clear
    • Thumbnail and title support the same promise
    • Thumbnail does not repeat the full title
    • Wording is accurate
    • Benefit is realistic
    • No fake statistics or guarantees
    • Thumbnail readable at small size
    • Title understandable to beginners
    • Final choice matches the actual video

    Figure 9. Compare thumbnail and title options together for clarity, accuracy, readability, and consistency with the finished video before choosing the final combination.

    Explanation: The strongest combination is not necessarily the most dramatic one. For beginner educational content, a clear and truthful thumbnail-title pair gives viewers a better understanding of what the video actually offers.

    How to Use AI to Improve Thumbnails, Titles, and Descriptions Without Losing Accuracy

    AI can help refine publishing elements after you create a first draft. The important rule is to improve wording without changing the facts.

    Give AI the Original Meaning

    Tell AI what must remain unchanged, such as topic, audience, number of steps, year, names, dates, links, and factual meaning.

    Ask for Improvement, Not Reinvention

    Request shorter or clearer versions without adding new claims or benefits.

    Protect Numbers and Specific Details

    Tell AI to preserve all numbers exactly, then verify them manually.

    Protect Names and Technical Terms

    Do not let rewriting change product names, tool names, feature names, file formats, dates, or website names.

    Improve Thumbnail Text Carefully

    Ask for short alternatives with the same meaning and no hype.

    Do Not Let AI Add Clickbait Automatically

    Instead of “make this more exciting,” ask for wording that is more engaging while remaining factual, specific, beginner-friendly, and non-clickbait.

    Tell AI Not to Alter Links

    Preserve every URL exactly as written, then open and verify the final links yourself.

    Protect Credits and Disclosures

    Do not creatively rewrite attribution or disclosure wording that must remain exact under a licence, contract, platform rule, or law.

    Use a Controlled Revision Workflow

    1. Start with the approved original.

    2. Give AI clear revision boundaries.

    3. Generate several alternatives.

    4. Compare them with the original.

    5. Check every factual detail.

    6. Choose or manually combine the best wording.

    7. Proofread again.

    8. Save the final approved version.

    Final Accuracy Check

    • Meaning has not changed
    • No new claim added
    • No number changed
    • Dates and names remain correct
    • Links remain unchanged
    • Credits remain accurate
    • Required disclosures remain intact
    • No unsupported superlative introduced
    • Wording still matches the finished video
    • Result remains clear for beginners

    Figure 10. Use AI to improve clarity and readability while protecting facts, numbers, names, links, credits, and disclosures from accidental changes.

    Explanation: AI-assisted rewriting is most reliable when you define what may change and what must remain untouched. A final comparison with the original helps catch factual changes before publication.

    Common Mistakes When Creating YouTube Thumbnails, Titles, and Descriptions with AI

    Mistake 1: Accepting the First AI Suggestion

    Reality: AI brainstorming works better when you compare several options.

    How to Avoid This Mistake: Ask for multiple clearly different ideas and choose the option that best matches the finished video.

    Mistake 2: Asking AI to Make Everything More Clickable

    Reality: Engagement prompts can push AI toward hype and fake urgency.

    How to Avoid This Mistake: Ask for clear and engaging wording without guarantees, exaggerated claims, or misleading clickbait.

    Mistake 3: Making the Thumbnail Too Crowded

    Reality: Too many objects compete for attention.

    How to Avoid This Mistake: Choose one main visual idea and one short supporting phrase.

    Mistake 4: Using Too Much Thumbnail Text

    Reality: Long text becomes unreadable at small size.

    How to Avoid This Mistake: Keep thumbnail wording short and let the title provide detail.

    Mistake 5: Repeating the Exact Same Words in Thumbnail and Title

    Reality: Repeating everything wastes space.

    How to Avoid This Mistake: Let the thumbnail create quick recognition and the title explain the full topic.

    Mistake 6: Letting AI Invent Numbers

    Reality: Numbers are factual claims.

    How to Avoid This Mistake: Preserve verified numbers exactly and remove numbers AI invented.

    Mistake 7: Using Fake Earnings, Views, or Subscriber Counts

    Reality: Invented performance figures can mislead viewers.

    How to Avoid This Mistake: Use only genuine, relevant, verified figures.

    Mistake 8: Using a Misleading Thumbnail

    Reality: A thumbnail should not promise something absent from the video.

    How to Avoid This Mistake: Compare it with the finished video before publishing.

    Mistake 9: Using AI-Generated Text Without Checking It

    Reality: Generated image text can be misspelled or nonsensical.

    How to Avoid This Mistake: Proofread all text and add important wording separately when practical.

    Mistake 10: Using a Real Person’s Likeness to Attract Clicks

    Reality: A recognizable person can imply participation or endorsement.

    How to Avoid This Mistake: Use permission and avoid false endorsements or impersonation.

    Mistake 11: Assuming AI Disclosure Makes Everything Acceptable

    Reality: Disclosure does not remove other responsibilities.

    How to Avoid This Mistake: Review permission, impersonation, accuracy, privacy, and platform rules separately.

    Mistake 12: Letting AI Invent Links or Credits

    Reality: AI can generate plausible but false URLs and licence details.

    How to Avoid This Mistake: Insert verified links, licence terms, and credits yourself.

    Mistake 13: Allowing AI to Guess Chapter Timestamps

    Reality: Scripts do not provide exact final timing.

    How to Avoid This Mistake: Record chapter times from the finished export.

    Mistake 14: Writing a Description Full of Repeated Keywords

    Reality: Keyword repetition is difficult to read.

    How to Avoid This Mistake: Use important phrases naturally in complete sentences.

    Mistake 15: Copying the Same Description to Every Video

    Reality: Different videos teach different things.

    How to Avoid This Mistake: Write a unique opening summary and topic section for every video.

    Mistake 16: Making Unsupported Claims

    Reality: Words such as best, fastest, professional, or guaranteed require support.

    How to Avoid This Mistake: Remove strong claims unless you can accurately support them.

    Mistake 17: Forgetting the Final Combined Review

    Reality: Each element can be acceptable alone but inconsistent together.

    How to Avoid This Mistake: Review thumbnail, title, description, and finished video as one package.

    Figure 11. Most AI-assisted YouTube publishing mistakes come from accepting generated content without checking accuracy, readability, permissions, links, claims, and consistency with the finished video.

    Explanation: AI can speed up brainstorming and drafting, but thumbnails, titles, descriptions, credits, and disclosures still require human review before publication.

    Benefits of Using AI for YouTube Thumbnails, Titles, and Descriptions

    AI can make the publishing stage faster and easier, especially when you are working alone and need help moving from a blank page to several useful options.

    Faster Brainstorming

    Generate thumbnail concepts, short phrases, title styles, description structures, and chapter-name ideas quickly.

    More Title Options

    Compare straightforward, step-by-step, benefit-focused, question-based, and shorter versions.

    Easier Simplification

    Turn technical language into clearer beginner-friendly wording.

    Better Organization

    Organize summaries, chapters, related links, sources, credits, and disclosures.

    Faster Rewriting and Proofreading

    Shorten titles, remove repetition, improve wording, and check spelling or grammar.

    Easier Consistency Checks

    Compare the thumbnail, title, and description to see whether they describe the same video.

    Easier Version Creation

    Prepare two or three accurate alternatives for comparison or testing.

    More Time for Final Review

    Use saved time for accuracy, permissions, licensing, privacy, disclosure, readability, and final quality control.

    The main benefit is assistance, not automation: Ideas -> Options -> Organization -> Rewriting -> Review.

    Figure 12. AI can speed up brainstorming, rewriting, comparison, organization, and proofreading while leaving the final publishing decisions to the creator.

    Explanation: The strongest benefit of AI is assistance. It can reduce repetitive work and generate useful options, giving you more time to focus on accuracy, readability, permissions, and final quality.

    Limitations of Using AI for Thumbnails, Titles, and Descriptions

    Limitation 1: AI Can Invent Information

    How to Reduce This Limitation: Verify facts, numbers, names, dates, links, credits, and technical details.

    Limitation 2: AI Can Make Titles More Dramatic Than Necessary

    How to Reduce This Limitation: Use precise prompts that forbid hype, guarantees, and fake urgency.

    Limitation 3: AI Does Not Know the Final Video Unless You Tell It

    How to Reduce This Limitation: Give AI the final video summary or finished script.

    Limitation 4: AI-Generated Thumbnail Text Can Be Wrong

    How to Reduce This Limitation: Add important final text separately when practical.

    Limitation 5: AI Can Create Visual Distortions

    How to Reduce This Limitation: Review the full-size image and regenerate or correct errors.

    Limitation 6: AI Can Produce Misleading Realistic Images

    How to Reduce This Limitation: Do not present synthetic images as proof of real events or results.

    Limitation 7: AI May Create Fake or Unsafe Links

    How to Reduce This Limitation: Supply real links and verify every one.

    Limitation 8: AI Cannot Reliably Determine Licence Requirements

    How to Reduce This Limitation: Use the actual licence or permission terms from the source.

    Limitation 9: AI Can Alter Required Credit Wording

    How to Reduce This Limitation: Preserve required attribution exactly when needed.

    Limitation 10: AI Can Change Important Numbers During Rewriting

    How to Reduce This Limitation: Tell AI to preserve numbers exactly and compare the output with the original.

    Limitation 11: AI Cannot Know Exact Chapter Timestamps Without Timing Data

    How to Reduce This Limitation: Use the final video or reliable timed transcript.

    Limitation 12: AI May Not Understand Legal Significance of a Disclosure

    How to Reduce This Limitation: Verify important legal or contractual requirements from authoritative sources or professional advice when needed.

    Limitation 13: AI Can Encourage Repetitive Publishing

    How to Reduce This Limitation: Use a consistent brand style while matching each individual video.

    Limitation 14: AI Cannot Guarantee Better Performance

    How to Reduce This Limitation: Judge suggestions by clarity, accuracy, and fit – not promises of views or revenue.

    Limitation 15: AI May Miss Accessibility Problems

    How to Reduce This Limitation: Check contrast, text size, clutter, colour-only meaning, and mobile readability yourself.

    Limitation 16: AI Can Miss Privacy Problems

    How to Reduce This Limitation: Manually inspect screenshots and photographs.

    Limitation 17: AI Cannot Replace Final Human Judgment

    How to Reduce This Limitation: Keep final approval with the creator.

    Limitation 18: Platform Rules Can Change

    How to Reduce This Limitation: Check current official guidance when setting up the workflow, after relevant updates, and periodically.

    Figure 13. AI can assist with YouTube publishing, but it can still invent facts, exaggerate claims, create visual errors, misunderstand licences, and miss accessibility or privacy problems.

    Explanation: The safest workflow uses AI for ideas and drafting while keeping factual verification, permissions, accessibility, and final approval under human control.

    Myths About AI YouTube Thumbnails, Titles, and Descriptions

    Myth 1: AI Can Automatically Create the Perfect Thumbnail

    Reality: AI can create useful starting points, but the final thumbnail still needs human review.

    Myth 2: The Most Dramatic Thumbnail Is Always the Best

    Reality: The thumbnail should accurately represent the video and help viewers understand what to expect.

    Myth 3: Clickbait Is Necessary to Get Views

    Reality: A title can be interesting without being misleading.

    Myth 4: AI Knows Which Title Will Definitely Get the Most Views

    Reality: AI can suggest options but cannot guarantee clicks, views, subscribers, or growth.

    Myth 5: More Keywords Always Make a Better Title and Description

    Reality: Natural, clear wording is more useful than repeated phrases.

    Myth 6: The Thumbnail Should Repeat the Entire Title

    Reality: Thumbnail and title can perform different jobs while supporting the same message.

    Myth 7: AI-Generated Thumbnail Text Is Ready to Publish

    Reality: Important generated text must be checked manually.

    Myth 8: A Professional-Looking AI Image Must Be Accurate

    Reality: Realistic appearance is not proof of factual accuracy.

    Myth 9: Using AI Anywhere Means the Video Always Needs an AI Disclosure

    Reality: Not every production-assistance use triggers the same disclosure requirement.

    Myth 10: Adding an AI Disclosure Makes Misleading Content Acceptable

    Reality: Disclosure does not replace other platform rules, permission, or honesty.

    Myth 11: AI Can Safely Invent Links for the Description

    Reality: Every link must be verified.

    Myth 12: Giving Credit Means You Automatically Have Permission

    Reality: Credit and permission are different issues.

    Myth 13: AI Can Create Accurate Chapter Timestamps From a Script

    Reality: Exact timing comes from the final video or reliable timed information.

    Myth 14: You Must Constantly Change Titles and Thumbnails

    Reality: Changes should have a clear purpose; eligible creators can test accurate alternatives when useful.

    Myth 15: AI Removes the Need for Human Review

    Reality: A reliable workflow is AI Generates -> You Compare -> You Verify -> You Correct -> You Approve.

    Figure 14. AI can assist with YouTube thumbnails, titles, and descriptions, but it cannot guarantee performance, replace permissions, verify every fact, or remove the need for human review.

    Explanation: Understanding these myths helps beginners use AI as a practical publishing assistant rather than treating generated content as automatically accurate, effective, or ready to publish.

    Frequently Asked Questions About YouTube Thumbnails, Titles, and Descriptions with AI

    Can AI create my YouTube thumbnail for me?

    Yes. AI can help with concepts, backgrounds, illustrations, layout ideas, and alternatives, but the final image still needs human review for accuracy, readability, visual errors, permissions, and privacy.

    How much text should I put on a thumbnail?

    There is no single required number of words. Shorter text is usually easier to read on small screens.

    Should the thumbnail and title say the same thing?

    Not exactly. They should describe the same video but can perform different jobs.

    Can I use AI to write my YouTube title?

    Yes. Use AI to create alternatives, then reject invented numbers, fake urgency, unsupported claims, guarantees, and misleading clickbait.

    How long can a YouTube title be?

    Current YouTube guidance allows up to 100 characters. You do not need to use the entire limit.

    Should I put the year in my title?

    It can be useful for topics that change over time, but the video should actually be reviewed for that year.

    Can AI write the entire YouTube description?

    Yes, but provide correct information and verify the final result. Do not let AI invent URLs, timestamps, credits, licences, sponsors, statistics, or claims.

    How long can a YouTube description be?

    Current YouTube guidance allows up to 5,000 characters.

    Can AI create my chapter timestamps?

    AI can help with chapter names, but actual times should come from the final video.

    What are the basic rules for YouTube chapters?

    Current manual chapter guidance requires 00:00 first, at least three timestamps, ascending order, and chapters at least 10 seconds long.

    Can I add links to the description?

    Yes. Add useful links and verify every destination before publishing.

    Can I add affiliate links?

    Affiliate links may be used when they comply with applicable rules. Make the relationship clear when required.

    Does giving credit mean I have permission?

    No. Attribution and permission are separate issues.

    Do I need to disclose that AI helped create the thumbnail?

    Not necessarily. Ordinary production assistance does not automatically require the same disclosure as qualifying realistic synthetic or meaningfully altered content.

    Can I use a real celebrity in an AI thumbnail?

    Do not use a real person in a way that falsely suggests participation, endorsement, or authorization.

    Can AI guarantee a better click-through rate?

    No. AI cannot guarantee views, subscribers, ranking, revenue, or growth.

    Should I test different thumbnails and titles?

    You can. YouTube currently offers testing for eligible creators, but beginners can also choose the clearest accurate option manually.

    What is the most important rule?

    The thumbnail, title, description, and actual video should make the same truthful promise.

    Key Takeaways

    • Start with the finished video, not just the original idea.
    • Identify the main topic, target viewer, problem, and realistic benefit before using AI.
    • Keep thumbnails simple, readable, accurate, and easy to understand at small size.
    • Use short thumbnail text instead of repeating the full title.
    • Check AI-generated thumbnails for distorted people, screens, objects, numbers, and text.
    • Avoid fake statistics, earnings, analytics, subscriber counts, and unrelated public figures.
    • Use AI to generate several title options, then check accuracy and clarity.
    • Avoid fake urgency, guarantees, invented numbers, keyword stuffing, and unsupported superlatives.
    • Start descriptions with a clear explanation of what viewers will learn.
    • Use important topic phrases naturally instead of repeating keywords excessively.
    • Create chapter timestamps from the final exported video.
    • Open and verify every link before publication.
    • Never allow AI to invent URLs, credits, licences, sponsors, statistics, or timestamps.
    • Check actual licence requirements for third-party assets.
    • Remember that credit does not automatically provide permission.
    • Use YouTube paid-promotion or AI-content disclosure settings when required.
    • Do not assume every AI use requires the same disclosure.
    • Protect private information.
    • Preserve original and final publishing records.
    • Compare thumbnail, title, description, and finished video together before publishing.

    The most important principle is simple: The thumbnail, title, description, and actual video should all make the same truthful promise to the viewer.

    Final Tip

    Do not try to make every thumbnail, title, or description more dramatic than the last one. Improve one thing at a time: shorter thumbnail text, better contrast, a clearer main subject, a more specific title, a stronger description opening, better chapter names, or more accurate credits.

    Keep copies of thumbnail concepts, final thumbnails, title options, descriptions, verified links, chapter timestamps, credits, licences, permissions, and disclosure records. These records make future updates and testing much easier.

    Most importantly, remember that the purpose of the thumbnail, title, and description is not simply to attract a click. Their purpose is to help the right viewer understand what the video offers before watching.

    Clear, accurate, readable, and trustworthy beats complicated every time.

    Continue Learning

    Sources and References

    The following official YouTube sources were reviewed for Article 064. They support the guidance about thumbnails, titles, descriptions, chapters, links, paid promotions, AI-generated content, testing, and misleading publishing practices.

    Sources reviewed: August 8, 2026

    1. YouTube Help – Add custom thumbnails on YouTube

    Current custom-thumbnail guidance recommends 3840 x 2160 pixels, a minimum width of 640 pixels, common formats such as JPG or PNG, and a 16:9 aspect ratio. Upload-size limits differ by device.

    2. YouTube Help – Thumbnail & title tips

    Creator guidance on choosing thumbnails for the intended audience and using readable text when text appears in a thumbnail.

    3. YouTube Help – Edit video settings

    Video titles currently have a maximum length of 100 characters. Video settings also include title, description, thumbnail, and disclosure controls.

    4. YouTube Help – Tips for video descriptions

    Video descriptions currently allow up to 5,000 characters. YouTube recommends a unique description for each video and using one or two main topic terms naturally.

    5. YouTube Help – Video Chapters

    Manual chapters currently require a first timestamp of 00:00, at least three timestamps in ascending order, and chapters at least 10 seconds long.

    6. YouTube Help – A/B test titles and thumbnails

    Eligible creators can test and compare up to three titles, thumbnails, or combinations in YouTube Studio.

    7. YouTube Help – Spam, deceptive practices, & scams policies

    YouTube prohibits misleading titles, thumbnails, descriptions, and other practices that deceive viewers about what content contains.

    8. YouTube Help – External links policy

    External-link rules apply across YouTube, including URLs and other ways creators direct viewers to off-platform destinations.

    9. YouTube Help – Add paid product placements, sponsorships & endorsements

    Creators must use the paid-promotion setting when a video includes qualifying paid product placements, sponsorships, endorsements, or similar relationships.

    10. YouTube Help – Disclosing use of GenAI content

    YouTube provides an AI use setting for qualifying AI-generated or meaningfully AI-altered content and distinguishes these cases from ordinary production assistance.

    11. YouTube Help – Understanding ‘How this content was made’ disclosures

    Explains viewer-facing disclosures such as Made with AI for meaningfully altered or synthetically generated content.

    12. YouTube Help – Add tags to your YouTube videos

    YouTube says title, thumbnail, and description are more important metadata for discovery than tags, while tags generally play a limited role.

    Important Note About Changing YouTube Features and Policies

    YouTube can change thumbnail recommendations, title and description limits, chapter requirements, testing features, link rules, paid-promotion settings, AI-disclosure requirements, and the YouTube Studio interface.

    • Check relevant official guidance when using a feature for the first time.
    • Check when changing your workflow.
    • Check when YouTube announces a relevant update.
    • Check when a publishing option or interface changes.
    • Check when sponsorships, affiliate relationships, realistic AI-generated material, or other special situations apply.
    • Review periodically as part of maintaining your channel.

    For photographs, music, fonts, templates, stock media, AI-generated assets, and other third-party material, also check the licence or permission conditions provided by the applicable rights holder or service.

    This article provides general educational information, not legal advice. Copyright, advertising disclosure, privacy, licensing, endorsement, and other legal requirements can depend on your location and specific circumstances.

  • Article 063 — How to Edit Faceless YouTube Videos and Audio: Beginner Guide (2026)

    Article 063 — How to Edit Faceless YouTube Videos and Audio: Beginner Guide (2026)

    Estimated reading time: 65–75 minutes

    Last updated: August 8, 2026

    Editing brings narration, visuals, music, sound effects, text, and captions together into one finished faceless YouTube video.

    Introduction

    Creating the script, voiceover, visuals, and screen recordings for a faceless YouTube video is only part of the process. The next step is editing everything together into one clear, polished video.

    Video editing may sound complicated to a beginner, but you do not need professional filmmaking skills to get started. For a typical faceless YouTube video, editing mainly means arranging your clips in the correct order, matching visuals to the narration, removing mistakes, improving the sound, adding useful text or captions, and preparing the finished video for YouTube.

    A simple faceless video might contain:

    • An AI-generated or recorded voiceover
    • AI-generated images or video clips
    • Stock footage
    • Screen recordings
    • Background music
    • Sound effects
    • Text and titles
    • Captions or subtitles
    • Simple transitions between scenes

    During editing, these separate pieces are placed on a timeline. A timeline is the part of a video editor where you arrange video, images, narration, music, and other elements according to when they should appear.

    For example, suppose your narration says, “Artificial intelligence can help beginners organize everyday tasks.” While that sentence is being spoken, you might show a short clip of someone working at a computer, followed by an AI-generated illustration of a digital assistant. The editor allows you to control exactly when each visual appears and disappears.

    Good editing does not mean adding as many effects as possible. For beginner-friendly faceless videos, clear narration, understandable visuals, clean cuts, readable text, and balanced audio are usually more important than complicated effects.

    In this guide, you will learn a practical editing workflow that can be used with many popular video-editing programs. The buttons and menus may look different from one editor to another, but the basic editing principles are similar.

    • You will also learn how to:
    • Organize your video and audio files before editing
    • Create a new editing project
    • Import your narration, visuals, music, and other media
    • Arrange scenes on a timeline
    • Cut unwanted sections
    • Match visuals to narration
    • Adjust clip timing
    • Add simple transitions
    • Add titles and on-screen text
    • Improve voiceover clarity
    • Balance voice, music, and sound effects
    • Add captions
    • Review the complete video
    • Export the finished video correctly
    • Avoid common beginner editing mistakes
    • Protect privacy, permissions, licences, and source files

    The goal is not to turn you into a professional video editor overnight. The goal is to give you a repeatable beginner workflow that helps you turn the materials created in the earlier stages of the Faceless YouTube Video Creation Series into a finished video ready for final review and publication.

    Before Learning

    Before you begin editing a faceless YouTube video, it helps to have the main parts of the video prepared and organized.

    You do not need every element to be perfect before opening your video editor. However, having your files ready can make editing much easier and reduce confusion later.

    Try to have the following available:

    • Your completed video script
    • Your recorded or AI-generated voiceover
    • AI-generated video clips, if used
    • AI-generated images, if used
    • Licensed stock footage or stock images, if used
    • Screen recordings, if used
    • Background music, if used
    • Sound effects, if used
    • Any titles, names, facts, or text that will appear on screen
    • Your storyboard or scene plan, if you created one
    • A folder where the complete project will be stored

    It is also helpful to know the basic structure of your video before you start editing.

    For example:

    1. Opening or hook

    2. Short introduction

    3. Main section 1

    4. Main section 2

    5. Main section 3

    6. Summary or key takeaway

    7. Call to action or ending

    Your exact structure will depend on the type of video you are creating.

    Keep Your Project Files Together

    Create one main folder for the video before you start editing. Inside it, you can create separate folders such as:

    • Script
    • Voiceover
    • Video Clips
    • Images
    • Screen Recordings
    • Music
    • Sound Effects
    • Captions
    • Project Files
    • Exports
    • Licences and Permissions

    For example: Article063-Example-YouTube-Video.

    Using numbers at the beginning of folder names helps keep them in a predictable order. Good file organization becomes especially useful when a video contains many clips, images, audio files, and different versions.

    Use Clear Filenames

    Avoid filenames such as video1.mp4, newvideo2.mp4, final-final2.mp4, or audio-new.wav.

    Instead, use names that tell you what the file contains, such as:

    • scene-01-opening-city.mp4
    • scene-02-ai-workspace.png
    • voiceover-main-v1.wav
    • background-music-soft-tech.mp3
    • screen-recording-chatgpt-demo.mp4

    Clear filenames make it easier to find the correct asset while editing.

    Keep the Original Files

    Do not rely only on files that have already been edited, resized, compressed, or converted. When practical, keep:

    • Original recordings
    • Original AI-generated images or video
    • Original voice recordings
    • Original downloaded licensed assets
    • Editing project files
    • Exported versions
    • Licence information
    • Permission records

    Keeping the original files gives you something to return to if you make a mistake or need to create another version later.

    Check Permissions and Licences Before Editing

    Before spending time building a video around an image, music track, video clip, voice, template, font, or other asset, check that you are permitted to use it for your intended purpose.

    Pay particular attention to stock-media licence conditions, music and sound-effect licences, commercial-use restrictions, AI-tool terms, real-person photographs or recordings, voice-cloning permissions, fonts and templates, brand assets, and screenshots or recordings containing private information.

    Save important licence information and permission records with the project rather than trying to find them again after the video is finished.

    Do Not Worry About Advanced Editing Yet

    Beginners sometimes assume they need to learn complicated colour grading, animation, motion graphics, or cinematic effects before making a YouTube video. You do not.

    For your first faceless videos, concentrate on the fundamentals:

    • Clear narration
    • Relevant visuals
    • Correct timing
    • Clean cuts
    • Readable text
    • Balanced audio
    • Accurate information
    • Simple transitions
    • A complete final review

    Once these basics become comfortable, you can gradually learn more advanced editing techniques.

    What You’ll Learn

    By the end of this guide, you should understand the complete beginner workflow for turning separate video and audio assets into a finished faceless YouTube video.

    You will learn how to:

    • Choose a simple video-editing workflow
    • Set up a new editing project
    • Import video clips, images, screen recordings, narration, music, and sound effects
    • Understand the basic parts of an editing timeline
    • Place your voiceover on the timeline first
    • Match visuals to the spoken narration
    • Trim unwanted parts from video and audio clips
    • Split clips into smaller sections
    • Move clips into the correct order
    • Adjust how long images and video clips stay on screen
    • Add simple transitions without overusing them
    • Add titles, labels, and other on-screen text
    • Make text easier to read
    • Improve voiceover volume and clarity
    • Reduce distracting background noise when possible
    • Balance narration, background music, and sound effects
    • Use fades so audio begins and ends smoothly
    • Add and review captions
    • Check timing, spelling, facts, and visual accuracy
    • Review the complete video before export
    • Export a high-quality version suitable for YouTube
    • Save project files and master exports for future changes
    • Avoid common editing mistakes
    • Use AI-assisted editing features responsibly
    • Protect privacy and obtain permission when real people, voices, photographs, or private information are involved
    • Check licences and usage conditions for music, stock footage, templates, fonts, and other third-party assets
    • Keep records showing where important assets came from and what permissions or licences apply

    You do not need to memorize every editing tool or button.

    The most important skill is understanding the basic workflow:

    Organize → Import → Arrange → Trim → Match → Improve Audio → Add Text and Captions → Review → Export

    Once you understand this workflow, moving to another video editor is usually easier because most editing programs use similar basic concepts, even when their interfaces and feature names are different.

    What Video Editing Means for a Faceless YouTube Video

    Video editing is the process of combining separate pieces of content into one finished video.

    For a faceless YouTube video, this usually means combining voiceover narration, video clips, AI-generated visuals, stock footage, screen recordings, images, text, captions, background music, and sound effects.

    The editor gives you control over what appears, when it appears, how long it stays on screen, and what the viewer hears at the same time.

    The Timeline Is the Main Editing Workspace

    Most video editors use a timeline. The timeline runs from the beginning of the video to the end. Different types of content are placed on separate horizontal tracks.

    For example, one track may contain your main video clips, another may contain images or overlays, another may contain the voiceover, and additional tracks may contain music, sound effects, text, or captions.

    When you press Play, the editor follows the timeline from left to right. Anything positioned at the same point in time can appear or play together.

    Editing Is Mostly About Timing

    One of the most important editing skills is timing. A visual should normally appear when it helps explain or support what the viewer is hearing.

    Suppose your narration says, “First, create a folder for your project files.” If the folder example appears ten seconds later, the video may feel confusing. A better edit would show the folder while that idea is being explained.

    Editing Does Not Mean Constant Movement

    A common beginner mistake is assuming that something must change on screen every second. That is not necessary.

    A useful image can stay on screen long enough for the viewer to understand it. A screen recording may continue while several related points are explained. The goal is not maximum movement. The goal is clear visual support for the narration.

    Simple Cuts Are Often Enough

    A cut means moving directly from one clip or visual to another. You do not always need animated transitions between scenes.

    Simple cuts are often cleaner and less distracting, especially in educational videos. Transitions can still be useful when they help indicate a new topic, a change in location, a passage of time, or a major change in the video.

    The Voiceover Often Becomes the Editing Guide

    For many faceless YouTube videos, the voiceover provides the basic structure of the edit. You can place the completed narration on the timeline first and then add visuals that match each part of the narration.

    For example:

    1. The narrator introduces the topic.

    2. You add an opening visual.

    3. The narrator explains the first idea.

    4. You add a matching image, clip, or screen recording.

    5. The narrator moves to the next idea.

    6. You change the visual.

    7. The process continues until the narration ends.

    Video Editing and Audio Editing Work Together

    A video can look excellent and still feel difficult to watch if the audio is poor. During editing, you may need to remove unwanted silence, cut recording mistakes, adjust voice volume, reduce background noise when possible, lower background music, add gentle audio fades, position sound effects, and check that speech remains easy to understand.

    For most educational faceless videos, the narration should remain the main audio element.

    Your First Goal Is Clarity

    A beginner does not need to create a highly complicated edit. A strong first goal is to produce a video in which the narration is clear, the visuals match the narration, scenes appear in the correct order, unwanted mistakes are removed, text is readable, music does not overpower speech, captions are accurate, and the video has a clear beginning, middle, and ending.

    The Basic Parts of a Video Editor

    Most video-editing programs look different at first, but they usually contain the same basic areas.

    Media Library or Project Panel

    The media library is where imported files are stored inside your editing project. It may contain video clips, images, voiceover files, music, sound effects, screen recordings, graphics, and other project assets.

    Some editors call this area the media bin, project panel, library, or media pool.

    Preview Window

    The preview window shows what your video currently looks like. Use it to check what is visible on screen, whether an image is positioned correctly, whether text is readable, whether a transition works properly, whether the visual matches the narration, and whether anything is accidentally cut off.

    Timeline

    The timeline is where most editing takes place. It shows the video from beginning to end and allows you to arrange clips, images, audio, text, and other elements.

    A typical timeline may include:

    • Video Track 1 — main visuals
    • Video Track 2 — additional images or overlays
    • Text Track — titles and labels
    • Audio Track 1 — narration
    • Audio Track 2 — background music
    • Audio Track 3 — sound effects

    Playhead

    The playhead is the marker that shows your current position on the timeline. You can drag it to a specific point when you want to make a cut, add a visual, adjust text, check audio, insert a transition, or review a specific scene.

    Tracks

    A track is a horizontal row on the timeline where media is placed. Multiple tracks allow different elements to appear or play at the same time.

    Editing Tools

    Common editing tools include:

    • Select: choose and move an item
    • Split or Cut: divide one clip into separate pieces
    • Trim: shorten the beginning or end of a clip
    • Delete: remove an unwanted section
    • Crop: remove part of the visible image
    • Resize: make an image or video larger or smaller
    • Move or Position: change where something appears on screen
    • Speed: make a video clip play faster or slower
    • Volume: increase or decrease audio level
    • Fade: gradually increase or decrease video or audio
    • Text: add titles, labels, or other written information

    For a first faceless YouTube video, select, split, trim, move, text, and volume controls can handle much of the basic work.

    Effects and Transitions Panel

    Many editors include transitions, visual effects, audio effects, filters, animated text, and motion effects. These tools can be useful, but beginners should use them carefully. Too many effects can make an educational video look distracting or inconsistent.

    Audio Controls

    Depending on the editor, audio controls may include volume, fade-in, fade-out, noise reduction, equalization, compression, stereo balance, and voice enhancement.

    For beginners, the first priority should be making sure that the narration is clear and that background music remains comfortably underneath it.

    Export or Share Controls

    When editing is finished, use the Export, Render, or Share area to create the final video file. Saving the project preserves your editable timeline; exporting creates the finished video file that can later be uploaded to YouTube.

    You should normally keep both the editable project and the final exported video.

    Beginner Tip

    Do not try to learn every panel and button at once. First learn where to import files, find the timeline, play the video, move clips, cut clips, adjust volume, add text, and export the finished video.

    How to Organize and Prepare Your Files Before Editing

    Good organization can save a surprising amount of time during video editing. If your narration, images, video clips, music, and screen recordings are scattered across different folders, it becomes harder to find the correct file when you need it.

    Create One Main Project Folder

    Start by creating one main folder for the entire video, for example faceless-youtube-ai-tools-video. Inside that folder, create smaller folders such as:

    • 01-Script
    • 02-Voiceover
    • 03-Video-Clips
    • 04-Images
    • 05-Screen-Recordings
    • 06-Music
    • 07-Sound-Effects
    • 08-Project-Files
    • 09-Exports
    • 10-Licences-and-Permissions

    Separate Visuals by Scene When Necessary

    If your video contains many scenes, you can organize visuals by scene, such as scene-01-introduction, scene-02-main-problem, scene-03-first-example, and scene-04-second-example.

    Use Descriptive Filenames

    A filename should help you identify the asset without opening it. Better names might be scene-01-person-at-laptop.mp4, scene-02-ai-workflow.png, voiceover-main-v1.wav, intro-music-soft.mp3, and screen-recording-dashboard.mp4.

    If you create several versions of the same file, add a version number rather than relying on words such as “new,” “latest,” or “final-final.”

    Check Your Voiceover Before Editing

    Listen to the complete voiceover before building the timeline. Check for missing sentences, repeated words, long accidental pauses, mispronounced names, incorrect facts, sudden volume changes, unwanted background sounds, and sections that need to be recorded again.

    Check Your Visual Files

    Open your important images, video clips, and screen recordings before importing them. Make sure the correct files were saved, images are not blurry, videos play properly, screen recordings show the intended steps, private information is not visible, text is readable, important objects are not cropped incorrectly, and AI-generated visuals do not contain obvious mistakes.

    A realistic-looking AI-generated image or video should also be reviewed carefully. AI systems can create incorrect text, strange objects, inaccurate details, or scenes that look convincing even though they do not represent a real event.

    Check Aspect Ratio and Orientation

    Most standard YouTube videos use a 16:9 landscape format. Vertical or square images can still be used, but you may need to crop, resize, add a background, or reposition them.

    Prepare Music and Sound Effects

    Organize intro music, background music, transition sounds, notification sounds, and simple emphasis effects before editing. Do not add sound merely because it is available. For educational faceless videos, audio effects should have a purpose and should never make the narration difficult to understand.

    Keep Licence and Permission Records

    Create a folder for licence and permission information. Save records for stock footage, stock photographs, music, sound effects, templates, fonts, voice recordings, real-person photographs, and third-party graphics.

    Useful records may include a licence file, receipt, permission message, screenshot of applicable usage terms, asset source, download date, and original filename.

    Licensing terms can differ between services and can change. Check the conditions that apply to the asset and your intended use rather than assuming that anything downloaded or AI-generated is automatically permitted for YouTube or commercial use.

    Make a Backup Before Major Editing

    Before substantial editing, keep a backup of important source files, including the script, narration, original visuals, screen recordings, music, licence records, editing project, and important exported versions.

    This is especially valuable if a project becomes corrupted, a file is accidentally overwritten, or you decide to create another version of the video later.

    Figure 1. A simple folder structure keeps scripts, narration, visuals, editing files, exports, and licence records organized in one project.

    Explanation: Keeping each type of asset in a clearly named folder makes files easier to find during editing and helps preserve important originals, licences, and project versions.

    How to Start a New Video-Editing Project

    Once your files are organized, the next step is to create a new project in your video editor. The exact buttons and menu names vary between editing programs, but the basic setup is usually similar.

    Create a New Project

    Open your video-editing program and choose the option to create a new project. Depending on the software, the button may be called New Project, Create Project, New Video, Start Editing, or Create New.

    Give the project a clear name, such as faceless-youtube-ai-tools-video. Try to use the same project name as your main project folder.

    Save the Project in the Correct Folder

    Save the editing project inside the folder you created earlier, such as 08-Project-Files. Do not save important project files only in a temporary downloads folder or on the desktop if you can avoid it.

    Choose the Correct Video Format

    Before adding many clips, check the project settings. For a standard landscape YouTube video, you will usually want a 16:9 aspect ratio.

    A common project resolution is 1920 × 1080 pixels, commonly called 1080p or Full HD.

    If your source footage was created at a different resolution, your editor may ask whether you want the project settings to match that footage. For a beginner project, the main goal is consistency.

    Understand Frame Rate

    The frame rate is the number of individual video frames shown each second. You may see settings such as:

    • 24 fps
    • 25 fps
    • 30 fps
    • 50 fps
    • 60 fps

    The abbreviation fps means frames per second.

    For many beginner faceless YouTube videos, 30 fps is a practical choice, especially when the video contains narration, images, simple motion, or screen recordings. However, if your main source footage was recorded at another frame rate, keeping the project consistent with that footage can help avoid unnecessary conversion.

    Check Your Audio Settings

    Most beginner editors handle audio settings automatically, but you should still confirm that your narration imports and plays correctly.

    After creating the project:

    1. Import one voiceover file.

    2. Place it on the timeline.

    3. Press Play.

    4. Confirm that the sound is clear.

    5. Check that the audio does not sound unusually fast, slow, distorted, or silent.

    If something sounds wrong, fix the problem before building the rest of the project.

    Set Up Automatic Saving When Available

    If your editor provides Auto Save, Automatic Backup, Recovery Files, or Project Versions, turn them on when appropriate. Even with automatic saving, manually save your project regularly.

    A useful habit is to save after importing files, arranging the narration, adding the main visuals, finishing audio work, and before exporting.

    Create Project Versions for Major Changes

    Instead of continuously overwriting one project file, create versions such as:

    • faceless-video-v01
    • faceless-video-v02
    • faceless-video-v03

    Create a new version when making a major change or reaching an important stage. This gives you a previous version to return to if something goes wrong.

    Do Not Start Adding Effects Yet

    When you first create the project, resist the temptation to begin adding transitions, filters, animations, and effects. First build the basic structure.

    Your early priorities should be:

    1. Import the media.

    2. Add the narration.

    3. Arrange the scenes.

    4. Match visuals to the narration.

    5. Remove mistakes.

    6. Check timing.

    Effects should come later, after the main video already works.

    Figure 2. A basic video-editing project starts with clear project naming, organized saving, suitable video settings, and reliable backups.

    Explanation: Setting up the project correctly at the beginning reduces avoidable problems later and gives you a clean foundation before you start arranging narration and visuals.

    How to Import Your Video, Images, and Audio Files

    After creating the project, the next step is to bring your prepared files into the video editor. This process is usually called importing media.

    Importing does not normally move or permanently change your original files. Instead, the editing program creates references to them so you can use them inside the project.

    Import Your Main Media Files

    Look for a button or menu such as Import, Import Media, Add Media, Add Files, Upload, or Media Library. Then select the files you want to use.

    These may include:

    • Voiceover recordings
    • Video clips
    • AI-generated video
    • AI-generated images
    • Stock footage
    • Stock photographs
    • Screen recordings
    • Music
    • Sound effects
    • Graphics

    Keep Imported Media Organized

    If your editor allows folders, bins, collections, or labels inside the media library, use them. You might create groups for Voiceover, Main Video, B-Roll, Images, Screen Recordings, Music, Sound Effects, and Graphics.

    B-roll means supporting footage that appears while the main narration continues. For example, if the narrator talks about working from home, B-roll might show a person using a laptop, a home office, a close-up of typing, a calendar, or a productivity application.

    Import the Voiceover Early

    For many faceless YouTube videos, it is useful to import the completed voiceover before arranging most of the visuals. The narration often becomes the main guide for the entire timeline.

    Check that the full file is present, the beginning is not cut off, the ending is complete, the audio plays correctly, there are no obvious missing sections, and the correct version was imported.

    If you have several narration versions, use filenames such as voiceover-v1.wav, voiceover-v2.wav, and voiceover-approved.wav.

    Preview Files Before Adding Them to the Timeline

    Do not immediately place every imported file on the timeline. Preview important clips first.

    Check what the clip shows, how long it lasts, whether it contains unwanted material, whether the quality is acceptable, whether the correct scene was imported, whether the audio is usable, whether private information is visible, and whether AI-generated content contains obvious errors.

    This is especially important for screen recordings. A screen recording can accidentally reveal:

    • Email addresses
    • Account names
    • Notifications
    • Personal documents
    • Browser tabs
    • File paths
    • Contact information
    • Payment information
    • Private messages

    Review these carefully before using them.

    Check AI-Generated Visuals Again

    AI-generated images and video should be reviewed before editing. Look for distorted hands or faces, incorrect text, duplicated objects, strange movement, inconsistent clothing or characters, incorrect product details, impossible physical behaviour, and misleading realistic scenes.

    Do not assume that a realistic-looking AI-generated visual is factually accurate. If viewers could reasonably mistake synthetic footage for a real event, person, place, or recording, consider whether clear disclosure is appropriate or required by the platform.

    Check File Quality

    Try to use the best practical version of each asset. Avoid unnecessarily using heavily compressed images, very small images, low-resolution video, recordings with severe noise, or repeatedly re-exported files.

    Editing cannot fully restore quality that was lost before the file was imported.

    Do Not Rename or Move Files Carelessly After Importing

    Some video editors link directly to the original media files on your computer. If you later rename, move, delete, or disconnect the storage location, the editor may report that the media is missing.

    You may see messages such as Media Offline, Missing File, File Not Found, or Relink Media.

    For this reason, organize your project files before importing them and avoid moving them unnecessarily while the project is active.

    What to Do If Media Goes Missing

    If an editor reports that a file is missing, look for an option such as Relink, Locate, Replace Media, or Find File. Then point the editor to the file’s new location.

    Import Only What You Need

    Beginners sometimes import hundreds of files because they might use them later. That can make the media library difficult to navigate.

    A better approach is to import files already included in your storyboard, strong alternative visuals, necessary narration and audio, and assets you are realistically considering. You can always import more media later.

    Figure 3. Import organized source files into clearly labelled media groups so they remain easy to find while editing.

    Explanation: Keeping imported media organized makes timeline work faster and reduces the chance of using the wrong file. Avoid moving or deleting original source files while the editing project still depends on them.

    How to Place the Voiceover on the Timeline First

    For many faceless YouTube videos, the easiest editing method is to build the project around the narration. Instead of arranging all the visuals first, place the completed voiceover on the timeline and use it as the main guide for the video.

    This creates a clear structure because the narration already determines when the video begins, when each topic starts, how long each section lasts, when the visuals should change, and when the video ends.

    Add the Voiceover to an Audio Track

    Drag your main voiceover file from the media library onto an audio track near the beginning of the timeline. Try to place it at the start of the project unless you intentionally want silence, music, or an opening animation before the narration begins.

    Confirm that the correct voiceover version is being used, the beginning has not been cut off, the narration starts where expected, the voice plays at normal speed, and there are no obvious audio problems.

    Listen Through the Complete Narration

    Before adding many visuals, listen to the entire voiceover from beginning to end. Listen for recording mistakes, repeated sentences, missing words, long or unnatural pauses, mispronunciations, sudden volume changes, background noise, incorrect facts, and sections that feel unnecessarily long.

    If a major problem requires the narration to be recorded again, it is usually better to fix it now rather than after you have carefully matched dozens of visuals to it.

    Remove Unwanted Silence Carefully

    Some pauses are useful because they make narration easier to understand. However, very long accidental gaps can make a video feel slow.

    You can shorten an unwanted pause by:

    1. Moving the playhead to the beginning of the unwanted section.

    2. Splitting the audio.

    3. Moving the playhead to the end of the unwanted section.

    4. Splitting again.

    5. Deleting the unwanted portion.

    6. Moving the remaining sections together.

    Be careful not to remove every small pause. Natural speech needs breathing room, and cutting too tightly can make the narration sound rushed or artificial.

    Remove Recording Mistakes

    If the voiceover contains a mistake followed by a corrected version, remove the incorrect portion. Listen across the edited cut afterward to make sure the sentence still sounds natural.

    Leave Useful Space Between Sections

    A small pause between major topics can help the viewer recognize that one section has ended and another is beginning. This space may later be used for a section title, visual change, short transition, brief music change, or a moment for the viewer to absorb information.

    Use the Narration to Identify Scene Changes

    Listen to the voiceover and identify where each new idea begins. These points can become natural locations for visual changes.

    Some editors allow you to add markers to the timeline. A marker is a small reference point that helps you remember where something should happen.

    Understand the Audio Waveform

    When a voiceover is placed on the timeline, many editors display a waveform, a visual representation of the sound. It can help you locate pauses, sentence endings, recording mistakes, scene-change points, and sections that may need trimming.

    However, do not edit only by looking at the waveform. Always listen to the audio as well.

    Build the Video Around Meaning, Not Exact Word Counts

    You do not need to change the visual every time the narrator starts a new sentence. Group related ideas together.

    Change the visual when the subject changes, a new example begins, the viewer needs to see a specific action, the current visual no longer supports what is being said, or a visual has remained on screen so long that attention may begin to drop.

    Use Temporary Gaps When a Visual Is Not Ready

    If a scene is missing, leave a temporary gap or use a simple placeholder inside the editing project. These notes are only for the editing process and must be removed before the final export.

    Lock the Voiceover Track When Useful

    Some editors allow you to lock a track. After the narration has been cleaned and positioned correctly, locking the voiceover track can prevent you from accidentally moving, shortening, deleting, or shifting it out of sync.

    Save a New Project Version

    After cleaning and arranging the narration, save the project. You may also create a new project version, such as faceless-video-v01-imported and faceless-video-v02-voiceover-cleaned.

    Figure 4. Placing the voiceover first gives the timeline a clear structure and shows where each visual should support the narration.

    Explanation: The narration can act as the backbone of a faceless YouTube video. Once it is cleaned and arranged, you can match images, clips, screen recordings, and other visuals to the ideas being spoken.

    How to Match Visuals to the Voiceover

    Once the voiceover is arranged, begin adding visuals that support what the viewer is hearing. The goal is not to decorate every sentence. The goal is to help the viewer understand the narration more easily.

    Work Through the Video One Section at a Time

    Start at the beginning of the timeline. Listen to a short section of narration, then ask:

    • What is the narrator talking about?
    • What would help the viewer understand this point?
    • Do I already have a suitable visual?
    • Should this be an image, video clip, screen recording, diagram, or text label?

    Then place the most useful visual above that part of the voiceover. Continue through the video section by section.

    Match the Visual to the Meaning

    The visual should support the idea being spoken. If the narration says, “Create one main folder for your video project,” a useful visual might show a project folder, several organized subfolders, or a short screen recording showing the folders being created.

    A random image of someone using a laptop may look attractive, but it does not explain the instruction as clearly.

    Use Different Types of Visuals

    A faceless YouTube video can combine:

    • AI-generated images
    • AI-generated video clips
    • Licensed stock footage
    • Screen recordings
    • Diagrams
    • Infographics
    • Screenshots
    • Simple text cards
    • Icons
    • Charts
    • Photographs

    Use a screen recording when showing how to perform a task, an infographic when explaining a process, stock footage when showing a general activity, an AI-generated image for a custom illustrative scene, and text on screen when emphasizing an important word or short instruction.

    Keep Visual Changes Natural

    You do not need to change the visual after every sentence. Change it when the narration moves to a new idea or when the current visual has finished serving its purpose.

    The right duration depends on how much information the visual contains, how quickly the narration moves, whether the viewer needs time to read, whether the visual contains motion, and whether the subject has changed.

    Give Viewers Time to Read

    If a visual contains text, do not remove it before the viewer has had enough time to read it. This is especially important for checklists, diagrams, step labels, warnings, comparison graphics, screenshots, and captions.

    Match Screen Recordings Closely to Instructions

    If the narration says, “Click Export in the upper-right corner,” the screen recording should show that action at approximately the same time. Avoid showing steps far ahead of the narration or letting the narration describe an action long after it has already happened on screen.

    Trim Visual Clips to the Needed Section

    If a stock clip lasts 20 seconds but you only need six seconds, trim the clip so only the useful section remains. The same idea applies to screen recordings.

    Adjust Image Duration

    Still images do not have a fixed duration like recorded video. Drag the beginning or end of the image clip to control how long it stays visible.

    Reuse a Visual Only When It Still Helps

    You may reuse certain visuals, especially channel diagrams, workflow graphics, section title cards, branded design elements, and interface screenshots. However, avoid repeatedly showing the same generic footage merely because you do not have another visual.

    Use B-Roll to Support General Narration

    B-roll works well when the narration describes a general concept rather than a specific on-screen action. It should reinforce the idea without needing to show every spoken word literally.

    Avoid Misleading Visuals

    Do not use a dramatic or realistic visual if it could give viewers the wrong impression. Avoid presenting AI-generated footage as actual news footage, a fictional person as a real expert, a simulated interface as the current real interface without making that clear, a stock image as evidence that a specific event occurred, or a synthetic voice as the voice of a real person without appropriate permission.

    A realistic visual can still be fictional.

    Use Temporary Placeholders When Necessary

    If a visual is not ready, continue working with a temporary title card or note. Before export, perform a full review and remove every placeholder.

    Review Each Scene With the Audio

    After adding a visual, play the section from several seconds before the change. Check whether the visual appears at the right moment, supports the narration, stays long enough, remains too long, contains readable text, and transitions naturally to the next visual.

    Figure 5. Match each visual to the idea being discussed instead of changing scenes simply because a certain number of seconds has passed.

    Explanation: Strong editing connects the narration and visuals. Images, clips, screen recordings, and diagrams should appear when they help explain the spoken information and remain visible long enough for viewers to understand them.

    How to Trim, Split, Move, and Arrange Clips

    Once your voiceover and main visuals are on the timeline, you will need to adjust them so each scene starts and ends at the right time.

    Four of the most useful beginner editing actions are:

    • Trim
    • Split
    • Move
    • Arrange

    These basic actions are used repeatedly throughout almost every video-editing project.

    What Trimming Means

    Trimming means shortening the beginning or end of a clip. For example, if a screen recording begins with five seconds of unnecessary movement before the useful action starts, you can trim away those five seconds.

    In most editors, you can trim by dragging the left or right edge of a clip inward.

    What Splitting Means

    Splitting divides one clip into two separate pieces. This is useful when you want to remove something from the middle of a clip.

    For example, imagine a screen recording contains:

    1. A useful opening section

    2. Ten seconds of waiting

    3. Another useful section

    You can:

    1. Place the playhead before the unwanted section.

    2. Split the clip.

    3. Move the playhead to the end of the unwanted section.

    4. Split again.

    5. Delete the middle section.

    6. Move the remaining clips together.

    The same method works with voice recordings and video clips.

    Trim Before Adding Complicated Effects

    Do your main cutting and trimming before spending much time on transitions, filters, animations, motion effects, or detailed colour adjustments.

    If you add many effects first and then change the timing later, you may have to redo some of that work. Build the clean structure first.

    Move Clips Along the Timeline

    To change when a clip appears, select it and move it left or right on the timeline. Moving a clip to the left makes it appear earlier; moving it to the right makes it appear later.

    Use the narration as your guide.

    Watch for Unwanted Gaps

    When you remove or move clips, you may accidentally create empty gaps on the timeline. Depending on the editor and track layout, an empty gap may cause a black screen, blank background, silence, or an unexpected visual disappearance.

    Some editors include a feature called Ripple Delete, which removes a selected section and automatically closes the resulting gap. This can be useful, but use it carefully because it may move later material.

    Understand Ripple Editing

    Ripple editing means that changing one clip can automatically move other clips to keep the timeline connected. This can save time, but it can also cause problems if your narration moves unexpectedly, titles shift out of position, music becomes misaligned, or captions no longer match the speech.

    If you use ripple editing, review the surrounding timeline after each major change.

    Keep Narration and Related Audio Together

    If your video contains several narration files, arrange them carefully so they play in the correct order. Avoid accidental overlaps, large gaps, or missing sections.

    Zoom in on the timeline when you need to make small adjustments. A closer view helps with precise cuts; a wider view helps you understand the complete video structure.

    Keep Related Elements Aligned

    Sometimes one scene contains several elements that must remain together, such as a screen recording, arrow graphic, text label, and sound effect.

    Some editors allow you to group clips, link clips, or select several clips together. These features can help keep related elements aligned.

    Be Careful When Moving Video With Attached Audio

    Some recorded video clips include their own audio. The video and audio may be linked. If you move or delete the video, its audio may move or disappear as well.

    For many faceless videos, you may mute or remove the original sound from B-roll footage when the main voiceover should remain dominant.

    Remove Unnecessary Footage

    Ask whether each clip adds value. Remove sections that are repetitive, too long, unclear, off-topic, accidentally recorded, visually poor, or no longer relevant to the narration.

    Do Not Cut So Aggressively That the Video Feels Rushed

    Fast editing does not automatically make a video better. Keep enough time for natural speech, reading on-screen text, understanding diagrams, following screen-recorded actions, and moving mentally from one topic to another.

    Editing should improve pacing without making the video exhausting to follow.

    Review Around Every Important Cut

    After making a cut, play the video from a few seconds before it. Check for abrupt audio, missing words, sudden visual jumps, unnatural pauses, black frames, text disappearing too early, or incorrect timing.

    Use Undo When Necessary

    If a change causes a problem, use the editor’s Undo command. Do not keep trying to repair a mistake if undoing it is simpler.

    Save After Major Timeline Changes

    Once a section is arranged correctly, save the project. You may also create another project version after completing a major editing stage, such as faceless-video-v03-main-cut or faceless-video-v04-scenes-arranged.

    Figure 6. Trimming, splitting, moving, and arranging clips are the core timeline actions beginners use to control the timing and order of a video.

    Explanation: These four editing actions allow you to remove unnecessary material, place visuals at the correct moment, and keep each scene aligned with the narration.

    How to Add Simple Transitions Between Scenes

    A transition is the visual change that happens when one scene moves to another. The simplest transition is a cut: one clip ends and the next begins immediately.

    For many faceless YouTube videos, simple cuts are enough. You do not need an animated transition between every scene.

    Start With Simple Cuts

    A direct cut works well when the narration continues naturally, the next visual supports the next idea, and the viewer does not need a special signal that the topic has changed.

    When a Transition Can Help

    A transition can be useful when it helps the viewer recognize a change, such as moving to a new main section, changing from explanation to demonstration, showing that time has passed, moving between very different visual styles, or ending one major topic and beginning another.

    The transition should support the structure of the video. It should not become the main attraction.

    Common Beginner-Friendly Transitions

    Useful simple options may include:

    • Cut
    • Fade
    • Dissolve
    • Crossfade
    • Dip to black
    • Dip to white

    A fade gradually makes a visual appear or disappear. A dissolve gradually blends one visual into another. A dip to black briefly fades the scene toward black before the next scene appears.

    Keep Transitions Short

    Very long transitions can interrupt the flow of narration. For an educational faceless video, a short transition is often enough to signal a change without slowing the viewer down.

    Do Not Use a Different Transition for Every Scene

    One common beginner mistake is using many different transitions simply because the editor provides them. Spin, zoom, flip, swipe, blur, bounce, and flash effects can make an educational video feel inconsistent and distracting.

    A better approach is to choose one or two simple transition styles and use them consistently when needed.

    Use Transitions to Support Structure

    You can create a simple transition rule for your project:

    • Normal scene changes: direct cut
    • Major section changes: short dissolve
    • Beginning and ending: fade

    This creates consistency.

    Check Whether the Transition Hides Important Content

    Some transitions overlap the end of one clip with the beginning of another. This can accidentally hide important text, a final screen-recording action, a diagram label, a person’s face, or a key visual detail.

    Watch the complete transition and make sure important content remains visible long enough.

    Be Careful With Transitions Between Screenshots

    If you are showing screenshots or instructional screens, a direct cut is often better than a complicated transition because it keeps the tutorial straightforward.

    Match the Transition to the Tone

    A calm educational video usually benefits from restrained transitions. Ask: Does this transition help the viewer understand the change? If the answer is no, a simple cut may be better.

    Avoid Transitions That Cause Visual Discomfort

    Fast flashing, repeated zooming, rapid movement, or intense visual effects can be uncomfortable for some viewers. Use motion carefully and avoid unnecessary flashing effects.

    Accessibility is part of good editing.

    Preview the Audio Across the Transition

    Play the scene from a few seconds before the transition to a few seconds after it. Check whether the narration continues naturally, the music changes unexpectedly, there is an accidental audio gap, a sound effect becomes too loud, or the transition feels too slow for the spoken pace.

    Do Not Add Transitions Until the Main Timing Is Stable

    Complete the main narration editing, scene arrangement, visual timing, and major cuts before adding many transitions. Otherwise, you may spend time fixing transitions every time you shorten, move, or replace a clip.

    Figure 7. Simple, consistent transitions usually work better than using many different animated effects throughout an educational video.

    Explanation: Use transitions only when they help communicate a scene or section change. Direct cuts can handle most edits, while short fades or dissolves can help mark larger changes without distracting from the content.

    How to Add Titles and On-Screen Text

    Text can make a faceless YouTube video easier to understand, especially when you want to highlight an important word, introduce a new section, identify a step, or reinforce something being said in the narration.

    However, too much text can make a video difficult to watch. The best approach is to keep on-screen text short, readable, and purposeful.

    Common Types of On-Screen Text

    You may use text for:

    • Opening titles
    • Section headings
    • Step numbers
    • Short instructions
    • Important terms
    • Names or labels
    • Warnings
    • Key facts
    • Calls to action
    • Closing messages

    You normally do not need to display the entire narration as ordinary on-screen text. Full spoken dialogue is better handled through captions.

    Add a Simple Opening Title

    The opening title tells viewers what the video is about. It should be easy to read quickly and should not cover most of the screen.

    Use Section Titles to Organize Longer Videos

    Short section titles such as Preparing Your Files, Importing Media, Editing the Voiceover, Adding Visuals, Improving Audio, and Exporting the Video can reinforce the structure of the narration.

    Keep their font, size, position, background style, and animation style consistent throughout the video.

    Keep Text Short

    Avoid placing paragraphs of text on screen while narration is also playing. Instead of a long sentence, use a short phrase such as Organize Your Files First and let the narration explain the details.

    Make Text Large Enough to Read

    Remember that viewers may watch on desktop computers, laptops, tablets, phones, or televisions. Use large text, simple fonts, clear spacing, and strong contrast between text and background.

    Avoid extremely thin fonts, decorative fonts that are hard to read, tiny labels, long blocks of text, and crowded layouts.

    Use Good Contrast

    Text should stand out clearly from the background. Possible solutions include a darker text background, a semi-transparent box, a subtle shadow, a darker area behind the text, or repositioning the text.

    Do not rely only on colour differences that may be difficult for some viewers to distinguish.

    Keep Important Text Away From the Edges

    Give important text comfortable space around it. Player controls, interface elements, or cropping can make edge-positioned information harder to see.

    Use Text to Guide Screen Recordings

    Short labels such as Click Export, Choose 1080p, Select Your File, or Save Project can help guide viewers. You can also use arrows, circles, highlight boxes, or pointer animations when they genuinely help.

    Do not cover the button or setting you are trying to explain.

    Keep Text on Screen Long Enough

    Viewers need time to read. After adding text:

    1. Play the scene at normal speed.

    2. Read the text as if seeing it for the first time.

    3. Check whether it disappears too quickly.

    4. Extend its duration if necessary.

    Match Text Timing to the Narration

    Display important text when the related idea is being discussed. If the narrator says, “Always save a backup of your editing project,” a short label such as Save a Backup should appear near that statement.

    Avoid Constant Text Animation

    For beginner educational videos, simple effects such as fade in, fade out, gentle slide, or no animation are often sufficient. Constant flying, spinning, bouncing, zooming, or flashing text can distract viewers.

    Check Spelling Carefully

    Before export, check headings, names, product names, technical terms, step numbers, dates, website names, and numbers. Do not assume AI-generated text is correct.

    Verify Facts Shown on Screen

    Double-check statistics, dates, prices, feature names, plan conditions, software instructions, and legal or policy statements. Information that can change should be checked against an appropriate current source before publication.

    Avoid Showing Private Information

    Do not accidentally expose personal email addresses, phone numbers, home addresses, account numbers, passwords, private usernames, private messages, customer information, or payment information.

    Blur, crop, replace, or remove private information before publishing. When possible, use a clean demonstration account or example screen.

    Use a Consistent Text Style

    Create a simple visual system for the entire video: main title largest, section headings medium, labels smaller, and warnings treated consistently. A small, consistent style system generally looks cleaner and is easier for viewers to understand.

    Figure 8. Effective on-screen text is short, readable, well timed, and visually consistent throughout the video.

    Explanation: On-screen text should help viewers understand the content without competing with the narration. Large text, clear contrast, simple wording, and consistent positioning make educational videos easier to follow.

    How to Edit and Improve the Voiceover Audio

    Clear narration is one of the most important parts of a faceless YouTube video. Viewers may accept simple visuals, but they can quickly stop watching if the voiceover is difficult to understand.

    Your main goal is not to make the audio sound heavily processed. The goal is to make the narration sound clear, consistent, comfortable, and easy to follow.

    Listen Before Applying Audio Effects

    Before changing anything, listen to the complete voiceover. Use headphones if possible, but also check the audio through ordinary speakers.

    Listen for background noise, hissing, hum, echo, sudden volume changes, long pauses, mouth noises, distortion, clipped words, mispronunciations, and sections that sound much louder or quieter than others.

    Do not immediately apply every audio effect available in the editor.

    Remove Obvious Recording Mistakes

    If the narration contains mistakes, repeated sentences, coughing, unwanted interruptions, or unusually long pauses, remove them with trimming and splitting. After each edit, listen across the cut and make sure the voice still sounds natural.

    Adjust the Overall Voice Volume

    The narration should be easy to hear without forcing the viewer to increase the volume substantially. If one section is noticeably quieter, raise it; if another is much louder, reduce it.

    Do not simply make everything as loud as possible. Audio that is pushed too high can become distorted.

    Understand Clipping

    Audio clipping happens when the signal becomes too loud for the recording or editing system to handle properly. Clipped audio may sound harsh, crackly, distorted, or unpleasantly sharp.

    If the audio meter repeatedly reaches the maximum level or shows a warning area, lower the level.

    Use Noise Reduction Carefully

    Noise Reduction, Denoise, Voice Cleanup, Audio Cleanup, or Background Noise Removal can reduce computer fans, air-conditioning, low-level room noise, or constant hiss.

    However, excessive noise reduction can make a voice sound metallic, robotic, hollow, underwater, or unnatural. Apply only as much processing as needed, then compare the edited version with the original.

    Improve Uneven Voice Levels

    Some editors provide Normalization, Compression, Auto Level, or Voice Leveling. These tools can help make volume more consistent, but their names and behaviour vary. Do not apply them blindly.

    What Compression Means

    Compression reduces the difference between louder and quieter parts of an audio recording. It can help make speech feel more consistent, but aggressive compression can make speech sound unnatural or tiring.

    Beginners should use gentle settings or suitable speech presets when available, then listen carefully.

    Use Equalization Only When Necessary

    You may see a tool called EQ, Equalizer, or Equalization. It can sometimes help reduce excessive bass, harsh high frequencies, or muddy sound.

    If the original recording already sounds clear, minimal processing may be better.

    Remove Background Noise at the Source When Possible

    For future recordings, record in a quiet room, close noisy applications, reduce fan or appliance noise when practical, keep the microphone at a consistent distance, avoid touching the microphone or desk, and reduce strong room echo when possible.

    Review AI-Generated Voiceovers Too

    Listen for incorrect pronunciation, unnatural pauses, strange emphasis, sudden changes in tone, repeated words, missing words, incorrect names, and awkward pacing.

    Do not assume an AI-generated voice file is ready for publication simply because it was generated successfully.

    Be Careful With AI Voice Cloning

    If you use technology that imitates the voice of a real person, obtain appropriate permission. Do not use someone else’s voice to make it appear that they said something they did not say.

    This is especially important when the content could damage someone’s reputation, mislead viewers, impersonate a public figure, create a false endorsement, or suggest participation that never occurred.

    Add Short Audio Fades Where Needed

    An audio fade-in gradually raises the volume from silence. An audio fade-out gradually lowers the volume toward silence. Short fades can help prevent abrupt starts and endings.

    Listen for Clicks at Edit Points

    If you hear a clicking or popping sound at a cut, adjust the cut slightly, add a very short fade, or check whether the clips overlap incorrectly.

    Keep the Voice Consistent Across Sections

    If several voiceover files were recorded separately, try to make their volume, background noise, microphone distance, and voice settings reasonably consistent.

    Compare Before and After

    Whenever you apply an audio-processing effect, compare the original with the edited version. Ask whether the voice is actually clearer and whether the effect introduced distortion or an artificial sound.

    Review the Voiceover by Itself

    Before adding music, listen to the narration without other audio tracks playing. Make sure the voiceover is understandable on its own. Only then should you balance it with music and sound effects.

    Figure 9. Voiceover editing should focus on removing mistakes, controlling unwanted noise, and keeping speech clear and consistent without excessive processing.

    Explanation: The narration is usually the most important audio element in a faceless YouTube video. Clean, natural-sounding speech provides a strong foundation before music and sound effects are added.

    How to Balance Voiceover, Background Music, and Sound Effects

    Once the narration sounds clear on its own, you can add background music and sound effects.

    The most important rule is simple:

    The viewer should always be able to understand the voiceover clearly.

    Music and sound effects should support the video, not compete with the narration.

    Make the Voiceover the Main Audio Element

    For most educational faceless YouTube videos, the voiceover should be the loudest and clearest audio element. Start by setting the narration at a comfortable listening level, then add other sounds underneath it.

    Add Background Music at a Low Level

    Background music can help create mood, energy, continuity, and a more polished feel. However, it should remain in the background.

    A practical beginner method is:

    1. Play the narration by itself.

    2. Add the music track.

    3. Lower the music until it is clearly quieter than the voice.

    4. Listen to several sections.

    5. Reduce the music further if any words become harder to understand.

    Do not rely only on volume meters. Your ears matter too.

    Lower Music During Important Speech

    Some editors allow you to lower music automatically when narration begins. This may be called Ducking, Auto Ducking, Voice Priority, or Speech Emphasis.

    Audio ducking means temporarily reducing the music volume when someone is speaking. This can be useful, but always review the result.

    Use Keyframes When You Need More Control

    Many editors allow you to change audio volume at different points using keyframes. A keyframe marks a point where a setting changes.

    For example, you can keep music slightly louder during an opening title, lower it when narration begins, raise it briefly between major sections, lower it again under speech, and fade it out at the end.

    Do Not Let Music Mask Speech

    Some music tracks compete with speech even at a low volume, especially when they contain strong vocals, heavy drums, bright instruments, dense arrangements, or sudden loud sections.

    If viewers must work to understand the voice, the music is too distracting.

    Use Sound Effects With a Clear Purpose

    Sound effects can help emphasize a button click, notification, scene change, warning, successful completion, or short visual reveal. Use them selectively.

    Too many effects can make an educational video feel noisy and distracting.

    Keep Sound Effects Short and Controlled

    Check every sound effect for volume, timing, length, and relevance. Avoid sudden effects that are dramatically louder than the narration.

    Fade Music In and Out

    Background music often sounds more natural when it begins and ends gradually. Use fade-in at the beginning, fade-out at the ending, and short fades when changing music tracks.

    Avoid Music Changes That Distract From the Topic

    For many beginner tutorials, one suitable background track may be enough for a large part of the video. Change music only when it supports a significant change in tone or section.

    Check the Mix at Different Points

    Do not balance only the first 30 seconds. Listen to the beginning, a middle section, quieter and louder narration sections, a section with sound effects, and the ending.

    Listen on More Than One Device When Possible

    Audio can sound different through headphones, desktop speakers, laptop speakers, phone speakers, and television speakers. Even checking on two different playback devices can reveal problems.

    Avoid Extremely Loud Master Audio

    Do not try to make the complete video as loud as possible. Audio that is too loud can distort, sound harsh, reduce listening comfort, and make transitions more noticeable.

    Watch Audio Meters

    Use audio meters to identify sudden peaks, very quiet sections, possible clipping, and unexpectedly loud sound effects. Meters are helpful, but they do not replace listening.

    Check for Sudden Volume Jumps

    The viewer should not have to keep adjusting the volume. Play through transitions between audio elements and listen for unexpected jumps.

    Review the Video With Music Muted

    Temporarily mute the music track and listen to the narration. Then turn the music back on and compare. If the video becomes harder to understand when the music returns, reduce the music.

    Review the Video With Narration Muted

    Briefly mute the narration and listen to only the background elements. This can reveal sudden music changes, overused sound effects, gaps in background audio, abrupt cuts, or unnecessary noise.

    Check Music and Sound Licences

    Before publishing, confirm that you have the right to use the music and sound effects. Check whether commercial use is allowed, attribution is required, YouTube use is permitted, the licence applies to your plan, redistribution is restricted, and the licence conditions have changed.

    Do not assume that music described as “free” automatically means unrestricted commercial use. Save licence information and proof of permission with your project records.

    Be Careful With AI-Generated Music

    AI-generated music may also have usage conditions. Review the provider’s current terms before relying on it for a published or monetized video.

    Consider commercial-use rights, plan restrictions, ownership terms, attribution requirements, content restrictions, and whether generated music may resemble existing material.

    Policies and features can change, so check them when first using the tool, when changing plans or features, after receiving a policy update, and periodically.

    Figure 10. Keep narration clear and dominant, with background music lower and sound effects brief, controlled, and properly licensed.

    Explanation: A balanced audio mix helps viewers focus on the information. Music and sound effects should support the narration without hiding words, creating sudden volume jumps, or distracting from the lesson.

    How to Add and Review Captions

    Captions display spoken words and, when appropriate, important sounds as text on the screen.

    Captions are especially useful for viewers who are deaf or hard of hearing, watch videos with the sound turned off, have difficulty understanding a particular voice or accent, are watching in a noisy environment, or benefit from seeing important words while listening.

    For a faceless YouTube tutorial, accurate captions are an important accessibility feature.

    Captions Are Different From Ordinary On-Screen Text

    Captions normally follow the spoken narration. Ordinary on-screen text may instead highlight a step, title, or key idea.

    You can use both, but avoid creating so much overlapping text that the screen becomes difficult to read.

    You Can Create Captions During Editing

    Many video editors can automatically create captions from narration. Depending on the editor, the feature may be called Auto Captions, Automatic Captions, Speech to Text, Transcription, Generate Subtitles, or Auto Subtitles.

    This can save time, but automatically generated captions still need human review.

    Never Assume Automatic Captions Are Correct

    Automatic transcription can make mistakes with names, technical terminology, acronyms, product names, numbers, accents, unusual pronunciations, similar-sounding words, and speech over music or noise.

    A caption can look grammatically reasonable while still being factually wrong. Review the complete caption track against the actual narration.

    Check Every Caption

    Check for missing words, added words, incorrect words, misspellings, incorrect names, incorrect numbers, incorrect punctuation, captions appearing too early or late, and text disappearing before it can be read.

    Correct errors manually.

    Keep Captions Easy to Read

    Use clear fonts, readable text size, strong contrast, short manageable lines, and comfortable spacing.

    Avoid very small text, decorative fonts, extremely long lines, excessive animation, poor contrast, and large blocks of text covering important visuals.

    Position Captions Carefully

    Captions commonly appear near the lower part of the video, but that area may already contain important interface buttons, lower-third text, charts, demonstrations, or other labels.

    Do not solve one accessibility problem by creating another readability problem.

    Check Caption Timing

    A caption should appear close to when the corresponding words are spoken. Play the video at normal speed when reviewing timing.

    Break Long Captions Into Smaller Pieces

    Break longer narration into sensible sections based on sentences, phrases, natural pauses, or changes of idea. Do not divide words or phrases in places that make the sentence confusing.

    Include Important Non-Speech Information When Needed

    Captions can communicate important sounds such as [soft music], [notification sound], or [door closes]. You do not need to describe every tiny sound; include non-speech information when it helps the viewer understand the video.

    Decide Between Embedded Text and YouTube Caption Tracks

    Embedded or burned-in captions become part of the video image itself and normally cannot be switched off.

    YouTube caption tracks are separate from the video image. Viewers can turn available captions on or off and adjust certain caption-display settings.

    For accessibility and flexibility, a separate caption track can be valuable even when you occasionally use styled on-screen text in the edited video.

    Adding Captions in YouTube Studio

    YouTube currently allows creators to manage subtitles and captions in YouTube Studio → Subtitles. Creators can select a video, add a language, and then add captions or subtitles. YouTube also allows captions to be added during the upload process.

    The exact interface wording may change over time, so check YouTube’s current Help information if the buttons in your account look different.

    YouTube Automatic Captions Still Need Review

    YouTube can automatically create captions for supported videos using speech-recognition technology and provides tools for reviewing and correcting automatic captions that were not transcribed properly.

    Treat automatic captions as a starting point, not as the final quality check.

    Uploading a Caption File

    If your video editor can export a subtitle or caption file, YouTube supports several subtitle and closed-caption file formats. A caption file usually contains caption text, start times, and end times.

    Your editor’s available export formats may vary, so check whether its caption format is compatible with YouTube before depending on this workflow.

    Check Names, Numbers, and Technical Terms Twice

    Pay extra attention to information where one caption error could change the meaning, such as “15” versus “50,” “30 fps” versus “13 fps,” software names, people’s names, website addresses, dates, file formats, and technical terminology.

    Review Captions Without Sound

    Mute the video and watch part of it using only visuals, on-screen text, and captions. Ask whether you can understand the main information, captions are readable, they stay visible long enough, they cover important screen elements, and important sounds are explained when necessary.

    Do Not Forget Captions After Making Late Audio Changes

    Any time you replace a voiceover section, remove a sentence, add narration, or change timing significantly, review the affected captions again.

    Caption Review Checklist

    Before considering the captions complete, confirm that:

    • Every important spoken section is captioned.
    • The words match the narration.
    • Names and technical terms are correct.
    • Numbers are correct.
    • Spelling and punctuation have been reviewed.
    • Captions appear at the correct time.
    • Captions remain visible long enough to read.
    • Text is large and clear.
    • Captions do not hide essential visuals.
    • Important non-speech sounds are identified when necessary.
    • Late narration edits have not created caption errors.

    Figure 11. Automatic captions can speed up the process, but every caption should be checked for wording, timing, readability, and accuracy.

    Explanation: Captions improve accessibility only when viewers can rely on them. Review automatic transcription carefully, correct mistakes, and make sure captions remain synchronized with the final narration.

    How to Use AI-Assisted Video Editing Features Responsibly

    Modern video editors increasingly include AI-assisted features that can automate or speed up parts of the editing process.

    Depending on the software, AI may help with creating captions, transcribing narration, removing background noise, improving voice recordings, removing or replacing backgrounds, finding pauses or silence, reframing video, generating short clips, creating titles or summaries, suggesting edits, generating or extending images, generating music or sound, and improving image or video quality.

    These tools can save time, but they should be treated as editing assistants, not as substitutes for reviewing the finished video.

    Review Every AI-Assisted Edit

    Do not assume an AI feature made the correct decision. An automatic editing tool might cut an important pause, remove part of a word, select an irrelevant clip, crop an important object, create incorrect captions, remove useful background sound, make a voice sound unnatural, generate incorrect text, or add footage that does not match the narration.

    After using an AI-assisted feature, play the affected section and check it yourself.

    Keep Control of the Final Edit

    Automatic editing can be useful for creating a starting point. An editor might analyze the narration, remove long pauses, add captions, suggest scene changes, and adjust audio.

    You should then review those changes and decide what stays. Your final video should reflect your own topic, structure, research, explanations, visual choices, editing decisions, and quality standards.

    YouTube’s current monetization policies emphasize original, authentic content and clarify that repetitive or mass-produced content may be ineligible for monetization. Automated tools can assist creation, but the finished work should still provide meaningful original value.

    Be Careful With Automatic Silence Removal

    Automatic silence removal can sometimes make narration sound rushed. Natural pauses can help viewers understand a difficult point, read a graphic, follow a demonstration, or recognize a change of topic.

    After using silence removal, listen to the complete section at normal speed and restore pauses when the narration feels unnatural or too fast.

    Review Automatic Reframing and Cropping

    AI-assisted reframing may automatically reposition a video when changing its size or aspect ratio. Check that the automatic crop has not removed important text, interface buttons, diagrams, faces, products, demonstration steps, or important objects.

    Check AI Background Removal Carefully

    Automatic background removal can struggle with hair, hands, clothing, moving objects, transparent objects, and fine edges. Poor results can produce flickering, missing body parts, or unnatural outlines.

    Treat AI Audio Repair as a Starting Point

    AI tools may offer automatic noise removal, voice enhancement, echo reduction, volume correction, or speech cleanup. Always compare the processed version with the original and use the version that makes the narration clearer without making it sound strange.

    Review AI-Generated Captions

    Check names, numbers, technical terms, product names, punctuation, and timing. YouTube’s current guidance lists caption creation as an example of production assistance that does not by itself require an AI-content disclosure.

    Check AI-Generated Visuals for Accuracy

    AI-generated visuals can contain invented text, incorrect objects, impossible physical details, inaccurate interfaces, misleading locations, false historical details, or unrealistic movement.

    Never use a realistic-looking image as proof that an event actually happened. If factual accuracy matters, verify the underlying information separately.

    Understand YouTube’s Current AI Disclosure Rule

    As of August 2026, YouTube requires creators to disclose AI-generated or altered content that seems realistic and meets its disclosure criteria. Examples include making a real person appear to say or do something they did not do, altering footage of a real event or place, or generating a realistic scene that did not actually occur.

    YouTube currently provides an AI use setting during the upload process for this purpose.

    YouTube also explains that minor or primarily production-assistance uses generally do not require this disclosure. Current examples include caption creation, video sharpening or upscaling, video repair, voice or audio repair, colour or lighting adjustments, idea generation, assistance with scripts, titles, thumbnails, or infographics, and cloning your own voice for voiceovers or dubbing.

    This does not mean every use of AI is automatically exempt. The nature of the finished content matters.

    Some AI-Generated Content Does Require Disclosure

    YouTube’s current examples of content requiring disclosure include realistic AI-generated or meaningfully altered scenes and AI-generated music.

    For example, disclosure may be required if you create:

    • A realistic scene of an event that never happened
    • Realistic additional footage depicting a real place
    • A real person appearing to give advice they never gave
    • A realistic fake event involving a public figure
    • AI-generated music

    Because YouTube’s policies and interface can change, check current official guidance when you first begin using these features, when your workflow changes, when YouTube announces a policy update, and periodically.

    Disclosure Does Not Automatically Prevent Monetization

    YouTube currently states that making the required AI disclosure does not by itself limit a video’s audience or make it ineligible to earn money. However, monetization has separate requirements.

    Simply adding AI narration, AI visuals, transitions, or automatic editing to copied material should not be treated as a guaranteed path to monetization.

    Do Not Build a Channel Around Repetitive Automation

    It can be tempting to create one template and automatically produce many nearly identical videos. This may be fast, but speed alone does not create useful content.

    YouTube’s current monetization guidance addresses inauthentic, repetitive, or mass-produced content. For an AI Mastery-style educational channel, concentrate on making each video genuinely useful to the viewer.

    Be Careful With Reused Material

    AI editing does not automatically transform someone else’s content into original content. Adding only AI narration, music, captions, simple filters, or minor cuts may not necessarily provide enough original value.

    Create your own explanations, structure, examples, editing decisions, and meaningful additions.

    YouTube’s reused-content monetization policy is separate from copyright rules. Permission to use something does not automatically mean it satisfies monetization requirements.

    Protect Private Information

    Some AI editing services may process uploaded videos, voice recordings, photographs, documents, or screen recordings. Before uploading sensitive material, check the provider’s current privacy and data-use terms.

    Remove unnecessary personal information before uploading whenever practical.

    Get Permission Before Imitating Real People

    Do not use AI editing features to make a real person appear to say something they never said, perform an action they never performed, endorse a product they never endorsed, or participate in a video they never joined.

    Obtain appropriate permission when using another person’s voice, likeness, photograph, or recording.

    Keep Records of Important AI Use

    For important projects, keep original prompts, original generated files, source media, editing project versions, tool names, important settings, licence information, permissions, master exports, and publication records.

    A Simple Rule for Beginners

    Use this workflow:

    AI Assists → You Review → You Correct → You Approve

    Do not reverse it into:

    AI Creates → Publish Immediately

    The human review is what catches errors, misleading visuals, bad timing, poor audio, privacy problems, and other issues the automated system may miss.

    Figure 12. AI-assisted editing can save time, but the creator should review, correct, and approve the finished work before publication.

    Explanation: AI can assist with captions, audio cleanup, reframing, visual generation, and other editing tasks, but human review remains essential for accuracy, timing, accessibility, privacy, permissions, and appropriate disclosure.

    How to Review the Complete Video Before Exporting

    Before exporting your finished faceless YouTube video, watch the entire project from beginning to end. Do not review only individual scenes.

    A video can look correct section by section but still contain problems when everything plays together. A full review helps you catch missing visuals, incorrect timing, audio problems, spelling errors, caption mistakes, repeated scenes, black frames, unwanted gaps, placeholder text, incorrect facts, privacy problems, and licence or permission concerns.

    Watch the Video at Normal Speed

    Start from the beginning and watch the complete video at normal playback speed. Try to watch it as a viewer rather than as the person who created it.

    Ask:

    • Is the opening clear?
    • Does the video explain the topic quickly enough?
    • Does each section lead naturally to the next?
    • Are any scenes unnecessarily long?
    • Does anything feel rushed?
    • Are the visuals relevant?
    • Is the narration easy to understand?
    • Does the ending feel complete?

    Take notes instead of stopping every few seconds. After the full viewing, return to the sections that need correction.

    Check the Beginning Carefully

    Confirm that the video starts intentionally, there is no accidental black screen, the opening title is correct, the voiceover begins at the intended time, music does not overpower narration, the first visual matches the topic, and no unfinished editing elements appear.

    Check Every Scene Change

    Look for black frames, empty timeline gaps, transitions that are too long, sudden jumps, images disappearing too early, or visuals remaining after the narration has changed topic.

    Check Visual Accuracy

    Review AI-generated text, screenshots, screen recordings, charts, diagrams, names, dates, numbers, and interface examples. A polished appearance does not prove that a visual is accurate.

    Correct, replace, or remove anything misleading.

    Check Screen Recordings for Private Information

    Pause at different points in every screen recording. Look for email addresses, notifications, browser tabs, account names, file names, personal documents, private messages, payment details, and customer information.

    Do not assume information is safe simply because it appears for less than a second. Blur, crop, replace, or remove sensitive material.

    Review Text and Titles

    Check spelling, grammar, capitalization, names, step numbers, dates, technical terms, and consistent formatting.

    Also check that text remains visible long enough, has sufficient contrast, does not touch the edges, does not cover important visuals, and uses a consistent style.

    Review the Captions Again

    Late editing changes can cause captions to become inaccurate or mistimed. Check spoken words, names, numbers, punctuation, timing, line breaks, and readability.

    Listen to the Audio Without Watching

    Perform an audio-only review. Listen for voice clarity, volume changes, abrupt cuts, background noise, music that becomes too loud, distracting sound effects, missing narration, and long unwanted silence.

    Watch Without Sound

    Mute the video and watch several sections. Check whether captions are readable, visuals make sense, titles are clear, important instructions are understandable, screens stay visible long enough, and important information is not communicated only through sound.

    This is a useful accessibility review.

    Check Music and Sound Effects

    Listen carefully when music or sound effects begin and end. Look for sudden loud starts, abrupt endings, poor fades, music competing with speech, excessive sound effects, or effects playing at the wrong moment.

    Look for Placeholders

    Search the timeline for temporary items such as Add image here, Replace this clip, Insert screenshot, Fix audio, Add title, or Placeholder. Remove every unfinished note before exporting.

    Also check for temporary test graphics, colour blocks, sample music, draft narration, or unapproved images.

    Check for Duplicated or Missing Content

    Compare the final video with your script or storyboard. Make sure every intended section is present once and in the correct order.

    Check Factual Accuracy

    Before publication, verify important factual claims, especially software features, platform rules, prices, plan conditions, licensing terms, privacy settings, commercial-use conditions, and AI disclosure requirements.

    Use current reliable sources when necessary.

    Check Licences and Permissions

    Confirm that your project records cover important third-party assets such as music, sound effects, stock footage, stock images, templates, fonts, voice recordings, and photographs of real people.

    Do not assume that downloading an asset gives you unlimited publishing or commercial rights.

    Check AI Disclosure Needs

    Review whether any part of the finished video contains realistic AI-generated or meaningfully altered content that viewers could reasonably mistake for real footage, speech, people, places, or events.

    If disclosure is required by YouTube or another platform, prepare to provide it during publication.

    Check the Ending

    Make sure the final sentence is complete, music ends smoothly, the final visual stays long enough, captions finish correctly, and there is no accidental blank section after the ending.

    Save a Final Pre-Export Project Version

    Before exporting, save the project again. You may create a version such as faceless-video-v05-pre-export.

    Use a Final Review Checklist

    Before pressing Export, confirm:

    •  The complete video has been watched.
    • Narration is clear.
    • Visuals match the narration.
    • Scene timing feels natural.
    • No unwanted gaps remain.
    • No black frames appear accidentally.
    • Text is readable and correctly spelled.
    • Captions are accurate.
    • Music stays below narration.
    • Sound effects are controlled.
    • Private information has been removed.
    • AI-generated visuals have been checked.
    • Important facts have been verified.
    • Licences and permissions have been reviewed.
    • Required disclosure has been considered.
    • Placeholders have been removed.
    • The ending is complete.
    • The project has been saved.

    Figure 13. A complete pre-export review helps catch visual, audio, accessibility, accuracy, privacy, and licensing problems before the finished file is created.

    Explanation: Watch and listen to the entire video before export rather than checking only individual scenes. A structured final review is one of the simplest ways to prevent avoidable publishing mistakes.

    How to Export the Finished Video for YouTube

    After you have completed the full review, you are ready to export the video. Exporting creates the finished video file from everything on your editing timeline.

    Remember: Saving the project and exporting the video are not the same thing. Your project file keeps the editable timeline. The exported file is the finished video that you can upload to YouTube.

    Save the Editing Project First

    Before exporting:

    1. Save the project.

    2. Confirm that all media is available.

    3. Save a final project version when useful.

    For example: faceless-video-v06-final-project.

    Keep this editable version even after the video has been published.

    Find the Export Command

    Depending on your editing program, the command may be called Export, Render, Share, Produce, Export Video, or Create Video.

    The export area normally gives you choices for file format, resolution, frame rate, video quality, video codec, audio settings, filename, and save location.

    A Practical Beginner Export Setup

    For a typical 16:9 faceless YouTube video created in Full HD, a practical starting point is:

    • Resolution: 1920 × 1080
    • Aspect ratio: 16:9
    • Container: MP4
    • Video codec: H.264
    • Scan: Progressive
    • Frame rate: Match the frame rate used for your project or original recording
    • Audio: AAC-LC when available
    • Audio sample rate: 48 kHz

    These choices closely follow YouTube’s current recommended upload-encoding settings. YouTube currently recommends MP4 as the container, H.264 video, progressive scan, and 48 kHz audio. Supported recommended audio codecs include AAC-LC, Opus, and Eclipsa Audio.

    Many editors provide a preset such as YouTube, YouTube 1080p, Full HD, or 1080p H.264. A suitable preset can simplify the process, but still review its important settings before exporting.

    Match the Original Frame Rate

    YouTube currently recommends uploading content at the same frame rate at which it was recorded. Common frame rates include 24, 25, 30, 48, 50, and 60 frames per second.

    Do not change a 30 fps project to 60 fps simply because 60 sounds better. Creating extra frames does not automatically improve the original material.

    Choose the Resolution Carefully

    For many beginner faceless YouTube tutorials, 1920 × 1080, commonly called 1080p or Full HD, provides a practical balance between quality and file size.

    If your project and source material were created in 4K, you may choose to export in 4K. However, exporting low-resolution source material at a much higher resolution does not magically restore missing detail.

    Understand Bitrate Without Making It Complicated

    Bitrate describes roughly how much data is used to represent the video over time. Higher bitrates can preserve more visual information but also create larger files.

    YouTube’s current recommended SDR upload bitrates include:

    • 1080p at 24, 25, or 30 fps: 8 Mbps
    • 1080p at 48, 50, or 60 fps: 12 Mbps
    • 1440p at standard frame rates: 16 Mbps
    • 2160p/4K at standard frame rates: 35–45 Mbps

    If your editor provides a good YouTube or high-quality export preset, beginners usually do not need to manually adjust every advanced bitrate control.

    Use Suitable Audio Settings

    YouTube currently recommends a 48 kHz audio sample rate. Its recommended upload audio bitrate for stereo audio is 384 kbps.

    The most important practical test is still to make sure the exported narration is clear, undistorted, properly synchronized, loud enough to understand, and not overwhelmed by music.

    Give the Export a Clear Filename

    Avoid filenames such as final.mp4, final-new.mp4, or final-final.mp4. Use a descriptive filename such as faceless-youtube-ai-tools-master-v1.mp4.

    Save the Export in the Correct Folder

    Save the master export inside the project folder you created earlier, such as 09-Exports. You may create subfolders for Master, Review Copies, Published Version, and Shorts or Alternate Formats.

    Export a Master Version

    When practical, keep a high-quality final export as your master version. This is the main finished copy from which you can later create a corrected version, shorter version, promotional clip, different aspect ratio, or archive copy.

    Wait for the Export to Finish Completely

    Do not close the editor or shut down the computer before the export has completed successfully. After completion, confirm that the output file exists in the intended folder.

    Watch the Exported File

    Do not assume the exported file is correct just because the editing timeline was correct. Open the actual exported file and watch it.

    At minimum, check the beginning, several middle sections, scene transitions, captions, important screen recordings, music, and ending. For a final publication-quality check, watch the complete exported file.

    Check for Export Problems

    Look and listen for missing audio, audio out of sync, black frames, frozen video, missing images, missing text, incorrect colours, distorted audio, low visual quality, captions appearing incorrectly, and unexpected cropping.

    If you find a problem, return to the editing project, correct it, and export a new version.

    Check the File Before Uploading

    Before moving to YouTube, confirm that the correct version was exported, the filename is clear, the video opens successfully, the beginning and ending are correct, audio and video remain synchronized, captions or embedded text display correctly, no placeholders remain, and no private information is visible.

    Videos Longer Than 15 Minutes

    YouTube currently states that accounts can upload videos up to 15 minutes by default, while verified accounts can upload longer videos. YouTube currently lists the maximum upload as 256 GB or 12 hours, whichever is less.

    Most beginner faceless tutorials will be far below these limits, but longer videos may require account verification.

    Do Not Delete the Project After Uploading

    Keep important project materials after publication, including the final script, source visuals, original narration, editing project, master export, caption files, licence records, permission records, important AI-generation records, and published version information.

    Export Settings Can Change

    YouTube can change its technical recommendations. You do not need to reread the complete technical documentation before every upload.

    Check current official guidance when setting up your workflow for the first time, changing editing software or export settings, YouTube announces relevant changes, you begin using a significantly different video format, and periodically as part of maintaining your publishing workflow.

    As of August 8, 2026, the settings described above reflect YouTube’s current official upload-encoding guidance.

    Figure 14. A beginner-friendly export workflow saves the editable project, uses suitable YouTube settings, creates the master video, and checks the actual exported file before upload.

    Explanation: Exporting is not the final quality check. Keep the editable project and master file, then review the exported video itself to catch rendering, synchronization, visual, or audio problems before publication.

    Common Faceless YouTube Video Editing Mistakes

    Beginners often make editing harder than it needs to be. Most problems are not caused by a lack of advanced skills. They come from poor organization, rushed decisions, excessive effects, or incomplete review.

    Mistake 1: Editing Without Organizing the Files

    Starting with files scattered across different folders can quickly become confusing.

    Reality: Good organization is part of editing, not a separate administrative task.

    How to Avoid This Mistake: Create one main project folder with clearly labelled subfolders before importing your media.

    Mistake 2: Adding Visuals Before the Narration Structure Is Stable

    If you carefully place dozens of visuals before finishing the voiceover, a later narration change may force you to rearrange much of the timeline.

    Reality: For many faceless videos, the narration provides the basic structure of the edit.

    How to Avoid This Mistake: Clean and arrange the main voiceover first, then build the visuals around it.

    Mistake 3: Changing the Visual Too Often

    Some beginners change the scene every few seconds because they are afraid the viewer will become bored.

    Reality: A useful visual can remain on screen while several related sentences are explained.

    How to Avoid This Mistake: Change visuals when the topic, example, action, or explanation changes—not simply because a timer has passed.

    Mistake 4: Leaving One Visual on Screen Too Long

    A static image may remain on screen long after the narration has moved to another idea.

    Reality: Visual timing should follow meaning.

    How to Avoid This Mistake: Replace or change the visual when it no longer supports the spoken information.

    Mistake 5: Using Too Many Transitions

    Reality: Most scene changes can use a simple cut.

    How to Avoid This Mistake: Use direct cuts for ordinary changes and reserve short fades or dissolves for larger section changes when they genuinely help.

    Mistake 6: Making Background Music Too Loud

    Reality: In most educational faceless videos, narration should remain the main audio element.

    How to Avoid This Mistake: Lower the music until the spoken words are clearly understandable, then check the mix on more than one section and device when practical.

    Mistake 7: Using Too Many Sound Effects

    Reality: Sound effects are most effective when used selectively.

    How to Avoid This Mistake: Use a sound effect only when it adds useful emphasis or helps explain an action.

    Mistake 8: Overprocessing the Voiceover

    Reality: More audio processing does not automatically mean better audio.

    How to Avoid This Mistake: Apply only what is needed, then compare the processed voice with the original.

    Mistake 9: Trusting Automatic Captions Without Checking Them

    Reality: A caption can look believable and still be wrong.

    How to Avoid This Mistake: Review the complete caption track and correct wording, spelling, timing, names, and numbers.

    Mistake 10: Using Small or Crowded Text

    Reality: YouTube viewers use many different screen sizes.

    How to Avoid This Mistake: Use large text, strong contrast, short phrases, clear spacing, and safe distance from the edges.

    Mistake 11: Showing Important Text Too Briefly

    Reality: Reading takes time, especially when viewers are also listening to narration.

    How to Avoid This Mistake: Make sure text stays visible long enough to read comfortably.

    Mistake 12: Leaving Black Frames or Empty Gaps

    Reality: Tiny timeline gaps are easy to miss while editing.

    How to Avoid This Mistake: Zoom into scene boundaries and watch the completed video from beginning to end before export.

    Mistake 13: Forgetting Temporary Placeholders

    Reality: Temporary editing notes must never survive the final review.

    How to Avoid This Mistake: Perform a dedicated placeholder check before exporting.

    Mistake 14: Using Irrelevant Stock Footage

    Reality: Relevant visuals help comprehension more than decorative visuals.

    How to Avoid This Mistake: Ask whether each visual helps explain, demonstrate, or reinforce the narration.

    Mistake 15: Using Misleading AI-Generated Visuals

    Reality: Realistic appearance is not evidence of truth.

    How to Avoid This Mistake: Review AI visuals for factual accuracy and disclose synthetic content when viewers could reasonably mistake it for reality or when platform rules require disclosure.

    Mistake 16: Ignoring Screen-Recording Privacy

    Reality: Private information may appear for only a fraction of a second and still be visible to viewers.

    How to Avoid This Mistake: Review screen recordings carefully and crop, blur, replace, or rerecord sensitive sections.

    Mistake 17: Assuming Every Downloaded Asset Is Safe to Use

    Reality: Being able to download an asset does not automatically give unlimited commercial or publishing rights.

    How to Avoid This Mistake: Check the applicable licence and save permission or licence records with the project.

    Mistake 18: Moving Source Files After Importing Them

    Reality: The editing project may depend on the original file location.

    How to Avoid This Mistake: Organize your files before importing them and avoid moving them until the project is complete.

    Mistake 19: Exporting Without Watching the Final File

    Reality: The exported file is what the viewer will receive—not the editing timeline.

    How to Avoid This Mistake: Open and review the actual exported video before uploading it.

    Mistake 20: Deleting the Project After Publishing

    Reality: Keeping the editable project makes future corrections much easier.

    How to Avoid This Mistake: Preserve the project file, source files, master export, captions, permissions, licences, and important publication records.

    Figure 15. Most beginner editing problems can be prevented with organized files, simple visual choices, clear audio, careful captioning, privacy checks, and a complete final review.

    Explanation: Strong editing is usually built on clear fundamentals rather than complicated effects. Avoiding these common mistakes helps produce a video that is easier to understand, safer to publish, and easier to update later.

    Benefits of a Simple Editing Workflow

    A simple editing workflow helps beginners produce videos more consistently without becoming overwhelmed by unnecessary tools and effects.

    You do not need a complicated editing system to make a useful faceless YouTube video. A clear process can improve both the quality of the finished video and the efficiency of your work.

    Benefit 1: You Know What to Do Next

    A repeatable workflow removes much of the uncertainty from editing. Instead of randomly moving between different tools, you can follow a clear order:

    1. Organize the files.

    2. Import the media.

    3. Place the narration.

    4. Add the main visuals.

    5. Trim and arrange clips.

    6. Improve the audio.

    7. Add text and captions.

    8. Review the complete video.

    9. Export the finished file.

    This makes large projects feel more manageable.

    Benefit 2: Fewer Editing Mistakes

    When you complete tasks in a sensible order, you reduce the chance of creating unnecessary problems. Completing the main cuts before adding many transitions means you are less likely to redo transition work later.

    Benefit 3: Easier Corrections

    A well-organized project makes corrections much easier. If you discover that a scene contains an incorrect visual, you can find and replace that asset without searching through hundreds of poorly named files.

    Benefit 4: More Consistent Videos

    Using the same basic editing process from one video to another helps create consistency in titles, section headings, transitions, captions, music, audio levels, file organization, and export settings.

    Benefit 5: Faster Editing Over Time

    Your first few videos may take longer because many actions are unfamiliar. As you repeat the same workflow, common tasks become easier.

    The goal is not to rush. The goal is to spend less time figuring out the process and more time improving the content.

    Benefit 6: Easier Collaboration

    Even if you currently work alone, organized files and project versions can help if another person becomes involved later, such as a voiceover artist, video editor, designer, researcher, or caption reviewer.

    Benefit 7: Better Backups and Record Keeping

    A structured workflow encourages you to preserve original source files, project versions, master exports, caption files, licences, permissions, AI-generation records, and publication records.

    Benefit 8: Easier Updates to Older Videos

    Software, platform rules, and AI tools can change. An older tutorial may eventually contain an outdated interface, changed setting, old policy, discontinued feature, or incorrect instruction.

    If you kept the project organized, you may be able to replace only the affected sections instead of rebuilding the entire video.

    Benefit 9: Less Dependence on One Editing Program

    Learning the underlying workflow is more valuable than memorizing one specific application. Different editors may use different button names, but the main ideas remain similar: Import, Timeline, Trim, Split, Move, Audio, Text, Captions, and Export.

    Benefit 10: More Attention on the Viewer

    A simple workflow gives you more time to concentrate on the questions that actually matter:

    • Is the explanation clear?
    • Does the visual help?
    • Can the viewer hear the narration?
    • Can the viewer read the text?
    • Is the information accurate?
    • Is anything misleading?
    • Is the video easy to follow?

    These questions matter more than using the largest number of editing effects.

    Figure 16. A simple repeatable editing workflow reduces confusion, improves consistency, and makes future corrections and updates easier.

    Explanation: Beginners benefit more from a dependable editing process than from learning every advanced feature immediately. A structured workflow helps you focus on clarity, accuracy, audio quality, accessibility, and the viewer’s experience.

    Limitations of AI-Assisted and Beginner Video Editing

    AI-assisted editing tools can make video production easier, but they do not remove the need for human judgment. Beginners should understand the main limitations before depending heavily on automation.

    Limitation 1: AI Can Make Incorrect Editing Decisions

    Automatic editing tools may misunderstand what matters in a scene. AI may remove a useful pause, cut a sentence too early, select an irrelevant visual, crop out an important object, choose the wrong moment for a scene change, or create captions containing incorrect words.

    How to Reduce This Limitation: Treat automatic edits as suggestions. Review every important change before approving it.

    Limitation 2: Automatic Captions Can Be Wrong

    Speech-to-text systems can misunderstand names, numbers, technical terms, acronyms, product names, accents, and unusual pronunciations.

    How to Reduce This Limitation: Compare captions with the actual narration and manually correct errors before publication.

    Limitation 3: Audio Repair Cannot Fix Every Problem

    Noise reduction and voice-enhancement tools cannot always repair severe distortion, very loud background noise, strong echo, missing words, poor microphone placement, or clipped audio.

    How to Reduce This Limitation: Start with the cleanest recording possible. Rerecord badly damaged sections when practical instead of relying entirely on repair tools.

    Limitation 4: AI-Generated Visuals Can Contain Errors

    AI-generated images and video can produce incorrect text, distorted objects, strange hands, impossible movement, inconsistent characters, false details, or misleading realistic scenes.

    How to Reduce This Limitation: Inspect important AI-generated visuals carefully and replace anything inaccurate, confusing, or misleading.

    Limitation 5: Automatic Reframing Can Crop Important Content

    When AI converts a landscape video into another aspect ratio, it may focus on the wrong part of the image and remove text, interface controls, diagrams, people, or important objects.

    How to Reduce This Limitation: Preview every automatically reframed scene and manually reposition the crop when needed.

    Limitation 6: AI Background Removal May Look Unnatural

    Automatic background removal can struggle with hair, hands, transparent objects, fast movement, fine edges, or similar foreground and background colours.

    How to Reduce This Limitation: Review the full moving clip instead of checking only one frame. If the effect looks distracting, use a simpler background or another visual.

    Limitation 7: Templates Can Make Videos Look Repetitive

    Templates can save time, but using the same layout, scene order, effects, and stock footage repeatedly can make videos feel nearly identical.

    How to Reduce This Limitation: Use templates for structure, not as a substitute for original explanations, examples, research, and editing decisions.

    Limitation 8: AI Does Not Automatically Make Content Original

    Adding AI narration, automatic captions, music, or transitions to existing material does not necessarily create meaningful original value.

    How to Reduce This Limitation: Add your own structure, commentary, explanations, examples, demonstrations, and editorial decisions.

    Limitation 9: Editing Software Can Change

    Video-editing applications frequently change button locations, menu names, AI features, export options, plan limits, supported formats, pricing, and licence conditions.

    How to Reduce This Limitation: Learn the underlying editing concepts rather than memorizing only one interface. Check current official information when a feature, plan, licence, or export setting matters.

    Limitation 10: AI Features May Depend on Internet Access

    Some AI-assisted editing features work through cloud services rather than entirely on your computer. Large video files can also take significant time to upload.

    How to Reduce This Limitation: Keep a workflow that can continue without every AI feature. Save local copies of important source files and project versions.

    Limitation 11: AI Processing Can Create Privacy Concerns

    Cloud-based AI features may require you to upload voice recordings, videos, photographs, screen recordings, or documents.

    How to Reduce This Limitation: Remove unnecessary personal or confidential information before uploading files and review the provider’s current privacy and data-use conditions when sensitive material is involved.

    Limitation 12: Commercial-Use Rights Can Vary

    Different editing tools, AI services, stock libraries, music providers, templates, and fonts can have different rules.

    How to Reduce This Limitation: Check the licence and commercial-use terms that apply to the tool, plan, and asset you are using. Save important licence records.

    Limitation 13: AI Cannot Reliably Judge Factual Accuracy

    A video can be technically well edited while containing incorrect information.

    How to Reduce This Limitation: Verify important claims independently, especially technical instructions, statistics, legal or policy information, software features, dates, and other information that may change.

    Limitation 14: Editing Still Takes Time

    AI tools can speed up individual tasks, but a good video still requires time for reviewing the script, preparing assets, editing narration, matching visuals, checking captions, balancing audio, checking accuracy, reviewing privacy, exporting, and watching the final file.

    How to Reduce This Limitation: Use a repeatable workflow and improve it gradually instead of trying to automate the entire process immediately.

    Limitation 15: More Automation Does Not Always Produce a Better Video

    Automatic effects, scene selection, transitions, captions, and audio enhancement can make production faster. However, too much automation can make a video feel generic or poorly matched to the subject.

    How to Reduce This Limitation: Use automation where it saves useful time, but keep human control over the final structure, timing, accuracy, and presentation.

    Figure 17. AI-assisted editing can save time, but it still has limitations involving accuracy, audio, captions, privacy, licensing, and automated decision-making.

    Explanation: AI editing tools are most useful when they assist a careful human workflow. Reviewing the final decisions yourself helps catch problems that automated systems may overlook.

    Myths About Editing Faceless YouTube Videos

    Beginners often hear advice that makes video editing sound more complicated, expensive, or automatic than it really is. Understanding these common myths can help you focus on the skills that matter most.

    Myth 1: You Need Professional Editing Software to Make a Good Video

    Expensive professional software can offer advanced tools, but beginners do not need every advanced feature to create a clear faceless YouTube video.

    Reality: A basic editor that can trim clips, arrange a timeline, adjust audio, add text, create captions, and export suitable video files may be enough to begin.

    Myth 2: More Effects Make a Video Look More Professional

    Reality: Too many effects can make a video distracting. Clear cuts, readable text, relevant visuals, good pacing, and understandable audio usually matter more.

    Myth 3: The Visual Must Change Every Few Seconds

    Reality: The visual should remain as long as it continues helping the viewer understand the narration. Edit according to meaning rather than a stopwatch.

    Myth 4: Background Music Is Necessary Throughout the Entire Video

    Reality: Clear narration matters more than having music in every scene. Use music intentionally.

    Myth 5: Louder Audio Is Better Audio

    Reality: Audio that is pushed too high can distort or become uncomfortable. Good narration should be clear, consistent, and easy to understand.

    Myth 6: AI Can Edit the Entire Video Correctly Without Review

    Reality: Automated systems can still make incorrect decisions. AI can assist the workflow, but the finished video still needs human review.

    Myth 7: Automatic Captions Are Always Accurate

    Reality: Automatic captioning can misunderstand names, numbers, technical terminology, accents, and unusual words. Always review captions before publication.

    Myth 8: AI-Generated Visuals Do Not Need Fact Checking

    Reality: AI-generated visuals can contain invented, inaccurate, or physically impossible details. A realistic image or video is not proof that something actually happened.

    Myth 9: Anything Created With AI Is Automatically Copyright-Free

    Reality: Rights and permitted uses can depend on the AI provider’s terms, your subscription or plan, source material, reference images, music, fonts, templates, other incorporated assets, and applicable law.

    Myth 10: Free Music Can Always Be Used Commercially

    Reality: Check the actual licence. “Free” can still involve attribution, commercial-use, modification, or redistribution conditions.

    Myth 11: Stock Footage Automatically Makes a Video Original

    Reality: Your original value normally comes from your explanation, research, structure, examples, narration, demonstrations, and editing decisions.

    Myth 12: A Faceless Channel Means No Human Involvement Is Needed

    Reality: Human judgment remains important for research, accuracy, editing, timing, privacy, permissions, accessibility, fact checking, and final quality control.

    Myth 13: Once the Timeline Looks Correct, the Video Is Finished

    Reality: The final export must also be reviewed. Rendering problems can include missing audio, frozen frames, incorrect captions, black screens, synchronization issues, or unexpected cropping.

    Myth 14: You Must Learn Every Editing Feature Before Publishing

    Reality: Beginners can start with a small core set of skills: Import, Timeline, Trim, Split, Move, Volume, Text, Captions, and Export.

    Myth 15: Your First Video Must Look Like a Professional Production

    Reality: Your first goal should be a video that is clear, accurate, understandable, well organized, properly reviewed, accessible, and safe to publish.

    Editing quality improves through repeated practice.

    Figure 18. Good faceless YouTube editing depends more on clear fundamentals, careful review, and consistent practice than on expensive software, constant effects, or complete automation.

    Explanation: Understanding these myths helps beginners concentrate on practical editing skills instead of unnecessary complexity. Simple tools and careful decisions can produce clear, useful videos while your skills continue to improve.

    Frequently Asked Questions About Editing Faceless YouTube Videos

    Do I Need Expensive Video-Editing Software?

    No. Beginners can learn the basic editing process with software that provides essential tools such as timeline editing, trimming, splitting, audio controls, text, captions, and export options.

    More advanced software can provide additional control, but expensive software does not automatically create a better video.

    Should I Edit the Voiceover or the Visuals First?

    For many faceless YouTube videos, it is easier to edit the voiceover first. The narration can then guide scene timing, visual placement, section changes, text placement, and music timing.

    How Often Should I Change the Visual?

    There is no fixed rule. Change the visual when the subject changes, a new example begins, a demonstration starts, the current visual no longer supports the narration, or the viewer needs to see something specific.

    How Long Should a Still Image Stay on Screen?

    It depends on the image and narration. A simple image may only need a few seconds. A detailed diagram, screenshot, checklist, or infographic may need more time.

    Should I Use Transitions Between Every Clip?

    No. A direct cut is often the best choice. Simple transitions such as fades or dissolves can be useful for larger changes.

    Should Background Music Play Throughout the Entire Video?

    Not necessarily. Background music can help create atmosphere, but clear narration is more important. Use whatever supports the viewer’s understanding.

    How Loud Should Background Music Be?

    There is no single volume setting that works for every recording and music track. The practical rule is: The narration must remain clearly understandable.

    Can AI Clean Up Bad Audio Completely?

    Not always. AI audio tools can sometimes reduce background noise, hum, echo, or uneven levels, but badly distorted or severely noisy recordings may still sound poor after processing.

    Can I Use an AI Voice for a Faceless YouTube Video?

    AI-generated narration can be used as part of a faceless-video workflow, subject to applicable tool terms, platform rules, permissions, and any disclosure requirements that apply to the finished content.

    Do not use another real person’s voice or likeness in a misleading or unauthorized way.

    Do I Need Captions?

    Captions are strongly recommended for accessibility and can also help people watching without sound or in noisy environments. Whether produced automatically or manually, review them before publication.

    Are Automatic Captions Good Enough?

    They can provide a useful starting point, but they should not automatically be treated as final. Always review and correct the captions.

    Should I Add Captions Inside the Video or Through YouTube?

    Both approaches are possible. Text permanently embedded into the video cannot normally be turned off. A separate caption track gives viewers more flexibility.

    Can I Use Stock Footage in a Faceless YouTube Video?

    Yes, when you have the appropriate rights or licence for your intended use. Stock footage should support your own content rather than replace meaningful original work.

    Can I Use AI-Generated Images and Video?

    Yes, when their use complies with applicable tool terms, platform policies, permissions, and other relevant requirements. Review AI-generated content carefully for inaccuracies and misleading realism.

    Do I Have to Disclose That AI Was Used?

    Not every AI-assisted editing action requires the same treatment. The important question is what the final content shows and whether viewers could reasonably mistake realistic synthetic or meaningfully altered material for something real.

    Can AI Edit My Entire Video Automatically?

    Some tools can automate large parts of the editing process, but you should still review cuts, visual choices, captions, audio, timing, accuracy, privacy, permissions, and disclosure needs.

    How Long Does It Take to Edit a Faceless YouTube Video?

    There is no reliable universal time. Editing time depends on video length, number of scenes, amount of screen recording, corrections, audio quality, caption work, experience, computer performance, and complexity of the visuals.

    Should I Use Lots of Zooms and Animations to Keep Attention?

    Not necessarily. Excessive motion can become distracting. Use movement when it helps the viewer notice something important.

    What Should I Do If a Scene Feels Boring?

    You might improve the scene by shortening unnecessary narration, replacing an irrelevant visual, adding a useful screen recording, showing a diagram, adding a short label, adjusting the timing, or removing an unnecessary pause.

    Do not automatically solve every pacing problem by adding effects.

    Should I Export in 4K?

    Only when it makes sense for your project and source material. If your original visuals and screen recordings were created for 1080p, exporting at a much higher resolution does not automatically create genuine additional detail.

    Should I Watch the Whole Video After Exporting?

    Yes. The exported file is the actual finished product. Review it before uploading.

    Should I Delete My Editing Files After Publishing?

    No, not if you can reasonably preserve them. Keep important materials such as the script, source media, voiceover, editing project, master export, caption file, licence records, permission records, and important AI-generation records.

    What Is the Most Important Editing Skill for a Beginner?

    The most important skill is not learning every effect. It is learning to make the audio, visuals, text, and timing work together clearly.

    If viewers can understand the narration, follow the visuals, read the text, and move naturally from one section to the next, you have already built the foundation of good faceless YouTube editing.

    Key Takeaways

    Editing a faceless YouTube video becomes much easier when you follow a simple, repeatable workflow instead of trying to use every advanced feature.

    Remember these main points:

    • Organize your files before you begin editing.
    • Keep the script, voiceover, visuals, music, project files, exports, licences, and permissions in clearly labelled folders.
    • For many faceless videos, place and clean the voiceover first.
    • Use the narration as the main guide for scene timing.
    • Match visuals to the meaning of the narration rather than changing scenes at fixed time intervals.
    • Use trimming, splitting, moving, and arranging as your main timeline editing tools.
    • Keep transitions simple and consistent.
    • Use on-screen text only when it helps the viewer understand an important point.
    • Keep text large, readable, well contrasted, and away from crowded screen areas.
    • Make narration the main audio element.
    • Keep background music lower than the voiceover.
    • Use sound effects sparingly and avoid sudden loud volume changes.
    • Review automatic captions instead of assuming they are correct.
    • Check names, numbers, technical terms, spelling, and caption timing carefully.
    • Use AI-assisted editing as a helper, not as an automatic publishing system.
    • Review AI-generated visuals for errors, misleading realism, and factual problems.
    • Check privacy before publishing screen recordings, images, voices, and other personal material.
    • Verify licences and permissions for music, sound effects, stock footage, photographs, templates, fonts, and other third-party assets.
    • Consider whether realistic AI-generated or meaningfully altered content requires disclosure under the current platform rules.
    • Watch the complete video before exporting.
    • Review the actual exported file before uploading it.
    • Keep the editable project, source files, master export, captions, licences, permissions, and important creation records after publication.
    • Check current official information periodically because software features, platform policies, licensing conditions, and AI tools can change.

    The most important editing principle is simple:

    Make every editing decision help the viewer understand the video more clearly.

    Complicated effects cannot replace clear narration, relevant visuals, readable text, accurate captions, balanced audio, and careful final review.

    Final Tip

    Do not judge your first faceless YouTube video by how many effects, transitions, animations, or AI features you used.

    Judge it by whether a beginner viewer can hear the narration clearly, understand what the visuals are showing, read the important text and captions, follow the video without becoming confused, trust that important facts have been checked, and watch without being distracted by unnecessary effects.

    A simple, well-organized video is usually easier to improve than an overcomplicated one.

    For each new video, keep the same basic editing workflow and improve one or two things at a time. Your next video might have better audio balance, cleaner scene timing, more useful screen recordings, more readable captions, better file organization, or more consistent titles.

    Small improvements add up.

    Keep your original files, project versions, licences, permissions, and master exports so you can correct or update the video later if necessary.

    Most importantly, remember that AI can help with editing, but you remain responsible for reviewing what is published.

    Clear communication, accuracy, accessibility, privacy, permission, and responsible use matter more than creating the most complicated edit.

    Continue Learning

    Continue with these related AI Mastery guides:

    These articles work together as part of the wider AI Mastery video-learning path.

    If the related articles are already published on your website, link these titles to their WordPress posts when publishing Article 063. If any are not yet published, mark them for linking later rather than linking to an unfinished page.

    Sources and References

    Sources reviewed: August 8, 2026

    1. YouTube Help — Recommended Upload Encoding Settings

    YouTube’s official upload guidance covers recommended containers, video and audio codecs, frame rates, resolutions, bitrates, progressive scanning, and audio sample rates. It currently recommends MP4, H.264 video, progressive scan, and a 48 kHz audio sample rate, and recommends uploading content at the same frame rate at which it was recorded.

    Used in this article for: Export format, H.264, MP4, frame rate, resolution, bitrate, progressive video, and audio-export guidance.

    2. YouTube Help — Add Subtitles and Captions

    YouTube explains how creators can add subtitles and captions through YouTube Studio, including selecting a video, adding a language, and adding captions. YouTube also allows captions to be added during the upload process.

    Used in this article for: Caption creation, YouTube Studio caption management, and accessibility guidance.

    3. YouTube Help — Use Automatic Captioning

    YouTube provides automatic captioning for supported content and recommends reviewing automatic captions and correcting sections that were not transcribed properly.

    Used in this article for: The recommendation that automatically generated captions should be treated as a starting point and manually reviewed.

    4. YouTube Help — Supported Subtitle and Closed-Caption Files

    YouTube supports multiple caption-file formats. Its guidance explains that caption files contain spoken text and timing information indicating when each line should appear.

    Used in this article for: Caption-file export and upload guidance.

    5. YouTube Help — Disclosing the Use of Generative AI Content

    YouTube currently requires creators to disclose AI-generated or altered content that seems realistic and meets its disclosure criteria. Its guidance provides examples of content that requires disclosure and examples of production assistance that generally does not.

    YouTube also explains how qualifying content may be identified to viewers through its How this content was made information.

    Used in this article for: AI-generated and altered-content disclosure, realistic synthetic media, AI-assisted editing, AI-generated music, and responsible publishing guidance.

    6. YouTube Help — YouTube Channel Monetization Policies

    YouTube’s monetization policies address original and authentic content as well as inauthentic, repetitive, mass-produced, and reused material.

    Used in this article for: Originality, repetitive automation, reused content, AI-assisted production, and monetization-related cautions.

    7. YouTube Help — Upload Videos Longer Than 15 Minutes

    YouTube currently states that verified accounts can upload videos longer than 15 minutes and lists a maximum upload size of 256 GB or 12 hours, whichever is less.

    Used in this article for: Account verification and longer-video upload limits.

    Important Note About Changing Policies

    YouTube features, interface wording, AI-disclosure requirements, monetization rules, supported formats, and technical recommendations can change.

    You do not need to reread every policy before every video. Check the relevant current official information:

    • When using a feature for the first time
    • When changing your editing or publishing workflow
    • When changing tools, plans, or important settings
    • When YouTube sends or announces a relevant policy update
    • When publishing content involving realistic AI-generated or altered material
    • Periodically as part of maintaining your channel

    For music, stock footage, sound effects, fonts, templates, AI-generated assets, voices, photographs, and other third-party material, also check the current licence or permission conditions from the applicable provider or rights holder.

    This article provides general educational information, not legal advice. Copyright, licensing, privacy, consent, and other legal requirements can depend on the material, intended use, location, and circumstances.

  • How to Create Visuals for Faceless YouTube Videos with AI Images, Stock Footage, and Screen Recordings: Beginner Guide (2026)

    How to Create Visuals for Faceless YouTube Videos with AI Images, Stock Footage, and Screen Recordings: Beginner Guide (2026)

    Estimated reading time: 30 minutes

    Last updated: August 7, 2026

    Introduction

    Article 061 turned the approved script into a storyboard and detailed scene plan. Article 062 continues from that approved plan and turns each planned scene into a real visual asset that can later be assembled in the video editor.

    A faceless YouTube video can use many kinds of visuals, including AI-generated images, licensed stock photographs or footage, screen recordings, screenshots, original diagrams, checklists, comparison graphics, warning cards, text cards, and simple motion graphics.

    The goal is not to collect as many visuals as possible. The goal is to create or select the right visual for each approved scene.

    For example, a software action is usually clearer as a screen recording. One stable setting may be clearer as a screenshot. A workflow is often easier to understand as an original diagram. A fictional or conceptual scene may be suitable for an AI-generated image. General real-world context may be suitable for licensed stock media.

    Before producing a scene, you should already know its scene number, matching narration, visual purpose, proposed visual type, approximate duration, on-screen text, source or rights requirements, privacy concerns, accessibility needs, and planned filename.

    This article focuses on three major production sources – AI images, stock media, and screen recordings – while also showing when screenshots and original graphics are better choices.

    AI-generated visuals still require human review. Check for distorted objects, incorrect text, unwanted logos, invented interfaces, misleading realism, privacy issues, rights concerns, and whether realistic synthetic content needs disclosure review.

    Stock footage should be selected for relevance and licence suitability rather than used as generic filler. Screen recordings should be prepared carefully so that private information, distracting notifications, and unnecessary interface areas do not appear.

    A strong video can mix several visual sources. You do not need to use AI for every scene, and you do not need stock footage merely to keep the screen moving. Create one scene at a time, preserve originals and source records, and approve the visual package before editing.

    What You’ll Learn

    • How to turn an approved scene plan into a visual-production list.
    • How to create and review AI-generated images for specific scenes.
    • How to search for and document stock images and stock footage.
    • How to prepare and record safe, readable screen demonstrations.
    • How to capture useful screenshots and create original graphics.
    • How to review privacy, permissions, licensing, factual accuracy, accessibility, and synthetic-content disclosure needs.
    • How to organize approved assets so Article 063 can begin editing with a clean production package.

    Important: Creating or downloading a visual does not automatically make it accurate, private, licensed, accessible, or suitable for publication. Final approval still requires human review.

    Figure 1. The approved storyboard becomes a production list of specific visual assets that are created, reviewed, and approved before editing.

    Explanation: This workflow helps beginners avoid creating random visuals and keeps every asset connected to a specific approved scene.

    Before You Begin

    Start from the approved storyboard and scene plan created in Article 061. Do not begin a new visual-production process from memory or from an older script version.

    Use the Approved Project Files

    • Approved storyboard, for example: 062-approved-storyboard-v1-0.docx
    • Approved scene plan, for example: 062-approved-scene-plan-v1-0.docx
    • Approved narration or script version
    • Any existing source, permission, or disclosure notes from earlier stages

    Keep Scene Numbers Consistent

    Use the same scene numbers throughout production. If the storyboard uses Scene 001, Scene 002, and Scene 003, the visual filenames, source records, review notes, and editor handoff should use those same numbers.

    Create One Main Visual-Production Folder

    Create one main folder for the visual-production stage.

    • Approved Storyboard
    • Scene Plan
    • AI Images
    • Stock Images
    • Stock Footage
    • Screen Recordings
    • Screenshots
    • Original Graphics
    • Sources
    • Licences
    • Permissions
    • AI Prompts
    • Rejected Assets
    • Approved Assets
    • Exports
    • Archive

    Figure 2. Separating visual assets, source records, approved files, and rejected versions makes a larger video project easier to manage.

    Explanation: A clear folder structure reduces version confusion and helps preserve the original files, rights records, and approved production assets.

    Create a Master Asset List

    A master asset list can track the scene, purpose, visual type, asset source, production status, licence or permission status, privacy review, accessibility review, and approved filename.

    Useful status labels include:

    • Not Started
    • In Progress
    • Review Required
    • Replacement Required
    • Approved
    • Blocked

    Choose a Technical Target

    For standard landscape YouTube production, 16:9 is a common format. A working size such as 1920 x 1080 can provide a Full HD production target when supported by the source and editing workflow. Do not stretch a lower-quality or differently shaped asset merely to fill the frame.

    Prepare a Simple Visual Style Guide

    • Use a consistent colour palette.
    • Use large readable on-screen text.
    • Keep safe margins around important text and controls.
    • Use similar icon and graphic styles.
    • Avoid decorative clutter.
    • Leave room for captions when the video will include them.

    Prepare Safe Demonstration Data

    Before screen recording or taking screenshots, create fictional files, example folders, test accounts, and neutral sample data whenever practical. This reduces the risk of exposing real personal or confidential information.

    Preserve Source Records

    Keep source and rights information with the project from the moment an external asset is selected. Do not wait until the video is almost finished to reconstruct where a photograph, clip, icon, template, or font came from.

    Common Mistake: Generating or downloading visual assets before the folder structure, filenames, and review fields are prepared.

    How to Avoid This Mistake: Prepare the scene numbers, production folders, source record, review status, style rules, and filename pattern before creating the first asset.

    Step 1: Turn the Approved Scene Plan into a Visual Production List

    The visual production list tells you exactly what must now be created, recorded, downloaded, or designed.

    Create One Production Task for Each Required Asset

    For every approved scene, identify the visual purpose and create a specific production task. Some scenes may need one asset, while a longer demonstration may need several clips or screenshots.

    Choose the Visual According to the Teaching Purpose

    Choose the visual according to the teaching purpose.

    • AI image – useful for fictional, conceptual, illustrative, or difficult-to-photograph scenes.
    • Stock image or footage – useful for realistic general context when the licence and scene meaning are suitable.
    • Screen recording – best when viewers must see an action happen.
    • Screenshot – useful when viewers need to study one stable interface detail.
    • Original graphic – useful for workflows, comparisons, checklists, warnings, timelines, and structured explanations.

    Figure 3. Convert each storyboard scene into a specific production task before creating the visual.

    Explanation: The production list tells you what needs to be created, where it will come from, how it will be named, and whether it has passed review.

    Figure 4. Choose the visual source according to what the viewer needs to understand.

    Explanation: The best visual is not always the easiest one to obtain. Screen recordings, screenshots, diagrams, AI images, and stock media each serve different purposes.

    Identify Reusable Assets

    Some visuals can be reused across related scenes if repetition improves understanding. A fictional sample photograph, a recurring folder icon, or a consistent warning card may appear more than once. Reuse should support continuity rather than become repetitive filler.

    Mark Blockers and Priorities

    Mark assets that require permissions, licence review, new screen access, updated software, or special technical work. Create high-priority teaching visuals before optional decorative material.

    Name Files Before Production

    A clear filename can include the article number, scene number, and short description, for example: 062-scene-024-ai-workspace-planning.png. Use controlled version names such as v01, v02, and approved rather than final2 or newest.

    Common Mistake: Creating visuals without a production task or scene number.

    How to Avoid This Mistake: Every asset should answer three questions before production begins: Which scene is this for? What must the viewer understand? How will the asset be reviewed and identified later?

    Step 2: Create AI-Generated Images for Approved Scenes

    AI-generated images can be useful for scenes that are fictional, conceptual, illustrative, or difficult to photograph. They are usually less suitable when a viewer needs an exact, current software interface or documentary evidence of a real event.

    Build the Prompt from the Approved Scene

    A useful AI image prompt may include: Main subject, Setting, Action, Camera view, Lighting, Visual style, Mood, Composition, Aspect ratio, Required objects, Text requirements, Quality controls, and Things to avoid.

    Figure 5. A structured prompt gives the image generator clearer instructions about the scene, composition, style, and quality requirements.

    Explanation: Specific prompts usually provide more useful production results than vague instructions such as “create an image for my video.”

    Use Fictional People and Neutral Details When Possible

    For general educational scenes, fictional people and neutral environments are usually easier to manage than unnecessary imitations of identifiable real people. Do not use a real person’s likeness to imply participation, endorsement, or an event that did not occur.

    Keep Important Text Simple

    Image generators may create incorrect or distorted text. Keep required text minimal, verify every word, and consider adding important labels later with a graphics tool rather than relying on the image generator to render long instructions.

    Generate One Scene First

    Before generating a large batch, create one representative scene and check whether the composition, style, subject size, safe margins, and technical format work with the planned video layout.

    Review the First Generation Carefully

    Review the first generation carefully.

    • Hands, faces, and body proportions
    • Object shapes and repeated objects
    • Text and numbers
    • Logos or unintended brand marks
    • Background details
    • Software screens or controls
    • Lighting and scene continuity
    • Whether the image could mislead viewers about a real event

    Figure 6. AI-generated images should be reviewed for scene accuracy, visual errors, privacy, consistency, and disclosure concerns.

    Explanation: A polished-looking image can still contain subtle errors, misleading details, or inappropriate information that should be corrected before approval.

    Check Factual Meaning

    An image can look realistic while still showing something that never happened. Do not present synthetic imagery as proof that a real person, event, place, product result, or historical incident occurred.

    Review Disclosure Needs

    If realistic synthetic content could cause viewers to believe that a real event occurred or that a real person said or did something they did not, keep the scene marked for final platform-disclosure review. Platform rules can change, so check the current YouTube requirements before publishing.

    Save Prompt and Version Records

    • Scene number
    • AI tool used
    • Creation date
    • Prompt version
    • Reference assets used
    • Original output filename
    • Edited filename
    • Approved filename

    Common Mistake: Accepting the first AI-generated image because it looks attractive at a glance.

    How to Avoid This Mistake: Inspect the complete image at full size, compare it with the approved scene, and reject or correct any misleading, distorted, private, or inconsistent details.

    Step 3: Find and Review Stock Images and Stock Footage

    Stock media can provide realistic visual context, but the challenge is not finding something attractive. The challenge is finding an asset that matches the narration, fits the visual style, has suitable licence conditions, does not create a misleading impression, works technically in the video, and can be documented properly.

    Search from the Scene Purpose

    Use specific search terms based on the action, environment, camera framing, and mood needed for the scene. Avoid choosing a clip only because it looks cinematic.

    Figure 7. Stock media should be selected for relevance, technical quality, licence suitability, and accurate documentation.

    Explanation: A visually attractive stock clip is not enough. It should support the narration and have a clearly recorded source and licence.

    Preview the Complete Asset

    For video, preview the entire usable section. Check for unexpected logos, identifiable information, distracting background events, quality changes, or actions that contradict the narration.

    Check the Exact Licence Before Approval

    Do not assume that “free,” “royalty-free,” or “included with a subscription” means unrestricted use. Stock providers can use different licences and restrictions. Review the current conditions for the exact provider and intended use.

    Record the Source Immediately

    For every selected asset, record: Scene number, Provider, Asset title, Asset ID when available, Source page, Creator name when provided, Download date, Licence type, Attribution requirement, Commercial-use status, Original filename, and Project filename.

    Figure 8. Record the source and licence information when the stock asset is obtained rather than trying to reconstruct it later.

    Explanation: Keeping the asset ID, licence, download date, and production filename together makes future review and replacement much easier.

    Review People and Context

    Stock footage of recognizable people should not be used in a way that falsely implies that they are your customer, endorse a product, experienced a particular condition, participated in a real event, or made the claims in your narration. Review provider rules for identifiable people and sensitive uses.

    Preserve the Original Download

    Keep the provider’s original file separately, then create a production copy with the project filename. Do not use watermarked previews as final assets or remove a watermark from an unlicensed preview.

    Avoid Excess Stock Filler

    Too much generic stock footage can weaken an instructional video because viewers may not see the action or information described by the narration. Replace filler with a screenshot, diagram, screen recording, or original graphic when the teaching purpose requires precision.

    Common Mistake: Reviewing licence and source information only after editing is nearly finished.

    How to Avoid This Mistake: Check and record licence information when the asset is selected, before it enters the approved-assets folder.

    Step 4: Create Clear and Safe Screen Recordings

    Screen recordings are especially useful when the viewer needs to follow an actual sequence in software, a website, or a file-management process.

    Prepare Before Recording

    Practise the approved action first. Confirm which window, menu, button, setting, or result needs to appear so the recording does not wander through unnecessary screens.

    Before recording, remove or hide information that viewers do not need to see.

    • Close unrelated applications and tabs.
    • Turn off notifications.
    • Use a safe demonstration account when practical.
    • Replace real files with fictional examples.
    • Check browser bookmarks and recent-file lists.
    • Remove email addresses and profile information when not needed.
    • Check file paths and desktop names.
    • Do not record passwords, recovery codes, payment information, or confidential records.

    Figure 9. Prepare the recording environment before pressing Record to reduce privacy risks and distractions.

    Explanation: Using fictional demonstration data and removing unnecessary account information is generally safer than trying to hide private details later.

    Capture Only the Needed Area

    Record the application window or useful screen area rather than the entire desktop when the rest of the screen adds no teaching value. Keep text large enough to read after the video is resized for phones and smaller displays.

    Move the Cursor Deliberately

    Move the cursor deliberately.

    Pause briefly over an important control before clicking it, then leave the result visible long enough for a beginner to understand what changed.

    Figure 10. Slow, deliberate cursor movement and short pauses help complete beginners follow a screen demonstration.

    Explanation: A clear recording gives viewers time to locate the correct control, observe the action, and see the result before the tutorial continues.

    Record Short Task-Based Clips

    A long recording may be harder to review and replace. When practical, record one main task per clip and include a few seconds before and after the action so the editor has room to trim.

    Review Immediately

    Watch the complete recording after capture. Check privacy, readability, cursor movement, unwanted audio, accidental notifications, current interface accuracy, and whether the result actually matches the approved scene.

    Preserve the Original Recording

    Keep an untouched original file and create separate trimmed or edited production versions. Record the software or service, recording date, platform, and version when that information will help future updates.

    Common Mistake: Starting the screen recorder before preparing the computer and demonstration data.

    How to Avoid This Mistake: Practise the exact action, clean the screen, turn off notifications, use safe demonstration data, and inspect the entire frame before recording.

    Step 5: Capture Clear and Useful Screenshots

    Screenshots are useful when the viewer mainly needs to study one stable control, setting, confirmation message, or completed result.

    Choose a Screenshot When Motion Is Unnecessary

    Use a screenshot when the viewer does not need to see the action happen.

    Figure 11. Use screenshots for stable details and screen recordings when viewers need to see an action or sequence.

    Explanation: Choosing the simpler format can improve clarity and reduce unnecessary recording and editing work.

    Prepare the Screen First

    Use fictional data when possible and check the complete frame for email addresses, account names, browser tabs, notifications, filenames, private documents, recent-file lists, profile photographs, and other personal information.

    Capture Enough Context

    Crop unnecessary areas, but keep enough surrounding interface so a beginner knows where the highlighted control is located. Extreme cropping can make an otherwise accurate screenshot confusing.

    Highlight Only the Important Detail

    Highlight only the information needed for that scene.

    Use one simple arrow, outline, or label when it improves understanding. Do not cover the screen with annotations.

    Figure 12. Simple screenshot highlighting is usually clearer than covering the screen with many arrows and labels.

    Explanation: A screenshot should direct attention to the important control while preserving enough surrounding interface context for beginners.

    Do Not Change the Meaning of the Interface

    Cropping and highlighting can improve readability, but do not edit a screenshot so that it falsely shows a button, setting, message, or result that was not present.

    Record When It Was Captured

    Software interfaces change. When a screenshot teaches a specific feature, keep the capture date and relevant software context so the scene can be reviewed before publication or future updates.

    Common Mistake: Capturing the whole screen and expecting the viewer to find one small control.

    How to Avoid This Mistake: Capture enough context to orient the viewer, then crop and highlight the specific area needed for the lesson.

    Step 6: Create Original Graphics, Diagrams, Checklists, and Comparison Visuals

    Original graphics are often better than AI images or stock footage when the narration explains something specific.

    Figure 13. Original graphics are useful when viewers need structured information rather than general visual context.

    Explanation: Workflows, checklists, comparisons, and warning cards give the creator precise control over wording, layout, accessibility, and teaching sequence.

    Choose the Simplest Graphic Type

    • Workflow – when sequence matters.
    • Checklist – when viewers need to verify several items.
    • Comparison – when two or more choices must be evaluated consistently.
    • Timeline – when order and timing matter.
    • Warning card – when a risk needs clear emphasis.
    • Step card – when one instruction needs to remain visible.

    Keep One Main Idea per Graphic

    If a graphic requires several paragraphs of tiny text, divide it into multiple scenes. The narration can provide detail while the visual keeps the key point readable.

    Use Consistent Hierarchy

    • Large heading
    • Short labels
    • Logical reading order
    • Consistent icon style
    • Safe margins
    • Strong contrast
    • Limited colours
    • Clear arrows that do not cross unnecessarily

    Use Data Carefully

    Create charts only when the narration depends on verified numerical information. Label the data clearly and preserve the source. Do not invent statistics merely to make a graphic look more authoritative.

    Design for Accessibility

    Use words, symbols, and shapes in addition to colour. Keep text large enough for mobile viewing, allow sufficient display time, and make sure important visual information is also explained in narration when appropriate.

    Preserve Editable Masters

    Save the editable source file as well as the exported PNG or video version. This makes spelling corrections, terminology changes, and future updates much easier.

    Common Mistake: Trying to place an entire lesson inside one infographic.

    How to Avoid This Mistake: Give each graphic one teaching purpose and split complex information into several scenes when necessary.

    Step 7: Review, Organize, and Approve All Visual Assets Before Editing

    Do not move every file directly into the video editor simply because it has been created.

    Figure 14. Only visuals that pass the required review should enter the approved-assets folder for editing.

    Explanation: Separating approved and rejected files reduces the risk of accidentally using an incorrect, unlicensed, outdated, or privacy-sensitive asset.

    Check the Production List for Missing Assets

    Compare the completed folder against the scene plan. Mark missing, blocked, replacement-required, and approved assets clearly.

    Review Every Asset Against the Narration

    Confirm that the visual supports the exact narration and does not introduce a contradictory claim, wrong software step, irrelevant stock scene, or misleading representation.

    Review the Different Asset Types Together

    A strong individual image can still look out of place in the full video. Review AI images, stock clips, screenshots, recordings, and graphics together for repeated ideas, inconsistent colours, abrupt style changes, and unnecessary visual variety.

    Complete Final Rights, Privacy, and Disclosure Checks

    • External source recorded
    • Licence reviewed
    • Attribution recorded when required
    • Permission status recorded when relevant
    • Private information removed
    • Real-person implications reviewed
    • Synthetic-content disclosure flag recorded when relevant
    • Current platform requirements marked for final publishing review

    Check Technical Quality

    • Correct aspect ratio
    • Adequate resolution
    • No stretching
    • Readable text
    • Safe margins
    • Caption space
    • No accidental crop of important controls
    • Suitable duration or trim points

    Create the Approved Asset Index

    The approved-assets folder should contain only production-ready copies. Keep originals, editable masters, rejected versions, source records, and licence documents elsewhere in the project structure.

    Create the Editing Handoff

    Prepare a short handoff document such as 062-approved-visual-assets-handoff-v1-0.docx containing the scene number, approved filename, visual purpose, duration or trim note, source status, privacy status, accessibility note, and any editing instruction.

    Back Up the Package

    Back up the approved visual package before editing begins. This protects the clean production assets if editing versions are later overwritten or changed.

    Common Mistake: Importing every draft, rejected asset, and unreviewed download directly into the editor.

    How to Avoid This Mistake: Send only approved, clearly named production copies to the editing stage and keep the source material and rejected versions in separate folders.

    Benefits of Using AI Images, Stock Footage, and Screen Recordings Together

    • More accurate visual matching because different scene purposes can use different visual sources.
    • Clearer software tutorials because actual actions can use screen recordings instead of generic illustrations.
    • More flexible conceptual scenes because AI images can be created to match a planned composition.
    • Realistic general context from suitable licensed stock media.
    • Precise teaching graphics for workflows, comparisons, warnings, and checklists.
    • Easier replacement because assets are scene-numbered and stored separately.
    • Better rights documentation because source and licence records are captured during production.
    • Lower privacy risk when demonstrations use fictional data and prepared screens.
    • More consistent accessibility planning because text size, contrast, caption space, and reading time are checked before editing.
    • More efficient editing because the editor receives approved files instead of an unorganized collection of drafts.

    Reality: Mixing several visual sources does not automatically improve a video. The value comes from choosing each source for a clear teaching purpose and reviewing the complete sequence.

    Best Use: Treat AI images, stock media, screen recordings, screenshots, and original graphics as different tools rather than competing solutions.

    Limitations of AI Images, Stock Footage, and Screen Recordings

    AI Image Limitations

    • Generated text may be incorrect.
    • Hands, objects, reflections, or backgrounds may contain errors.
    • Recurring characters may change between scenes.
    • Software interfaces may be invented or outdated.
    • Several attempts may be needed to obtain the required composition.
    • Realistic synthetic images can be misunderstood as authentic.
    • Provider terms, features, and commercial-use conditions can change.

    Stock Media Limitations

    • Suitable footage may be difficult to find.
    • Generic clips may not match the narration closely.
    • Different providers use different licence conditions.
    • An asset can later be removed or its availability can change.
    • Branding, recognizable people, locations, or background details may create additional review needs.
    • Large libraries can create source-tracking and storage problems.

    Screen Recording Limitations

    • Private information can appear unexpectedly.
    • Software interfaces can change after recording.
    • Small text may become unreadable after resizing.
    • Long demonstrations can slow the video.
    • A recording may need to be repeated because of notifications, mistakes, or cursor movement.

    Screenshot and Graphic Limitations

    • Screenshots can become outdated.
    • Overly large screenshots can make important controls too small.
    • Graphics can become crowded when too much text is included.
    • Colour-only meaning can reduce accessibility.
    • Incorrect or unsourced charts can mislead viewers.

    Reality: No visual source removes the need for factual review, privacy review, licensing checks, accessibility planning, or human approval.

    How to Reduce This Limitation: Use the simplest suitable visual, preserve editable and original files, keep records with each external asset, and review the full sequence before editing.

    Common Mistakes When Creating Visuals for Faceless YouTube Videos

    1. Creating assets before the storyboard is approved.
    2. Using AI images for every scene.
    3. Accepting the first AI image without inspection.
    4. Leaving misspelled AI-generated text inside an image.
    5. Presenting an AI-generated software interface as a real current interface.
    6. Using an identifiable person’s likeness without appropriate review.
    7. Presenting realistic synthetic imagery as proof of a real event.
    8. Generating a large image batch before checking the visual style.
    9. Using generic stock footage as filler instead of supporting the narration.
    10. Choosing stock media based only on appearance.
    11. Checking the stock licence after editing is finished.
    12. Assuming free stock has no restrictions.
    13. Assuming royalty-free means copyright-free.
    14. Using a watermarked stock preview in the final video.
    15. Failing to record the provider and asset ID.
    16. Using stock models in a way that implies endorsement or a personal experience.
    17. Ignoring editorial-only or sensitive-use conditions.
    18. Recording a screen without preparing the desktop.
    19. Using a real personal account when a demo account would work.
    20. Moving the cursor too quickly.
    21. Recording one unnecessarily long tutorial clip.
    22. Allowing passwords or security codes to appear.
    23. Ignoring autocomplete, recent files, and notifications.
    24. Relying on blur to fix preventable privacy exposure.
    25. Using a screenshot when viewers need to see a sequence.
    26. Capturing the entire desktop when one control matters.
    27. Cropping a screenshot so tightly that viewers lose context.
    28. Adding too many arrows and labels.
    29. Editing a screenshot in a way that changes the meaning of the interface.
    30. Using outdated screenshots without review.
    31. Putting too much text into one graphic.
    32. Using text that is too small for mobile viewing.
    33. Relying only on colour to show warnings or approval.
    34. Mixing unrelated icon and visual styles.
    35. Creating charts without verified data.
    36. Stretching assets into the wrong aspect ratio.
    37. Upscaling low-quality media until it becomes visibly soft or distorted.
    38. Overwriting the original file.
    39. Using vague filenames such as final.png.
    40. Mixing approved and rejected assets in one folder.
    41. Deleting rejection reasons before the project is finished.
    42. Failing to save important AI prompt records.
    43. Failing to save licence and permission records.
    44. Assuming an attractive visual makes a factual claim accurate.
    45. Skipping the final full-sequence review.
    46. Ignoring mobile readability.
    47. Assuming visual quality alone guarantees monetization or audience growth.

    How to Avoid These Mistakes: Use the approved scene plan, assign each asset a production purpose, review one asset at a time, preserve source and version records, and keep only approved files in the editing handoff.

    Common Myths About Creating Visuals for Faceless YouTube Videos

    Myth: Every faceless video should use AI-generated images.

    Reality: Some scenes are clearer with screen recordings, screenshots, original diagrams, or suitable stock media.

    Myth: Free stock media can be used without checking anything.

    Reality: Provider licences and restrictions still need review.

    Myth: Royalty-free means copyright-free.

    Reality: Royalty-free usually describes a licence model, not the absence of copyright.

    Myth: AI-generated images are automatically safe for commercial use.

    Reality: Tool terms, input rights, output use, third-party rights, and the intended context still matter.

    Myth: A realistic AI image proves that the depicted event happened.

    Reality: Synthetic content can look convincing even when the event never occurred.

    Myth: Screen recordings are automatically private because they show only a computer screen.

    Reality: Accounts, notifications, filenames, messages, browser data, and other personal information can appear.

    Myth: One long screen recording is always faster.

    Reality: Short task-based clips can be easier to review, replace, and edit.

    Myth: More annotations make screenshots easier to understand.

    Reality: Too many arrows and labels can hide the control the viewer needs to see.

    Myth: More visual variety always improves retention.

    Reality: Variety without a teaching purpose can become distracting and inconsistent.

    Myth: AI can perform the final rights and privacy approval.

    Reality: AI can help identify possible issues, but final responsibility remains with the creator.

    Myth: Better visuals guarantee views or monetization.

    Reality: Visual quality can support clarity, but it cannot guarantee recommendations, retention, subscribers, revenue, or monetization.

    Final Reality: Strong faceless-video visuals come from planning, relevance, review, organization, and responsible use – not from using the largest possible number of AI or stock assets.

    Visual Production Checklist

    • Approved storyboard and scene plan are available.
    • Scene numbers match the storyboard.
    • Visual-production folders are created.
    • Master asset list is current.
    • Every required scene has a production task.
    • The visual type matches the teaching purpose.
    • AI image prompts are saved when important.
    • AI images have been checked for visual errors and misleading realism.
    • AI-generated text has been verified or replaced.
    • Synthetic-content disclosure needs are flagged where relevant.
    • Stock assets have been previewed completely.
    • Stock provider and asset ID are recorded when available.
    • The exact stock licence has been reviewed.
    • Commercial-use and attribution conditions are recorded.
    • Watermarked previews are excluded from final assets.
    • Screen-recording accounts and files use safe demonstration data when practical.
    • Notifications are turned off before recording.
    • Passwords, payment information, and security codes are excluded.
    • Screen recordings are readable and task-focused.
    • Original screen recordings are preserved.
    • Screenshots include enough context.
    • Screenshot annotations are simple and accurate.
    • Software screenshots and recordings are reviewed for current accuracy.
    • Original graphics use large readable text.
    • Important meaning does not depend only on colour.
    • Charts use verified data when included.
    • Editable graphic masters are preserved.
    • All assets are reviewed for privacy.
    • Permissions are recorded when relevant.
    • External sources and licences are documented.
    • Aspect ratio and resolution are suitable.
    • Important content remains inside safe margins.
    • Caption space is considered.
    • Files use scene-numbered names.
    • Approved and rejected assets are separated.
    • The complete visual sequence has been reviewed.
    • Mobile readability has been checked.
    • Approved asset counts match the production list.
    • An editing handoff record is prepared.
    • The approved production package is backed up before editing.

    Final Tip: A clean approved-assets folder and complete source records can save more editing time than collecting additional visuals.

    Practical Example: Create the Visual Package for a Faceless YouTube Scene

    This example shows how a complete beginner can turn one approved storyboard sequence into actual production assets.

    The fictional video topic is: How to Organize Digital Photos Safely.

    The approved storyboard already contains five scenes: similar files may not be true duplicates; compare original, smaller, and edited versions; check quality, date, format, and content; move uncertain files into a review folder; and confirm the backup before deleting anything.

    The goal now is to create the visual assets for those five scenes.

    Scene 001: Similar Files

    Narration purpose: Explain that similar-looking files may not be unnecessary duplicates.

    Best visual type: AI-generated illustration or original file-browser graphic.

    Production decision: Use an original fictional file-browser graphic rather than a realistic software screenshot. This avoids presenting a specific software interface when the lesson is about the general idea.

    Visual requirements: Show five photograph thumbnails, similar filenames, slight differences between files, one folder window, and no real personal information.

    Suggested filename: 062-scene-001-similar-photo-files.png

    Privacy status: Passed – fictional files only.

    Rights status: Original asset.

    Accessibility note: Use labels and icons rather than relying only on small filename differences.

    Scene 002: Compare Three Versions

    Narration purpose: Show that three similar photographs can have different purposes.

    Best visual type: Original comparison graphic.

    Production decision: Create a three-panel 16:9 comparison labelled Original, Smaller Copy, and Edited Version. Use the same fictional landscape photograph in all three panels.

    Show meaningful differences such as image dimensions, file size, and a visible edit indicator. Do not use tiny technical details as the only way to distinguish the versions.

    Suggested filename: 062-scene-002-photo-version-comparison.png

    Privacy status: Passed – fictional photograph.

    Rights status: Original asset.

    Accessibility note: Use clear text labels and visible structural differences between the three panels.

    Scene 003: Check Before Deleting

    Narration purpose: Explain which file details should be reviewed before deleting a possible duplicate.

    Best visual type: Original checklist graphic.

    Production decision: Create four large checklist cards: Quality, Date, Format, and Content. Add a magnifying-glass symbol to reinforce the review action.

    Suggested filename: 062-scene-003-check-before-deleting.png

    Privacy status: Not applicable.

    Rights status: Original asset.

    Accessibility note: Use large labels, strong contrast, and simple icons.

    Scene 004: Move Uncertain Files

    Narration purpose: Show the safer action when the creator is not certain whether a file should be deleted.

    Best visual type: Simple screen-style demonstration or original animated graphic.

    Production decision: Use a fictional screen-style graphic rather than recording a real personal computer. Show two uncertain photograph files, a folder labelled Review First, files moving into that folder, and no delete symbol.

    Suggested filename: 062-scene-004-move-to-review-first-folder.png

    Privacy status: Passed – fictional data only.

    Rights status: Original asset.

    Accessibility note: Keep the movement slow and add the visible label Review First. Do not rely only on the motion.

    Scene 005: Confirm the Backup

    Narration purpose: Explain that deletion should happen only after the backup has been checked.

    Best visual type: Original confirmation graphic.

    Production decision: Show the main photo collection, a separate backup drive, one sample photograph opened successfully, a large check mark, and the text label Backup Confirmed.

    Suggested filename: 062-scene-005-confirm-backup-first.png

    Privacy status: Passed – fictional files.

    Rights status: Original asset.

    Accessibility note: Use the words Backup Confirmed in addition to the green check mark.

    Build the Production List

    SceneAssetSourceStatus
    001Similar-file browser graphicOriginalApproved
    002Three-version comparisonOriginalApproved
    003Review checklistOriginalApproved
    004Review-folder demonstrationOriginalApproved
    005Backup confirmation graphicOriginalApproved

    This example does not require stock footage, real personal photographs, real screen recordings, or external screenshots. That is acceptable. The visual source should match the scene rather than forcing every project to use every available visual type.

    Create the Assets in Production Order

    1. Create Scene 002 first because it establishes the fictional photograph used throughout the sequence.

    2. Reuse that photograph in Scene 001.

    3. Create Scene 003 as the checklist.

    4. Create Scene 004 using the same fictional file style.

    5. Create Scene 005 using the same photograph and file system.

    Preserve the Editable Masters

    Keep editable versions of the comparison graphic, checklist, folder demonstration, and backup graphic. If a term changes later, the text can be corrected without rebuilding the complete visual.

    Review the Complete Sequence

    Arrange the five visuals in scene order: Similar Files -> Compare Versions -> Check Details -> Review First -> Confirm Backup.

    Figure 15. One approved storyboard sequence can become a complete set of consistent, scene-numbered production assets.

    Explanation: The visual package uses the simplest suitable asset for each scene without adding unnecessary AI images, stock footage, or real personal information.

    • Colours remain consistent.
    • The fictional photograph stays recognizable.
    • File icons use one style.
    • Text remains large.
    • No scene looks unrelated.
    • The sequence follows the narration.

    Complete the Privacy, Rights, and Accessibility Review

    Confirm that no real photograph, username, email, file path, account information, or other private detail was accidentally inserted. Because the example uses original graphics and fictional material, no external stock licence is needed. If an external icon, photograph, font, or template is added later, update the rights record before approval.

    Confirm that text is large, labels are clear, green is not the only sign of approval, narration explains the important differences, no scene is overcrowded, and important information remains visible long enough.

    Final Asset Filenames

    • 062-scene-001-similar-photo-files.png
    • 062-scene-002-photo-version-comparison.png
    • 062-scene-003-check-before-deleting.png
    • 062-scene-004-move-to-review-first-folder.png
    • 062-scene-005-confirm-backup-first.png

    What This Example Shows

    This example demonstrates that a strong visual-production workflow does not require using every possible asset source. The creator did not add unnecessary stock footage, AI-generated people, real private photographs, or real account recordings because those assets were not needed.

    Final Lesson: Choose the visual source that best explains the approved narration. Do not use AI images, stock footage, or screen recordings merely because the tools are available.

    Frequently Asked Questions

    Should I use AI images, stock footage, or screen recordings?

    Use the visual type that best explains the approved scene. AI images suit fictional or conceptual scenes; stock media suits realistic general context; screen recordings suit actions; screenshots suit stable details; and original graphics suit workflows, comparisons, and checklists.

    Can I make an entire faceless YouTube video with AI images?

    Some videos can use mostly AI-generated visuals, but that may not be the clearest choice when the narration includes real software demonstrations, exact interfaces, detailed comparisons, or processes better explained with diagrams.

    Are AI-generated images always safe to use commercially?

    Do not assume so. Commercial-use conditions can depend on the AI provider, plan, current terms, specific output, third-party rights, and intended use. Check the current provider terms when relevant and preserve the generation records.

    Should I save my AI prompts?

    Yes. Save important prompts with the scene number, tool used, creation date, prompt version, generated file, and approved version.

    What should I do if an AI image contains misspelled text?

    Do not publish the incorrect text. Regenerate without text, replace the text manually, or use an original graphic.

    Can I use AI-generated screenshots of real software?

    Avoid presenting generated interfaces as though they are real current software screens. AI may invent buttons, menus, labels, and features.

    Can I create realistic AI people for my faceless videos?

    You can use fictional synthetic people when appropriate, subject to the tool terms and intended use. Avoid impersonation, false endorsement, misrepresentation of real events, and misleading viewers about authenticity.

    Does a realistic AI image prove that something happened?

    No. A realistic synthetic image is not evidence that a person was present, an event occurred, a business made a claim, or a product produced a result.

    Is free stock footage safe to use?

    Not automatically. Free stock can still have conditions involving commercial use, attribution, modification, redistribution, trademarks, identifiable people, or sensitive uses.

    Does royalty-free mean copyright-free?

    No. Royalty-free usually describes a licensing arrangement. The asset may still be protected by copyright and have usage restrictions.

    Should I save the stock licence?

    Yes. Preserve the source page, provider, asset ID, download date, licence record, attribution requirement, and subscription information when relevant.

    Can I use stock footage showing recognizable people?

    Possibly, depending on the licence and context. Do not use it in a way that falsely implies endorsement, customer status, participation in an event, or a sensitive personal experience.

    What is editorial-only stock footage?

    Editorial-only content is generally intended for editorial contexts and may not allow the same promotional or commercial uses as standard stock media. Check the specific provider licence.

    Can I remove a watermark from stock footage?

    Do not remove a watermark from an unlicensed preview. Obtain the properly licensed downloadable version.

    When is a screen recording better than a screenshot?

    Use a screen recording when viewers need to see a sequence, such as opening a menu, changing a setting, and viewing the result.

    When is a screenshot better than a screen recording?

    Use a screenshot when the viewer mainly needs to study one stable screen, such as a button, menu, confirmation message, or final result.

    Should I record my whole desktop?

    Usually no. Record only the application, browser window, or region viewers need. This can improve privacy, readability, focus, and editing flexibility.

    Should I use a separate account for demonstrations?

    When practical, yes. A safe demonstration account can reduce the chance of exposing personal email, private files, account photos, messages, purchase history, or payment information.

    Can I use my real files during a screen recording?

    You can, but fictional demonstration files are usually safer when real information is not necessary.

    What should I do with passwords during screen recording?

    Do not record passwords, authentication codes, recovery codes, or security tokens. Pause or stop the recording while entering sensitive information.

    Should I speak while recording my screen?

    You do not have to. A beginner-friendly workflow is to record the clean screen action, review it, add narration later, and synchronize the narration during editing.

    How fast should I move the cursor?

    Move slowly enough for a beginner to follow. Pause briefly over important controls before clicking.

    Should I record one long tutorial or several short clips?

    Short task-based recordings can be easier to review, replace, rename, edit, and organize.

    What if a notification appears during recording?

    If it reveals private information or creates a serious distraction, rerecord the scene. Turning notifications off before recording is safer.

    Can I blur private information later?

    Sometimes, but prevention is usually better. A blur can miss frames, move incorrectly, or leave other private information visible.

    What if software changes after I record the video?

    Review the affected scenes before publication. If the change makes the tutorial inaccurate, update the recording, screenshot, narration, or scene plan as needed.

    Should I record the software version?

    When known and relevant, record the software or service, recording date, platform, version, and browser.

    Can I use screenshots from another website?

    Do not assume that an online screenshot can automatically be reused. Review the source, rights, permission, licence, and attribution requirements.

    How much of the screen should a screenshot show?

    Enough to provide context, but not so much that the important control becomes tiny.

    Should I add arrows to every screenshot?

    No. Use arrows, outlines, or highlights only when they improve understanding.

    Can I edit a screenshot?

    Yes for cropping, highlighting, a simple arrow, or a short label, but do not edit it in a way that changes what the real interface means.

    What is the best format for workflows and checklists?

    Original graphics are often suitable because you can control the text, spacing, colours, icons, layout, and accessibility.

    Should I use charts in my faceless video?

    Only when you have real numerical information useful to the viewer. Do not invent statistics merely to create a chart.

    How much text should be inside a graphic?

    Use enough text to communicate the key point, but keep it concise. Let the narration provide the detailed explanation.

    How can I make visuals easier to read on phones?

    Use large text, short labels, strong contrast, simple layouts, close-up screenshots, clear icons, and enough viewing time.

    Can I use colour to show approved and warning items?

    Yes, but do not use colour alone. Combine words, icons, shapes, and colour.

    What image size should I use?

    For standard landscape YouTube production, 1920 x 1080 is a common Full HD working size when supported by the workflow. Use the correct aspect ratio and avoid stretching.

    Can I stretch a portrait image into 16:9?

    Avoid stretching. Crop, reframe, regenerate, or place the portrait visual inside a suitable landscape layout.

    Should I keep rejected images and clips?

    You do not need to keep every failed file forever, but preserving important rejected versions during production can help document why they were not approved.

    How should I name visual files?

    Use scene-numbered descriptive filenames and controlled versions. Avoid vague names such as final.png, newest.png, or image-copy.png.

    Should I keep the original files?

    Yes. Preserve the original AI generation, stock download, screen recording, screenshot, editable graphic master, and approved production copy when relevant.

    Do I need a separate approved-assets folder?

    It is strongly recommended for larger projects. The editor should receive only the files that passed review.

    Should I check all the visuals together?

    Yes. Individual assets may look good while the full sequence becomes repetitive or inconsistent.

    Can AI approve the final visual package for me?

    AI can help identify possible issues, but final approval should remain under human review. AI cannot independently guarantee licence validity, permission, privacy safety, legal compliance, factual accuracy, or accessibility.

    Do better visuals guarantee more YouTube views?

    No. Better visuals may improve clarity and presentation, but they cannot guarantee views, retention, subscribers, recommendations, or revenue.

    Do AI images and stock footage guarantee monetization?

    No. Visual quality and licences are only part of the publishing process. YouTube monetization, originality, reused-content, copyright, and disclosure requirements should be reviewed separately.

    What is the most important final visual check?

    Ask whether the approved asset clearly helps the viewer understand the matching narration and whether it has passed the necessary accuracy, privacy, rights, accessibility, and technical reviews.

    Key Takeaways

    • Start with the approved storyboard and scene plan.
    • Convert every scene into a specific production task before creating assets.
    • Choose the visual type according to what the viewer needs to understand.
    • Use AI-generated images for suitable fictional, conceptual, or hard-to-photograph scenes.
    • Use real screenshots or screen recordings when teaching actual software actions.
    • Use stock images and footage mainly for realistic general context.
    • Use original graphics for workflows, checklists, warnings, comparisons, and structured explanations.
    • Do not use stock footage merely to fill the screen.
    • Do not use AI-generated interfaces as though they are real current software screens.
    • Inspect AI-generated images carefully for distorted objects, incorrect text, unwanted logos, and misleading details.
    • Preserve important AI prompts, original outputs, edited versions, tool information, and creation dates.
    • Review the current terms of AI providers when relevant to commercial or monetized use.
    • Do not assume AI-generated content is automatically unrestricted or commercially permitted.
    • Review the exact licence for every external stock asset.
    • Do not assume that free means unrestricted or that royalty-free means copyright-free.
    • Save stock source pages, asset IDs, download dates, licence records, and attribution requirements.
    • Prepare the computer before making screen recordings.
    • Use fictional demonstration data whenever practical.
    • Keep passwords, security codes, payment information, and private records out of screen recordings.
    • Use screenshots when movement is unnecessary.
    • Do not change the meaning of real interfaces through editing.
    • Keep original graphics simple and focused on one teaching purpose.
    • Use large text, strong contrast, simple icons, and clear spacing.
    • Do not rely only on colour to communicate warnings, approvals, or errors.
    • Preview important visuals at mobile size.
    • Leave safe space for captions and later cropping.
    • Use scene-numbered filenames.
    • Keep approved and rejected assets in separate folders.
    • Review every asset for privacy before it enters the editing stage.
    • Record permission status when a visual involves another person’s likeness, voice, story, or personal information.
    • Keep realistic synthetic content marked for disclosure review when viewers could mistake it for authentic footage or a real event.
    • Do not present synthetic images as proof that an event occurred.
    • Review the complete visual sequence before editing.
    • Back up the approved visual package before beginning Article 063.

    The Basic Visual Production Workflow

    1. Open the approved storyboard and scene plan.

    2. Create the master visual-production list.

    3. Assign a visual source to every scene.

    4. Create AI-generated images where suitable.

    5. Find and document suitable stock media.

    6. Prepare and record screen demonstrations.

    7. Capture required screenshots.

    8. Create original graphics and diagrams.

    9. Review every individual asset.

    10. Check privacy, rights, permissions, and disclosure requirements.

    11. Check technical quality and accessibility.

    12. Move only approved files into the approved-assets folder.

    13. Review the complete visual sequence.

    14. Create the editing handoff package.

    15. Back up the visual-production files.

    16. Move to video and audio editing.

    Figure 16. The complete visual-production workflow moves from the approved scene plan to a clean, reviewed asset package ready for editing.

    Explanation: Following the workflow in order helps prevent random asset creation, missing source records, privacy problems, version confusion, and unreviewed files from entering the editing stage.

    What This Workflow Cannot Guarantee

    • Perfect AI generations
    • Permanent software-interface accuracy
    • Continued stock-asset availability
    • Licence approval for every possible use
    • YouTube recommendations
    • Viewer retention
    • Monetization
    • Revenue

    Final Tip: Do not ask which visual looks the most impressive. Ask which visual helps the viewer understand this approved scene most clearly, accurately, and responsibly.

    Final Thoughts

    Creating visuals for a faceless YouTube video is easier when every asset begins with a clear purpose. The process should not start with random AI image generation, large stock-media downloads, unplanned screen recordings, or unorganized screenshots. It should start with the approved storyboard and scene plan.

    AI-generated images, stock footage, screenshots, screen recordings, and original graphics all have different strengths. The best workflow does not try to use every visual source equally. It chooses the source that explains each scene most clearly.

    A strong visual package should preserve the production records behind the assets, including AI prompts, original outputs, stock source records, licence information, permission records, original recordings, screenshots, editable graphic masters, approved production copies, and version records.

    Privacy should be handled before editing begins. Screen recordings and screenshots should be checked for email addresses, account information, private messages, file names, notifications, payment information, customer information, and confidential information.

    Licensing requires the same early attention. Do not assume that content is unrestricted because it is free, online, royalty-free, AI-generated, or included in a subscription. Check the relevant conditions and preserve the records.

    Accessibility should also be built into the visuals from the beginning through large readable text, strong contrast, clear labels, controlled motion, sufficient display time, mobile-friendly layouts, and icons or wording in addition to colour.

    Before moving to editing, the project should have one approved visual for each required scene, clear scene-numbered filenames, an approved-assets folder, original files preserved separately, complete source and licence records, privacy-reviewed recordings and screenshots, permission records when needed, synthetic-content disclosure flags where relevant, accessibility-reviewed graphics, a complete visual-sequence review, and a backup copy of the production package.

    Article 063 will use this approved visual package to begin the next stage: editing the faceless YouTube video and audio.

    Final Tip: Do not send unreviewed images, clips, and recordings into the editor. Finish the visual-production review first so Article 063 begins with one clean, organized, approved asset package.

    Continue Learning

    This article is part of the AI Mastery Faceless YouTube Video Creation Series.

    For the clearest learning sequence, complete Article 061 before this article, then continue directly to Article 063.

    Sources and References

    The following official or original sources were reviewed for this article on August 7, 2026. Software features, licences, privacy guidance, and platform policies can change. Check the relevant official source when first using a service, when changing plans or features, after receiving a policy-update notice, and periodically as part of the publishing workflow.

    YouTube Help – Disclosing use of GenAI content

    YouTube explains when creators must disclose realistic AI-generated or meaningfully altered content and provides the AI use setting in the upload workflow.

    Open official source

    YouTube Help – Understanding “How this content was made” disclosures

    YouTube explains how information about AI-generated or altered content can appear to viewers.

    Open official source

    YouTube Help – Protecting your identity

    YouTube explains privacy complaints and realistic altered or synthetic likenesses.

    Open official source

    YouTube Help – Impersonation policy

    YouTube prohibits misleading impersonation, including deceptive use of AI-generated likenesses or voices.

    Open official source

    Canadian Intellectual Property Office – Copyright: Learn the basics

    CIPO provides introductory guidance on copyright and legally using the works of others.

    Open official source

    Pexels – Free Stock Photo & Video License

    Pexels provides an example of provider-specific stock-media licence conditions, including restrictions involving identifiable people, endorsement, resale, and trademarks.

    Open official source

    Office of the Privacy Commissioner of Canada – Your privacy and AI chatbots

    The OPC recommends limiting personal information shared with AI chatbots and not sharing sensitive or identifiable personal information unnecessarily.

    Open official source

    Google Gemini Apps Help – Gemini Apps Privacy Hub

    Google describes information that can be provided to Gemini Apps, including prompts, files, videos, screens, and photos, and explains privacy controls and responsibilities.

    Open official source

    OpenAI – Terms & policies

    OpenAI provides the current legal terms and policies governing individual and business use of its services. Users should check the agreement that applies to their account and use case.

    Open official source

    W3C Web Accessibility Initiative – Captions/Subtitles

    W3C explains captions and broader accessible-media practices for video content.

    Open official source

    Important Note: This article provides general educational information, not legal advice. Copyright, licensing, privacy, permissions, commercial use, and synthetic-content requirements can depend on the asset, provider, licence, AI tool, account or subscription plan, people depicted, intended use, jurisdiction, and publishing platform.

    Readers do not need to reread every policy before creating every individual scene. A practical approach is to check the relevant conditions when first using a new tool or provider, when choosing a new licence type, when changing plans, when receiving a policy update, when using another person’s photograph, video, face, or voice, when realistic synthetic content could be mistaken for authentic footage, before an important commercial project, and periodically during final publishing review.

  • How to Create Storyboards and Plan Scenes for Faceless YouTube Videos with AI: Beginner Guide (2026)

    How to Create Storyboards and Plan Scenes for Faceless YouTube Videos with AI: Beginner Guide (2026)

    Estimated reading time: 28 minutes

    Last updated: August 6, 2026

    Introduction

    A completed script explains what the narrator will say. A storyboard and scene plan explain what viewers will see while they hear it.

    For a faceless YouTube video, the visuals may include AI-generated images, licensed stock photographs or footage, screen recordings, screenshots, diagrams, charts, text cards, simple animation, product demonstrations, or other assets that support the narration.

    A storyboard is a visual outline of the video. It shows the planned scene, the matching narration point, the visual type, approximate timing, and important notes. A detailed scene plan adds production information such as the source, licence status, permission status, privacy checks, accessibility requirements, filename, and production status.

    You do not need professional drawing skills. A beginner storyboard can use simple boxes, rough sketches, screenshots, text placeholders, or a table. The goal is to make the visual sequence clear before final assets are created.

    AI can help divide an approved script into possible scenes, suggest suitable visual categories, identify repeated visual ideas, organize a shot list, and compare the script with a storyboard. AI should not automatically decide whether a visual is factually accurate, licensed for the planned use, privacy-safe, accessible, properly disclosed, or suitable for final publication.

    Article 061 begins after the research and scriptwriting work in Articles 059 and 060. The research, examples, warnings, and final narration wording should already be approved or nearly final. This article focuses on turning that script into a clear visual sequence. Article 062 will cover creating and collecting the actual AI images, stock footage, and screen recordings.

    By the end of this guide, you will know how to divide a script into scenes, choose visual types, build a simple storyboard, create a detailed scene plan, estimate timing, maintain visual continuity, review privacy and rights, plan accessibility, and approve one production-ready version.

    Storyboarding can improve organization and reduce unnecessary rework, but it does not guarantee views, viewer retention, monetization, or income.

    Figure 1. An approved script is divided into visual storyboard scenes and then expanded into a detailed scene plan.

    Explanation: The storyboard connects the narration to the planned visuals, while the detailed scene plan adds the production information needed to create, review, and organize those visuals.

    Before You Begin

    Before creating the storyboard, make sure the script is complete enough to guide the visual plan. You should already have verified research, an approved outline, a final or nearly final script, a defined audience, a clear learning result, approved examples, necessary warnings and limitations, a planned narration style, and a basic estimate of video length.

    Use One Approved Script Version

    Save one clearly named script version for storyboarding, for example: 061-approved-script-for-storyboard-v1-0.docx. Do not build different parts of the storyboard from different script drafts.

    Confirm the Main Viewer Result

    Write one realistic learning result at the top of the storyboard. For this article, a suitable example is: After watching this video, the viewer should understand how to turn an approved script into a clear storyboard and detailed scene plan.

    Define Beginner-Friendly Visual Rules

    • Use clear examples and large readable text.
    • Use simple diagrams instead of crowded graphics.
    • Use slow screen demonstrations when viewers need to follow an action.
    • Keep one main teaching idea per scene.
    • Use familiar symbols and labels.
    • Allow enough time for viewers to read important text.

    Prepare the Scene-Plan Fields

    A useful detailed scene plan may include the scene number, script paragraph, narration reference, visual purpose, visual type, visual description, on-screen text, duration, transition, asset source, licence status, permission status, privacy check, accessibility note, production status, and filename.

    Prepare File and Asset Organization

    Use consistent scene numbers such as Scene 001, Scene 002, and Scene 003. For standard long-form YouTube video, a 16:9 layout such as 1920 × 1080 is a common production target. Vertical Shorts normally use a different format, so choose the intended format before creating final assets.

    Keep source and rights records with the project. For external assets, record the title, creator or provider, source, download date, licence, commercial-use conditions, attribution requirements, permission records, scene number, and filename.

    Prepare a Safe AI Planning Prompt

    A useful planning instruction is: Use only the approved script below. Divide it into possible scenes without changing the narration. For each scene, identify the matching script paragraph, visual purpose, suitable visual type, and estimated duration. Do not add facts, brands, real people, copyrighted assets, or production claims. Mark uncertain items as [NEEDS HUMAN REVIEW].

    Common Mistake: Beginning visual production before the storyboard framework is prepared.

    How to Avoid This Mistake: Prepare the approved script version, scene-number system, visual rules, asset folders, and review fields before splitting the script into scenes.

    Figure 2. Prepare the main research, script, audience, and production information before dividing the video into scenes.

    Explanation: Starting from a stable script reduces the chance that scene numbers, visuals, timing, and production notes will need major changes later.

    Step 1: Divide the Approved Script into Scenes

    A scene is a planned section of the video where the narration and visual purpose remain mostly consistent. A new sentence does not automatically require a new scene.

    Read the Complete Script First

    Read the entire approved script before adding scene breaks. Understanding the complete learning flow makes it easier to recognize where the visual purpose changes.

    Mark Meaningful Visual Changes

    • A new main idea begins.
    • The viewer needs to see a demonstration.
    • A practical example begins.
    • An important warning needs visual emphasis.
    • A comparison begins.
    • A checklist or review stage begins.
    • The video moves to a new major step.

    You may mark a planning copy with [SCENE CHANGE], but keep production notes out of the narration copy if an AI voice or narrator might read them accidentally.

    Use One Main Visual Purpose per Scene

    A scene can contain several closely related sentences when one visual supports the whole idea. Split a long paragraph when the viewer needs to see a different action, example, diagram, or warning.

    Mark Special Asset Needs

    • [SCREEN RECORDING NEEDED]
    • [DIAGRAM NEEDED]
    • [REALISTIC VISUAL NEEDED]
    • [COMPARISON NEEDED]
    • [WARNING CARD NEEDED]

    Review the Initial Scene List

    Check that every important narration section has visual coverage, decorative scenes are removed, warnings are visible, and the sequence contains enough visual variety to support the lesson without changing constantly.

    AI Scene-Break Prompt

    Example: Divide this approved narration into possible visual scenes. Keep the narration unchanged. Create a new scene only when the visual purpose changes meaningfully. Identify the reason for each scene break and mark uncertain breaks as [HUMAN REVIEW].

    Common Mistake: Dividing scenes according to sentence length instead of visual purpose.

    How to Avoid This Mistake: Change scenes when the viewer needs to see something meaningfully different, not merely because a sentence ends.

    Figure 3. Divide the script when the viewer needs a meaningfully different visual rather than creating a new scene for every sentence.

    Explanation: Scene breaks should follow the teaching purpose of the narration. Closely related sentences can often remain together under one visual.

    Step 2: Choose the Best Visual Type for Each Scene

    Choose the visual based on what the viewer needs to see in order to understand the narration.

    Narration PurposeSuitable Visual
    Show an actionScreen recording or carefully planned demonstration
    Show one stable detailScreenshot or close-up
    Explain a processWorkflow diagram
    Show differencesComparison layout
    Review several itemsChecklist
    Emphasize a riskWarning card
    Provide general contextRealistic workspace or licensed stock footage
    Introduce a short sectionSimple text card

    Use Screen Recordings for Actions

    When the viewer needs to follow a real software action, plan a screen recording. Prepare fictional or safe demonstration data, remove private information, and practise the sequence before recording.

    Use Screenshots for Stable Details

    A screenshot is often clearer than motion when the viewer needs to study one button, menu, setting, or completed result.

    Use Diagrams for Processes

    Workflow diagrams are useful when the relationship between steps matters more than the appearance of a software interface.

    Use Text Cards Sparingly

    Short headings, warnings, and labels can be useful. Avoid copying full narration paragraphs onto the screen.

    Review the Visual-Variety Map

    Look at the planned visual types across the entire section. Replace repeated generic laptop scenes with more specific instructional visuals when appropriate.

    AI Visual-Category Prompt

    Example: For each approved scene below, suggest one visual category only: screen recording, screenshot, diagram, comparison, checklist, warning card, realistic context scene, or text card. Do not invent facts or assets. Explain briefly why the category fits the teaching purpose.

    Common Mistake: Choosing visuals because they look attractive rather than because they help teach the narration.

    How to Avoid This Mistake: Write the visual purpose first, then choose the simplest visual type that satisfies that purpose.

    Figure 4. Different narration purposes require different types of visuals.

    Explanation: A screen recording is useful for demonstrating an action, while a diagram or comparison may be clearer when the viewer needs to understand a process or difference.

    Step 3: Create a Simple Storyboard

    A storyboard is a sequence of frames that shows the planned visual flow before final assets are created. A storyboard frame does not need finished artwork.

    Use Simple Placeholders

    • Rough sketches
    • Text descriptions
    • Draft screenshots
    • Simple icons
    • [AI IMAGE NEEDED] placeholders
    • [SCREEN RECORDING NEEDED] placeholders
    • [STOCK FOOTAGE NEEDED] placeholders

    Include the Essential Scene Information

    Each storyboard frame should contain the scene number, narration summary, visual description, planned on-screen text, approximate duration, asset status, and any important production or accessibility note.

    Keep Production Notes Separate from Narration

    Do not mix instructions such as Zoom to the menu or Add a warning icon into text that will be recorded as narration.

    Build One Main Section at a Time

    Create the opening sequence first, then work through each main section. Review the sequence before moving to the next section so that visual problems do not accumulate.

    Review the Storyboard Without Narration

    Look through the storyboard as a visual sequence. Then compare it with the script. A useful storyboard should still show a recognizable progression even before the final assets exist.

    Save Clear Storyboard Versions

    • 061-storyboard-v0-1-first-layout.docx
    • 061-storyboard-v0-2-scene-review.docx
    • 061-storyboard-v0-3-accessibility-review.docx
    • 061-storyboard-v1-0-approved.docx

    Common Mistake: Treating the rough storyboard as finished artwork before the sequence is approved.

    How to Avoid This Mistake: Keep the first storyboard simple and inexpensive to change. Create polished assets only after the scene order and visual purposes are approved.

    Figure 5. A beginner storyboard frame can use a simple placeholder plus the information needed to understand the scene.

    Explanation: The storyboard is used to approve the visual sequence before time is spent creating polished final assets.

    Step 4: Build the Detailed Scene Plan

    The detailed scene plan adds production information to the approved storyboard. Use one row for each scene and keep the same scene numbering across the storyboard, filenames, narration references, source records, and editing notes.

    Recommended Scene-Plan Fields

    • Scene Number
    • Script Section
    • Narration Reference
    • Visual Purpose
    • Visual Type
    • Visual Description
    • On-Screen Text
    • Duration
    • Transition
    • Asset Source
    • Licence Status
    • Permission Status
    • Privacy Check
    • Accessibility Note
    • Production Status
    • Filename

    Use Specific Visual Descriptions

    Write enough detail that you or an editor can understand what must be created without guessing. Avoid vague notes such as nice image or add B-roll.

    Record Source, Rights, and Review Status

    Use clear statuses such as Original Asset, Licence Confirmed, Permission Required, Privacy Review Required, Asset Needed, Revision Required, and Approved for Visual Production.

    Example Scene-Plan Row

    FieldExample
    Scene Number014
    NarrationRemove private information before recording.
    Visual PurposePrivacy warning
    Visual TypeWarning card + fictional screen example
    Duration12 seconds
    Asset SourceOriginal infographic
    PermissionNot applicable
    PrivacyFictional data only
    AccessibilityLabels and icons, not colour alone
    StatusPlanned
    Filename061-scene-014-check-privacy-before-recording.png

    Use AI Only to Organize the Plan

    Example: Organize the approved scene information below into a structured scene-plan table. Do not add assets, facts, licences, permissions, or approval decisions. Mark missing fields as [HUMAN REVIEW].

    Common Mistake: Building a storyboard but leaving production details for the editor to guess later.

    How to Avoid This Mistake: Record the timing, source, rights, privacy, accessibility, production status, and filename for every important scene before final asset creation.

    Figure 6. A detailed scene plan records the information needed to turn each storyboard frame into a production-ready asset.

    Explanation: The plan connects the scene to its narration, timing, source, rights checks, privacy review, accessibility requirements, and final filename.

    Step 5: Plan Scene Timing and Narration Synchronization

    After building the detailed scene plan, review how long each scene should remain on screen and how it will match the narration. The goal is not to make every scene the same length. The goal is to give viewers enough time to understand each idea.

    Time the Approved Narration

    1. Read the matching narration aloud.

    2. Time how long it takes naturally.

    3. Add time for reading or demonstration.

    4. Record the estimate in the scene plan.

    Do not read unnaturally fast simply to make a scene fit a preferred duration.

    Allow More Time for Complex Visuals

    • Checklists
    • Comparison tables
    • Workflow diagrams
    • Screen demonstrations
    • Warnings
    • Detailed screenshots

    Time Real Screen Actions

    Practise the actual action instead of estimating from the script alone. Allow time for menus to open, clicks to register, the cursor to move clearly, and the viewer to see the result.

    Use Pauses Deliberately

    A short pause after a warning, definition, comparison, or completed demonstration can give viewers time to process the visual. Do not fill every pause with extra narration.

    Use Approximate Timecodes

    SceneStartEndDuration
    00100:0000:066 sec
    00200:0600:148 sec
    00300:1400:2612 sec
    00400:2600:3610 sec

    Test with a Rough Animatic When Useful

    An animatic is a simple video made from storyboard frames placed on a timeline with temporary narration. It can reveal rushed scenes, long static sections, missing pauses, and visual changes that occur at the wrong time before final assets are produced.

    Common Mistake: Assigning the same three-to-five-second duration to every scene or forcing the narration to fit the edit.

    How to Avoid This Mistake: Time the real narration and demonstrations, allow reading time, and adjust scene length according to comprehension rather than a fixed rule.

    Figure 7. Scene duration should match narration, visual complexity, demonstrations, and reading time.

    Explanation: Not every scene should have the same duration. Complex visuals and demonstrations normally require more viewing time than simple headings.

    Step 6: Plan Visual Continuity and Transitions Between Scenes

    Visual continuity helps the video feel like one organized lesson instead of a collection of unrelated images, clips, screenshots, and diagrams.

    Use a Consistent Visual System

    • Blue as the main instructional colour
    • White and light-grey backgrounds
    • Subtle green for approved or completed states
    • Restrained warning accents
    • Large readable text
    • Consistent icons and step numbers

    Keep Related Objects in Familiar Positions

    If a script page appears on the left and storyboard frames appear on the right, keep that relationship through related scenes when possible. Consistent direction helps viewers understand sequence.

    Use Simple Transition Rules

    TransitionBest Use
    Direct cutNormal scene change
    Short fadeMajor section change
    Controlled zoomFocus on a detail
    Highlight changeSame visual, new point

    Avoid Excessive Motion

    Do not use spins, flips, fast wipes, flashing effects, or constant movement simply to make the video look busy. Movement should explain sequence, change, emphasis, or progress.

    Keep Warnings and Approvals Consistent

    Use a recognizable warning style and a recognizable approval style. Include labels or icons so meaning does not depend on colour alone.

    Common Mistake: Adding a different transition, colour, layout, or movement style to every scene because variety seems more professional.

    How to Avoid This Mistake: Use a small set of consistent visual rules and change the design only when the narration or teaching purpose genuinely requires it.

    Figure 8. Consistent layouts, colours, directions, and simple transition rules help scenes feel connected.

    Explanation: Visual continuity helps beginners recognize that several different scenes belong to the same lesson and production system.

    Step 7: Plan Privacy, Permissions, Licensing, and Disclosure for Every Scene

    Before creating or collecting the final visual assets, review every storyboard scene for privacy, permission, licensing, and disclosure requirements. This review is easier before editing begins than after a finished video has already been assembled.

    Classify the Asset Source

    • Original creator-made visual
    • Self-recorded screen recording
    • AI-generated image or video
    • Licensed stock photograph or footage
    • Official or self-captured screenshot
    • Public-domain material
    • Material used with written permission
    • Asset still to be selected

    Do Not Assume Online Means Free to Use

    Finding an image, clip, screenshot, or graphic through a search engine, website, YouTube, or social media does not automatically give permission to reuse it. The word free also does not prove that commercial use, modification, or redistribution is allowed.

    Save Licence and Permission Records

    For external assets, preserve the provider, asset name, source page, download date, licence type, commercial-use conditions, attribution requirements, receipt or subscription record, and any written permission.

    Plan Real-Person Permission Before Production

    A faceless video can still use another person’s photograph, voice, video, personal story, testimonial, or private message. Obtain suitable permission when required, and avoid unauthorized impersonation or synthetic content that makes a real person appear to say or do something they did not say or do.

    Protect Screen-Recording Privacy

    Screen recordings can reveal information outside the main area being demonstrated. Check browser tabs, notifications, email addresses, account names, profile photographs, recent documents, file paths, payment information, and private messages.

    Figure 9. Review privacy, permissions, licensing, and synthetic-content disclosure before approving a scene for production.

    Explanation: Identifying these requirements during storyboarding makes it easier to replace unsuitable assets before the video has already been edited.

    Figure 10. Check the complete screen for private or identifying information before recording.

    Explanation: Removing unnecessary personal information before recording is generally safer and easier than trying to hide it during final editing.

    Review Realistic Synthetic Content

    Ask whether a reasonable viewer could mistake an AI-generated or meaningfully altered scene for authentic footage or a real event. When the answer may be yes, mark the scene for final platform disclosure review. Do not present synthetic visuals as proof that an event occurred.

    Stop Production When Rights or Privacy Are Unclear

    Use clear blocking statuses such as DO NOT PRODUCE – RIGHTS REVIEW REQUIRED or DO NOT RECORD – PRIVACY REVIEW REQUIRED. Replace the asset when the problem cannot be resolved safely.

    Common Mistake: Choosing all visuals first and checking licences, permissions, privacy, and disclosure only after editing.

    How to Avoid This Mistake: Add source, rights, privacy, permission, and disclosure fields to the scene plan before visual production begins.

    Step 8: Complete the Final Storyboard and Scene-Plan Review

    Before creating all final visuals, review the complete storyboard and detailed scene plan from beginning to end.

    Compare the Storyboard with the Approved Script

    • Every important narration section has visual coverage.
    • Scene order matches narration order.
    • Important warnings are visible.
    • Examples appear after the necessary explanation.
    • No visual adds unsupported information.
    • No scene belongs to an older script version.

    Review Timing, Text, and Continuity

    Confirm that complex scenes have enough time, on-screen text is readable, terms match the script, related objects stay in logical positions, and transitions are simple and consistent.

    Review Production Difficulty

    Classify scenes as Easy, Moderate, Difficult, or Replacement Recommended. Replace unnecessarily difficult scenes when a simpler visual can teach the same idea.

    Create a Missing-Asset List and Blocked-Scene List

    Track unfinished visuals separately from blocked scenes. A blocked scene may have an unclear licence, pending permission, privacy risk, unavailable source, interface that needs rechecking, or unresolved synthetic-content review.

    Review the Storyboard as a Thumbnail Sheet

    Place small versions of all frames on one page or screen. This makes repeated layouts, too many text-heavy scenes, inconsistent colours, and missing visual variety easier to notice.

    Figure 11. Complete one full storyboard review before final visual production begins.

    Explanation: The final review checks that the visual plan still matches the approved script and that timing, rights, privacy, accessibility, and production requirements have been addressed.

    Figure 12. Reviewing all storyboard frames together can reveal repetition and inconsistent visual patterns.

    Explanation: A thumbnail overview makes it easier to notice when a section contains too many similar images, text cards, or layouts.

    Assign a Final Scene Status

    • Approved for Visual Production
    • Revision Required
    • Asset Required
    • Licence Review Required
    • Permission Review Required
    • Privacy Review Required
    • Disclosure Review Required

    Common Mistake: Beginning production because the storyboard looks complete without checking script match, timing, rights, privacy, accessibility, and production requirements.

    How to Avoid This Mistake: Conduct one complete review, resolve important blocked scenes, and approve one production version before creating the final asset set.

    Benefits of Storyboarding and Scene Planning

    The main benefit of storyboarding is that important visual decisions are made before time and money are spent creating every final asset.

    • Clearer visual direction
    • Better connection between script and visuals
    • Easier visual production
    • Less unnecessary asset creation
    • Better file organization
    • Easier timing review
    • Better narration synchronization
    • Easier detection of repetition
    • Better visual continuity
    • Earlier privacy and licence planning
    • Better accessibility planning
    • Easier work delegation and revision

    Reality: Storyboarding does not guarantee better viewer performance, monetization, or production success. It provides a structured way to organize visual decisions before final assets are created.

    Figure 13. Storyboarding helps organize visual, timing, production, privacy, rights, and accessibility decisions before final asset creation.

    Explanation: The value of storyboarding comes from reducing uncertainty and identifying problems while changes are still relatively easy to make.

    Limitations of Storyboarding and Scene Planning

    A storyboard can become outdated

    Use one approved script version and update all related references after important script changes.

    Timing estimates may be inaccurate

    Time real narration and demonstrations instead of relying only on word counts.

    Planned visuals may be difficult to create

    Classify production difficulty and use a simpler visual when it teaches the same point.

    AI may suggest repetitive or impractical scenes

    Treat AI suggestions as ideas and review them for teaching value, cost, rights, and feasibility.

    Storyboards cannot confirm factual accuracy

    Verify claims during research and recheck current facts when a visual displays policies, features, statistics, or other changeable information.

    Storyboards cannot confirm licence rights

    Review the exact licence for the selected asset.

    Privacy problems can appear during recording

    Complete a separate privacy check before recording and another review of the final capture.

    Interfaces can change

    Capture and review current interface visuals close to production and publication.

    A storyboard cannot guarantee visual consistency

    Use a shared visual specification and review related assets together.

    Planning can become too detailed

    Record the information needed for production, rights, privacy, accessibility, and review without turning the storyboard into an unmanageable document.

    Reality: Storyboarding reduces uncertainty, but it does not eliminate production problems or replace final human review.

    Common Mistakes When Creating Storyboards and Scene Plans

    The following mistakes are common when beginners move from an approved script into visual production.

    Mistake 1: Starting before the script is stable

    Use one approved or nearly final script version.

    Mistake 2: Creating a new scene for every sentence

    Create a new scene only when the visual purpose changes meaningfully.

    Mistake 3: Keeping one visual for too long

    Change the visual when the viewer needs to see something different.

    Mistake 4: Choosing visuals only because they look attractive

    Write the teaching purpose first.

    Mistake 5: Using too much generic stock footage

    Use specific instructional visuals when the lesson requires them.

    Mistake 6: Adding too much on-screen text

    Use short headings, labels, warnings, and key phrases.

    Mistake 7: Ignoring reading time

    Add reading time to the scene plan.

    Mistake 8: Guessing screen-recording duration

    Practise and time the real action.

    Mistake 9: Recording a real account with private information

    Use safe demonstration data and review the complete screen.

    Mistake 10: Using unverified AI-generated interfaces

    Use current real screenshots or recordings for real software tutorials.

    Mistake 11: Using real people without permission

    Obtain suitable permission or replace the scene.

    Mistake 12: Choosing stock assets before checking the licence

    Review and save the licence when the asset is selected.

    Mistake 13: Adding a different transition between every scene

    Use a small transition system.

    Mistake 14: Forgetting scene numbers and filenames

    Use a continuous numbering system and descriptive filenames.

    Mistake 15: Skipping mobile and accessibility review

    Test important visuals at smaller display sizes and check contrast, labels, timing, and movement.

    Figure 14. Common storyboard mistakes can increase production work or make the finished tutorial harder to follow.

    Explanation: Most of these problems can be reduced by starting with an approved script, assigning one clear purpose to each scene, and reviewing the complete plan before production.

    Common Myths About Storyboarding and Scene Planning

    Myth 1: Storyboards are only for professional filmmakers

    Reality: A beginner storyboard can use boxes, screenshots, text descriptions, tables, or placeholders.

    Myth 2: Every storyboard frame must be beautiful

    Reality: Rough planning frames are often easier to change and more useful early in production.

    Myth 3: One script paragraph always equals one scene

    Reality: Scene changes should follow visual purpose rather than paragraph length.

    Myth 4: A scene should change every few seconds

    Reality: There is no universal duration; timing depends on narration, reading time, and visual complexity.

    Myth 5: Every scene needs movement

    Reality: Static visuals can be effective for comparisons, diagrams, warnings, and checklists.

    Myth 6: AI can automatically create and approve the storyboard

    Reality: AI can assist with planning but cannot confirm accuracy, licences, permissions, privacy, accessibility, or final suitability.

    Myth 7: Free or royalty-free means unrestricted

    Reality: Always review the exact licence for the asset.

    Myth 8: A faceless video has no real-person permission issues

    Reality: Faceless videos may still use real voices, photographs, testimonials, stories, or messages.

    Myth 9: A storyboard guarantees monetization

    Reality: YouTube monetization depends on the complete channel, content, eligibility requirements, and current policies.

    Myth 10: Accessibility can be added at the end

    Reality: Planning readable text, contrast, pacing, narration, captions, and mobile layouts early reduces rework.

    Storyboarding and Scene-Planning Checklist

    Script and Project Setup

    • One approved script version is used.
    • The audience and learning result are clear.
    • The approximate video length is realistic.
    • Scene numbering is continuous.

    Scene Division

    • Every important narration section has visual coverage.
    • Scene changes follow visual purpose.
    • Warnings, examples, comparisons, and demonstrations have enough visual attention.

    Visual Planning

    • Each scene has one clear teaching purpose.
    • The visual type fits the narration.
    • On-screen text is brief and readable.
    • Mobile readability has been considered.

    Timing and Synchronization

    • Timing is based on approved narration.
    • Complex scenes receive enough reading or demonstration time.
    • Narration and visual changes match.

    Rights and Safety

    • Asset sources are identified.
    • Licence and permission status are recorded.
    • Screen-recording privacy is planned.
    • Realistic synthetic scenes are flagged for disclosure review when needed.

    Accessibility

    • Text is large and high contrast.
    • Meaning does not depend only on colour.
    • Important visuals are explained through narration when needed.
    • Rapid flashing is avoided.

    Production Readiness

    • Filenames are assigned.
    • Missing assets are listed.
    • Blocked scenes are identified.
    • One storyboard and scene-plan version are approved.

    Final Tip: Do not begin creating all final images, footage, and screen recordings until the storyboard tells you exactly what each scene needs and every important blocked issue has been identified.

    Practical Example: Turn an Approved Script into a Storyboard and Scene Plan

    This fictional example shows how one approved script section about organizing digital photographs safely can become a five-scene storyboard.

    Approved Narration

    A duplicate photograph may be an unnecessary copy, but it may also be an edited version, a higher-quality original, or a file saved in a different format. Do not delete every matching file automatically. Open the photographs, compare their quality, date, format, and visible content, move uncertain files into a temporary review folder, and remove a copy only after confirming that the separate backup opens correctly.

    Five-Scene Visual Progression

    SceneNarration PurposeVisual PurposeApprox. Duration
    001Introduce the duplicate-file problemShow several similar-looking files7 sec
    002Explain that similar files may differCompare original, smaller copy, edited version10 sec
    003Explain the review processShow Quality, Date, Format, Content checklist10 sec
    004Show the safer actionMove uncertain files to Review First folder9 sec
    005Confirm the final safety checkOpen the separate backup successfully10 sec

    Suggested Filenames

    • 061-scene-001-similar-photo-files.png
    • 061-scene-002-original-small-edited-comparison.png
    • 061-scene-003-check-before-deleting.png
    • 061-scene-004-review-first-folder.png
    • 061-scene-005-confirm-backup-first.png

    The five frames now form this visual progression: Similar Files → Compare Versions → Check Details → Move to Review Folder → Confirm Backup.

    Figure 15. A short approved script can be divided into several visual scenes when each part requires a different teaching purpose.

    Explanation: This example shows how narration about similar photo files becomes a clear sequence of comparison, review, safe temporary storage, and backup confirmation.

    Final Lesson: A useful storyboard does not ask, “How can I make every sentence look interesting?” It asks, “What does the viewer need to see to understand this part of the approved narration?”

    Frequently Asked Questions

    What is the difference between a storyboard and a scene plan?

    A storyboard shows the visual sequence. A scene plan records detailed production information such as timing, source, rights, privacy, accessibility, filename, and status.

    Do I need professional drawing skills?

    No. Boxes, screenshots, text descriptions, icons, and placeholders are enough for a beginner storyboard.

    Can AI create the storyboard for me?

    AI can suggest scene breaks and visual categories, but the creator still needs to approve accuracy, privacy, permissions, licences, accessibility, timing, and final suitability.

    How many scenes should a faceless YouTube video have?

    There is no fixed number. Create a new scene when the visual purpose changes meaningfully.

    How long should each scene stay on screen?

    The duration depends on narration, reading time, visual complexity, and demonstration speed.

    Should every sentence have a different visual?

    No. Several related sentences can share one scene when the same visual supports the whole idea.

    When should I use a screen recording?

    Use a screen recording when viewers need to see an actual action or sequence.

    When is a screenshot better?

    A screenshot is useful when viewers need to study one stable detail.

    Can I use AI-generated screenshots of real software?

    Use caution. AI-generated interfaces may contain invented features or wrong labels. For real tutorials, current screenshots or recordings are generally more reliable.

    Do I need to check licences during storyboarding?

    Yes. Identify scenes that require a licence or permission review before final production.

    Does royalty-free mean copyright-free?

    No. Royalty-free normally describes a licensing arrangement. Review the actual licence.

    Do I need permission to use a real person?

    Depending on the content and use, suitable permission may be required for a person’s voice, photograph, video, story, message, or testimonial.

    Do I need to disclose every AI-generated image?

    Not necessarily. Current YouTube guidance distinguishes realistic or meaningfully altered synthetic content from some non-realistic or minor uses. Check the current policy before publication.

    What is an animatic?

    An animatic is a rough video made from storyboard frames, approximate timing, and temporary narration.

    Should I delete old storyboard versions?

    Usually no. Archive earlier versions and keep one version clearly marked as the current approved production version.

    Key Takeaways

    • Start with one approved script version.
    • Divide the script according to visual purpose, not sentence length.
    • Give each scene one main teaching function.
    • Choose the visual type according to what viewers need to understand.
    • Use simple storyboard frames before polished assets.
    • Record timing, source, licence, permission, privacy, accessibility, status, and filename in the detailed scene plan.
    • Match scene timing to real narration and reading time.
    • Keep visual style and transitions consistent.
    • Use fictional demonstration data when practical.
    • Do not assume that online, free, royalty-free, or AI-generated content is unrestricted.
    • Mark realistic synthetic scenes for disclosure review when viewers could mistake them for authentic footage or a real event.
    • Plan accessibility before final production.
    • Keep scene numbers consistent across all project files.
    • Maintain missing-asset and blocked-scene lists.
    • Approve one production version before creating the complete final visual set.

    The Basic Storyboarding Workflow

    1. Approve the script.
    2. Divide the script into scenes.
    3. Define the purpose of each scene.
    4. . Choose the visual type.
    5. Build the simple storyboard.
    6. Create the detailed scene plan.
    7. Estimate timing.
    8. . Match visuals to narration.
    9. Plan continuity and transitions.
    10. Review privacy, permissions, licensing, and disclosure needs.
    11. Review accessibility.
    12. . Identify missing and blocked assets.
    13. Review the complete storyboard.
    14. Approve one production version.
    15. Move to visual production.

    Figure 16. The complete beginner workflow moves from an approved script to an approved visual-production plan.

    Explanation: Following the workflow in order helps prevent the creator from producing large numbers of images, clips, and recordings before the visual sequence and important review requirements have been approved.

    Final Tip: If a scene does not help the viewer understand the narration, reconsider whether it needs to be there.

    Final Thoughts

    Creating a storyboard and detailed scene plan gives a faceless YouTube video a clear visual structure before production begins. The process turns each important narration section into a scene, visual purpose, visual type, timing estimate, asset requirement, safety review, accessibility note, and production status.

    You do not need professional drawing skills or complicated software. A clear table or set of simple frames can be enough. The quality of the planning decisions matters more than the artistic quality of the rough storyboard.

    The storyboard is not the finished video. Timing may change, stock assets may need replacement, screen recordings may need to be repeated, AI-generated images may be unsuitable, interfaces may change, and rights issues may require a different visual. Update the plan when important production changes occur and keep one approved version clearly identified.

    Article 062 will explain how to create and collect the actual visuals using AI images, stock footage, and screen recordings.

    Continue Learning

    Sources and References

    The following official sources were reviewed on August 6, 2026. Platform policies, software features, licensing conditions, and accessibility guidance may change. Check important requirements again when first using a tool, when plans or features change, after a policy-update notice, and periodically as part of the publishing workflow.

    YouTube Help – Disclosing use of GenAI content – Explains YouTube disclosure requirements for realistic or meaningfully altered AI-generated content.

    YouTube Help – Understanding “How this content was made” disclosures – Explains how AI and altered-content disclosures may appear to viewers.

    YouTube Help – Protecting your identity – Provides privacy guidance and explains requests involving realistic altered or synthetic likenesses.

    YouTube Help – YouTube channel monetization policies – Explains original and authentic content expectations, inauthentic content, and reused-content policy.

    Canadian Intellectual Property Office – Copyright: Learn the basics – Provides Canadian copyright basics and guidance about legally using the works of others.

    Office of the Privacy Commissioner of Canada – 5 tips to protect your privacy online – Provides current guidance on protecting personal information online.

    W3C WAI – Audio Content and Video Content – Provides accessibility considerations for planning, scripting, storyboarding, recording, and producing video.

    W3C WAI – Understanding Captions (Prerecorded) – Explains captions for prerecorded synchronized media.

    W3C WAI – Understanding Three Flashes – Explains guidance for avoiding rapid flashing content.

    Important Note: This article provides general educational guidance, not legal advice. Copyright, licensing, privacy, permission, and commercial-use questions can depend on the specific asset, licence, person, jurisdiction, platform, and intended use. For important or unusual legal questions, consider advice from a qualified professional.
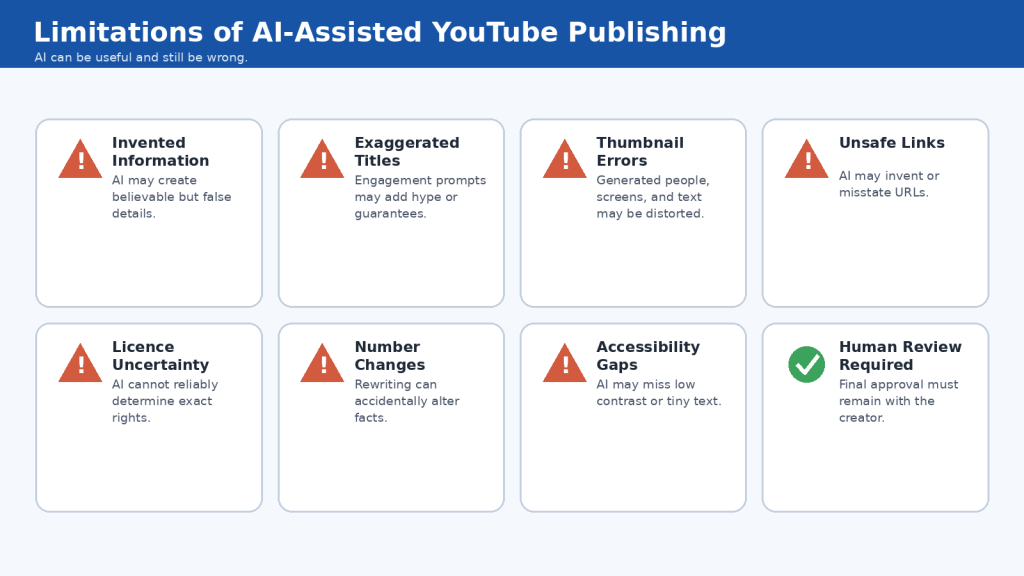
  • How to Write Original YouTube Video Scripts with AI (2026)

    How to Write Original YouTube Video Scripts with AI (2026)

    Estimated reading time: 26 minutes

    Last updated: August 6, 2026

    Introduction

    AI can help prepare a YouTube video script, but the first generated draft is rarely ready to record. It may contain generic wording, repeated ideas, weak transitions, unnatural spoken language, unsuitable examples, unsupported claims, or wording that resembles common online templates.

    An original script requires more than changing a few words. The creator must decide what unique value the video provides, how the subject will be explained, which examples will be used, what order helps viewers learn, what tone suits the audience, and which parts must be rewritten or removed.

    Article 059 explained how to research the topic, verify important claims, organize source notes, and create an approved outline. Article 060 begins after those steps are complete and focuses on turning verified material into an original, narration-ready script.

    • Generate possible hooks
    • Organize an approved outline
    • Draft individual sections
    • Simplify difficult wording
    • Suggest transitions
    • Identify repetition
    • Create alternative explanations
    • Convert formal writing into spoken language

    AI can assist with these tasks, but the creator remains responsible for accuracy, source meaning, originality, examples, privacy, permissions, licences, disclosure, accessibility, and final approval.

    Figure 1. A responsible workflow for turning verified research into an original, narration-ready YouTube script.

    Explanation: This workflow shows that AI may assist with drafting, but verified research, original rewriting, narration testing, and final approval remain human responsibilities.

    YouTube states that monetized content should be original and authentic. Reused material may be eligible when viewers can recognize meaningful original commentary, substantial changes, education, or entertainment value. A strong script does not guarantee views, subscribers, monetization, or income, but it provides a clearer foundation for narration, visuals, captions, editing, and final review.

    Before You Begin

    Before drafting, confirm that the research and planning work is complete. You should already have a clear topic, defined audience, one main viewer question, verified notes, an approved outline, important limitations, a narration style, and a basic visual approach.

    Confirm the Main Viewer Question

    Write the main question at the top of the script document. Every section should help answer it. Remove information that is interesting but does not support the main purpose.

    Define the Useful Result

    Complete this sentence: After watching this video, the viewer should be able to [specific result]. Keep the result realistic and avoid promises of viral success, guaranteed monetization, quick subscribers, or automatic income.

    Identify What Makes the Video Different

    Original value may come from a clearer learning order, simpler language, better examples, stronger warnings, audience-specific explanations, original diagrams, or practical checklists. Write one originality statement that guides the complete script.

    Figure 2. A project brief defines the audience, viewer result, originality angle, tone, scope, and AI boundaries before drafting begins.

    Explanation: Preparing these decisions before prompting AI helps keep the script focused, consistent, and suitable for the intended audience.

    Choose the Script Type and Tone

    • Step-by-step tutorial
    • Beginner explanation
    • Comparison
    • Common-mistakes video
    • Myth-versus-reality video
    • Checklist
    • Case study
    • Practical demonstration
    • Frequently asked questions

    Choose a calm, beginner-friendly, professional, direct, and evidence-based tone. Avoid talking down to beginners, using aggressive sales language, or pretending that one method is always correct.

    Prepare the Drafting Instruction

    A useful instruction is: Use only the approved outline and verified notes below. Write one beginner-friendly script section at a time. Do not add facts, statistics, policies, examples, sources, or claims. Use natural spoken language, short sentences, and clear transitions. Mark missing information as [NEEDS REVIEW].

    Common Mistake: Beginning the script without defining what makes the video useful and different.

    How to Avoid This Mistake: Confirm the audience, viewer result, scope, originality statement, tone, approved terminology, and AI boundaries before drafting.

    Step 1: Turn the Approved Outline into an Original Teaching Structure

    An approved outline shows what the video needs to cover. Before writing full narration, improve the outline so it reflects your own teaching approach rather than a generic AI template.

    Figure 3. A generic outline becomes an original teaching structure through audience-focused organization, examples, warnings, transitions, and visuals.

    Explanation: Originality begins before full narration is written. The creator reorganizes approved information around the viewer’s learning journey.

    Start with the Viewer’s Learning Journey

    1. Identify the problem.

    2. Explain the basic idea.

    3. Define unfamiliar terms.

    4. Show what is required.

    5. Present the steps.

    6. Demonstrate an example.

    7. Explain mistakes and limitations.

    8. Provide a final checklist.

    9. Give one useful next action.

    Do not organize the script only according to the order in which research was collected. Research notes may be arranged by source; a video should be arranged according to how the audience learns.

    Choose the Main Teaching Pattern

    • Problem-to-solution
    • Before-and-after
    • Step-by-step process
    • Question-and-answer

    Choose one main pattern and a clear teaching angle. For Article 060, the angle is turning verified research into an original, beginner-friendly, narration-ready script through human rewriting and practical review.

    Plan Examples, Warnings, and Visuals

    Plan original examples before asking AI to draft them. Place warnings beside the relevant action rather than collecting all warnings at the end. Mark outline points as Spoken, Shown on Screen, Both, or Source Note Only.

    SectionViewer NeedMain PointOriginal ExampleWarningVisual
    OpeningUnderstand the problemAI drafts may sound genericWeak and improved openingAvoid false promisesTwo script cards
    RewriteLearn how to add valueChange explanation and examplesBefore-and-after paragraphPreserve source meaningEditing marks
    NarrationMake the script naturalRead aloud and reviseLong versus short sentenceDo not rushMicrophone and timer

    Common Mistake: Treating an AI-generated outline as automatically original because the wording is new.

    How to Avoid This Mistake: Reorganize the information around your audience, teaching angle, examples, warnings, learning order, and visual approach before drafting narration.

    Step 2: Write a Clear and Original Opening

    The opening introduces the viewer’s problem, identifies who the video is for, describes the realistic result, and explains why the viewer should continue. It should be clear rather than dramatic.

    Figure 4. The Problem–Promise–Plan formula creates a clear and truthful opening without hype or guarantees.

    Explanation: The formula introduces the viewer’s problem, states a realistic learning result, and previews the main lesson steps.

    Use the Problem–Promise–Plan Formula

    • Problem: Describe the specific difficulty.
    • Promise: State the realistic result the video provides.
    • Plan: Briefly explain the main steps.

    Example: AI can create a script quickly, but the first draft may sound generic and unnatural. In this video, you will learn how to turn verified notes into an original script that sounds clear when spoken. We will improve the structure, rewrite generic wording, add original examples, and test the narration before approval.

    Choose a Truthful Hook

    • Problem hook
    • Question hook
    • Before-and-after hook
    • Practical warning hook
    • Result hook

    Avoid false emergencies, unsupported statistics, invented stories, guaranteed results, and statements unrelated to the lesson. Keep the opening brief and reach useful information quickly.

    Compare a Weak and Strong Opening

    Weak: In today’s fast-paced digital world, AI is revolutionizing content creation and helping anyone produce amazing videos quickly and easily.

    Stronger: AI can produce a YouTube script quickly, but the first draft may sound generic, repetitive, or unnatural. This guide shows complete beginners how to rewrite verified material into a clear script that is ready for narration.

    Common Mistake: Using a dramatic or generic AI-generated hook that does not accurately represent the lesson.

    How to Avoid This Mistake: Begin with the real problem, give a realistic promise, explain the plan briefly, and rewrite the opening until it sounds natural and specific.

    Step 3: Rewrite Generic AI Wording into Original Explanations

    Generic wording may be grammatically correct while still sounding like many other videos. Original rewriting means explaining the subject through your own structure, priorities, examples, and teaching approach.

    Figure 5. A meaningful rewrite changes the explanation, examples, structure, and audience guidance rather than replacing a few words.

    Explanation: Synonym replacement is not enough. The final version should provide specific, audience-relevant value while preserving verified meaning.

    Identify Generic Language

    • In today’s digital world
    • This powerful tool
    • Game-changing solution
    • Endless possibilities
    • Everything you need to know
    • Take your content to the next level
    • It is important to note
    • By following these tips, you can succeed

    Ask whether a sentence could appear in hundreds of unrelated videos. When the answer is yes, rewrite it more specifically.

    Replace Broad Claims with Specific Meaning

    Generic: AI can help creators improve their scripts. Specific: AI can help organize an approved outline, suggest transitions, and simplify difficult sentences. The creator still needs to verify the information and approve the final wording.

    Use Actions and Clear Criteria

    Replace vague advice such as “make the script engaging” with specific actions: begin with the viewer’s real problem, explain one main idea at a time, use a relevant example, and remove sentences that do not help the viewer understand or complete the task.

    Preserve Source Meaning

    Simplification must not remove conditions, limitations, regional differences, plan restrictions, or uncertainty. Compare every rewrite with the verified notes and restore any meaning that was lost.

    Write for Spoken Language

    Formal: Creators should undertake a comprehensive evaluation of generated material. Spoken: Review the complete AI draft before recording it. Use direct subjects, shorter sentences, and familiar words without changing the facts.

    Common Mistake: Replacing a few words in an AI draft and treating the result as an original script.

    How to Avoid This Mistake: Change the explanation, structure, examples, sentence rhythm, and audience guidance while preserving verified meaning.

    Step 4: Add Original Examples, Commentary, and Practical Value

    Accurate information may still be difficult for a beginner to apply. Original examples and commentary show what the idea looks like in practice, why it matters, what can go wrong, and what the viewer should do next.

    Figure 6. The Example–Meaning–Action pattern turns an example into a clear teaching tool.

    Explanation: A focused example should show the situation, explain why it matters, and give the viewer a practical action.

    Use the Example–Meaning–Action Pattern

    • Example: Show one focused situation.
    • Meaning: Explain the lesson, problem, or risk.
    • Action: Tell the viewer what to do.

    Example: An AI draft recommends music from a “free” website. Meaning: Free does not prove that commercial or monetized use is permitted. Action: Open the licence for the exact track, confirm the planned use, and save a copy with the project records.

    Create Audience-Relevant Examples

    Use situations complete beginners may realistically encounter, such as rewriting a generic introduction, checking an AI-generated statistic, shortening a long sentence, or replacing an invented company example. Keep each example focused on one main point.

    Separate Evidence from Commentary

    Use phrases such as “The official guidance explains…” for source-derived information and “In this workflow, I recommend…” for practical recommendations. Do not present personal interpretation as an official requirement.

    Protect Privacy and Avoid Fake Results

    Do not invent testimonials, subscriber gains, income results, companies, or real-person stories. Clearly label fictional examples when viewers could mistake them for real events. Obtain permission before using another person’s voice, photograph, story, message, or private information.

    Common Mistake: Allowing AI to invent realistic stories, statistics, companies, or results to make the script sound convincing.

    How to Avoid This Mistake: Create and approve the examples yourself, use only necessary details, label fictional scenarios, and explain the specific lesson each example demonstrates.

    Step 5: Make the Script Sound Natural When Spoken

    A YouTube script is written to be heard, not only read. A paragraph may look professional on the page but sound formal, repetitive, or difficult during narration.

    Figure 7. A written paragraph becomes natural narration through shorter sentences, clear wording, pauses, and read-aloud testing.

    Explanation: A polished document may still need substantial revision before it is suitable for voice-over production.

    Read Every Section Aloud

    Mark places where you run out of breath, lose the meaning, change the wording naturally, or need to restart. The version you say naturally may be better than the version written on the page.

    Use One Main Idea per Sentence

    Before: AI can suggest hooks, transitions, examples, and alternative wording, but because it may produce inaccurate information, generic phrases, invented examples, or unsuitable recommendations, the creator should carefully review all generated material before using it.

    After: AI can suggest hooks, transitions, examples, and alternative wording. However, it may also add inaccurate or generic information. Review every suggestion before using it.

    Use Clear Signposting and Transitions

    • First, define the viewer’s problem.
    • The next step is rewriting generic wording.
    • Here is a simple example.
    • Before recording, complete one final check.

    Do not announce every paragraph. Use transitions when they help viewers understand why the next idea follows.

    Test with and without Visuals

    Listen to the narration without the screen to find unclear references. Then review it with the planned visuals to confirm that text remains visible long enough, scene changes match idea changes, and the narration does not repeat every word on screen.

    Common Mistake: Writing a polished document instead of a script designed for spoken narration.

    How to Avoid This Mistake: Read every section aloud, shorten difficult sentences, group long lists, clarify transitions, and revise according to how the script sounds.

    Step 6: Improve Transitions, Pacing, and Section Flow

    Clear paragraphs can still produce a disconnected or uneven video. Transitions connect ideas, pacing controls how quickly information is presented, and section flow determines whether viewers can follow the complete learning journey.

    Create a Pacing Map

    SectionPurposeApproximate TimePacing Note
    OpeningIntroduce the problem30 secondsKeep brief
    Teaching structureExplain the learning order1 minuteUse a diagram
    Original rewriteDemonstrate the main method2 minutesInclude before-and-after example
    ExamplesShow practical value2 minutesSlow down for comparison
    Narration testTest spoken clarity2 minutesInclude pauses
    Final reviewApprove the script1 minuteUse checklist
    ConclusionSummarize and give next action30 secondsNo new topic

    Figure 8. A pacing map helps balance the opening, explanations, examples, warnings, demonstrations, and conclusion.

    Explanation: Different sections may need different amounts of time according to their difficulty, importance, and visual requirements.

    Time a real narration sample because word-count estimates do not include pauses, demonstrations, technical terms, screen actions, or reading time. Do not solve a long script by making the narration unnaturally fast.

    Control Repetition

    Repeat essential ideas deliberately when first introduced, during the relevant step, and in the final checklist. Remove accidental recaps and paragraphs that perform the same job.

    Allow Time for Visual Understanding

    Tables, checklists, software menus, diagrams, and comparisons may require additional viewing time. Change the visual when the main idea changes rather than after every sentence.

    Conduct a Full Read-Through

    Record total time, slow sections, rushed sections, repeated information, awkward transitions, visual-reading needs, and places where attention may weaken. Revise the complete script rather than correcting paragraphs in isolation.

    Common Mistake: Reviewing individual paragraphs without checking whether the complete script moves smoothly and at a suitable pace.

    How to Avoid This Mistake: Read the entire script aloud, time the sections, improve transitions, remove accidental repetition, and allow enough time for viewers to understand narration and visuals.

    Step 7: Write a Clear Conclusion and Relevant Call to Action

    The conclusion should complete the lesson without repeating the entire script. It confirms what the viewer learned, reinforces the central principle, gives one practical next action, and connects to the next production stage.

    Figure 9. A strong conclusion confirms the learning result, reinforces the central principle, and gives one relevant next action.

    Explanation: This approach avoids generic summaries, unsupported success promises, and several competing calls to action.

    Return to the Main Viewer Result

    Example: You now have a process for turning verified research into a structured YouTube script, rewriting generic AI language, adding original examples, and testing the narration before approval.

    Use One Relevant Call to Action

    Choose the action that best supports learning, such as reviewing one script section, downloading the checklist, watching the previous research guide, or continuing to the narration lesson. Avoid asking viewers to complete many unrelated actions.

    Avoid Unsupported Outcomes

    Do not promise views, subscribers, watch time, monetization, sponsorships, income, or viral success. A clearer statement is that an original script provides a stronger foundation for narration, visuals, editing, and viewer understanding.

    Common Mistake: Ending with a generic AI summary, unsupported success promise, and several unrelated calls to action.

    How to Avoid This Mistake: Confirm the learning result, reinforce the central principle, give one practical next action, and connect the approved script to the next stage of production.

    Step 8: Complete the Final Script Review and Approval

    Before recording narration or creating final visuals, review the complete script as one production document. It must be accurate, original, clear, suitable for the audience, natural when spoken, consistent with the outline, practical to produce, responsible, and accessible.

    Figure 10. The final approval review checks the complete script before narration and visual production begin.

    Explanation: Accuracy, originality, clarity, privacy, permissions, licensing, disclosure, accessibility, and production practicality all require review.

    Complete the Accuracy Review

    Check every statement that depends on external information, including software features, policies, plan conditions, prices, usage limits, licences, privacy controls, accessibility requirements, disclosure rules, dates, statistics, names, and quotations. Remove unsupported additions and preserve important conditions.

    Complete the Originality Review

    Confirm that the final version uses your teaching structure, explanations, examples, commentary, comparisons, warnings, visual plan, and wording. Check that it does not copy another creator’s narration, a source’s sentence structure, a distinctive example, or a mass-produced template.

    Review Privacy, Permissions, and Licences

    Search scripts, screenshots, recordings, and file paths for names, email addresses, photographs, usernames, financial information, private messages, or account identifiers. Confirm rights and licences for photographs, video clips, music, sound effects, fonts, templates, stock assets, AI-generated assets, and brand materials.

    Review Accessibility and Production Practicality

    Confirm accurate captions, clear narration, suitable pacing, defined terms, readable text, strong contrast, labels beyond colour, verbal explanation of important visuals, and enough time for reading. Revise any scene that depends on unavailable features, unlicensed assets, unsafe recordings, or unrealistic production requirements.

    Create the Final Approved Version

    1. Save the working draft.

    2. Create a clean production copy.

    3. Remove unresolved comments and drafting notes.

    4. Keep source records in the research file.

    5. Separate pronunciation and editing notes from narration.

    6. Add the final version date.

    7. Mark the file Approved for Production.

    8. Protect the approved version from accidental overwriting.

    Suggested filename: 060-youtube-script-v1-0-final-approved.docx

    Common Mistake: Treating the script as complete as soon as the wording sounds polished.

    How to Avoid This Mistake: Review accuracy, originality, privacy, licences, accessibility, narration, visual practicality, and version control before approving one production copy.

    Benefits of Using AI to Help Write Original YouTube Scripts

    AI can support scriptwriting when the creator remains responsible for research, structure, examples, accuracy, and final wording. The main benefit is reducing repetitive drafting work and providing options for human review.

    Figure 11. Controlled AI assistance can support drafting, organization, simplification, consistency, and review while preserving human control.

    Explanation: AI can reduce repetitive drafting work, but it does not replace research, judgement, original examples, or final responsibility.

    Faster First Drafts

    Turn an approved outline and notes into a working draft more quickly.

    Help Organizing Information

    Arrange approved content into openings, steps, examples, transitions, conclusions, and checklists.

    Alternative Wording

    Offer several ways to explain the same verified idea.

    Beginner Simplification

    Identify long sentences, difficult vocabulary, unexplained terms, and dense paragraphs.

    Repetition Detection

    Locate repeated explanations, warnings, examples, and calls to action.

    Spoken-Language Editing

    Identify formal wording, long lists, unclear pronouns, and abrupt transitions.

    Consistent Terminology

    Find inconsistent use of approved terms.

    Draft Variations

    Create alternative hooks, section openings, conclusions, and transitions for comparison.

    Section-by-Section Control

    Make accuracy, length, tone, and originality easier to review.

    More Time for Human Decisions

    Allow more attention for sources, examples, permissions, visuals, and accessibility.

    Reality: AI can make some drafting and review tasks faster, but it does not automatically make a script accurate, original, natural, or suitable for publication.

    Best Use: Treat AI as a drafting and editing assistant while keeping research, judgement, originality, permissions, and final approval under human control.

    Limitations of Using AI to Write YouTube Scripts

    AI can assist with drafting and editing, but it has important limitations. Understanding them helps creators use the tool more safely and responsibly.

    Figure 12. AI scriptwriting limitations require source checking, original rewriting, permission review, licence verification, and human approval.

    Explanation: The main risks include incorrect or outdated information, generic language, repetition, privacy problems, licence uncertainty, and unsupported results.

    AI May Add Incorrect Information

    Begin with verified notes and compare every important claim with approved sources.

    AI May Use Outdated Information

    Check current official sources for features, prices, plans, policies, and limits.

    AI Cannot Judge Source Quality Reliably

    Select and approve source types before drafting.

    AI May Invent Sources or Quotations

    Open every source and confirm the title, publisher, date, link, and wording.

    AI Does Not Automatically Create Original Content

    Add your own structure, explanations, examples, commentary, warnings, and visual plan.

    AI May Copy Supplied Structure

    Use factual notes rather than long passages or another creator’s script.

    AI May Produce Generic Language

    Replace broad expressions with specific actions and audience-relevant examples.

    AI May Repeat the Same Idea

    Review by main idea, not only by sentence.

    AI May Produce Unnatural Spoken Language

    Read aloud and test the intended narration voice.

    AI Cannot Fully Understand the Audience

    Define knowledge level, tone, learning result, and scope.

    AI May Oversimplify Important Information

    Restore conditions, exceptions, limitations, and uncertainty.

    AI May Invent Examples

    Create or approve every scenario and clearly identify fiction.

    AI Cannot Confirm Privacy Safety

    Remove unnecessary personal information and inspect complete recordings.

    AI Cannot Obtain Permission

    Get consent directly from the person or authorized rights holder.

    AI Cannot Confirm Licensing Rights

    Review the exact licence for the exact asset and planned use.

    AI-Generated Assets Are Not Automatically Unrestricted

    Check provider terms, plan conditions, third-party rights, likeness, and disclosure.

    AI Cannot Determine Legal Compliance

    Seek qualified advice for significant legal, privacy, or commercial risk.

    AI Cannot Guarantee Monetization or Viewer Response

    Treat performance suggestions as ideas to test, not predictions.

    AI May Lose Context in Long Projects

    Maintain a short project brief and work one section at a time.

    AI Cannot Manage File Versions by Itself

    Use clear article-numbered filenames, version dates, folders, and a change log.

    AI May Create Accessibility Problems

    Review captions, pacing, contrast, text size, visual descriptions, and mobile readability.

    AI Features and Conditions May Change

    Record the tool and review date and update the script after meaningful changes.

    Reality: AI may assist with drafting and review, but the creator remains responsible for accuracy, originality, privacy, consent, licensing, disclosure, accessibility, and final publication decisions.

    Common Mistakes When Writing YouTube Scripts with AI

    AI can make script drafting faster, but it can also make weak habits easier to repeat. The following mistakes are common when creators move too quickly from an AI-generated draft to production.

    Figure 13. Common mistakes include recording the first draft, accepting invented facts, copying structures, skipping narration tests, and losing version control.

    Explanation: A controlled workflow helps prevent mistakes that arise when creators move too quickly from an AI draft to production.

    1. Recording the First AI Draft: Treat the first output as raw material and complete all reviews.

    2. One Short Prompt for the Entire Script: Prepare the research, outline, tone, examples, and terminology first.

    3. Allowing AI to Add Facts: Use only approved notes and remove unsupported additions.

    4. Confusing New Wording with Originality: Change the teaching structure, explanations, examples, and visuals.

    5. Using Generic AI Phrases: Replace broad wording with specific problems, actions, and limitations.

    6. Copying Long Source Passages: Extract short factual notes and keep quotations limited.

    7. Copying Another Creator’s Structure: Build the outline from viewer needs and verified research.

    8. Using Unchecked AI Examples: Create or approve every example and label fiction.

    9. Making Unsupported Success Promises: Describe realistic benefits without guaranteeing performance.

    10. Hiding Important Limitations: Explain conditions, risks, and situations where the method may not work.

    11. Oversimplifying Source Information: Compare the simplified version with the source meaning.

    12. Using Unverified Quotations: Confirm wording, speaker, context, and date.

    13. Writing for the Page Instead of the Ear: Read the complete script aloud.

    14. Making Narration Unnaturally Fast: Shorten unnecessary material or allow a longer video.

    15. Using Too Many Hooks: Choose one truthful hook and begin the lesson.

    16. Writing a Long Channel Introduction: Reach the viewer’s problem quickly.

    17. Repeating the Same Warning: Explain it fully once and use brief reminders later.

    18. Adding Too Many Examples: Keep the strongest example for each main idea.

    19. Using Complicated Examples: Use simple fictional situations that explain one point.

    20. Using Real People Without Permission: Obtain permission or use a fictional example.

    21. Assuming AI Assets Are Automatically Safe: Review terms, licences, likeness concerns, and disclosure.

    22. Assuming Royalty-Free Means Unrestricted: Read the licence for the exact asset.

    23. Ignoring Privacy in Screen Recordings: Use safe demonstration data and review every frame.

    24. Depending on Visuals for Essential Information: Narrate the important action and allow enough viewing time.

    25. Using Tiny On-Screen Text: Use large text, strong contrast, short labels, and mobile testing.

    26. Using Colour as the Only Meaning: Add labels, icons, shapes, or patterns.

    27. Using Too Many Visual Changes: Change scenes when the main idea changes.

    28. Reading Every Word on Screen: Summarize the key message and allow reading time.

    29. Forgetting to Match the Script and Visual Plan: Review them together before narration and editing.

    30. Leaving Production Notes in Narration: Separate narration, visual directions, pronunciation, and editing fields.

    31. Changing the Script Without Recording It: Update the approved version and synchronize captions and visuals.

    32. Using Confusing Filenames: Use article number, version, purpose, and date.

    33. Deleting Earlier Drafts Too Soon: Archive earlier versions and records.

    34. Forgetting the Final Source Review: Recheck important current claims before recording or publication.

    35. Relying Only on AI for Review: Combine AI review with sources, judgement, narration, and visual testing.

    36. Skipping Beginner Feedback: Ask a suitable beginner about order, terms, examples, and pace.

    37. Adding Several Calls to Action: Choose one main next action.

    38. Introducing a New Topic in the Conclusion: Summarize the lesson and link to the next guide.

    39. Treating the Checklist as a Substitute for Judgement: Review the complete viewer experience.

    40. Publishing Before Important Problems Are Resolved: Use Revision Required until accuracy, permission, licence, privacy, and accessibility issues are resolved.

    Final Reminder: AI can help create and review a script, but it should not control the complete process. The creator remains responsible for research, originality, examples, permissions, narration, visual planning, and approval.

    Common Myths About Writing YouTube Scripts with AI

    AI scriptwriting is often described in ways that are too simple, too negative, or too promotional. The following myths can mislead beginners.

    Figure 14. Common myths are corrected by realistic guidance about AI assistance, originality, accuracy, monetization, and human responsibility.

    Explanation: AI is useful as a limited assistant, but it cannot guarantee originality, accuracy, monetization, legal compliance, or final readiness.

    Myth 1: AI can write a complete YouTube script automatically. Reality: AI can generate a draft, but human verification, rewriting, permission review, and approval remain necessary.

    Myth 2: AI-written scripts are automatically original. Reality: Originality comes from human structure, explanations, examples, commentary, and final wording.

    Myth 3: Changing a few words makes the script original. Reality: Meaningful rewriting changes the explanation, structure, audience focus, and spoken rhythm.

    Myth 4: AI always produces accurate information. Reality: Important claims need reliable and current sources.

    Myth 5: A professional-sounding draft is ready to record. Reality: Polished wording can still hide factual, privacy, narration, and licensing problems.

    Myth 6: Longer scripts always provide more value. Reality: Value depends on relevance, clarity, accuracy, and usefulness.

    Myth 7: Short scripts are always better. Reality: The script must be long enough to explain the subject responsibly.

    Myth 8: A dramatic hook is required. Reality: A clear statement of the real problem can be effective and trustworthy.

    Myth 9: AI can predict which script will go viral. Reality: Viewer response depends on many factors and cannot be guaranteed.

    Myth 10: A good script guarantees monetization. Reality: YouTube reviews the complete channel and content under current policies.

    Myth 11: Using AI means the creator has no original role. Reality: The creator makes the core research, structure, example, and approval decisions.

    Myth 12: AI should be avoided completely. Reality: AI can be useful for controlled drafting and review tasks.

    Myth 13: AI-generated examples are safe to use. Reality: Every example requires review for invented facts, people, companies, and results.

    Myth 14: AI-generated assets are automatically copyright-free. Reality: Provider terms, third-party rights, likeness concerns, and disclosure may apply.

    Myth 15: Royalty-free means an asset can be used anywhere. Reality: Royalty-free licences may still limit commercial use, editing, redistribution, or attribution.

    Myth 16: Public information is always safe to copy. Reality: Public facts may be used, but protected wording and media require care.

    Myth 17: Paraphrasing removes the need for sources. Reality: Important factual claims still require verification.

    Myth 18: One source is enough for every subject. Reality: Source quantity and type depend on the claim and risk.

    Myth 19: AI can confirm whether a licence is valid. Reality: The creator must review the exact licence and rights holder.

    Myth 20: AI can obtain permission from a real person. Reality: Consent must come from the person or authorized rights holder.

    Myth 21: Faceless videos have no privacy risks. Reality: Screen recordings, files, notifications, and stories may reveal private information.

    Myth 22: Synthetic content is proof that an event happened. Reality: Realistic AI content is not evidence of a real event.

    Myth 23: Disclosure makes a video look unprofessional. Reality: Clear disclosure supports transparency and may be required.
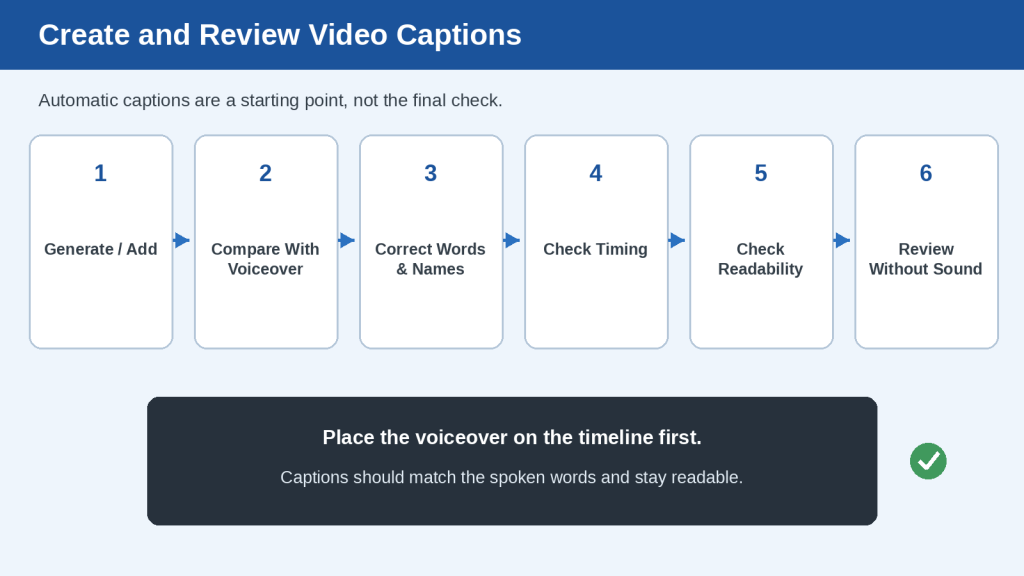
    Myth 24: Accessibility is only about captions. Reality: Accessibility also includes narration, text size, contrast, pacing, visual descriptions, and motion.

    Myth 25: Faster narration makes a long script better. Reality: Shorten or divide the content instead of rushing essential information.

    Myth 26: Every sentence must be highly engaging. Reality: Most educational narration should be calm, clear, and easy to follow.

    Myth 27: Every section needs an example. Reality: Use examples only when they improve understanding.

    Myth 28: Every detail must be spoken. Reality: Narrate the key message while suitable detail appears visually.

    Myth 29: AI can complete the final review. Reality: Final approval needs human source checking, narration testing, visual review, and judgement.

    Myth 30: Once approved, the script never needs updating. Reality: Recheck time-sensitive information when meaningful time has passed.

    Myth 31: One prompt can replace the complete workflow. Reality: Research, outlining, rewriting, narration, privacy, licensing, and approval remain separate tasks.

    Myth 32: AI scriptwriting requires advanced technical skills. Reality: Beginners need clear instructions and responsible review, not programming expertise.

    Myth 33: Originality means never covering an existing topic. Reality: Creators can provide original value through their own explanation and presentation.

    Myth 34: The script is the only part that matters. Reality: Narration, visuals, captions, music, editing, and accessibility shape the complete viewer experience.

    Myth 35: More AI automation always saves time. Reality: Automation can create more correction work when outputs are repetitive, unsupported, or inconsistent.

    Final Reality: AI can be a useful scriptwriting assistant, but it does not replace verified research, original human judgement, permissions, accessibility review, narration testing, or final responsibility.

    Original YouTube Scriptwriting Checklist

    Use this checklist before approving an AI-assisted YouTube script for narration and production. A checked item means that you reviewed it; it does not mean AI made the decision.

    Figure 15. The complete scriptwriting checklist covers research, originality, narration, privacy, licences, accessibility, visuals, and final approval.

    Explanation: This visual is a concise review aid. It does not replace the detailed written checklist or human judgement.

    Topic and Audience

    • One clear viewer question
    • Defined intended audience and starting knowledge
    • Realistic learning result
    • Scope fits the channel and series
    • Planned length suits the information

    Research and Evidence

    • Important claims use suitable sources
    • Current features, prices, limits, plans, and policies rechecked
    • Quotations verified
    • Statistics include date and context
    • Source uncertainty identified
    • Final source-review date recorded

    Approved Outline

    • Logical learning journey
    • Separate purpose for each section
    • Warnings beside relevant actions
    • Examples planned where useful
    • Conclusion matches opening promise

    AI Drafting Rules

    • Use only approved notes
    • Draft one section at a time
    • Do not add facts or sources
    • Mark missing information
    • Preserve conditions and limitations
    • Avoid hype and guarantees

    Accuracy and Originality

    • Every important claim checked
    • No invented source, quotation, number, or feature
    • Original structure, explanations, examples, commentary, transitions, and visuals
    • No copied narration or distinctive example

    Examples and Narration

    • Every example teaches one point
    • Fiction labelled when needed
    • No fake testimonials or results
    • Sentences easy to say
    • Technical terms defined
    • Lists divided into manageable groups
    • Read-aloud test completed

    Privacy, Permissions, and Licensing

    • No unnecessary personal information
    • Permission records saved
    • Exact asset licences reviewed
    • Commercial-use conditions checked
    • AI-generated assets not treated as unrestricted

    Disclosure and Accessibility

    • AI or synthetic disclosure considered
    • Sponsorship and affiliate disclosure considered
    • Accurate captions
    • Clear narration and pacing
    • Readable text and strong contrast
    • Meaning not dependent only on colour
    • Important visuals explained

    Production and Version Control

    • Visuals support narration
    • Scenes are possible to create
    • Approved script stored separately
    • Narration, captions, visuals, and editing notes use the same version
    • Source, prompt, permission, licence, and publication records preserved

    Final Approval Status

    • Approved for Production
    • Revision Required
    • Source Update Required
    • Permission or Licence Review Required
    • Privacy Review Required

    Final Tip: Save one clean, approved production script and make all narration, caption, visual, and editing work from that version.

    Practical Example: Turn Verified Notes into an Original YouTube Script

    This fictional example shows how a complete beginner can turn approved notes into a clear, original, narration-ready section for a video titled “How to Organize Digital Photos Safely.”

    Define the Viewer and Result

    Audience: Complete beginners with photographs stored across a phone, computer, and cloud service. Main question: How can I organize digital photographs without accidentally losing important files? Result: Create a basic folder system, review duplicates carefully, and prepare a separate backup.

    Approved Notes

    • A backup should be stored separately from the main collection.
    • Files should be checked before duplicates are permanently deleted.
    • A consistent folder and filename system can make photographs easier to find.
    • Cloud synchronization is not always the same as an independent backup.
    • Private photographs should not be uploaded to an unfamiliar service without reviewing privacy settings.

    First AI Draft

    Removing duplicate photographs is an important part of digital organization. Powerful duplicate-finding tools can instantly locate unnecessary files and free valuable storage space. Simply scan your folders, select all duplicates, and delete them.

    Problems Identified

    • Promotional wording
    • Unsupported speed claim
    • Unverified tool capability
    • Unsafe automatic-deletion advice
    • No limitation
    • No practical example
    • Risk of data loss

    Final Approved Narration

    A duplicate photograph may be an unnecessary copy, but it may also be an edited version, a higher-quality original, or a file saved in a different format. Do not delete every matching file automatically.

    Imagine that one folder contains three photographs with similar names. One is the original, one is a smaller copy sent through a messaging application, and one has been edited. They may look like duplicates in the file list, but each version may serve a different purpose.

    Open the photographs before making a decision. Compare their quality, date, format, and visible content. When you are uncertain, move the files into a temporary review folder instead of deleting them. Remove a copy only after checking the collection and confirming that the separate backup opens correctly.

    Figure 16. A generic AI paragraph becomes an original, safer, narration-ready script through problem identification, human rewriting, and practical review.

    Explanation: The fictional digital-photo example shows how a first AI draft changes through accuracy, originality, safety, narration, and production review.

    Visual Plan

    Narration PointPlanned Visual
    A duplicate may not be unnecessary.Show three similar fictional photo files with different sizes and formats.
    One may be edited.Highlight an Edited label beside one fictional image.
    Do not delete automatically.Show a delete button with a warning symbol.
    Compare the files.Show quality, date, format, and content check cards.
    Use a review folder.Move uncertain files into a folder labelled Review First.
    Confirm the backup.Show a separate backup drive with a check mark.

    What This Example Demonstrates

    AI produced starting material, but the creator identified unsafe advice, removed generic language, preserved approved facts, added an original fictional example, planned safe visuals, tested the narration, and approved the final version.

    Frequently Asked Questions

    Can AI write my complete YouTube script?

    It can create a first draft, but you still need to verify claims, rewrite generic wording, add original value, review privacy and licences, test narration, and approve the final version.

    Is an AI-generated script automatically original?

    No. New sentences may still use common structures, phrases, examples, and templates.

    How much of an AI draft should I rewrite?

    There is no fixed percentage. Rewrite every part that is generic, inaccurate, unclear, unsuitable, or insufficiently original.

    Can I keep parts that already sound good?

    Yes, when they are accurate, clear, relevant, audience-appropriate, supported, and consistent with the approved outline.

    Can I use information from other YouTube videos?

    You may identify questions and presentation ideas, but do not copy narration, distinctive wording, examples, complete structure, or visual sequence.

    Do I need to cite sources in the spoken script?

    Not every sentence needs a spoken citation, but important claims should remain supported in research records and may be linked in the description, article, or source cards.

    Should I read source quotations aloud?

    Only when exact wording matters and the quotation, context, attribution, and planned use are confirmed.

    Can AI simplify official policies?

    It may draft a simpler version, but you must compare it with the official source and restore conditions, exceptions, uncertainty, and limitations.

    How can I reduce invented facts?

    Supply only approved notes, prohibit additions, mark missing information, and compare the output with the notes.

    Should I draft the whole script at once?

    For long beginner tutorials, one section at a time is usually easier to control and review.

    How long should a YouTube script be?

    Long enough to explain the topic clearly at a suitable pace. Time a real narration sample.

    How many examples should I include?

    Use examples where they clarify difficult ideas, decisions, mistakes, limitations, or demonstrations.

    Can AI create examples for me?

    It can suggest ideas, but the creator should approve every fact, detail, person, company, result, and licence implication.

    Should fictional examples be labelled?

    Yes, when viewers could mistake them for real events, people, results, or testimonials.

    Can I use personal experience?

    Yes, when it is accurate, relevant, clearly identified as personal experience, and does not expose other people’s private information.

    Can I use an AI-generated voice?

    Only when current tool terms and the planned use permit it. Review commercial use, consent, likeness, disclosure, pronunciation, and audio quality.

    Do I need to disclose AI help?

    Requirements depend on the platform, content type, local rules, sponsorship conditions, and whether viewers could be misled.

    Will AI use prevent YouTube monetization?

    AI use alone does not decide monetization. The complete channel and content must meet current YouTube requirements; approval is not guaranteed.

    Can AI determine whether my script is original enough?

    It can flag generic or repeated wording, but it cannot give a definitive originality or legal determination.

    Do I need legal advice before every video?

    Usually not, but qualified advice may be appropriate for significant copyright, privacy, defamation, health, financial, advertising, or commercial risk.

    How can I make the script sound less robotic?

    Use shorter sentences, natural transitions, varied sentence length, read-aloud testing, and audience-relevant examples.

    Should narration repeat all on-screen text?

    No. Narrate the key meaning while allowing detailed information to remain visible long enough.

    What should I do when the script is too long?

    Remove repetition and material outside the main question. Divide the topic into multiple videos when necessary.

    Should I change the script while recording?

    Record every meaningful change in the approved script so narration, captions, sources, visuals, and editing notes remain synchronized.

    What files should I save?

    Keep verified notes, sources, prompts, drafts, the approved script, narration, captions, scene plan, licences, permissions, original assets, and publication records.

    When should I recheck sources?

    When first using a tool, after plan or feature changes, after policy notices, when a project is delayed, or when the recorded interface differs from the script.

    What is the most important final check?

    Confirm that the script answers the main viewer question accurately and originally and is safe, natural, accessible, and aligned with one approved version.

    Key Takeaways

    •  Begin with verified research notes and an approved outline.
    • Define one viewer question and a realistic learning result.
    • Organize the script around the audience’s learning journey.
    • Use AI for limited drafting and review tasks.
    • Rewrite generic language into specific explanations.
    • Add original examples, commentary, comparisons, and practical guidance.
    • Preserve source meaning, conditions, and limitations.
    • Remove unsupported facts, quotations, prices, policies, and statistics.
    • Write for spoken narration and read the complete script aloud.
    • Improve transitions, pacing, and visual reading time.
    • Protect private information and obtain permission for real people and their work.
    • Check licences for every asset and consider required disclosure.
    • Support accessibility through captions, clear narration, readable text, contrast, pacing, and visual descriptions.
    • Save one clearly labelled approved production script.
    • Do not proceed while an important accuracy, privacy, permission, licensing, or accessibility issue remains unresolved.

    The central principle is simple: AI may help create and improve the draft, but the creator remains responsible for research, originality, examples, accuracy, narration, permissions, accessibility, and final approval.

    Final Thoughts

    AI can make YouTube scriptwriting faster, but speed is not the same as quality. The first draft may contain useful ideas, yet the creator must still decide the structure, examples, explanation, source meaning, narration, privacy, permissions, licences, disclosure, accessibility, and final approval.

    A strong script does not guarantee views, subscribers, monetization, or income. It provides a clearer foundation for narration, visuals, captions, editing, and the final viewer experience.

    Final Tip: Save one clearly labelled approved production script and use that same version for the narration, captions, visuals, editing notes, and final review.

    Continue Learning

    How to Research and Write Faceless YouTube Video Scripts with AI(2026)

    Use this first when the research, verification, notes, or outline are not complete.

    How to Choose a Faceless YouTube Niche and Plan Your Channel with AI: Beginner Step-by-Step Guide (2026)

    Use this to evaluate possible channel subjects before researching scripts.

    How to Create Faceless YouTube Videos with AI: Complete Beginner Step-by-Step Guide (2026)

    Use this as the starting guide for the overall channel and workflow.

    How to Create AI Videos with ChatGPT: Beginner Step-by-Step Guide (2026)

    Learn how ChatGPT can help plan scenes and prompts.

    How to Create AI Videos from Text: Beginner Step-by-Step Guide (2026)

    Learn how written prompts can become short AI-generated scenes.

    How to Add Voice, Music, and Captions to AI Videos: Beginner Step-by-Step Guide (2026)

    Learn how to prepare narration, permitted music, sound effects, and captions.

    How to Create Storyboards and Plan Scenes for Faceless YouTube Videos with AI: Beginner Guide (2026)

    Learn how to turn your finished script into a clear storyboard and scene-by-scene visual plan.

    Recommended Learning Order: Complete Article 059 before Article 060. After the script is approved, continue to Article 061 for storyboard and scene planning.

    Sources and References

    The following official sources were reviewed on August 6, 2026. Software features, platform policies, privacy controls, monetization requirements, and legal guidance may change. Check current information when first using a tool, after meaningful changes, after receiving an update notice, and periodically.

    YouTube Channel Monetisation Policies

    YouTube explains that monetized content should be original and authentic. Its reused-content guidance allows material from other sources when viewers can recognize meaningful differences created through original commentary, substantial changes, education, or entertainment value. Copyright rules apply separately.

    Open official source: YouTube Channel Monetisation Policies

    YouTube AI-Generated and Altered-Content Disclosure

    YouTube requires disclosure for realistic content that has been meaningfully altered or synthetically generated when viewers could mistake it for something that actually occurred. The AI-use setting is available during upload in YouTube Studio.

    Open official source: YouTube AI-Generated and Altered-Content Disclosure

    OpenAI Terms of Use

    OpenAI’s Terms explain that users are responsible for their inputs and outputs, including having the necessary rights, licences, and permissions. They also explain that output may not be unique and other users may receive similar content.

    Open official source: OpenAI Terms of Use

    OpenAI Usage Policies

    OpenAI’s Usage Policies explain that users remain responsible for complying with applicable laws, professional duties, and ethical responsibilities when using OpenAI services and outputs.

    Open official source: OpenAI Usage Policies

    OpenAI Data Controls FAQ

    OpenAI’s Data Controls let users choose whether new conversations may be used to improve models and provide options for exports, account deletion, and Temporary Chat.

    Open official source: OpenAI Data Controls FAQ

    OpenAI Privacy Policy

    OpenAI’s Privacy Policy explains the categories of personal data it may collect, how data may be used or disclosed, retention practices, controls, and user rights.

    Open official source: OpenAI Privacy Policy

    Canadian Intellectual Property Office: A Guide to Copyright

    The Canadian Intellectual Property Office provides general information about copyright, protected works, ownership, registration, and infringement.

    Open official source: Canadian Intellectual Property Office: A Guide to Copyright

    Office of the Privacy Commissioner of Canada: Privacy Guide for Businesses

    The Office of the Privacy Commissioner explains responsibilities under PIPEDA, including meaningful consent, limiting collection, safeguards, and privacy-breach obligations.

    Open official source: Office of the Privacy Commissioner of Canada: Privacy Guide for Businesses

    Office of the Privacy Commissioner of Canada: Meaningful Consent

    The guidance explains that organizations generally need meaningful consent for collecting, using, and disclosing personal information.

    Open official source: Office of the Privacy Commissioner of Canada: Meaningful Consent

    W3C Web Accessibility Initiative: Captions

    W3C explains that captions provide a synchronized text version of speech and meaningful non-speech audio needed to understand prerecorded video.

    Open official source: W3C Web Accessibility Initiative: Captions

    W3C Web Accessibility Initiative: Planning Audio and Video Media

    W3C guidance helps creators plan captions, transcripts, and descriptions of important visual information for accessible media.

    Open official source: W3C Web Accessibility Initiative: Planning Audio and Video Media

    Educational and Professional-Advice Notice

    This article provides general educational information about AI-assisted scriptwriting, originality, privacy, permissions, licensing, disclosure, accessibility, and YouTube production. It is not legal, financial, copyright, privacy, or other professional advice. Obtain qualified advice when a project involves significant legal, privacy, commercial, or reputational risk.

  • How to Research and Write Faceless YouTube Video Scripts with AI: Beginner Step-by-Step Guide (2026)

    How to Research and Write Faceless YouTube Video Scripts with AI: Beginner Step-by-Step Guide (2026)

    Estimated reading time: 27 minutes

    Last updated: August 6, 2026

    Introduction

    A good faceless YouTube video begins with a useful topic, reliable research, and a clear script. The script controls what the video explains, the order of the information, what the narrator says, which visuals appear, and what viewers should understand or do next.

    AI can help generate research questions, organize source notes, build an outline, simplify difficult wording, suggest transitions, and prepare a first draft. It can also produce inaccurate, unsupported, outdated, repetitive, or invented information. The creator must therefore verify important claims and approve every section before production begins.

    A responsible scriptwriting process includes a clear audience and purpose, current sources, accurate notes, an original outline, a human-reviewed draft, suitable examples, important limitations, privacy and permission checks, copyright and licensing awareness, accessibility planning, and a final fact-check before narration begins.

    Figure 1. The complete AI-assisted faceless YouTube scriptwriting workflow.

    Explanation: A responsible script moves through research, verified notes, outlining, drafting, fact-checking, narration preparation, scene planning, and final approval. AI can support several stages, but human review remains necessary throughout.

    YouTube explains that monetized content should be original and authentic. Repetitive or mass-produced material may be treated as inauthentic content. A quickly generated AI script does not automatically provide meaningful original value or guarantee monetization eligibility.

    This article provides general educational information. It is not legal, medical, financial, copyright, accessibility-compliance, or other professional advice.

    Before You Begin

    Before researching and writing the script, identify the channel niche, intended audience, video topic, main viewer question, expected length, narration method, and main visual format. These decisions guide the research and reduce unrelated information.

    Define the Video Purpose

    Complete this sentence: This video helps [audience] understand or complete [specific topic or task] so they can [useful result]. The statement should describe one main result rather than several unrelated goals.

    Identify the Audience

    A complete beginner may need definitions, slower demonstrations, clear warnings, familiar examples, and fewer assumptions. An experienced audience may prefer shorter explanations and more advanced detail. Write for the chosen audience consistently.

    Choose the Video Type

    • Step-by-step tutorial
    • Beginner explanation
    • Comparison
    • Checklist
    • Common-mistakes video
    • Myth-versus-reality video
    • Practical project
    • Frequently asked questions

    The video type affects the script structure. A tutorial requires ordered steps, while a comparison requires consistent criteria for every option.

    Prepare the Script Brief

    Before research begins, prepare a short script brief containing the working title, intended audience, main viewer question, video purpose, video type, expected length, narration method, visual format, tone, important warnings, research requirements, and final viewer action.

    Figure 2. The essential parts of a beginner video-script brief.

    Explanation: A script brief defines the video before research and drafting begin. It helps keep the topic, audience, length, narration, visuals, tone, and final result consistent.

    Create a project folder with subfolders for research sources, notes, drafts, narration, images, video clips, licences, captions, thumbnails, exports, and publication records. Use version numbers instead of filenames such as Final Final or Use This One.

    Step 1: Turn the Video Topic into Research Questions

    Research questions help you decide what information is needed, which facts require verification, which sources are most useful, what should be excluded, and how the script may be organized.

    Figure 3. How one video topic becomes a focused research-question map.

    Explanation: A broad topic becomes easier to research when it is divided into foundation, process, accuracy, limitation, safety, audience, source, and visual questions.

    Begin with the main viewer question, then create smaller questions under these categories:

    • Foundation questions: definitions and background
    • Process questions: the steps viewers need to follow
    • Audience questions: what beginners may not understand
    • Accuracy questions: facts, dates, numbers, limits, or policies needing evidence
    • Limitation questions: what can vary or fail
    • Safety and responsibility questions: privacy, permission, licensing, and harm
    • Visual questions: what viewers need to see
    • Source questions: which authority is appropriate

    Label each question Essential, Helpful, Optional, or Outside Scope. This prevents an interesting but unrelated subject from expanding the script beyond the promised result.

    AI may help expand the question list, but it should not answer the questions at this stage. Ask it to suggest categories and mark possible gaps, then review the list yourself.

    Common Mistake: Searching immediately without deciding what the video needs to answer.

    How to Avoid This Mistake: Create and prioritize the research questions first, then collect only the information required to answer them accurately.

    Step 2: Find Reliable and Current Sources

    Begin with sources directly responsible for the information. Examples include official product documentation, government websites, standards organizations, original research papers, official policy pages, and actual licence terms.

    Different claims require different source types.

    Figure 4. Match each type of script claim with the most suitable source.

    Explanation: Software features, laws, scientific findings, licences, and platform policies require different source types. Choosing the correct authority improves accuracy and reduces reliance on weak summaries.

    • Use official documentation for features, plan conditions, privacy controls, file limits, and platform policies.
    • Use government or regulatory sources for laws, public programmes, consumer protections, and official procedures.
    • Use original research for scientific findings, methods, limitations, and results.
    • Use the actual licence terms for music, footage, images, fonts, templates, voices, and AI-generated assets.
    • Use reputable secondary sources for explanation and context, not as automatic proof of an important claim.

    Check the publication date, last-updated date, applicable region, device, account, plan, and software version. Information about AI tools, prices, menus, policies, and licences can change quickly.

    Confirm that the source supports the exact sentence planned for the script. A page discussing an AI voice does not automatically support a claim that monetized commercial use is permitted.

    Rate each source as Strong, Useful, Limited, or Do Not Use.

    Figure 5. A simple source-quality ladder for script research.

    Explanation: The strongest sources are current, authoritative, and directly support the planned claim. Weak or unverifiable sources should not be used merely because they support a preferred conclusion.

    Preserve the title, publisher, link, dates, relevant section, supported point, conditions, and planned script use. Do not depend only on browser history or a search-result snippet.

    Common Mistake: Using AI responses, snippets, or popular videos as the main evidence for important claims.

    How to Avoid This Mistake: Begin with current official and primary sources, verify the exact claim, and use secondary sources only for suitable explanation and context.

    Step 3: Organize Research Notes Before Writing

    Create one research document and organize it by research question or planned script section. For every important source, record the title, organization, link, dates, main supported point, conditions, and planned use.

    Summarize the source in your own words. Record what the source says, what it does not say, and which conditions matter. Avoid copying long passages into the script.

    Keep verified facts separate from recommendations, interpretations, examples, and items that still need verification. Mark time-sensitive information with a note such as RECHECK BEFORE RECORDING.

    A claim-evidence table helps verify that every important statement has support.

    Figure 6. A claim-evidence table for checking important script statements.

    Explanation: The table connects each planned statement to a supporting source, records conditions or limits, and shows whether the claim is approved, needs review, or should be removed.

    Record exact numbers carefully. Include the source, unit, date, plan, region, and whether the number can change. Remove numbers that are not essential rather than guessing.

    Add possible examples, visuals, pronunciations, and research gaps. Preserve sources, permissions, licence records, and approved notes after publication because they may be needed for corrections or updates.

    Step 4: Create the Video Outline

    The outline connects research to narration. It shows the learning order, essential points, examples, warnings, visuals, transitions, timing, and final viewer action.

    Choose a structure suited to the video type. A tutorial normally moves from preparation through ordered steps and final review. A comparison uses the same criteria for every option. A myth video presents the myth, verified reality, and practical correction.

    Put information in learning order rather than the order in which you discovered it. Explain a technical term before asking the viewer to use it. Place a warning beside the risky step rather than saving every warning for the conclusion.

    A detailed outline may contain a section heading, main point, supporting points, source references, example, warning, visual note, transition, and approximate time.

    Figure 7. The main parts of a detailed faceless-video outline.

    Explanation: A detailed outline organizes verified research into a logical teaching sequence before full narration is written. It also connects each section to examples, warnings, visuals, transitions, and timing.

    Use AI to organize verified notes only after the notes are complete. Instruct it not to add facts, numbers, sources, or examples. Review the result against the approved research before drafting the narration.

    Step 5: Draft the Script with AI Using Verified Notes

    The AI tool should receive the intended audience, video purpose, approved outline, verified research notes, important limitations, required warnings, preferred tone, expected length, and planned visual format.

    Figure 8. The information AI needs before drafting a video script.

    Explanation: A strong drafting prompt gives AI clear boundaries. It provides verified material, audience information, tone, length, warnings, and an approved structure while prohibiting unsupported facts.

    A useful prompt might say: Write a first-draft script for complete beginners using only the approved outline and verified notes. Do not add facts, statistics, prices, policy claims, sources, or examples. Mark missing information as NEEDS REVIEW.

    Draft one section at a time. This makes it easier to check facts, control length, correct tone, remove repetition, and stop unsupported additions early.

    Write for speaking, not only reading. Use shorter sentences, familiar words, natural pauses, and one main idea at a time. Explain technical terms the first time they appear.

    Mark source-dependent claims and time-sensitive details. Add limitations where they matter. Remove hype, guarantees, false urgency, and sales language such as effortless, perfect results, secret method, or instant success.

    Common Mistake: Giving AI a title and accepting the complete generated script as finished work.

    How to Avoid This Mistake: Provide verified notes and an approved outline, draft in sections, mark source-dependent claims, and treat every AI-generated sentence as material requiring human review.

    Step 6: Fact-Check and Rewrite the First Draft

    A polished draft can still be wrong. Identify each factual claim and confirm which source supports it, whether the source is current, whether conditions are missing, and whether the wording could mislead a beginner.

    Fact-checking confirms whether the information is supported. Rewriting turns the draft into accurate, original, natural narration.

    Figure 9. The fact-checking and rewriting cycle for an AI-generated draft.

    Explanation: Every important claim should be compared with its original source. Unsupported details are removed, limitations are restored, and the wording is rewritten for clarity and originality.

    • Recheck current features, prices, policies, plan limits, laws, and regional availability.
    • Verify every number, date, name, quotation, product name, and policy title.
    • Compare paraphrases with the original source and preserve cautious wording.
    • Separate verified facts from practical recommendations.
    • Remove unsupported statistics and invented example details.
    • Apply stronger review to health, law, finance, safety, elections, and other high-risk subjects.
    • Rewrite the organization, wording, examples, and transitions in the channel’s own style.

    Read the revised script aloud. Break long sentences, remove filler, reduce repeated introductions and conclusions, and use consistent terminology. A disclaimer does not make inaccurate or dangerous advice acceptable.

    Step 7: Prepare the Script for Narration

    A script that reads well on a page may still sound unnatural when narrated.

    Figure 10. How to convert a written script into natural narration.

    Explanation: Narration preparation shortens sentences, adds pauses, checks pronunciation, divides the script into manageable audio sections, and allows enough time for visual demonstrations.

    Create a separate narration copy from the fact-checked script. Preserve the main approved script with its source labels and review notes. Divide narration into short sections so one mistake can be replaced without recording the entire video again.

    • Use one main idea per sentence.
    • Add natural pauses and paragraph breaks.
    • Prepare a pronunciation guide for names, abbreviations, technical terms, and places.
    • Write numbers and dates in a spoken-friendly form.
    • Allow time for screen actions and on-screen reading.
    • Test 30 to 60 seconds before producing the full audio.
    • Review the audio without reading the script, then review it again with the planned visuals.

    When using an AI voice, check commercial-use permission, monetized-use conditions, attribution, voice-cloning restrictions, consent, reuse rights, and what happens after a subscription ends. Never imitate a real person without clear authorization.

    Step 8: Turn the Script into a Scene Plan

    A scene plan connects narration, visuals, screen actions, on-screen text, captions, timing, source references, and editing notes.

    Figure 11. How the approved script becomes a scene-by-scene production plan.

    Explanation: The scene plan shows what viewers hear and see during each part of the video. It prevents unrelated visuals, missing demonstrations, timing problems, and unnecessary asset creation.

    Create a new scene when the main idea, step, screen action, example, comparison, or warning changes. Give every visual a clear purpose: demonstrate, explain, compare, warn, provide evidence, or show the result.

    • Use screen recordings for exact actions.
    • Use diagrams for processes and relationships.
    • Use tables for comparisons with consistent criteria.
    • Use short on-screen text for key terms, steps, and warnings.
    • Keep important visuals visible long enough for beginners to understand them.
    • Record the source and licence for every external asset.
    • Review AI-generated visuals for misspellings, distortion, false interfaces, misleading details, and real-person resemblance.

    Protect privacy in every scene. Use demonstration accounts, disable notifications, hide personal files, and review screen recordings frame by frame. Plan accurate captions, strong contrast, large text, verbal explanation of important visuals, and labels in addition to colour.

    Step 9: Complete the Final Script Review and Approval

    The final review should check accuracy, originality, structure, spoken clarity, visual alignment, privacy, permission, licensing, accessibility, current information, file organization, and final approval.

    Figure 12. The final approval checks before narration and editing begin.

    Explanation: A script should not enter full production until factual, creative, privacy, licensing, accessibility, narration, and visual checks are complete and one approved version has been identified.

    Identify one exact script version for production. Compare it with the approved outline, recheck important claims and current information, confirm source links, and ensure the title matches the actual lesson.

    Review originality against source wording, competitor videos, AI drafts, and earlier channel scripts. Confirm that the final version uses original structure, wording, examples, explanations, transitions, and scene planning.

    Complete separate privacy, permission, licensing, AI-disclosure, accessibility, and professional-advice reviews. Approve the scene plan and narration test. Lock the approved version and record every later change with a new version number and another accuracy review.

    Benefits of a Structured AI-Assisted Scriptwriting Process

    • The video remains focused on one clear viewer result.
    • Research is organized around useful questions instead of random links.
    • Claims are easier to verify and update.
    • AI can reduce routine organization and first-draft work.
    • Language, examples, pacing, and visuals can be matched to the audience.
    • Narration sounds more natural after a spoken-language review.
    • The scene plan reduces unused assets and editing confusion.
    • Accessibility, privacy, permissions, and licences can be planned before production.
    • The creator maintains control of the final message and approval.

    Reality: AI can make organization and drafting more manageable, but the strongest benefit appears only when it is used inside a workflow that includes reliable sources, original rewriting, fact-checking, privacy protection, licensing review, accessibility planning, and final human approval.

    Limitations of Researching and Writing Scripts with AI

    AI can support research organization, outlining, drafting, and editing, but it has important limitations.

    Figure 13. Important limitations of AI-assisted scriptwriting.

    Explanation: AI may invent facts, use outdated information, misunderstand sources, create generic wording, miss privacy risks, and suggest unsuitable visuals. Human supervision is required at every important stage.

    • It may invent facts, links, studies, quotations, or statistics.
    • It may use outdated information or combine different plans and regions.
    • It may misunderstand sources, remove conditions, or strengthen uncertain wording.
    • It may add unsupported details to examples.
    • It may create generic, repetitive, or overly formal scripts.
    • It cannot confirm copyright permission, real-person consent, or professional advice.
    • It may miss privacy risks and harmful implications.
    • It cannot reliably judge narration quality or exact production capacity.
    • AI chats are not a dependable project archive.
    • A strong script cannot guarantee views, subscribers, monetization, retention, or income.

    How to Reduce This Limitation: Use AI only for tasks you can supervise. Preserve the approved brief, notes, sources, outline, drafts, and final files outside the chat, and complete independent human reviews.

    Common Mistakes

    • Asking AI for a complete script from only a title
    • Researching without one main viewer question
    • Using AI or search snippets as the evidence
    • Saving links without recording the supported claim
    • Using old sources for current features or policies
    • Treating all sources as equally reliable
    • Creating the outline before completing essential research
    • Generating the entire script in one response
    • Writing for reading instead of speaking
    • Using unexplained technical terms
    • Making the opening too long or misleading
    • Leaving unsupported statistics and invented examples in the draft
    • Treating grammar correction as fact-checking
    • Ignoring regional, plan, privacy, permission, and licensing differences
    • Creating visuals before approving the script and scene plan
    • Skipping the narration test
    • Using different script versions across the team
    • Deleting research and licence records after publication

    Final Reminder: The most serious mistakes happen when speed replaces research and review. AI can support the workflow, but every important decision and final approval remains a human responsibility.

    Common Myths

    Myth: AI can research the entire topic for you

    Reality: AI may help organize information, but the creator must review reliable sources.

    Myth: A confident AI answer is usually correct

    Reality: Confidence is a writing style, not evidence.

    Myth: Several links guarantee an accurate script

    Reality: The links must be opened, understood, and connected to exact claims.

    Myth: AI-generated scripts are automatically original

    Reality: Original structure, wording, examples, and visual planning still require human work.

    Myth: AI can reliably fact-check its own draft

    Reality: The original sources provide the evidence.

    Myth: More sources always produce a better script

    Reality: Quality and relevance matter more than quantity.

    Myth: Longer scripts are more valuable

    Reality: The script should be only as long as needed to answer the viewer’s question.

    Myth: Every sentence needs a new visual

    Reality: Visuals should change when the idea or context changes, not constantly.

    Myth: AI-generated assets are automatically copyright-free

    Reality: Tool terms, licences, consent, and planned use still matter.

    Myth: A disclaimer makes inaccurate advice acceptable

    Reality: Accuracy and responsibility remain required.

    Myth: Disclosure solves permission and licensing problems

    Reality: Disclosure is separate from consent, rights, accuracy, and safety.

    Myth: A perfect script guarantees a successful video

    Reality: Performance depends on many additional factors.

    Faceless YouTube Script Research and Writing Checklist

    Use this checklist before approving a faceless YouTube script for narration, visual production, and editing.

    Figure 14. Final research and scriptwriting checklist for faceless YouTube videos.

    Explanation: The checklist brings together the full workflow, including the brief, research questions, sources, evidence, outline, AI drafting, fact-checking, narration, scenes, privacy, licences, accessibility, and approval.

    • The script brief defines the audience, purpose, length, tone, narration, and visuals.
    • Research questions cover foundations, process, accuracy, limitations, safety, sources, and visuals.
    • Important claims use current authoritative sources.
    • The source record includes titles, links, dates, supported points, and conditions.
    • The claim-evidence table identifies unsupported or time-sensitive statements.
    • The outline follows a logical beginner learning order.
    • AI receives only verified notes and clear restrictions.
    • The draft is rewritten and fact-checked in original language.
    • The narration copy has been tested for pacing and pronunciation.
    • The scene plan matches the approved narration.
    • Privacy, permission, copyright, licences, AI disclosure, and accessibility have been reviewed.
    • One clearly named final script version is approved and backed up.

    Final Approval Rule: Do not begin full narration, asset creation, or editing while important facts, permissions, licences, privacy issues, or production questions remain unresolved.

    Practical Example: Research and Write a Privacy-Focused Script

    This example shows how a complete beginner could move from a video idea to a reviewed faceless YouTube script.

    Figure 15. A complete example of researching and writing a privacy-focused video script.

    Explanation: The example shows how a broad idea becomes a focused beginner video through audience definition, reliable privacy sources, a claim-evidence table, an approved outline, original rewriting, narration preparation, and scene planning.

    The starting topic “AI Privacy” is narrowed to “How to Protect Personal Information When Using AI Tools.” The intended audience is complete beginners using AI for writing, images, documents, or everyday questions.

    The main viewer question becomes: What should beginners check before sharing information with an AI tool? The research questions cover personal information, uploaded files, screen recordings, current privacy controls, fictional examples, common mistakes, and the final review before sending or publishing.

    The creator uses official privacy and data-control guidance, file-upload information, government privacy education, and current platform disclosure guidance where relevant. A claim-evidence table removes unsupported statements such as “temporary chat guarantees complete anonymity” or “every AI provider handles files in the same way.”

    The outline explains the privacy problem, defines personal information, identifies where it may appear, shows how to prepare a safe file and screen recording, checks the output, and ends with a privacy checklist. The draft is written one section at a time and rewritten for natural narration.

    A fictional household-bill example demonstrates how names, addresses, account numbers, and payment details can be removed before a document is uploaded. The scene plan shows grey privacy blocks rather than real information. The final review confirms that no private details remain in the script, audio, visuals, or project files.

    Final Tip: A useful AI-assisted script is built from verified research and careful human decisions. The prompt is only one part of the process.

    Frequently Asked Questions

    Can AI write the complete script?

    AI can create an outline and first draft, but the creator must research, verify, rewrite, test, plan visuals, and approve the final version.

    Should I research before asking AI to write?

    Yes. Prepare the purpose, viewer question, research questions, reliable sources, verified notes, and approved outline first.

    How many sources are needed?

    There is no fixed number. Use enough strong sources to support the important claims accurately.

    Can other YouTube videos be sources?

    They may identify viewer questions or content gaps, but important claims should be verified through suitable original or authoritative sources.

    Should I generate the entire script at once?

    Drafting one section at a time is safer for detailed beginner videos.

    How long should the script be?

    Long enough to answer the main question clearly, including demonstrations, examples, and necessary warnings.

    Can AI fact-check its own script?

    It can flag possible problems, but the original source provides independent evidence.

    Can I use fictional examples?

    Yes, provided they are clearly fictional, accurate, privacy-safe, and not presented as real events or guaranteed results.

    When is professional review needed?

    Use qualified review for important medical, legal, financial, safety, engineering, mental-health, election, or other high-risk information.

    Should images be created before the script is finished?

    No. Approve the script and scene plan first to avoid unused or contradictory assets.

    Can I use an AI voice?

    Yes, when the planned use is permitted and pronunciation, pacing, consent, and licence conditions have been checked.

    Do I always need AI disclosure?

    Disclosure depends on the content, realism, alteration, and current platform rules. Check the rules before publication.

    Can a researched script guarantee views?

    No. It improves the production foundation but cannot guarantee views, subscribers, retention, monetization, or income.

    Key Takeaways

    • Begin with a clear audience, purpose, and viewer question.
    • Research before drafting.
    • Use current primary and authoritative sources for important claims.
    • Connect claims to evidence and record conditions.
    • Build the detailed outline from verified notes.
    • Give AI clear boundaries and draft one section at a time.
    • Fact-check every important claim and rewrite the wording originally.
    • Prepare a separate narration copy and test it aloud.
    • Create the scene plan from the approved script before producing assets.
    • Review privacy, permissions, licences, disclosure, accessibility, and professional risks.
    • Approve one clearly named final version and preserve the complete project record.

    Final Principle: AI should support the scriptwriting workflow, not control it. The creator remains responsible for research, evidence, originality, accuracy, privacy, permissions, licences, accessibility, and final approval.

    Final Thoughts

    Researching and writing a faceless YouTube script with AI is not a one-prompt task. A responsible workflow combines a script brief, focused questions, reliable sources, organized notes, evidence, an approved outline, a reviewed draft, narration preparation, scene planning, and documented approval.

    Do not begin full narration or editing while important questions remain unresolved. Correcting one sentence before production is usually easier than replacing narration, captions, visuals, and edited scenes later.

    Preserve sources, drafts, prompts, licences, permissions, scene plans, audio versions, and approval records. These materials may be needed for corrections, updates, or related videos.

    Final Tip: Use AI to support work you understand and supervise. Approve the script only after every important claim, example, warning, visual direction, permission, and licence has received careful human review.

    Continue Learning

    Add an internal link to Article 060 after it has been completed and published.

    Sources and References

    The following official and authoritative sources were reviewed for this article on August 6, 2026:

    Policies, features, licence conditions, privacy controls, and accessibility options may change. Check relevant current official guidance when first using a tool, changing plans or features, receiving an update notice, preparing realistic synthetic content, applying for monetization, or when a permission or licence is unclear.

  • How to Choose a Faceless YouTube Niche and Plan Your Channel with AI: Beginner Step-by-Step Guide (2026)

    How to Choose a Faceless YouTube Niche and Plan Your Channel with AI: Beginner Step-by-Step Guide (2026)

    Estimated reading time: 25 minutes

    Last updated: August 6, 2026

    Introduction

    A faceless YouTube channel can teach, explain, demonstrate, compare, or entertain without showing the creator on camera. The videos may use narration, screen recordings, slides, diagrams, original photographs, licensed stock assets, animation, hands-only demonstrations, or carefully reviewed AI-generated visuals.

    Before creating videos, choose a clear niche and prepare a simple channel plan. A niche is the focused combination of subject, audience, problem, and useful result that gives the channel a recognizable direction. Without this direction, beginners often collect unrelated ideas, purchase unnecessary tools, or produce videos that serve different audiences.

    AI can help generate ideas, organize research, compare possible niches, draft content pillars, and plan video topics. It cannot prove that a niche will be successful, profitable, or easy to monetize. Important claims about YouTube features, policies, analytics, licensing, and disclosure should be checked against current official guidance.

    This article provides general educational information. It does not guarantee views, subscribers, monetization, sponsorships, or income, and it is not legal, financial, medical, or other professional advice.

    Before You Begin

    Prepare a simple planning folder before making the first video. Save the niche ideas, audience notes, source links, channel-name options, content pillars, topic lists, licence records, permissions, budget, test-video notes, and later analytics in clearly named files.

    • A computer, tablet, or suitable smartphone
    • A reliable internet connection
    • A document or spreadsheet for planning
    • An AI assistant for brainstorming and organizing ideas
    • Access to current official YouTube help pages
    • A realistic monthly budget
    • Folders for sources, licences, permissions, images, scripts, audio, videos, thumbnails, and exports

    Do not subscribe to several paid services before completing one small test project. Free plans and trials may include watermarks, export limits, lower resolution, restricted commercial use, or limited credits. Review current terms before publishing or monetizing content.

    What You’ll Learn

    • Define a clear audience and useful channel purpose
    • Generate possible niche ideas with AI
    • Evaluate each niche for practical fit
    • Research repeated viewer questions and content demand
    • Choose three to five content pillars
    • Select a repeatable faceless-video format
    • Plan the channel identity, playlists, and first 20 topics
    • Choose a realistic publishing schedule
    • Test the niche before making major purchases
    • Avoid common planning, copyright, privacy, and disclosure mistakes

    What Is a Faceless YouTube Niche?

    A faceless YouTube niche is the specific subject, audience, problem, and useful result that a channel focuses on while the creator remains off camera. The niche is broader than one video topic but narrower than a general category such as technology, education, or entertainment.

    A useful niche is more than a general subject. It combines the topic, the intended audience, the problem being solved, and the result viewers hope to achieve.

    Figure 1. The four parts of a clear faceless YouTube niche.

    Explanation: A practical niche combines a subject, a specific audience, a problem or need, and a useful result. Defining all four parts makes it easier to choose video topics and explain the channel to new viewers.

    For example, “technology” is broad. “Slow smartphone tutorials for adults over 50” is clearer because it identifies the subject, audience, and teaching approach. A specific niche helps viewers understand the channel and helps the creator decide which ideas belong.

    Why Choosing the Right Niche Matters

    A clear niche improves decision-making. It helps the creator choose topics, research sources, visuals, narration style, thumbnail design, playlists, and publishing frequency. It can also reduce repeated work because the same research methods, file structure, and production format can be reused.

    • Viewers can understand the channel more quickly
    • Related videos can support one another
    • Playlists become easier to organize
    • Research and production systems become more consistent
    • Tool and subscription costs become easier to control
    • Viewer feedback becomes easier to interpret

    A niche does not guarantee success. Its purpose is to create clarity, not certainty.

    Step 1: Identify the Audience You Want to Help

    Begin with the audience rather than the tool. A useful audience description identifies who the viewers are, what they already understand, which problems they face, and what type of explanation will help them.

    Figure 2. A simple target-audience profile for a faceless YouTube channel.

    Explanation: Defining the audience helps the creator choose suitable language, examples, video length, narration speed, text size, and topic difficulty.

    Avoid descriptions such as “everyone” or “people who like videos.” A clearer audience might be complete beginners using AI tools, retirees learning smartphone skills, small-business owners creating simple marketing videos, or parents looking for beginner digital-safety guidance.

    Complete this sentence:

    This channel helps [audience] understand or complete [problem or task] so they can achieve [useful result].

    Do not collect unnecessary sensitive information about potential viewers. Public comments, surveys, or community discussions should be used respectfully and without exposing private identities.

    Step 2: Generate Possible Niche Ideas with AI

    Use AI as a brainstorming assistant. Provide your interests, skills, experience, available tools, budget, preferred video style, and intended audience. Ask for several distinct options rather than one “best niche.”

    Figure 3. A responsible workflow for generating niche ideas with AI.

    Explanation: AI can help generate and organize possible niche ideas, but every suggestion still requires human review and independent research.

    Example prompt:

    I want to create a beginner-friendly faceless YouTube channel. My interests are [subjects]. My useful experience includes [skills]. I can publish [frequency] and prefer . Generate 15 niche ideas, identify the audience and useful result for each, and note possible research, cost, copyright, privacy, or professional-advice risks. Do not claim that any niche is guaranteed to grow or earn money.

    Review every suggestion. AI may invent search volumes, competition levels, advertising rates, or growth predictions. Treat those claims as unverified until confirmed through appropriate current sources.

    Step 3: Evaluate Each Niche for Practical Fit

    Compare the strongest ideas using the same criteria. This prevents one exciting idea from receiving special treatment while its difficulties are ignored.

    Figure 4. A practical scorecard for comparing possible channel niches.

    Explanation: A niche should be evaluated for more than popularity. Compare audience value, topic depth, research difficulty, production cost, originality, safety, and sustainability.

    • Clear audience need
    • At least 20 to 30 meaningfully different video topics
    • Reliable and understandable research sources
    • A production format you can repeat
    • Affordable tools and assets
    • Opportunities for original value
    • Manageable copyright, privacy, and safety risks
    • Enough personal interest to continue learning

    A high-risk niche may still be possible, but it requires stronger evidence, more review, and sometimes qualified professional input. Beginners should be cautious with medical, legal, investing, politics, crime, child safety, and fast-changing news content.

    Step 4: Research Viewer Questions and Content Demand

    Look for repeated questions rather than one trend or one successful competitor. Useful evidence may come from search suggestions, video comments, official support pages, forums, community discussions, your own experience, and later YouTube Analytics.

    Figure 5. Sources of useful viewer questions and video ideas.

    Explanation: Repeated questions from search, comments, support pages, related videos, experience, and analytics can become useful video topics.

    Record the exact wording of repeated questions, but do not copy another creator’s script, thumbnail, title pattern, branding, or examples. The purpose of research is to understand the audience, not imitate a channel.

    A topic with some competition may still be useful because competition can show that an audience exists. Very low competition can also mean that few people are searching for the subject.

    Step 5: Choose the Final Niche

    Choose the option that offers the best balance of usefulness, originality, manageable production, acceptable risk, and long-term interest. Write a one-sentence niche statement and a short list of boundaries.

    Example niche statement:

    This channel helps adults over 50 learn essential smartphone skills so they can complete everyday tasks more safely and confidently through slow screen-recorded tutorials and simple visual explanations.

    Also record what the channel will not cover. Boundaries help prevent unrelated trend chasing and reduce the risk of entering subjects that require qualifications or assets you do not have.

    Step 6: Choose Three to Five Content Pillars

    Content pillars are the main subject areas inside the niche. Each content pillar should serve the same audience and support the same overall channel purpose.

    Figure 6. How one channel niche can be organized into content pillars.

    Explanation: Content pillars divide the niche into related subject areas. Each pillar can support multiple videos and may later become a playlist.

    For an AI-for-beginners channel, the pillars might be AI basics, AI writing, AI images, AI video, and AI safety. For smartphone help, they might be basic settings, communication, photographs and storage, privacy and scam protection, and useful everyday apps.

    Combine pillars that overlap. Avoid adding an unrelated pillar simply because it appears popular.

    Step 7: Choose the Main Video Formats

    Select one practical main format and optional supporting formats. The best choice depends on what viewers need to see, the assets you can create or license, and the amount of editing you can manage.

    Figure 7. Common faceless YouTube video formats and their main uses.

    Explanation: Beginners should choose a main format that is understandable, affordable, accessible, and practical to repeat.

    • Screen recordings for software and settings
    • Narrated slides for structured explanations
    • Original diagrams for workflows and comparisons
    • Hands-only demonstrations for physical tasks
    • Properly licensed stock footage for general scenes
    • Carefully reviewed AI-generated visuals when they add real value

    Check every asset licence. “Free” and “royalty-free” do not always mean unrestricted or commercially permitted. Save licences, receipts, permission messages, and the original source files.

    Step 8: Plan the Channel Identity

    A channel identity includes the name, description, viewer promise, visual style, narration style, thumbnail style, and overall experience viewers receive.

    Figure 8. The main parts of a clear and consistent channel identity.

    Explanation: A simple channel identity helps viewers recognize the channel and understand its purpose.

    Choose a name that is clear, easy to spell, and distinct from existing channels and companies. Do not suggest official affiliation with YouTube, Google, OpenAI, Microsoft, or another organization when no such relationship exists.

    The viewer promise should describe the value accurately. Avoid guaranteed outcomes such as “earn money quickly,” “grow instantly,” or “never make another mistake.”

    Step 9: Plan Your First 20 Video Topics

    Plan approximately 20 initial topics, then select the first five carefully. The first 20 topics should include foundation lessons, practical tutorials, common mistakes, safety guidance, comparisons, and useful projects.

    Figure 9. A balanced plan for the first 20 channel videos.

    Explanation: A balanced topic list includes foundation lessons, tutorials, mistakes, safety guidance, comparisons, and projects without becoming repetitive.

    A balanced list gives beginners a clear starting path while allowing viewers to enter through different questions. Every topic should be meaningfully different and connected to the niche.

    Do not create hundreds of titles before producing a test video. Real production experience may change the format, schedule, or topic priorities.

    Step 10: Create a Realistic Publishing Schedule

    A publishing schedule should reflect the complete workload, not only editing time. Produce one test video, record the actual time required, add a reasonable buffer, and then choose a schedule you can maintain.

    Figure 10. How to calculate a realistic video-publishing schedule.

    Explanation: A sustainable schedule should be based on the complete workload, including research, scripting, narration, visuals, editing, captions, review, and uploading.

    • Research and source checking
    • Outline and script
    • Narration recording or authorized AI voice preparation
    • Visual creation and licensing checks
    • Editing and audio balancing
    • Caption correction and accessibility review
    • Thumbnail, title, description, upload, and final review

    One carefully reviewed video every two weeks may be more sustainable than rushed daily uploads. Quality, accuracy, permissions, captions, and privacy should not be sacrificed to meet an arbitrary frequency.

    Step 11: Organize the Channel, Playlists, and Launch Plan

    A clear structure helps new visitors understand what the channel teaches, which videos they should watch first, how related topics connect, and what to watch next.

    Figure 11. A simple channel structure that guides viewers to the next lesson.

    Explanation: A well-organized channel uses a clear starting point, related playlists, and natural next-video recommendations.

    Create a simple starting point such as “Start Here” or “Beginner Basics.” Turn established content pillars into playlists after related videos exist. Avoid creating many empty playlists simply to make the channel look larger.

    Plan a brief channel trailer, a featured video for returning viewers, a readable banner, a simple profile image, and only relevant public links. Use a dedicated business contact address when appropriate and do not publish personal family details, private phone numbers, financial information, or exact daily routines.

    Step 12: Test the Niche Before Fully Committing

    Before investing heavily in tools, branding, stock libraries, narration services, or advanced editing, test the niche with a small number of videos.

    Figure 12. A small test cycle for evaluating a faceless YouTube niche.

    Explanation: Testing three to five connected videos helps reveal the actual research difficulty, production time, cost, viewer understanding, and practicality.

    Create three to five connected videos. Record research difficulty, production time, cost, narration quality, visual requirements, caption workload, viewer understanding, and your willingness to continue. One completed project provides more useful information than an ambitious unfinished plan.

    After the test, choose one of three paths: continue, adjust, or stop. Stopping an unsuitable plan is not failure; it prevents larger losses of time and money.

    Benefits of Choosing a Clear Niche and Channel Plan

    • Viewers understand the channel more quickly
    • Video ideas become easier to generate
    • Related videos form a useful learning path
    • Production and branding become more consistent
    • Research sources and workflows can be reused
    • Tool choices and costs become easier to control
    • Playlists and internal recommendations become clearer
    • Risks can be identified before publication
    • A written plan reduces creative stress

    The main benefit is clarity. Planning improves decisions and organization, but it does not guarantee views, subscribers, monetization, or income.

    Limitations of Niche and Channel Planning

    A detailed plan may feel complete even though no video has been produced.

    Figure 13. Important limitations of niche and channel planning.

    Explanation: Planning improves organization but cannot guarantee views, monetization, income, or long-term demand.

    • Planning cannot guarantee views or monetization
    • Search interest and competition can change
    • AI suggestions may be inaccurate or outdated
    • Competitor research cannot reveal every cost or advantage
    • A niche may prove too broad, too narrow, or too expensive
    • Fast-changing tutorials may become outdated
    • New channels may not have enough analytics data
    • Too much planning can delay the first useful video

    Create a small test series and update the plan using real evidence. Do not change the entire niche after one low-view video, but do not ignore repeated evidence that the plan is impractical.

    Common Mistakes

    Choosing a niche only because it looks profitable

    Compare audience usefulness, production difficulty, cost, risk, and personal interest.

    Accepting the first AI recommendation

    Generate several options and verify all important claims.

    Choosing a topic before defining the audience

    Write the audience statement first.

    Copying a successful channel

    Create original research, wording, examples, branding, and visuals.

    Ignoring copyright, privacy, and impersonation risks

    Confirm permissions and licences before committing to the niche.

    Buying tools before producing a test video

    Start with existing or limited tools and upgrade only for a specific need.

    Planning an unrealistic publishing schedule

    Time one complete video and include a buffer.

    Changing direction after one poor result

    Review several related videos and repeated patterns.

    Waiting for the perfect niche

    Choose the strongest practical option and begin a small test.

    Common Myths

    Myth: You must choose the most profitable niche

    Reality: A suitable niche must also be useful, affordable, researchable, and sustainable.

    Myth: AI can identify the perfect niche

    Reality: AI can brainstorm, but it cannot predict demand, growth, monetization, or income.

    Myth: Low competition is always better

    Reality: Low competition may mean limited demand or a very narrow topic.

    Myth: A broad channel reaches more people

    Reality: Unrelated subjects can confuse viewers and weaken the learning path.

    Myth: You need expensive tools before launching

    Reality: Many ideas can be tested with simple screen recordings, diagrams, slides, and basic editing.

    Myth: Daily uploads are necessary

    Reality: A sustainable schedule is more valuable than rushed production.

    Myth: Faceless means fully automatic

    Reality: Human research, review, licensing checks, editing, accessibility, and judgement remain necessary.

    Myth: Good planning guarantees monetization

    Reality: Planning improves clarity but cannot guarantee approval or income.

    Faceless YouTube Niche and Channel Planning Checklist

    Complete this checklist before confirming the niche, purchasing several tools, or producing a large batch of videos.

    Figure 14. Final checklist for confirming a faceless YouTube niche and channel plan.

    Explanation: The checklist brings together the main decisions about audience, niche, pillars, topics, format, budget, licences, privacy, schedule, organization, and testing.

    • The audience can be described in one sentence
    • The niche combines a subject, audience, problem, and useful result
    • At least 20 to 30 distinct video topics are possible
    • Reliable sources are available
    • Three to five related content pillars are defined
    • One repeatable main video format is selected
    • The budget is affordable even without channel income
    • Copyright, licences, privacy, permission, and disclosure have been considered
    • The first five videos form a useful starting path
    • One complete test video has been timed
    • The publishing schedule includes review and correction time
    • Planning records and source files will be preserved

    Final planning rule: revise the plan when it depends on uncertain facts, questionable licences, unauthorized real-person content, unaffordable tools, or an unsustainable schedule.

    Practical Example: Plan a Faceless YouTube Channel from Start to Finish

    This example shows how a broad idea can become a practical channel plan through a defined audience, a clear niche statement, five related content pillars, a repeatable video format, twenty connected topics, a realistic publishing schedule, a small test project, and written safety and update procedures.

    Figure 15. A complete example of a beginner faceless YouTube channel plan.

    Explanation: The example shows how one audience, one purpose, five content pillars, a repeatable format, a topic list, and a realistic schedule fit together.

    Starting idea: a general technology channel. This is narrowed to adults over 50 who need slow, clear smartphone help. The channel becomes “Everyday Smartphone Help.”

    Niche statement: This channel helps adults over 50 learn essential smartphone and digital skills so they can complete everyday tasks more safely and confidently through slow screen-recorded tutorials and simple visual explanations.

    Content pillars: smartphone basics, communication, photographs and storage, privacy and scam protection, and useful everyday apps.

    First five videos: increase text size, connect to Wi-Fi, add a contact, recognize a suspicious message, and free storage space safely.

    After one test video takes approximately 11 hours from research to upload, the creator chooses one carefully reviewed video every two weeks. The test also reveals that pointer movement should be slower, menu names may vary, and thumbnail text must be larger.

    Frequently Asked Questions

    Is a niche the same as a video topic?

    No. The niche is the channel’s overall direction. A video topic is one individual lesson inside that direction.

    How many content pillars should a beginner choose?

    Three to five related pillars are usually enough at the beginning.

    How narrow should the niche be?

    It should be clear enough to guide the channel but broad enough to support at least 20 to 30 meaningfully different topics.

    Can AI choose the niche for me?

    AI can organize and suggest ideas, but the final decision requires research, testing, and human judgement.

    Do I need to be an expert?

    You need enough knowledge and reliable research to explain the topic accurately. Do not claim qualifications you do not have.

    How many videos should I prepare before launching?

    One fully reviewed video is enough to begin. Two or three connected videos can create a stronger starting path when the workload is manageable.

    How often should a beginner publish?

    Choose a frequency after timing one complete test video. Weekly, every two weeks, or monthly can all be reasonable.

    Can I change the niche later?

    Yes. Make small evidence-based adjustments. A completely unrelated subject may be better on a separate channel.

    What should I do when early videos receive few views?

    Review titles, thumbnails, openings, usefulness, and viewer paths. Look for patterns across several videos before making a major change.

    Can a clear niche guarantee monetization?

    No. Planning cannot guarantee views, subscribers, YouTube Partner Program approval, advertising income, or sponsorships.

    Key Takeaways

    • Define the audience before confirming the niche
    • Use AI for brainstorming and organization, not guaranteed predictions
    • Evaluate usefulness, topic depth, cost, originality, research, and risk
    • Choose three to five related content pillars
    • Plan approximately 20 topics and select the first five carefully
    • Use one practical main video format
    • Measure one complete test video before choosing a schedule
    • Organize the channel with a clear starting point and useful playlists
    • Preserve sources, licences, permissions, versions, and project records
    • Test the niche with three to five connected videos and improve gradually

    The best niche is not simply the most popular or profitable-looking subject. It is a clear, useful, responsible, and sustainable channel direction that you can continue developing through original videos over time.

    Final Thoughts

    Choosing a faceless YouTube niche is not about discovering a secret topic that guarantees success. It is about creating a clear starting direction that serves a real audience and can be produced responsibly with the time, knowledge, tools, and budget available.

    Begin with one audience, one clear niche statement, three to five content pillars, approximately 20 useful topics, and one repeatable format. Then create a small test series and improve the plan with real production experience and viewer evidence.

    Choose a niche you can explain clearly, research responsibly, afford to produce, and continue developing even when early results are limited.

    Continue Learning

    Sources and References

    The following official YouTube and Google resources were reviewed for this article on August 6, 2026. Features, menu names, policies, analytics, plan conditions, and disclosure requirements may change.

    Readers should review the relevant current official guidance when first using a feature, changing tools or plans, receiving a policy-update notice, applying for monetization, publishing realistic altered or synthetic content, and periodically as part of normal channel maintenance.

    This article provides general educational information and is not legal, financial, medical, copyright, or other professional advice.

  • How to Create Faceless YouTube Videos with AI: Complete Beginner Step-by-Step Guide (2026)

    How to Create Faceless YouTube Videos with AI: Complete Beginner Step-by-Step Guide (2026)

    Estimated reading time: 28 minutes

    Last updated: August 6, 2026

    Create faceless YouTube videos by combining careful research, AI-assisted scripting, narration, visuals, editing, captions, and responsible publishing.

    Introduction

    You do not have to appear on camera to create useful, professional YouTube videos. A faceless YouTube video communicates through narration, images, video clips, screen recordings, animation, text, music, or a combination of these elements.

    Artificial intelligence can help with topic ideas, research organization, outlines, scripts, narration, images, short clips, captions, thumbnails, titles, and descriptions. However, AI should support your work rather than replace your judgement. A successful faceless video still needs an original purpose, accurate information, useful editing, clear narration, and something valuable for the viewer.

    YouTube’s monetization policies address repetitive, mass-produced, and insufficiently original content. AI-generated material can be used, but channels seeking monetization must still provide authentic, materially varied, creative, educational, or other meaningful value.

    You must also use AI responsibly. Check important claims, protect private information, obtain permission when using real people or their voices, and verify the licences for music, photographs, video clips, fonts, templates, and other assets.

    YouTube requires creators to disclose realistic content that has been meaningfully generated or altered with AI when viewers could mistake it for authentic content. Policies and controls may change, so check the current official guidance when your workflow, tools, or publishing plans change.

    This guide covers the complete process, from choosing a topic to publishing and reviewing the finished video. It is suitable for educational videos, tutorials, explainers, list videos, documentary-style videos, product demonstrations, stories, and YouTube Shorts.

    Before You Begin

    A faceless YouTube channel does not mean a fully automatic channel. You are still responsible for the quality, accuracy, legality, accessibility, and usefulness of everything you publish.

    Before creating your first video, prepare:

    • A clear topic and intended audience
    • A Google account and YouTube channel
    • A computer, tablet, or suitable smartphone
    • A reliable internet connection
    • A quiet place to review narration and audio
    • Folders for research, scripts, narration, images, video clips, music, captions, thumbnails, project files, licences, and final exports
    • An AI writing assistant for planning and drafting
    • A video editor or AI-assisted video tool
    • Properly licensed music, images, video clips, fonts, and templates

    Do not subscribe to several services before you understand your workflow. Start with tools you already have or limited free versions. Upgrade only when a paid feature solves a genuine production problem.

    Important: Free plans may include watermarks, export limits, lower resolution, restricted commercial use, or limited AI credits. Review current plan conditions and licensing rules before publishing or monetizing a video.

    What You’ll Learn

    • Choose a suitable topic and audience
    • Select a practical faceless video format
    • Research responsibly and save sources
    • Create an outline and script with AI assistance
    • Check facts and improve the script
    • Create narration with your own voice or an authorized AI voice
    • Plan and produce suitable visuals
    • Edit narration, visuals, music, and captions
    • Create an accurate thumbnail, title, and description
    • Upload and publish with the correct settings and disclosures
    • Avoid copyright, privacy, impersonation, licensing, and accessibility problems
    • Review performance and improve future videos

    What Is a Faceless YouTube Video?

    A faceless YouTube video is a video in which the creator does not appear on camera as the main presenter. The video may use stock clips, AI-generated visuals, screen recordings, slides, diagrams, animation, text, product demonstrations, hands-only footage, narration, music, and sound effects.

    Common Types of Faceless Videos

    Popular faceless formats include tutorials, narrated slideshows, documentary-style videos, history and science explainers, travel guides, list videos, stories, meditation videos, recipe demonstrations, product comparisons, animation, and YouTube Shorts.

    Figure 2. Common faceless YouTube video formats include tutorials, slideshows, stock footage, animation, demonstrations, documentary-style videos, AI-generated stories, and Shorts.

    Explanation: Each format needs a different combination of tools, visuals, narration, and editing. Beginners should choose the simplest format that clearly explains the topic and can be completed with their current skills and resources.

    Faceless Does Not Mean Effortless

    AI can reduce repetitive work, but it cannot guarantee that a video will be accurate, original, useful, or successful. You still decide who the video is for, which facts are reliable, which assets are permitted, whether narration sounds natural, whether disclosure is required, and whether the final video follows YouTube’s rules.

    Reality: Viewers usually care more about usefulness, clarity, trust, and entertainment than whether the creator appears on camera.

    How AI Can Help Create Faceless YouTube Videos

    AI can assist with several stages of video production.

    Figure 3. AI can assist with ideas, research planning, scripts, narration, visuals, editing, captions, titles, and thumbnails, but every output requires human review.

    Explanation: AI is most useful as a production assistant rather than an automatic replacement for the creator. Important facts, wording, pronunciation, visual accuracy, licences, accessibility, disclosures, and final publishing decisions must still be checked by a person.

    Topic and Research Support

    AI can suggest focused topics, organize research questions, explain unfamiliar terms, and summarize notes. Treat these outputs as starting points. Verify important information with official organizations, governments, universities, original research, product documentation, and reputable publishers.

    Script and Narration Assistance

    AI can create outlines, draft scripts, simplify language, improve transitions, generate text-to-speech narration, and suggest pronunciation changes. Review the entire script and audio. Never clone or imitate a real person’s voice without clear authorization.

    Visual and Editing Assistance

    AI tools can create illustrations, backgrounds, diagrams, short clips, captions, translations, background removal, audio cleanup, and editing suggestions. Inspect every result for visual errors, incorrect text, misleading realism, poor timing, and accessibility problems.

    Reality: AI can accelerate production, but the creator remains responsible for every fact, asset, editing decision, licence, disclosure, and published result.

    The Complete Faceless Video Workflow

    A faceless YouTube video is easier to manage when you follow the same production sequence each time.

    Figure 1. The complete workflow for planning, creating, reviewing, publishing, and improving a faceless YouTube video.

    Explanation: Following the workflow in order reduces wasted work. Research and script approval should normally happen before narration, visual creation, and editing. The final review should include accuracy, licensing, privacy, accessibility, and AI-disclosure checks before the video becomes public.

    1. Choose the audience and topic.

    2. Define the result the viewer should receive.

    3. Research the topic using reliable sources.

    4. Create a video outline.

    5. Draft and review the script.

    6. Prepare the narration.

    7. Plan the visuals for every scene.

    8. Create or collect authorized visual assets.

    9. Edit narration, visuals, music, and sound effects.

    10. Add and correct captions.

    11. Create the thumbnail, title, and description.

    12. Complete a final quality and compliance review.

    13. Upload privately.

    14. Add disclosures and publish.

    15. Review analytics and improve the next video.

    Why the Order Matters

    Creating images or clips before finishing the script often causes wasted work. A finished script tells you which scenes are needed, how long they should appear, which facts need supporting visuals, how much narration is required, and which assets must be created, licensed, or replaced.

    Use a Scene Plan

    A simple scene plan records the scene number, narration, visual description, on-screen text, estimated duration, asset source, licence or permission notes, and editing notes.

    Keep the First Video Manageable

    A practical first project may be three to five minutes long, answer one clear question, use one consistent voice, rely on a small number of visuals, use simple cuts, and include accurate captions. A small complete video teaches more than an ambitious project that is never finished.

    Step 1: Choose Your Audience and Video Topic

    Before opening an AI tool, decide exactly who the video is for and what it should help them accomplish. A video made for complete beginners should use different language, examples, and pacing from a video for experienced users.

    Every useful video should answer a question, solve a problem, or provide a clear experience.

    Figure 4. A focused video topic combines one audience, one clear problem, and one useful result.

    Explanation: A narrow topic is easier to research, script, illustrate, and explain. It also helps viewers understand exactly what the video will teach before they select it.

    Use a Simple Topic Formula

    Use this formula: Audience + problem + useful result. For example, “new gardeners + uncertainty about watering + learn a simple routine” can become “How Often Should Beginners Water Tomato Plants?”

    Ask AI for Topic Ideas

    Prompt example: “I want to create a faceless YouTube channel for [audience]. Suggest 15 focused topics that solve one clear problem each. For every idea, include the viewer’s question, the useful result, and a possible beginner-friendly title. Avoid vague topics, exaggerated promises, and unsupported medical or financial claims.”

    Check Whether the Topic Is Suitable

    • Can I explain it accurately?
    • Can I find reliable current sources?
    • Does it solve one clear viewer problem?
    • Can it be shown effectively without appearing on camera?
    • Can I create or legally obtain suitable visuals?
    • Does it involve legal, medical, financial, safety, or professional advice that needs extra care?

    Common Mistake: Choosing a subject that is too broad. How to Avoid This Mistake: Turn it into one specific question that can be answered clearly within a few minutes.

    Step 2: Choose the Best Faceless Video Format

    The format affects the tools, editing time, number of visuals, cost, and viewer experience. Choose the simplest format that explains the topic clearly.

    Screen Recording

    Screen recordings work well for software tutorials, websites, apps, WordPress instructions, and account setup. Remove or hide private information before recording, including notifications, email addresses, filenames, account details, payment information, and personal photographs.

    Narrated Slideshow

    Narrated slideshows use photographs, illustrations, diagrams, charts, or text slides while a voice explains the topic. Slides should support the narration rather than repeat every spoken sentence.

    Stock Footage and AI-Generated Visuals

    Licensed stock footage can make a video look polished, but random clips may feel generic. AI-generated images and clips can illustrate difficult scenes, but they may contain distorted objects, inconsistent characters, unreadable text, flicker, or unrealistic movement.

    Animation, Hands-Only, Audio-Led, and Hybrid Formats

    Animation suits workflows and concepts. Hands-only footage works for cooking, crafts, repairs, products, and gardening. Audio-led videos rely on narration, stories, meditation, or interviews. Hybrid videos combine formats but should keep fonts, colours, transitions, narration, and pacing consistent.

    Common Mistake: Selecting a complicated format because it looks impressive. How to Avoid This Mistake: Use the format that explains the topic most clearly with the fewest unnecessary steps.

    Step 3: Research the Topic and Save Reliable Sources

    Good research is the backbone of a trustworthy faceless YouTube video.

    Figure 5. Reliable video research involves asking focused questions, checking current authoritative sources, comparing important claims, verifying AI outputs, and saving complete source records.

    Explanation: AI can help organize research, but it may produce outdated or incorrect information. Important facts should be confirmed using reliable sources, and the creator should preserve links, dates, notes, permissions, and supporting records for future review or correction.

    Start with Research Questions

    Turn the topic into focused questions. For a smartphone-storage tutorial, ask what uses the most storage, how users check it, which files can be removed safely, what should be backed up, and how menu names differ between devices.

    Use Reliable Sources

    • Official product documentation
    • Government departments
    • Universities and recognized educational institutions
    • Original research papers
    • Standards organizations
    • Professional associations
    • Original statements from companies or creators
    • Reputable news organizations for current events

    Check Dates and Compare Claims

    Older sources may be outdated. Check publication and update dates, product versions, policy changes, and whether the instructions match the current interface. Compare important claims, especially statistics, safety instructions, health information, legal rules, product limits, and statements about real people.

    Keep Research Records

    Record the research question, answer in your own words, source title, organization or author, direct link, publication date, access date, and the script section that relies on the source. Save licence documents, permission messages, and screenshots of important conditions.

    Common Mistake: Asking AI to write the entire script and publishing without checking it. How to Avoid This Mistake: Research first, save reliable sources, verify important claims, and only then begin the script.

    Step 4: Create a Clear Video Outline

    An outline organizes the video before you write the full script. It helps keep the content focused, remove repetition, and arrange ideas logically.

    Use a Simple Structure

    1. Hook

    2. Brief introduction

    3. Main steps or points

    4. Warnings or common mistakes

    5. Summary

    6. Natural call to action

    Write an Honest Hook

    A useful hook identifies the problem or learning result without exaggeration. Avoid promises such as guaranteed income, overnight success, or automatic results.

    Add Visual Notes and Estimate Length

    Beside each section, note what viewers need to see. Time a sample paragraph aloud because narration, pauses, demonstrations, and on-screen reading often take longer than expected.

    Common Mistake: Writing the full script before deciding the structure. How to Avoid This Mistake: Approve a short, logical outline first.

    Step 5: Write the Video Script with AI Assistance

    AI can help create a first draft, but the finished script should be checked, corrected, and rewritten by you.

    Figure 6. A reliable video script develops from a clear audience, verified research, a structured outline, an AI-assisted draft, and careful human revision.

    Explanation: The first AI-generated draft should never be treated as the finished script. The creator should verify every important claim, rewrite generic wording, remove repetition, improve the speaking style, and read the complete script aloud before recording narration.

    Prepare the Information

    • Intended audience
    • Working title
    • Viewer’s main question
    • Desired result
    • Approved outline
    • Verified research notes
    • Warnings and examples
    • Preferred length and tone

    Use a Detailed Script Prompt

    Ask for simple natural language, a brief introduction, explained technical terms, smooth transitions, a practical example, relevant warnings, and a short summary. Instruct the tool not to invent facts, quotations, statistics, sources, personal stories, or guarantees, and to mark statements that still require verification.

    Write for Speaking

    Spoken narration usually works better with shorter sentences, familiar words, clear transitions, natural pauses, and one main idea at a time. Read the entire script aloud and revise any sentence that is difficult to say or understand.

    Keep Your Own Voice

    Make the script original by adding your own explanation, testing, examples, demonstrations, comparisons, warnings, and teaching style. Do not invent personal experience that did not happen.

    Common Mistake: Publishing the first AI-generated script. How to Avoid This Mistake: Treat it as raw material, verify the information, rewrite weak sections, remove repetition, and approve every sentence.

    Step 6: Create the Narration

    You can use your own recorded voice, a hired narrator, an AI-generated voice, or a combination of human and AI narration.

    Figure 7. Narration may use the creator’s voice, an authorized narrator, or a properly licensed AI voice, but every recording must be reviewed before editing.

    Explanation: The chosen voice should be clear, consistent, appropriate for the audience, and authorized for the intended use. Review pronunciation, pacing, pauses, volume, and licence conditions, and never clone or imitate a real person’s voice without clear permission.

    Record Your Own Voice

    Use a quiet location with soft furnishings to reduce echo. Silence notifications, record a test, listen with headphones, and record the script in short sections. Speak naturally and leave brief pauses before and after each section for editing.

    Use an AI Voice Responsibly

    Check commercial-use permission, plan restrictions, export limits, attribution, privacy practices, voice-library conditions, and restrictions on cloning. Generate narration in sections and listen to every file for names, dates, abbreviations, technical terms, pauses, emphasis, and volume.

    Never clone or imitate a real person’s voice without clear permission. This includes celebrities, politicians, employers, teachers, family members, creators, and private individuals.

    Clean and Preserve the Audio

    Remove mistakes, reduce background noise carefully, balance volume, and add gentle fades. Save original recordings, cleaned versions, AI voice settings, pronunciation notes, permissions, and the approved master audio.

    Common Mistake: Publishing generated narration without listening to it. How to Avoid This Mistake: Review every sentence, correct pronunciation and pacing, confirm permission, and keep narration clear above all other audio.

    Step 7: Plan the Visuals for Every Scene

    This stage is often called visual planning or storyboarding.

    Figure 8. A scene plan connects each part of the narration with the required visual, on-screen text, duration, source, and editing notes.

    Explanation: Planning scenes before creating assets reduces wasted work and helps ensure that every visual supports the approved script. Recording the source and licence for each asset also makes the final copyright and publishing review easier.

    Divide the Script into Scenes

    Begin a new scene when the topic changes, a step starts, an example appears, a warning is introduced, or the viewer needs to see a specific action.

    Match Visuals to Narration

    The visual should explain or support what the viewer hears. Avoid unrelated footage merely because it looks attractive. Use on-screen text for headings, numbers, warnings, definitions, and key takeaways, but keep it brief and readable on a phone.

    Keep Safe Areas and a Consistent Style

    Leave comfortable space around titles, captions, diagrams, buttons, and essential objects. Keep fonts, heading sizes, colours, icons, transitions, text placement, and animation speed consistent.

    Plan Accessibility

    Use strong contrast, large text, clear narration, accurate captions, sufficient reading time, simple layouts, limited flashing, and spoken explanations of important visual information. Do not communicate a warning through colour alone.

    Common Mistake: Collecting random visuals after editing has started. How to Avoid This Mistake: Complete the scene plan first, then create only the assets required by the approved script.

    Step 8: Create or Collect the Visual Assets

    Once the scene plan is complete, create or collect the images, video clips, screen recordings, diagrams, and text graphics needed for the video.

    Figure 9. Visual assets may come from original recordings, screen captures, AI generation, licensed stock libraries, or original diagrams, but every asset must be checked before editing.

    Explanation: The creator should confirm that each visual supports the script, appears correctly, protects privacy, matches the intended style, and has suitable permission or licensing. Realistic synthetic scenes should also be labelled or disclosed when viewers could mistake them for genuine footage.

    Record Your Screen Safely

    1. Close unrelated programs and tabs.

    2. Turn off notifications.

    3. Hide bookmarks and personal files.

    4. Use demonstration information instead of real customer or family data.

    5. Check the entire recording before using it.

    Create AI Images and Video Clips

    Describe the subject, setting, action, style, camera view, lighting, mood, aspect ratio, colours, and unwanted elements. Generate short clips with one simple action. Inspect images at full size and watch clips several times for distorted hands, duplicated objects, changing backgrounds, incorrect text, flickering, unrealistic movement, and misleading realism.

    Use Stock Assets and Open Licences Carefully

    Check whether commercial and monetized use is allowed, whether attribution is required, whether modification is permitted, and whether restrictions apply to people, trademarks, buildings, or sensitive subjects. “Free” may mean free only for personal use or free with conditions. Record the exact Creative Commons licence and version when applicable.

    Organize and Record Assets

    Use descriptive filenames and maintain a record containing the provider, source link, licence type, download date, attribution wording, commercial-use status, restrictions, receipts, prompts, generation date, model, and selected output.

    Common Mistake: Assuming anything found online, generated by AI, or labelled free can automatically be used. How to Avoid This Mistake: Verify the source, licence, permission, commercial-use conditions, and platform rules for every asset.

    Step 9: Edit the Video

    Editing combines the narration, visuals, music, sound effects, captions, and transitions into one finished video.

    Figure 10. A clear editing timeline combines narration, visuals, text, music, sound effects, and captions in organized layers.

    Explanation: Adding the narration first creates the timing foundation for the video. Visuals should match the spoken content, while music, effects, transitions, and text should support understanding without distracting from the main message.

    Create the Project and Add Narration First

    Use the correct orientation and resolution for the intended format. Import and organize the files. Place the approved narration on the main audio track first because it provides the timing foundation for the video.

    Match Visuals and Use Simple Transitions

    Place each visual beside the corresponding narration. Trim empty frames, mistakes, repeated footage, unrelated visuals, long silences, and unnecessary introductions. Straight cuts, fades, and simple dissolves are usually enough.

    Add Text, Music, and Sound Effects Carefully

    Keep text large, brief, high-contrast, and visible long enough to read. Keep narration clearly louder than licensed background music. Use sound effects sparingly and test the mix through headphones and ordinary speakers.

    Review the Rough Cut

    Watch the complete rough cut without stopping. Then watch without sound to assess visuals and captions, and listen without watching to assess narration, pacing, and whether essential visuals are described. Save project versions and keep a backup outside the main project folder.

    Common Mistake: Adding every available effect. How to Avoid This Mistake: Use only elements that improve clarity, pacing, accessibility, or understanding.

    Step 10: Add Accurate Captions and Improve Accessibility

    Captions display the spoken words and important sounds as text.

    Figure 11. Accurate captions, readable design, clear narration, and careful testing make faceless videos easier for more viewers to understand.

    Explanation: Accessibility should be planned throughout production rather than added at the end. Captions must match the final audio, important visuals should be explained through narration, and text should remain readable on small screens without relying on colour alone.

    Do Not Rely Blindly on Automatic Captions

    Automatic captions may misunderstand names, technical terms, accents, numbers, dates, abbreviations, quiet narration, music, and multiple speakers. Compare every caption with the final audio and correct both text and timing.

    Make Captions Readable

    Use manageable lines, natural phrase breaks, correct punctuation, accurate timing, speaker identification when needed, and descriptions of important sounds. Avoid captions that cover essential visual information.

    Improve Accessibility Beyond Captions

    Use large text, strong contrast, simple fonts, clear narration, uncluttered layouts, sufficient reading time, limited flashing, and spoken explanations of charts, diagrams, screen actions, and warnings.

    Test Several Ways

    • With sound and captions
    • Without sound
    • With captions off
    • On a desktop screen
    • On a phone-sized screen
    • Through headphones
    • Through ordinary speakers

    Common Mistake: Assuming automatic captions are correct. How to Avoid This Mistake: Compare every caption with the final audio, correct the text and timing, add meaningful sound descriptions, and test readability on a small screen.

    Step 11: Create the Thumbnail, Title, and Description

    The thumbnail, title, and description explain what the video is about before viewers watch it.

    Figure 12. The thumbnail, title, and description should work together to describe the finished video clearly and honestly.

    Explanation: The thumbnail should remain understandable at a small size, the title should explain the main topic or benefit, and the description should provide useful details, chapters, sources, credits, and required disclosures. None of these elements should promise something the video does not deliver.

    Create a Clear Custom Thumbnail

    Use one clear main subject, strong contrast, large readable text when needed, a simple background, and a direct visual connection to the video. Test the design at a small size. It is often better to generate the background or main image with AI and add final text manually.

    Write an Accurate Title

    Explain the subject and useful result without unbelievable promises, excessive capitals, unrelated trending terms, false urgency, or names of tools and people that do not appear in the video.

    Write a Useful Description

    Use the opening lines to summarize the video. Add chapters, sources, credits, attribution, affiliate or sponsorship disclosures, AI-content context when appropriate, contact information, related videos, and a brief call to action.

    Use YouTube Tags Carefully

    YouTube video tags are separate from WordPress tags. Titles, thumbnails, and descriptions are more important for discovery. Tags may help with common misspellings, but avoid long keyword lists or irrelevant terms.

    Common Mistake: Creating a dramatic thumbnail and title before finishing the video. How to Avoid This Mistake: Complete and review the video first, then create accurate publishing materials based on what it genuinely contains.

    Step 12: Upload and Publish the Video on YouTube

    For a first upload, set the video to Private or Unlisted until you have checked the processed video, captions, thumbnail, links, disclosures, and publishing settings.

    Figure 13. Uploading privately first provides time to review processing, captions, metadata, disclosures, copyright results, and playback quality before publication.

    Explanation: The uploaded version may look or sound different after platform processing. Watching the complete private video on desktop and mobile helps identify caption errors, broken links, unreadable text, incorrect settings, and other problems before viewers see it.

    Prepare and Upload

    Confirm the final export, thumbnail, title, description, chapters, caption file, sources, credits, attribution, disclosure decision, playlist, and related-video choices. In YouTube Studio, select Create, Upload videos, and choose the final file.

    Select the Audience and Additional Settings

    State accurately whether the content is Made for Kids. Review paid promotion, altered or synthetic content, automatic chapters, tags, video language, captions, recording date, licence and distribution, remixing, category, comments, and ratings. Menu names may change.

    Complete the AI Disclosure

    Disclose realistic content that was meaningfully generated or altered when it makes a real person appear to say or do something they did not, alters a real event or place, or creates a realistic-looking scene that did not occur. Ordinary assistance with outlines, scripts, captions, audio cleanup, or clearly unrealistic animation generally does not require the same disclosure. When uncertain, consider whether a reasonable viewer could mistake the content for authentic media.

    Review Checks and Visibility

    Review copyright and other checks, but remember that an automated check does not guarantee that no later claim will occur. Upload privately, wait for high-definition processing, watch the YouTube version completely, test captions and links, and then publish or schedule it.

    Common Mistake: Selecting Public immediately. How to Avoid This Mistake: Upload privately, complete a full review, and publish only after every important setting and asset has been checked.

    Step 13: Review the Results and Improve Your Next Video

    Publishing is not the end of the process.

    Figure 14. Analytics can help creators understand how viewers found the video, what held their attention, and which practical improvement to test next.

    Explanation: One video rarely provides enough information to judge an entire channel. Compare similar videos over time, study patterns in viewer behaviour, and improve one meaningful part of the workflow at a time rather than changing every element after a single result.

    Review the Main Analytics

    YouTube Analytics can show views, watch time, subscribers, traffic sources, impressions, click-through rate, average view duration, audience retention, and viewer comments. These measurements should be interpreted together rather than in isolation.

    Study Retention and the Opening

    A sudden drop may indicate a long introduction, poor audio, confusing visuals, repeated information, a mismatch between title and content, or an answer that arrived too late. A spike may mean viewers replayed a useful or confusing section.

    Correct Errors and Improve One Thing

    Correct important factual, safety, legal, medical, or financial errors openly. Do not change the title, thumbnail, description, topic, and promotion at the same time. Make one meaningful improvement when practical and compare similar videos over time.

    Avoid Artificial Engagement

    Do not buy views, subscribers, comments, or automated engagement. Artificial activity does not build a genuine audience and may violate platform policies.

    Common Mistake: Judging the channel after one upload. How to Avoid This Mistake: Publish several carefully made videos, compare similar content, and improve one practical part of the workflow at a time.

    Benefits of Creating Faceless YouTube Videos with AI

    Faceless video creation can be a practical option for beginners who want to publish useful content without appearing on camera.

    Figure 15. AI-assisted faceless video creation offers flexibility and production support, but it also introduces accuracy, quality, licensing, privacy, and consistency risks.

    Explanation: AI can reduce repetitive work and help beginners create videos without appearing on camera. It does not guarantee originality, correctness, monetization, or audience growth. Careful human review remains necessary throughout the complete production and publishing process.

    • Create without appearing on camera
    • Reduce repetitive planning and production work
    • Begin with basic equipment
    • Reuse a structured workflow and templates
    • Use captions, transcripts, and translations to improve access
    • Update individual narration or visual sections more easily
    • Test ideas before spending heavily
    • Focus attention on research, explanation, and storytelling
    • Protect some aspects of personal privacy

    Reality: The main advantage is flexibility, not effortless success. AI can simplify production, but useful videos still require research, judgement, creativity, editing, and responsible publication.

    Limitations of Creating Faceless YouTube Videos with AI

    AI may produce incorrect information, generic scripts, unnatural voices, inconsistent characters, distorted visuals, misleading realistic scenes, and poor automatic edits. Free plans may include watermarks, limited credits, low resolution, or restricted commercial use. Several subscriptions can become expensive, and a short finished video may still require many hours of careful work.

    Licensing, privacy, copyright, impersonation, platform rules, prices, product features, and disclosure controls can change. A faceless format can also feel impersonal when it relies on generic narration, random stock footage, and no consistent teaching style.

    How to Reduce This Limitation: Verify facts, rewrite scripts, review every audio and visual asset, check licences and permissions, keep the project small, preserve records, and add human explanation, examples, testing, or commentary.

    Reality: AI can make production more accessible, but it cannot replace originality, judgement, patience, or audience trust.

    Common Mistakes When Creating Faceless YouTube Videos with AI

    Beginners often make avoidable mistakes because AI tools make the process look faster and easier than it really is.

    Figure 16. Common mistakes usually result from rushing research, scripting, asset creation, accessibility checks, licensing, disclosure, or final review.

    Explanation: A structured workflow prevents many beginner errors. Completing each stage in order gives the creator time to verify facts, approve scripts, review narration, check visual assets, correct captions, confirm permissions, and inspect the uploaded video before publication.

    • Starting without a clear audience
    • Choosing a topic that is too broad
    • Asking AI to do everything in one prompt
    • Publishing unverified AI information
    • Copying another creator too closely
    • Using a generic AI script without rewriting it
    • Writing a long introduction
    • Using an AI voice without listening
    • Cloning a real person’s voice without permission
    • Using random stock footage
    • Assuming AI-generated assets are automatically safe
    • Using free assets without reading the licence
    • Creating visuals before finishing the script
    • Generating large batches without review
    • Ignoring visual errors
    • Showing realistic synthetic content without context
    • Using tiny text or too many effects
    • Making music louder than narration
    • Trusting automatic captions
    • Forgetting accessibility
    • Revealing private information
    • Using misleading titles or thumbnails
    • Publishing before processing is complete
    • Forgetting required disclosure
    • Assuming a copyright check guarantees safety
    • Buying too many tools
    • Publishing too frequently
    • Deleting source files
    • Giving up after one video

    Final Reminder: Most serious mistakes happen when creators rush. A slower, well-documented workflow usually produces safer, clearer, and more useful videos.

    Common Myths About Faceless YouTube Videos

    Faceless video creation is often surrounded by exaggerated claims.

    Figure 17. Common myths can create unrealistic expectations about automation, monetization, copyright, disclosure, production speed, and channel success.

    Explanation: AI can support video creation, but it does not remove the need for research, originality, licensing checks, human review, and patience. Faceless channels succeed by providing useful and trustworthy content, not by relying on automation or expensive tools alone.

    Myth: Faceless Means Fully Automatic

    Reality: AI can assist with production, but a person must still check facts, wording, licences, audio, visuals, captions, disclosures, and final quality.

    Myth: Success Takes Minutes

    Reality: Generating a file is not the same as creating a useful finished video. Responsible production still takes research, revision, editing, captioning, licensing checks, and testing.

    Myth: Faceless Videos Cannot Be Monetized

    Reality: Appearing on camera is not required. Originality, authentic value, rights clearance, and policy compliance matter.

    Myth: Every AI Use Requires a Label

    Reality: Disclosure depends on the actual content and whether realistic synthetic media could be mistaken for something authentic.

    Myth: AI Content Is Automatically Copyright-Free

    Reality: Tool terms, plans, uploaded references, recognizable people, trademarks, voice rights, licences, and applicable law still matter.

    Myth: More Videos or Expensive Tools Guarantee Success

    Reality: Quality, usefulness, planning, judgement, viewer satisfaction, and consistent improvement matter more than volume or subscription cost.

    Faceless YouTube Video Safety and Responsible-Use Checklist

    Complete this checklist before publishing every faceless YouTube video.

    Figure 18. The final safety checklist covers accuracy, permissions, licensing, privacy, impersonation, disclosure, captions, accessibility, publishing settings, and project records.

    Explanation: A complete pre-publication review reduces avoidable risks and protects viewer trust. When a fact, asset, permission, licence, or disclosure remains uncertain, verify it, replace it, remove it, or obtain appropriate professional advice before publishing.

    Research and Script

    • Verify important facts with reliable sources
    • Check names, dates, numbers, quotations, and technical details
    • Distinguish facts, examples, estimates, and opinions
    • Review and rewrite AI-generated wording
    • Remove unsupported claims and invented sources
    • Explain technical terms for beginners

    Voice, Visuals, and Rights

    • Listen to the complete narration
    • Check voice permissions and commercial-use rights
    • Inspect every image and clip
    • Confirm copyright, licences, and attribution
    • Remove private information
    • Avoid impersonation and misleading use of real people

    Disclosure, Accessibility, and Publishing

    • Add AI disclosure when realistic synthetic content requires it
    • Correct captions and timing
    • Use readable text and strong contrast
    • Explain essential visuals through narration
    • Remove flashing and unexpected flicker
    • Review audience, copyright, language, visibility, captions, links, and end screens
    • Watch the complete processed upload before going public

    Records and Backups

    • Research notes and sources
    • Final script and prompts
    • Narration and source assets
    • Licences, permissions, and receipts
    • Caption file and thumbnail
    • Editing project and master export
    • Disclosure decisions and publication record
    • Backup copy

    Final Safety Rule: When an asset, claim, permission, licence, or disclosure is uncertain, do not guess. Verify it, replace it, remove it, or obtain appropriate professional advice before publishing.

    Practical Example: Create a Simple Three-Minute Faceless YouTube Video

    This example shows how a complete beginner could turn one focused idea into a short faceless video.

    Figure 19. A short faceless video can use one focused question, several clearly planned scenes, consistent narration, simple visuals, captions, and a final safety review.

    Explanation: This three-minute example demonstrates that a beginner does not need a complex documentary or many tools. One focused topic, a short scene plan, verified information, clear narration, and consistent visuals can produce a complete and useful first video.

    Example Project

    Working title: Five Everyday Ways Artificial Intelligence Is Already Helping You. Audience: Adults with little or no technical knowledge. Desired result: Viewers recognize five familiar examples of AI and understand that AI is not limited to robots or laboratories. Main format: Narrated slideshow. Approximate length: Three minutes.

    Main Points and Scenes

    1. Opening: AI in everyday life

    2. Navigation and traffic predictions

    3. Email spam filtering

    4. Product and video recommendations

    5. Voice recognition

    6. Smartphone photo organization

    7. Privacy and accuracy warning

    8. Final summary

    Production

    Research each example, create a short outline and script, record or generate authorized narration, build a consistent set of simple visuals, edit with restrained transitions and licensed music, correct the captions, create an accurate thumbnail, upload privately, and complete the safety checklist.

    Final Tip: Complete one small video using a reliable workflow before attempting a long documentary, complicated animation, or highly automated channel.

    Frequently Asked Questions

    Do I need to show my face?

    No. You can use narration, screen recordings, demonstrations, animation, diagrams, licensed footage, photographs, or AI-generated visuals.

    Can I create videos using only AI?

    AI can assist with most stages, but fully automatic creation is not recommended. You remain responsible for research, rights, accessibility, disclosure, and final review.

    What is the easiest format for a beginner?

    Screen-recorded tutorials and narrated slideshows are often manageable because the screen or slides provide most of the visuals.

    Do I need expensive equipment?

    No. A computer or suitable phone, a basic microphone, a simple editor, an AI assistant, and authorized visual assets may be enough.

    Can faceless videos be monetized?

    They may be eligible when they provide original, authentic value and comply with YouTube’s monetization, rights, and community policies.

    Does YouTube allow AI-generated videos?

    Yes, when they follow platform rules. Realistic generated or meaningfully altered content may require disclosure.

    Must I disclose every use of AI?

    No. Ordinary production assistance usually does not require the same disclosure as realistic synthetic media that could mislead viewers.

    Can I use an AI voice?

    Yes, when the voice and plan allow the intended use. Review the terms and never clone a real person without authorization.

    Can I use images found through search?

    Finding an asset online does not provide permission. Use original, licensed, verified public-domain, correctly attributed open-licensed, or expressly permitted material.

    How long should my first video be?

    Long enough to answer one focused question clearly. Three to five minutes is often manageable for a first tutorial or explainer.

    How many tools do I need?

    Often one AI assistant, one narration method, one editor, and one reliable source of visuals are enough to begin.

    Should I delete project files after publishing?

    No. Preserve research, prompts, scripts, narration, source assets, licences, captions, thumbnails, projects, and master exports.

    How quickly can a channel succeed?

    There is no reliable timetable. Avoid anyone who guarantees rapid views, monetization, subscribers, or income.

    What is the most important advice?

    Complete one small, useful, original video from beginning to end, review every stage, save the records, and improve the next video.

    Key Takeaways

    • Faceless does not mean automatic.
    • Begin with one audience, one focused topic, and one useful result.
    • Research before asking AI for a full script.
    • Treat AI output as a draft that needs verification and rewriting.
    • Finish the script before producing most assets.
    • Use a scene plan to connect narration and visuals.
    • Review every generated image, clip, and narration file.
    • Use only assets you are authorized to use.
    • Never clone a real person’s voice or likeness without permission.
    • Add accurate captions and design for accessibility.
    • Use honest titles and thumbnails.
    • Complete the altered-content disclosure when realistic generated or modified media could be mistaken for authentic content.
    • Upload privately and review the processed version before publishing.
    • Preserve source files, permissions, licences, projects, and publication records.
    • Review several similar videos and improve one part of the workflow at a time.

    Final Principle: AI can make faceless video production more accessible, but audience trust still depends on accuracy, originality, transparency, and careful human review.

    Final Thoughts

    Creating a faceless YouTube video with AI is not simply a matter of pressing one button and publishing whatever appears. A dependable process requires a focused topic, reliable research, an approved script, authorized narration and visuals, careful editing, corrected captions, licence and disclosure checks, a private upload review, and continued improvement.

    You do not need expensive equipment, several subscriptions, or advanced editing skills to begin. Start with a small project that answers one clear question. Use simple visuals, clear narration, accurate captions, and straightforward editing.

    Final Tip: Do not try to automate an entire channel before completing one carefully reviewed video. Build a reliable workflow first, preserve your records, and improve one practical part of the process with every new video.

    Continue Learning

    The next guides in the Faceless YouTube Video Creation Series will explain channel planning, scriptwriting, narration, visual creation, editing, thumbnails, publishing, and responsible monetization in greater detail.

    Sources and References

    The following official sources were reviewed on August 6, 2026. YouTube features, menu names, policies, limits, and licence conditions may change. Check current official guidance when first using a tool, changing plans or features, receiving a policy notice, or periodically during continued use.

    Official Links

    These references provide general platform and licensing information. They do not replace legal, financial, medical, copyright, privacy, accessibility, or other professional advice for a particular situation.

  •   How to Add Voice, Music, and Captions to AI Videos: Beginner Step-by-Step Guide (2026)

      How to Add Voice, Music, and Captions to AI Videos: Beginner Step-by-Step Guide (2026)

    What You’ll Learn

    In this beginner-friendly guide, you will learn how to:

    • add a recorded voice or AI-generated voice to an AI video

    • choose background music that matches the video

    • adjust voice, music, and sound-effect volume levels

    • create accurate captions automatically

    • correct caption mistakes and improve readability

    • position and format captions for different screen sizes

    • synchronize voice, music, captions, and video scenes

    • avoid copyright, privacy, and permission problems

    • export and review a finished video before publishing it

    By the end of this guide, you will understand how to turn a silent AI-generated video into a clearer, more engaging, and more professional finished video.

    Introduction

    AI-generated video clips often begin as silent visual scenes. The images may look impressive, but a video can feel incomplete when it has no narration, background music, or captions.

    Voice helps explain the message and guide the viewer through each scene. Music creates mood and makes the video feel more polished. Captions display spoken words as text, helping viewers understand the video when the sound is turned off or difficult to hear.

    You do not need professional recording equipment or advanced video-editing skills to add these elements. Many beginner-friendly video editors can generate voices, add music, create automatic captions, and synchronize everything on a simple timeline.

    The basic process is:

    1. Prepare the video and script.

    2. Add a recorded or AI-generated voice.

    3. Add suitable background music.

    4. Generate and correct captions.

    5. Adjust timing and volume.

    6. Review and export the completed video.

    This guide explains each step in simple language. The exact buttons may differ between video-editing tools, but the main process is similar in most applications.

    Figure 1. The main parts of a finished AI video arranged on separate editing tracks.

    A finished AI video usually combines visual scenes, narration, background music, and captions. These elements are arranged on separate tracks so their timing and volume can be controlled independently

    What You Need Before You Start

    Before adding voice, music, and captions, gather the main files and tools you will use. Preparing them first will make the editing process faster and help you avoid missing audio, incorrect timing, or lost files.

    Your AI Video

    Use the best available version of your AI-generated video. Watch it from beginning to end and check for:

    • unwanted objects or visual mistakes

    • scenes that are too short or too long

    • incorrect cropping or aspect ratio

    • missing scenes

    • poor image quality

    Correct major video problems before adding audio and captions. Replacing scenes later may change the timing of your narration, music, and text.

    A Final Script

    Prepare the exact words that will be spoken in the video. A final script helps you create smoother narration and more accurate captions.

    Read the script aloud before recording. Rewrite sentences that sound too long, complicated, or unnatural. Spoken language should usually be simple and direct.

    A Video-Editing Tool

    You need a video editor that allows you to work with separate video, voice, music, and caption tracks.

    Useful features include:

    • audio recording or audio-file import

    • AI voice generation

    • background-music controls

    • automatic caption generation

    • caption editing and formatting

    • volume and timing adjustments

    • video export settings

    The names and locations of these features may differ between editing tools, but the overall process is usually similar.

    A Voice Option

    Decide whether you will use:

    • your own recorded voice

    • another person’s voice with permission

    • an AI-generated voice

    Using your own voice can make the video feel more personal. An AI-generated voice may be useful when you do not want to record or when you need a consistent narration style.

    Music You Are Allowed to Use

    Choose music that you created, licensed, purchased with suitable usage rights, or obtained from a source that clearly allows your intended use.

    Do not assume that music is free to use simply because it is available online. Check whether it can be used in personal, public, or commercial videos.

    Headphones or Speakers

    Use headphones or reliable speakers when reviewing the video. Laptop speakers may make it difficult to notice background noise, uneven volume, or music that is covering the narration.

    An Organized Project Folder

    Create one main folder for the video project. Inside it, you can create separate folders for:

    • video clips

    • voice recordings

    • music

    • sound effects

    • captions

    • exported versions

    • licences and permission records

    Use clear filenames so you can identify each file quickly.

    For example:

    article-021-main-video.mp4

    article-021-narration-final.wav

    article-021-background-music.mp3

    article-021-final-video.mp4

    Figure 2. The main files and tools to prepare before adding voice, music, and captions.

    Preparing the video, script, voice, music, editing tool, and project folder before you begin helps keep the project organized and reduces avoidable mistakes.

    Understand the Video-Editing Timeline

    A video-editing timeline is the main workspace where you arrange your video, voice, music, captions, and other elements.

    The timeline usually runs from left to right. The left side represents the beginning of the video, while the right side represents the end.

    Each element appears on its own horizontal track. Figure 1 shows how these tracks work together.

    Video Track

    The video track contains your AI-generated clips, images, transitions, and visual scenes.

    You can use this track to:

    • arrange scenes in the correct order

    • shorten or extend clips

    • remove unwanted sections

    • add transitions between scenes

    • match scenes with the narration

    The video track is usually placed near the top of the timeline.

    Voice Track

    The voice track contains your recorded narration or AI-generated voice.

    The audio appears as a waveform. A waveform is a visual pattern that shows where the voice becomes louder, quieter, or silent.

    You can move the voice recording along the timeline so that each spoken sentence matches the correct scene.

    Music Track

    The music track contains your background music.

    Music should normally support the narration rather than compete with it. You can shorten the music, repeat it, fade it in, fade it out, and lower its volume.

    Caption Track

    The caption track contains the written words displayed on the screen.

    Each caption block should appear at the same time as the matching spoken words. You can move, shorten, or extend caption blocks to improve their timing.

    The Playhead

    The playhead is a vertical line that shows your current position in the video.

    When you move the playhead, the preview screen displays what appears at that exact moment.

    Use the playhead to check:

    • where a voice sentence begins

    • when music starts or ends

    • when a caption appears

    • where one video scene changes to another

    Zooming In and Out

    Most video editors allow you to zoom in or out on the timeline.

    Zoom in when you need to make small timing adjustments. Zoom out when you want to see the complete video structure.

    For example, zooming in can help you move a caption by a fraction of a second so that it appears exactly when the speaker begins talking.

    Locking Tracks

    Some editors allow you to lock a track. Locking prevents the items on that track from moving accidentally.

    After your video scenes are arranged correctly, you may lock the video track before editing the voice, music, or captions.

    Muting and Hiding Tracks

    You may also be able to mute an audio track or temporarily hide a visual track.

    This can help you review one part of the project at a time. For example, you can mute the music while checking the narration or hide captions while reviewing the video scenes.

    Keep Related Elements Aligned

    Always check that the video, narration, music, and captions remain synchronized.

    If you move or remove a video clip, the other tracks may no longer match. Review the timeline after every major change to make sure nothing has shifted out of position.

    Step 1: Prepare Your Video and Narration Script

    Before recording or generating a voice, make sure the video scenes and narration script are ready.

    Adding narration too early can create extra work. If you later change the video scenes or rewrite the script, you may need to record the voice again and correct the captions.

    Review the Video First

    Watch the complete AI video without adding any audio.

    Check that:

    • the scenes appear in the correct order

    • each scene remains on screen long enough

    • there are no unwanted visual mistakes

    • the video uses the correct aspect ratio

    • the beginning and ending are complete

    • there are no long blank sections

    Fix major visual problems before continuing.

    Match the Script to the Video Scenes

    Divide the narration script into short sections. Match each section with the scene it explains.

    For example:

    Scene 1: A person opens an AI video tool.

    Narration: “AI video tools can help beginners create short videos from written instructions.”

    Scene 2: A written prompt changes into a video.

    Narration: “The tool uses your prompt to generate the visual scene.”

    This method helps you see whether the video scenes are long enough for the spoken words.

    Figure 3. Matching each narration section with the correct AI video scene.

    Dividing the script into short sections and matching each section with a video scene makes narration easier to record and synchronize.

    Keep Narration Sentences Short

    Short sentences are easier to record, understand, caption, and synchronize.

    Instead of writing:

    “Artificial intelligence video-generation tools provide users with several different options that can be used to produce, modify, and improve videos for many types of personal and business projects.”

    Write:

    “AI video tools can create and improve videos. They can be used for personal, educational, or business projects.”

    Read the Script Aloud

    Read the complete script at a natural speaking speed.

    While reading, check for:

    • sentences that are difficult to pronounce

    • words that sound unnatural

    • sentences that are too long

    • repeated ideas

    • technical terms that need explanation

    • sections that do not match the video

    Rewrite anything that sounds confusing.

    Estimate the Narration Length

    A script may take longer to speak than expected.

    Read the script aloud and time it before recording. The total length will depend on your speaking pace, pauses, pronunciation, and the style of the video.

    Do not force the narrator to speak too quickly just to fit the existing video. Extend the scene, shorten the script, or divide the information across more scenes.

    Add Pauses to the Script

    Mark places where the narrator should pause.

    A simple script may look like this:

    “Welcome to this beginner guide. [Pause]

    Today, you will learn how to add voice, music, and captions to an AI video. [Pause]

    Let us begin with the narration.”

    Pauses make the voice sound more natural and give viewers time to understand the message.

    Check Difficult Names and Terms

    Confirm how names, abbreviations, and technical terms should be pronounced.

    This is especially important when using an AI-generated voice because the tool may pronounce unfamiliar words incorrectly.

    You can sometimes improve pronunciation by:

    • spelling the word phonetically

    • adding spaces between letters

    • writing an abbreviation in full

    • replacing a difficult word with a simpler alternative

    Save the Final Script

    Save the approved script before creating the narration.

    Use a clear filename such as:

    article-021-final-narration-script.docx

    Keep an unchanged copy of the final script. This will help when checking the narration, correcting captions, and updating the video later.

    Step 2: Add Voice Narration

    Voice narration explains what is happening in the video and guides the viewer from one scene to the next.

    You can record your own voice or create an AI-generated voice. Both options can work well when the narration is clear, natural, and correctly synchronized with the video.

    Figure 4. Two common ways to add voice narration to an AI video.

    Recording your own voice can create a personal connection, while an AI-generated voice can provide speed and consistency. The best choice depends on the video, the audience, and the available recording environment.

    Choose Your Voice Method

    Before adding narration, decide which method best suits the video.

    Record Your Own Voice

    Recording your own voice can make the video feel more personal and trustworthy.

    This option may be suitable when:

    • you are comfortable speaking

    • you want viewers to recognize your voice

    • the video represents you or your website

    • you want natural emotion and pronunciation

    • you can record in a quiet location

    You do not need an expensive microphone. A headset microphone, smartphone, or computer microphone may be sufficient when the room is quiet and the recording is clear.

    Use an AI-Generated Voice

    An AI-generated voice reads your written script aloud.

    This option may be useful when:

    • you do not want to record yourself

    • you need consistent pronunciation and volume

    • you want to test several voice styles

    • you need narration in another language

    • you need to correct individual sentences easily

    AI voices have improved, but some may still sound unnatural or pronounce names incorrectly. Always listen to the complete narration before using it.

    Record in a Quiet Location

    Choose a room with as little background noise as possible.

    Turn off or move away from:

    • televisions

    • fans

    • air conditioners

    • open windows

    • noisy appliances

    • mobile-phone notifications

    Rooms with curtains, carpets, furniture, and soft materials usually create less echo than large empty rooms.

    Position the Microphone Correctly

    Place the microphone close enough to capture a clear voice, but not directly against your mouth.

    A useful starting position is approximately 15 to 20 centimetres away.

    Speak slightly past the microphone instead of directly into it. This can reduce harsh sounds caused by letters such as P, B, and T.

    Test the Recording First

    Record one or two sentences before recording the complete script.

    Listen for:

    • background noise

    • echo

    • distorted sound

    • very low volume

    • sudden loud sounds

    • unclear pronunciation

    Fix these problems before continuing.

    Record Short Sections

    Do not feel that you must record the complete script in one attempt.

    Record one paragraph or scene at a time. Short recordings are easier to repeat, correct, organize, and synchronize.

    Use clear filenames such as:

    scene-01-narration.wav

    scene-02-narration.wav

    scene-03-narration.wav

    Keep the original recordings until the entire video is completed.

    Speak Clearly and Naturally

    Use a calm, steady pace.

    Avoid speaking too quickly. Give viewers enough time to understand each sentence and look at the video.

    Try to:

    • pronounce each word clearly

    • pause between important ideas

    • use a natural tone

    • keep a consistent distance from the microphone

    • maintain a similar volume throughout the recording

    Do not exaggerate every word. The narration should sound like a helpful person explaining the subject.

    Create an AI Voice

    The exact steps vary between tools, but the basic process is usually similar:

    1. Open the text-to-speech or AI voice feature.

    2. Paste one section of the final script.

    3. Select a voice.

    4. Choose the language and accent when available.

    5. Adjust the speaking speed if necessary.

    6. Generate the narration.

    7. Listen to the complete result.

    8. Correct pronunciation or timing problems.

    9. Export or add the voice to the project timeline.

    Generate short sections separately when possible. This makes corrections easier because you do not need to regenerate the entire narration when one sentence is wrong.

    Choose a Suitable AI Voice

    Select a voice that matches the subject and intended audience.

    For a beginner tutorial, the voice should normally sound:

    • clear

    • calm

    • friendly

    • confident

    • easy to understand

    Avoid voices that sound rushed, overly dramatic, robotic, or distracting.

    The most realistic voice is not always the best choice. Clear pronunciation is more important than style.

    Correct AI Pronunciation Problems

    Listen carefully for names, abbreviations, numbers, and technical terms.

    When a word is pronounced incorrectly, try:

    • spelling it phonetically

    • writing an abbreviation in full

    • adding punctuation to create a pause

    • dividing a long sentence into shorter sentences

    • replacing the word with a simpler alternative

    For example, an AI voice may pronounce “AI” incorrectly in some contexts. Writing “A.I.” or “artificial intelligence” may improve the result.

    Import the Narration

    After recording or generating the narration, add the audio files to the video-editing project.

    Place each recording on the voice track below the matching video scene.

    Arrange the clips in the correct order and leave short natural pauses between them.

    Synchronize the Voice with the Video

    Move each narration clip along the timeline until the spoken words match the correct visual scene.

    Check that:

    • the narration begins after the opening scene appears

    • each explanation matches what viewers see

    • the voice does not continue after the related scene ends

    • pauses occur at natural points

    • the final sentence ends before the closing screen disappears

    When the narration is longer than the video scene, you can:

    • extend the scene

    • slow the scene slightly

    • shorten the narration

    • divide the information between two scenes

    Do not speed up the voice so much that it becomes difficult to understand.

    Adjust the Narration Volume

    The narration should be the clearest audio element in the video.

    Use the volume control or audio meter to check that the voice is strong without becoming distorted.

    If the narration volume changes between clips, adjust each clip so the complete video sounds consistent.

    Some editors include a normalize or automatic-volume feature. This can help balance clips, but you should still listen to the result.

    Remove Unwanted Silence and Noise

    Trim excessive silence from the beginning and end of each recording.

    You may also use noise-reduction tools to reduce steady background sounds. Apply noise reduction carefully because excessive processing can make the voice sound metallic or unnatural.

    Keep short natural pauses between sentences. Removing every pause can make the narration feel rushed.

    Add Gentle Fades

    A short fade-in can prevent a voice recording from starting abruptly. A short fade-out can soften the ending.

    Voice fades should normally be subtle. Long fades may make the first or last words difficult to hear.

    Review the Complete Voice Track

    Play the video from beginning to end with only the voice track active.

    Check for:

    • missing sentences

    • repeated recordings

    • incorrect scene placement

    • sudden volume changes

    • unnatural pauses

    • pronunciation errors

    • clipped words

    • background noise

    Correct these problems before adding background music.

    Step 3: Add Background Music

    Background music can make an AI video feel more polished, engaging, and complete. It can create emotion, support the pace of the scenes, and help different parts of the video flow together.

    Music should support the message without distracting viewers from the narration.

    Choose Music That Matches the Video

    Select music that suits the subject, audience, and mood of the video.

    For example:

    • calm music may suit a beginner tutorial

    • energetic music may suit a short promotional video

    • soft inspirational music may suit an educational introduction

    • gentle ambient music may suit a technology demonstration

    Avoid music that feels too dramatic, aggressive, or busy for the subject.

    A simple instrumental track is often easier to use beneath narration than a song containing lyrics. Lyrics can compete with the spoken words and make the video difficult to understand.

    Confirm That You Can Use the Music

    Before adding music, check its usage rights.

    Use music that:

    • you created yourself

    • came with the video-editing tool and is licensed for your intended use

    • was purchased with suitable usage rights

    • is available under a licence that permits your type of project

    • was provided by a source that clearly explains how it may be used

    Do not assume that music is free to use because it can be downloaded or heard online. [5]

    Check whether the licence permits:

    • personal use

    • public publishing

    • commercial use

    • social-media use

    • website use

    • editing or shortening the track

    Save a copy of the licence, receipt, or permission record in the project folder.

    Import the Music File

    Add the music file to the video-editing project.

    Place it on the Background Music track below the narration. Start the music near the beginning of the video unless the opening requires silence.

    Use a clear filename such as:

    article-021-background-music-final.mp3

    Keep the original music file until the project is complete.

    Trim the Music to Fit the Video

    The music track may be longer than the video.

    Move the playhead to the end of the video and trim the music so it stops at the correct point.

    When the music is shorter than the video, you may:

    • repeat the track

    • choose a longer version

    • use a second compatible track

    • extend a loopable section

    Avoid repeating a short section so often that the repetition becomes noticeable.

    Lower the Music Volume

    Narration should normally be louder and clearer than background music.

    Begin by lowering the music substantially. Then play the video and adjust it while listening through headphones or reliable speakers.

    The music should still be audible, but viewers should not need to struggle to hear the voice.

    There is no single volume setting that works for every recording. The correct level depends on the narration, music, and editing tool.

    Use Audio Ducking

    Audio ducking automatically lowers the music while someone is speaking and raises it during silent sections.

    The basic process is:

    1. Select the background-music track.

    2. Open the audio or volume controls.

    3. Find the ducking, voice-priority, or narration-detection option.

    4. Apply the effect.

    5. Play the complete video.

    6. Adjust the strength if the music drops too much or not enough.

    Not every video editor includes automatic ducking. You can create a similar effect manually by adding volume points to the music track.

    Figure 5. Lowering background music during narration helps keep the spoken message clear.

    The narration should remain the main audio element. Lowering the music during speech and raising it gently during pauses helps viewers hear the message clearly.

    Adjust Music Manually with Keyframes

    Keyframes are small control points that change a setting at specific moments.

    For example, you can use keyframes to:

    • lower the music when narration begins

    • raise it during a pause

    • reduce it beneath an important sentence

    • lower it gradually near the end

    Keep the changes smooth. Sudden volume jumps can distract viewers.

    Add a Fade-In

    A fade-in makes the music begin quietly and become louder gradually.

    This can prevent the video from starting abruptly.

    A short fade-in is usually enough. Make sure the music does not become louder than the narration when the voice begins.

    Add a Fade-Out

    A fade-out gradually lowers the music near the end of the video.

    Place the fade-out before the final scene finishes so the music ends smoothly instead of stopping suddenly.

    The ending should still be audible, but it should not cover the final spoken words.

    Use Silence When It Helps

    Background music does not need to play throughout every second of the video.

    A short silent section can:

    • emphasize an important statement

    • separate two major sections

    • create a calm opening

    • make the ending feel more deliberate

    Music is useful, but constant sound is not always necessary.

    Avoid Too Many Music Changes

    Changing music repeatedly can make a short video feel disorganized.

    For most beginner tutorials, one suitable background track may be enough.

    Use more than one track only when the mood or subject changes clearly. Make sure the tracks have compatible volume levels and do not create an abrupt transition.

    Review the Music with the Narration

    Play the video with both the voice and music tracks active.

    Check that:

    • every spoken word is easy to understand

    • the music matches the mood

    • the volume remains consistent

    • the music does not begin or end suddenly

    • the track does not contain unwanted lyrics or sounds

    • the music licence permits your intended use

    Lower the music further when uncertain. Clear narration is more important than loud background music.

    Step 4: Add Captions

    Captions display spoken words as text on the screen. They help viewers understand the video when the sound is muted, the narration is difficult to hear, or the viewer prefers to read along.

    Captions can also make tutorials easier to follow because important words remain visible while the viewer watches the scene.

    Understand Captions and Subtitles

    The words captions and subtitles are sometimes used as though they mean the same thing, but they can serve different purposes.

    Captions usually include the spoken dialogue and may also describe important sounds, such as:

    • [Music begins]

    • [Door closes]

    • [Phone ringing]

    Subtitles usually translate spoken words into another language. They may not describe sound effects or identify speakers.

    For a beginner tutorial, captions normally display the narration in the same language used in the video. [2]

    Generate Automatic Captions

    Many video editors can listen to the narration and create captions automatically.

    The basic process is usually:

    1. Confirm that the final narration is on the timeline.

    2. Open the captions, subtitles, or text section.

    3. Select the automatic-caption feature.

    4. Choose the spoken language.

    5. Select the narration or audio track.

    6. Start the caption-generation process.

    7. Wait for the editor to analyse the voice.

    8. Review every caption before publishing.

    Automatic captions can save time, but they are not always accurate. [3]

    Figure 6. Automatic captions must be checked for wording, spelling, punctuation, and timing.

    Automatic caption tools can create a useful first draft, but every word, punctuation mark, and timing point should be checked before the video is published.

    Select the Correct Language

    Choose the language actually spoken in the narration.

    Some tools also ask you to select a regional variation, such as:

    • English (Canada)

    • English (United States)

    • English (United Kingdom)

    • French (Canada)

    • French (France)

    Selecting the closest language and accent can improve accuracy.

    Review Every Caption

    Never assume that automatically generated captions are correct.

    Compare the captions with the final script and listen to the narration carefully.

    Check for:

    • incorrect words

    • missing words

    • repeated words

    • incorrect names

    • wrong numbers

    • poor punctuation

    • technical terms written incorrectly

    • captions that appear too early or too late

    Even one incorrect word can change the meaning of a sentence.

    Correct Names and Technical Terms

    Automatic caption tools may struggle with names, abbreviations, product terms, and technical language.

    For example, the tool may incorrectly write:

    • “artificial intelligent” instead of “artificial intelligence”

    • “A eye” instead of “AI”

    • “voice over” when “voice-over” is intended

    • “caption track” as “captain track”

    Use the final script as the main reference when correcting these mistakes.

    Divide Long Captions

    Do not place an entire paragraph on the screen at once.

    Long captions are difficult to read and can cover important parts of the video.

    Break the narration into short caption blocks containing one clear phrase or sentence.

    Instead of:

    “Before adding voice, music, and captions, you should organize your project files and review the complete video carefully.”

    Use two caption blocks:

    “Organize your project files first.”

    “Then review the complete video carefully.”

    Keep Captions on Screen Long Enough

    Viewers need enough time to read each caption comfortably.

    A caption should not disappear immediately after it appears. It should remain visible for the duration of the matching spoken phrase.

    When a caption changes too quickly, you can:

    • shorten the text

    • divide it into smaller blocks

    • slow the narration slightly

    • extend the caption duration

    • remove unnecessary words

    Do not keep an old caption on screen after the speaker has moved to a different idea.

    Match Captions with the Narration

    Move each caption block so it begins when the matching words are spoken.

    The caption should not appear several seconds before the narration. It should also not arrive after the viewer has already heard the sentence.

    Use the timeline playhead and zoom controls to make small timing adjustments.

    Check the beginning and ending of every caption block.

    Use Easy-to-Read Text

    Choose a simple font that remains clear on phones, tablets, and computer screens.

    Good caption text should normally be:

    • large enough to read

    • bold or medium weight

    • clearly separated from the background

    • written with correct capitalization

    • displayed in a consistent style

    Avoid decorative, handwritten, or very thin fonts.

    Create Strong Contrast

    Captions must remain readable over both light and dark scenes.

    Common methods include:

    • white text with a dark outline

    • white text inside a semi-transparent dark box

    • dark text inside a light box

    • a subtle shadow behind the text

    Do not rely on text colour alone when the background changes throughout the video.

    Position Captions Carefully

    Captions are commonly placed near the bottom centre of the screen.

    Leave enough space between the captions and the bottom edge. Some video platforms place controls, titles, or buttons in this area.

    Avoid placing captions over:

    • a person’s face

    • important demonstrations

    • menus or buttons

    • product details

    • charts or diagrams

    • other text already shown in the video

    Move captions higher when the bottom of the screen contains important information.

    Keep Captions Inside the Safe Area

    The safe area is the part of the screen that is less likely to be covered or cropped on different devices and platforms.

    Keep caption text away from the extreme top, bottom, left, and right edges.

    This is especially important for vertical videos because social-media buttons and descriptions may cover the sides or bottom of the screen.

    Use Consistent Formatting

    Apply the same caption style throughout the video.

    Keep the following consistent:

    • font

    • text size

    • capitalization

    • colour

    • outline or background box

    • screen position

    • line spacing

    • animation style

    Frequent style changes can make the video look unprofessional and distract viewers.

    Use Caption Animation Carefully

    Some editors allow captions to appear word by word, line by line, or with animated effects.

    Simple animation may work well in short social-media videos. However, excessive movement can make educational videos harder to read.

    Use a plain appearance or gentle animation for beginner tutorials.

    The caption should support the narration, not compete for attention.

    Identify Different Speakers

    When more than one person speaks, make it clear who is talking.

    You may use:

    • the speaker’s name

    • a short label

    • different but consistent text positioning

    • carefully selected text colours with strong contrast

    For example:

    Instructor: Open the video-editing timeline.

    Student: Where should I place the narration?

    Do not use colour as the only way to identify speakers because some viewers may not distinguish the colours easily.

    Include Important Sound Information

    When an important sound affects the meaning of the video, describe it in brackets.

    Examples include:

    • [Background music]

    • [Notification sound]

    • [Applause]

    • [Warning tone]

    Do not describe every minor sound. Include only sounds that help viewers understand what is happening.

    Edit Captions After Changing the Voice

    Any change to the narration may affect the captions.

    After replacing, shortening, or moving a voice clip:

    1. Review the matching caption text.

    2. Correct any words that changed.

    3. Adjust the caption timing.

    4. Remove captions that no longer match.

    5. Generate new captions when necessary.

    Always review the complete caption track after major audio changes.

    Export a Caption File When Needed

    Some editors allow you to export captions as a separate file.

    Common caption-file formats include:

    • SRT

    • VTT

    A separate caption file can allow viewers to turn captions on or off. It can also make translation and future corrections easier. [4]

    Other videos use burned-in captions. Burned-in captions are permanently displayed as part of the video image and cannot be turned off.

    Choose the method that suits the publishing platform and audience.

    Review Captions Without Sound

    Mute the video and watch it from beginning to end.

    Check whether the captions alone make the main message understandable.

    Look for:

    • missing information

    • text that disappears too quickly

    • poor contrast

    • captions covering important content

    • incorrect timing

    • inconsistent formatting

    • spelling and punctuation mistakes

    Then watch the video again with the sound turned on to confirm that the captions match the narration.

    Step 5: Synchronize Voice, Music, Captions, and Video

    After adding the narration, music, and captions, the next task is to make sure every element appears at the correct time.

    This process is called synchronization. A synchronized video feels smooth because the spoken words, visual scenes, music, and captions work together.

    Figure 7. Voice, music, captions, and video scenes aligned at the correct point on the timeline.

    Voice, captions, visuals, and music should align on the same timeline so each element appears at the correct moment. Reviewing short sections and using the playhead helps identify timing problems before the video is exported.

    Start with the Voice Track

    Use the narration as the main guide for the timeline.

    Move each voice clip so the spoken explanation matches the correct video scene.

    Check that:

    • the scene appears before the narrator begins describing it

    • the voice does not start too early

    • the narration ends before the related scene disappears

    • pauses occur at natural points

    • no voice clips overlap accidentally

    When the narration and video do not match, decide whether to adjust the voice, the scene, or both.

    Align Captions with the Spoken Words

    Each caption should appear when the matching words are spoken.

    Move the caption block until its beginning matches the start of the spoken phrase. Then adjust its ending so it disappears when the phrase finishes.

    Captions should not:

    • appear before the speaker begins

    • remain after the speaker changes subjects

    • disappear before the sentence ends

    • overlap with the next caption

    • move too quickly for viewers to read

    Use the timeline zoom control when making small timing changes.

    Match Scene Changes with the Narration

    Scene changes should normally occur at logical points in the narration.

    Good places for a scene change include:

    • after a complete sentence

    • when a new idea begins

    • when the narrator introduces a new step

    • during a short pause

    • when the viewer needs to see a new example

    Avoid changing scenes in the middle of an important word or sentence unless the visual change is intentional.
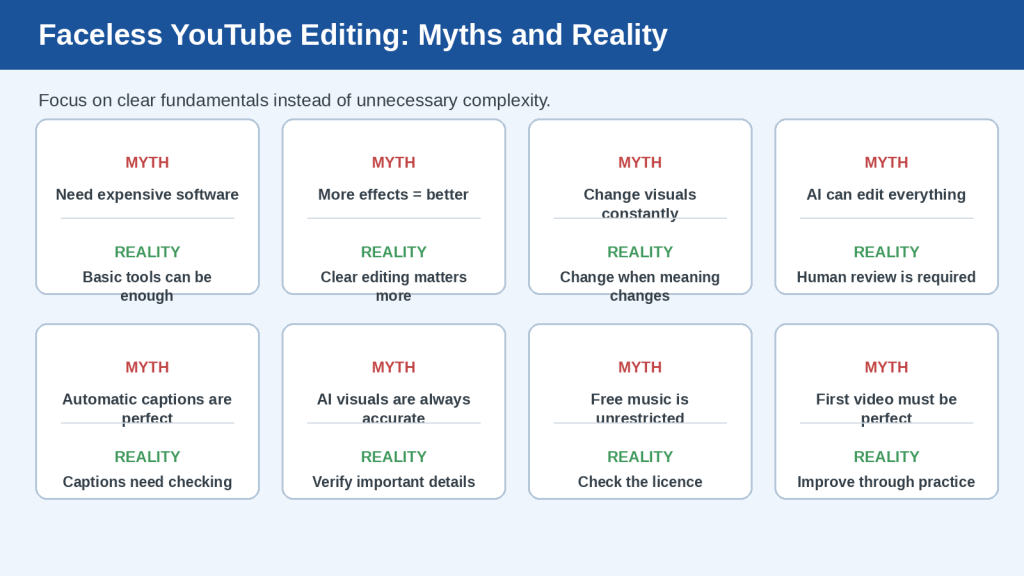
    Adjust Scene Length When Needed

    Some scenes may be too short for the narration.

    When this happens, you can:

    • extend the scene

    • freeze the final frame briefly

    • slow the clip slightly

    • shorten the spoken sentence

    • divide the explanation between two scenes

    Other scenes may be too long and create unnecessary silence. Shorten them when they do not add useful information.

    Do not force every scene to have the same length. The timing should follow the information being explained.

    Synchronize Music with Important Moments

    Background music should support the structure of the video.

    You may align music changes with:

    • the opening title

    • the beginning of a new section

    • a major scene change

    • a silent pause

    • the closing message

    When the music contains a noticeable beat or transition, try to match it with a visual change only when it feels natural.
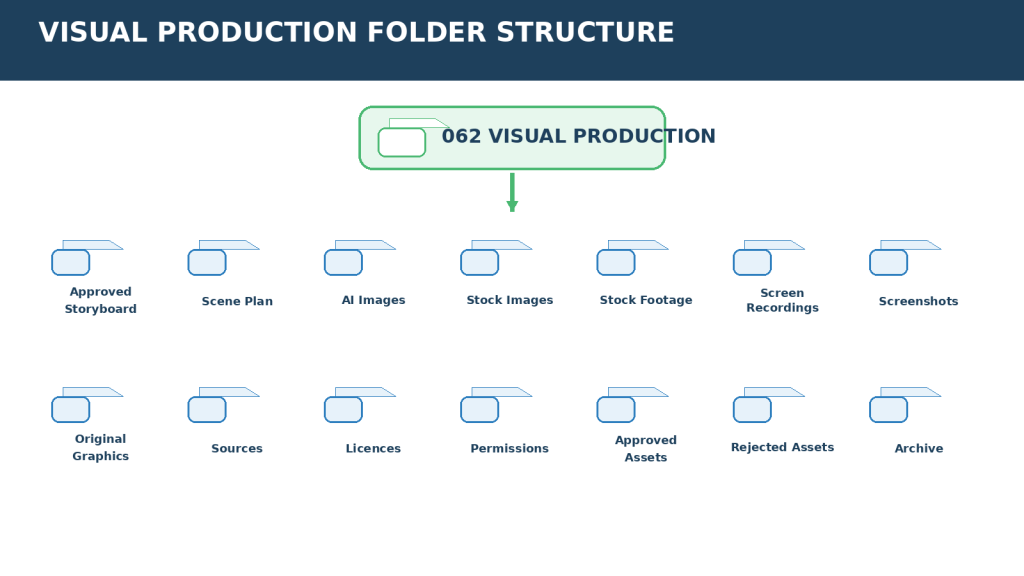
    Do not move important narration just to match the music.

    Keep Music Lower During Speech

    Play the video with the voice and music tracks active.

    Lower the music whenever narration is present. Raise it gently during pauses only when this improves the video.

    Watch for sudden changes in volume. Music should rise and fall smoothly.

    Check Transitions

    Transitions connect one video scene to the next.

    Simple transitions such as a cut or gentle fade are usually suitable for beginner tutorials.

    Make sure transitions do not:

    • cover important captions

    • remove the beginning of a spoken sentence

    • create unwanted silence

    • make the scene change feel slow

    • distract from the explanation

    Avoid using a different transition for every scene. Consistency usually produces a cleaner result.

    Use Timeline Markers

    Some video editors allow you to place markers on the timeline.

    Markers can help identify:

    • where a narration section begins

    • where a caption should appear

    • where the music should change

    • where a new scene starts

    • where a correction is required

    For example, you can place a marker at the beginning of every major section before arranging the remaining tracks.

    Review One Section at a Time

    Do not try to correct the entire video at once.

    Review a short section, such as 10 to 30 seconds, and check:

    1. the video scene

    2. the narration

    3. the music level

    4. the captions

    5. the transition to the next scene

    Correct that section before moving forward.

    Watch the Complete Video

    After checking each section, play the complete video from beginning to end.

    Do not stop after every small issue during the first review. Write down the problems and correct them afterward.

    Watch for:

    • delayed captions

    • narration that does not match the scene

    • long silent gaps

    • music that becomes too loud

    • sudden scene changes

    • missing words

    • repeated clips

    • awkward pauses

    Repeat the review after making corrections.

    Test the Video Without Looking at the Timeline

    Watching only the timeline can make small problems difficult to notice.

    Use the full preview screen and watch the video as a normal viewer would.

    Ask:

    • Is the message easy to follow?

    • Does each scene appear at the right time?

    • Can every word be heard clearly?

    • Are the captions easy to read?

    • Does the music support the video?

    • Does anything feel rushed or delayed?

    A technically correct timeline can still feel unnatural. The final viewing experience is what matters.
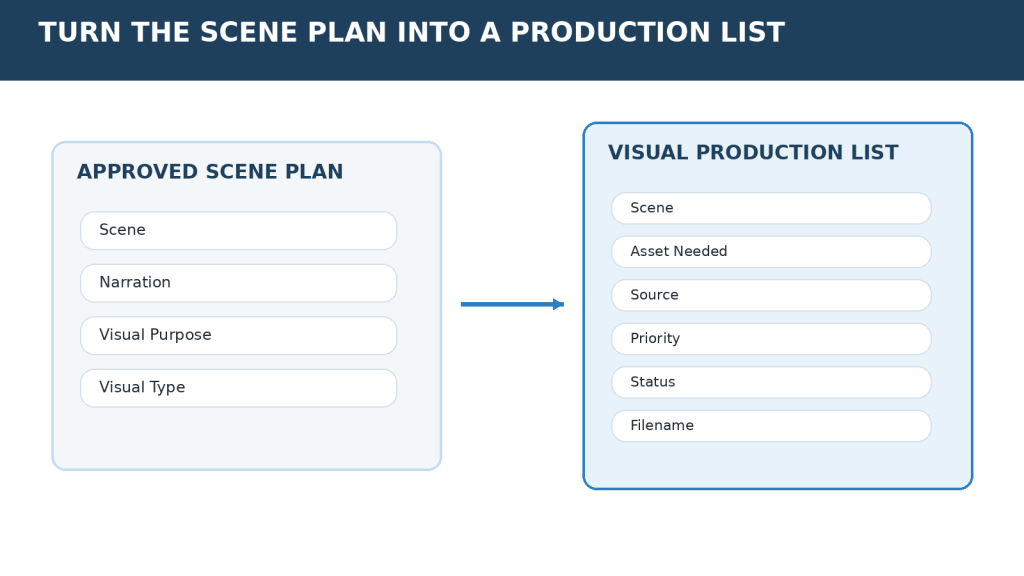
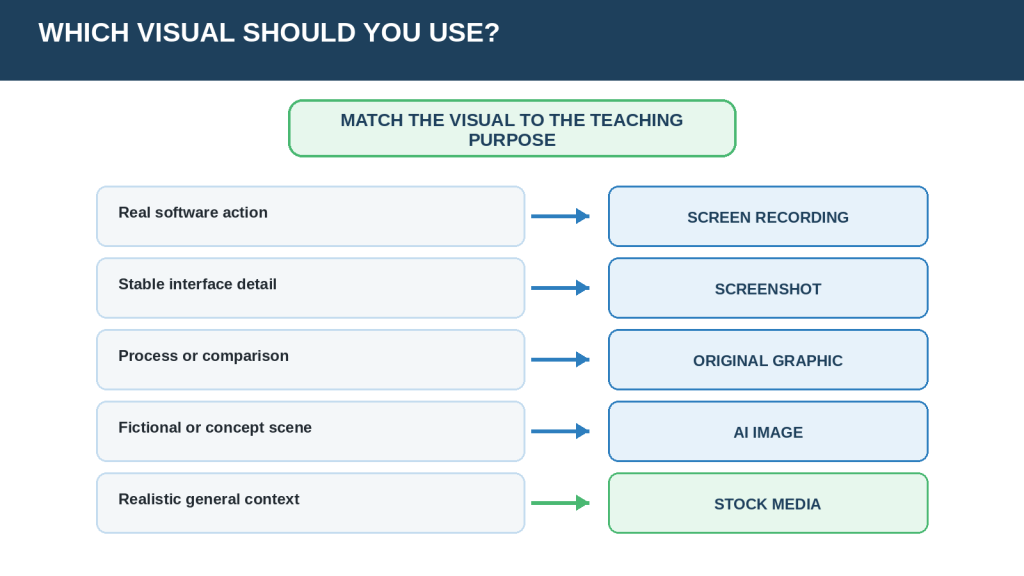
    Step 6: Review and Export the Finished Video

    Before exporting the video, review the complete project carefully. Small errors in narration, music, captions, or timing are easier to correct before the final file is created.

    Figure 8. The essential checks to complete before publishing an AI video.

    A final review should confirm the video format, resolution, sound, captions, timing, permissions, and exported file. Checking the exported file separately helps catch problems before the video is published.

    Save a Review Copy

    Save the project before making final changes.

    Use a clear project filename such as:

    article-021-ai-video-editing-project

    Do not delete the original video clips, narration recordings, music files, caption files, or licence records. The editing project may need these files when it is opened again.

    Watch the Video from Beginning to End

    Play the complete video without stopping.

    Watch it as a normal viewer rather than concentrating only on the editing timeline.

    During the first review, write down problems such as:

    • incorrect or delayed captions

    • narration that does not match the scene

    • music that covers the voice

    • sudden volume changes

    • long silent sections

    • missing or repeated scenes

    • abrupt transitions

    • spelling mistakes

    • an incomplete beginning or ending

    Correct the problems after the first viewing, then watch the video again.

    Review the Audio Separately

    Close your eyes or look away from the screen while listening to the video.

    Check whether:

    • every spoken word is clear

    • the narration volume is consistent

    • the music remains below the voice

    • there is unwanted background noise

    • pauses sound natural

    • the music begins and ends smoothly

    • no audio clip stops in the middle of a word

    Listening without watching the visuals can make audio problems easier to notice.

    Review the Captions Without Sound

    Mute the video and read the captions from beginning to end.

    Confirm that:

    • the main message remains understandable

    • every caption matches the narration

    • spelling and punctuation are correct

    • captions stay visible long enough

    • text does not cover important visual content

    • the caption style remains consistent

    • the text stays inside the safe area

    Correct every caption error before exporting.

    Test the Video on Different Screen Sizes

    A video that looks clear on a large computer monitor may be difficult to read on a phone.

    Preview the video at a smaller size and check:

    • caption readability

    • text size

    • image clarity

    • cropping

    • important details near the edges

    • controls or platform elements that may cover captions

    Pay special attention to vertical videos because social-media buttons may cover the sides or lower part of the screen.

    Confirm the Aspect Ratio

    Export the video using the aspect ratio required by the publishing platform.

    Common formats include:

    • 16:9 for websites, presentations, and standard landscape videos

    • 9:16 for vertical short-form videos

    • 1:1 for square social-media posts

    • 4:5 for portrait social-media posts

    Do not stretch a landscape video into a vertical format. Reframe or crop the scenes properly so people, text, and important objects remain visible.

    Choose the Export Resolution

    The export resolution determines the number of pixels in the finished video.

    A common landscape resolution is:

    1920 × 1080 pixels

    This is often called 1080p or Full HD.

    A common vertical resolution is:

    1080 × 1920 pixels

    Higher resolution can improve image quality, but it also creates a larger file. Exporting at a resolution higher than the original video does not automatically restore missing detail.

    Choose a Suitable File Format

    MP4 is widely supported by websites, video platforms, phones, and computers.

    When available, a common beginner-friendly choice is:

    • file format: MP4

    • video codec: H.264

    • audio codec: AAC

    • resolution: 1080p

    • frame rate: the same as the original project

    A codec is the method used to compress and store video or audio data. Most beginners can use the editor’s recommended or standard-quality export preset.

    Keep the Original Frame Rate

    Frame rate is the number of video frames displayed each second.

    Common frame rates include:

    • 24 frames per second

    • 25 frames per second

    • 30 frames per second

    • 60 frames per second

    Use the same frame rate as the original video or project unless there is a clear reason to change it.

    Changing the frame rate unnecessarily may create uneven movement or duplicated frames.

    Choose an Appropriate Quality Setting

    Many editors offer settings such as:

    • low quality

    • standard quality

    • high quality

    • recommended quality

    Use a high or recommended setting when the video will be published online.

    Very high settings may create unnecessarily large files. Very low settings can make captions, faces, and fine details look unclear.

    Decide How Captions Will Be Included

    Captions can be included in two main ways.

    Burned-In Captions

    Burned-in captions become a permanent part of the video image.

    They:

    • appear automatically

    • cannot be turned off

    • remain visible on most platforms

    • are useful for social-media videos

    However, mistakes cannot be corrected without exporting the video again.

    Separate Caption File

    A separate SRT or VTT file can be uploaded with the video on supported platforms.

    This allows viewers to turn captions on or off and may make translation easier.

    Check whether the publishing platform supports separate caption files before choosing this method.

    Export the Video

    The exact export buttons differ between editors, but the basic process is usually:

    1. Save the editing project.

    2. Open the Export, Share, Render, or Download section.

    3. Select the required aspect ratio.

    4. Choose the resolution.

    5. Select MP4 or another suitable format.

    6. Confirm the quality and frame rate.

    7. Choose whether captions are burned in or exported separately.

    8. Select the destination folder.

    9. Enter a clear filename.

    10. Start the export.

    11. Wait for the process to finish.

    12. Open and review the exported file.

    Do not close the editor or turn off the computer while the video is exporting.

    Use a Clear Final Filename

    Use a descriptive filename without unclear names such as final2-new-revised.mp4.

    A better filename is:

    how-to-add-voice-music-captions-ai-video-2026.mp4

    When creating additional versions, add a clear identifier:

    how-to-add-voice-music-captions-ai-video-vertical.mp4

    how-to-add-voice-music-captions-ai-video-landscape.mp4

    Review the Exported File

    Do not assume the exported file is correct simply because the project preview looked correct.

    Open the exported video in a separate media player and check:

    • the complete video plays

    • the sound is present

    • the narration is clear

    • the music level is suitable

    • captions appear correctly

    • the image is not stretched or cropped incorrectly

    • the beginning and ending are complete

    • there are no frozen or missing frames

    Reviewing the exported file can reveal problems that were not visible inside the editing tool.

    Save the Final Project Records

    Keep the following files together:

    • final exported video

    • editable project file

    • original AI video clips

    • final narration script

    • voice recordings

    • music and sound files

    • caption file

    • music licence or permission record

    • AI tool and model information

    • final export date

    These records make corrections, updates, and permission checks easier later.

    Common Mistakes to Avoid

    Even when the editing tool is easy to use, a few common mistakes can make an AI video difficult to understand or unpleasant to watch.

    Figure 9. Common mistakes that can reduce the clarity and quality of an AI video.

    Recognizing these common mistakes can help beginners correct problems before exporting and publishing an AI video. Clear narration, supportive music, accurate captions, proper permissions, and a final export test are the main quality controls.

    Making the Background Music Too Loud

    Background music should support the narration, not compete with it.

    When the music is too loud, viewers may miss important words or stop watching because they must struggle to understand the message.

    How to Avoid This Mistake

    Lower the music while narration is playing. Review the video with headphones and ordinary speakers to confirm that every spoken word remains clear.

    Using Narration That Sounds Too Fast

    Speaking too quickly can make a tutorial feel rushed and confusing.

    This problem may occur when the script contains too many words for the available video length.

    How to Avoid This Mistake

    Shorten the script, extend the visual scene, or divide the explanation into additional scenes. Do not increase the voice speed simply to force the narration into a short clip.

    Accepting Automatic Captions Without Checking Them

    Automatic captions may contain incorrect words, names, numbers, punctuation, or technical terms.

    A caption error can change the meaning of the narration and reduce the credibility of the video.

    How to Avoid This Mistake

    Compare every caption with the final script. Correct spelling, punctuation, wording, and timing before exporting the video.

    Displaying Too Much Caption Text

    Long caption paragraphs are difficult to read, especially on a phone.

    They may also cover faces, demonstrations, buttons, or other important visual details.

    How to Avoid This Mistake

    Break long sentences into short caption blocks. Keep each caption focused on one phrase or idea and leave enough time for viewers to read it.

    Placing Captions Too Close to the Screen Edge

    Captions near the bottom or sides of the video may be cropped or covered by platform controls.

    This is especially common in vertical videos.

    How to Avoid This Mistake

    Keep captions inside the safe area and preview the video at different screen sizes before publishing it.

    Using Music Without Checking Its Licence

    Music found online is not automatically free to use.

    Publishing unlicensed music may lead to muted audio, removed content, copyright claims, or other restrictions from the publishing platform.

    How to Avoid This Mistake

    Use music that you created or obtained with suitable usage rights. Save the licence, receipt, or permission record with the project files.

    Using Another Person’s Voice Without Permission

    A real person’s voice should not be recorded, copied, cloned, or published without appropriate permission.

    An AI-generated voice that imitates a recognizable person may also mislead viewers.

    How to Avoid This Mistake

    Use your own voice, a properly licensed AI voice, or another person’s voice with clear permission. Do not suggest that a real person said something they did not say.

    Adding Too Many Sounds and Effects

    Too many music changes, sound effects, transitions, and animated captions can make the video feel cluttered.

    The viewer may pay more attention to the effects than to the lesson.

    How to Avoid This Mistake

    Use only effects that improve understanding. A clear voice, simple music, readable captions, and consistent transitions are usually enough for a beginner tutorial.

    Using Inconsistent Volume Levels

    One narration clip may sound quiet while the next sounds much louder.

    Sudden volume changes can startle viewers and make the video feel poorly edited.

    How to Avoid This Mistake

    Review all voice clips together and adjust them to a similar level. Use normalization carefully when the editing tool provides it, and listen to the complete result.
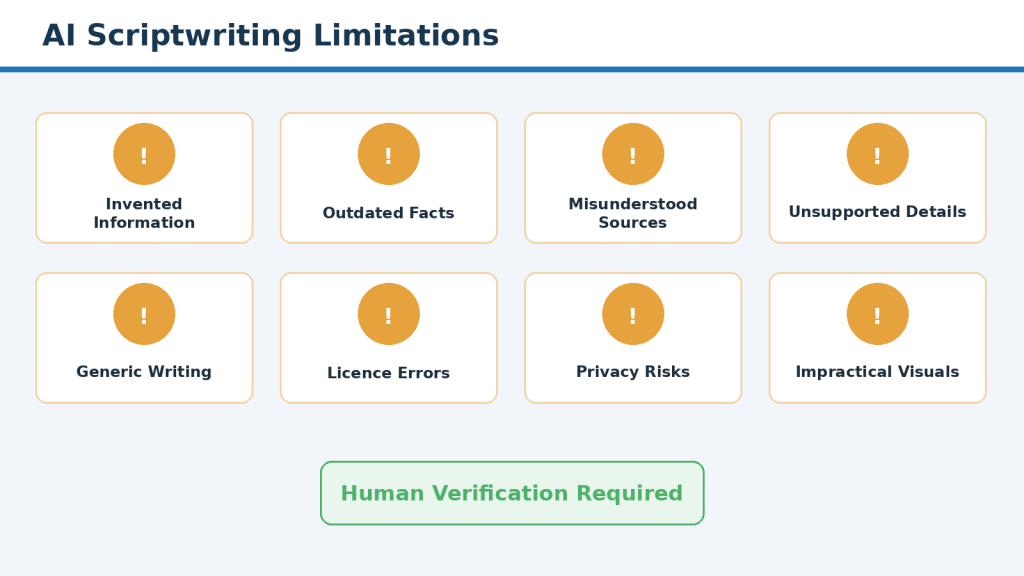
    Changing the Video After Finishing the Captions

    Removing, moving, or shortening a scene can shift the narration and captions out of position.

    This may create captions that appear too early, too late, or over the wrong scene.

    How to Avoid This Mistake

    Complete major visual changes before finalizing narration and captions. After any later edit, review every affected track and correct the timing.

    Exporting Without Testing the Final File

    The editing preview may look correct even when the exported file contains missing audio, incorrect cropping, frozen frames, or caption problems.

    How to Avoid This Mistake

    Open the exported video in a separate media player. Watch it from beginning to end before uploading or publishing it.

    Recognizing these common mistakes can help beginners correct problems before exporting and publishing an AI video.

    Copyright, Privacy, and Permission Rules

    Adding voice, music, and captions involves more than technical editing. You must also make sure that you have the right to use every recording, music track, image, video clip, and personal detail included in the finished video.

    The exact legal requirements may vary by country, publishing platform, and type of project. This section provides general information, not legal advice. When the rights are unclear, do not publish the material until you have checked the licence, permission, or platform rules.

    Figure 10. Important permission, privacy, and disclosure checks for AI video audio and captions.

    Following a simple permission and privacy checklist helps protect the people involved, the video creator, and the audience. Check the current licence and platform terms whenever the intended use is unclear.

    Use Music with Suitable Rights

    Do not use a music track simply because you found it online or can download it.

    Before using music, confirm whether the licence allows:

    • public publishing

    • commercial use

    • website use

    • social-media use

    • editing or shortening the track

    • use in monetized videos

    • use on more than one platform

    Some music may be free for personal projects but restricted for business or commercial use.

    Save a copy of the licence, receipt, or permission page. Website terms can change, so keeping a record of the terms that applied when you obtained the music can be helpful.

    Check Music Included with Editing Tools

    Many video editors provide built-in music libraries.

    Do not assume every included track has identical usage rights. Some may be limited to videos created or published through that particular service.

    Before exporting, check:

    • where the music may be published

    • whether attribution is required

    • whether commercial use is permitted

    • whether the licence continues after a subscription ends

    • whether the music can be exported to another platform

    Use the tool’s current licence information as the main reference.

    Get Permission Before Using Another Person’s Voice

    Do not record or publish another person’s voice without their knowledge and appropriate permission.

    Permission is especially important when:

    • the person can be recognized

    • the voice is used in advertising

    • the video represents a business

    • the recording includes private information

    • the voice will be edited or translated

    • an AI tool will imitate or clone the voice

    Keep a written record explaining how the voice may be used.

    Permission to record a person does not always mean permission to publish, edit, reuse, or commercially distribute the recording. Make the intended use clear.

    Be Careful with AI Voice Cloning

    Voice cloning uses AI to create speech that sounds like a particular person.

    Do not clone the voice of a real person without clear authorization. This includes public figures, family members, customers, employees, and people heard in online recordings.

    A cloned voice can mislead viewers into believing that a person said something they never said.

    Use:

    • your own authorized voice

    • a licensed synthetic voice

    • a contributor who agreed to the intended use

    • a non-imitative voice supplied by the AI tool

    Do not present an AI-generated voice as a real person’s statement when that person did not make the statement.

    Review the AI Voice Provider’s Terms

    Before using an AI-generated voice, check the provider’s current rules.

    Confirm whether the voice may be used for:

    • personal projects

    • public videos

    • business content

    • advertising

    • monetized content

    • client work

    Also check whether the provider requires attribution or restricts certain subjects, impersonation, or misleading use.

    Do not assume that paying for a tool automatically grants unlimited rights.

    Protect Private Information

    Review the script, narration, captions, and visible video content for private information.

    Remove unnecessary details such as:

    • home addresses

    • private telephone numbers

    • personal email addresses

    • account numbers

    • identification documents

    • private messages

    • medical or financial details

    • children’s personal information

    • passwords or security codes

    Automatic captions may display information that was spoken quietly or accidentally. Review the caption text as carefully as the video image.

    Check Screens and Documents Shown in the Video

    A screen recording or demonstration may reveal information that is easy to overlook.

    Before publishing, check for:

    • open browser tabs

    • saved usernames

    • email addresses

    • recent documents

    • account balances

    • customer information

    • private photographs

    • notifications

    • file paths containing personal names

    Blur, crop, replace, or rerecord any section that displays information that should remain private.

    Get Permission from People Shown or Heard

    When a real person appears or speaks in the video, make sure you have suitable permission for the intended use.

    Explain:

    • where the video will be published

    • whether it may be edited

    • whether it will be used commercially

    • whether it may remain online permanently

    • whether clips may be reused later

    Extra care is required when children or vulnerable people are involved. Do not include them merely as decoration or without appropriate authorization.

    Use Captions Responsibly

    Captions should accurately represent what was spoken.

    Do not change captions in a way that makes a person appear to say something different.

    Correct obvious speech-recognition errors, punctuation, and readability problems, but preserve the intended meaning.

    When spoken words are unclear, verify them with the speaker or original script instead of guessing.

    Disclose AI Use When Appropriate

    Some publishing platforms, clients, employers, or audiences may expect disclosure when a video uses AI-generated voices, visuals, or realistic synthetic media.

    A simple disclosure may state:

    “This video includes AI-generated visuals and narration.”

    The wording should accurately describe what was created or changed.

    For example, YouTube requires disclosure when realistic content is meaningfully altered or generated with AI. [6]

    Do not claim that the complete video was recorded naturally when important parts were generated or substantially altered by AI.

    Avoid Misleading Viewers

    Do not use AI voice or editing tools to create false evidence, fake endorsements, fabricated interviews, or misleading statements.

    Be especially careful when the video discusses:

    • health

    • finance

    • legal matters

    • elections

    • emergencies

    • public figures

    • news events

    • products or services

    Viewers should be able to understand what is real, what is recreated, and what was generated by AI when that distinction matters.

    Save Creation and Permission Records

    Keep a simple record of how the video was created.

    Save:

    • the final script

    • original voice recordings

    • AI voice settings

    • music source and licence

    • permission records

    • caption files

    • original video clips

    • image-generation prompts

    • editing project file

    • export date

    • published version

    These records can help you correct the video, answer questions about permissions, or confirm how an AI-generated element was produced.

    Review Platform Rules Before Publishing

    Every publishing platform may have its own rules for copyrighted music, synthetic media, impersonation, privacy, advertising, and captions.

    Review the current rules of the platform where the video will appear.

    A video accepted on one platform may not automatically meet the requirements of another.

    When You Are Unsure

    Do not guess about usage rights.

    When the licence or permission is unclear:

    1. Stop using the material temporarily.

    2. Check the original source and current terms.

    3. Contact the rights holder or service provider when necessary.

    4. Replace the material with something clearly licensed.

    5. Seek qualified legal advice when the risk is significant.

    Using a simpler, properly authorized asset is better than publishing material with uncertain ownership or permission.

    Tips for Better Results

    Small editing improvements can make voice, music, and captions feel more professional without making the project complicated.

    Complete the Video Structure First

    Arrange the main video scenes before finalizing narration, music, or captions.

    Changing scenes later may cause the audio and captions to move out of synchronization.

    Complete major visual edits first, then work in this order:

    1. Add and synchronize the narration.

    2. Add and balance the music.

    3. Generate and correct the captions.

    4. Review the complete video.

    5. Export and test the final file.

    Use One Final Script

    Keep one approved version of the narration script.

    Do not record from several different drafts because the spoken words may no longer match the captions or scenes.

    Give the final script a clear filename, such as:

    article-021-final-script.docx

    Record Short Narration Sections

    Record or generate narration one scene or paragraph at a time.

    Short sections are easier to:

    • repeat

    • correct

    • rename

    • synchronize

    • replace

    • organize

    Avoid creating one very long recording unless the narration is simple and unlikely to change.

    Keep the Voice Consistent

    Use the same microphone, room, speaking distance, and voice settings throughout the project.

    When using an AI voice, keep the same:

    • voice

    • language

    • accent

    • speaking speed

    • tone

    • volume

    Sudden changes can make separate narration clips sound as though they came from different videos.

    Leave Natural Pauses

    Do not remove every silent moment from the narration.

    Short pauses help viewers understand the information and give them time to look at the visual scene.

    Add pauses:

    • after an important statement

    • before a new section

    • between numbered steps

    • when the visual scene changes

    • before the closing message

    The narration should feel steady rather than rushed.

    Use Music Sparingly

    One suitable music track is often enough for a beginner tutorial.

    Choose music that supports the subject without drawing attention away from the lesson.

    When uncertain, lower the music. Viewers must be able to understand every spoken word.

    Keep Captions Short

    Use short phrases or sentences instead of large paragraphs.

    Captions should be easy to read before the next caption appears.

    Remove unnecessary words only when doing so does not change the speaker’s meaning.

    Highlight Important Words Carefully

    Some editors allow important caption words to use a different colour, weight, or background.

    This can help emphasize:

    • step numbers

    • tool names

    • warnings

    • key actions

    • important settings

    Do not highlight too many words. When everything is emphasized, nothing stands out.

    Use a Simple Caption Style

    Choose one readable font and use it consistently.

    A reliable caption style normally includes:

    • large text

    • strong contrast

    • a dark outline or background box

    • consistent positioning

    • limited animation

    • enough space from the screen edges

    Test captions on a phone-sized preview before exporting.

    Save Versions During Editing

    Save new project versions after major stages.

    For example:

    article-021-project-01-video-arranged

    article-021-project-02-voice-added

    article-021-project-03-music-added

    article-021-project-04-captions-corrected

    article-021-project-final

    Versioned files make it easier to return to an earlier stage when something goes wrong.

    Review with Headphones and Speakers

    Headphones can reveal background noise, clipped words, and small timing problems.

    Ordinary speakers help you judge how the video may sound to a typical viewer.

    Review the final video using both when possible.

    Ask Someone Else to Review It

    After working on a video for a long time, you may stop noticing mistakes.

    Ask another person to check:

    • whether the narration is clear

    • whether the music is distracting

    • whether captions are readable

    • whether the timing feels natural

    • whether any part is confusing

    A first-time viewer may notice problems that the editor overlooks.

    Keep the First Version Simple

    Do not try to use every available effect.

    A strong beginner video usually needs only:

    • clear scenes

    • understandable narration

    • quiet supportive music

    • accurate captions

    • simple transitions

    • a clean export

    Frequently Asked Questions

    Do I Need an Expensive Microphone?

    No. A computer microphone, headset, or smartphone may produce acceptable narration when you record in a quiet room.

    Clear speech, low background noise, and consistent microphone placement usually matter more than expensive equipment.

    Is My Own Voice Better Than an AI Voice?

    Neither option is automatically better.

    Your own voice may feel more personal and natural. An AI-generated voice may provide consistent volume, faster corrections, and support for additional languages.

    Choose the method that best fits the video and audience.

    How Loud Should the Background Music Be?

    The music should remain noticeably quieter than the narration.

    There is no single setting that works for every video. Lower the music until every spoken word is easy to understand, then test the result using headphones and speakers.

    Should Music Play During the Entire Video?

    Not necessarily.

    Music can play throughout the video when it remains quiet and suitable. You can also use silence during important explanations, transitions, or the opening and closing scenes.

    Can I Use Any Music I Find Online?

    No. Being able to hear or download music does not automatically give you permission to use it.

    Check the licence and confirm that it permits your intended personal, public, commercial, website, or social-media use.

    Are Automatic Captions Accurate?

    Automatic captions can create a helpful first draft, but they may misunderstand names, numbers, accents, abbreviations, and technical terms.

    Review and correct every caption before publishing the video.

    How Much Text Should Appear in One Caption?

    Use one short phrase or sentence whenever possible.

    Avoid displaying large paragraphs. Captions should remain on screen long enough for viewers to read them comfortably.

    Where Should Captions Be Placed?

    Captions are usually placed near the bottom centre of the video.

    Keep them inside the safe area and move them when they cover faces, demonstrations, menus, charts, or other important details.

    Should I Add the Voice or Music First?

    Add and synchronize the voice narration first.

    The voice carries the main message. After the narration is correct, add the music and lower it so it supports rather than covers the voice.

    What Should I Do When the Narration Is Longer Than the Scene?

    You can:

    • extend the scene

    • slow the visual slightly

    • shorten the narration

    • divide the explanation between two scenes

    • add another relevant visual

    Do not make the voice uncomfortably fast merely to fit the scene.

    Can Viewers Turn Captions Off?

    That depends on how the captions are added.

    Burned-in captions are permanently visible. Separate caption files, such as SRT or VTT files, may allow viewers to turn captions on or off on supported platforms.

    Should I Review the Exported Video?

    Yes. Open the exported file separately and watch it from beginning to end.

    Check the video, narration, music, captions, timing, cropping, and final image quality before publishing it.

    Key Takeaways

    Adding voice, music, and captions can turn a silent AI-generated clip into a clear, polished, and easier-to-understand video.

    Remember these main points:

    • prepare the video and final script before editing the audio

    • use your own recorded voice or a properly licensed AI-generated voice

    • record or generate narration in short sections

    • synchronize each voice clip with the correct video scene

    • keep background music quieter than the narration

    • use audio ducking or manual volume adjustments during speech

    • generate captions only after the narration is final

    • review every automatic caption for wording, spelling, punctuation, and timing

    • keep captions short, readable, and inside the safe area

    • check licences, permissions, privacy, and AI disclosure requirements

    • export using the correct aspect ratio, resolution, and file format

    • watch the exported file from beginning to end before publishing

    The best results usually come from keeping the editing simple. Clear narration, supportive music, accurate captions, and careful timing are more valuable than complicated effects.

    Final Tip

    Complete the editing process in the correct order:

    1. Finalize the video scenes.

    2. Add and synchronize the narration.

    3. Add and balance the background music.

    4. Generate and correct the captions.

    5. Review the complete timeline.

    6. Export and test the finished file.

    Avoid trying to perfect every element at the same time. Working in stages makes mistakes easier to find and prevents later changes from disrupting the entire project.

    Keep the final result simple. Viewers will remember a clear message, understandable voice, supportive music, and readable captions—not how many editing effects were used.

    Sources and References

    The following authoritative sources support the article’s guidance on captions, accessibility, copyright, automatic captioning, and AI disclosure:

    1. World Wide Web Consortium (W3C). “Understanding Success Criterion 1.2.2: Captions (Prerecorded).” Explains synchronized captions for prerecorded audio and their accessibility purpose.

    2. W3C Web Accessibility Initiative. “Captions/Subtitles.” Explains captions, subtitles, open and closed captions, positioning, and the need to correct automatic captions.

    3. YouTube Help. “Use Automatic Captioning.” Explains that speech-recognition captions can contain errors and should be reviewed and edited.

    4. YouTube Help. “Add Subtitles & Captions.” Explains common methods for adding caption tracks to videos.

    5. Canadian Intellectual Property Office. “A Guide to Copyright.” Explains copyright protection for musical works, performances, sound recordings, and other creative works.

    6. YouTube Help. “Disclosing Use of GenAI Content.” Explains disclosure requirements for realistic content that is meaningfully altered or generated with AI.

    Accessed July 27, 2026.

    Continue Learning

    Continue building your AI video skills with these related guides:

    How to Create AI Videos from Text: Beginner Step-by-Step Guide (2026)

    How to Create AI Videos from Images: Beginner Step-by-Step Guide (2026)

    How to Edit AI-Generated Videos: Beginner Step-by-Step Guide (2026)