
Estimated reading time: 55–65 minutes
Last updated: July 28, 2026
What You’ll Learn
By the end of this guide, you will know:
• What AI video generation is and how it works
• How ChatGPT helps you create better AI videos
• How to choose a suitable AI video generator to use alongside ChatGPT
• How to write clearer prompts for more controlled video results
• How to create videos from text descriptions
• How to create videos from existing images
• How to edit AI-generated videos
• Common mistakes beginners should avoid
• Tips for improving the presentation of AI-generated videos
• The current limitations of AI video generation
• Best practices for using AI-generated videos responsibly
Before Learning
These related guides will make this article easier to follow:
• ChatGPT Basics for Beginners (Complete Guide 2026)
• Prompt Engineering for Beginners: Complete Guide (2026)
• AI Image Generation for Beginners: Complete Guide (2026)
Introduction
AI video generation has advanced rapidly. Some tasks that once required expensive software, professional cameras, and advanced editing skills can now be completed more quickly with artificial intelligence.
In this guide, ChatGPT is used as a creative planning assistant rather than as the video generator. It helps you develop ideas, write and improve prompts, plan scenes, and prepare narration. A clear prompt gives a dedicated video generator better direction than a vague request. [2]
Beginners can create simple visual content for YouTube, social media, websites, presentations, online courses, and business marketing without years of professional video-editing experience.
In this guide, you will learn how ChatGPT works together with modern AI video tools to create professional-looking videos step by step.
Current Information Note
OpenAI discontinued the Sora web and app experiences on April 26, 2026, and states that the Sora API is scheduled to be discontinued on September 24, 2026. This guide therefore uses ChatGPT mainly for planning and prompt writing, while the moving clips are created with a dedicated video generator that is currently available to the reader. Tool features, access, and service names can change, so check the current official information before starting. [1]

Figure 1. ChatGPT helping a beginner create an AI video using a video generation tool.
Figure 1 introduces the relationship between ChatGPT and AI video generators. It helps readers understand that ChatGPT can help create and improve prompts, while dedicated AI tools generate the actual moving video.
What Is AI Video Generation?
AI video generation is the process of using artificial intelligence to create or modify video content.
Instead of recording every scene with a camera, you can describe what you want using written instructions called a prompt. The AI then interprets your description and generates a short video based on it.
For example, you could enter:
Create a five-second video of a small wooden boat moving across a calm lake at sunrise, with soft mist above the water and gentle camera movement.
The AI video tool may then create a moving scene that includes the boat, lake, sunrise, mist, and camera motion described in the prompt.
AI video generators can create content in several ways.
Text-to-Video
Text-to-video tools create a video directly from a written description. [3][11]
You describe:
• The subject
• The setting
• The action
• The camera movement
• The lighting
• The visual style
The AI uses these instructions to generate the video.
Image-to-Video
Image-to-video tools turn a still image into a moving scene. [4]
For example, you can upload an image of a forest and ask the AI to:
• Move the tree branches gently
• Add falling leaves
• Create drifting fog
• Make the camera slowly move forward
The original image becomes the starting point for the video.
Video-to-Video
Video-to-video tools modify an existing video.
They may help you:
• Change the visual style
• Replace the background
• Improve lighting
• Add visual effects
• Remove unwanted objects
• Convert real footage into animation
AI-Assisted Video Editing
Some AI tools do not generate an entire video from scratch. Instead, they help edit existing footage.
They may automatically:
• Add captions
• Remove pauses
• Improve sound quality
• Resize videos for social media
• Remove backgrounds
• Create short clips from longer videos
The best method depends on whether you are starting with text, an image, or an existing video.
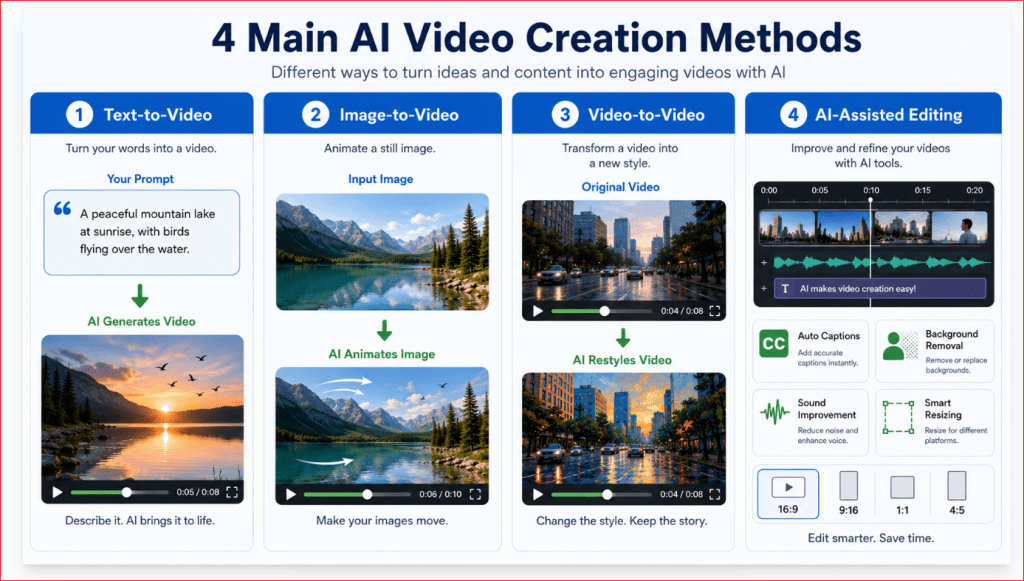
Figure 2. The four main ways artificial intelligence can create or improve video content.
Figure 2 shows the main ways AI can create or improve videos. It helps beginners quickly understand the difference between generating a video from text, animating an image, transforming existing footage, and using AI editing tools.
How ChatGPT Helps You Create AI Videos
ChatGPT helps you plan and improve many stages of the AI video creation process.
It does not replace the video generator. Instead, it helps you prepare clear instructions that the video tool can understand.
Develop the Video Idea
You can ask ChatGPT to turn a simple idea into a complete video concept.
For example:
Help me develop a 15-second promotional video idea for a small bakery. The video should feel warm, friendly, and suitable for social media.
ChatGPT can suggest:
• The main subject
• The sequence of scenes
• The mood
• The visual style
• The camera angles
• The ending message
Write a Video Prompt
ChatGPT can transform a basic request into a detailed AI video prompt.
A basic request might be:
Create a video of a café.
ChatGPT can improve it to:
Create a realistic eight-second video of a quiet neighbourhood café during the early morning. Warm sunlight enters through large windows while a barista prepares coffee behind the counter. Steam rises gently from a cup in the foreground. Use a slow camera movement toward the counter, warm natural lighting, soft shadows, and a welcoming cinematic style.
The improved prompt gives the AI video generator clearer direction.
Create a Scene-by-Scene Plan
Longer videos usually work better when divided into several short scenes.
ChatGPT can prepare a simple scene plan such as:
1. Exterior view of the café
2. Close-up of coffee beans being poured
3. Barista preparing coffee
4. Customer receiving the drink
5. Final view of the café table
Each scene can then be generated separately and combined later.
Write Narration and Dialogue
ChatGPT can write:
• Voice-over scripts
• Character dialogue
• Introductions
• Product descriptions
• Educational explanations
• Calls to action
You can also ask it to adjust the language for a particular audience.
For example:
Rewrite this video narration using simple language for complete beginners. Keep it under 60 words.
Improve Camera and Motion Instructions
AI video prompts often need specific movement instructions.
ChatGPT can suggest camera movements such as:
• Slow zoom in
• Slow zoom out
• Pan left or right
• Camera moving forward
• Camera circling the subject
• Overhead camera view
• Close-up shot
• Wide establishing shot
It can also describe subject movement, such as a person walking, leaves moving in the wind, or a product slowly rotating.
Maintain a Consistent Style
When a video contains several scenes, the visual style should remain consistent.
ChatGPT can help you repeat important details in every prompt, including:
• Character appearance
• Clothing
• Location
• Colour scheme
• Lighting
• Camera style
• Mood
• Aspect ratio
This reduces sudden visual changes between clips.
Review and Improve Weak Results
The first generated video may not look exactly as expected. [5][6]
You can describe the problem to ChatGPT, such as:
The person moves too quickly, the camera shakes, and the background changes during the clip. Improve my prompt.
ChatGPT can rewrite the prompt with clearer instructions, such as slower movement, a fixed background, and stable camera motion.

Figure 3. The main ways ChatGPT supports the AI video creation process.
Figure 3 shows that ChatGPT can support the entire planning process, from developing the original idea to improving the final prompt. It also reinforces that the actual video is created by a specialized AI video generator.
What You Need Before You Begin
You do not need professional cameras, expensive editing equipment, or advanced technical skills to begin creating AI videos.
However, you should prepare a few basic items before starting.
A Clear Video Idea
Begin with one simple idea.
Decide what you want the video to show and why you are creating it. For example, your goal might be to create:
• A short social media video
• A product demonstration
• An educational explanation
• A website introduction
• A YouTube scene
• A promotional advertisement
• An animated story
• A presentation background
Avoid trying to include too many ideas in one short video. A focused scene is usually easier for the AI to understand and generate successfully.
Access to ChatGPT
You can use ChatGPT to develop your idea, create a storyboard, write narration, and prepare detailed prompts.
You can begin with a simple request such as:
Help me plan a ten-second AI video showing a modern home office becoming more organized.
ChatGPT can then help you define the setting, action, camera movement, lighting, mood, and visual style.
An AI Video Generator
You also need an AI video generator that can turn your prompt or image into a video.
Depending on the available tool, you may be able to:
• Generate a video from written instructions
• Animate an uploaded image
• Add sound effects or dialogue
• Transform an existing video
• Extend a short video
• Create several clips for a longer project
Video-generation tools, features, access, pricing, and usage limits change frequently. Before beginning a project, check the tool’s supported inputs, clip lengths, aspect ratios, export quality, watermark policy, privacy settings, and commercial-use terms. [8][9][12][13]
How to Choose an AI Video Generator
Choose a tool that matches the type of project you want to create. Check whether it provides:
• Text-to-video, image-to-video, or both
• Suitable clip lengths and aspect ratios
• Acceptable resolution and export options
• Clear watermark and download rules
• Privacy controls for uploaded images and videos
• Commercial-use terms that match your project
• Pricing or credit limits you can manage
• Availability on your device and in your region
There is no single best tool for every beginner. Features change quickly, so choose the simplest tool that supports your planned workflow.
A Reference Image When Needed
A reference image gives the video generator a visual starting point.
You may use:
• An AI-generated image
• A photograph you own
• A product image
• A character design
• A landscape
• An illustration
• A branded background you have permission to use
Use a clear, high-quality image without unnecessary objects. A confusing starting image can produce confusing movement. [4]
Do not upload material that you do not have the right or permission to use, especially private photographs of other people.
A Basic Scene Plan
Even a short video benefits from a simple plan.
Write down:
1. What appears at the beginning
2. What action takes place
3. How the camera moves
4. What appears at the end
For example:
1. A closed notebook rests on a clean desk.
2. The notebook slowly opens.
3. Handwritten ideas appear across the pages.
4. The camera moves closer to the finished page.
This plan can be converted into a detailed prompt before generating the video.
A Suitable Aspect Ratio
Choose the video shape according to where it will be published.
Common choices include:
• 16:9 landscape: YouTube, websites, presentations, and television-style videos
• 9:16 vertical: YouTube Shorts, Instagram Reels, TikTok, and mobile viewing
• 1:1 square: Social media posts and advertisements
• 4:5 portrait: Instagram and Facebook feed posts
Choosing the correct aspect ratio at the beginning can prevent important parts of the video from being cropped later.
Enough Storage Space
AI-generated video files can be much larger than images.
Create an organized folder for:
• Original prompts
• Reference images
• Generated clips
• Narration files
• Music and sound effects
• Edited versions
• Final exported videos
Use descriptive filenames instead of names such as video1 or final2.
For example:
organized-home-office-scene-01.mp4
A simple file system makes it easier to revise, replace, and combine clips later.
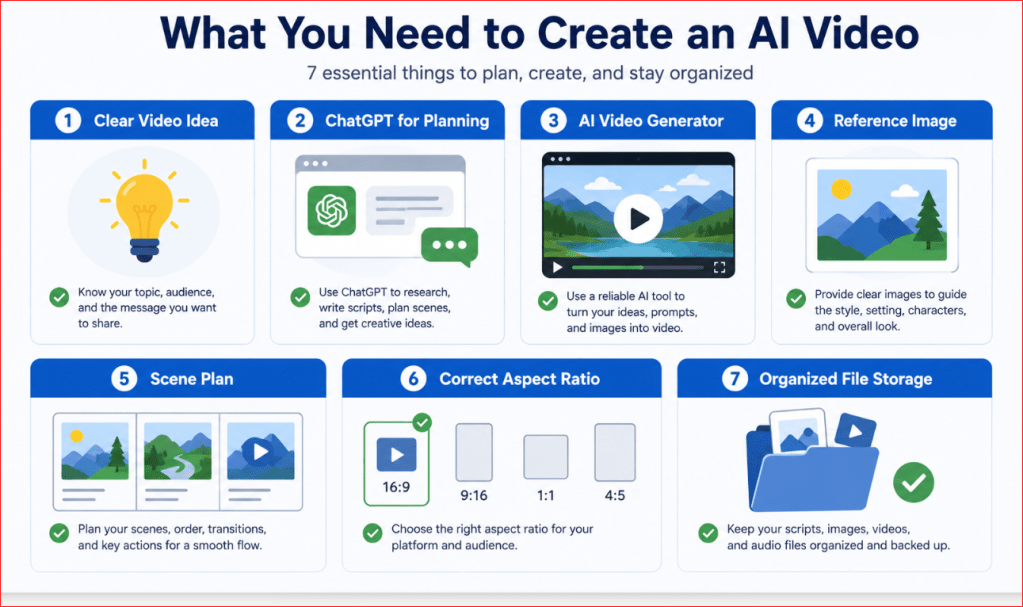
Figure 4. The basic items needed before creating an AI video.
Figure 4 gives beginners a visual checklist of the basic items required before starting an AI video project. Preparing the idea, prompt, format, reference material, and file-storage system in advance can make the creation process easier and more organized.
How to Write an Effective AI Video Prompt
A strong AI video prompt gives the generator clear instructions about what should appear, what should move, and how the finished scene should look. [3][10]
A vague prompt may produce unpredictable motion, unwanted objects, poor framing, or an inconsistent background. A detailed prompt gives the AI a better creative brief.
Start with the Main Subject
First, describe the most important person, object, animal, or location in the scene.
For example:
A small red bicycle beside a wooden fence.
You can improve the description by adding useful details:
A clean vintage red bicycle with a brown leather seat resting beside a weathered wooden fence.
Avoid adding unnecessary details that do not improve the scene.
Describe the Setting
Explain where the scene takes place.
The setting may include:
• A modern office
• A quiet beach
• A busy city street
• A family kitchen
• A forest path
• A professional studio
• A futuristic laboratory
Include the time of day or weather when it affects the appearance.
For example:
The bicycle stands beside a wooden fence on a quiet country road during early morning, with light mist over the fields.
Explain the Action
A video prompt must describe movement.
State clearly what the subject should do.
Examples include:
• A person slowly walks toward the camera
• A product rotates on a display stand
• Steam rises from a cup
• Leaves move gently in the wind
• A car drives along a wet road
• A notebook opens by itself
• Clouds move across the sky
Use simple and realistic actions. Too many movements in one short clip may confuse the AI.
Add Camera Instructions
Camera direction helps control how the viewer sees the scene.
Useful camera instructions include:
• Static camera
• Slow zoom in
• Slow zoom out
• Pan left
• Pan right
• Camera moving forward
• Camera following the subject
• Close-up shot
• Medium shot
• Wide shot
• Overhead view
• Low-angle view
For beginners, slow and simple camera movement usually produces more stable results.
Describe the Lighting
Lighting affects the mood and quality of the video.
You might request:
• Soft natural daylight
• Warm golden-hour lighting
• Bright studio lighting
• Cool evening light
• Dramatic side lighting
• Soft shadows
• Gentle indoor lighting
Avoid combining several conflicting lighting styles in one prompt.
Choose the Visual Style
State how the video should look.
Possible styles include:
• Realistic
• Cinematic
• Documentary
• Professional commercial
• Hand-drawn animation
• Watercolour illustration
• 3D animation
• Minimalist
• Futuristic
• Vintage film
Keep the style consistent throughout all scenes in the same project.
Include the Mood
Mood describes the feeling of the scene.
Examples include:
• Calm
• Welcoming
• Energetic
• Inspiring
• Serious
• Peaceful
• Luxurious
• Playful
• Mysterious
The mood should match the lighting, movement, and purpose of the video.
State the Video Length and Format
When the tool allows it, include the desired duration and aspect ratio.
For example:
Create an eight-second video in 16:9 landscape format.
You can also specify whether the video is intended for a website, YouTube, or a vertical social media post.
Add Quality and Stability Instructions
You may include instructions that reduce common problems.
Examples include:
• Smooth natural motion
• Stable background
• Consistent character appearance
• No camera shake
• No sudden object changes
• Realistic body movement
• Clean composition
• Sharp subject
• No duplicated objects
• No visible text
• No unintended logos or generated text
Different generators handle exclusion instructions differently. Some accept phrases such as “no visible text,” while others work better with positive wording or a separate negative-prompt control. Follow the current guidance for the selected tool. [3][4]
These instructions do not guarantee a perfect result, but they give the generator clearer guidance.
Use a Simple Prompt Formula
A practical AI video prompt can follow this structure:
Subject + setting + action + camera movement + lighting + visual style + mood + duration + aspect ratio + quality instructions
For example:
Create an eight-second realistic video of a vintage red bicycle resting beside a wooden fence on a quiet country road at sunrise. Light mist moves gently across the fields while nearby grass sways in the breeze. Use a slow camera movement toward the bicycle, soft golden natural lighting, a peaceful cinematic mood, and a 16:9 landscape format. Keep the bicycle and background consistent, with smooth motion, stable framing, no people, no text, no logos, and no duplicated objects.
This prompt gives the AI clear instructions without making the scene unnecessarily complicated.
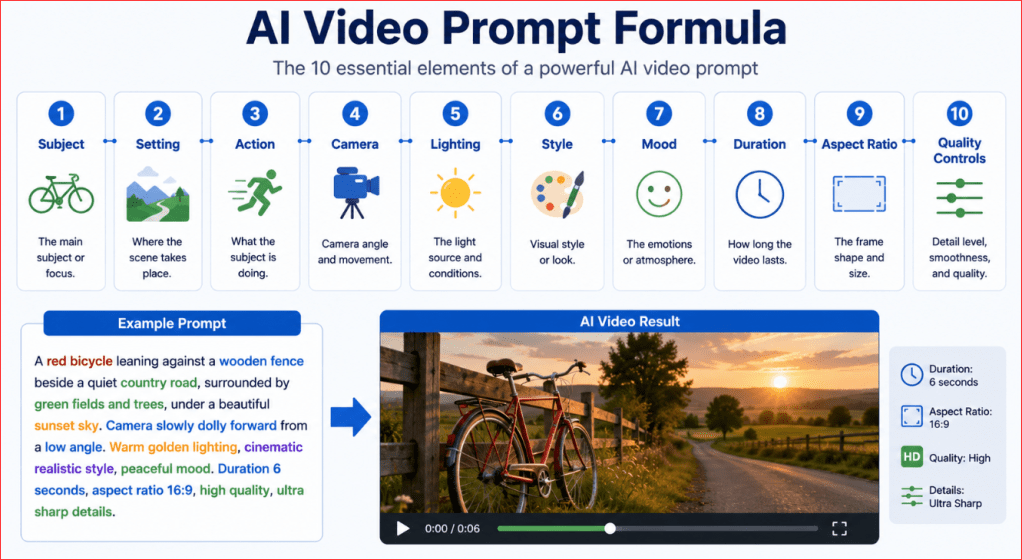
Figure 5. The main parts of an effective AI video prompt.
Figure 5 breaks an AI video prompt into clear building blocks. Beginners can use this structure as a checklist to make sure they describe the subject, motion, camera, lighting, style, format, and quality requirements before generating a video.
Step-by-Step: Create an AI Video from Text
Text-to-video generation begins with a written description. The AI video generator uses that description to create the scene, movement, camera behaviour, lighting, and visual style. [3][6][11]
The following process helps beginners create a more reliable result.
Step 1: Choose One Simple Scene
Start with a scene that contains:
• One main subject
• One clear action
• One location
• One camera movement
For example:
A baker places a fresh loaf of bread on a wooden counter while morning sunlight enters through the window.
Do not begin with a long story containing several characters, locations, and actions. Short, focused scenes are easier to generate successfully.
Step 2: Ask ChatGPT to Improve the Idea
Enter your basic idea into ChatGPT.
For example:
Turn this idea into a detailed eight-second AI video prompt: A baker places fresh bread on a wooden counter in the morning.
ChatGPT can add useful details such as:
• The baker’s appearance
• The style of the kitchen
• The movement of the hands
• The direction of the camera
• The lighting
• The mood
• The aspect ratio
• Quality-control instructions
Review the result and remove any details you do not need.
Step 3: Check the Prompt for Clarity
Before using the prompt, confirm that it answers these questions:
• What is the main subject?
• Where is the scene happening?
• What action takes place?
• How does the camera move?
• What lighting is used?
• What visual style is required?
• How long should the clip be?
• What aspect ratio is needed?
• What problems should the AI avoid?
A clear prompt is easier to improve if the first result is not satisfactory.
Step 4: Open the AI Video Generator
Open the video-generation tool available through your account.
Look for an option such as:
• Create video
• Generate video
• Text-to-video
• New project
• Start from prompt
The exact wording differs from one tool to another.
Step 5: Paste the Prompt
Copy the completed prompt from ChatGPT and paste it into the video generator.
For example:
Create an eight-second realistic cinematic video of an adult baker placing a freshly baked loaf of bread on a clean wooden counter inside a warm traditional bakery during early morning. Soft sunlight enters through a side window while gentle steam rises from the bread. Use a slow camera movement toward the loaf, natural hand movement, warm golden lighting, soft shadows, and a welcoming atmosphere. Use 16:9 landscape format. Keep the baker, counter, bread, and background consistent. Use smooth motion, stable framing, no visible text, no logos, no duplicated objects, and no sudden scene changes.
Read the prompt once more before generating the video.
Step 6: Select the Video Settings
Choose the available settings that match your project.
These may include:
• Video duration
• Aspect ratio
• Resolution
• Number of variations
• Visual style
• Motion strength
• Camera movement
• Reference image
• Audio settings
Do not select the highest motion level automatically. Strong movement may produce unstable or unrealistic results.
Step 7: Generate the First Version
Start the generation process.
When the video appears, watch it several times and examine:
• Subject consistency
• Body movement
• Object movement
• Background stability
• Camera motion
• Lighting
• Cropping
• Unwanted objects
• Sudden visual changes
Do not judge the clip only by the first frame. Some problems appear later in the video.
Step 8: Identify the Main Problem
If the result is weak, identify the most important problem instead of changing everything at once.
For example:
• The baker moves too quickly
• The bread changes shape
• The camera shakes
• The background changes
• The hands look unnatural
• The scene is too dark
• The subject is cropped
• Extra objects appear
A specific diagnosis makes the next prompt easier to improve.
Step 9: Ask ChatGPT to Revise the Prompt
Describe the problem clearly.
For example:
Improve this prompt. The baker’s hands move too quickly, the loaf changes shape, and the camera is unstable. Keep the same scene and style.
ChatGPT may add clearer controls such as:
• Slow natural hand movement
• Fixed loaf shape
• Stable counter and background
• Static camera or gentle forward movement
• No object transformation
• Consistent subject appearance
Step 10: Generate a New Version
Paste the revised prompt into the video generator and create another version.
Compare both clips and keep the stronger one.
It may take several attempts to produce a usable result. This is normal. AI video generation usually involves testing, reviewing, and refining rather than expecting a finished video from the first prompt. [5][6]
Step 11: Download and Rename the Video
After selecting the best result, save the clip using a descriptive filename.
For example:
bakery-fresh-bread-scene-01.mp4
Avoid filenames such as:
video-final-new-2.mp4
Descriptive filenames make it easier to organize multiple scenes.

Figure 6. The step-by-step process for creating an AI video from a text prompt.
Figure 6 shows that text-to-video creation is an improvement cycle rather than a single action. The user develops the idea, writes the prompt, generates the clip, reviews the result, and revises the instructions until the video becomes more useful and consistent.
Step-by-Step: Create an AI Video from an Image
Image-to-video generation starts with a still image. The AI then adds movement to the subject, background, camera, or environment. [4]
This method is useful when you already have a strong image and want to turn it into a short animated scene.
Step 1: Choose a Suitable Image
Select a clear image with:
• One main subject
• A simple background
• Good lighting
• Enough space around the subject
• No important objects cut off at the edges
The starting image should already resemble the scene you want in the video.
A crowded or confusing image may produce unpredictable movement.
Step 2: Check the Image Quality
Use a high-quality image whenever possible.
Avoid images that are:
• Blurry
• Pixelated
• Heavily compressed
• Poorly cropped
• Too dark
• Filled with tiny details
• Visually inconsistent
The AI uses the image as its visual foundation, so weak image quality can lead to weak video quality.
Step 3: Decide What Should Move
Choose one or two main movements.
For example:
• Hair moving gently in the wind
• Steam rising from a cup
• Water flowing in the background
• Leaves moving on a tree
• A product slowly rotating
• A person blinking naturally
• A curtain moving beside a window
• The camera slowly moving forward
Do not ask every object in the image to move at the same time.
Step 4: Decide What Should Remain Still
It is equally important to tell the AI what should not change.
You may request:
• Keep the face consistent
• Keep the background stable
• Keep the product shape unchanged
• Keep the clothing unchanged
• Keep the colours consistent
• Do not add new objects
• Do not change the camera angle suddenly
These instructions can reduce unwanted transformations.
Step 5: Ask ChatGPT to Write the Motion Prompt
Describe the image and the movement you want.
For example:
Write an image-to-video prompt for a still image of a woman sitting beside a window holding a cup of tea. Add only gentle steam from the cup, slight curtain movement, and a slow camera push forward. Keep her face, clothing, hands, and background consistent.
ChatGPT can turn this into a more complete motion prompt.
Step 6: Upload the Image
Open the image-to-video feature in the available AI video tool.
Choose an option such as:
• Upload image
• Animate image
• Image-to-video
• Start from image
• Add reference image
Select the image from your device.
Before continuing, confirm that the image is displayed correctly and has not been cropped incorrectly.
Step 7: Paste the Motion Prompt
Paste the prompt created with ChatGPT.
For example:
Animate this image into a six-second realistic video. Keep the woman seated in the same position beside the window while gentle steam rises from the cup. Add slight natural movement to the curtain and a slow, smooth camera push forward. Maintain the same face, hairstyle, clothing, hands, cup, window, background, lighting, and colour palette. Use calm natural motion, stable framing, no new objects, no facial changes, no hand distortion, no sudden movement, and no text or logos.
The prompt should focus on motion rather than redescribing the entire image unnecessarily. [4]
Step 8: Choose the Motion Strength
Some tools allow you to control how strongly the image moves.
Use a lower or moderate motion level for:
• Portraits
• Product images
• Interior scenes
• Close-up shots
• Images where consistency is important
Use stronger motion only when the scene genuinely requires it.
Too much motion can cause faces, hands, products, or backgrounds to change.
Step 9: Generate the First Version
Create the video and watch the entire clip.
Check whether:
• The main subject remains recognizable
• The face stays consistent
• The hands remain natural
• The background stays stable
• The requested movement appears
• Unwanted movement is avoided
• The camera behaves correctly
• The image edges remain clean
Pay close attention to the final seconds because unwanted changes may appear near the end.
Step 10: Revise the Motion Prompt
If the result is too active or unstable, simplify the instructions.
For example:
Reduce the motion. Keep the woman completely still except for natural blinking. Keep the cup fixed. Only animate the steam and curtain slightly. Use a static camera.
If the result feels too still, increase one movement at a time.
For example:
Keep the subject consistent, but add a slightly stronger forward camera movement and more visible steam.
Step 11: Generate Another Version
Create a new version using the revised prompt.
Compare the clips based on:
• Stability
• Natural movement
• Subject consistency
• Visual quality
• Suitability for the intended purpose
The most dramatic version is not always the best. A subtle, stable clip often looks more professional.
Step 12: Save the Final Clip
Download the strongest version and rename it clearly.
For example:
woman-tea-window-image-to-video-01.mp4
Store the original image, prompt, and final video in the same project folder.
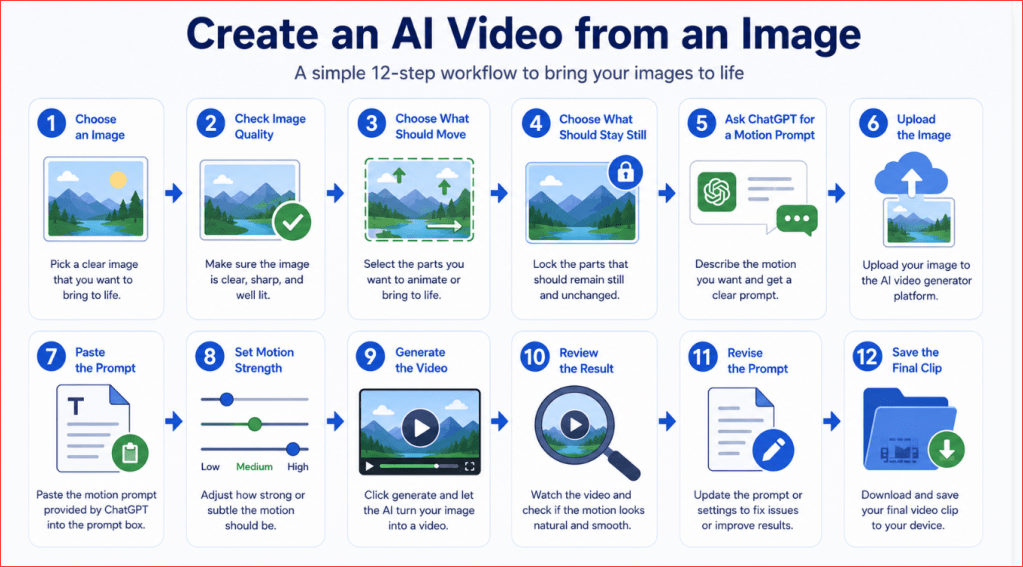
Figure 7. The process for turning a still image into an AI-generated video.
Figure 7 shows that successful image-to-video creation depends on controlling both movement and stability. The prompt should explain what the AI should animate and what must remain unchanged throughout the clip.
How to Create a Multi-Scene AI Video
A longer AI video is often easier to control when it is divided into several short clips. [7]
Instead of asking the AI to generate an entire story at once, create one scene at a time and combine the clips afterward.
This approach gives you more control over the subject, camera movement, timing, and visual consistency.
Step 1: Define the Main Goal
Decide what the complete video should accomplish.
For example, the goal might be to:
• Explain a simple process
• Promote a product
• Introduce a business
• Tell a short story
• Create a social media advertisement
• Show a before-and-after transformation
• Present an educational topic
Write the goal in one clear sentence.
For example:
Create a 30-second promotional video showing how a small bakery prepares fresh bread each morning.
Step 2: Divide the Video into Short Scenes
Break the main idea into separate moments.
A simple bakery video might include:
1. Exterior view of the bakery at sunrise
2. Baker mixing the dough
3. Bread baking inside the oven
4. Fresh bread placed on the counter
5. Customer receiving the finished loaf
Each scene should focus on one clear action.
Step 3: Choose the Length of Each Scene
Short clips are often easier to control. [7]
For a 30-second video, you might create:
• Five scenes of approximately six seconds each
• Six scenes of approximately five seconds each
• Ten scenes of approximately three seconds each
The exact timing depends on the story and the tool being used.
Avoid making every scene the same length automatically. An opening scene may need more time than a quick close-up.
Step 4: Create a Simple Storyboard
A storyboard is a scene-by-scene plan showing what happens in the video.
You can ask ChatGPT:
Create a five-scene storyboard for a 30-second bakery promotional video. Include the subject, action, camera shot, lighting, and approximate duration for each scene.
A basic storyboard might include:
Scene 1: Bakery Exterior
Wide shot
Early morning
Warm lights inside the bakery
Slow camera movement toward the entrance
Duration: five seconds
Scene 2: Preparing the Dough
Close-up of hands mixing dough
Warm indoor lighting
Static camera
Duration: six seconds
Scene 3: Bread in the Oven
Close-up through the oven door
Bread rising and turning golden
Gentle camera push forward
Duration: five seconds
Scene 4: Finished Bread
Baker places fresh bread on a wooden counter
Steam rises from the loaf
Slow camera movement toward the bread
Duration: seven seconds
Scene 5: Customer Experience
Customer receives the loaf and smiles
Bright, welcoming lighting
Medium shot
Duration: seven seconds
Step 5: Create a Consistency Sheet
A consistency sheet records important details that should remain the same in every scene.
Include:
• Character appearance
• Clothing
• Hairstyle
• Location
• Interior design
• Colour palette
• Lighting style
• Camera style
• Product appearance
• Visual mood
• Aspect ratio
For example:
The baker is an adult man with short dark hair, wearing a white shirt, beige apron, and dark trousers. The bakery has wooden shelves, cream walls, warm golden lighting, and a clean traditional appearance.
Repeat these details in every relevant prompt.
Step 6: Write One Prompt for Each Scene
Do not use one large prompt for the entire video.
Prepare a separate prompt for every scene.
For example:
Scene 1: Create a five-second realistic cinematic video of a small traditional bakery on a quiet street at sunrise. Warm lights glow through the front windows. Use a slow camera movement toward the entrance, soft golden morning light, stable framing, and a welcoming mood. Use 16:9 landscape format. No people, no visible logos, no text, and no sudden camera movement.
Each prompt should contain only the details required for that scene while preserving the overall visual style.
Step 7: Generate and Review Each Clip
Create one scene at a time.
After each clip is generated, check:
• Character consistency
• Clothing
• Background
• Product appearance
• Lighting
• Camera direction
• Motion speed
• Aspect ratio
• Unwanted objects
Do not continue automatically if one scene looks significantly different from the others.
Step 8: Regenerate Weak Scenes
Some clips may need several attempts.
If a scene does not match the others, revise the prompt.
For example:
Regenerate this scene using the same baker, clothing, bakery interior, warm lighting, and cinematic style as the previous clips. Keep the camera stable and use slower hand movement.
Focus on the biggest inconsistency first.
Step 9: Arrange the Clips in Order
Import the finished clips into a video editor.
Place them in the correct sequence according to the storyboard.
Trim unnecessary frames from the beginning or end of each clip.
The story should remain understandable even before narration or music is added.
Step 10: Add Transitions Carefully
Transitions connect one clip to the next.
Common options include:
• Straight cut
• Fade
• Crossfade
• Dip to black
• Gentle zoom transition
Simple transitions usually look more professional than dramatic effects.
Use the same transition style throughout the video unless a scene change requires something different.
Step 11: Add Narration, Music, and Captions
Once the visual sequence is complete, add supporting audio and text.
You may include:
• Voice-over narration
• Background music
• Sound effects
• Captions
• Short titles
• A final call to action
Keep the audio balanced so that music does not overpower the narration.
Step 12: Review the Complete Video
Watch the video from beginning to end.
Check:
• Does the story make sense?
• Do the scenes match visually?
• Is the pacing comfortable?
• Are the transitions smooth?
• Is the narration clear?
• Are captions readable?
• Is the final message easy to understand?
• Are there any AI errors that need correction?
Review the video on both a computer and a mobile device when possible.
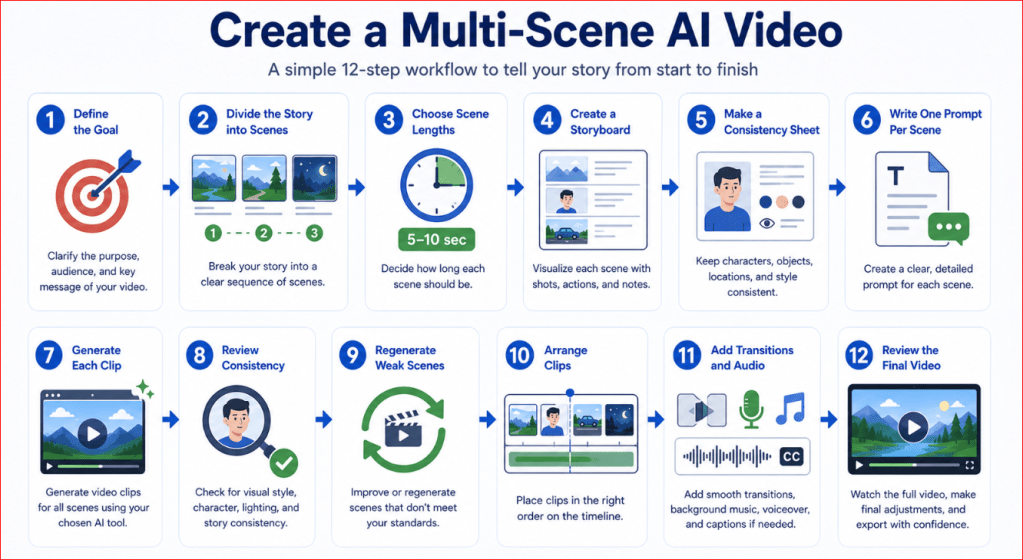
Figure 8. The workflow for creating a multi-scene AI video.
Figure 8 shows how a longer AI video can be built from several shorter clips. Planning each scene separately and using a consistency sheet gives the creator more control over the final story, pacing, and visual style.
How to Edit AI-Generated Videos
The first version of an AI-generated video is rarely the final version.
Most videos benefit from a few simple edits that improve their appearance, pacing, and overall quality. Small adjustments can make a significant difference without requiring advanced editing skills.
Step 1: Watch the Entire Video
Before making any changes, watch the video from beginning to end several times.
Look for:
• Sudden changes in the subject
• Unnatural body movement
• Flickering backgrounds
• Camera shake
• Inconsistent lighting
• Missing objects
• Extra unwanted objects
• Poor framing
• Distracting transitions
Take notes so you know exactly what needs to be improved.
Step 2: Trim Unnecessary Sections
AI-generated videos often include a few unwanted frames at the beginning or end.
Trim these sections to create a cleaner result.
Common examples include:
• The subject appearing suddenly
• Camera movement starting too early
• Objects changing shape near the end
• A frozen final frame
A clean beginning and ending make the video feel more professional.
Step 3: Improve the Pacing
Every scene should last long enough for viewers to understand what they are seeing.
If a clip feels rushed:
• Extend the duration if your tool allows it.
• Slow the playback slightly.
• Replace it with a longer version.
If a scene feels too slow:
• Shorten the clip.
• Remove unnecessary pauses.
• Move to the next scene sooner.
Aim for a comfortable viewing rhythm.
Step 4: Correct Visual Problems
Review each scene carefully.
Common issues include:
• Distorted hands or faces
• Objects changing size
• Backgrounds shifting unexpectedly
• Inconsistent shadows
• Sudden colour changes
• Duplicate objects
• Cropped subjects
If a problem affects only one scene, regenerate that scene instead of the entire video.
Step 5: Improve the Audio
If your video includes sound, check that it matches the visuals.
Review:
• Voice-over quality
• Background music volume
• Sound effects
• Timing between speech and visuals
• Unwanted background noise
The narration should remain easy to hear throughout the video.
Step 6: Add Captions
Accurate, synchronized captions make videos easier to understand and improve accessibility. [18][19]
They also help viewers who:
• Watch without sound
• Have hearing difficulties
• Speak a different first language
• View the video in noisy environments
Keep captions:
• Short
• Easy to read
• Correctly spelled
• Well-timed
• Consistent in style
Avoid covering important parts of the video.
Use a readable font, strong contrast, and text large enough to read on a phone. Avoid rapid flashing effects, and include clear narration or descriptive text when it helps viewers understand the scene. [18][19]
Step 7: Add Titles and Simple Graphics
A few simple graphics can improve clarity.
Examples include:
• Opening title
• Section headings
• Product names
• Labels
• Simple arrows
• Highlight boxes
• End screen
Avoid filling the screen with unnecessary text or decorative effects.
Step 8: Adjust Colour and Brightness
Some AI-generated clips may appear too dark or too bright.
Small adjustments can improve:
• Brightness
• Contrast
• Saturation
• White balance
• Shadow detail
Avoid excessive colour correction that makes the scene look unnatural.
Step 9: Keep the Style Consistent
If your video contains several scenes, make sure they share the same:
• Colour palette
• Lighting
• Camera style
• Subject appearance
• Typography
• Caption style
• Transition style
Consistency makes the finished video feel more polished.
Step 10: Export the Final Video
When the edits are complete, export the video using settings appropriate for where it will be published.
Choose the correct:
• Resolution
• Aspect ratio
• File format
• Video quality
Save the finished version with a descriptive filename.
For example:
bakery-promo-final-1080p.mp4
Keep the original project files in case you need to make changes later.
Step 11: Review Before Publishing
Watch the exported video one final time.
Check:
• Video quality
• Audio quality
• Spelling in captions
• Smooth transitions
• Consistent appearance
• Correct aspect ratio
• No missing scenes
• No obvious AI mistakes
If possible, test the video on both a computer and a mobile device.
A final review helps catch small problems before sharing the video.

Figure 9. The video editing checklist for AI-generated videos.
Figure 9 summarizes the essential editing steps after an AI video has been generated. Reviewing, refining, and exporting the video carefully helps produce a polished result that is ready for websites, presentations, or social media.
Common AI Video Generation Mistakes
AI video generation is powerful, but beginners often make avoidable mistakes that reduce video quality.
Understanding these problems early can save time, credits, and frustration.
Using a Vague Prompt
A vague prompt might say:
Create a beautiful video of a city.
This does not give the AI enough direction.
The generator does not know:
• Which city style to use
• What time of day it is
• What should move
• How the camera should behave
• What mood the video should have
• Whether the style should be realistic or animated
A clearer prompt might be:
Create an eight-second realistic cinematic video of a modern city street at night after light rain. Reflections glow on the pavement while cars move slowly in the background. Use a gentle camera movement forward, cool blue lighting, stable framing, and a calm atmosphere.
How to Avoid This Mistake
Include the subject, setting, action, camera movement, lighting, style, mood, duration, and aspect ratio.
Including Too Many Actions
A short video cannot always handle several complex movements at once.
For example:
A woman walks through a market, picks up fruit, talks to a seller, turns toward the camera, waves, and enters a car.
This may cause distorted movement, missing actions, or sudden scene changes.
How to Avoid This Mistake
Use one main action per clip. Divide longer sequences into separate scenes.
Changing Too Many Details at Once
When a generated video has several problems, beginners may completely rewrite the prompt.
This makes it difficult to identify which change improved or damaged the result.
How to Avoid This Mistake
Correct one major problem at a time. For example, first stabilize the camera, then improve the hand movement, and finally adjust the lighting.
Requesting Fast or Complicated Movement
Rapid movement can cause:
• Distorted bodies
• Changing faces
• Unstable objects
• Flickering backgrounds
• Unnatural motion
How to Avoid This Mistake
Use instructions such as:
• Slow natural movement
• Gentle camera motion
• Stable framing
• One simple action
• Consistent subject appearance
Ignoring the Background
A prompt may describe the main subject clearly but say nothing about the background.
The AI may then add unwanted people, objects, signs, or changing scenery.
How to Avoid This Mistake
Describe the background and state whether it should remain fixed.
For example:
Keep the bakery interior, shelves, counter, and lighting unchanged throughout the clip.
Forgetting Camera Instructions
Without camera direction, the generator may choose an unsuitable camera angle or movement.
The result may include:
• Sudden zooming
• Camera shake
• Unwanted rotation
• Poor framing
• Cropped subjects
How to Avoid This Mistake
Use one clear camera instruction, such as a static camera, slow zoom, gentle pan, or smooth forward movement.
Using Strong Motion for Portraits
High motion can cause faces, hands, hair, and clothing to change.
This is especially common when animating a still portrait.
How to Avoid This Mistake
Use low or moderate motion and limit the animation to small actions such as blinking, breathing, slight hair movement, or a gentle camera push.
Expecting Perfect Text Inside the Video
AI video generators may create misspelled, distorted, or unreadable signs and labels.
How to Avoid This Mistake
Ask for no visible text in the generated scene. Add titles, captions, labels, and product information later in a video editor.
Using the Wrong Aspect Ratio
A landscape video may not fit a vertical social media platform. Cropping it later can remove important parts of the scene.
How to Avoid This Mistake
Choose the publishing platform before generating the video and select the correct format from the beginning.
Failing to Review the Entire Clip
The opening frames may look good while problems appear later.
Common late-clip problems include:
• Faces changing
• Objects disappearing
• Hands becoming distorted
• Backgrounds shifting
• Unwanted objects appearing
How to Avoid This Mistake
Watch the complete clip several times, including the final second.
Regenerating Without Saving Good Versions
A new version may be worse than the previous one.
If the earlier clip was not saved, it may be difficult or impossible to recover.
How to Avoid This Mistake
Download and rename every promising version before generating another.
Using Copyrighted or Private Material
Uploading protected images, private photographs, or branded content without permission can create legal and ethical problems.
How to Avoid This Mistake
Use material you created, licensed, purchased with suitable rights, or have clear permission to use.

Figure 10. Common mistakes beginners make when generating AI videos.
Figure 10 helps beginners recognize the most common causes of weak AI-generated videos. Clear prompts, simple movement, correct formatting, careful review, and responsible source material can prevent many of these problems.
Tips for Better AI Video Results
Good AI videos usually come from careful planning and small improvements rather than one perfect prompt.
The following tips can help beginners produce more stable, realistic, and professional-looking videos.
Keep Each Scene Simple
Use one main subject, one clear action, and one camera movement.
Simple scenes are easier for the AI to understand and more likely to remain consistent.
Use Short Clips
Short clips are easier to control than long continuous videos.
Generate several short scenes and combine them later instead of asking the AI to create an entire story in one attempt.
Describe Motion Clearly
Do not only describe what the scene looks like.
Explain what should move and how it should move.
For example:
The curtain moves gently in the breeze while the camera slowly moves toward the window.
State What Must Remain Unchanged
Include stability instructions such as:
• Keep the face consistent
• Keep the background fixed
• Keep the product shape unchanged
• Keep the clothing and colours consistent
• Do not add new objects
This is especially important for image-to-video generation.
Use Slow, Natural Movement
Slow movement generally produces better results than rapid action.
Useful instructions include:
• Gentle motion
• Slow camera push
• Natural walking speed
• Slight head movement
• Soft fabric movement
• Stable framing
Use One Camera Movement
Avoid combining zooming, panning, rotating, and tracking in the same short clip.
Choose the movement that best supports the scene.
Avoid Text Inside Generated Scenes
AI-generated text may be misspelled or unreadable.
Generate the scene without visible text and add captions, titles, signs, and labels later using a video editor.
Use Reference Images
A reference image can help define:
• Character appearance
• Product design
• Colour palette
• Location
• Clothing
• Lighting
• Composition
Use a clear image with a simple background and enough space around the subject.
Repeat Important Details
When creating several clips, repeat the same character, clothing, setting, lighting, and style details in every relevant prompt.
Do not assume the generator will remember earlier scenes automatically.
Save Every Promising Version
Download any clip that contains useful movement, composition, or lighting.
Even if it is not perfect, it may be valuable for part of the final video.
Change One Thing at a Time
When improving a weak result, revise one major problem before changing the entire prompt.
For example:
• Stabilize the camera.
• Slow the subject’s movement.
• Correct the lighting.
• Remove unwanted background objects.
This makes it easier to understand which instruction improved the result.
Review Frame by Frame
Watch the full clip slowly.
Check the beginning, middle, and end for:
• Object changes
• Facial distortion
• Hand problems
• Background movement
• Flickering
• Cropping
• Lighting changes
A clip may appear acceptable at normal speed but reveal errors during a closer review.
Keep Your Prompts Organized
Save your prompts in a document or spreadsheet.
Record:
• Scene number
• Original prompt
• Revised prompt
• Generator settings
• Filename
• Problems found
• Best version
This helps you reproduce successful results and avoid repeating failed attempts.
Match the Video to the Platform
Decide where the video will be published before creating it.
Use:
• 16:9 for YouTube, websites, and presentations
• 9:16 for Shorts, Reels, TikTok, and mobile-first content
• 1:1 for square social media posts
• 4:5 for portrait feed posts
Add the Final Polish in an Editor
Use a video editor to add:
• Accurate text
• Captions
• Narration
• Music
• Sound effects
• Transitions
• Branding
• Colour correction
AI generation creates the visual foundation. Editing turns the clips into a complete finished video.
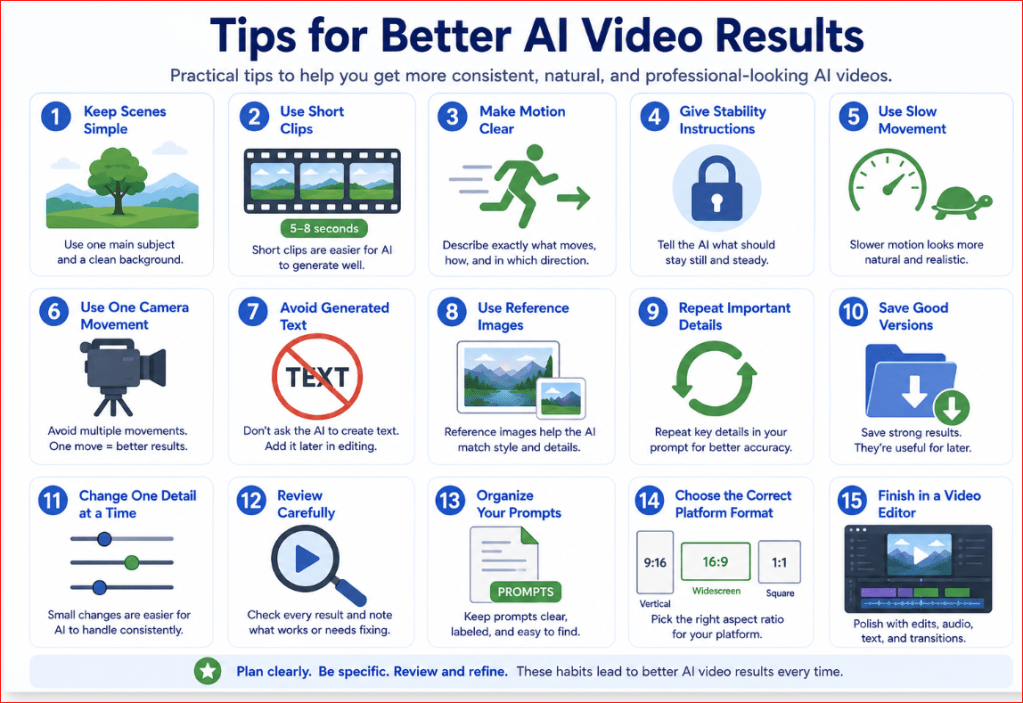
Figure 11. Practical tips for producing better AI-generated videos.
Figure 11 provides a practical checklist that beginners can follow while planning, generating, reviewing, and editing AI videos. The most reliable results usually come from simple scenes, controlled movement, consistent details, and careful revision.
Limitations of AI Video Generation
AI video tools can create impressive results, but they are not perfect. Beginners should understand their limitations before using generated videos for websites, advertising, education, or business projects.
Inconsistent Characters
A person’s face, hairstyle, clothing, age, or body shape may change between frames or scenes.
This problem becomes more noticeable in longer videos or when the subject moves quickly.
How to Reduce This Limitation
Use a clear reference image, repeat the character description in every prompt, keep movements simple, and generate short clips instead of one long scene.
Distorted Hands and Body Movement
Hands, fingers, arms, legs, and facial expressions may move unnaturally.
Complex actions such as eating, writing, running, or handling small objects are often more difficult for the AI to generate correctly.
How to Reduce This Limitation
Use slow, simple actions and avoid close-up shots of complicated hand movements whenever possible. Review the entire clip carefully before publishing it.
Objects May Change Shape
Products, furniture, tools, food, and other objects may change size, colour, position, or shape during the clip.
For example, a cup may become larger, a chair may disappear, or a product label may change.
How to Reduce This Limitation
Ask the AI to keep the object unchanged, use a reference image, reduce motion strength, and keep the camera stable.
Background Instability
Walls, windows, signs, furniture, trees, and other background elements may move, flicker, or transform unexpectedly.
How to Reduce This Limitation
Describe the background clearly and include instructions such as:
Keep the background fixed, stable, and unchanged throughout the clip.
Incorrect or Unreadable Text
Text shown on signs, screens, packages, or clothing may be misspelled, distorted, or replaced with random symbols.
How to Reduce This Limitation
Ask the generator to avoid visible text. Add accurate titles, labels, and captions later using a video editor.
Limited Control Over Exact Results
Even a detailed prompt may not produce exactly what you imagined.
The generator may interpret camera movement, action, lighting, or composition differently.
How to Reduce This Limitation
Generate several versions, compare the results, and revise one instruction at a time.
Short Video Lengths
Many AI video tools are designed to create short clips rather than complete long-form videos.
Longer generations may become less consistent as the scene continues.
How to Reduce This Limitation
Build longer projects from several short clips and combine them in a video editor.
Scene-to-Scene Inconsistency
When several clips are generated separately, the character, setting, lighting, clothing, or visual style may change.
How to Reduce This Limitation
Create a consistency sheet and repeat the same important details in every scene prompt.
Lip-Sync and Speech Problems
A character’s mouth movement may not match the narration or dialogue correctly.
Speech may also sound unnatural, poorly timed, or emotionally inconsistent.
How to Reduce This Limitation
Create the visual clip first, then use a dedicated narration or lip-sync tool if needed. Review the timing closely before publishing.
Audio May Need Additional Editing
Generated music, speech, or sound effects may not match the scene perfectly.
The audio may be too loud, too quiet, repetitive, or poorly synchronized.
How to Reduce This Limitation
Edit audio separately and balance narration, music, and effects in a video editor.
Product Accuracy Problems
AI may change important product details such as:
• Shape
• Colour
• Size
• Packaging
• Buttons
• Labels
• Materials
This can be a serious problem in advertising.
How to Reduce This Limitation
Use real product footage or carefully controlled reference images for important commercial details. Do not use AI-generated product scenes when exact accuracy is required.
High Generation Costs or Usage Limits
Video generation may use credits, limited monthly allowances, or paid plans. [13]
Repeated testing can quickly consume available usage.
How to Reduce This Limitation
Plan prompts carefully, begin with low-cost tests when available, save good versions, and avoid regenerating without first identifying the main problem.
Processing Time
Video generation may take longer than image generation, especially for higher-quality clips.
Busy services may also process requests more slowly.
How to Reduce This Limitation
Prepare several prompts in advance and organize the project so you can review or edit other scenes while generating clips.
Copyright and Ownership Concerns
AI-generated videos may unintentionally resemble protected characters, brands, artwork, or other existing content.
Copyright protection, ownership, and commercial-use rights may depend on applicable law, the amount of human creative input, the service’s current terms, and the rights attached to the source material. [8][12][13][21][22]
How to Reduce This Limitation
Use original material, avoid direct copies of protected content, review the service’s current terms, and keep records of your prompts and source material. For important commercial projects, obtain qualified legal advice.
Difficulty Creating Complex Stories
AI video tools may struggle with:
• Several characters interacting
• Long conversations
• Precise action sequences
• Multiple location changes
• Detailed cause-and-effect events
• Consistent storytelling over time
How to Reduce This Limitation
Divide complex stories into short, clearly planned scenes and use editing to control the final sequence.
Human Review Is Still Necessary
AI cannot reliably decide whether every generated scene is accurate, appropriate, ethical, or suitable for the intended audience.
How to Reduce This Limitation
Review every clip manually before publishing. Check visual accuracy, permissions, captions, audio, and possible misleading content.
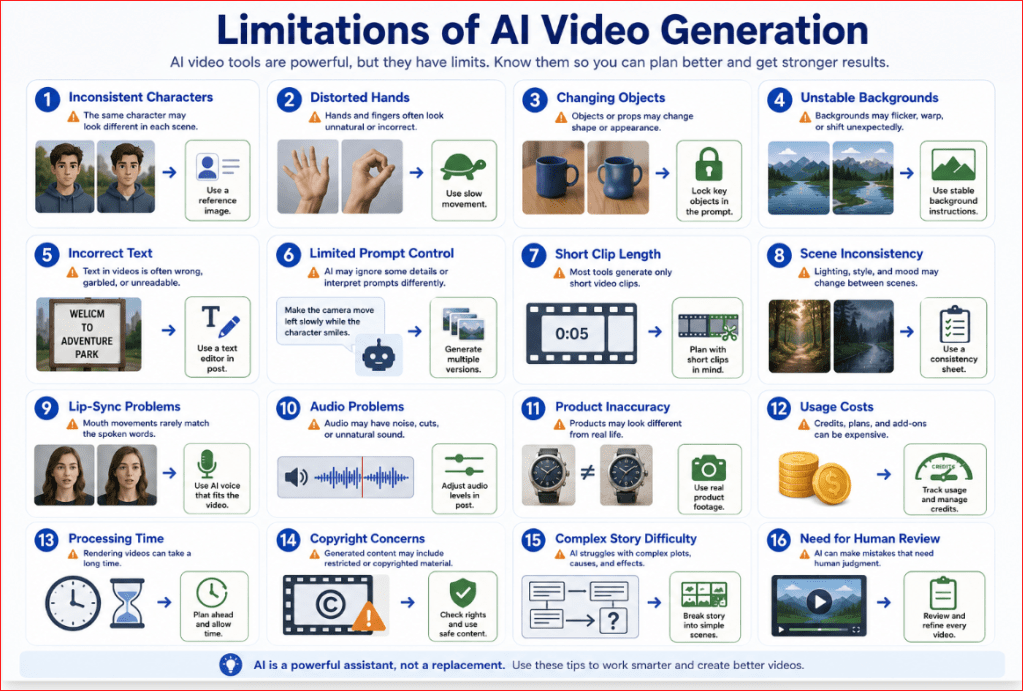
Figure 12. The main limitations of AI video generation and how to reduce them.
Figure 12 shows that AI video generation still requires careful planning, testing, editing, and human review. Understanding these limitations helps beginners choose suitable scenes and avoid relying on AI where exact accuracy is essential.
How to Use AI-Generated Videos Responsibly
AI-generated videos can be useful for education, marketing, storytelling, and creative projects. However, they should be created and shared carefully.
The person publishing the video remains responsible for checking its accuracy, permissions, and possible effect on viewers.
Important Note
Copyright, privacy, likeness, disclosure, and commercial-use rules vary by location, platform, and project. This section provides general educational information, not legal advice.
Review Every Video Before Publishing
Do not publish an AI-generated video immediately after it is created.
Watch the entire clip and check for:
• Distorted faces or bodies
• Incorrect product details
• Unwanted text
• Misleading scenes
• Offensive content
• Private information
• Copyrighted logos or characters
• Sudden visual changes
• Inaccurate captions or narration
Human review is necessary even when the video looks realistic.
Do Not Mislead Viewers
AI-generated videos can appear convincing.
Do not present a fictional event as if it actually happened. Avoid creating videos that falsely show:
• A real person saying something they never said
• A public event that did not happen
• A product performing better than it actually does
• A location or building that does not exist
• A customer giving a false testimonial [23]
• A news event with invented details
When appropriate, tell viewers that the video was created or modified using AI.
Protect Real People
Do not use a person’s image or voice in a deceptive, harmful, or commercial way without the appropriate permission or legal basis. Rules differ by jurisdiction. [16][20]
Be particularly careful when using images of:
• Children
• Family members
• Customers
• Employees
• Public figures
• Private individuals
Never use AI video tools to impersonate someone or create false evidence. [16][20]
Protect Personal Information
Before uploading a reference image or video, check whether it contains: [9][20]
• Full names
• Addresses
• Phone numbers
• Email addresses
• Identification documents
• Vehicle licence plates
• Financial information
• Medical information
• Private messages
• Computer passwords or account details
Crop, blur, or remove private information before uploading the file.
Respect Copyright
Use images, video clips, music, sound effects, and other materials that you: [21][22]
• Created yourself
• Purchased with suitable rights
• Licensed correctly
• Received permission to use
• Obtained from a legitimate royalty-free source
Do not assume that material found online is free to reuse. [21][22]
Avoid Unauthorized Characters, Brands, and Likenesses
AI tools may generate content that resembles famous characters, company logos, packaging, branded products, or real people.
Avoid requesting unauthorized copies or deceptive impersonations of:
• Movie characters
• Cartoon characters
• Real-person or celebrity likenesses
• Company logos
• Branded packaging
• Protected artwork
Create original characters and designs instead.
Check Product Accuracy
AI-generated product videos may show incorrect colours, features, dimensions, packaging, or labels.
Do not use an AI-generated video as the only evidence of how a product looks or works.
For important commercial content, compare the video with the real product before publishing it.
Check Educational and Factual Claims
A visually impressive video can still contain inaccurate information.
Verify:
• Names
• Dates
• Statistics
• Procedures
• Historical events
• Health information
• Financial claims
• Technical explanations
Use reliable sources before adding factual narration or captions.
Use Care with Health, Legal, and Financial Content
AI-generated videos should not be presented as professional advice unless reviewed by a qualified expert.
Mistakes in these areas may cause serious harm.
Use clear disclaimers when appropriate, but do not treat a disclaimer as a substitute for qualified review. Avoid guaranteed or unsupported claims.
Label AI-Generated Content When Appropriate
Disclosure can help viewers understand how the content was created.
A simple note may say: [14][15]
This video was created with the assistance of artificial intelligence.
You may place the disclosure in:
• The video caption
• The description
• The opening title
• The closing credits
• The website page containing the video
The best location depends on how realistic or sensitive the content is.
Some platforms provide a specific AI-use or altered-content setting. Use that setting when required; a note in the description may not be enough. [14][15]
Keep Creation Records
Save basic information about each project, including:
• Original prompt
• Revised prompts
• Reference images
• Generated versions
• Final edited video
• Creation date
• Source licences
• Permission records
• AI disclosure wording
These records may help if questions arise later.
Follow Platform Rules
Social media platforms, advertising networks, and video services may have rules for AI-generated or altered content. [14][15][16]
Review the current rules before publishing, especially when the video contains:
• Realistic people
• Political subjects
• News-style content
• Paid advertising
• Health claims
• Financial claims
• Synthetic voices
• Sensitive events
Use Human Judgment
A video can be technically impressive but still be inappropriate, confusing, or misleading.
Before publishing, ask:
• Is the video accurate?
• Is it respectful?
• Do I have permission to use the source material?
• Could viewers misunderstand it?
• Does it need an AI disclosure?
• Would I be comfortable explaining how it was created?
Responsible use protects both the creator and the audience.
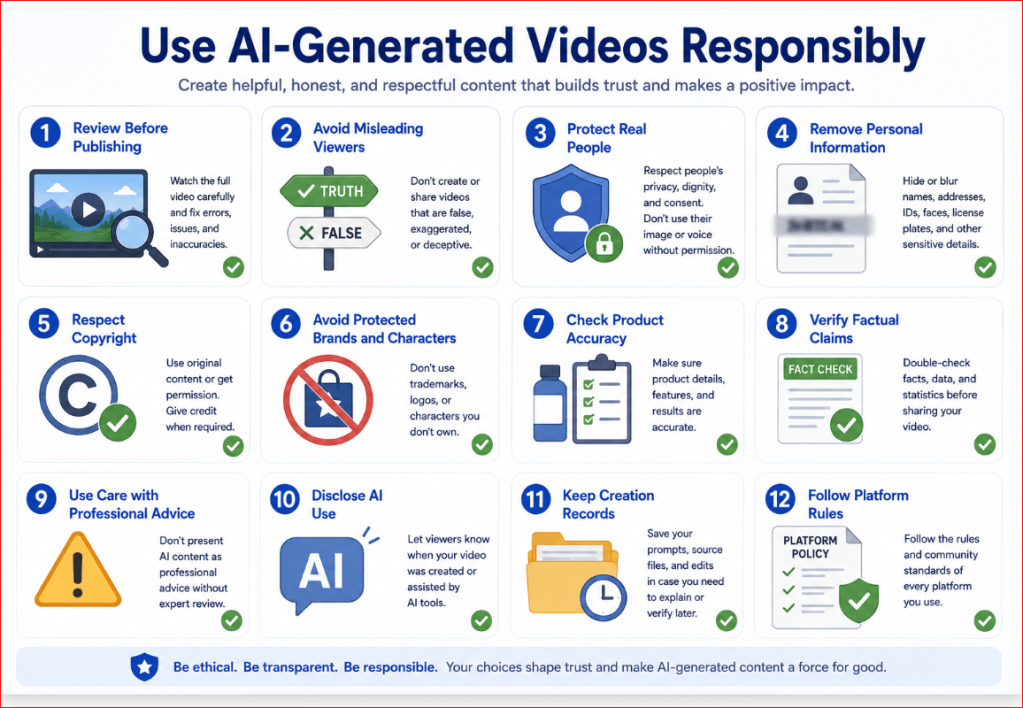
Figure 13. A responsible-use checklist for AI-generated videos.
Figure 13 gives beginners a practical checklist for reviewing AI-generated videos before publication. It emphasizes accuracy, permission, privacy, disclosure, and human responsibility.
Practical Uses for AI-Generated Videos
AI-generated videos can be used in many personal, educational, creative, and business projects.
The most suitable uses are usually short, clearly planned videos where exact real-world accuracy is not essential.
Social Media Content
AI videos can help create short content for platforms such as:
• YouTube Shorts
• Instagram Reels
• TikTok
Possible examples include:
• Motivational scenes
• Simple educational tips
• Product introductions
• Animated quotes
• Short stories
• Background videos
• Before-and-after concepts
Choose the correct aspect ratio before generating the clip.
Website Content
Short AI videos can make a website more engaging. [17]
They may be used for:
• Homepage backgrounds
• Service introductions
• Tutorial demonstrations
• Article illustrations
• Product-category pages
• About-page introductions
• Landing pages
Keep website videos short and compressed so they do not slow down page loading.
Educational Videos
Teachers, trainers, bloggers, and course creators can use AI-generated clips to help explain ideas visually.
Examples include:
• Historical reconstructions
• Science demonstrations
• Animated diagrams
• Vocabulary examples
• Process explanations
• Geography scenes
• Training scenarios
Always verify educational details before publishing the video.
YouTube Videos
AI-generated clips can support longer YouTube content.
They may be used as:
• Opening scenes
• Background footage
• Story illustrations
• Transition clips
• Visual examples
• Reconstructed scenes
• Narration support
Combine AI clips with original narration, screenshots, diagrams, and real footage to create a more complete video.
Product Promotion
AI video can help demonstrate a product concept or create an attractive promotional scene.
Possible uses include:
• Product introductions
• Lifestyle scenes
• Promotional backgrounds
• Concept advertisements
• Packaging presentations
• Social media teasers
However, the product must remain visually accurate. Use real footage when exact features, dimensions, colours, or functions must be shown.
Small-Business Marketing
Small businesses may use AI-generated video for:
• Service advertisements
• Seasonal promotions
• Event announcements
• Website introductions
• Social media campaigns
• Brand storytelling
• Customer education
A bakery, restaurant, repair service, consultant, or online shop could use short AI scenes to support marketing content without filming every visual from scratch.
Presentations
AI-generated clips can make presentations more visually interesting.
They may be useful for:
• Opening slides
• Section transitions
• Concept demonstrations
• Future scenarios
• Process illustrations
• Background motion
• Project introductions
Avoid adding distracting movement behind important text.
Storytelling
Writers and creative beginners can turn ideas into visual stories.
AI video can help create:
• Short fictional scenes
• Children’s stories
• Fantasy locations
• Animated characters
• Book trailers
• Poetry videos
• Visual storyboards
Create one scene at a time and keep character descriptions consistent.
Online Courses
Course creators can use AI-generated video to support lessons.
Examples include:
• Lesson introductions
• Scenario demonstrations
• Animated examples
• Visual summaries
• Background scenes
• Practice situations
AI video should support the lesson rather than replace clear teaching.
Advertising Concepts
AI video can help businesses test creative ideas before paying for a full production.
For example, a business can compare:
• Different settings
• Different camera angles
• Different moods
• Different colour schemes
• Different product presentations
• Different story concepts
These early versions can act as visual prototypes.
Music and Creative Projects
AI-generated visuals can support:
• Original music videos
• Instrumental tracks
• Poetry readings
• Meditation videos
• Ambient backgrounds
• Art projects
• Experimental animation
Only use music, voices, and images that you have permission to use. [21][22]
Video Prototypes
A prototype is an early version used to demonstrate an idea.
AI video prototypes can help explain:
• A future advertisement
• A proposed film scene
• A website concept
• A product launch
• An architectural idea
• A training scenario
The prototype can help other people understand the idea before more time or money is invested.
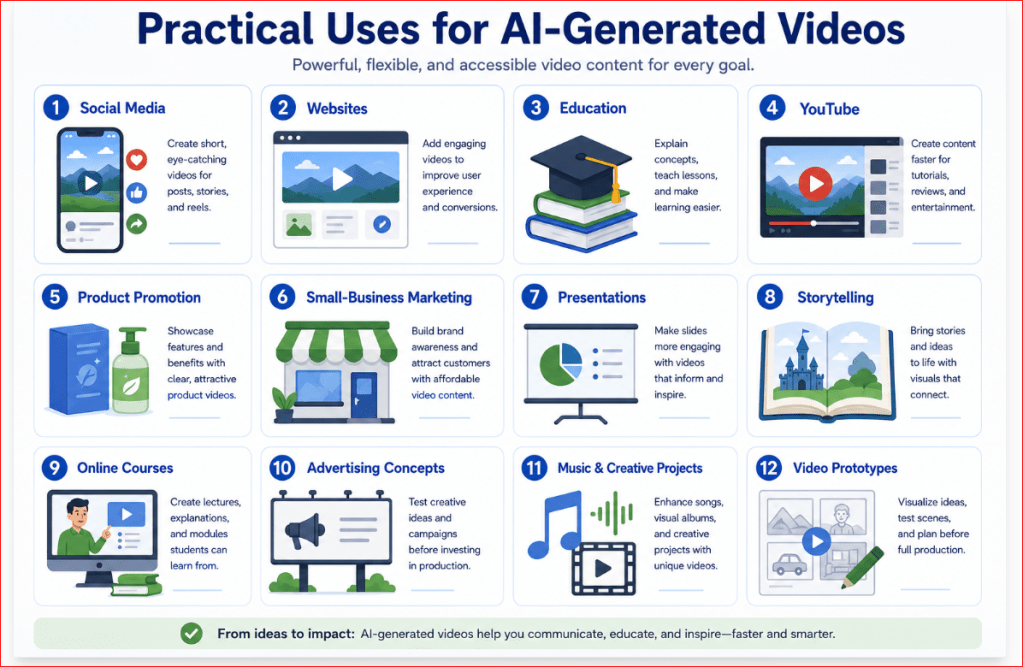
Figure 14. Common practical uses for AI-generated videos.
Figure 14 shows the wide range of projects that can benefit from AI-generated video. These tools are especially useful for short visual scenes, educational support, creative storytelling, marketing concepts, and video prototypes.
Common Myths About AI Video Generation
AI video generation is often misunderstood. Some people expect perfect results immediately, while others believe the technology can replace every part of professional video production.
The following myths explain what beginners should realistically expect.
Myth 1: AI Creates Perfect Videos from One Prompt
A detailed prompt improves the result, but it does not guarantee perfection.
AI-generated videos may still contain:
• Distorted movement
• Changing faces
• Unstable backgrounds
• Incorrect objects
• Poor timing
• Unwanted camera motion
Reality
Creating a useful AI video often requires several attempts. The prompt may need to be revised, and some scenes may need to be regenerated or edited.
Myth 2: ChatGPT Creates the Complete Video by Itself
ChatGPT is used to help plan the idea, write the prompt, create the storyboard, and improve weak instructions.
A dedicated video-generation tool is responsible for creating the moving video.
Reality
ChatGPT and the AI video generator perform different roles. ChatGPT helps with planning and communication, while the generator produces the visual clip.
Myth 3: Longer Prompts Always Produce Better Videos
A long prompt is not automatically a good prompt.
Too many details, actions, camera movements, and style instructions can confuse the generator.
Reality
The best prompts are clear, organized, and focused. Include important details, but avoid unnecessary complexity.
Myth 4: AI Video Requires No Editing
Even a strong generated clip may contain weak frames, poor pacing, inaccurate text, or audio problems.
Reality
Most AI videos benefit from trimming, captions, sound adjustment, colour correction, transitions, and a final review.
Myth 5: AI Video Can Replace Professional Filming in Every Situation
AI video is useful for concepts, short scenes, educational examples, creative projects, and prototypes.
However, it may not be suitable when exact accuracy is essential.
Examples include:
• Product demonstrations
• Legal evidence
• Medical instructions
• Customer testimonials
• Technical procedures
• News reporting
Reality
Real footage is still the safer choice when viewers must see exactly what happened or how something works.
Myth 6: The AI Remembers Every Character and Setting
Different clips may produce changes in appearance, clothing, lighting, or background.
Reality
You must repeat important details in each prompt and use reference images or consistency sheets when available.
Myth 7: More Motion Makes a Video More Exciting
Strong motion may appear dramatic, but it can also create distortion and instability.
Reality
Slow, controlled movement often looks more realistic and professional.
Myth 8: AI Can Generate Accurate Text Inside Videos
Signs, labels, packaging, and screens may contain misspelled or unreadable text.
Reality
Add important text later in a video editor rather than relying on the generator.
Myth 9: Every Generated Video Can Be Used Commercially
Usage rights may depend on:
• The tool
• The subscription plan
• The source images
• The music
• The voices
• The reference material
• The platform rules
Reality
Check the current terms and licences before using generated videos for advertising, sales, or paid projects.
Myth 10: AI-Generated Videos Are Automatically Original
A generated video may unintentionally resemble existing characters, brands, artwork, or visual styles.
Reality
Review the result carefully and avoid prompts that request direct copies of protected material.
Myth 11: Anyone Can Publish Realistic AI Videos Without Disclosure
A realistic AI video may mislead viewers, especially when it includes real people, news-style scenes, or sensitive events.
Reality
Disclosure may be necessary or appropriate depending on the subject, platform, and purpose of the video. [14][15]
Myth 12: AI Video Removes the Need for Human Creativity
AI can generate visuals, but it does not replace the creator’s judgment.
The human creator still decides:
• The purpose
• The story
• The audience
• The message
• The scene order
• The final quality
Whether the video should be published.
Reality
AI is a creative tool. The quality of the final video still depends heavily on human planning, review, and editing.

Figure 15. Common myths and realities about AI video generation.
Figure 15 corrects common misunderstandings about AI video generation. It shows that useful results still depend on clear prompts, careful editing, responsible use, and human creative judgment.
Frequently Asked Questions
Can ChatGPT Create the Complete Video Directly?
No—not in the workflow described in this guide. ChatGPT can help you plan a video, write prompts, create storyboards, prepare narration, and improve weak instructions or results.
The moving video is generated by a currently available dedicated AI video tool.
Do I Need Video-Editing Experience?
No. Beginners can create simple AI videos without advanced editing experience.
However, learning basic skills such as trimming clips, adding captions, adjusting sound, and arranging scenes will improve the final result.
Can I Create a Video from a Photograph?
Yes. Image-to-video tools can animate a still photograph by adding movement to the subject, background, camera, or environment.
Use a clear image and describe both what should move and what should remain unchanged.
How Long Should an AI-Generated Clip Be?
Short clips are usually easier to control.
A clip of approximately five to ten seconds is often suitable for one simple action. Longer videos can be created by combining several short clips.
Why Does My Character Change During the Video?
AI may have difficulty maintaining the same face, clothing, hairstyle, or body shape across several frames.
Use a reference image, repeat the character details, reduce motion, and create shorter clips.
Why Do Objects Change Shape?
The AI synthesizes the video from learned patterns rather than recording a real object.
Reduce complex movement, use a clear reference image, keep the camera stable, and state that the object must remain unchanged.
Can AI Video Generators Create Accurate Text?
They may create visible text, but the result can be misspelled, distorted, or unreadable.
It is usually better to generate the scene without text and add accurate titles or captions later in a video editor.
Can I Add Music and Narration?
Yes. You can add narration, music, sound effects, and captions during the editing stage.
Use audio that you created, properly licensed, purchased with suitable usage rights, or have permission to use.
Can I Use AI-Generated Videos on YouTube?
AI-generated videos may be used on YouTube when they follow the platform’s rules and you have the necessary rights to all video, music, voice, and source materials. [14][16]
YouTube requires disclosure when AI meaningfully alters or generates realistic content that could be mistaken for real events, places, or actions. Check the current upload settings and policy before publishing. [14]
Can I Use AI Videos for My Business?
Yes. AI-generated videos can support advertisements, websites, presentations, social media, educational content, and early product concepts.
Review the video carefully and do not use inaccurate AI-generated visuals to make false claims about a product or service.
Are AI-Generated Videos Free?
Some tools provide limited free access, trials, or credits, while others require a paid plan.
Video generation often uses more processing resources than image generation, so free limits may be restricted.
How Many Attempts Does It Take to Get a Good Video?
There is no fixed number.
A simple scene may work after one or two attempts, while a difficult scene may require several prompt revisions and regenerated versions.
Should I Use Text-to-Video or Image-to-Video?
Use text-to-video when you want the AI to create the entire scene from a written description.
Use image-to-video when you already have a suitable image and want greater control over the subject, composition, or visual style.
What Is the Best Aspect Ratio?
The best format depends on where the video will be published:
• 16:9 for YouTube, websites, and presentations
• 9:16 for Shorts, Reels, TikTok, and mobile viewing
• 1:1 for square social media posts
• 4:5 for portrait feed posts
Choose the format before generating the video.
Can AI Video Replace Real Filming?
AI video can replace some visual scenes, concept demonstrations, backgrounds, and creative sequences.
It should not replace real footage when exact accuracy, proof, product details, or genuine human testimony is required.
Do I Need to Disclose That a Video Was Created with AI?
Disclosure may be appropriate or required when the video is realistic, contains real people, covers sensitive events, or could mislead viewers.
Check the rules of the platform where the video will be published, and use its built-in AI-use or altered-content setting when required.
Key Takeaways
• ChatGPT helps plan AI videos and write detailed prompts.
• Dedicated AI video tools generate the actual moving clips.
• Simple scenes usually produce more reliable results.
• A strong prompt describes the subject, setting, action, camera, lighting, style, mood, duration, and format.
• Short clips are easier to control than long videos.
• Image-to-video prompts should explain what moves and what remains unchanged.
• Multi-scene videos require a storyboard and consistency sheet.
• AI-generated videos usually need editing before publication.
• Generated text, hands, faces, products, and backgrounds may be inaccurate.
• Human review is necessary before every video is published.
• Copyright, privacy, disclosure, and platform rules must be considered.
• AI video works best as a creative tool guided by human planning and judgment.
Final Tip
Start with one simple scene.
Use one subject, one action, and one camera movement. Generate a short clip, review the result carefully, and improve only the most important problem.
This step-by-step approach is more effective than trying to create a complete professional video with one complicated prompt.
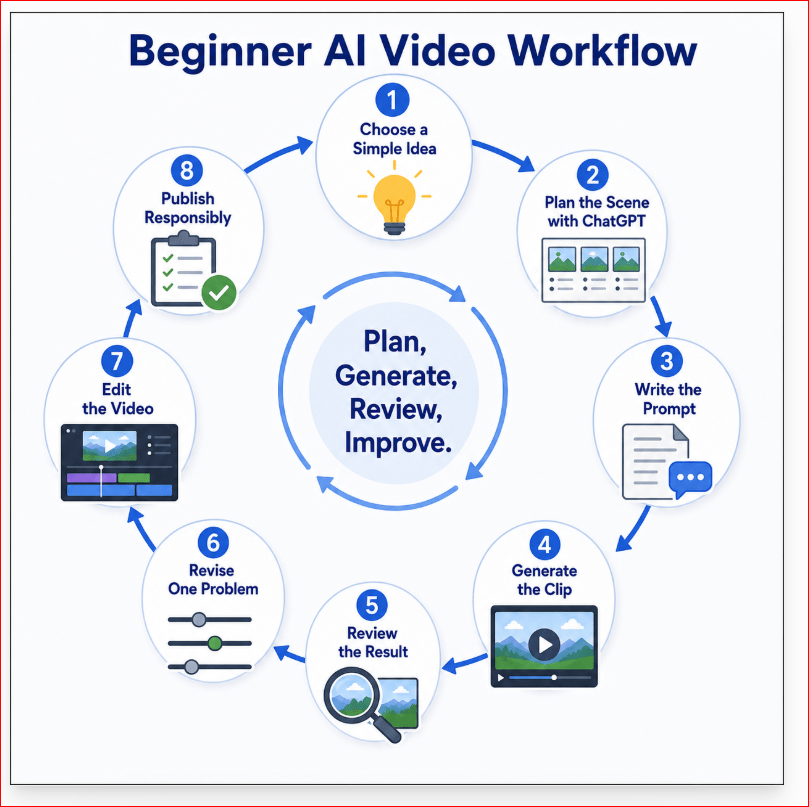
Figure 16. The complete beginner workflow for creating an AI video.
Figure 16 summarizes the complete process covered in this guide. It reminds beginners that successful AI video creation is a cycle of planning, generating, reviewing, improving, editing, and publishing responsibly.
Conclusion
AI video generation gives beginners a practical way to create some types of moving visual content without professional cameras, actors, or advanced editing equipment.
ChatGPT can help you develop the idea, plan each scene, write stronger prompts, create narration, and improve weak results. The actual video is then generated using a dedicated AI video tool.
The best results usually come from keeping each scene simple, using short clips, describing motion clearly, and reviewing every generated version carefully.
AI video tools are improving quickly, but they can still produce inconsistent characters, distorted movement, changing objects, unstable backgrounds, and incorrect text. For this reason, human review and editing remain essential.
Start with one simple video idea, generate a short clip, review the result, and improve one problem at a time. With practice, you can use AI video generation for websites, social media, education, presentations, storytelling, and small-business marketing.
Sources and References
Citations in square brackets refer to the numbered official sources below. These pages were reviewed on July 28, 2026. Features, access, prices, credits, licences, privacy practices, and platform rules can change. Readers do not need to reread every policy before every publication, but they should check when first using a tool, changing plans or features, receiving a policy-update notice, and periodically for important publishing or commercial projects.
[1] OpenAI. What to Know About the Sora Discontinuation. Confirms that the Sora web and app experiences ended on April 26, 2026, and gives the scheduled Sora API discontinuation date. Accessed July 28, 2026.
[2] OpenAI. Prompt Engineering Best Practices for ChatGPT. Recommends clear, specific instructions, sufficient context, and iterative refinement when working with ChatGPT. Accessed July 28, 2026.
[3] Runway. Text to Video Prompting Guide. Explains that text-to-video prompts should describe both the visible scene and how the elements move, using clear and direct language. Accessed July 28, 2026.
[4] Runway. Image to Video Prompting Guide. Explains that the starting image defines the composition and appearance, while the text prompt should focus mainly on motion and temporal changes. Accessed July 28, 2026.
[5] Runway. Introduction to Prompting. Recommends starting simply, reviewing the output, and refining prompts as part of an iterative creative process. Accessed July 28, 2026.
[6] Runway. Getting Started with Generative Video. Describes a current workflow for selecting a generation mode, prompting, generating, reviewing, and iterating. Accessed July 28, 2026.
[7] Runway. How to Create Longer Videos and Films. Explains how shorter generated clips can be planned and combined through editing to create longer-form video projects. Accessed July 28, 2026.
[8] Runway. Usage Rights. Provides Runway-specific ownership and commercial-use information. Other providers may use different terms. Accessed July 28, 2026.
[9] Runway. Understanding Runway’s Security and Privacy Standards. Provides Runway-specific information about asset privacy, sharing, and security controls. Other tools may use different defaults. Accessed July 28, 2026.
[10] Adobe. Writing Effective Text Prompts for Video Generation. Provides current official guidance on concise prompts, actions, camera angles, movement, context, and iterative refinement for video generation. Accessed July 28, 2026.
[11] Adobe. Generate Videos Using Text Prompts. Explains how text prompts and available settings can guide video content, setting, mood, camera angle, and movement. Accessed July 28, 2026.
[12] Adobe. Adobe Firefly FAQ. Provides current product-specific information about Firefly features, models, data practices, beta status, and commercial use. Accessed July 28, 2026.
[13] Adobe. Generative Credits FAQ. Explains generative-credit use, plan conditions, and distinctions that may apply to premium video and partner-model features. Accessed July 28, 2026.
[14] YouTube Help. Disclosing Use of Generative AI Content. Explains when creators must use YouTube’s AI-use disclosure for realistic, meaningfully altered, or synthetically generated content. Accessed July 28, 2026.
[15] YouTube Help. Understanding “How This Content Was Made” Disclosures on YouTube. Explains how YouTube presents information about AI generation, meaningful alteration, and supported content-provenance signals. Accessed July 28, 2026.
[16] YouTube Help. Impersonation Policy. Explains that AI disclosure does not permit misleading impersonation and addresses unauthorized use of a person’s voice or likeness. Accessed July 28, 2026.
[17] WordPress.com Support. Video Block. Explains direct video upload, embedding, poster images, playback settings, and text tracks in the WordPress Video block. Accessed July 28, 2026.
[18] W3C Web Accessibility Initiative. Captions/Subtitles. Explains the role of accurate synchronized captions for speech and important non-speech audio information. Accessed July 28, 2026.
[19] W3C Web Accessibility Initiative. Planning Audio and Video Media. Provides planning guidance for captions, transcripts, audio descriptions, and other accessibility needs. Accessed July 28, 2026.
[20] Office of the Privacy Commissioner of Canada. Consent. Explains meaningful consent for collecting, using, and disclosing personal information in Canada. Accessed July 28, 2026.
[21] Canadian Intellectual Property Office. A Guide to Copyright. Provides general Canadian copyright information for audiovisual works, photographs, music, sound recordings, and other protected material. Accessed July 28, 2026.
[22] Creative Commons. The Creative Commons Licences. Explains licence conditions such as attribution, ShareAlike, NonCommercial, and NoDerivatives that may apply to source assets. Accessed July 28, 2026.
[23] Federal Trade Commission. Consumer Reviews and Testimonials Rule: Questions and Answers. Explains concerns involving false reviews, fake testimonials, AI-generated avatars, and marketing content that may mislead consumers. Accessed July 28, 2026.
Continue Learning
Continue building your AI-video skills with these related guides:
• Best AI Video Tools for Beginners: Complete Guide (2026)
• How to Create AI Videos from Text: Beginner Step-by-Step Guide (2026)
• How to Create AI Videos from Images: Beginner Step-by-Step Guide (2026)
• How to Edit AI-Generated Videos: Beginner Step-by-Step Guide (2026)
• How to Add Voice, Music, and Captions to AI Videos: Beginner Step-by-Step Guide (2026)
These guides continue the learning path from selecting a suitable video tool to creating clips, editing the strongest versions, adding audio and captions, and preparing the final video for publication.
 AI Mastery
Leave a comment