
Estimated reading time: 30 minutes
Last updated: August 7, 2026
Introduction
Article 061 turned the approved script into a storyboard and detailed scene plan. Article 062 continues from that approved plan and turns each planned scene into a real visual asset that can later be assembled in the video editor.
A faceless YouTube video can use many kinds of visuals, including AI-generated images, licensed stock photographs or footage, screen recordings, screenshots, original diagrams, checklists, comparison graphics, warning cards, text cards, and simple motion graphics.
The goal is not to collect as many visuals as possible. The goal is to create or select the right visual for each approved scene.
For example, a software action is usually clearer as a screen recording. One stable setting may be clearer as a screenshot. A workflow is often easier to understand as an original diagram. A fictional or conceptual scene may be suitable for an AI-generated image. General real-world context may be suitable for licensed stock media.
Before producing a scene, you should already know its scene number, matching narration, visual purpose, proposed visual type, approximate duration, on-screen text, source or rights requirements, privacy concerns, accessibility needs, and planned filename.
This article focuses on three major production sources – AI images, stock media, and screen recordings – while also showing when screenshots and original graphics are better choices.
AI-generated visuals still require human review. Check for distorted objects, incorrect text, unwanted logos, invented interfaces, misleading realism, privacy issues, rights concerns, and whether realistic synthetic content needs disclosure review.
Stock footage should be selected for relevance and licence suitability rather than used as generic filler. Screen recordings should be prepared carefully so that private information, distracting notifications, and unnecessary interface areas do not appear.
A strong video can mix several visual sources. You do not need to use AI for every scene, and you do not need stock footage merely to keep the screen moving. Create one scene at a time, preserve originals and source records, and approve the visual package before editing.
What You’ll Learn
- How to turn an approved scene plan into a visual-production list.
- How to create and review AI-generated images for specific scenes.
- How to search for and document stock images and stock footage.
- How to prepare and record safe, readable screen demonstrations.
- How to capture useful screenshots and create original graphics.
- How to review privacy, permissions, licensing, factual accuracy, accessibility, and synthetic-content disclosure needs.
- How to organize approved assets so Article 063 can begin editing with a clean production package.
Important: Creating or downloading a visual does not automatically make it accurate, private, licensed, accessible, or suitable for publication. Final approval still requires human review.
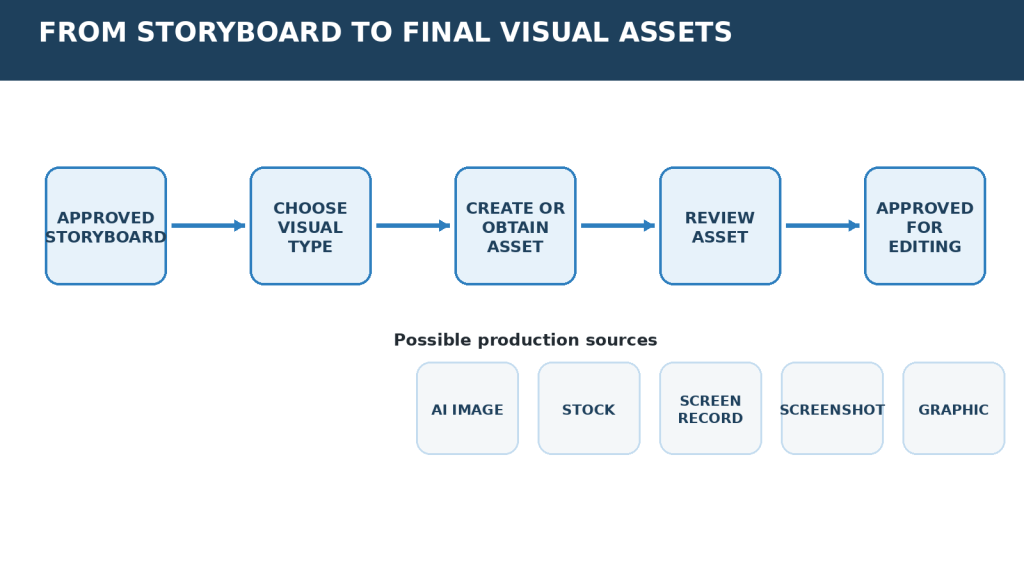
Figure 1. The approved storyboard becomes a production list of specific visual assets that are created, reviewed, and approved before editing.
Explanation: This workflow helps beginners avoid creating random visuals and keeps every asset connected to a specific approved scene.
Before You Begin
Start from the approved storyboard and scene plan created in Article 061. Do not begin a new visual-production process from memory or from an older script version.
Use the Approved Project Files
- Approved storyboard, for example: 062-approved-storyboard-v1-0.docx
- Approved scene plan, for example: 062-approved-scene-plan-v1-0.docx
- Approved narration or script version
- Any existing source, permission, or disclosure notes from earlier stages
Keep Scene Numbers Consistent
Use the same scene numbers throughout production. If the storyboard uses Scene 001, Scene 002, and Scene 003, the visual filenames, source records, review notes, and editor handoff should use those same numbers.
Create One Main Visual-Production Folder
Create one main folder for the visual-production stage.
- Approved Storyboard
- Scene Plan
- AI Images
- Stock Images
- Stock Footage
- Screen Recordings
- Screenshots
- Original Graphics
- Sources
- Licences
- Permissions
- AI Prompts
- Rejected Assets
- Approved Assets
- Exports
- Archive
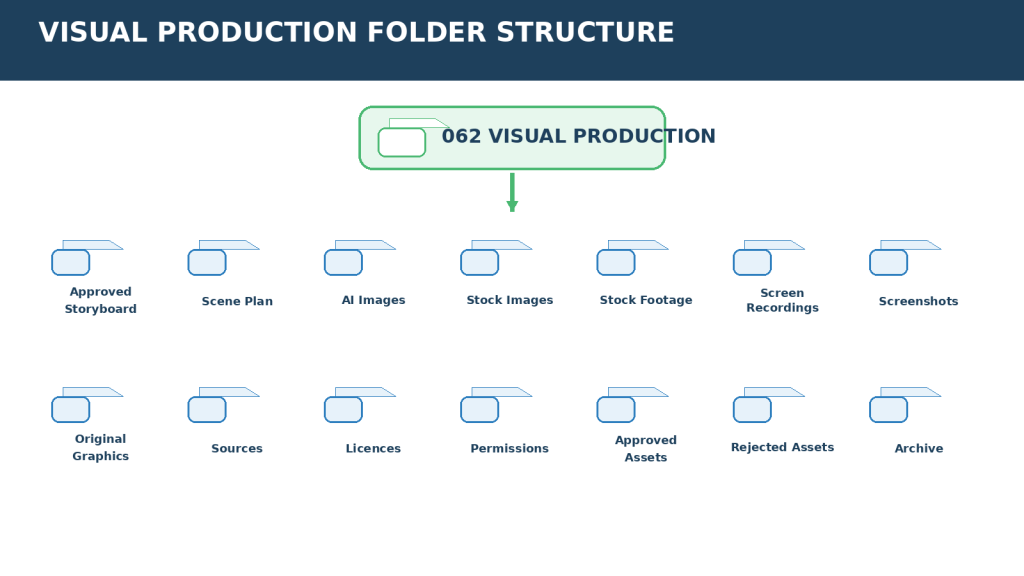
Figure 2. Separating visual assets, source records, approved files, and rejected versions makes a larger video project easier to manage.
Explanation: A clear folder structure reduces version confusion and helps preserve the original files, rights records, and approved production assets.
Create a Master Asset List
A master asset list can track the scene, purpose, visual type, asset source, production status, licence or permission status, privacy review, accessibility review, and approved filename.
Useful status labels include:
- Not Started
- In Progress
- Review Required
- Replacement Required
- Approved
- Blocked
Choose a Technical Target
For standard landscape YouTube production, 16:9 is a common format. A working size such as 1920 x 1080 can provide a Full HD production target when supported by the source and editing workflow. Do not stretch a lower-quality or differently shaped asset merely to fill the frame.
Prepare a Simple Visual Style Guide
- Use a consistent colour palette.
- Use large readable on-screen text.
- Keep safe margins around important text and controls.
- Use similar icon and graphic styles.
- Avoid decorative clutter.
- Leave room for captions when the video will include them.
Prepare Safe Demonstration Data
Before screen recording or taking screenshots, create fictional files, example folders, test accounts, and neutral sample data whenever practical. This reduces the risk of exposing real personal or confidential information.
Preserve Source Records
Keep source and rights information with the project from the moment an external asset is selected. Do not wait until the video is almost finished to reconstruct where a photograph, clip, icon, template, or font came from.
Common Mistake: Generating or downloading visual assets before the folder structure, filenames, and review fields are prepared.
How to Avoid This Mistake: Prepare the scene numbers, production folders, source record, review status, style rules, and filename pattern before creating the first asset.
Step 1: Turn the Approved Scene Plan into a Visual Production List
The visual production list tells you exactly what must now be created, recorded, downloaded, or designed.
Create One Production Task for Each Required Asset
For every approved scene, identify the visual purpose and create a specific production task. Some scenes may need one asset, while a longer demonstration may need several clips or screenshots.
Choose the Visual According to the Teaching Purpose
Choose the visual according to the teaching purpose.
- AI image – useful for fictional, conceptual, illustrative, or difficult-to-photograph scenes.
- Stock image or footage – useful for realistic general context when the licence and scene meaning are suitable.
- Screen recording – best when viewers must see an action happen.
- Screenshot – useful when viewers need to study one stable interface detail.
- Original graphic – useful for workflows, comparisons, checklists, warnings, timelines, and structured explanations.
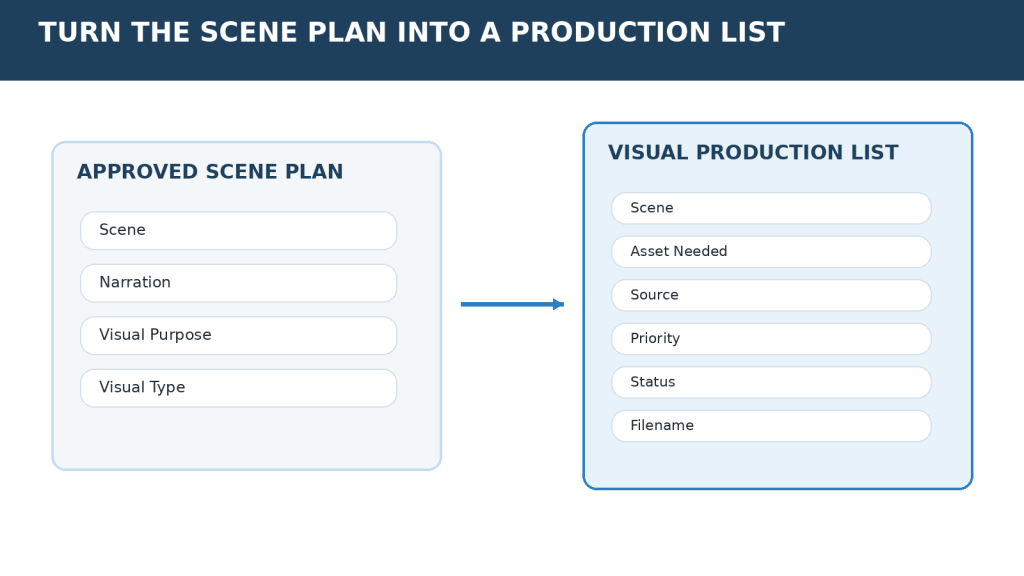
Figure 3. Convert each storyboard scene into a specific production task before creating the visual.
Explanation: The production list tells you what needs to be created, where it will come from, how it will be named, and whether it has passed review.
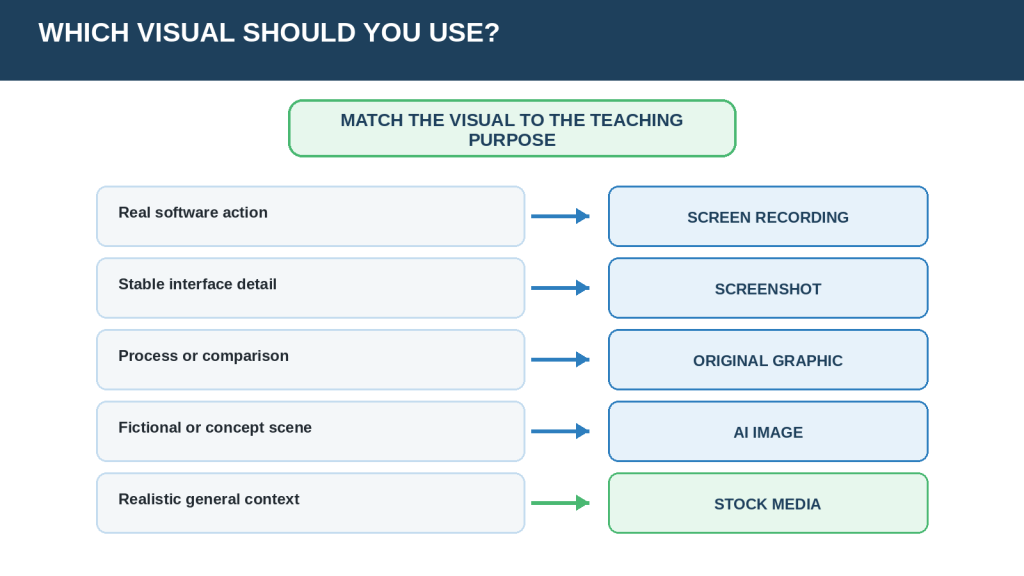
Figure 4. Choose the visual source according to what the viewer needs to understand.
Explanation: The best visual is not always the easiest one to obtain. Screen recordings, screenshots, diagrams, AI images, and stock media each serve different purposes.
Identify Reusable Assets
Some visuals can be reused across related scenes if repetition improves understanding. A fictional sample photograph, a recurring folder icon, or a consistent warning card may appear more than once. Reuse should support continuity rather than become repetitive filler.
Mark Blockers and Priorities
Mark assets that require permissions, licence review, new screen access, updated software, or special technical work. Create high-priority teaching visuals before optional decorative material.
Name Files Before Production
A clear filename can include the article number, scene number, and short description, for example: 062-scene-024-ai-workspace-planning.png. Use controlled version names such as v01, v02, and approved rather than final2 or newest.
Common Mistake: Creating visuals without a production task or scene number.
How to Avoid This Mistake: Every asset should answer three questions before production begins: Which scene is this for? What must the viewer understand? How will the asset be reviewed and identified later?
Step 2: Create AI-Generated Images for Approved Scenes
AI-generated images can be useful for scenes that are fictional, conceptual, illustrative, or difficult to photograph. They are usually less suitable when a viewer needs an exact, current software interface or documentary evidence of a real event.
Build the Prompt from the Approved Scene
A useful AI image prompt may include: Main subject, Setting, Action, Camera view, Lighting, Visual style, Mood, Composition, Aspect ratio, Required objects, Text requirements, Quality controls, and Things to avoid.
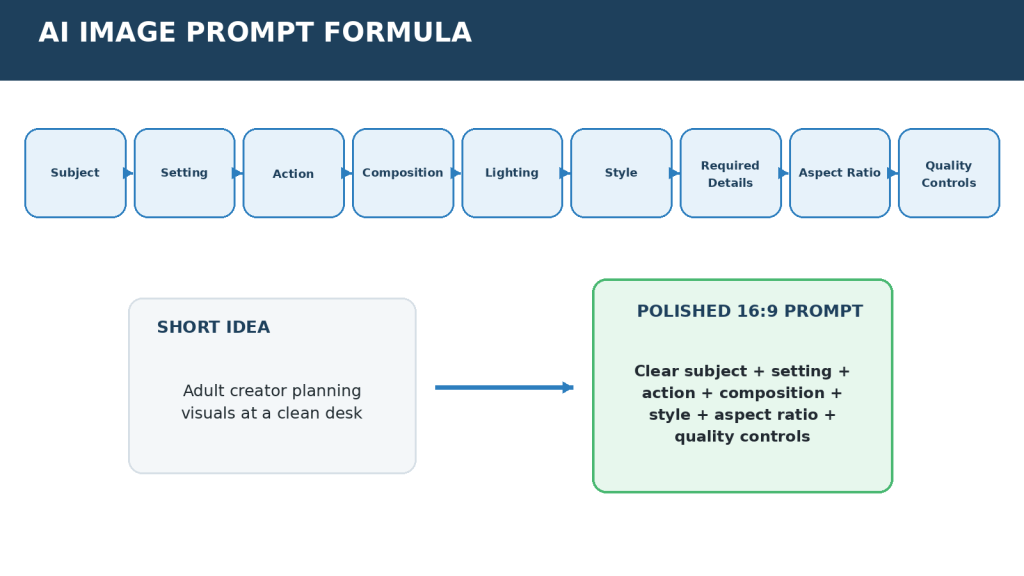
Figure 5. A structured prompt gives the image generator clearer instructions about the scene, composition, style, and quality requirements.
Explanation: Specific prompts usually provide more useful production results than vague instructions such as “create an image for my video.”
Use Fictional People and Neutral Details When Possible
For general educational scenes, fictional people and neutral environments are usually easier to manage than unnecessary imitations of identifiable real people. Do not use a real person’s likeness to imply participation, endorsement, or an event that did not occur.
Keep Important Text Simple
Image generators may create incorrect or distorted text. Keep required text minimal, verify every word, and consider adding important labels later with a graphics tool rather than relying on the image generator to render long instructions.
Generate One Scene First
Before generating a large batch, create one representative scene and check whether the composition, style, subject size, safe margins, and technical format work with the planned video layout.
Review the First Generation Carefully
Review the first generation carefully.
- Hands, faces, and body proportions
- Object shapes and repeated objects
- Text and numbers
- Logos or unintended brand marks
- Background details
- Software screens or controls
- Lighting and scene continuity
- Whether the image could mislead viewers about a real event
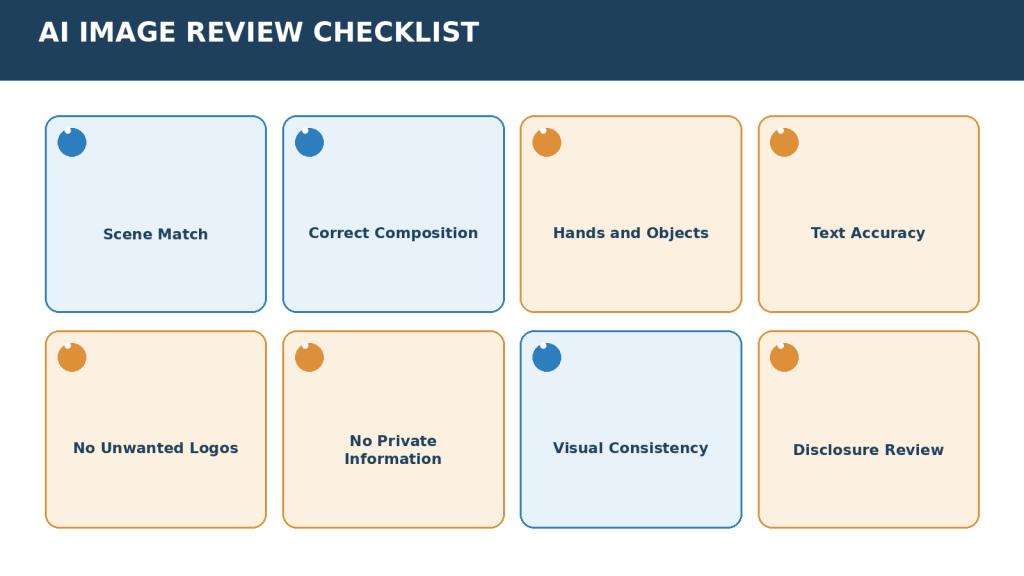
Figure 6. AI-generated images should be reviewed for scene accuracy, visual errors, privacy, consistency, and disclosure concerns.
Explanation: A polished-looking image can still contain subtle errors, misleading details, or inappropriate information that should be corrected before approval.
Check Factual Meaning
An image can look realistic while still showing something that never happened. Do not present synthetic imagery as proof that a real person, event, place, product result, or historical incident occurred.
Review Disclosure Needs
If realistic synthetic content could cause viewers to believe that a real event occurred or that a real person said or did something they did not, keep the scene marked for final platform-disclosure review. Platform rules can change, so check the current YouTube requirements before publishing.
Save Prompt and Version Records
- Scene number
- AI tool used
- Creation date
- Prompt version
- Reference assets used
- Original output filename
- Edited filename
- Approved filename
Common Mistake: Accepting the first AI-generated image because it looks attractive at a glance.
How to Avoid This Mistake: Inspect the complete image at full size, compare it with the approved scene, and reject or correct any misleading, distorted, private, or inconsistent details.
Step 3: Find and Review Stock Images and Stock Footage
Stock media can provide realistic visual context, but the challenge is not finding something attractive. The challenge is finding an asset that matches the narration, fits the visual style, has suitable licence conditions, does not create a misleading impression, works technically in the video, and can be documented properly.
Search from the Scene Purpose
Use specific search terms based on the action, environment, camera framing, and mood needed for the scene. Avoid choosing a clip only because it looks cinematic.
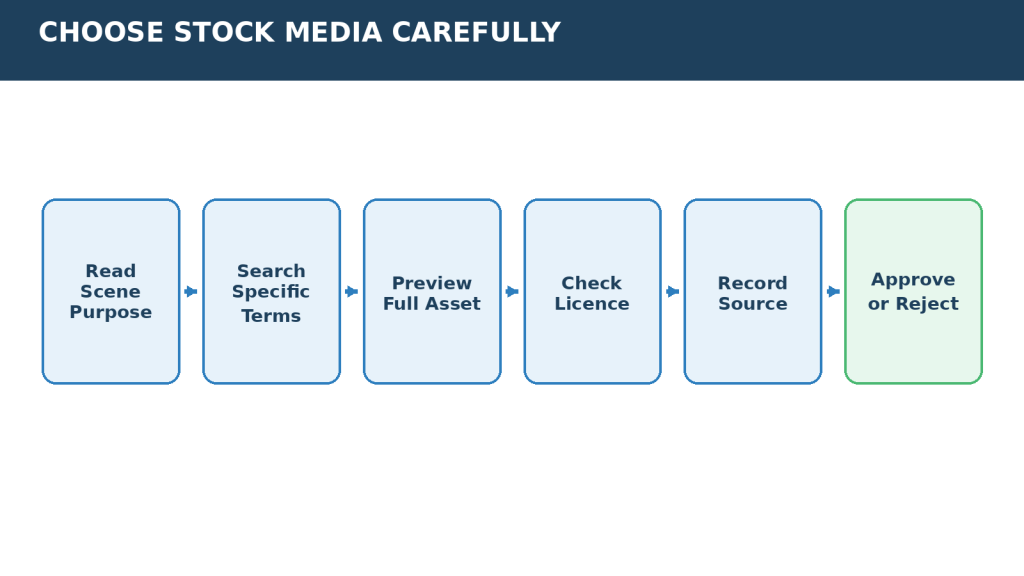
Figure 7. Stock media should be selected for relevance, technical quality, licence suitability, and accurate documentation.
Explanation: A visually attractive stock clip is not enough. It should support the narration and have a clearly recorded source and licence.
Preview the Complete Asset
For video, preview the entire usable section. Check for unexpected logos, identifiable information, distracting background events, quality changes, or actions that contradict the narration.
Check the Exact Licence Before Approval
Do not assume that “free,” “royalty-free,” or “included with a subscription” means unrestricted use. Stock providers can use different licences and restrictions. Review the current conditions for the exact provider and intended use.
Record the Source Immediately
For every selected asset, record: Scene number, Provider, Asset title, Asset ID when available, Source page, Creator name when provided, Download date, Licence type, Attribution requirement, Commercial-use status, Original filename, and Project filename.
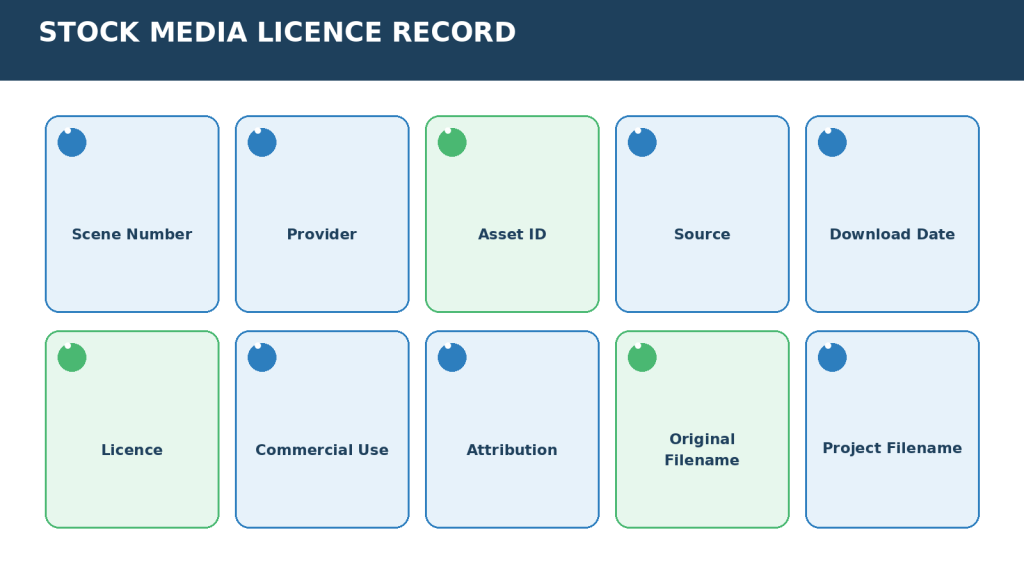
Figure 8. Record the source and licence information when the stock asset is obtained rather than trying to reconstruct it later.
Explanation: Keeping the asset ID, licence, download date, and production filename together makes future review and replacement much easier.
Review People and Context
Stock footage of recognizable people should not be used in a way that falsely implies that they are your customer, endorse a product, experienced a particular condition, participated in a real event, or made the claims in your narration. Review provider rules for identifiable people and sensitive uses.
Preserve the Original Download
Keep the provider’s original file separately, then create a production copy with the project filename. Do not use watermarked previews as final assets or remove a watermark from an unlicensed preview.
Avoid Excess Stock Filler
Too much generic stock footage can weaken an instructional video because viewers may not see the action or information described by the narration. Replace filler with a screenshot, diagram, screen recording, or original graphic when the teaching purpose requires precision.
Common Mistake: Reviewing licence and source information only after editing is nearly finished.
How to Avoid This Mistake: Check and record licence information when the asset is selected, before it enters the approved-assets folder.
Step 4: Create Clear and Safe Screen Recordings
Screen recordings are especially useful when the viewer needs to follow an actual sequence in software, a website, or a file-management process.
Prepare Before Recording
Practise the approved action first. Confirm which window, menu, button, setting, or result needs to appear so the recording does not wander through unnecessary screens.
Before recording, remove or hide information that viewers do not need to see.
- Close unrelated applications and tabs.
- Turn off notifications.
- Use a safe demonstration account when practical.
- Replace real files with fictional examples.
- Check browser bookmarks and recent-file lists.
- Remove email addresses and profile information when not needed.
- Check file paths and desktop names.
- Do not record passwords, recovery codes, payment information, or confidential records.
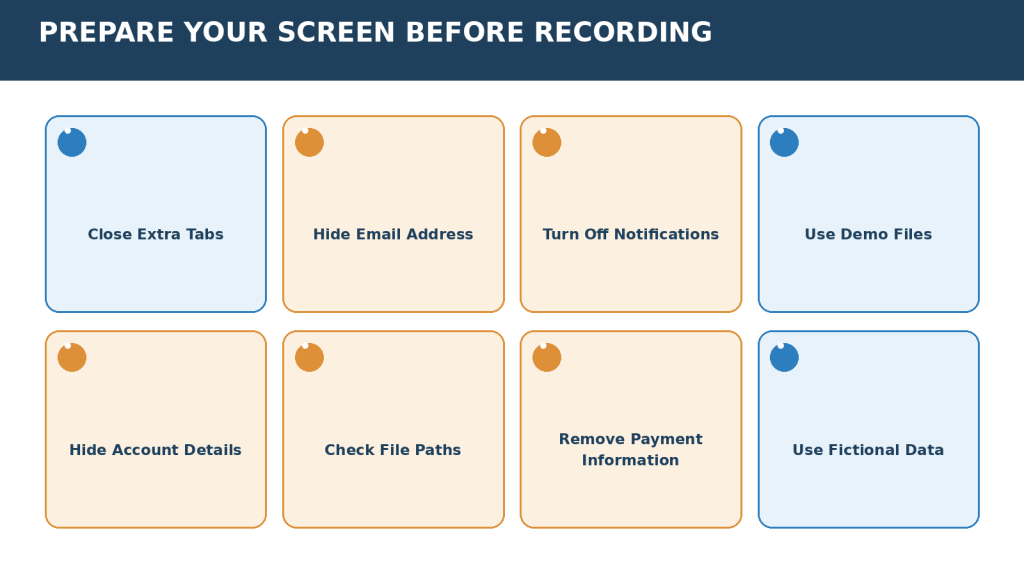
Figure 9. Prepare the recording environment before pressing Record to reduce privacy risks and distractions.
Explanation: Using fictional demonstration data and removing unnecessary account information is generally safer than trying to hide private details later.
Capture Only the Needed Area
Record the application window or useful screen area rather than the entire desktop when the rest of the screen adds no teaching value. Keep text large enough to read after the video is resized for phones and smaller displays.
Move the Cursor Deliberately
Move the cursor deliberately.
Pause briefly over an important control before clicking it, then leave the result visible long enough for a beginner to understand what changed.
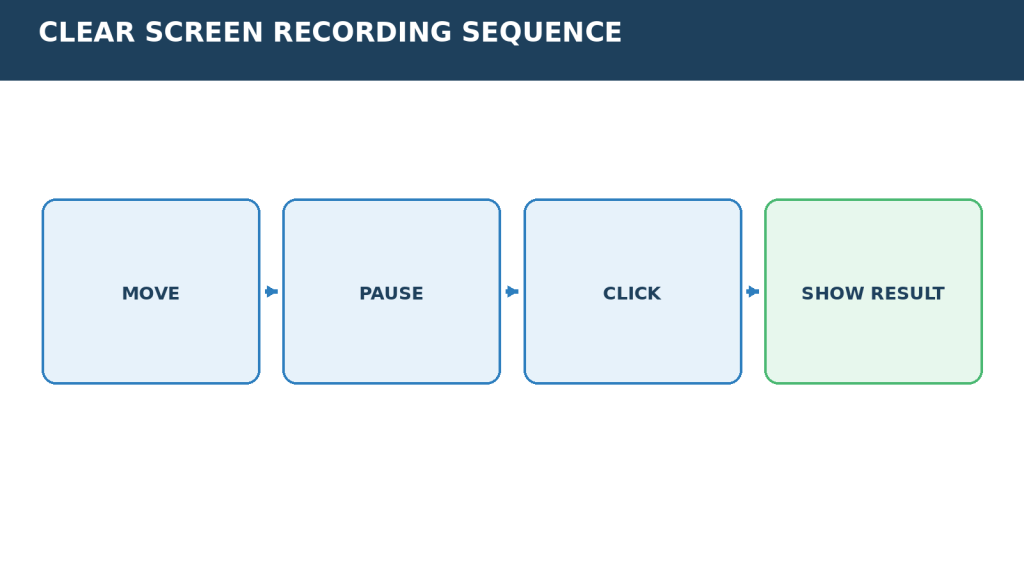
Figure 10. Slow, deliberate cursor movement and short pauses help complete beginners follow a screen demonstration.
Explanation: A clear recording gives viewers time to locate the correct control, observe the action, and see the result before the tutorial continues.
Record Short Task-Based Clips
A long recording may be harder to review and replace. When practical, record one main task per clip and include a few seconds before and after the action so the editor has room to trim.
Review Immediately
Watch the complete recording after capture. Check privacy, readability, cursor movement, unwanted audio, accidental notifications, current interface accuracy, and whether the result actually matches the approved scene.
Preserve the Original Recording
Keep an untouched original file and create separate trimmed or edited production versions. Record the software or service, recording date, platform, and version when that information will help future updates.
Common Mistake: Starting the screen recorder before preparing the computer and demonstration data.
How to Avoid This Mistake: Practise the exact action, clean the screen, turn off notifications, use safe demonstration data, and inspect the entire frame before recording.
Step 5: Capture Clear and Useful Screenshots
Screenshots are useful when the viewer mainly needs to study one stable control, setting, confirmation message, or completed result.
Choose a Screenshot When Motion Is Unnecessary
Use a screenshot when the viewer does not need to see the action happen.
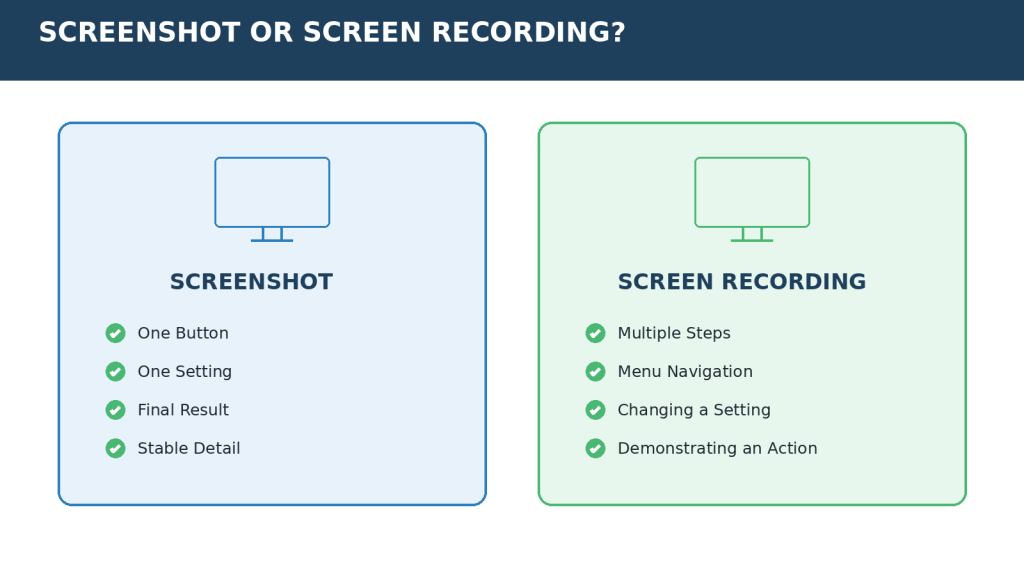
Figure 11. Use screenshots for stable details and screen recordings when viewers need to see an action or sequence.
Explanation: Choosing the simpler format can improve clarity and reduce unnecessary recording and editing work.
Prepare the Screen First
Use fictional data when possible and check the complete frame for email addresses, account names, browser tabs, notifications, filenames, private documents, recent-file lists, profile photographs, and other personal information.
Capture Enough Context
Crop unnecessary areas, but keep enough surrounding interface so a beginner knows where the highlighted control is located. Extreme cropping can make an otherwise accurate screenshot confusing.
Highlight Only the Important Detail
Highlight only the information needed for that scene.
Use one simple arrow, outline, or label when it improves understanding. Do not cover the screen with annotations.
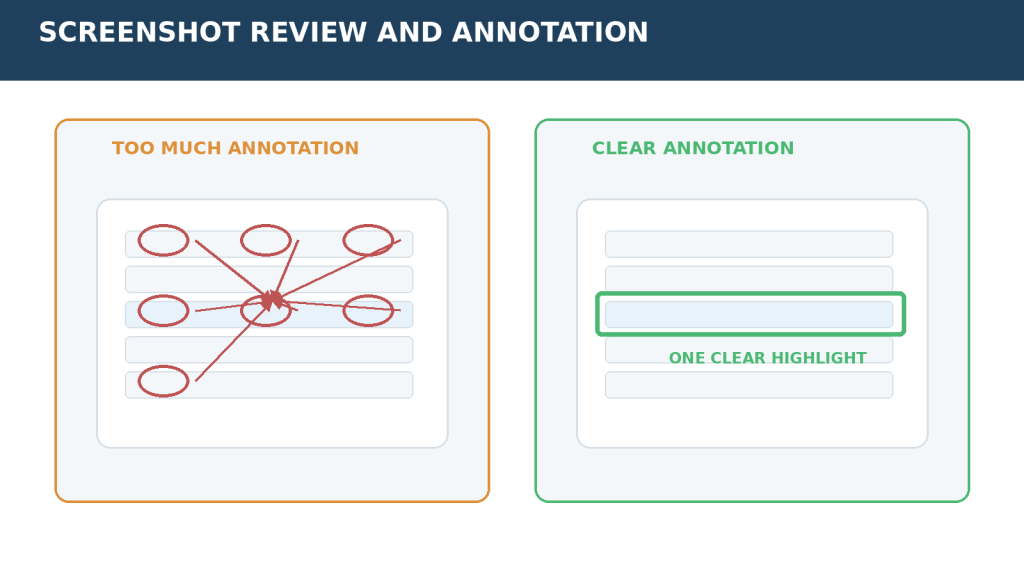
Figure 12. Simple screenshot highlighting is usually clearer than covering the screen with many arrows and labels.
Explanation: A screenshot should direct attention to the important control while preserving enough surrounding interface context for beginners.
Do Not Change the Meaning of the Interface
Cropping and highlighting can improve readability, but do not edit a screenshot so that it falsely shows a button, setting, message, or result that was not present.
Record When It Was Captured
Software interfaces change. When a screenshot teaches a specific feature, keep the capture date and relevant software context so the scene can be reviewed before publication or future updates.
Common Mistake: Capturing the whole screen and expecting the viewer to find one small control.
How to Avoid This Mistake: Capture enough context to orient the viewer, then crop and highlight the specific area needed for the lesson.
Step 6: Create Original Graphics, Diagrams, Checklists, and Comparison Visuals
Original graphics are often better than AI images or stock footage when the narration explains something specific.
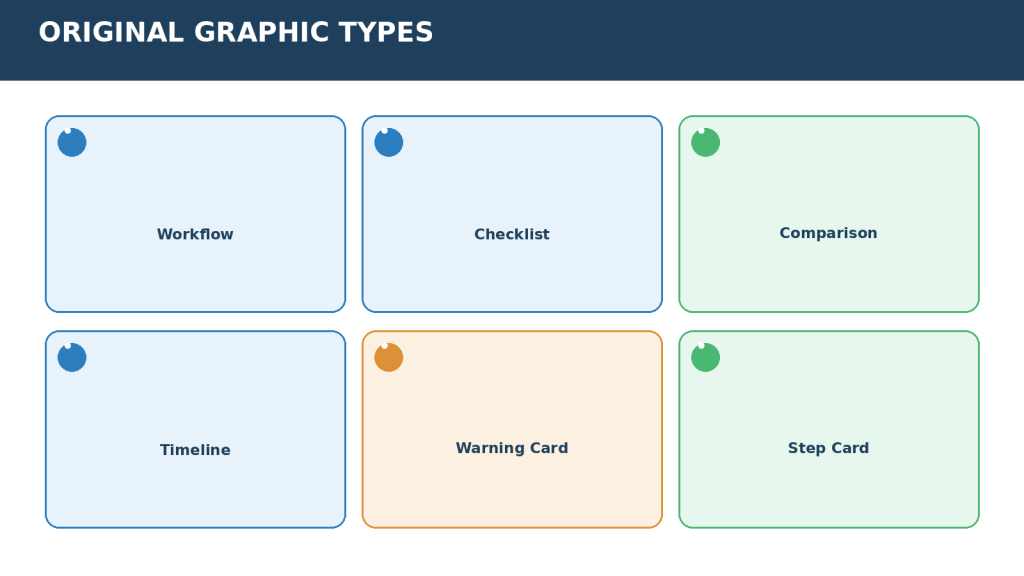
Figure 13. Original graphics are useful when viewers need structured information rather than general visual context.
Explanation: Workflows, checklists, comparisons, and warning cards give the creator precise control over wording, layout, accessibility, and teaching sequence.
Choose the Simplest Graphic Type
- Workflow – when sequence matters.
- Checklist – when viewers need to verify several items.
- Comparison – when two or more choices must be evaluated consistently.
- Timeline – when order and timing matter.
- Warning card – when a risk needs clear emphasis.
- Step card – when one instruction needs to remain visible.
Keep One Main Idea per Graphic
If a graphic requires several paragraphs of tiny text, divide it into multiple scenes. The narration can provide detail while the visual keeps the key point readable.
Use Consistent Hierarchy
- Large heading
- Short labels
- Logical reading order
- Consistent icon style
- Safe margins
- Strong contrast
- Limited colours
- Clear arrows that do not cross unnecessarily
Use Data Carefully
Create charts only when the narration depends on verified numerical information. Label the data clearly and preserve the source. Do not invent statistics merely to make a graphic look more authoritative.
Design for Accessibility
Use words, symbols, and shapes in addition to colour. Keep text large enough for mobile viewing, allow sufficient display time, and make sure important visual information is also explained in narration when appropriate.
Preserve Editable Masters
Save the editable source file as well as the exported PNG or video version. This makes spelling corrections, terminology changes, and future updates much easier.
Common Mistake: Trying to place an entire lesson inside one infographic.
How to Avoid This Mistake: Give each graphic one teaching purpose and split complex information into several scenes when necessary.
Step 7: Review, Organize, and Approve All Visual Assets Before Editing
Do not move every file directly into the video editor simply because it has been created.
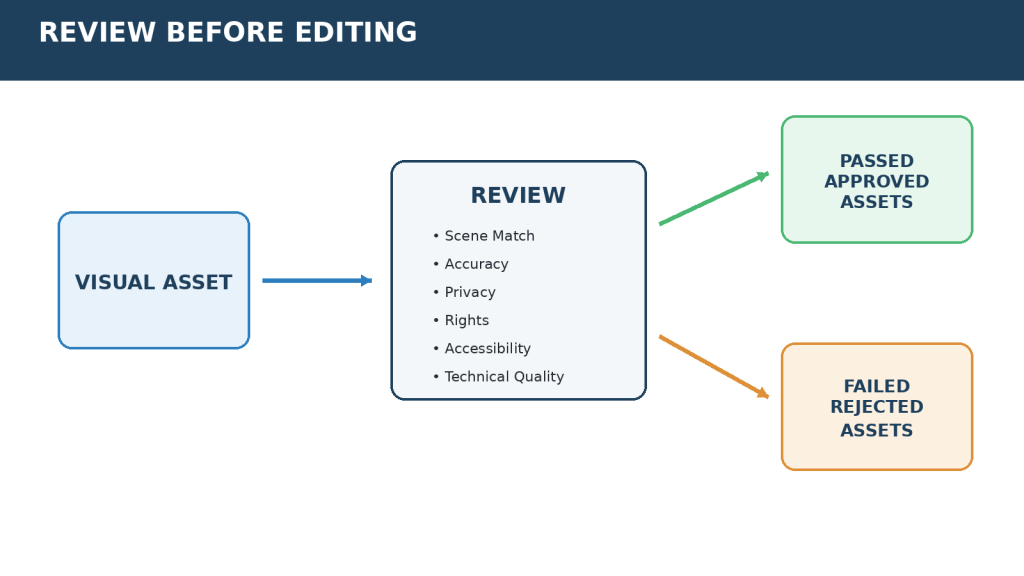
Figure 14. Only visuals that pass the required review should enter the approved-assets folder for editing.
Explanation: Separating approved and rejected files reduces the risk of accidentally using an incorrect, unlicensed, outdated, or privacy-sensitive asset.
Check the Production List for Missing Assets
Compare the completed folder against the scene plan. Mark missing, blocked, replacement-required, and approved assets clearly.
Review Every Asset Against the Narration
Confirm that the visual supports the exact narration and does not introduce a contradictory claim, wrong software step, irrelevant stock scene, or misleading representation.
Review the Different Asset Types Together
A strong individual image can still look out of place in the full video. Review AI images, stock clips, screenshots, recordings, and graphics together for repeated ideas, inconsistent colours, abrupt style changes, and unnecessary visual variety.
Complete Final Rights, Privacy, and Disclosure Checks
- External source recorded
- Licence reviewed
- Attribution recorded when required
- Permission status recorded when relevant
- Private information removed
- Real-person implications reviewed
- Synthetic-content disclosure flag recorded when relevant
- Current platform requirements marked for final publishing review
Check Technical Quality
- Correct aspect ratio
- Adequate resolution
- No stretching
- Readable text
- Safe margins
- Caption space
- No accidental crop of important controls
- Suitable duration or trim points
Create the Approved Asset Index
The approved-assets folder should contain only production-ready copies. Keep originals, editable masters, rejected versions, source records, and licence documents elsewhere in the project structure.
Create the Editing Handoff
Prepare a short handoff document such as 062-approved-visual-assets-handoff-v1-0.docx containing the scene number, approved filename, visual purpose, duration or trim note, source status, privacy status, accessibility note, and any editing instruction.
Back Up the Package
Back up the approved visual package before editing begins. This protects the clean production assets if editing versions are later overwritten or changed.
Common Mistake: Importing every draft, rejected asset, and unreviewed download directly into the editor.
How to Avoid This Mistake: Send only approved, clearly named production copies to the editing stage and keep the source material and rejected versions in separate folders.
Benefits of Using AI Images, Stock Footage, and Screen Recordings Together
- More accurate visual matching because different scene purposes can use different visual sources.
- Clearer software tutorials because actual actions can use screen recordings instead of generic illustrations.
- More flexible conceptual scenes because AI images can be created to match a planned composition.
- Realistic general context from suitable licensed stock media.
- Precise teaching graphics for workflows, comparisons, warnings, and checklists.
- Easier replacement because assets are scene-numbered and stored separately.
- Better rights documentation because source and licence records are captured during production.
- Lower privacy risk when demonstrations use fictional data and prepared screens.
- More consistent accessibility planning because text size, contrast, caption space, and reading time are checked before editing.
- More efficient editing because the editor receives approved files instead of an unorganized collection of drafts.
Reality: Mixing several visual sources does not automatically improve a video. The value comes from choosing each source for a clear teaching purpose and reviewing the complete sequence.
Best Use: Treat AI images, stock media, screen recordings, screenshots, and original graphics as different tools rather than competing solutions.
Limitations of AI Images, Stock Footage, and Screen Recordings
AI Image Limitations
- Generated text may be incorrect.
- Hands, objects, reflections, or backgrounds may contain errors.
- Recurring characters may change between scenes.
- Software interfaces may be invented or outdated.
- Several attempts may be needed to obtain the required composition.
- Realistic synthetic images can be misunderstood as authentic.
- Provider terms, features, and commercial-use conditions can change.
Stock Media Limitations
- Suitable footage may be difficult to find.
- Generic clips may not match the narration closely.
- Different providers use different licence conditions.
- An asset can later be removed or its availability can change.
- Branding, recognizable people, locations, or background details may create additional review needs.
- Large libraries can create source-tracking and storage problems.
Screen Recording Limitations
- Private information can appear unexpectedly.
- Software interfaces can change after recording.
- Small text may become unreadable after resizing.
- Long demonstrations can slow the video.
- A recording may need to be repeated because of notifications, mistakes, or cursor movement.
Screenshot and Graphic Limitations
- Screenshots can become outdated.
- Overly large screenshots can make important controls too small.
- Graphics can become crowded when too much text is included.
- Colour-only meaning can reduce accessibility.
- Incorrect or unsourced charts can mislead viewers.
Reality: No visual source removes the need for factual review, privacy review, licensing checks, accessibility planning, or human approval.
How to Reduce This Limitation: Use the simplest suitable visual, preserve editable and original files, keep records with each external asset, and review the full sequence before editing.
Common Mistakes When Creating Visuals for Faceless YouTube Videos
- Creating assets before the storyboard is approved.
- Using AI images for every scene.
- Accepting the first AI image without inspection.
- Leaving misspelled AI-generated text inside an image.
- Presenting an AI-generated software interface as a real current interface.
- Using an identifiable person’s likeness without appropriate review.
- Presenting realistic synthetic imagery as proof of a real event.
- Generating a large image batch before checking the visual style.
- Using generic stock footage as filler instead of supporting the narration.
- Choosing stock media based only on appearance.
- Checking the stock licence after editing is finished.
- Assuming free stock has no restrictions.
- Assuming royalty-free means copyright-free.
- Using a watermarked stock preview in the final video.
- Failing to record the provider and asset ID.
- Using stock models in a way that implies endorsement or a personal experience.
- Ignoring editorial-only or sensitive-use conditions.
- Recording a screen without preparing the desktop.
- Using a real personal account when a demo account would work.
- Moving the cursor too quickly.
- Recording one unnecessarily long tutorial clip.
- Allowing passwords or security codes to appear.
- Ignoring autocomplete, recent files, and notifications.
- Relying on blur to fix preventable privacy exposure.
- Using a screenshot when viewers need to see a sequence.
- Capturing the entire desktop when one control matters.
- Cropping a screenshot so tightly that viewers lose context.
- Adding too many arrows and labels.
- Editing a screenshot in a way that changes the meaning of the interface.
- Using outdated screenshots without review.
- Putting too much text into one graphic.
- Using text that is too small for mobile viewing.
- Relying only on colour to show warnings or approval.
- Mixing unrelated icon and visual styles.
- Creating charts without verified data.
- Stretching assets into the wrong aspect ratio.
- Upscaling low-quality media until it becomes visibly soft or distorted.
- Overwriting the original file.
- Using vague filenames such as final.png.
- Mixing approved and rejected assets in one folder.
- Deleting rejection reasons before the project is finished.
- Failing to save important AI prompt records.
- Failing to save licence and permission records.
- Assuming an attractive visual makes a factual claim accurate.
- Skipping the final full-sequence review.
- Ignoring mobile readability.
- Assuming visual quality alone guarantees monetization or audience growth.
How to Avoid These Mistakes: Use the approved scene plan, assign each asset a production purpose, review one asset at a time, preserve source and version records, and keep only approved files in the editing handoff.
Common Myths About Creating Visuals for Faceless YouTube Videos
Myth: Every faceless video should use AI-generated images.
Reality: Some scenes are clearer with screen recordings, screenshots, original diagrams, or suitable stock media.
Myth: Free stock media can be used without checking anything.
Reality: Provider licences and restrictions still need review.
Myth: Royalty-free means copyright-free.
Reality: Royalty-free usually describes a licence model, not the absence of copyright.
Myth: AI-generated images are automatically safe for commercial use.
Reality: Tool terms, input rights, output use, third-party rights, and the intended context still matter.
Myth: A realistic AI image proves that the depicted event happened.
Reality: Synthetic content can look convincing even when the event never occurred.
Myth: Screen recordings are automatically private because they show only a computer screen.
Reality: Accounts, notifications, filenames, messages, browser data, and other personal information can appear.
Myth: One long screen recording is always faster.
Reality: Short task-based clips can be easier to review, replace, and edit.
Myth: More annotations make screenshots easier to understand.
Reality: Too many arrows and labels can hide the control the viewer needs to see.
Myth: More visual variety always improves retention.
Reality: Variety without a teaching purpose can become distracting and inconsistent.
Myth: AI can perform the final rights and privacy approval.
Reality: AI can help identify possible issues, but final responsibility remains with the creator.
Myth: Better visuals guarantee views or monetization.
Reality: Visual quality can support clarity, but it cannot guarantee recommendations, retention, subscribers, revenue, or monetization.
Final Reality: Strong faceless-video visuals come from planning, relevance, review, organization, and responsible use – not from using the largest possible number of AI or stock assets.
Visual Production Checklist
- Approved storyboard and scene plan are available.
- Scene numbers match the storyboard.
- Visual-production folders are created.
- Master asset list is current.
- Every required scene has a production task.
- The visual type matches the teaching purpose.
- AI image prompts are saved when important.
- AI images have been checked for visual errors and misleading realism.
- AI-generated text has been verified or replaced.
- Synthetic-content disclosure needs are flagged where relevant.
- Stock assets have been previewed completely.
- Stock provider and asset ID are recorded when available.
- The exact stock licence has been reviewed.
- Commercial-use and attribution conditions are recorded.
- Watermarked previews are excluded from final assets.
- Screen-recording accounts and files use safe demonstration data when practical.
- Notifications are turned off before recording.
- Passwords, payment information, and security codes are excluded.
- Screen recordings are readable and task-focused.
- Original screen recordings are preserved.
- Screenshots include enough context.
- Screenshot annotations are simple and accurate.
- Software screenshots and recordings are reviewed for current accuracy.
- Original graphics use large readable text.
- Important meaning does not depend only on colour.
- Charts use verified data when included.
- Editable graphic masters are preserved.
- All assets are reviewed for privacy.
- Permissions are recorded when relevant.
- External sources and licences are documented.
- Aspect ratio and resolution are suitable.
- Important content remains inside safe margins.
- Caption space is considered.
- Files use scene-numbered names.
- Approved and rejected assets are separated.
- The complete visual sequence has been reviewed.
- Mobile readability has been checked.
- Approved asset counts match the production list.
- An editing handoff record is prepared.
- The approved production package is backed up before editing.
Final Tip: A clean approved-assets folder and complete source records can save more editing time than collecting additional visuals.
Practical Example: Create the Visual Package for a Faceless YouTube Scene
This example shows how a complete beginner can turn one approved storyboard sequence into actual production assets.
The fictional video topic is: How to Organize Digital Photos Safely.
The approved storyboard already contains five scenes: similar files may not be true duplicates; compare original, smaller, and edited versions; check quality, date, format, and content; move uncertain files into a review folder; and confirm the backup before deleting anything.
The goal now is to create the visual assets for those five scenes.
Scene 001: Similar Files
Narration purpose: Explain that similar-looking files may not be unnecessary duplicates.
Best visual type: AI-generated illustration or original file-browser graphic.
Production decision: Use an original fictional file-browser graphic rather than a realistic software screenshot. This avoids presenting a specific software interface when the lesson is about the general idea.
Visual requirements: Show five photograph thumbnails, similar filenames, slight differences between files, one folder window, and no real personal information.
Suggested filename: 062-scene-001-similar-photo-files.png
Privacy status: Passed – fictional files only.
Rights status: Original asset.
Accessibility note: Use labels and icons rather than relying only on small filename differences.
Scene 002: Compare Three Versions
Narration purpose: Show that three similar photographs can have different purposes.
Best visual type: Original comparison graphic.
Production decision: Create a three-panel 16:9 comparison labelled Original, Smaller Copy, and Edited Version. Use the same fictional landscape photograph in all three panels.
Show meaningful differences such as image dimensions, file size, and a visible edit indicator. Do not use tiny technical details as the only way to distinguish the versions.
Suggested filename: 062-scene-002-photo-version-comparison.png
Privacy status: Passed – fictional photograph.
Rights status: Original asset.
Accessibility note: Use clear text labels and visible structural differences between the three panels.
Scene 003: Check Before Deleting
Narration purpose: Explain which file details should be reviewed before deleting a possible duplicate.
Best visual type: Original checklist graphic.
Production decision: Create four large checklist cards: Quality, Date, Format, and Content. Add a magnifying-glass symbol to reinforce the review action.
Suggested filename: 062-scene-003-check-before-deleting.png
Privacy status: Not applicable.
Rights status: Original asset.
Accessibility note: Use large labels, strong contrast, and simple icons.
Scene 004: Move Uncertain Files
Narration purpose: Show the safer action when the creator is not certain whether a file should be deleted.
Best visual type: Simple screen-style demonstration or original animated graphic.
Production decision: Use a fictional screen-style graphic rather than recording a real personal computer. Show two uncertain photograph files, a folder labelled Review First, files moving into that folder, and no delete symbol.
Suggested filename: 062-scene-004-move-to-review-first-folder.png
Privacy status: Passed – fictional data only.
Rights status: Original asset.
Accessibility note: Keep the movement slow and add the visible label Review First. Do not rely only on the motion.
Scene 005: Confirm the Backup
Narration purpose: Explain that deletion should happen only after the backup has been checked.
Best visual type: Original confirmation graphic.
Production decision: Show the main photo collection, a separate backup drive, one sample photograph opened successfully, a large check mark, and the text label Backup Confirmed.
Suggested filename: 062-scene-005-confirm-backup-first.png
Privacy status: Passed – fictional files.
Rights status: Original asset.
Accessibility note: Use the words Backup Confirmed in addition to the green check mark.
Build the Production List
| Scene | Asset | Source | Status |
| 001 | Similar-file browser graphic | Original | Approved |
| 002 | Three-version comparison | Original | Approved |
| 003 | Review checklist | Original | Approved |
| 004 | Review-folder demonstration | Original | Approved |
| 005 | Backup confirmation graphic | Original | Approved |
This example does not require stock footage, real personal photographs, real screen recordings, or external screenshots. That is acceptable. The visual source should match the scene rather than forcing every project to use every available visual type.
Create the Assets in Production Order
1. Create Scene 002 first because it establishes the fictional photograph used throughout the sequence.
2. Reuse that photograph in Scene 001.
3. Create Scene 003 as the checklist.
4. Create Scene 004 using the same fictional file style.
5. Create Scene 005 using the same photograph and file system.
Preserve the Editable Masters
Keep editable versions of the comparison graphic, checklist, folder demonstration, and backup graphic. If a term changes later, the text can be corrected without rebuilding the complete visual.
Review the Complete Sequence
Arrange the five visuals in scene order: Similar Files -> Compare Versions -> Check Details -> Review First -> Confirm Backup.
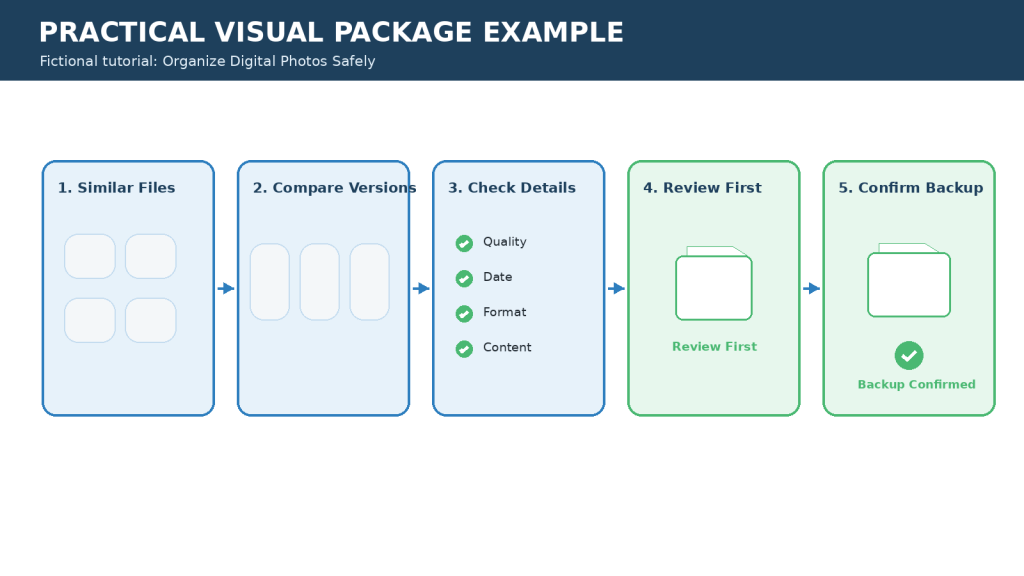
Figure 15. One approved storyboard sequence can become a complete set of consistent, scene-numbered production assets.
Explanation: The visual package uses the simplest suitable asset for each scene without adding unnecessary AI images, stock footage, or real personal information.
- Colours remain consistent.
- The fictional photograph stays recognizable.
- File icons use one style.
- Text remains large.
- No scene looks unrelated.
- The sequence follows the narration.
Complete the Privacy, Rights, and Accessibility Review
Confirm that no real photograph, username, email, file path, account information, or other private detail was accidentally inserted. Because the example uses original graphics and fictional material, no external stock licence is needed. If an external icon, photograph, font, or template is added later, update the rights record before approval.
Confirm that text is large, labels are clear, green is not the only sign of approval, narration explains the important differences, no scene is overcrowded, and important information remains visible long enough.
Final Asset Filenames
- 062-scene-001-similar-photo-files.png
- 062-scene-002-photo-version-comparison.png
- 062-scene-003-check-before-deleting.png
- 062-scene-004-move-to-review-first-folder.png
- 062-scene-005-confirm-backup-first.png
What This Example Shows
This example demonstrates that a strong visual-production workflow does not require using every possible asset source. The creator did not add unnecessary stock footage, AI-generated people, real private photographs, or real account recordings because those assets were not needed.
Final Lesson: Choose the visual source that best explains the approved narration. Do not use AI images, stock footage, or screen recordings merely because the tools are available.
Frequently Asked Questions
Should I use AI images, stock footage, or screen recordings?
Use the visual type that best explains the approved scene. AI images suit fictional or conceptual scenes; stock media suits realistic general context; screen recordings suit actions; screenshots suit stable details; and original graphics suit workflows, comparisons, and checklists.
Can I make an entire faceless YouTube video with AI images?
Some videos can use mostly AI-generated visuals, but that may not be the clearest choice when the narration includes real software demonstrations, exact interfaces, detailed comparisons, or processes better explained with diagrams.
Are AI-generated images always safe to use commercially?
Do not assume so. Commercial-use conditions can depend on the AI provider, plan, current terms, specific output, third-party rights, and intended use. Check the current provider terms when relevant and preserve the generation records.
Should I save my AI prompts?
Yes. Save important prompts with the scene number, tool used, creation date, prompt version, generated file, and approved version.
What should I do if an AI image contains misspelled text?
Do not publish the incorrect text. Regenerate without text, replace the text manually, or use an original graphic.
Can I use AI-generated screenshots of real software?
Avoid presenting generated interfaces as though they are real current software screens. AI may invent buttons, menus, labels, and features.
Can I create realistic AI people for my faceless videos?
You can use fictional synthetic people when appropriate, subject to the tool terms and intended use. Avoid impersonation, false endorsement, misrepresentation of real events, and misleading viewers about authenticity.
Does a realistic AI image prove that something happened?
No. A realistic synthetic image is not evidence that a person was present, an event occurred, a business made a claim, or a product produced a result.
Is free stock footage safe to use?
Not automatically. Free stock can still have conditions involving commercial use, attribution, modification, redistribution, trademarks, identifiable people, or sensitive uses.
Does royalty-free mean copyright-free?
No. Royalty-free usually describes a licensing arrangement. The asset may still be protected by copyright and have usage restrictions.
Should I save the stock licence?
Yes. Preserve the source page, provider, asset ID, download date, licence record, attribution requirement, and subscription information when relevant.
Can I use stock footage showing recognizable people?
Possibly, depending on the licence and context. Do not use it in a way that falsely implies endorsement, customer status, participation in an event, or a sensitive personal experience.
What is editorial-only stock footage?
Editorial-only content is generally intended for editorial contexts and may not allow the same promotional or commercial uses as standard stock media. Check the specific provider licence.
Can I remove a watermark from stock footage?
Do not remove a watermark from an unlicensed preview. Obtain the properly licensed downloadable version.
When is a screen recording better than a screenshot?
Use a screen recording when viewers need to see a sequence, such as opening a menu, changing a setting, and viewing the result.
When is a screenshot better than a screen recording?
Use a screenshot when the viewer mainly needs to study one stable screen, such as a button, menu, confirmation message, or final result.
Should I record my whole desktop?
Usually no. Record only the application, browser window, or region viewers need. This can improve privacy, readability, focus, and editing flexibility.
Should I use a separate account for demonstrations?
When practical, yes. A safe demonstration account can reduce the chance of exposing personal email, private files, account photos, messages, purchase history, or payment information.
Can I use my real files during a screen recording?
You can, but fictional demonstration files are usually safer when real information is not necessary.
What should I do with passwords during screen recording?
Do not record passwords, authentication codes, recovery codes, or security tokens. Pause or stop the recording while entering sensitive information.
Should I speak while recording my screen?
You do not have to. A beginner-friendly workflow is to record the clean screen action, review it, add narration later, and synchronize the narration during editing.
How fast should I move the cursor?
Move slowly enough for a beginner to follow. Pause briefly over important controls before clicking.
Should I record one long tutorial or several short clips?
Short task-based recordings can be easier to review, replace, rename, edit, and organize.
What if a notification appears during recording?
If it reveals private information or creates a serious distraction, rerecord the scene. Turning notifications off before recording is safer.
Can I blur private information later?
Sometimes, but prevention is usually better. A blur can miss frames, move incorrectly, or leave other private information visible.
What if software changes after I record the video?
Review the affected scenes before publication. If the change makes the tutorial inaccurate, update the recording, screenshot, narration, or scene plan as needed.
Should I record the software version?
When known and relevant, record the software or service, recording date, platform, version, and browser.
Can I use screenshots from another website?
Do not assume that an online screenshot can automatically be reused. Review the source, rights, permission, licence, and attribution requirements.
How much of the screen should a screenshot show?
Enough to provide context, but not so much that the important control becomes tiny.
Should I add arrows to every screenshot?
No. Use arrows, outlines, or highlights only when they improve understanding.
Can I edit a screenshot?
Yes for cropping, highlighting, a simple arrow, or a short label, but do not edit it in a way that changes what the real interface means.
What is the best format for workflows and checklists?
Original graphics are often suitable because you can control the text, spacing, colours, icons, layout, and accessibility.
Should I use charts in my faceless video?
Only when you have real numerical information useful to the viewer. Do not invent statistics merely to create a chart.
How much text should be inside a graphic?
Use enough text to communicate the key point, but keep it concise. Let the narration provide the detailed explanation.
How can I make visuals easier to read on phones?
Use large text, short labels, strong contrast, simple layouts, close-up screenshots, clear icons, and enough viewing time.
Can I use colour to show approved and warning items?
Yes, but do not use colour alone. Combine words, icons, shapes, and colour.
What image size should I use?
For standard landscape YouTube production, 1920 x 1080 is a common Full HD working size when supported by the workflow. Use the correct aspect ratio and avoid stretching.
Can I stretch a portrait image into 16:9?
Avoid stretching. Crop, reframe, regenerate, or place the portrait visual inside a suitable landscape layout.
Should I keep rejected images and clips?
You do not need to keep every failed file forever, but preserving important rejected versions during production can help document why they were not approved.
How should I name visual files?
Use scene-numbered descriptive filenames and controlled versions. Avoid vague names such as final.png, newest.png, or image-copy.png.
Should I keep the original files?
Yes. Preserve the original AI generation, stock download, screen recording, screenshot, editable graphic master, and approved production copy when relevant.
Do I need a separate approved-assets folder?
It is strongly recommended for larger projects. The editor should receive only the files that passed review.
Should I check all the visuals together?
Yes. Individual assets may look good while the full sequence becomes repetitive or inconsistent.
Can AI approve the final visual package for me?
AI can help identify possible issues, but final approval should remain under human review. AI cannot independently guarantee licence validity, permission, privacy safety, legal compliance, factual accuracy, or accessibility.
Do better visuals guarantee more YouTube views?
No. Better visuals may improve clarity and presentation, but they cannot guarantee views, retention, subscribers, recommendations, or revenue.
Do AI images and stock footage guarantee monetization?
No. Visual quality and licences are only part of the publishing process. YouTube monetization, originality, reused-content, copyright, and disclosure requirements should be reviewed separately.
What is the most important final visual check?
Ask whether the approved asset clearly helps the viewer understand the matching narration and whether it has passed the necessary accuracy, privacy, rights, accessibility, and technical reviews.
Key Takeaways
- Start with the approved storyboard and scene plan.
- Convert every scene into a specific production task before creating assets.
- Choose the visual type according to what the viewer needs to understand.
- Use AI-generated images for suitable fictional, conceptual, or hard-to-photograph scenes.
- Use real screenshots or screen recordings when teaching actual software actions.
- Use stock images and footage mainly for realistic general context.
- Use original graphics for workflows, checklists, warnings, comparisons, and structured explanations.
- Do not use stock footage merely to fill the screen.
- Do not use AI-generated interfaces as though they are real current software screens.
- Inspect AI-generated images carefully for distorted objects, incorrect text, unwanted logos, and misleading details.
- Preserve important AI prompts, original outputs, edited versions, tool information, and creation dates.
- Review the current terms of AI providers when relevant to commercial or monetized use.
- Do not assume AI-generated content is automatically unrestricted or commercially permitted.
- Review the exact licence for every external stock asset.
- Do not assume that free means unrestricted or that royalty-free means copyright-free.
- Save stock source pages, asset IDs, download dates, licence records, and attribution requirements.
- Prepare the computer before making screen recordings.
- Use fictional demonstration data whenever practical.
- Keep passwords, security codes, payment information, and private records out of screen recordings.
- Use screenshots when movement is unnecessary.
- Do not change the meaning of real interfaces through editing.
- Keep original graphics simple and focused on one teaching purpose.
- Use large text, strong contrast, simple icons, and clear spacing.
- Do not rely only on colour to communicate warnings, approvals, or errors.
- Preview important visuals at mobile size.
- Leave safe space for captions and later cropping.
- Use scene-numbered filenames.
- Keep approved and rejected assets in separate folders.
- Review every asset for privacy before it enters the editing stage.
- Record permission status when a visual involves another person’s likeness, voice, story, or personal information.
- Keep realistic synthetic content marked for disclosure review when viewers could mistake it for authentic footage or a real event.
- Do not present synthetic images as proof that an event occurred.
- Review the complete visual sequence before editing.
- Back up the approved visual package before beginning Article 063.
The Basic Visual Production Workflow
1. Open the approved storyboard and scene plan.
2. Create the master visual-production list.
3. Assign a visual source to every scene.
4. Create AI-generated images where suitable.
5. Find and document suitable stock media.
6. Prepare and record screen demonstrations.
7. Capture required screenshots.
8. Create original graphics and diagrams.
9. Review every individual asset.
10. Check privacy, rights, permissions, and disclosure requirements.
11. Check technical quality and accessibility.
12. Move only approved files into the approved-assets folder.
13. Review the complete visual sequence.
14. Create the editing handoff package.
15. Back up the visual-production files.
16. Move to video and audio editing.
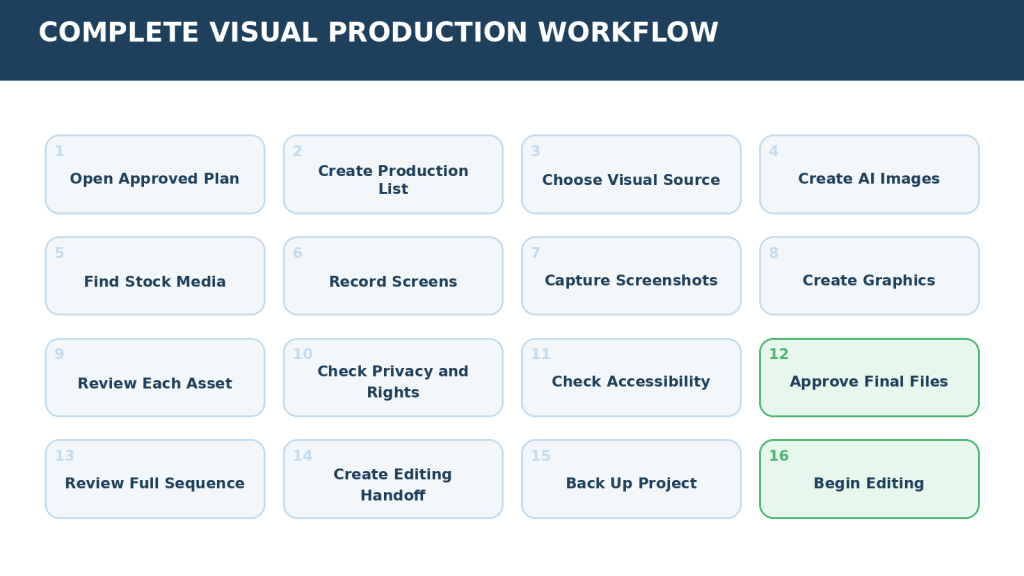
Figure 16. The complete visual-production workflow moves from the approved scene plan to a clean, reviewed asset package ready for editing.
Explanation: Following the workflow in order helps prevent random asset creation, missing source records, privacy problems, version confusion, and unreviewed files from entering the editing stage.
What This Workflow Cannot Guarantee
- Perfect AI generations
- Permanent software-interface accuracy
- Continued stock-asset availability
- Licence approval for every possible use
- YouTube recommendations
- Viewer retention
- Monetization
- Revenue
Final Tip: Do not ask which visual looks the most impressive. Ask which visual helps the viewer understand this approved scene most clearly, accurately, and responsibly.
Final Thoughts
Creating visuals for a faceless YouTube video is easier when every asset begins with a clear purpose. The process should not start with random AI image generation, large stock-media downloads, unplanned screen recordings, or unorganized screenshots. It should start with the approved storyboard and scene plan.
AI-generated images, stock footage, screenshots, screen recordings, and original graphics all have different strengths. The best workflow does not try to use every visual source equally. It chooses the source that explains each scene most clearly.
A strong visual package should preserve the production records behind the assets, including AI prompts, original outputs, stock source records, licence information, permission records, original recordings, screenshots, editable graphic masters, approved production copies, and version records.
Privacy should be handled before editing begins. Screen recordings and screenshots should be checked for email addresses, account information, private messages, file names, notifications, payment information, customer information, and confidential information.
Licensing requires the same early attention. Do not assume that content is unrestricted because it is free, online, royalty-free, AI-generated, or included in a subscription. Check the relevant conditions and preserve the records.
Accessibility should also be built into the visuals from the beginning through large readable text, strong contrast, clear labels, controlled motion, sufficient display time, mobile-friendly layouts, and icons or wording in addition to colour.
Before moving to editing, the project should have one approved visual for each required scene, clear scene-numbered filenames, an approved-assets folder, original files preserved separately, complete source and licence records, privacy-reviewed recordings and screenshots, permission records when needed, synthetic-content disclosure flags where relevant, accessibility-reviewed graphics, a complete visual-sequence review, and a backup copy of the production package.
Article 063 will use this approved visual package to begin the next stage: editing the faceless YouTube video and audio.
Final Tip: Do not send unreviewed images, clips, and recordings into the editor. Finish the visual-production review first so Article 063 begins with one clean, organized, approved asset package.
Continue Learning
This article is part of the AI Mastery Faceless YouTube Video Creation Series.
- How to Create Faceless YouTube Videos with AI: Complete Beginner Step-by-Step Guide (2026)
- How to Choose a Faceless YouTube Niche and Plan Your Channel with AI: Beginner Step-by-Step Guide (2026)
- How to Research and Write Faceless YouTube Video Scripts with AI: Beginner Step-by-Step Guide (2026)
- How to Write Original YouTube Video Scripts with AI (2026)
- How to Create Storyboards and Plan Scenes for Faceless YouTube Videos with AI: Beginner Guide (2026)
- How to Edit Faceless YouTube Videos and Audio: Beginner Guide (2026)
- How to Create YouTube Thumbnails Titles, and Descriptions with AI: Beginner Guide (2026)
- YouTube Copyright and Licensing for AI Videos: Beginner Guide (2026)
- Reused Content, AI Disclosure, and Monetization for Faceless Videos: Beginner Guide (2026)
- How to Use YouTube Studio and YouTube Analytics for Faceless Channels: Beginner Guide (2026)
For the clearest learning sequence, complete Article 061 before this article, then continue directly to Article 063.
Sources and References
The following official or original sources were reviewed for this article on August 7, 2026. Software features, licences, privacy guidance, and platform policies can change. Check the relevant official source when first using a service, when changing plans or features, after receiving a policy-update notice, and periodically as part of the publishing workflow.
YouTube Help – Disclosing use of GenAI content
YouTube explains when creators must disclose realistic AI-generated or meaningfully altered content and provides the AI use setting in the upload workflow.
YouTube Help – Understanding “How this content was made” disclosures
YouTube explains how information about AI-generated or altered content can appear to viewers.
YouTube Help – Protecting your identity
YouTube explains privacy complaints and realistic altered or synthetic likenesses.
YouTube Help – Impersonation policy
YouTube prohibits misleading impersonation, including deceptive use of AI-generated likenesses or voices.
Canadian Intellectual Property Office – Copyright: Learn the basics
CIPO provides introductory guidance on copyright and legally using the works of others.
Pexels – Free Stock Photo & Video License
Pexels provides an example of provider-specific stock-media licence conditions, including restrictions involving identifiable people, endorsement, resale, and trademarks.
Office of the Privacy Commissioner of Canada – Your privacy and AI chatbots
The OPC recommends limiting personal information shared with AI chatbots and not sharing sensitive or identifiable personal information unnecessarily.
Google Gemini Apps Help – Gemini Apps Privacy Hub
Google describes information that can be provided to Gemini Apps, including prompts, files, videos, screens, and photos, and explains privacy controls and responsibilities.
OpenAI – Terms & policies
OpenAI provides the current legal terms and policies governing individual and business use of its services. Users should check the agreement that applies to their account and use case.
W3C Web Accessibility Initiative – Captions/Subtitles
W3C explains captions and broader accessible-media practices for video content.
Important Note: This article provides general educational information, not legal advice. Copyright, licensing, privacy, permissions, commercial use, and synthetic-content requirements can depend on the asset, provider, licence, AI tool, account or subscription plan, people depicted, intended use, jurisdiction, and publishing platform.
Readers do not need to reread every policy before creating every individual scene. A practical approach is to check the relevant conditions when first using a new tool or provider, when choosing a new licence type, when changing plans, when receiving a policy update, when using another person’s photograph, video, face, or voice, when realistic synthetic content could be mistaken for authentic footage, before an important commercial project, and periodically during final publishing review.


Leave a comment