

Estimated reading time: 120–150 minutes
Last updated: July 28, 2026
Before Learning
For the best results, read these beginner-friendly guides first:
• ChatGPT Basics for Beginners: Complete Guide (2026)
• Prompt Engineering for Beginners: Complete Guide (2026)
• How to Create AI Videos with ChatGPT: Beginner Step-by-Step Guide (2026)
• Best AI Video Tools for Beginners: Complete Guide (2026)
These guides explain how to use ChatGPT, write clearer prompts, plan an AI video, and choose a suitable video-generation tool.
What You’ll Learn
By the end of this guide, you will know:
• What text-to-video generation is and how it works
• How a written prompt becomes a moving video
• How to choose a simple video idea
• How to describe the subject, setting, action, and camera movement
• How to describe lighting, style, mood, duration, and aspect ratio
• How to write an effective text-to-video prompt
• How to use ChatGPT to improve a video prompt
• How to choose suitable video-generation settings
• How to generate your first text-to-video clip
• How to review the complete result
• How to correct weak movement, changing objects, distorted faces, and unstable backgrounds
• How to improve one prompt instruction at a time
• How to create several connected clips for a longer video
• How to add captions, narration, music, and final editing
• How to export, name, and organize the finished video
• How to use AI-generated videos responsibly
• Which common mistakes, limitations, and myths beginners should understand
• How to prepare text-generated videos for WordPress, YouTube, and social media
Introduction
Text-to-video generation allows you to create a moving video from written instructions. Instead of uploading a starting image or recording footage with a camera, you describe the scene you want, and an AI video generator creates a short clip based on your description.
The written instruction is called a text-to-video prompt.
For example:
Create a six-second cinematic video of a red bicycle beside a quiet country road at sunrise. Grass moves gently in the breeze while the camera slowly travels toward the bicycle. Use warm natural lighting, realistic movement, and a wide 16:9 landscape composition.
The AI video generator interprets the prompt and attempts to create:
• A red bicycle
• A country road
• Sunrise lighting
• Moving grass
• A slow forward camera movement
• A realistic visual style
• A wide landscape composition
Unlike image-to-video generation, text-to-video does not begin with an uploaded picture. The AI must create the complete visual scene, including the subject, background, lighting, composition, and movement.
This gives the AI more creative freedom, but it also gives you less control over the exact appearance of the first frame.
A text-to-video prompt should normally explain:
• The main subject
• The setting
• The subject’s action
• Environmental movement
• Camera angle
• Camera movement
• Lighting
• Visual style
• Mood
• Clip duration
• Aspect ratio
• Important quality requirements
Current text-to-video guidance from Runway recommends describing both the visual appearance and the movement of the scene. Adobe similarly recommends using a clear, well-structured prompt that identifies the shot, subject, action, location, and visual style. [1, 4, 5]
A vague prompt may say:
Create a video of a bicycle.
This does not explain:
• What the bicycle looks like
• Where it is located
• Whether it is moving
• How the camera should behave
• What time of day it is
• What visual style should be used
• What shape the video should have
The AI must make all these decisions.
A clearer prompt might say:
Create a realistic six-second video of a red bicycle standing beside a wooden fence on a quiet country road at sunrise. Grass and tree leaves move gently in a light breeze. The camera slowly pushes forward toward the bicycle in one continuous shot. Use warm golden light, natural colours, smooth movement, and a wide 16:9 landscape composition. Do not include people, visible text, logos, or additional bicycles.
The clearer prompt gives the AI more useful direction while still leaving room for the model to create the scene.
However, a detailed prompt does not guarantee a perfect result.
The generated clip may still contain:
• Changing objects
• Unstable backgrounds
• Unnatural movement
• Incorrect hands or faces
• Unexpected camera behaviour
• Distorted products
• Unreadable visible text
• Objects appearing or disappearing
• Incorrect cropping
• Differences from the original idea
For this reason, text-to-video generation should be treated as a process of:
1. Planning the scene
2. Writing the prompt
3. Generating a short test
4. Reviewing the entire result
5. Identifying the largest problem
6. Revising one instruction
7. Generating an improved version
8. Editing the strongest clip
Runway’s introductory prompting guidance recommends beginning with a simple prompt, reviewing the result, and improving it through controlled iteration rather than attempting to produce everything perfectly in one generation. [2]
In this guide, ChatGPT will be used to help you:
• Develop the video idea
• Organize the scene
• Write the first prompt
• Improve unclear instructions
• Plan camera movement
• Create several connected scenes
• Write narration and captions
• Troubleshoot weak results
• Prepare a publishing checklist
A compatible AI video generator will then create the moving clip from the finished prompt.
Text-to-video is especially useful when you do not already have a suitable photograph or reference image. It can help create:
• Cinematic landscapes
• Creative story scenes
• Educational visual examples
• Website background clips
• Presentation visuals
• Social-media content
• Advertising concepts
• Animated environments
• Video prototypes
• B-roll footage
Text-to-video is less suitable when exact appearance is essential.
For example, it may not be the best choice when you need:
• An exact product demonstration
• A consistent real person
• Documentary evidence
• Genuine customer testimony
• Accurate safety instructions
• A precise technical process
• A verified historical event
In those situations, real footage or carefully controlled image-to-video generation may provide greater accuracy.
The most practical beginner approach is to start with one subject, one action, one setting, and one camera movement. Generate a short clip, review it carefully, and increase the complexity only after the basic result is stable.
Current Information Note
AI video tools, model names, available settings, generation limits, credit costs, privacy options, and commercial-use conditions can change frequently.
Some current platforms allow users to select settings such as the model, aspect ratio, camera controls, and prompt enhancement, but the exact options depend on the selected service and model. [3, 5]
Always check the provider’s current official documentation before paying for a plan or beginning an important commercial project.
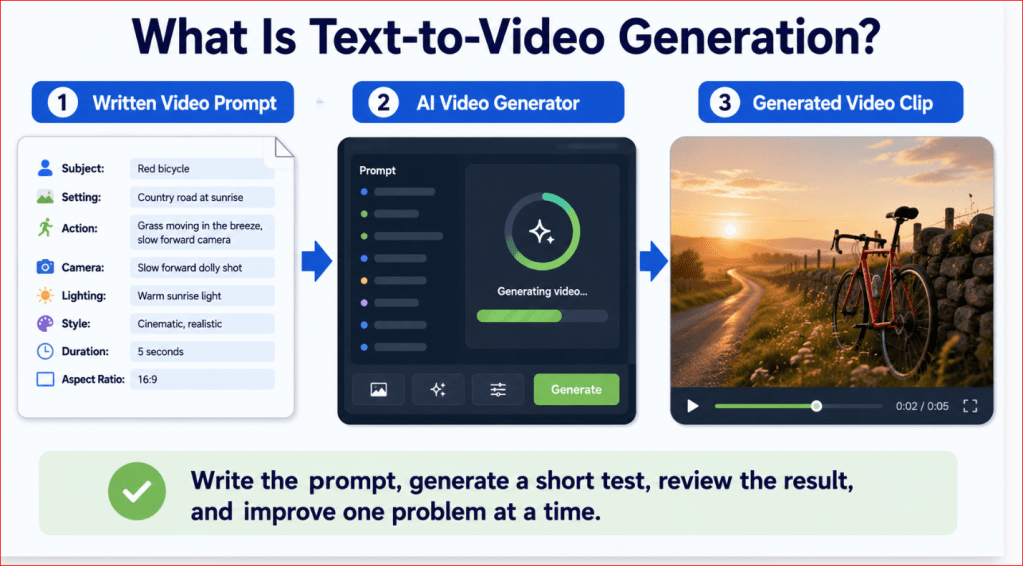
Figure 1. Text-to-video generation turns a written description into a short moving video.
Figure 1 shows the basic text-to-video process. The user writes a prompt describing the subject, setting, action, camera, lighting, style, duration, and format. The AI video generator interprets these instructions and creates a moving clip that must be reviewed and improved before publication.
How Text-to-Video Generation Works
Text-to-video generation begins with a written prompt and ends with a sequence of moving images called video frames. [1, 5]
A traditional video is usually recorded with a camera. A text-to-video system creates the frames using artificial intelligence instead.
The process can be understood in seven main steps.
Step 1: You Write the Video Prompt
The process begins when you describe the video you want.
For example:
Create a six-second realistic video of a small wooden boat moving slowly across a calm lake at sunrise. Soft mist drifts above the water while the camera gently follows the boat from the side. Use warm natural lighting and a wide 16:9 landscape format.
The prompt gives the AI information about:
• The subject
• The setting
• The action
• Environmental movement
• Camera movement
• Lighting
• Visual style
• Duration
• Aspect ratio
The AI cannot see the exact video in your imagination. It relies on the words in the prompt to understand what it should create.
Step 2: The AI Identifies the Main Elements
The AI examines the prompt and separates it into important visual and motion instructions.
From the boat example, it may identify:
• Subject: Small wooden boat
• Setting: Calm lake
• Time: Sunrise
• Action: Boat moving slowly
• Environment: Mist drifting above the water
• Camera: Side-following movement
• Lighting: Warm natural light
• Format: Wide 16:9 landscape
• Duration: Six seconds
Clear prompts make this step easier.
A vague instruction such as:
Create a beautiful lake video.
does not provide enough information about the main subject, movement, camera, lighting, or visual style.
Step 3: The AI Creates the Starting Scene
The system creates the first visual appearance of the scene.
It must decide:
• Where the boat appears
• How large it is
• What the lake looks like
• Where the horizon is placed
• How the sunrise lights the scene
• What colours appear in the sky and water
• How the camera frames the subject
Because there is no uploaded reference image, the AI creates these visual details from the written prompt.
This means that two generations using the same prompt may look different.
For example, one version may show:
• A small fishing boat
• A wide open lake
• Orange sunrise light
• Mountains in the background
Another version may show:
• A narrow wooden rowboat
• A lake surrounded by trees
• Soft yellow light
• Mist covering part of the background
Both versions may follow the general prompt while interpreting some details differently.
Step 4: The AI Plans the Movement
The AI then attempts to understand what should move during the clip.
Movement may include:
• The main subject
• Background objects
• Water
• Clouds
• Trees
• Clothing
• Hair
• Shadows
• Reflections
• The camera itself
In the boat example:
• The boat moves slowly forward.
• Mist drifts above the lake.
• Water produces gentle ripples.
• Reflections change as the boat moves.
• The camera follows the boat from the side.
A strong prompt should make the movement clear.
Instead of writing:
The boat moves.
write:
The small wooden boat travels slowly from left to right across the calm lake while the camera follows it smoothly from the side.
This gives the AI clearer information about direction, speed, and camera behaviour.
Step 5: The AI Generates a Sequence of Frames
A video is made from many still images shown quickly one after another.
These images are called frames.
The AI generates a sequence of frames that attempts to show the requested scene changing over time.
For the movement to look natural, important details should remain consistent from one frame to the next.
The AI should try to preserve:
• The shape of the boat
• The boat’s colour
• The lake
• The horizon
• The lighting
• The camera angle
• The background
• The direction of movement
However, the AI may struggle to keep everything stable.
Possible problems include:
• The boat changing shape
• Parts of the boat disappearing
• The background shifting
• The horizon moving unexpectedly
• Reflections becoming unrealistic
• The camera changing direction
• Additional objects appearing
• The movement becoming too fast
These problems are called temporal consistency problems because details change incorrectly over time.
Step 6: The Frames Are Combined into a Video Clip
After the frames are generated, they are played in sequence to create the appearance of movement.
The resulting clip may include:
• Subject movement
• Camera movement
• Environmental motion
• Lighting changes
• Depth and perspective
• Visual effects
Some tools may also generate or add:
• Sound effects
• Background audio
• Dialogue
• Music
• Lip movement
These features depend on the selected platform and model.
Do not assume that automatically generated sound is accurate or suitable. Listen to the complete clip and review all dialogue, music, and sound effects before using them.
Step 7: You Review and Improve the Result
The first generated video should be treated as a draft.
Watch the complete clip several times.
Check:
• Does the subject match the prompt?
• Is the main action correct?
• Is the movement smooth?
• Does the camera follow the requested direction?
• Are objects stable?
• Does the background remain consistent?
• Are faces and hands natural?
• Does the lighting remain believable?
• Is the composition suitable?
• Is anything cropped?
• Did unwanted objects appear?
• Is visible text readable?
• Does the clip end cleanly?
Identify the largest problem first.
For example, suppose the boat looks correct, but the camera moves too quickly.
Do not rewrite the complete prompt immediately.
Add or strengthen one instruction:
Keep the same subject, lake, sunrise lighting, and side view. Use a very slow and steady camera movement. Do not zoom, rotate, shake, or change the camera angle.
Generate another version and compare it with the first result.
This controlled process helps you understand which instructions improve the video.
A Simple Text-to-Video Workflow
The complete process can be summarized as:
Written prompt → AI interprets the scene → Starting frame is created → Movement is planned → Video frames are generated → Frames become a clip → User reviews and improves the result
Text-to-video generation is not simply pressing a button and accepting the first clip. [2, 3]
The strongest results normally come from:
1. Starting with a simple scene
2. Writing clear visual instructions
3. Describing movement precisely
4. Using one camera movement
5. Generating a short test
6. Reviewing the complete clip
7. Correcting one problem at a time
8. Saving every useful version
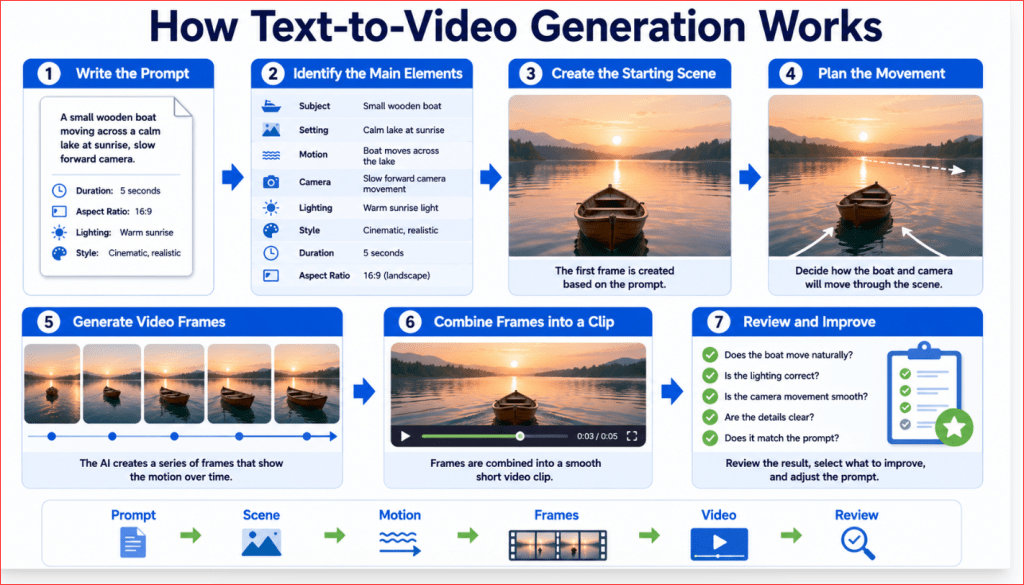
Figure 2. The main stages that turn a written prompt into an AI-generated video clip.
Figure 2 shows how a text-to-video system interprets a written description, creates the visual scene, plans movement, generates a sequence of frames, and combines those frames into a video. The finished clip must still be reviewed because subjects, backgrounds, camera movement, and other details may change unexpectedly.
What You Need Before Creating a Text-to-Video Clip
You do not need professional cameras, actors, filming locations, or advanced animation skills to begin creating a text-to-video clip.
However, preparing a few basic items before generating the video can make the process easier and reduce unnecessary attempts.
A Clear Video Idea
Begin with one simple idea that can be shown in a short clip.
For example:
A red bicycle beside a country road while grass moves in the breeze.
This idea contains:
• One main subject
• One setting
• One environmental movement
• A simple visual purpose
Avoid beginning with an entire story containing many characters, locations, actions, and camera changes.
A complicated first idea might say:
Create a complete adventure about four friends travelling through several cities, entering a forest, escaping a storm, and arriving at a mountain cabin.
This would require:
• Several characters
• Multiple locations
• Many actions
• Different lighting conditions
• Scene transitions
• Character consistency
• Longer video duration
• More editing
A better approach is to divide the story into short scenes.
For example:
1. Four friends prepare for a journey.
2. Their vehicle travels along a country road.
3. Dark clouds appear above a forest.
4. The group reaches a mountain cabin.
5. Warm lights appear inside the cabin.
Each scene can then be generated separately and combined later.
One Main Subject
Choose one clear subject for your first clip.
Examples include:
• A bicycle
• A wooden boat
• A small house
• A bird
• A robot
• A coffee cup
• A tree
• A car
• A person walking
• A product concept
Scenes with one subject are generally easier to control than scenes containing several unrelated objects or people.
For example:
A small blue robot standing in a bright classroom.
is simpler than:
Five robots, several students, two teachers, flying screens, moving chairs, and three animals inside a crowded classroom.
More subjects create more opportunities for:
• Duplicate objects
• Missing objects
• Changing faces
• Incorrect positions
• Unstable backgrounds
• Confusing movement
One Clear Action
Decide what the main subject should do.
Useful beginner actions include:
• Walk slowly
• Turn toward the camera
• Move from left to right
• Open a door
• Lift an object
• Look through a window
• Travel across water
• Drive along a road
• Sit quietly
• Wave gently
• Rotate slowly
• Remain still while the environment moves
Use actions that can be shown clearly within a short clip.
For example:
A small wooden boat moves slowly from left to right across a calm lake.
This is easier to generate than:
A boat races across the lake, turns suddenly, jumps over a wave, changes direction, circles an island, and stops beside a dock.
A Defined Setting
Explain where the scene takes place.
The setting may include:
• A country road
• A modern office
• A quiet lake
• A classroom
• A city street
• A forest
• A kitchen
• A garden
• A beach
• A mountain valley
• A futuristic laboratory
• A simple studio background
A setting should support the main subject without becoming unnecessarily crowded.
For example:
A red bicycle beside a wooden fence on a quiet country road.
gives the AI a clearer environment than:
A bicycle somewhere outside.
You may also describe important background details:
• Green fields
• Distant mountains
• Wooden buildings
• Large windows
• Indoor plants
• Wet pavement
• Soft clouds
• Calm water
• Autumn leaves
Do not add background objects that do not improve the scene.
A Camera Plan
Decide how the viewer should see the subject.
Useful camera views include:
• Wide shot
• Medium shot
• Close-up
• Eye-level view
• Low-angle view
• High-angle view
• Side view
• Overhead view
• Behind-the-subject view
Then decide whether the camera should remain still or move.
Beginner-friendly camera movements include:
• Static camera
• Slow push forward
• Slow pull backward
• Gentle pan left
• Gentle pan right
• Smooth side tracking
• Slow upward movement
• Slow downward movement
Use only one main camera movement in the first version.
For example:
Use a medium-wide side view while the camera slowly tracks beside the boat.
Avoid combining several camera instructions such as:
Zoom in, rotate around the subject, move upward, pan left, and then pull backward.
Too many camera movements can create:
• Sudden changes
• Unstable framing
• Cropped subjects
• Unwanted rotation
• Camera shake
• Confusing motion
A Lighting and Mood Choice
Lighting affects the colours, realism, atmosphere, and visibility of the generated scene.
Useful lighting descriptions include:
• Soft natural daylight
• Warm sunrise light
• Golden-hour sunlight
• Bright studio lighting
• Soft indoor lighting
• Cool moonlight
• Dramatic cinematic lighting
• Gentle evening light
• Cloudy diffused light
The mood should match the subject and setting.
Possible moods include:
• Peaceful
• Welcoming
• Professional
• Hopeful
• Dramatic
• Mysterious
• Energetic
• Calm
• Playful
• Futuristic
For example:
Use warm sunrise light and a peaceful, hopeful mood.
Avoid conflicting lighting instructions unless the contrast is intentional.
For example:
Bright midday sunshine with dark midnight lighting.
may confuse the generator.
A Visual Style
Choose how the video should look.
Common styles include:
• Realistic
• Cinematic
• Documentary-style
• Cartoon
• Three-dimensional animation
• Watercolour animation
• Digital illustration
• Minimalist
• Storybook
• Futuristic
• Vintage
• Product-commercial style
One main visual style is usually enough.
For example:
Use a realistic cinematic style with natural colours.
Avoid combining too many unrelated styles, such as:
Realistic photographic cartoon watercolour 3D documentary style.
This may lead to an inconsistent result.
The Correct Aspect Ratio
Aspect ratio describes the shape of the video.
Choose it according to where the video will be published.
• 16:9 landscape: WordPress, YouTube, presentations, websites, and standard video
• 9:16 vertical: YouTube Shorts, Instagram Reels, TikTok, and mobile-first content
• 1:1 square: Square social-media posts
• 4:5 portrait: Instagram and Facebook feed posts
For an AI Mastery article demonstration, use:
16:9 landscape
Choosing the format before generating the video helps protect the composition.
Changing the aspect ratio later may:
• Crop the main subject
• Remove background details
• Cut off hands or feet
• Reduce image quality
• Leave empty borders
• Require another generation
A Suitable Clip Duration
Text-to-video generators usually work best with short clips.
A beginner can start with approximately:
• Four seconds
• Five seconds
• Six seconds
• Eight seconds
The available duration depends on the selected tool and model.
Short clips are easier to review and improve because they contain fewer opportunities for the subject or background to change.
For a longer video, generate several short clips and combine them in a video editor.
A File-Organization System
Create a folder before beginning the project.
For Article 018, use a folder such as:
018 How to Create AI Videos from Text
Inside it, create subfolders such as:
• Featured Image
• Figures
• Video Prompts
• Generated Clips
• Selected Clips
• Edited Videos
• Audio
• Captions
• Sources
• Old Versions
Use clear filenames.
For example:
• 018-red-bicycle-text-to-video-prompt.txt
• 018-red-bicycle-version-01.mp4
• 018-red-bicycle-version-02.mp4
• 018-red-bicycle-selected-clip.mp4
• 018-red-bicycle-final-16×9.mp4
Do not save every version as:
• Video 1
• New video
• Final
• Final new
• Final corrected
• Final final
Clear names help you identify the strongest version later.
A Record of the Prompt and Settings
Save the exact information used for every important generation.
Record:
• Complete prompt
• Platform
• Selected model
• Date generated
• Clip duration
• Aspect ratio
• Resolution
• Camera setting
• Motion setting
• Prompt-enhancement option
• Credits used
• Resulting filename
• Problems found
• Changes made in the next version
For example:
Project: Red bicycle country-road test
Prompt version: 01
Duration: Six seconds
Aspect ratio: 16:9
Camera: Slow forward movement
Main problem: Bicycle front wheel changed shape
Next correction: Strengthen bicycle-stability instruction
This record helps you understand which prompt changes improved or weakened the result.
A Review Checklist
Prepare a simple checklist before generating the clip.
Check:
• Main subject
• Subject appearance
• Action
• Background
• Camera angle
• Camera movement
• Lighting
• Colours
• Style
• Duration
• Aspect ratio
• Cropping
• Visible text
• Hands and faces
• Product accuracy
• Unwanted objects
• Beginning and ending frames
• Overall stability
A checklist helps you review the complete clip instead of focusing only on the most attractive frame.
Beginner Preparation Example
Suppose you want to create a video of a red bicycle beside a country road.
Your preparation might be:
Subject: Red bicycle
Setting: Quiet country road beside a wooden fence
Action: Bicycle remains still while grass moves
Camera: Slow forward movement
Lighting: Warm sunrise light
Style: Realistic cinematic
Mood: Peaceful
Duration: Six seconds
Aspect ratio: 16:9 landscape
Important stability instructions: Keep the bicycle, fence, road, wheels, lighting, and background consistent
Details to avoid: No people, text, logos, extra bicycles, camera shake, or sudden zoom
This preparation can then be converted into a complete text-to-video prompt.
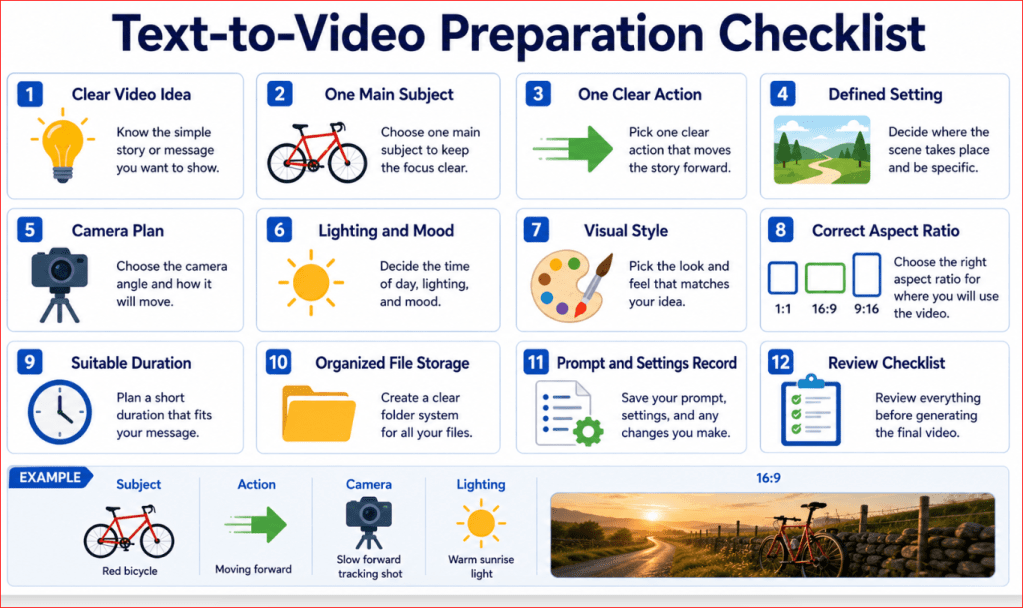
Figure 3. The main items beginners should prepare before generating a text-to-video clip.
Figure 3 provides a practical preparation checklist for text-to-video projects. Deciding the subject, action, setting, camera, lighting, style, duration, aspect ratio, file organization, and review method before generation can reduce confusion and make prompt improvement more controlled.
How to Write an Effective Text-to-Video Prompt
A text-to-video prompt describes the scene the AI should create and how that scene should move over time.
The prompt should give enough information to guide the generator without adding unnecessary or conflicting instructions.
A useful beginner formula is:
Subject + appearance + setting + action + environmental movement + camera + lighting + style + mood + duration + aspect ratio + stability instructions + details to avoid
You do not need every element in every prompt. However, this formula provides a reliable checklist when planning an important video.
Step 1: Identify the Main Subject
Begin by stating clearly what the video is about.
Examples include:
• A red bicycle
• A small wooden boat
• An elderly man
• A friendly robot
• A modern house
• A coffee cup
• A bird
• A product concept
• A mountain landscape
Place the main subject near the beginning of the prompt.
For example:
Create a video of a red bicycle.
This gives the AI a basic subject, but it does not provide enough information for a controlled result.
Step 2: Describe the Subject’s Appearance
Add the details that are important to the subject’s appearance.
You might describe:
• Colour
• Size
• Material
• Clothing
• Age range
• Shape
• Condition
• Position
• Important accessories
For example:
Create a video of a clean red touring bicycle with a black seat, silver handlebars, and two matching wheels.
Do not add details that are not important to the final scene.
Too many small instructions may distract the AI from the main subject and movement.
Step 3: Describe the Setting
Explain where the subject appears.
For example:
Create a video of a clean red touring bicycle beside a wooden fence on a quiet country road.
You may add useful environmental details such as:
• Green fields
• Distant hills
• A bright classroom
• A modern office
• A calm lake
• A simple studio
• A city street
• A forest path
• A comfortable kitchen
Keep the setting organized.
A crowded scene creates more opportunities for objects to appear, disappear, duplicate, or change shape.
Step 4: Describe the Main Action
State what the subject should do.
For example:
The bicycle remains still beside the fence.
Or:
A cyclist rides the bicycle slowly from left to right.
Use clear action verbs such as:
• Walks
• Turns
• Opens
• Lifts
• Moves
• Travels
• Looks
• Sits
• Waves
• Rotates
• Remains still
Avoid vague instructions such as:
Make the scene interesting.
The AI may interpret “interesting” in an unexpected way.
Step 5: Describe Environmental Movement
Text-to-video prompts can also explain what should move around the subject.
Environmental movement may include:
• Grass moving
• Leaves swaying
• Water rippling
• Mist drifting
• Clouds travelling
• Curtains moving
• Snow falling
• Light reflections changing
• Dust floating
• Rain falling
For example:
Grass and small wildflowers move gently in a light breeze while soft clouds travel slowly across the sky.
Use restrained motion for the first version.
Too much movement may cause the background to become unstable.
Step 6: Choose the Camera View
Explain how the subject should be framed.
Useful camera views include:
• Wide shot
• Medium shot
• Close-up
• Eye-level view
• Side view
• Front view
• Low-angle view
• High-angle view
• Overhead view
For example:
Use a medium-wide eye-level view showing the complete bicycle, fence, road, and surrounding field.
The camera view affects what is visible in the frame.
A close-up may hide the background, while a wide shot may make the subject appear small.
Step 7: Choose One Camera Movement
State whether the camera should remain still or move.
Beginner-friendly choices include:
• Static camera
• Slow push forward
• Slow pull backward
• Gentle pan left
• Gentle pan right
• Smooth side tracking
• Slow upward movement
• Slow downward movement
For example:
The camera slowly pushes forward toward the bicycle in one smooth continuous movement.
Use one main movement in the first generation.
Avoid combining several directions such as:
Zoom in, rotate around the bicycle, move upward, pan left, and then pull backward.
This may create unstable framing or unexpected camera changes.
Step 8: Describe the Lighting
Lighting affects the visibility, colours, shadows, and overall atmosphere.
Useful lighting instructions include:
• Soft natural daylight
• Warm sunrise light
• Golden-hour sunlight
• Bright studio lighting
• Soft indoor lighting
• Cloudy diffused light
• Cool moonlight
• Dramatic cinematic lighting
For example:
Use warm sunrise light with soft shadows and natural colours.
Keep the lighting consistent with the setting and time of day.
Avoid conflicting combinations such as bright midday sunlight and dark moonlight unless the contrast is intentional.
Step 9: Choose the Visual Style
Explain how the video should look.
Common choices include:
• Realistic
• Cinematic
• Documentary-style
• Cartoon
• Three-dimensional animation
• Digital illustration
• Watercolour animation
• Minimalist
• Futuristic
• Vintage
• Product-commercial style
For example:
Use a realistic cinematic style with natural textures and believable movement.
Choose one main style.
Combining unrelated styles may create an inconsistent result.
Step 10: Describe the Mood
Mood explains the emotional atmosphere of the scene.
Possible moods include:
• Peaceful
• Welcoming
• Professional
• Hopeful
• Dramatic
• Calm
• Playful
• Mysterious
• Energetic
• Futuristic
For example:
Create a peaceful and hopeful atmosphere.
The mood should match the subject, movement, lighting, and setting.
Step 11: State the Duration
Specify a short clip duration when the tool allows it.
For example:
Create a six-second video.
Short clips are usually easier to control than long clips.
The available duration depends on the selected platform and model. When the tool provides a duration setting, select it in the interface as well as mentioning it in the prompt when useful.
Step 12: State the Aspect Ratio
Choose the shape of the video before generation.
For an AI Mastery article demonstration, write:
Use a wide 16:9 landscape composition.
Other common formats include:
• 9:16 vertical
• 1:1 square
• 4:5 portrait
Choose the format according to the publishing platform.
Step 13: Add Stability Instructions
Stability instructions explain what should remain visually consistent throughout the clip.
For example:
Keep the bicycle, wheels, handlebars, seat, fence, road, lighting, colours, and background visually consistent throughout the entire clip.
This can help reduce:
• Changing objects
• Misshaped wheels
• Background shifts
• Colour changes
• Lighting changes
• Objects appearing or disappearing
Stability instructions cannot guarantee a perfect result, but they give the AI clearer direction.
Step 14: Add Details to Avoid
Finish with a short list of unwanted elements.
For example:
Do not include people, additional bicycles, visible text, logos, watermarks, camera shake, sudden zooming, object duplication, or changing bicycle parts.
Only include restrictions that are important.
An extremely long list of negative instructions may make the prompt difficult to understand.
Complete Red Bicycle Prompt
The separate prompt elements can now be combined:
Create a realistic six-second cinematic video of a clean red touring bicycle with a black seat, silver handlebars, and two matching wheels standing beside a wooden fence on a quiet country road. Show green fields and distant hills in the background. The bicycle remains completely still while grass and small wildflowers move gently in a light breeze and soft clouds travel slowly across the sky. Use a medium-wide eye-level view showing the complete bicycle. The camera slowly pushes forward in one smooth continuous movement. Use warm sunrise light, natural colours, soft shadows, and a peaceful atmosphere. Use a wide 16:9 landscape composition. Keep the bicycle, wheels, handlebars, seat, fence, road, lighting, colours, and background visually consistent throughout the clip. Do not include people, additional bicycles, visible text, logos, watermarks, camera shake, sudden zooming, duplicated objects, or changing bicycle parts.
This prompt is detailed, but its instructions follow a clear order.
It tells the AI:
• What to create
• Where to place it
• What should move
• What should remain still
• How the camera should behave
• How the scene should look
• What format to use
• Which problems to avoid
Weak Prompt Compared with a Strong Prompt
Weak prompt:
Create a nice video of a bicycle outside.
This prompt does not explain:
• The bicycle’s appearance
• The exact setting
• The action
• Environmental movement
• Camera position
• Camera movement
• Lighting
• Style
• Mood
• Duration
• Aspect ratio
• Stability requirements
Stronger prompt:
Create a realistic six-second video of a red bicycle standing beside a wooden fence on a quiet country road at sunrise. Grass moves gently in the breeze while the camera slowly pushes forward. Use warm natural lighting, smooth movement, a peaceful cinematic style, and a wide 16:9 landscape composition. Keep the bicycle, fence, road, and background consistent. Do not include people, text, logos, extra bicycles, camera shake, or sudden movement.
The stronger prompt gives the AI clearer direction without becoming unnecessarily complicated.
Reusable Text-to-Video Prompt Template
Use this template for future projects:
Create a [duration] [visual style] video of [main subject and appearance] in [setting]. The subject [main action]. [Environmental elements] move [direction and speed]. Use a [camera view] while the camera [camera movement]. Use [lighting], [colour description], and a [mood] atmosphere. Use a [aspect ratio] composition. Keep [important subjects, objects, background, lighting, and colours] visually consistent throughout the clip. Do not include [unwanted objects, text, logos, camera problems, or visual errors].
Example Using the Template
Create a five-second realistic video of a small wooden boat with a white sail travelling across a calm lake at sunrise. The boat moves slowly from left to right while gentle ripples spread across the water and mist drifts above the surface. Use a medium-wide side view while the camera tracks smoothly beside the boat. Use warm golden light, natural blue and orange colours, and a peaceful atmosphere. Use a wide 16:9 landscape composition. Keep the boat, sail, lake, mountains, lighting, and reflections visually consistent throughout the clip. Do not include people, additional boats, visible text, logos, camera shake, sudden zooming, or changing boat parts.
Keep the First Prompt Manageable
A strong prompt does not need to describe an entire film.
For the first generation, focus on:
1. One main subject
2. One clear action
3. One setting
4. One environmental movement
5. One camera movement
6. One lighting condition
7. One visual style
8. One short duration
9. One aspect ratio
10. A few important stability instructions
After reviewing the first result, add or change only the instructions needed to correct the largest problem.
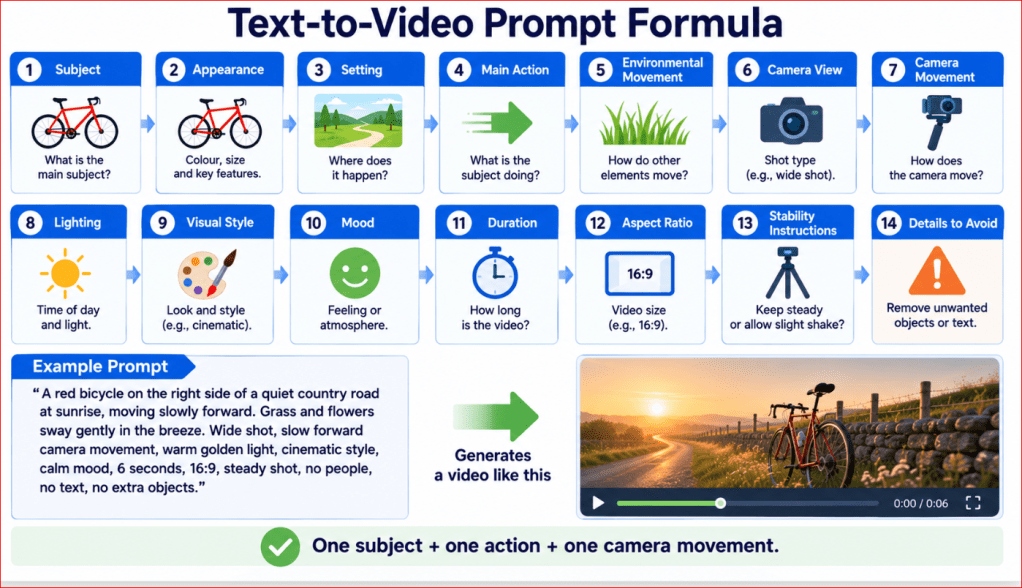
Figure 4. The main elements of a clear and effective text-to-video prompt
Figure 4 breaks a text-to-video prompt into practical building blocks. Beginners can use this formula to describe the subject, setting, action, movement, camera, lighting, style, mood, duration, format, stability requirements, and unwanted details in a clear and logical order.
How ChatGPT Can Help You Improve a Text-to-Video Prompt
ChatGPT can help turn a basic video idea into a clearer, more organized text-to-video prompt. [19]
It does not replace the dedicated AI video generator. Its main role is to help you:
• Develop the scene
• Organize the prompt
• Clarify movement
• Choose a camera view
• Remove conflicting instructions
• Add stability requirements
• Simplify an overly complicated idea
• Troubleshoot problems after generation
• Create revised prompt versions
• Plan several connected scenes
You can write the prompt yourself and ask ChatGPT to review it, or you can begin with a simple idea and ask ChatGPT to build the first draft.
Start with a Simple Video Idea
You do not need to prepare a complete prompt before asking ChatGPT for help.
For example, you could write:
I want to create a short AI video of a red bicycle beside a country road at sunrise.
ChatGPT can then help identify the missing information.
It may ask or help you decide:
• What type of bicycle should appear?
• Should the bicycle move or remain still?
• What should move in the environment?
• What camera view should be used?
• Should the camera remain static or move?
• What visual style should the video use?
• How long should the clip be?
• What aspect ratio is required?
• Which details must remain consistent?
• Which unwanted elements should be excluded?
This turns a general idea into a more complete scene plan.
Ask ChatGPT to Build the First Prompt
A useful request is:
Turn this idea into a clear six-second text-to-video prompt. Use one main subject, one environmental movement, one camera movement, realistic cinematic style, warm sunrise lighting, and a 16:9 landscape format. Keep the scene simple and add important stability instructions.
ChatGPT might produce:
Create a realistic six-second cinematic video of a clean red touring bicycle standing beside a wooden fence on a quiet country road at sunrise. The bicycle remains still while grass and small wildflowers move gently in a light breeze. Use a medium-wide eye-level view while the camera slowly pushes forward in one smooth continuous movement. Use warm natural lighting, soft shadows, peaceful colours, and a wide 16:9 landscape composition. Keep the bicycle, wheels, fence, road, lighting, and background visually consistent. Do not include people, additional bicycles, visible text, logos, camera shake, sudden zooming, or changing bicycle parts.
Review the result before using it.
Confirm that it matches your intended scene and does not include details you do not want.
Ask ChatGPT to Organize a Prompt
A prompt may contain useful information but place it in a confusing order.
For example:
Make a video that is cinematic and has no text and the camera moves slowly and it is a bicycle outside with sunrise and the grass moves and it should be six seconds and wide and realistic.
The main idea is understandable, but the instructions are disorganized.
Ask ChatGPT:
Organize this text-to-video prompt in the following order: subject, setting, action, environmental movement, camera, lighting, style, duration, aspect ratio, stability instructions, and details to avoid. Preserve the original idea and do not add new objects.
The organized version might become:
Create a realistic six-second cinematic video of a red bicycle beside a wooden fence on a quiet country road. The bicycle remains still while the grass moves gently in a light breeze. Use a medium-wide view with a slow forward camera movement. Use warm sunrise lighting and a peaceful atmosphere. Use a wide 16:9 landscape composition. Keep the bicycle, fence, road, lighting, and background consistent. Do not include visible text, logos, additional bicycles, camera shake, or sudden movement.
Organizing the prompt helps the AI identify the most important instructions.
Ask ChatGPT to Simplify a Complicated Prompt
A beginner may try to include too many actions in one clip.
For example:
Create a video of a cyclist entering a city, riding through traffic, stopping at a café, meeting a friend, drinking coffee, checking a phone, leaving the café, and riding into the countryside while the camera changes between close-up, aerial, side, and front views.
This is too complicated for one short text-to-video generation.
Ask ChatGPT:
Divide this idea into simple text-to-video scenes. Each scene should contain one main action, one setting, and one camera movement. Keep the same cyclist, bicycle, clothing, and visual style throughout.
ChatGPT could divide it into:
1. The cyclist enters the city.
2. The cyclist rides along a quiet street.
3. The cyclist stops outside a café.
4. The cyclist meets a friend at an outdoor table.
5. The cyclist leaves the café.
6. The cyclist rides toward the countryside.
Each scene can then be generated separately and combined during editing.
Ask ChatGPT to Identify Conflicting Instructions
Conflicting instructions can weaken a video prompt.
For example:
Create a bright midday scene under dark moonlight. The camera remains completely static while rotating around the subject.
This contains two conflicts:
• Bright midday lighting conflicts with dark moonlight.
• A static camera cannot rotate around the subject.
Ask ChatGPT:
Review this text-to-video prompt for conflicting instructions. Identify each conflict, explain it briefly, and provide a corrected version without changing the main idea.
ChatGPT can help you choose one clear instruction.
For example:
Create a nighttime scene under soft moonlight. Use a slow circular camera movement around the subject.
Or:
Create a bright midday scene. Keep the camera completely static.
Ask ChatGPT to Improve Movement Instructions
Weak movement descriptions may produce unpredictable results.
For example:
The person moves naturally.
This does not explain:
• What the person does
• Which direction they move
• How quickly they move
• Whether the camera follows
• What should remain stable
Ask ChatGPT:
Rewrite the movement instruction so it clearly describes the action, direction, speed, and camera behaviour. Keep the action simple.
A clearer version might say:
The person walks slowly from left to right across the room while the camera tracks smoothly beside them at eye level.
For environmental movement, you might ask:
Improve this instruction: “The trees move.”
ChatGPT could write:
Tree branches and leaves sway gently in a light breeze while the trunks and surrounding landscape remain stable.
Ask ChatGPT to Strengthen Stability Instructions
When the first generation contains changing objects or backgrounds, ChatGPT can help add focused stability instructions.
Suppose the bicycle wheels change shape.
Describe the problem precisely:
The generated video is mostly correct, but the bicycle wheels change size and shape during the clip. The handlebars also become distorted near the end.
Then ask:
Add focused stability instructions to the prompt. Preserve the bicycle’s shape, wheel size, handlebars, frame, colour, position, and all successful parts of the scene. Do not rewrite unrelated instructions.
ChatGPT might add:
Keep both bicycle wheels perfectly circular, equal in size, correctly aligned, and unchanged throughout the entire clip. Preserve the bicycle frame, handlebars, seat, colour, and proportions. Do not bend, duplicate, remove, enlarge, or reshape any bicycle component.
This focused correction is usually more useful than simply writing:
Make the bicycle better.
Ask ChatGPT to Protect Successful Details
A revised generation may accidentally damage parts that were already correct.
Before changing the prompt, identify what must remain unchanged.
For example:
Keep the red bicycle, wooden fence, country road, sunrise lighting, green fields, camera angle, composition, and slow forward movement unchanged. Correct only the unstable front wheel.
This tells the AI that the current scene is mostly successful.
A reusable correction structure is:
Keep [successful details] unchanged. Correct only [specific problem]. The corrected result should [required appearance or behaviour]. Do not change [protected elements].
For example:
Keep the bicycle, fence, road, lighting, colours, composition, background, and camera movement unchanged. Correct only the front wheel. Keep it perfectly circular, correctly aligned with the frame, and unchanged throughout the clip. Do not modify any other part of the scene.
Ask ChatGPT to Shorten an Overly Long Prompt
A prompt may become difficult to manage after several revisions.
Ask ChatGPT:
Shorten this text-to-video prompt without removing the subject, action, camera movement, lighting, style, aspect ratio, stability requirements, or important restrictions. Remove repetition and unnecessary adjectives.
ChatGPT can reduce repeated instructions while keeping the essential details.
For example, this repeated wording:
Keep the bicycle unchanged. Do not change the bicycle. The bicycle should remain the same. Preserve the bicycle throughout the video.
can become:
Keep the bicycle’s appearance, shape, colour, position, and proportions consistent throughout the entire clip.
Ask ChatGPT to Create Several Prompt Versions
Different prompt versions can help you test one variable at a time.
For example, ask:
Create three versions of this prompt. Keep the subject, setting, action, lighting, style, duration, and aspect ratio identical. Change only the camera movement:
1. Static camera
2. Slow forward push
3. Smooth side tracking
This creates a controlled comparison.
You can also test:
• Different camera views
• Different movement speeds
• Different lighting
• Different visual styles
• Different subject actions
• Different environmental movement
Do not change several major elements at once because you may not know which change improved the result.
Ask ChatGPT to Create a Prompt Comparison Table
Before generating several versions, ask ChatGPT to organize the differences.
For example:
Create a comparison table for three versions of my bicycle video prompt. Keep everything the same except the camera movement. Include the version number, camera instruction, expected visual effect, possible risk, and filename.
The table might contain:
| Version | Camera instruction | Expected effect | Possible risk | Filename |
| 01 | Static camera | Maximum scene stability | Less visual energy | bicycle-static-v01.mp4 |
| 02 | Slow forward push | Greater depth and focus | Subject may distort as camera approaches | bicycle-push-v02.mp4 |
| 03 | Smooth side tracking | Stronger sense of space | Background may shift | bicycle-track-v03.mp4 |
This helps you test the scene systematically.
Ask ChatGPT to Review the Final Prompt
Before pasting the prompt into the video generator, ask:
Review this final text-to-video prompt. Check whether it clearly includes the subject, setting, action, environmental movement, camera view, camera movement, lighting, style, mood, duration, aspect ratio, stability instructions, and details to avoid. Identify anything missing or conflicting. Do not rewrite it unless a correction is necessary.
This creates a final quality check.
Ask ChatGPT to Troubleshoot the Generated Clip
After generating the video, describe what happened.
For example:
The bicycle is correct at the beginning, but the front wheel becomes oval after three seconds. The camera also accelerates near the end. The background and lighting are good.
Ask:
Suggest the smallest prompt changes needed to correct only those two problems. Preserve the successful background, lighting, composition, bicycle colour, and overall style.
ChatGPT might suggest:
Keep both wheels perfectly circular and equal in size throughout every frame. Preserve the bicycle’s proportions and alignment. Maintain one very slow, constant-speed forward camera movement from beginning to end. Do not accelerate, zoom suddenly, rotate, or change the camera angle.
This is more controlled than creating an entirely new prompt.
Ask ChatGPT to Maintain Consistency Across Scenes
When creating several clips, prepare a consistency description.
For example:
Create a short consistency sheet for a red-bicycle video series. Include the bicycle’s colour, type, wheel shape, seat, handlebars, setting, lighting, colour palette, visual style, camera height, and details that must remain unchanged.
A consistency sheet might say:
Bicycle
• Red touring bicycle
• Black seat
• Silver straight handlebars
• Two equal circular wheels
• Clean frame
• No basket
• No rider
Setting
• Quiet country road
• Wooden fence
• Green fields
• Distant low hills
• No buildings or vehicles
Lighting and style
• Warm sunrise lighting
• Natural colours
• Realistic cinematic style
• Soft shadows
• Peaceful atmosphere
Camera
• Eye-level height
• Medium-wide framing
• Smooth movement
• No camera shake
Use the same description in each related scene.
Ask ChatGPT to Prepare a Revision Record
After each generation, record what changed.
Ask ChatGPT to format your notes as:
• Prompt version
• Main change
• Successful details
• Problems found
• Next correction
• Selected or rejected
• Filename
For example:
Prompt version: 03
Main change: Reduced forward camera speed
Successful details: Bicycle colour, fence, lighting and background
Problems found: Front wheel changes shape in final second
Next correction: Add wheel-stability instruction
Decision: Keep for comparison but do not publish
Filename: 018-red-bicycle-text-video-v03.mp4
This record prevents repeated mistakes and helps identify the strongest version.
Useful ChatGPT Requests
You can copy and modify these requests:
Turn my idea into a simple six-second text-to-video prompt for a complete beginner.
Review this video prompt and identify missing or conflicting instructions.
Simplify this prompt so it contains one subject, one action, and one camera movement.
Divide this complex video idea into separate short scenes.
Improve only the movement instructions without changing the visual scene.
Add stability instructions for the subject and background.
Keep all successful details unchanged and correct only the named problem.
Create three controlled prompt versions that change only the camera movement.
Shorten this prompt without removing essential instructions.
Create a consistency sheet for several connected video scenes.
Suggest the smallest prompt correction based on the problems I observed.
Organize my generation notes into a clear revision record.
Important Reminder
ChatGPT does not see the generated video unless you upload the clip or provide clear screenshots and a detailed description of the problem.
When asking for troubleshooting help, explain:
• What looks correct
• What looks wrong
• When the problem appears
• Which details must remain unchanged
• What the corrected result should look like
The more specific your review is, the more focused the revised prompt can be.
Use ChatGPT as a planning and revision assistant, but judge the generated video yourself. A well-written prompt can improve the result, but every final clip still requires human review.
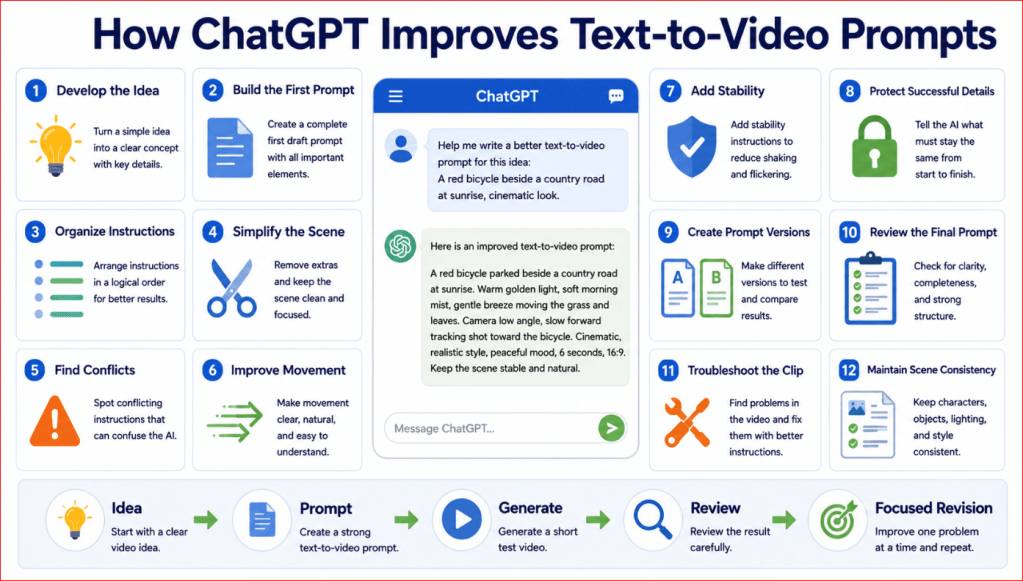
Figure 5. ChatGPT can help develop, organize, review, simplify, and improve text-to-video prompts.
Figure 5 shows how ChatGPT supports the text-to-video workflow before and after generation. It can turn a simple idea into an organized prompt, identify conflicts, improve movement and stability instructions, divide complicated stories into shorter scenes, and prepare focused revisions based on problems found in the generated clip.
How to Create Your First Text-to-Video Clip
After preparing the scene and writing the prompt, you can generate the first video version.
The exact interface varies between AI video platforms, but the basic workflow is similar.
For this example, use the red-bicycle prompt developed earlier in the article.
Step 1: Create a Project Folder
Before opening the video generator, create a folder for the project.
Use:
018 Red Bicycle Text-to-Video Test
Inside the folder, create:
• Prompts
• Generated Clips
• Selected Clips
• Edited Videos
• Audio
• Captions
• Screenshots
• Sources
• Old Versions
Save the original prompt in the Prompts folder.
Suggested filename:
018-red-bicycle-prompt-v01.txt
Organizing the files before generating prevents useful versions from becoming mixed with rejected clips.
Step 2: Review the Video Idea
Confirm that the scene is simple enough for one short generation.
The planned scene is:
• One red bicycle
• One country-road setting
• Bicycle remains still
• Grass moves gently
• Clouds move slowly
• Camera pushes forward
• Warm sunrise lighting
• Six-second duration
• Wide 16:9 format
This is suitable for a beginner because it contains one main subject and limited movement.
Do not add extra people, vehicles, animals, buildings, or several camera changes during the first test.
Step 3: Review the Final Prompt
Use the complete prompt:
Create a realistic six-second cinematic video of a clean red touring bicycle with a black seat, silver handlebars, and two matching wheels standing beside a wooden fence on a quiet country road. Show green fields and distant hills in the background. The bicycle remains completely still while grass and small wildflowers move gently in a light breeze and soft clouds travel slowly across the sky. Use a medium-wide eye-level view showing the complete bicycle. The camera slowly pushes forward in one smooth continuous movement. Use warm sunrise light, natural colours, soft shadows, and a peaceful atmosphere. Use a wide 16:9 landscape composition. Keep the bicycle, wheels, handlebars, seat, fence, road, lighting, colours, and background visually consistent throughout the clip. Do not include people, additional bicycles, visible text, logos, watermarks, camera shake, sudden zooming, duplicated objects, or changing bicycle parts.
Check that the prompt includes:
• Subject
• Appearance
• Setting
• Action
• Environmental movement
• Camera view
• Camera movement
• Lighting
• Style
• Mood
• Duration
• Aspect ratio
• Stability instructions
• Details to avoid
Correct any missing or conflicting instruction before generation.
Step 4: Open the AI Video Generator
Open the selected video-generation platform and sign in.
Look for an option such as:
• Text-to-Video
• Generate Video
• Create Video
• Video from Prompt
• AI Video Generator
Do not select image-to-video for this demonstration because Article 018 begins with text only.
The wording and layout may differ between platforms.
Step 5: Start a New Video Project
Select the option to create a new project or generation.
When available, give the project a clear name:
Article 018 — Red Bicycle Text-to-Video Test
A descriptive project name makes it easier to find the generation later.
Avoid generic names such as:
• Untitled
• New project
• Video test
• Final video
Step 6: Select the Text-to-Video Mode
Confirm that the selected generation method is text-to-video.
The interface should allow you to enter a written description without requiring a starting image.
Some platforms place text-to-video and image-to-video inside the same workspace. Check that no image has been accidentally attached.
The input should be:
Written prompt → Generated video
not:
Uploaded image + motion prompt → Generated video
Step 7: Choose the Video Model
Some platforms provide more than one video-generation model.
The available models may differ in:
• Visual quality
• Motion quality
• Clip duration
• Resolution
• Camera control
• Generation speed
• Credit use
• Audio support
• Aspect ratios
• Commercial-use conditions
For the first test, choose a general-purpose model suitable for realistic text-to-video generation.
Record the exact model name in your project notes.
Do not assume that the newest or most expensive model is automatically the best choice for a simple beginner project.
Step 8: Paste the Prompt
Copy the final prompt from the saved text file and paste it into the prompt box.
Read it again after pasting.
Check for:
• Missing sentences
• Repeated wording
• Accidental line breaks
• Changed punctuation
• Conflicting instructions
• Unwanted copied notes
• Drafting instructions that should not be included
Paste only the actual video prompt.
Do not paste:
• Figure captions
• Article explanations
• File-management notes
• WordPress instructions
• Source references
Step 9: Choose the Aspect Ratio
Select:
16:9 landscape
This format is suitable for:
• WordPress articles
• YouTube
• Presentations
• Desktop viewing
• Standard video players
Check the preview frame after selecting the aspect ratio.
Confirm that there is enough space for:
• The complete bicycle
• Both wheels
• The fence
• The road
• Some surrounding landscape
If the preview crops the subject, revise the composition instruction before generating.
For example:
Keep the complete bicycle fully inside the frame with clear space around both wheels.
Step 10: Choose the Clip Duration
Select approximately:
Six seconds
when the platform supports it.
A short clip is suitable for the first test because it is easier to:
• Review
• Regenerate
• Compare
• Edit
• Download
• Embed in WordPress
When six seconds is unavailable, choose the nearest suitable short duration.
Record the actual selected duration.
Step 11: Choose the Resolution
Select a practical test resolution.
For early experiments, a lower or standard resolution may be sufficient.
For the final published clip, use the highest suitable resolution that:
• The selected model supports
• Your plan permits
• Your computer can handle
• Your editor can open
• Your website can display efficiently
Higher resolution can make a video sharper, but it does not correct:
• Changing objects
• Distorted wheels
• Weak movement
• Camera instability
• Poor prompt interpretation
• Unnatural backgrounds
Test the scene quality before spending additional credits on a higher-resolution version.
Step 12: Review Camera Controls
Some platforms provide separate camera controls.
Possible options include:
• Static
• Pan left
• Pan right
• Zoom in
• Zoom out
• Move forward
• Move backward
• Track left
• Track right
• Move upward
• Move downward
The prompt already requests:
A slow forward camera movement.
When the interface includes a matching control, select the option closest to:
Slow push forward
Do not select a control that conflicts with the prompt.
For example, do not request a forward push in the prompt while selecting a rapid pull-back in the interface.
When no separate camera setting exists, rely on the written prompt.
Step 13: Review Motion Strength
Some tools allow you to choose how strongly the scene moves.
Possible settings may include:
• Low
• Moderate
• High
• Subtle
• Dynamic
For the bicycle example, use low or moderate motion.
The bicycle remains still, while the movement comes mainly from:
• Grass
• Wildflowers
• Clouds
• The camera
High motion may cause:
• Bicycle distortion
• Changing wheels
• Background instability
• Excessive grass movement
• Sudden camera motion
• Objects appearing or disappearing
Use stronger motion only when the scene genuinely requires it.
Step 14: Review Prompt Enhancement
Some platforms offer an option that automatically expands or improves the prompt.
This may be called:
• Enhance Prompt
• Improve Prompt
• Rewrite Prompt
• Prompt Assistant
• Creative Prompt
Automatic enhancement may add useful details, but it may also change the original idea.
Before using it, check whether the platform shows the revised wording.
Confirm that it did not add:
• People
• Vehicles
• Buildings
• Animals
• Extra bicycles
• Dramatic camera movement
• Visible text
• Unwanted weather
• A different time of day
• A different visual style
For a controlled comparison, save both versions:
• Original prompt
• Enhanced prompt
Do not assume that the enhanced version will always produce a better result.
Step 15: Review Sound Options
Some video models may offer automatically generated:
• Music
• Environmental audio
• Sound effects
• Dialogue
• Narration
For the first visual test, disable generated audio when possible unless sound is necessary for the experiment.
This makes it easier to review the visual quality separately.
Audio can be added later during editing.
When generated audio cannot be disabled, listen to the complete clip and check for:
• Unwanted voices
• Distorted sounds
• Incorrect music
• Sudden volume changes
• Copyright or licensing concerns
• Audio that does not match the scene
Step 16: Check the Generation Cost
Before selecting Generate, review:
• Credits required
• Number of versions
• Resolution
• Duration
• Selected model
• Audio settings
• Watermark conditions
• Download options
Record the expected credit use.
Do not generate several versions automatically until you know how many credits each attempt consumes.
For the first test, generate one version.
Step 17: Generate the First Clip
Select:
Generate
The platform may require several seconds or minutes to process the request.
Do not repeatedly click the Generate button while waiting.
Doing so may:
• Create duplicate generations
• Consume additional credits
• Slow the project
• Make the results harder to organize
Wait until the first generation is complete.
Step 18: Watch the Entire Clip
Do not judge the video from its thumbnail or opening frame.
Watch the clip from beginning to end several times.
First, watch the complete scene normally.
Then watch it again while checking the bicycle.
On another viewing, check:
• Camera movement
• Background
• Lighting
• Grass and cloud motion
• Beginning frame
• Final frame
Problems may appear only near the end.
Step 19: Review the Main Subject
Check whether the bicycle remains accurate throughout the clip.
Review:
• Frame shape
• Red colour
• Black seat
• Silver handlebars
• Front wheel
• Back wheel
• Wheel size
• Wheel alignment
• Pedals
• Position beside the fence
• Overall proportions
Possible problems include:
• Oval wheels
• Wheels changing size
• Missing bicycle parts
• Extra bicycle parts
• A bent frame
• Changing handlebars
• The bicycle moving unexpectedly
• A second bicycle appearing
Record the exact time when each problem appears.
For example:
The front wheel becomes oval during the final two seconds.
Step 20: Review the Movement
Check whether the requested movement occurred.
The intended movement is:
• Grass moves gently
• Wildflowers move gently
• Clouds move slowly
• Camera moves forward slowly
• Bicycle remains still
Ask:
• Is the motion too strong?
• Is the grass moving naturally?
• Do the clouds move smoothly?
• Does the camera remain steady?
• Does the camera maintain one direction?
• Does the camera suddenly accelerate?
• Does the bicycle move when it should remain still?
The motion should support the scene without distracting from the subject.
Step 21: Review the Background
Check:
• Wooden fence
• Country road
• Green fields
• Distant hills
• Sky
• Clouds
• Lighting
• Shadows
• Horizon
Look for:
• Fence posts appearing or disappearing
• Road changing shape
• Fields becoming distorted
• Hills moving unexpectedly
• Horizon shifting
• Objects forming in the background
• Sudden weather changes
• Lighting flicker
Background changes can make the complete scene look unstable even when the bicycle is correct.
Step 22: Review the Camera
Confirm that the camera:
• Uses an eye-level view
• Shows the complete bicycle
• Moves forward slowly
• Uses one continuous movement
• Does not shake
• Does not rotate
• Does not suddenly zoom
• Does not crop the bicycle
• Does not change direction
The camera may begin correctly and become unstable near the end.
Watch the final second carefully.
Step 23: Review Lighting and Colours
Check whether the scene maintains:
• Warm sunrise light
• Natural colours
• Soft shadows
• Peaceful atmosphere
• Consistent brightness
Possible problems include:
• Sudden darkening
• Colour changes
• Flickering shadows
• Lighting moving in the wrong direction
• Sunrise becoming midday
• Overly orange colour
• Unnatural reflections
Lighting should remain believable from beginning to end.
Step 24: Review Unwanted Elements
Check for anything that was not requested.
Examples include:
• People
• Cars
• Animals
• Signs
• Words
• Logos
• Watermarks
• Extra bicycles
• Buildings
• Floating objects
• Unnatural shadows
• Random background movement
A small unwanted object may be easy to miss during the first viewing.
Pause the clip when necessary.
Step 25: Record the Results
Create a generation record.
For example:
Project: Article 018 Red Bicycle Test
Prompt version: 01
Model: Enter selected model
Date: Enter generation date
Duration: Six seconds
Aspect ratio: 16:9
Resolution: Enter selected resolution
Motion strength: Low or moderate
Audio: Off
Credits used: Enter amount
Filename: 018-red-bicycle-text-video-v01.mp4
Successful details:
• Correct bicycle colour
• Good sunrise lighting
• Stable fence
• Smooth grass movement
• Suitable composition
Problems found:
• Front wheel becomes oval near the end
• Camera accelerates during the final second
• Clouds move too quickly
Next correction:
• Strengthen wheel-stability instruction
• Require constant camera speed
• Reduce cloud movement
Step 26: Write a Focused Revision
Do not rewrite the entire scene when most of it is correct.
Use:
Keep the red bicycle, black seat, silver handlebars, wooden fence, country road, green fields, distant hills, sunrise lighting, colours, composition, and visual style unchanged. Keep both bicycle wheels perfectly circular, equal in size, correctly aligned, and unchanged throughout every frame. Maintain one very slow, constant-speed forward camera movement from beginning to end. Clouds should move very slowly and remain subtle. Do not accelerate, shake, rotate, crop the bicycle, reshape any bicycle part, or change the background.
This revision protects successful details and corrects only the named problems.
Save it as:
018-red-bicycle-prompt-v02.txt
Step 27: Generate the Second Version
Paste the revised prompt and confirm that all generation settings remain the same.
Keep the same:
• Model
• Duration
• Aspect ratio
• Resolution
• Motion strength
• Audio setting
Changing several settings at the same time makes the comparison less useful.
Generate one revised version.
Step 28: Compare the Two Versions
Watch Version 01 and Version 02 one after the other.
Compare:
• Bicycle accuracy
• Wheel stability
• Camera speed
• Background
• Lighting
• Cloud movement
• Composition
• Overall realism
Do not assume that the newer version is automatically better.
Version 02 may correct the wheel but introduce another problem.
Select the strongest complete clip.
Step 29: Download Every Useful Version
Download any version that may be useful.
Use clear filenames:
• 018-red-bicycle-text-video-v01.mp4
• 018-red-bicycle-text-video-v02.mp4
• 018-red-bicycle-text-video-v03.mp4
Do not rely only on the platform’s online project history.
Projects may be:
• Deleted
• Limited by storage
• Difficult to find
• Removed when a subscription ends
• Affected by platform changes
Keep local copies.
Step 30: Select the Best Clip
Move the strongest generation into the Selected Clips folder.
Rename it:
018-red-bicycle-selected-text-to-video.mp4
Do not call it the final published video yet.
It may still require:
• Trimming
• Cropping
• Captions
• Narration
• Music
• Colour correction
• Compression
• Accessibility review
Step 31: Save the Complete Creation Record
Keep:
• Original idea
• Scene plan
• Prompt Version 01
• Revised prompts
• Generation settings
• Model name
• Dates
• Credit use
• Generated clips
• Review notes
• Selected clip
• Licences or terms checked
• Final edited version
This creates a repeatable workflow for future text-to-video projects.
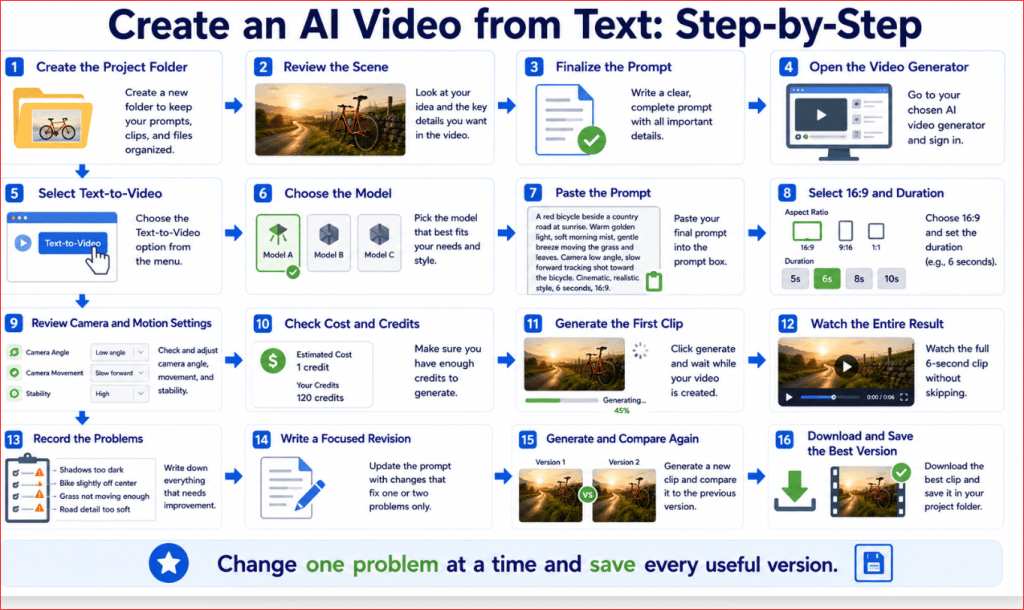
Figure 6. The step-by-step workflow for generating and improving a video from a written prompt.
Figure 6 summarizes the complete beginner workflow for text-to-video generation. The process begins with a simple scene and organized prompt, continues through model and setting selection, and finishes with careful review, focused revision, comparison, downloading, and record keeping.
How to Improve a Weak Text-to-Video Result
The first generated clip should be treated as a draft.
Even a well-written prompt may produce a video with:
• Changing objects
• Unstable backgrounds
• Incorrect movement
• Camera problems
• Distorted faces or hands
• Lighting changes
• Unexpected cropping
• Extra subjects
• Unreadable text
• A weak beginning or ending
Do not immediately replace the complete prompt.
First, identify which parts worked and which part caused the greatest problem.
Review the Successful Details First
Before correcting anything, write down what should remain unchanged.
For example:
Successful details:
• The bicycle is red.
• The country-road setting is correct.
• The sunrise lighting looks natural.
• The wooden fence remains stable.
• The grass movement is gentle.
• The wide composition is suitable.
Protecting these details reduces the risk of losing the strongest parts of the video during the next generation.
A useful instruction is:
Keep the red bicycle, country road, wooden fence, sunrise lighting, colours, composition, visual style, and successful environmental movement unchanged.
Then describe only the problem that needs correction.
Identify the Largest Problem
Watch the clip several times and select the most important issue.
For example:
• The front wheel changes shape.
• The camera moves too quickly.
• A second bicycle appears.
• The background shifts.
• The bicycle moves even though it should remain still.
• The final frame becomes distorted.
Do not try to correct every small issue in one revision.
A focused correction is easier to test and compare.
Use a Focused Revision Formula
Use this structure:
Keep [successful details] unchanged. Correct only [specific problem]. The corrected result should [required appearance or movement]. Do not [unwanted change].
For example:
Keep the red bicycle, fence, road, fields, sunrise lighting, composition, and slow environmental movement unchanged. Correct only the front wheel. Keep it perfectly circular, equal in size to the back wheel, correctly aligned with the frame, and visually unchanged throughout every frame. Do not modify any other bicycle part or background detail.
This gives the generator a clear correction target.
Common Text-to-Video Problems and Focused Corrections
The Main Subject Looks Different from the Prompt
The generated subject may have the wrong:
• Colour
• Shape
• Size
• Material
• Clothing
• Position
• Age
• Accessories
For example, the prompt requests a red touring bicycle, but the result shows a blue mountain bicycle.
How to Improve It: Place the subject description near the beginning and remove unnecessary competing details.
Use:
Create a clean red touring bicycle with a black seat, silver straight handlebars, a slim frame, and two equal circular wheels. This exact bicycle is the main visual subject.
You can also add:
Do not change the bicycle type, colour, frame style, seat, handlebars, or wheel design.
The Subject Changes Shape During the Clip
This is a common consistency problem.
A bicycle may develop:
• Oval wheels
• A bent frame
• Extra pedals
• Missing handlebars
• Changing colours
• Duplicate parts
A person may develop:
• Changing facial features
• Distorted hands
• Different clothing
• Changing body proportions
How to Improve It: Add precise stability instructions.
For a bicycle:
Keep the bicycle’s frame, colour, wheels, seat, handlebars, pedals, proportions, and position visually identical throughout every frame. Do not bend, duplicate, remove, resize, or reshape any bicycle component.
For a person:
Keep the same face, hairstyle, clothing, body proportions, skin tone, and accessories throughout the complete clip. Do not change the person’s identity or appearance.
The Subject Moves When It Should Remain Still
The AI may interpret environmental movement as permission to move the main subject.
For example, the bicycle may roll forward even though only the grass should move.
How to Improve It: Separate the stationary subject from the moving environment.
Use:
The bicycle remains completely stationary and firmly positioned beside the fence. Only the grass, small wildflowers, and clouds move gently. The bicycle does not roll, rotate, tilt, shake, or change position.
This removes ambiguity about which elements should move.
The Main Action Is Incorrect
The subject may:
• Move in the wrong direction
• Move too quickly
• Perform a different action
• Stop unexpectedly
• Repeat the action
• Begin too late
For example, a person should walk from left to right but instead walks toward the camera.
How to Improve It: Describe the action using direction, speed, and timing.
Use:
The person begins walking immediately and continues slowly from the left side of the frame toward the right side. Maintain one steady walking speed throughout the complete six-second clip.
Avoid vague wording such as:
The person walks naturally.
The Movement Is Too Fast
Fast motion can make the subject or background unstable.
Possible symptoms include:
• Sudden acceleration
• Excessive grass movement
• Rapid cloud movement
• Unnatural walking
• Strong camera shake
• Objects becoming distorted
How to Improve It: Use clear speed limits.
For example:
Use slow, restrained movement throughout the complete clip. Grass moves gently in a light breeze, clouds travel very slowly, and the camera maintains a constant low speed. Do not accelerate or introduce rapid movement.
Words such as slow, gentle, subtle, steady, and constant-speed provide clearer guidance.
The Movement Is Too Weak
Sometimes the video appears almost still.
The environment may not move enough, or the requested action may be difficult to see.
How to Improve It: Identify one movement and make it more visible without making the entire scene dynamic.
For example:
Make the grass movement clearly visible but still natural. Grass blades and small wildflowers sway gently from left to right throughout the clip while the bicycle and fence remain completely still.
Avoid increasing all movement at the same time.
The Camera Ignores the Prompt
The camera may:
• Remain static
• Move in the wrong direction
• Zoom unexpectedly
• Rotate
• Shake
• Change angle
• Move too quickly
How to Improve It: Use one simple camera instruction.
For example:
Use one very slow, smooth forward camera movement from beginning to end. Maintain the same eye-level angle and direction. Do not rotate, pan, shake, pull backward, accelerate, or suddenly zoom.
When the platform includes separate camera controls, confirm that the selected control matches the prompt.
The Camera Crops the Subject
The subject may be fully visible at the beginning but partly cropped later.
For example:
• A bicycle wheel leaves the frame.
• A person’s head becomes cropped.
• A product moves too close to the edge.
• Important background details disappear.
How to Improve It: Add framing and safe-space instructions.
Use:
Keep the complete bicycle fully inside the frame throughout the entire clip. Maintain clear space around both wheels, handlebars, seat, and frame. Do not crop or move the bicycle beyond the image boundaries.
For a person:
Keep the person’s complete head, hands, torso, and feet visible throughout the clip.
A wider initial framing may also reduce cropping.
The Background Changes or Becomes Unstable
The background may:
• Shift position
• Change shape
• Produce new objects
• Lose existing objects
• Move with the camera incorrectly
• Become blurry or distorted
How to Improve It: Identify the essential background elements and protect them.
Use:
Keep the wooden fence, road, green fields, distant hills, horizon, sky, and cloud arrangement visually consistent. Do not add, remove, duplicate, bend, or reposition background objects.
Do not describe too many small background details unless they are important.
Simple backgrounds are usually easier to stabilize.
Objects Appear or Disappear
The AI may create:
• Extra bicycles
• New people
• Vehicles
• Signs
• Animals
• Buildings
• Random objects
It may also remove objects that should remain visible.
How to Improve It: State exactly which objects should appear.
For example:
Show one red bicycle, one wooden fence, one country road, green fields, distant hills, grass, wildflowers, and clouds. Do not add people, vehicles, animals, buildings, signs, text, or additional bicycles.
Use the word one when the exact number matters.
Duplicate Subjects Appear
A single bicycle, person, cup, or product may become duplicated.
How to Improve It: State the exact quantity and preserve it.
Use:
Show exactly one red bicycle throughout the complete clip. Do not create a second bicycle, reflection bicycle, duplicate wheel set, or additional bicycle parts.
For people:
Show exactly one adult person. Do not add another person or duplicate any body part.
Faces Change During the Video
A face may:
• Change identity
• Become distorted
• Change age
• Change expression unexpectedly
• Lose facial features
• Become asymmetrical
How to Improve It: Simplify the action and protect the identity.
Use:
Keep the same person, facial structure, skin tone, hairstyle, age, clothing, and expression throughout every frame. Use subtle head movement and avoid rapid facial motion.
When exact identity is essential, text-to-video may not provide enough control. A suitable reference image and image-to-video workflow may be more appropriate.
Hands and Fingers Become Distorted
Hands are difficult to maintain when they perform complicated actions.
Problems may include:
• Extra fingers
• Missing fingers
• Merged hands
• Changing hand size
• Objects passing through fingers
• Hands disappearing
How to Improve It: Use a simpler action and reduce hand prominence.
Instead of:
The person rapidly opens a small box, removes several objects, points at the screen, and waves.
use:
The person rests both hands naturally on the desk while looking at the laptop.
When hand movement is necessary, describe one slow action:
The person slowly lifts one coffee cup with the right hand while the left hand remains resting on the desk.
Lighting Flickers or Changes
The video may begin with warm sunrise light and suddenly become darker, brighter, or a different colour.
How to Improve It: Require one stable lighting condition.
Use:
Maintain the same warm sunrise lighting, brightness, colour temperature, shadow direction, and exposure throughout the complete clip. Do not flicker, darken, brighten suddenly, or change the time of day.
Lighting changes may still occur when the camera moves through a complex environment, so begin with a simple scene.
Colours Change
The subject or background may change colour during the video.
For example:
• The red bicycle becomes orange.
• Clothing changes from blue to green.
• The sky changes from yellow to purple.
• A product’s colour becomes inconsistent.
How to Improve It: State the required colours clearly and protect them.
Use:
Keep the bicycle consistently deep red, the seat black, the handlebars silver, the grass natural green, and the sunrise light warm gold throughout every frame.
Avoid adding too many competing colour descriptions.
The Generated Text Is Incorrect
AI-generated video may contain:
• Misspelled words
• Random letters
• Changing signs
• Distorted labels
• Unreadable screens
• Incorrect product packaging
How to Improve It: Generate the scene without visible text whenever possible.
Use:
Do not include readable text, letters, numbers, captions, signs, labels, logos, packaging words, or screen text.
Add accurate text later in a video editor.
For important product labels or instructions, use real verified material rather than relying on generated text.
The Product Is Inaccurate
A generated product may contain:
• Incorrect buttons
• Missing components
• Impossible features
• Wrong dimensions
• Changing colours
• Misleading accessories
How to Improve It: Text-to-video is not ideal when exact product accuracy is required.
You may add:
Preserve the product’s shape, dimensions, materials, controls, colours, and components exactly as described. Do not add or remove features.
However, when accuracy is essential, use:
• Real product footage
• A verified product photograph
• Image-to-video with a suitable reference
• Manual editing
Do not use an inaccurate generated product video to make factual or commercial claims.
The Clip Begins Poorly
The opening frame may contain:
• A distorted subject
• An unfinished scene
• A sudden camera movement
• Incorrect lighting
• An object appearing gradually
How to Improve It: Add an opening-state instruction.
For example:
Begin with the complete red bicycle clearly visible, fully formed, stationary, and correctly positioned beside the fence. Start with stable sunrise lighting and a steady eye-level camera.
The clip should not begin in the middle of a transformation unless that effect is intentional.
The Clip Ends Poorly
The final second may contain:
• Distortion
• Sudden movement
• Subject disappearance
• Camera acceleration
• Abrupt lighting change
• An incomplete action
How to Improve It: Describe how the clip should finish.
Use:
End with the bicycle fully visible, unchanged, and stationary. Maintain the same camera angle, lighting, background, and composition during the final second. Finish smoothly without sudden movement, distortion, fading, or object disappearance.
The weak ending can also be trimmed during editing when the earlier portion is strong.
The Prompt Is Partly Ignored
A long prompt may contain too many instructions for the model to follow reliably.
How to Improve It: Shorten the prompt and prioritize the most important details.
Keep:
• Main subject
• Main action
• Setting
• One camera movement
• Lighting
• Style
• Aspect ratio
• Critical stability instructions
Remove:
• Repeated adjectives
• Unnecessary background objects
• Several camera changes
• Multiple actions
• Long negative lists
• Details that do not affect the main purpose
A shorter, organized prompt can be more effective than a long, confusing prompt.
Change One Variable at a Time
When comparing prompt versions, keep the generation settings consistent.
Do not change all of these together:
• Prompt
• Model
• Duration
• Aspect ratio
• Resolution
• Motion strength
• Camera control
• Prompt enhancement
When several variables change, you may not know which one improved or weakened the result.
A controlled test could be:
• Version 01: Original prompt
• Version 02: Wheel-stability correction only
• Version 03: Camera-speed correction only
• Version 04: Reduced cloud movement only
Keep clear notes for each version.
Red Bicycle Revision Example
Version 01 Problem
The first clip has:
• Correct bicycle colour
• Good background
• Suitable sunrise lighting
• Stable fence
• Front wheel distortion
• Camera acceleration near the end
Version 02 Focused Prompt
Keep the red touring bicycle, black seat, silver handlebars, wooden fence, country road, green fields, distant hills, sunrise lighting, colours, composition, and realistic cinematic style unchanged. Keep both bicycle wheels perfectly circular, equal in size, correctly aligned with the frame, and visually identical throughout every frame. Maintain one very slow, constant-speed forward camera movement from beginning to end. Do not accelerate, shake, rotate, crop the bicycle, reshape any bicycle part, or change the background.
Version 02 Review
Compare whether:
• Both wheels remain circular
• The bicycle stays fully visible
• The camera maintains a steady speed
• Previously successful details remain correct
• New problems appear
Do not select Version 02 only because it is newer.
Choose the strongest complete result.
Know When to Stop Regenerating
Repeated generation can consume time and credits without producing a perfect clip.
Stop regenerating when:
• The remaining issue can be trimmed
• A small problem can be hidden by a title or transition
• Another tool can correct the issue more easily
• The scene is too complicated for the selected model
• A reference image would provide better control
• Real footage is required for accuracy
• Additional attempts are not producing meaningful improvement
A useful five-second section may be better than an unstable eight-second clip.
Save the strongest version and continue with editing.
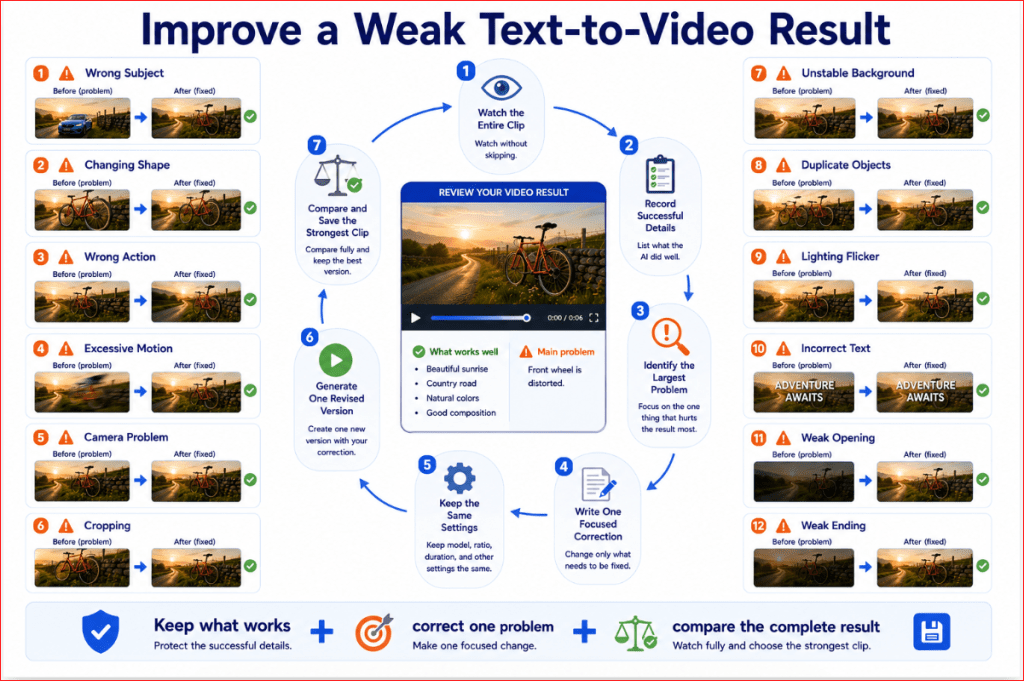
Figure 7. A focused revision process helps correct text-to-video problems without losing successful details.
Figure 7 shows how beginners can improve a weak text-to-video result by identifying what worked, selecting the largest problem, protecting successful details, changing one instruction, generating a controlled revision, and comparing the complete clips before choosing the strongest version.
How to Create a Longer Video from Several Text-to-Video Clips
Most text-to-video generators create short clips rather than complete long videos. [6]
To create a longer video, divide the main idea into several simple scenes, generate each scene separately, and combine the strongest clips in a video editor.
This method gives you more control over:
• Subject consistency
• Camera movement
• Scene order
• Timing
• Narration
• Captions
• Music
• Transitions
• Problem correction
• Final video length
Trying to create an entire story in one generation may produce changing subjects, confused actions, unstable backgrounds, or unexpected camera movements.
Begin with the Complete Video Purpose
Before dividing the video into scenes, write one sentence explaining its purpose.
For example:
Create a short peaceful promotional video showing a red bicycle journey from a country road to a lakeside resting place.
This purpose gives the project a clear direction.
It helps you decide:
• Which scenes are necessary
• Which scenes can be removed
• What mood should remain consistent
• How the video should begin
• How the video should end
Avoid adding scenes that do not support the main purpose.
Decide the Approximate Final Length
Estimate how long the finished video should be.
For example:
• 15 seconds
• 30 seconds
• 45 seconds
• 60 seconds
A 30-second video might use:
• Five clips of approximately six seconds each
• Six clips of approximately five seconds each
• A combination of clips with some sections trimmed
The final length may become shorter after removing weak openings or endings.
Do not assume that every generated second must be used.
Divide the Story into Simple Scenes
Each scene should contain:
• One main subject
• One main action
• One setting
• One camera view
• One camera movement
• One lighting condition
• One clear purpose
For the red-bicycle example, the complete story could be divided into five scenes.
Scene 1: Establish the Country Road
Purpose:
Introduce the bicycle and setting.
Prompt idea:
A red touring bicycle stands beside a wooden fence on a quiet country road at sunrise. Grass moves gently while the camera slowly pushes forward.
Scene 2: Begin the Journey
Purpose:
Show the bicycle travelling along the road.
Prompt idea:
The same red touring bicycle is ridden slowly along the country road from left to right while the camera tracks smoothly beside it.
Scene 3: Travel Through the Countryside
Purpose:
Show progress through a wider landscape.
Prompt idea:
The same red bicycle travels along a winding road through green fields while the camera follows from behind at a safe distance.
Scene 4: Arrive Beside the Lake
Purpose:
Introduce the destination.
Prompt idea:
The same red bicycle approaches a calm lakeside path while warm sunlight reflects across the water.
Scene 5: End at the Resting Place
Purpose:
Provide a peaceful conclusion.
Prompt idea:
The same red bicycle stands beside a wooden bench overlooking the lake at sunset while the camera slowly pulls backward.
Generating these scenes separately is more practical than asking one prompt to create the complete journey.
Create a Scene Plan
Prepare a simple planning table before generation.
| Scene | Purpose | Main action | Camera | Approximate duration |
| 1 | Introduce bicycle and road | Bicycle remains still | Slow push forward | 5–6 seconds |
| 2 | Begin journey | Bicycle moves left to right | Side tracking | 5–6 seconds |
| 3 | Show countryside travel | Bicycle follows winding road | Follow from behind | 5–6 seconds |
| 4 | Arrive near lake | Bicycle approaches lake | Gentle forward movement | 5–6 seconds |
| 5 | Finish peacefully | Bicycle remains beside bench | Slow pull backward | 5–6 seconds |
The scene plan prevents repeated or unnecessary clips.
It also helps you identify which camera movement belongs to each scene.
Prepare a Consistency Sheet
A consistency sheet records the visual details that must remain the same across every connected clip.
For the bicycle project, use:
Main subject
• Red touring bicycle
• Slim red frame
• Black seat
• Silver straight handlebars
• Two equal circular wheels
• No basket
• No visible logo
• Clean condition
Environment
• Quiet countryside
• Green fields
• Wooden fences
• Low distant hills
• Natural vegetation
• No traffic
• No large buildings
• No crowds
Lighting
• Warm early-morning or golden-hour lighting
• Soft natural shadows
• Natural green, blue, brown, and gold colours
• No sudden colour changes
Visual style
• Realistic cinematic style
• Natural textures
• Smooth motion
• Peaceful atmosphere
• Wide 16:9 landscape format
Camera
• Eye-level or slightly elevated view
• Smooth controlled movement
• No camera shake
• No rapid zooming
• No sudden rotation
Copy the relevant consistency details into each scene prompt.
Keep the Main Subject Description Identical
Do not describe the bicycle differently in each prompt.
For example, avoid changing from:
A red touring bicycle with a black seat and silver handlebars
to:
A bright crimson mountain bicycle with curved black handlebars.
Even small wording changes may produce a different bicycle.
Use the same core description throughout every scene:
The same clean red touring bicycle with a slim red frame, black seat, silver straight handlebars, and two equal circular wheels.
The phrase the same may help communicate continuity, but it does not guarantee exact consistency because each clip is generated separately.
Use a Reference Image When Greater Consistency Is Needed
Pure text-to-video generation may create a different version of the subject in each scene.
For greater visual consistency, you may:
1. Generate or select one strong image of the subject.
2. Use that image as a visual reference when the platform supports it.
3. Create later scenes using image-to-video or reference-image controls.
4. Maintain the same subject description in every prompt.
This changes part of the workflow from pure text-to-video to a more controlled reference-based method.
Use text-to-video when creative variation is acceptable.
Use a reference image or real footage when exact appearance is important.
Keep the Visual Style Consistent
Choose one main visual style for the complete project.
For example:
Realistic cinematic style with natural textures, warm lighting, smooth movement, and a peaceful atmosphere.
Do not make one scene realistic, another cartoon, another watercolour, and another futuristic unless the style change is intentional.
Consistency helps the separate clips feel like one video.
Keep the Colour Palette Consistent
Use a repeated colour description across all prompts.
For example:
Use natural green fields, a deep red bicycle, warm golden light, soft blue sky, and neutral brown wooden details.
A repeated colour palette helps reduce sudden visual changes between clips.
However, the exact colours may still vary between generations and may require correction during editing.
Plan Camera Continuity
Connected clips look smoother when camera directions support one another.
For example:
• Scene 1: Slow push toward the bicycle
• Scene 2: Bicycle moves from left to right
• Scene 3: Camera follows from behind
• Scene 4: Camera approaches the lake
• Scene 5: Camera slowly pulls backward
Avoid making the subject travel left to right in one scene and immediately right to left in the next unless the direction change is intentional.
This may make the bicycle appear to turn around unexpectedly.
Maintain Screen Direction
Screen direction describes the direction a subject moves across the frame.
For example:
• Left to right
• Right to left
• Toward the camera
• Away from the camera
For a continuous journey, keep the main direction consistent.
Use:
The bicycle travels from left to right.
in several connected side-view scenes.
Changing direction can be useful when showing a return journey, but it should be planned.
Create Transition-Friendly Openings and Endings
Each clip should begin and end in a way that can connect to another clip.
For example:
• Begin with the subject already visible.
• Avoid incomplete transformations.
• Maintain stable lighting during the final second.
• Avoid sudden camera acceleration.
• End with the subject still inside the frame.
• Leave a short stable moment before the clip ends.
A useful instruction is:
Begin with the bicycle clearly visible and fully formed. End smoothly with the bicycle still visible and unchanged. Maintain stable camera movement and lighting during the opening and final second.
Stable openings and endings are easier to trim and connect.
Use Overlapping Visual Details
Two connected scenes can share a common visual element.
For example:
• Scene 1 ends with the bicycle near the right side of the road.
• Scene 2 begins with the bicycle near the left side of a similar road.
• Both scenes use the same fence, lighting, and travel direction.
The viewer may accept the transition more easily when the clips share:
• Subject
• Direction
• Colour palette
• Lighting
• Camera height
• Background type
• Movement speed
Generate Each Scene Separately
Use a separate prompt file for every scene.
Suggested filenames:
• 018-bicycle-scene-01-country-road-prompt-v01.txt
• 018-bicycle-scene-02-start-journey-prompt-v01.txt
• 018-bicycle-scene-03-countryside-travel-prompt-v01.txt
• 018-bicycle-scene-04-lake-arrival-prompt-v01.txt
• 018-bicycle-scene-05-lakeside-ending-prompt-v01.txt
Save generated clips with matching names:
• 018-bicycle-scene-01-v01.mp4
• 018-bicycle-scene-02-v01.mp4
• 018-bicycle-scene-03-v01.mp4
• 018-bicycle-scene-04-v01.mp4
• 018-bicycle-scene-05-v01.mp4
Matching names prevent the prompts and videos from becoming separated.
Review Each Clip Independently
Before combining the clips, check each scene for:
• Correct bicycle
• Correct setting
• Intended action
• Stable wheels
• Suitable camera movement
• Consistent colours
• Appropriate lighting
• Clean opening
• Clean ending
• No unwanted objects
• No visible text or logos
• No sudden distortion
Do not begin editing with several weak clips.
Improve or replace the most important weak scenes first.
Select the Best Version of Each Scene
A project may contain several generations of one scene.
For example:
• Scene 1 Version 01
• Scene 1 Version 02
• Scene 1 Version 03
Compare the complete clips and select the strongest one.
Move selected files into:
Selected Clips
Rename them clearly:
• 018-bicycle-scene-01-selected.mp4
• 018-bicycle-scene-02-selected.mp4
• 018-bicycle-scene-03-selected.mp4
• 018-bicycle-scene-04-selected.mp4
• 018-bicycle-scene-05-selected.mp4
Do not delete rejected versions immediately. They may contain useful sections.
Use Only the Strongest Part of a Clip
A six-second generation may contain only four strong seconds.
For example:
• The first second is unstable.
• The middle four seconds look correct.
• The final second contains distortion.
During editing, trim away the weak beginning and ending.
A shorter clean section is more valuable than a longer unstable clip.
Place the Clips in Story Order
In the video editor, arrange the selected clips in the planned order:
1. Country-road introduction
2. Beginning of journey
3. Countryside travel
4. Lake arrival
5. Lakeside conclusion
Watch the complete sequence without music or narration first.
Check whether the visual story is understandable.
Review the Transition Between Every Two Clips
Watch each connection separately.
For example:
• Scene 1 to Scene 2
• Scene 2 to Scene 3
• Scene 3 to Scene 4
• Scene 4 to Scene 5
Check:
• Does the bicycle suddenly change?
• Does the travel direction remain logical?
• Does the lighting change too strongly?
• Does the camera jump?
• Does the setting change too abruptly?
• Does the subject appear in a believable position?
A transition problem may be caused by either clip.
Use Simple Transitions
Useful transitions include:
• Direct cut
• Short dissolve
• Fade to black
• Fade from black
• Brief title card
Do not use a decorative transition between every clip.
Excessive transitions can distract from the video and make it look less professional.
A direct cut may work well when the movement and screen direction are similar.
A short dissolve may help when the location or time changes.
Match the Timing to the Story
Not every scene needs the same duration.
For example:
• Scene 1 introduction: Four seconds
• Scene 2 beginning journey: Five seconds
• Scene 3 countryside travel: Six seconds
• Scene 4 lake arrival: Five seconds
• Scene 5 conclusion: Four seconds
The final video would be approximately 24 seconds before titles or transitions.
Keep each scene only as long as necessary to communicate its purpose.
Plan Narration Before Final Trimming
When the video includes narration, prepare the spoken text before completing the final timing.
Example narration:
A quiet road can lead to a new beginning. With every turn, the journey reveals a different view. Sometimes the destination is not a place, but a moment to pause.
Read the narration aloud and measure its duration.
Then adjust the clip lengths to support the spoken words.
Do not force a long narration into a very short video.
Plan Captions and On-Screen Text
Add accurate text during editing rather than asking the AI video generator to create it inside the scene.
Possible text includes:
• Opening title
• Scene label
• Short message
• Educational explanation
• Closing statement
• Website address
Keep on-screen text:
• Large
• Brief
• High contrast
• Correctly spelled
• Away from important subjects
• Visible long enough to read
For accessibility, captions should accurately match spoken narration or dialogue.
Add Music After the Visual Sequence Is Stable
Do not use music to hide weak visual transitions.
First, create a strong visual sequence.
Then choose music that matches:
• Mood
• Pace
• Length
• Audience
• Publishing platform
• Licensing requirements
For the bicycle example, gentle instrumental music may support the peaceful visual style.
Confirm that you have permission to use the selected music.
Use Sound Effects Carefully
Possible sound effects include:
• Light wind
• Bicycle wheels
• Birds
• Water
• Footsteps
• Road ambience
Sound effects should support the scene without becoming distracting.
Do not add sounds that imply an event that is not visible.
For example, loud traffic sounds would not match a quiet empty country road.
Review the Complete Video
After combining all scenes, watch the video several times.
Review once for:
• Story order
Review again for:
• Subject consistency
Review again for:
• Camera and transitions
Review again for:
• Audio
Review again for:
• Captions and text
Review again for:
• Beginning and ending
Check whether the complete video feels like one connected project rather than several unrelated clips.
Example Complete Folder Structure
The completed project may contain:
018 How to Create AI Videos from Text
• Featured Image
• Figures
• Video Prompts
• Scene 01
• Scene 02
• Scene 03
• Scene 04
• Scene 05
• Generated Clips
• Selected Clips
• Edited Videos
• Audio
• Captions
• Screenshots
• Sources
• Old Versions
This structure makes future updates easier.
Save a Master Project Record
Create a document containing:
• Project purpose
• Final scene order
• Consistency sheet
• Every final prompt
• Model used
• Generation dates
• Selected settings
• Credit use
• Selected clip filenames
• Editing decisions
• Audio sources
• Caption text
• Final export settings
• Publishing locations
This record is especially important when the video is used for a website, client, business, advertisement, or educational project.
Final Multi-Scene Workflow
The complete process is:
1. Define the video purpose.
2. Estimate the final duration.
3. Divide the idea into simple scenes.
4. Prepare a consistency sheet.
5. Write one prompt for each scene.
6. Generate each scene separately.
7. Review and revise each clip.
8. Select the strongest version of every scene.
9. Trim weak openings and endings.
10. Arrange the clips in story order.
11. Correct transition problems.
12. Add narration, captions, music, and sound.
13. Review the complete video.
14. Export and save the final version.
15. Keep the complete creation record.
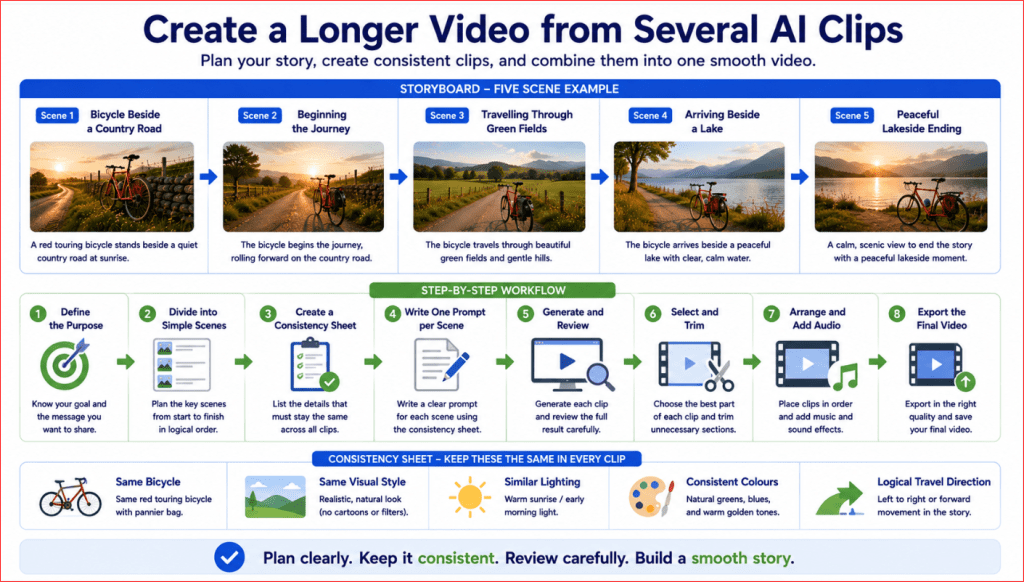
Figure 8. A longer AI video can be created by generating several simple connected scenes and combining the strongest clips.
Figure 8 shows how a complete video idea can be divided into short scenes that share the same subject, style, lighting, colour palette, and movement direction. Each scene is generated and reviewed separately before the selected clips are trimmed, arranged, edited, and exported as one connected video.
How to Prepare a Text-to-Video Clip for Publishing
After selecting the strongest generated clip, prepare it for its intended publishing platform.
A generated video should not normally be uploaded immediately without checking:
• Beginning and ending
• Video dimensions
• Aspect ratio
• Resolution
• Audio
• Captions
• Visible text
• File size
• Filename
• Accessibility
• Accuracy
• Publishing rights
The amount of editing required depends on the project. A simple website demonstration may need only trimming and compression, while a longer educational video may require narration, captions, music, titles, and several connected scenes.
The related guide How to Edit AI-Generated Videos: Beginner Step-by-Step Guide (2026) explains AI-video editing in greater detail. This section provides the essential preparation steps needed to complete a text-to-video project.
Step 1: Keep the Original Generated Clip
Do not edit the only copy of the generated video.
Keep the original file in:
Generated Clips
Make a separate working copy and place it in:
Edited Videos
For example:
Original generation:
018-red-bicycle-text-video-v03.mp4
Working copy:
018-red-bicycle-edit-v01.mp4
Keeping the original makes it possible to:
• Restart the edit
• Compare before and after
• Recover a removed section
• Create another format
• Verify what the AI originally generated
• Preserve the project record
Step 2: Watch the Selected Clip Again
Review the selected clip before importing it into an editor.
Check:
• Opening frame
• Final frame
• Main subject
• Subject movement
• Camera movement
• Background
• Lighting
• Cropping
• Unwanted objects
• Visible text
• Audio
• Overall stability
A clip that looked acceptable during comparison may still contain a small problem that becomes noticeable during editing.
Record the usable time range.
For example:
Usable section: 00:00.6 to 00:05.2
This means that the beginning and final portion should be removed.
Step 3: Import the Clip into a Video Editor
Open a suitable video-editing application and create a new project.
Import:
• Selected video clips
• Narration
• Music
• Sound effects
• Captions
• Titles
• Logo only when appropriate and authorized
• Any real photographs or verified graphics
Organize the editor’s media area using clear folders or labels.
For example:
• Video
• Audio
• Titles
• Captions
• Images
• Exports
Do not mix rejected clips with the selected publishing files.
Step 4: Set the Project Aspect Ratio
Set the editing project to the same aspect ratio as the generated video whenever possible.
For the AI Mastery website example, use:
16:9 landscape
Common publishing formats include:
• 16:9 landscape: WordPress, YouTube, websites, presentations, and desktop video
• 9:16 vertical: YouTube Shorts, TikTok, Instagram Reels, and mobile-first platforms
• 1:1 square: Square social-media posts
• 4:5 portrait: Instagram and Facebook feed posts
Changing from one format to another may crop the subject.
For example, converting a 16:9 bicycle video to 9:16 may remove:
• One bicycle wheel
• Part of the fence
• The surrounding landscape
• Important movement near the sides
When creating several formats, make a separate editing project for each shape.
Step 5: Trim the Weak Beginning
AI-generated clips may begin with:
• An unfinished subject
• A sudden camera movement
• Temporary distortion
• Incorrect lighting
• An object forming
• A blank or blurred frame
Move the beginning trim point forward until the scene is stable.
Do not remove so much that the video begins abruptly in the middle of an action.
A strong opening should show:
• The subject clearly
• The correct composition
• Stable lighting
• Understandable movement
• No unfinished transformation
Step 6: Trim the Weak Ending
The final second of an AI-generated clip may contain:
• Changing subject shape
• Camera acceleration
• Background distortion
• Lighting flicker
• Object disappearance
• Sudden blur
• Incomplete movement
Trim the video before the problem begins.
For example, a six-second generation may contain only five useful seconds.
Use the clean five-second section rather than keeping the complete unstable clip.
Step 7: Remove Unnecessary Pauses
Some clips contain a long period with little useful movement.
Remove unnecessary time when:
• The subject remains inactive too long
• The camera pauses unexpectedly
• The action finishes early
• The final section adds no useful information
However, do not shorten the clip so much that viewers cannot understand the scene.
A peaceful scene may require slower timing than an energetic social-media clip.
Step 8: Correct the Composition Carefully
Some editors allow you to:
• Reposition the video
• Increase or decrease its size
• Crop the frame
• Rotate the video
• Add background space
Use these controls carefully.
Confirm that the complete subject remains visible.
For the red-bicycle example, protect:
• Both wheels
• Handlebars
• Seat
• Bicycle frame
• Fence
• Road
• Important environmental movement
Avoid enlarging the clip so much that the bicycle becomes cropped.
Step 9: Avoid Excessive Digital Zoom
Digital zoom enlarges the existing pixels.
Too much enlargement may cause:
• Blurriness
• Pixelation
• Reduced detail
• More visible AI distortions
• Cropped subjects
A small adjustment may be acceptable, but a large zoom does not create missing detail.
When the subject is too small, generating a better-framed version may produce a stronger result.
Step 10: Stabilize Only When Necessary
Some editors provide video-stabilization controls.
Stabilization may help reduce:
• Minor camera shake
• Small unwanted movement
• Slight frame instability
However, stabilization may also:
• Crop the video
• Reduce sharpness
• Create warped edges
• Change intended camera movement
Do not apply stabilization automatically.
Compare the original and stabilized versions before accepting the change.
Step 11: Adjust Brightness and Colour Carefully
Basic corrections may include:
• Exposure
• Brightness
• Contrast
• Highlights
• Shadows
• Colour temperature
• Saturation
• White balance
Make small adjustments.
Do not attempt to solve a serious generation error with extreme colour correction.
For example, colour adjustment may improve a slightly dark scene, but it cannot correct:
• A distorted bicycle
• A changing face
• Missing objects
• Incorrect movement
• Unstable backgrounds
Keep skin tones, product colours, and natural environments believable.
Step 12: Add an Opening Title When Needed
An educational video may begin with a brief title.
For example:
Creating an AI Video from Text
Keep the title:
• Short
• Large
• Easy to read
• Correctly spelled
• Visible long enough
• Separate from important visual details
Do not place the title directly over the main subject when another clear area is available.
For the bicycle video, the title could appear in open sky or unused landscape space.
Step 13: Add Explanatory Text in the Editor
Do not depend on the AI generator to create accurate visible words inside the scene.
Add text manually during editing.
Possible labels include:
• Text-to-Video Prompt
• Generated Clip
• First Version
• Focused Revision
• Final Selected Clip
• Camera: Slow Push Forward
• Aspect Ratio: 16:9
Manual text is easier to:
• Spell correctly
• Position accurately
• Resize
• Animate
• Replace
• Translate
• Keep consistent
Step 14: Keep On-Screen Text Readable
Use:
• Large font size
• Clear typeface
• Strong contrast
• Short wording
• Suitable display time
• Consistent placement
Avoid:
• Long paragraphs
• Decorative fonts
• Very small labels
• Low-contrast text
• Fast-moving captions
• Text near the frame edge
• Several messages appearing at once
Test the video at normal viewing size rather than only in the editor’s enlarged preview.
Step 15: Add Narration When It Improves Understanding
Narration can explain what the video shows.
For example:
This short clip was created from a written prompt describing the subject, setting, movement, camera, lighting, and aspect ratio.
Keep the narration:
• Clear
• Accurate
• Brief
• Relevant to the visible scene
• Suitable for the audience
Do not describe an action or object that does not appear in the final video.
Record narration in a quiet environment or use an authorized voice-generation tool.
Review pronunciation, names, numbers, and factual statements.
Step 16: Add Captions
Captions make spoken content easier to understand and improve accessibility. [15]
Captions should:
• Match the spoken words
• Use correct spelling
• Include suitable punctuation
• Appear at the correct time
• Remain visible long enough
• Avoid covering important visuals
• Identify important sounds when necessary
Automatically generated captions must be reviewed.
Common caption errors include:
• Incorrect names
• Missing words
• Wrong punctuation
• Misheard technical terms
• Incorrect numbers
• Poor timing
Correct every important caption error before publishing.
Step 17: Add Music Only When Appropriate
Music can support the mood of a video.
For the peaceful bicycle scene, suitable music might be:
• Gentle instrumental music
• Soft acoustic music
• Calm ambient music
The music should not overpower:
• Narration
• Dialogue
• Important sound effects
Reduce the music volume when narration begins.
Use music that you created, licensed, or have permission to publish.
Do not assume that music available online is free for commercial or public use.
Step 18: Add Sound Effects Carefully
The bicycle video might use:
• Gentle wind
• Moving grass
• Distant birds
• Soft road ambience
• Quiet bicycle-wheel sounds when the bicycle moves
Sound should match the visible action.
Do not add:
• Traffic to an empty quiet road
• Heavy rain to a sunny scene
• Bicycle movement when the bicycle remains still
• Loud birds when no natural environment is shown
Sound effects should support the visual scene rather than create confusion.
Step 19: Review Automatically Generated Audio
Some AI video generators may create audio with the clip.
Listen carefully for:
• Unwanted voices
• Incorrect dialogue
• Distorted speech
• Repeated sounds
• Sudden volume changes
• Music that does not match
• Sounds with uncertain usage rights
Remove or replace unsuitable audio during editing.
Do not publish generated speech without checking every spoken word.
Step 20: Add a Disclosure When Required
Some platforms, projects, clients, or jurisdictions may require disclosure when realistic content was created or altered using AI. [11, 12]
A simple disclosure might say:
This video includes AI-generated visuals.
The correct wording depends on:
• Publishing platform
• Type of content
• Intended audience
• Realism of the video
• Whether a real person is represented
• Advertising requirements
• Local rules
• Client policies
Do not use disclosure wording to make unsupported guarantees.
Check the current publishing rules before uploading important content.
Step 21: Check for Misleading Content
Ask whether viewers could misunderstand the clip as:
• Real recorded footage
• Documentary evidence
• A genuine event
• A real product demonstration
• A customer testimonial
• A verified location
• A real person performing an action
When there is a meaningful risk of confusion, provide suitable context or disclosure.
Do not present a generated event as proof that it happened.
Step 22: Verify Products, Places, and Technical Details
AI-generated videos may show inaccurate:
• Products
• Buildings
• Maps
• Machinery
• Medical equipment
• Safety procedures
• Historical details
• Uniforms
• Signs
• Measurements
Review every important factual element.
For educational or commercial content, replace inaccurate generated details with verified material.
Step 23: Confirm Permission for Real People
When a video represents a real person, confirm that you have the necessary permission to use:
• Their appearance
• Their photograph
• Their voice
• Their name
• Their personal information
• A realistic imitation of them
Do not create misleading endorsements or statements that the person did not make.
When a real person is not necessary, use a fictional adult character instead.
Step 24: Remove Private Information
Before publishing, check every frame for:
• Names
• Addresses
• Email addresses
• Phone numbers
• Account information
• Licence plates
• Identification documents
• Computer screens
• Private photographs
• Medical information
• Children’s identifying information
Blur, crop, replace, or remove private information.
Generated clips can also accidentally reproduce information from uploaded reference material, so review them carefully.
Step 25: Check Brands and Logos
A generated clip may contain:
• Invented logos
• Distorted brand names
• Recognizable packaging
• Similar trademarks
• Unrequested signs
Remove unintended branding when it is not needed.
Do not imply that a company approved, sponsored, or created the video unless that statement is accurate.
Step 26: Review the Complete Video Without Sound
Watch the finished video with the sound turned off.
Check:
• Story clarity
• Composition
• Subject consistency
• Camera movement
• Captions
• Titles
• Transitions
• Beginning
• Ending
• Unexpected objects
The visual story should remain understandable.
Step 27: Review the Complete Video with Sound
Watch again with sound.
Check:
• Narration clarity
• Caption accuracy
• Music level
• Sound-effect timing
• Sudden volume changes
• Audio beginning and ending
• Synchronization
Use headphones and normal speakers when possible because problems may sound different on each device.
Step 28: Review the Video at Full Screen
Small preview windows may hide:
• Distorted details
• Blurry subjects
• Incorrect text
• Background problems
• Compression artifacts
• Cropping
Watch the video at full screen before exporting the final version.
Also test it at normal website or mobile size.
Step 29: Choose the Export Resolution
For a standard 16:9 video, common resolutions include:
• 1280 × 720: HD
• 1920 × 1080: Full HD
• 3840 × 2160: 4K
Use a resolution supported by the original material.
Exporting a low-resolution generation as 4K does not restore missing detail.
For a WordPress demonstration, 1280 × 720 or 1920 × 1080 may be practical, depending on:
• Original quality
• File size
• Website plan
• Hosting limits
• Internet speed
• Intended display size
Step 30: Choose a Practical Video Format
A widely supported choice is:
MP4
MP4 video is commonly used for:
• Websites
• YouTube
• Social media
• Presentations
• Computers
• Mobile devices
The editor may also ask for a video codec. A common compatible option is:
H.264
Available settings depend on the editing application and publishing platform.
Step 31: Balance Quality and File Size
A very large video file may:
• Upload slowly
• Use more storage
• Load slowly on a website
• Consume more mobile data
• Affect playback
A very small, highly compressed file may:
• Look blurry
• Show blocky movement
• Lose fine details
• Make text difficult to read
Export a test version and inspect it before publishing.
Do not reduce the quality more than necessary.
Step 32: Use a Clear Final Filename
Use a descriptive filename that identifies the article and content.
For example:
018-how-to-create-ai-videos-from-text-red-bicycle-demo.mp4
Avoid filenames such as:
• Final.mp4
• New final.mp4
• Video corrected.mp4
• Untitled export.mp4
• Final final 2.mp4
A clear filename helps with:
• WordPress organization
• Website maintenance
• Searchability
• Backups
• Future updates
Step 33: Save a High-Quality Master Copy
Keep one high-quality version that is not heavily compressed.
Suggested filename:
018-red-bicycle-text-to-video-master.mp4
Store the master copy locally.
Create separate publishing copies for:
• WordPress
• YouTube
• Social media
• Presentations
• Mobile viewing
Do not repeatedly edit and export the same compressed file because quality may decrease.
Step 34: Create Platform-Specific Copies
A publishing folder might include:
• 018-red-bicycle-wordpress-16×9.mp4
• 018-red-bicycle-youtube-16×9.mp4
• 018-red-bicycle-reel-9×16.mp4
• 018-red-bicycle-square-1×1.mp4
Review every version because changing the shape may alter:
• Cropping
• Text placement
• Caption position
• Subject size
• Transition appearance
Do not assume that one export is suitable for every platform.
Step 35: Create a Video Thumbnail
A thumbnail helps readers understand what the video contains before playing it.
Choose a frame that:
• Shows the main subject clearly
• Has good lighting
• Contains no distortion
• Matches the video
• Has space for a short title when needed
For the bicycle example, select a stable frame showing:
• Complete red bicycle
• Wooden fence
• Country road
• Warm sunrise
• Clear landscape
Do not select a dramatic frame that does not accurately represent the clip.
Step 36: Add Accessible Supporting Text
When placing the video in a WordPress article, add a short paragraph explaining: [13, 14]
• What the video demonstrates
• Whether it was generated from text
• What viewers should observe
• Whether sound is required
For example:
This short demonstration shows a text-to-video clip created from a prompt describing a red bicycle, country-road setting, gentle environmental movement, slow camera motion, sunrise lighting, and a 16:9 composition. Watch the bicycle wheels, background, and camera speed to evaluate the clip’s visual consistency.
Do not rely on the video alone to communicate essential educational information.
Step 37: Test the Uploaded Video
After uploading, test:
• Playback
• Loading time
• Sound
• Captions
• Full-screen mode
• Mobile display
• Desktop display
• Thumbnail
• Controls
• Beginning and ending
• Page layout
Test the published or preview page, not only the editor.
Step 38: Keep the Final Publishing Record
Record:
• Final filename
• Master filename
• Export resolution
• Aspect ratio
• Format
• Codec
• Duration
• File size
• Audio sources
• Caption file
• Thumbnail filename
• Disclosure used
• Publishing date
• Publishing location
• Any later corrections
This record helps when the video must be updated, replaced, or republished.
Text-to-Video Publishing Checklist
Before publishing, confirm:
• The strongest generated version was selected.
• Weak opening and ending sections were trimmed.
• The subject remains stable.
• The background remains acceptable.
• The camera movement is suitable.
• The video uses the correct aspect ratio.
• No important details are cropped.
• Titles and labels are correctly spelled.
• Narration is accurate.
• Captions match the audio.
• Music and sound effects are authorized.
• Generated audio was reviewed.
• Private information was removed.
• Real people were used with permission.
• Products and technical details were verified.
• Unwanted brands and logos were removed.
• AI disclosure was added when required.
• The export quality is suitable.
• The file size is practical.
• The filename is descriptive.
• A high-quality master copy was saved.
• The uploaded video was tested on the final platform.
• The complete creation and publishing record was saved.
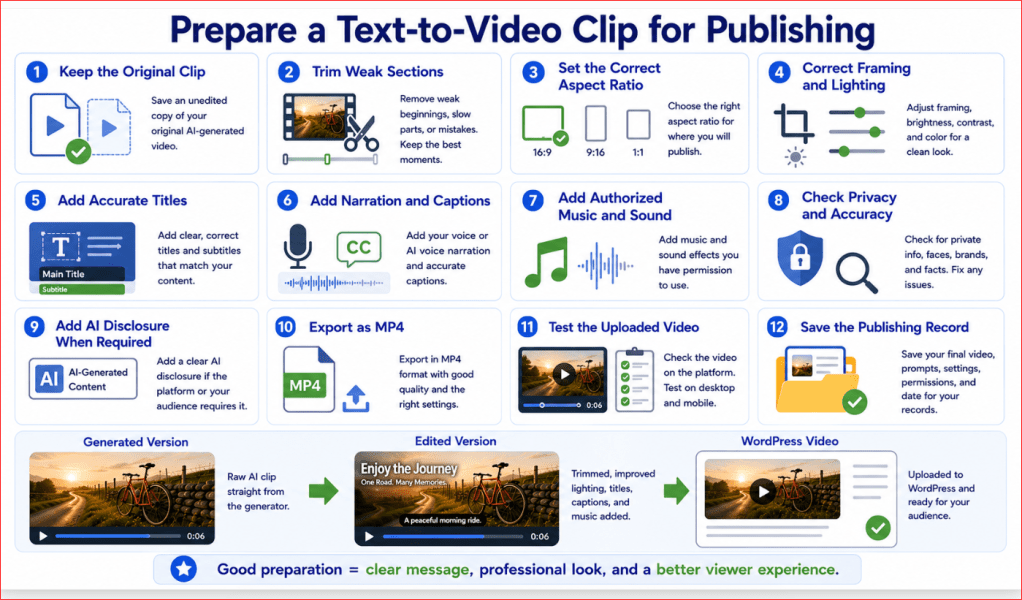
Figure 9. A text-generated video should be reviewed, edited, exported, tested, and documented before publication.
Figure 9 summarizes the final preparation process for a text-to-video clip. Keeping the original generation, trimming weak sections, adding accurate text and audio, checking accessibility and rights, exporting the correct format, testing the upload, and saving a complete project record help produce a more reliable publishing result.
Common Mistakes When Creating AI Videos from Text
Text-to-video generation becomes easier when you understand the mistakes that commonly weaken the result.
Most beginner problems are caused by:
• Starting with an idea that is too complicated
• Using vague movement instructions
• Requesting several camera movements
• Ignoring the aspect ratio
• Accepting the first generation
• Failing to save prompts and settings
• Using generated text, products, or people without careful review
The following mistakes can be reduced through better planning and controlled revision.
Mistake 1: Beginning with a Complicated Story
A beginner may try to create an entire story in one prompt.
For example:
Create a video of a family leaving their house, entering a car, driving through a city, arriving at an airport, boarding an aircraft, flying across the ocean, and reaching a tropical beach.
This prompt contains:
• Several people
• Multiple locations
• Many actions
• Several vehicles
• Scene transitions
• Different camera views
• Changing lighting
• A long timeline
A short text-to-video generation may combine, remove, or confuse these elements.
Possible results include:
• Changing characters
• Missing family members
• Distorted vehicles
• Sudden location changes
• Impossible actions
• Unstable backgrounds
• An unfinished story
How to Avoid This Mistake: Divide the idea into separate scenes.
For example:
1. The family leaves the house.
2. The family enters the car.
3. The car travels toward the airport.
4. The family walks through the airport.
5. An aircraft flies above the clouds.
6. The family arrives at the beach.
Generate each scene separately and combine the strongest clips during editing.
Mistake 2: Using a Vague Prompt
A vague prompt may say:
Create a beautiful video of a bicycle.
The AI must decide:
• What the bicycle looks like
• Where it appears
• Whether it moves
• What the camera does
• What lighting is used
• What style is required
• What aspect ratio should be created
The result may not match the user’s idea.
How to Avoid This Mistake: Include the most important visual and motion instructions.
For example:
Create a realistic six-second video of a red touring bicycle standing beside a wooden fence on a quiet country road at sunrise. Grass moves gently while the camera slowly pushes forward. Use warm natural lighting and a wide 16:9 landscape composition.
This gives the generator a clearer starting point.
Mistake 3: Adding Too Many Prompt Details
A prompt can also become too detailed.
For example:
Create a red bicycle with exactly twelve visible frame reflections, seven specific flowers, twenty fence posts, three cloud shapes, precise leaf counts, several changing shadows, multiple birds, moving insects, detailed buildings, passing vehicles, and five camera movements.
Too many instructions can reduce clarity.
The AI may focus on unimportant details while ignoring the subject or main action.
How to Avoid This Mistake: Prioritize the details that affect the purpose of the scene.
Keep:
• Main subject
• Important appearance
• Setting
• Main action
• Environmental movement
• Camera
• Lighting
• Style
• Aspect ratio
• Critical stability instructions
Remove details that do not improve the video.
Mistake 4: Requesting Several Main Actions
A short clip may not be able to show several complicated actions clearly.
For example:
The person stands up, walks across the room, opens a box, removes a laptop, turns toward the camera, waves, sits down, and begins typing.
The result may:
• Skip actions
• Combine actions
• Show incorrect timing
• Distort hands
• Change the person
• End before the sequence is complete
How to Avoid This Mistake: Use one main action per clip.
For example:
The person slowly opens the box while remaining seated at the desk.
Create another clip for the next action.
Mistake 5: Using Unclear Movement Instructions
Instructions such as:
Move naturally.
or:
Make the background dynamic.
do not explain what should move, in which direction, or how quickly.
The AI may create excessive or unrelated motion.
How to Avoid This Mistake: Describe the movement using:
• Subject
• Action
• Direction
• Speed
• Timing
For example:
Grass and small wildflowers sway gently from left to right in a light breeze throughout the complete clip.
For a walking person:
The person walks slowly from the left side of the frame toward the right side at one steady speed.
Mistake 6: Requesting Too Many Camera Movements
A prompt may say:
Zoom toward the bicycle, rotate around it, move upward, pan left, pull backward, and then follow it from the side.
This may create:
• Camera shake
• Sudden movement
• Changing perspective
• Cropped subjects
• Background distortion
• Unclear composition
How to Avoid This Mistake: Use one main camera movement.
For example:
Use one slow, steady forward camera movement from beginning to end.
After the first version is stable, test a different camera movement in a separate generation.
Mistake 7: Giving Conflicting Instructions
A prompt may contain instructions that cannot happen together.
For example:
Keep the camera completely static while it rotates around the bicycle.
Or:
Use bright midday sunlight and dark midnight moonlight.
The generator may ignore one instruction or produce an inconsistent result.
How to Avoid This Mistake: Review the prompt for contradictions.
Choose one instruction:
Keep the camera completely static.
or:
Move the camera slowly around the bicycle.
Choose one lighting condition:
Use warm sunrise light.
Mistake 8: Failing to State What Should Remain Still
The user may describe moving grass and clouds but forget to say that the bicycle should remain stationary.
The AI may move the bicycle as well.
How to Avoid This Mistake: Separate moving and stationary elements.
For example:
The bicycle remains completely still beside the fence. Only the grass, wildflowers, and clouds move gently.
This makes the movement plan clearer.
Mistake 9: Ignoring Subject Stability
The AI may create the correct subject at the beginning but change it during the clip.
For example:
• Wheels change shape
• Clothing changes colour
• A person’s face changes
• Product parts appear or disappear
• The subject becomes duplicated
How to Avoid This Mistake: Add stability instructions.
For example:
Keep the bicycle’s frame, colour, wheels, seat, handlebars, proportions, and position visually consistent throughout every frame.
Stability wording cannot guarantee a perfect result, but it provides useful guidance.
Mistake 10: Ignoring the Background
Beginners may focus only on the main subject.
However, the background may contain:
• Moving buildings
• Changing roads
• Bending fences
• Disappearing trees
• New objects
• Shifting horizons
• Lighting flicker
How to Avoid This Mistake: Review the complete frame.
Add focused instructions when necessary:
Keep the fence, road, fields, hills, horizon, sky, and lighting visually consistent throughout the clip.
Simple backgrounds are generally easier to control than crowded scenes.
Mistake 11: Choosing the Wrong Aspect Ratio
A user may create a 16:9 landscape video and later discover that a 9:16 vertical version is required.
Changing the format may crop:
• The subject
• Hands or feet
• Important objects
• Background movement
• Titles or captions
How to Avoid This Mistake: Choose the publishing platform before generating.
Use:
• 16:9 for WordPress, YouTube, websites, and presentations
• 9:16 for Shorts, Reels, and TikTok
• 1:1 for square social-media posts
• 4:5 for portrait feed posts
Create separate versions when several formats are required.
Mistake 12: Selecting an Unnecessarily Long Duration
Longer clips provide more time for:
• Objects to change
• Faces to distort
• Backgrounds to shift
• Lighting to flicker
• Camera movement to become unstable
• New objects to appear
How to Avoid This Mistake: Begin with a short generation of approximately four to eight seconds, depending on the available tool.
Create longer videos by combining several short clips.
Mistake 13: Using High Motion for a Simple Scene
A quiet bicycle beside a country road does not require strong motion.
High motion may cause:
• Rapid grass movement
• Camera instability
• Bicycle distortion
• Moving fence posts
• Unnatural clouds
• Objects appearing
How to Avoid This Mistake: Use low or moderate motion for calm scenes.
Increase motion only when the subject or story requires it.
Mistake 14: Allowing Prompt Enhancement to Change the Idea
Automatic prompt enhancement may add:
• People
• Animals
• Buildings
• Vehicles
• Dramatic weather
• Extra camera movement
• A different style
• A different time of day
The result may look attractive but no longer match the intended scene.
How to Avoid This Mistake: Review the enhanced wording before generating.
Save:
• Original prompt
• Enhanced prompt
Compare the two versions and confirm that the added details are appropriate.
Mistake 15: Changing Several Variables at Once
A user may revise the prompt, select another model, change the duration, increase the motion, alter the aspect ratio, and enable prompt enhancement at the same time.
If the result improves or becomes worse, it will be difficult to identify the cause.
How to Avoid This Mistake: Change one main variable at a time.
For example:
• Version 01: Original prompt
• Version 02: Wheel-stability correction
• Version 03: Slower camera movement
• Version 04: Reduced environmental motion
Keep the other settings unchanged.
Mistake 16: Accepting the First Generated Clip
The first clip may contain attractive lighting or movement, but it may also contain problems that appear only after several seconds.
A thumbnail cannot show:
• Changing objects
• A weak ending
• Camera acceleration
• Lighting flicker
• Background instability
How to Avoid This Mistake: Watch the complete clip several times.
Review separately for:
• Main subject
• Movement
• Camera
• Background
• Lighting
• Opening
• Ending
• Unwanted objects
• Audio
Treat the first generation as a draft.
Mistake 17: Judging Only One Frame
A single paused frame may look excellent even when the video is unstable.
A text-to-video clip must be judged over time.
How to Avoid This Mistake: Review:
• Beginning frame
• Middle frames
• Final frame
• Complete movement
• Object consistency
• Camera consistency
A strong video requires more than one attractive image.
Mistake 18: Regenerating Without Recording the Problem
A beginner may repeatedly select Generate without writing down what needs to change.
This can waste:
• Time
• Credits
• Storage
• Useful prompt information
It may also recreate the same problem.
How to Avoid This Mistake: Record:
• What worked
• What failed
• When the problem appeared
• What changed in the next prompt
• Which settings were used
• Which version was strongest
Use a clear revision record.
Mistake 19: Deleting Earlier Versions Too Soon
A newer version may correct one problem but weaken another part of the scene.
For example:
• Version 01 has better lighting.
• Version 02 has more stable wheels.
• Version 03 has smoother camera movement.
An earlier clip may contain the strongest usable section.
How to Avoid This Mistake: Save every useful generation until the final video has been completed and backed up.
Use clear filenames rather than relying only on the platform’s online history.
Mistake 20: Trying to Correct Everything Through Regeneration
Some problems are easier to fix during editing.
For example:
• Weak first half-second
• Distorted final frame
• Excessive empty time
• Small colour difference
• Missing title
• Required captions
• Minor audio issue
How to Avoid This Mistake: Stop regenerating when a practical editing solution is available.
Trim, crop, add text, adjust timing, or replace audio when appropriate.
Do not spend repeated credits trying to create a perfect clip when the strongest section is already usable.
Mistake 21: Asking the AI to Generate Important Visible Text
AI-generated video text may be:
• Misspelled
• Distorted
• Incomplete
• Changing between frames
• Replaced with random symbols
How to Avoid This Mistake: Generate the scene without visible text.
Add accurate titles, signs, labels, captions, and product information manually in the editor.
Mistake 22: Using AI-Generated Products as Accurate Demonstrations
A generated product may show:
• Incorrect controls
• Missing parts
• Invented features
• Impossible dimensions
• Changing logos
• Misleading performance
How to Avoid This Mistake: Use real verified product footage when accuracy matters.
A generated product concept may be suitable for creative illustration, but it should not be presented as factual proof of how a real product works.
Mistake 23: Using Real People Without Permission
A realistic AI video may appear to show a real person doing or saying something they never did.
This can create privacy, consent, reputational, and publishing concerns.
How to Avoid This Mistake: Obtain appropriate permission before using a real person’s:
• Appearance
• Photograph
• Voice
• Name
• Personal information
• Realistic likeness
Use a fictional adult character when a real identity is unnecessary.
Mistake 24: Publishing Without Checking AI Disclosure Rules
Some realistic AI-generated or altered content may require disclosure depending on the publishing platform, project, audience, or local requirements.
How to Avoid This Mistake: Check the current rules before publishing.
When appropriate, use a clear statement such as:
This video includes AI-generated visuals.
Do not assume that one disclosure rule applies to every platform.
Mistake 25: Using Music or Voices Without Checking Rights
A generated video may include automatic music, speech, or sound effects.
The user may also add online music without confirming permission.
How to Avoid This Mistake: Confirm that you have the right to use:
• Music
• Voice recordings
• Narration
• Sound effects
• Uploaded audio
• Automatically generated audio
Keep records of licences, permissions, and sources.
Mistake 26: Uploading the Video Without Testing It
A video may work correctly on the computer but fail after uploading.
Possible problems include:
• Slow loading
• Missing sound
• Incorrect captions
• Cropped mobile view
• Wrong thumbnail
• Playback failure
• Large file size
• Broken page layout
How to Avoid This Mistake: Test the uploaded video on:
• Desktop
• Mobile
• Full-screen mode
• Normal page view
• Headphones
• Speakers
Review the actual published or preview page.
Mistake 27: Using Confusing Filenames
Files named:
• Final
• Final new
• Corrected
• Final final
• New video 2
become difficult to identify later.
How to Avoid This Mistake: Include:
• Article number
• Subject
• Scene number
• Version number
• Purpose
• Format
For example:
018-red-bicycle-scene-01-text-video-v03.mp4
For the final WordPress copy:
018-how-to-create-ai-videos-from-text-wordpress-16×9.mp4
Mistake 28: Failing to Save the Creation Record
Without a record, you may forget:
• The final prompt
• The model used
• Selected settings
• Generation date
• Credits used
• Audio source
• Disclosure wording
• Export settings
• Publishing location
How to Avoid This Mistake: Save a project document containing the complete creation and publishing history.
This is especially important for:
• Business content
• Client work
• Advertising
• Educational materials
• Videos containing real people
• Projects that may need future updates
Common-Mistake Review Formula
Before generating or publishing, ask:
1. Is the idea simple enough?
2. Is the main subject clear?
3. Is there one main action?
4. Is the movement specific?
5. Is there one camera movement?
6. Are any instructions conflicting?
7. Is the correct aspect ratio selected?
8. Are important details protected?
9. Have I watched the entire clip?
10. Have I recorded the prompt and settings?
11. Can the remaining problem be corrected through editing?
12. Have I checked privacy, accuracy, rights, and disclosure requirements?
Avoiding these common mistakes does not guarantee a perfect generation, but it creates a more organized process and improves the chance of producing a usable video.
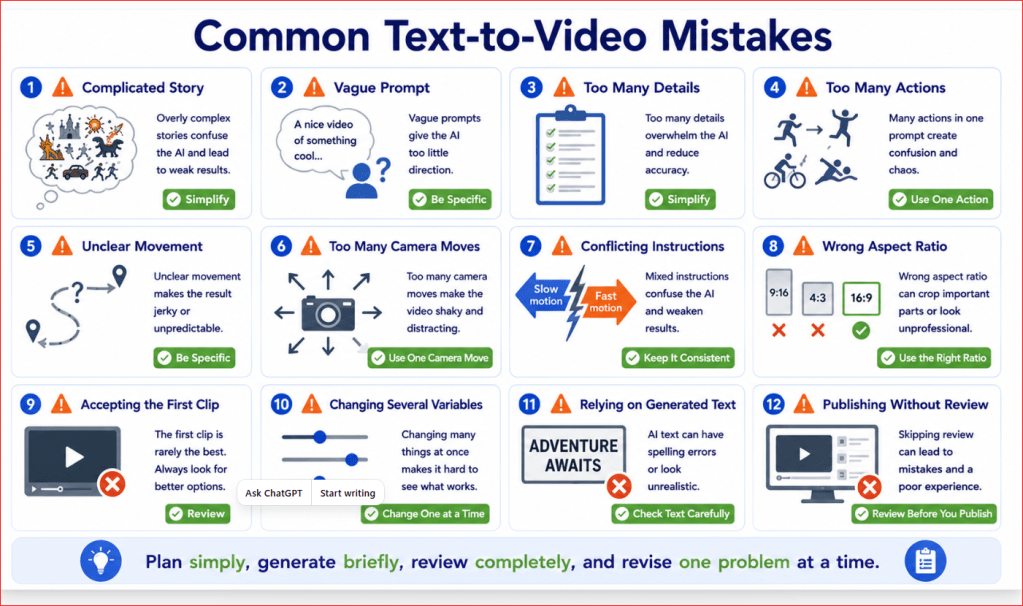
Figure 10. Common text-to-video mistakes can be reduced through simpler scenes, clearer prompts, controlled revisions, and careful publishing checks.
Figure 10 highlights the most common problems beginners encounter when creating videos from text. Planning one subject and one action, using one camera movement, reviewing the complete clip, changing one variable at a time, adding accurate text during editing, and saving the creation record can make the workflow more reliable.
Limitations of Text-to-Video Generation
Text-to-video technology can create impressive short clips, but it still has important limitations.
A detailed prompt may improve the result, but it cannot guarantee that every object, person, movement, background, or camera instruction will remain correct throughout the entire video.
Understanding these limitations helps beginners choose suitable projects, review generated clips realistically, and decide when another method would provide better control.
Limitation 1: The Result May Not Match the Prompt Exactly
The AI may understand the general idea but change important details.
For example, a prompt may request:
• A red touring bicycle
• A wooden fence
• A quiet country road
• Warm sunrise lighting
• A slow forward camera movement
The generated video may instead show:
• A different bicycle design
• An incomplete fence
• A road with buildings
• Bright midday lighting
• A static or rapidly moving camera
The AI is interpreting the prompt rather than following it like an exact technical drawing.
Reality: A clear prompt provides direction, but the model still makes creative decisions.
How to Reduce This Limitation: Place the most important subject, action, setting, and camera instructions near the beginning. Remove unnecessary details and generate several controlled versions when needed.
Limitation 2: Objects May Change Between Frames
An object may look correct at the beginning and become distorted later.
A bicycle may develop:
• Changing wheel shapes
• A bent frame
• Missing pedals
• Extra handlebars
• Different colours
• Duplicate parts
Other objects may:
• Grow or shrink
• Appear or disappear
• Change material
• Move unexpectedly
• Merge with the background
Reality: Maintaining the same object accurately across many frames remains difficult, especially when the object has complex shapes or is moving.
How to Reduce This Limitation: Use a simple subject, restrained movement, short duration, and focused stability instructions. Trim the clip before the distortion begins when the earlier section is usable.
Limitation 3: Faces May Change
A generated person’s face may change during the video.
Possible problems include:
• Different facial structure
• Changing age
• Uneven eyes
• Distorted mouth
• Changing expression
• Inconsistent skin tone
• Different hairstyle
• Identity changes
These problems may become more noticeable during:
• Head turns
• Talking
• Strong expressions
• Fast camera movement
• Close-up shots
• Longer clips
Reality: Text-to-video generation may not preserve one exact person reliably throughout several frames or separate scenes.
How to Reduce This Limitation: Use subtle movement, medium or wider framing, short clips, and a consistent character description. When exact appearance is important, use an authorized reference image or real footage.
Limitation 4: Hands and Fingers May Be Distorted
Hands are especially difficult when they interact with small objects.
Possible problems include:
• Extra fingers
• Missing fingers
• Merged fingers
• Changing hand size
• Objects passing through hands
• Hands disappearing
• Unnatural wrist movement
Complicated actions increase the risk.
Examples include:
• Typing rapidly
• Opening packaging
• Holding several small objects
• Playing an instrument
• Using tools
• Pointing and waving at the same time
Reality: Detailed hand-object interaction may be unstable even when the rest of the scene looks convincing.
How to Reduce This Limitation: Use one slow hand action, avoid close-ups when unnecessary, and keep the hands resting naturally when they are not important to the scene. Use real footage for accurate demonstrations.
Limitation 5: Movement May Look Unnatural
The main action may be:
• Too fast
• Too slow
• Repeated
• Incomplete
• Physically impossible
• In the wrong direction
• Poorly timed
A person may slide instead of walking.
A vehicle may move without the wheels rotating correctly.
Water may flow in an unnatural direction.
Clothing or hair may move without wind.
Reality: The AI is creating the appearance of movement, but it may not consistently follow real-world physics.
How to Reduce This Limitation: Use simple actions, state the direction and speed clearly, and generate short clips. Review movement frame by frame when physical accuracy matters.
Limitation 6: Camera Instructions May Be Ignored
The prompt may request a slow camera movement, but the result may include:
• A static camera
• Sudden zooming
• Unexpected rotation
• Rapid acceleration
• Camera shake
• A change of angle
• Cropping
• Movement in the opposite direction
The camera may behave correctly at first and become unstable near the end.
Reality: Written camera instructions and interface camera controls do not always produce the intended movement.
How to Reduce This Limitation: Use one simple camera movement, match the prompt with any separate camera setting, and avoid combining zooming, panning, tracking, and rotation in one short clip.
Limitation 7: Backgrounds May Become Unstable
Background details may:
• Move unexpectedly
• Change shape
• Appear or disappear
• Become blurred
• Bend or stretch
• Produce new objects
• Shift with the camera incorrectly
Common examples include:
• Changing fence posts
• Bending buildings
• Moving roads
• Disappearing trees
• Shifting horizons
• Changing windows
• Unstable furniture
Reality: A detailed or crowded background increases the number of elements the AI must preserve across every frame.
How to Reduce This Limitation: Use a simple setting with only a few important background elements. State which objects must remain unchanged and avoid unnecessary decoration.
Limitation 8: Visible Text Is Often Incorrect
Generated signs, screens, labels, packaging, and documents may contain:
• Misspelled words
• Random letters
• Changing text
• Distorted numbers
• Incomplete sentences
• Invented logos
• Unreadable symbols
A word may look correct in one frame and change in the next.
Reality: Text inside an AI-generated video is not reliable enough for important information.
How to Reduce This Limitation: Ask the generator to avoid visible text. Add accurate titles, captions, labels, and signs manually during editing.
Limitation 9: Product Details May Be Inaccurate
A generated product may show:
• Invented features
• Missing controls
• Incorrect materials
• Wrong dimensions
• Changing buttons
• Impossible connections
• Distorted packaging
• Misleading performance
A product may look realistic while still being technically wrong.
Reality: Visual realism does not prove factual accuracy.
How to Reduce This Limitation: Use real verified product footage or authorized product images when accuracy matters. Do not use an AI-generated demonstration as evidence of how a real product operates.
Limitation 10: Character Consistency Across Scenes Is Difficult
A longer video may use several separately generated clips.
The same character may change:
• Face
• Height
• Clothing
• Hair
• Age
• Body shape
• Accessories
• Skin tone
The same bicycle, vehicle, room, or product may also look different between scenes.
Reality: Repeating the same description does not guarantee that separate generations will produce an identical subject.
How to Reduce This Limitation: Prepare a consistency sheet and copy the same core description into every prompt. Use reference-image controls when available and permitted. Choose clips with similar framing, lighting, and colours.
Limitation 11: Exact Scene Composition Is Difficult to Control
The AI may place the subject:
• Too close to the frame edge
• Too far from the camera
• In the wrong position
• Partly behind another object
• At a different camera height
• In an unsuitable background area
Important details may become cropped when the camera moves.
Reality: Text prompts provide general composition guidance but not the precision of manual layout or traditional filming.
How to Reduce This Limitation: State the camera view, subject position, safe space, and required visible body or object parts. Use wider framing when cropping is a risk.
Limitation 12: Long Clips Are More Likely to Develop Problems
The longer the clip continues, the more opportunities there are for:
• Subject changes
• Background distortion
• Camera acceleration
• Lighting flicker
• New objects
• Weak endings
• Unnatural motion
A strong opening may become unstable after several seconds.
Reality: A longer duration does not always produce a more useful result.
How to Reduce This Limitation: Generate short clips and combine the strongest sections during editing. A stable four-second clip may be more valuable than an unstable eight-second clip.
Limitation 13: Complex Actions May Be Incomplete
A prompt may request a sequence such as:
1. A person walks to a desk.
2. The person sits down.
3. The person opens a laptop.
4. The person types.
5. The person turns toward the camera.
The AI may:
• Skip an action
• Combine two actions
• Perform them in the wrong order
• Finish before the sequence is complete
• Distort the person or objects
Reality: Short text-to-video generations are better suited to one main action than a long sequence of coordinated actions.
How to Reduce This Limitation: Divide the action into separate clips and combine them in the editor.
Limitation 14: Physical Accuracy May Be Weak
Generated motion may not follow real-world rules.
Examples include:
• Incorrect wheel rotation
• Objects floating
• Incorrect shadows
• Water moving uphill
• Impossible reflections
• Doors opening incorrectly
• Objects passing through one another
• Unnatural body balance
Reality: A visually convincing clip can still contain physical errors.
How to Reduce This Limitation: Review the complete movement carefully. Use real footage, animation software, or a controlled production process when physical or technical accuracy is essential.
Limitation 15: Lighting May Flicker or Change
Lighting can change unexpectedly between frames.
Possible problems include:
• Sudden brightness changes
• Colour-temperature changes
• Moving shadows
• Flickering highlights
• Sunrise becoming midday
• Indoor lighting changing direction
• Reflections appearing without a source
Reality: Maintaining consistent lighting across moving frames can be difficult.
How to Reduce This Limitation: Use one simple lighting condition and request consistent brightness, colour temperature, shadow direction, and exposure. Trim sections containing visible flicker.
Limitation 16: The Final Result May Contain Unwanted Content
The model may add:
• Extra people
• Animals
• Vehicles
• Signs
• Buildings
• Objects
• Words
• Logos
• Unrequested weather
• Additional movement
These additions may appear only briefly.
Reality: Negative instructions can reduce unwanted details, but they cannot guarantee that nothing unexpected will appear.
How to Reduce This Limitation: Keep the scene simple, state the exact number of important subjects, and review every frame before publishing.
Limitation 17: Generated Audio May Be Incorrect
When a model creates sound automatically, the result may contain:
• Unwanted voices
• Distorted speech
• Incorrect sound effects
• Repeated sounds
• Music that does not match
• Sudden volume changes
• Audio that begins or ends abruptly
Generated dialogue may not match the visible mouth movement.
Reality: Audio must be reviewed separately from the visual result.
How to Reduce This Limitation: Disable automatic audio during visual testing when possible. Add verified narration, captions, music, and sound effects during editing.
Limitation 18: Exact Real-Person Representation May Be Unreliable
A prompt describing a real person may produce:
• An inaccurate likeness
• Changing identity
• Incorrect clothing
• Distorted features
• An appearance that is misleadingly realistic
There may also be consent, privacy, disclosure, and platform-policy concerns.
Reality: Text-to-video should not be used casually to make a real person appear to perform an action or make a statement.
How to Reduce This Limitation: Obtain appropriate permission and use authorized source material. Use a fictional adult character when a real identity is unnecessary.
Limitation 19: Different Generations May Produce Very Different Results
Using the same prompt twice may create different:
• Subjects
• Backgrounds
• Camera angles
• Colours
• Lighting
• Movement
• Composition
• Details
This can make exact reproduction difficult.
Reality: AI video generation includes variation, even when the prompt and settings remain similar.
How to Reduce This Limitation: Save every useful version, record the exact prompt and settings, and use fixed controls or reference material when the selected platform supports them.
Limitation 20: Higher Resolution Does Not Correct Generation Errors
Increasing the output resolution may improve sharpness, but it does not correct:
• Changing objects
• Incorrect actions
• Distorted hands
• Unstable backgrounds
• Camera problems
• Incorrect text
• Product inaccuracies
A high-resolution error is still an error.
Reality: Resolution affects image detail, not the correctness of the generated content.
How to Reduce This Limitation: Test the prompt and movement at a practical resolution before using more credits for the final high-quality generation.
Limitation 21: Prompt Improvement May Require Several Attempts
A prompt that appears clear may still produce an unexpected clip.
Several versions may be needed to correct:
• Subject appearance
• Movement
• Camera behaviour
• Background stability
• Lighting
• Cropping
Each attempt may consume time and credits.
Reality: Text-to-video creation is usually an iterative process rather than a one-click result.
How to Reduce This Limitation: Generate one version at a time, record the main problem, change one variable, and compare the complete results.
Limitation 22: Costs and Usage Limits May Restrict Experimentation
Depending on the selected platform and plan, generation may involve:
• Credits
• Monthly limits
• Queue limits
• Watermarks
• Resolution restrictions
• Duration restrictions
• Download limits
• Storage limits
Repeated unsuccessful attempts may increase the cost of one usable clip.
Reality: Free or lower-cost access may not include every feature or output option.
How to Reduce This Limitation: Begin with a short, simple test. Review the current plan details before paying, and record the credits used by each generation.
Limitation 23: Privacy Controls Differ Between Platforms
Projects, uploaded references, prompts, and generated videos may be handled differently by each provider.
Possible differences include:
• Public or private projects
• Data retention
• Content-review processes
• Training options
• Sharing settings
• Team access
• Deletion procedures
Reality: A project should not be assumed private simply because it is inside a personal account.
How to Reduce This Limitation: Check the current privacy settings and provider terms before uploading private, confidential, personal, or client material.
Limitation 24: Commercial-Use Conditions May Differ
A generated video may be intended for:
• A business website
• Advertising
• Client work
• A paid course
• A monetized channel
• Product promotion
The right to use the output may depend on:
• The provider
• The selected plan
• The model
• Uploaded source rights
• Music and voice rights
• Local requirements
• Platform rules
Reality: Creating a clip does not automatically confirm that every element is approved for every commercial purpose.
How to Reduce This Limitation: Review the current provider terms and keep records of source ownership, permissions, licences, model used, and generation date.
Limitation 25: Text-to-Video Cannot Replace Verified Evidence
An AI-generated video can appear highly realistic.
However, it does not prove that:
• An event occurred
• A product works
• A person made a statement
• A location exists as shown
• A medical process is correct
• A historical scene is accurate
• A safety method is reliable
Reality: Generated visuals are synthetic content, not documentary evidence.
How to Reduce This Limitation: Use verified real footage and reliable sources when factual proof is required. Label generated illustrations appropriately when viewers could misunderstand them.
When Text-to-Video Is a Suitable Choice
Text-to-video may be useful for:
• Creative concepts
• Story ideas
• Cinematic landscapes
• Educational illustrations
• Website background clips
• Social-media visuals
• Presentation footage
• Fictional scenes
• Marketing prototypes
• Mood and style experiments
• General-purpose B-roll
It is most suitable when some creative variation is acceptable.
When Another Method May Be Better
Consider using real footage, traditional animation, screen recording, or image-to-video when you need:
• An exact real person
• A verified product
• Accurate machinery
• Precise hand movements
• Documentary evidence
• Medical or safety instructions
• A consistent character across many scenes
• Accurate visible text
• A genuine testimonial
• A specific real location
• Repeatable technical movement
Choosing the correct method is more important than forcing every project into text-to-video generation.
Practical Limitation Review
Before using a generated clip, ask:
1. Does the result match the main idea?
2. Does the subject remain consistent?
3. Is the movement believable?
4. Is the camera stable?
5. Does the background remain acceptable?
6. Are faces and hands suitable?
7. Is visible text accurate?
8. Are products and technical details verified?
9. Is the clip long enough without becoming unstable?
10. Could viewers mistake it for real evidence?
11. Do I have the necessary source, audio, voice, and publishing rights?
12. Would real footage or image-to-video provide better control?
Text-to-video generation is most effective when it is used for suitable projects, supported by careful human review, and combined with editing or real material when greater accuracy is required.
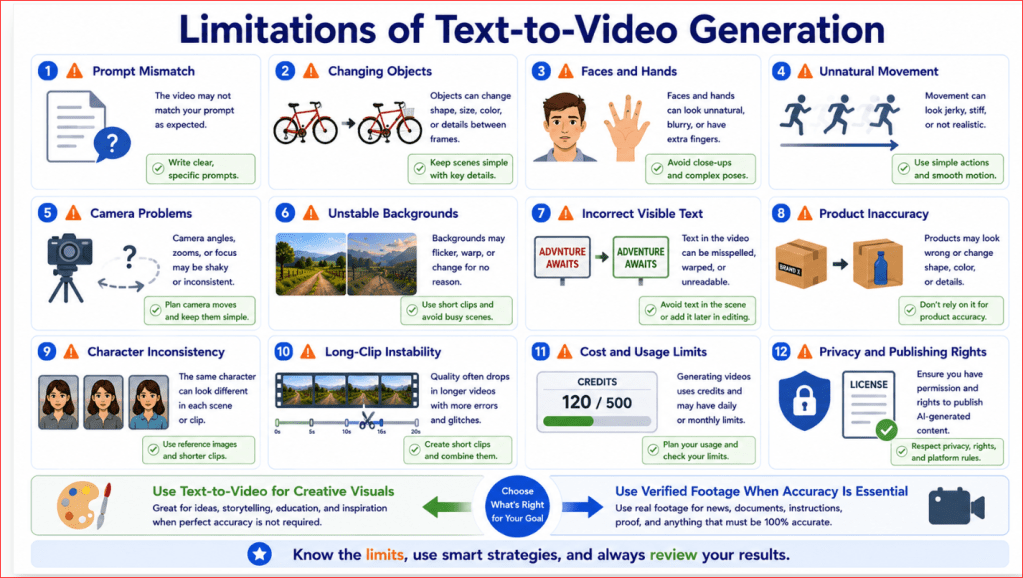
Figure 11. Text-to-video generation has limitations involving prompt accuracy, consistency, movement, text, products, people, costs, privacy, and publishing rights.
Figure 11 summarizes the most important limitations beginners should understand before relying on a generated video. A realistic-looking clip may still contain changing objects, distorted faces or hands, unstable movement, incorrect text, inaccurate products, or misleading details. Careful review and the correct choice of production method remain essential.
Common Myths About Text-to-Video Generation
Text-to-video tools can create impressive clips, but beginners may develop unrealistic expectations after watching carefully selected demonstrations online.
Understanding the difference between a promotional example and a normal working process helps you plan projects more accurately.
Myth 1: The AI Creates Exactly What You Imagine
A prompt may describe the intended subject, setting, movement, camera, lighting, and style, but the AI cannot see the exact scene in your mind.
It interprets the words and makes its own visual decisions.
Two generations from the same prompt may contain different:
• Subjects
• Backgrounds
• Camera angles
• Colours
• Lighting
• Movement
• Compositions
Reality: A prompt gives the AI direction, but it does not provide complete control.
Improve the result by starting with a simple idea, prioritizing the most important details, and generating controlled revisions.
Myth 2: A Longer Prompt Always Produces a Better Video
A detailed prompt can be useful, but a very long prompt may contain:
• Repeated instructions
• Conflicting descriptions
• Too many objects
• Several actions
• Multiple camera movements
• Unnecessary visual details
The generator may ignore or combine some instructions.
Reality: Clarity is more important than length.
A well-organized prompt containing one subject, one action, one setting, and one camera movement may produce a more stable result than a long and complicated description.
Myth 3: One Generation Is Usually Enough
An attractive first frame does not mean that the complete clip is suitable.
Problems may appear later, including:
• Changing objects
• Camera acceleration
• Background distortion
• Lighting flicker
• Weak endings
• Duplicate subjects
Reality: The first generation should normally be treated as a test or draft.
Watch the complete clip, identify the largest problem, revise one instruction, and compare the new version with the original.
Myth 4: Better Prompts Guarantee Perfect Results
Prompt quality matters, but even a carefully written prompt may produce:
• Incorrect movement
• Misshaped objects
• Changing faces
• Cropped subjects
• Unexpected backgrounds
• Unwanted content
The model’s technical limitations still affect the result.
Reality: A better prompt improves direction but cannot guarantee a flawless video.
Human review, regeneration, trimming, and editing remain necessary.
Myth 5: Text-to-Video Works Like Traditional Filming
Traditional filming allows a creator to control:
• Actors
• Props
• Camera placement
• Lighting
• Location
• Timing
• Repeated takes
Text-to-video generation interprets written instructions and creates synthetic frames.
The creator cannot directly control every object or movement in the same way.
Reality: Text-to-video is a generative process, not a digital replacement for every part of traditional production.
Real filming may still be better when exact actions, people, products, or locations are required.
Myth 6: Realistic-Looking Videos Are Factually Accurate
A generated video may look convincing while showing:
• Incorrect machinery
• Impossible movement
• Inaccurate products
• Invented buildings
• Incorrect signs
• Unrealistic procedures
• False historical details
Visual realism can make errors harder to notice.
Reality: A realistic appearance does not prove that the content is accurate.
Verify important products, processes, places, measurements, and factual claims before publishing.
Myth 7: The Same Prompt Always Produces the Same Video
AI generation normally includes variation.
Using the same prompt again may create a different:
• Bicycle
• Character
• Setting
• Composition
• Camera movement
• Colour palette
• Background
Even similar settings may not reproduce the exact earlier result.
Reality: A prompt is not a complete recipe for recreating an identical clip.
Save every useful generation and record the model, settings, prompt, date, and filename.
Myth 8: The AI Will Keep a Character Consistent Across Every Scene
A repeated character description may still produce changes in:
• Face
• Hair
• Clothing
• Height
• Body proportions
• Accessories
• Age
• Skin tone
Separate text-to-video generations do not automatically remember the exact appearance of a character from an earlier clip.
Reality: Character consistency across several scenes remains difficult.
Use a detailed consistency sheet, repeat the same description, and use authorized reference-image controls when greater visual consistency is necessary.
Myth 9: AI-Generated Hands and Faces Are Always Reliable Now
Video models may produce improved faces and hands, but difficult movements can still cause:
• Extra fingers
• Missing fingers
• Changing facial features
• Distorted expressions
• Unnatural hand-object interaction
• Identity changes
Problems may be especially noticeable in close-ups or long clips.
Reality: Faces and hands must still be inspected throughout the complete video.
Use restrained movement and real footage when accurate human actions are essential.
Myth 10: Higher Resolution Fixes a Weak Generation
Increasing the resolution may make the clip sharper, but it cannot correct:
• Changing bicycle wheels
• Distorted hands
• Incorrect actions
• Camera shake
• Unstable backgrounds
• Misspelled text
• Inaccurate products
Reality: Resolution improves image detail, not content accuracy.
Test the prompt and movement at a practical resolution before spending additional credits on a higher-quality export.
Myth 11: AI Video Generators Create Accurate Written Text
A generated sign, label, document, or screen may contain:
• Random letters
• Misspelled words
• Changing characters
• Incorrect numbers
• Distorted logos
• Unreadable sentences
The text may also change from one frame to the next.
Reality: Important visible wording should normally be added manually during editing.
Generate a clean scene without text, then add accurate titles, labels, captions, signs, and product information in the editor.
Myth 12: The AI Automatically Knows the Best Camera Movement
The generator may select a camera movement that does not support the scene.
It might:
• Move too quickly
• Rotate unexpectedly
• Crop the subject
• Change direction
• Ignore the requested camera
• Remain static
Reality: Camera behaviour should be planned and described clearly.
Begin with one simple option, such as a static camera, slow forward push, or smooth side-tracking movement.
Myth 13: More Motion Makes the Video More Professional
Strong movement may appear dramatic, but it can also create:
• Subject distortion
• Background instability
• Camera shake
• Unnatural physics
• Cropping
• Distracting visual changes
A peaceful scene does not need constant action.
Reality: Movement should support the purpose and mood of the video.
Use subtle motion for calm scenes and stronger movement only when the subject requires it.
Myth 14: AI Video Can Replace Every Type of Real Footage
Text-to-video may be useful for fictional, creative, illustrative, or conceptual scenes.
It should not automatically replace real footage when the project requires:
• Documentary evidence
• A genuine testimonial
• An exact product demonstration
• A verified location
• A real safety procedure
• Medical instructions
• Legal evidence
• Accurate technical movement
Reality: The best production method depends on the purpose of the content.
Use verified real footage whenever authenticity or exact accuracy is essential.
Myth 15: AI-Generated Video Is Automatically Free to Use Anywhere
A generated clip may involve:
• Provider terms
• Plan restrictions
• Uploaded source rights
• Music rights
• Voice rights
• Real-person permissions
• Platform disclosure rules
• Commercial-use conditions
Creating the clip does not automatically confirm that every included element can be used for every purpose.
Reality: Usage conditions must be reviewed for the specific tool, model, plan, source material, and publishing platform.
Keep records of the terms and permissions checked for important projects.
Myth 16: Anything Generated Inside an Account Is Automatically Private
Platforms may handle prompts, uploads, generated files, project sharing, and data retention differently.
A personal account does not necessarily mean that every project has the same privacy protection.
Reality: Privacy depends on the provider’s current settings and terms.
Do not upload confidential, private, client, medical, or identifying information until you understand how the selected service handles it.
Myth 17: Automatically Generated Audio Is Ready to Publish
AI-generated audio may include:
• Incorrect dialogue
• Unwanted voices
• Distorted speech
• Poor sound effects
• Unbalanced volume
• Music that does not match
• Audio that begins or ends abruptly
Reality: Generated audio requires the same careful review as generated visuals.
Check every spoken word, sound effect, music track, and usage right before publishing.
Myth 18: Editing Is Unnecessary When the Generated Clip Looks Good
Even a strong generation may still need:
• Trimming
• Colour adjustment
• Captions
• Narration
• Titles
• Audio correction
• Compression
• Format changes
• Disclosure
• Accessibility improvements
Reality: Generation creates the source clip, while editing prepares it for viewers and publishing platforms.
The best workflow combines generation with careful post-production.
Myth 19: Every Weak Result Can Be Fixed by Regenerating
Repeated regeneration may correct one problem but create another.
Some issues are easier to correct by:
• Trimming the beginning
• Removing the final second
• Adding text manually
• Replacing audio
• Cropping carefully
• Combining clips
• Using a different production method
Reality: Regeneration is only one correction method.
Stop generating when editing, a reference image, or real footage would provide a more practical solution.
Myth 20: AI Video Removes the Need for Human Creativity
The AI can generate visual material, but a person still decides:
• The purpose
• The story
• The audience
• The scene order
• The prompt
• The strongest result
• The narration
• The editing
• The ethical context
• The final publishing decision
Reality: AI video generation supports human creativity; it does not replace creative judgment.
The creator remains responsible for the idea, accuracy, permissions, quality, and final use of the video.
Myth Review Checklist
Before beginning a project, remember:
• The AI interprets rather than perfectly follows.
• Longer prompts are not automatically better.
• The first generation is usually a draft.
• Realistic visuals may still be inaccurate.
• Character consistency is not guaranteed.
• Higher resolution does not fix content errors.
• Generated text and audio require review.
• Editing remains an important part of the workflow.
• Usage and privacy conditions must be checked.
• Human judgment remains essential.
Text-to-video generation is most useful when expectations are realistic and the creator remains involved throughout planning, generation, review, editing, and publication.
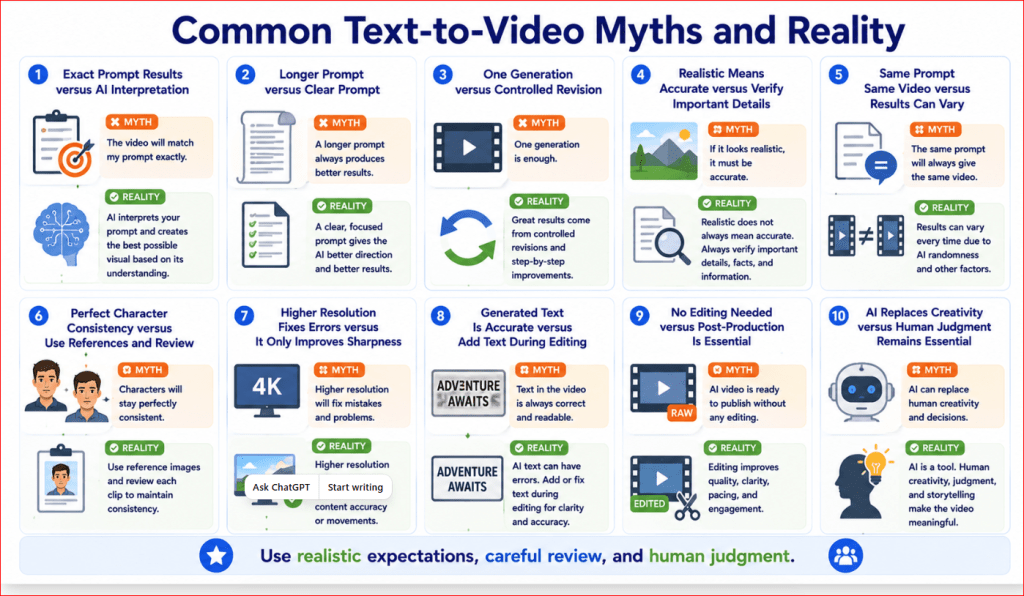
Figure 12. Understanding common text-to-video myths helps beginners develop realistic expectations and make better production decisions.
Figure 12 compares common beliefs about text-to-video generation with the practical reality. Clear prompts and advanced tools can improve results, but they do not guarantee perfect accuracy, consistent characters, correct visible text, reliable audio, or unrestricted publishing rights. Human review and editing remain essential.
How to Use Text-to-Video Generation Responsibly
Text-to-video tools can create convincing scenes that never occurred in real life.
This makes careful human review especially important.
Before generating or publishing a video, consider:
• Who or what the video represents
• Whether viewers could mistake it for real footage
• Whether private information is involved
• Whether you have permission to use the source material
• Whether products, places, and procedures are accurate
• Whether disclosure is required
• Whether the video could cause harm or confusion
• Whether commercial use is permitted
The person who creates and publishes the video remains responsible for deciding whether it is suitable.
Use Source Material You Own or Have Permission to Use
Text-to-video normally begins with written instructions, but a project may also involve:
• Photographs
• Logos
• Character designs
• Product images
• Music
• Voice recordings
• Scripts
• Reference videos
• Client material
• Brand assets
Do not assume that material found online can be copied into an AI project.
Before using source material, confirm that:
• You created it
• You purchased an appropriate licence
• You received permission
• It is supplied by an authorized client
• Its licence permits the intended use
• Any required attribution is provided
Keep a copy of the permission, licence, receipt, or source page with the project records.
Obtain Permission Before Representing a Real Person
A text-to-video prompt can create a realistic person or imitate someone’s appearance.
Do not make a real person appear to:
• Say something they did not say
• Endorse a product they did not endorse
• Participate in an event that never occurred
• Perform an embarrassing or harmful action
• Give medical, financial, political, or legal advice
• Appear in advertising without permission
Obtain appropriate permission before using a real person’s:
• Name
• Face
• Body
• Photograph
• Voice
• Personal story
• Recognizable clothing or surroundings
• Realistic likeness
When a real identity is unnecessary, use a clearly fictional adult character.
For example:
Create a fictional adult teacher explaining a simple idea in a bright classroom. Do not resemble a known or real person.
Take Extra Care with Children
Do not upload or generate identifying material involving children without appropriate permission and a legitimate purpose.
Avoid including:
• Full names
• Home addresses
• School names
• Uniform details
• Personal documents
• Medical information
• Daily schedules
• Exact locations
• Private family photographs
Use fictional or generic educational visuals when a real child is not necessary.
Review the complete background because identifying details may appear on signs, screens, clothing, or documents.
Remove Private and Confidential Information
Do not include private information in prompts, uploads, screenshots, or generated videos unless it is necessary and properly protected.
Examples include:
• Home addresses
• Phone numbers
• Email addresses
• Account numbers
• Passwords
• Identification documents
• Licence plates
• Medical records
• Employment records
• Financial information
• Private client material
• Confidential business plans
• Unpublished products
Before publishing, pause the video at different points and examine:
• Computer screens
• Documents
• Signs
• Packaging
• Background photographs
• Vehicles
• Reflections
• Name badges
• Mobile devices
Blur, crop, replace, or remove sensitive details.
Check the Project’s Privacy Settings
A project stored inside an online account is not automatically confidential. [17]
Before entering sensitive information, review the provider’s current settings for:
• Project visibility
• Sharing
• Team access
• Data retention
• Content review
• Training preferences
• Deletion
• Public galleries
• Download links
Do not use confidential client or personal information until you understand how the selected service handles it.
For sensitive projects, use anonymous descriptions and remove unnecessary identifying information.
Review the Provider’s Current Terms
AI video services may have different rules concerning:
• Ownership
• Commercial use
• Uploaded material
• Generated output
• Restricted content
• Real-person likenesses
• Voice generation
• Data retention
• Public sharing
• Watermarks
• Attribution
• Account level
• Selected models
These conditions can change.
Review the current official terms before using a generated video for:
• Advertising
• Client work
• Paid courses
• Monetized videos
• Business websites
• Product promotions
• Resale
• Political communication
• Public campaigns
Keep a dated record of the terms or guidance you reviewed for an important project.
Confirm Commercial-Use Permission
A video created under a free or trial plan may not have the same usage conditions as one created under a paid plan. [7, 8, 9]
Before commercial publication, check:
• Whether commercial use is permitted
• Whether the selected plan affects usage rights
• Whether attribution is required
• Whether a watermark must remain
• Whether uploaded sources permit commercial use
• Whether music and voices have separate conditions
• Whether client delivery is permitted
• Whether resale or template use is permitted
Do not describe a video as commercially cleared unless you have verified all relevant elements.
Avoid Misleading Viewers
A realistic generated clip may look like recorded footage.
Viewers could mistakenly believe that:
• An event happened
• A person was present
• A product was tested
• A location exists exactly as shown
• A customer gave a testimonial
• A procedure is safe
• A public figure made a statement
• A news event was recorded
Do not present generated visuals as evidence of a real event.
Provide context when there is a meaningful risk of misunderstanding.
For example:
This is an AI-generated illustration created for educational purposes.
The disclosure should be clear enough for the intended audience.
Add AI Disclosure When Required
Disclosure rules may depend on:
• The publishing platform
• How realistic the video appears
• Whether a real person is represented
• Whether the video is advertising
• The subject matter
• Local requirements
• Client policies
• The intended audience
Possible disclosure wording includes:
This video includes AI-generated visuals.
Or:
This fictional demonstration was created using artificial intelligence.
Do not hide important disclosure inside tiny text or an unrelated description.
Place it where viewers can reasonably notice it.
Do Not Create False Testimonials or Endorsements
Do not generate a person who appears to recommend:
• A product
• A service
• A business
• A political candidate
• A medical treatment
• An investment
• A course
• A charity
unless the endorsement is authentic and properly authorized.
A fictional character should not be presented in a way that suggests a real customer gave the statement.
For fictional advertising demonstrations, make the context clear and avoid unsupported claims.
Verify Product Accuracy
AI-generated products may look convincing while containing incorrect features.
Before using a product video, check:
• Shape
• Dimensions
• Materials
• Buttons
• Ports
• Labels
• Packaging
• Accessories
• Colour
• Operation
• Safety features
Do not show an AI-generated product performing an action that the real product cannot perform.
For factual product demonstrations, use verified photographs, approved manufacturer material, or real footage.
Verify Educational and Technical Information
Take special care when creating videos involving:
• Medicine
• Health
• Safety
• Machinery
• Construction
• Electricity
• Vehicles
• Finance
• Law
• Emergency procedures
• Food preparation
• Childcare
A visually realistic procedure may still be dangerous or incorrect.
Do not rely on an AI-generated video as the only source for technical instruction.
Verify the process using appropriate professional or authoritative sources.
Do Not Use Generated Content as Documentary Evidence
Text-to-video generation can create events that never happened.
It should not be presented as:
• Security footage
• News footage
• Court evidence
• Scientific evidence
• Historical documentation
• Proof of product performance
• Proof of a person’s actions
• Proof of an accident
• Proof of a location or condition
Use genuine, verifiable records when evidence is required.
Check Brands, Logos, and Packaging
Generated videos may include recognizable or invented branding.
Review the clip for:
• Company logos
• Product names
• Store signs
• Clothing brands
• Vehicle badges
• Packaging
• Interface designs
• Trademark-like symbols
Remove unintended branding when it is not necessary.
Do not imply that a brand sponsored, approved, or participated in the video unless that is accurate.
Review Visible Text
AI-generated text may be incorrect, distorted, or misleading.
Inspect:
• Signs
• Screens
• Documents
• Packaging
• Licence plates
• Posters
• Clothing
• Background labels
When accurate wording is required, generate the scene without visible text and add it manually in a video editor.
Check all manually added text for:
• Spelling
• Grammar
• Numbers
• Names
• Dates
• Links
• Claims
Verify Music and Sound Rights
A text-generated video may contain automatic music or sound.
Before publishing, determine whether you have permission to use:
• Generated music
• Uploaded music
• Background tracks
• Sound effects
• Voice recordings
• Narration
• Samples
• Remixed audio
Record:
• Source
• Creator or provider
• Licence
• Download date
• Intended use
• Attribution requirement
Do not assume that a track is safe to use because it was available inside an application.
Obtain Permission for Voices
A person’s voice can be identifying even when their face is not shown.
Do not imitate or clone a real person’s voice without appropriate permission. [18]
Take particular care with:
• Family members
• Employees
• Clients
• Teachers
• Medical professionals
• Public figures
• Children
• Deceased people
When no real voice is necessary, use an authorized generic voice or record original narration.
Review the complete spoken content before publication.
Check All Claims
A video may contain written, spoken, or visual claims.
Examples include:
• “This product works instantly.”
• “This method is completely safe.”
• “This service guarantees results.”
• “This treatment cures the condition.”
• “This investment cannot lose money.”
• “This is the real location.”
• “This person recommends the product.”
Verify every important claim.
Do not use attractive AI visuals to make unsupported statements appear more believable.
Avoid Harmful Stereotypes
Review fictional people and scenes for unnecessary stereotypes involving:
• Age
• Disability
• Ethnicity
• Religion
• Gender
• Nationality
• Employment
• Income
• Education
• Appearance
Use respectful descriptions and include diversity only where it fits naturally.
Do not assign negative behaviour to a group without a legitimate and carefully supported reason.
Make the Video Accessible
Responsible publishing also includes accessibility. [15]
Consider adding:
• Accurate captions
• A written explanation
• Clear narration
• High-contrast text
• Readable font sizes
• Adequate display time
• Descriptive surrounding content
• Transcripts when appropriate
Do not rely entirely on colour, sound, or fast animation to communicate essential information.
Avoid flashing or rapidly changing effects that could make the video difficult or unsafe for some viewers.
Review the Video for Emotional Impact
A generated clip may unintentionally appear:
• Frightening
• Disturbing
• Violent
• Misleading
• Humiliating
• Discriminatory
• Inappropriate for children
• Insensitive to a serious event
Consider the intended audience and publishing context.
A visual that is suitable for fictional entertainment may not be suitable for education, advertising, news, or a family website.
Use Extra Care with News and Political Content
A generated video involving a public event, election, government, conflict, or political figure can easily mislead viewers. [11, 12, 16]
Do not create or share realistic footage that falsely appears to document:
• A speech
• A protest
• An arrest
• A military event
• An election event
• A government announcement
• A public emergency
• A candidate’s behaviour
Use clearly labelled illustrations when synthetic visuals are necessary for explanation.
Verify the latest platform rules before publishing this type of content.
Save the Complete Creation Record
For every important video, save:
• Original idea
• Complete prompts
• Prompt revisions
• Platform
• Model
• Generation date
• Settings
• Generated versions
• Selected clip
• Source files
• Source permissions
• Music licences
• Voice permissions
• Review notes
• Disclosure wording
• Export settings
• Publishing locations
• Later corrections
A complete record helps demonstrate how the video was created and what checks were performed.
Correct or Remove Problematic Content
If you discover an important problem after publishing:
1. Review the issue.
2. Remove or unpublish the video when necessary.
3. Correct the inaccurate or harmful section.
4. Replace the affected file.
5. Update the disclosure or explanation.
6. Record what was changed.
7. Notify affected viewers or clients when appropriate.
Do not leave misleading content online simply because it has already been published.
Responsible Text-to-Video Checklist
Before publishing, confirm:
• You own or have permission to use all source material.
• Real people were used with appropriate permission.
• Children’s identifying information was not exposed.
• Private and confidential information was removed.
• Project privacy settings were checked.
• Current provider terms were reviewed.
• Commercial-use conditions were confirmed when relevant.
• The video cannot easily be mistaken for genuine evidence.
• AI disclosure was added when required.
• No false testimonial or endorsement was created.
• Product and technical details were verified.
• Visible text was reviewed or added manually.
• Brands and logos were handled appropriately.
• Music, sounds, and voices were authorized.
• Spoken and visual claims were checked.
• Captions and accessibility support were included.
• The complete clip was reviewed for harmful or misleading content.
• The creation and publishing records were saved.
Responsible use does not mean avoiding AI video generation. It means using the technology with permission, transparency, accuracy, careful review, and respect for the people who may appear in or watch the final video.
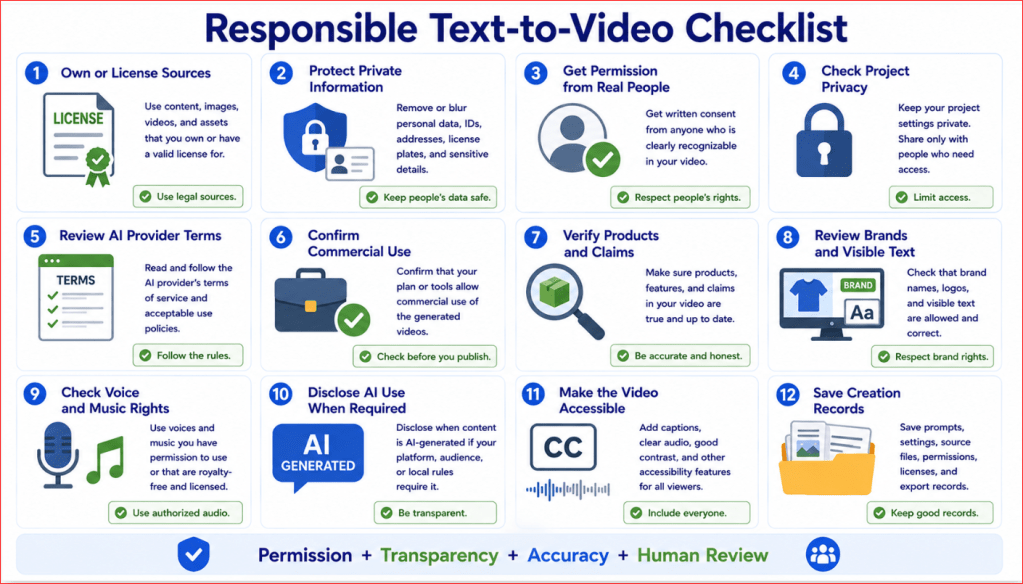
Figure 13. Responsible text-to-video creation requires permission, privacy protection, accurate information, suitable disclosure, authorized media, and complete records.
Figure 13 summarizes the main responsibilities involved in creating and publishing text-generated videos. Creators should verify their sources, obtain permission from real people, remove private information, review provider terms, check products and claims, disclose synthetic content when required, confirm voice and music rights, and save the complete creation record.
Frequently Asked Questions About Text-to-Video Generation
What Is Text-to-Video Generation?
Text-to-video generation is the process of creating a moving video from written instructions.
The user describes:
• The subject
• The setting
• The action
• The camera
• The lighting
• The visual style
• The desired format
An AI video generator interprets these instructions and creates a short sequence of moving frames.
Do I Need to Upload an Image?
No. Text-to-video generation can begin with a written prompt only.
This is different from image-to-video generation, which starts with an uploaded or generated reference image.
Text-to-video provides more creative freedom, but the creator normally has less control over the exact appearance of the first frame.
Use image-to-video when a particular subject, character, product, or composition must be preserved more closely.
Can ChatGPT Generate the Finished Video?
ChatGPT can help you:
• Develop the idea
• Write the prompt
• Organize the scenes
• Improve movement instructions
• Troubleshoot weak results
• Prepare narration and captions
• Create an editing plan
The finished video must then be generated through a compatible AI video-generation feature or platform.
Available features can vary by account, plan, device, region, and current product availability.
How Long Should My First Text-to-Video Clip Be?
Begin with a short clip of approximately four to eight seconds, depending on the options available in the selected tool.
Short clips are easier to:
• Generate
• Review
• Compare
• Revise
• Trim
• Organize
Longer clips create more opportunities for objects, faces, backgrounds, lighting, and camera movement to become unstable.
Can I Create a Long Video from One Prompt?
Some tools may support longer generations, but asking one prompt to create a complete story can reduce consistency and control.
A more practical beginner method is to:
1. Divide the story into short scenes.
2. Write one prompt for each scene.
3. Generate each clip separately.
4. Select the strongest versions.
5. Combine them in a video editor.
6. Add narration, captions, music, and transitions.
This method makes it easier to replace or improve one weak scene without recreating the entire video.
How Detailed Should a Text-to-Video Prompt Be?
The prompt should be detailed enough to explain the important visual and movement instructions, but not so long that it becomes confusing.
A useful prompt normally includes:
• One main subject
• Important appearance details
• One setting
• One main action
• Environmental movement
• One camera view
• One camera movement
• Lighting
• Visual style
• Mood
• Duration
• Aspect ratio
• Stability instructions
• Important details to avoid
Remove repeated adjectives, unnecessary objects, several actions, and conflicting camera directions.
Should I Describe What Remains Still?
Yes.
When only part of the scene should move, state this clearly.
For example:
The bicycle remains completely stationary beside the fence. Only the grass, small wildflowers, clouds, and camera move.
Without this distinction, the AI may move or distort the main subject.
What Is the Best Camera Movement for Beginners?
A static camera is often the easiest option because it reduces the number of changing visual elements.
Other beginner-friendly movements include:
• Slow push forward
• Slow pull backward
• Gentle pan left
• Gentle pan right
• Smooth side tracking
Use one main camera movement in the first generation.
Avoid combining zooming, rotation, tracking, panning, and vertical movement inside one short clip.
Why Does the AI Ignore Part of My Prompt?
The model may ignore or reinterpret instructions when the prompt contains:
• Too many objects
• Several actions
• Conflicting descriptions
• Multiple camera movements
• Repeated restrictions
• Unnecessary background details
• A long sequence of events
Simplify the prompt and prioritize the subject, action, camera, and important stability requirements.
Generate separate clips for separate actions.
Why Do Objects Change Shape?
AI video generators create a sequence of frames and must preserve the subject across time.
Complex shapes, movement, camera changes, and longer durations can make this difficult.
To reduce the problem:
• Use a simple subject.
• Keep the clip short.
• Use restrained movement.
• Use a stable camera.
• Add precise consistency instructions.
• Trim the clip before the distortion begins.
• Use an authorized reference image when greater control is needed.
A prompt cannot guarantee perfect object consistency.
Why Do Faces Change During the Video?
Faces may change when:
• The person turns quickly.
• The camera moves close to the face.
• The person speaks.
• Strong expressions are requested.
• Lighting changes.
• The clip is long.
• The scene contains several people.
Use short clips, subtle facial movement, consistent lighting, and medium framing.
When exact identity is necessary, use properly authorized reference material or real footage.
Can Text-to-Video Create Accurate Hands?
It may create acceptable hands in simple scenes, but detailed hand and object interactions can still produce errors.
For better results:
• Use one slow hand movement.
• Avoid unnecessary close-ups.
• Keep unused hands resting naturally.
• Avoid several objects.
• Review every frame.
• Use real footage when exact hand movements are important.
Why Is the Generated Text Misspelled?
Text-to-video models are primarily creating visual frames and movement rather than typesetting accurate words across time.
Signs, labels, screens, and packaging may contain:
• Misspellings
• Random symbols
• Changing letters
• Incorrect numbers
• Distorted logos
Ask the generator to avoid visible text and add accurate wording manually in a video editor.
Can I Use the Same Prompt to Recreate the Same Video?
Not necessarily.
The same prompt may create different:
• Subjects
• Backgrounds
• Camera views
• Colours
• Lighting
• Movement
• Compositions
Save every useful clip and record:
• The exact prompt
• Selected model
• Settings
• Date
• Aspect ratio
• Duration
• Resolution
• Filename
Some tools may offer additional controls that improve repeatability, but exact reproduction should not be assumed.
How Can I Keep a Character Consistent Across Several Scenes?
Create a consistency sheet that records the character’s:
• Age range
• Face
• Hairstyle
• Skin tone
• Clothing
• Body proportions
• Accessories
• Visual style
• Lighting
• Camera height
Repeat the same core description in every scene prompt.
When permitted and available, use the same authorized reference image or character-reference feature.
Even with these steps, separate generations may not produce a perfectly identical character.
Should I Use Prompt Enhancement?
Prompt enhancement can help expand a short description, but it may also add details you did not request.
Review whether it introduced:
• Extra people
• Vehicles
• Animals
• Buildings
• Dramatic weather
• Additional camera movement
• A different style
• A different time of day
Save the original and enhanced prompts separately.
For a controlled test, change only one factor at a time.
How Many Versions Should I Generate?
There is no fixed number.
Generate enough versions to find a usable result without repeatedly spending time or credits on small imperfections.
A practical process is:
1. Generate one test.
2. Record what worked.
3. Identify the largest problem.
4. Make one focused revision.
5. Generate one more version.
6. Compare the complete clips.
7. Stop when editing or another method becomes more practical.
Do not assume that the newest generation is automatically the best.
Should I Generate Several Versions at the Same Time?
Generating several versions can provide useful choices, but it may also consume credits quickly.
For a beginner project, generating one version at a time makes it easier to:
• Review carefully
• Record the exact problem
• Make a controlled correction
• Understand which change affected the result
Check the estimated generation cost before requesting multiple outputs.
Does a Higher Resolution Produce Better Movement?
Higher resolution may improve sharpness and visible detail, but it does not automatically improve:
• Object consistency
• Camera movement
• Face stability
• Hand accuracy
• Background stability
• Physical realism
• Correct text
Test the prompt and motion at a practical resolution before creating a more expensive final version.
What Aspect Ratio Should I Use?
Choose the aspect ratio according to the publishing destination.
• 16:9 landscape: WordPress, YouTube, websites, presentations, and standard video
• 9:16 vertical: YouTube Shorts, Instagram Reels, TikTok, and mobile-first content
• 1:1 square: Square social-media posts
• 4:5 portrait: Instagram and Facebook feeds
For a standard AI Mastery article demonstration, use 16:9 landscape.
Can I Change a Landscape Video into a Vertical Video?
Yes, but converting 16:9 landscape to 9:16 vertical may crop important content.
The conversion may remove:
• Parts of the subject
• Hands or feet
• Background movement
• Titles
• Captions
• Objects near the sides
A better approach may be to create a separate vertical generation or editing project.
Review every platform-specific version individually.
Do I Need a Video Editor?
A video editor is strongly recommended.
Editing allows you to:
• Trim weak openings and endings
• Arrange several clips
• Add accurate text
• Add narration
• Correct captions
• Add music and sound
• Adjust timing
• Create transitions
• Export the correct format
• Prepare different platform versions
AI generation creates the source material. Editing prepares it for viewers.
Can I Add Narration and Captions Later?
Yes. Adding narration and captions during editing usually provides more control than trying to generate accurate speech and visible text inside the original scene.
Review:
• Pronunciation
• Factual accuracy
• Caption spelling
• Timing
• Volume
• Music level
• Accessibility
Automatically generated captions should always be checked before publication.
Can I Use AI-Generated Music or Voices?
Possibly, but the permitted use depends on the provider, plan, model, licence, source material, and publishing purpose.
Before publishing, verify:
• Commercial-use conditions
• Voice permissions
• Music permissions
• Attribution requirements
• Platform rules
• Client requirements
Do not imitate a real person’s voice without appropriate authorization.
Can I Use an AI-Generated Video Commercially?
Commercial-use conditions vary. [7, 8, 9]
Check:
• The current provider terms
• Your subscription plan
• The model used
• Source-material rights
• Music and voice rights
• Real-person permissions
• Watermark or attribution conditions
• Advertising rules
• Publishing-platform requirements
Keep a dated record of the conditions you reviewed.
Do I Need to Disclose That the Video Was AI-Generated?
Disclosure may be required depending on: [11, 12]
• The publishing platform
• The realism of the video
• Whether a real person is represented
• Whether the content could mislead viewers
• The subject matter
• Advertising rules
• Local requirements
• Client policies
A suitable statement may be:
This video includes AI-generated visuals.
Check the current requirements before publication.
Can I Use a Real Person in a Text-to-Video Prompt?
Using a real person’s name, appearance, photograph, or voice may involve consent, privacy, platform-policy, and disclosure requirements. [16, 18]
Do not make someone appear to:
• Say something they did not say
• Endorse a product
• Participate in a fictional event
• Perform a harmful or embarrassing action
• Provide professional advice they did not provide
Use a fictional adult character when a real identity is not necessary.
Is Text-to-Video Suitable for Product Demonstrations?
It may be suitable for creative concepts, mock-ups, or general promotional ideas.
It is less suitable when viewers need to see:
• Exact controls
• Genuine dimensions
• Real materials
• Verified performance
• Correct safety features
• Accurate assembly
• Actual packaging
Use real footage or authorized product material when factual accuracy matters.
Is Text-to-Video Suitable for Medical, Safety, or Technical Instructions?
Use extreme caution.
A generated video may show a procedure that looks realistic but is incomplete, inaccurate, or unsafe.
For high-stakes instruction, use:
• Verified information
• Qualified professional review
• Real demonstrations
• Approved diagrams
• Authoritative sources
Do not rely on synthetic video as the only instructional evidence.
What Should I Do When the Video Is Almost Correct?
Identify whether the remaining problem can be corrected more efficiently through editing.
Editing may solve:
• A weak opening
• A distorted final second
• Excessive empty time
• Missing titles
• Caption errors
• Music problems
• Minor brightness differences
Regenerate only when the problem affects the essential subject, action, camera, or accuracy.
When Should I Stop Regenerating?
Stop when:
• A strong usable section already exists.
• The remaining problem can be trimmed.
• Editing can correct the issue.
• Another tool would provide better control.
• A reference image is needed.
• Real footage is more appropriate.
• New attempts are not producing meaningful improvement.
• The cost is no longer reasonable for the project.
A shorter stable clip is usually better than a longer unstable one.
What Files Should I Save?
For an important project, save:
• Original idea
• Scene plan
• Complete prompts
• Prompt revisions
• Model and settings
• Generated versions
• Review notes
• Selected clips
• Edited project
• Narration
• Caption files
• Music and sound sources
• Licences and permissions
• Final exports
• Thumbnail
• Publishing record
Clear records make future updates and corrections easier.
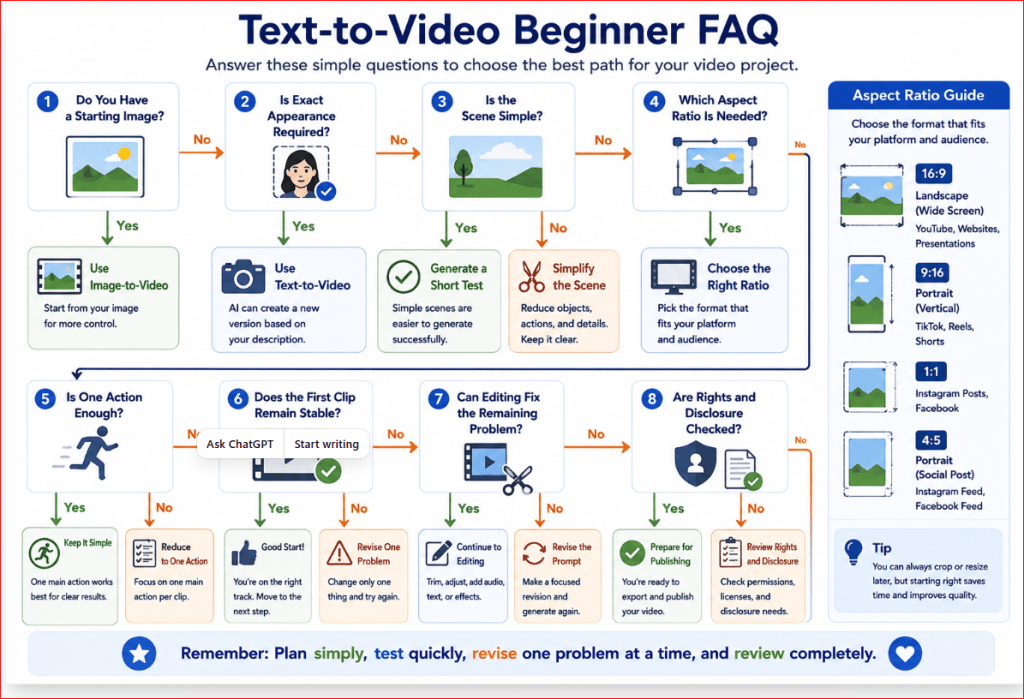
Figure 14. Answers to common beginner questions can help users choose the correct text-to-video workflow, format, and review process.
Figure 14 provides a quick decision guide for common text-to-video questions. It helps beginners decide when to use text-only generation, when to use a reference image or real footage, how long the first clip should be, which aspect ratio to choose, and when to regenerate or continue with editing.
Key Takeaways
Text-to-video generation allows you to create a short moving video from a written description without starting with an uploaded image.
Remember these important points:
• Begin with one simple video idea.
• Use one main subject, one setting, and one main action.
• Explain what should move and what should remain still.
• Choose one camera view and one main camera movement.
• Describe the lighting, visual style, mood, duration, and aspect ratio.
• Keep the most important instructions clear and organized.
• Avoid unnecessary objects, repeated descriptions, and conflicting directions.
• Start with a short clip of approximately four to eight seconds when the selected tool permits it.
• Use a static camera or slow controlled movement for the first test.
• Choose the aspect ratio before generating the video.
• Use 16:9 for WordPress, YouTube, websites, and presentations.
• Use 9:16 for Shorts, Reels, TikTok, and other vertical platforms.
• Treat the first generation as a draft rather than a finished video.
• Watch the complete clip instead of judging only the thumbnail or opening frame.
• Review the subject, movement, camera, background, lighting, opening, and ending separately.
• Record which details worked before revising the prompt.
• Identify the largest problem and correct one instruction at a time.
• Keep the model, duration, format, resolution, and other settings unchanged during controlled comparisons.
• Save every useful prompt and generated version with a descriptive filename.
• Do not assume that a newer generation is automatically better.
• Trim weak openings or endings when the strongest part of the clip is already usable.
• Create longer videos by generating several short scenes and combining them in a video editor.
• Use a consistency sheet when the same character, object, setting, or visual style appears across several scenes.
• Add accurate titles, captions, signs, and labels during editing rather than relying on generated visible text.
• Review automatically generated narration, music, dialogue, and sound effects before publication.
• Verify products, locations, technical procedures, and factual claims.
• Obtain permission before using a real person’s appearance, photograph, name, or voice.
• Remove private, confidential, or identifying information.
• Check the provider’s current privacy, commercial-use, and publishing terms.
• Confirm that music, voices, photographs, logos, and other source materials are authorized.
• Add an AI disclosure when required or when realistic synthetic content could mislead viewers.
• Keep the original generated clip and save a high-quality master copy.
• Test the exported video on the actual publishing platform.
• Preserve the complete creation and publishing record.
Text-to-video works best when creative variation is acceptable. When exact identity, product accuracy, genuine evidence, or precise technical movement is essential, use authorized reference material, controlled animation, or verified real footage.
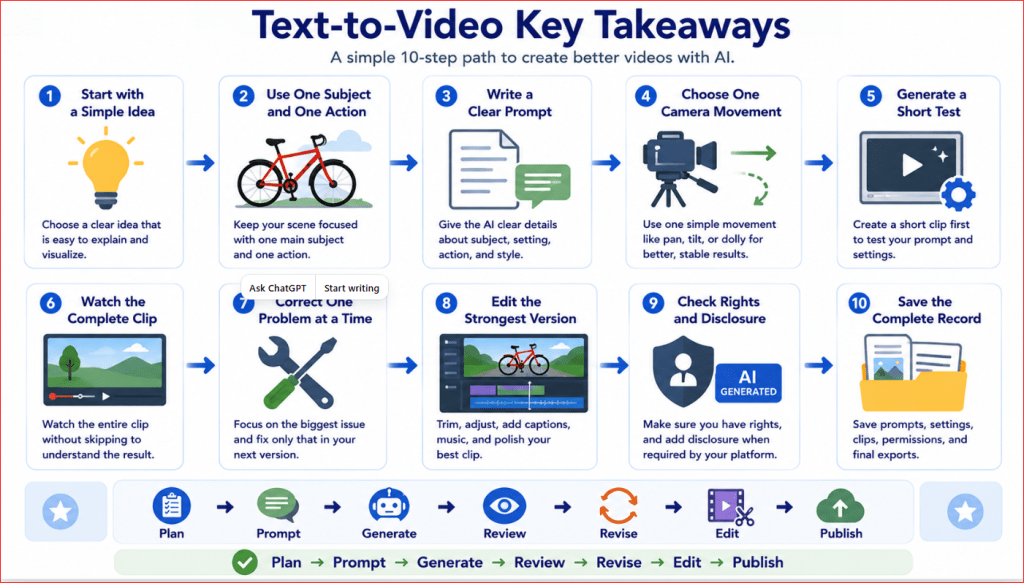
Figure 15. The essential text-to-video workflow begins with a simple idea and ends with careful editing, review, and responsible publication.
Figure 15 summarizes the main lessons from this guide. A successful text-to-video project requires a clear scene, an organized prompt, suitable generation settings, complete video review, focused revisions, careful editing, responsible-use checks, and well-organized creation records.
Final Tip
Do not try to create a perfect, complicated video with your first prompt.
Begin with:
• One main subject
• One simple setting
• One clear action
• One environmental movement
• One camera movement
• One short clip
Generate the first version and watch it from beginning to end.
Then ask:
What is the single most important problem in this clip?
Protect the details that already look correct and revise only the instruction connected to that problem.
For example:
Keep the bicycle, country road, wooden fence, sunrise lighting, colours, composition, and visual style unchanged. Correct only the front wheel. Keep it perfectly circular, correctly aligned, equal in size to the back wheel, and visually unchanged throughout every frame.
This focused approach is usually more effective than rewriting the complete prompt after every generation.
Remember:
Start simply, review carefully, and improve specifically.
The goal is not to make the AI follow every imagined detail perfectly. The goal is to create the strongest usable clip through clear planning, controlled testing, human judgment, and careful editing.
Sources and References
Citations in square brackets refer to the numbered official sources below. These pages were reviewed on July 28, 2026. Features, prices, limits, policies, and plan conditions may change, so check the current official page before an important project or publication.
[1] Runway. Text to Video Prompting Guide. Explains that text-to-video prompts should clearly describe what appears in the frame and how the elements move. Accessed July 28, 2026.
[2] Runway. Introduction to Prompting. Recommends reviewing each generation and refining the prompt through an iterative process. Accessed July 28, 2026.
[3] Runway. Getting Started with Generative Video. Describes a general workflow for creating a session, prompting, generating, reviewing, and iterating. Accessed July 28, 2026.
[4] Adobe. Writing Effective Text Prompts for Video Generation. Provides official prompt-writing guidance for video generation in Adobe Firefly. Accessed July 28, 2026.
[5] Adobe. Generate Videos Using Text Prompts. Explains how text prompts can define video content, emotion, setting, camera angle, and camera movement. Available controls depend on the selected model. Accessed July 28, 2026.
[6] Runway. How to Create Longer Videos and Films. Explains how short generated clips can be planned and combined into longer-form video projects. Accessed July 28, 2026.
[7] Runway. Usage Rights. Describes Runway-specific ownership and commercial-use information. Users should also review the current terms and the rights attached to any uploaded material. Accessed July 28, 2026.
[8] Adobe. Adobe Firefly FAQ. Provides current information about Adobe Firefly features, models, data practices, and product-specific conditions. Accessed July 28, 2026.
[9] Adobe. Generative Credits FAQ. Explains generative-credit use and Adobe-specific commercial-use conditions, including important distinctions between Adobe and partner models. Accessed July 28, 2026.
[10] Adobe. Known Limitations in Firefly. Lists current known limitations. The specific items can change as Firefly features are updated. Accessed July 28, 2026.
[11] YouTube Help. Disclosing Use of Generative AI Content. Explains when creators should use YouTube’s altered or synthetic content disclosure. Accessed July 28, 2026.
[12] YouTube Help. Understanding “How This Content Was Made” Disclosures on YouTube. Explains how YouTube presents information about content origin and meaningful alteration. Accessed July 28, 2026.
[13] WordPress.com Support. Video Block. Explains how to upload or embed video, add text tracks, choose a poster image, and configure playback settings. Accessed July 28, 2026.
[14] WordPress.com Support. Working with Video. Summarizes the available methods for adding uploaded and externally hosted video to a WordPress.com site. Plan requirements may change. Accessed July 28, 2026.
[15] W3C Web Accessibility Initiative. Captions/Subtitles. Explains that captions provide synchronized text for speech and important non-speech audio information. Accessed July 28, 2026.
[16] YouTube Help. Impersonation Policy. Explains that AI disclosure does not permit misleading impersonation and that voice or likeness imitation may violate policy. Accessed July 28, 2026.
[17] Runway. Understanding Runway’s Security and Privacy Standards. Provides Runway-specific information about asset privacy and sharing. Other providers may use different defaults and controls. Accessed July 28, 2026.
[18] Runway. Voice Verification. States that explicit consent is required when a voice is submitted for custom voice training in Runway. Accessed July 28, 2026.
[19] OpenAI. Prompt Engineering Best Practices for ChatGPT. Recommends clear, specific instructions and iterative refinement when working with ChatGPT. Accessed July 28, 2026.
Continue Learning
Continue building your AI video skills with these related guides:
• How to Create AI Videos with ChatGPT: Beginner Step-by-Step Guide (2026)
• Best AI Video Tools for Beginners: Complete Guide (2026)
• How to Create AI Videos from Images: Beginner Step-by-Step Guide (2026)
• How to Edit AI-Generated Videos: Beginner Step-by-Step Guide (2026)
These guides explain how to plan AI videos with ChatGPT, choose a suitable video-generation tool, animate a starting image, and prepare generated clips for publication.
 AI Mastery
Leave a comment