Tag: AI Video for Social Media

  • How to Create TikTok Videos with AI: Beginner Step-by-Step Guide (2026)

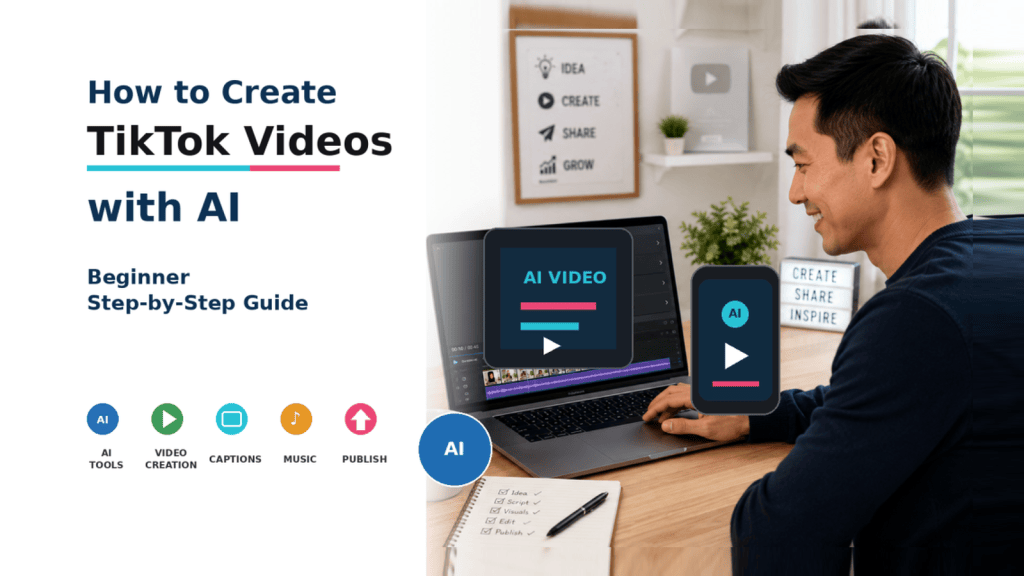
    How to Create TikTok Videos with AI: Beginner Step-by-Step Guide (2026)

    Estimated Reading Time: 18 minutes
    Last Updated: August 15, 2026

    Before Learning

    Before you begin, it helps to have one clear idea for the TikTok video you want to create. Your video can be educational, entertaining, promotional, instructional, or adapted from a longer video, article, tutorial, or other original content.

    You do not need advanced video-editing skills. AI tools can help you brainstorm ideas, draft a short script, plan scenes, create visuals, generate narration, prepare captions, and improve the editing workflow.

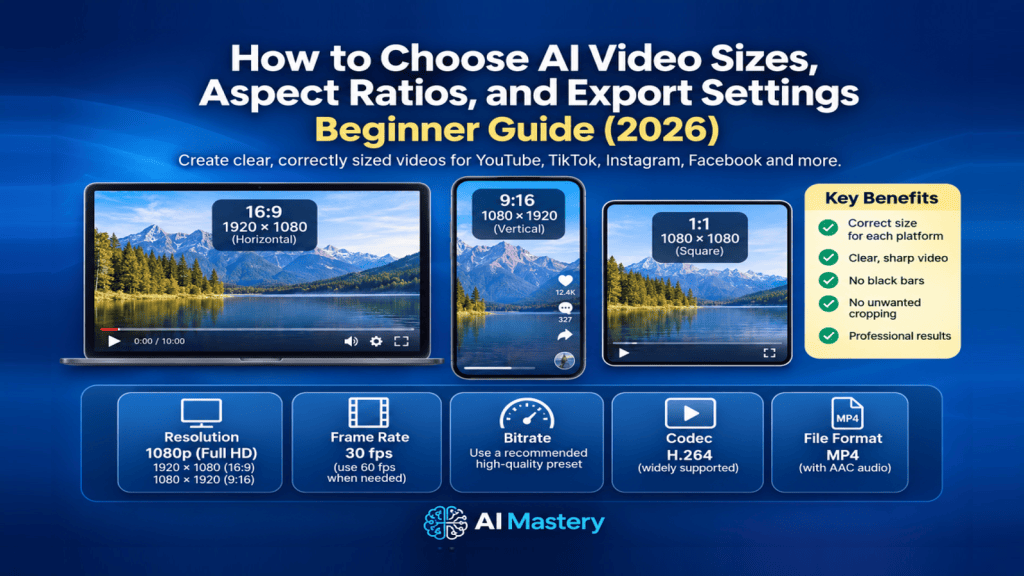
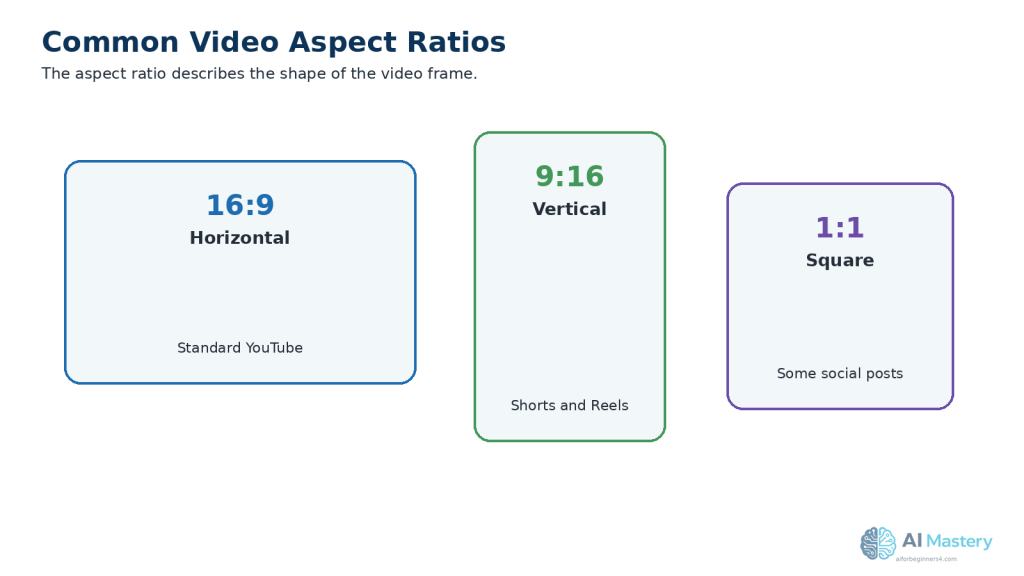
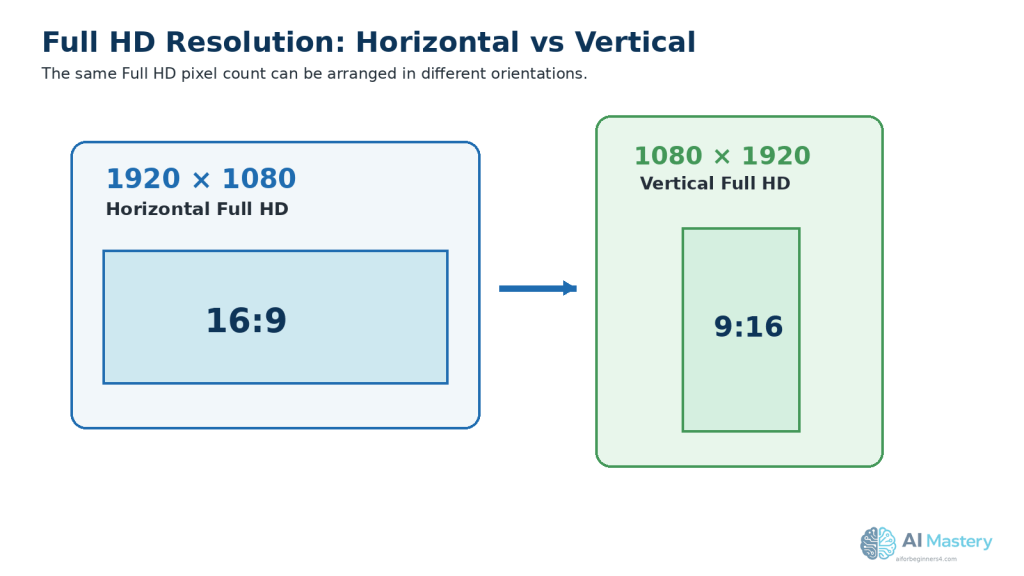
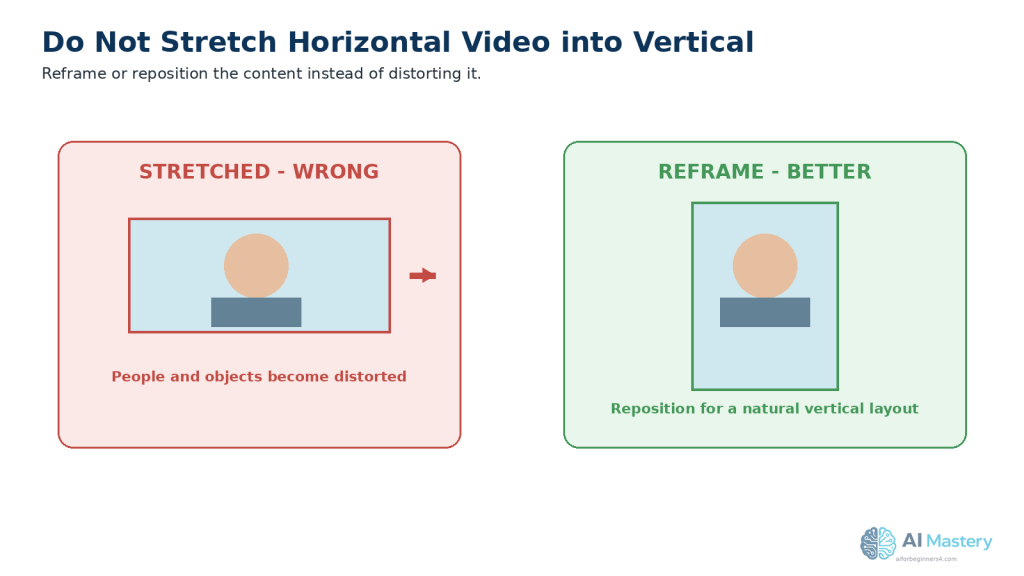
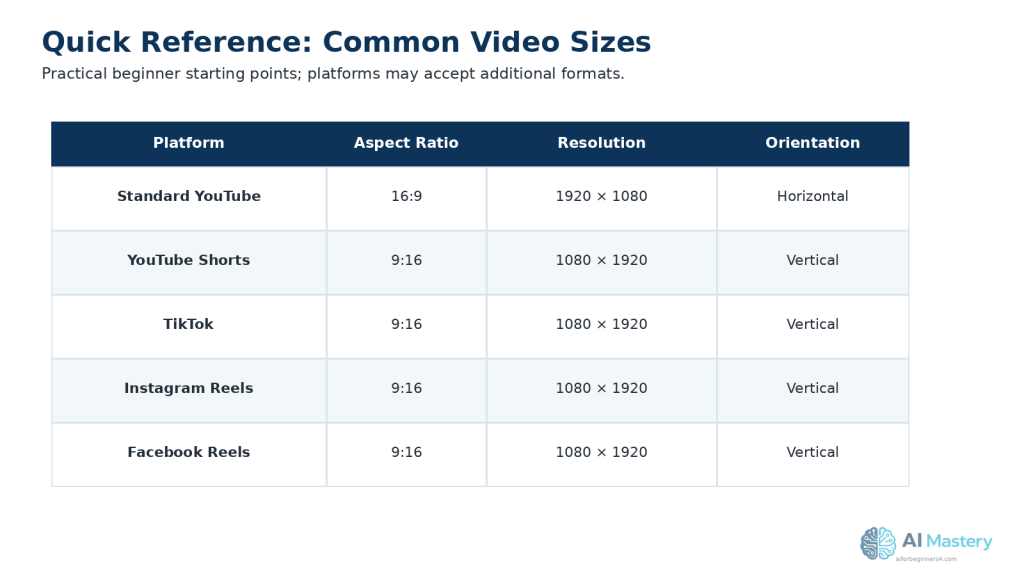
    For beginner-friendly vertical TikTok videos, a 9:16 vertical format at 1080 × 1920 pixels is a practical working size. TikTok recommends vertical 9:16 video for its full-screen viewing experience.

    TikTok currently allows videos recorded inside the app to be up to 10 minutes long and uploaded videos to be up to 60 minutes long. Your video does not need to be long simply because longer uploads are available; use only the time needed to communicate the idea clearly.

    If you use AI-generated or significantly AI-altered images, video, or audio, you should also review TikTok’s current AI-generated-content labeling requirements before publishing. TikTok provides a setting that lets creators label qualifying content as AI-generated.

    Music, photographs, video clips, voices, fonts, templates, and other assets may have separate licensing or permission requirements. For commercial content, TikTok recommends using music from its Commercial Music Library unless you have the necessary rights to other music.

    This guide will show you how to move from one simple idea to a finished TikTok video while keeping your source files, prompts, licences, permissions, clean master export, and publication records organized.

    What You’ll Learn

    By the end of this guide, you will know how to:

    · Choose one clear idea for a TikTok video.

    · Use AI to brainstorm video topics and create a simple content plan.

    · Write a short, focused TikTok script with AI assistance.

    · Create or prepare visuals for a vertical 9:16 layout.

    · Generate or record narration when needed.

    · Add readable captions and on-screen text.

    · Choose music and sound effects while checking usage rights.

    · Edit the video so the main idea is clear quickly.

    · Keep important text, faces, and graphics inside safe viewing areas.

    · Export a clean final version with suitable video settings.

    · Upload and publish the video on TikTok.

    · Review TikTok’s current AI-generated-content labeling requirements.

    · Keep your project files, prompts, licences, permissions, and clean master export for future reuse.

    Introduction

    TikTok is a short-form video platform where people discover educational, entertaining, promotional, and instructional content through a fast-moving vertical feed.

    AI can help with several parts of the TikTok video creation process. You can use it to generate ideas, outline a video, draft a script, create visuals, prepare narration, improve captions, and suggest editing changes.

    However, AI should support your work rather than replace your final judgment. Review every script, visual, voice, caption, and factual claim before publishing. Make sure you have appropriate rights or permission for any music, images, video clips, voices, fonts, templates, or other material that you did not create yourself.

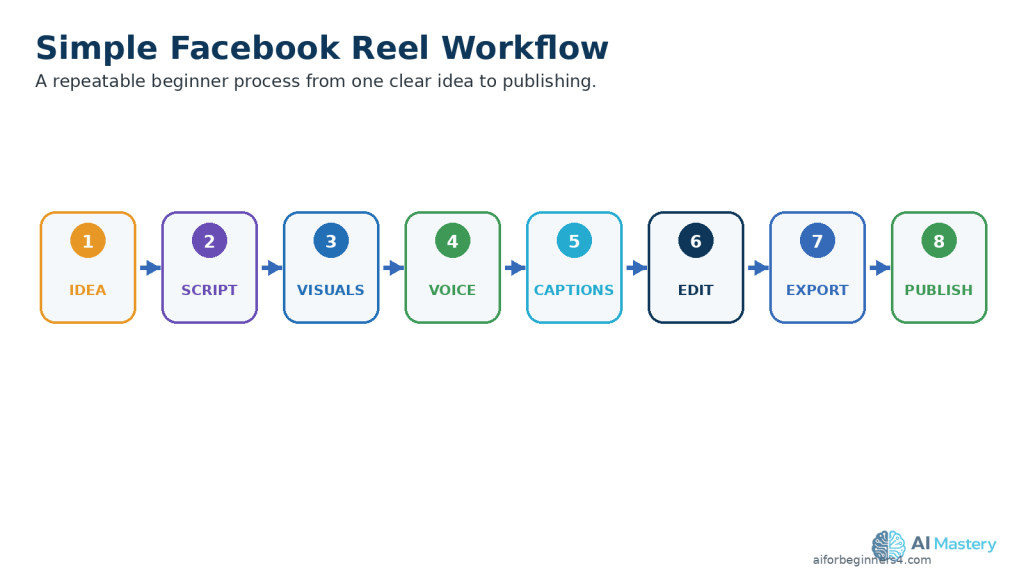
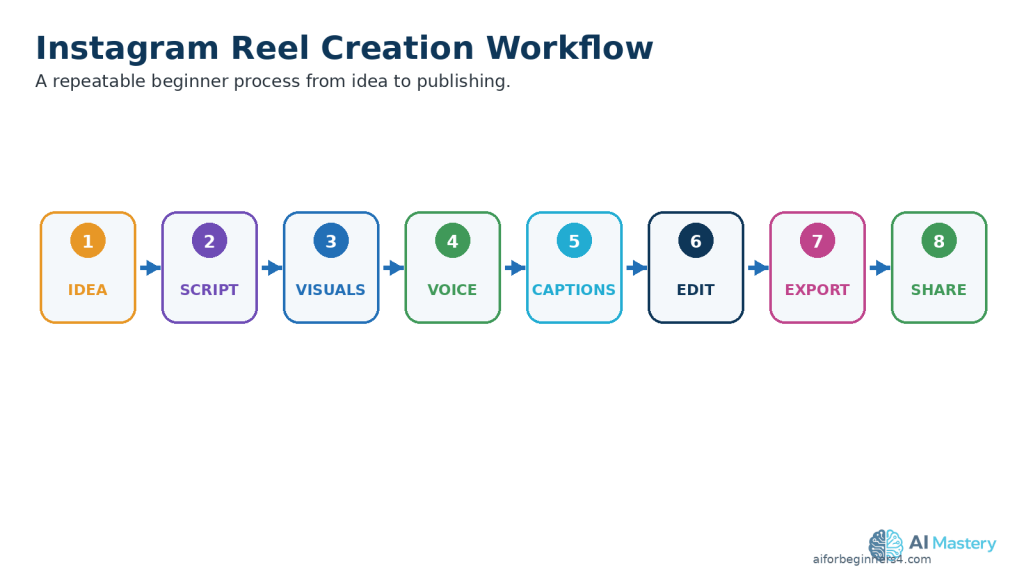
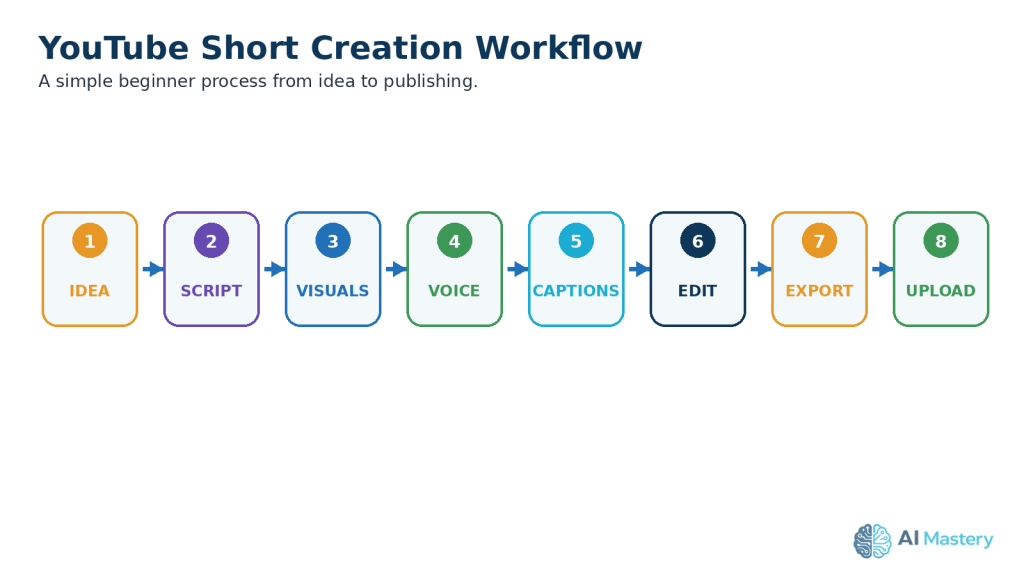
    A practical beginner workflow is to start with one clear idea, write a focused script, prepare vertical visuals, add clear narration and captions, edit the video carefully, and review the final export before uploading it to TikTok.
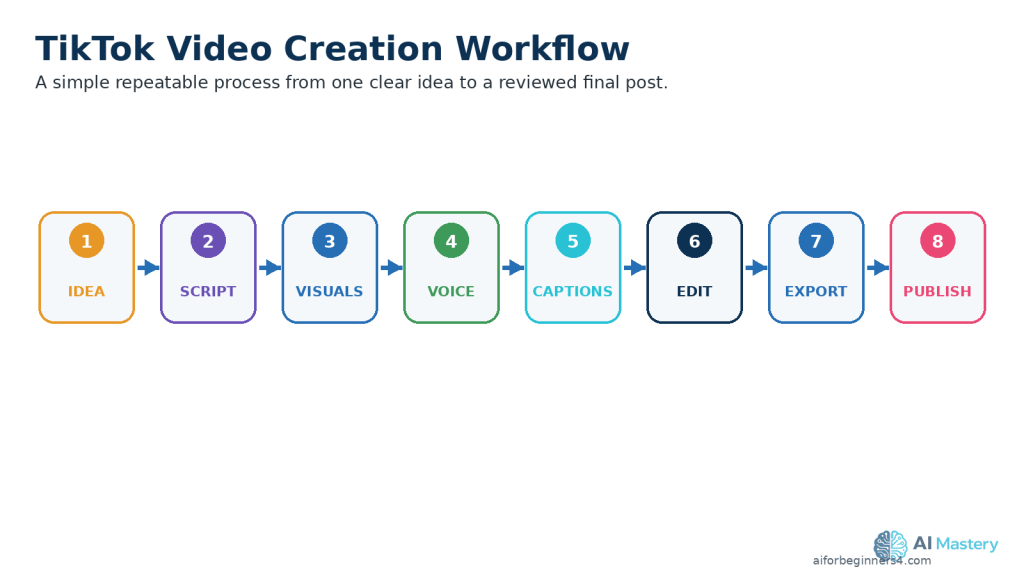
    Figure 1. A simple TikTok video workflow moves from one clear idea through scripting, visuals, narration, captions, editing, export, and publishing.

    Explanation: Reusing the same sequence for each video makes the production process easier to repeat, review, and improve.

    If realistic AI-generated or significantly altered content could be mistaken for a real person, place, or event, review TikTok’s current AI-generated-content labeling requirements before publishing.

    What Are TikTok Videos?

    TikTok videos are posts that can combine video, sound, narration, captions, text, effects, and other visual elements. People use them for entertainment, tutorials, demonstrations, educational content, product information, personal stories, and many other purposes.

    TikTok currently allows uploaded videos to be up to 60 minutes long.

    For beginner short-form content, however, the goal is not to make the video as long as possible. Use only the time needed to explain the idea clearly.

    TikTok videos can work well for:

    · Quick tips.

    · Short tutorials.

    · Educational explanations.

    · Before-and-after examples.

    · Demonstrations.

    · Product or service information.

    · Lists and recommendations.

    · Faceless videos.

    · AI-assisted videos.

    · Clips adapted from longer original content.

    Recommended Beginner Format

    For a phone-friendly TikTok video, a practical beginner format is:

    · Aspect ratio: 9:16

    · Resolution: 1080 × 1920 pixels

    · Orientation: Vertical

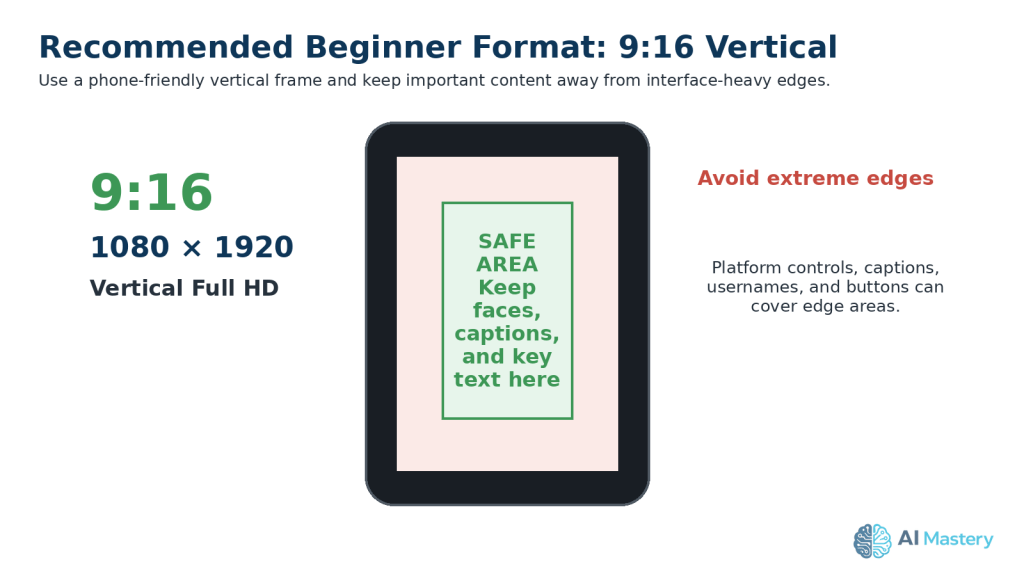
    TikTok’s current creative guidance recommends 9:16 vertical video and keeping important content inside the interface safe zone. TikTok for Business also recommends exporting at 1080 × 1920 or higher for clear full-screen playback.

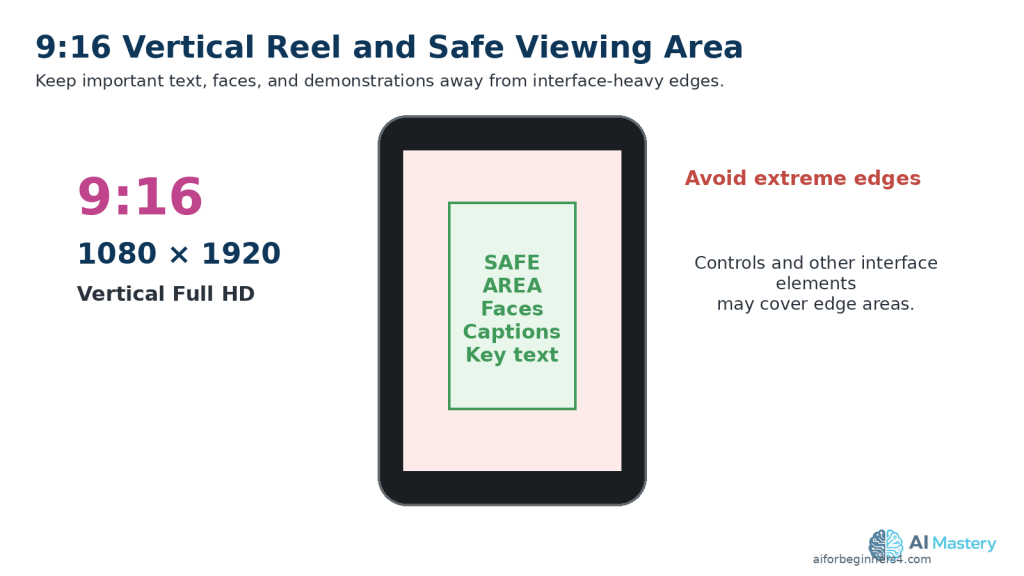
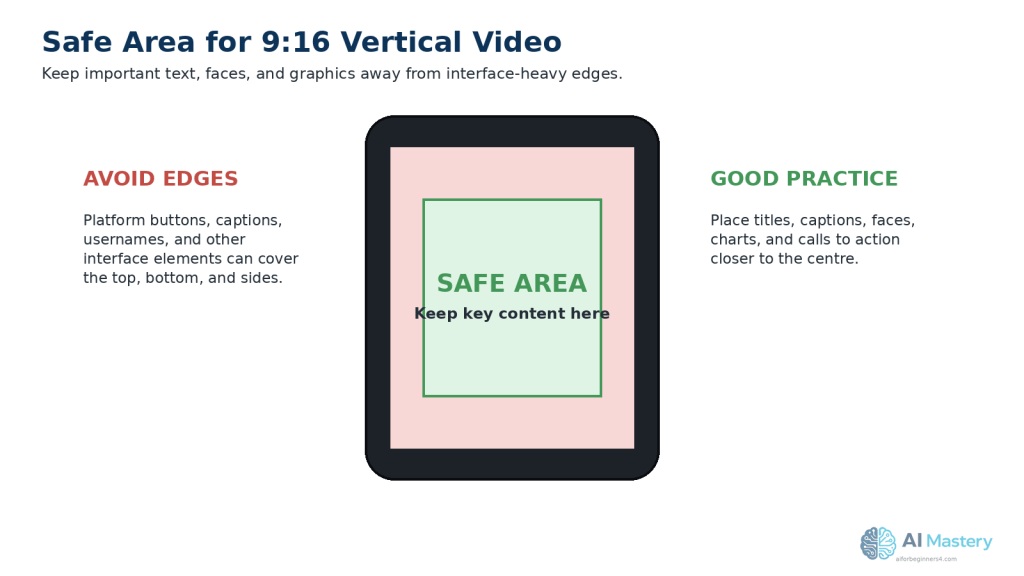
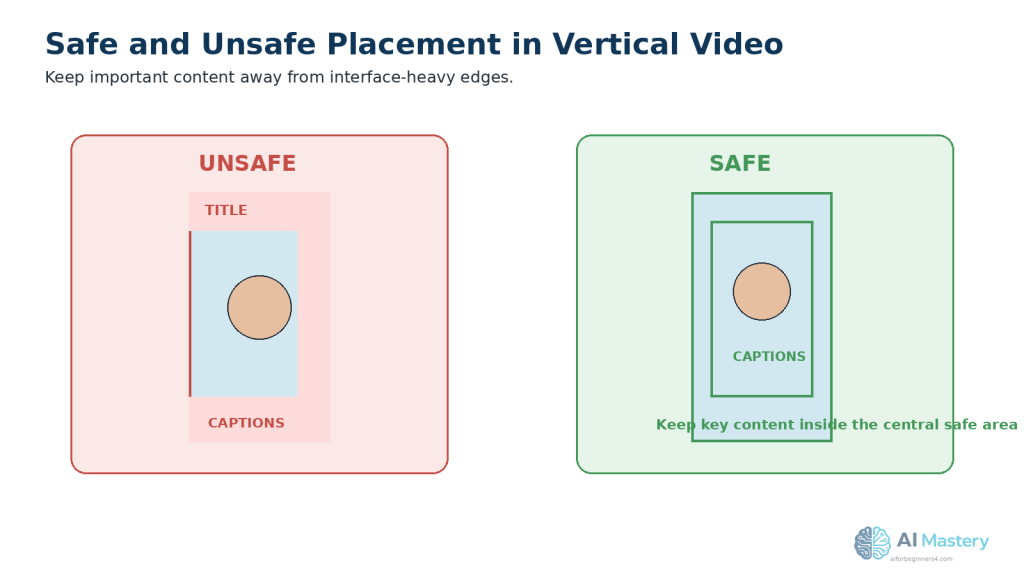
    Keep Important Content Inside the Safe Area

    TikTok places interface elements over parts of the video, including controls and text areas.

    Keep important elements such as:

    · Faces.

    · Captions.

    · Titles.

    · Demonstrations.

    · Screenshots.

    · Charts.

    · Important buttons.

    · Calls to action.

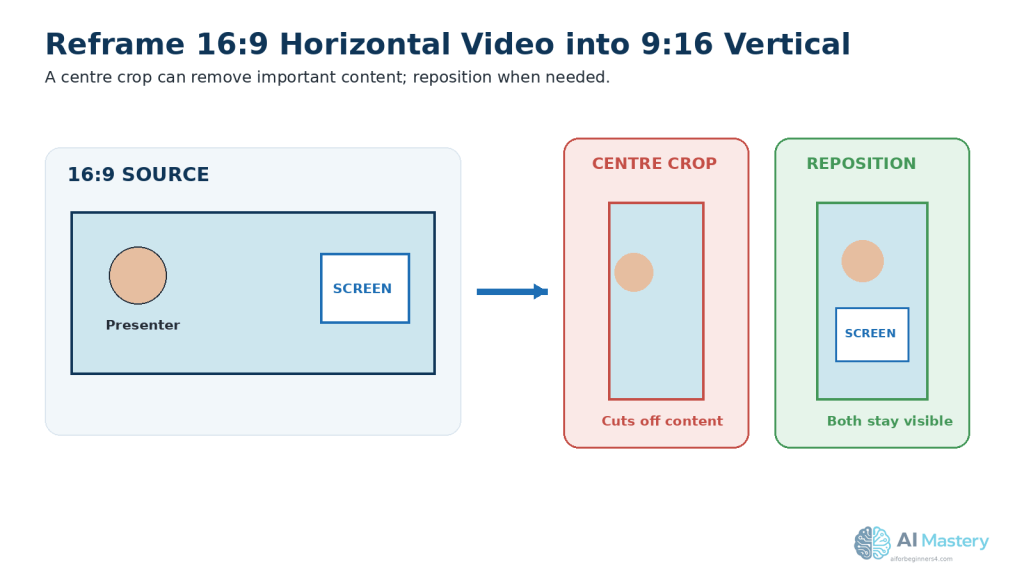
    away from the extreme edges of the frame.

    TikTok’s official creative guidance recommends keeping key information inside the safe zone so interface elements do not cover it.
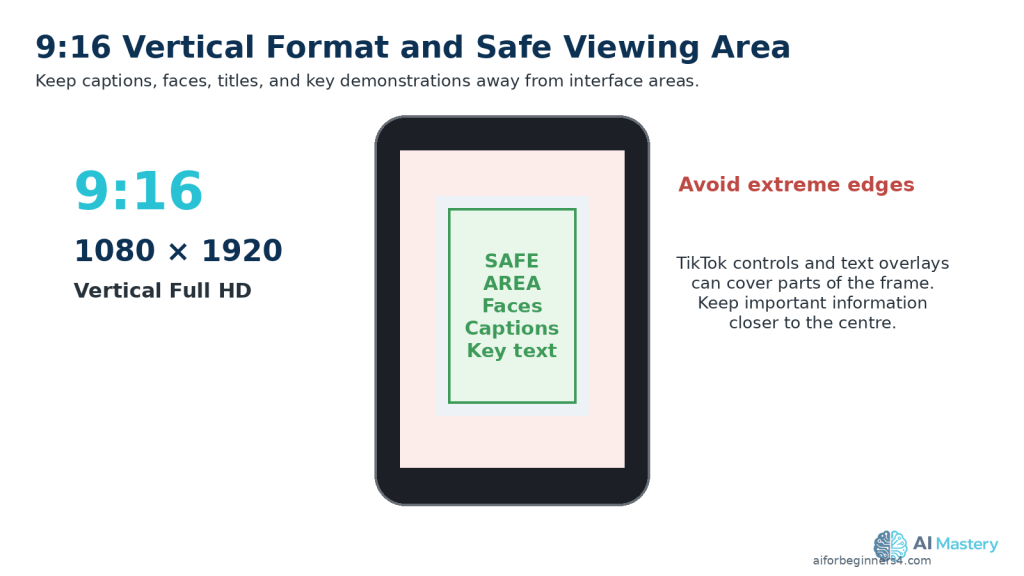
    Figure 2. A 9:16 vertical frame at 1080 × 1920 pixels is a practical beginner format, with key content kept away from interface areas.

    Explanation: Keep important faces, captions, titles, and demonstrations closer to the central viewing area so TikTok controls are less likely to cover them.

    Practical Example

    Suppose you want to create a TikTok video explaining one beginner AI tip.

    You could create a 1080 × 1920 vertical video, keep the main subject and important captions toward the central area, and zoom into any screen recording that viewers need to read.

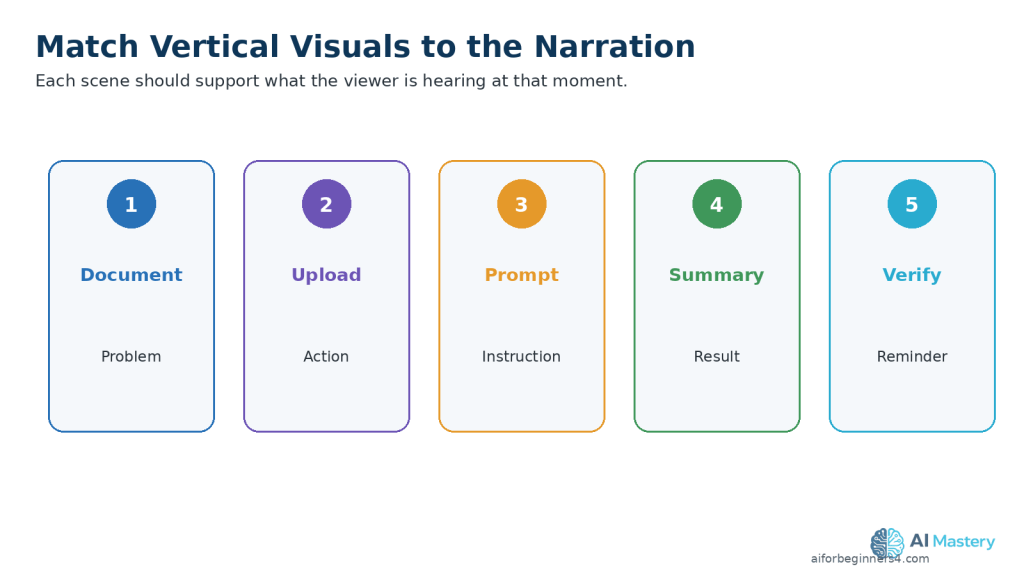
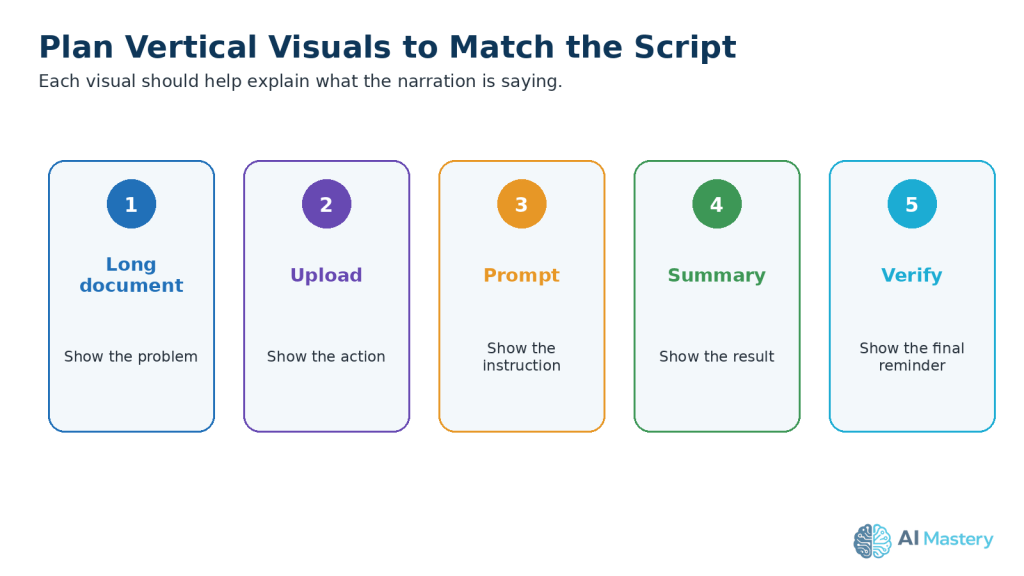
    For example, a short video about document summarization could show the original document, the upload step, a short AI prompt, the generated summary, and a final reminder to verify important information against the original document.

    Step 1: Choose One Clear Idea for Your TikTok Video

    A TikTok video is easier to understand when it focuses on one main idea. Trying to cover too many topics in one video can make the content feel rushed or confusing.

    Choose a topic that can be explained clearly, such as:

    · One beginner AI tip.

    · One useful AI tool.

    · One common mistake.

    · One short tutorial.

    · One quick comparison.

    · One before-and-after example.

    · One useful idea from a longer AI Mastery article.

    Use AI to Brainstorm TikTok Ideas

    You can ask an AI assistant to suggest video ideas based on your topic.

    Prompt:

    “Give me 10 beginner-friendly TikTok video ideas about using AI for everyday tasks. Keep each idea focused on one clear lesson.”

    Review the suggestions carefully and choose an idea that is useful, accurate, and appropriate for your audience.

    Keep the Topic Narrow

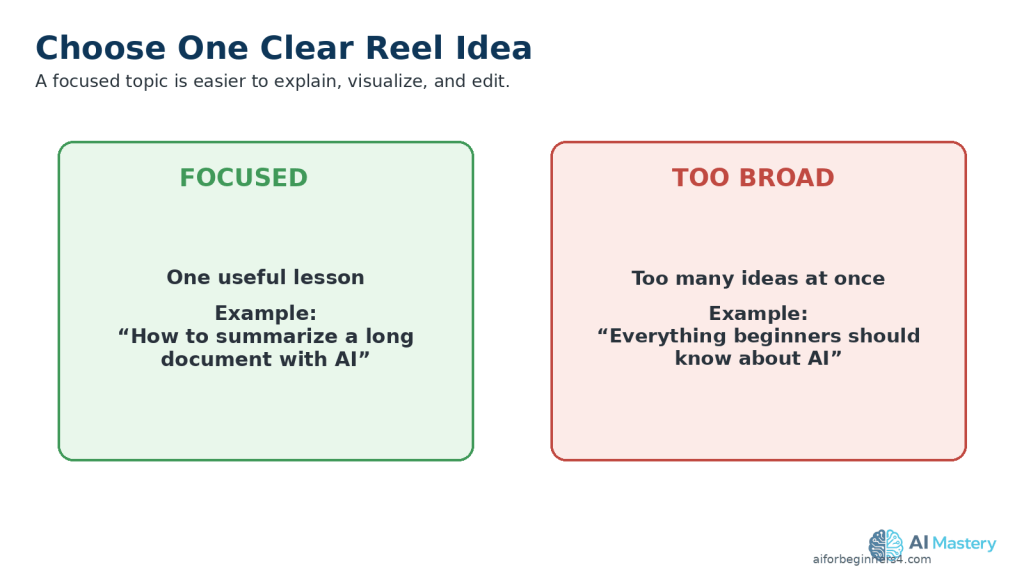
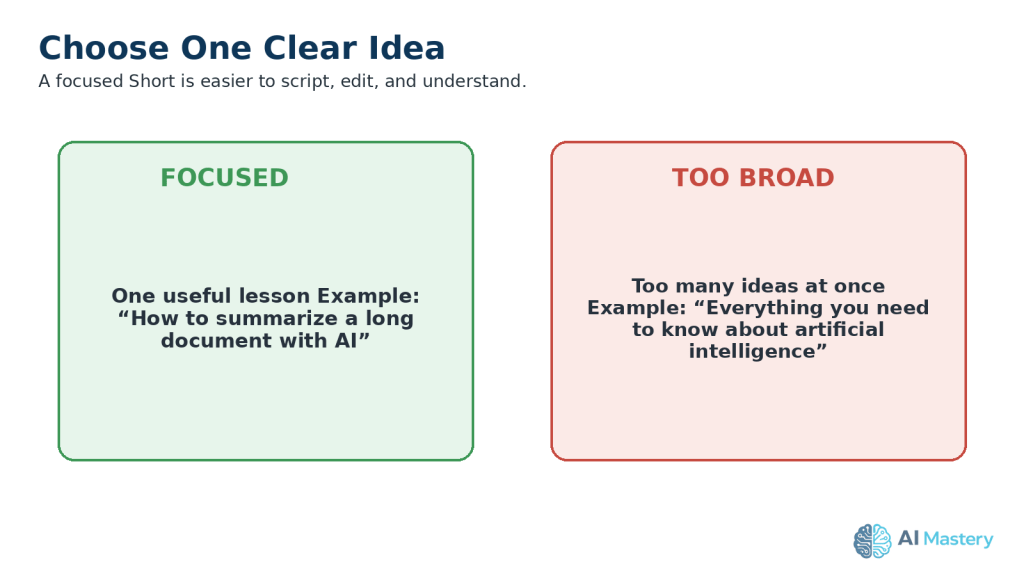
    Instead of creating a video called:

    “Everything Beginners Should Know About AI”

    choose something more specific, such as:

    “3 Ways AI Can Help You Save Time”

    or:

    “How to Summarize a Long Document with AI”

    A narrow topic makes it easier to write a clear script, choose suitable visuals, and keep the video focused.
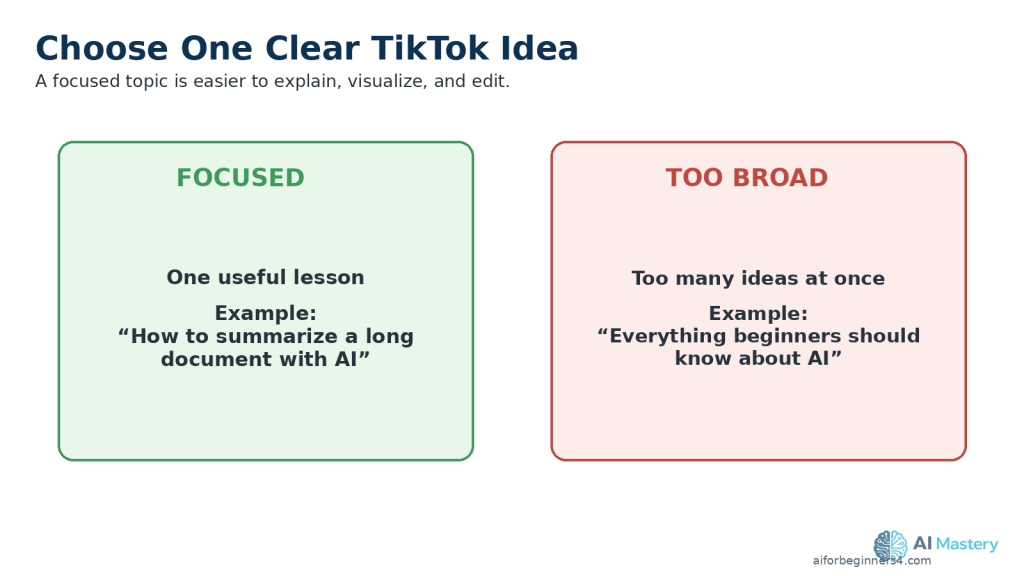
    Figure 3. One focused TikTok idea is easier to explain than a broad topic containing many unrelated points.

    Explanation: A narrow topic helps keep the script, visuals, and editing focused on one useful lesson.

    Practical Example

    If a longer AI Mastery article explains several document features, you could create one TikTok video about only document summarization.

    The video can show the problem, demonstrate the basic process, and finish with one clear reminder to review the AI-generated result against the original document.

    Step 2: Write a Short, Focused TikTok Script with AI

    A clear script helps keep your TikTok video organized and easy to follow. Even a short video benefits from having a simple beginning, main point, and ending.

    AI can help you turn your idea into a draft script, but you should review and improve the result before using it.

    Start with a Clear Prompt

    Give the AI assistant enough information about your topic, audience, and goal.

    Prompt:

    “Write a beginner-friendly TikTok script about how AI can help summarize a long document. Keep it clear, practical, and focused on one useful example. Use simple language and avoid hype.”

    Use a Simple Script Structure

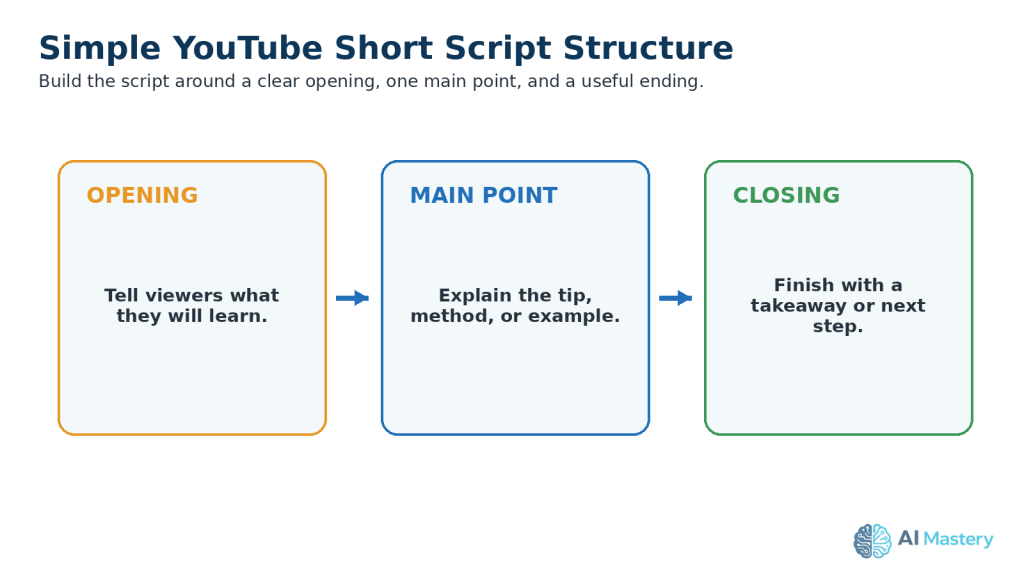
    A practical beginner structure is:
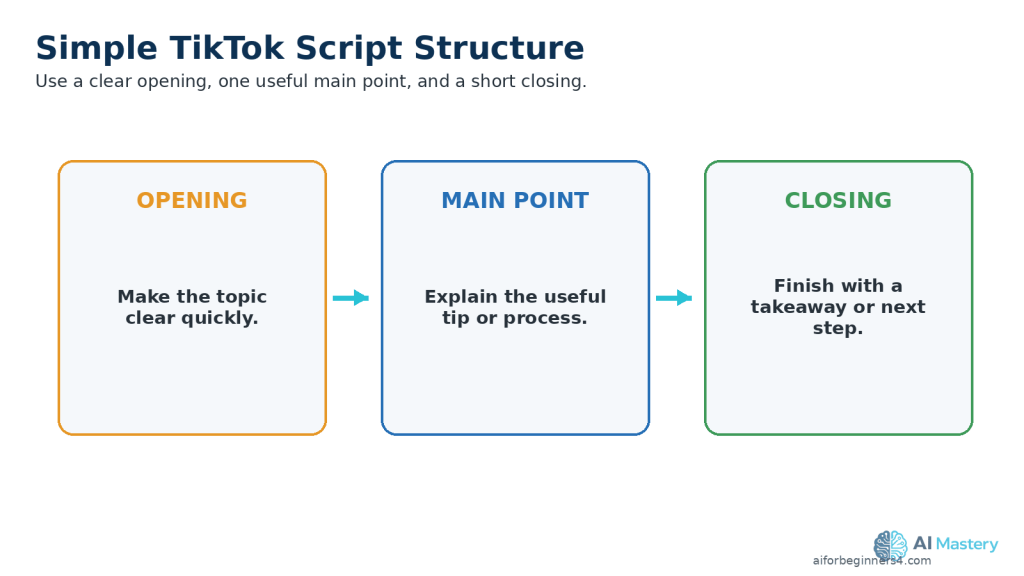
    Figure 4. A simple TikTok script can use a clear opening, one useful main point, and a short closing takeaway.

    Explanation: This structure helps the video reach useful information quickly without requiring a long introduction.

    1. Opening: Tell viewers quickly what the video is about.

    2. Main point: Explain the useful tip, process, or example.

    3. Closing: Finish with a short takeaway or next step.

    Make the Opening Clear

    Avoid spending too much time on a long introduction.

    Instead of:

    “Hello everyone, welcome back to another video.”

    you could begin with:

    “Have a long document to read? AI can help you create a short summary.”

    This tells viewers what the video is about immediately.

    Review the AI-Written Script

    Check the script for:

    · Factual accuracy.

    · Clear and simple language.

    · Unnecessary repetition.

    · Claims that sound exaggerated.

    · Instructions that may be outdated.

    · Difficult technical terms.

    · Information that does not support the video’s main idea.

    Do not assume that an AI-generated script is automatically correct.

    Practical Example

    For a TikTok video about summarizing a document with AI, the script could follow this simple sequence:

    1. Show the long document.

    2. Explain that an AI tool can help summarize it.

    3. Show the document being uploaded.

    4. Show a short summary prompt.

    5. Remind viewers to compare the summary with the original document.

    This gives viewers one clear lesson without trying to explain every document-analysis feature at once.

    Step 3: Create or Prepare Vertical Visuals

    Your visuals should support the script and make the TikTok video easy to understand on a phone screen.

    For most beginner projects, use a 9:16 vertical layout at 1080 × 1920 pixels.

    Choose Visuals That Match the Script

    Depending on your topic, you can use:

    · AI-generated images.

    · Licensed stock photos or stock video.

    · Screen recordings.

    · Charts or simple graphics.

    · Text-based slides.

    · Product or workspace footage.

    · Clips from a longer video you created.

    Use only visuals that help explain the main point.

    Keep Important Content Visible

    Keep important elements such as:

    · Faces.

    · Captions.

    · Titles.

    · Buttons.

    · Screenshots.

    · Charts.

    · Demonstrations.

    away from the extreme edges of the frame.

    TikTok interface elements can cover parts of a vertical video, so keep important information closer to the central viewing area.

    Make Screenshots Easy to Read

    If your TikTok video includes a computer or phone screenshot, avoid showing the entire screen when the important text becomes too small.

    Instead, crop or zoom into the area viewers need to see.

    For example, if you are demonstrating an AI prompt, show the prompt box clearly rather than displaying an entire browser window at a very small size.

    Review AI-Generated Visuals Carefully

    AI-generated images and video clips can contain mistakes such as:

    · Distorted hands or objects.

    · Misspelled text.

    · Duplicate items.

    · Inconsistent people or clothing.

    · Incorrect interface elements.

    · Unrealistic details.

    Review every generated visual before adding it to the video.

    Check Licences and Permissions

    If you use stock footage, photographs, templates, fonts, graphics, or other assets that you did not create yourself, check the licence and commercial-use conditions before publishing.

    Do not assume that an image or video is free to reuse simply because it is available online.

    Practical Example

    For a TikTok video about summarizing a document with AI, you might use:

    1. A visual showing a long document.

    2. A screen recording of the document being uploaded.

    3. A close-up of the summary prompt.

    4. A simple visual showing the shorter AI-generated result.

    5. A final reminder to compare the summary with the original document.

    This creates a clear visual sequence that follows the script from beginning to end.
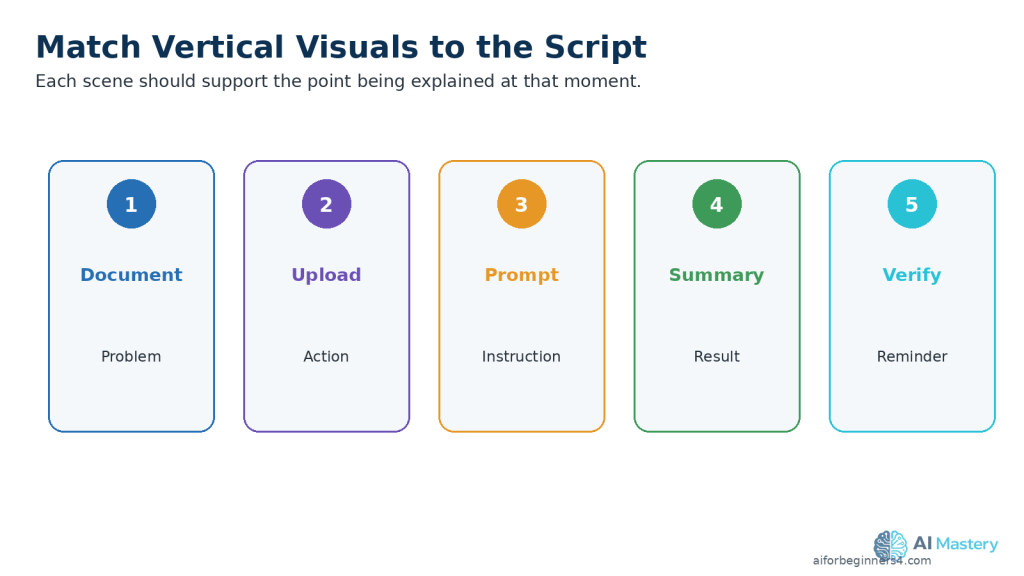
    Figure 5. Plan vertical visuals in the same order as the script so each scene supports the point being explained.

    Explanation: Matching scenes to the script helps viewers follow a demonstration on a small phone screen.

    Step 4: Add Narration or an AI Voice

    Narration can make a TikTok video easier to follow, especially when the video explains a process, gives a tip, or demonstrates a task.

    You can record your own voice or use an AI-generated voice when the tool and licence allow your intended use.

    Choose a Clear Voice

    The narration should be easy to understand and should match the pace of the visuals.

    A good voice-over should:

    · Speak clearly.

    · Avoid rushing.

    · Use natural pauses.

    · Match the tone of the topic.

    · Pronounce technical terms correctly.

    · Leave enough time for viewers to read important on-screen text.

    Review AI-Generated Narration

    If you use an AI voice, listen to the entire recording before adding it to the TikTok video.

    Check for:

    · Mispronounced names or technical terms.

    · Unnatural pauses.

    · Missing words.

    · Incorrect emphasis.

    · Audio that sounds too fast or too slow.

    · Sentences that do not match the visuals.

    Correct the script or regenerate the affected section when necessary.

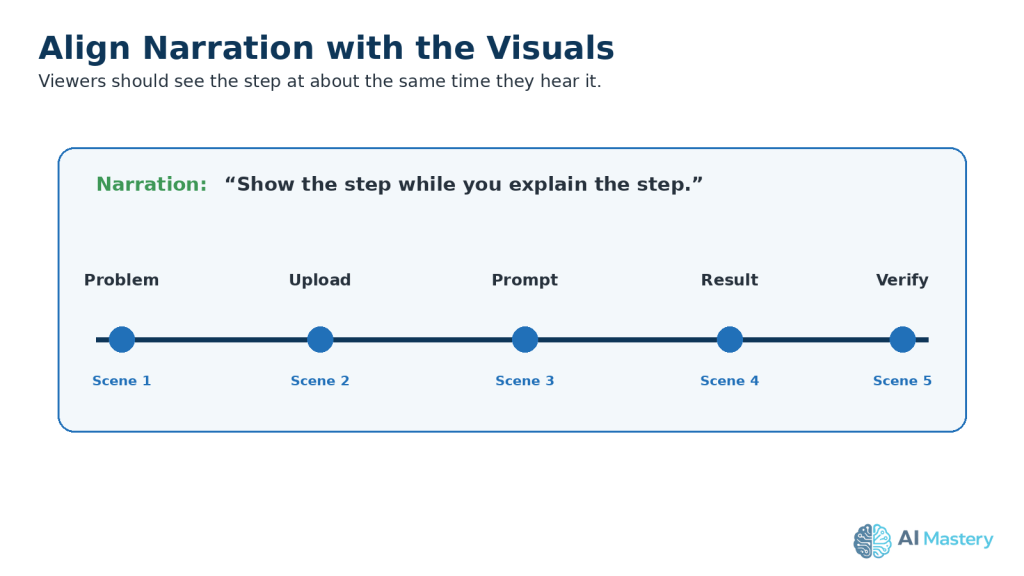
    Keep Narration and Visuals Aligned

    The visual shown on screen should support what the viewer is hearing.

    For example, if the narration says:

    “Upload your document to the AI tool.”

    the video should show the upload step at approximately the same time.

    This makes the video easier to understand.

    Protect Privacy and Get Permission

    Do not clone or imitate a real person’s voice without appropriate permission.

    If you use another person’s recording, make sure you have permission to use it and understand any licence or platform conditions that apply.

    Avoid using AI voices in ways that could falsely make viewers believe a real person said something they did not say.

    Practical Example

    For a TikTok video explaining document summarization, the narration could briefly guide the viewer through uploading a document, asking for a summary, and checking the result.

    Each visual can change as the narration moves to the next step, keeping the video clear and easy to follow.
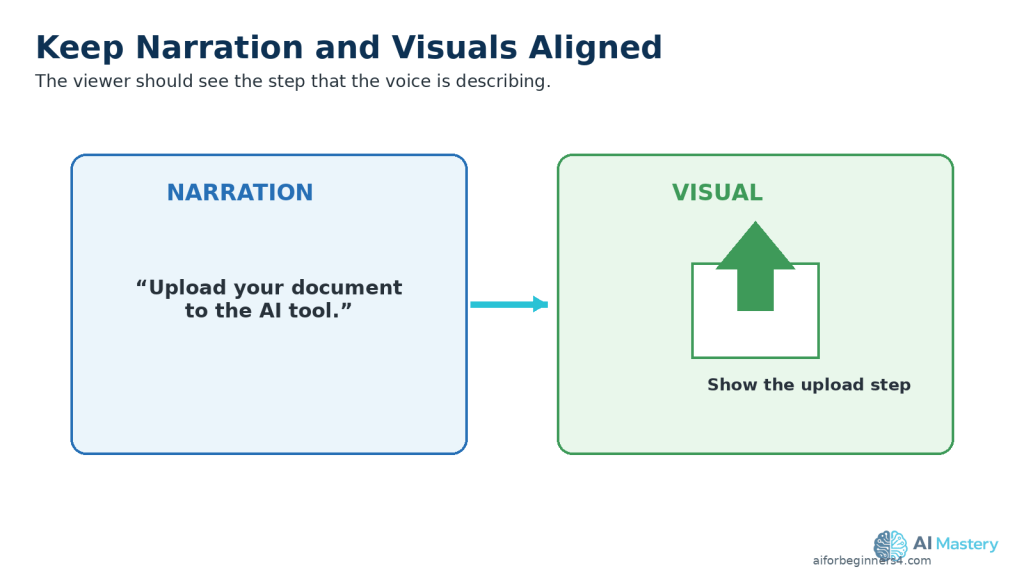
    Figure 6. Keep narration and visuals aligned so viewers see the step that the voice is describing.

    Explanation: When spoken instructions and visual actions match, the video becomes easier to follow.

    Step 5: Add Captions and On-Screen Text

    Captions and on-screen text can make a TikTok video easier to understand, especially when viewers are watching without sound.

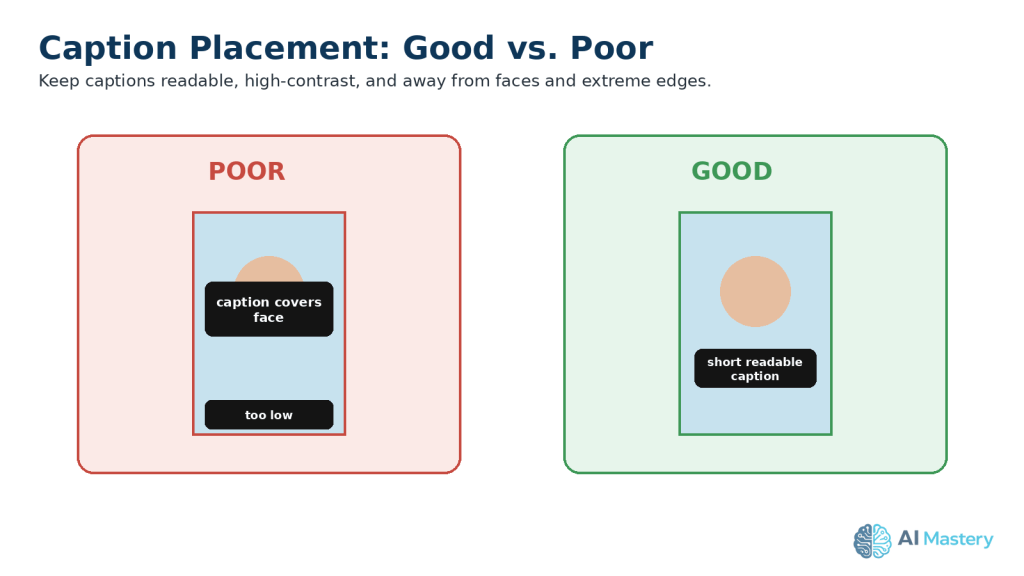
    Keep Captions Easy to Read

    Use captions that are:

    · Large enough to read on a phone.

    · Short and easy to scan.

    · High contrast against the background.

    · Timed closely with the spoken words.

    · Positioned away from important faces, demonstrations, and other visual details.

    Avoid placing captions too close to the extreme edges of the frame, where TikTok interface elements may cover them.

    Use On-Screen Text Carefully

    On-screen text can highlight the most important information in the video.

    For example, you could show:

    “3 Steps to Summarize a Document with AI”

    near the beginning.

    Later, you could use short labels such as:

    · Step 1: Upload

    · Step 2: Ask for a Summary

    · Step 3: Review the Result

    Keep the wording simple. Too much text on screen at the same time can make the video difficult to follow.

    Check Spelling and Accuracy

    Review every caption and text element before exporting.

    Check for:

    · Spelling mistakes.

    · Missing words.

    · Incorrect punctuation.

    · Wrong names or technical terms.

    · Captions that appear too early or too late.

    · Text that does not match the narration.

    Accessibility

    Captions can help people who are deaf or hard of hearing, viewers watching without sound, and people who find written text easier to follow than narration alone.

    Do not rely only on colour to communicate important information. Use clear words, labels, or symbols as well.

    Practical Example

    If the narrator says:

    “Always check the AI-generated summary against the original document.”

    you could display:

    “Always verify the summary.”

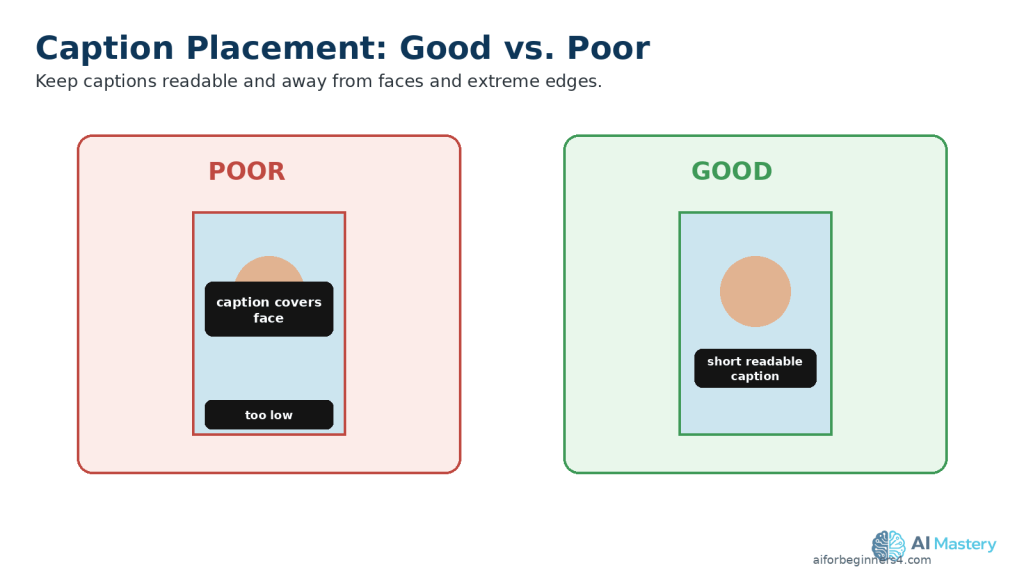
    This reinforces the main lesson without overcrowding the screen.
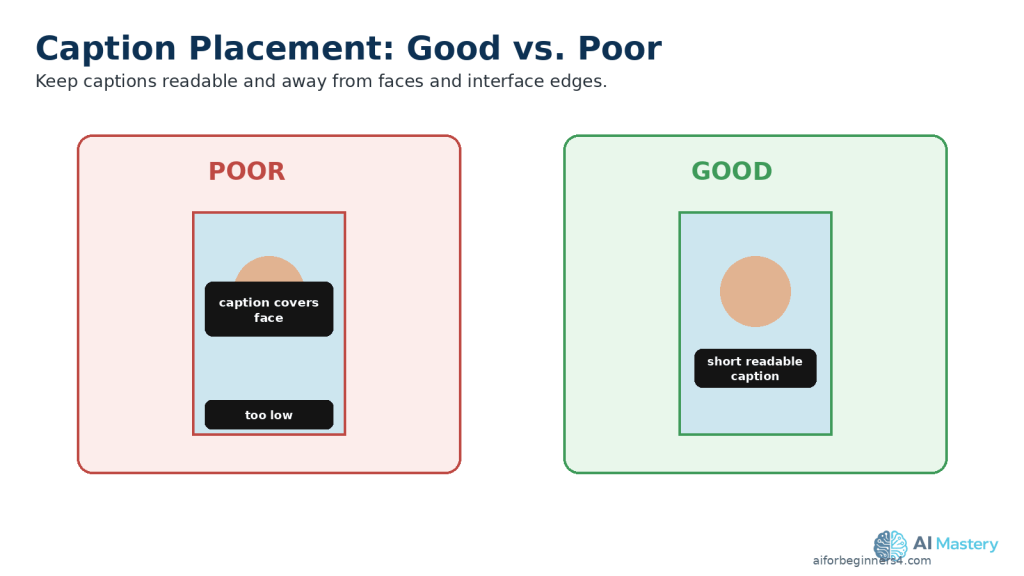
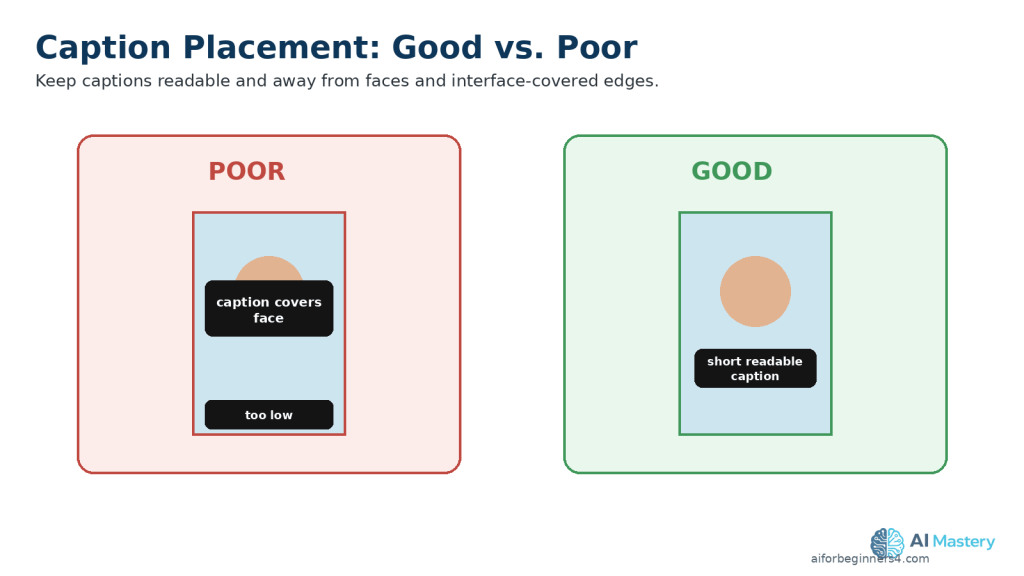
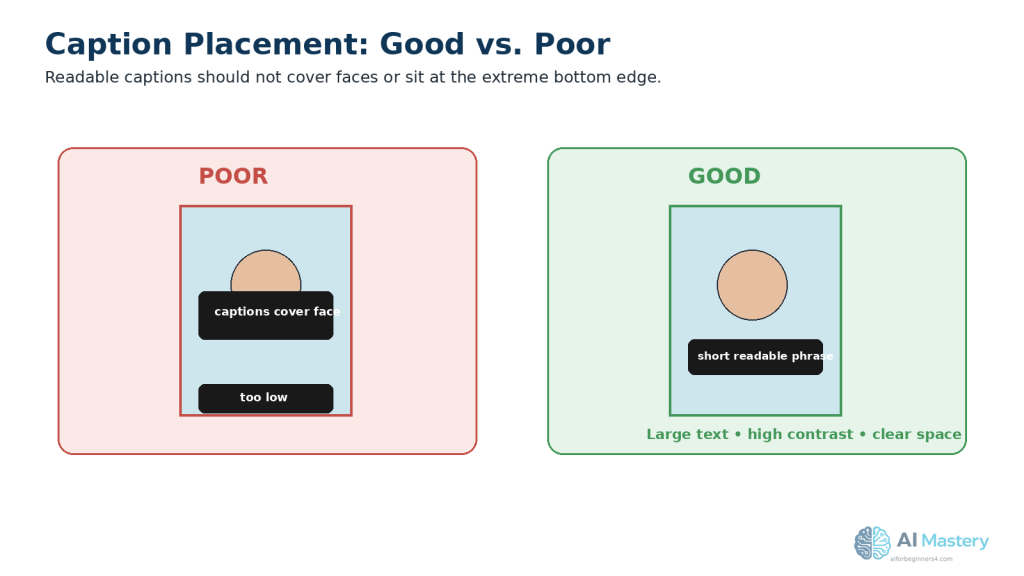
    Figure 7. Place captions where they remain readable without covering faces or sitting too close to interface edges.

    Explanation: Clear caption placement improves readability and accessibility while reducing the chance that TikTok controls will hide important text.

    Step 6: Add Music and Sound Effects Carefully

    Music and sound effects can make a TikTok video more engaging, but they should support the video rather than distract from the main message.

    Choose Music You Are Allowed to Use

    Do not assume that any song available online is automatically safe to use in a TikTok video.

    TikTok explains that copyright protects original works such as music and videos, and sounds may be removed when they violate copyright restrictions or TikTok’s rules.

    Be Extra Careful with Commercial Content

    If your TikTok video promotes a brand, product, or service, TikTok recommends using music from its Commercial Music Library (CML) because that music is cleared for commercial use on TikTok.

    Business Accounts do not have access to TikTok’s general music library because those songs are not cleared for commercial use.

    If you use music outside the Commercial Music Library for commercial content, make sure you have the necessary rights or permission.

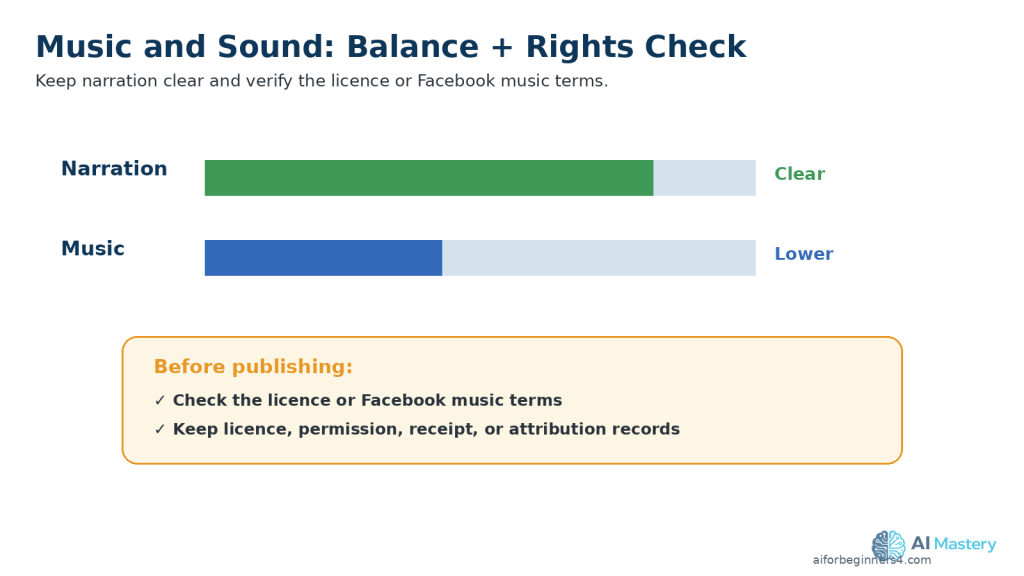
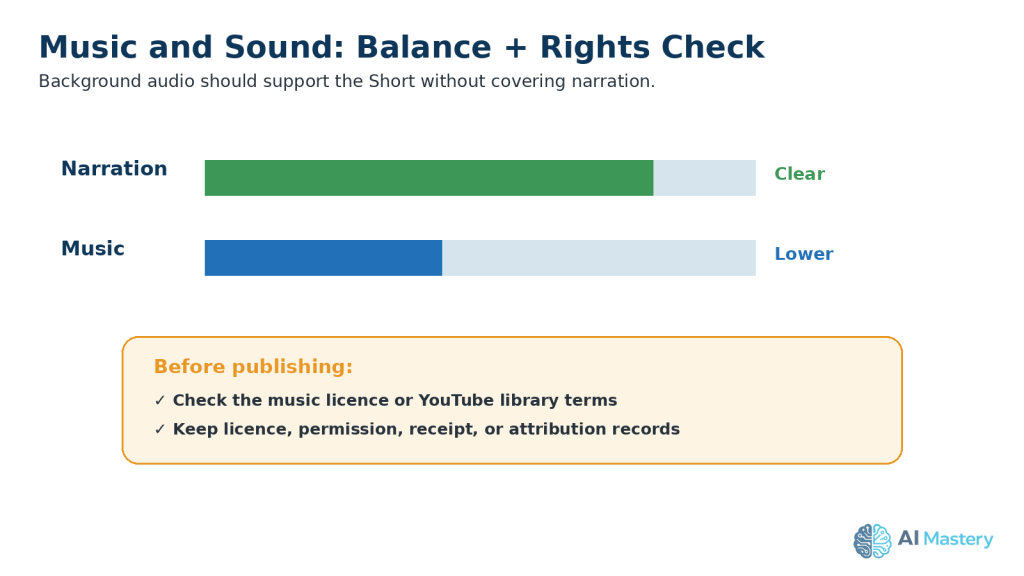
    Keep Music Below the Narration

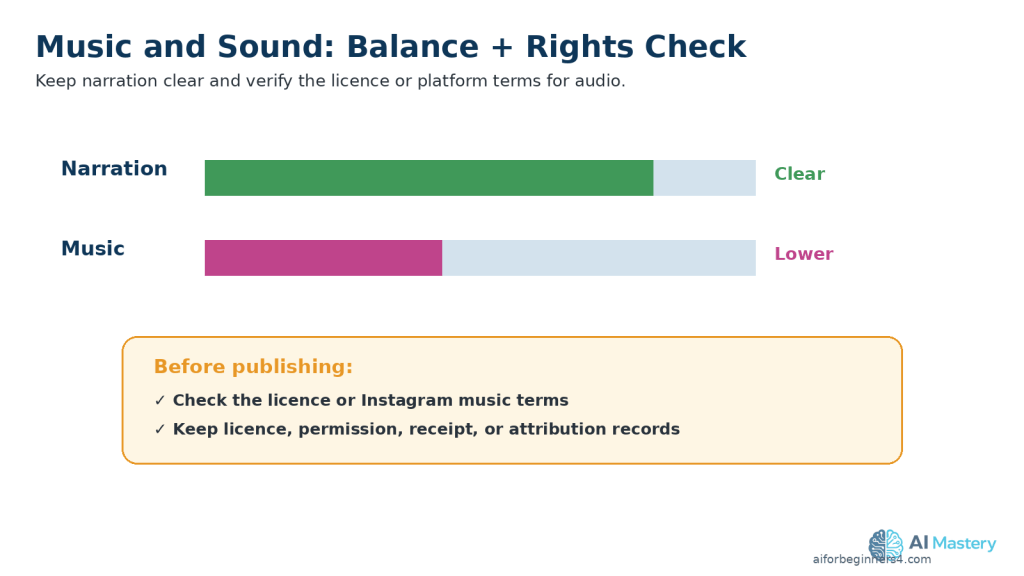
    If your TikTok video includes spoken narration, keep the background music at a lower volume so the voice remains easy to understand.

    Listen to the complete video and check that:

    · The narration is clear.

    · Music does not cover important words.

    · Sound effects are not unexpectedly loud.

    · Audio changes are smooth.

    · The beginning and ending do not contain sudden volume jumps.

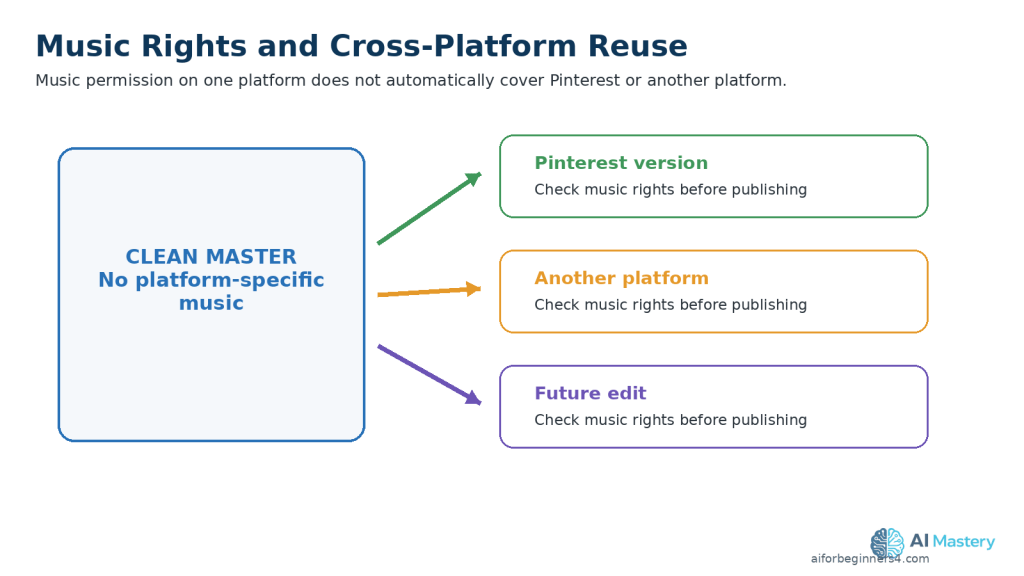
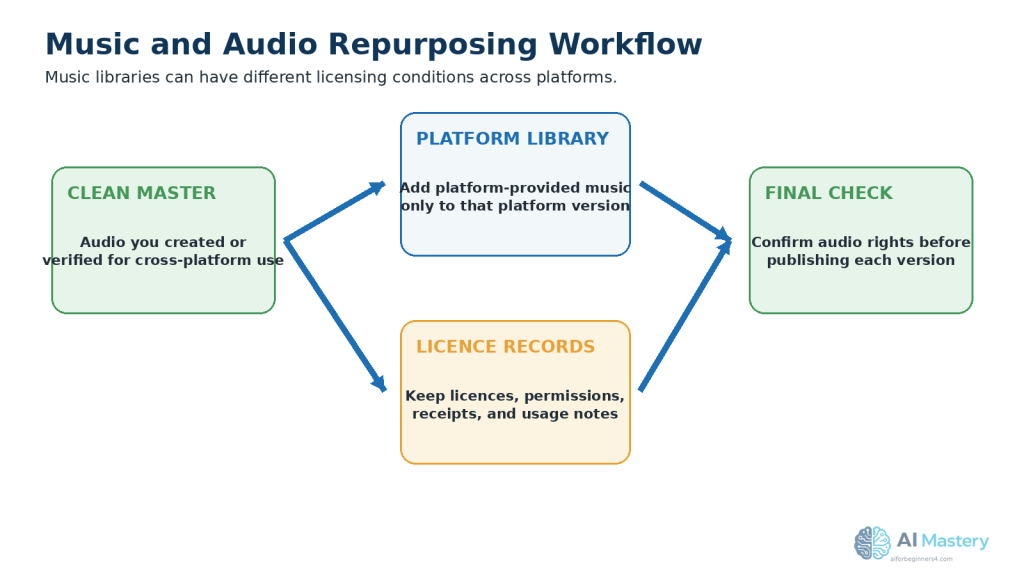
    Be Careful When Reusing Music on Other Platforms

    Music that is available for use on TikTok does not automatically mean you can use the same track on:

    · YouTube Shorts.

    · Instagram Reels.

    · Facebook Reels.

    · Pinterest.

    · Other websites or advertisements.

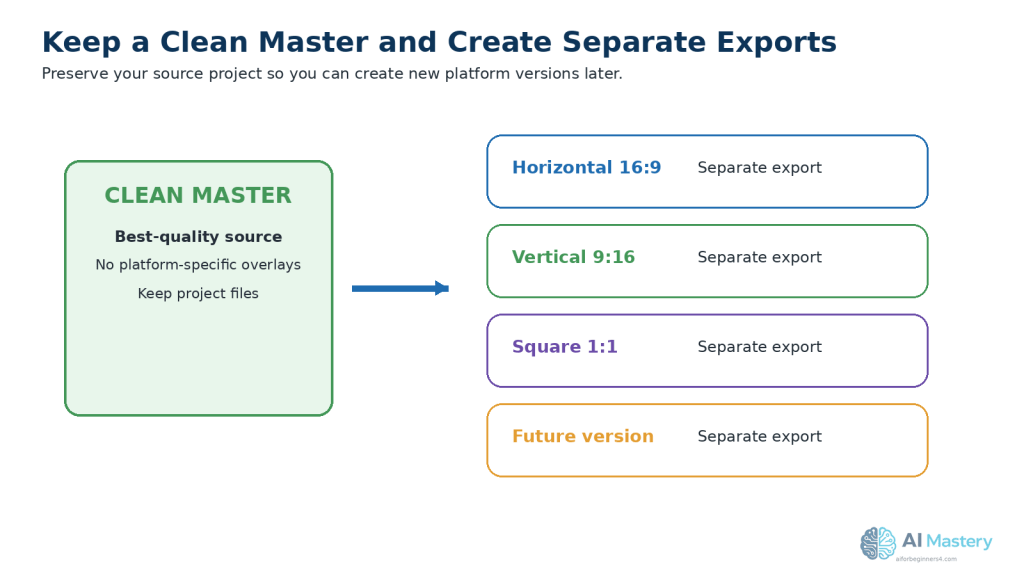
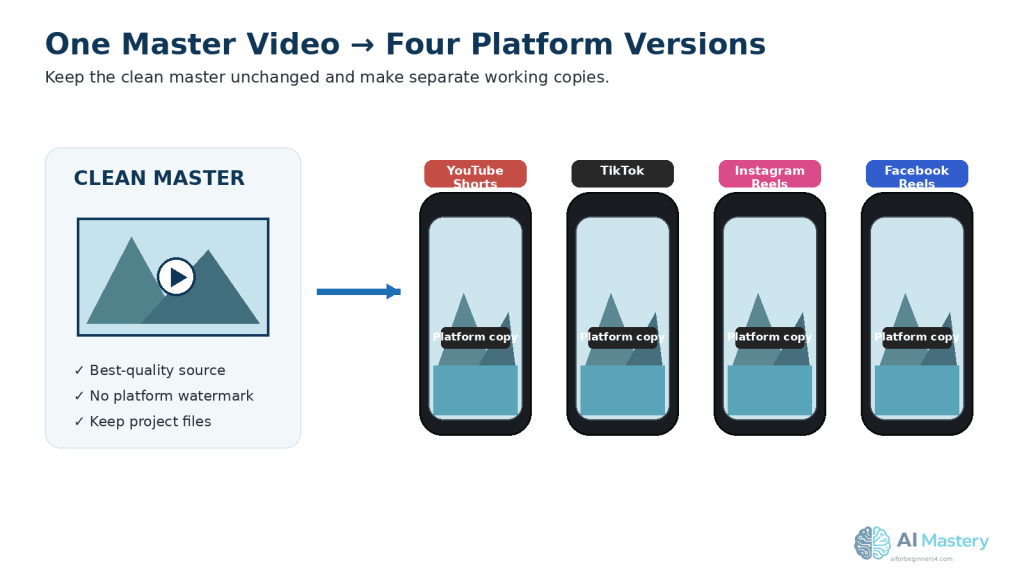
    A safer workflow is to keep a clean master video without platform-specific music and add suitable audio separately for each platform after checking the applicable rights.

    Keep Licensing Records

    If you use music or sound effects from outside TikTok, keep records such as:

    · The licence.

    · Permission from the rights holder.

    · A purchase receipt.

    · Attribution instructions.

    · A copy of the applicable usage conditions.

    This can help you confirm later where and how the audio may be used.
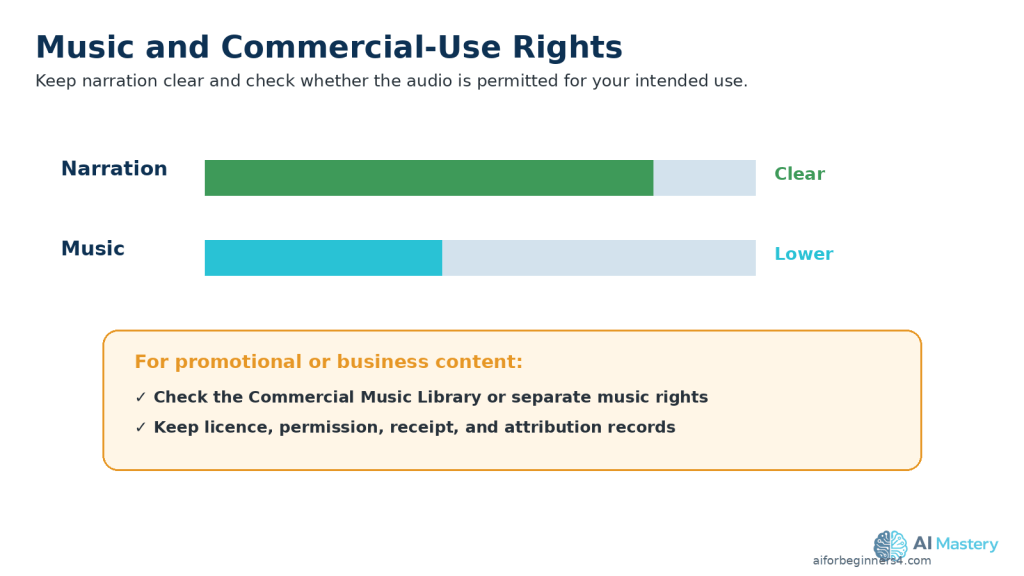
    Figure 8. Keep background music below narration and check commercial-use rights before publishing.

    Explanation: Music available for personal or platform use may have different conditions for promotional or business content.

    Practical Example

    For a beginner AI tutorial on TikTok, you might use quiet background music beneath the narration.

    Keep the voice clearly understandable throughout the video. If the TikTok post promotes a product, service, or business, check whether the music is from TikTok’s Commercial Music Library or whether you have separate permission for the commercial use.

    Step 7: Edit the TikTok Video for a Clear, Fast Flow

    A TikTok video should move quickly enough to keep viewers interested without making the information difficult to follow.

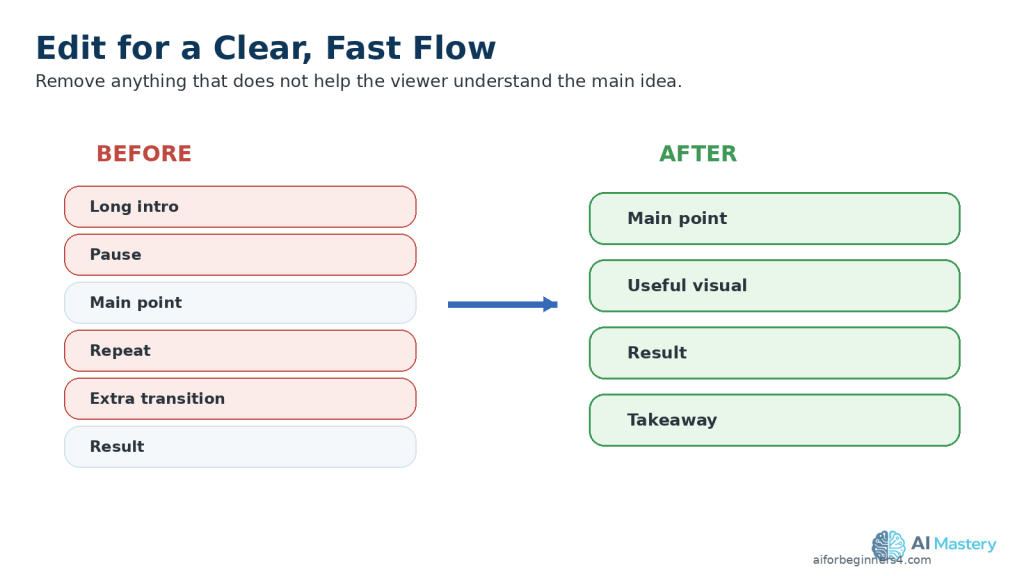
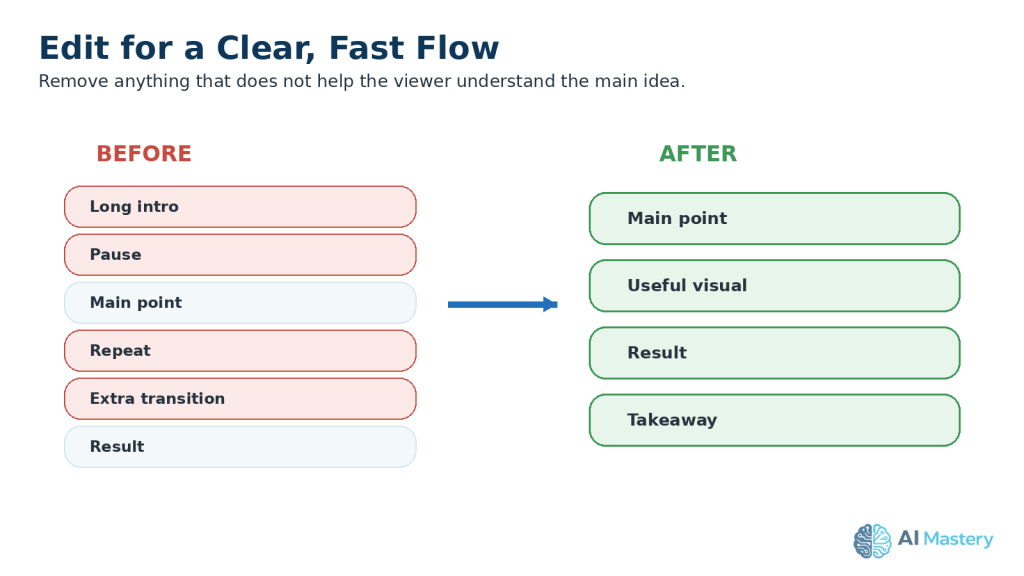
    Remove Unnecessary Parts

    Review the full video and remove:

    · Long pauses.

    · Repeated explanations.

    · Empty frames.

    · Slow introductions.

    · Unnecessary transitions.

    · Visuals that do not support the main point.

    The goal is to keep the video focused on one useful idea.

    Match the Editing to the Script

    Change visuals when the narration moves to a new point.

    For example:

    · Show the problem when the opening introduces it.

    · Show the AI tool when the script explains the tool.

    · Show the result when the narration describes the result.

    · Show the final takeaway at the end.

    This helps viewers understand the information without having to guess what each visual means.

    Keep Transitions Simple

    You do not need complicated effects between every scene.

    Simple cuts, gentle zooms, or basic fades are often enough for beginner tutorials.

    Too many effects can distract from the content.

    Keep Important Content Visible

    Check that captions, faces, screenshots, and important text remain clear throughout the video.

    If a scene contains small text, zoom into the relevant area instead of showing the entire screen at once.

    Keep important information away from areas that TikTok interface elements may cover.

    Practical Example

    For a TikTok video about summarizing a document with AI, the editing sequence might be:

    1. Show the long document.

    2. Show the upload step.

    3. Show the summary prompt.

    4. Show the shorter result.

    5. End with the reminder to verify the summary against the original.

    This creates a simple beginning-to-end flow without unnecessary scenes.
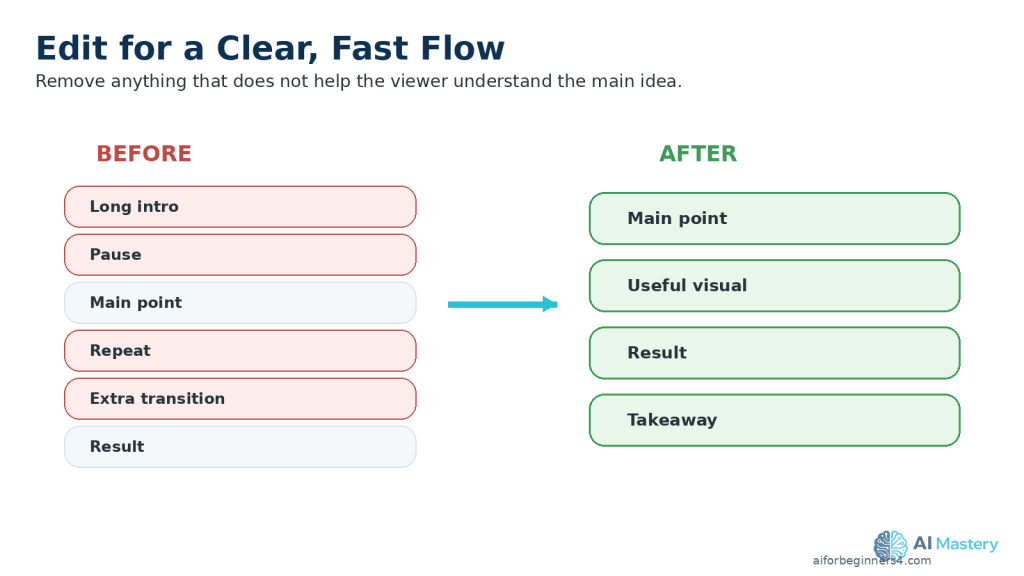
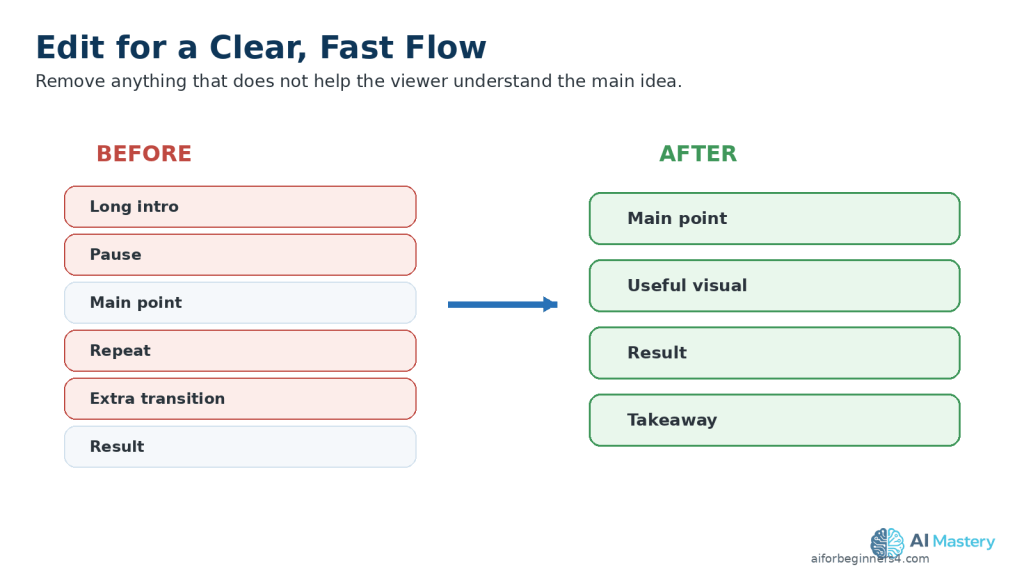
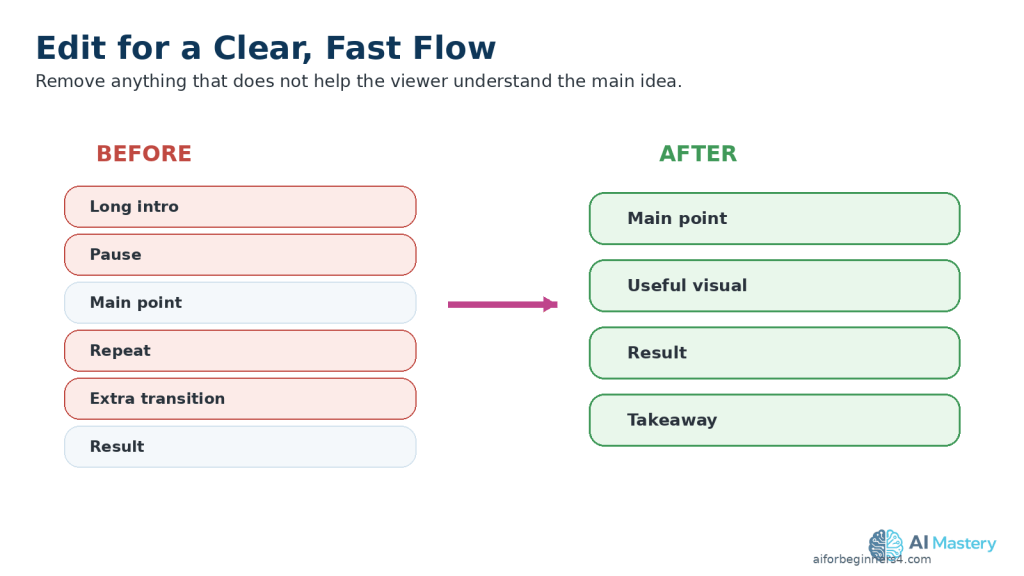
    Figure 9. Removing long pauses, repeated information, and distracting effects creates a clearer TikTok video.

    Explanation: Simple editing keeps attention on the lesson rather than unnecessary production effects.

    Step 8: Export and Review the Final TikTok Video

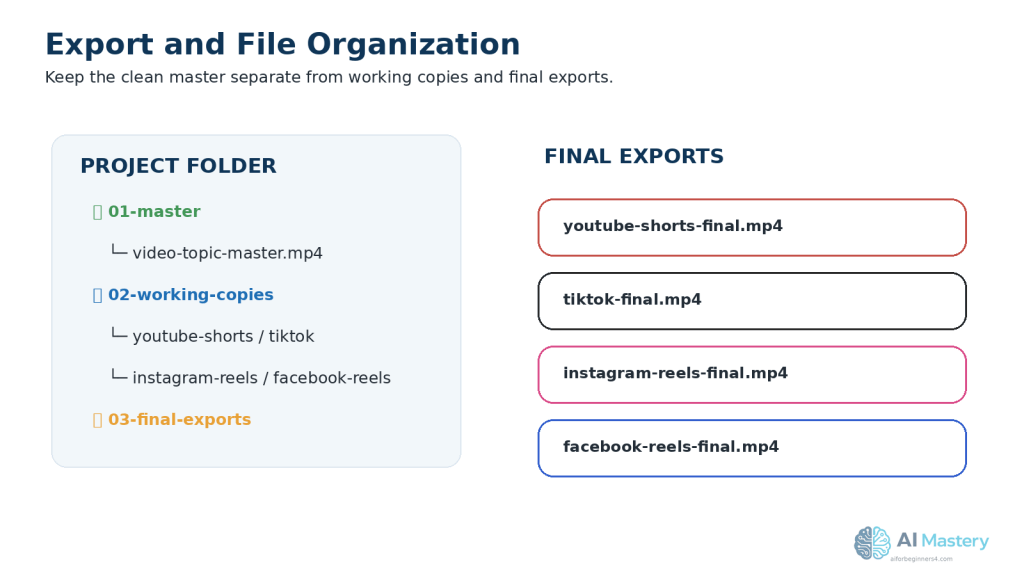
    When editing is complete, export the TikTok video as a separate final file. Keep your original editing project and clean master version so you can make corrections or prepare versions for other platforms later.

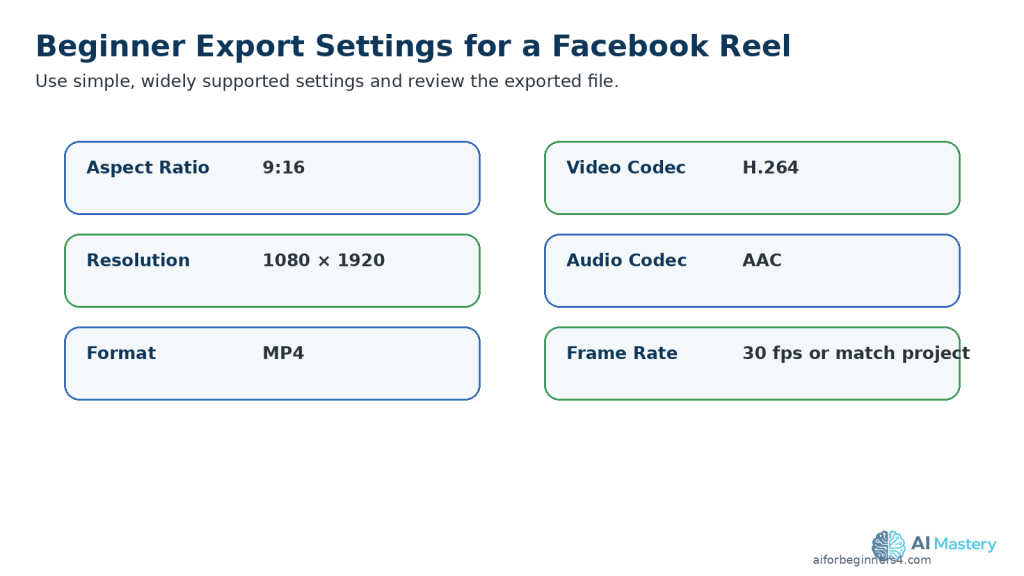
    Choose Practical Export Settings

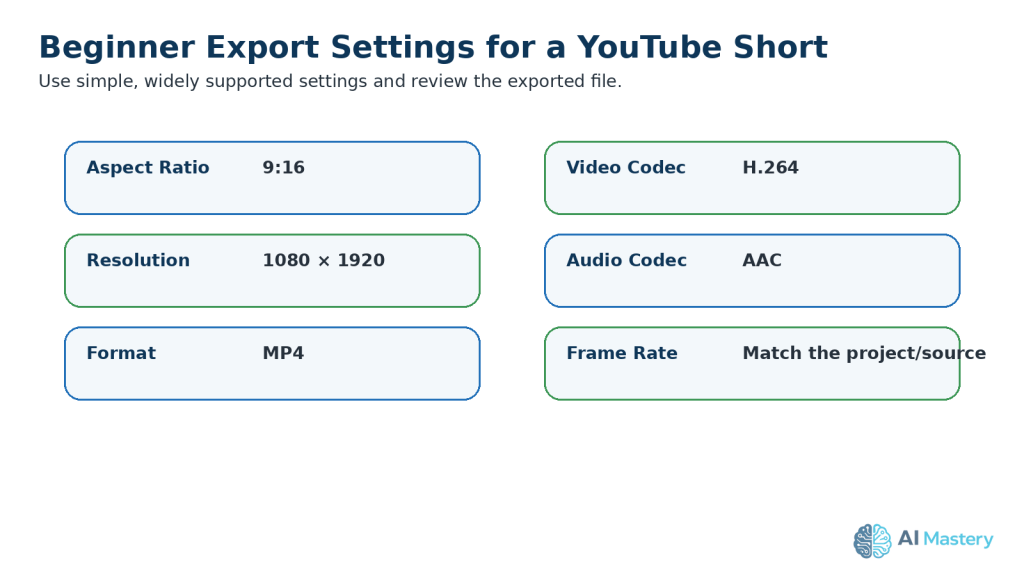
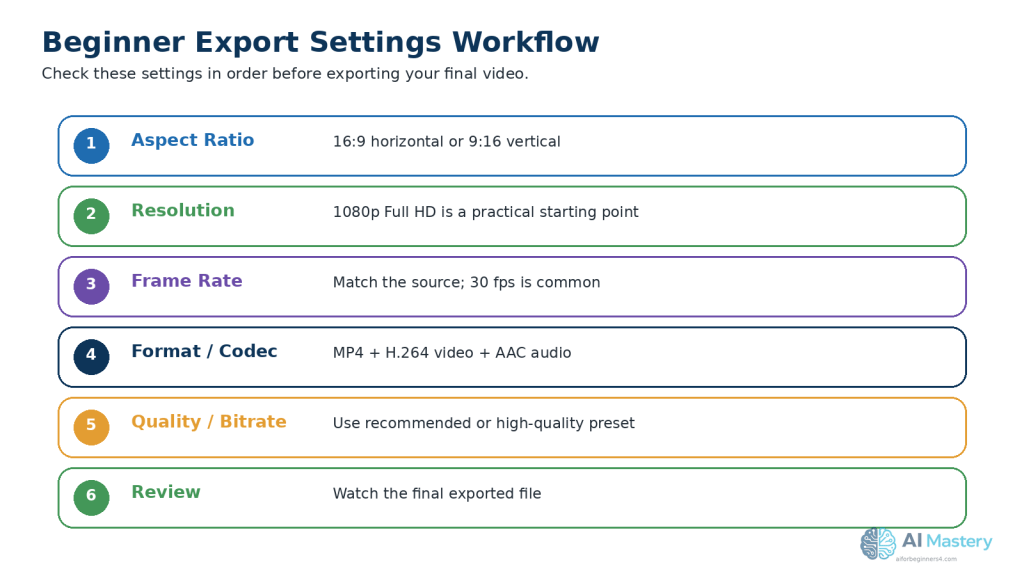
    For a full-screen, phone-friendly TikTok video, a practical beginner starting point is:

    · Aspect ratio: 9:16

    · Resolution: 1080 × 1920 pixels

    · Orientation: Vertical

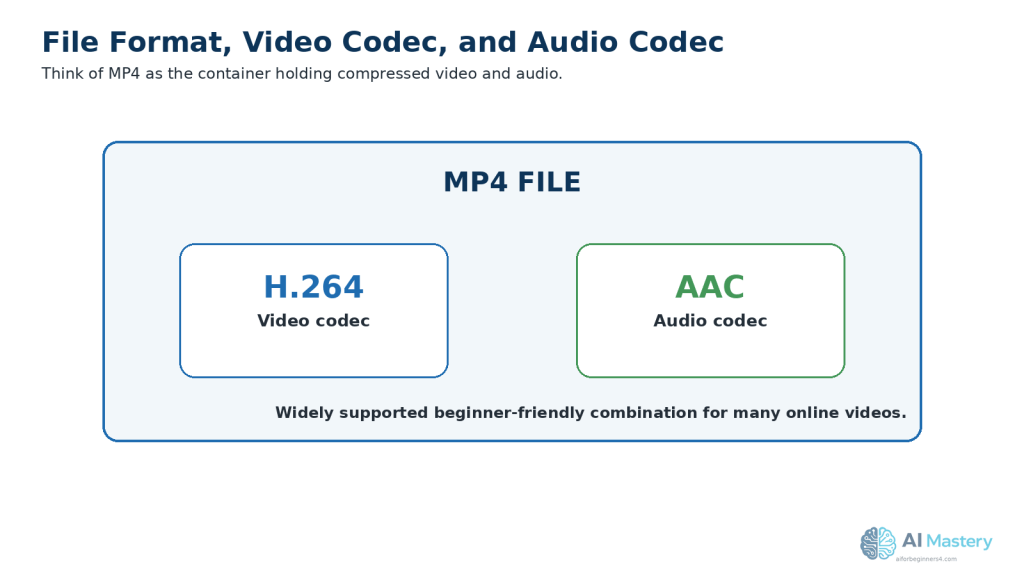
    · File format: MP4

    · Video codec: H.264

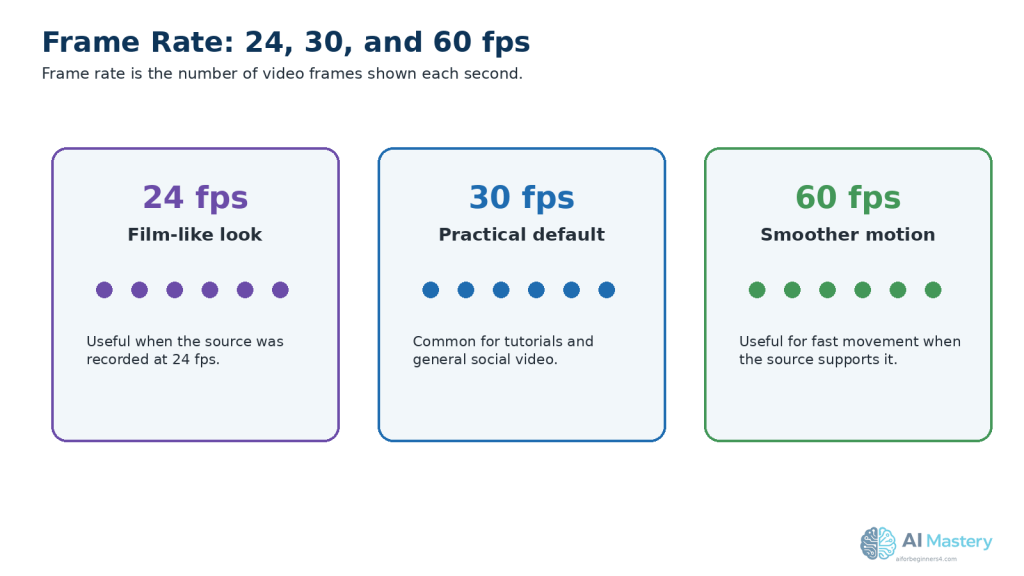
    · Frame rate: 30 fps is a practical choice for many beginner projects

    TikTok’s current creative guidance recommends 9:16 vertical video and at least 1080 × 1920 pixels for clear full-screen viewing.
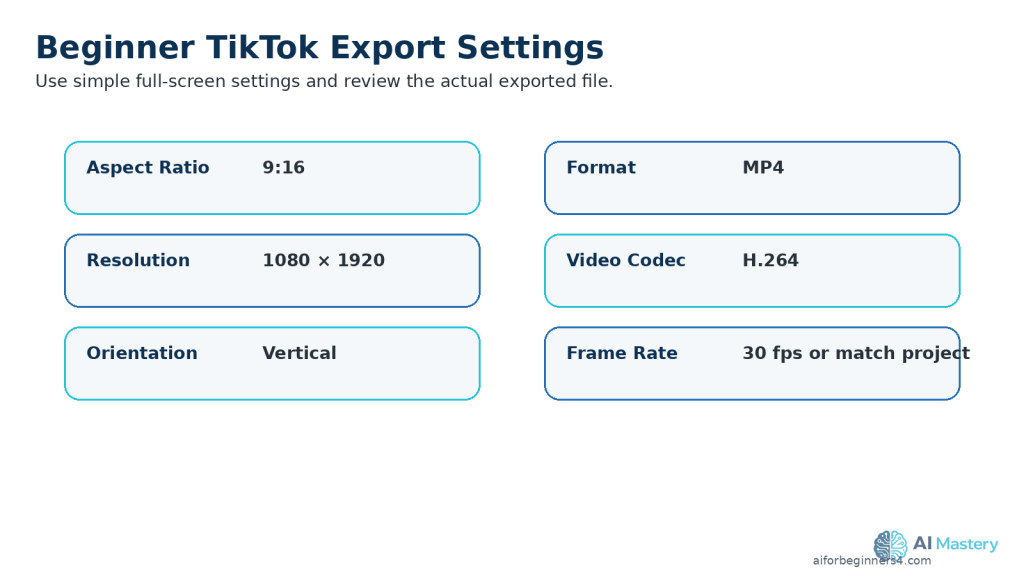
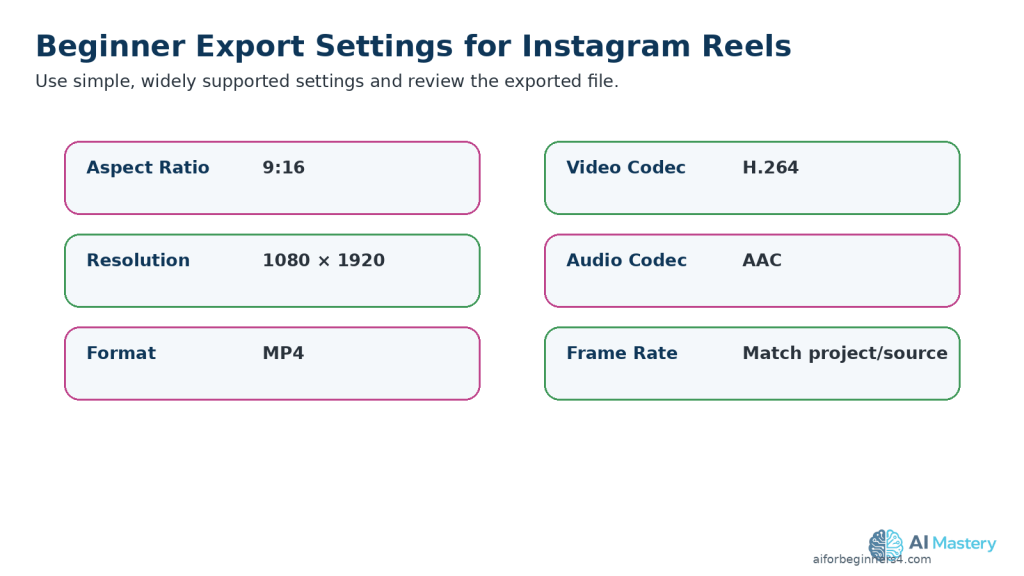
    Figure 10. Practical beginner export settings include 9:16, 1080 × 1920, vertical orientation, MP4, H.264, and a suitable frame rate.

    Explanation: Watch the actual exported file before uploading rather than relying only on the preview inside the video editor.

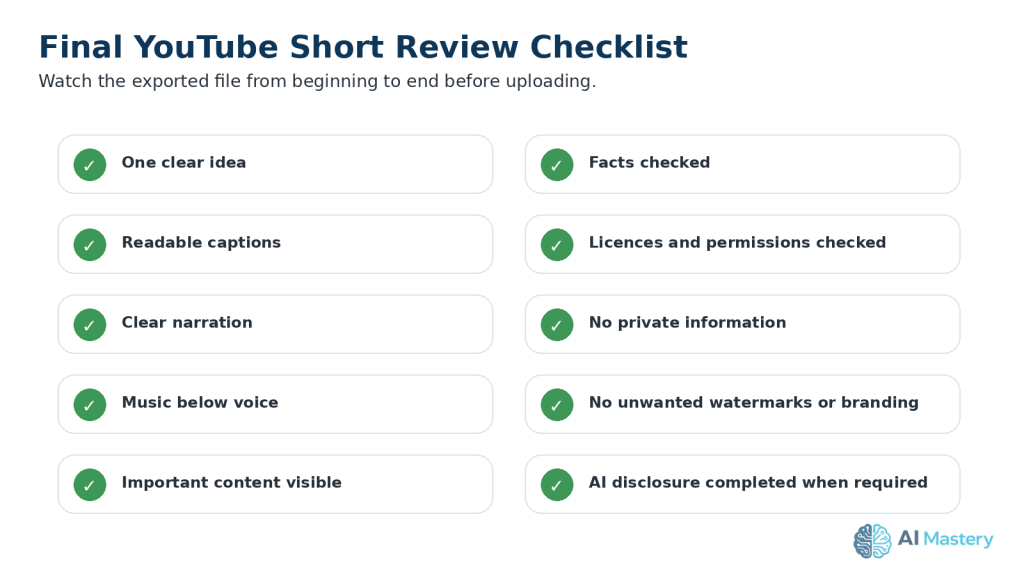
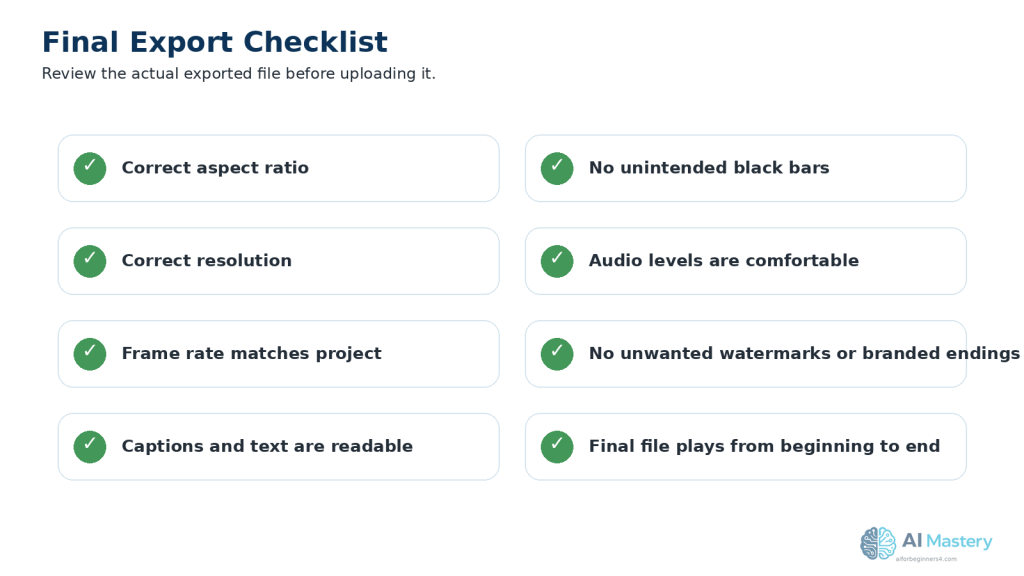
    Watch the Exported File Before Uploading

    Do not rely only on the preview inside your video editor.

    Open the actual exported video and watch it from beginning to end.

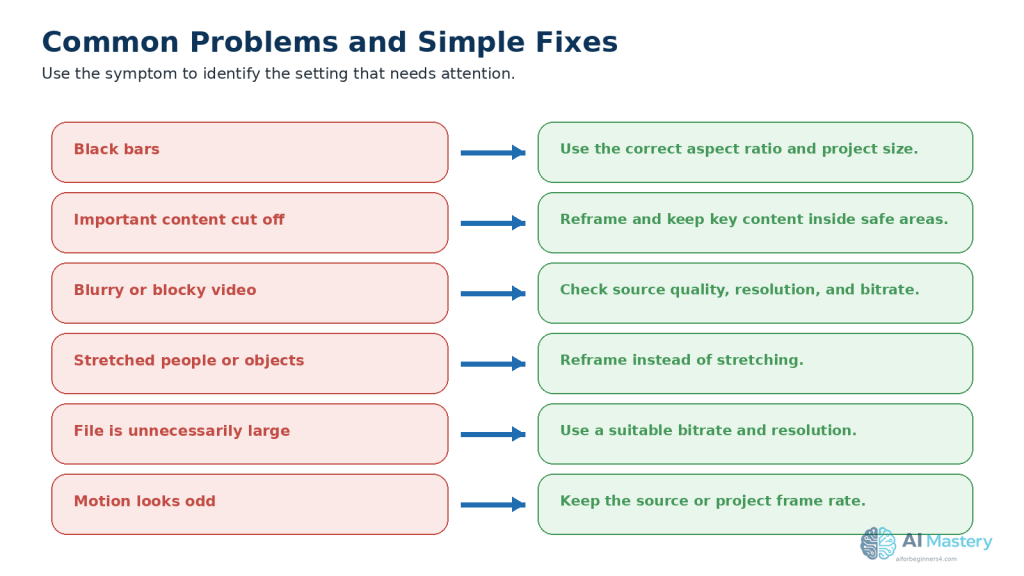
    Check for:

    · Blurry or pixelated video.

    · Cropped faces or important objects.

    · Captions that are difficult to read.

    · Text positioned too close to the edges.

    · Music that covers the narration.

    · Audio that is too loud or too quiet.

    · Missing scenes or blank frames.

    · Spelling mistakes.

    · Distorted AI-generated images.

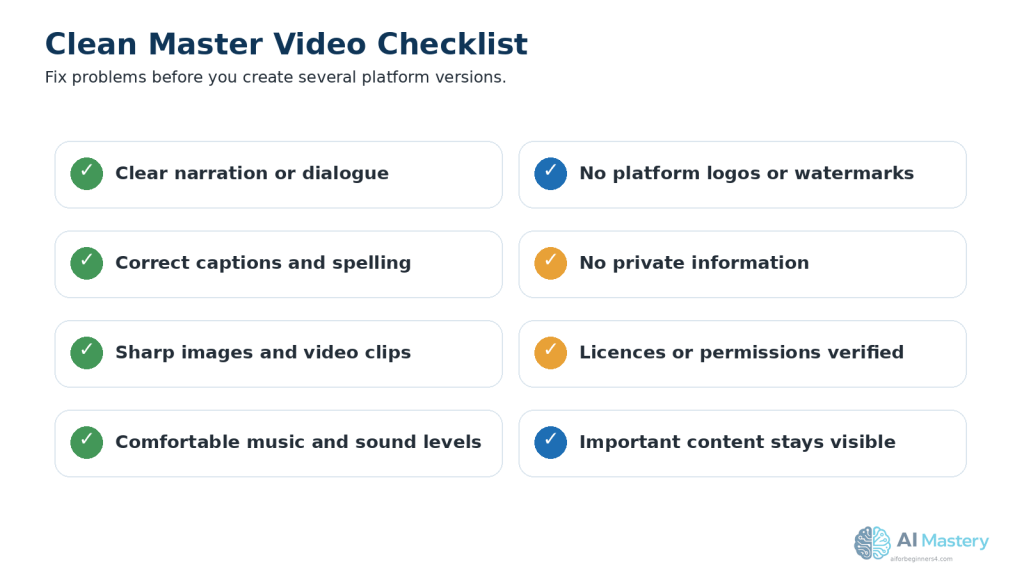
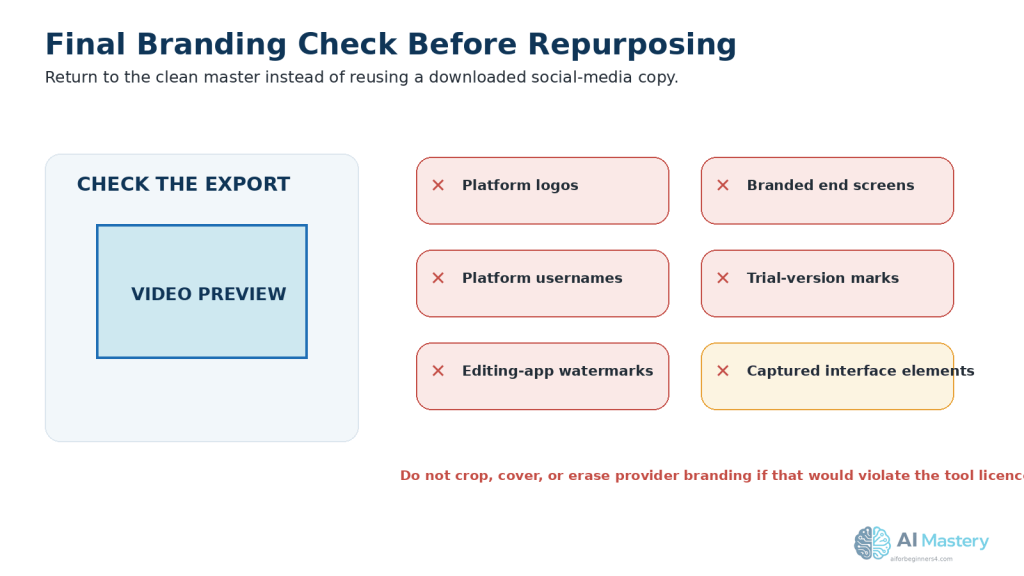
    · Unwanted logos, watermarks, usernames, or branded endings.

    · Private or confidential information.

    Check the Vertical Layout

    Watch the exported video on a phone if possible.

    Make sure that:

    · Important faces remain visible.

    · Captions are readable.

    · Demonstrations are large enough to understand.

    · Important text stays away from areas covered by TikTok controls.

    · The main subject remains clear in the vertical frame.

    TikTok’s official creative specifications recommend keeping important content inside the safe area so interface elements do not cover it.

    Keep a Clean Master

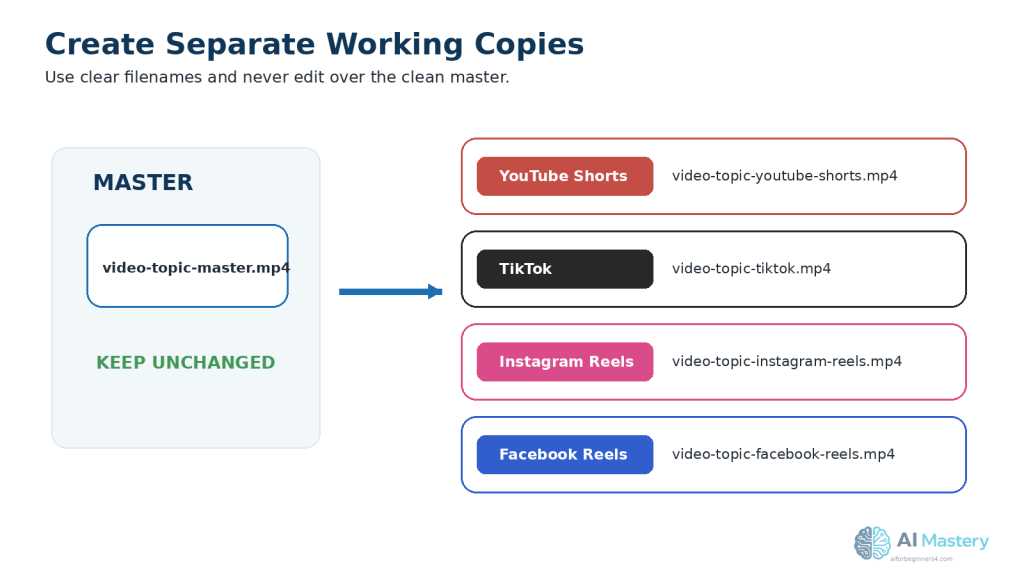
    Save a clean master separately from the TikTok version.

    For example:

    · ai-document-summary-master.mp4

    · ai-document-summary-tiktok-final.mp4

    The clean master should avoid unnecessary platform-specific logos, usernames, downloaded watermarks, or platform-specific music when possible.

    This makes it easier to prepare another version later for YouTube Shorts, Instagram Reels, Facebook Reels, Pinterest, or another platform.

    Practical Example

    After exporting your document-summary TikTok video, watch the final MP4 on your computer and phone.

    If the captions are readable, the narration is clear, the important demonstration remains visible, and there are no unwanted watermarks or private details, the video is ready for the publishing step.

    Step 9: Upload and Publish the TikTok Video

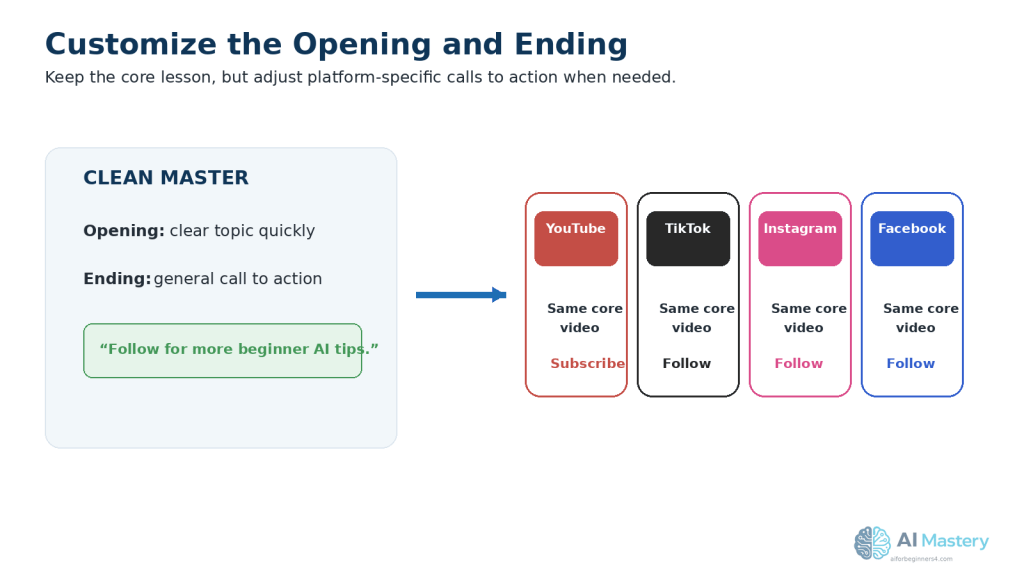
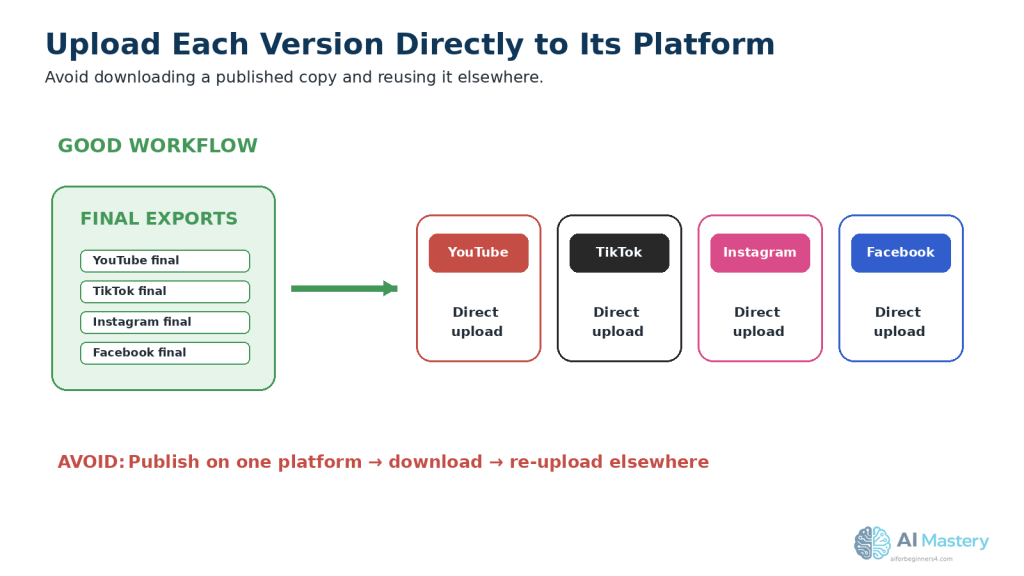
    When the final video has been reviewed, upload the clean TikTok version rather than a copy downloaded from another social media platform.

    TikTok currently lets you create or upload a video from the app, add editing elements, review posting options, and then publish the post. The exact buttons can change as TikTok updates its interface.

    Upload the Video

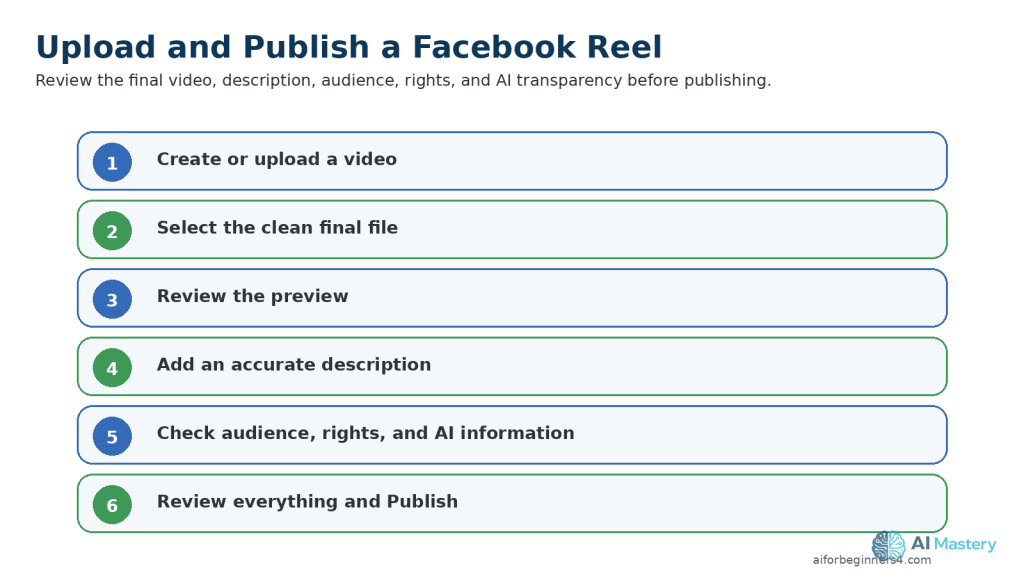
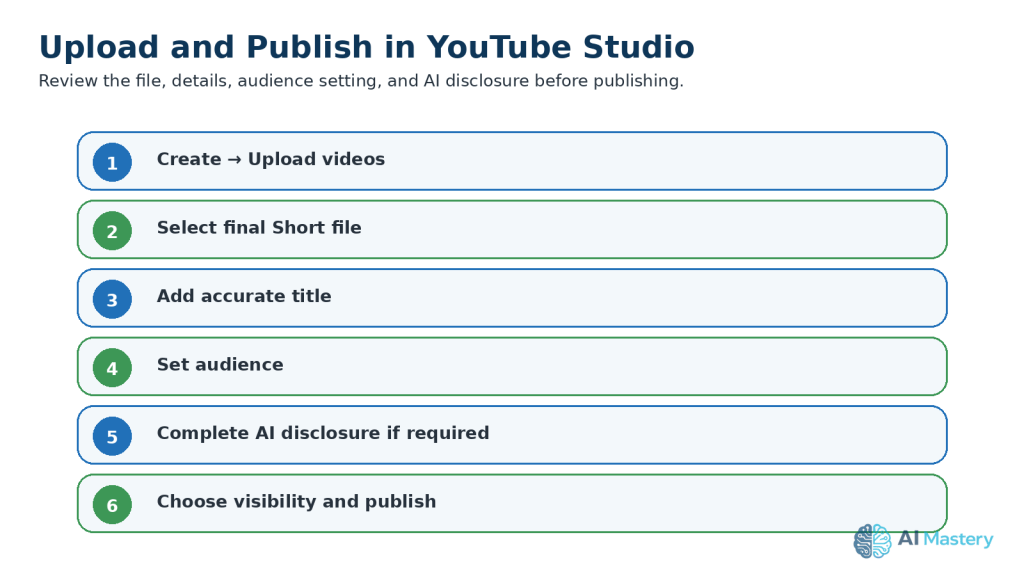
    A typical beginner workflow is:

    1. Open TikTok.

    2. Tap the Add post + button.

    3. Choose Upload and select your final video from your device.

    4. Review the video and make any necessary edits.

    5. Tap Next to reach the posting screen.

    6. Add a clear description.

    7. Choose a cover image if needed.

    8. Review the audience or privacy setting.

    9. Review comments, reuse, or other available post settings.

    10. Review any commercial-content settings if the video promotes a brand, product, or service.

    11. Review the AI-generated-content label when applicable.

    12. Check the complete post carefully.

    13. Publish when everything is correct.

    TikTok’s current Help Center confirms that uploaded videos can be selected from your device and that additional posting options are available before publication.

    Add a Clear Description

    Your description should accurately explain what the video is about.

    For example:

    Learn a simple way to summarize a long document with AI. Always compare important information with the original document before relying on the summary.

    Keep the wording natural and relevant to the actual video.

    Avoid exaggerated claims that promise results the video cannot support.

    Review the Audience and Privacy Setting

    TikTok lets you control who can view individual posts. The available choices can depend on whether your account is public or private and on other account settings.

    Before publishing, make sure the selected audience matches who you actually want to see the video.

    Review Comments and Content-Reuse Settings

    TikTok provides controls for comments and for ways other people may interact with or reuse your content. Available options can depend on your account and privacy settings.

    Review these settings rather than assuming the defaults are right for every video.

    Label AI-Generated Content When Required

    TikTok currently requires creators to label certain realistic AI-generated content and encourages labeling content that was completely generated or significantly edited with AI. TikTok provides a Creator labeled as AI-generated setting in the posting process.

    Pay particular attention when AI content:

    · Makes a real person appear to say something they did not say.

    · Changes a real person’s voice or appearance significantly.

    · Creates a realistic person, place, or event that did not exist.

    · Alters real footage beyond minor corrections.

    · Could reasonably be mistaken for authentic footage.

    TikTok may also automatically apply an AI-generated label when its systems detect qualifying AI-generated or AI-modified content.

    Review Commercial Content When Relevant

    If the TikTok video promotes your own business or another brand, product, or service, review TikTok’s current commercial-content disclosure settings before publishing. TikTok provides specific disclosure options for promotional content.

    This is separate from AI labeling. A video may require a commercial-content disclosure, an AI-generated-content label, both, or neither depending on what the video contains.
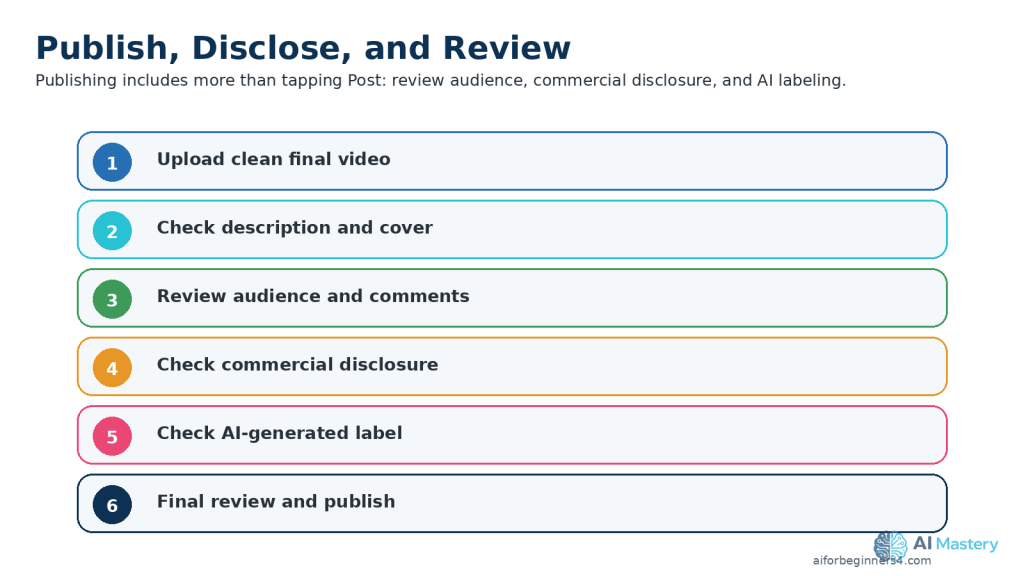
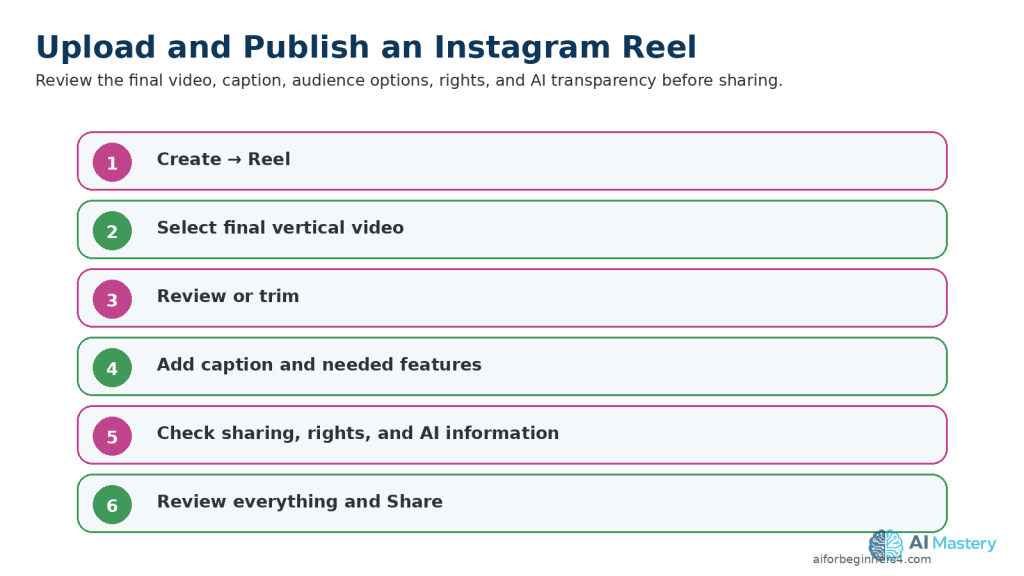
    Figure 11. Before publishing, review the video, description, audience, commercial-content disclosure, AI-generated-content label, and final post.

    Explanation: Commercial-content disclosure and AI-generated-content labeling are separate checks and may apply independently.

    Review Before Publishing

    Before publishing the TikTok video, check:

    · The correct video was selected.

    · The video displays properly in the vertical frame.

    · The description accurately matches the content.

    · Captions and important text remain readable.

    · Narration is clear.

    · Music and sound effects have appropriate usage rights.

    · Images, clips, fonts, voices, and other assets are properly licensed or permitted.

    · No private or confidential information appears.

    · No unwanted watermark, username, or platform branding remains.

    · The audience setting is correct.

    · Comment and reuse settings are appropriate.

    · Any commercial-content disclosure has been reviewed.

    · Any required AI-generated-content label has been applied.

    Practical Example

    Suppose your TikTok video uses an AI-generated illustration of a fictional office worker while explaining how to summarize a document.

    Before publishing, review the visual for obvious AI mistakes, check the captions and narration, verify your music and asset rights, choose the appropriate audience, and review TikTok’s current AI-generated-content labeling options.

    If the video realistically alters a real person’s appearance, voice, or actions, labeling becomes especially important because viewers could mistake the synthetic material for authentic content.

    Common Mistakes to Avoid When Creating TikTok Videos with AI

    Beginners can save time by avoiding several common problems that affect clarity, quality, licensing, privacy, or publishing.

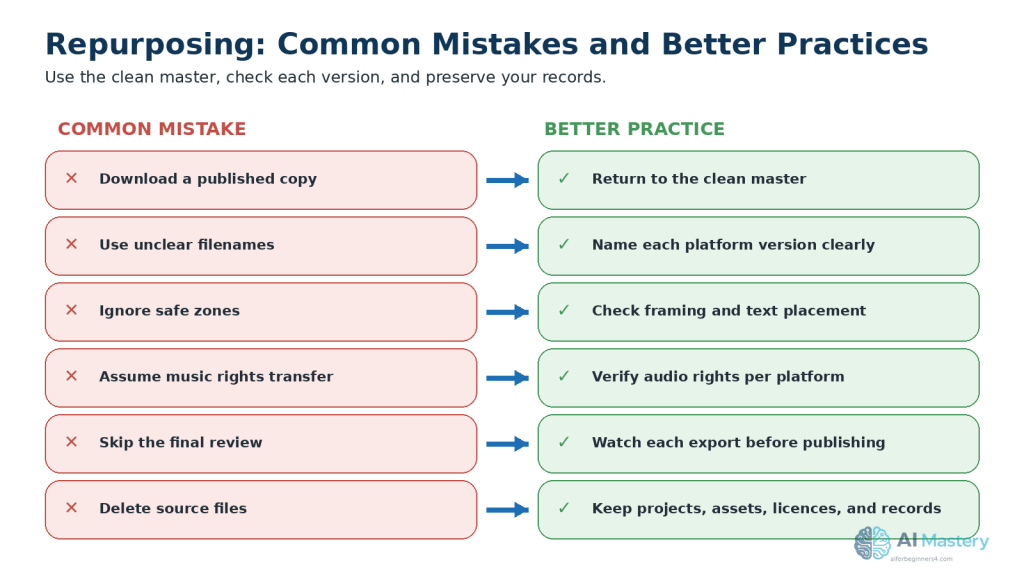
    Common mistakes include:

    · Trying to explain too many ideas in one TikTok video.

    · Using a long introduction before reaching the main point.

    · Placing captions or important text too close to areas covered by TikTok interface elements.

    · Shrinking screenshots until the text becomes difficult to read.

    · Using music without checking whether the licence allows TikTok use.

    · Letting background music overpower the narration.

    · Publishing AI-generated information without checking factual accuracy.

    · Using a real person’s voice, image, or likeness without appropriate permission.

    · Uploading a downloaded copy from another platform instead of using a clean master export.

    · Leaving unwanted watermarks, usernames, logos, or branded endings in the video.

    · Using AI-generated visuals without checking for distorted objects, incorrect text, duplicated items, or unrealistic details.

    · Forgetting to review the audience and privacy settings.

    · Ignoring commercial-content disclosure requirements when promoting a brand, product, or service.

    · Skipping TikTok’s AI-generated-content labeling requirements when realistic synthetic or significantly altered content is involved.

    · Skipping the final review of the exported video.

    How to Avoid These Mistakes

    Keep each TikTok video focused on one clear lesson and work from a clean master project.

    Before publishing, review the:

    · Script.

    · Visuals.

    · Captions.

    · Audio.

    · Music rights.

    · Asset licences.

    · Permissions.

    · Audience and privacy settings.

    · Commercial-content settings when applicable.

    · AI-generated content.

    · Final export.

    · Any required AI-generated-content label.

    If something is unclear, incorrect, poorly positioned, misleading, or not properly licensed, correct the project and export a new version before publishing.
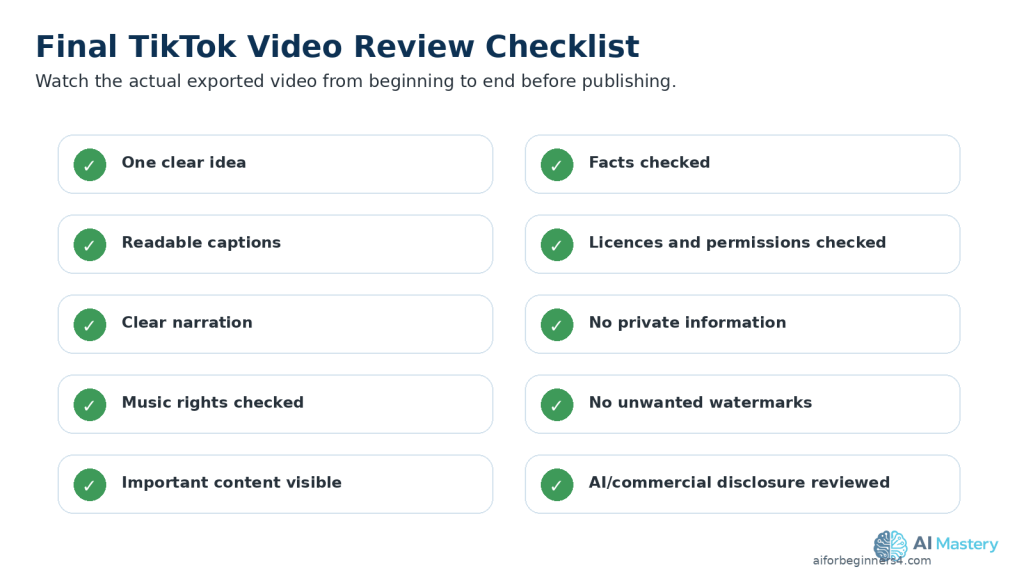
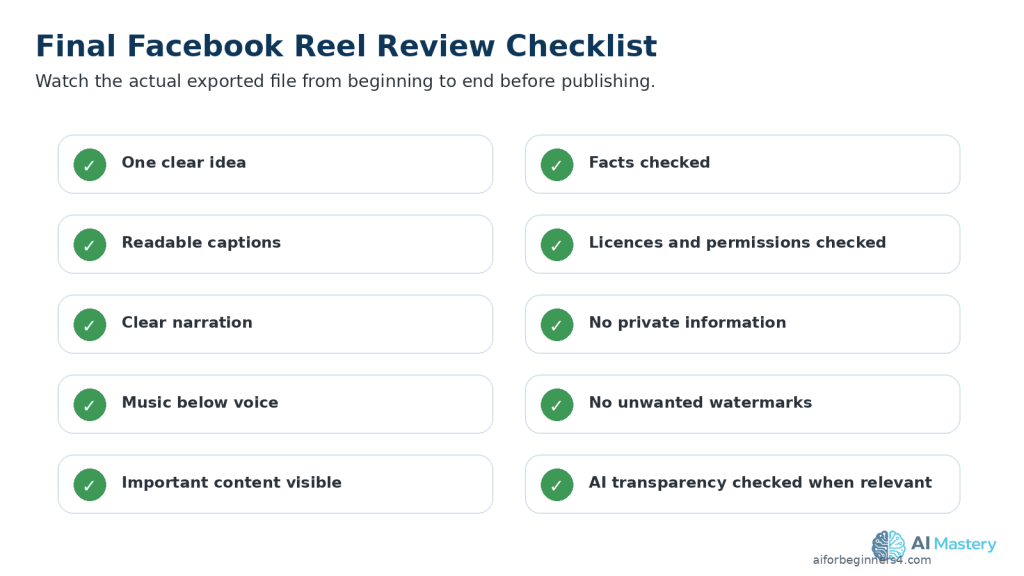
    Figure 12. A final checklist helps catch quality, licensing, privacy, branding, and disclosure problems before publication.

    Explanation: Watching the complete exported video from beginning to end is one of the most important final checks.

    Benefits of Creating TikTok Videos with AI

    AI can make the TikTok video workflow easier for beginners by helping with planning, writing, visuals, narration, captions, and editing.

    Key benefits include:

    · Faster idea generation: AI can suggest focused TikTok topics when you are not sure what to create.

    · Simpler script writing: AI can turn a basic idea into a short script that you can review and improve.

    · Easier visual planning: AI can suggest scenes, image ideas, screen recordings, text overlays, and simple shot sequences.

    · More accessible production: AI voices, captions, and editing assistance can help beginners create videos without advanced production skills.

    · Better organization: AI can help reduce a broad topic to one clear lesson that fits a TikTok video.

    · Easier repurposing: A TikTok video can be adapted from a longer video, article, tutorial, or clean master project.

    · More consistent workflow: Using the same planning, scripting, editing, and review process can make future videos easier to produce.

    · Useful learning support: AI can explain unfamiliar editing terms and suggest improvements while you are learning a new tool.

    · Cross-platform flexibility: A clean master can be adapted for YouTube Shorts, Instagram Reels, Facebook Reels, Pinterest, or other vertical-video platforms after checking each platform’s current requirements.

    · Support for faceless content: AI can help create scripts, visuals, narration, captions, and other elements without requiring you to appear on camera.

    AI is most useful when it supports your decisions rather than replacing them. Review the final script, visuals, audio, captions, facts, licences, permissions, privacy settings, and publishing choices before making the video public.

    Limitations of Creating TikTok Videos with AI

    AI can help with many parts of the TikTok video workflow, but it does not remove the need for careful human review.

    Common limitations include:

    · Factual errors: AI-generated scripts can contain incorrect, outdated, or misleading information.

    · Generic writing: AI may produce scripts that sound repetitive or similar to other content unless you revise them.

    · Visual inconsistencies: AI-generated images or video clips may contain distorted objects, unusual details, inconsistent characters, or misspelled text.

    · Voice limitations: AI narration can mispronounce names, sound unnatural, or use incorrect emphasis.

    · Licensing differences: AI tools, stock libraries, music services, templates, and fonts can have different rules for personal, commercial, or promotional use.

    · Platform changes: TikTok video specifications, editing features, music options, privacy controls, commercial-content settings, and AI-labeling methods can change over time.

    · Editing is still required: AI-generated material usually needs trimming, timing adjustments, caption checks, and final quality review.

    · Privacy risks: Uploading private documents, photographs, recordings, or personal information to an AI tool can create privacy concerns.

    · Disclosure may be required: Realistic AI-generated or significantly altered content may need labeling under TikTok’s current rules.

    · Commercial-use restrictions: Music or other assets that are allowed for personal content may not automatically be cleared for business or promotional use.

    · No guarantee of performance: AI can help improve the production workflow, but it cannot guarantee views, followers, engagement, sales, or other results.

    How to Reduce These Limitations

    Use AI as an assistant rather than treating its output as automatically finished.

    Verify important facts, review every generated visual and voice recording, check licences and permissions, protect private information, and watch the complete exported video before publishing.

    When TikTok changes a video feature, music option, privacy setting, commercial-content requirement, AI-labeling method, or other rule that affects your workflow, check the current official TikTok guidance before relying on older instructions.

    Common Myths About Creating TikTok Videos with AI

    Several common myths can make beginners expect too much from AI or create unnecessary publishing problems.

    Myth 1: AI Can Create a Perfect TikTok Video Automatically

    Reality: AI can help with ideas, scripts, visuals, narration, captions, and editing suggestions, but the final video still needs human review for accuracy, quality, timing, licensing, privacy, and publishing decisions.

    Myth 2: AI-Generated Images and Music Are Automatically Copyright-Free

    Reality: Rights and commercial-use conditions depend on the tool, licence, source material, and intended use.

    Always check the terms that apply to AI-generated images, music, stock footage, fonts, templates, voices, and other assets before publishing.

    Myth 3: Every AI-Assisted TikTok Video Needs the Same Label

    Reality: Using AI for brainstorming or minor script editing is different from publishing realistic AI-generated or significantly altered content.

    Review TikTok’s current AI-generated-content rules and apply the appropriate label when required.

    Myth 4: More Effects Make a TikTok Video More Professional

    Reality: Too many transitions, animations, text boxes, filters, or sound effects can distract viewers from the main idea.

    Clear visuals, readable captions, useful information, and simple editing are often more effective.

    Myth 5: The Same TikTok Video Can Be Uploaded Everywhere Without Changes

    Reality: You can start from the same clean master video, but other platforms can have different requirements for dimensions, safe areas, music rights, captions, branding, and disclosure.

    Prepare a separate final version for each platform instead of relying on a downloaded TikTok copy.

    Myth 6: AI Can Guarantee More Views or Followers

    Reality: AI can help improve your planning and production workflow, but it cannot guarantee views, followers, engagement, sales, or other results.

    Topic choice, usefulness, presentation, timing, audience interest, competition, and many other factors can affect performance.

    Frequently Asked Questions

    How Long Can a TikTok Video Be?

    TikTok currently allows videos recorded inside the app to be up to 10 minutes long and uploaded videos to be up to 60 minutes long.

    For beginner short-form content, use only the length needed to explain the idea clearly.

    What Size Should I Use for a TikTok Video?

    A practical beginner format is:

    · 1080 × 1920 pixels

    · 9:16 aspect ratio

    · Vertical orientation

    TikTok’s current creative guidance recommends 9:16 vertical video for full-screen viewing and 1080 × 1920 or higher for clear playback.

    Do I Need an Expensive AI Video Tool?

    No. You can start with simple tools for writing, visuals, narration, captions, and editing.

    Before choosing a free or paid tool, check whether it:

    · Adds watermarks.

    · Limits video resolution.

    · Limits export length.

    · Restricts commercial use.

    · Limits AI voices or generated media.

    Can I Create TikTok Videos Without Showing My Face?

    Yes. Faceless TikTok videos can use:

    · Screen recordings.

    · AI-generated visuals.

    · Licensed stock footage.

    · Text and graphics.

    · Charts.

    · Product or workspace footage.

    · Voice-over narration.

    Can I Use an AI Voice?

    Yes, when the AI voice tool and its licence allow your intended use.

    Review the narration carefully and avoid cloning or impersonating a real person’s voice without appropriate permission.

    Should I Add Captions?

    Captions are strongly recommended because they can improve understanding and accessibility. TikTok also provides auto-generated captions using speech-recognition technology.

    Always review automatic captions for spelling, timing, names, and technical terms before publishing.

    Can I Use Any Music I Find Online?

    No.

    If a TikTok post promotes a brand, product, or service, TikTok recommends using music from its Commercial Music Library because those tracks are pre-cleared for commercial use on TikTok. If you use other music, you need the necessary rights or permissions.

    Do I Need to Label AI-Generated TikTok Content?

    TikTok provides creator labels for content that was completely generated or significantly edited with AI, and it requires labeling for certain realistic AI-generated content. TikTok can also automatically apply AI-generated labels to some content.

    Review TikTok’s current AI-generated-content guidance before publishing realistic synthetic or significantly altered media.

    Can I Control Who Sees My TikTok Video?

    Yes. TikTok provides post visibility controls that let you choose who can see individual posts. The options available can depend on your account and privacy settings.

    Review the audience setting before publishing rather than relying automatically on the default.

    Can I Reuse the Same Video on TikTok, YouTube, Instagram, Facebook, or Pinterest?

    Yes, but start from your clean master video and prepare a separate version for each platform.

    Check:

    · Aspect ratio.

    · Safe areas.

    · Caption placement.

    · Music rights.

    · Video length.

    · Platform branding.

    · Commercial disclosures.

    · AI-generated-content requirements.

    TikTok’s interface can cover parts of a vertical video, so important information should remain within the appropriate safe area.

    Will AI Guarantee More TikTok Views or Followers?

    No.

    AI can help with ideas, scripts, visuals, narration, captions, and editing, but it cannot guarantee views, followers, engagement, sales, or other results.

    Key Takeaways

    Creating TikTok videos with AI becomes easier when you follow a simple, repeatable workflow.

    Remember these main points:

    · Start with one clear idea for each TikTok video.

    · Use AI to help brainstorm, outline, and draft the script, but always review the final wording.

    · Keep the script focused and make the topic clear near the beginning.

    · Use a 9:16 vertical format at 1080 × 1920 pixels for a phone-friendly full-screen layout.

    · Keep important captions, faces, titles, and demonstrations away from areas covered by TikTok interface elements.

    · Prepare visuals that are easy to understand on a small screen.

    · Use clear narration when it helps explain the content.

    · Add readable captions and on-screen text to improve understanding and accessibility.

    · Keep background music below the narration and verify that you have appropriate music rights.

    · For commercial content, review whether TikTok’s Commercial Music Library or separate music permissions are required.

    · Check licences and permissions for stock footage, images, fonts, templates, voices, music, and other third-party assets.

    · Review AI-generated visuals for distorted objects, incorrect text, duplicated items, or unrealistic details.

    · Edit out unnecessary pauses, repeated information, and distracting effects.

    · Export a clean final version and watch the complete file before uploading it.

    · Review the audience, privacy, comment, and reuse settings before publishing.

    · Review any commercial-content disclosure requirements when promoting a brand, product, or service.

    · Apply TikTok’s AI-generated-content label when required for realistic synthetic or significantly altered content.

    · Keep your clean master video, project files, prompts, licences, permissions, and final exports for future corrections or repurposing.

    AI can help make the production process faster, but the final quality, accuracy, licensing, privacy, accessibility, disclosure, and publishing decisions still require careful human review.

    Final Tip

    Keep your first TikTok videos simple.

    Choose one useful idea, explain it clearly, use readable visuals and captions, and review the complete exported video before publishing. You do not need complicated effects or advanced editing to create a useful TikTok video.

    As your workflow improves, keep your clean master files, prompts, licences, permissions, and final exports organized. This makes it easier to correct mistakes, update older videos, or repurpose successful content for YouTube Shorts, Instagram Reels, Facebook Reels, Pinterest, or other platforms later.

    Continue Learning

    If you want to continue building your AI video skills, these AI Mastery guides are useful next steps:

    · How to Repurpose One AI Video for YouTube Shorts, TikTok, Instagram Reels, and Facebook Reels: Beginner Guide (2026) — Learn how to adapt one clean master video for several social media platforms.

    · How to Choose AI Video Sizes, Aspect Ratios, and Export Settings: Beginner Guide (2026) — Learn how to choose practical dimensions, aspect ratios, frame rates, and export settings for vertical video.

    · How to Create YouTube Shorts with AI: Beginner Step-by-Step Guide (2026) — Learn how to create, edit, export, and publish short-form videos for YouTube.

    · How to Create Instagram Reels with AI: Beginner Step-by-Step Guide (2026) — Learn how to prepare and publish vertical AI-assisted videos for Instagram.

    · How to Create Facebook Reels with AI: Beginner Step-by-Step Guide (2026) — Learn how to create and publish AI-assisted vertical videos for Facebook.

    · How to Create Pinterest Video Pins with AI: Beginner Step-by-Step Guide (2026) — Learn how to create vertical video Pins with AI and publish them on Pinterest.

    · How to Create AI Virtual Presenter Videos for TikTok: Beginner Guide (2026) — Learn how to create TikTok videos using a fictional AI virtual presenter.

    · How to Edit AI-Generated Videos: Beginner Step-by-Step Guide (2026) — Learn how to trim clips, arrange scenes, improve pacing, and prepare a clean final video.

    · How to Add Voice, Music, and Captions to AI Videos: Beginner Step-by-Step Guide (2026) — Learn how to add narration, background music, sound effects, and readable captions.

    Sources and References

    The following official TikTok sources were checked for the current video-length limits, posting workflow, AI-generated-content labeling, music use, copyright, accessibility, privacy controls, commercial-content requirements, and vertical-video guidance used in this guide. TikTok features and policies can change, so important requirements should be checked again when TikTok announces an update or when you change your publishing workflow.

    TikTok Help Center — Camera Tools: TikTok explains that videos recorded inside TikTok can currently be up to 10 minutes, while uploaded videos can be up to 60 minutes.

    TikTok Help Center — Making a Post: TikTok explains the process for uploading or recording a video, reviewing it, and choosing posting options before publishing.

    TikTok Help Center — About AI-Generated Content: TikTok explains creator AI-generated-content labels, required labeling for certain realistic AI-generated content, and automatic labels that may be applied to qualifying content.

    TikTok Help Center — Commercial Use of Music on TikTok: TikTok recommends music from its Commercial Music Library when a post promotes a brand, product, or service because those tracks are pre-cleared for commercial use on TikTok.

    TikTok Help Center — Account Types on TikTok: TikTok explains Business Accounts and access to the Commercial Music Library for commercial use.

    TikTok Help Center — Copyright: TikTok explains copyright protections and its processes for copyright-related content and infringement reports.

    TikTok Help Center — Intellectual Property: TikTok provides information about intellectual-property rights, removals, and related resources.

    TikTok Help Center — Accessibility for Your Videos: TikTok explains accessibility features including automatically generated captions, which creators should review for accuracy.

    TikTok Help Center — Post Privacy Settings: TikTok provides controls for choosing who can see individual posts.

    TikTok Help Center — Manage Comments: TikTok provides controls for who can comment and for filtering and reviewing comments.

    TikTok Help Center — Promoting a Brand, Product, or Service: TikTok requires the content disclosure setting when a post promotes a brand, product, or service.

    TikTok Help Center — Editing TikTok Videos and Photos: TikTok explains built-in editing tools and how uploaded clips can be edited during the creation process.

    TikTok for Business — Video Advertising Guide for Small Businesses: TikTok for Business recommends 9:16 vertical video, keeping text and captions in safe zones, and exporting at 1080 × 1920 or higher for crisp full-screen playback.

    Important: This guide provides general educational information about AI video creation, copyright, licensing, privacy, disclosure, accessibility, and publishing. It is not legal advice. Verify that you have appropriate rights or permission for material you publish.
  • How to Create Pinterest Video Pins with AI: Beginner Step-by-Step Guide (2026)

    How to Create Pinterest Video Pins with AI: Beginner Step-by-Step Guide (2026)

    Estimated Reading Time: 18 minutes
    Last Updated: August 15, 2026

    Before Learning

    Before you begin, it helps to have one clear idea for the Pinterest video Pin you want to create. Your Pin can be educational, inspirational, promotional, or adapted from a longer video, article, tutorial, or other original content.

    You do not need advanced video-editing skills. AI tools can help you brainstorm ideas, write a short script, prepare visuals, generate narration, create captions, and improve the editing workflow.

    For a full-screen vertical video Pin, Pinterest currently recommends a 9:16 aspect ratio at 1080 × 1920 pixels. Pinterest also accepts several other aspect ratios, but 9:16 is a practical format when you want the video to fill a phone screen.

    Keep important text, captions, faces, and other key information away from areas that Pinterest may cover with interface elements. Pinterest provides safe-zone guidance for full-screen video Pins so important content remains visible on different devices.

    This guide will show you how to move from one simple idea to a finished Pinterest video Pin while keeping your source files, prompts, licences, permissions, clean master export, and publication records organized.

    What You’ll Learn

    By the end of this guide, you will know how to:

    · Choose one clear idea for a Pinterest video Pin.

    · Use AI to brainstorm Pin topics and create a simple content plan.

    · Write a short, focused script with AI assistance.

    · Create or prepare visuals for a vertical 9:16 layout.

    · Generate or record narration when needed.

    · Add readable captions and on-screen text.

    · Choose music and sound effects while checking usage rights.

    · Edit the video so the main idea is clear quickly.

    · Keep important text, faces, and graphics inside safe viewing areas.

    · Export a clean final version with suitable video settings.

    · Upload and publish the video Pin on Pinterest.

    · Review whether AI-generated content needs additional disclosure or labeling.

    · Keep your project files, prompts, licences, permissions, and clean master export for future reuse.

    Introduction

    Pinterest video Pins are videos that people can discover, save, and revisit while browsing Pinterest. They can use vertical, square, or other supported aspect ratios depending on the format. They can be used for tutorials, tips, demonstrations, product ideas, educational content, before-and-after examples, and many other visual topics.

    AI can help with several parts of the video Pin creation process. You can use it to generate ideas, outline the video, draft a short script, create visuals, prepare narration, improve captions, and suggest editing changes.

    However, AI should support your work rather than replace your final judgment. Review every script, visual, voice, caption, and factual claim before publishing. Make sure you have appropriate rights or permission for any music, images, video clips, voices, fonts, templates, or other material that you did not create yourself.

    A practical beginner workflow is to start with one clear idea, write a short script, prepare vertical visuals, add clear audio and captions, edit the video carefully, and review the final export before uploading it to Pinterest.

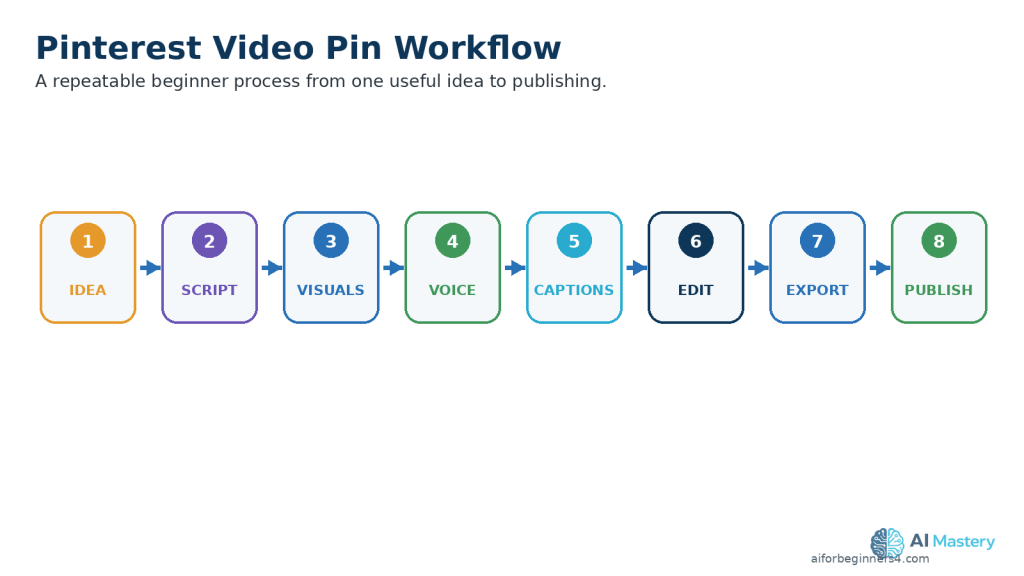
    Figure 1. A simple Pinterest video Pin workflow moves from one clear idea through scripting, visuals, audio, editing, export, and publishing.

    Explanation: Using the same sequence for each Pin makes the production process easier to repeat, review, and improve.

    What Are Pinterest Video Pins?

    Pinterest video Pins are Pins that use video instead of a single static image. They can be used for tutorials, demonstrations, ideas, educational content, product examples, and other visual topics that people can discover and save on Pinterest.

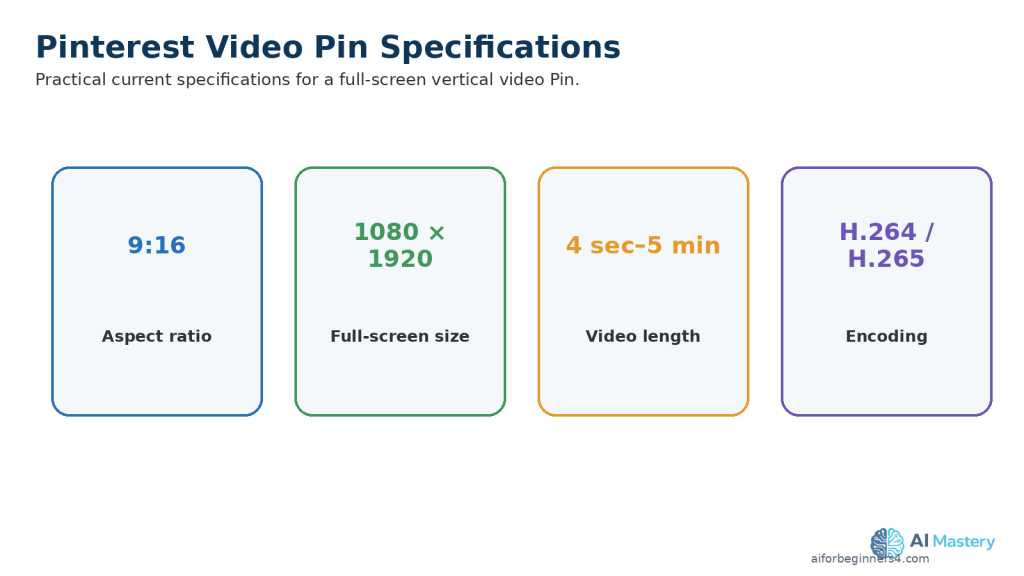
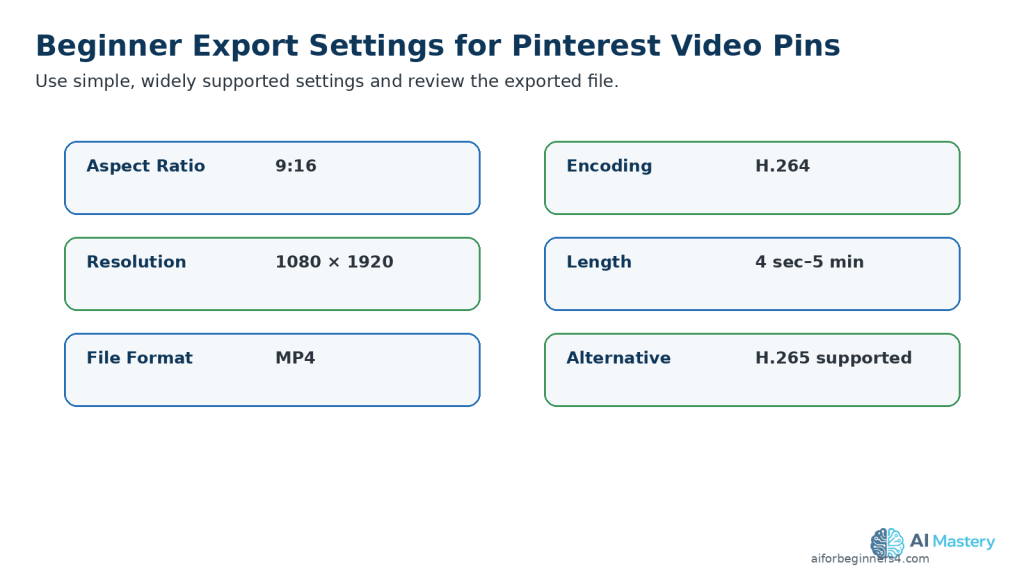
    Pinterest currently allows video Pins from 4 seconds up to 5 minutes long. Pinterest supports H.264 or H.265 video encoding.

    Figure 2. Current Pinterest video Pin specifications include 9:16 full-screen video at 1080 × 1920 pixels, 4 seconds to 5 minutes in length, and H.264 or H.265 encoding.

    Explanation: These settings provide a practical technical starting point for beginner full-screen vertical video Pins.

    Video Pins can work well for:

    · Quick tips.

    · Short tutorials.

    · Step-by-step demonstrations.

    · Before-and-after examples.

    · Educational explanations.

    · Product demonstrations.

    · Lists and recommendations.

    · Ideas adapted from longer articles or videos.

    Recommended Beginner Format

    For a full-screen video Pin, Pinterest recommends:

    · Aspect ratio: 9:16

    · Resolution: 1080 × 1920 pixels

    · Orientation: Vertical

    Pinterest also accepts other video aspect ratios, including 1:2, 2:3, 3:4, 4:5, and 1:1. For this beginner workflow, 9:16 is convenient because it fills a vertical phone screen and can also make repurposing easier for other vertical-video platforms.

    Keep Important Content Inside the Safe Area

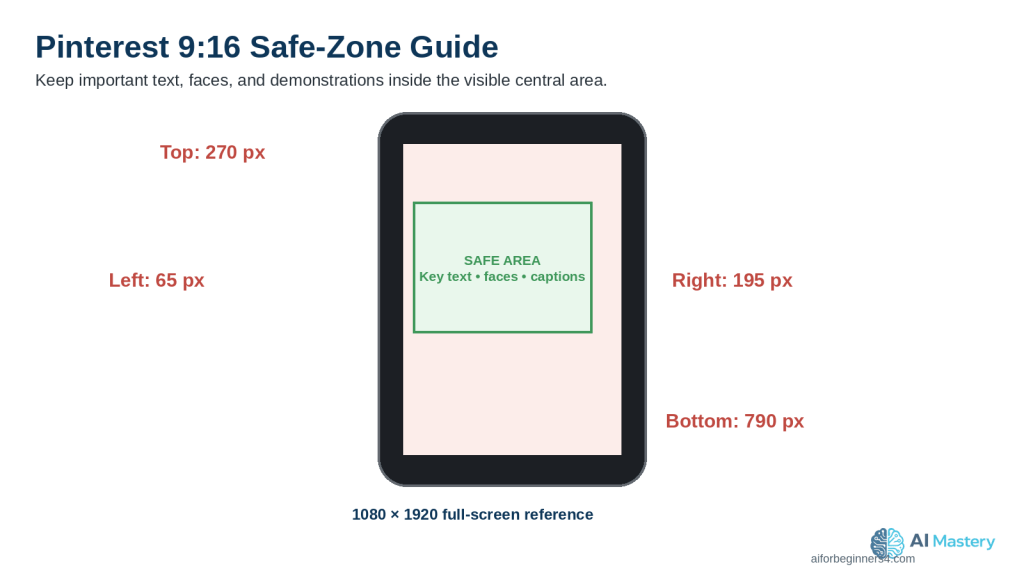
    Pinterest provides specific safe-zone guidance for full-screen 9:16 video Pins because interface elements can cover parts of the video.

    For a 1080 × 1920 full-screen video, Pinterest currently recommends keeping important content away from approximately:

    · Top: 270 pixels

    · Left: 65 pixels

    · Right: 195 pixels

    · Bottom: 790 pixels

    Keep important faces, captions, titles, demonstrations, and other key information inside the remaining visible area.

    Figure 3. Pinterest’s 9:16 safe-zone guidance keeps key creative elements away from the top, sides, and bottom areas that interface elements may cover.

    Explanation: For a 1080 × 1920 full-screen video Pin, Pinterest lists approximate safe-zone margins of 270 px top, 65 px left, 195 px right, and 790 px bottom.

    Practical Example

    Suppose you want to create a Pinterest video Pin explaining how to summarize a document with AI.

    You could create a 1080 × 1920 vertical video, keep the important demonstration near the centre, use large readable captions, and zoom into the part of the screen viewers need to understand.

    The video might show the document, the upload step, a short prompt, the AI-generated summary, and a final reminder to verify the result against the original document.

    Step 1: Choose One Clear Idea for Your Pinterest Video Pin

    A Pinterest video Pin is easier to understand when it focuses on one main idea. Trying to cover too many topics in one video can make the Pin feel rushed or confusing.

    Choose a topic that can be explained clearly, such as:

    · One beginner AI tip.

    · One useful AI tool.

    · One common mistake.

    · One short tutorial.

    · One simple before-and-after example.

    · One quick comparison.

    · One useful idea from a longer AI Mastery article.

    Use AI to Brainstorm Pin Ideas

    You can ask an AI assistant to suggest video Pin ideas based on your topic.

    Prompt:

    “Give me 10 beginner-friendly Pinterest video Pin ideas about using AI for everyday tasks. Keep each idea focused on one clear lesson.”

    Review the suggestions carefully and choose an idea that is useful, accurate, and appropriate for your audience.

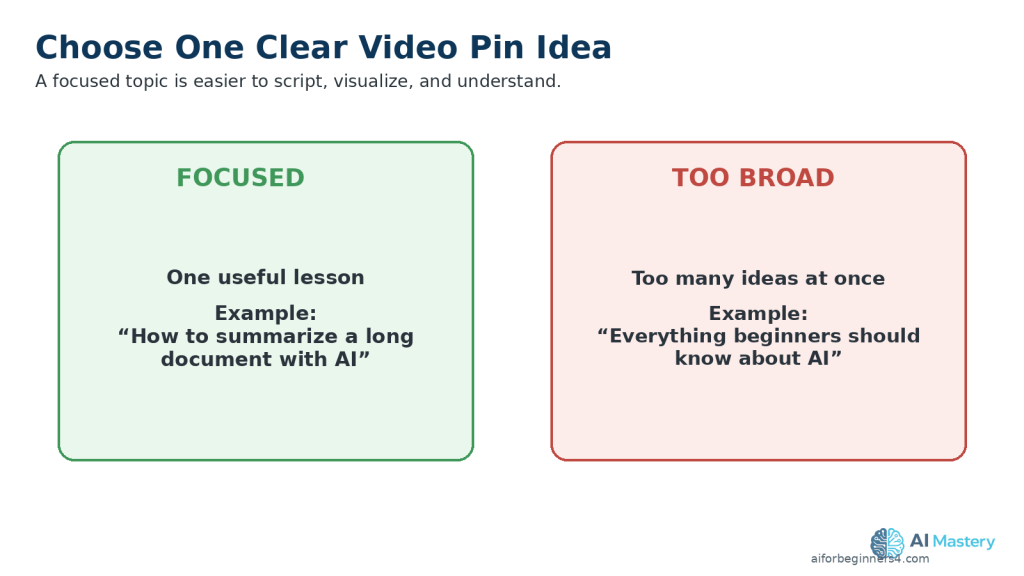
    Keep the Topic Narrow

    Instead of creating a video Pin called:

    “Everything Beginners Should Know About AI”

    choose something more specific, such as:

    “3 Ways AI Can Help You Save Time”

    or:

    “How to Summarize a Long Document with AI”

    A narrow topic makes it easier to write a clear script, choose suitable visuals, and keep the video focused.

    Figure 4. One focused Pinterest video Pin idea is easier to explain than a broad topic containing many unrelated points.

    Explanation: A narrow topic helps beginners keep the script, visuals, and editing focused on one useful lesson.

    Practical Example

    If a longer AI Mastery article explains several document features, you could create one Pinterest video Pin about only document summarization.

    The Pin can show the problem, demonstrate the basic process, and finish with one clear reminder to review the AI-generated result against the original document.

    Step 2: Write a Short, Focused Pinterest Video Pin Script with AI

    A clear script helps keep your Pinterest video Pin organized and easy to follow. Even a short video benefits from having a simple beginning, main point, and ending.

    AI can help you turn your idea into a draft script, but you should review and improve the result before using it.

    Start with a Clear Prompt

    Give the AI assistant enough information about your topic, audience, and goal.

    Prompt:

    “Write a beginner-friendly Pinterest video Pin script about how AI can help summarize a long document. Keep it clear, practical, and focused on one useful example. Use simple language and avoid hype.”

    Use a Simple Script Structure

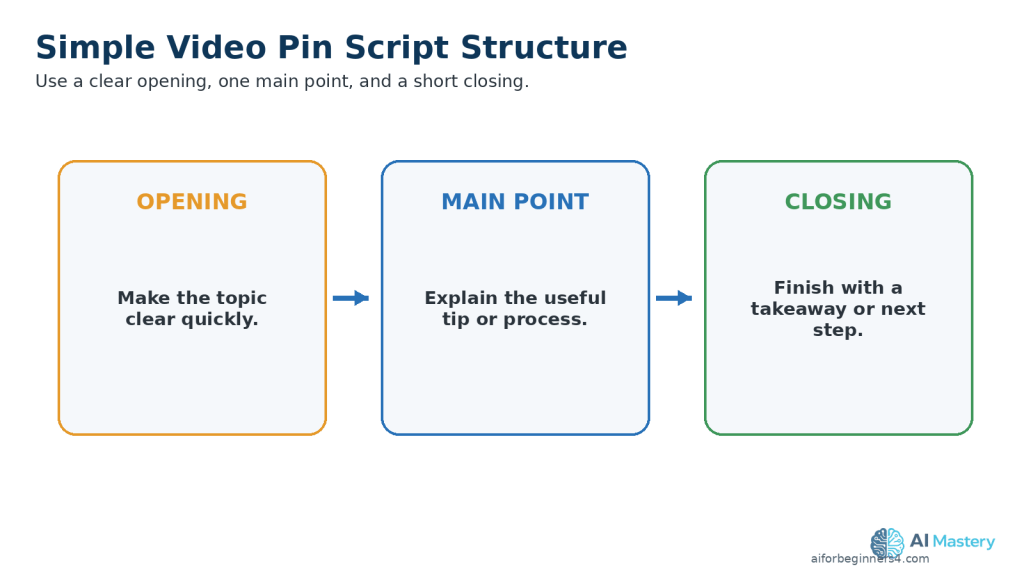
    A practical beginner structure is:

    Figure 5. A simple Pinterest video Pin script can use a clear opening, one main point, and a short closing takeaway.

    Explanation: This structure helps the video reach the useful information quickly without requiring a long introduction.

    1. Opening: Tell viewers quickly what the video is about.

    2. Main point: Explain the useful tip, process, or example.

    3. Closing: Finish with a short takeaway or next step.

    Make the Opening Clear

    Avoid spending too much time on a long introduction.

    Instead of:

    “Hello everyone, welcome back to another video.”

    you could begin with:

    “Have a long document to read? AI can help you create a short summary.”

    This tells viewers what the Pin is about immediately.

    Review the AI-Written Script

    Check the script for:

    · Factual accuracy.

    · Clear and simple language.

    · Unnecessary repetition.

    · Claims that sound exaggerated.

    · Instructions that may be outdated.

    · Difficult technical terms.

    · Information that does not support the video Pin’s main idea.

    Do not assume that an AI-generated script is automatically correct.

    Practical Example

    For a Pinterest video Pin about summarizing a document with AI, the script could follow this simple sequence:

    1. Show the long document.

    2. Explain that an AI tool can help summarize it.

    3. Show the document being uploaded.

    4. Show a short summary prompt.

    5. Remind viewers to compare the summary with the original document.

    This gives viewers one clear lesson without trying to explain every document-analysis feature at once.

    Step 3: Create or Prepare Vertical Visuals

    Your visuals should support the script and make the Pinterest video Pin easy to understand on a phone screen.

    For most beginner projects, use a 9:16 vertical layout at 1080 × 1920 pixels.

    Choose Visuals That Match the Script

    Depending on your topic, you can use:

    · AI-generated images.

    · Licensed stock photos or stock video.

    · Screen recordings.

    · Charts or simple graphics.

    · Text-based slides.

    · Product or workspace footage.

    · Clips from a longer video you created.

    Use only visuals that help explain the main point.

    Keep Important Content Visible

    Keep important elements such as:

    · Faces.

    · Captions.

    · Titles.

    · Buttons.

    · Screenshots.

    · Charts.

    · Demonstrations.

    away from areas that may be covered by Pinterest interface elements.

    For full-screen vertical video Pins, keep the most important information closer to the central viewing area rather than placing it near the extreme edges.

    Make Screenshots Easy to Read

    If your video Pin includes a computer or phone screenshot, avoid showing the entire screen when the important text becomes too small.

    Instead, crop or zoom into the part viewers need to see.

    For example, if you are demonstrating an AI prompt, show the prompt box clearly rather than displaying an entire browser window at a very small size.

    Review AI-Generated Visuals Carefully

    AI-generated images and video clips can contain mistakes such as:

    · Distorted hands or objects.

    · Misspelled text.

    · Duplicate items.

    · Inconsistent people or clothing.

    · Incorrect interface elements.

    · Unrealistic details.

    Review every generated visual before adding it to the video Pin.

    Check Licences and Permissions

    If you use stock footage, photographs, templates, fonts, graphics, or other assets that you did not create yourself, check the licence and commercial-use conditions before publishing.

    Do not assume that an image or video is free to reuse simply because it is available online.

    Practical Example

    For a Pinterest video Pin about summarizing a document with AI, you might use:

    1. A visual showing a long document.

    2. A screen recording of the document being uploaded.

    3. A close-up of the summary prompt.

    4. A simple visual showing the shorter AI-generated result.

    5. A final reminder to compare the summary with the original document.

    This creates a clear visual sequence that follows the script from beginning to end.

    Figure 6. Plan vertical visuals in the same order as the narration so each scene supports the current point.

    Explanation: Matching scenes to narration helps viewers follow the demonstration on a small phone screen.

    Step 4: Add Narration or an AI Voice

    Narration can make a Pinterest video Pin easier to follow, especially when the video explains a process, gives a tip, or demonstrates a task.

    You can record your own voice or use an AI-generated voice when the tool and licence allow your intended use.

    Choose a Clear Voice

    The narration should be easy to understand and should match the pace of the visuals.

    A good voice-over should:

    · Speak clearly.

    · Avoid rushing.

    · Use natural pauses.

    · Match the tone of the topic.

    · Pronounce technical terms correctly.

    · Leave enough time for viewers to read important on-screen text.

    Review AI-Generated Narration

    If you use an AI voice, listen to the entire recording before adding it to the video Pin.

    Check for:

    · Mispronounced names or technical terms.

    · Unnatural pauses.

    · Missing words.

    · Incorrect emphasis.

    · Audio that sounds too fast or too slow.

    · Sentences that do not match the visuals.

    Correct the script or regenerate the affected section when necessary.

    Keep Narration and Visuals Aligned

    The visual shown on screen should support what the viewer is hearing.

    For example, if the narration says:

    “Upload your document to the AI tool.”

    the video should show the upload step at approximately the same time.

    This makes the Pin easier to understand.

    Protect Privacy and Get Permission

    Do not clone or imitate a real person’s voice without appropriate permission.

    If you use another person’s recording, make sure you have permission to use it and understand any licence or platform conditions that apply.

    Avoid using AI voices in ways that could falsely make viewers believe a real person said something they did not say.

    Practical Example

    For a Pinterest video Pin explaining document summarization, the narration could briefly guide the viewer through uploading a document, asking for a summary, and checking the result.

    Each visual can change as the narration moves to the next step, keeping the video clear and easy to follow.

    Step 5: Add Captions and On-Screen Text

    Captions and on-screen text can make a Pinterest video Pin easier to understand, especially when viewers are watching without sound.

    Keep Captions Easy to Read

    Use captions that are:

    · Large enough to read on a phone.

    · Short and easy to scan.

    · High contrast against the background.

    · Timed closely with the spoken words.

    · Positioned away from important faces, demonstrations, and other visual details.

    Avoid placing important captions too close to the extreme edges of the frame, where interface elements may cover them.

    Use On-Screen Text Carefully

    On-screen text can highlight the most important information in the video Pin.

    For example, you could show:

    “3 Steps to Summarize a Document with AI”

    near the beginning.

    Later, you could use short labels such as:

    · Step 1: Upload

    · Step 2: Ask for a Summary

    · Step 3: Review the Result

    Keep the wording simple. Too much text on screen at the same time can make the video difficult to follow.

    Check Spelling and Accuracy

    Review every caption and text element before exporting.

    Check for:

    · Spelling mistakes.

    · Missing words.

    · Incorrect punctuation.

    · Wrong names or technical terms.

    · Captions that appear too early or too late.

    · Text that does not match the narration.

    Accessibility

    Captions can help people who are deaf or hard of hearing, viewers watching without sound, and people who find written text easier to follow than narration alone.

    Do not rely only on colour to communicate important information. Use clear words, labels, or symbols as well.

    Practical Example

    If the narrator says:

    “Always check the AI-generated summary against the original document.”

    you could display:

    “Always verify the summary.”

    This reinforces the main lesson without overcrowding the screen.

    Figure 7. Place captions where they remain readable without covering faces or sitting too close to interface-covered edges.

    Explanation: Clear caption placement supports accessibility and keeps important text visible.

    Step 6: Add Music and Sound Effects Carefully

    Music and sound effects can make a Pinterest video Pin more engaging, but they should support the video rather than distract from the main message.

    Choose Music You Are Allowed to Use

    Pinterest allows music to be added to Pins, but Pinterest states that all music is subject to licensing requirements regardless of how it is added. If a Pin contains music that you do not have permission to use, Pinterest may mute the audio. This can also apply to music already included in an uploaded video.

    Do not assume that a song is safe to use simply because you found it online or because it appeared in a video on another social media platform.

    Keep Music Below the Narration

    If your video Pin includes spoken narration, keep the background music at a lower volume so the voice remains easy to understand.

    Listen to the complete video and check that:

    · The narration is clear.

    · Music does not cover important words.

    · Sound effects are not unexpectedly loud.

    · Audio changes are smooth.

    · The beginning and ending do not contain sudden volume changes.

    Be Careful with Commercial or Promotional Pins

    Pinterest states that brands generally cannot promote Pins containing licensed music unless they have permission to use that music for the intended promotional purpose. This is especially important for advertising, sponsorships, paid partnerships, and other commercial uses.

    If you plan to promote a video Pin, check the music licence and Pinterest’s current advertising requirements before publishing or promoting it.

    Be Careful When Reusing Music from Other Platforms

    Music that you are allowed to use on Instagram, Facebook, TikTok, YouTube, or another service is not automatically licensed for Pinterest.

    Pinterest specifically notes that imported Instagram content can be muted when it contains music that the creator does not have permission to use on Pinterest.

    A safer workflow is to keep a clean master video without platform-specific music and add suitable audio separately for each platform after checking the applicable rights.

    Figure 8. Keep a clean master without platform-specific music and check audio rights separately for Pinterest and every other platform.

    Explanation: Music permission or availability on one platform does not automatically give permission to reuse the same track on another platform.

    Keep Licensing Records

    If you use music or sound effects from outside Pinterest, keep records such as:

    · The licence.

    · Permission from the rights holder.

    · A purchase receipt.

    · Attribution requirements.

    · A copy of the applicable usage conditions.

    Pinterest also advises users to obtain permission from copyright holders when using copyrighted material that they do not own.

    Practical Example

    Suppose your Pinterest video Pin explains how to summarize a document with AI.

    You could use quiet background music beneath the narration while keeping the spoken instructions clearly understandable.

    If you later adapt the same video for YouTube Shorts, Instagram Reels, Facebook Reels, or TikTok, return to your clean master and check whether the music licence permits use on that platform before publishing.

    Step 7: Edit the Pinterest Video Pin for a Clear, Fast Flow

    A Pinterest video Pin should move quickly enough to keep viewers interested without making the information difficult to follow.

    Remove Unnecessary Parts

    Review the full video and remove:

    · Long pauses.

    · Repeated explanations.

    · Empty frames.

    · Slow introductions.

    · Unnecessary transitions.

    · Visuals that do not support the main point.

    The goal is to keep the Pin focused on one useful idea.

    Match the Editing to the Script

    Change visuals when the narration moves to a new point.

    For example:

    · Show the problem when the opening introduces it.

    · Show the AI tool when the script explains the tool.

    · Show the result when the narration describes the result.

    · Show the final takeaway at the end.

    This helps viewers understand the information without having to guess what each visual means.

    Keep Transitions Simple

    You do not need complicated effects between every scene.

    Simple cuts, gentle zooms, or basic fades are often enough for beginner tutorials.

    Too many effects can distract from the content.

    Keep Important Content Visible

    Check that captions, faces, screenshots, and important text remain clear throughout the video.

    If a scene contains small text, zoom into the relevant area instead of showing the entire screen at once.

    Keep important information away from the areas that Pinterest may cover with interface elements.

    Practical Example

    For a Pinterest video Pin about summarizing a document with AI, the editing sequence might be:

    1. Show the long document.

    2. Show the upload step.

    3. Show the summary prompt.

    4. Show the shorter result.

    5. End with the reminder to verify the summary against the original.

    This creates a simple beginning-to-end flow without unnecessary scenes.

    Figure 9. Removing long pauses, repeated information, and distracting effects creates a clearer Pinterest video Pin.

    Explanation: Simple editing keeps attention on the lesson rather than on unnecessary production effects.

    Step 8: Export and Review the Final Pinterest Video Pin

    When editing is complete, export the video as a separate final file. Keep your original editing project and clean master version so you can make corrections or prepare versions for other platforms later.

    Choose Practical Export Settings

    For a full-screen, phone-friendly Pinterest video Pin, a practical beginner starting point is:

    · Aspect ratio: 9:16

    · Resolution: 1080 × 1920 pixels

    · Orientation: Vertical

    · Video encoding: H.264

    · File format: MP4

    Pinterest currently supports H.264 or H.265 video encoding and recommends 9:16 at 1080 × 1920 pixels for full-screen video Pins. Pinterest allows video Pins from 4 seconds up to 5 minutes long.

    Figure 10. Practical Pinterest video Pin export settings include 9:16, 1080 × 1920, MP4 with H.264 as a simple beginner choice, and a video length within Pinterest’s current limits.

    Explanation: Pinterest also supports H.265 encoding; always watch the actual exported file before uploading.

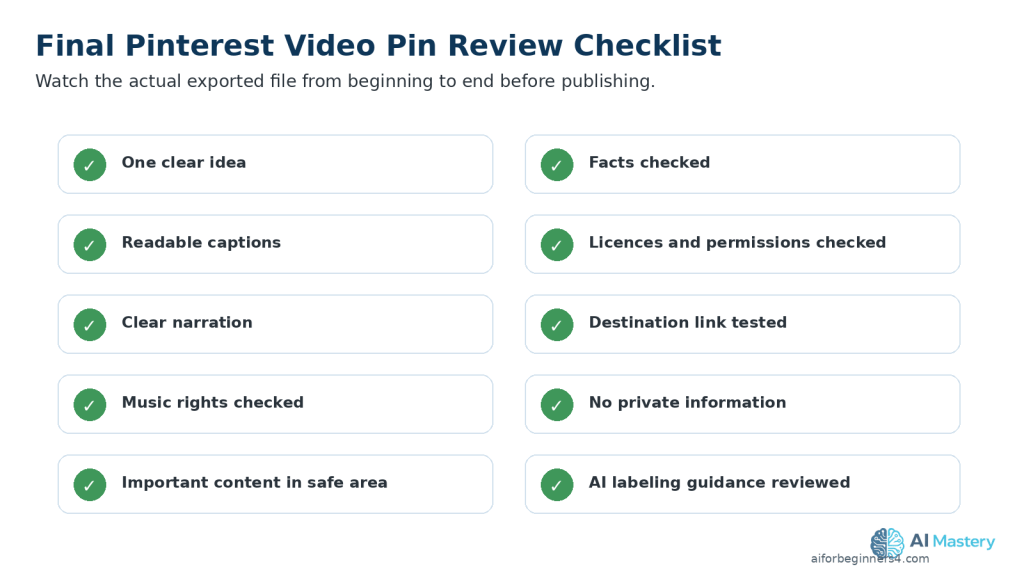
    Watch the Exported File Before Uploading

    Do not rely only on the preview inside your video editor.

    Open the actual exported video and watch it from beginning to end.

    Check for:

    · Blurry or pixelated video.

    · Cropped faces or important objects.

    · Captions that are difficult to read.

    · Text positioned too close to the edges.

    · Music that covers the narration.

    · Audio that is too loud or too quiet.

    · Missing scenes or blank frames.

    · Spelling mistakes.

    · Distorted AI-generated images.

    · Unwanted logos, watermarks, usernames, or branded endings.

    · Private or confidential information.

    Check the Vertical Layout

    Watch the exported video on a phone if possible.

    Make sure that:

    · Important faces remain visible.

    · Captions are readable.

    · Demonstrations are large enough to understand.

    · Important text remains inside the safe viewing area.

    · The main subject remains clear in the vertical frame.

    Pinterest provides safe-zone guidance for 9:16 full-screen video Pins because interface elements can cover parts of the video.

    Keep a Clean Master

    Save a clean master separately from the Pinterest version.

    For example:

    · ai-document-summary-master.mp4

    · ai-document-summary-pinterest-video-pin-final.mp4

    The clean master should avoid unnecessary platform-specific logos, usernames, downloaded watermarks, or platform-specific music when possible.

    This makes it easier to create another version later for YouTube Shorts, Instagram Reels, Facebook Reels, TikTok, or another platform.

    Practical Example

    After exporting your document-summary Pinterest video Pin, watch the final MP4 on your computer and phone.

    If the captions are readable, the narration is clear, the important demonstration remains visible, and there are no unwanted watermarks or private details, the video is ready for the publishing step.

    Step 9: Upload and Publish the Pinterest Video Pin

    When the final video has been reviewed, upload the clean Pinterest version rather than a copy downloaded from another social media platform.

    Pinterest’s exact publishing buttons and options can change over time, but the basic workflow is similar.

    Upload the Video Pin

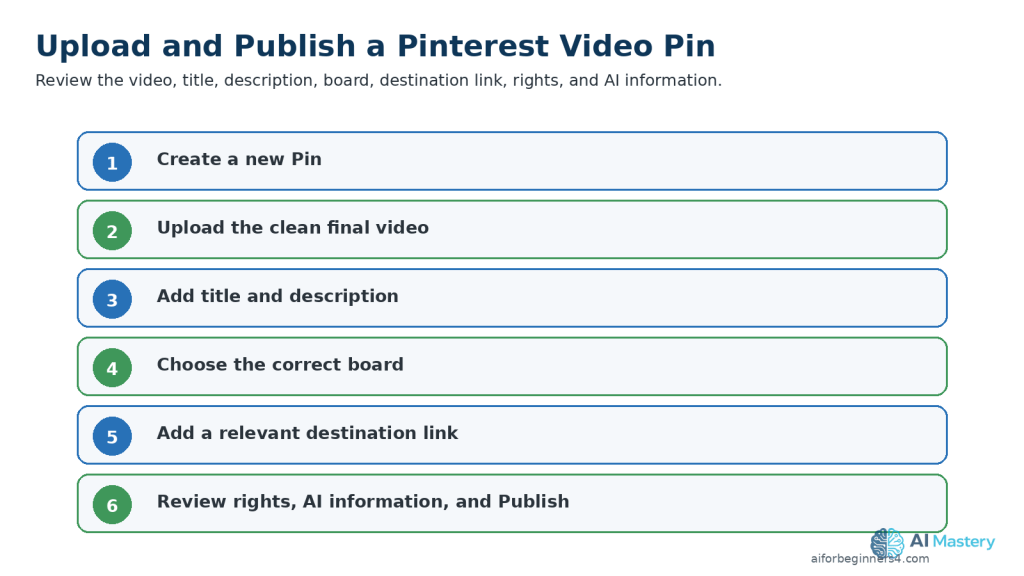
    A typical beginner workflow is:

    1. Open Pinterest.

    2. Choose the option to create a new Pin.

    3. Upload your final video file.

    4. Review the video preview.

    5. Add a clear title.

    6. Add a helpful description.

    7. Choose the most appropriate board.

    8. Add a destination link if the Pin should lead to a relevant webpage.

    9. Review any available topic, product, partnership, or promotional options that apply.

    10. Check the final Pin carefully.

    11. Publish when everything is correct.

    Figure 11. The Pinterest publishing workflow includes creating a Pin, uploading the clean final video, adding a title and description, choosing a board, adding a relevant destination link, and reviewing rights and AI information before publishing.

    Explanation: Exact button names can vary by device, account type, and Pinterest interface updates.

    The exact button names and available options may vary depending on whether you are using Pinterest on a computer, mobile device, personal account, or business account.

    Write a Clear Pin Title

    The title should explain what the viewer will learn or see.

    For example:

    How to Summarize a Long Document with AI

    Avoid vague titles that do not explain the Pin’s subject.

    Add a Helpful Description

    Your description can briefly explain the content and include relevant words that help people understand the Pin.

    For example:

    Learn a simple way to summarize a long document with AI. Upload the document, ask for a focused summary, and compare important information with the original before using the result.

    Write naturally for the reader rather than repeating the same keyword many times.

    Choose the Right Board

    Save the video Pin to a board that closely matches the topic.

    For example, an AI document tutorial could belong on a board such as:

    · AI for Beginners.

    · AI Productivity Tips.

    · ChatGPT Tutorials.

    · AI Tools.

    · Digital Productivity.

    Clear board organization can make your Pinterest content easier to manage and understand.

    Add a Relevant Destination Link

    If the video Pin supports an article, tutorial, product page, or other useful resource, you can add a relevant destination link when Pinterest provides that option.

    The linked page should match what the Pin promises.

    For example, a Pin about summarizing documents with AI could link to the complete AI Mastery tutorial about document summarization.

    Avoid using misleading links that send people to unrelated content.

    Review AI-Generated or AI-Altered Content

    Before publishing, review whether the video contains realistic AI-generated or significantly altered material that viewers could mistake for authentic people, places, or events.

    Pay particular attention when AI content:

    · Realistically represents a real person.

    · Alters what a real person appears to say or do.

    · Creates a realistic event that did not occur.

    · Significantly changes a real photograph or video.

    · Could reasonably be mistaken for authentic footage.

    Check Pinterest’s current AI-labeling guidance and consider a clear disclosure when this type of synthetic content could be mistaken for authentic footage.

    Review Before Publishing

    Before publishing the video Pin, check:

    · The correct video was selected.

    · The video displays properly.

    · The title accurately describes the content.

    · The description matches the video.

    · The correct board was selected.

    · The destination link works and is relevant.

    · Captions and important text remain readable.

    · Narration is clear.

    · Music and sound effects have appropriate usage rights.

    · Images, clips, fonts, voices, and other assets are properly licensed or permitted.

    · No private or confidential information appears.

    · No unwanted watermark, username, or platform branding remains.

    · Any appropriate AI-content disclosure or transparency option has been reviewed.

    Practical Example

    Suppose your Pinterest video Pin explains how to summarize a document with AI.

    You could title the Pin:

    How to Summarize a Document with AI

    Add a short description explaining the three basic steps, save it to an appropriate AI tutorial board, and link to the full related AI Mastery article if available.

    Before publishing, review the video, captions, narration, music rights, destination link, and any relevant AI-transparency requirements.

    Common Mistakes to Avoid When Creating Pinterest Video Pins with AI

    Beginners can save time by avoiding several common problems that affect clarity, quality, licensing, privacy, or publishing.

    Common mistakes include:

    · Trying to explain too many ideas in one video Pin.

    · Using a long introduction before reaching the main point.

    · Placing captions or important text too close to areas that Pinterest interface elements may cover.

    · Shrinking screenshots until the text becomes difficult to read.

    · Using music without checking whether the licence allows Pinterest use.

    · Letting background music overpower the narration.

    · Publishing AI-generated information without checking factual accuracy.

    · Using a real person’s voice, image, or likeness without appropriate permission.

    · Uploading a downloaded copy from another platform instead of using a clean master export.

    · Leaving unwanted watermarks, usernames, logos, or branded endings in the video.

    · Using AI-generated visuals without checking for distorted objects, incorrect text, or unrealistic details.

    · Adding a destination link that does not match the Pin.

    · Saving the Pin to an unrelated board.

    · Skipping the final review of the exported file.

    · Ignoring relevant AI-content transparency or disclosure requirements when realistic synthetic or altered content is used.

    How to Avoid These Mistakes

    Keep each video Pin focused on one clear lesson and work from a clean master project.

    Before publishing, review the:

    · Script.

    · Visuals.

    · Captions.

    · Audio.

    · Music rights.

    · Asset licences.

    · Permissions.

    · Pin title.

    · Description.

    · Board selection.

    · Destination link.

    · AI-generated content.

    · Final export.

    · Any applicable AI-content transparency or disclosure requirements.

    If something is unclear, incorrect, poorly positioned, misleading, or not properly licensed, correct the project and export a new version before publishing.

    Figure 12. A final checklist helps catch quality, licensing, privacy, linking, branding, and AI-labeling issues before publication.

    Explanation: Watching the complete exported video and testing the destination link are important final checks.

    Benefits of Creating Pinterest Video Pins with AI

    AI can make the Pinterest video Pin workflow easier for beginners by helping with planning, writing, visuals, narration, captions, and editing.

    Key benefits include:

    · Faster idea generation: AI can suggest focused Pin topics when you are not sure what to create.

    · Simpler script writing: AI can turn a basic idea into a short script that you can review and improve.

    · Easier visual planning: AI can suggest scenes, image ideas, screen recordings, text overlays, and simple shot sequences.

    · More accessible production: AI voices, captions, and editing assistance can help beginners create videos without advanced production skills.

    · Better organization: AI can help reduce a broad topic to one clear lesson that fits a video Pin.

    · Easier repurposing: A Pinterest video Pin can be adapted from a longer video, article, tutorial, or clean master project.

    · More consistent workflow: Using the same planning, scripting, editing, and review process can make future Pins easier to produce.

    · Useful learning support: AI can explain unfamiliar editing terms and suggest improvements while you are learning a new tool.

    · Cross-platform flexibility: A clean master can be adapted for Instagram Reels, YouTube Shorts, Facebook Reels, TikTok, or other vertical-video platforms after checking each platform’s current requirements.

    · Support for evergreen content: Pinterest content can remain useful beyond the day it is published, especially when the Pin answers a practical question or teaches a repeatable skill.

    AI is most useful when it supports your decisions rather than replacing them. Review the final script, visuals, audio, captions, facts, licences, permissions, links, and publishing choices before making the video Pin public.

    Limitations of Creating Pinterest Video Pins with AI

    AI can help with many parts of the Pinterest video Pin workflow, but it does not remove the need for careful human review.

    Common limitations include:

    · Factual errors: AI-generated scripts can contain incorrect, outdated, or misleading information.

    · Generic writing: AI may produce scripts that sound repetitive or similar to other content unless you revise them.

    · Visual inconsistencies: AI-generated images or video clips may contain distorted objects, unusual details, inconsistent characters, or misspelled text.

    · Voice limitations: AI narration can mispronounce names, sound unnatural, or use incorrect emphasis.

    · Licensing differences: AI tools, stock libraries, music services, templates, and fonts can have different rules for commercial use.

    · Platform changes: Pinterest video specifications, publishing tools, music options, account features, and disclosure methods can change over time.

    · Editing is still required: AI-generated material usually needs trimming, timing adjustments, caption checks, and final quality review.

    · Privacy risks: Uploading private documents, photographs, recordings, or personal information to an AI tool can create privacy concerns.

    · Link quality matters: AI can help write a Pin description, but it cannot ensure that a destination page is useful, accurate, current, or appropriate for the Pin.

    · Disclosure may be necessary: Realistic AI-generated or significantly altered content may require additional transparency depending on how it is presented and Pinterest’s current rules.

    · No guarantee of performance: AI can help improve the production workflow, but it cannot guarantee saves, clicks, followers, website traffic, sales, or other results.

    How to Reduce These Limitations

    Use AI as an assistant rather than treating its output as automatically finished.

    Verify important facts, review every generated visual and voice recording, check licences and permissions, protect private information, test destination links, and watch the complete exported video before publishing.

    When Pinterest changes a video specification, music option, publishing feature, disclosure method, or other requirement that affects your workflow, check the current official Pinterest guidance before relying on older instructions.

    Common Myths About Creating Pinterest Video Pins with AI

    Several common myths can make beginners expect too much from AI or create unnecessary publishing problems.

    Myth 1: AI Can Create a Perfect Pinterest Video Pin Automatically

    Reality: AI can help with ideas, scripts, visuals, narration, captions, and editing suggestions, but the final video still needs human review for accuracy, quality, timing, licensing, privacy, and publishing decisions.

    Myth 2: AI-Generated Images and Music Are Automatically Copyright-Free

    Reality: Rights and commercial-use conditions depend on the tool, licence, source material, and intended use.

    Always check the terms that apply to AI-generated images, music, stock footage, fonts, templates, voices, and other assets before publishing.

    Myth 3: More Effects Make a Pinterest Video Pin More Professional

    Reality: Too many transitions, animations, text boxes, or sound effects can distract from the main idea.

    Clear visuals, readable captions, simple editing, and useful information are usually more important than complicated effects.

    Myth 4: Every Pinterest Video Pin Needs an AI Voice

    Reality: Narration is optional.

    Depending on the topic, you can create an effective video Pin using:

    · On-screen text.

    · Captions.

    · Screen recordings.

    · Simple animations.

    · Demonstrations.

    · Music or sound effects when appropriately licensed.

    Use narration only when it genuinely helps explain the content.

    Myth 5: The Same Video Can Be Uploaded to Every Platform Without Changes

    Reality: You can start from the same clean master video, but each platform can have different requirements for dimensions, safe areas, music rights, captions, links, branding, and disclosure.

    Create a separate final version for Pinterest rather than simply downloading a video from another social media platform and uploading it unchanged.

    Myth 6: AI Can Guarantee More Saves, Clicks, or Followers

    Reality: AI can help improve your planning and production workflow, but it cannot guarantee saves, clicks, followers, website traffic, sales, or other results.

    The usefulness of the Pin, visual clarity, topic, title, description, destination link, audience interest, and many other factors can affect performance.

    Frequently Asked Questions

    How Long Can a Pinterest Video Pin Be?

    Pinterest currently allows video Pins from 4 seconds up to 5 minutes long.

    For beginner short-form content, use only the length needed to explain the idea clearly.

    What Size Should I Use for a Pinterest Video Pin?

    For a full-screen vertical video Pin, Pinterest recommends:

    · 1080 × 1920 pixels

    · 9:16 aspect ratio

    · Vertical orientation

    Pinterest also accepts other aspect ratios, including 1:2, 2:3, 3:4, 4:5, and 1:1.

    What Video Format Does Pinterest Support?

    Pinterest currently supports H.264 or H.265 video encoding.

    For a simple beginner workflow, an MP4 video using H.264 is a practical choice when your editing program provides it.

    Do I Need an Expensive AI Video Tool?

    No. Beginners can start with simple tools for writing, editing, captions, narration, and visuals.

    Before choosing a free or paid tool, check whether it:

    · Adds watermarks.

    · Limits video resolution.

    · Limits export length.

    · Restricts commercial use.

    · Places limits on AI voices or generated media.

    Can I Create Pinterest Video Pins Without Showing My Face?

    Yes.

    You can create faceless video Pins using:

    · Screen recordings.

    · AI-generated visuals.

    · Licensed stock footage.

    · Text and graphics.

    · Charts.

    · Product or workspace footage.

    · Voice-over narration.

    Can I Use an AI Voice?

    Yes, when the AI voice tool and its licence allow your intended use.

    Review the narration carefully and avoid cloning or impersonating a real person’s voice without appropriate permission.

    Should I Add Captions?

    Captions are strongly recommended.

    They can help viewers understand the video without sound and improve accessibility for people who are deaf or hard of hearing.

    Pinterest video Pins can also begin playing while people browse, so clear visual information and captions can help communicate the topic before someone opens the Pin.

    Can I Use Any Music I Find Online?

    No.

    Pinterest states that music is subject to licensing requirements regardless of how it is added. Pins containing music that the creator does not have permission to use may be muted.

    Check the music licence and keep appropriate permission or licensing records.

    Does Pinterest Label AI-Generated Content?

    Pinterest uses generative-AI disclosures for some content. Its current guidance explains that a disclosure may indicate that a Pin was modified with AI, contains an AI-generated person, or may have been modified with AI when Pinterest’s systems detect it.

    Review Pinterest’s current AI-labeling guidance before publishing realistic synthetic or significantly altered content.

    Can I Reuse the Same Video on Pinterest, Instagram, Facebook, YouTube, or TikTok?

    Yes, but start from your clean master video and prepare a separate final version for each platform.

    Check:

    · Aspect ratio.

    · Safe areas.

    · Caption placement.

    · Music rights.

    · Video length.

    · Platform branding.

    · Destination links.

    · AI-disclosure requirements.

    Pinterest’s own specifications include particular safe zones for full-screen 9:16 video Pins, so a layout prepared for another platform may need adjustment.

    Will AI Guarantee More Saves, Clicks, or Followers?

    No.

    AI can help with planning, writing, visuals, narration, and editing, but it cannot guarantee saves, clicks, followers, website traffic, sales, or other results.

    Key Takeaways

    Creating Pinterest video Pins with AI becomes easier when you follow a simple, repeatable workflow.

    Remember these main points:

    · Start with one clear idea for each video Pin.

    · Use AI to help brainstorm, outline, and draft the script, but always review the final wording.

    · Keep the script focused and make the topic clear near the beginning.

    · Use a 9:16 vertical format at 1080 × 1920 pixels when creating a full-screen, phone-friendly video Pin.

    · Keep important captions, faces, titles, and demonstrations inside Pinterest’s safe viewing area.

    · Prepare visuals that remain easy to understand on a small screen.

    · Use clear narration when it helps explain the content.

    · Add readable captions and on-screen text to improve understanding and accessibility.

    · Keep background music below the narration and verify that you have appropriate music rights.

    · Check licences and permissions for stock footage, images, fonts, templates, voices, music, and other third-party assets.

    · Review AI-generated visuals for distorted objects, incorrect text, duplicated items, or unrealistic details.

    · Edit out unnecessary pauses, repeated information, and distracting effects.

    · Export a clean final version and watch the complete file before uploading it.

    · Use an accurate title, description, board, and destination link when publishing.

    · Review Pinterest’s current AI-labeling or disclosure guidance when realistic synthetic or significantly altered content is involved.

    · Keep your clean master video, project files, prompts, licences, permissions, and final exports for future corrections or repurposing.

    AI can help make the production process faster, but the final quality, accuracy, licensing, privacy, accessibility, linking, and publishing decisions still require careful human review.

    Final Tip

    Keep your first Pinterest video Pins simple.

    Choose one useful idea, explain it clearly, use readable visuals and captions, and review the complete exported video before publishing. You do not need complicated effects or advanced editing to create a useful Pin.

    As your workflow improves, keep your clean master files, prompts, licences, permissions, destination links, and final exports organized. This makes it easier to correct mistakes, update older Pins, or repurpose successful videos for other platforms later.

    Continue Learning

    If you want to continue building your AI video skills, these AI Mastery guides are useful next steps:

    · How to Repurpose One AI Video for YouTube Shorts, TikTok, Instagram Reels, and Facebook Reels: Beginner Guide (2026) — Learn how to adapt one clean master video for several social media platforms.

    · How to Choose AI Video Sizes, Aspect Ratios, and Export Settings: Beginner Guide (2026) — Learn how to choose practical dimensions, frame rates, file formats, and export settings for vertical video.

    · How to Create YouTube Shorts with AI: Beginner Step-by-Step Guide (2026) — Learn how to create, edit, export, and publish short-form videos for YouTube.

    · How to Create Instagram Reels with AI: Beginner Step-by-Step Guide (2026) — Learn how to prepare and publish vertical AI-assisted videos for Instagram.

    · How to Create Facebook Reels with AI: Beginner Step-by-Step Guide (2026) — Learn how to create and publish AI-assisted vertical videos for Facebook.

    · How to Edit AI-Generated Videos: Beginner Step-by-Step Guide (2026) — Learn how to trim clips, arrange scenes, improve pacing, and prepare a clean final video.

    · How to Add Voice, Music, and Captions to AI Videos: Beginner Step-by-Step Guide (2026) — Learn how to add narration, background music, sound effects, and readable captions.

    Sources and References

    The following official Pinterest sources were checked for the current video Pin specifications, safe zones, music licensing, copyright, video playback, Pin creation, and generative-AI labeling information used in this guide. Pinterest features and policies can change, so important requirements should be checked again when Pinterest announces an update or when you change your publishing workflow.

    · Pinterest Help Center — Review Pin Specs: Pinterest provides current specifications for video Pins, including supported video encoding, video length, recommended full-screen dimensions, aspect ratios, and safe-zone measurements. For full-screen video, Pinterest recommends 9:16 at 1080 × 1920 pixels. Video Pins can currently be 4 seconds to 5 minutes long and use H.264 or H.265 encoding.

    · Pinterest Help Center — Using Music in Pins: Pinterest explains that music is subject to licensing requirements regardless of how it is added. Pins containing music that the creator does not have permission to use may be muted, and additional restrictions can apply to commercial or promoted Pins.

    · Pinterest Help Center — Gen AI Labels: Pinterest explains how it may add an AI modified label when its systems detect from available information that generative AI was used to create or modify a Pin.

    · Pinterest Help Center — AI at Pinterest: Pinterest provides additional information about its use of generative AI and its approach to labeling AI-generated or AI-modified content.

    · Pinterest Help Center — Copyright: Pinterest explains basic copyright principles and provides information about reporting material that infringes copyright. Creators should have appropriate rights or permission for copyrighted material they publish.

    · Pinterest Help Center — Manage Video Autoplay Settings: Pinterest explains that video Pins can appear in the home feed and search results and may play automatically depending on the viewer’s settings.

    · Pinterest Help Center — Design a Pin: Pinterest explains its Pin-creation tools, including options for recording and combining video clips when creating visual content.

    · Pinterest Help Center — Content Claiming Portal: Pinterest provides copyright owners with tools for identifying and managing matching images or videos that appear on Pinterest.

    Pinterest Help Center — Create a Pin from an Image or Video: Pinterest explains the current desktop and mobile workflow for creating a Pin from uploaded image or video files.

    Important: This guide provides general educational information about AI video creation, copyright, licensing, privacy, disclosure, and publishing. It is not legal advice. Always verify that you have appropriate rights or permission for music, photographs, video clips, voices, fonts, templates, and other material you publish.
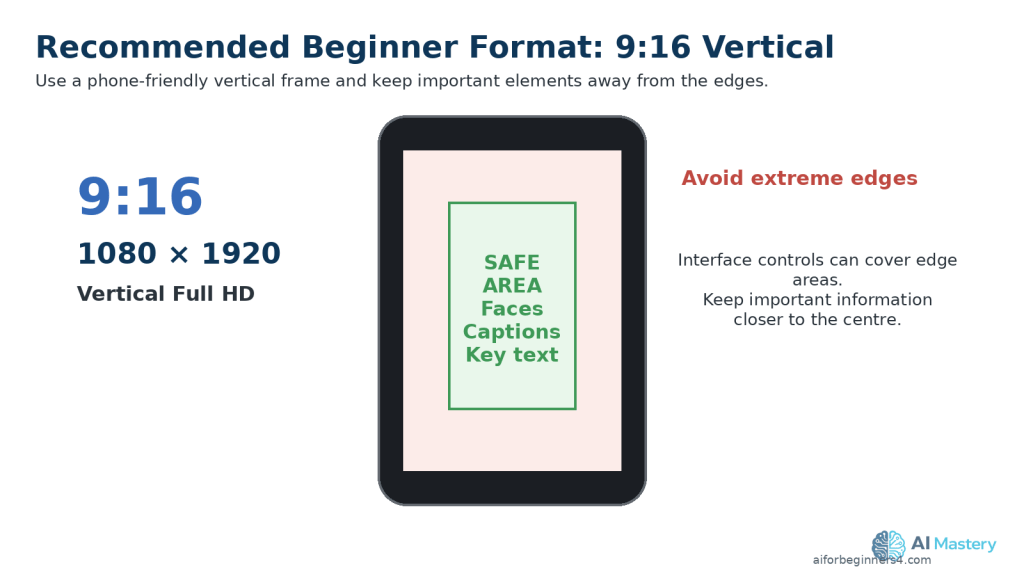
  • How to Create Facebook Reels with AI: Beginner Step-by-Step Guide (2026)

    How to Create Facebook Reels with AI: Beginner Step-by-Step Guide (2026)

    Estimated Reading Time: 18 minutes
    Last Updated: August 15, 2026

    Before Learning

    Before you begin, it helps to have one clear idea for the Facebook Reel you want to create. Your Reel can be educational, promotional, entertaining, or adapted from a longer video, article, tutorial, or other original content.

    You do not need advanced video-editing skills. AI tools can help you brainstorm ideas, write a short script, prepare vertical visuals, generate narration, create captions, and improve the editing workflow.

    For most beginner projects, a 9:16 vertical video at 1080 × 1920 pixels is a practical working format. Keep important text, captions, faces, and other key information away from the extreme edges because Facebook interface elements may cover parts of the video.

    This guide will show you how to move from one simple idea to a finished Facebook Reel while keeping your source files, prompts, licences, permissions, clean master export, and publication records organized.

    What You’ll Learn

    By the end of this guide, you will know how to:

    · Choose one clear idea for a Facebook Reel.

    · Use AI to brainstorm Reel topics and create a simple content plan.

    · Write a short, focused script with AI assistance.

    · Create or prepare visuals for a vertical 9:16 layout.

    · Generate or record narration when needed.

    · Add readable captions and on-screen text.

    · Choose music and sound effects while checking usage rights.

    · Edit the Reel so the opening quickly communicates the main topic.

    · Keep important text, faces, and graphics inside safe viewing areas.

    · Export a clean final version with suitable video settings.

    · Upload and publish the Reel on Facebook.

    · Review whether AI-content disclosure or other platform labels are required.

    · Keep your original project files, prompts, licences, permissions, and clean master export for future reuse.

    Introduction

    Facebook Reels are short-form videos designed for quick viewing in a vertical feed. They can be used for tutorials, tips, demonstrations, product explanations, educational content, behind-the-scenes clips, and many other types of posts.

    AI can help with several parts of the Reel-creation process. You can use it to generate ideas, outline a Reel, draft a script, create visuals, prepare narration, improve captions, and suggest editing changes.

    However, AI should support your work rather than replace your final judgment. Review every script, visual, voice, caption, and factual claim before publishing. Make sure you have appropriate rights or permission for any music, images, video clips, voices, fonts, templates, or other material that you did not create yourself.

    A practical beginner workflow is to start with one clear idea, write a short script, prepare vertical visuals, add clear audio and captions, edit the Reel carefully, and review the final export before uploading it to Facebook.

    Figure 1. A simple Facebook Reel workflow moves from one clear idea through scripting, visuals, audio, editing, export, and publishing.

    Explanation: Using the same sequence for each Reel makes the production process easier to repeat, review, and improve.

    What Are Facebook Reels?

    Facebook Reels are videos that appear in Facebook’s Reels experience. Meta changed Facebook’s video system so that all videos posted to Facebook are now shared as Reels, regardless of their length or orientation. This means a Facebook Reel is no longer limited to the older short-video format.

    Figure 2. Facebook now shares uploaded videos as Reels regardless of their length or orientation.

    Explanation: The newer Facebook video system unifies uploaded videos under the Reels experience, so a Reel is no longer limited to the older short-video format.

    Reels can be used for:

    · Quick tips.

    · Short tutorials.

    · Educational explanations.

    · Demonstrations.

    · Product or service information.

    · Behind-the-scenes videos.

    · Longer instructional videos.

    · Videos adapted from content you created for another platform.

    Recommended Beginner Format

    Even though Facebook now accepts videos of different lengths and orientations as Reels, a practical format for short-form, phone-friendly content is:

    · Aspect ratio: 9:16

    · Resolution: 1080 × 1920 pixels

    · Orientation: Vertical

    Meta recommends 9:16 for Reels placements because the vertical format can use the full phone screen.

    Keep Important Content Inside the Safe Area

    Facebook interface elements can cover parts of a vertical Reel.

    Keep important elements such as:

    · Faces.

    · Captions.

    · Titles.

    · Demonstrations.

    · Charts.

    · Calls to action.

    away from the extreme top, bottom, and sides of the frame.

    Meta’s safe-zone guidance recommends keeping key creative elements away from the edges of 9:16 Reels so interface controls are less likely to cover them.

    Practical Example

    Suppose you want to create a short Facebook Reel explaining one beginner AI tip.

    You could create a 1080 × 1920 vertical video, place the main subject near the centre, use large readable captions, and zoom into any screen recording that viewers need to read.

    Although Facebook can also accept other video orientations, using a clean 9:16 vertical master is convenient when you want to adapt the same original video for Instagram Reels, YouTube Shorts, or TikTok later.

    Figure 3. A 9:16 vertical frame at 1080 × 1920 pixels is a practical beginner format for short-form, phone-friendly Facebook Reels.

    Explanation: Keep important text, faces, and captions toward the central viewing area so interface controls are less likely to cover them.

    Step 1: Choose One Clear Idea for Your Facebook Reel

    A Facebook Reel is easier to understand when it focuses on one main idea. Trying to cover too many topics in one video can make the Reel feel rushed or confusing.

    Choose a topic that can be explained clearly, such as:

    · One beginner AI tip.

    · One useful AI tool.

    · One common mistake.

    · One short tutorial.

    · One quick comparison.

    · One simple before-and-after example.

    · One useful feature from a longer AI Mastery article.

    Use AI to Brainstorm Reel Ideas

    You can ask an AI assistant to suggest Reel ideas based on your topic.

    Prompt:

    “Give me 10 beginner-friendly Facebook Reel ideas about using AI for everyday tasks. Keep each idea focused on one clear lesson.”

    Review the suggestions carefully and choose an idea that is useful, accurate, and appropriate for your audience.

    Keep the Topic Narrow

    Instead of creating a Reel called:

    “Everything Beginners Should Know About AI”

    choose something more specific, such as:

    “3 Ways AI Can Help You Save Time”

    or:

    “How to Summarize a Long Document with AI”

    A narrow topic makes it easier to write a clear script, choose suitable visuals, and keep the Reel focused.

    Figure 4. One focused Facebook Reel idea is easier to explain than a broad topic containing many unrelated points.

    Explanation: A narrow topic helps beginners keep the script, visuals, and editing focused on one useful lesson.

    Practical Example

    If a longer AI Mastery article explains several document features, you could create one Facebook Reel about only document summarization.

    The Reel can show the problem, demonstrate the basic process, and finish with one clear reminder to review the AI-generated result against the original document.

    Step 2: Write a Short, Focused Facebook Reel Script with AI

    A clear script helps keep your Facebook Reel organized and easy to follow. Even a short Reel benefits from having a simple beginning, main point, and ending.

    AI can help you turn your idea into a draft script, but you should review and improve the result before using it.

    Start with a Clear Prompt

    Give the AI assistant enough information about your topic, audience, and goal.

    Prompt:

    “Write a beginner-friendly Facebook Reel script about how AI can help summarize a long document. Keep it clear, practical, and focused on one useful example. Use simple language and avoid hype.”

    Use a Simple Script Structure

    A practical beginner structure is:

    Figure 5. A simple Facebook Reel script can use a clear opening, one main point, and a short closing takeaway.

    Explanation: This structure helps the Reel reach the useful information quickly without requiring a long introduction.

    1. Opening: Tell viewers quickly what the Reel is about.

    2. Main point: Explain the useful tip, process, or example.

    3. Closing: Finish with a short takeaway or next step.

    Make the Opening Clear

    Avoid spending too much time on a long introduction.

    Instead of:

    “Hello everyone, welcome back to another video.”

    you could begin with:

    “Have a long document to read? AI can help you create a short summary.”

    This tells viewers what the Reel is about immediately.

    Review the AI-Written Script

    Check the script for:

    · Factual accuracy.

    · Clear and simple language.

    · Unnecessary repetition.

    · Claims that sound exaggerated.

    · Instructions that may be outdated.

    · Difficult technical terms.

    · Information that does not support the Reel’s main idea.

    Do not assume that an AI-generated script is automatically correct.

    Practical Example

    For a Facebook Reel about summarizing a document with AI, the script could follow this simple sequence:

    1. Show the long document.

    2. Explain that an AI tool can help summarize it.

    3. Show the document being uploaded.

    4. Show a short summary prompt.

    5. Remind viewers to compare the summary with the original document.

    This gives viewers one clear lesson without trying to explain every document-analysis feature at once.

    Step 3: Create or Prepare Vertical Visuals

    Your visuals should support the script and make the Facebook Reel easy to understand on a phone screen.

    For most beginner projects, use a 9:16 vertical layout at 1080 × 1920 pixels.

    Choose Visuals That Match the Script

    Depending on your topic, you can use:

    · AI-generated images.

    · Licensed stock photos or stock video.

    · Screen recordings.

    · Charts or simple graphics.

    · Text-based slides.

    · Product or workspace footage.

    · Clips from a longer video you created.

    Use only visuals that help explain the main point.

    Keep Important Content Visible

    Keep important elements such as:

    · Faces.

    · Captions.

    · Titles.

    · Buttons.

    · Screenshots.

    · Charts.

    · Demonstrations.

    away from the extreme top, bottom, and sides of the frame.

    Facebook interface elements can cover parts of the video, so important information should remain closer to the central viewing area.

    Make Screenshots Easy to Read

    If your Reel includes a computer or phone screenshot, avoid showing the entire screen when the important text becomes too small.

    Instead, crop or zoom into the area viewers need to see.

    For example, if you are demonstrating an AI prompt, show the prompt box clearly rather than displaying an entire browser window at a very small size.

    Review AI-Generated Visuals Carefully

    AI-generated images and video clips can contain mistakes such as:

    · Distorted hands or objects.

    · Misspelled text.

    · Duplicate items.

    · Inconsistent people or clothing.

    · Incorrect interface elements.

    · Unrealistic details.

    Review every generated visual before adding it to the Reel.

    Check Licences and Permissions

    If you use stock footage, photographs, templates, fonts, graphics, or other assets that you did not create yourself, check the licence and commercial-use conditions before publishing.

    Do not assume that an image or video is free to reuse simply because it is available online.

    Practical Example

    For a Facebook Reel about summarizing a document with AI, you might use:

    1. A visual showing a long document.

    2. A screen recording of the document being uploaded.

    3. A close-up of the summary prompt.

    4. A simple visual showing the shorter AI-generated result.

    5. A final reminder to compare the summary with the original document.

    This creates a clear visual sequence that follows the script from beginning to end.

    Figure 6. Plan vertical visuals in the same order as the narration so each scene supports the current point.

    Explanation: Matching scenes to narration helps viewers follow the demonstration on a small phone screen.

    Step 4: Add Narration or an AI Voice

    Narration can make a Facebook Reel easier to follow, especially when the video explains a process, gives a tip, or shows a demonstration.

    You can record your own voice or use an AI-generated voice when the tool and licence allow your intended use.

    Choose a Clear Voice

    The narration should be easy to understand and should match the pace of the visuals.

    A good voice-over should:

    · Speak clearly.

    · Avoid rushing.

    · Use natural pauses.

    · Match the tone of the topic.

    · Pronounce technical terms correctly.

    · Leave enough time for viewers to read important on-screen text.

    Review AI-Generated Narration

    If you use an AI voice, listen to the entire recording before adding it to the Reel.

    Check for:

    · Mispronounced names or technical terms.

    · Unnatural pauses.

    · Missing words.

    · Incorrect emphasis.

    · Audio that sounds too fast or too slow.

    · Sentences that do not match the visuals.

    Correct the script or regenerate the affected section when necessary.

    Keep Narration and Visuals Aligned

    The visual shown on screen should support what the viewer is hearing.

    For example, if the narration says:

    “Upload your document to the AI tool.”

    the Reel should show the upload step at approximately the same time.

    This makes the video easier to understand.

    Protect Privacy and Get Permission

    Do not clone or imitate a real person’s voice without appropriate permission.

    If you use another person’s recording, make sure you have permission to use it and understand any licence or platform conditions that apply.

    Avoid using AI voices in ways that could falsely make viewers believe a real person said something they did not say.

    Practical Example

    For a Facebook Reel explaining document summarization, the narration could briefly guide the viewer through uploading a document, asking for a summary, and checking the result.

    Each visual can change as the narration moves to the next step, keeping the Reel clear and easy to follow.

    Step 5: Add Captions and On-Screen Text

    Captions and on-screen text can make a Facebook Reel easier to understand, especially when viewers are watching without sound.

    Keep Captions Easy to Read

    Use captions that are:

    · Large enough to read on a phone.

    · Short and easy to scan.

    · High contrast against the background.

    · Timed closely with the spoken words.

    · Positioned away from important faces, demonstrations, and other visual details.

    Avoid placing captions at the extreme bottom or sides of the frame because Facebook interface elements can cover those areas.

    Use On-Screen Text Carefully

    On-screen text can highlight the most important information in the Reel.

    For example, you could show:

    “3 Steps to Summarize a Document with AI”

    near the beginning.

    Later, you could use short labels such as:

    · Step 1: Upload

    · Step 2: Ask for a Summary

    · Step 3: Review the Result

    Keep the wording simple. Too much text on screen at the same time can make the Reel difficult to follow.

    Check Spelling and Accuracy

    Review every caption and text element before exporting.

    Check for:

    · Spelling mistakes.

    · Missing words.

    · Incorrect punctuation.

    · Wrong names or technical terms.

    · Captions that appear too early or too late.

    · Text that does not match the narration.

    Accessibility

    Captions can help people who are deaf or hard of hearing, viewers watching without sound, and people who find written text easier to follow than narration alone.

    Do not rely only on colour to communicate important information. Use clear words, labels, or symbols as well.

    Practical Example

    If the narrator says:

    “Always check the AI-generated summary against the original document.”

    you could display:

    “Always verify the summary.”

    This reinforces the main lesson without overcrowding the screen.

    Figure 7. Place captions where they remain readable without covering faces or sitting too close to the edges.

    Explanation: Clear caption placement supports accessibility and reduces the chance that interface controls will hide important text.

    Step 6: Add Music and Sound Effects Carefully

    Music and sound effects can make a Facebook Reel more engaging, but they should support the video rather than distract from the main message.

    Choose Music You Are Allowed to Use

    Facebook lets creators add music or other audio to Reels through its audio tools. Meta also provides Sound Collection, which includes music and sound effects that can be used in Facebook Reels.

    Do not assume that any song you find online is safe to use.

    Meta explains that music use on Facebook is subject to agreements with music rights holders, and those agreements can place limits on how recorded music is used in videos and Reels.

    Keep Music Below the Narration

    If your Reel includes spoken narration, keep background music at a lower volume so the voice remains easy to understand.

    Listen to the complete Reel and check that:

    · The narration is clear.

    · Music does not cover important words.

    · Sound effects are not unexpectedly loud.

    · Audio changes are smooth.

    · The beginning and ending do not contain sudden volume jumps.

    Be Aware That Music Rights Can Change

    A track that is available today may not always remain available under the same conditions.

    Meta explains that if its rights to a song change, a Reel containing that song may later be muted.

    This is another reason to keep a clean master version of your video without platform-specific music.

    Be Careful When Reusing Music on Other Platforms

    Music that you can use in a Facebook Reel does not automatically mean you can use the same track in:

    · Instagram Reels.

    · YouTube Shorts.

    · TikTok.

    · Pinterest.

    · Other websites or advertisements.

    Return to your clean master and add suitable audio separately for each platform after checking the applicable rights.

    Keep Licensing Records

    If you use music or sound effects from outside Facebook, keep records such as:

    · The licence.

    · Permission from the rights holder.

    · A purchase receipt.

    · Attribution instructions.

    · A copy of the applicable usage conditions.

    This can help you confirm how the audio may be used later.

    Figure 8. Keep narration clear, background music lower, and verify the rights or licence for every audio source.

    Explanation: Music available through Facebook or another service may have different conditions for commercial or cross-platform use.

    Practical Example

    For a beginner AI tutorial Reel, you might use quiet background music beneath the narration.

    Keep the voice clearly understandable throughout the video. If you later adapt the Reel for YouTube Shorts or another platform, return to your clean master and confirm that the music licence also permits use on that platform before publishing.

    Step 7: Edit the Facebook Reel for a Clear, Fast Flow

    A Facebook Reel should move quickly enough to keep viewers interested without making the information difficult to follow.

    Remove Unnecessary Parts

    Review the full Reel and remove:

    · Long pauses.

    · Repeated explanations.

    · Empty frames.

    · Slow introductions.

    · Unnecessary transitions.

    · Visuals that do not support the main point.

    The goal is to keep the Reel focused on one useful idea.

    Match the Editing to the Script

    Change visuals when the narration moves to a new point.

    For example:

    · Show the problem when the opening introduces it.

    · Show the AI tool when the script explains the tool.

    · Show the result when the narration describes the result.

    · Show the final takeaway at the end.

    This helps viewers understand the information without having to guess what each visual means.

    Keep Transitions Simple

    You do not need complicated effects between every scene.

    Simple cuts, gentle zooms, or basic fades are often enough for beginner tutorials.

    Too many effects can distract from the content.

    Keep Important Content Visible

    Check that captions, faces, screenshots, and important text remain clear throughout the Reel.

    If a scene contains small text, zoom into the relevant area instead of showing the entire screen at once.

    Practical Example

    For a Facebook Reel about summarizing a document with AI, the editing sequence might be:

    1. Show the long document.

    2. Show the upload step.

    3. Show the summary prompt.

    4. Show the shorter result.

    5. End with the reminder to verify the summary against the original.

    This creates a simple beginning-to-end flow without unnecessary scenes.

    Figure 9. Removing long pauses, repeated information, and distracting effects creates a clearer Facebook Reel.

    Explanation: Simple editing keeps attention on the lesson rather than on unnecessary production effects.

    Step 8: Export and Review the Final Facebook Reel

    When editing is complete, export the Reel as a separate final video file. Keep your original editing project and clean master version so you can make corrections or prepare versions for other platforms later.

    Choose Practical Export Settings

    For a short-form, phone-friendly Facebook Reel, a practical beginner starting point is:

    · Aspect ratio: 9:16

    · Resolution: 1080 × 1920 pixels

    · Orientation: Vertical

    · File format: MP4

    · Video codec: H.264

    · Audio codec: AAC

    · Frame rate: 30 fps is a practical choice for many beginner projects.

    Meta recommends 9:16 for Reels placements because it can fill the vertical phone screen. Facebook’s video guidance also supports standard aspect ratios such as 9:16 for vertical video.

    Figure 10. Practical beginner export settings include 9:16, 1080 × 1920, MP4, H.264 video, AAC audio, and a suitable frame rate.

    Explanation: Watch the actual exported file before uploading rather than relying only on the preview inside the video editor.

    Watch the Exported File Before Uploading

    Do not rely only on the preview inside your video editor.

    Open the actual exported video and watch it from beginning to end.

    Check for:

    · Blurry or pixelated video.

    · Cropped faces or important objects.

    · Captions that are difficult to read.

    · Text positioned too close to the edges.

    · Music that covers the narration.

    · Audio that is too loud or too quiet.

    · Missing scenes or blank frames.

    · Spelling mistakes.

    · Distorted AI-generated images.

    · Unwanted logos, watermarks, usernames, or branded endings.

    · Private or confidential information.

    Check the Vertical Layout

    Watch the Reel on a phone if possible.

    Make sure that:

    · Important faces remain visible.

    · Captions are readable.

    · Demonstrations are large enough to understand.

    · Important text is not placed at the extreme top or bottom.

    · The main subject remains clear in the vertical frame.

    Meta’s safe-zone guidance recommends keeping important creative elements away from the edges of 9:16 Reels because interface controls can cover those areas.

    Keep a Clean Master

    Save a clean master separately from the Facebook version.

    For example:

    · ai-document-summary-master.mp4

    · ai-document-summary-facebook-reel-final.mp4

    The clean master should avoid unnecessary platform-specific logos, usernames, downloaded watermarks, or platform-specific music when possible.

    This makes it easier to create another version later for Instagram Reels, YouTube Shorts, TikTok, Pinterest, or another platform.

    Practical Example

    After exporting your document-summary Facebook Reel, watch the final MP4 on your computer and phone.

    If the captions are readable, the narration is clear, the important demonstration remains visible, and there are no unwanted watermarks or private details, the Reel is ready for the publishing step.

    Step 9: Upload and Publish the Facebook Reel

    When the final video has been reviewed, upload the clean Facebook version rather than a copy downloaded from another social media platform.

    Facebook now treats uploaded videos as Reels, so the exact posting flow can vary depending on whether you are using the Facebook app, a Page, a professional profile, or Meta Business Suite.

    Upload the Reel on Facebook

    A typical beginner workflow is:

    1. Open Facebook.

    2. Choose the option to create or upload a video or Reel.

    3. Select your final video file.

    4. Review the video preview.

    5. Add a clear description or caption.

    6. Add any music, text, or other Facebook features only if needed.

    7. Review the audience or privacy setting.

    8. Check whether any partnership, promotional, or branded-content options apply.

    9. Review any AI-content transparency or disclosure options that are available.

    10. Check the final post carefully.

    11. Publish when everything is correct.

    Figure 11. The Facebook publishing workflow includes selecting the clean final video, reviewing it, adding an accurate description, checking the audience, rights, and AI information, and publishing.

    Explanation: Exact buttons can vary by Facebook app, Page, professional profile, or Meta Business Suite, so check the current interface before publishing.

    The exact button names and available options can change as Facebook updates its interface.

    Add a Clear Description

    Your description should accurately explain what the Reel is about.

    For example:

    Learn a simple way to summarize a long document with AI. Always compare important information with the original document before using the summary.

    Avoid exaggerated or misleading claims simply to attract attention.

    Check the Audience and Privacy Settings

    Before publishing, review who can see the Reel.

    Depending on your account and posting method, Facebook may provide options for:

    · Public visibility.

    · Friends or followers.

    · Page audiences.

    · Professional or business audiences.

    · Other privacy or sharing controls.

    Choose the setting that matches the audience you actually want to reach.

    Review AI-Generated or AI-Altered Content

    Meta uses labels and technical signals to provide more information about some AI-generated or significantly AI-altered content across its platforms.

    Before publishing realistic AI-generated or heavily altered content, check the current AI-transparency options available in Facebook.

    Pay particular attention when AI content:

    · Realistically represents a person.

    · Alters what a real person appears to say or do.

    · Creates a realistic event that did not occur.

    · Significantly changes a real photograph or video.

    · Could reasonably be mistaken for authentic footage.

    If viewers could mistake synthetic content for real footage, clear disclosure is especially important.

    Review Before Publishing

    Before publishing the Reel, check:

    · The correct video was selected.

    · The video displays as intended.

    · The description accurately matches the content.

    · Captions and important text remain readable.

    · The narration is clear.

    · Music and sound effects have appropriate usage rights.

    · Images, clips, fonts, voices, and other assets are properly licensed or permitted.

    · No private or confidential information appears.

    · No unwanted watermark, username, or platform branding remains.

    · Any appropriate AI-content transparency or disclosure has been completed.

    Practical Example

    Suppose your Facebook Reel uses an AI-generated illustration of a fictional office worker while the narration explains how to summarize a document.

    Review the illustration for obvious AI mistakes, check the voice and captions, verify your asset licences, and review Facebook’s current AI-transparency options before publishing.

    If the Reel realistically makes a real person appear to say or do something that never happened, disclosure becomes particularly important because viewers could mistake the synthetic content for real footage.

    Common Mistakes to Avoid When Creating Facebook Reels with AI

    Beginners can save time by avoiding several common problems that affect clarity, quality, licensing, privacy, or publishing.

    Common mistakes include:

    · Trying to explain too many ideas in one Reel.

    · Using a long introduction before reaching the main point.

    · Placing captions or important text too close to the edges.

    · Shrinking screenshots until the text becomes difficult to read.

    · Using music without checking whether the licence allows Facebook use.

    · Letting background music overpower the narration.

    · Publishing AI-generated information without checking factual accuracy.

    · Using a real person’s voice, image, or likeness without appropriate permission.

    · Uploading a downloaded copy from another platform instead of using a clean master export.

    · Leaving unwanted watermarks, usernames, logos, or branded endings in the video.

    · Using AI-generated visuals without checking for distorted objects, incorrect text, or unrealistic details.

    · Forgetting to review privacy and audience settings.

    · Skipping the final review of the exported file.

    · Ignoring relevant AI-content transparency or disclosure requirements when realistic synthetic or altered content is used.

    How to Avoid These Mistakes

    Keep each Reel focused on one clear lesson and work from a clean master project.

    Before publishing, review the:

    · Script.

    · Visuals.

    · Captions.

    · Audio.

    · Music rights.

    · Asset licences.

    · Permissions.

    · Privacy and audience settings.

    · AI-generated content.

    · Final export.

    · Any applicable AI-content transparency or disclosure requirements.

    If something is unclear, incorrect, poorly positioned, or not properly licensed, correct the project and export a new version before publishing.

    Figure 12. A final checklist helps catch quality, licensing, privacy, branding, and AI-transparency problems before publication.

    Explanation: Watching the complete exported video from beginning to end is one of the most important final checks.

    Benefits of Creating Facebook Reels with AI

    AI can make the Facebook Reels workflow easier for beginners by helping with planning, writing, visuals, narration, captions, and editing.

    Key benefits include:

    · Faster idea generation: AI can suggest focused Reel topics when you are not sure what to create.

    · Simpler script writing: AI can turn a basic idea into a short script that you can review and improve.

    · Easier visual planning: AI can suggest scenes, image ideas, screen recordings, text overlays, and simple shot sequences.

    · More accessible production: AI voices, captions, and editing assistance can help beginners create videos without advanced production skills.

    · Better organization: AI can help reduce a broad topic to one clear lesson that fits a Reel.

    · Easier repurposing: A Facebook Reel can be adapted from a longer video, article, tutorial, or clean master project.

    · More consistent workflow: Using the same planning, scripting, editing, and review process can make future Reels easier to produce.

    · Useful learning support: AI can explain unfamiliar editing terms and suggest improvements while you are learning a new tool.

    · Cross-platform flexibility: A clean master can be adapted for Instagram Reels, YouTube Shorts, TikTok, or other vertical-video platforms after checking each platform’s current requirements.

    AI is most useful when it supports your decisions rather than replacing them. Review the final script, visuals, audio, captions, facts, licences, permissions, privacy settings, and publishing choices before making the Reel public.

    Limitations of Creating Facebook Reels with AI

    AI can help with many parts of the Facebook Reels workflow, but it does not remove the need for careful human review.

    Common limitations include:

    · Factual errors: AI-generated scripts can contain incorrect, outdated, or misleading information.

    · Generic writing: AI may produce scripts that sound repetitive or similar to other content unless you revise them.

    · Visual inconsistencies: AI-generated images or video clips may contain distorted objects, unusual details, inconsistent characters, or misspelled text.

    · Voice limitations: AI narration can mispronounce names, sound unnatural, or use incorrect emphasis.

    · Licensing differences: AI tools, stock libraries, music services, templates, and fonts can have different rules for commercial use.

    · Platform changes: Facebook features, music options, publishing tools, audience controls, and AI-transparency methods can change over time.

    · Editing is still required: AI-generated material usually needs trimming, timing adjustments, caption checks, and final quality review.

    · Privacy risks: Uploading private documents, photographs, recordings, or personal information to an AI tool can create privacy concerns.

    · Disclosure requirements: Some realistic AI-generated or significantly AI-altered content may require additional transparency or labeling.

    · No guarantee of performance: AI can help create a clearer Reel, but it cannot guarantee views, followers, engagement, sales, or other results.

    How to Reduce These Limitations

    Use AI as an assistant rather than treating its output as automatically finished.

    Verify important facts, review every generated visual and voice recording, check licences and permissions, protect private information, and watch the complete exported Reel before publishing.

    When Facebook changes a feature, music option, audience setting, disclosure method, or publishing requirement that affects your workflow, check the current official guidance before relying on older instructions.

    Common Myths About Creating Facebook Reels with AI

    Several common myths can make beginners expect too much from AI or use it in ways that create unnecessary problems.

    Myth 1: AI Can Create a Perfect Facebook Reel Automatically

    Reality: AI can help with ideas, scripts, visuals, narration, captions, and editing suggestions, but the final Reel still needs human review for accuracy, quality, timing, licensing, privacy, and platform requirements.

    Myth 2: Every AI-Generated Reel Must Be Labelled the Same Way

    Reality: AI transparency and labeling can depend on how the content was created and how realistic or significantly altered it is. Simple AI assistance with brainstorming or script editing is different from realistic synthetic media that viewers could mistake for authentic footage.

    Myth 3: AI-Generated Images and Music Are Automatically Copyright-Free

    Reality: Rights and commercial-use conditions depend on the tool, licence, source material, and intended use. Always check the terms that apply to the assets you use.

    Myth 4: More Effects Make a Facebook Reel More Professional

    Reality: Too many transitions, animations, text boxes, or sound effects can distract viewers. Clear visuals, readable captions, and simple editing are often more effective for beginner tutorials.

    Myth 5: Facebook Reels Must Always Be Very Short

    Reality: Facebook now treats uploaded videos as Reels, so a Reel is not limited to the older short-video format. For beginner short-form content, however, keeping the video focused and concise can still make it easier to understand.

    Myth 6: AI Can Guarantee More Views or Followers

    Reality: AI can help improve your workflow, but it cannot guarantee views, followers, engagement, sales, or other results. Audience interest, usefulness, presentation, timing, competition, and many other factors can affect performance.

    Frequently Asked Questions

    How Long Can a Facebook Reel Be?

    Facebook now treats uploaded videos as Reels, so Reels are no longer limited to the older short-video format.

    For beginner short-form content, use only the length needed to explain the idea clearly.

    What Size Should I Use for a Facebook Reel?

    A practical beginner format is 1080 × 1920 pixels with a 9:16 vertical aspect ratio.

    Do I Need an Expensive AI Video Tool?

    No. Beginners can start with simple tools for writing, editing, captions, narration, or visuals.

    Check whether a free plan adds watermarks, limits exports, restricts resolution, or has different commercial-use conditions.

    Can I Create a Facebook Reel Without Showing My Face?

    Yes. You can create faceless Reels using:

    · Screen recordings.

    · AI-generated visuals.

    · Licensed stock footage.

    · Text and graphics.

    · Charts.

    · Product footage.

    · Voice-over narration.

    Can I Use an AI Voice in a Facebook Reel?

    Yes, when the tool and licence allow your intended use.

    Review the narration carefully and avoid cloning or impersonating a real person’s voice without appropriate permission.

    Should I Add Captions?

    Captions are strongly recommended.

    They can help viewers who are watching without sound and improve accessibility for people who are deaf or hard of hearing.

    Can I Use Any Music I Find Online?

    No.

    Only use music when you have appropriate permission, a suitable licence, or access through Facebook under terms that allow your intended use.

    Do I Need to Disclose AI Use?

    It depends on how AI was used.

    Simple assistance with brainstorming, script writing, or minor editing is different from realistic AI-generated or significantly altered content that viewers could mistake for real people, events, or places.

    Check Facebook’s current AI-transparency or disclosure options before publishing realistic synthetic content.

    Can I Reuse the Same Reel on Instagram Reels, YouTube Shorts, or TikTok?

    Yes, but return to your clean master video and create a separate version for each platform.

    Check:

    · Aspect ratio.

    · Caption placement.

    · Music rights.

    · Safe areas.

    · Platform branding.

    · Disclosure requirements.

    before publishing each version.

    Will AI Guarantee More Views or Followers?

    No.

    AI can help with planning and production, but it cannot guarantee views, followers, engagement, sales, or other results.

    Key Takeaways

    Creating Facebook Reels with AI becomes easier when you follow a simple, repeatable workflow.

    Remember these main points:

    · Start with one clear idea for each Reel.

    · Use AI to help brainstorm, outline, and draft the script, but always review the final wording.

    · Keep the script focused and make the topic clear near the beginning.

    · Use a 9:16 vertical format for a phone-friendly layout when creating short-form content.

    · Prepare visuals that are easy to understand on a small screen.

    · Keep captions, titles, faces, and important information away from the extreme edges.

    · Use clear narration and make sure background music does not overpower the voice.

    · Check licences and permissions for music, stock footage, images, fonts, voices, templates, and other third-party assets.

    · Review AI-generated visuals for distorted objects, incorrect text, or unrealistic details.

    · Edit out unnecessary pauses, repeated information, and distracting effects.

    · Export a clean final version and watch the complete file before uploading.

    · Review Facebook’s current AI-transparency or disclosure options when realistic synthetic or significantly altered content is involved.

    · Keep your clean master video, project files, prompts, licences, permissions, and final exports for future corrections or repurposing.

    AI can help make the production process faster, but the final quality, accuracy, licensing, privacy, accessibility, and publishing decisions still require careful human review.

    Final Tip

    Keep your first Facebook Reels simple.

    Choose one useful idea, explain it clearly, use readable visuals and captions, and review the final video before publishing. You do not need complicated effects or advanced editing to create a useful Reel.

    As your workflow improves, keep your clean master files, prompts, licences, permissions, and final exports organized. This makes it easier to correct mistakes, update older videos, or repurpose successful Reels for other platforms later.

    Continue Learning

    If you want to continue building your AI video skills, these AI Mastery guides are useful next steps:

    · How to Repurpose One AI Video for YouTube Shorts, TikTok, Instagram Reels, and Facebook Reels: Beginner Guide (2026) — Learn how to adapt one clean master video into separate versions for several social media platforms.

    · How to Choose AI Video Sizes, Aspect Ratios, and Export Settings: Beginner Guide (2026) — Learn how to choose the correct dimensions, frame rate, file format, and export settings for vertical video.

    · How to Create YouTube Shorts with AI: Beginner Step-by-Step Guide (2026) — Learn how to create, edit, export, and publish short-form videos for YouTube.

    · How to Create Instagram Reels with AI: Beginner Step-by-Step Guide (2026) — Learn how to prepare and publish vertical AI-assisted videos for Instagram.

    · How to Create Faceless YouTube Videos with AI: Complete Beginner Step-by-Step Guide (2026) — Follow a complete workflow for planning, scripting, visuals, narration, editing, and publishing.

    · How to Edit AI-Generated Videos: Beginner Step-by-Step Guide (2026) — Learn how to trim clips, arrange scenes, improve pacing, and prepare a clean final video.

    · How to Add Voice, Music, and Captions to AI Videos: Beginner Step-by-Step Guide (2026) — Learn how to add narration, background music, sound effects, and readable captions.

    Sources and References

    The following official Facebook and Meta sources were checked for the current Reels format, vertical-video recommendations, safe areas, music, audience controls, copyright, and AI-transparency information used in this guide. Facebook features and policies can change, so important requirements should be checked again when Meta announces an update or when you change your publishing workflow.

    · Facebook Help Center — Create a Reel on Facebook: Facebook explains that its video experience has been unified and that videos posted to Facebook, except Stories and Live video, are now shared as Reels regardless of length or orientation.

    · Meta Business Help Center — Best Practices for Aspect Ratios Across Placements: Meta recommends a 9:16 vertical aspect ratio for Reels placements to make use of the full phone screen.

    · Meta Business Help Center — Safe Zones for Reels: Meta provides guidance for keeping important creative elements away from the edges of 9:16 Reels where interface controls may cover them.

    · Meta Business Help Center — Use Sound Collection for Reels on Facebook: Meta explains how its Sound Collection provides rights-cleared music and sound effects for Facebook Reels.

    · Facebook Help Center — About Music in Your Content on Facebook: Facebook explains that music use is subject to agreements with music rights holders and that videos or Reels may be restricted when music-use conditions are not met.

    · Meta Business Help Center — What Happens When Music Rights Change on Facebook: Meta explains that changes in music rights can affect previously published content, including Reels.

    · Facebook Help Center — Change Who Can See Your Reels: Facebook provides audience controls that let creators manage who can see their Reels.

    · Facebook Help Center — Intellectual Property and Copyright: Facebook states that users should not post content that violates another person’s intellectual-property rights and provides guidance for avoiding copyright infringement.

    · Meta — Our Approach to Labeling AI-Generated Content: Meta explains its use of AI info labels and technical signals to provide context about some AI-generated or significantly AI-modified images, video, and audio.

    · Meta — Transparency of AI-Generated Content: Meta confirmed in July 2026 that it continues to develop transparency measures for AI-generated content as synthetic media becomes increasingly difficult to distinguish from authentic media.

    Important: This guide provides general educational information about AI video creation, copyright, licensing, privacy, disclosure, and publishing. It is not legal advice. Always verify that you have appropriate rights or permission for music, photographs, video clips, voices, fonts, templates, and other material you publish.
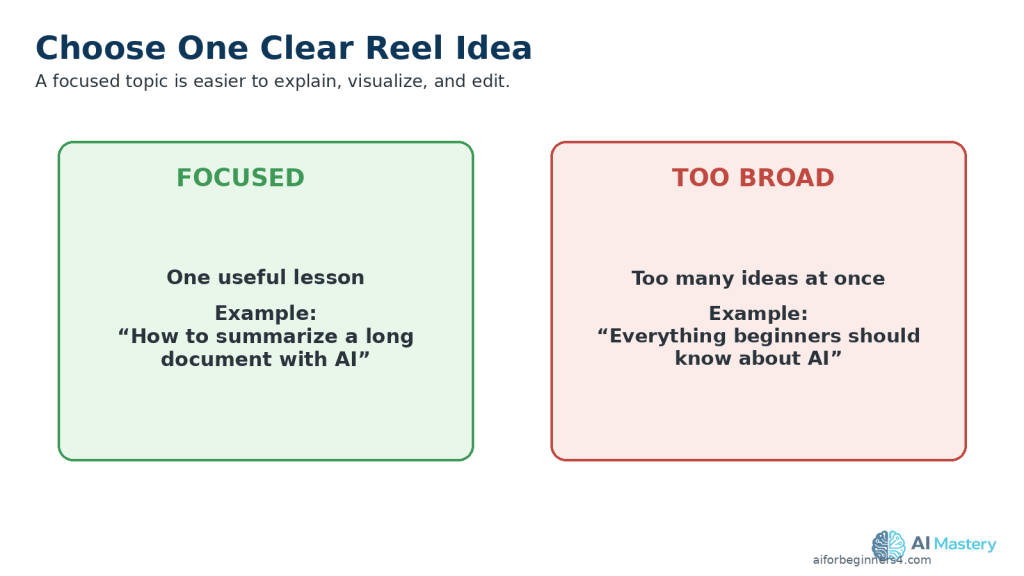
  • How to Create Instagram Reels with AI: Beginner Step-by-Step Guide (2026)

    How to Create Instagram Reels with AI: Beginner Step-by-Step Guide (2026)

    Estimated Reading Time: 18 minutes
    Last Updated: August 15, 2026

    Before Learning

    Before you begin, it helps to have one clear idea for the Instagram Reel you want to create. Your Reel can be educational, promotional, entertaining, or adapted from a longer video, article, tutorial, or other original content.

    You do not need advanced video-editing skills. AI tools can help you brainstorm ideas, write a short script, prepare vertical visuals, generate narration, create captions, and improve the editing workflow.

    For most beginner projects, a 9:16 vertical video at 1080 × 1920 pixels is a practical working format. Keep important text, captions, faces, and other key information away from the extreme edges because Instagram interface elements may cover parts of the video.

    This guide will show you how to move from one simple idea to a finished Instagram Reel while keeping your source files, prompts, licences, permissions, clean master export, and publication records organized.

    What You’ll Learn

    By the end of this guide, you will know how to:

    · Choose one clear idea for an Instagram Reel.

    · Use AI to brainstorm Reel topics and create a simple content plan.

    · Write a short, focused script with AI assistance.

    · Create or prepare visuals for a vertical 9:16 layout.

    · Generate or record narration when needed.

    · Add readable captions and on-screen text.

    · Choose music and sound effects while checking usage rights.

    · Edit the Reel so the opening quickly communicates the main topic.

    · Keep important text, faces, and graphics inside safe viewing areas.

    · Export a clean final version with suitable video settings.

    · Upload and publish the Reel on Instagram.

    · Review whether AI-content disclosure or other platform labels are required.

    · Keep your original project files, prompts, licences, permissions, and clean master export for future reuse.

    Introduction

    Instagram Reels are short-form videos designed for quick viewing in a vertical feed. They can be used for tutorials, tips, demonstrations, product explanations, educational content, behind-the-scenes clips, and many other types of posts.

    AI can help with several parts of the Reel-creation process. You can use it to generate ideas, outline a Reel, draft a script, create visuals, prepare narration, improve captions, and suggest editing changes.

    However, AI should support your work rather than replace your final judgment. Review every script, visual, voice, caption, and factual claim before publishing. Make sure you have appropriate rights or permission for any music, images, video clips, voices, fonts, templates, or other material that you did not create yourself.

    A practical beginner workflow is to start with one clear idea, write a short script, prepare vertical visuals, add clear audio and captions, edit the Reel carefully, and review the final export before uploading it to Instagram.

    Figure 1. A beginner Instagram Reel workflow moves from one clear idea through scripting, visuals, audio, editing, export, and sharing.

    Explanation: Following the same sequence for each Reel makes the process easier to repeat, review, and improve.

    What Are Instagram Reels?

    Instagram Reels are videos that you can create, edit, and share with your followers on Instagram. Instagram currently allows people to record and edit Reels of up to 20 minutes, although shorter videos may be more suitable when you want a quick, focused lesson or demonstration.

    Reels can include:

    · Recorded or uploaded video clips.

    · Music or original audio.

    · Text.

    · Effects.

    · Voice-over or text-to-speech.

    · Captions and other visual elements.

    Recommended Beginner Format

    For a full-screen vertical Reel, a practical beginner format is:

    · Aspect ratio: 9:16

    · Resolution: 1080 × 1920 pixels

    · Orientation: Vertical

    · Frame rate: 30 fps or higher

    Instagram accepts Reel aspect ratios from 1.91:1 through 9:16 and requires at least 30 fps and 720-pixel resolution. Meta recommends 9:16 for Reels because most people hold their phones vertically and this format can use the full screen.

    Keep Important Content Inside the Safe Area

    Instagram interface elements can cover parts of a vertical Reel. Keep important information such as:

    · Faces.

    · Captions.

    · Titles.

    · Demonstrations.

    · Charts.

    · Calls to action.

    away from the extreme top, bottom, and sides of the frame. Meta provides safe-zone guidance for 9:16 Reels so important creative elements are less likely to be covered by interface controls.

    Practical Example

    If you want to create a Reel explaining one beginner AI tip, you could use a 1080 × 1920 vertical project, keep the main subject near the centre, add large readable captions, and show only the screen area needed for the demonstration.

    This creates a simple phone-friendly layout while leaving room around the edges for Instagram interface elements.

    Figure 2. A 9:16 vertical frame at 1080 × 1920 pixels provides a practical full-screen Reel layout with space around the edges.

    Explanation: Keeping important text, faces, and captions toward the central viewing area reduces the chance that interface elements will cover them.

    Step 1: Choose One Clear Idea for Your Instagram Reel

    An Instagram Reel is easier to understand when it focuses on one main idea. Trying to cover too many topics in one Reel can make the video feel rushed or confusing.

    Choose a topic that can be explained clearly, such as:

    · One beginner AI tip.

    · One useful AI tool.

    · One common mistake.

    · One short tutorial.

    · One quick comparison.

    · One simple before-and-after example.

    · One useful feature from a longer AI Mastery article.

    Use AI to Brainstorm Reel Ideas

    You can ask an AI assistant to suggest Reel ideas based on your topic.

    Prompt:

    “Give me 10 beginner-friendly Instagram Reel ideas about using AI for everyday tasks. Keep each idea focused on one clear lesson.”

    Review the suggestions carefully and choose an idea that is useful, accurate, and appropriate for your audience.

    Keep the Topic Narrow

    Instead of creating a Reel called:

    “Everything Beginners Should Know About AI”

    choose something more specific, such as:

    “3 Ways AI Can Help You Save Time”

    or:

    “How to Summarize a Long Document with AI”

    A narrow topic makes it easier to write a clear script, choose suitable visuals, and keep the Reel focused.

    Figure 3. One focused Reel idea is easier to explain than a broad topic containing many unrelated points.

    Explanation: A narrow topic helps beginners keep the script, visuals, and editing focused on one useful lesson.

    Practical Example

    If a longer AI Mastery article explains several document features, you could create one Reel about only document summarization.

    The Reel can show the problem, demonstrate the basic process, and finish with one clear reminder to review the AI-generated result against the original document.

    Step 2: Write a Short, Focused Reel Script with AI

    A clear script helps keep your Instagram Reel organized and easy to follow. Even a short Reel benefits from having a simple beginning, main point, and ending.

    AI can help you turn your idea into a draft script, but you should review and improve the result before using it.

    Start with a Clear Prompt

    Give the AI assistant enough information about your topic, audience, and goal.

    Prompt:

    “Write a beginner-friendly Instagram Reel script about how AI can help summarize a long document. Keep it clear, practical, and focused on one useful example. Use simple language and avoid hype.”

    Use a Simple Script Structure

    A practical beginner structure is:

    Figure 4. A simple Instagram Reel script can use a clear opening, one main point, and a short closing takeaway.

    Explanation: This structure helps the Reel reach the useful information quickly without requiring a long introduction.

    1. Opening: Tell viewers quickly what the Reel is about.

    2. Main point: Explain the useful tip, process, or example.

    3. Closing: Finish with a short takeaway or next step.

    Make the Opening Clear

    Avoid spending too much time on a long introduction.

    Instead of:

    “Hello everyone, welcome back to another video.”

    you could begin with:

    “Have a long document to read? AI can help you create a short summary in minutes.”

    This tells viewers what the Reel is about immediately.

    Review the AI-Written Script

    Check the script for:

    · Factual accuracy.

    · Clear and simple language.

    · Unnecessary repetition.

    · Claims that sound exaggerated.

    · Instructions that may be outdated.

    · Difficult technical terms.

    · Information that does not support the Reel’s main idea.

    Do not assume that an AI-generated script is automatically correct.

    Practical Example

    For a Reel about summarizing a document with AI, the script could follow this simple sequence:

    1. Show the long document.

    2. Explain that an AI tool can help summarize it.

    3. Show the document being uploaded.

    4. Show a short summary prompt.

    5. Remind viewers to compare the summary with the original document.

    This gives viewers one clear lesson without trying to explain every document-analysis feature at once.

    Step 3: Create or Prepare Vertical Visuals

    Your visuals should support the script and make the Reel easy to understand on a phone screen.

    For most beginner Instagram Reels, use a 9:16 vertical layout at 1080 × 1920 pixels.

    Choose Visuals That Match the Script

    Depending on your topic, you can use:

    · AI-generated images.

    · Licensed stock photos or stock video.

    · Screen recordings.

    · Charts or simple graphics.

    · Text-based slides.

    · Product or workspace footage.

    · Clips from a longer video you created.

    Use only visuals that help explain the main point.

    Keep Important Content Visible

    Vertical video is narrower than a standard horizontal video. Keep important elements such as:

    · Faces.

    · Captions.

    · Titles.

    · Buttons.

    · Screenshots.

    · Charts.

    · Demonstrations.

    away from the extreme top, bottom, and sides of the frame.

    Instagram interface elements can cover parts of the video, so important information should remain closer to the central viewing area.

    Make Screenshots Easy to Read

    If your Reel includes a computer or phone screenshot, avoid showing the entire screen when the important text becomes too small.

    Instead, crop or zoom into the area viewers need to see.

    For example, if you are demonstrating an AI prompt, show the prompt box clearly rather than displaying an entire browser window at a very small size.

    Review AI-Generated Visuals Carefully

    AI-generated images and video clips can contain mistakes such as:

    · Distorted hands or objects.

    · Misspelled text.

    · Duplicate items.

    · Inconsistent people or clothing.

    · Incorrect interface elements.

    · Unrealistic details.

    Review every generated visual before adding it to the Reel.

    Check Licences and Permissions

    If you use stock footage, photographs, templates, fonts, graphics, or other assets that you did not create yourself, check the licence and commercial-use conditions before publishing.

    Do not assume that an image or video is free to reuse simply because it is available online.

    Practical Example

    For an Instagram Reel about summarizing a document with AI, you might use:

    1. A visual showing a long document.

    2. A screen recording of the document being uploaded.

    3. A close-up of the summary prompt.

    4. A simple visual showing the shorter AI-generated result.

    5. A final reminder to compare the summary with the original document.

    This creates a clear visual sequence that follows the script from beginning to end.

    Figure 5. Plan vertical visuals in the same order as the script so each scene supports the current point.

    Explanation: A simple scene sequence helps viewers follow the process on a small phone screen.

    Step 4: Add Narration or an AI Voice

    Narration can make an Instagram Reel easier to follow, especially when the video explains a process, gives a tip, or shows a demonstration.

    You can record your own voice or use an AI-generated voice when the tool and licence allow your intended use.

    Choose a Clear Voice

    The narration should be easy to understand and should match the pace of the visuals.

    A good voice-over should:

    · Speak clearly.

    · Avoid rushing.

    · Use natural pauses.

    · Match the tone of the topic.

    · Pronounce technical terms correctly.

    · Leave enough time for viewers to read important on-screen text.

    Review AI-Generated Narration

    If you use an AI voice, listen to the entire recording before adding it to the Reel.

    Check for:

    · Mispronounced names or technical terms.

    · Unnatural pauses.

    · Missing words.

    · Incorrect emphasis.

    · Audio that sounds too fast or too slow.

    · Sentences that do not match the visuals.

    Correct the script or regenerate the affected section when necessary.

    Keep Narration and Visuals Aligned

    The visual shown on screen should support what the viewer is hearing.

    For example, if the narration says:

    “Upload your document to the AI tool.”

    the Reel should show the upload step at approximately the same time.

    This makes the video easier to understand.

    Figure 6. Match narration and visuals so viewers see each step at approximately the same time they hear it.

    Explanation: Good timing makes demonstrations easier to follow and reduces confusion.

    Protect Privacy and Get Permission

    Do not clone or imitate a real person’s voice without appropriate permission.

    If you use another person’s recording, make sure you have permission to use it and understand any licence or platform conditions that apply.

    Avoid using AI voices in ways that could falsely make viewers believe a real person said something they did not say.

    Practical Example

    For a Reel explaining document summarization, the narration could briefly guide the viewer through uploading a document, asking for a summary, and checking the result.

    Each visual can change as the narration moves to the next step, keeping the Reel clear and easy to follow.

    Step 5: Add Captions and On-Screen Text

    Captions and on-screen text can make an Instagram Reel easier to understand, especially when viewers are watching without sound.

    Keep Captions Easy to Read

    Use captions that are:

    · Large enough to read on a phone.

    · Short and easy to scan.

    · High contrast against the background.

    · Timed closely with the spoken words.

    · Positioned away from important faces, demonstrations, and other visual details.

    Avoid placing captions at the extreme bottom or sides of the frame because Instagram interface elements can cover those areas.

    Use On-Screen Text Carefully

    On-screen text can highlight the most important information in the Reel.

    For example, you could show:

    “3 Steps to Summarize a Document with AI”

    near the beginning.

    Later, you could use short labels such as:

    · Step 1: Upload

    · Step 2: Ask for a Summary

    · Step 3: Review the Result

    Keep the wording simple. Too much text on screen at the same time can make the Reel difficult to follow.

    Check Spelling and Accuracy

    Review every caption and text element before exporting.

    Check for:

    · Spelling mistakes.

    · Missing words.

    · Incorrect punctuation.

    · Wrong names or technical terms.

    · Captions that appear too early or too late.

    · Text that does not match the narration.

    Accessibility

    Captions can help people who are deaf or hard of hearing, viewers watching without sound, and people who find written text easier to follow than narration alone.

    Do not rely only on colour to communicate important information. Use clear words, labels, or symbols as well.

    Practical Example

    If the narrator says:

    “Always check the AI-generated summary against the original document.”

    you could display:

    “Always verify the summary.”

    This reinforces the main lesson without overcrowding the screen.

    Figure 7. Place captions where they remain readable without covering faces or sitting too close to the edges.

    Explanation: Clear caption placement supports accessibility and improves readability on vertical screens.

    Step 6: Add Music and Sound Effects Carefully

    Music and sound effects can make an Instagram Reel more engaging, but they should support the video rather than distract from the main message.

    Choose Music You Are Allowed to Use

    You can use music available through Instagram when it is offered for your account and intended use, or use music from another source when you have the appropriate licence or permission.

    Music availability can vary by account type, location, track, and intended use. Some music that is available for personal content may have different restrictions for business or commercial use.

    Do not assume that music is safe to reuse simply because you found it online or because it appears in another creator’s Reel.

    Keep Music Below the Narration

    If your Reel includes spoken narration, keep the background music at a lower volume so the voice remains easy to understand.

    Listen to the complete Reel and check that:

    · The narration is clear.

    · Music does not cover important words.

    · Sound effects are not unexpectedly loud.

    · Audio changes are smooth.

    · The beginning and ending do not contain sudden volume jumps.

    Be Careful When Reusing Music on Other Platforms

    Music available inside Instagram does not automatically mean you have permission to use the same track in a YouTube Short, TikTok video, Facebook Reel, or another platform.

    If you plan to repurpose the video, keep a clean master version without platform-specific music when possible.

    You can then add suitable music separately for each platform after checking the applicable licence or usage conditions.

    Keep Licensing Records

    If you use music or sound effects from an external source, keep records such as:

    · The licence.

    · Permission from the rights holder.

    · A purchase receipt.

    · Attribution instructions.

    · A copy of the applicable usage conditions.

    This can help you confirm how the audio may be used later.

    Figure 8. Keep narration clear, background music lower, and verify the rights or licence for every audio source.

    Explanation: Music available under Instagram or another service may have different conditions for business, commercial, or cross-platform use.

    Practical Example

    For a beginner AI tutorial Reel, you might use quiet background music beneath the narration.

    The voice should remain clearly understandable throughout the video. If you later adapt the Reel for YouTube Shorts or another platform, return to the clean master and check the music rights again before publishing the new version.

    Step 7: Edit the Instagram Reel for a Clear, Fast Flow

    An Instagram Reel should move quickly enough to keep viewers interested without making the information difficult to follow.

    Remove Unnecessary Parts

    Review the full Reel and remove:

    · Long pauses.

    · Repeated explanations.

    · Empty frames.

    · Slow introductions.

    · Unnecessary transitions.

    · Visuals that do not support the main point.

    The goal is to keep the Reel focused on one useful idea.

    Match the Editing to the Script

    Change visuals when the narration moves to a new point.

    For example:

    · Show the problem when the opening introduces it.

    · Show the AI tool when the script explains the tool.

    · Show the result when the narration describes the result.

    · Show the final takeaway at the end.

    This helps viewers understand the information without having to guess what each visual means.

    Keep Transitions Simple

    You do not need complicated effects between every scene.

    Simple cuts, gentle zooms, or basic fades are often enough for beginner tutorials.

    Too many effects can distract from the content.

    Keep Important Content Visible

    Check that captions, faces, screenshots, and important text remain clear throughout the Reel.

    If a scene contains small text, zoom into the relevant area instead of showing the entire screen at once.

    Practical Example

    For a Reel about summarizing a document with AI, the editing sequence might be:

    1. Show the long document.

    2. Show the upload step.

    3. Show the summary prompt.

    4. Show the shorter result.

    5. End with the reminder to verify the summary against the original.

    This creates a simple beginning-to-end flow without unnecessary scenes.

    Figure 9. Removing long pauses, repeated information, and distracting effects creates a clearer Reel.

    Explanation: Simple editing keeps attention on the lesson rather than on unnecessary production effects.

    Step 8: Export and Review the Final Instagram Reel

    When editing is complete, export the Reel as a separate final video file. Keep your original editing project and clean master version so you can make corrections or prepare versions for other platforms later.

    Choose Practical Export Settings

    For most beginner Instagram Reels, a practical starting point is:

    · Aspect ratio: 9:16

    · Resolution: 1080 × 1920 pixels

    · Orientation: Vertical

    · File format: MP4

    · Video codec: H.264

    · Audio codec: AAC

    · Frame rate: Keep the same frame rate used in your original footage or editing project when possible.

    Instagram Reels are designed for vertical viewing, and Meta recommends keeping important creative elements away from interface-heavy edges when using a 9:16 Reel layout.

    Figure 10. Practical beginner export settings include 9:16, 1080 × 1920, MP4, H.264 video, AAC audio, and a frame rate matched to the project when possible.

    Explanation: Open and watch the exported file itself before uploading rather than relying only on the editor preview.

    Watch the Exported File Before Uploading

    Do not rely only on the preview inside your video editor.

    Open the actual exported video and watch it from beginning to end.

    Check for:

    · Blurry or pixelated video.

    · Cropped faces or important objects.

    · Captions that are difficult to read.

    · Text positioned too close to the edges.

    · Music that covers the narration.

    · Audio that is unexpectedly loud or quiet.

    · Missing scenes or blank frames.

    · Spelling mistakes.

    · Distorted AI-generated images.

    · Unwanted logos, watermarks, usernames, or branded endings.

    · Private or confidential information.

    Check the Vertical Layout

    Watch the Reel on a phone if possible.

    Make sure that:

    · Important faces remain visible.

    · Captions are readable.

    · Demonstrations are large enough to understand.

    · Important text is not placed at the extreme top or bottom.

    · The main subject remains clear in the vertical frame.

    Meta specifically advises keeping key creative elements away from the edges of 9:16 Reels because platform controls can cover those areas.

    Keep a Clean Master

    Save a clean master separately from the Instagram version.

    For example:

    · ai-document-summary-master.mp4

    · ai-document-summary-instagram-reel-final.mp4

    The clean master should avoid unnecessary platform-specific logos, usernames, or downloaded watermarks.

    This makes it easier to create another version later for YouTube Shorts, TikTok, Facebook Reels, or another platform.

    Practical Example

    After exporting your document-summary Reel, watch the final MP4 on your computer and phone.

    If the captions are readable, the narration is clear, the important demonstration remains visible, and there are no unwanted watermarks or private details, the Reel is ready for the publishing step.

    Step 9: Upload and Publish the Instagram Reel

    When the final video has been reviewed, upload the clean Instagram version rather than a copy downloaded from another social media platform.

    Instagram lets you create a Reel from the Instagram app and add existing photos or video clips from your device. The exact button names can change as Instagram updates its interface.

    Upload the Reel in Instagram

    A typical beginner workflow is:

    1. Open Instagram.

    2. Tap Create or the + button.

    3. Choose Reel.

    4. Select your final vertical video from your device.

    5. Review or trim the video if necessary.

    6. Add captions, music, text, or other Instagram features only if you need them.

    7. Tap Next.

    8. Add a clear caption and any other required information.

    9. Choose the sharing and audience options available to your account.

    10. Review everything carefully.

    11. Tap Share when the Reel is ready.

    Figure 11. The Instagram publishing workflow includes selecting the final video, reviewing it, adding a caption, checking settings and rights, and sharing.

    Explanation: Exact button names can change, so review the current Instagram interface before publishing.

    Instagram also provides tools for creating, editing, and managing Reels, although the exact options available can vary by account and app version.

    Add a Clear Caption

    Your caption should accurately explain what the Reel is about.

    For example:

    Learn a simple way to summarize a long document with AI. Always compare important information with the original document before using the summary.

    Avoid exaggerated or misleading claims simply to attract attention.

    Check Sharing and Privacy Settings

    Before publishing, review who can see and interact with the Reel.

    Your available sharing options can depend on your account and privacy settings. Instagram also provides controls related to sharing, remixing, and reuse of Reels.

    If you are publishing professional or business content, also check whether any partnership, promotional, or branded-content requirements apply.

    Review AI-Generated or AI-Altered Content

    Meta uses AI info labels to provide additional context about some AI-generated or AI-modified content on Instagram, Facebook, and Threads. Meta may identify AI content through technical signals or information supplied when content is uploaded.

    Before publishing realistic AI-generated or significantly AI-altered content, check the current disclosure options available in Instagram.

    Pay particular attention when AI content:

    · Realistically represents a person.

    · Alters what a real person appears to say or do.

    · Creates a realistic event that did not occur.

    · Significantly changes a real photograph or video.

    · Could reasonably be mistaken for authentic footage.

    Meta continues to develop its AI-content transparency and labeling approach, so these requirements and labels can change.

    Review Before Publishing

    Before tapping Share, check:

    · The correct video was selected.

    · The Reel is displayed vertically as intended.

    · The caption accurately describes the content.

    · Captions and important text remain readable.

    · The narration is clear.

    · Music and sound effects have appropriate usage rights.

    · Images, video clips, fonts, voices, and other assets are properly licensed or permitted.

    · No private or confidential information appears.

    · No unwanted watermark, username, or platform branding remains.

    · Any appropriate AI-content information or disclosure has been completed.

    Practical Example

    Suppose your Reel uses an AI-generated illustration of a fictional office worker while the narration explains how to summarize a document.

    Review the illustration for obvious AI mistakes, check the voice and captions, verify your asset licences, and check Instagram’s current AI disclosure options before publishing.

    If instead you create a realistic AI video that makes a real person appear to perform an action that never happened, transparency becomes particularly important because viewers could mistake the synthetic content for real footage.

    Common Mistakes to Avoid When Creating Instagram Reels with AI

    Beginners can save time by avoiding several common problems that affect clarity, quality, licensing, privacy, or publishing.

    Common mistakes include:

    · Trying to explain too many ideas in one Reel.

    · Using a long introduction before reaching the main point.

    · Placing captions or important text too close to the edges.

    · Shrinking screenshots until the text becomes difficult to read.

    · Using music without checking whether the licence allows Instagram use.

    · Letting background music overpower the narration.

    · Publishing AI-generated information without checking factual accuracy.

    · Using a real person’s voice, image, or likeness without appropriate permission.

    · Uploading a downloaded copy from another platform instead of using a clean master export.

    · Leaving unwanted watermarks, usernames, logos, or branded endings in the video.

    · Using AI-generated visuals without checking for distorted objects, incorrect text, or unrealistic details.

    · Forgetting to review privacy settings and sharing options.

    · Skipping the final review of the exported file.

    · Ignoring relevant AI-content disclosure or labeling requirements when realistic synthetic or altered content is used.

    How to Avoid These Mistakes

    Keep each Reel focused on one clear lesson and work from a clean master project.

    Before publishing, review the:

    · Script.

    · Visuals.

    · Captions.

    · Audio.

    · Music rights.

    · Asset licences.

    · Permissions.

    · Privacy settings.

    · AI-generated content.

    · Final export.

    · Any applicable disclosure or labeling requirements.

    If something is unclear, incorrect, poorly positioned, or not properly licensed, correct the project and export a new version before publishing.

    Figure 12. A final checklist helps catch quality, licensing, privacy, branding, and AI-transparency problems before publication.

    Explanation: Watching the actual exported video from beginning to end is one of the most important final checks.

    Benefits of Creating Instagram Reels with AI

    AI can make the Instagram Reels workflow easier for beginners by helping with planning, writing, visuals, narration, captions, and editing.

    Key benefits include:

    · Faster idea generation: AI can suggest focused Reel topics when you are not sure what to create.

    · Simpler script writing: AI can turn a basic idea into a short script that you can review and improve.

    · Easier visual planning: AI can suggest scenes, image ideas, screen recordings, text overlays, and simple shot sequences.

    · More accessible production: AI voices, captions, and editing assistance can help beginners create videos without advanced production skills.

    · Better organization: AI can help reduce a broad topic to one clear lesson that fits a Reel.

    · Easier repurposing: A Reel can be adapted from a longer video, article, tutorial, or clean master project.

    · More consistent workflow: Using the same planning, scripting, editing, and review process can make future Reels easier to produce.

    · Useful learning support: AI can explain unfamiliar editing terms and suggest improvements when you are learning a new tool.

    AI is most useful when it supports your decisions rather than replacing them. Review the final script, visuals, audio, captions, facts, licences, permissions, privacy settings, and publishing choices before making the Reel public.

    Limitations of Creating Instagram Reels with AI

    AI can help with many parts of the Instagram Reels workflow, but it does not remove the need for careful human review.

    Common limitations include:

    · Factual errors: AI-generated scripts can contain incorrect, outdated, or misleading information.

    · Generic writing: AI may produce scripts that sound repetitive or similar to other content unless you revise them.

    · Visual inconsistencies: AI-generated images or video clips may contain distorted objects, unusual details, inconsistent characters, or misspelled text.

    · Voice limitations: AI narration can mispronounce names, sound unnatural, or use incorrect emphasis.

    · Licensing differences: AI tools, stock libraries, music services, templates, and fonts can have different rules for commercial use.

    · Platform changes: Instagram features, music options, upload settings, labels, and publishing tools can change over time.

    · Editing is still required: AI-generated material usually needs trimming, timing adjustments, caption checks, and final quality review.

    · Privacy risks: Uploading private documents, photographs, recordings, or personal information to an AI tool can create privacy concerns.

    · Disclosure requirements: Some realistic AI-generated or significantly AI-altered content may require additional transparency or labeling.

    · No guarantee of performance: AI can help create a clearer Reel, but it cannot guarantee views, followers, engagement, sales, or other results.

    How to Reduce These Limitations

    Use AI as an assistant rather than treating its output as automatically finished.

    Verify important facts, review every generated visual and voice recording, check licences and permissions, protect private information, and watch the complete exported Reel before publishing.

    When Instagram changes a feature, music option, disclosure method, or publishing requirement that affects your workflow, check the current official guidance before relying on older instructions.

    Common Myths About Creating Instagram Reels with AI

    Several common myths can make beginners expect too much from AI or use it in ways that create unnecessary problems.

    Myth 1: AI Can Create a Perfect Instagram Reel Automatically

    Reality: AI can help with ideas, scripts, visuals, narration, captions, and editing suggestions, but the final Reel still needs human review for accuracy, quality, timing, licensing, privacy, and platform requirements.

    Myth 2: Every AI-Generated Reel Must Be Labelled the Same Way

    Reality: AI transparency and labeling can depend on how the content was created and how realistic or significantly altered it is. Simple AI assistance with brainstorming or script editing is different from realistic synthetic media that could be mistaken for real footage.

    Myth 3: AI-Generated Images and Music Are Automatically Copyright-Free

    Reality: Rights and commercial-use conditions depend on the tool, licence, source material, and intended use. Always check the terms that apply to the assets you use.

    Myth 4: More Effects Make a Reel More Professional

    Reality: Too many transitions, animations, text boxes, or sound effects can distract viewers. Clear visuals, readable captions, and simple editing are often more effective for beginner tutorials.

    Myth 5: Instagram Reels Must Be Extremely Fast

    Reality: A Reel should be concise and easy to follow, but viewers still need enough time to understand the information and read important captions.

    Myth 6: AI Can Guarantee More Views or Followers

    Reality: AI can help improve your workflow, but it cannot guarantee views, followers, engagement, sales, or other results. Audience interest, usefulness, presentation, timing, competition, and many other factors can affect performance.

    Frequently Asked Questions

    How Long Can an Instagram Reel Be?

    Instagram currently allows Reels of up to 20 minutes, although shorter videos are often easier to keep focused and suitable for quick viewing.

    What Size Should I Use for an Instagram Reel?

    A practical beginner format is 1080 × 1920 pixels with a 9:16 vertical aspect ratio.

    Do I Need an Expensive AI Video Tool?

    No. Beginners can start with simple tools for writing, editing, captions, narration, or visuals.

    Check whether a free plan adds watermarks, limits exports, restricts resolution, or has different commercial-use conditions.

    Can I Create an Instagram Reel Without Showing My Face?

    Yes. You can create faceless Reels using:

    · Screen recordings.

    · AI-generated visuals.

    · Licensed stock footage.

    · Text and graphics.

    · Charts.

    · Product footage.

    · Voice-over narration.

    Can I Use an AI Voice in an Instagram Reel?

    Yes, when the tool and licence allow your intended use.

    Review the narration carefully and avoid cloning or impersonating a real person’s voice without appropriate permission.

    Should I Add Captions?

    Captions are strongly recommended.

    They can help viewers who are watching without sound and improve accessibility for people who are deaf or hard of hearing.

    Can I Use Any Music I Find Online?

    No.

    Only use music when you have appropriate permission, a suitable licence, or access through Instagram under terms that allow your intended use.

    Do I Need to Disclose AI Use?

    It depends on how AI was used.

    Simple assistance with brainstorming, script writing, or minor editing is different from realistic AI-generated or significantly altered content that viewers could mistake for real people, events, or places.

    Check Instagram’s current AI labeling and disclosure options before publishing realistic synthetic content.

    Can I Reuse the Same Reel on YouTube Shorts, TikTok, or Facebook Reels?

    Yes, but return to your clean master video and create a separate version for each platform.

    Check:

    · Aspect ratio.

    · Caption placement.

    · Music rights.

    · Safe areas.

    · Platform branding.

    · Disclosure requirements.

    before publishing each version.

    Will AI Guarantee More Views or Followers?

    No.

    AI can help with planning and production, but it cannot guarantee views, followers, engagement, sales, or other results.

    Key Takeaways

    Creating Instagram Reels with AI becomes easier when you follow a simple, repeatable workflow.

    Remember these main points:

    · Start with one clear idea for each Reel.

    · Use AI to help brainstorm, outline, and draft the script, but always review the final wording.

    · Keep the script focused and make the topic clear near the beginning.

    · Use a 9:16 vertical format for a full-screen phone-friendly layout.

    · Prepare visuals that are easy to understand on a small screen.

    · Keep captions, titles, faces, and important information away from the extreme edges.

    · Use clear narration and make sure background music does not overpower the voice.

    · Check licences and permissions for music, stock footage, images, fonts, voices, templates, and other third-party assets.

    · Review AI-generated visuals for distorted objects, incorrect text, or unrealistic details.

    · Edit out unnecessary pauses, repeated information, and distracting effects.

    · Export a clean final version and watch the complete file before uploading.

    · Review Instagram’s current AI-content labeling or disclosure options when realistic synthetic or significantly altered content is involved.

    · Keep your clean master video, project files, prompts, licences, permissions, and final exports for future corrections or repurposing.

    AI can help make the production process faster, but the final quality, accuracy, licensing, privacy, accessibility, and publishing decisions still require careful human review.

    Final Tip

    Keep your first Instagram Reels simple.

    Choose one useful idea, explain it clearly, use readable visuals and captions, and review the final video before publishing. You do not need complicated effects or advanced editing to create a useful Reel.

    As your workflow improves, keep your clean master files, prompts, licences, permissions, and final exports organized. This makes it easier to correct mistakes, update older videos, or repurpose successful Reels for other platforms later.

    Continue Learning

    If you want to continue building your AI video skills, these AI Mastery guides are useful next steps:

    · How to Repurpose One AI Video for YouTube Shorts, TikTok, Instagram Reels, and Facebook Reels: Beginner Guide (2026) — Learn how to adapt one clean master video into separate versions for several social media platforms.

    · How to Choose AI Video Sizes, Aspect Ratios, and Export Settings: Beginner Guide (2026) — Learn how to choose the correct dimensions, frame rate, file format, and export settings for vertical video.

    · How to Create YouTube Shorts with AI: Beginner Step-by-Step Guide (2026) — Learn how to create, edit, export, and publish short-form videos for YouTube.

    · How to Create Faceless YouTube Videos with AI: Complete Beginner Step-by-Step Guide (2026) — Follow a complete workflow for planning, scripting, visuals, narration, editing, and publishing.

    · How to Edit AI-Generated Videos: Beginner Step-by-Step Guide (2026) — Learn how to trim clips, arrange scenes, improve pacing, and prepare a clean final video.

    · How to Add Voice, Music, and Captions to AI Videos: Beginner Step-by-Step Guide (2026) — Learn how to add narration, background music, sound effects, and readable captions.

    · How to Create AI Virtual Presenter Videos for TikTok: Beginner Guide (2026) — Learn how a fictional AI presenter can be used in short-form vertical video workflows.

    Sources and References

    The following official Instagram and Meta sources were checked for the Reel length, dimensions, music, intellectual-property, and AI-transparency information used in this guide. Instagram features and policies can change, so important requirements should be checked again when Meta announces an update or when you change your publishing workflow.

    · Instagram Help Center — Record a Reel on Instagram: Instagram explains that Reel clips can currently add up to 20 minutes.

    · Instagram Help Center — Reel Size and Aspect Ratios: Instagram states that uploaded Reels can use aspect ratios from 1.91:1 through 9:16 and should have at least 30 frames per second and the required minimum resolution.

    · Instagram Help Center — Access to the Licensed Music Library: Instagram explains that access to licensed music can vary and provides information about music available for commercial purposes through Meta’s Sound Collection.

    · Instagram Help Center — How to Use Music in Videos: Instagram provides guidance about using music while respecting Meta’s agreements with music rights holders.

    · Instagram Help Center — What Audio You Can Use in a Reel: Instagram explains options for original and licensed audio used in Reels.

    · Instagram Help Center — Intellectual Property: Instagram states that users should post only content that does not violate another person’s intellectual-property rights.

    · Meta — Our Approach to Labeling AI-Generated Content: Meta explains its approach to identifying and labeling AI-generated or significantly AI-modified content across Instagram, Facebook, and Threads.

    · Meta — Transparency of AI-Generated Content: Meta confirmed in July 2026 that it continues to work on identifying and labeling AI-generated content as realistic synthetic media becomes more difficult to distinguish from authentic media.

    Important: This guide provides general educational information about AI video creation, copyright, licensing, privacy, disclosure, and publishing. It is not legal advice. Always verify that you have appropriate rights or permission for music, photographs, video clips, voices, fonts, templates, and other material you publish.
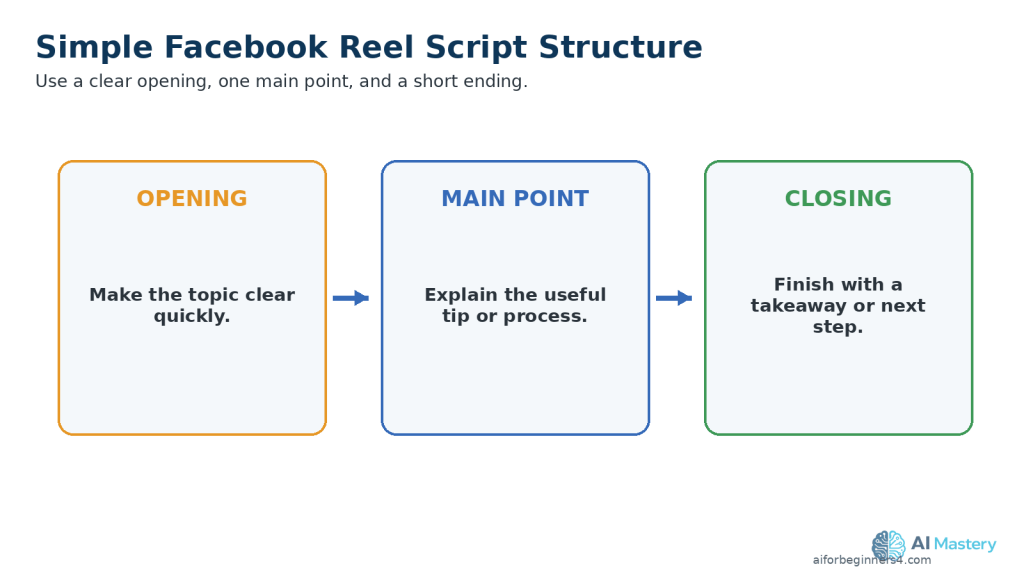
  • How to Create YouTube Shorts with AI: Beginner Step-by-Step Guide (2026)

    How to Create YouTube Shorts with AI: Beginner Step-by-Step Guide (2026)

    Estimated Reading Time: 18 minutes
    Last Updated: August 15, 2026

    Before Learning

    Before you begin, it helps to have a basic idea for the short video you want to create. Your idea can be educational, entertaining, promotional, or based on a longer video that you want to turn into a shorter version.

    You do not need advanced video-editing skills. AI tools can help you plan the topic, write a short script, create or improve visuals, generate narration, add captions, and prepare the video for YouTube Shorts.

    For most beginner projects, a 9:16 vertical video at 1080 × 1920 pixels is a practical working format. Keep important text, captions, faces, and other key content away from the extreme edges so YouTube interface elements are less likely to cover them.

    This guide will show you how to move from a simple idea to a finished YouTube Short while keeping your original project files, source material, licences, permissions, and clean master export organized.

    What You’ll Learn

    By the end of this guide, you will know how to:

    · Choose a clear idea for a YouTube Short.

    · Use AI to brainstorm topics and create a simple video plan.

    · Write a short, focused script with AI assistance.

    · Create or prepare visuals that work well in a vertical format.

    · Generate or record narration when needed.

    · Add readable captions and on-screen text.

    · Choose suitable music and sound effects while checking usage rights.

    · Edit the video so the opening quickly communicates the topic.

    · Keep important content inside safe viewing areas.

    · Review the final export for quality, captions, audio, branding, and unwanted watermarks.

    · Upload the finished video as a YouTube Short.

    · Use YouTube’s AI-content disclosure tools when applicable.

    · Keep your project files, prompts, licences, permissions, and clean master export for future reuse.

    Introduction

    YouTube Shorts are short-form videos designed for quick viewing on phones and other devices. They can be used for tutorials, tips, demonstrations, product explanations, educational content, and many other types of videos.

    AI can help with several parts of the process. You can use it to generate ideas, outline a Short, draft a script, create visuals, prepare narration, improve captions, and suggest editing changes.

    However, AI should support your work rather than replace your final judgment. Review every script, visual, voice, caption, and factual claim before publishing. Make sure you have permission to use any music, images, video clips, voices, fonts, or other material that you did not create yourself.

    A successful beginner workflow is to start with one simple idea, create a short script, prepare vertical visuals, add clear audio and captions, edit the video carefully, and review the final export before uploading it to YouTube.

    Figure 1. A simple YouTube Shorts workflow moves from one clear idea through scripting, visuals, audio, editing, export, and publishing.

    Explanation: Following the same basic sequence for each Short makes the production process easier to repeat and review.

    What Are YouTube Shorts?

    YouTube Shorts are short-form videos that appear in YouTube’s Shorts experience. YouTube currently categorizes square or vertical videos of up to three minutes as Shorts when they meet its requirements.

    Shorts are designed for quick viewing and work especially well for:

    · Quick tips.

    · Short tutorials.

    · Before-and-after examples.

    · Simple demonstrations.

    · Short educational explanations.

    · Highlights from longer videos.

    · Lists and recommendations.

    · Answers to common questions.

    Recommended Beginner Format

    For a full-screen vertical Short, a practical beginner format is:

    · Aspect ratio: 9:16

    · Resolution: 1080 × 1920 pixels

    · Orientation: Vertical

    YouTube can also accept square Shorts, but a 9:16 vertical layout makes good use of a phone screen and is convenient when the video may later be adapted for other vertical platforms.

    Figure 2. A 9:16 vertical frame at 1080 × 1920 pixels is a practical beginner format for a full-screen YouTube Short.

    Explanation: Keeping important text, faces, and captions toward the centre reduces the chance that interface elements will cover them.

    Practical Example

    Instead of creating a ten-minute tutorial about five beginner AI tools, you could create a Short that explains one useful tool in less than three minutes.

    The Short can focus on one clear idea, show the most important steps, and direct viewers to your longer guide or website if they want more detail.

    Step 1: Choose One Clear Idea for Your YouTube Short

    A YouTube Short works best when it focuses on one main idea. Trying to explain too many things in a short video can make it feel rushed or confusing.

    Choose a topic that can be understood quickly, such as:

    · One beginner AI tip.

    · One useful AI tool.

    · One common mistake.

    · One simple comparison.

    · One short tutorial.

    · One quick answer to a common question.

    · One useful feature from a longer AI Mastery article.

    Use AI to Brainstorm Ideas

    You can ask an AI assistant to suggest Short ideas based on your topic.

    For example:

    Prompt:
    “Give me 10 beginner-friendly YouTube Shorts ideas about using AI for everyday tasks. Keep each idea focused on one clear lesson.”

    Review the suggestions carefully and choose an idea that is useful, accurate, and suitable for your audience.

    Keep the Topic Narrow

    Instead of creating a Short called:

    “Everything You Need to Know About AI”

    choose something more specific, such as:

    “3 Ways Beginners Can Use AI to Save Time”

    or:

    “How to Summarize a Long Document with AI”

    A narrow topic makes it easier to write a clear script, choose useful visuals, and keep the video focused.

    Figure 3. One focused idea is usually easier to explain in a Short than a broad topic containing many unrelated points.

    Explanation: A narrow topic helps beginners keep the script, visuals, and editing focused on one useful lesson.

    Practical Example

    If your longer video explains ten AI tools, you could create a separate Short about just one of those tools.

    The Short can explain what the tool does, show one useful example, and encourage interested viewers to learn more from your longer content.

    Step 2: Write a Short, Focused Script with AI

    A YouTube Short usually works better when the script is simple, direct, and focused on one main message.

    AI can help you turn your idea into a short script, but you should review the result carefully before using it.

    Start with a Clear Prompt

    Give the AI assistant enough information to understand the topic, audience, and style you want.

    For example:

    Prompt:
    “Write a beginner-friendly YouTube Short script about how AI can help summarize a long document. Keep it clear, practical, and focused on one useful example. Use simple language and avoid hype.”

    Use a Simple Script Structure

    A useful beginner structure is:

    Figure 4. A simple Short script can use an opening, one main point, and a closing takeaway.

    Explanation: This structure helps the video reach the useful information quickly without requiring a long introduction.

    1. Opening: Quickly tell viewers what they will learn.

    2. Main point: Explain the useful tip, method, or example.

    3. Closing: Finish with a short takeaway or next step.

    Keep the Opening Direct

    The first few seconds should make the topic clear.

    Instead of:

    “Hello everyone, welcome back to another video.”

    you could begin with:

    “Have a long document you do not want to read page by page? AI can help you create a quick summary.”

    This gets to the topic faster.

    Review the AI-Written Script

    Check the script for:

    · Factual accuracy.

    · Clear language.

    · Unnecessary repetition.

    · Claims that sound exaggerated or unsupported.

    · Instructions that may be outdated.

    · Words that are difficult for beginners.

    · Information that does not fit the Short’s main topic.

    Do not assume that an AI-generated script is automatically correct.

    Practical Example

    For a Short about summarizing documents, your script might explain one simple workflow:

    1. Upload the document to an AI tool that supports file analysis.

    2. Ask for a short summary of the main points.

    3. Review the summary against the original document.

    4. Correct anything important before using or sharing it.

    This gives the viewer one clear lesson without trying to explain every document-analysis feature at once.

    Step 3: Create or Prepare Vertical Visuals

    Your visuals should support the script and make the main idea easy to understand on a phone screen.

    For a typical YouTube Short, use a 9:16 vertical layout. A practical working size is 1080 × 1920 pixels.

    Choose Visuals That Match the Script

    Depending on your topic, you can use:

    · AI-generated images.

    · Stock photos or stock video.

    · Screen recordings.

    · Charts or simple graphics.

    · Text-based slides.

    · Product or workspace footage.

    · Clips from a longer video you created.

    Use only visuals that genuinely help explain the point.

    Keep Important Content Visible

    Vertical video is narrower than standard horizontal video. Keep important elements such as:

    · Faces.

    · Captions.

    · Titles.

    · Buttons.

    · Screenshots.

    · Charts.

    · Demonstrations.

    away from the extreme top, bottom, and sides of the frame.

    This reduces the chance that YouTube interface elements will cover important information.

    Make Screenshots Easy to Read

    If you include a computer screenshot, do not shrink the entire screen until the text becomes too small.

    Instead, crop or zoom into the part viewers need to see.

    For example, if you are demonstrating an AI prompt, show the prompt box clearly rather than displaying the entire browser window at a tiny size.

    Check Licences and Permissions

    If you use stock footage, photographs, templates, fonts, music-related graphics, or other assets you did not create yourself, check the licence and commercial-use conditions before publishing.

    Do not assume that an image or video is free to reuse simply because you found it online.

    Practical Example

    For a Short about summarizing a document with AI, you might use:

    Figure 5. Plan vertical visuals in the same order as the script so each scene supports the current point.

    Explanation: A simple scene sequence helps viewers follow the process on a small vertical screen.

    1. A visual of a long document.

    2. A screen recording showing the document being uploaded.

    3. A close-up of the summary prompt.

    4. A simple visual showing the shorter summary result.

    5. A final reminder to review the AI-generated summary against the original document.

    Step 4: Add Narration or an AI Voice

    Narration can make a YouTube Short easier to follow, especially when the video explains a process, gives a tip, or shows a demonstration.

    You can record your own voice or use an AI-generated voice when the tool and licence allow your intended use.

    Choose a Clear Voice

    The narration should be easy to understand and should match the pace of the visuals.

    A good voice-over should:

    · Speak clearly.

    · Avoid rushing.

    · Use natural pauses.

    · Match the tone of the topic.

    · Pronounce technical terms correctly.

    · Leave enough time for viewers to read important on-screen text.

    Review AI-Generated Narration

    If you use an AI voice, listen to the entire recording before adding it to the video.

    Check for:

    · Mispronounced names or technical terms.

    · Unnatural pauses.

    · Missing words.

    · Incorrect emphasis.

    · Audio that sounds too fast or too slow.

    · Sentences that do not match the visuals.

    Correct the script or regenerate the affected section when necessary.

    Keep the Narration and Visuals Aligned

    The visual shown on screen should support what the viewer is hearing.

    For example, if the narration says:

    “Upload your document to the AI tool.”

    the video should show the upload step at approximately the same time.

    This makes the Short easier to understand.

    Figure 6. Match narration and visuals so viewers see each step at approximately the same time they hear it.

    Explanation: Good timing reduces confusion and makes demonstrations easier to follow.

    Protect Privacy and Get Permission

    Do not clone or imitate a real person’s voice without appropriate permission.

    If you use recordings from another person, make sure you have permission to use them and understand any licence or platform conditions that apply.

    Practical Example

    For a Short explaining document summarization, the narration could briefly guide the viewer through uploading a document, asking for a summary, and checking the result.

    Each visual can change as the narration moves to the next step, keeping the video clear and easy to follow.

    Step 5: Add Captions and On-Screen Text

    Captions and on-screen text can make a YouTube Short easier to understand, especially when viewers are watching without sound.

    Keep Captions Easy to Read

    Use captions that are:

    · Large enough to read on a phone.

    · Short and easy to scan.

    · High contrast against the background.

    · Timed closely with the spoken words.

    · Positioned away from important faces, demonstrations, and other visual details.

    Avoid placing captions at the extreme bottom or sides of the screen because YouTube interface elements may cover those areas.

    Use On-Screen Text Carefully

    On-screen text can highlight the most important point in the video.

    For example, you could show:

    “3 Steps to Summarize a Document with AI”

    near the beginning of the Short.

    Later, you might show short labels such as:

    · Step 1: Upload

    · Step 2: Ask for a Summary

    · Step 3: Review the Result

    Keep text simple. Too many words on screen at the same time can make a Short difficult to follow.

    Check Spelling and Accuracy

    Review all captions and text before exporting the video.

    Check for:

    · Spelling mistakes.

    · Missing words.

    · Incorrect punctuation.

    · Wrong names or technical terms.

    · Captions that appear too early or too late.

    · Text that does not match the narration.

    Accessibility

    Captions can help people who are deaf or hard of hearing, viewers watching without sound, and people who find written text easier to follow than narration alone.

    Do not rely only on color to communicate important information. Use clear words, labels, or symbols as well.

    Practical Example

    If the narrator says, “Always check the AI-generated summary against the original document,” display a short caption such as:

    “Always verify the summary.”

    This reinforces the main lesson without overcrowding the screen.

    Figure 7. Place captions where they remain readable without covering faces or sitting too close to interface-heavy edges.

    Explanation: Clear caption placement improves readability and accessibility, especially on phones.

    Step 6: Add Music and Sound Effects Carefully

    Music and sound effects can make a YouTube Short more engaging, but they should support the video rather than overpower the narration or distract from the main message.

    Choose Music You Are Allowed to Use

    YouTube provides music through the Shorts Audio Library and royalty-free music and sound effects through the YouTube Audio Library. YouTube states that music availability and the amount of a track you can use in a Short can vary by song.

    You can also use music that you created yourself or music from another source when its licence allows your intended use.

    Do not assume that music is safe to use simply because you found it online.

    Keep Music Below the Narration

    If your Short includes spoken narration, keep the background music at a lower volume so the voice remains easy to understand.

    Listen to the complete video with headphones or speakers and check that:

    · The narration is clear.

    · Music does not cover important words.

    · Sound effects are not unexpectedly loud.

    · Audio changes are smooth.

    · The beginning and ending do not contain sudden volume jumps.

    Be Careful with Longer Shorts

    YouTube explains that music use in Shorts depends on the selected track, and some songs may allow more usable time than others. YouTube also notes special copyright restrictions for certain Shorts longer than one minute, so check the music information shown in YouTube before publishing.

    Keep Licensing Records

    If you use music or sound effects from outside YouTube, keep a copy of the licence, permission, receipt, or other record that explains how you are allowed to use the audio.

    If attribution is required, follow the licence instructions carefully.

    Figure 8. Keep narration clear, background music lower, and verify the rights or licence for every audio source.

    Explanation: Music available under one set of terms may not automatically be permitted in another editing or publishing workflow.

    Practical Example

    For a short AI tutorial, you might use quiet background music during the introduction and demonstration while keeping the narration clearly louder.

    If you later repurpose the Short for another platform, return to your clean master video and confirm that the music licence also permits use on that platform rather than assuming YouTube music rights automatically apply elsewhere.

    Step 7: Edit the YouTube Short for a Clear, Fast Flow

    A YouTube Short should move quickly enough to keep the viewer interested without making the information difficult to follow.

    Remove Unnecessary Parts

    Review the full video and remove:

    · Long pauses.

    · Repeated explanations.

    · Empty frames.

    · Slow introductions.

    · Unnecessary transitions.

    · Visuals that do not support the main point.

    The goal is to keep the Short focused on one useful idea.

    Match the Editing to the Script

    Change visuals when the narration moves to a new point.

    For example:

    · Show the problem when the opening introduces it.

    · Show the AI tool when the script explains the tool.

    · Show the result when the narration describes the result.

    · Show the final takeaway at the end.

    This helps the viewer understand the information without having to guess what each visual means.

    Keep Transitions Simple

    You do not need complicated effects between every scene.

    Simple cuts, gentle zooms, or basic fades are often enough for beginner tutorials.

    Too many effects can distract from the content.

    Keep Important Content Visible

    Check that captions, faces, screenshots, and important text remain clear throughout the video.

    If a scene contains small text, zoom into the relevant area instead of showing the entire screen at once.

    Practical Example

    For a Short about summarizing a document with AI, the editing sequence might be:

    1st Show the long document.

    2nd Show the upload step.

    3rd Show the summary prompt.

    4th Show the shorter result.

    5th End with the reminder to verify the summary against the original.

    This creates a simple beginning-to-end flow without unnecessary scenes.

    Figure 9. Removing long pauses, repeated information, and distracting effects creates a clearer editing flow.

    Explanation: Simple editing can keep attention on the lesson rather than on unnecessary production effects.

    Step 8: Export and Review the Final YouTube Short

    When your editing is complete, export the Short as a separate final video file. Keep your original editing project and clean master version unchanged so you can make corrections or create another version later.

    Choose Practical Export Settings

    For many beginner YouTube Shorts, a practical starting point is:

    · Aspect ratio: 9:16

    · Resolution: 1080 × 1920 pixels

    · File format: MP4

    · Video codec: H.264

    · Audio codec: AAC

    · Frame rate: Keep the same frame rate used in your original footage or project whenever possible.

    YouTube recommends H.264 video encoding and advises uploading video using the same frame rate at which it was recorded.

    Figure 10. Beginner-friendly export settings include a 9:16 frame, 1080 × 1920 resolution, MP4, H.264 video, and AAC audio.

    Explanation: Keep the frame rate matched to the project or source when possible and review the exported file before uploading.

    Watch the Exported File Before Uploading

    Do not rely only on the preview inside your video editor. Open the actual exported video and watch it from beginning to end.

    Check for:

    · Blurry or pixelated video.

    · Cropped faces, screenshots, or text.

    · Captions that are difficult to read.

    · Audio that is too loud or too quiet.

    · Music that covers the narration.

    · Missing scenes or blank frames.

    · Spelling mistakes.

    · Unwanted logos, watermarks, usernames, or branded endings.

    · Private or confidential information that should not appear publicly.

    Check the Video Length and Shape

    YouTube currently allows Shorts uploads of up to three minutes when the video uses a square or vertical aspect ratio.

    A Short does not need to use the full three minutes. Use only the time needed to explain the idea clearly.

    Keep a Clean Master

    Save the clean master separately from the final YouTube export.

    For example:

    · ai-document-summary-master.mp4

    · ai-document-summary-youtube-short-final.mp4

    This makes it easier to correct the video later or create versions for TikTok, Instagram Reels, Facebook Reels, or another platform.

    Practical Example

    After exporting your document-summary Short, watch the final MP4 file on your computer or phone.

    If the captions are readable, the narration is clear, the important screen recording remains visible, and no unwanted watermark or branding appears, the video is ready for the next publishing step.

    Step 9: Upload and Publish the YouTube Short

    When the final video has been reviewed, upload it directly to YouTube from your clean export rather than using a copy downloaded from another social media platform.

    YouTube Studio currently allows creators to upload square or vertical Shorts of up to three minutes from a computer.

    Upload the Short in YouTube Studio

    1. Sign in to YouTube Studio.

    2. Click Create.

    3. Choose Upload videos.

    4. Select your final YouTube Short video file.

    5. Add a clear title.

    6. Complete the audience and other required settings.

    7. Review the video details.

    8. Choose the appropriate visibility setting.

    9. Publish the Short when everything is correct.

    Figure 11. The YouTube Studio upload workflow includes the final file, title, audience setting, disclosure review, visibility, and publishing.

    Explanation: Complete the required details carefully before making the Short public.

    YouTube recommends keeping titles accurate and placing the most important words near the beginning because viewers may see only part of a title.

    Add a Clear Title and Description

    The title should tell viewers what the Short is about without exaggerating what they will see.

    For example:

    How to Summarize a Long Document with AI

    A short description can explain the main topic and provide useful information or a relevant link when appropriate.

    Avoid misleading titles, descriptions, or claims simply to attract clicks.

    Check the Audience Setting

    YouTube asks creators to indicate whether content is made for children.

    Choose the setting based on the actual intended audience and content of the video rather than guessing from the video format.

    Disclose Realistic AI-Generated or Altered Content When Required

    YouTube requires creators to disclose certain realistic content that has been meaningfully altered or generated using AI.

    Examples include content that:

    · Makes a real person appear to say or do something they did not actually say or do.

    · Alters footage of a real event or place in a meaningful way.

    · Creates a realistic-looking event or scene that did not actually occur.

    YouTube may display a Made with AI or similar disclosure to give viewers more context about how certain content was created.

    Using AI simply to help write a script, brainstorm ideas, or make minor production improvements does not necessarily mean every video requires the same disclosure. Check YouTube’s current disclosure guidance for the type of AI content you created.

    Review Before Publishing

    Before making the Short public, check:

    · The correct video file was uploaded.

    · The title matches the actual content.

    · The description is accurate.

    · The audience setting is correct.

    · Any required AI disclosure has been completed.

    · Captions and important text remain visible.

    · The video does not contain private information.

    · Music, images, video clips, voices, and other assets are properly licensed or permitted.

    · No unwanted watermark, logo, username, or branded ending appears.

    Practical Example

    If your Short uses an AI-generated fictional illustration and AI-assisted script but does not realistically depict a real person or event, review YouTube’s disclosure requirements before deciding whether a label is necessary.

    If the Short realistically makes a real person appear to say something they never said, disclosure is required under YouTube’s altered or synthetic-content policy.

    Common Mistakes to Avoid When Creating YouTube Shorts

    Beginners can save time by avoiding a few common problems that affect clarity, quality, licensing, or publishing.

    Common mistakes include:

    · Trying to explain too many ideas in one Short.

    · Using a long introduction before getting to the main point.

    · Placing captions or important text too close to the edges.

    · Shrinking screenshots until the text becomes difficult to read.

    · Using music without checking whether the licence allows YouTube use.

    · Letting background music overpower the narration.

    · Publishing AI-generated information without checking factual accuracy.

    · Using a real person’s voice, image, or likeness without appropriate permission.

    · Uploading a downloaded copy from another platform instead of using a clean master export.

    · Leaving unwanted watermarks, logos, usernames, or branded endings in the video.

    · Skipping the final review of the exported file.

    · Forgetting required AI-content disclosure when realistic synthetic or altered content is used.

    How to Avoid These Mistakes

    Keep each Short focused on one clear lesson, use a clean master project, and review the final exported video before uploading it.

    Check the script, visuals, captions, audio, licences, permissions, privacy, and any required disclosure. If something is unclear or incorrect, fix the project and export a new version before publishing.

    Figure 12. A final checklist helps catch quality, licensing, privacy, branding, and disclosure problems before publication.

    Explanation: Watching the actual exported file from beginning to end is one of the most important final checks.

    Benefits of Creating YouTube Shorts with AI

    Using AI can make the YouTube Shorts workflow faster and easier, especially for beginners who need help with planning, writing, visuals, narration, or captions.

    Key benefits include:

    · Faster idea generation: AI can help suggest focused topics when you are not sure what to create.

    · Simpler script writing: AI can turn a basic idea into a short, structured script that you can review and improve.

    · Easier visual planning: AI can help suggest scenes, image ideas, text overlays, and simple shot sequences.

    · More accessible production: AI voices, captions, and editing assistance can help beginners create videos without advanced production skills.

    · Better organization: AI can help turn a longer topic into one clear lesson that fits a Short.

    · Easier repurposing: A Short can be adapted from a longer video, article, tutorial, or clean master project.

    · More consistent workflow: Using the same planning, scripting, editing, and review process can make future Shorts easier to produce.

    · Useful learning support: AI can explain unfamiliar editing terms, suggest improvements, and help beginners understand each production step.

    AI is most useful when it supports your decisions rather than replacing them. Review the final script, visuals, audio, captions, facts, licences, and publishing settings before making the Short public.

    Limitations of Creating YouTube Shorts with AI

    AI can help with many parts of the YouTube Shorts workflow, but it does not remove the need for human review and careful editing.

    Common limitations include:

    · Factual errors: AI-generated scripts can contain incorrect, outdated, or misleading information.

    · Generic writing: AI may produce scripts that sound repetitive or similar to other content unless you revise them.

    · Visual inconsistencies: AI-generated images or video clips may contain distorted objects, unusual details, or inconsistent characters.

    · Voice limitations: AI narration can mispronounce names, sound unnatural, or use the wrong emphasis.

    · Licensing differences: AI tools, stock libraries, music services, and templates can have different rules for commercial use.

    · Platform changes: YouTube features, limits, disclosure requirements, and publishing options can change over time.

    · Editing is still required: AI-generated material usually needs trimming, timing adjustments, caption checks, and final quality review.

    · Privacy risks: Uploading private documents, photographs, recordings, or personal information to an AI tool can create privacy concerns.

    · Disclosure requirements: Some realistic AI-generated or altered content may require disclosure on YouTube.

    · No guarantee of performance: AI can help produce a clearer Short, but it cannot guarantee views, subscribers, engagement, or monetization.

    How to Reduce These Limitations

    Use AI as an assistant rather than treating its output as automatically finished.

    Verify important facts, review every generated visual and voice recording, check licences and permissions, protect private information, and watch the complete exported Short before publishing.

    When YouTube changes a feature or policy that affects your workflow, check the current official guidance before relying on older settings or instructions.

    Common Myths About Creating YouTube Shorts with AI

    Several common myths can make beginners expect too much from AI or use it in ways that create unnecessary problems.

    Myth 1: AI Can Create a Perfect YouTube Short Automatically

    Reality: AI can help with ideas, scripts, visuals, narration, captions, and editing suggestions, but the final Short still needs human review for accuracy, quality, timing, licensing, privacy, and platform requirements.

    Myth 2: Every AI-Generated Short Must Be Labelled the Same Way

    Reality: YouTube’s disclosure requirements depend on how AI was used and whether the content realistically alters or creates people, events, or places in a way viewers could mistake for reality. AI-assisted brainstorming or script editing does not automatically create the same disclosure requirement as realistic synthetic media.

    Myth 3: AI-Generated Images and Music Are Automatically Copyright-Free

    Reality: Rights and commercial-use conditions depend on the tool, licence, source material, and platform. Always check the terms that apply to the assets you use.

    Myth 4: More Effects Make a Short More Professional

    Reality: Too many transitions, animations, text boxes, or sound effects can distract viewers. Clear visuals, readable captions, and simple editing are often more effective for beginner tutorials.

    Myth 5: A YouTube Short Must Be Extremely Fast

    Reality: A Short should be concise, but viewers still need enough time to understand the information. Fast editing is not useful if captions cannot be read or the explanation becomes difficult to follow.

    Myth 6: AI Can Guarantee More Views or Subscribers

    Reality: AI can help improve your workflow, but it cannot guarantee views, subscribers, engagement, or monetization. Audience interest, usefulness, presentation, competition, timing, and many other factors can affect performance.

    Frequently Asked Questions

    How Long Can a YouTube Short Be?

    YouTube currently allows qualifying square or vertical Shorts of up to three minutes. A Short does not need to use the full available time; use only the length needed to explain the idea clearly.

    Do I Need an Expensive AI Video Tool?

    No. Beginners can start with simple tools for writing, editing, captions, narration, or visuals. Choose tools based on the features you actually need and check whether free plans add watermarks, restrict exports, or limit commercial use.

    Can I Make a YouTube Short Without Showing My Face?

    Yes. You can create a faceless Short using screen recordings, AI-generated visuals, licensed stock footage, text, narration, charts, or simple graphics.

    Can I Use an AI Voice in a YouTube Short?

    Yes, when the tool and licence allow your intended use. Review the narration carefully and avoid cloning or impersonating a real person’s voice without appropriate permission.

    Should I Add Captions?

    Captions are strongly recommended because they can help viewers understand the video when sound is unavailable or difficult to hear. They also improve accessibility for people who are deaf or hard of hearing.

    Can I Use Copyrighted Music in a Short?

    Only when you have appropriate permission or the music is provided under terms that allow your intended use. Music available inside YouTube may have specific conditions, so check the information attached to the track.

    Do I Need to Disclose AI Use?

    It depends on how AI was used. YouTube requires disclosure for certain realistic synthetic or meaningfully altered content that viewers could mistake for real people, events, or places. Simple AI assistance with brainstorming, script editing, or similar production tasks does not automatically create the same disclosure requirement.

    Can I Reuse the Same Short on TikTok, Instagram Reels, or Facebook Reels?

    Yes, but return to your clean master video and create a separate export for each platform. Check framing, captions, music rights, safe areas, platform branding, and disclosure requirements before publishing each version.

    Will Using AI Guarantee More Views?

    No. AI can help with planning and production, but it cannot guarantee views, subscribers, engagement, or monetization. The usefulness of the topic, presentation, audience interest, competition, timing, and other factors can affect performance.

    Key Takeaways

    Creating YouTube Shorts with AI becomes easier when you follow a simple, repeatable workflow.

    Remember these main points:

    · Start with one clear idea for each Short.

    · Use AI to help brainstorm, outline, and draft the script, but always review the final wording.

    · Keep the script concise and make the topic clear in the opening seconds.

    · Use a 9:16 vertical format for a full-screen phone-friendly layout.

    · Prepare visuals that are easy to understand on a small screen.

    · Keep captions, titles, faces, and important information away from the extreme edges.

    · Use clear narration and make sure music does not overpower the voice.

    · Check licences and permissions for music, stock footage, images, fonts, voices, and other third-party assets.

    · Edit out unnecessary pauses, repeated information, and distracting effects.

    · Export a clean final version and watch the entire file before uploading.

    · Use YouTube’s AI-content disclosure tools when realistic synthetic or meaningfully altered content requires disclosure.

    · Keep your clean master video, project files, prompts, licences, permissions, and final exports for future corrections or repurposing.

    AI can help make the production process faster, but the final quality, accuracy, licensing, privacy, and publishing decisions still require careful human review.

    Final Tip

    Keep your first YouTube Shorts simple.

    Choose one useful idea, explain it clearly, use readable visuals and captions, and review the final video before publishing. You do not need complicated effects or advanced editing to create a useful Short.

    As your workflow improves, keep your clean master files, prompts, licences, permissions, and final exports organized. This makes it easier to correct mistakes, update older videos, or repurpose successful Shorts for other platforms later.

    Continue Learning

    If you want to continue building your AI video skills, these AI Mastery guides are useful next steps:

    · How to Repurpose One AI Video for YouTube Shorts, TikTok, Instagram Reels, and Facebook Reels: Beginner Guide (2026) — Learn how to adapt one clean master video into separate versions for several social media platforms.

    · How to Choose AI Video Sizes, Aspect Ratios, and Export Settings: Beginner Guide (2026) — Learn how to choose the correct dimensions, frame rate, file format, and export settings for different video platforms.

    · How to Create Faceless YouTube Videos with AI: Complete Beginner Step-by-Step Guide (2026) — Follow a complete workflow for planning, creating, editing, and publishing faceless YouTube videos.

    · How to Create YouTube Thumbnails, Titles, and Descriptions with AI (2026) — Learn how to prepare the publishing elements that support your YouTube videos.

    · YouTube Copyright and Licensing for AI Videos: Beginner Guide (2026) — Learn how to check music, images, footage, voices, and other assets before publishing.

    · Reused Content, AI Disclosure, and YouTube Monetization for Faceless Videos: Beginner Guide (2026) — Learn about reused content, realistic AI disclosure, and monetization considerations.

    · How to Use YouTube Studio and YouTube Analytics for Faceless Channels: Beginner Guide (2026) — Learn how to manage published videos and understand basic performance information.

    Sources and References

    The following official YouTube sources were checked for the Shorts length, upload process, music, export settings, copyright, and AI-disclosure information in this guide. YouTube features and policies can change, so important requirements should be checked again when YouTube announces an update or when you change your publishing workflow.

    · YouTube Help — Understand Three-Minute YouTube Shorts: YouTube explains that qualifying square or vertical videos of up to three minutes can be categorized as Shorts.

    · YouTube Help — Upload YouTube Shorts: YouTube provides the current computer upload process and states that Shorts uploads can be square or vertical and up to three minutes long.

    · YouTube Help — Recommended Upload Encoding Settings: YouTube provides recommendations for video encoding and advises uploading content using the same frame rate at which it was recorded.

    · YouTube Help — Music Eligibility for YouTube Shorts: YouTube explains how music from the Shorts Audio Library can be used and notes that the amount of usable music can depend on the selected track.

    · YouTube Help — Use Music and Sound Effects from the Audio Library: YouTube explains how creators can use music and sound effects from the YouTube Audio Library and review applicable attribution requirements.

    · YouTube Help — Disclosing Use of Generative AI Content: YouTube explains when creators are expected to disclose AI-generated or meaningfully AI-altered content and provides an AI-use setting in YouTube Studio.

    · YouTube Help — Understanding “How This Content Was Made” Disclosures: YouTube explains labels that can appear when content has been meaningfully altered or synthetically generated.

    · YouTube Help — Impersonation Policy: YouTube explains that AI disclosure does not permit creators to impersonate people or entities in ways that violate its policies.

    YouTube Help — Tips for Thumbnails and Titles: YouTube recommends accurate, concise titles and advises placing important words near the beginning.

    Important: This guide provides general educational information about AI video creation, copyright, licensing, disclosure, and publishing. It is not legal advice. Always verify that you have appropriate rights or permission for music, images, video clips, voices, fonts, and other material you publish.
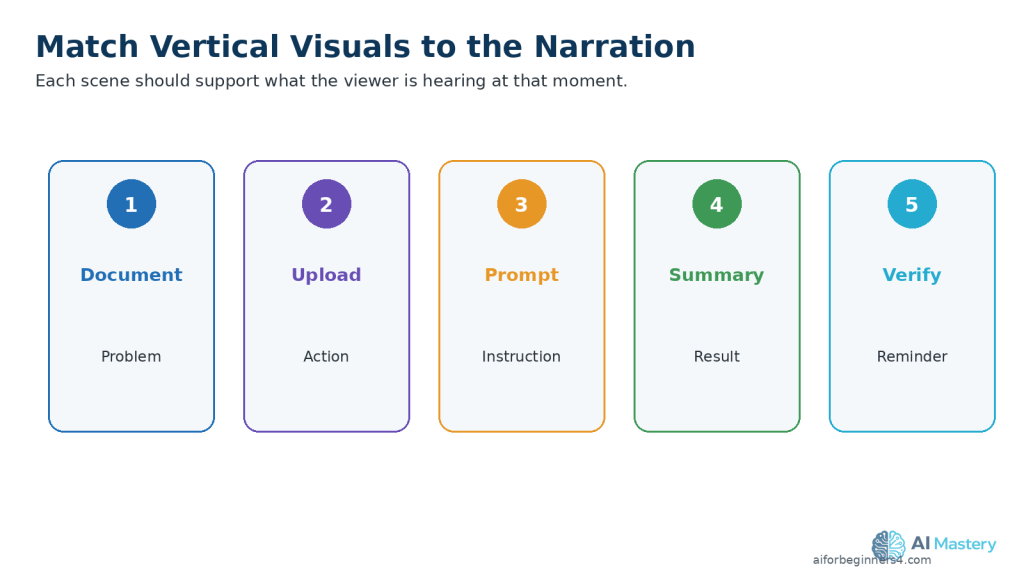
  • How to Choose AI Video Sizes, Aspect Ratios, and Export Settings: Beginner Guide (2026)

    How to Choose AI Video Sizes, Aspect Ratios, and Export Settings: Beginner Guide (2026)

    Estimated Reading Time: 24 minutes
    Last Updated: August 15, 2026

    Before Learning

    Before you begin, it helps to understand that a video can have the same content but look very different depending on its size, shape, and export settings.

    A vertical video made for a phone screen usually needs different dimensions from a traditional horizontal YouTube video. Choosing the wrong settings can cause black bars, unwanted cropping, blurry text, or important content being placed outside the visible area.

    In this guide, you will learn the basic video sizes, aspect ratios, resolution choices, and export settings beginners need for common social media platforms. You do not need advanced video-editing knowledge to follow along.

    The exact requirements and recommendations of platforms can change over time. This guide will use current official platform guidance, and you should recheck important settings when a platform announces an update or when you begin using a new video format.

    What You’ll Learn

    By the end of this guide, you will know how to:

    • Understand the difference between video dimensions, resolution, and aspect ratio.
    • Choose between common formats such as 16:9, 9:16, and 1:1.
    • Select suitable video sizes for YouTube, YouTube Shorts, TikTok, Instagram Reels, Facebook Reels, and other common platforms.
    • Understand what 1080p, 1920 × 1080, and 1080 × 1920 mean.
    • Choose beginner-friendly export settings for clear video and good file size.
    • Understand basic terms such as frame rate, bitrate, codec, and file format.
    • Avoid black bars, unwanted cropping, blurry text, and stretched video.
    • Keep important text, captions, and subjects inside safe viewing areas.
    • Export separate versions when different platforms need different settings.
    • Keep a clean master video so you can create new platform versions later.

    Introduction

    Choosing the correct video size and export settings is an important part of creating videos for YouTube, TikTok, Instagram, Facebook, and other platforms.

    A video can look clear and professional in your editing program but appear cropped, stretched, blurry, or surrounded by black bars after uploading if the dimensions or aspect ratio are not suitable for the platform.

    The good news is that beginners do not need to understand every technical video setting. A small number of common formats and export choices cover most everyday video projects.

    In this guide, you will learn how to choose practical settings for horizontal videos, vertical short-form videos, and square videos. You will also learn what terms such as resolution, aspect ratio, frame rate, bitrate, codec, and file format mean in simple language.

    The goal is not to memorize every number. Instead, you will learn how to recognize the most common settings and choose a reliable option for the type of video you want to publish.
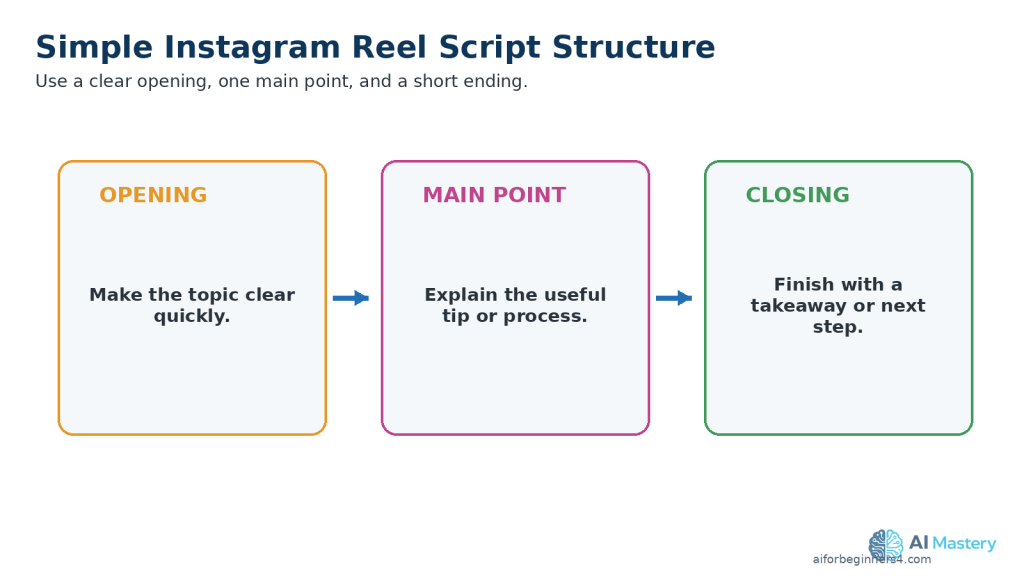
    What Is an Aspect Ratio?

    An aspect ratio describes the shape of a video frame. It compares the width of the video with its height.

    For example:

    • 16:9 is a wide horizontal format commonly used for standard YouTube videos and computer screens.
    • 9:16 is a tall vertical format commonly used for YouTube Shorts, TikTok, Instagram Reels, and Facebook Reels.
    • 1:1 is a square format that can still be useful for some social media posts.

    The first number represents the width, and the second number represents the height.

    Why Aspect Ratio Matters

    If the aspect ratio does not match the type of video you are creating, the platform or editing program may crop the picture, add empty space, or display the video in a way you did not expect.

    For example, placing a 16:9 horizontal video inside a 9:16 vertical project may leave large empty areas or require part of the original video to be cropped.

    Practical Example

    A standard horizontal YouTube video may use 16:9, while a short vertical version of the same content may use 9:16.

    The main information can stay the same, but the visual arrangement may need to change so important subjects, captions, and text remain visible in the narrower vertical frame.

    Figure 1. Common video aspect ratios: 16:9 horizontal, 9:16 vertical, and 1:1 square.

    Aspect ratio describes the shape of the frame. Choose the shape that matches the type of video you are creating.

    What Is Video Resolution?

    Video resolution describes how many pixels are used to create the picture. Pixels are the tiny points of color that make up a digital image.

    A common video resolution is 1920 × 1080 pixels, often called 1080p or Full HD.

    In this example:

    • 1920 is the number of pixels across the width.
    • 1080 is the number of pixels down the height.

    For a vertical video, the same Full HD resolution is often written as 1080 × 1920 pixels because the frame is taller than it is wide.

    Why Resolution Matters

    Higher resolution can make a video look sharper, especially when it contains text, screenshots, charts, or detailed images.

    However, higher resolution can also create larger files and require more storage, processing power, and upload time. Choosing an extremely high resolution is not always necessary for a beginner project.

    For many everyday social media videos, 1080p provides a good balance between image quality and manageable file size.

    Practical Example

    A standard horizontal Full HD video may use:

    1920 × 1080 pixels

    A vertical Full HD video may use:

    1080 × 1920 pixels

    Both contain the same number of pixels overall, but the orientation and aspect ratio are different.

    Figure 2. Full HD can be arranged as 1920 × 1080 horizontal or 1080 × 1920 vertical.

    Resolution describes pixel dimensions, while aspect ratio describes the shape of the frame.

    What Is Frame Rate?

    Frame rate describes how many individual images, or frames, are shown every second in a video. It is usually written as fps, which means frames per second.

    Common frame rates include:

    • 24 fps — often used for a film-like appearance.
    • 30 fps — a common choice for tutorials, social media videos, presentations, and general online video.
    • 60 fps — useful when smoother motion is important, such as sports, gaming, or fast demonstrations.

    Which Frame Rate Should Beginners Use?

    For many AI Mastery tutorials and everyday social media videos, 30 fps is a simple and practical starting point.

    If your original video was recorded or generated at another frame rate, it is usually better to keep that frame rate unless you have a specific reason to change it.

    Changing frame rates unnecessarily can sometimes make motion look less smooth or cause duplicated or removed frames.

    Practical Example

    If you record a screen tutorial at 30 fps, you can normally keep the project and final export at 30 fps.

    If you record fast-moving footage at 60 fps, keeping the final export at 60 fps may preserve smoother movement, provided the platform and your editing workflow support it.

    Figure 3. Common frame rates include 24, 30, and 60 frames per second.

    For many beginner tutorials, 30 fps is a practical starting point. Keeping the source frame rate avoids unnecessary conversion.

    What Is Bitrate?

    Bitrate describes how much video data is used each second. It is commonly measured in megabits per second, written as Mbps.

    A higher bitrate can preserve more detail, but it also creates a larger video file. A very low bitrate can make the video look blurry, blocky, or less detailed, especially when there is movement or small text on the screen.

    Why Bitrate Matters

    Bitrate works together with resolution, frame rate, and the video codec. A 1080p video usually needs more data than a much smaller video if you want to maintain similar visual quality.

    Using the highest possible bitrate is not always necessary. Social media platforms normally process and compress uploaded videos, so an extremely large file may take longer to export and upload without producing a noticeable improvement for viewers.

    Which Bitrate Should Beginners Use?

    For beginners, it is usually easiest to use the recommended, standard, or high-quality preset provided by a reputable video editor rather than manually entering a bitrate.

    If your editing program asks you to choose between options such as Low, Recommended, and High, start with Recommended unless you have a specific reason to change it.

    Practical Example

    If a 1080p tutorial looks clear when exported with your editor’s recommended quality setting, increasing the bitrate dramatically may only make the file larger.

    If small text, screen recordings, or moving details look blurry after export, check the bitrate and overall export quality before assuming the original video is the problem.

    Figure 4. Bitrate affects both video detail and file size.

    A recommended or high-quality preset usually gives beginners a better balance than choosing the lowest or highest bitrate automatically.

    What Are Video Codecs and File Formats?

    A file format is the container used to store a video file. A common example is MP4.

    A codec is the method used to compress and store the video and audio inside that file. Compression helps reduce file size while trying to preserve good picture and sound quality.

    Common Beginner-Friendly Choice

    For many online videos, a practical beginner combination is:

    • File format: MP4
    • Video codec: H.264
    • Audio codec: AAC

    This combination is widely supported by video editors, web browsers, mobile devices, and major social media platforms.

    Why Codecs Matter

    Two videos can both be saved as MP4 files but use different codecs inside them. One may work correctly on a platform while another may need to be converted before uploading.

    A codec also affects:

    • File size.
    • Video quality.
    • Export time.
    • Playback compatibility.
    • How efficiently the video can be uploaded and processed.

    Practical Example

    If your video editor offers an export option such as MP4 with H.264, this is often a straightforward choice for a standard 1080p social media video.

    You usually do not need to change advanced codec settings unless the platform, editing program, or project has a specific requirement.

    Figure 5. MP4 is a common file container that can hold H.264 video and AAC audio.

    The file format and codecs work together to affect compatibility, quality, and file size.

    Recommended Video Sizes for YouTube

    YouTube supports several video shapes, but the best choice depends on whether you are creating a standard YouTube video or a YouTube Short.

    Standard YouTube Videos

    For a traditional horizontal YouTube video, a reliable beginner choice is:

    • Aspect ratio: 16:9
    • Resolution: 1920 × 1080 pixels
    • Orientation: Horizontal
    • Common name: 1080p Full HD

    YouTube identifies 16:9 as the standard aspect ratio for viewing on computers. The YouTube player can also adapt to other aspect ratios, including vertical and square videos.

    A 1920 × 1080 video works well for tutorials, demonstrations, screen recordings, educational videos, interviews, and other standard YouTube content.

    YouTube Shorts

    For a YouTube Short, a practical beginner choice is:

    • Aspect ratio: 9:16
    • Resolution: 1080 × 1920 pixels
    • Orientation: Vertical
    • Common name: Vertical Full HD

    YouTube currently classifies videos of up to three minutes with a square or vertical aspect ratio as Shorts when they meet its Shorts requirements.

    Although YouTube also accepts square Shorts, 9:16 makes better use of a vertically held phone screen and is a convenient format when the same video may later be adapted for TikTok, Instagram Reels, or Facebook Reels.

    Practical Example

    If you create a full YouTube tutorial in 1920 × 1080, you can later make a vertical Short in 1080 × 1920.

    Do not simply rotate or stretch the horizontal video. Reframe the important content so faces, demonstrations, captions, and text fit naturally inside the vertical layout.

    Figure 6. Reframing preserves natural proportions when adapting horizontal video to a vertical layout.

    Stretching distorts people, objects, text, and graphics. Reposition or crop thoughtfully instead.

    Recommended Video Size for TikTok

    TikTok is designed mainly for vertical viewing on smartphones. For beginners, a practical format is:

    • Aspect ratio: 9:16
    • Resolution: 1080 × 1920 pixels
    • Orientation: Vertical
    • Common name: Vertical Full HD

    TikTok for Business recommends 9:16 vertical video, at least 720p resolution, and keeping important content inside the interface safe zone.

    Why 1080 × 1920 Is a Good Beginner Choice

    Although lower resolutions may be accepted, 1080 × 1920 pixels gives you a clear Full HD vertical video and is a convenient size for editing text, captions, screen recordings, and other visual details.

    Using 9:16 also allows the video to make good use of the vertical phone screen rather than appearing as a small horizontal video surrounded by unused space. TikTok specifically recommends vertical 9:16 creative for its full-screen viewing experience.

    Keep Important Content Inside the Safe Area

    TikTok places interface elements over parts of the video. These can include buttons, captions, account information, and other controls.

    Keep important elements such as:

    • Faces.
    • Titles.
    • Captions.
    • Demonstrations.
    • Charts.
    • Calls to action.

    away from the extreme edges of the frame. TikTok recommends keeping important content within its UI safe zone.

    Practical Example

    If you create a TikTok video at 1080 × 1920 pixels, place the main subject and important text closer to the central viewing area.

    A caption placed directly against the bottom or right edge may look correct in your editing program but could be partly covered by TikTok interface controls after publishing.

    Recommended Video Size for Instagram Reels

    Instagram Reels supports several aspect ratios, but Meta recommends 9:16 for Reels so the video can use the full vertical phone screen. Instagram also states that Reels should have a minimum frame rate of 30 fps and a minimum resolution of 720 pixels.

    For beginners, a practical choice is:

    • Aspect ratio: 9:16
    • Resolution: 1080 × 1920 pixels
    • Orientation: Vertical
    • Frame rate: 30 fps or higher

    Why 1080 × 1920 Works Well

    A 1080 × 1920 video gives you a Full HD vertical frame with enough detail for captions, demonstrations, and other on-screen elements.

    Although Instagram can accept lower resolutions, starting with 1080 × 1920 gives you more room to preserve clarity before the platform processes the uploaded video.

    Keep Important Content Away from the Edges

    Meta recommends keeping important text and visual elements away from areas that may be covered by interface controls in Reels.

    Keep important elements such as:

    • Faces.
    • Captions.
    • Titles.
    • Demonstrations.
    • Charts.
    • Calls to action.

    closer to the central viewing area rather than placing them directly against the top, bottom, or sides.

    Practical Example

    If you create an Instagram Reel at 1080 × 1920 pixels, keep the main subject near the centre and leave extra space around captions and titles.

    This makes it less likely that Instagram interface elements will cover important information after the Reel is published.

    Recommended Video Size for Facebook Reels

    Facebook Reels supports multiple video shapes, but Meta recommends 9:16 for Reels because it fills a vertically held phone screen. Meta’s current Facebook Reels guidance recommends 1080p resolution and supports common modern video codecs.

    For beginners, a practical choice is:

    • Aspect ratio: 9:16
    • Resolution: 1080 × 1920 pixels
    • Orientation: Vertical
    • Frame rate: 30 fps is a practical starting point

    Why 9:16 Works Well for Facebook Reels

    A 9:16 video uses the full vertical screen more effectively than a horizontal video. Meta recommends 9:16 for Reels placements to capture the full screen.

    Using 1080 × 1920 pixels also gives you a clear Full HD vertical video that is suitable for captions, text, demonstrations, and other educational content.

    Keep Important Content Inside the Safe Area

    Meta advises keeping important text and visual elements away from the top, bottom, and sides of 9:16 Reel content because interface elements can cover those areas.

    Keep important elements such as:

    • Faces.
    • Captions.
    • Titles.
    • Demonstrations.
    • Charts.
    • Calls to action.

    closer to the central viewing area.

    Practical Example

    If you create a Facebook Reel at 1080 × 1920 pixels, keep your main subject and captions inside the central part of the frame.

    This reduces the chance that Facebook interface controls will cover important information after the Reel is published.

    Figure 7. A central safe area helps keep important content away from interface-heavy edges.

    Safe-area planning is especially important for captions, faces, titles, charts, and calls to action in vertical videos.

    Quick Reference: Common Video Sizes

    The following settings are practical beginner starting points for the platforms covered in this guide. They are not the only formats each platform may accept.

     Standard YouTube video: 16:9, 1920 × 1080 pixels, horizontal. YouTube identifies 16:9 as its standard computer-viewing aspect ratio.

     YouTube Shorts: 9:16, 1080 × 1920 pixels, vertical is a practical Full HD choice.

    • TikTok: 9:16, 1080 × 1920 pixels, vertical is a practical choice. TikTok recommends 9:16 vertical video, at least 720p, and keeping important content inside the interface safe zone.
    • Instagram Reels: 9:16, 1080 × 1920 pixels, vertical is a practical choice. Instagram accepts Reel aspect ratios up to 9:16 and requires at least 30 fps and 720-pixel minimum resolution.
    • Facebook Reels: 9:16, 1080 × 1920 pixels, vertical is a practical choice. Meta recommends 9:16 for Reels and recommends 1080p resolution for Facebook Reels.

    Remember the Difference Between Requirement and Recommendation

    A platform may accept several video sizes while still recommending a particular format for better full-screen viewing.

    For example, Instagram accepts more than one Reel aspect ratio, but 9:16 is convenient for full-screen vertical content. TikTok also recommends 9:16 for its vertical viewing experience.

    For beginners creating one vertical video that may later be adapted for several short-form platforms, 1080 × 1920 pixels at 9:16 is a useful working format. It gives you a Full HD vertical canvas while still allowing you to make platform-specific adjustments before publishing.

    Figure 8. Practical beginner video-size starting points for standard YouTube videos and common short-form platforms.

    Platform requirements can change, so treat these as practical working settings and confirm current official guidance when needed.

    How to Choose Export Settings in Your Video Editor

    When your video is finished, the final step is to export it as a video file. Most editing programs show several options, but beginners usually need to check only a few important settings.

    Step 1: Check the Aspect Ratio and Resolution

    Make sure the project matches the type of video you want to publish.
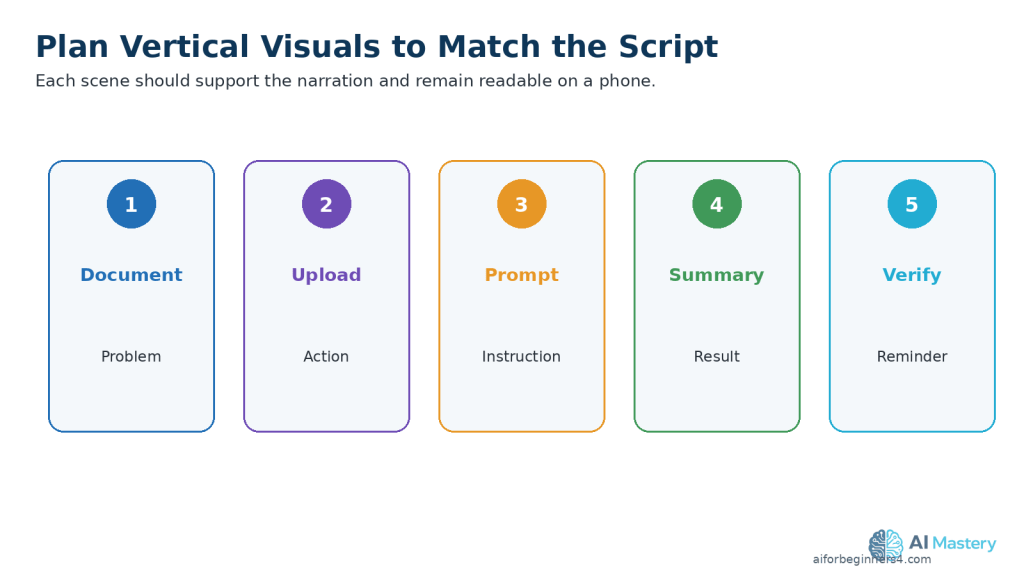
    For example:

    • Horizontal YouTube video: 16:9 at 1920 × 1080 pixels.
    • Vertical short-form video: 9:16 at 1080 × 1920 pixels.

    Do not stretch a horizontal video into a vertical shape. Reframe or reposition the content instead.

    Step 2: Check the Frame Rate

    Use the same frame rate as your main project or original footage whenever possible.

    For many tutorials and general social media videos, 30 fps is a practical choice.

    If your project was created at 60 fps, you can normally export at 60 fps when smoother motion is useful and your platform supports it.

    Step 3: Choose the File Format and Codec

    For many beginner projects, a practical choice is:

    • File format: MP4
    • Video codec: H.264
    • Audio codec: AAC

    These settings provide broad compatibility and are commonly available in video-editing programs.

    Step 4: Choose the Quality or Bitrate

    If your editor provides simple options such as Low, Recommended, or High, start with Recommended or the normal high-quality preset.

    Avoid choosing an extremely low-quality setting simply to reduce the file size. Small captions, screen recordings, and detailed graphics may become difficult to read.

    Step 5: Check the Audio

    Make sure the final video contains clear narration and that music or sound effects do not overpower the speaker.

    If your editor provides a normal AAC audio preset, beginners can usually leave the advanced audio settings at their recommended values.

    Step 6: Export and Review the Final File

    After exporting, watch the actual video file from beginning to end before uploading it.

    Check for:

    • Blurry or pixelated video.
    • Cropped faces or text.
    • Black bars that you did not intend to include.
    • Captions that are difficult to read.
    • Audio that is too loud or too quiet.
    • Missing scenes or unexpected blank frames.
    • Unwanted logos, watermarks, or branded endings.

    If something looks wrong, correct the editing project and export a new file rather than trying to repair the already exported video.

    Figure 9. A simple export workflow helps beginners check the most important settings in the right order.

    Check aspect ratio, resolution, frame rate, format, codec, bitrate, audio, and the final exported file before publishing.

    Common Mistakes When Choosing Video Sizes and Export Settings

    Beginners often run into problems because several video settings look similar but control different things.

    Common mistakes include:

    • Choosing the correct resolution but the wrong aspect ratio.
    • Stretching a horizontal video to make it vertical.
    • Cropping a video without checking whether important content was removed.
    • Exporting at a much lower resolution than the original project.
    • Changing the frame rate unnecessarily.
    • Choosing an extremely low bitrate to reduce file size.
    • Placing captions or important text too close to the edges.
    • Using settings from one platform without checking whether they suit another platform.
    • Exporting over the clean master file instead of creating a separate final version.
    • Uploading the video without watching the exported file first.

    How to Avoid These Mistakes

    Start by deciding where the video will be published. Then choose the aspect ratio, resolution, and orientation that fit that type of video.

    Keep your original project and clean master file unchanged. Create separate exports when you need different horizontal, vertical, or platform-specific versions.

    Before publishing, watch the final exported file on a phone or computer and check the framing, captions, picture quality, sound, and important visual elements.

    Figure 10. Common video problems often point directly to an aspect-ratio, resolution, bitrate, framing, or frame-rate issue.

    Use the visible symptom to decide which setting or editing choice to check first.

    Benefits of Choosing the Correct Video Settings

    Using suitable video sizes and export settings can improve both the viewing experience and your editing workflow.

    Key benefits include:

    • Better picture quality: Correct resolution and bitrate help preserve sharp text, images, and video details.
    • Correct screen fit: The right aspect ratio reduces unwanted black bars, stretching, or excessive cropping.
    • Clearer captions and graphics: Proper dimensions give you enough space to position text where viewers can read it.
    • Fewer editing problems: Starting with the correct project size reduces the amount of reframing needed later.
    • More consistent results: Using reliable export settings makes it easier to produce similar quality across several videos.
    • Easier repurposing: A well-organized master project can be adapted into horizontal and vertical versions more efficiently.
    • More manageable files: Appropriate export settings can provide good quality without creating unnecessarily large video files.
    • Faster troubleshooting: When you understand the basic settings, it becomes easier to identify why a video looks blurry, stretched, cropped, or incorrectly shaped.

    Choosing the correct settings from the beginning can save time because you are less likely to need repeated exports or major corrections before publishing.

    Limitations of Video Sizes and Export Settings

    Even when you choose suitable settings, some limitations can still affect how a video looks after publishing.

    Common limitations include:

    • Platform compression: Social media platforms usually compress uploaded videos, which can slightly reduce image quality.
    • Different device screens: A video may look slightly different on phones, tablets, monitors, and televisions.
    • Platform interface overlays: Buttons, captions, usernames, and other controls may cover parts of a vertical video.
    • File-size limits: Higher resolution, higher frame rate, and higher bitrate can create larger files.
    • Slower exports: High-quality settings may take longer to process on an older or less powerful computer.
    • Longer uploads: Large video files can take more time to upload, especially with a slower internet connection.
    • Source-quality limits: Exporting a low-quality original video at a higher resolution does not restore missing detail.
    • Different platform processing: The same uploaded file may not look exactly the same after each platform processes it.

    How to Reduce These Limitations

    Start with the best-quality source material you reasonably have and keep a clean master project before creating final exports.

    Use appropriate settings rather than automatically choosing the highest available resolution or bitrate. For many beginner projects, Full HD provides a practical balance between quality, file size, export time, and compatibility.

    Always review the final exported file before publishing. After uploading, also check the published version when possible to make sure captions, text, framing, picture quality, and audio still look correct.

    Common Myths About Video Sizes and Export Settings

    Several common myths can make video settings seem more complicated than they really are.

    Myth 1: Higher Resolution Always Means Better Video

    Reality: Higher resolution can preserve more detail, but it also creates larger files and requires more processing power. If the original video is low quality, exporting it at a much higher resolution will not recreate missing detail.

    Myth 2: 4K Is Necessary for Every Social Media Video

    Reality: Many beginner projects work very well at 1080p Full HD. Higher resolutions may be useful for some projects, but they are not automatically required for clear social media videos.

    Myth 3: A 1920 × 1080 Video Can Be Turned into 1080 × 1920 by Stretching It

    Reality: Stretching changes the shape of people, objects, text, and graphics. A horizontal video should be reframed, cropped, repositioned, or redesigned for a vertical layout instead.

    Myth 4: The Highest Bitrate Setting Is Always the Best Choice

    Reality: A very high bitrate can create a much larger file without producing a noticeable improvement for viewers. A recommended or suitable high-quality preset is usually a better starting point.

    Myth 5: Changing 30 fps Video to 60 fps Automatically Makes It Smoother

    Reality: Increasing the export frame rate does not create genuine extra motion detail that was never captured in the original footage. Keeping the original or project frame rate is usually more reliable.

    Myth 6: If a Video Looks Good in the Editor, It Will Look the Same After Publishing

    Reality: Social media platforms process uploaded videos and add interface elements around or over them. Always check the final exported file and, when possible, review the published version as well.

    Frequently Asked Questions

    What Is the Best Video Resolution for Beginners?

    For many beginner projects, 1080p Full HD is a practical choice. Use 1920 × 1080 pixels for horizontal video and 1080 × 1920 pixels for vertical video.

    What Is the Difference Between 16:9 and 9:16?

    16:9 is a wide horizontal format commonly used for standard YouTube videos. 9:16 is a tall vertical format commonly used for short-form videos such as YouTube Shorts, TikTok, Instagram Reels, and Facebook Reels.

    Should I Export Every Video at 60 fps?

    No. If your project or original footage uses 30 fps, exporting at 30 fps is usually appropriate. Use 60 fps when smoother motion is useful and your source material was created or recorded at that frame rate.

    Is MP4 a Good Video Format for Social Media?

    Yes. MP4 with H.264 video and AAC audio is a widely supported combination and is a practical starting point for many online video projects.

    Should I Always Choose the Highest Bitrate?

    No. A very high bitrate can make the file much larger without producing a noticeable improvement. Start with your editor’s recommended or high-quality preset unless you have a specific reason to change it.

    Why Does My Vertical Video Have Black Bars?

    Black bars can appear when the video’s aspect ratio does not match the project or viewing area. For example, placing a horizontal 16:9 video inside a vertical 9:16 project without reframing it can leave unused space.

    Can I Use the Same 1080 × 1920 Video on Several Platforms?

    Yes. A 1080 × 1920, 9:16 vertical video is a useful starting format for several short-form platforms. However, check each platform version separately for safe areas, captions, music, text placement, and other platform-specific details before publishing.

    Should I Keep My Original Video Project?

    Yes. Keep the original editing project, clean master video, source files, prompts, licences, permissions, and final exports. This makes it much easier to correct mistakes or create new versions later.

    Figure 11. Keep one clean master and create separate exports for different formats or platforms.

    Preserving the source project makes future corrections, repurposing, and new platform versions much easier.

    Key Takeaways

    Choosing the correct video size and export settings becomes much easier when you focus on a few basic ideas.

    Remember these main points:

    • 16:9 is a common horizontal format for standard YouTube videos.
    • 9:16 is a common vertical format for YouTube Shorts, TikTok, Instagram Reels, and Facebook Reels.
    • 1920 × 1080 pixels is a common Full HD horizontal resolution.
    • 1080 × 1920 pixels is a common Full HD vertical resolution.
    • 30 fps is a practical frame rate for many tutorials and general social media videos.
    • MP4 with H.264 video and AAC audio is a widely supported beginner-friendly export combination.
    • Use your editor’s recommended or high-quality bitrate preset unless you have a specific reason to change it.
    • Do not stretch a horizontal video to make it vertical. Reframe or reposition the content instead.
    • Keep important text, captions, faces, and demonstrations away from the extreme edges of vertical videos.
    • Watch the final exported file before uploading it.
    • Keep your clean master project and original source files so you can create new versions later.

    You do not need to memorize every technical setting. Start with a reliable format, understand what each setting controls, and adjust only when your project or publishing platform requires something different.

    Figure 12. A final export checklist catches common problems before upload.

    Review the actual exported file, not only the editing timeline, because some issues appear only after export.

    Final Tip

    Choose the simplest settings that meet the needs of your video and publishing platform.

    For many beginner projects, 1080p Full HD, the correct aspect ratio, a suitable frame rate, and a standard MP4 export are enough to produce a clear result.

    Avoid changing advanced settings simply because higher numbers appear better. The best export is the one that preserves good quality, fits the platform correctly, and remains easy for you to edit, store, upload, and reuse later.

    Continue Learning

    If you want to continue building your AI video skills, these AI Mastery guides are useful next steps:

    Sources and References

    The following official sources were checked for the video-size, aspect-ratio, resolution, frame-rate, codec, export, and safe-area information in this guide. Platform requirements and recommendations can change, so specifications should be checked again when a platform announces an update or when you begin using a new video format.

    Platform specifications are not permanent. Check official guidance when you first use a platform, when you change your video workflow, or when a platform announces updated requirements.

  • How to Repurpose One AI Video for YouTube Shorts, TikTok, Instagram Reels, and Facebook Reels: Beginner Guide (2026)

    How to Repurpose One AI Video for YouTube Shorts, TikTok, Instagram Reels, and Facebook Reels: Beginner Guide (2026)

    Estimated Reading Time: 18 minutes
    Last Updated: August 14, 2026

    Before Learning

    Before you begin, it helps to have one finished video that you can use as your main source video. This can be a video you created with AI, edited yourself, or produced using a combination of AI tools and regular video-editing software.

    You do not need four completely different videos for YouTube Shorts, TikTok, Instagram Reels, and Facebook Reels. In this guide, you will learn how to start with one clean master video and adapt separate versions for each platform.

    What You’ll Learn

    By the end of this guide, you will know how to:

    · Prepare one clean master video before repurposing it.

    · Adapt the same video for YouTube Shorts, TikTok, Instagram Reels, and Facebook Reels.

    · Reframe or crop the video for vertical viewing without cutting off important content.

    · Adjust captions, text, music, and other elements for each platform.

    · Export a separate clean version for each platform.

    · Avoid carrying another platform’s watermark, logo, or branded ending into your new version.

    · Keep your original project files and master export so you can make future versions more easily.

    Introduction

    Repurposing a video means taking one finished video and creating new versions of it for different platforms. Instead of starting from the beginning every time, you reuse the main content while adjusting the format, framing, captions, length, and other details when needed.

    This can save time and help you publish the same core idea across YouTube Shorts, TikTok, Instagram Reels, and Facebook Reels. However, you should not simply upload the exact same exported file everywhere. Each platform can display video differently, and text or important visual elements may be cropped or covered by interface controls.

    A better approach is to keep one clean master video and create a separate export for each platform. This also makes it easier to avoid unwanted watermarks, logos, branded endings, or other elements from one platform appearing on another.

    Figure 1. One clean master video can be adapted into separate versions for YouTube Shorts, TikTok, Instagram Reels, and Facebook Reels.

    Keeping the master unchanged gives you a reliable source for future edits and exports.

    What Does It Mean to Repurpose a Video?

    Repurposing does not mean simply uploading the same video file to every social media platform. It means using the same main content as your starting point and making a version that fits each platform better.

    For example, you may keep the same narration, main visuals, and message while changing the crop, text position, captions, music, opening seconds, or ending. You may also shorten or rearrange parts of the video if one platform works better with a faster or shorter version.

    The most important idea is to keep one clean master version of your video before making platform-specific copies. This gives you a reliable original that does not contain another platform’s watermark, logo, interface elements, or branded ending.

    Practical example: You create one 60-second vertical video about three beginner AI tools. From that master video, you can make separate versions for YouTube Shorts, TikTok, Instagram Reels, and Facebook Reels without rebuilding the entire video four times.

    Why Start with a Clean Master Video?

    A clean master video is the best-quality version of your finished video before you adapt it for individual social media platforms. It should contain the main visuals, narration, captions, music, and edits you want to keep, but it should not include a platform-specific watermark, logo, username overlay, or branded ending.

    Keeping a clean master makes repurposing easier because you can return to the original whenever you need another version. For example, if you later want to create a Pinterest Video Pin or another short-form version, you do not have to download one of your already-published videos and edit it again.

    A master video also helps protect video quality. Downloading a published video from a social platform and then editing and exporting it again can reduce quality because the video may already have been compressed.

    Keep the clean master video in a clearly named folder together with the original editing project, narration files, images, music licences, permissions, prompts, and other source files you may need later.

    Example: Instead of downloading your TikTok version to create a YouTube Short, open your clean master project and export a new YouTube version from it.

    Step 1: Prepare Your Master Video for Repurposing

    Before creating versions for different platforms, check that your clean master video is complete and ready to reuse. It is easier to fix problems now than after you have created several separate exports.

    Check the master video for:

    · Clear narration or dialogue.

    · Correct spelling in captions and on-screen text.

    · Images and video clips that are sharp enough to use.

    · Music and sound effects at comfortable levels.

    · No unwanted platform logos, watermarks, usernames, or branded endings.

    · No private information that should not appear publicly.

    · Permission or suitable licences for music, stock footage, photographs, fonts, and other assets you did not create yourself.

    · Important text and subjects positioned so they can still be seen if the video needs to be reframed.

    Figure 2. Check the clean master for quality, privacy, licensing, and visible content before creating platform copies.

    Fixing problems in the master first prevents the same problem from appearing in several exports.

    Watch the entire master video from beginning to end before making your platform versions. Pay special attention to the first few seconds, because the opening should quickly make it clear what the video is about.

    Practical example: If your master video contains a title placed very close to the bottom edge, move it higher before creating your platform versions. Interface buttons, captions, or other controls may cover text placed too close to an edge.

    Step 2: Use a Vertical Format for the Four Platforms

    For this repurposing workflow, use a 9:16 vertical video as your main working format. This tall format is well suited to phone screens and is supported for YouTube Shorts, TikTok, Instagram Reels, and Facebook Reels. YouTube accepts square or vertical videos for Shorts, while Instagram supports several Reel aspect ratios; Meta and TikTok specifically recommend 9:16 for full-screen vertical viewing.

    A common 9:16 video size is 1080 × 1920 pixels. We will cover video dimensions and export settings in more detail in the next AI Mastery guide, so for now the important point is to work vertically rather than creating a separate horizontal video for each short-form platform.

    When converting an existing horizontal video to vertical, do not simply crop the middle automatically and assume everything will remain visible. Check every scene. A person, product, screenshot, chart, or important text may be cut off when the frame becomes narrower.

    Keep important subjects and on-screen text away from the extreme top, bottom, and sides of the frame. Social platforms place interface elements over videos, and TikTok specifically advises keeping key information within its safe zone.

    Practical example: If a horizontal scene shows a person on the left and a laptop demonstration on the right, a simple centre crop may remove one of them. You may need to reposition the scene, zoom differently, or show the person and laptop in separate shots.

    Figure 3. Reframing a 16:9 video for 9:16 viewing may require repositioning rather than a simple centre crop.

    Check each scene so important people, text, screenshots, and demonstrations remain visible.

    Step 3: Create a Separate Version for Each Platform

    Once your clean master video is ready, make a separate copy for each platform instead of editing the master file directly.

    Create four working versions:

    · YouTube Shorts

    · TikTok

    · Instagram Reels

    · Facebook Reels

    Give each version a clear filename so you do not accidentally upload the wrong file later. For example:

    · video-topic-youtube-shorts.mp4

    · video-topic-tiktok.mp4

    · video-topic-instagram-reels.mp4

    · video-topic-facebook-reels.mp4

    Figure 4. Create clearly named working copies for each platform while keeping the clean master unchanged.

    Clear filenames reduce the risk of editing or uploading the wrong version.

    Keep your original clean master unchanged. If you make a mistake while editing one platform version, you can return to the master and create a fresh copy.

    Practical example: If you add TikTok-specific text or change the opening of the TikTok version, those changes should remain only in the TikTok copy. Your YouTube Shorts, Instagram Reels, and Facebook Reels versions can be adjusted separately.

    This simple file system also makes it easier to keep track of your final exports, thumbnails, captions, and publication records.

    Step 4: Reframe Each Video Carefully

    Even when all four versions use a vertical format, you should check the framing of every scene before exporting. A crop that looks good in one part of the video may cut off important content in another part.

    Watch each platform version from beginning to end and check that:

    · Faces and important subjects remain fully visible.

    · On-screen text is not too close to the edges.

    · Captions do not cover important visual details.

    · Screenshots and demonstrations are large enough to read on a phone.

    · Charts, lists, and graphics are not cropped.

    · Important information is not placed at the very top or bottom of the frame where platform controls may appear.

    Figure 5. Keep important subjects, captions, and text inside a central safe area in vertical video.

    Platform controls can cover content near the top, bottom, and sides.

    If a scene does not fit well vertically, do not force it into a simple centre crop. You can reposition the image, zoom in or out, split the scene into two shots, or use a background behind the original footage.

    Practical example: A computer screen recording may contain useful information across the entire horizontal screen. Instead of shrinking the whole screen until the text becomes unreadable, crop into the important area and move to another area when the narration changes.

    Step 5: Adjust Captions and On-Screen Text

    Captions and on-screen text can make short videos easier to follow, especially when viewers are watching without sound. However, text that looks good in your editing program may be partly covered by buttons, usernames, descriptions, or other platform controls after publishing.

    Keep important text away from the extreme top, bottom, and sides of the video. Place it closer to the central viewing area whenever possible.

    Use captions that are:

    · Large enough to read on a phone.

    · Easy to distinguish from the background.

    · Broken into short, readable phrases.

    · Timed closely with the spoken words.

    · Positioned so they do not cover faces, demonstrations, or other important information.

    Figure 6. Good captions are readable, high-contrast, and positioned away from faces and interface-heavy edges.

    Caption placement affects both accessibility and readability on small screens.

    Do not overcrowd the screen with several text boxes at the same time. A short video is usually easier to understand when viewers can focus on one main message at a time.

    Accessibility: Captions are especially helpful for people who are deaf or hard of hearing, people watching with the sound turned off, and viewers who may have difficulty understanding the narration.

    Practical example: If your captions sit at the very bottom of the master video, move them slightly higher before exporting your platform versions. This can reduce the chance that platform controls cover them.

    Step 6: Check Music and Audio Before Reusing the Video

    Before uploading the same video to several platforms, check the music, sound effects, and other audio included in your master video. Permission to use music on one platform does not automatically mean that you can reuse that music on every other platform.

    For example, YouTube offers music through its Shorts Audio Library and Audio Library, Instagram provides licensed audio and Meta Sound Collection, and TikTok has its own music options, including a Commercial Music Library for certain commercial content. These libraries operate under their own licensing conditions.

    Figure 7. Keep cross-platform audio rights clear and add platform-specific music only where its licence allows.

    Music available inside one platform does not automatically carry the same rights elsewhere.

    The safest workflow for repurposing is to keep a clean master version with audio that you created yourself or that you have verified you are allowed to use across the platforms where you plan to publish. If you want to use music supplied by a particular platform, consider adding that music separately when preparing the version for that platform.
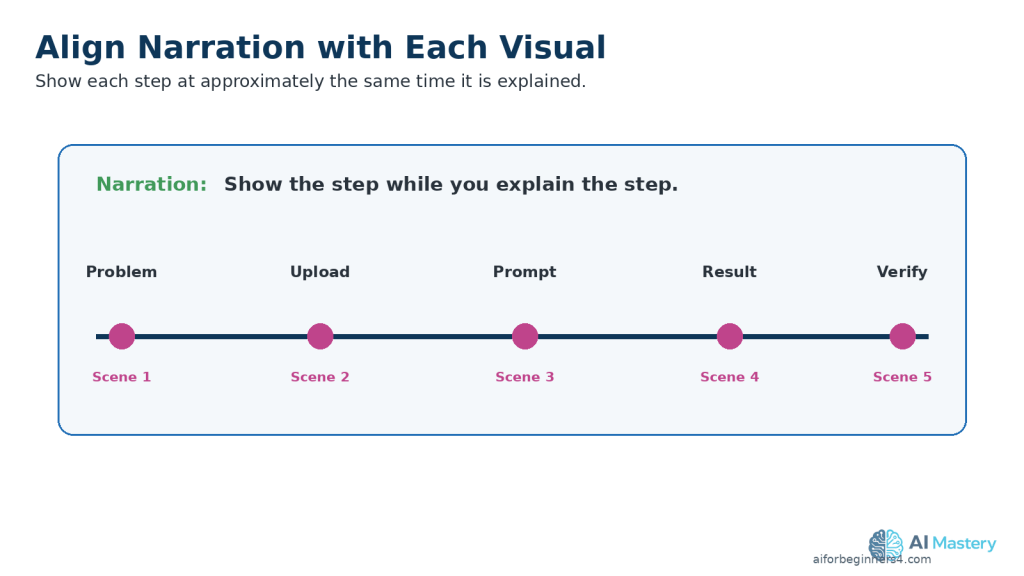
    Warning: Do not assume that a song is copyright-free simply because you can select it inside a social media app. For example, Instagram describes licensed audio as copyrighted audio available through its library, and YouTube explains that music rights can affect how a video may be used.

    Keep a copy of any music licence, permission, receipt, or other record that explains how you are allowed to use an audio track. Licensing conditions and platform music features can change, so check the relevant terms when you first use a music source, when your plan or usage changes, or when the provider announces an update.

    Practical example: If you add a song from TikTok after uploading your TikTok version, keep that song out of your clean master video. Use the clean master again when creating the YouTube Shorts, Instagram Reels, and Facebook Reels versions.

    Step 7: Avoid Platform Watermarks, Logos, and Branded Endings

    When you repurpose a video, start from your clean master file rather than downloading a version that has already been published on another social media platform.

    A downloaded or previously exported version may contain a platform watermark, username, logo, branded ending, or other element that you do not want in the next version.

    Before exporting each platform version, check the entire video for:

    · Platform names or logos that were added automatically.

    · Watermarks from editing or AI video tools.

    · Usernames or account names that belong only to another platform.

    · Branded ending screens added by an app or template.

    · Trial-version marks or export restrictions.

    · Unwanted text or interface elements captured in screen recordings.

    Figure 8. Review every export for platform logos, usernames, watermarks, branded endings, and captured interface elements.

    Return to the clean master instead of reusing a downloaded social-media copy.

    If your editing or AI tool adds branding to free exports, check whether the tool provides a legitimate way to remove it. Do not crop, cover, or erase a provider’s watermark if doing so would violate the tool’s licence or terms.

    Keep your clean master video free from platform-specific branding. Then create separate exports for YouTube Shorts, TikTok, Instagram Reels, and Facebook Reels.

    Practical example: If you publish a video on TikTok and later want to make a YouTube Short, return to your clean master project instead of downloading the TikTok version and uploading that file to YouTube.

    Step 8: Adjust the Opening and Ending for Each Platform

    The main content of your video can stay the same, but the opening and ending may need small changes for each platform.

    Check the first few seconds carefully. A viewer should quickly understand what the video is about without needing a long introduction. Remove unnecessary pauses, blank frames, or lengthy opening graphics that delay the main point.

    You can also adjust the final message depending on where the video will be published. For example, avoid ending every version with instructions that only make sense on one platform.

    Instead of saying something platform-specific such as “Subscribe to my YouTube channel” in every version, you could use a more general message in the clean master, such as:

    · Follow for more beginner AI tips.

    · Save this video for later.

    · Share this with someone learning about AI.

    · Visit aiforbeginners4.com for more beginner guides.

    Figure 9. Keep the core lesson but adjust the opening or call to action when a platform-specific version needs it.

    Small platform-specific changes can improve relevance without rebuilding the entire video.

    Then, if appropriate, customize the final message in each platform version.

    Practical example: Your YouTube Shorts version could mention subscribing, while your TikTok or Instagram version could use a more suitable follow message. The educational content itself does not need to be recreated.

    Keep these changes in the individual platform copies and leave your clean master unchanged.

    Step 9: Export a Separate Final File for Each Platform

    When you finish editing, export a separate final video file for each platform. Do not overwrite your clean master video.

    Use clear filenames so you can immediately tell which file belongs to which platform. For example:

    · video-topic-youtube-shorts-final.mp4

    · video-topic-tiktok-final.mp4

    · video-topic-instagram-reels-final.mp4

    · video-topic-facebook-reels-final.mp4

    Figure 10. Organize the master, working copies, and final exports in separate folders.

    Good organization makes corrections, publishing, and future repurposing easier.

    Before uploading, watch each exported file from beginning to end. Check the picture, audio, captions, text placement, opening, ending, and overall quality.

    Also check that the exported video does not accidentally contain another platform’s watermark, username, logo, editing-app branding, or unwanted end screen.

    If you use your own small creator or business mark, keep it unobtrusive and away from important text, captions, faces, and platform interface areas. A small mark can help identify the original source, but it does not prevent someone from copying the video.

    Keep the final exports in a separate folder from your master project. This makes it easier to find the correct file when you are ready to publish.
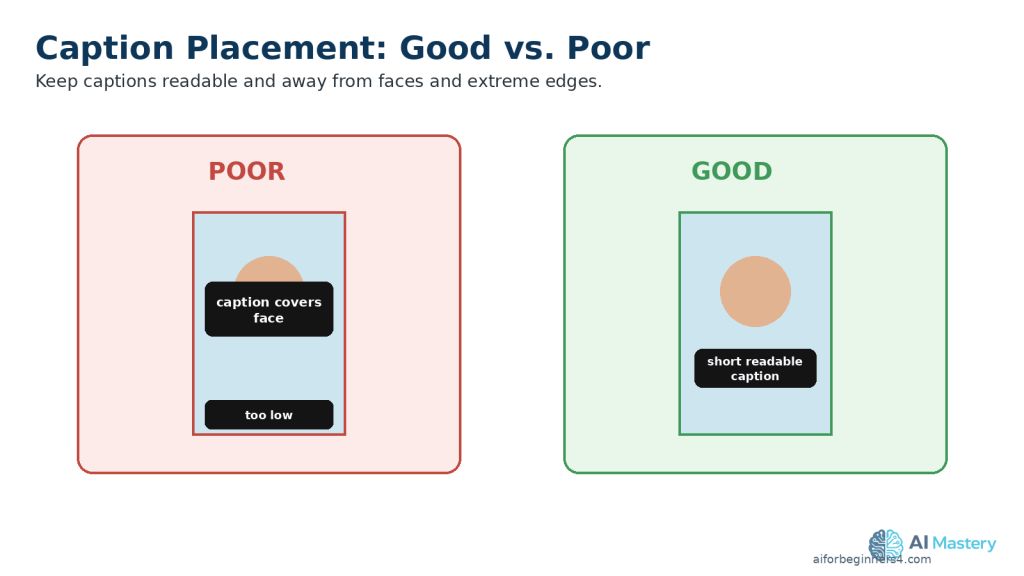
    Practical example: After completing your four versions, your project folder might contain one clean master video and four clearly labelled final exports. If you later need to make a correction, return to the editing project or clean master rather than editing a downloaded social-media copy.
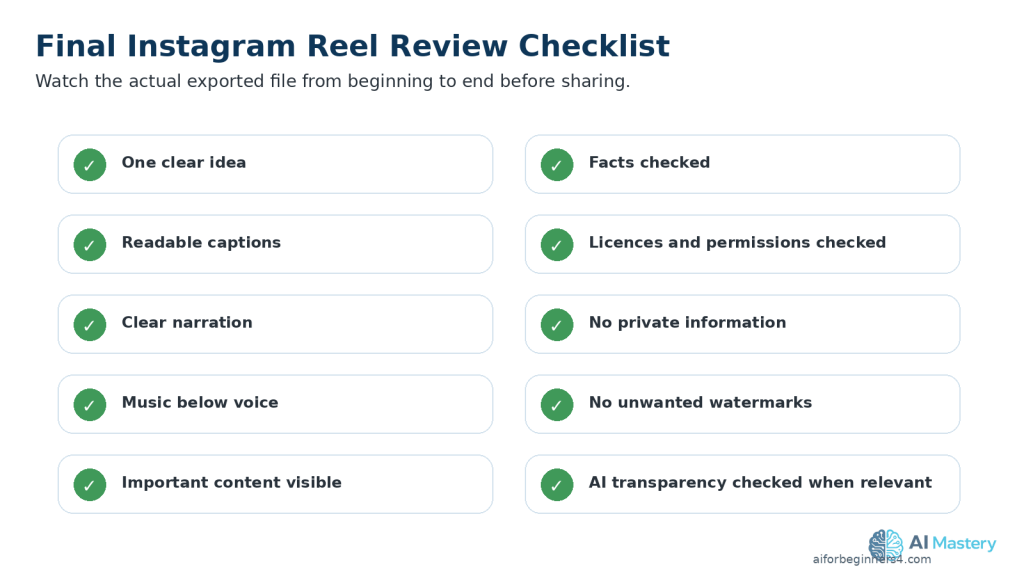
    Step 10: Upload Each Version Directly to Its Platform

    When your four final video files are ready, upload each one directly to the platform it was prepared for. Avoid publishing on one platform, downloading that published copy, and then using the downloaded file on the next platform.

    Uploading your clean platform-specific exports helps you preserve better video quality and reduces the chance of carrying unwanted watermarks, usernames, logos, or other platform-specific elements into another version.

    Figure 11. Upload each clean platform-specific export directly instead of downloading and reusing a published copy.

    Direct uploads reduce quality loss and unwanted platform branding.

    Before you publish each video, check:

    · You selected the correct platform-specific file.

    · The title, caption, or description matches the platform and video.

    · Any links or calls to action are correct.

    · Captions and important text remain visible in the preview.

    · The thumbnail or cover frame looks appropriate when the platform allows you to choose one.

    · Required AI-content disclosures or labels are completed when applicable.

    · No private or confidential information appears in the video or description.

    Do not assume that the same caption or description must be copied word-for-word across all four platforms. You can keep the main message consistent while adjusting the wording for the audience and features of each platform.

    Practical example: The educational video itself may stay almost identical across all four platforms, but the YouTube Shorts title, TikTok caption, Instagram Reel caption, and Facebook Reel description can be prepared separately.

    Common Mistakes to Avoid When Repurposing Videos

    Repurposing can save time, but a few common mistakes can make the finished videos look less professional or create unnecessary problems.

    Common mistakes include:

    · Downloading a published video from one platform and uploading that copy to another platform.

    · Leaving another platform’s watermark, username, logo, or branded ending in the video.

    · Cropping a horizontal video without checking whether faces, text, screenshots, or other important details were cut off.

    · Placing captions or important text too close to the edges of the screen.

    · Using music on several platforms without checking whether the licence allows that use.

    · Exporting over the clean master video instead of creating separate platform versions.

    · Reusing exactly the same call to action even when it refers to features available only on one platform.

    · Uploading the wrong platform-specific file because the filenames are unclear.

    · Forgetting to watch the final exported video before publishing.

    · Deleting the original project files after publishing.

    Figure 12. Replace common repurposing mistakes with a clean-master, platform-specific workflow.

    A simple repeatable workflow improves organization, quality, and licensing awareness.

    How to Avoid These Mistakes

    Keep one clean master video, create clearly named copies for each platform, and perform a final review of every exported file before uploading it.

    Keep your original project, source files, licences, permissions, and final exports together so you can correct or repurpose the video again later.

    Benefits of Repurposing One Video

    Repurposing one video for several platforms can make content creation more efficient without requiring you to create every video from the beginning.

    Key benefits include:

    · Saves time: You can reuse the same main idea, narration, and visuals instead of rebuilding the entire video.

    · Reduces editing work: Most changes involve reframing, captions, text placement, audio, or platform-specific details.

    · Keeps your message consistent: Viewers on different platforms receive the same main information.

    · Makes planning easier: One finished video can become several publishing opportunities.

    · Helps you reach different audiences: Some people mainly use YouTube, while others may prefer TikTok, Instagram, or Facebook.

    · Makes corrections easier: Keeping a clean master allows you to fix a problem once and create new exports when needed.

    · Improves file organization: Separate platform versions make it easier to identify what has been published and where.

    · Supports future reuse: Your clean master can later be adapted for another platform or format without starting again.

    Repurposing works best when the original video is well organized and the platform versions are treated as separate exports rather than identical copies.

    Limitations of Repurposing One Video

    Repurposing can save time, but one video will not always work perfectly on every platform without changes.

    Common limitations include:

    · Different viewing layouts: Text or subjects that look correct in one version may be partly covered or cropped on another platform.

    · Different audiences: A style that performs well with one audience may not interest viewers on another platform.

    · Music restrictions: Audio that is permitted on one platform may not be licensed for use elsewhere.

    · Different platform features: Calls to action, captions, covers, descriptions, and publishing options can vary.

    · Quality loss: Repeatedly downloading, editing, and re-exporting published videos can reduce visual quality.

    · Extra checking is still required: Each final version needs to be reviewed before publishing.

    How to Reduce These Limitations

    Keep a clean master video and create a separate working copy for each platform. Make only the changes that are genuinely needed, such as reframing, repositioning text, changing music, or adjusting the opening and ending.

    Repurposing should reduce unnecessary work, not eliminate the final quality check.

    Common Myths About Repurposing Videos

    Repurposing is useful, but several common myths can lead beginners to make poor editing or publishing decisions.

    Myth 1: Repurposing Means Uploading the Exact Same File Everywhere

    Reality: A clean master video can be the starting point, but each platform version may need small changes to framing, captions, text placement, audio, opening, ending, or description.

    Myth 2: A Vertical Video Will Automatically Look Good on Every Platform

    Reality: Even when the video uses a 9:16 format, platform controls can cover different areas of the screen. Important text, captions, and subjects should still be checked in each version.

    Myth 3: Music Available on One Platform Can Be Used Anywhere

    Reality: Music libraries and licences can differ between platforms. Always verify that you have permission to use the audio in each place where you plan to publish it.

    Myth 4: Downloading a Published Video Is the Best Way to Reuse It

    Reality: Returning to the clean master is usually better because a downloaded version may contain platform branding, watermarks, usernames, or reduced video quality.

    Myth 5: Repurposing Means You Never Need to Edit Again

    Reality: Repurposing reduces repeated work, but every final version still needs a quality check before publication.

    Frequently Asked Questions

    Can I Upload the Same Video to YouTube Shorts, TikTok, Instagram Reels, and Facebook Reels?

    Yes, you can reuse the same main video content, but it is better to create a separate version for each platform. Check the framing, captions, text placement, audio, opening, ending, and other platform-specific details before publishing.

    Should I Download My TikTok Video and Upload It to YouTube Shorts?

    It is better to return to your clean master video instead. A downloaded TikTok version may include a watermark, username, platform branding, or reduced video quality.

    Do I Need to Create Four Completely Different Videos?

    No. The purpose of repurposing is to reuse the same main content. You normally keep the core message, narration, and visuals while making only the adjustments needed for each platform.

    Should I Keep a Copy Without Music?

    Keeping a clean version without platform-specific music can be useful. You can then add suitable music separately when preparing each platform version, especially when music licensing conditions differ.

    Can I Use My Own Logo or Watermark on All Four Versions?

    Yes, you can use a small creator or business mark on your own original video. Keep it unobtrusive and away from captions, faces, important information, and areas where platform controls may appear.

    A watermark can help identify the source of your content, but it does not guarantee that other people cannot copy the video.

    What Should I Keep After Publishing?

    Keep your clean master video, editing project, source files, final platform exports, prompts, licences, permissions, and publication records. These files make future corrections and repurposing much easier.

    Key Takeaways

    Repurposing one video across several platforms can save time while keeping your main message consistent.

    Remember these main points:

    · Start with one clean master video.

    · Keep the master free from platform-specific watermarks, usernames, logos, and branded endings.

    · Create separate versions for YouTube Shorts, TikTok, Instagram Reels, and Facebook Reels.

    · Check framing, captions, text placement, music, opening, and ending in every version.

    · Use clear filenames so you do not confuse your exports.

    · Return to the clean master instead of downloading a published social-media copy.

    · Verify licences and permissions for music, stock footage, images, fonts, and other third-party assets.

    · Keep your original project files, prompts, licences, permissions, master export, and publication records.

    · Review every final export before publishing.

    Repurposing works best when you reuse the main content while still giving each platform version a careful final check.

    Final Tip

    Create once, but publish carefully.

    A well-organized clean master video can become several platform-specific versions without requiring you to rebuild the entire project. The time-saving benefit comes from reusing your strongest work while making only the adjustments each platform genuinely needs.

    Before publishing any version, watch the final exported file from beginning to end. Check the framing, captions, audio, text placement, branding, licences, and overall quality.

    Keeping your master video, source files, project files, permissions, licences, and final exports organized will make future updates and repurposing much easier.

    Continue Learning

    If you want to continue building your AI video skills, these AI Mastery guides are useful next steps:

    · Best AI Video Tools for Beginners: Complete Guide (2026) — Learn about beginner-friendly tools for creating AI videos.

    · How to Edit AI-Generated Videos: Beginner Step-by-Step Guide (2026) — Learn how to improve clips, timing, transitions, and overall video quality.

    · How to Add Voice, Music, and Captions to AI Videos: Beginner Step-by-Step Guide (2026) — Learn how to add narration, audio, and accessible captions.

    · How to Create Faceless YouTube Videos with AI: Complete Beginner Step-by-Step Guide (2026) — Follow a complete workflow for creating faceless YouTube videos.

    · How to Create YouTube Thumbnails, Titles, and Descriptions with AI (2026) — Learn how to prepare the publishing elements that support your videos.

    · How to Create an AI Virtual Presenter for YouTube Videos: Beginner Guide (2026) — Learn how to create videos using a fictional AI presenter.

    · How to Create AI Virtual Presenter Videos for TikTok: Beginner Guide (2026) — Learn how to adapt virtual-presenter videos for TikTok.

    Sources and References

    The following official sources were checked for the platform, video-format, music, safe-zone, and AI-disclosure information in this guide. Platform features and policies can change, so check the relevant official guidance when you first use a feature, when your account or plan changes, or when a platform announces an update.

    · YouTube Help — Upload YouTube Shorts: YouTube explains that Shorts uploads can use a square or vertical aspect ratio and can be up to three minutes long.

    · YouTube Help — Disclosing Use of Generative AI Content: YouTube explains when creators should disclose content that is AI-generated or meaningfully altered.

    · YouTube Help — Use Music and Sound Effects from the Audio Library: YouTube explains how its Audio Library works, including licensing and attribution requirements for certain tracks.

    · TikTok Support — About AI-Generated Content: TikTok explains its AI-generated-content labels and when creators are required to label realistic AI-generated images, audio, or video.

    · TikTok for Business — Creative Best Practices: TikTok recommends vertical 9:16 video and advises keeping important content within the interface safe zone.

    · TikTok Support — Commercial Use of Music on TikTok: TikTok explains that commercial content should use appropriately licensed music and recommends its Commercial Music Library for commercial uses.

    · Instagram Help — Reel Size and Aspect Ratios: Instagram explains the supported aspect ratios and minimum technical requirements for Reels.

    · Meta Business Help — Best Practices for Aspect Ratios: Meta recommends 9:16 vertical video for Reels placements to use the full mobile screen.

    · Meta Business Help — Safe Zones for Reels: Meta advises keeping important text and visual elements away from areas that may be covered by interface elements.

    · Meta Business Help — Sound Collection: Meta provides information about music and sound effects available through its Sound Collection for Facebook and Instagram content.

    Important: This guide provides general educational information about video creation, licensing, and platform practices. It is not legal advice. Always verify that you have the necessary rights or permissions for music, images, video clips, fonts, voices, and other material you publish.