
Estimated Reading Time: 18 minutes
Last Updated: August 15, 2026
Before Learning
Before you begin, it helps to have one clear idea for the Instagram Reel you want to create. Your Reel can be educational, promotional, entertaining, or adapted from a longer video, article, tutorial, or other original content.
You do not need advanced video-editing skills. AI tools can help you brainstorm ideas, write a short script, prepare vertical visuals, generate narration, create captions, and improve the editing workflow.
For most beginner projects, a 9:16 vertical video at 1080 × 1920 pixels is a practical working format. Keep important text, captions, faces, and other key information away from the extreme edges because Instagram interface elements may cover parts of the video.
This guide will show you how to move from one simple idea to a finished Instagram Reel while keeping your source files, prompts, licences, permissions, clean master export, and publication records organized.
What You’ll Learn
By the end of this guide, you will know how to:
· Choose one clear idea for an Instagram Reel.
· Use AI to brainstorm Reel topics and create a simple content plan.
· Write a short, focused script with AI assistance.
· Create or prepare visuals for a vertical 9:16 layout.
· Generate or record narration when needed.
· Add readable captions and on-screen text.
· Choose music and sound effects while checking usage rights.
· Edit the Reel so the opening quickly communicates the main topic.
· Keep important text, faces, and graphics inside safe viewing areas.
· Export a clean final version with suitable video settings.
· Upload and publish the Reel on Instagram.
· Review whether AI-content disclosure or other platform labels are required.
· Keep your original project files, prompts, licences, permissions, and clean master export for future reuse.
Introduction
Instagram Reels are short-form videos designed for quick viewing in a vertical feed. They can be used for tutorials, tips, demonstrations, product explanations, educational content, behind-the-scenes clips, and many other types of posts.
AI can help with several parts of the Reel-creation process. You can use it to generate ideas, outline a Reel, draft a script, create visuals, prepare narration, improve captions, and suggest editing changes.
However, AI should support your work rather than replace your final judgment. Review every script, visual, voice, caption, and factual claim before publishing. Make sure you have appropriate rights or permission for any music, images, video clips, voices, fonts, templates, or other material that you did not create yourself.
A practical beginner workflow is to start with one clear idea, write a short script, prepare vertical visuals, add clear audio and captions, edit the Reel carefully, and review the final export before uploading it to Instagram.
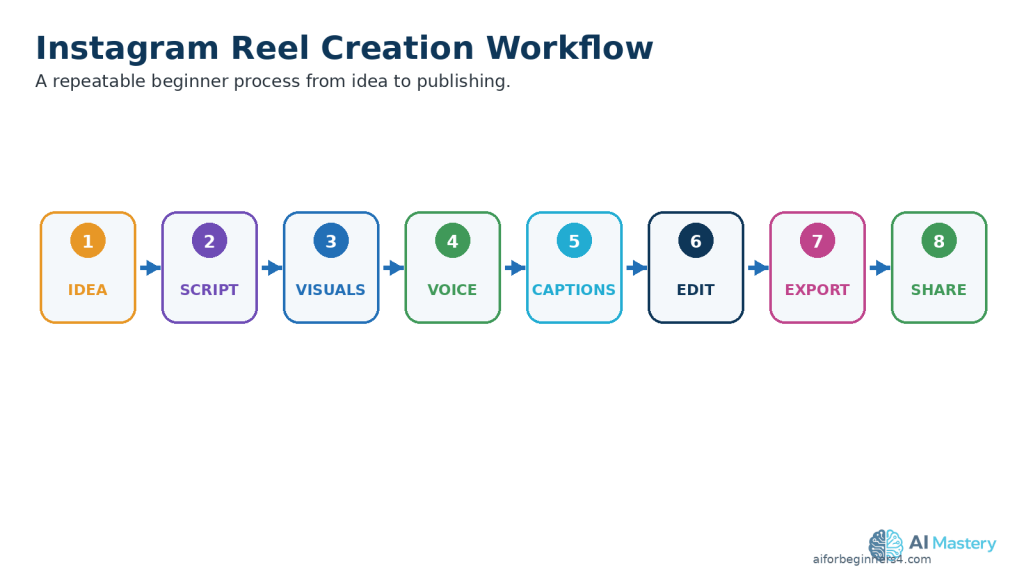
Figure 1. A beginner Instagram Reel workflow moves from one clear idea through scripting, visuals, audio, editing, export, and sharing.
Explanation: Following the same sequence for each Reel makes the process easier to repeat, review, and improve.
What Are Instagram Reels?
Instagram Reels are videos that you can create, edit, and share with your followers on Instagram. Instagram currently allows people to record and edit Reels of up to 20 minutes, although shorter videos may be more suitable when you want a quick, focused lesson or demonstration.
Reels can include:
· Recorded or uploaded video clips.
· Music or original audio.
· Text.
· Effects.
· Voice-over or text-to-speech.
· Captions and other visual elements.
Recommended Beginner Format
For a full-screen vertical Reel, a practical beginner format is:
· Aspect ratio: 9:16
· Resolution: 1080 × 1920 pixels
· Orientation: Vertical
· Frame rate: 30 fps or higher
Instagram accepts Reel aspect ratios from 1.91:1 through 9:16 and requires at least 30 fps and 720-pixel resolution. Meta recommends 9:16 for Reels because most people hold their phones vertically and this format can use the full screen.
Keep Important Content Inside the Safe Area
Instagram interface elements can cover parts of a vertical Reel. Keep important information such as:
· Faces.
· Captions.
· Titles.
· Demonstrations.
· Charts.
· Calls to action.
away from the extreme top, bottom, and sides of the frame. Meta provides safe-zone guidance for 9:16 Reels so important creative elements are less likely to be covered by interface controls.
Practical Example
If you want to create a Reel explaining one beginner AI tip, you could use a 1080 × 1920 vertical project, keep the main subject near the centre, add large readable captions, and show only the screen area needed for the demonstration.
This creates a simple phone-friendly layout while leaving room around the edges for Instagram interface elements.
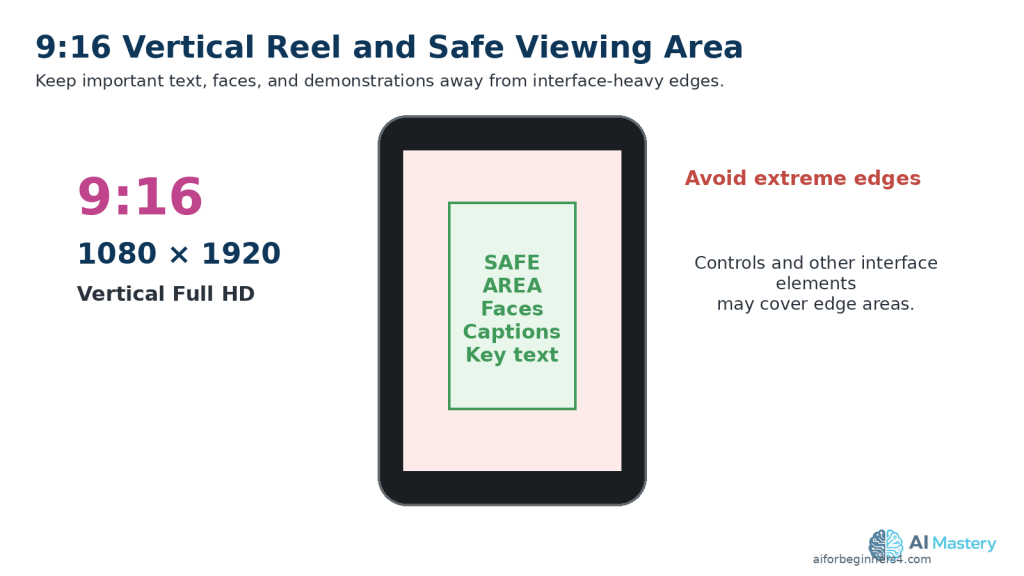
Figure 2. A 9:16 vertical frame at 1080 × 1920 pixels provides a practical full-screen Reel layout with space around the edges.
Explanation: Keeping important text, faces, and captions toward the central viewing area reduces the chance that interface elements will cover them.
Step 1: Choose One Clear Idea for Your Instagram Reel
An Instagram Reel is easier to understand when it focuses on one main idea. Trying to cover too many topics in one Reel can make the video feel rushed or confusing.
Choose a topic that can be explained clearly, such as:
· One beginner AI tip.
· One useful AI tool.
· One common mistake.
· One short tutorial.
· One quick comparison.
· One simple before-and-after example.
· One useful feature from a longer AI Mastery article.
Use AI to Brainstorm Reel Ideas
You can ask an AI assistant to suggest Reel ideas based on your topic.
Prompt:
“Give me 10 beginner-friendly Instagram Reel ideas about using AI for everyday tasks. Keep each idea focused on one clear lesson.”
Review the suggestions carefully and choose an idea that is useful, accurate, and appropriate for your audience.
Keep the Topic Narrow
Instead of creating a Reel called:
“Everything Beginners Should Know About AI”
choose something more specific, such as:
“3 Ways AI Can Help You Save Time”
or:
“How to Summarize a Long Document with AI”
A narrow topic makes it easier to write a clear script, choose suitable visuals, and keep the Reel focused.
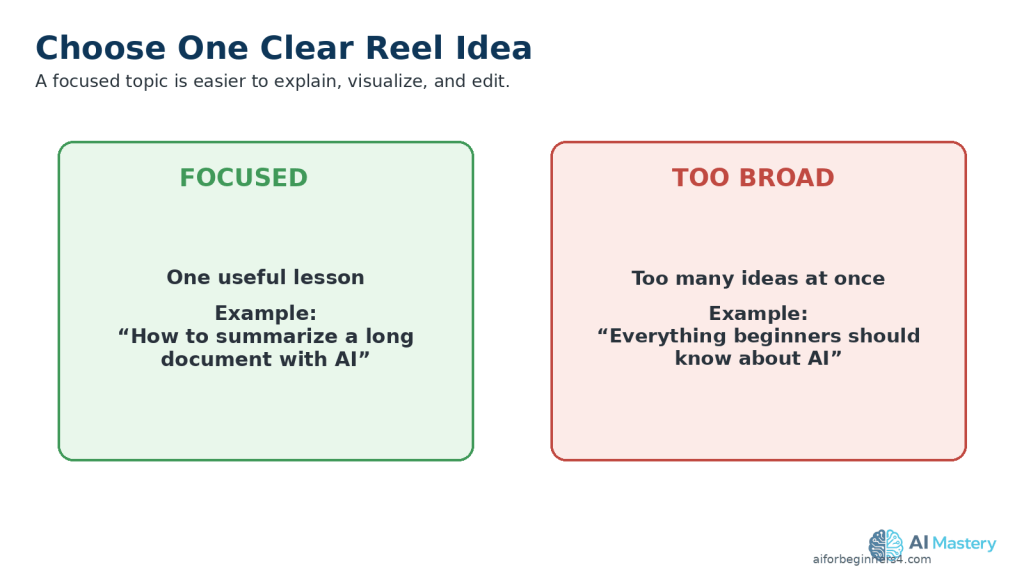
Figure 3. One focused Reel idea is easier to explain than a broad topic containing many unrelated points.
Explanation: A narrow topic helps beginners keep the script, visuals, and editing focused on one useful lesson.
Practical Example
If a longer AI Mastery article explains several document features, you could create one Reel about only document summarization.
The Reel can show the problem, demonstrate the basic process, and finish with one clear reminder to review the AI-generated result against the original document.
Step 2: Write a Short, Focused Reel Script with AI
A clear script helps keep your Instagram Reel organized and easy to follow. Even a short Reel benefits from having a simple beginning, main point, and ending.
AI can help you turn your idea into a draft script, but you should review and improve the result before using it.
Start with a Clear Prompt
Give the AI assistant enough information about your topic, audience, and goal.
Prompt:
“Write a beginner-friendly Instagram Reel script about how AI can help summarize a long document. Keep it clear, practical, and focused on one useful example. Use simple language and avoid hype.”
Use a Simple Script Structure
A practical beginner structure is:
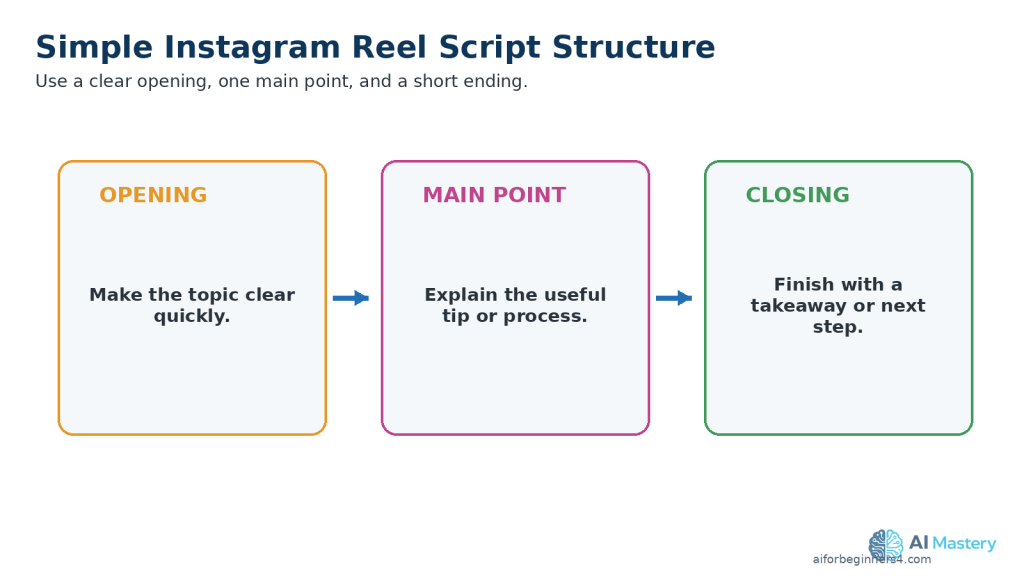
Figure 4. A simple Instagram Reel script can use a clear opening, one main point, and a short closing takeaway.
Explanation: This structure helps the Reel reach the useful information quickly without requiring a long introduction.
1. Opening: Tell viewers quickly what the Reel is about.
2. Main point: Explain the useful tip, process, or example.
3. Closing: Finish with a short takeaway or next step.
Make the Opening Clear
Avoid spending too much time on a long introduction.
Instead of:
“Hello everyone, welcome back to another video.”
you could begin with:
“Have a long document to read? AI can help you create a short summary in minutes.”
This tells viewers what the Reel is about immediately.
Review the AI-Written Script
Check the script for:
· Factual accuracy.
· Clear and simple language.
· Unnecessary repetition.
· Claims that sound exaggerated.
· Instructions that may be outdated.
· Difficult technical terms.
· Information that does not support the Reel’s main idea.
Do not assume that an AI-generated script is automatically correct.
Practical Example
For a Reel about summarizing a document with AI, the script could follow this simple sequence:
1. Show the long document.
2. Explain that an AI tool can help summarize it.
3. Show the document being uploaded.
4. Show a short summary prompt.
5. Remind viewers to compare the summary with the original document.
This gives viewers one clear lesson without trying to explain every document-analysis feature at once.
Step 3: Create or Prepare Vertical Visuals
Your visuals should support the script and make the Reel easy to understand on a phone screen.
For most beginner Instagram Reels, use a 9:16 vertical layout at 1080 × 1920 pixels.
Choose Visuals That Match the Script
Depending on your topic, you can use:
· AI-generated images.
· Licensed stock photos or stock video.
· Screen recordings.
· Charts or simple graphics.
· Text-based slides.
· Product or workspace footage.
· Clips from a longer video you created.
Use only visuals that help explain the main point.
Keep Important Content Visible
Vertical video is narrower than a standard horizontal video. Keep important elements such as:
· Faces.
· Captions.
· Titles.
· Buttons.
· Screenshots.
· Charts.
· Demonstrations.
away from the extreme top, bottom, and sides of the frame.
Instagram interface elements can cover parts of the video, so important information should remain closer to the central viewing area.
Make Screenshots Easy to Read
If your Reel includes a computer or phone screenshot, avoid showing the entire screen when the important text becomes too small.
Instead, crop or zoom into the area viewers need to see.
For example, if you are demonstrating an AI prompt, show the prompt box clearly rather than displaying an entire browser window at a very small size.
Review AI-Generated Visuals Carefully
AI-generated images and video clips can contain mistakes such as:
· Distorted hands or objects.
· Misspelled text.
· Duplicate items.
· Inconsistent people or clothing.
· Incorrect interface elements.
· Unrealistic details.
Review every generated visual before adding it to the Reel.
Check Licences and Permissions
If you use stock footage, photographs, templates, fonts, graphics, or other assets that you did not create yourself, check the licence and commercial-use conditions before publishing.
Do not assume that an image or video is free to reuse simply because it is available online.
Practical Example
For an Instagram Reel about summarizing a document with AI, you might use:
1. A visual showing a long document.
2. A screen recording of the document being uploaded.
3. A close-up of the summary prompt.
4. A simple visual showing the shorter AI-generated result.
5. A final reminder to compare the summary with the original document.
This creates a clear visual sequence that follows the script from beginning to end.
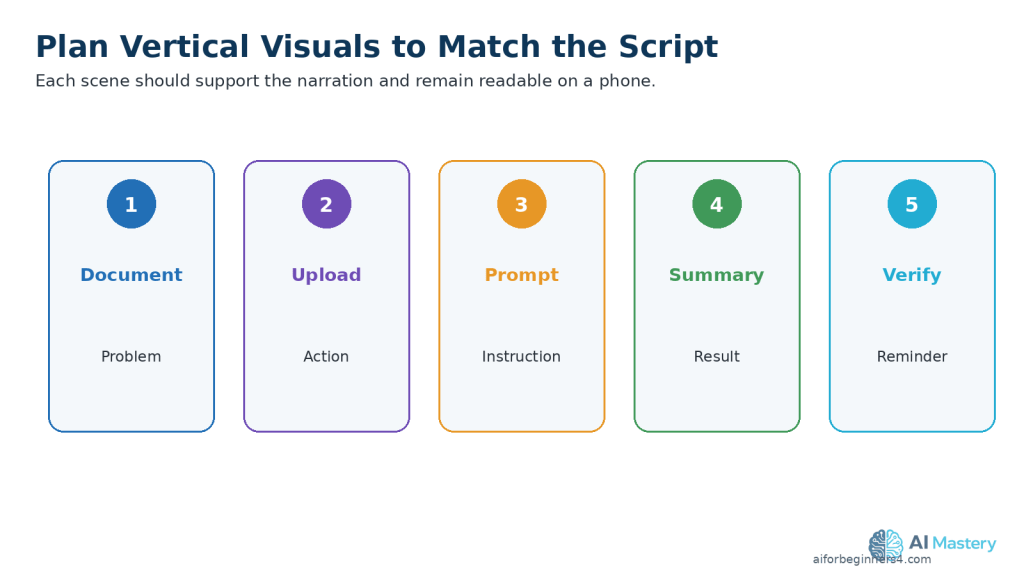
Figure 5. Plan vertical visuals in the same order as the script so each scene supports the current point.
Explanation: A simple scene sequence helps viewers follow the process on a small phone screen.
Step 4: Add Narration or an AI Voice
Narration can make an Instagram Reel easier to follow, especially when the video explains a process, gives a tip, or shows a demonstration.
You can record your own voice or use an AI-generated voice when the tool and licence allow your intended use.
Choose a Clear Voice
The narration should be easy to understand and should match the pace of the visuals.
A good voice-over should:
· Speak clearly.
· Avoid rushing.
· Use natural pauses.
· Match the tone of the topic.
· Pronounce technical terms correctly.
· Leave enough time for viewers to read important on-screen text.
Review AI-Generated Narration
If you use an AI voice, listen to the entire recording before adding it to the Reel.
Check for:
· Mispronounced names or technical terms.
· Unnatural pauses.
· Missing words.
· Incorrect emphasis.
· Audio that sounds too fast or too slow.
· Sentences that do not match the visuals.
Correct the script or regenerate the affected section when necessary.
Keep Narration and Visuals Aligned
The visual shown on screen should support what the viewer is hearing.
For example, if the narration says:
“Upload your document to the AI tool.”
the Reel should show the upload step at approximately the same time.
This makes the video easier to understand.
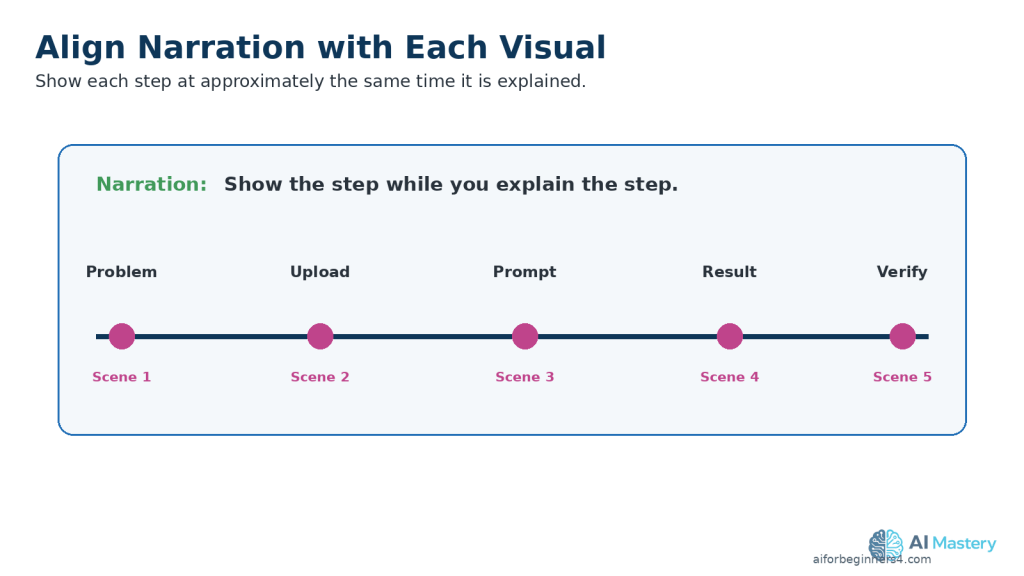
Figure 6. Match narration and visuals so viewers see each step at approximately the same time they hear it.
Explanation: Good timing makes demonstrations easier to follow and reduces confusion.
Protect Privacy and Get Permission
Do not clone or imitate a real person’s voice without appropriate permission.
If you use another person’s recording, make sure you have permission to use it and understand any licence or platform conditions that apply.
Avoid using AI voices in ways that could falsely make viewers believe a real person said something they did not say.
Practical Example
For a Reel explaining document summarization, the narration could briefly guide the viewer through uploading a document, asking for a summary, and checking the result.
Each visual can change as the narration moves to the next step, keeping the Reel clear and easy to follow.
Step 5: Add Captions and On-Screen Text
Captions and on-screen text can make an Instagram Reel easier to understand, especially when viewers are watching without sound.
Keep Captions Easy to Read
Use captions that are:
· Large enough to read on a phone.
· Short and easy to scan.
· High contrast against the background.
· Timed closely with the spoken words.
· Positioned away from important faces, demonstrations, and other visual details.
Avoid placing captions at the extreme bottom or sides of the frame because Instagram interface elements can cover those areas.
Use On-Screen Text Carefully
On-screen text can highlight the most important information in the Reel.
For example, you could show:
“3 Steps to Summarize a Document with AI”
near the beginning.
Later, you could use short labels such as:
· Step 1: Upload
· Step 2: Ask for a Summary
· Step 3: Review the Result
Keep the wording simple. Too much text on screen at the same time can make the Reel difficult to follow.
Check Spelling and Accuracy
Review every caption and text element before exporting.
Check for:
· Spelling mistakes.
· Missing words.
· Incorrect punctuation.
· Wrong names or technical terms.
· Captions that appear too early or too late.
· Text that does not match the narration.
Accessibility
Captions can help people who are deaf or hard of hearing, viewers watching without sound, and people who find written text easier to follow than narration alone.
Do not rely only on colour to communicate important information. Use clear words, labels, or symbols as well.
Practical Example
If the narrator says:
“Always check the AI-generated summary against the original document.”
you could display:
“Always verify the summary.”
This reinforces the main lesson without overcrowding the screen.
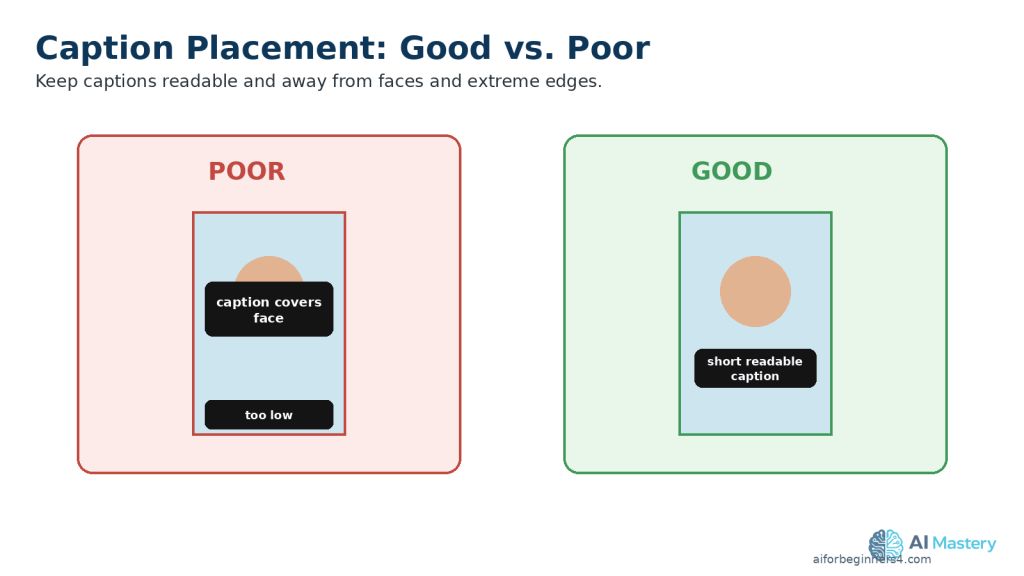
Figure 7. Place captions where they remain readable without covering faces or sitting too close to the edges.
Explanation: Clear caption placement supports accessibility and improves readability on vertical screens.
Step 6: Add Music and Sound Effects Carefully
Music and sound effects can make an Instagram Reel more engaging, but they should support the video rather than distract from the main message.
Choose Music You Are Allowed to Use
You can use music available through Instagram when it is offered for your account and intended use, or use music from another source when you have the appropriate licence or permission.
Music availability can vary by account type, location, track, and intended use. Some music that is available for personal content may have different restrictions for business or commercial use.
Do not assume that music is safe to reuse simply because you found it online or because it appears in another creator’s Reel.
Keep Music Below the Narration
If your Reel includes spoken narration, keep the background music at a lower volume so the voice remains easy to understand.
Listen to the complete Reel and check that:
· The narration is clear.
· Music does not cover important words.
· Sound effects are not unexpectedly loud.
· Audio changes are smooth.
· The beginning and ending do not contain sudden volume jumps.
Be Careful When Reusing Music on Other Platforms
Music available inside Instagram does not automatically mean you have permission to use the same track in a YouTube Short, TikTok video, Facebook Reel, or another platform.
If you plan to repurpose the video, keep a clean master version without platform-specific music when possible.
You can then add suitable music separately for each platform after checking the applicable licence or usage conditions.
Keep Licensing Records
If you use music or sound effects from an external source, keep records such as:
· The licence.
· Permission from the rights holder.
· A purchase receipt.
· Attribution instructions.
· A copy of the applicable usage conditions.
This can help you confirm how the audio may be used later.
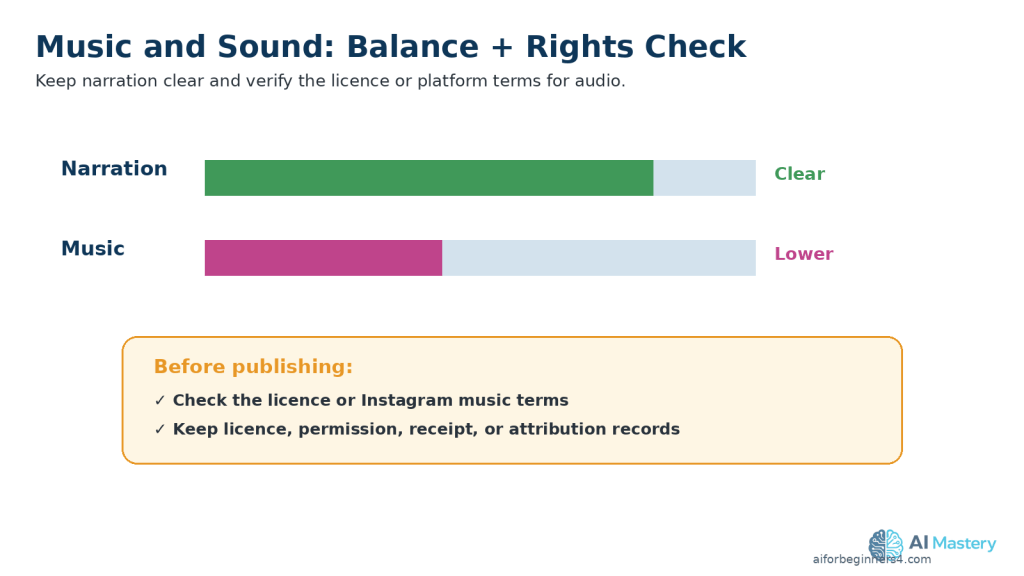
Figure 8. Keep narration clear, background music lower, and verify the rights or licence for every audio source.
Explanation: Music available under Instagram or another service may have different conditions for business, commercial, or cross-platform use.
Practical Example
For a beginner AI tutorial Reel, you might use quiet background music beneath the narration.
The voice should remain clearly understandable throughout the video. If you later adapt the Reel for YouTube Shorts or another platform, return to the clean master and check the music rights again before publishing the new version.
Step 7: Edit the Instagram Reel for a Clear, Fast Flow
An Instagram Reel should move quickly enough to keep viewers interested without making the information difficult to follow.
Remove Unnecessary Parts
Review the full Reel and remove:
· Long pauses.
· Repeated explanations.
· Empty frames.
· Slow introductions.
· Unnecessary transitions.
· Visuals that do not support the main point.
The goal is to keep the Reel focused on one useful idea.
Match the Editing to the Script
Change visuals when the narration moves to a new point.
For example:
· Show the problem when the opening introduces it.
· Show the AI tool when the script explains the tool.
· Show the result when the narration describes the result.
· Show the final takeaway at the end.
This helps viewers understand the information without having to guess what each visual means.
Keep Transitions Simple
You do not need complicated effects between every scene.
Simple cuts, gentle zooms, or basic fades are often enough for beginner tutorials.
Too many effects can distract from the content.
Keep Important Content Visible
Check that captions, faces, screenshots, and important text remain clear throughout the Reel.
If a scene contains small text, zoom into the relevant area instead of showing the entire screen at once.
Practical Example
For a Reel about summarizing a document with AI, the editing sequence might be:
1. Show the long document.
2. Show the upload step.
3. Show the summary prompt.
4. Show the shorter result.
5. End with the reminder to verify the summary against the original.
This creates a simple beginning-to-end flow without unnecessary scenes.
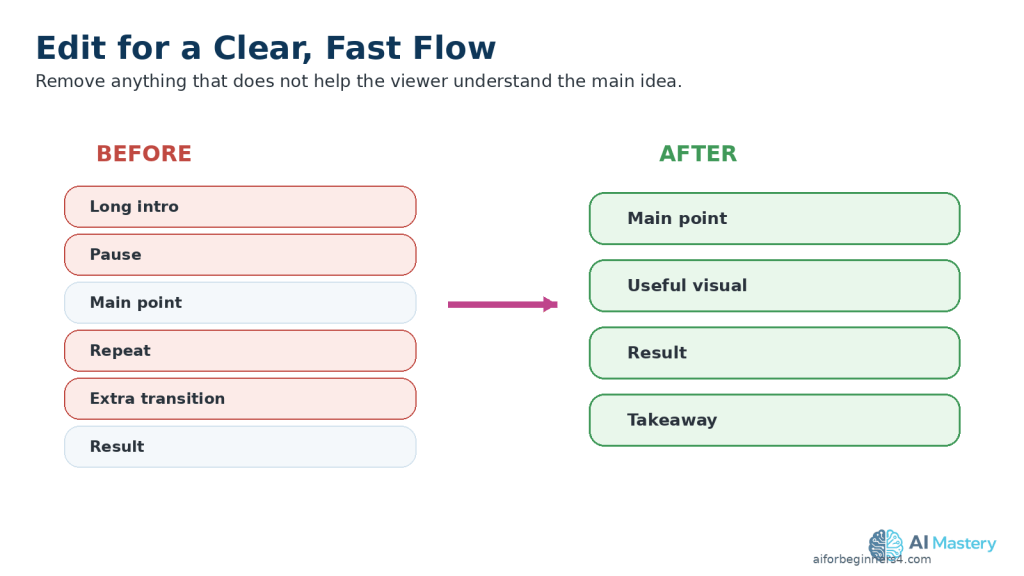
Figure 9. Removing long pauses, repeated information, and distracting effects creates a clearer Reel.
Explanation: Simple editing keeps attention on the lesson rather than on unnecessary production effects.
Step 8: Export and Review the Final Instagram Reel
When editing is complete, export the Reel as a separate final video file. Keep your original editing project and clean master version so you can make corrections or prepare versions for other platforms later.
Choose Practical Export Settings
For most beginner Instagram Reels, a practical starting point is:
· Aspect ratio: 9:16
· Resolution: 1080 × 1920 pixels
· Orientation: Vertical
· File format: MP4
· Video codec: H.264
· Audio codec: AAC
· Frame rate: Keep the same frame rate used in your original footage or editing project when possible.
Instagram Reels are designed for vertical viewing, and Meta recommends keeping important creative elements away from interface-heavy edges when using a 9:16 Reel layout.
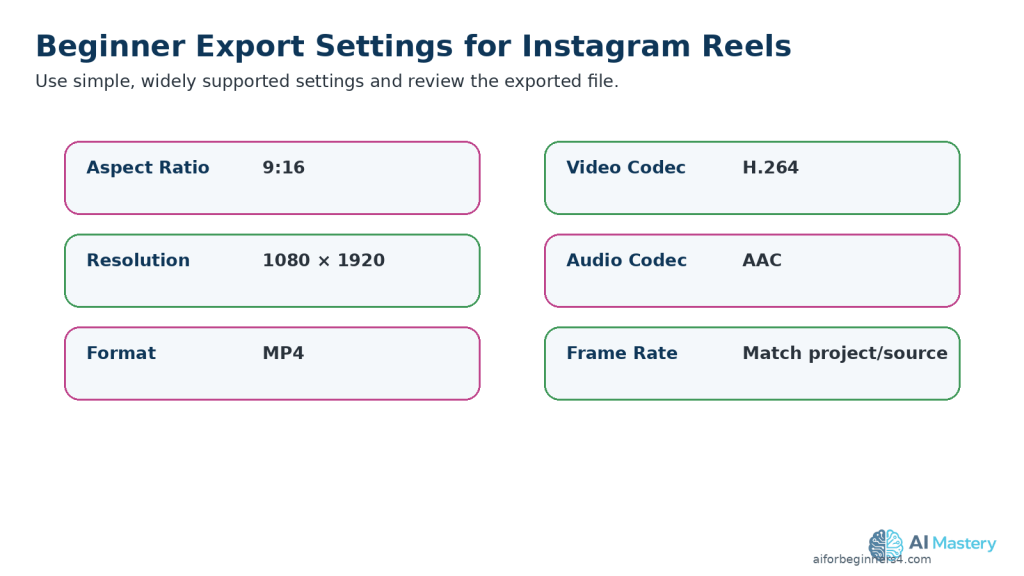
Figure 10. Practical beginner export settings include 9:16, 1080 × 1920, MP4, H.264 video, AAC audio, and a frame rate matched to the project when possible.
Explanation: Open and watch the exported file itself before uploading rather than relying only on the editor preview.
Watch the Exported File Before Uploading
Do not rely only on the preview inside your video editor.
Open the actual exported video and watch it from beginning to end.
Check for:
· Blurry or pixelated video.
· Cropped faces or important objects.
· Captions that are difficult to read.
· Text positioned too close to the edges.
· Music that covers the narration.
· Audio that is unexpectedly loud or quiet.
· Missing scenes or blank frames.
· Spelling mistakes.
· Distorted AI-generated images.
· Unwanted logos, watermarks, usernames, or branded endings.
· Private or confidential information.
Check the Vertical Layout
Watch the Reel on a phone if possible.
Make sure that:
· Important faces remain visible.
· Captions are readable.
· Demonstrations are large enough to understand.
· Important text is not placed at the extreme top or bottom.
· The main subject remains clear in the vertical frame.
Meta specifically advises keeping key creative elements away from the edges of 9:16 Reels because platform controls can cover those areas.
Keep a Clean Master
Save a clean master separately from the Instagram version.
For example:
· ai-document-summary-master.mp4
· ai-document-summary-instagram-reel-final.mp4
The clean master should avoid unnecessary platform-specific logos, usernames, or downloaded watermarks.
This makes it easier to create another version later for YouTube Shorts, TikTok, Facebook Reels, or another platform.
Practical Example
After exporting your document-summary Reel, watch the final MP4 on your computer and phone.
If the captions are readable, the narration is clear, the important demonstration remains visible, and there are no unwanted watermarks or private details, the Reel is ready for the publishing step.
Step 9: Upload and Publish the Instagram Reel
When the final video has been reviewed, upload the clean Instagram version rather than a copy downloaded from another social media platform.
Instagram lets you create a Reel from the Instagram app and add existing photos or video clips from your device. The exact button names can change as Instagram updates its interface.
Upload the Reel in Instagram
A typical beginner workflow is:
1. Open Instagram.
2. Tap Create or the + button.
3. Choose Reel.
4. Select your final vertical video from your device.
5. Review or trim the video if necessary.
6. Add captions, music, text, or other Instagram features only if you need them.
7. Tap Next.
8. Add a clear caption and any other required information.
9. Choose the sharing and audience options available to your account.
10. Review everything carefully.
11. Tap Share when the Reel is ready.
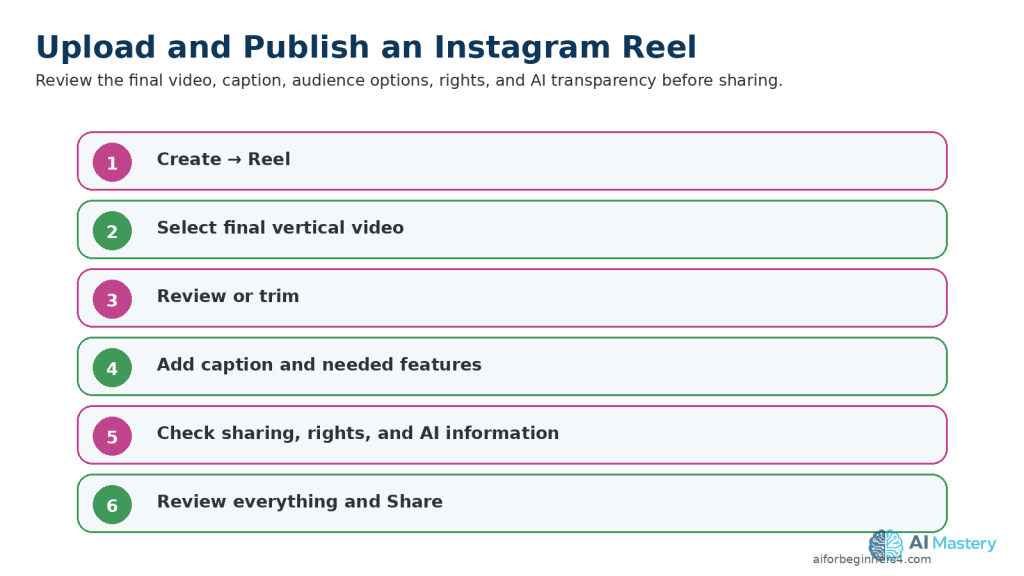
Figure 11. The Instagram publishing workflow includes selecting the final video, reviewing it, adding a caption, checking settings and rights, and sharing.
Explanation: Exact button names can change, so review the current Instagram interface before publishing.
Instagram also provides tools for creating, editing, and managing Reels, although the exact options available can vary by account and app version.
Add a Clear Caption
Your caption should accurately explain what the Reel is about.
For example:
Learn a simple way to summarize a long document with AI. Always compare important information with the original document before using the summary.
Avoid exaggerated or misleading claims simply to attract attention.
Check Sharing and Privacy Settings
Before publishing, review who can see and interact with the Reel.
Your available sharing options can depend on your account and privacy settings. Instagram also provides controls related to sharing, remixing, and reuse of Reels.
If you are publishing professional or business content, also check whether any partnership, promotional, or branded-content requirements apply.
Review AI-Generated or AI-Altered Content
Meta uses AI info labels to provide additional context about some AI-generated or AI-modified content on Instagram, Facebook, and Threads. Meta may identify AI content through technical signals or information supplied when content is uploaded.
Before publishing realistic AI-generated or significantly AI-altered content, check the current disclosure options available in Instagram.
Pay particular attention when AI content:
· Realistically represents a person.
· Alters what a real person appears to say or do.
· Creates a realistic event that did not occur.
· Significantly changes a real photograph or video.
· Could reasonably be mistaken for authentic footage.
Meta continues to develop its AI-content transparency and labeling approach, so these requirements and labels can change.
Review Before Publishing
Before tapping Share, check:
· The correct video was selected.
· The Reel is displayed vertically as intended.
· The caption accurately describes the content.
· Captions and important text remain readable.
· The narration is clear.
· Music and sound effects have appropriate usage rights.
· Images, video clips, fonts, voices, and other assets are properly licensed or permitted.
· No private or confidential information appears.
· No unwanted watermark, username, or platform branding remains.
· Any appropriate AI-content information or disclosure has been completed.
Practical Example
Suppose your Reel uses an AI-generated illustration of a fictional office worker while the narration explains how to summarize a document.
Review the illustration for obvious AI mistakes, check the voice and captions, verify your asset licences, and check Instagram’s current AI disclosure options before publishing.
If instead you create a realistic AI video that makes a real person appear to perform an action that never happened, transparency becomes particularly important because viewers could mistake the synthetic content for real footage.
Common Mistakes to Avoid When Creating Instagram Reels with AI
Beginners can save time by avoiding several common problems that affect clarity, quality, licensing, privacy, or publishing.
Common mistakes include:
· Trying to explain too many ideas in one Reel.
· Using a long introduction before reaching the main point.
· Placing captions or important text too close to the edges.
· Shrinking screenshots until the text becomes difficult to read.
· Using music without checking whether the licence allows Instagram use.
· Letting background music overpower the narration.
· Publishing AI-generated information without checking factual accuracy.
· Using a real person’s voice, image, or likeness without appropriate permission.
· Uploading a downloaded copy from another platform instead of using a clean master export.
· Leaving unwanted watermarks, usernames, logos, or branded endings in the video.
· Using AI-generated visuals without checking for distorted objects, incorrect text, or unrealistic details.
· Forgetting to review privacy settings and sharing options.
· Skipping the final review of the exported file.
· Ignoring relevant AI-content disclosure or labeling requirements when realistic synthetic or altered content is used.
How to Avoid These Mistakes
Keep each Reel focused on one clear lesson and work from a clean master project.
Before publishing, review the:
· Script.
· Visuals.
· Captions.
· Audio.
· Music rights.
· Asset licences.
· Permissions.
· Privacy settings.
· AI-generated content.
· Final export.
· Any applicable disclosure or labeling requirements.
If something is unclear, incorrect, poorly positioned, or not properly licensed, correct the project and export a new version before publishing.
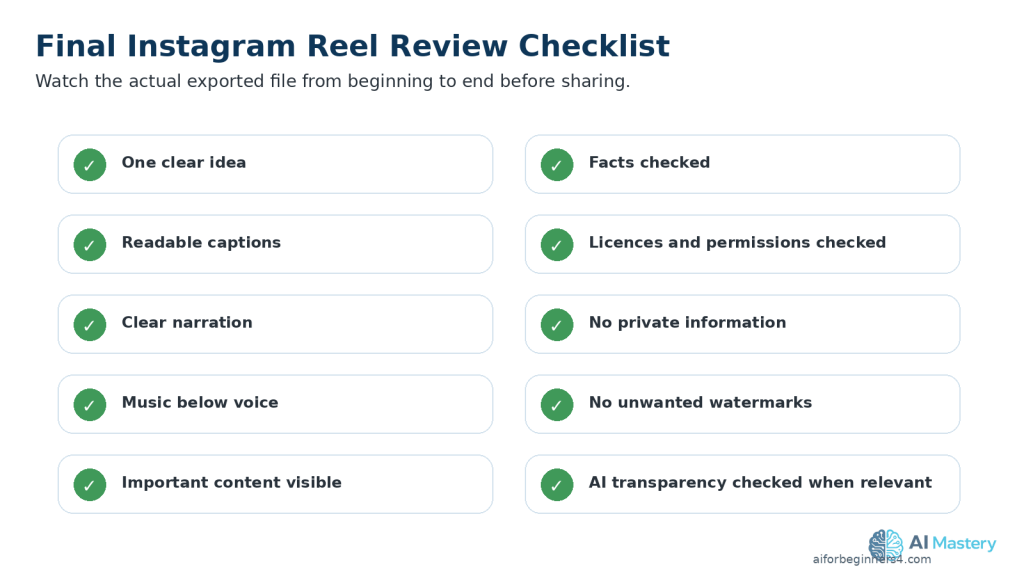
Figure 12. A final checklist helps catch quality, licensing, privacy, branding, and AI-transparency problems before publication.
Explanation: Watching the actual exported video from beginning to end is one of the most important final checks.
Benefits of Creating Instagram Reels with AI
AI can make the Instagram Reels workflow easier for beginners by helping with planning, writing, visuals, narration, captions, and editing.
Key benefits include:
· Faster idea generation: AI can suggest focused Reel topics when you are not sure what to create.
· Simpler script writing: AI can turn a basic idea into a short script that you can review and improve.
· Easier visual planning: AI can suggest scenes, image ideas, screen recordings, text overlays, and simple shot sequences.
· More accessible production: AI voices, captions, and editing assistance can help beginners create videos without advanced production skills.
· Better organization: AI can help reduce a broad topic to one clear lesson that fits a Reel.
· Easier repurposing: A Reel can be adapted from a longer video, article, tutorial, or clean master project.
· More consistent workflow: Using the same planning, scripting, editing, and review process can make future Reels easier to produce.
· Useful learning support: AI can explain unfamiliar editing terms and suggest improvements when you are learning a new tool.
AI is most useful when it supports your decisions rather than replacing them. Review the final script, visuals, audio, captions, facts, licences, permissions, privacy settings, and publishing choices before making the Reel public.
Limitations of Creating Instagram Reels with AI
AI can help with many parts of the Instagram Reels workflow, but it does not remove the need for careful human review.
Common limitations include:
· Factual errors: AI-generated scripts can contain incorrect, outdated, or misleading information.
· Generic writing: AI may produce scripts that sound repetitive or similar to other content unless you revise them.
· Visual inconsistencies: AI-generated images or video clips may contain distorted objects, unusual details, inconsistent characters, or misspelled text.
· Voice limitations: AI narration can mispronounce names, sound unnatural, or use incorrect emphasis.
· Licensing differences: AI tools, stock libraries, music services, templates, and fonts can have different rules for commercial use.
· Platform changes: Instagram features, music options, upload settings, labels, and publishing tools can change over time.
· Editing is still required: AI-generated material usually needs trimming, timing adjustments, caption checks, and final quality review.
· Privacy risks: Uploading private documents, photographs, recordings, or personal information to an AI tool can create privacy concerns.
· Disclosure requirements: Some realistic AI-generated or significantly AI-altered content may require additional transparency or labeling.
· No guarantee of performance: AI can help create a clearer Reel, but it cannot guarantee views, followers, engagement, sales, or other results.
How to Reduce These Limitations
Use AI as an assistant rather than treating its output as automatically finished.
Verify important facts, review every generated visual and voice recording, check licences and permissions, protect private information, and watch the complete exported Reel before publishing.
When Instagram changes a feature, music option, disclosure method, or publishing requirement that affects your workflow, check the current official guidance before relying on older instructions.
Common Myths About Creating Instagram Reels with AI
Several common myths can make beginners expect too much from AI or use it in ways that create unnecessary problems.
Myth 1: AI Can Create a Perfect Instagram Reel Automatically
Reality: AI can help with ideas, scripts, visuals, narration, captions, and editing suggestions, but the final Reel still needs human review for accuracy, quality, timing, licensing, privacy, and platform requirements.
Myth 2: Every AI-Generated Reel Must Be Labelled the Same Way
Reality: AI transparency and labeling can depend on how the content was created and how realistic or significantly altered it is. Simple AI assistance with brainstorming or script editing is different from realistic synthetic media that could be mistaken for real footage.
Myth 3: AI-Generated Images and Music Are Automatically Copyright-Free
Reality: Rights and commercial-use conditions depend on the tool, licence, source material, and intended use. Always check the terms that apply to the assets you use.
Myth 4: More Effects Make a Reel More Professional
Reality: Too many transitions, animations, text boxes, or sound effects can distract viewers. Clear visuals, readable captions, and simple editing are often more effective for beginner tutorials.
Myth 5: Instagram Reels Must Be Extremely Fast
Reality: A Reel should be concise and easy to follow, but viewers still need enough time to understand the information and read important captions.
Myth 6: AI Can Guarantee More Views or Followers
Reality: AI can help improve your workflow, but it cannot guarantee views, followers, engagement, sales, or other results. Audience interest, usefulness, presentation, timing, competition, and many other factors can affect performance.
Frequently Asked Questions
How Long Can an Instagram Reel Be?
Instagram currently allows Reels of up to 20 minutes, although shorter videos are often easier to keep focused and suitable for quick viewing.
What Size Should I Use for an Instagram Reel?
A practical beginner format is 1080 × 1920 pixels with a 9:16 vertical aspect ratio.
Do I Need an Expensive AI Video Tool?
No. Beginners can start with simple tools for writing, editing, captions, narration, or visuals.
Check whether a free plan adds watermarks, limits exports, restricts resolution, or has different commercial-use conditions.
Can I Create an Instagram Reel Without Showing My Face?
Yes. You can create faceless Reels using:
· Screen recordings.
· AI-generated visuals.
· Licensed stock footage.
· Text and graphics.
· Charts.
· Product footage.
· Voice-over narration.
Can I Use an AI Voice in an Instagram Reel?
Yes, when the tool and licence allow your intended use.
Review the narration carefully and avoid cloning or impersonating a real person’s voice without appropriate permission.
Should I Add Captions?
Captions are strongly recommended.
They can help viewers who are watching without sound and improve accessibility for people who are deaf or hard of hearing.
Can I Use Any Music I Find Online?
No.
Only use music when you have appropriate permission, a suitable licence, or access through Instagram under terms that allow your intended use.
Do I Need to Disclose AI Use?
It depends on how AI was used.
Simple assistance with brainstorming, script writing, or minor editing is different from realistic AI-generated or significantly altered content that viewers could mistake for real people, events, or places.
Check Instagram’s current AI labeling and disclosure options before publishing realistic synthetic content.
Can I Reuse the Same Reel on YouTube Shorts, TikTok, or Facebook Reels?
Yes, but return to your clean master video and create a separate version for each platform.
Check:
· Aspect ratio.
· Caption placement.
· Music rights.
· Safe areas.
· Platform branding.
· Disclosure requirements.
before publishing each version.
Will AI Guarantee More Views or Followers?
No.
AI can help with planning and production, but it cannot guarantee views, followers, engagement, sales, or other results.
Key Takeaways
Creating Instagram Reels with AI becomes easier when you follow a simple, repeatable workflow.
Remember these main points:
· Start with one clear idea for each Reel.
· Use AI to help brainstorm, outline, and draft the script, but always review the final wording.
· Keep the script focused and make the topic clear near the beginning.
· Use a 9:16 vertical format for a full-screen phone-friendly layout.
· Prepare visuals that are easy to understand on a small screen.
· Keep captions, titles, faces, and important information away from the extreme edges.
· Use clear narration and make sure background music does not overpower the voice.
· Check licences and permissions for music, stock footage, images, fonts, voices, templates, and other third-party assets.
· Review AI-generated visuals for distorted objects, incorrect text, or unrealistic details.
· Edit out unnecessary pauses, repeated information, and distracting effects.
· Export a clean final version and watch the complete file before uploading.
· Review Instagram’s current AI-content labeling or disclosure options when realistic synthetic or significantly altered content is involved.
· Keep your clean master video, project files, prompts, licences, permissions, and final exports for future corrections or repurposing.
AI can help make the production process faster, but the final quality, accuracy, licensing, privacy, accessibility, and publishing decisions still require careful human review.
Final Tip
Keep your first Instagram Reels simple.
Choose one useful idea, explain it clearly, use readable visuals and captions, and review the final video before publishing. You do not need complicated effects or advanced editing to create a useful Reel.
As your workflow improves, keep your clean master files, prompts, licences, permissions, and final exports organized. This makes it easier to correct mistakes, update older videos, or repurpose successful Reels for other platforms later.
Continue Learning
If you want to continue building your AI video skills, these AI Mastery guides are useful next steps:
· How to Repurpose One AI Video for YouTube Shorts, TikTok, Instagram Reels, and Facebook Reels: Beginner Guide (2026) — Learn how to adapt one clean master video into separate versions for several social media platforms.
· How to Choose AI Video Sizes, Aspect Ratios, and Export Settings: Beginner Guide (2026) — Learn how to choose the correct dimensions, frame rate, file format, and export settings for vertical video.
· How to Create YouTube Shorts with AI: Beginner Step-by-Step Guide (2026) — Learn how to create, edit, export, and publish short-form videos for YouTube.
· How to Create Faceless YouTube Videos with AI: Complete Beginner Step-by-Step Guide (2026) — Follow a complete workflow for planning, scripting, visuals, narration, editing, and publishing.
· How to Edit AI-Generated Videos: Beginner Step-by-Step Guide (2026) — Learn how to trim clips, arrange scenes, improve pacing, and prepare a clean final video.
· How to Add Voice, Music, and Captions to AI Videos: Beginner Step-by-Step Guide (2026) — Learn how to add narration, background music, sound effects, and readable captions.
· How to Create AI Virtual Presenter Videos for TikTok: Beginner Guide (2026) — Learn how a fictional AI presenter can be used in short-form vertical video workflows.
Sources and References
The following official Instagram and Meta sources were checked for the Reel length, dimensions, music, intellectual-property, and AI-transparency information used in this guide. Instagram features and policies can change, so important requirements should be checked again when Meta announces an update or when you change your publishing workflow.
· Instagram Help Center — Record a Reel on Instagram: Instagram explains that Reel clips can currently add up to 20 minutes.
· Instagram Help Center — Reel Size and Aspect Ratios: Instagram states that uploaded Reels can use aspect ratios from 1.91:1 through 9:16 and should have at least 30 frames per second and the required minimum resolution.
· Instagram Help Center — Access to the Licensed Music Library: Instagram explains that access to licensed music can vary and provides information about music available for commercial purposes through Meta’s Sound Collection.
· Instagram Help Center — How to Use Music in Videos: Instagram provides guidance about using music while respecting Meta’s agreements with music rights holders.
· Instagram Help Center — What Audio You Can Use in a Reel: Instagram explains options for original and licensed audio used in Reels.
· Instagram Help Center — Intellectual Property: Instagram states that users should post only content that does not violate another person’s intellectual-property rights.
· Meta — Our Approach to Labeling AI-Generated Content: Meta explains its approach to identifying and labeling AI-generated or significantly AI-modified content across Instagram, Facebook, and Threads.
· Meta — Transparency of AI-Generated Content: Meta confirmed in July 2026 that it continues to work on identifying and labeling AI-generated content as realistic synthetic media becomes more difficult to distinguish from authentic media.
Important: This guide provides general educational information about AI video creation, copyright, licensing, privacy, disclosure, and publishing. It is not legal advice. Always verify that you have appropriate rights or permission for music, photographs, video clips, voices, fonts, templates, and other material you publish.


Leave a Reply