
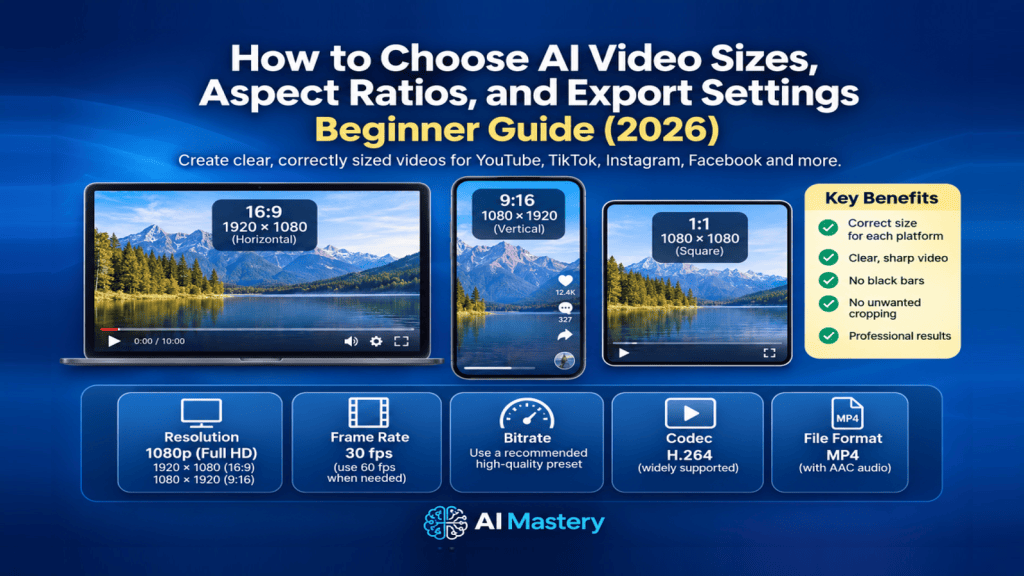
Estimated Reading Time: 24 minutes
Last Updated: August 15, 2026
Before Learning
Before you begin, it helps to understand that a video can have the same content but look very different depending on its size, shape, and export settings.
A vertical video made for a phone screen usually needs different dimensions from a traditional horizontal YouTube video. Choosing the wrong settings can cause black bars, unwanted cropping, blurry text, or important content being placed outside the visible area.
In this guide, you will learn the basic video sizes, aspect ratios, resolution choices, and export settings beginners need for common social media platforms. You do not need advanced video-editing knowledge to follow along.
The exact requirements and recommendations of platforms can change over time. This guide will use current official platform guidance, and you should recheck important settings when a platform announces an update or when you begin using a new video format.
What You’ll Learn
By the end of this guide, you will know how to:
- Understand the difference between video dimensions, resolution, and aspect ratio.
- Choose between common formats such as 16:9, 9:16, and 1:1.
- Select suitable video sizes for YouTube, YouTube Shorts, TikTok, Instagram Reels, Facebook Reels, and other common platforms.
- Understand what 1080p, 1920 × 1080, and 1080 × 1920 mean.
- Choose beginner-friendly export settings for clear video and good file size.
- Understand basic terms such as frame rate, bitrate, codec, and file format.
- Avoid black bars, unwanted cropping, blurry text, and stretched video.
- Keep important text, captions, and subjects inside safe viewing areas.
- Export separate versions when different platforms need different settings.
- Keep a clean master video so you can create new platform versions later.
Introduction
Choosing the correct video size and export settings is an important part of creating videos for YouTube, TikTok, Instagram, Facebook, and other platforms.
A video can look clear and professional in your editing program but appear cropped, stretched, blurry, or surrounded by black bars after uploading if the dimensions or aspect ratio are not suitable for the platform.
The good news is that beginners do not need to understand every technical video setting. A small number of common formats and export choices cover most everyday video projects.
In this guide, you will learn how to choose practical settings for horizontal videos, vertical short-form videos, and square videos. You will also learn what terms such as resolution, aspect ratio, frame rate, bitrate, codec, and file format mean in simple language.
The goal is not to memorize every number. Instead, you will learn how to recognize the most common settings and choose a reliable option for the type of video you want to publish.
What Is an Aspect Ratio?
An aspect ratio describes the shape of a video frame. It compares the width of the video with its height.
For example:
- 16:9 is a wide horizontal format commonly used for standard YouTube videos and computer screens.
- 9:16 is a tall vertical format commonly used for YouTube Shorts, TikTok, Instagram Reels, and Facebook Reels.
- 1:1 is a square format that can still be useful for some social media posts.
The first number represents the width, and the second number represents the height.
Why Aspect Ratio Matters
If the aspect ratio does not match the type of video you are creating, the platform or editing program may crop the picture, add empty space, or display the video in a way you did not expect.
For example, placing a 16:9 horizontal video inside a 9:16 vertical project may leave large empty areas or require part of the original video to be cropped.
Practical Example
A standard horizontal YouTube video may use 16:9, while a short vertical version of the same content may use 9:16.
The main information can stay the same, but the visual arrangement may need to change so important subjects, captions, and text remain visible in the narrower vertical frame.
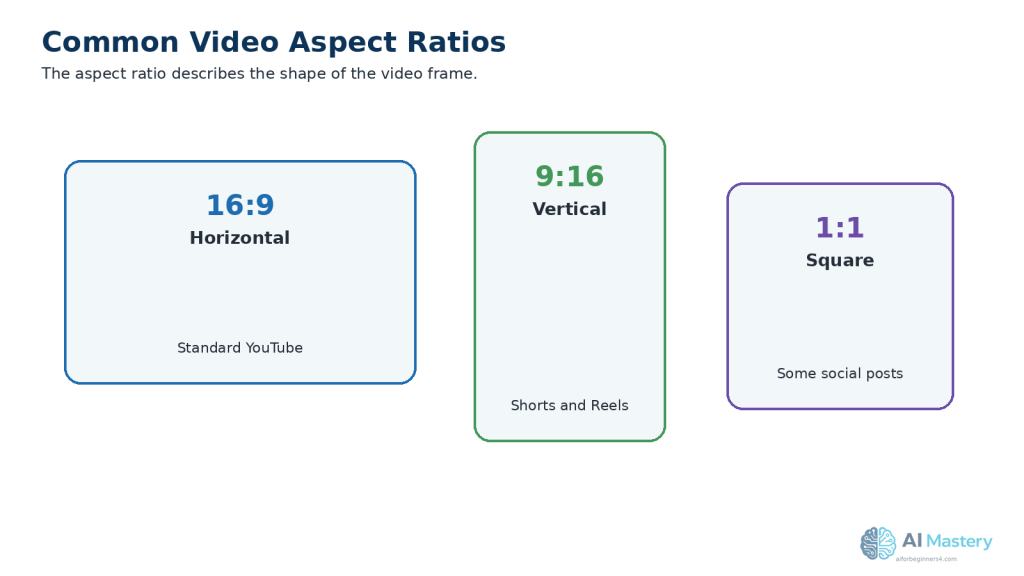
Figure 1. Common video aspect ratios: 16:9 horizontal, 9:16 vertical, and 1:1 square.
Aspect ratio describes the shape of the frame. Choose the shape that matches the type of video you are creating.
What Is Video Resolution?
Video resolution describes how many pixels are used to create the picture. Pixels are the tiny points of color that make up a digital image.
A common video resolution is 1920 × 1080 pixels, often called 1080p or Full HD.
In this example:
- 1920 is the number of pixels across the width.
- 1080 is the number of pixels down the height.
For a vertical video, the same Full HD resolution is often written as 1080 × 1920 pixels because the frame is taller than it is wide.
Why Resolution Matters
Higher resolution can make a video look sharper, especially when it contains text, screenshots, charts, or detailed images.
However, higher resolution can also create larger files and require more storage, processing power, and upload time. Choosing an extremely high resolution is not always necessary for a beginner project.
For many everyday social media videos, 1080p provides a good balance between image quality and manageable file size.
Practical Example
A standard horizontal Full HD video may use:
1920 × 1080 pixels
A vertical Full HD video may use:
1080 × 1920 pixels
Both contain the same number of pixels overall, but the orientation and aspect ratio are different.
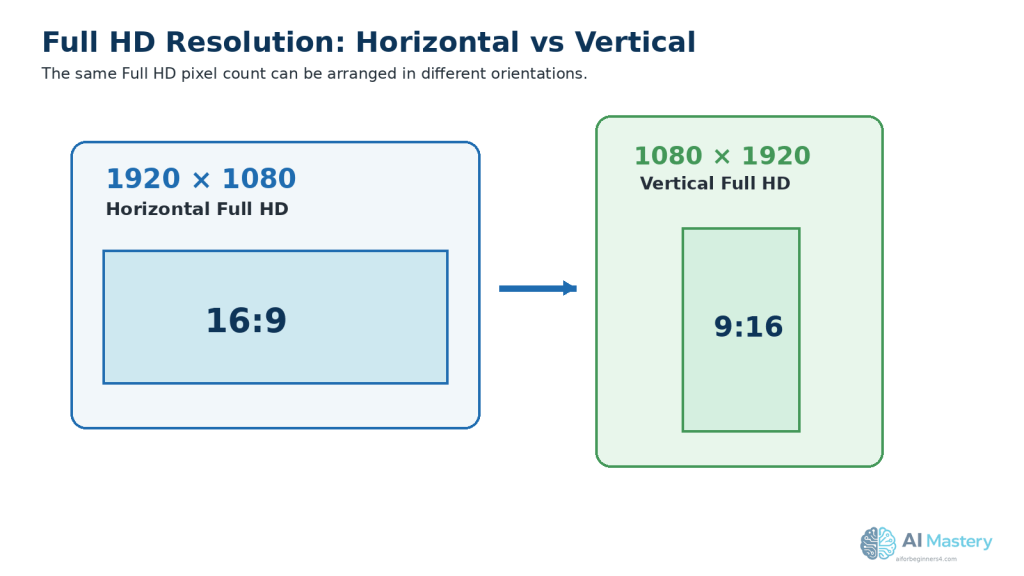
Figure 2. Full HD can be arranged as 1920 × 1080 horizontal or 1080 × 1920 vertical.
Resolution describes pixel dimensions, while aspect ratio describes the shape of the frame.
What Is Frame Rate?
Frame rate describes how many individual images, or frames, are shown every second in a video. It is usually written as fps, which means frames per second.
Common frame rates include:
- 24 fps — often used for a film-like appearance.
- 30 fps — a common choice for tutorials, social media videos, presentations, and general online video.
- 60 fps — useful when smoother motion is important, such as sports, gaming, or fast demonstrations.
Which Frame Rate Should Beginners Use?
For many AI Mastery tutorials and everyday social media videos, 30 fps is a simple and practical starting point.
If your original video was recorded or generated at another frame rate, it is usually better to keep that frame rate unless you have a specific reason to change it.
Changing frame rates unnecessarily can sometimes make motion look less smooth or cause duplicated or removed frames.
Practical Example
If you record a screen tutorial at 30 fps, you can normally keep the project and final export at 30 fps.
If you record fast-moving footage at 60 fps, keeping the final export at 60 fps may preserve smoother movement, provided the platform and your editing workflow support it.
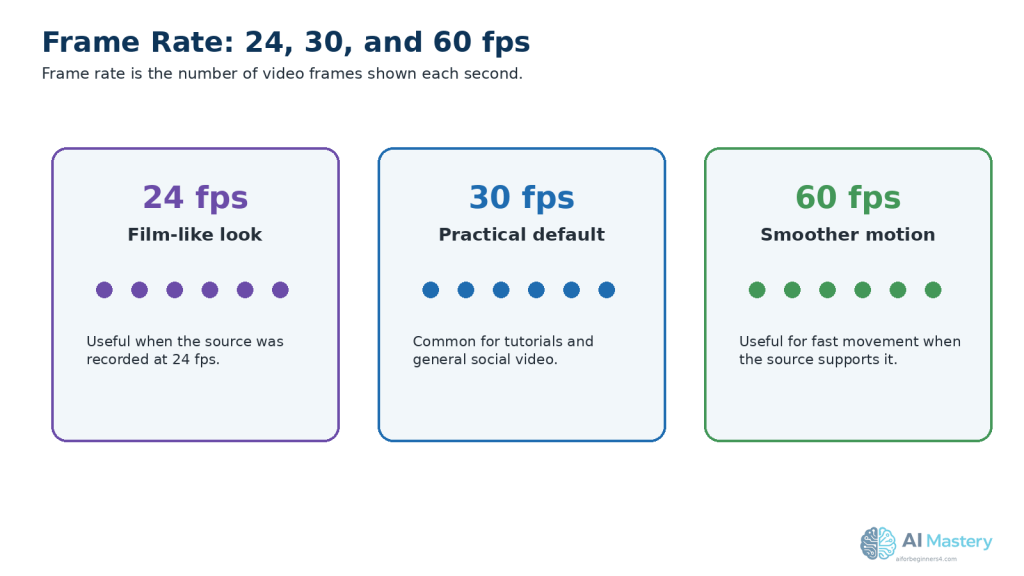
Figure 3. Common frame rates include 24, 30, and 60 frames per second.
For many beginner tutorials, 30 fps is a practical starting point. Keeping the source frame rate avoids unnecessary conversion.
What Is Bitrate?
Bitrate describes how much video data is used each second. It is commonly measured in megabits per second, written as Mbps.
A higher bitrate can preserve more detail, but it also creates a larger video file. A very low bitrate can make the video look blurry, blocky, or less detailed, especially when there is movement or small text on the screen.
Why Bitrate Matters
Bitrate works together with resolution, frame rate, and the video codec. A 1080p video usually needs more data than a much smaller video if you want to maintain similar visual quality.
Using the highest possible bitrate is not always necessary. Social media platforms normally process and compress uploaded videos, so an extremely large file may take longer to export and upload without producing a noticeable improvement for viewers.
Which Bitrate Should Beginners Use?
For beginners, it is usually easiest to use the recommended, standard, or high-quality preset provided by a reputable video editor rather than manually entering a bitrate.
If your editing program asks you to choose between options such as Low, Recommended, and High, start with Recommended unless you have a specific reason to change it.
Practical Example
If a 1080p tutorial looks clear when exported with your editor’s recommended quality setting, increasing the bitrate dramatically may only make the file larger.
If small text, screen recordings, or moving details look blurry after export, check the bitrate and overall export quality before assuming the original video is the problem.
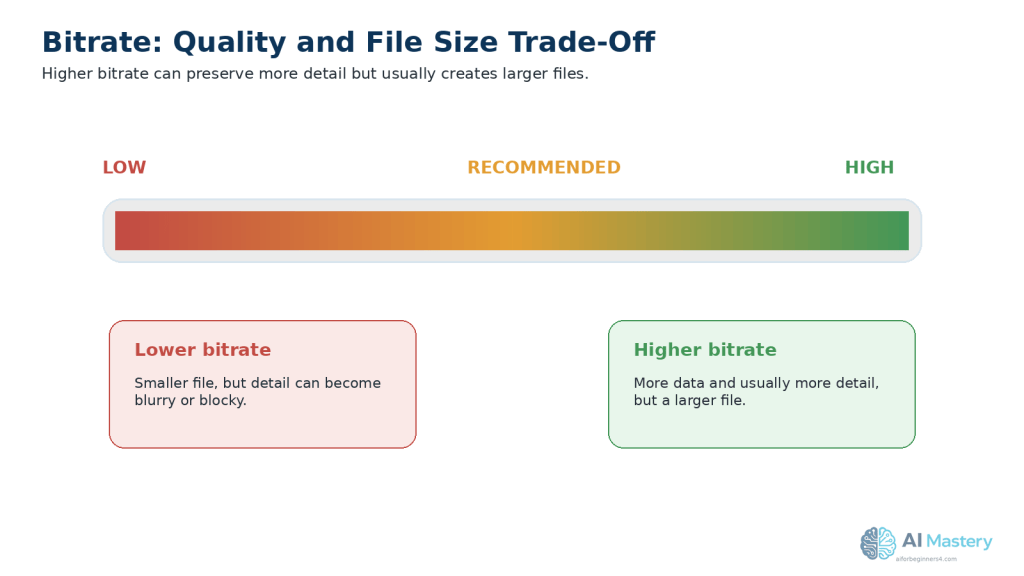
Figure 4. Bitrate affects both video detail and file size.
A recommended or high-quality preset usually gives beginners a better balance than choosing the lowest or highest bitrate automatically.
What Are Video Codecs and File Formats?
A file format is the container used to store a video file. A common example is MP4.
A codec is the method used to compress and store the video and audio inside that file. Compression helps reduce file size while trying to preserve good picture and sound quality.
Common Beginner-Friendly Choice
For many online videos, a practical beginner combination is:
- File format: MP4
- Video codec: H.264
- Audio codec: AAC
This combination is widely supported by video editors, web browsers, mobile devices, and major social media platforms.
Why Codecs Matter
Two videos can both be saved as MP4 files but use different codecs inside them. One may work correctly on a platform while another may need to be converted before uploading.
A codec also affects:
- File size.
- Video quality.
- Export time.
- Playback compatibility.
- How efficiently the video can be uploaded and processed.
Practical Example
If your video editor offers an export option such as MP4 with H.264, this is often a straightforward choice for a standard 1080p social media video.
You usually do not need to change advanced codec settings unless the platform, editing program, or project has a specific requirement.
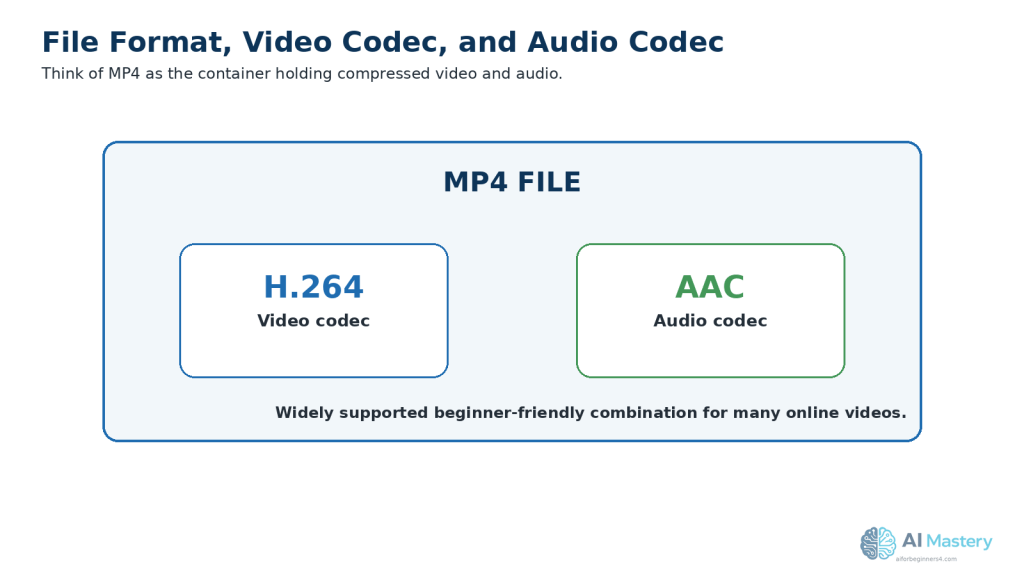
Figure 5. MP4 is a common file container that can hold H.264 video and AAC audio.
The file format and codecs work together to affect compatibility, quality, and file size.
Recommended Video Sizes for YouTube
YouTube supports several video shapes, but the best choice depends on whether you are creating a standard YouTube video or a YouTube Short.
Standard YouTube Videos
For a traditional horizontal YouTube video, a reliable beginner choice is:
- Aspect ratio: 16:9
- Resolution: 1920 × 1080 pixels
- Orientation: Horizontal
- Common name: 1080p Full HD
YouTube identifies 16:9 as the standard aspect ratio for viewing on computers. The YouTube player can also adapt to other aspect ratios, including vertical and square videos.
A 1920 × 1080 video works well for tutorials, demonstrations, screen recordings, educational videos, interviews, and other standard YouTube content.
YouTube Shorts
For a YouTube Short, a practical beginner choice is:
- Aspect ratio: 9:16
- Resolution: 1080 × 1920 pixels
- Orientation: Vertical
- Common name: Vertical Full HD
YouTube currently classifies videos of up to three minutes with a square or vertical aspect ratio as Shorts when they meet its Shorts requirements.
Although YouTube also accepts square Shorts, 9:16 makes better use of a vertically held phone screen and is a convenient format when the same video may later be adapted for TikTok, Instagram Reels, or Facebook Reels.
Practical Example
If you create a full YouTube tutorial in 1920 × 1080, you can later make a vertical Short in 1080 × 1920.
Do not simply rotate or stretch the horizontal video. Reframe the important content so faces, demonstrations, captions, and text fit naturally inside the vertical layout.
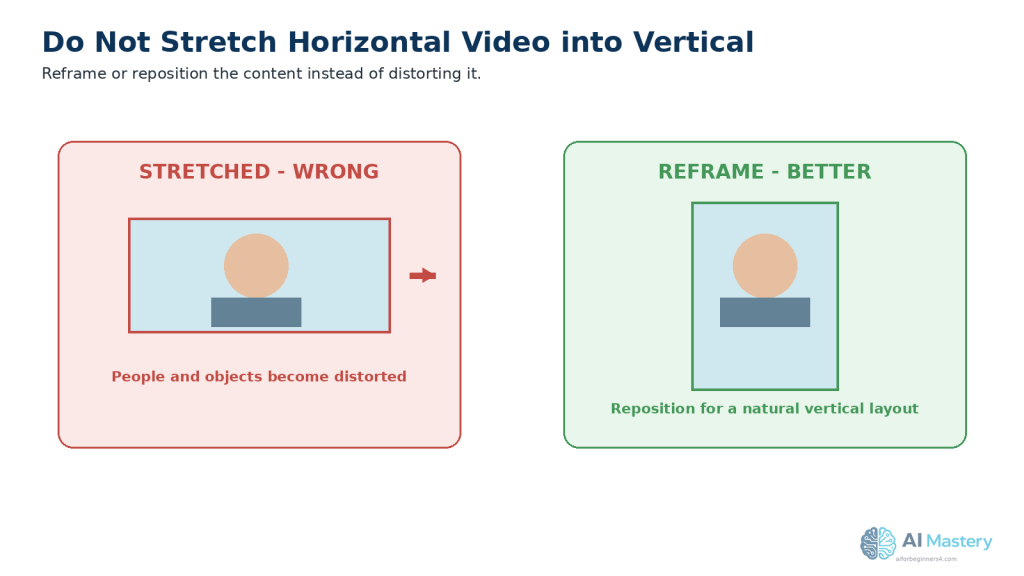
Figure 6. Reframing preserves natural proportions when adapting horizontal video to a vertical layout.
Stretching distorts people, objects, text, and graphics. Reposition or crop thoughtfully instead.
Recommended Video Size for TikTok
TikTok is designed mainly for vertical viewing on smartphones. For beginners, a practical format is:
- Aspect ratio: 9:16
- Resolution: 1080 × 1920 pixels
- Orientation: Vertical
- Common name: Vertical Full HD
TikTok for Business recommends 9:16 vertical video, at least 720p resolution, and keeping important content inside the interface safe zone.
Why 1080 × 1920 Is a Good Beginner Choice
Although lower resolutions may be accepted, 1080 × 1920 pixels gives you a clear Full HD vertical video and is a convenient size for editing text, captions, screen recordings, and other visual details.
Using 9:16 also allows the video to make good use of the vertical phone screen rather than appearing as a small horizontal video surrounded by unused space. TikTok specifically recommends vertical 9:16 creative for its full-screen viewing experience.
Keep Important Content Inside the Safe Area
TikTok places interface elements over parts of the video. These can include buttons, captions, account information, and other controls.
Keep important elements such as:
- Faces.
- Titles.
- Captions.
- Demonstrations.
- Charts.
- Calls to action.
away from the extreme edges of the frame. TikTok recommends keeping important content within its UI safe zone.
Practical Example
If you create a TikTok video at 1080 × 1920 pixels, place the main subject and important text closer to the central viewing area.
A caption placed directly against the bottom or right edge may look correct in your editing program but could be partly covered by TikTok interface controls after publishing.
Recommended Video Size for Instagram Reels
Instagram Reels supports several aspect ratios, but Meta recommends 9:16 for Reels so the video can use the full vertical phone screen. Instagram also states that Reels should have a minimum frame rate of 30 fps and a minimum resolution of 720 pixels.
For beginners, a practical choice is:
- Aspect ratio: 9:16
- Resolution: 1080 × 1920 pixels
- Orientation: Vertical
- Frame rate: 30 fps or higher
Why 1080 × 1920 Works Well
A 1080 × 1920 video gives you a Full HD vertical frame with enough detail for captions, demonstrations, and other on-screen elements.
Although Instagram can accept lower resolutions, starting with 1080 × 1920 gives you more room to preserve clarity before the platform processes the uploaded video.
Keep Important Content Away from the Edges
Meta recommends keeping important text and visual elements away from areas that may be covered by interface controls in Reels.
Keep important elements such as:
- Faces.
- Captions.
- Titles.
- Demonstrations.
- Charts.
- Calls to action.
closer to the central viewing area rather than placing them directly against the top, bottom, or sides.
Practical Example
If you create an Instagram Reel at 1080 × 1920 pixels, keep the main subject near the centre and leave extra space around captions and titles.
This makes it less likely that Instagram interface elements will cover important information after the Reel is published.
Recommended Video Size for Facebook Reels
Facebook Reels supports multiple video shapes, but Meta recommends 9:16 for Reels because it fills a vertically held phone screen. Meta’s current Facebook Reels guidance recommends 1080p resolution and supports common modern video codecs.
For beginners, a practical choice is:
- Aspect ratio: 9:16
- Resolution: 1080 × 1920 pixels
- Orientation: Vertical
- Frame rate: 30 fps is a practical starting point
Why 9:16 Works Well for Facebook Reels
A 9:16 video uses the full vertical screen more effectively than a horizontal video. Meta recommends 9:16 for Reels placements to capture the full screen.
Using 1080 × 1920 pixels also gives you a clear Full HD vertical video that is suitable for captions, text, demonstrations, and other educational content.
Keep Important Content Inside the Safe Area
Meta advises keeping important text and visual elements away from the top, bottom, and sides of 9:16 Reel content because interface elements can cover those areas.
Keep important elements such as:
- Faces.
- Captions.
- Titles.
- Demonstrations.
- Charts.
- Calls to action.
closer to the central viewing area.
Practical Example
If you create a Facebook Reel at 1080 × 1920 pixels, keep your main subject and captions inside the central part of the frame.
This reduces the chance that Facebook interface controls will cover important information after the Reel is published.
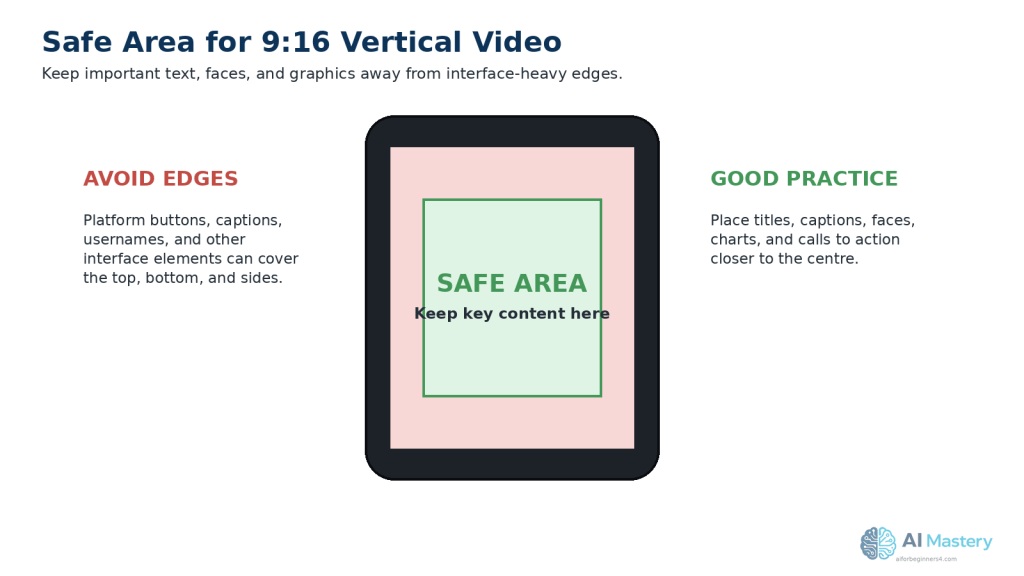
Figure 7. A central safe area helps keep important content away from interface-heavy edges.
Safe-area planning is especially important for captions, faces, titles, charts, and calls to action in vertical videos.
Quick Reference: Common Video Sizes
The following settings are practical beginner starting points for the platforms covered in this guide. They are not the only formats each platform may accept.
Standard YouTube video: 16:9, 1920 × 1080 pixels, horizontal. YouTube identifies 16:9 as its standard computer-viewing aspect ratio.
YouTube Shorts: 9:16, 1080 × 1920 pixels, vertical is a practical Full HD choice.
- TikTok: 9:16, 1080 × 1920 pixels, vertical is a practical choice. TikTok recommends 9:16 vertical video, at least 720p, and keeping important content inside the interface safe zone.
- Instagram Reels: 9:16, 1080 × 1920 pixels, vertical is a practical choice. Instagram accepts Reel aspect ratios up to 9:16 and requires at least 30 fps and 720-pixel minimum resolution.
- Facebook Reels: 9:16, 1080 × 1920 pixels, vertical is a practical choice. Meta recommends 9:16 for Reels and recommends 1080p resolution for Facebook Reels.
Remember the Difference Between Requirement and Recommendation
A platform may accept several video sizes while still recommending a particular format for better full-screen viewing.
For example, Instagram accepts more than one Reel aspect ratio, but 9:16 is convenient for full-screen vertical content. TikTok also recommends 9:16 for its vertical viewing experience.
For beginners creating one vertical video that may later be adapted for several short-form platforms, 1080 × 1920 pixels at 9:16 is a useful working format. It gives you a Full HD vertical canvas while still allowing you to make platform-specific adjustments before publishing.
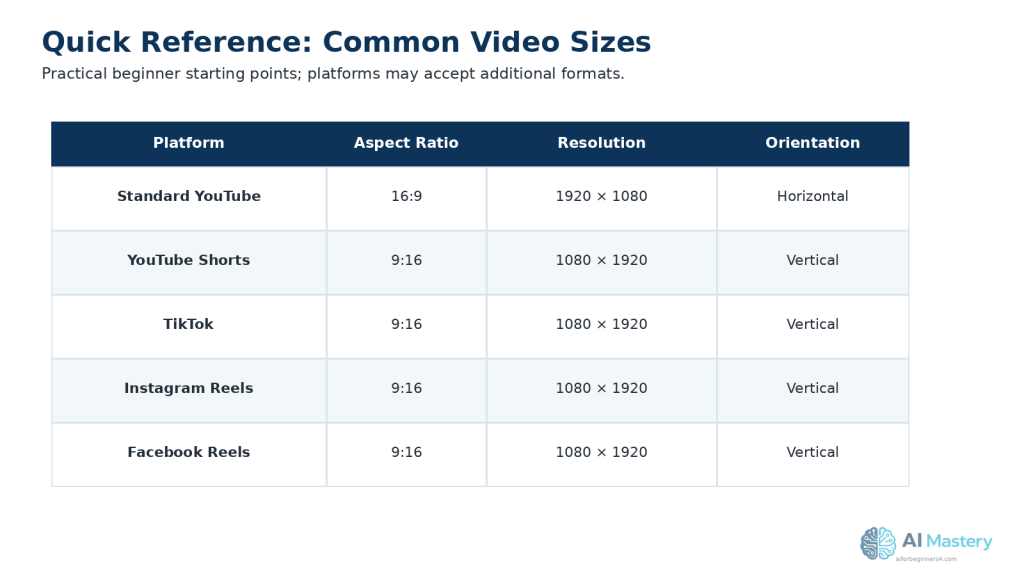
Figure 8. Practical beginner video-size starting points for standard YouTube videos and common short-form platforms.
Platform requirements can change, so treat these as practical working settings and confirm current official guidance when needed.
How to Choose Export Settings in Your Video Editor
When your video is finished, the final step is to export it as a video file. Most editing programs show several options, but beginners usually need to check only a few important settings.
Step 1: Check the Aspect Ratio and Resolution
Make sure the project matches the type of video you want to publish.
For example:
- Horizontal YouTube video: 16:9 at 1920 × 1080 pixels.
- Vertical short-form video: 9:16 at 1080 × 1920 pixels.
Do not stretch a horizontal video into a vertical shape. Reframe or reposition the content instead.
Step 2: Check the Frame Rate
Use the same frame rate as your main project or original footage whenever possible.
For many tutorials and general social media videos, 30 fps is a practical choice.
If your project was created at 60 fps, you can normally export at 60 fps when smoother motion is useful and your platform supports it.
Step 3: Choose the File Format and Codec
For many beginner projects, a practical choice is:
- File format: MP4
- Video codec: H.264
- Audio codec: AAC
These settings provide broad compatibility and are commonly available in video-editing programs.
Step 4: Choose the Quality or Bitrate
If your editor provides simple options such as Low, Recommended, or High, start with Recommended or the normal high-quality preset.
Avoid choosing an extremely low-quality setting simply to reduce the file size. Small captions, screen recordings, and detailed graphics may become difficult to read.
Step 5: Check the Audio
Make sure the final video contains clear narration and that music or sound effects do not overpower the speaker.
If your editor provides a normal AAC audio preset, beginners can usually leave the advanced audio settings at their recommended values.
Step 6: Export and Review the Final File
After exporting, watch the actual video file from beginning to end before uploading it.
Check for:
- Blurry or pixelated video.
- Cropped faces or text.
- Black bars that you did not intend to include.
- Captions that are difficult to read.
- Audio that is too loud or too quiet.
- Missing scenes or unexpected blank frames.
- Unwanted logos, watermarks, or branded endings.
If something looks wrong, correct the editing project and export a new file rather than trying to repair the already exported video.
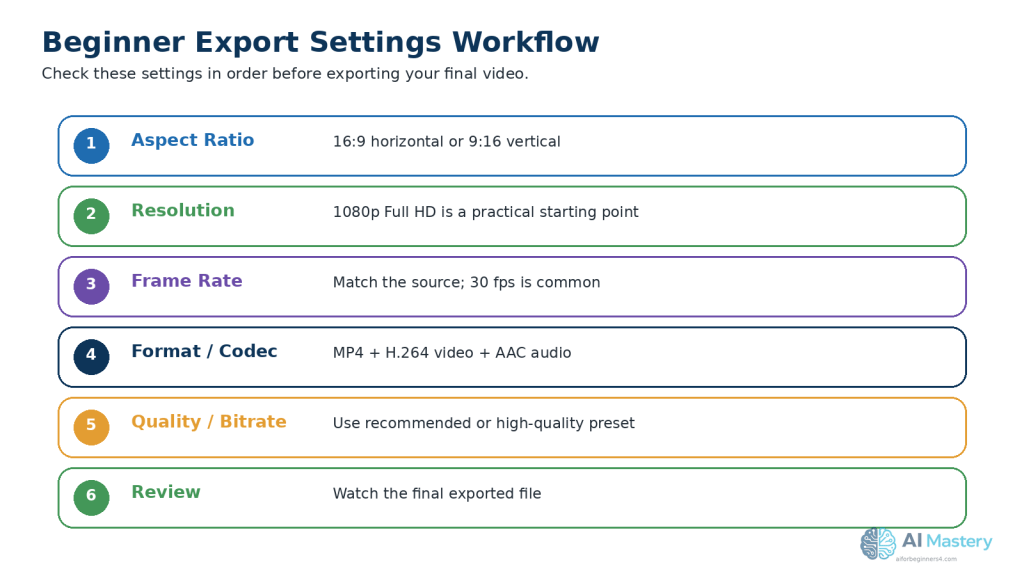
Figure 9. A simple export workflow helps beginners check the most important settings in the right order.
Check aspect ratio, resolution, frame rate, format, codec, bitrate, audio, and the final exported file before publishing.
Common Mistakes When Choosing Video Sizes and Export Settings
Beginners often run into problems because several video settings look similar but control different things.
Common mistakes include:
- Choosing the correct resolution but the wrong aspect ratio.
- Stretching a horizontal video to make it vertical.
- Cropping a video without checking whether important content was removed.
- Exporting at a much lower resolution than the original project.
- Changing the frame rate unnecessarily.
- Choosing an extremely low bitrate to reduce file size.
- Placing captions or important text too close to the edges.
- Using settings from one platform without checking whether they suit another platform.
- Exporting over the clean master file instead of creating a separate final version.
- Uploading the video without watching the exported file first.
How to Avoid These Mistakes
Start by deciding where the video will be published. Then choose the aspect ratio, resolution, and orientation that fit that type of video.
Keep your original project and clean master file unchanged. Create separate exports when you need different horizontal, vertical, or platform-specific versions.
Before publishing, watch the final exported file on a phone or computer and check the framing, captions, picture quality, sound, and important visual elements.
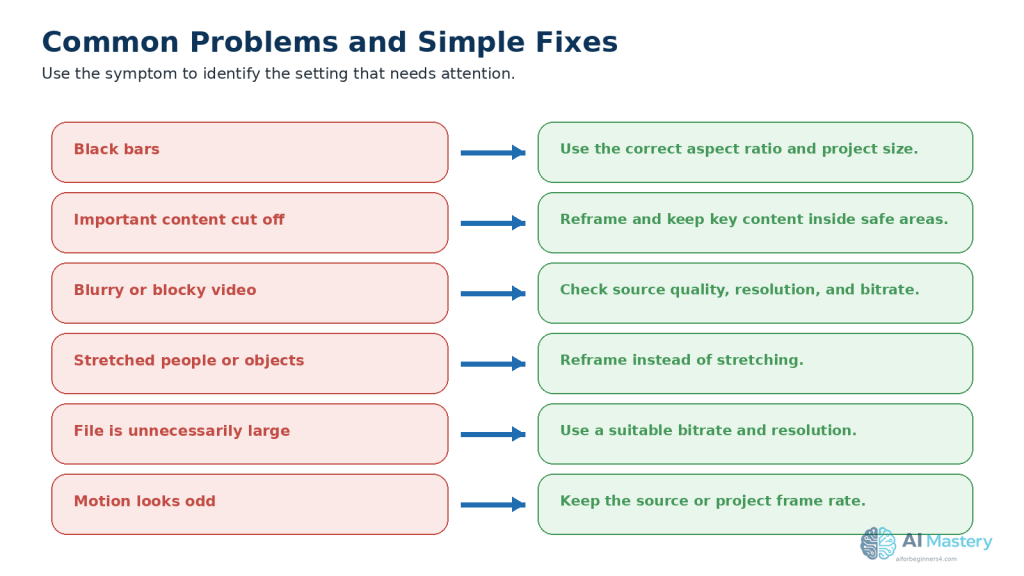
Figure 10. Common video problems often point directly to an aspect-ratio, resolution, bitrate, framing, or frame-rate issue.
Use the visible symptom to decide which setting or editing choice to check first.
Benefits of Choosing the Correct Video Settings
Using suitable video sizes and export settings can improve both the viewing experience and your editing workflow.
Key benefits include:
- Better picture quality: Correct resolution and bitrate help preserve sharp text, images, and video details.
- Correct screen fit: The right aspect ratio reduces unwanted black bars, stretching, or excessive cropping.
- Clearer captions and graphics: Proper dimensions give you enough space to position text where viewers can read it.
- Fewer editing problems: Starting with the correct project size reduces the amount of reframing needed later.
- More consistent results: Using reliable export settings makes it easier to produce similar quality across several videos.
- Easier repurposing: A well-organized master project can be adapted into horizontal and vertical versions more efficiently.
- More manageable files: Appropriate export settings can provide good quality without creating unnecessarily large video files.
- Faster troubleshooting: When you understand the basic settings, it becomes easier to identify why a video looks blurry, stretched, cropped, or incorrectly shaped.
Choosing the correct settings from the beginning can save time because you are less likely to need repeated exports or major corrections before publishing.
Limitations of Video Sizes and Export Settings
Even when you choose suitable settings, some limitations can still affect how a video looks after publishing.
Common limitations include:
- Platform compression: Social media platforms usually compress uploaded videos, which can slightly reduce image quality.
- Different device screens: A video may look slightly different on phones, tablets, monitors, and televisions.
- Platform interface overlays: Buttons, captions, usernames, and other controls may cover parts of a vertical video.
- File-size limits: Higher resolution, higher frame rate, and higher bitrate can create larger files.
- Slower exports: High-quality settings may take longer to process on an older or less powerful computer.
- Longer uploads: Large video files can take more time to upload, especially with a slower internet connection.
- Source-quality limits: Exporting a low-quality original video at a higher resolution does not restore missing detail.
- Different platform processing: The same uploaded file may not look exactly the same after each platform processes it.
How to Reduce These Limitations
Start with the best-quality source material you reasonably have and keep a clean master project before creating final exports.
Use appropriate settings rather than automatically choosing the highest available resolution or bitrate. For many beginner projects, Full HD provides a practical balance between quality, file size, export time, and compatibility.
Always review the final exported file before publishing. After uploading, also check the published version when possible to make sure captions, text, framing, picture quality, and audio still look correct.
Common Myths About Video Sizes and Export Settings
Several common myths can make video settings seem more complicated than they really are.
Myth 1: Higher Resolution Always Means Better Video
Reality: Higher resolution can preserve more detail, but it also creates larger files and requires more processing power. If the original video is low quality, exporting it at a much higher resolution will not recreate missing detail.
Myth 2: 4K Is Necessary for Every Social Media Video
Reality: Many beginner projects work very well at 1080p Full HD. Higher resolutions may be useful for some projects, but they are not automatically required for clear social media videos.
Myth 3: A 1920 × 1080 Video Can Be Turned into 1080 × 1920 by Stretching It
Reality: Stretching changes the shape of people, objects, text, and graphics. A horizontal video should be reframed, cropped, repositioned, or redesigned for a vertical layout instead.
Myth 4: The Highest Bitrate Setting Is Always the Best Choice
Reality: A very high bitrate can create a much larger file without producing a noticeable improvement for viewers. A recommended or suitable high-quality preset is usually a better starting point.
Myth 5: Changing 30 fps Video to 60 fps Automatically Makes It Smoother
Reality: Increasing the export frame rate does not create genuine extra motion detail that was never captured in the original footage. Keeping the original or project frame rate is usually more reliable.
Myth 6: If a Video Looks Good in the Editor, It Will Look the Same After Publishing
Reality: Social media platforms process uploaded videos and add interface elements around or over them. Always check the final exported file and, when possible, review the published version as well.
Frequently Asked Questions
What Is the Best Video Resolution for Beginners?
For many beginner projects, 1080p Full HD is a practical choice. Use 1920 × 1080 pixels for horizontal video and 1080 × 1920 pixels for vertical video.
What Is the Difference Between 16:9 and 9:16?
16:9 is a wide horizontal format commonly used for standard YouTube videos. 9:16 is a tall vertical format commonly used for short-form videos such as YouTube Shorts, TikTok, Instagram Reels, and Facebook Reels.
Should I Export Every Video at 60 fps?
No. If your project or original footage uses 30 fps, exporting at 30 fps is usually appropriate. Use 60 fps when smoother motion is useful and your source material was created or recorded at that frame rate.
Is MP4 a Good Video Format for Social Media?
Yes. MP4 with H.264 video and AAC audio is a widely supported combination and is a practical starting point for many online video projects.
Should I Always Choose the Highest Bitrate?
No. A very high bitrate can make the file much larger without producing a noticeable improvement. Start with your editor’s recommended or high-quality preset unless you have a specific reason to change it.
Why Does My Vertical Video Have Black Bars?
Black bars can appear when the video’s aspect ratio does not match the project or viewing area. For example, placing a horizontal 16:9 video inside a vertical 9:16 project without reframing it can leave unused space.
Can I Use the Same 1080 × 1920 Video on Several Platforms?
Yes. A 1080 × 1920, 9:16 vertical video is a useful starting format for several short-form platforms. However, check each platform version separately for safe areas, captions, music, text placement, and other platform-specific details before publishing.
Should I Keep My Original Video Project?
Yes. Keep the original editing project, clean master video, source files, prompts, licences, permissions, and final exports. This makes it much easier to correct mistakes or create new versions later.
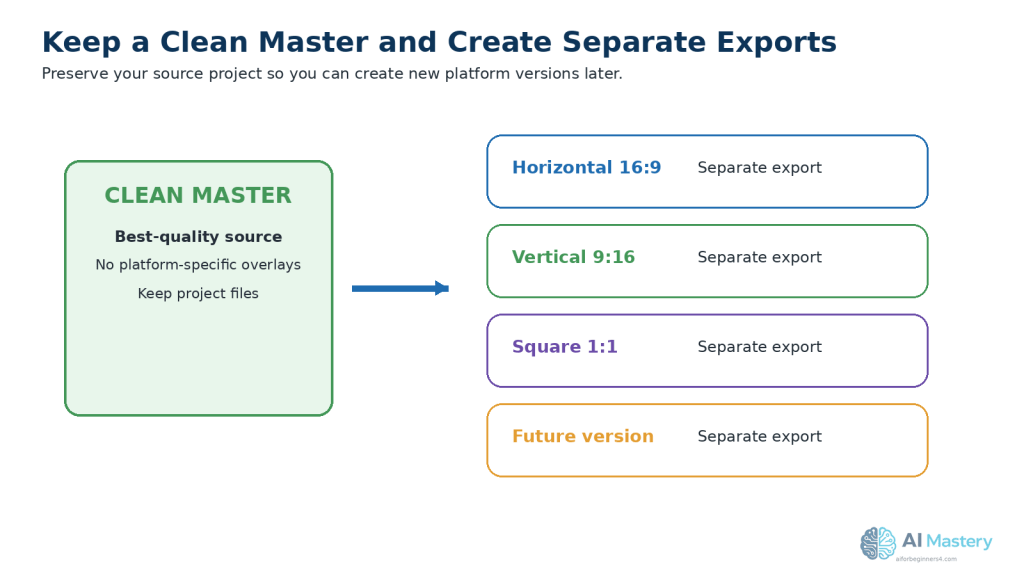
Figure 11. Keep one clean master and create separate exports for different formats or platforms.
Preserving the source project makes future corrections, repurposing, and new platform versions much easier.
Key Takeaways
Choosing the correct video size and export settings becomes much easier when you focus on a few basic ideas.
Remember these main points:
- 16:9 is a common horizontal format for standard YouTube videos.
- 9:16 is a common vertical format for YouTube Shorts, TikTok, Instagram Reels, and Facebook Reels.
- 1920 × 1080 pixels is a common Full HD horizontal resolution.
- 1080 × 1920 pixels is a common Full HD vertical resolution.
- 30 fps is a practical frame rate for many tutorials and general social media videos.
- MP4 with H.264 video and AAC audio is a widely supported beginner-friendly export combination.
- Use your editor’s recommended or high-quality bitrate preset unless you have a specific reason to change it.
- Do not stretch a horizontal video to make it vertical. Reframe or reposition the content instead.
- Keep important text, captions, faces, and demonstrations away from the extreme edges of vertical videos.
- Watch the final exported file before uploading it.
- Keep your clean master project and original source files so you can create new versions later.
You do not need to memorize every technical setting. Start with a reliable format, understand what each setting controls, and adjust only when your project or publishing platform requires something different.
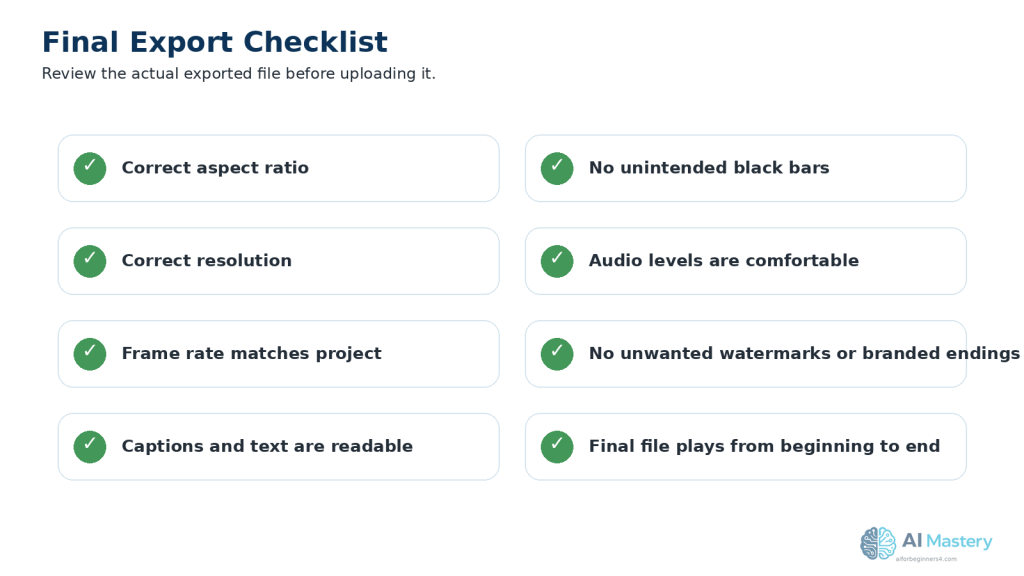
Figure 12. A final export checklist catches common problems before upload.
Review the actual exported file, not only the editing timeline, because some issues appear only after export.
Final Tip
Choose the simplest settings that meet the needs of your video and publishing platform.
For many beginner projects, 1080p Full HD, the correct aspect ratio, a suitable frame rate, and a standard MP4 export are enough to produce a clear result.
Avoid changing advanced settings simply because higher numbers appear better. The best export is the one that preserves good quality, fits the platform correctly, and remains easy for you to edit, store, upload, and reuse later.
Continue Learning
If you want to continue building your AI video skills, these AI Mastery guides are useful next steps:
- Best AI Video Tools for Beginners: Complete Guide (2026) — Learn about beginner-friendly tools for creating AI videos.
- How to Create AI Videos from Text: Beginner Step-by-Step Guide (2026) — Learn how to turn written prompts into video clips.
- How to Create AI Videos from Images: Beginner Step-by-Step Guide (2026) — Learn how to animate images and turn them into video.
- How to Edit AI-Generated Videos: Beginner Step-by-Step Guide (2026) — Learn how to improve clips, timing, transitions, and overall video quality.
- How to Add Voice, Music, and Captions to AI Videos: Beginner Step-by-Step Guide (2026) — Learn how to prepare narration, audio, and accessible captions.
- How to Repurpose One AI Video for YouTube Shorts, TikTok, Instagram Reels, and Facebook Reels: Beginner Guide (2026) — Learn how to adapt one clean master video into separate versions for several social media platforms.
Sources and References
The following official sources were checked for the video-size, aspect-ratio, resolution, frame-rate, codec, export, and safe-area information in this guide. Platform requirements and recommendations can change, so specifications should be checked again when a platform announces an update or when you begin using a new video format.
- YouTube Help — Recommended Upload Encoding Settings: YouTube provides recommended settings for aspect ratio, resolution, frame rate, H.264 video encoding, AAC audio, and bitrate. It also recommends uploading video using the same frame rate at which it was recorded.
- YouTube Help — Upload YouTube Shorts: YouTube explains that Shorts uploaded from a computer can be up to three minutes long and use a square or vertical aspect ratio.
- TikTok for Business — Creative Best Practices: TikTok recommends 9:16 vertical video, at least 720p resolution, and keeping important content within the user-interface safe zone.
- Instagram Help — Reel Size and Aspect Ratios: Instagram supports Reel aspect ratios between 1.91:1 and 9:16 and states that Reels should have a minimum frame rate of 30 fps and minimum resolution of 720 pixels.
- Meta Business Help — Requirements for Facebook Reels: Meta recommends 1080p resolution for Facebook Reels and lists H.264 and H.265 among its recommended video codecs, with recommended frame rates from 24 fps to 60 fps.
- Meta Business Help — Safe Zones for Stories and Reels: Meta explains that important text, logos, and other key creative elements should stay away from interface-heavy edges in 9:16 Stories and Reels content.
- Meta Business Help — Best Practices for Aspect Ratios Across Placements: Meta recommends 9:16 for Stories, Status, and Reels placements to capture the full vertical screen.
Platform specifications are not permanent. Check official guidance when you first use a platform, when you change your video workflow, or when a platform announces updated requirements.


Leave a Reply