
Estimated reading time: 28 minutes
Last updated: August 8, 2026
Introduction
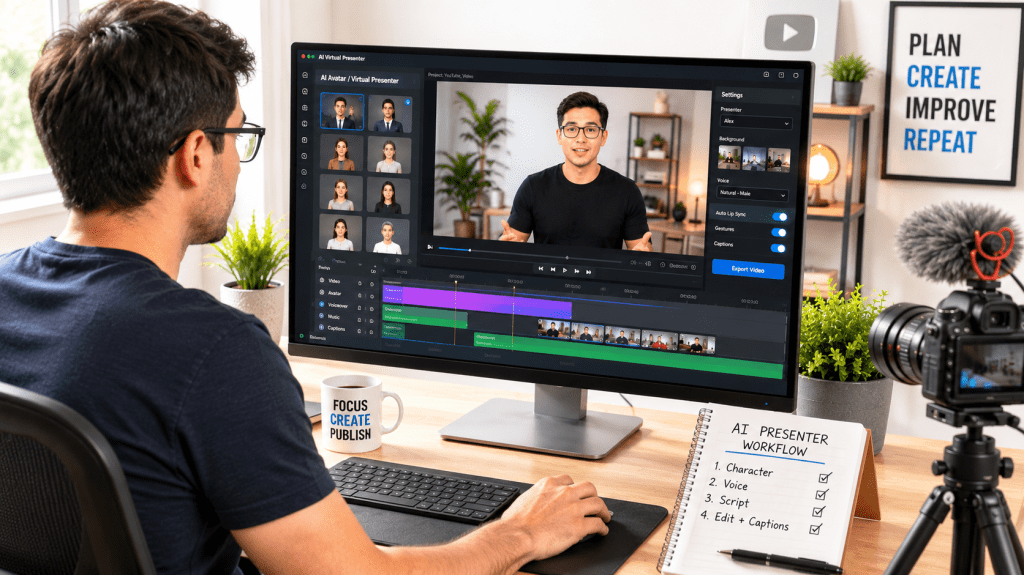
An AI virtual presenter is a digitally generated host that can appear on screen and speak a script. You may also see terms such as AI avatar, virtual avatar, AI presenter, digital presenter, AI host, virtual character, or AI personality. In this guide, the main term is AI virtual presenter.
A virtual presenter can be a fictional, consistent host with its own appearance, clothing, voice, speaking style, background, and personality. It can appear throughout a video or only in selected scenes. For many educational channels, a hybrid format works well: Presenter → Demonstration → Presenter → Supporting Visual → Presenter.
An AI presenter is different from a fully faceless video, but the two approaches can work together. The presenter can introduce the lesson or explain difficult points, while screen recordings, diagrams, AI images, stock footage, and charts show the details that viewers actually need to see.
The goal is not to fool viewers into believing that a synthetic person is real. The goal is to create a clear, useful, consistent presentation while respecting permission, privacy, copyright, licensing, accessibility, factual accuracy, AI-disclosure rules, and platform policies.
Using an AI presenter does not automatically prevent YouTube monetization, and it does not guarantee monetization either. YouTube still evaluates channels under its current Partner Program and monetization policies, including rules addressing reused and inauthentic or mass-produced content. The presenter is only one production tool; useful research, original writing, relevant visuals, editing, captions, accuracy, and human review still matter.
Before Learning
• Decide why the video needs a presenter before choosing a tool.
• Choose whether the presenter will be fictional, based on you, or based on another authorized person.
• Define the presenter’s role before designing appearance.
• Keep the first character simple and easy to reproduce.
• Prioritize consistency over complexity.
• Save a master character reference image and character-profile document.
• Treat the voice as part of the character identity.
• Do not clone another person’s recognizable voice without appropriate permission.
• Realistic synthetic presenters may require platform disclosure depending on the final result and current rules.
• Use an original, reviewed script rather than letting the avatar read unverified material.
• Plan where the presenter should appear and where supporting visuals are better.
• Expect lip-sync and motion to need review; short clips are easier to correct.
• Preserve source files, prompts, settings, licence records, permissions, and master exports.
• Check the current commercial-use and privacy conditions of the tools you actually use.
• Remember that AI-generated assets are not automatically copyright-free or unrestricted.
• Keep human review in the workflow and begin with one small test video.
Beginner Rule: Simple Character → Consistent Appearance → Clear Voice → Useful Script → Short Presenter Clips → Supporting Visuals → Human Review.
What You’ll Learn
• How to choose the right type of virtual presenter
• How to design a fictional character and personality
• How to keep appearance consistent
• How to compare avatar tools
• How to choose and test the voice
• How to write natural spoken scripts
• How to generate and review the first presenter clip
• How to improve lip-sync, expressions, and gestures
• How to use backgrounds and supporting visuals
• How to edit, caption, and make the video easier to access
• How to check privacy, permission, copyright, licensing, YouTube disclosure, and monetization considerations
• How to avoid common mistakes and build a repeatable workflow
Overall workflow: Choose Presenter Role → Design Character → Create Character → Choose Voice → Write Script → Generate Presenter Clips → Create Supporting Visuals → Edit → Add Captions → Check Rights and Disclosure → Review → Publish → Analyze → Improve.
How to Choose the Right Type of AI Virtual Presenter
Common Presenter Types
• Ready-made AI avatar: fastest starting point, but less unique.
• Custom fictional AI presenter: an original character designed for your channel.
• AI presenter based on yourself: useful for a digital twin, but it involves personal images, video, voice, and privacy considerations.
• Presenter based on another real person: use only with appropriate authorization and provider-supported consent.
• Realistic human-looking presenter: professional-looking but may need additional disclosure review.
• Stylized character: clearly fictional and sometimes easier to distinguish from real footage.
• Talking-head presenter: usually chest-up or waist-up and simple for beginners.
• Full-body presenter: allows more movement but can introduce more visual errors.
• Hybrid presenter: appears only in selected scenes while other visuals take over when they teach better.
Recommended beginner combination: Fictional + Consistent + Talking-Head + Used for Selected Scenes.
Example: Alex is a fictional beginner AI instructor. He is an adult male with short dark hair, a blue business-casual shirt, a calm and patient personality, a clear moderate voice, chest-up framing, and a clean modern technology workspace. He appears for introductions, explanations, warnings, transitions, and summaries, while demonstrations and detailed visuals fill the screen when needed.
• Does the presenter fit the channel topic?
• Will the character be easy to reproduce?
• Is the voice appropriate for the audience?
• Will viewers understand that the character is fictional when necessary?
• Can the presenter be combined with supporting visuals instead of staying on screen constantly?
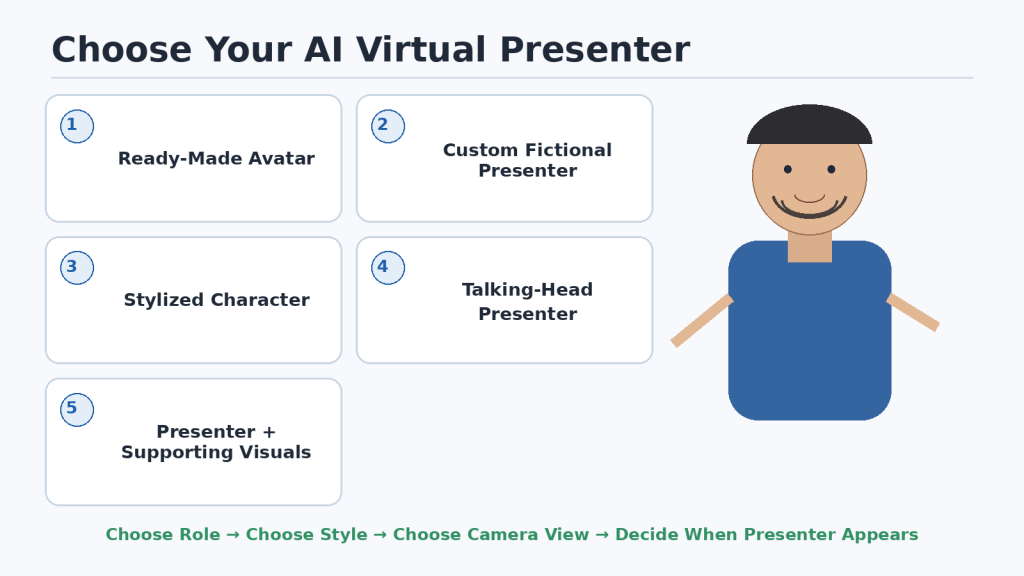
Figure 1. Beginners can choose between ready-made avatars, custom fictional presenters, stylized characters, talking-head presenters, and hybrid videos that combine a presenter with other visuals.
Explanation: A fictional talking-head presenter used only when helpful is a practical starting point for many beginner educational videos.
How to Design a Fictional AI Personality and Character Profile
A consistent presenter begins with a written character profile. The profile gives you a repeatable description that can be reused across image, avatar, voice, and video tools.
1. Choose the presenter’s role.
2. Define the target audience.
3. Choose three to five simple personality traits.
4. Define the speaking style.
5. Describe the main appearance.
6. Choose a simple clothing style.
7. Choose a consistent background style.
8. Define normal facial expressions.
9. Define restrained gestures.
10. Give the presenter a name if useful.
11. Write down what should not change.
12. Create a master character profile.
13. Create a master image prompt.
14. Generate several reference images.
15. Choose one master reference image.
16. Save the original prompt, tool, model, date, and important settings.
17. Create a consistency folder for approved assets.
18. Use a short approval checklist for every new scene.
19. Allow controlled variation only when intentional.
20. Avoid deliberately making the fictional character resemble a real identifiable person.
Example character profile: Name: Alex. Role: Beginner AI tutorial presenter. Audience: Complete beginners learning AI tools. Personality: Calm, friendly, patient, professional. Speaking style: Clear, moderate pace, short explanations. Appearance: Fictional adult male, approximately 35–45, short dark hair, neatly trimmed beard. Clothing: Blue or navy business-casual. Framing: Chest-up. Background: Clean modern technology workspace. Purpose: Introductions, difficult explanations, warnings, transitions, and summaries.
A reusable prompt formula is: Role + Audience + Personality + Appearance + Clothing + Voice Style + Background + Purpose.
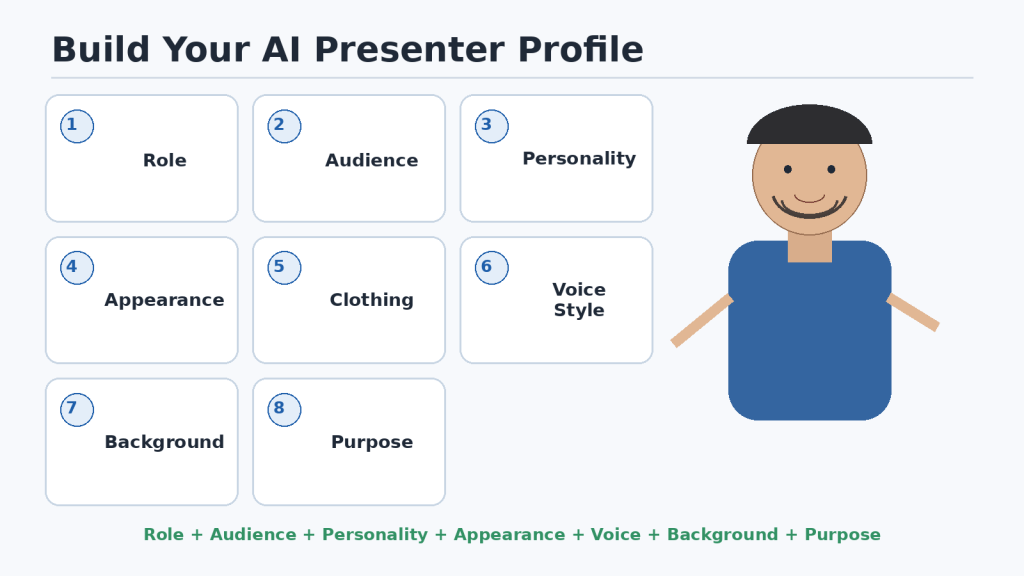
Figure 2. A consistent AI virtual presenter begins with a simple character profile covering the presenter’s role, audience, personality, appearance, voice, background, and purpose.
Explanation: Saving the profile, master prompt, and reference images makes it easier to reproduce the same character later.
How to Create and Keep a Consistent AI Presenter Appearance
1. Create one approved master image.
2. Save it at good quality.
3. Use it as the main reference whenever the tool allows.
4. Keep the core character description stable.
5. Separate fixed traits from flexible traits.
6. Keep clothing within a small approved range.
7. Keep age appearance stable.
8. Use similar camera framing for recurring presenter scenes.
9. Keep lighting broadly consistent.
10. Use related background styles.
11. Create a small approved reference set rather than dozens of conflicting references.
12. Use the same written character profile in every tool.
13. Do not rely on the character name alone.
14. Compare the face carefully.
15. Check hands and body shape when visible.
16. Avoid unnecessary full-body views until the workflow is reliable.
17. Use a standard presenter position for common layouts.
18. Use a simple or transparent background when it improves editing flexibility.
19. Generate shorter clips so weak sections can be replaced.
20. Review consistency before editing.
21. Use an approval checklist.
22. Save approved clips separately from tests.
23. Record the settings that worked.
24. Expect some variation because generative systems do not always reproduce a character identically.
Character drift means the presenter gradually changes between generations. The face, hair, age, clothing, body proportions, or overall style may shift even when the prompt looks similar.
How to Avoid This Mistake: Return to the master character profile, master reference image, approved clothing range, voice profile, and background style. Compare every new result with the master instead of using the previous generation as the only reference.
Workflow: Master Character Profile → Master Reference Image → Approved Reference Set → Generate New Presenter Scene → Compare With Master → Approve or Regenerate → Save Approved Clip.
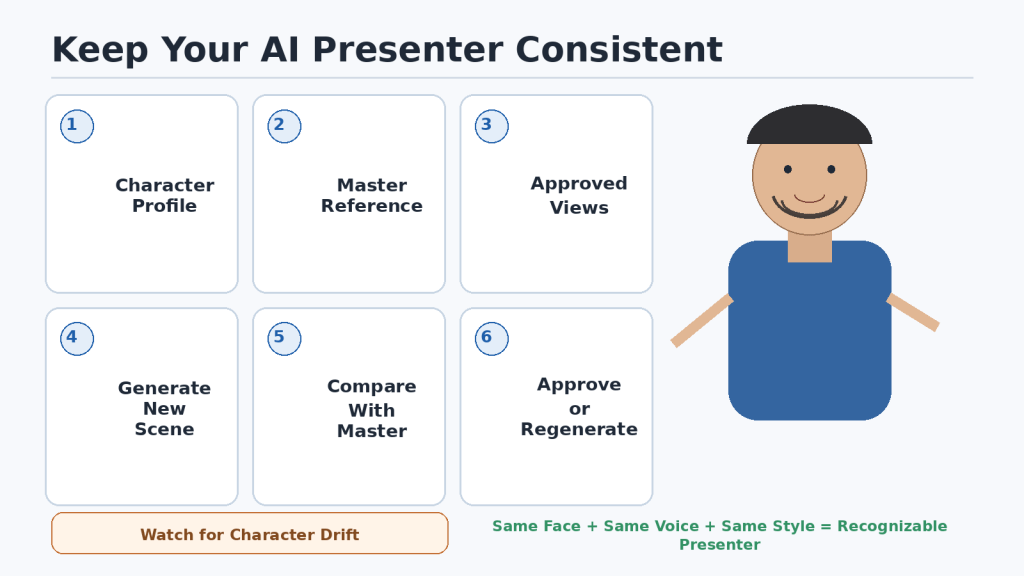
Figure 3. A consistent AI presenter workflow uses a master profile, reference image, approved views, and a compare-before-approval step.
Explanation: Generative tools can introduce character drift. Compare every new scene with the approved master rather than relying on memory.
How to Choose an AI Avatar or Virtual Presenter Tool
Do not choose an avatar platform only because a demonstration looks realistic. Compare the complete workflow you need.
• Fictional or ready-made avatar support
• Character consistency
• Lip-sync quality
• Natural or custom voice options
• Voice consistency and pronunciation controls
• Expressions and gestures
• Background options
• 16:9 landscape support
• Export resolution and download options
• Watermark conditions
• Generation minutes, credits, or usage limits
• Commercial-use conditions
• Avatar and voice restrictions
• Consent procedures for real-person avatars
• Privacy, storage, deletion, and training controls
• Editing workflow and ease of use
Current examples include HeyGen, Synthesia, and D-ID. HeyGen supports stock and digital-twin-style avatar workflows and current consent procedures for video-based Digital Twins. Synthesia supports stock and personal avatars, with live consent requirements for personal-avatar creation and custom voice cloning. D-ID Studio supports talking-avatar video creation from avatars, scripts, audio, and selectable voices. Canva also offers third-party avatar apps such as HeyGen and D-ID; third-party terms can apply separately.
Use these examples to understand what features to compare, not as a permanent ranking. Features, plans, prices, limits, and terms can change.
A Simple Tool Test
1. Choose two or three suitable tools.
2. Use the same fictional presenter concept.
3. Use the same short script.
4. Choose similar voice and framing settings.
5. Generate a short test clip.
6. Compare face consistency, voice, lip-sync, gestures, and background.
7. Check export quality and watermark conditions.
8. Review privacy, consent, and commercial-use terms.
9. Record the real amount of time or credits used.
10. Choose the tool that best fits your actual workflow.
Beginner Rule: Do not ask only, “Which tool is best?” Ask, “Which tool gives me the consistent presenter, voice, rights, privacy, export quality, and workflow I need?”
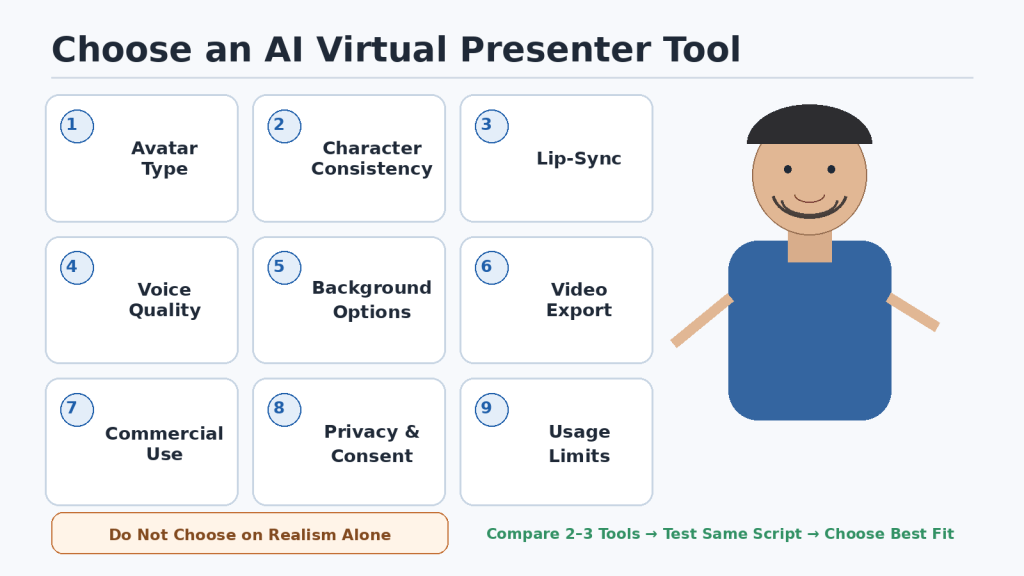
Figure 4. Choosing an AI virtual presenter tool involves more than visual realism; beginners should also compare consistency, voice, lip-sync, export options, privacy, consent, usage limits, and commercial-use conditions.
Explanation: Test the same fictional presenter and script in a few suitable tools before committing to a workflow. Current terms and features can change.
How to Choose and Create the Voice for Your AI Virtual Presenter
The voice is part of the character identity. Viewers may forgive small visual imperfections more easily than a voice that is difficult to understand, too fast, robotic, inconsistent, or repeatedly mispronounced.
Choose the Voice Type
• Built-in synthetic voice: usually the simplest beginner option for a fictional presenter.
• Your own authorized voice clone: more personal, but it involves biometric voice data and provider-specific consent and privacy controls.
• Another authorized person’s voice: use only with appropriate permission and a provider workflow that supports authorized creation.
A fictional presenter does not need a cloned real voice. Start with a built-in synthetic voice unless a custom voice clearly improves the project.
Match the Voice to the Character and Audience
• Choose a voice that fits the presenter’s apparent age, role, personality, and teaching style.
• For beginner education, prioritize clear pronunciation, moderate speed, calm delivery, and short explanations.
• Test the same paragraph with several voices so the comparison is fair.
• Include difficult words such as software names, acronyms, dates, numbers, and technical terms.
• Use pronunciation controls or script adjustments where available.
• Write with punctuation and short sentences to create natural pauses.
• Read the script aloud before generation.
• Keep the approved voice consistent across videos.
• Save the exact voice name or ID, language, speed, style, and pronunciation notes.
Do not clone a recognizable person’s voice merely because audio is publicly available. Public access is not the same as permission. Review provider consent rules, privacy practices, and commercial-use conditions before creating or publishing a voice clone.
Commercial-use rights can differ by provider and plan. For example, ElevenLabs currently states that its paid plans include a commercial licence subject to its terms and the user holding the necessary intellectual-property rights, while content created outside a paid subscription does not receive the same commercial licence. Check the current official terms for your exact account and intended use.
Recommended workflow: Built-In Synthetic Voice → Test Clarity and Pronunciation → Test With Avatar → Check Commercial-Use Conditions → Save Voice Settings → Reuse Consistently.
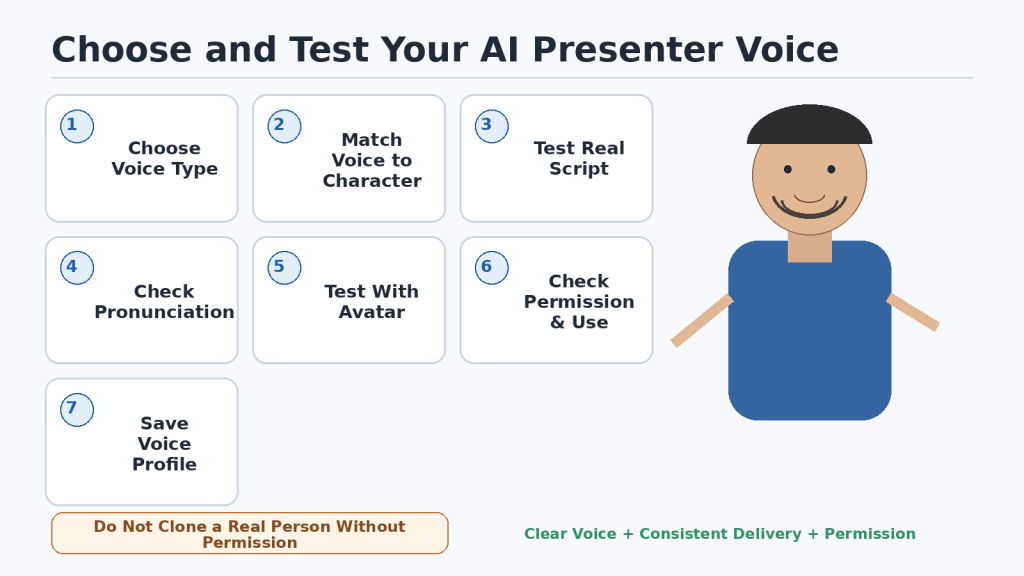
Figure 5. A reliable AI-presenter voice workflow includes choosing the voice type, testing pronunciation and clarity, checking it with the avatar, confirming permission and usage conditions, and saving the approved settings.
Explanation: A built-in synthetic voice is often a simple starting point. Voice cloning adds consent and privacy responsibilities.
How to Write a Script That Sounds Natural With an AI Virtual Presenter
A good AI presenter cannot rescue a weak script. Write for speaking and listening, not only for reading.
1. Start with the viewer’s question.
2. Define the result the viewer should achieve.
3. Write a short opening that explains what the video covers.
4. Use short sentences.
5. Keep one main idea per sentence.
6. Use everyday spoken language rather than unnecessarily formal wording.
7. Read every paragraph aloud.
8. Use punctuation to create natural pauses.
9. Break long narration into manageable presenter clips.
10. Mark presenter scenes in the production script.
11. Mark screen recordings, diagrams, examples, and warnings separately.
12. Use the presenter for introductions, explanations, warnings, transitions, and summaries.
13. Use demonstrations or detailed visuals when the viewer needs to see exact information.
14. Avoid making the presenter read every word already shown on screen.
15. Use natural transitions between sections.
16. Use occasional questions and practical examples.
17. Explain technical terms immediately.
18. Remove jargon, filler, and repetition.
19. Write numbers and acronyms in a form the selected voice pronounces clearly.
20. Separate facts, requirements, and recommendations.
21. Remove unsupported promises and guarantees.
22. Keep a full production script and a presenter-only script when helpful.
23. Generate a short test before approving the full narration.
24. Keep the presenter’s personality consistent across videos.
Recommended formula: Introduce the Idea → Explain It Simply → Give an Example → Show the Best Supporting Visual → Summarize the Point → Transition to the Next Section.
Beginner Rule: Short + Clear + Conversational + Visual + Easy to Regenerate.
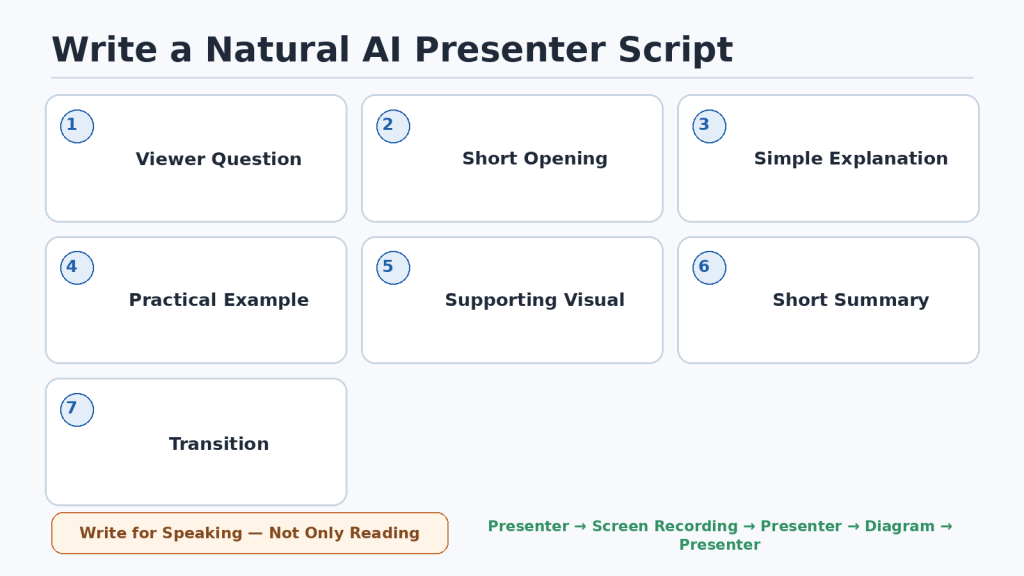
Figure 6. A natural AI-presenter script uses short spoken explanations, practical examples, supporting visuals, clear transitions, and manageable presenter clips.
Explanation: Writing for speech rather than only for reading can improve narration, lip-sync, captions, and editing.
How to Generate Your First Talking AI Presenter Clip
Different avatar platforms use different menus, but the basic workflow is similar: Choose Presenter → Add Script → Choose Voice → Set Video Format → Generate → Review → Regenerate if Needed.
1. Use a 30–60 second real test script first.
2. Open the platform’s video-creation area.
3. Choose the approved presenter rather than creating a new character.
4. Check face, hair, age appearance, clothing, character, and framing.
5. Choose 16:9 landscape for a normal YouTube tutorial unless you are creating vertical content.
6. Paste only the words the presenter should speak.
7. Check spelling, punctuation, names, numbers, and difficult words.
8. Select the approved voice profile.
9. Preview the voice when the tool allows.
10. Choose a simple background.
11. Position the presenter so captions and supporting visuals will fit.
12. Start with chest-up or waist-up framing.
13. Use restrained motion settings.
14. Choose sufficient output quality for evaluation.
15. Generate the test clip.
16. Watch the complete clip.
17. Mute the clip and review visual consistency and movement.
18. Listen without focusing on the visuals and review clarity, pronunciation, timing, and volume.
19. Review voice, face, lip-sync, movement, and script together.
20. Check facial expressions, head movement, hands, background, and any unwanted text or logos.
21. Confirm the spoken information is factually correct.
22. Approve, edit, or regenerate according to the seriousness of the problem.
23. Save approved clips with clear versioned filenames.
24. Keep rejected tests separate.
25. Record the settings that worked.
26. Generate the remaining presenter scenes as shorter clips.
Beginner Rule: Create One Short Clip → Review It Carefully → Fix the Workflow → Then Continue.
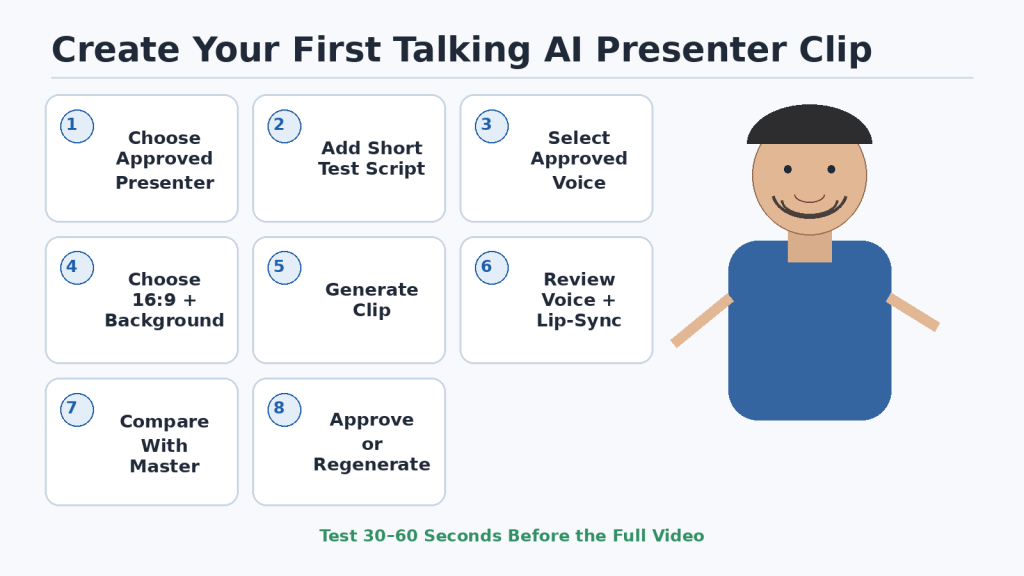
Figure 7. A short AI-presenter test clip lets you check the character, voice, lip-sync, movement, script, and video settings before generating the rest of the presenter scenes.
Explanation: Testing a short clip first can prevent the same pronunciation, consistency, animation, or formatting problem from being repeated throughout the video.
How to Improve Lip-Sync, Facial Expressions, and Gestures
The goal is not maximum movement. The goal is natural movement that supports the explanation.
1. Review the final render rather than judging only an unfinished preview.
2. Watch the mouth around long words, technical terms, names, numbers, and pauses.
3. Check pronunciation before assuming a problem is lip-sync.
4. Break difficult sentences into shorter lines.
5. Add natural pauses.
6. Use expressions that match the meaning.
7. Do not change emotion every sentence.
8. Use expression, gesture, or gaze controls selectively when the platform offers them.
9. Keep tutorial gestures small.
10. Match gestures to the script.
11. Use reliable preset gestures when they work better than improvised motion.
12. Avoid repeating the same gesture too often.
13. Cut away to supporting visuals when presenter motion becomes repetitive.
14. Treat presenter footage as A-roll and use screen recordings, images, diagrams, or charts as supporting B-roll.
15. Check eye direction and blinking.
16. Check head movement for excessive nodding or strange tilts.
17. Inspect hands carefully when they are visible.
18. Avoid complex object interaction until the workflow is reliable.
19. Use full-body movement only when it genuinely helps.
20. Keep the presenter away from important text, interface controls, and captions.
21. Compare movement style and energy across several clips.
22. Regenerate only the weak section instead of the complete video.
23. Do not chase perfect realism when a tiny imperfection does not affect understanding.
24. Review serious problems more strictly than minor ones.
25. Check at normal viewing size and on more than one screen when possible.
26. Keep human review as the final decision.
Beginner Rule: Less Motion + Better Timing is usually better than Constant Motion + Maximum Expression.
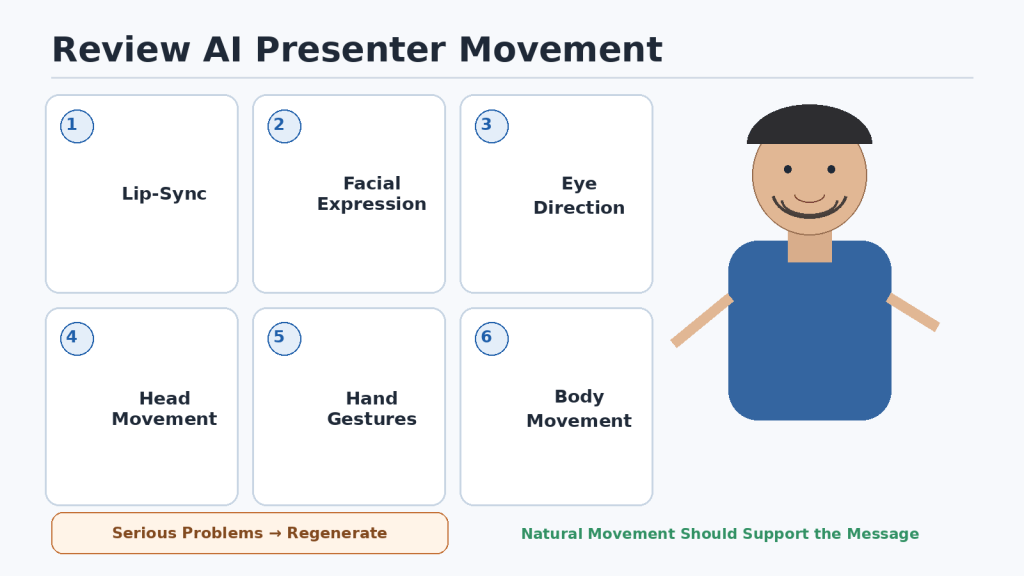
Figure 8. AI-presenter clips should be reviewed for lip-sync, facial expression, eye direction, head movement, hand gestures, and overall body movement before they are approved for editing.
Explanation: More animation is not automatically better. Restrained movement that matches the script usually works better for educational videos.
How to Create Backgrounds and Supporting Visuals for an AI Presenter Video
An AI presenter should not be the only thing viewers see. Educational videos usually become clearer when the host is combined with screen recordings, AI images, stock footage, diagrams, charts, screenshots, text labels, and examples.
1. Choose a simple main presenter background.
2. Keep the background style consistent across the channel.
3. Leave open space beside the presenter for information.
4. Plan for captions near the bottom of the frame.
5. Use screen recordings for exact software steps.
6. Use screenshots when motion is unnecessary.
7. Remove private information before recording screens.
8. Use AI images for concepts that are difficult to photograph, while clearly contextualizing realistic synthetic scenes.
9. Use stock footage only under appropriate licence conditions.
10. Use diagrams for workflows and relationships.
11. Use charts only when accurate data adds value.
12. Keep on-screen text short and large.
13. Do not repeat every spoken word on screen.
14. Use visual changes to support pacing without changing scenes too quickly.
15. Match supporting visuals to the narration.
16. Use B-roll to support the main presenter footage.
17. Keep the presenter visible when direct communication helps and hide it when another visual is more important.
18. Use picture-in-picture only when it adds value.
19. Keep presenter size and layout consistent.
20. Use a small consistent colour palette and readable fonts.
21. Check font and template licences for commercial use.
22. Avoid decorative logo use that could imply endorsement.
23. Use real people’s images only with appropriate rights and context.
24. Use reference images responsibly and avoid copying protected characters or another creator’s distinctive presenter.
25. Keep assets organized with clear filenames and source records.
26. Review every supporting visual for factual accuracy and accessibility.
27. Create a scene plan before editing.
A simple decision rule is: What should the viewer see while hearing this? Choose the presenter for direct communication, a screen recording for exact steps, a diagram for a process, an image or stock clip for illustration, and a checklist or text card for a point that needs to be remembered.
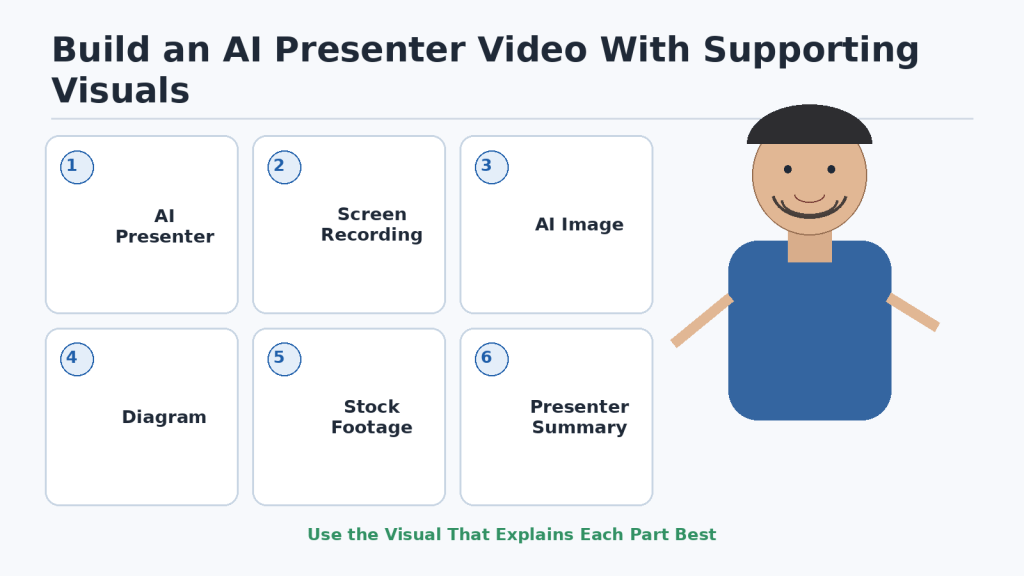
Figure 9. AI-presenter videos are usually more useful when the virtual host is combined with screen recordings, diagrams, AI images, stock footage, and other supporting visuals.
Explanation: Choose the visual that best explains each part of the lesson and keep layouts, captions, privacy checks, and licensing records consistent.
How to Edit an AI Virtual Presenter Video
Editing combines the separate presenter clips, narration, demonstrations, diagrams, images, music, and captions into one coherent lesson.
1. Create an organized project folder.
2. Open a 16:9 landscape editing project for a normal YouTube tutorial.
3. Import approved assets and keep rejected tests separate.
4. Build the main timeline from the script or storyboard.
5. Place presenter clips in the correct order.
6. Trim unnecessary silence without making speech feel rushed.
7. Fix obvious presenter-to-presenter framing jumps.
8. Place supporting visuals over presenter narration when they explain the point better.
9. Use full-screen screen recordings for detailed demonstrations.
10. Zoom carefully into small interface controls when necessary.
11. Use arrows, circles, and highlights sparingly.
12. Show diagrams when the narration discusses them.
13. Leave static visuals on screen long enough to read.
14. Use gentle motion on static images only when useful.
15. Keep transitions simple and consistent.
16. Review pacing from beginning to end.
17. Remove repeated information.
18. Keep important warnings visible long enough to understand.
19. Check presenter consistency across all clips.
20. Use standard presenter-centre, presenter-left, presenter-right, full-screen demonstration, and full-screen diagram layouts.
21. Balance voice levels across clips.
22. Keep narration above music and sound effects.
23. Use only properly licensed music and sound effects.
24. Add captions and correct names, technical terms, numbers, dates, punctuation, and timing.
25. Keep captions readable and away from important information.
26. Check accessibility, private information, generated text, and factual accuracy.
27. Review the complete video without editing, then perform separate visual, audio, caption, and rights/privacy passes.
28. Export a review copy and test it outside the editor.
29. Check on desktop and phone when possible.
30. Make final corrections and create a clearly named master export.
31. Keep the editing project and source files for future updates.
Common Editing Principle: The Information Determines the Visual. If the presenter is best, show the presenter. If a screen recording or diagram is clearer, show that instead.
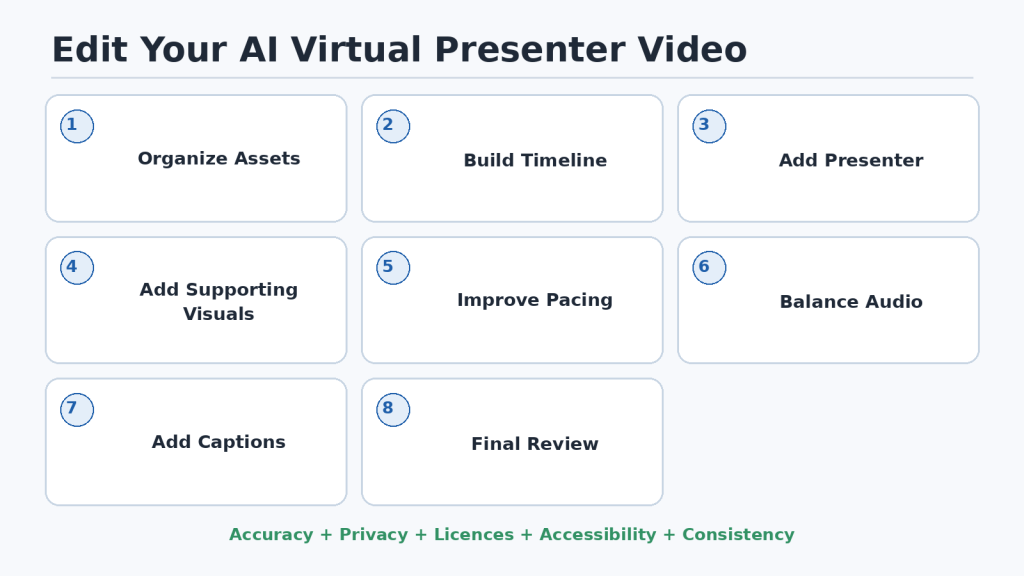
Figure 10. Editing an AI-presenter video combines presenter clips with demonstrations, diagrams, images, audio, and captions while checking pacing, accuracy, accessibility, privacy, and licensing.
Explanation: The presenter should be one part of the visual storytelling rather than remaining on screen continuously.
How to Add Music, Captions, and Accessibility to an AI Presenter Video
The main accessibility goal is to make the presenter easy to hear, easy to understand, and easy to follow. Background music is optional.
1. Decide whether background music genuinely helps.
2. Keep music below the presenter’s voice.
3. Avoid music that competes with speech.
4. Lower or remove music during difficult explanations.
5. Use sound effects only when they have a clear purpose.
6. Check music and sound-effect licences and save the records.
7. Add captions to spoken tutorials.
8. Remember that decorative on-screen text is not a substitute for captions.
9. Use YouTube Studio or another suitable caption workflow to add captions.
10. Treat automatic captions as a starting point and review them manually.
11. Check technical terms, names, numbers, dates, and timing carefully.
12. Keep caption segments manageable and readable.
13. Maintain strong contrast and avoid covering the presenter or important controls.
14. Use closed captions for normal YouTube accessibility and short on-screen text only as additional emphasis.
15. Consider a transcript when it helps viewers search or review the lesson.
16. Do not communicate important meaning through colour alone.
17. Use strong contrast and large on-screen text.
18. Do not rely only on the presenter pointing; describe the exact control or location.
19. Narrate important visual information.
20. Consider whether formal audio description or another alternative is needed when important visual information is not already conveyed in the audio.
21. Use specific instructions instead of vague phrases such as “click here.”
22. Explain diagrams in the narration.
23. Avoid rapid flashing and unnecessary motion.
24. Give viewers enough time to read.
25. Use clear section changes.
26. Keep audio levels consistent.
27. Correct synthetic-voice problems that reduce understanding.
28. Test the video without sound, then listen without concentrating on the visuals.
29. Review the video on a phone.
30. Plan accessibility during scripting and visual design instead of adding it only at the end.
WCAG 2.2 includes captions for prerecorded synchronized media at Level A and also addresses alternatives or audio description for important visual information. This article provides general accessibility guidance; applicable legal requirements depend on the specific creator, organization, audience, and jurisdiction.
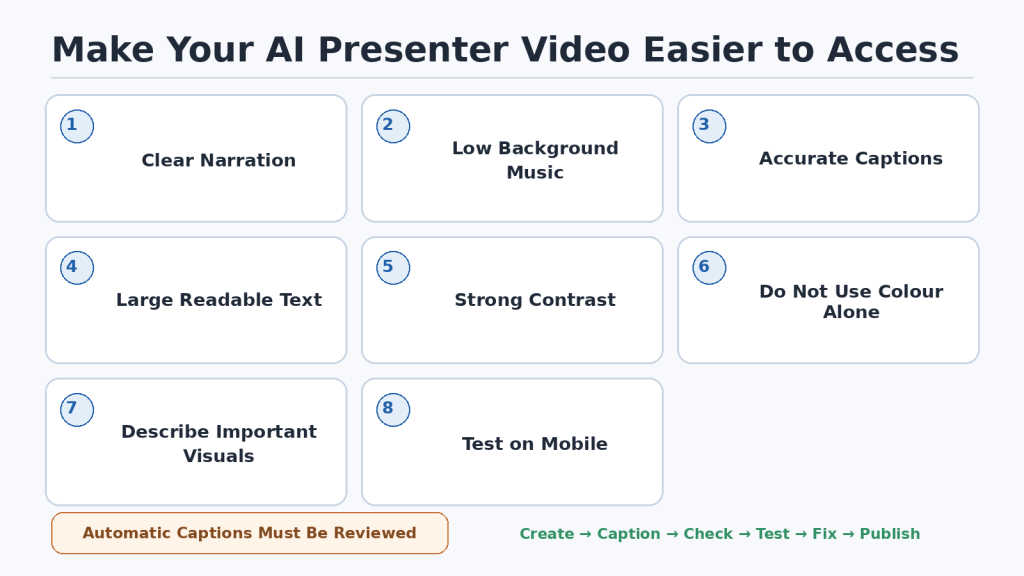
Figure 11. Accessible AI-presenter videos use clear narration, carefully reviewed captions, readable visuals, strong contrast, specific instructions, and multiple ways to understand important information.
Explanation: Accessibility should be considered during scripting, visual planning, captioning, and final review rather than added only after editing is complete.
Privacy, Permission, Copyright, and Responsible Use for AI Virtual Presenters
Before publishing, check four separate areas: Privacy → Permission → Copyright and Licensing → Responsible AI Use. A technically impressive video can still have serious problems in any of these areas.
1. Start with an original fictional presenter when possible.
2. Do not deliberately imitate a recognizable celebrity, politician, creator, customer, or private person without appropriate authorization.
3. Do not assume that a public photograph gives permission to create an avatar or digital twin.
4. Be especially careful with realistic likenesses. YouTube allows people to request removal of realistic altered or synthetic content that looks or sounds like them.
5. Get appropriate permission before creating a digital version of a real person and keep permission records.
6. Treat children and their images with additional care.
7. Never use a virtual presenter for deceptive impersonation, false endorsements, invented statements, or fake participation.
8. Remember that disclosure does not provide permission to impersonate someone.
9. Review whether realistic synthetic content requires YouTube disclosure.
10. Understand that disclosure is transparency, not a copyright licence or permission to use a person’s identity.
11. Clearly contextualize synthetic scenes when viewers could mistake them for real events.
12. Protect personal information and upload only what a workflow genuinely requires.
13. Review avatar-provider storage, deletion, training, and privacy controls.
14. Treat voice recordings as identity-related data and do not upload another person’s voice casually.
15. Check copyright separately from permission to use a person’s likeness.
16. Review every music, stock, image, font, template, icon, voice, and background asset in the final video.
17. Do not assume editing or AI transformation removes copyright.
18. Do not assume educational use automatically qualifies as fair use; copyright exceptions depend on the facts and jurisdiction.
19. Use original or properly licensed music and stock assets.
20. Check Creative Commons and attribution conditions when applicable.
21. Check AI-tool commercial-use conditions for the exact service, feature, account, and intended use.
22. Avoid claiming exclusive rights without understanding the relevant terms and law.
23. Avoid protected characters and distinctive copies of another creator’s presenter.
24. Make the presenter add real educational or communication value.
25. Avoid mass-producing nearly identical presenter videos.
26. Keep human review, fact-checking, and source verification in the workflow.
27. Do not invent expert credentials for a fictional presenter.
28. Use extra care for health, legal, financial, emergency, political, or other high-stakes topics.
29. Do not fabricate testimonials or realistic fake interviews.
30. Keep creation, permission, licence, disclosure, and publication records.
Beginner Rule: Ask four separate questions: Can I create it? Do I have the right and permission to use it? Could it mislead someone? Have I reviewed what I am publishing?
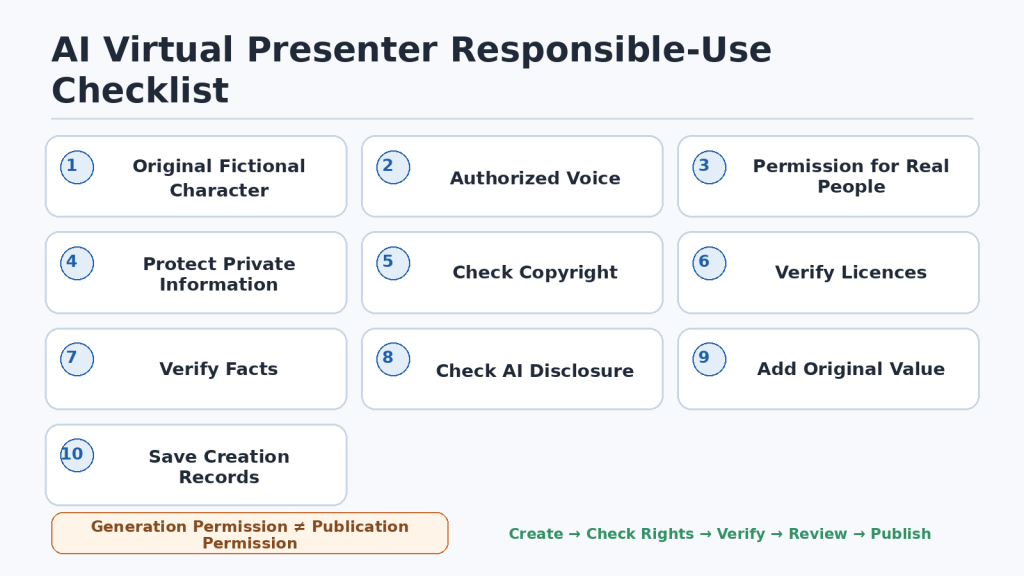
Figure 12. Responsible AI-presenter publishing requires separate checks for identity, permission, privacy, copyright, licences, factual accuracy, disclosure, original value, and record-keeping.
Explanation: The ability to generate an AI presenter does not automatically provide permission to publish every resulting asset.
YouTube AI Disclosure and Monetization for Virtual Presenter Videos
Using an AI virtual presenter does not automatically prevent a YouTube channel from being monetized. YouTube currently distinguishes between using AI as a production tool and publishing content that is repetitive, mass-produced, reused without sufficient original contribution, misleading, or otherwise policy-violating.
YouTube currently requires creators to disclose meaningfully altered or synthetically generated content that appears realistic under its disclosure criteria. Its May 2026 clarification emphasizes photorealistic content such as a real person appearing to do or say something they did not, altered footage of a real event or place, or a realistic scene that did not actually occur.
1. Review the final appearance rather than assuming “fictional” always means no disclosure.
2. Use YouTube Studio’s current AI-use setting when the content meets the disclosure criteria.
3. Understand that disclosure may produce viewer-facing information such as “Made with AI.”
4. Do not treat disclosure as a penalty; it is a transparency mechanism.
5. Remember that disclosure does not grant rights to another person’s face, voice, or copyrighted content.
6. Meet YouTube Partner Program eligibility requirements and understand that eligibility allows you to apply but does not guarantee approval.
7. Use a consistent presenter while making each video genuinely different and useful.
8. Avoid a workflow that mass-produces generic scripts with the same avatar, background, and minimal editing.
9. Add meaningful human contribution through research, structure, rewriting, examples, demonstrations, fact-checking, and editing.
10. Do not simply have the avatar read third-party articles, product descriptions, or other creators’ scripts with little original explanation.
11. Do not create nearly identical videos by changing only a few words.
12. Remember that repeated intros, outros, colours, and presenter branding are not the same as repetitive main content.
13. Do not use an avatar overlay to disguise reused footage.
14. Check copyright/licensing and monetization as separate questions.
15. Do not depend on the avatar itself to provide originality.
16. Make the channel purpose clear and maintain reasonable quality across the channel library.
17. Review older videos periodically for outdated facts, weak disclosure, or quality problems.
18. Do not promise monetization.
19. Check the current Earn section and official YPP documentation when preparing to apply.
20. Keep disclosure and production records for important videos.
21. Do not hide qualifying realistic synthetic content and do not label every minor AI-assisted action as if it were the same type of disclosure.
22. Recheck current rules after major platform updates or major changes to your production method.
A useful test is: If I replaced the virtual presenter with my own voice and simple graphics, would the lesson still contain useful information? If yes, the value likely comes from the research, teaching, examples, structure, and explanation rather than from the novelty of the avatar alone.
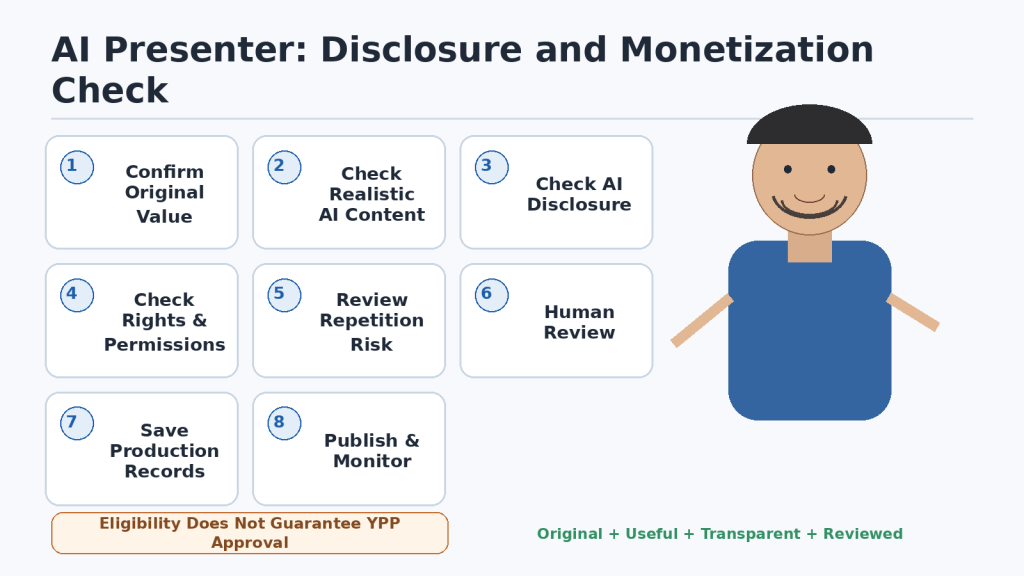
Figure 13. Responsible AI-presenter publishing combines original value, appropriate AI disclosure, rights and permission checks, protection against repetitive mass production, human review, and saved production records.
Explanation: AI assistance does not automatically prevent monetization, but YPP requirements and monetization policies still apply; eligibility does not guarantee approval.
Complete Step-by-Step AI Virtual Presenter Video Workflow
1. Choose one clear video topic.
2. Research the topic using reliable current sources.
3. Define where the presenter will appear.
4. Open the approved character profile and reference assets.
5. Select the approved voice and test new terminology.
6. Write a clear, original, spoken script.
7. Create a scene plan describing what the viewer hears and sees.
8. Generate a 30–60 second presenter test.
9. Review face, voice, pronunciation, lip-sync, gestures, hands, background, and accuracy.
10. Generate the remaining presenter clips as manageable scenes.
11. Create the supporting screen recordings, AI images, diagrams, screenshots, charts, and licensed stock footage.
12. Organize all project files.
13. Build the editing timeline.
14. Improve pacing and remove repetition.
15. Add music and sound only when useful and properly licensed.
16. Add and manually correct captions.
17. Perform an accessibility review.
18. Perform a privacy review.
19. Perform a copyright and licensing review.
20. Review the presenter for impersonation and permission risk.
21. Check YouTube AI disclosure.
22. Check originality and monetization-policy risks.
23. Watch the complete video as a final human review.
24. Export a review copy and test it outside the editor.
25. Correct confirmed problems.
26. Create the final master export and publishing package.
27. Upload privately or unlisted first when practical for a final check.
28. Publish.
29. Review YouTube Studio and Analytics after meaningful data develops.
30. Use what you learn to improve the next video.
The complete workflow in one line: Topic → Research → Presenter Plan → Character → Voice → Script → Scene Plan → Test Clip → Presenter Clips → Supporting Visuals → Edit → Audio → Captions → Accessibility → Privacy → Copyright → Permission → AI Disclosure → Originality Review → Human Review → Export → Publishing Package → Upload → Publish → Analytics → Improve.
The easiest five-stage version is: Plan → Create → Edit → Check and Publish → Learn and Improve.
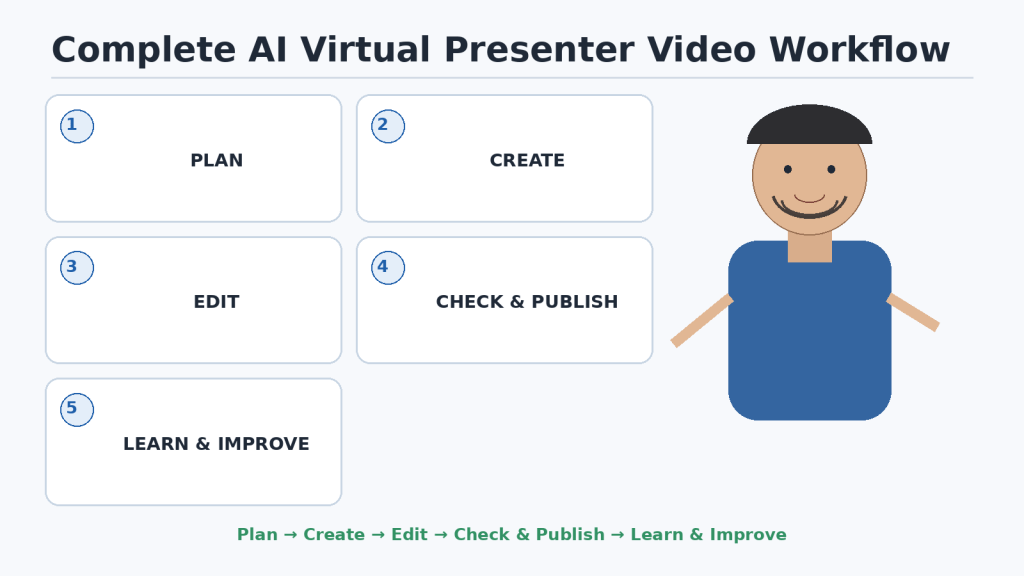
Figure 14. The complete AI virtual-presenter workflow moves through planning, creation, editing, rights and policy checks, publishing, and Analytics-based improvement.
Explanation: Beginners can simplify the process into five stages: Plan, Create, Edit, Check and Publish, then Learn and Improve.
Common AI Virtual Presenter Mistakes Beginners Should Avoid
Mistake 1: Creating the entire video before testing the presenter
How to Avoid This Mistake: Generate a 30–60 second test first and approve the character, voice, lip-sync, framing, background, and motion.
Mistake 2: Changing the character in every video
How to Avoid This Mistake: Keep a master character profile, prompt, reference image, clothing range, framing, and approved voice.
Mistake 3: Using only the character name as the prompt
How to Avoid This Mistake: Reuse the complete character description and reference image.
Mistake 4: Choosing a presenter only because it looks realistic
How to Avoid This Mistake: Compare consistency, voice, lip-sync, export, privacy, rights, and ease of use.
Mistake 5: Making the presenter too complicated
How to Avoid This Mistake: Start with simple clothing, background, framing, and gestures.
Mistake 6: Making the presenter look like a real person
How to Avoid This Mistake: Create an original fictional appearance instead of deliberately imitating an identifiable person.
Mistake 7: Cloning someone else’s voice without permission
How to Avoid This Mistake: Use a built-in synthetic voice, your own authorized clone, or another properly authorized voice.
Mistake 8: Choosing the voice without testing real script
How to Avoid This Mistake: Test technical terms, numbers, dates, acronyms, and names before long generation.
Mistake 9: Changing the voice between clips
How to Avoid This Mistake: Save and reuse the approved voice settings.
Mistake 10: Ignoring pronunciation
How to Avoid This Mistake: Keep a pronunciation list and test difficult words.
Mistake 11: Writing long formal sentences
How to Avoid This Mistake: Use short spoken sentences, natural pauses, and everyday language.
Mistake 12: Making the avatar speak for the entire video
How to Avoid This Mistake: Switch to screen recordings, diagrams, examples, and other visuals when they teach better.
Mistake 13: Keeping the presenter visible during detailed software steps
How to Avoid This Mistake: Use full-screen demonstrations when viewers need to see controls clearly.
Mistake 14: Using too many gestures
How to Avoid This Mistake: Use restrained movement that supports meaning.
Mistake 15: Ignoring hands
How to Avoid This Mistake: Regenerate, reduce gestures, or use chest-up framing when hands are visibly distorted.
Mistake 16: Trying to make every clip perfect
How to Avoid This Mistake: Fix problems that affect understanding or are noticeably distracting; do not waste credits on tiny invisible defects.
Mistake 17: Using busy backgrounds
How to Avoid This Mistake: Use clean backgrounds with room for text and captions.
Mistake 18: Covering important information with the presenter
How to Avoid This Mistake: Use consistent left/right layouts and give the teaching visual enough space.
Mistake 19: Forgetting caption space
How to Avoid This Mistake: Plan caption placement before finalizing the scene layout.
Mistake 20: Using tiny on-screen text
How to Avoid This Mistake: Use large labels and check on mobile.
Mistake 21: Trusting automatic captions without review
How to Avoid This Mistake: Correct the complete caption track manually.
Mistake 22: Making music too loud
How to Avoid This Mistake: Keep narration clearly above music.
Mistake 23: Using unlicensed music or stock assets
How to Avoid This Mistake: Check and save licence records before publishing.
Mistake 24: Assuming AI-generated means copyright-free
How to Avoid This Mistake: Check input rights, provider terms, and third-party assets separately.
Mistake 25: Assuming a paid plan gives unlimited rights
How to Avoid This Mistake: Review the exact service, feature, plan, and intended use.
Mistake 26: Uploading private information in screen recordings
How to Avoid This Mistake: Prepare the screen before recording and inspect the footage before publishing.
Mistake 27: Using AI-generated visuals without checking them
How to Avoid This Mistake: Inspect spelling, labels, numbers, logos, and factual details.
Mistake 28: Treating a realistic synthetic scene as evidence
How to Avoid This Mistake: Provide clear context when generated material could be mistaken for a real event.
Mistake 29: Forgetting AI disclosure
How to Avoid This Mistake: Include a disclosure check in the publishing checklist.
Mistake 30: Believing disclosure gives permission
How to Avoid This Mistake: Check consent, privacy, copyright, licensing, and impersonation separately.
Mistake 31: Giving a fictional presenter fake credentials
How to Avoid This Mistake: Describe the character accurately and rely on verifiable sources rather than invented authority.
Mistake 32: Publishing AI-generated facts without verification
How to Avoid This Mistake: Fact-check important information before final generation.
Mistake 33: Mass-producing almost identical videos
How to Avoid This Mistake: Give each video its own research, purpose, examples, demonstrations, and useful conclusions.
Mistake 34: Believing the avatar alone makes the video original
How to Avoid This Mistake: Original value should come from the complete production, not only the character.
Mistake 35: Automating the entire publishing process without human review
How to Avoid This Mistake: Keep human review for facts, script, visuals, captions, privacy, rights, and disclosure.
Mistake 36: Failing to save source files
How to Avoid This Mistake: Preserve scripts, clips, references, captions, project files, licences, permissions, and master exports.
Mistake 37: Naming files poorly
How to Avoid This Mistake: Use article/topic/scene/version filenames instead of final-final-new names.
Mistake 38: Changing too many variables at once
How to Avoid This Mistake: Change one important variable and compare the result.
Mistake 39: Buying several tools before testing
How to Avoid This Mistake: Complete one short end-to-end project first.
Mistake 40: Expecting the first video to be perfect
How to Avoid This Mistake: Improve the workflow one video at a time.
Beginner Rule: Test Small → Review → Correct → Generate More → Edit → Check Everything → Publish.
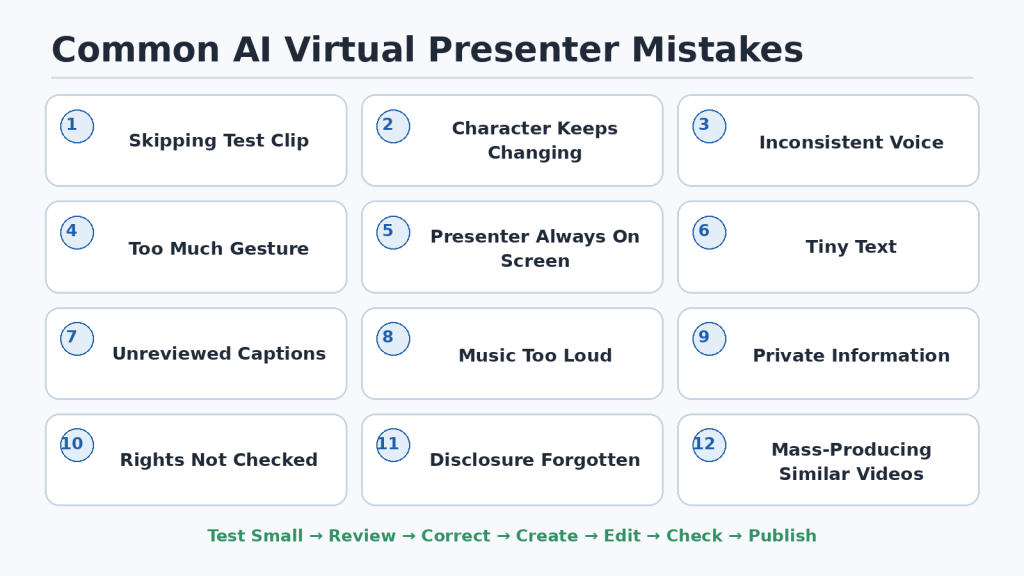
Figure 15. Common AI-presenter mistakes include skipping early tests, allowing character or voice inconsistency, overusing the avatar, neglecting captions and privacy, failing to check rights, and mass-producing similar videos without sufficient review.
Explanation: A short test-and-review cycle can prevent many problems before they spread through the entire production.
Benefits and Limitations of Using an AI Virtual Presenter
Benefits
• You can remain off camera while still using a visible host.
• You may reduce the need for a traditional camera, lighting, and recording-space setup.
• A saved character can create a recognizable channel identity.
• Short presenter clips can be replaced without re-recording an entire human presentation.
• Reusable presenter layouts and templates can speed future editing.
• A fictional host can separate the teaching role from the creator’s personal identity.
• Presenter clips can work well with faceless workflows and supporting visuals.
• Some workflows can make updates and multilingual versions easier to produce.
Limitations
Limitation 1: The presenter may still look artificial
How to Reduce This Limitation: Use short clips, restrained motion, careful review, and supporting visuals.
Limitation 2: Character appearance may drift
How to Reduce This Limitation: Use master references, consistent prompts, and approval checks.
Limitation 3: Voice quality can vary
How to Reduce This Limitation: Test difficult words and review every final narration.
Limitation 4: Lip-sync is not always perfect
How to Reduce This Limitation: Use moderate pace, shorter sentences, and correct pronunciation.
Limitation 5: Full-body motion creates more opportunities for errors
How to Reduce This Limitation: Begin with chest-up or waist-up framing.
Limitation 6: The presenter can become repetitive
How to Reduce This Limitation: Alternate presenter footage with demonstrations, diagrams, and examples.
Limitation 7: Tools may cost money or consume credits
How to Reduce This Limitation: Test one short video before paying for multiple plans.
Limitation 8: Tool features and plans can change
How to Reduce This Limitation: Check current official information at key workflow changes and periodically.
Limitation 9: You can become dependent on one provider
How to Reduce This Limitation: Keep prompts, references, source files, voice records, and master exports outside the service when possible.
Limitation 10: Commercial-use conditions require checking
How to Reduce This Limitation: Review the exact feature and intended use.
Limitation 11: Digital twins create additional privacy considerations
How to Reduce This Limitation: Use fictional assets when a real-person twin is unnecessary and review data controls before uploading personal material.
Limitation 12: AI can deliver incorrect information convincingly
How to Reduce This Limitation: Fact-check the script before final generation.
Limitation 13: AI does not replace good teaching
How to Reduce This Limitation: Prioritize useful topics, accurate research, clear scripts, and helpful visuals.
Limitation 14: The presenter does not guarantee engagement or monetization
How to Reduce This Limitation: Measure actual performance and follow current platform rules.
Limitation 15: Editing and accessibility work are still required
How to Reduce This Limitation: Keep captions, audio, rights, privacy, and accessibility checks in the normal workflow.
Limitation 16: Synthetic realism can confuse viewers
How to Reduce This Limitation: Use appropriate platform disclosure and additional context when needed.
Beginner Rule: Think of an AI virtual presenter as one video-creation tool, not the entire video-creation system.
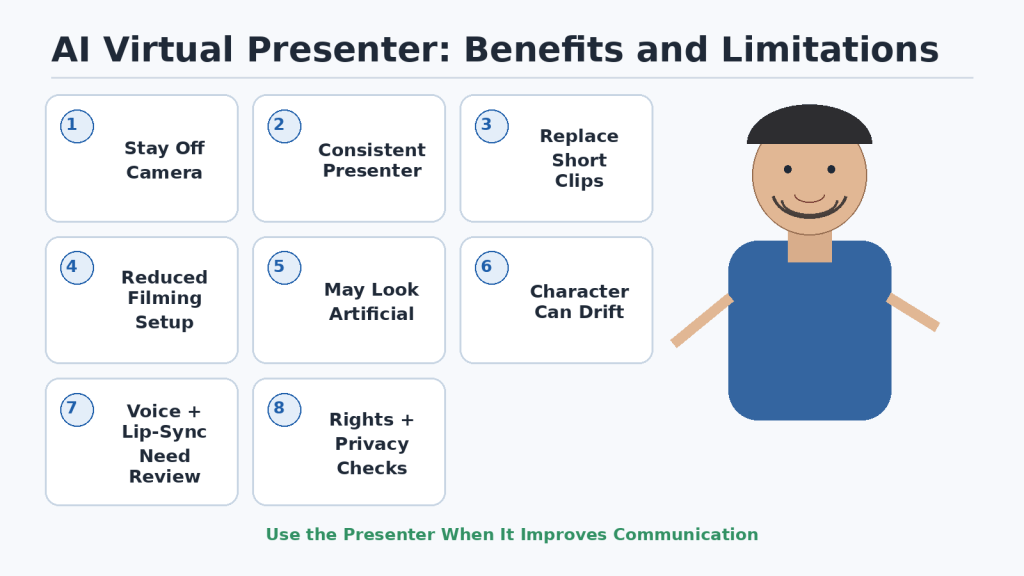
Figure 16. AI virtual presenters can reduce filming requirements and provide a consistent host, but they still require careful review for appearance, voice, rights, privacy, accessibility, accuracy, and overall usefulness.
Explanation: Use a virtual presenter when it solves a communication or production need rather than simply because the technology is available.
Common Myths About AI Virtual Presenters
Myth 1: “An AI presenter creates the whole video for me”
Reality: It automates part of presentation; research, review, editing, captions, rights checks, and publishing work remain.
Myth 2: “The more realistic the presenter, the better the video”
Reality: Clarity, usefulness, consistency, and teaching quality matter more than maximum realism.
Myth 3: “A fictional presenter never needs disclosure”
Reality: The final realistic appearance and current platform criteria determine the disclosure question.
Myth 4: “If I disclose AI, I can copy a real person”
Reality: Disclosure does not replace permission, privacy, copyright, or impersonation rules.
Myth 5: “Anything publicly available online can be used to build my avatar”
Reality: Public availability is not permission to create a digital version of a person or reuse protected source material.
Myth 6: “I can clone any voice because AI generated it”
Reality: Use authorized voices and provider-supported consent workflows.
Myth 7: “Paying for the AI tool gives unlimited rights”
Reality: A subscription still operates under provider terms and third-party rights.
Myth 8: “AI-generated images and videos are automatically copyright-free”
Reality: Inputs, references, characters, stock assets, music, fonts, and provider terms can still matter.
Myth 9: “Changing someone else’s content with AI makes it mine”
Reality: Transformation does not automatically remove underlying rights.
Myth 10: “Educational use automatically means fair use”
Reality: Copyright exceptions depend on the facts and applicable law.
Myth 11: “A virtual presenter automatically makes reused content original”
Reality: Original value should come from research, explanation, structure, examples, commentary, and editing.
Myth 12: “YouTube does not monetize AI presenter channels”
Reality: AI use itself is not an automatic disqualifier; the complete channel must satisfy current monetization policies.
Myth 13: “Using an AI presenter guarantees monetization”
Reality: No presenter format guarantees YPP approval, views, subscribers, or revenue.
Myth 14: “Reaching YPP numbers means automatic acceptance”
Reality: Eligibility allows an application; YouTube still reviews the channel.
Myth 15: “The same presenter makes every video repetitive”
Reality: Consistent branding is different from mass-producing substantially similar main content.
Myth 16: “The presenter should stay on screen throughout the entire video”
Reality: Use the presenter only where direct communication helps.
Myth 17: “More gestures make an avatar look more human”
Reality: Restrained, meaningful movement usually works better in tutorials.
Myth 18: “Perfect lip-sync is required”
Reality: Fix distracting problems, but do not chase invisible imperfections.
Myth 19: “A good AI voice does not need captions”
Reality: Voice clarity and caption accessibility solve different needs.
Myth 20: “Automatic captions are always accurate”
Reality: Technical terms, names, dates, and numbers often need manual correction.
Myth 21: “AI translation means no language review is needed”
Reality: Fluent output can still contain wrong meaning, terminology, or pronunciation.
Myth 22: “A professional-looking presenter must be accurate”
Reality: Appearance does not verify facts.
Myth 23: “AI presenters can replace all screen recordings”
Reality: Exact software steps are usually clearer when the interface itself is shown.
Myth 24: “More AI tools always produce a better video”
Reality: More tools can increase cost, complexity, inconsistency, and licensing work.
Myth 25: “I need expensive subscriptions before I test the idea”
Reality: Test the end-to-end workflow before committing to multiple plans.
Myth 26: “A saved character prompt guarantees identical results”
Reality: Stronger consistency comes from prompt + reference images + settings + human comparison.
Myth 27: “The platform will remember my character forever”
Reality: Keep your own copies of prompts, references, voice information, and approved outputs.
Myth 28: “Source files are unnecessary after publication”
Reality: Source files make future corrections, updates, and rights reviews possible.
Myth 29: “AI presenter videos require no human creativity”
Reality: Topic choice, research, explanation, character design, visual selection, editing, and quality control remain creative decisions.
Myth 30: “An AI presenter is always better than a faceless or human presenter”
Reality: Choose the format that best serves the topic and production needs.
Beginner Rule: Avoid extreme claims. AI virtual presenters can be useful production tools, but responsible videos still depend on good content, appropriate rights, current platform rules, accessibility, transparency, and human review.
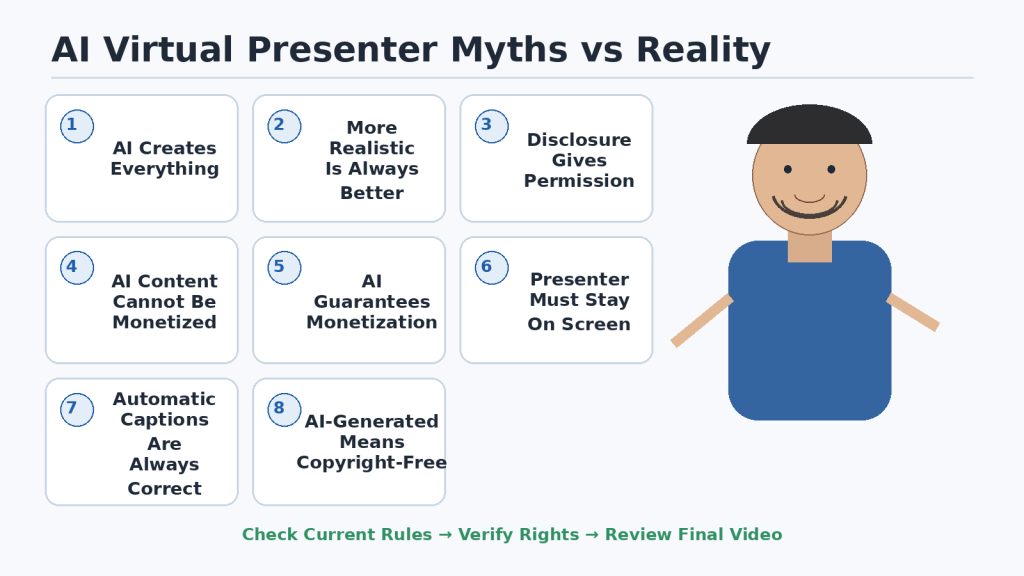
Figure 17. Common myths about AI virtual presenters often confuse technical capability with quality, permission, copyright, disclosure, accessibility, or monetization.
Explanation: AI presenters can simplify some production tasks, but they do not remove the need for research, rights checks, captions, disclosure decisions, platform compliance, or human review.
Frequently Asked Questions About AI Virtual Presenters
1. What is an AI virtual presenter?
A digitally generated character that appears on screen and speaks a script. It may be realistic or stylized and may also be called an AI avatar, digital presenter, virtual host, or AI personality.
2. Is an AI virtual presenter the same as a faceless YouTube video?
Not exactly. A faceless video can use narration and supporting visuals without a host. An AI-presenter video adds a digital host, often only in selected scenes.
3. Do I need to show the presenter throughout the video?
No. Use the presenter for direct communication and switch to demonstrations, diagrams, charts, screenshots, or examples when those visuals teach better.
4. Should a beginner create a fictional presenter or copy a real person?
A fictional presenter is usually simpler because it reduces many likeness, impersonation, permission, and privacy concerns.
5. Can I create an AI presenter that looks like me?
Some services support personal avatars or digital twins. Review consent, privacy, storage, deletion, and voice requirements before uploading personal material.
6. Can I create a presenter that looks like another person?
Do not use another person’s recognizable likeness without appropriate authorization.
7. Can I clone another person’s voice?
Use a recognizable real voice only with appropriate authorization. Built-in synthetic voices are simpler for fictional presenters.
8. Do I need to clone a voice at all?
No. A built-in synthetic voice is enough for many beginner workflows.
9. How do I keep the presenter consistent?
Use a master profile, master prompt, reference images, approved voice settings, standard framing, and a compare-before-approval check.
10. Why does the presenter sometimes look different?
Generative systems can introduce variation. Regenerate scenes with major drift and keep reference assets stable.
11. What camera framing is easiest?
Chest-up or waist-up is usually practical because it reduces full-body and hand-animation problems.
12. How long should a presenter clip be?
There is no universal length, but shorter clips are easier to review and replace. A 30–60 second first test is practical.
13. What if lip-sync is not perfect?
Small imperfections may be acceptable if they are not distracting. Check pronunciation and pace before regenerating.
14. How can I make AI speech sound natural?
Use short sentences, clear punctuation, moderate speed, natural pauses, and a pronunciation list.
15. Do I need an expensive avatar tool?
No. Test a small project and compare the features, rights, privacy, export quality, and limits you actually need.
16. Should I use one tool or several?
Use the simplest workflow that reliably accomplishes the job. Additional tools add flexibility but also cost and complexity.
17. Can I use ChatGPT to help write the script?
Yes, as writing assistance. Review the final script for accuracy, repetition, natural speech, unsupported claims, and appropriate warnings.
18. Can I combine the presenter with screen recordings?
Yes. This is often one of the clearest formats for tutorials.
19. Do AI-presenter videos need captions?
Captions are strongly recommended for educational videos, and automatic captions should be reviewed and corrected.
20. Do I have to disclose that the presenter is AI-generated?
Review YouTube’s current rules for meaningfully altered or synthetically generated content that appears realistic and use the AI-use setting when required.
21. Will YouTube penalize my channel just because I use an AI presenter?
AI use by itself is not the same as violating monetization policy. The complete channel must still provide sufficient original value and follow current policies.
22. Can an AI-presenter channel be monetized?
Potentially yes, but there is no guaranteed approval. The channel must meet current eligibility and monetization requirements.
23. Does using the same presenter make every video repetitive?
Not by itself. The content of each video should still be meaningfully different and useful.
24. Does an AI presenter guarantee more views?
No. Viewer response depends on topic, title, thumbnail, script, pacing, usefulness, audience interest, and many other factors.
25. Can my fictional presenter have a name and personality?
Yes. Keep the role and personality consistent, but do not invent deceptive real-world credentials.
26. Should I tell viewers the presenter is fictional?
Clear context can improve transparency when a realistic presentation could reasonably be mistaken for a real person.
27. Should I create several presenters?
Usually not at first. One consistent presenter is easier to manage. Add more only when a real series, language, or teaching need justifies it.
28. How should I organize presenter files?
Keep character profile, prompts, reference images, voice settings, approved clips, scripts, licences, permissions, project files, and master exports together with clear filenames.
29. What is the easiest beginner workflow?
Create one fictional presenter → choose one authorized voice → write one short script → generate a 30–60 second test → review → create short scenes → add supporting visuals → edit and caption → check rights, privacy, accuracy, and disclosure → human review → publish.
30. What is the most important thing to remember?
The presenter is not the main source of value. Useful information, clear explanation, relevant visuals, responsible publishing, and human review are the foundation.
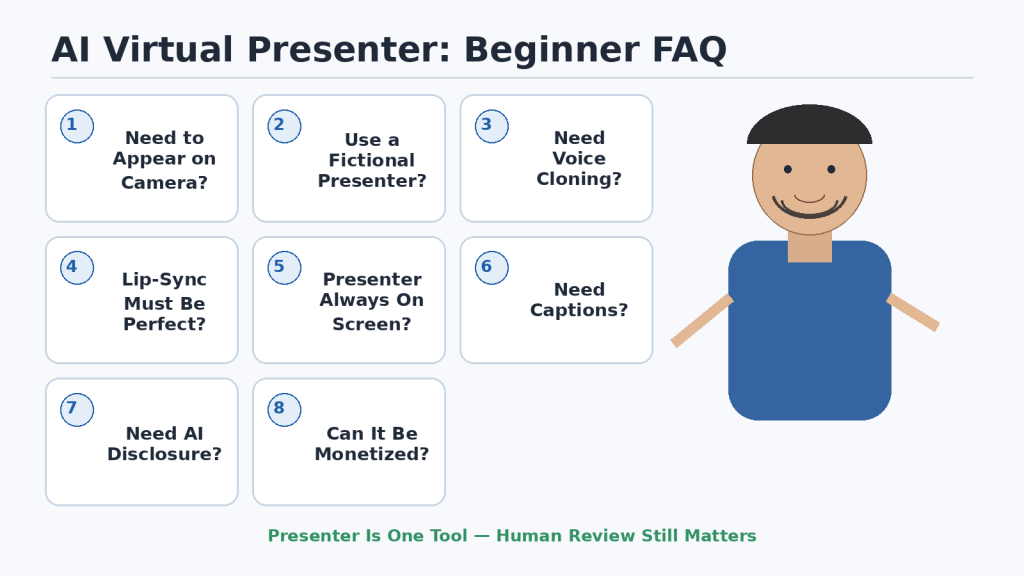
Figure 18. Beginners commonly ask about presenter consistency, voice cloning, lip-sync, captions, AI disclosure, monetization, and how much of the video should actually show the virtual host.
Explanation: The simplest starting approach is usually one original fictional presenter, one authorized consistent voice, short tested presenter clips, useful supporting visuals, and careful human review.
Key Takeaways
• An AI virtual presenter is a digital host that can speak a script and appear in selected video scenes.
• An original fictional presenter is usually the simplest beginner choice.
• Save a master character profile, prompt, reference image, approved voice, and standard framing.
• Built-in synthetic voices are often easier than voice cloning.
• Do not clone a recognizable voice or copy a real person’s likeness without appropriate authorization.
• Write for speaking and listening using short sentences and natural pauses.
• Generate a 30–60 second test before creating the complete video.
• Review face consistency, voice, pronunciation, lip-sync, expressions, gestures, hands, background, and script accuracy.
• Use the presenter only when it helps; use screen recordings, diagrams, images, charts, and stock footage when they teach better.
• Add and review captions, keep music below narration, and design visuals with accessibility in mind.
• Check privacy, copyright, licences, permissions, and factual accuracy separately.
• The ability to generate an asset does not automatically give permission to publish it.
• Review YouTube’s current AI-disclosure criteria for realistic synthetic content.
• AI use does not automatically prevent monetization and does not guarantee it.
• Avoid mass-producing nearly identical low-value videos.
• Human review should remain part of every important stage.
• Keep source files, prompts, licences, permissions, master exports, and publication records.
• Use analytics and viewer feedback to improve future videos.
• The complete beginner workflow can be remembered as Plan → Create → Edit → Check and Publish → Learn and Improve.
The presenter supports the lesson. The presenter is not the lesson.
Final Tip
Do not try to build the perfect AI virtual presenter before publishing your first video. Start with one fictional presenter, one consistent voice, one short test script, one 30–60 second presenter clip, and one complete beginner video.
After the first project, improve only what the evidence shows needs improvement. You may discover that the presenter should appear less often, the voice needs slower pacing, the background should be simpler, more screen recordings are needed, gestures should be reduced, captions need more space, or presenter clips should be shorter.
Keep your character profile, master prompt, reference images, voice settings, scripts, approved clips, licences, permissions, project files, and final exports organized from the beginning.
Most importantly: A good AI virtual presenter should make the lesson easier to understand. If the presenter becomes more important than the information, simplify the production. Use AI to support your teaching, not to replace careful research, clear explanations, responsible publishing, and human review.
Continue Learning
How to Create Faceless YouTube Videos with AI: Complete Beginner Step-by-Step Guide (2026)
Use this guide to understand the complete faceless-video workflow and how presenter-led scenes can fit inside it.
How to Create Storyboards and Plan Scenes for Faceless YouTube Videos with AI: Beginner Guide (2026)
Use this guide to decide what viewers should see during each part of the video.
How to Create Visuals for Faceless YouTube Videos with AI Images, Stock Footage, and Screen Recordings: Beginner Guide (2026)
Use this guide to create and organize the supporting visuals that appear between presenter scenes.
How to Create AI Videos from Text: Beginner Step-by-Step Guide (2026)
Use this guide when you need short generated video scenes from written prompts.
Best AI Video Tools for Beginners: Complete Guide (2026)
Use this guide to compare beginner-friendly AI video tools and choose a suitable tool for your video-creation workflow.
How to Add Voice, Music, and Captions to AI Videos: Beginner Step-by-Step Guide (2026)
Use this guide for additional voice, music, caption, permission, licensing, and responsible-use guidance.
How to Use YouTube Studio and YouTube Analytics for Faceless Channels: Beginner Guide (2026)
Use this guide after publishing to review performance and improve the next video.
Recommended learning order: Plan the Video → Create the Storyboard → Create the Presenter → Create Supporting Visuals → Generate Presenter and AI Video Clips → Edit → Add Voice, Music, and Captions → Check Rights, Privacy, Accessibility, and Disclosure → Publish → Review Analytics.
Sources and References
Sources reviewed: August 8, 2026. AI-avatar features, voice options, subscription conditions, privacy controls, licensing terms, YouTube monetization rules, AI-disclosure requirements, and platform interfaces can change. Check current official information when first choosing a tool, changing plans or features, receiving an important policy update, beginning commercial use, working with another person’s face or voice, and periodically as part of an established workflow.
1. HeyGen — Quick Avatar Video
Used in this article for: Avatar-video workflow, format, script, voice, motion, and output settings.
2. HeyGen — Avatar Looks Explained
Used in this article for: Avatar variations such as backgrounds, outfits, positions, and camera angles.
3. HeyGen — Avatar Voice FAQ
Used in this article for: Avatar voice selection, troubleshooting, pacing, and generation considerations.
4. HeyGen — Recording Your Consent Video
Used in this article for: Consent requirement for video-based Digital Twin creation.
5. HeyGen — Digital Twin FAQ
Used in this article for: Digital Twin creation, avatar slots, looks, and related controls.
6. Synthesia — AI Avatars
Used in this article for: Stock and personal avatar types and current avatar capabilities.
7. Synthesia — Personal Avatars
Used in this article for: Personal avatar creation and live consent requirements.
8. Synthesia — Custom Voices
Used in this article for: Custom voice creation, live consent, voice management, and deletion.
9. Synthesia — Script
Used in this article for: Script entry, voice selection, languages, and script-related controls.
10. D-ID — Generate a Video in Studio
Used in this article for: Avatar, script or audio, voice preview, and generation workflow.
11. D-ID — Select a Voice for an Avatar
Used in this article for: Voice selection and preview in D-ID Studio.
12. ElevenLabs — Publishing Generated Content
Used in this article for: Current commercial-licence guidance and rights responsibilities.
13. Canva — HeyGen AI Avatars
Used in this article for: Third-party HeyGen avatar app availability inside Canva.
14. Canva — D-ID AI Avatars
Used in this article for: Third-party D-ID avatar app availability inside Canva.
15. YouTube — Disclosing Use of Generative AI Content
Used in this article for: Current altered or synthetic content disclosure requirements and AI-use setting.
16. YouTube — Updates to AI Content Disclosure and Labels
Used in this article for: May 27, 2026 clarification focusing on meaningfully altered or generated photorealistic content.
17. YouTube — How This Content Was Made Disclosures
Used in this article for: Viewer-facing disclosure types including Made with AI.
18. YouTube — Impersonation Policy
Used in this article for: Rules against deceptive impersonation of people and channels.
19. YouTube — Protecting Your Identity
Used in this article for: Privacy complaint process for realistic altered or synthetic likenesses.
20. YouTube — Channel Monetization Policies
Used in this article for: YPP monetization policies including inauthentic and reused content.
21. YouTube — Partner Program Overview and Eligibility
Used in this article for: Eligibility and channel review for the YouTube Partner Program.
22. YouTube — Add Subtitles and Captions
Used in this article for: Adding caption tracks in YouTube Studio.
23. YouTube — Automatic Captions
Used in this article for: Automatic captioning and recommendation to review and correct errors.
24. YouTube — Edit or Remove Captions
Used in this article for: Editing caption text and timing.
25. YouTube — Caption Display Settings
Used in this article for: Viewer caption font, colour, size, opacity, background, and edge controls.
26. W3C — WCAG 2.2
Used in this article for: Current Web Content Accessibility Guidelines 2.2.
27. W3C — Captions (Prerecorded)
Used in this article for: WCAG 2.2 Success Criterion 1.2.2 for prerecorded captions.
28. W3C — Audio Description or Media Alternative (Prerecorded)
Used in this article for: Guidance for important visual information in prerecorded synchronized media.
This article provides general educational information. It is not legal advice. For important copyright, privacy, licensing, contractual, medical, financial, or other professional questions, obtain appropriate advice for the relevant situation and jurisdiction.


Leave a comment