
Estimated reading time: 110–140 minutes
Last updated: July 28, 2026
Before Learning
For the best results, read these guides first:
• AI Image Generation for Beginners: Complete Guide (2026)
• Prompt Engineering for Beginners: Complete Guide (2026)
• How to Create AI Videos with ChatGPT: Beginner Step-by-Step Guide (2026)
• Best AI Video Tools for Beginners: Complete Guide (2026)
What You’ll Learn
By the end of this guide, you will know:
• What image-to-video generation is and how it works
• How an uploaded image guides the subject, composition, lighting, colours, and visual style
• Which types of images produce the most stable results
• How to prepare, resize, crop, rename, and organize a starting image
• How to decide what should move and what should remain unchanged
• How to write a clear image-to-video motion prompt
• How to describe subject movement, background movement, camera movement, timing, and speed
• How to choose clip duration, aspect ratio, resolution, and motion strength
• How to animate photographs, AI-generated images, illustrations, products, characters, and landscapes
• How to maintain consistent faces, clothing, products, backgrounds, and colours
• How to use first-frame and last-frame controls when available
• How to generate and review the first video version
• How to identify problems and improve one instruction at a time
• How to correct distorted faces, hands, objects, backgrounds, cropping, and excessive motion
• How to combine several image-generated clips into a longer video
• How to add captions, narration, music, transitions, and final editing
• How to export, compress, name, and organize the finished video
• How to protect privacy and respect copyright and commercial-use conditions
• Which common mistakes, limitations, and myths beginners should understand
• How to publish image-generated videos responsibly on WordPress, YouTube, and social media
In current image-to-video workflows, the uploaded image normally provides the visual foundation, while the written prompt should concentrate mainly on movement, camera behaviour, timing, and what should remain stable.
High-quality starting images with clear subjects and minimal visual defects generally provide a stronger base because existing defects can become more noticeable when movement is added.
Introduction
A still image captures one moment. Image-to-video generation adds movement to that moment by animating the subject, background, environment, or camera.
For example, an image of a quiet lake could become a short video showing:
• Water moving gently
• Mist drifting above the surface
• Tree branches swaying
• Clouds moving slowly
• The camera travelling toward the mountains
The original image provides the visual foundation for the generated video. It normally guides
important details such as:
• The main subject
• Composition
• Background
• Lighting
• Colours
• Camera angle
• Visual style
The written prompt has a different job. Instead of repeating everything already visible in the image, it should mainly explain what should happen over time.
A strong image-to-video prompt may describe:
• Subject movement
• Environmental movement
• Camera movement
• Direction and speed
• Timing
• What should remain stable
Runway’s current image-to-video guidance explains that the uploaded image establishes the composition, subject matter, lighting, and style, while the text prompt should focus primarily on motion, camera work, and how the scene develops over time. [1]
For example, imagine that you upload a clear photograph of a red bicycle beside a country road.
A simple motion prompt could say:
Grass moves gently in the breeze while the camera slowly travels toward the bicycle. The bicycle, wooden fence, road, lighting, and background remain visually consistent.
The generator uses the image as the starting frame and attempts to create the requested movement across the following frames.
Image-to-video generation can be used with:
• Photographs you own or are permitted to use
• AI-generated images
• Product photographs
• Character designs
• Landscapes
• Illustrations
• Website graphics
• Educational visuals
• Storyboard frames
This method can provide more visual control than text-to-video because the starting image already establishes the subject and composition. However, it does not guarantee that every detail will remain unchanged. Faces, hands, products, clothing, backgrounds, or small objects may still distort or transform as movement is generated.
The quality of the starting image is therefore important. Runway recommends using a high-quality image without visible defects because problems such as blurry faces, malformed hands, or other visual artifacts may become more noticeable when the image is animated. [1]
Some modern platforms also allow the creator to provide:
• A first-frame image
• A last-frame image
• Both first and last frames
• Camera controls
• Motion references
• Resolution and aspect-ratio settings
Adobe Firefly currently supports image guidance through first and last keyframes in selected workflows. These frames act as visual anchors that help control how the generated video begins, ends, or transitions between two images. [6]
Available settings depend on the selected model. The most successful beginner projects usually begin with one clear image and a small amount of realistic motion. Asking a portrait subject to blink gently or adding slight movement to steam, water, curtains, leaves, or clouds is normally easier to control than requesting several dramatic actions at once.
Image-to-video generation should be treated as an improvement process:
1. Prepare a suitable image.
2. Decide what should move.
3. Decide what should remain stable.
4. Write a focused motion prompt.
5. Generate one short clip.
6. Review the entire result.
7. Correct the largest problem.
8. Generate another version when needed.
9. Edit and export the strongest clip.
The first result may not be perfect. Generative-video prompting commonly requires reviewing and refining several versions because each attempt helps reveal how the model interprets the image and instructions.
Current Information Note: Image-to-video model names, controls, supported formats, clip lengths, resolutions, credit costs, and account availability can change frequently. Always check the current official instructions for the platform and model you are using before beginning an important or commercial project. [3][6][9]
This guide will show you how to choose and prepare a starting image, write effective movement instructions, generate a short video, correct common problems, edit the finished result, and publish it responsibly.
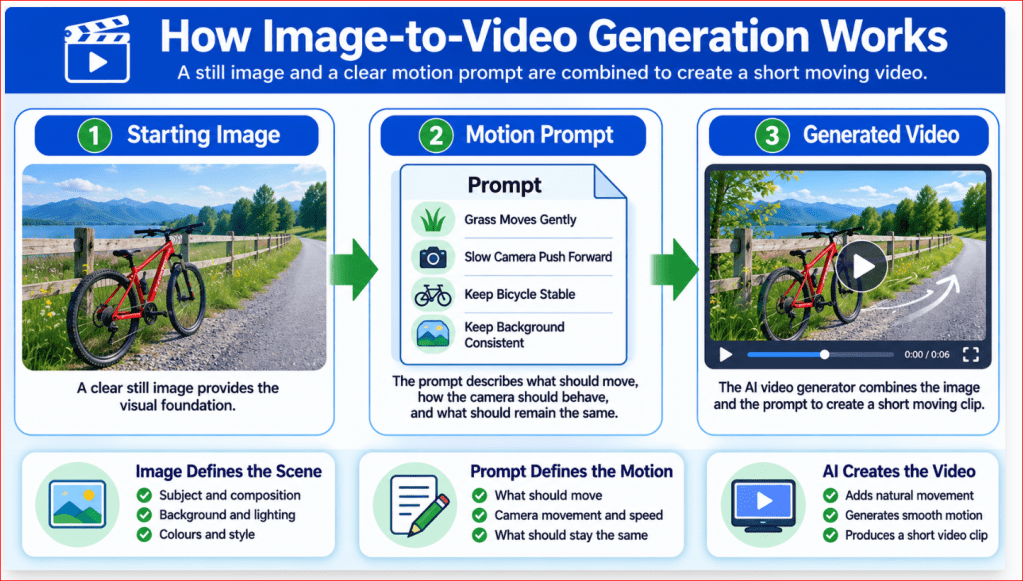
Figure 1. How a still image and motion prompt work together to create an AI-generated video.
Figure 1 shows that the uploaded image controls the scene’s visual foundation, while the motion prompt describes what should move, how the camera should behave, and what should remain consistent. The AI video generator combines both inputs to produce a short moving clip.
What Is Image-to-Video Generation?
Image-to-video generation is the process of using artificial intelligence to transform a still image into a short moving video.
The uploaded image becomes the visual starting point. The AI examines the image and attempts to maintain its:
• Main subject
• Composition
• Background
• Lighting
• Colour palette
• Camera angle
• Visual style
The written prompt then explains how the scene should change over time.
Runway describes the input image as the first frame that guides the composition, subject, lighting, and style. Its guidance recommends using the prompt mainly to describe motion rather than repeating details already visible in the image. [1]
For example, you might upload an image showing a cup of coffee beside a window and enter:
Gentle steam rises from the coffee while the curtain moves slightly in the breeze. The camera slowly moves closer to the cup. Keep the cup, table, window, lighting, and background unchanged.
The AI attempts to create the frames that connect the still starting image to the requested movement.
Image-to-Video Is Not a Traditional Slideshow
A slideshow displays several still images one after another. It may add simple transitions, zoom effects, music, or text, but the objects inside each photograph normally remain still.
Image-to-video generation is different because the AI can attempt to animate elements within one image.
For example, it may add:
• Natural blinking
• Hair moving gently
• Steam rising
• Water flowing
• Clouds drifting
• Leaves swaying
• Curtains moving
• A product rotating
• Camera movement through the scene
The generated video contains newly created frames rather than simply displaying the original photograph for several seconds.
The Starting Image Defines the Visual Scene
The starting image already tells the AI what the scene looks like.
It normally establishes:
• Who or what appears
• Where objects are positioned
• How closely the subject is framed
• Which direction the subject faces
• The time of day
• The lighting conditions
• The dominant colours
• The visual style
• The amount of space around the subject
This is why choosing the correct image is essential. A generator cannot reliably preserve details that are blurry, cropped, hidden, or already distorted.
Runway warns that visual problems in the source image—such as unclear faces or malformed hands—may become more noticeable when the image is animated. [1]
The Prompt Defines the Movement
The motion prompt explains what should happen after the first frame.
A useful prompt may describe:
• Subject action: A person turns their head slowly.
• Environmental motion: Leaves move gently in the wind.
• Camera motion: The camera slowly pushes forward.
• Direction: The person walks from left to right.
• Speed: The movement is slow and natural.
• Timing: The subject pauses before looking toward the camera.
• Stability: The face, clothing, and background remain unchanged.
You do not need to include every possible instruction. Runway recommends beginning with the most important movement and adding further detail only when refinement is needed. [1]
Image-to-Video Compared with Text-to-Video
With text-to-video, the AI must create both the scene and its movement from written instructions.
With image-to-video, the image already establishes the visual scene, so the prompt can concentrate more heavily on movement.
Text-to-Video
Use text-to-video when:
• You do not already have a starting image
• You want the AI to invent the complete scene
• You are exploring different visual ideas
• Exact composition is not essential
• You need backgrounds, B-roll, or creative concepts
Image-to-Video
Use image-to-video when:
• You already have a suitable photograph or illustration
• The subject should remain recognizable
• You want to preserve a particular composition
• A product or character must begin in a specific position
• Several clips should share a similar visual style
• You want greater control over the opening frame
Image-to-video often provides a clearer starting point, but it does not guarantee perfect consistency.
The AI may still alter faces, hands, products, clothing, backgrounds, or small details while generating movement.
First-Frame and Last-Frame Workflows
Some platforms allow only one uploaded image. That image becomes the first frame of the generated video.
Other platforms allow:
• A first-frame image
• A last-frame image
• Both a first and last frame
Adobe Firefly currently allows uploaded images to guide the beginning, ending, or both ends of a generated clip. [6]
The images act as visual anchors for the transition, although available controls may change according to the selected model.
For example:
• First frame: A closed book on a desk
• Last frame: The same book open to a page containing an illustration
• Prompt: The book opens slowly while the camera remains fixed
The AI attempts to generate the movement between the two frames.
Using first and last frames can be helpful for:
• Before-and-after transformations
• Product reveals
• Opening and closing objects
• Changes in lighting
• Scene transitions
• Seamless loops
• Moving from one planned composition to another
However, the two images should be visually compatible. A dramatic difference in camera angle, subject position, lighting, or background may produce an unstable transition.
Types of Images That Can Be Animated
Image-to-video tools can work with many kinds of images, including:
• Photographs
• AI-generated images
• Digital illustrations
• Product photographs
• Character designs
• Landscapes
• Interior scenes
• Website graphics
• Storyboard frames
• Educational artwork
The image must belong to you, be generated under terms that permit its use, or be properly licensed.
What Image-to-Video Does Not Guarantee
Uploading a clear image does not guarantee that the AI will preserve every detail.
Possible problems include:
• A face changing during the clip
• Hands becoming distorted
• A product changing shape
• Clothing changing colour
• Objects appearing or disappearing
• The background shifting
• Excessive camera movement
• Unnatural blinking or body motion
• Important areas being cropped
If the uploaded image does not match the selected aspect ratio, some tools may crop it automatically. Adobe provides crop controls in supported workflows, so the image should be inspected before generation.
The most reliable beginner approach is to use one clear image, request one or two gentle movements, and generate a short clip.
When Should You Use Image-to-Video?
Image-to-video is especially useful when the starting appearance matters more than giving the AI complete creative freedom.
Good beginner projects include:
• Adding gentle movement to a landscape
• Animating steam above a drink
• Making clouds drift across a sky
• Adding subtle motion to a website illustration
• Creating a slow camera movement around a product
• Animating an AI-generated character
• Turning a storyboard frame into a short scene
• Creating a moving background for a presentation
• Producing a simple before-and-after transition
It is less suitable when the video requires precise real-world evidence, exact product operation, verified testimony, or an authentic event. In those cases, real footage is usually more appropriate.
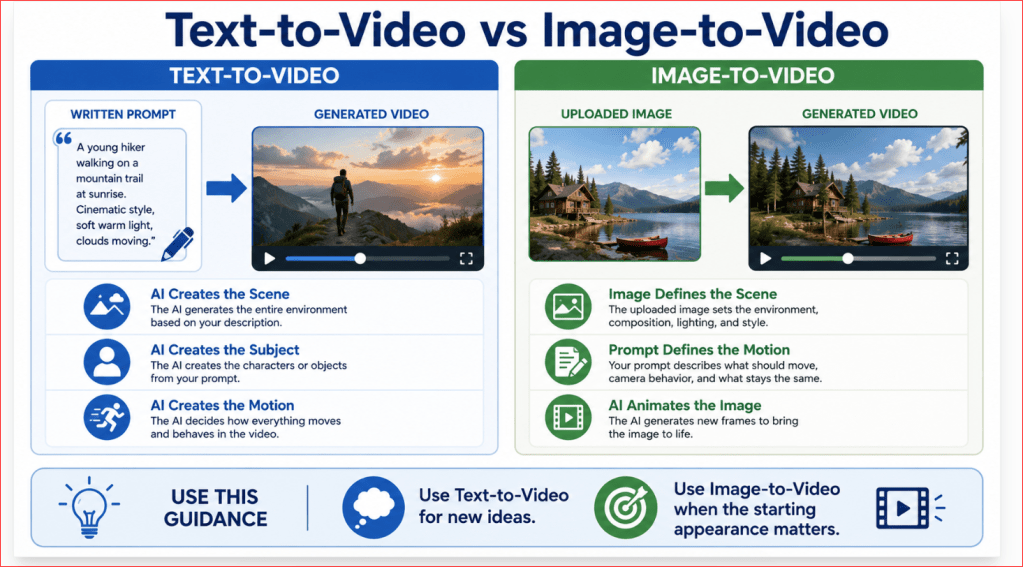
Figure 2. The main difference between text-to-video and image-to-video generation.
Figure 2 shows that text-to-video asks the AI to create both the scene and its movement, while image-to-video begins with an existing visual foundation and uses the prompt mainly to control motion, camera behaviour, and stability.
Which Images Work Best for Image-to-Video?
The quality of the starting image strongly affects the generated video. The AI uses the uploaded image as its first frame and visual foundation, so unclear or distorted details may continue—or become more noticeable—when movement is added.
A suitable starting image should be:
• Clear and sharp
• Properly exposed
• Correctly composed
• Free from visible defects
• Large enough for the intended video
• Already close to the desired final appearance
• Prepared in the correct aspect ratio
• Legally permitted for your intended use
Do not choose an image only because the idea is attractive. Examine the subject, background, hands, face, products, edges, and empty space carefully before uploading it.
Use a Clear Main Subject
The viewer should be able to identify the main subject immediately.
Good examples include:
• One person standing in a simple setting
• One product on a clean surface
• One bicycle beside a road
• One cup of coffee near a window
• One building in a landscape
• One animal in a natural environment
The subject should not be hidden behind other objects or blended into a complicated background.
A clear subject makes it easier to write movement instructions such as:
The woman turns her head slowly toward the window.
or:
The camera moves gently around the product while the product remains unchanged.
Choose a Sharp, High-Quality Image
Avoid starting with an image that is:
• Blurry
• Pixelated
• Heavily compressed
• Poorly focused
• Very dark
• Overexposed
• Covered by digital noise
• Damaged by previous editing
Runway recommends using a high-quality image without visual artifacts because blurry faces, unclear hands, and other existing problems may become more noticeable during animation.
Zoom in and inspect the image before using it. A picture may appear acceptable at normal size but reveal defects when enlarged.
Check Faces Carefully
When the image contains a person, inspect:
• Both eyes
• Eyebrows
• Nose
• Mouth
• Teeth
• Ears
• Hairline
• Skin texture
• Facial symmetry
• Direction of the person’s gaze
Avoid using a portrait when:
• One eye is distorted
• The mouth is unclear
• Teeth contain irregular shapes
• The face is partly hidden
• The image is too small
• Strong blur covers facial features
Animating a weak face may produce unnatural blinking, changing facial features, or unstable expressions.
For a first beginner project, use gentle motion such as:
• One natural blink
• Slight breathing
• A small head turn
• Subtle hair movement
• A slow camera push forward
Avoid asking for dramatic expressions or rapid head movement until you understand how the selected model handles faces.
Inspect Hands and Fingers
Hands are difficult elements for many generative systems.
Before uploading an image, check that:
• The correct number of fingers is visible
• Fingers do not merge
• The hand is not blurry
• Arms connect naturally
• The person holds objects correctly
• Hands are not hidden in confusing positions
A distorted starting hand may become more unstable during movement. Runway specifically notes that visual defects in the source image can be intensified in the resulting video.
When hands are not important, choose:
• A wider camera view
• A composition where hands are resting
• A pose with limited hand visibility
• A simple movement that does not involve handling objects
Use Simple, Natural Poses
The subject’s position should support the movement you plan to request.
For example:
• A standing person can turn or begin walking.
• A seated person can look up or move one hand.
• A parked bicycle can remain stable while the environment moves.
• A cup can remain still while steam rises.
• A tree can remain rooted while leaves move.
Avoid an image containing a pose that contradicts your requested action.
For example, an image with strong motion blur or a person frozen in the middle of running may make it difficult to request that the person remain completely still. Runway explains that source images may contain implied-motion cues—such as motion blur, directional lines, dust, or mid-action poses—that influence how the model interprets movement.
Match the Image to the Intended Motion
Before selecting the image, ask:
• What should move?
• In which direction should it move?
• Is there enough room for that movement?
• Is the subject facing the correct direction?
• Does the pose support the intended action?
• Will the requested motion remain inside the frame?
For example, when a person should walk toward the right, the image should leave sufficient empty space on the right side.
When the camera should push forward, the image should contain enough visual depth, such as:
• A road
• A hallway
• A landscape
• A row of trees
• A path
• A room with visible foreground and background
Leave Space Around the Subject
Avoid images where the main subject touches the edges.
Leave space:
• Above a person’s head
• In front of a moving subject
• Around a product
• Beside important objects
• Below feet or wheels
• Where captions may later appear
Extra space gives the generator more room for camera movement and reduces the risk of accidental cropping.
It also helps when the video must later be resized for:
• 16:9 landscape
• 9:16 vertical
• 1:1 square
• 4:5 portrait
Prepare the Correct Aspect Ratio First
Choose the destination format before preparing the starting image.
Use:
• 16:9 for YouTube, WordPress articles, websites, presentations, and landscape video
• 9:16 for YouTube Shorts, Instagram Reels, TikTok, and vertical mobile content
• 1:1 for square social posts
• 4:5 for portrait feed posts
When an uploaded image does not match the selected video ratio, some tools crop it automatically. Adobe Firefly’s mobile image-to-video workflow currently states that an image that does not match the selected ratio will be cropped to fit.
Selected Firefly workflows also provide cropping controls for keyframe images, allowing the user to reposition the crop before generating the video.
Do not rely on automatic cropping. Prepare and inspect the image in the required shape first.
Expand the Image Instead of Cutting Important Details
When the original image is too narrow or too short, cropping may remove important content.
A safer option may be to expand the background around the image before animation.
For example, you can add space:
• Above a person’s head
• Beside a product
• In front of a walking character
• Around a landscape
• Where titles or captions will appear
Some image editors provide generative expansion tools that can add background space around an image while attempting to preserve the existing composition.
After expanding the image, inspect the newly generated area for:
• Repeated objects
• Incorrect patterns
• Changing architecture
• Distorted trees
• Uneven lighting
• Unnatural shadows
• Unexpected people or text
Use a Simple Background
A simple background is generally easier to keep stable.
Suitable backgrounds include:
• A plain wall
• A clean studio
• A quiet road
• An uncluttered room
• A field
• A lake
• A simple office
• A softly blurred environment
Complicated backgrounds may contain many elements that can flicker, shift, or transform, such as:
• Crowds
• Shelves filled with products
• Detailed signs
• Repeated windows
• Complex patterns
• Heavy traffic
• Dense furniture
• Small objects
• Visible text
When a busy background is necessary, request minimal environmental motion and a stable camera.
Avoid Important Visible Text
Text inside the starting image may become distorted or change between frames.
Be cautious with:
• Product labels
• Signs
• Computer screens
• Book covers
• Posters
• Clothing text
• Packaging
• Logos
• Vehicle licence plates
When exact wording matters, generate the clip without important visible text and add the correct wording later in a video editor.
For a product video, real footage may be safer when packaging, instructions, labels, or branding must remain completely accurate.
Check Products for Accuracy
When animating a product photograph, inspect:
• Shape
• Colour
• Packaging
• Buttons
• Openings
• Materials
• Labels
• Accessories
• Proportions
• Reflections
• Shadows
The product should already appear exactly as intended before animation.
Request limited movement, such as:
The camera moves slowly from left to right around the product. Keep the product’s shape, colour, packaging, label, buttons, proportions, and materials completely unchanged.
Even with stability instructions, review every frame. Do not use the result as an exact product demonstration when important details change.
Choose Appropriate Lighting
Use an image with clear, consistent lighting.
Good lighting helps define:
• Facial features
• Product shape
• Background depth
• Clothing texture
• Object edges
• The intended mood
Avoid images with:
• Harsh mixed lighting
• Extremely dark shadows
• Blown-out highlights
• Different light colours on the same subject
• Unnatural reflections
• Light coming from conflicting directions
When the lighting is already attractive, tell the AI to preserve it:
Maintain the same soft golden lighting throughout the clip.
Avoid Excessive Depth-of-Field Blur
Background blur can create a professional appearance, but excessive blur may make object boundaries unclear.
Use a source image where:
• The main subject is sharply focused
• Important objects are recognizable
• Foreground and background boundaries are understandable
• Blur does not cover hands, hair, or product edges
The AI needs enough visual information to determine which elements belong to the subject and which belong to the environment.
Check Small and Repeated Objects
Repeated elements may create instability, including:
• Fence posts
• Windows
• Chairs
• Books
• Bottles
• Wheels
• Trees
• Lights
• Tiles
• Shelves
The AI may add, remove, merge, or reshape these elements during animation.
When repeated details are not essential, simplify the image before generating the video.
AI-Generated Images Should Be Corrected First
Do not animate an AI-generated image immediately after creating it.
First check for:
• Incorrect hands
• Distorted faces
• Unreadable text
• Duplicate objects
• Cropped subjects
• Uneven eyes
• Incorrect shadows
• Floating objects
• Broken furniture
• Inconsistent patterns
• Unnatural anatomy
Correct or regenerate the image before turning it into a video. A visual problem in the image may become more obvious once motion is added.
Use Compatible First and Last Frames
When the tool supports both first and last images, the two frames should share:
• The same subject
• Similar camera angle
• Similar composition
• Matching lighting
• Consistent colours
• The same background
• Similar object proportions
Firefly currently allows first and last keyframes to guide how a generated video begins and ends. These images function as visual anchors for the generation.
Avoid using two frames that differ dramatically unless a major transformation is intentional.
For example, a stable pair might show:
• A closed book and the same book slightly open
• A person looking forward and the same person looking left
• A dark room and the same room with a lamp turned on
• A product in its package and the same product revealed
Recommended Starting-Image Checklist
Before uploading an image, confirm:
1. The main subject is clear.
2. The image is sharp and high quality.
3. Faces and hands look correct.
4. The subject’s pose supports the intended movement.
5. The background is reasonably simple.
6. Important objects are not touching the edges.
7. There is enough room for the planned movement.
8. The aspect ratio matches the final video.
9. Important text can be added later.
10. Products and labels are accurate.
11. Lighting and shadows are consistent.
12. No private information is visible.
13. You own the image or have permission to use it.
14. The image is already close to the desired first video frame.
A strong starting image does not guarantee a perfect video, but it removes many preventable problems before generation begins.

Figure 3. The qualities of a strong starting image for image-to-video generation.
Figure 3 provides a practical checklist for selecting an image before animation. A clear subject, correct anatomy, sufficient space, simple background, suitable aspect ratio, accurate details, and consistent lighting give the AI a stronger visual foundation.
How to Prepare an Image for Image-to-Video
Preparing the starting image before uploading it can prevent cropping, distortion, privacy problems, and wasted video-generation credits.
Do not work directly on your only original image. Create a separate copy specifically for the video project.
Step 1: Keep the Original Image Safe
Create a project folder and place the untouched original image inside it.
A simple folder structure could be:
Article-019-Image-to-Video
• 01-original-images
• 02-prepared-images
• 03-prompts
• 04-generated-clips
• 05-edited-video
• 06-final-exports
• 07-licences-and-records
Keeping the original separate allows you to return to it when cropping, resizing, or editing produces an unwanted result.
Step 2: Create a Working Copy
Duplicate the original image and edit only the copy.
For example:
Original:
red-bicycle-original.jpg
Prepared working copy:
red-bicycle-image-to-video-16×9.jpg
This avoids accidentally replacing the highest-quality version.
Step 3: Choose the Final Video Format
Decide where the video will be published before cropping or resizing the image.
Use:
• 16:9 landscape for WordPress, websites, YouTube, and presentations
• 9:16 vertical for TikTok, Instagram Reels, and YouTube Shorts
• 1:1 square for square social media posts
• 4:5 portrait for portrait feed posts
For AI Mastery article demonstrations, use 16:9 landscape unless the video is being created specifically for mobile-first social media.
The image and video should preferably use the same aspect ratio. Otherwise, the generator may crop the uploaded image. Adobe Firefly currently crops images that do not match the selected video ratio, although supported workflows provide controls for repositioning the crop.
Step 4: Crop the Image Carefully
Crop the image to the required aspect ratio while protecting the main subject.
Check that the crop does not remove:
• The top of a person’s head
• Hands or feet
• Product edges
• Bicycle wheels
• Important background objects
• Space needed for movement
• Space intended for captions
• Shadows that help the subject look natural
Leave more empty space in the direction of movement.
For example:
• Leave space on the right when a person will walk right.
• Leave space above when the camera will tilt upward.
• Leave space around a product when the camera will move around it.
• Keep foreground and background depth when requesting a camera push forward.
Step 5: Expand the Background When Cropping Is Unsafe
Sometimes the original image cannot be cropped without cutting off important details.
In that case, expand the background instead of forcing a tight crop.
You might add:
• More sky above a landscape
• More road in front of a bicycle
• More wall beside a person
• Additional table space around a product
• Extra space for titles or captions
A generative expansion tool can extend an image into a selected aspect ratio while attempting to preserve the existing composition. Any generated extension must still be inspected carefully.
Check expanded areas for:
• Repeated trees or windows
• Broken fences
• Uneven patterns
• Incorrect shadows
• Unexpected objects
• Distorted architecture
• Changes in lighting
• Duplicate people or products
Step 6: Use a Suitable Image Size
The image should be large enough to remain clear after cropping.
For a 16:9 project, a practical prepared-image size is:
1600 × 900 pixels
A larger image may also be used when the platform supports it, but excessive size does not automatically produce better motion.
More important qualities include:
• Sharp focus
• Correct facial details
• Clean object edges
• Accurate products
• Consistent lighting
• No visible compression damage
Runway recommends using a high-quality source image without visual artifacts because existing defects may become more noticeable after animation.
Step 7: Choose a Compatible File Format
Common image formats include:
• JPG or JPEG
• PNG
• WebP
• HEIC on selected devices and platforms
Supported image formats vary by platform, model, device, and workflow. Check the upload requirements for the exact generator before preparing the final file.
For a simple beginner workflow:
• Use JPG for ordinary photographs.
• Use PNG when preserving fine graphics or transparency is important.
• Use WebP for efficient website storage when the selected video tool accepts it.
Do not repeatedly save and recompress a JPG because repeated compression may reduce image quality.
Step 8: Correct Visible Defects
Zoom in and inspect the entire image.
Correct or regenerate the image when you find:
• Distorted hands
• Uneven eyes
• Incorrect teeth
• Broken glasses
• Duplicate fingers
• Misshapen products
• Floating objects
• Crooked furniture
• Unnatural shadows
• Random symbols
• Blurry edges
• Repeated background objects
Do not expect the video generator to repair these defects automatically. Animation may make them more noticeable.
Step 9: Remove Unnecessary Visible Text
Important wording should normally be added during video editing rather than embedded in the generated scene.
Remove or avoid:
• Random text
• Incorrect product labels
• Website addresses
• Telephone numbers
• Licence plates
• Computer-screen information
• Personal names
• Posters containing unreadable words
Keep genuine product labels only when they are essential and already completely accurate. Even then, inspect every generated frame because text may change during animation.
Step 10: Remove Personal and Confidential Information
Before uploading the image, check the foreground and background for:
• Names
• Addresses
• Identification cards
• Account numbers
• Email addresses
• Telephone numbers
• Medical information
• Financial information
• Private computer screens
• Customer records
• Children’s identifying information
• Confidential business documents
Crop, blur, cover, or remove anything that the video generator does not need.
A visually small detail in the image may become more noticeable when the camera moves toward it.
Step 11: Improve Lighting Carefully
Make small corrections when the image is:
• Too dark
• Too bright
• Flat or low contrast
• Strongly tinted
• Difficult to understand
Avoid aggressive editing that creates:
• Artificial skin
• Bright halos
• Crushed shadows
• Pure-white highlights
• Oversaturated colours
• Uneven lighting
• Excessive sharpening
The prepared image should look natural and already resemble the desired first frame.
Step 12: Keep Important Colours Consistent
When a character, product, or brand colour matters, record it before generating the video.
For example:
• Red bicycle
• Dark-blue jacket
• White coffee cup
• Light-grey wall
• Green product packaging
The motion prompt can repeat these essential details:
Keep the bicycle’s red colour, black seat, silver wheels, and original proportions unchanged.
This does not guarantee perfect accuracy, but it clearly tells the model which details matter.
Step 13: Rename the Image Clearly
Use a descriptive filename before uploading.
Good example:
red-bicycle-country-road-image-to-video-16×9.jpg
Avoid filenames such as:
• IMG0045.jpg
• newfinal2.jpg
• picture-copy.jpg
• test-last-final.jpg
A useful filename may include:
• Main subject
• Setting
• Intended use
• Aspect ratio
• Version number
For example:
coffee-window-steam-animation-16×9-v01.png
Step 14: Save a Preparation Record
Record the following information:
• Original filename
• Prepared filename
• Image source
• Creator or licence
• Date prepared
• Aspect ratio
• Pixel dimensions
• Editing completed
• Intended movement
• Intended platform
• Whether personal information was removed
This record becomes useful when creating several scenes or returning to the project later.
Step 15: Preview the Image at Full Size
Before uploading, view the image at 100% magnification.
Inspect:
• Face
• Hands
• Hair
• Clothing
• Product
• Text
• Background
• Corners
• Shadows
• Repeated objects
• Expanded areas
Then view it at normal size to confirm that the full composition remains balanced.
Step 16: Make a Final Upload Copy
Save one clean file for uploading to the video generator.
Do not add:
• Figure captions
• Article text
• Decorative borders
• Watermarks
• Instructions
• Arrows
• WordPress metadata
The video generator needs the clean visual scene—not the completed article figure.
Prepared-Image Checklist
Before uploading, confirm:
1. The original image is safely stored.
2. You are using a separate working copy.
3. The aspect ratio matches the intended video.
4. The subject is not cropped.
5. There is enough room for movement.
6. The image is sharp and properly exposed.
7. Faces, hands, and products are correct.
8. The background is stable and understandable.
9. Important visible text has been removed or verified.
10. No personal information is visible.
11. You own the image or have permission to use it.
12. The filename is clear and descriptive.
13. The prepared image is already close to the desired first frame.
14. A full-size final inspection has been completed.
Preparing the image properly does not eliminate every generation problem, but it gives the AI a cleaner visual foundation and reduces avoidable corrections later.
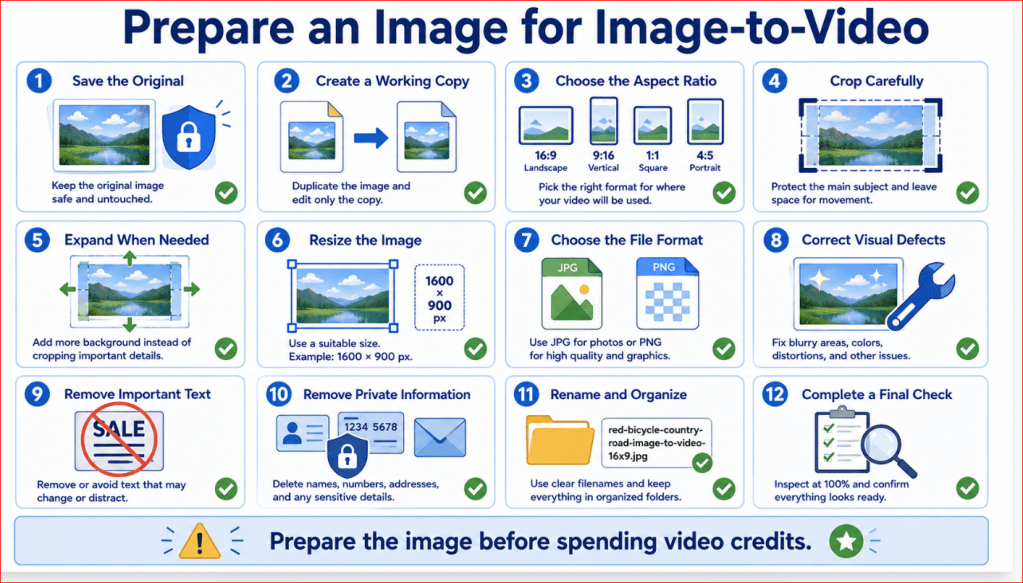
Figure 4. The step-by-step process for preparing an image before creating an AI video.
Figure 4 shows how to protect the original image, choose the correct format, crop or expand the composition, correct visible defects, remove private information, rename the file, and complete a final quality check before uploading it to an AI video generator.
Decide What Should Move and What Should Remain Still
Before writing the motion prompt, separate the scene into two groups:
• Elements that should move
• Elements that should remain stable
This decision is one of the most important parts of image-to-video prompting. The image already defines the appearance of the scene, while the prompt should describe the intended motion, camera behaviour, and progression over time.
A beginner should avoid asking everything in the image to move. Controlled motion usually makes it easier to protect the subject, composition, and background.
Identify the Main Subject
Begin by identifying the most important person, animal, product, vehicle, or object in the image.
Ask:
• Is the subject supposed to move?
• Should it remain completely still?
• Which part of the subject should move?
• How far should it move?
• How quickly should it move?
• Does the image provide enough space for the movement?
For example, in an image of a woman sitting beside a window, possible subject movements include:
• Blinking once
• Breathing naturally
• Turning her head slightly
• Looking toward the window
• Moving one hand slowly
• Allowing her hair to move gently
Do not request several major body movements in the first test.
Choose One Main Subject Movement
One clear action is normally easier to control than several simultaneous actions.
Weak instruction:
The woman stands, walks across the room, waves, turns around, opens the window, and looks outside.
Improved instruction:
The woman slowly turns her head toward the window and blinks naturally once.
The improved version gives the AI one main action and a clear direction.
When additional movement is required, create a separate short clip for the next action.
Use Subtle Motion for Portraits
Portraits can become unstable when the face, head, hands, hair, and camera all move at the same time.
Suitable beginner movements include:
• Gentle blinking
• Subtle breathing
• A slight smile
• A small head turn
• Soft hair movement
• A slow camera push forward
Example:
The man remains seated and breathes naturally. He slowly turns his eyes toward the camera and blinks once. His face, hairstyle, clothing, body position, and background remain consistent.
The word consistent communicates the desired result, but every frame must still be reviewed.
Use Natural Motion for Landscapes
Landscape images often work well with gentle environmental movement.
Possible movements include:
• Leaves swaying
• Grass moving
• Water rippling
• Clouds drifting
• Mist travelling slowly
• Snow falling
• Sunlight changing slightly
• A camera moving forward along a path
Example:
Leaves and grass move gently in a light breeze while clouds drift slowly across the sky. Small ripples move across the lake. The camera remains fixed.
Runway’s current guidance recommends directly describing the motion and camera behaviour desired in the final clip. [1]
Keep Buildings and Solid Objects Stable
Solid objects should normally remain unchanged unless their movement is essential to the scene.
Examples include:
• Buildings
• Walls
• Furniture
• Roads
• Fences
• Tables
• Mountains
• Parked vehicles
• Product packaging
• Signs
Example stability instruction:
Keep the building, windows, doors, pavement, streetlights, and camera framing fixed and visually consistent.
This helps communicate that environmental effects such as rain, leaves, or clouds may move while the permanent structures should not.
Protect Product Details
For product images, the product itself often needs to remain stable while the camera or surrounding environment moves.
Possible controlled movements include:
• A slow camera orbit
• A gentle camera push forward
• A slight turntable rotation
• Soft reflections moving across the surface
• Background light changing slightly
• Steam or particles moving around the product
Example:
The camera slowly moves from left to right around the headphones. Keep the headphones’ shape, dark-blue colour, ear cushions, headband, buttons, materials, proportions, and position unchanged.
Do not request dramatic product movement when exact accuracy is important. Generated footage may still alter small commercial details, so every frame must be checked before business use.
Separate Subject Motion from Camera Motion
Subject movement and camera movement are different instructions.
Subject motion describes what happens inside the scene:
• A person walks
• A bird flies
• Water flows
• Curtains move
• A product rotates
Camera motion describes how the viewer’s viewpoint changes:
• The camera moves forward
• The camera pans left
• The camera tilts upward
• The camera zooms out
• The camera remains still
Some current Firefly workflows provide camera controls or motion presets, while the prompt can also describe the desired movement. Available controls depend on the selected workflow and model.
For a first test, choose either:
• One subject movement with a fixed camera, or
• One camera movement while the subject remains mostly still
Combining several types of movement increases the chance of instability.
Decide Whether the Camera Should Move
A fixed camera is useful when:
• The subject already fills the frame
• Product accuracy matters
• Background stability is important
• The scene contains several small details
• You want subtle environmental movement
• You are testing the image for the first time
Prompt example:
The camera remains fixed. Steam rises slowly from the coffee while the curtain moves gently.
A moving camera is useful when:
• The image contains visual depth
• You want a more cinematic result
• The movement will reveal part of the environment
• The subject has enough space around it
• The scene can tolerate slight changes in framing
Prompt example:
The camera slowly pushes forward along the country road toward the bicycle. Keep the bicycle and fence visually consistent.
Use Only One Camera Movement at First
Beginner-friendly camera movements include:
• Slow push forward
• Slow pull backward
• Gentle pan left
• Gentle pan right
• Slow tilt upward
• Slow tilt downward
• Subtle zoom in
• Static camera
Avoid combining instructions such as:
Pan right, zoom in, rotate around the subject, tilt upward, and shake slightly.
A simpler prompt is easier to evaluate:
The camera slowly pans from left to right while maintaining stable framing.
Adobe currently offers controls for shot size, camera angle, and motion in supported Firefly Video workflows. It also supports motion references in selected workflows, but the exact options vary by model.
Decide What the Background Should Do
The background can be:
• Completely fixed
• Gently animated
• Moving because of the camera
• Changing intentionally
For most beginner projects, choose either a fixed background or one small environmental movement.
Fixed-background example:
Keep the wall, window, table, chair, lighting, and background completely stable.
Animated-background example:
The trees remain in place while their leaves move gently in the breeze.
Do not say only:
Animate the background.
That instruction is too broad and may cause buildings, furniture, trees, or other objects to shift unexpectedly.
Separate Permanent Elements from Flexible Elements
A useful planning method is to classify every visible element.
Permanent elements should remain stable:
• Face
• Clothing
• Product
• Furniture
• Building
• Road
• Fence
• Main composition
Flexible elements may move:
• Hair
• Steam
• Curtains
• Grass
• Leaves
• Clouds
• Water
• Light particles
This approach makes the prompt more precise.
Example:
Gentle steam rises from the cup, and the curtain moves slightly in the breeze. Keep the cup, table, window frame, wall, lighting, and composition unchanged. The camera remains fixed.
Describe Direction Clearly
Movement should have a clear direction when direction matters.
Use phrases such as:
• From left to right
• From right to left
• Toward the camera
• Away from the camera
• Upward
• Downward
• Clockwise
• Counterclockwise
• Forward along the road
• Around the product from left to right
Weak instruction:
The bird flies.
Improved instruction:
The bird flies slowly from left to right across the upper part of the frame.
Clear direction reduces ambiguity.
Describe Speed and Intensity
Useful speed words include:
• Very slowly
• Slowly
• Gently
• Gradually
• At a natural walking pace
• Smoothly
• Rapidly
• Suddenly
For a beginner project, words such as slowly, gently, and smoothly are usually easier to control.
Example:
The camera moves forward very slowly with smooth, stable motion.
Runway recommends clear, direct language and suggests beginning with the core motion before adding further details. [2]
Consider the Order of Events
When the clip includes more than one small action, state the order.
Example:
The woman blinks once, pauses briefly, and then turns her head slowly toward the window.
Another example:
The lamp turns on gradually. After the room becomes brighter, the camera slowly moves closer to the desk.
Do not attempt to place too many timed events into one short clip. Separate complicated sequences into multiple scenes.
Use Timing Words Carefully
Useful timing phrases include:
• At the beginning
• After a brief pause
• Halfway through the clip
• Near the end
• Gradually
• Throughout the video
• For the entire clip
Example:
At the beginning, the camera remains still. After a brief pause, it slowly pushes forward toward the bicycle.
Prompt adherence may vary, so always verify whether the event occurred at the intended time.
State What Must Remain Consistent
After describing movement, identify the important elements that should not change.
For a person:
Keep the face, age, hairstyle, clothing, body proportions, and background consistent.
For a product:
Keep the product’s shape, colour, label, materials, buttons, size, and proportions unchanged.
For a landscape:
Keep the mountains, road, buildings, horizon, lighting, and composition stable.
For an interior:
Keep the walls, furniture, windows, decorations, and room layout fixed.
Stability instructions are especially useful when only a small part of the image should move.
Avoid Long Lists of Negative Instructions
Some video models respond better to positive descriptions of the intended result than to long lists of unwanted outcomes.
Instead of:
No shaking, no distortion, no changing objects, no flickering, no extra people, no moving background.
Use:
Smooth stable camera motion. The bicycle, fence, road, and background remain visually consistent throughout the clip.
Model behaviour differs, so follow the prompt guidance for the exact generator being used. Runway’s prompting documentation emphasizes clear descriptions of what should appear and how it should move.
Create a Movement Plan Before Writing the Prompt
Use this simple planning template:
Main subject:
Red bicycle
Subject movement:
None
Environmental movement:
Grass moves gently
Camera movement:
Slow push forward
Movement speed:
Very slow and smooth
Elements that must remain stable:
Bicycle, fence, road, trees, lighting, and background
Clip duration:
Six seconds
Aspect ratio:
16:9
This plan can then be converted into a complete motion prompt:
Grass moves gently in a light breeze while the camera slowly pushes forward toward the red bicycle. Use smooth, stable motion. Keep the bicycle, wooden fence, country road, trees, lighting, colours, and background visually consistent throughout the six-second 16:9 clip.
Movement Planning Checklist
Before generating, confirm:
1. The main subject has been identified.
2. One primary movement has been selected.
3. The direction is clear.
4. The speed is described.
5. The camera movement is simple.
6. The background movement is controlled.
7. Important permanent objects are listed.
8. The intended movement fits inside the frame.
9. The subject’s pose supports the action.
10. The clip is not overloaded with events.
11. The prompt explains what should remain consistent.
12. The movement is suitable for the selected image.
A clear movement plan reduces guesswork and makes it easier to identify why a generated clip succeeds or fails.
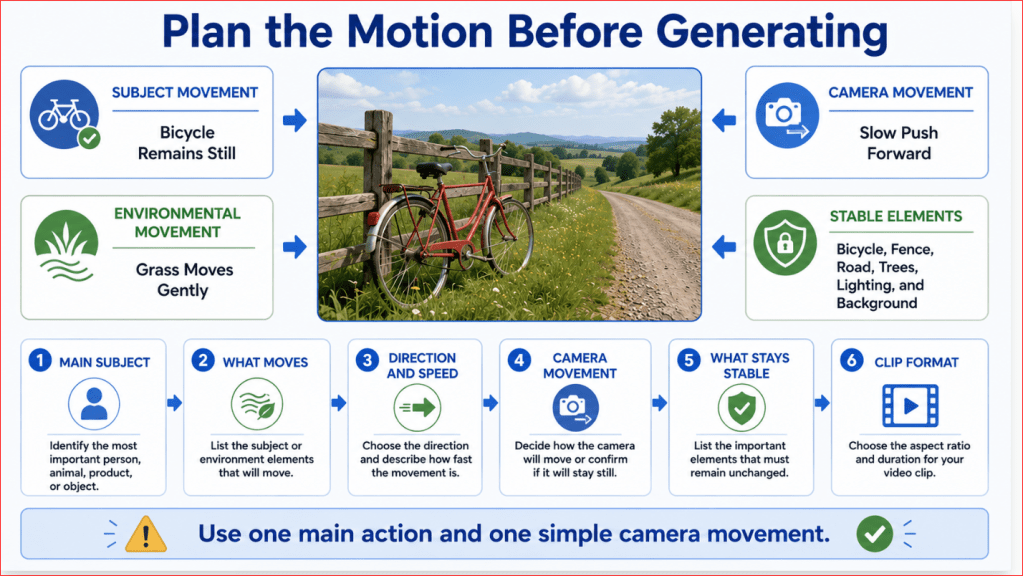
Figure 5. How to decide what should move and what should remain stable in an image-to-video prompt.
Figure 5 separates the scene into subject movement, environmental movement, camera movement, and stable elements. Planning these parts before generation helps beginners create simpler prompts and reduces unexpected changes in faces, products, objects, and backgrounds.
How to Write an Effective Image-to-Video Prompt
An image-to-video prompt should explain how the existing image should move.
The uploaded image already establishes the subject, composition, background, lighting, colours, and visual style. Therefore, the prompt should concentrate mainly on:
• Subject movement
• Environmental movement
• Camera movement
• Direction and speed
• Timing
• Elements that must remain consistent
Runway’s current guidance recommends focusing image-to-video prompts primarily on motion and beginning with the most important movement before adding more detail.
Use a Simple Prompt Formula
A practical beginner formula is:
Camera movement + subject action + environmental movement + speed and timing + stability instructions
Example:
The camera slowly pushes forward toward the red bicycle while the grass moves gently in a light breeze. Use smooth, natural motion. Keep the bicycle, fence, road, trees, lighting, colours, and background visually consistent throughout the clip.
You do not need to include every part in every prompt. A fixed-camera scene may not need a camera movement, while a product video may not need environmental movement.
Begin with the Most Important Motion
Start by describing the main action you want to see.
Examples:
• The woman slowly turns her head toward the window.
• Steam rises gently from the coffee.
• The bird flies from left to right.
• Small waves move across the lake.
• The product rotates slowly clockwise.
• The curtain moves slightly in the breeze.
Avoid beginning with unnecessary descriptions of objects already visible in the image.
Weak prompt:
A beautiful red bicycle with black tyres, a silver frame, a black seat, and handlebars beside a wooden fence on a country road.
This mainly repeats the image.
Improved prompt:
Grass moves gently while the camera slowly travels forward toward the bicycle.
The improved prompt tells the generator what should happen over time.
Describe the Subject Action Clearly
State exactly what the person, animal, vehicle, or object should do.
Use direct verbs such as:
• Turns
• Walks
• Looks
• Blinks
• Rotates
• Opens
• Closes
• Rises
• Falls
• Flows
• Drifts
• Sways
Weak instruction:
Add natural movement.
Improved instruction:
The woman blinks once and slowly turns her eyes toward the camera.
Clear verbs reduce uncertainty.
Keep the First Action Simple
One short clip should normally contain one main action.
Avoid:
The man stands up, walks across the room, opens the door, waves, turns around, and sits down.
Use:
The man slowly stands while the camera remains fixed.
Create another clip for the next action.
This scene-by-scene method makes it easier to maintain consistency and replace weak results.
Describe Environmental Movement Separately
Environmental movement includes motion that occurs around the main subject.
Examples include:
• Leaves moving
• Grass swaying
• Clouds drifting
• Water rippling
• Rain falling
• Snow moving
• Steam rising
• Curtains moving
• Light reflections changing
Example:
Steam rises slowly from the coffee while the curtain moves gently in the breeze.
Do not use a broad instruction such as:
Make the background move.
That may cause walls, furniture, trees, signs, or buildings to shift unexpectedly.
Choose a Camera Behaviour
Camera instructions describe how the viewer’s viewpoint changes.
Beginner-friendly choices include:
• Fixed or locked camera
• Slow push forward
• Slow pull backward
• Gentle pan left
• Gentle pan right
• Slow tilt upward
• Slow tilt downward
• Subtle zoom in
• Slow orbit around a product
Example:
The camera slowly pushes forward along the road toward the bicycle.
Adobe’s current video-generation guidance allows creators to control shot size, angle, movement, and first or last reference frames in supported workflows. Available controls depend on the selected model.
Use One Camera Movement at a Time
Weak instruction:
The camera pans right, zooms in, rotates around the bicycle, tilts upward, and then pulls backward.
Improved instruction:
The camera slowly pans from left to right while maintaining stable framing.
Several simultaneous camera instructions can make the movement confusing or unstable.
Describe Direction
When direction matters, state it clearly.
Examples:
• From left to right
• From right to left
• Toward the camera
• Away from the camera
• Forward along the road
• Upward toward the sky
• Clockwise
• Counterclockwise
• Around the product from left to right
Example:
The bird flies slowly from left to right across the upper part of the frame.
Without a direction, the model may choose one that does not suit the composition.
Describe Speed and Motion Style
Useful motion words include:
• Slowly
• Very slowly
• Gently
• Smoothly
• Gradually
• Naturally
• Calmly
• At a normal walking pace
• Quickly
• Suddenly
For a first test, use controlled words such as slowly, gently, and smoothly.
Example:
The camera moves forward very slowly with smooth, stable motion.
Runway recommends clear, direct language and notes that motion style, timing, direction, and speed can all be included when they are important to the result.
Explain the Order of Events
When the clip contains two small actions, describe their sequence.
Example:
The woman blinks once, pauses briefly, and then turns her head slowly toward the window.
Another example:
The lamp turns on gradually. After the room becomes brighter, the camera slowly moves closer to the desk.
Do not place a long sequence inside a five- or six-second clip. Generate separate scenes when the story contains several actions.
Use Timing Words
Useful timing instructions include:
• At the beginning
• After a brief pause
• Halfway through the clip
• Near the end
• Gradually
• Throughout the clip
• Continuously
Example:
At the beginning, the camera remains still. After a brief pause, it slowly pushes forward toward the bicycle.
The generator may not follow timing perfectly, so review the complete clip.
State What Must Remain Stable
After describing the movement, identify the details that must not change.
For a portrait:
Keep the face, age, hairstyle, clothing, body proportions, chair, lighting, and background consistent.
For a product:
Keep the product’s shape, colour, packaging, buttons, label, materials, and proportions unchanged.
For a landscape:
Keep the mountains, road, buildings, horizon, lighting, and composition stable.
For an interior:
Keep the walls, furniture, windows, decorations, and room layout fixed.
Stability instructions are particularly important when only one small part of the image should move.
Use Positive Stability Language
Long lists of negative instructions can make a prompt difficult to understand.
Instead of:
No shaking, no flickering, no distortion, no changing bicycle, no changing fence, no moving background, and no extra objects.
Use:
Use smooth, stable camera motion. Keep the bicycle, fence, road, trees, lighting, and background visually consistent.
Runway’s prompting guidance generally favours clear descriptions of the intended movement and result rather than relying entirely on negative wording. [2]
Request a Fixed Camera Clearly
When the camera should not move, state it directly:
The camera remains completely fixed while steam rises slowly from the coffee.
You may also use terms such as:
• Static camera
• Locked camera
• Locked-off shot
• Stable tripod shot
Video models are designed to create movement, so a still camera instruction works best when some visible subject or environmental motion is also described. Runway recommends specifying the movement that should occur within the frame when minimizing camera motion. [1]
Ask for a Continuous Shot When Needed
Unexpected scene changes may occur when the model interprets the prompt as requiring several shots.
For one uninterrupted scene, add:
Use one continuous, seamless shot.
This can be useful for:
• Slow product rotations
• Landscape camera movements
• Portrait animation
• Website background clips
• Simple loops
Runway recommends checking the prompt for language that may imply a cut and using continuous-shot wording when unwanted transitions appear. [1]
Match the Prompt to the Image
Do not request movement that contradicts the source image.
For example, an image showing:
• Strong motion blur
• Dust behind a vehicle
• A running pose
• Flowing clothing
• Directional speed lines
already suggests movement.
Asking the same subject to remain completely motionless may require several attempts because the visual cues conflict with the prompt. Runway advises correcting or removing contradictory motion cues from the starting image when they prevent the intended result. [1]
Do Not Repeat Every Visual Detail
For image-to-video, you generally do not need to describe:
• The complete background
• Every colour
• Every piece of clothing
• Every object
• The full artistic style
Repeat only details that are essential to preserve.
Example:
Keep the woman’s blue jacket, short dark hair, facial appearance, and seated position consistent.
This reinforces important details without rewriting the entire image.
Prompt Example: Landscape
Clouds drift slowly across the sky while grass and tree leaves move gently in a light breeze. Small ripples travel across the lake. The camera remains fixed. Keep the mountains, shoreline, trees, lighting, colours, and composition stable throughout the clip.
Prompt Example: Portrait
The woman breathes naturally, blinks once, and turns her eyes slightly toward the window. Her hair moves gently. The camera slowly pushes forward. Keep her face, age, hairstyle, clothing, body position, lighting, and background consistent.
Prompt Example: Product
The camera moves slowly from left to right around the headphones. Soft reflections travel across the surface. Keep the headphones’ dark-blue colour, shape, ear cushions, headband, buttons, materials, proportions, and position unchanged. Use one continuous, smooth shot.
Prompt Example: Coffee Scene
Steam rises gently from the coffee while the curtain moves slightly in the breeze. The camera remains completely fixed. Keep the cup, table, window, wall, lighting, colours, and background unchanged.
Prompt Example: Red Bicycle
Grass moves gently in a light breeze while the camera slowly pushes forward toward the red bicycle. Use smooth, natural movement and one continuous shot. Keep the bicycle, wooden fence, country road, trees, lighting, colours, and background visually consistent throughout the six-second 16:9 clip.
Use ChatGPT to Improve a Motion Prompt
You can give ChatGPT the following request:
Improve this image-to-video motion prompt for a complete beginner. Keep one main action, one simple camera movement, gentle natural motion, clear stability instructions, and a six-second 16:9 format. Do not redesign the scene or add new objects.
My draft prompt: [paste your prompt here]
Review the improved prompt before using it. Make sure it still matches the actual image and your intended movement.
Image-to-Video Prompt Checklist
Before generating, confirm:
1. The prompt focuses mainly on motion.
2. One primary subject action is clearly described.
3. Environmental movement is limited and specific.
4. Only one camera movement is used.
5. Direction is stated when necessary.
6. Speed and motion style are described.
7. The sequence of events is understandable.
8. Important subjects and objects are identified.
9. Stability instructions protect essential details.
10. The prompt does not contradict the image.
11. The clip is not overloaded with actions.
12. The requested movement fits within the frame.
13. The aspect ratio and duration are appropriate.
14. The prompt uses clear, direct language.
A strong image-to-video prompt does not need to be extremely long. It needs to describe the intended movement clearly and protect the details that matter.
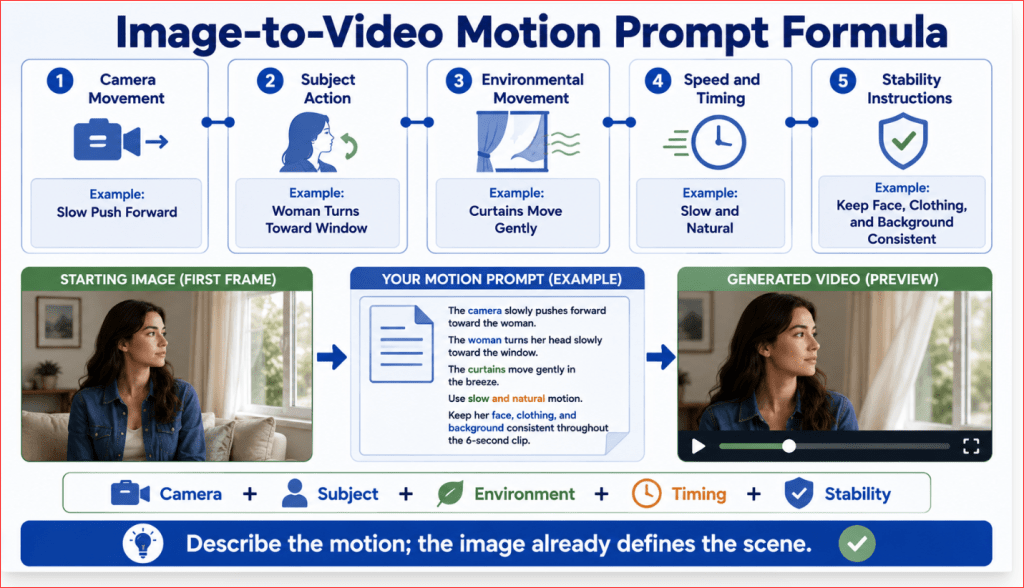
Figure 6. A beginner formula for writing a clear image-to-video motion prompt.
Figure 6 divides an image-to-video prompt into five practical parts: camera movement, subject action, environmental movement, speed and timing, and stability instructions. Beginners can use this formula to describe motion without unnecessarily repeating everything already visible in the image.
Step-by-Step: How to Create an AI Video from an Image
The exact buttons and settings differ between platforms, but the basic workflow is similar:
1. Choose one simple video goal.
2. Prepare the starting image.
3. Plan the movement.
4. Select an image-to-video model.
5. Upload the image.
6. Check the crop and aspect ratio.
7. Choose the video settings.
8. Add an optional final frame.
9. Enter the motion prompt.
10. Review the settings and credit cost.
11. Generate one version.
12. Watch the entire clip.
13. Identify the main problem.
14. Revise one instruction.
15. Generate an improved version.
16. Download, rename, and organize the result.
Step 1: Choose One Simple Video Goal
Decide what you want the finished clip to show.
Good beginner goals include:
• Steam rising from a cup of coffee
• Leaves moving in a landscape
• A portrait subject blinking naturally
• A slow camera movement toward a bicycle
• A product remaining still while the camera moves around it
• Curtains moving gently beside a window
Avoid beginning with a complicated story involving several people, locations, camera movements, or actions.
A useful goal can be written in one sentence:
Create a six-second landscape video in which grass moves gently while the camera slowly approaches a red bicycle.
Step 2: Prepare the Starting Image
Use the preparation process explained earlier in this guide.
Confirm that the image:
• Is clear and sharp
• Contains one obvious main subject
• Has correct faces and hands
• Uses the required aspect ratio
• Leaves enough space for movement
• Contains no unnecessary private information
• Has no important distorted text
• Is owned by you or properly licensed
• Already resembles the desired opening frame
Save the prepared image in your project folder before opening the video generator.
Example filename:
red-bicycle-country-road-image-to-video-16×9.jpg
Step 3: Create a Movement Plan
Before writing the complete prompt, record:
Main subject:
Red bicycle
Subject movement:
The bicycle remains still
Environmental movement:
Grass moves gently
Camera movement:
Slow push forward
Speed:
Very slow and smooth
Stable elements:
Bicycle, fence, road, trees, lighting, colours, and background
Duration:
Six seconds
Aspect ratio:
16:9 landscape
This short plan prevents you from adding unnecessary actions while writing the prompt.
Step 4: Select an Image-to-Video Tool and Model
Open the AI video platform you selected after completing Article 017.
Choose a model or workflow that specifically supports image-to-video or a first-frame image.
The exact wording may include:
• Image-to-Video
• Generate Video from Image
• First Frame
• Keyframe Image
• Animate Image
• Image Input
Runway’s current Gen-4.5 workflow supports image-to-video by allowing the user to upload an image and enter a motion-focused prompt. Adobe Firefly’s Generate Video workflow currently accepts first and optional last keyframe images. [3][6]
Do not accidentally select:
• Text-to-video
• Video-to-video
• Image generation
• A still-image editor
• A slideshow template
Check the selected model before continuing because different models may support different durations, aspect ratios, settings, and credit costs.
Step 5: Start a New Project or Session
Create a new project, generation, or session.
Use a clear project name such as:
Article 019 – Red Bicycle Image-to-Video Test
Keeping each experiment in a separate project makes it easier to compare versions and locate the final result later.
Some platforms automatically save completed generations in a project or generation history. Important files should still be downloaded and stored locally.
Do not rely only on online history. Important files should also be downloaded and stored on your computer.
Step 6: Upload the Starting Image
Drag the prepared image into the upload area or select it from your computer.
After uploading, confirm that:
• The correct image appears
• It is not blurry
• The subject remains fully visible
• The platform has not rotated it
• The correct file was selected
• No older test image was uploaded accidentally
In Runway’s current workflow, the uploaded image becomes the first frame and provides the composition, subject, lighting, and visual style. In Firefly, the uploaded image can be assigned as the first keyframe.
Step 7: Inspect the Crop
Check how the platform fits the image into the video frame.
Look for accidental removal of:
• A person’s head
• Hands or feet
• Product edges
• Bicycle wheels
• Background space
• Shadows
• Areas needed for movement
When the uploaded image does not match the selected aspect ratio, the platform may crop it.
Firefly currently provides a crop control for uploaded keyframe images so users can reposition the image within the selected format. Runway Gen-4.5 normally accommodates the input image’s aspect ratio but allows the user to select another ratio, which can crop the source.
Return to your image editor and prepare a better version when the available crop controls cannot protect the composition.
Step 8: Choose the Aspect Ratio
Select the format based on where the video will be used.
• 16:9: WordPress, websites, YouTube, and presentations
• 9:16: Reels, Shorts, TikTok, and vertical mobile content
• 1:1: Square social media posts
• 4:5: Portrait feed posts
For an AI Mastery article demonstration, use 16:9 landscape unless the video is intended specifically for vertical social media.
Do not generate the video in one format with the intention of making a major crop later. Converting a landscape video into a vertical clip may remove the subject or important background details.
Step 9: Choose a Short Duration
Begin with a short clip containing one simple movement.
A practical first test is approximately:
• Five seconds
• Six seconds
• Eight seconds
Current Runway Gen-4.5 generations can be set from two to ten seconds. Firefly’s available duration and settings depend on the selected Adobe or partner model. [3]
Longer clips provide more time for actions, but they can also give faces, objects, products, and backgrounds more opportunity to change.
Use several short clips when creating a longer video.
Step 10: Choose the Resolution
Select a practical test resolution before generating.
A lower or standard resolution may be sufficient while checking:
• Prompt accuracy
• Movement
• Camera behaviour
• Cropping
• Subject stability
• Background consistency
Use a higher-quality final generation only after the movement and composition are satisfactory.
Firefly currently allows users to select a resolution, with different resolutions consuming different amounts of generative credits. Runway Gen-4.5 currently outputs at 720p. [3][6][9]
Higher resolution improves sharpness, but it does not correct poor movement, distorted faces, changing objects, or an unsuitable prompt.
Step 11: Select the Camera Setting When Available
Some tools provide menu-based camera controls in addition to the written prompt.
Available options may include:
• Static camera
• Zoom in
• Zoom out
• Move left
• Move right
• Tilt up
• Tilt down
• Handheld motion
Firefly currently provides these motion choices when only a first keyframe is uploaded. When both first and last frames are supplied, its separate camera-motion options are disabled because the two keyframes guide the transition. [6]
Choose only one simple movement for the first test.
For the bicycle example:
Camera setting: Slow zoom or move forward
Avoid choosing a camera preset that contradicts the written prompt.
Step 12: Add a Last Frame Only When Needed
A last frame is optional.
Use one when you need the video to end in a planned composition, such as:
• A closed book becoming open
• A dark lamp becoming illuminated
• A person looking forward and then turning sideways
• A packaged product becoming revealed
• A camera beginning far away and ending closer
The first and last frames should contain compatible:
• Subjects
• Camera angles
• Lighting
• Backgrounds
• Colours
• Object positions
Firefly currently allows both first and last keyframes to act as fixed visual anchors. A prompt is optional when both are supplied, although Adobe recommends describing the content or transition to help the model create smoother movement. [6]
For a first beginner project, use only one starting image unless the final frame is necessary.
Step 13: Enter the Motion Prompt
Paste the prompt into the prompt field.
For the bicycle example:
Grass moves gently in a light breeze while the camera slowly pushes forward toward the red bicycle. Use smooth, natural movement and one continuous shot. Keep the bicycle, wooden fence, country road, trees, lighting, colours, and background visually consistent throughout the six-second 16:9 clip.
Review the prompt before generating.
Confirm that it contains:
• One main movement
• One camera movement
• Clear direction
• Clear speed
• Stability instructions
• No conflicting actions
• No unnecessary scene redesign
Current Runway guidance recommends that image-to-video prompts focus primarily on motion because the image already supplies the composition and appearance. It also recommends beginning with the most important motion and adding more detail only when refinement is needed.
Step 14: Review the Settings and Credit Cost
Before pressing Generate, verify:
• Correct image
• Correct model
• Correct aspect ratio
• Correct duration
• Correct resolution
• Correct camera setting
• Correct first and last frames
• Correct prompt
• Expected credit use
Do not generate several versions automatically.
One controlled version is easier to evaluate and prevents unnecessary credit consumption.
Take a screenshot of the settings or record them in your project document when the project is important.
Step 15: Generate the First Version
Select Generate and allow the platform to process the clip.
Do not repeatedly press the button when processing appears slow. This may create duplicate generations and consume additional credits.
While waiting, record:
• Generation number
• Prompt version
• Model used
• Duration
• Aspect ratio
• Resolution
• Date
• Estimated or actual credits
Example:
Generation 01 — Original motion prompt — 6 seconds — 16:9
Step 16: Watch the Entire Clip
When generation finishes, watch the video from beginning to end.
Do not judge it only from the preview image.
Check the:
• First frame
• Middle frames
• Final frame
• Subject
• Face and hands
• Product details
• Camera movement
• Background
• Lighting
• Cropping
• Speed
• Unexpected objects
• Visible text
Watch it more than once.
A clip may appear acceptable at normal speed but reveal problems during a slower or frame-by-frame review.
Step 17: Compare the Result with the Plan
Return to the original movement plan.
Ask:
• Did the intended element move?
• Did the movement follow the correct direction?
• Was the speed suitable?
• Did the camera behave correctly?
• Did the bicycle remain unchanged?
• Did the background remain stable?
• Did new objects appear?
• Did the final frame still resemble the original image?
Use a simple review record:
| Review item | Result |
| Grass movement | Acceptable |
| Camera speed | Too fast |
| Bicycle stability | Acceptable |
| Fence stability | Minor flicker |
| Background | Acceptable |
| Overall decision | Revise camera speed |
Step 18: Identify One Main Problem
Choose the largest problem rather than rewriting the entire prompt.
Examples:
• Camera moves too quickly
• Subject changes shape
• Background flickers
• Face becomes distorted
• Product label changes
• Motion is too strong
• Important area is cropped
• Requested movement does not occur
Do not change several instructions at once. Generative-video prompting is an iterative process in which each result helps clarify how the model interprets the prompt.
Step 19: Revise One Instruction
Correct the most important problem.
Original wording:
The camera slowly pushes forward toward the red bicycle.
Revised wording:
The camera pushes forward extremely slowly with smooth, stable movement.
When the bicycle changes shape, add:
Keep the bicycle completely unchanged throughout the entire clip.
When the background flickers, add:
Keep the fence, road, trees, horizon, lighting, and background fixed and visually consistent.
Keep the rest of the prompt unchanged so you can understand whether the revision improved the result.
Step 20: Generate the Improved Version
Create a second generation using the revised prompt.
Compare the two versions side by side.
Ask:
• Did the revised instruction improve the main problem?
• Did it create a new problem?
• Which version has better subject stability?
• Which version has better movement?
• Which version is easier to edit?
• Which version should be saved?
The second version does not automatically replace the first. Keep both until the final decision is made.
Step 21: Continue Only When Necessary
A difficult scene may need more than two attempts.
Use this sequence:
1. Review the current version.
2. Identify the largest remaining problem.
3. Change one instruction.
4. Generate again.
5. Compare the versions.
Stop when:
• The movement is useful
• The subject remains acceptably stable
• The clip can be corrected through ordinary editing
• Further generations are not producing meaningful improvement
Do not spend credits trying to make a suitable clip completely flawless when a small trim or edit can solve the problem.
Step 22: Download the Best Clip
Download the strongest version to your computer.
For general beginner use, MP4 is usually the most practical format.
After downloading, play the file outside the generator to confirm:
• It opens correctly
• The full duration is present
• Audio works when applicable
• No unexpected watermark appears
• The resolution is correct
• Playback is smooth
• The file is not corrupted
Firefly currently allows completed generations to be downloaded or opened in its browser video editor, while Runway provides controls to download or continue working with a completed output.
Step 23: Rename the Video
Use a descriptive filename.
Example:
red-bicycle-country-road-image-to-video-v02.mp4
A useful filename may contain:
• Subject
• Setting
• Creation method
• Version number
• Aspect ratio when helpful
Avoid:
• video1.mp4
• download.mp4
• final-final2.mp4
• newclip.mp4
Step 24: Save the Generation Record
Save:
• Starting image
• Original prompt
• Revised prompt
• Model name
• Platform
• Aspect ratio
• Duration
• Resolution
• Camera setting
• Credits used
• Generation dates
• Downloaded versions
• Final selected clip
This record allows you to reproduce successful results and understand what caused weak versions.
Step 25: Back Up the Project
Keep copies in at least two locations when the project is important.
For example:
• Computer project folder
• External drive
• Cloud storage
Do not depend entirely on the generator’s online history. Accounts, models, saved sessions, and retention policies can change.
Beginner Image-to-Video Workflow Summary
The complete process is:
1. Choose one simple goal.
2. Prepare a strong image.
3. Plan the movement.
4. Select the correct model.
5. Upload the image.
6. Check the crop.
7. Choose the format and duration.
8. Enter the motion prompt.
9. Generate one version.
10. Review the entire clip.
11. Correct one main problem.
12. Generate an improved version.
13. Download the best result.
14. Rename, document, and back up the files.
A successful image-to-video project is normally created through controlled testing—not by generating many versions without a plan.

Figure 7. The complete beginner workflow for creating an AI video from a still image.
Figure 7 summarizes the process from preparing the starting image and selecting settings through generation, review, prompt revision, downloading, and record keeping. Following one controlled step at a time helps beginners protect their credits and understand which changes improve the video.
How to Review and Improve Weak Image-to-Video Results
The first generated clip should be treated as a test version, not automatically as the final video.
Image-to-video generation is an iterative process. Runway recommends beginning with a simple prompt and adding or changing one element at a time so you can understand which instruction improves the result. Adobe similarly advises reviewing the generated video, adjusting the prompt or selected model when necessary, and generating a new version.
Watch the Entire Clip More Than Once
Do not judge the result from:
• The preview thumbnail
• The first frame
• One attractive moment
• A single screenshot
Watch the complete clip from beginning to end.
During the first viewing, examine the overall result:
• Does the intended movement occur?
• Is the speed suitable?
• Does the camera move correctly?
• Does the clip feel natural?
• Does it follow the original plan?
During the second viewing, examine details:
• Face
• Eyes
• Mouth
• Hands
• Clothing
• Product shape
• Background
• Lighting
• Text
• Cropping
• Final frame
When possible, pause the video at several points or review it frame by frame.
Compare the Video with the Original Image
Place the original image beside the generated clip.
Check whether important details remain recognizable.
For a person, compare:
• Facial appearance
• Age
• Hairstyle
• Clothing
• Body proportions
• Skin tone
• Accessories
For a product, compare:
• Shape
• Colour
• Packaging
• Buttons
• Materials
• Labels
• Proportions
For a landscape, compare:
• Buildings
• Roads
• Trees
• Mountains
• Horizon
• Lighting
• Main composition
Small changes may be acceptable in a creative scene. They may not be acceptable in a product advertisement, educational demonstration, or other project requiring accuracy.
Compare the Video with the Movement Plan
Return to the movement plan prepared before generation.
For example:
Planned subject movement:
Bicycle remains still
Planned environmental movement:
Grass moves gently
Planned camera movement:
Slow push forward
Stable elements:
Bicycle, fence, road, trees, lighting, and background
Then record what actually happened:
| Review item | Planned result | Generated result |
| Bicycle | Remains still | Front wheel changes slightly |
| Grass | Moves gently | Movement is too strong |
| Camera | Slow push forward | Camera moves too quickly |
| Fence | Remains stable | Minor flickering |
| Lighting | Remains constant | Acceptable |
This comparison helps identify the largest problem objectively.
Determine Where the Problem Comes From
A weak result may come from:
• The starting image
• The motion prompt
• The selected camera control
• The aspect ratio or crop
• The clip duration
• The first and last frames
• The selected video model
• A limitation of the generation system
Do not assume that every problem can be corrected by making the prompt longer.
Problem 1: The Requested Movement Does Not Occur
The subject or environment may remain still even though the prompt requested movement.
For example:
• Steam does not rise
• The person does not turn
• Grass remains still
• The camera does not move
• The product does not rotate
How to Improve It:
Place the missing movement near the beginning of the prompt.
Original:
The camera remains fixed. Keep the room, lighting, table, and background consistent. Steam rises from the coffee.
Revised:
Steam rises clearly and continuously from the coffee. The camera remains fixed. Keep the cup, table, room, lighting, and background consistent.
Runway recommends reinforcing an important component through clear natural language when it is missing from an initial generation.
Do not add several new actions at the same time.
Problem 2: The Movement Is Too Strong
The generated motion may be:
• Too fast
• Too dramatic
• Unnatural
• Jerky
• Excessive
• Distracting
How to Improve It:
Use stronger speed-control wording:
The grass moves very gently in a light breeze with minimal motion.
or:
The woman turns her head only slightly and very slowly.
You may also reduce a motion-strength setting when the platform provides one.
Problem 3: The Movement Is Too Weak
The requested movement may be barely visible.
How to Improve It:
Make the action more explicit without adding unrelated details:
The curtains move visibly but gently toward the left throughout the clip.
or:
Small, clearly visible ripples travel outward across the lake.
Avoid changing the camera, subject, environment, and lighting simultaneously.
Problem 4: The Camera Moves Too Quickly
A fast camera may create:
• Motion blur
• Cropping
• Object distortion
• Background instability
• An uncomfortable viewing experience
How to Improve It:
Revise:
The camera pushes forward extremely slowly with smooth, stable movement.
When the platform provides both a camera-motion menu and a written prompt, confirm that they do not conflict. Adobe currently allows camera behaviour to be guided through supported motion settings and prompt language.
Problem 5: The Camera Moves in the Wrong Direction
The prompt may request a pan right while the result pans left, moves forward, or rotates.
How to Improve It:
State the direction precisely:
The camera pans slowly from left to right across the scene.
Add a visual endpoint when useful:
The camera pans slowly from left to right, ending with the bicycle near the centre of the frame.
Check whether the platform’s selected camera preset contradicts the prompt.
Problem 6: The Camera Moves When It Should Remain Still
A portrait, product, or interior scene may unexpectedly zoom or drift.
How to Improve It:
Use:
The camera remains completely fixed in one stable tripod shot.
Then describe the movement that should occur inside the frame:
Steam rises gently from the cup while the camera remains completely fixed.
Runway’s image-to-video guidance recommends describing the movement that should occur within the frame when trying to minimize unwanted camera motion.
Problem 7: The Subject Changes Appearance
A person’s face, hair, clothing, age, or body shape may change during the clip.
How to Improve It:
Reduce the complexity of the movement and strengthen the consistency instruction:
The woman blinks naturally once with minimal facial movement. Keep her facial identity, age, hairstyle, blue jacket, body position, skin tone, and background consistent throughout the clip.
Also consider:
• Using a shorter duration
• Reducing head movement
• Keeping the camera fixed
• Using a clearer source image
• Choosing a wider shot
• Testing another model
When the original image already contains facial defects or blur, correct the image before regenerating.
Problem 8: Hands or Fingers Become Distorted
Hands may:
• Change shape
• Gain or lose fingers
• Merge with objects
• Move unnaturally
• Disappear
How to Improve It:
Use a simpler action that does not depend on detailed hand movement.
Instead of:
The woman lifts the cup, rotates it, waves, and places it back on the table.
Use:
The woman keeps both hands resting naturally while she turns her head slightly toward the window.
When hand movement is essential:
• Use a wider view
• Request slow movement
• Keep the action short
• Avoid several objects
• Review every frame
A distorted hand in the starting image should be corrected before another video generation.
Problem 9: The Product Changes Shape or Colour
Products may change:
• Shape
• Size
• Colour
• Buttons
• Packaging
• Labels
• Materials
• Reflections
How to Improve It:
Use a limited camera movement and detailed preservation instructions:
The camera moves very slowly from left to right. Keep the headphones’ dark-blue colour, headband, ear cushions, buttons, materials, dimensions, and proportions completely unchanged.
When precise product accuracy is essential, use real product footage rather than relying entirely on generated animation.
Problem 10: Background Objects Flicker or Move
Walls, windows, trees, roads, furniture, and fences may shift or transform.
How to Improve It:
Name the important stable elements:
Keep the wooden fence, road, trees, hills, horizon, lighting, and background fixed and visually consistent.
Also try:
• Reducing camera movement
• Shortening the clip
• Simplifying the source image
• Removing small repeated objects
• Using a fixed camera
• Testing another model
Problem 11: New Objects Appear
The generator may add:
• People
• Vehicles
• Furniture
• Signs
• Plants
• Extra products
• Birds or animals
How to Improve It:
Use positive preservation language:
Maintain the original scene composition with only the existing bicycle, fence, road, grass, and trees.
You may also add a brief restriction:
Do not introduce additional subjects or objects.
Keep the restriction focused rather than creating a long list of everything that must not appear.
Problem 12: Objects Disappear
An existing object may vanish during camera or subject movement.
How to Improve It:
Identify the object as permanent:
The coffee cup remains visible in its original position throughout the complete clip.
If the object is near the frame edge, prepare a new source image with more surrounding space.
Problem 13: The Video Contains an Unexpected Scene Change
The clip may suddenly:
• Cut to another angle
• Change location
• Replace the subject
• Shift to a different composition
• Introduce a second shot
How to Improve It:
Add:
Use one continuous, uninterrupted shot with no scene change.
Runway recommends reviewing prompts for wording that may imply several shots and using continuous-shot language when an unwanted cut appears.
Remove words that suggest a sequence of separate scenes.
Problem 14: The Lighting Changes Unexpectedly
The image may begin with soft daylight and end with:
• Darker lighting
• A different colour temperature
• Harsh shadows
• Brighter highlights
• A changed time of day
How to Improve It:
State:
Maintain the same soft natural daylight, shadows, colour temperature, and exposure throughout the clip.
Avoid requesting dramatic environmental movement when the lighting must remain exact.
Problem 15: Important Text Becomes Distorted
Text on signs, products, clothing, screens, or packaging may change or become unreadable.
How to Improve It:
The most reliable workflow is usually:
1. Remove or avoid important visible text in the starting image.
2. Generate the video.
3. Add the accurate text later in a video editor.
Do not rely on generated frames to preserve critical instructions, prices, contact information, or product labels.
Problem 16: The Image Is Cropped Incorrectly
The generated video may cut off:
• A person’s head
• Hands or feet
• Product edges
• Wheels
• Background space
• Areas intended for captions
How to Improve It:
Return to the starting image and:
• Prepare it in the correct aspect ratio
• Expand the background
• Reposition the subject
• Leave more surrounding space
• Upload the corrected version
Changing the aspect ratio after uploading may require cropping. Runway’s current documentation notes that choosing a resolution or format that differs from the input can prompt the user to crop the image.
Problem 17: First and Last Frames Do Not Connect Smoothly
When two keyframes are used, the transition may contain:
• Sudden changes
• Warping
• A different camera angle
• Altered subjects
• Unstable backgrounds
How to Improve It:
Use first and last frames that share:
• The same subject
• Similar framing
• Similar camera angle
• Matching lighting
• Consistent background
• Similar colours
• Compatible object positions
Reduce the difference between the two images or divide the transition into two shorter clips.
Problem 18: The Clip Ends Poorly
The final second may contain:
• Distortion
• A sudden camera movement
• A changing face
• A disappearing object
• Background flicker
How to Improve It:
Possible solutions include:
• Shortening the generated duration
• Trimming the last second in an editor
• Adding a compatible last-frame image
• Reducing motion near the end
• Generating a new version with a simpler action
A strong four- or five-second section may be more useful than keeping a defective final second.
Change One Instruction at a Time
Suppose the first result has three problems:
• Camera moves too quickly
• Fence flickers
• Grass movement is too strong
Correct the largest problem first.
Generation 1 prompt:
Grass moves gently while the camera slowly pushes forward toward the bicycle.
Generation 2 revision:
Grass moves gently while the camera pushes forward extremely slowly toward the bicycle.
After reviewing Generation 2, revise the next problem:
Grass moves very slightly while the camera pushes forward extremely slowly. Keep the wooden fence fixed and visually consistent.
Runway’s guidance recommends adding one new element at a time because this helps identify which instruction improves the result and makes troubleshooting easier.
Know When to Change the Starting Image
Revise or replace the source image when:
• A face is already unclear
• Hands are already distorted
• The product is inaccurate
• The composition lacks movement space
• Important objects touch the edges
• The image contains contradictory motion blur
• The background is excessively cluttered
• The aspect ratio requires damaging cropping
• Important text cannot be removed safely
A stronger prompt cannot reliably repair every weakness in the original image.
Know When to Change the Settings
Change a setting when:
• The selected aspect ratio crops the image
• The duration is unnecessarily long
• Motion strength is excessive
• A camera preset conflicts with the prompt
• The resolution consumes too many testing credits
• First and last frames are incompatible
Keep the prompt unchanged during the settings test when possible, so the effect of the setting remains clear.
Know When to Test Another Model
Consider another model when:
• Several clear prompt revisions produce the same defect
• The model repeatedly changes the subject
• Required aspect ratios are unavailable
• Camera control is insufficient
• Product details cannot be maintained
• The output style does not suit the project
• Credit use is unreasonable for the results
Adobe and Runway provide multiple video workflows or models whose available controls and behaviour may differ.
Record the model name so comparisons remain fair.
Know When Editing Is Better Than Regenerating
Ordinary editing may be more practical when the clip only needs:
• Trimming
• Cropping
• A speed adjustment
• Captions
• Colour correction
• Music
• Narration
• A transition
• Removal of a weak final second
Regeneration is more appropriate when:
• The face is badly distorted
• The main subject changes
• The product becomes inaccurate
• The requested motion is missing
• The camera movement is unusable
• The background transforms dramatically
Do not consume credits attempting to correct an issue that can be solved quickly in an editor.
Create a Version Record
Use a simple record for every generation:
| Version | Change made | Result | Decision |
| V01 | Original prompt | Camera too fast | Revise |
| V02 | Slower camera | Camera improved | Keep for comparison |
| V03 | Reduced grass motion | Strongest result | Select |
| V04 | Added fence stability | Bicycle changed | Reject |
This prevents confusion when several clips look similar.
Final Review Checklist
Before selecting the final clip, confirm:
1. The intended movement occurs.
2. The direction and speed are suitable.
3. The camera behaves correctly.
4. The main subject remains recognizable.
5. Faces and hands remain acceptable.
6. Product details remain accurate enough for the intended use.
7. The background remains reasonably stable.
8. No important object disappears.
9. No unwanted subject or object appears.
10. Lighting and colours remain consistent.
11. Important text is accurate or will be added during editing.
12. The composition is not incorrectly cropped.
13. The ending remains usable.
14. The downloaded file plays correctly.
15. The selected version is recorded and saved.
A useful final clip does not need to be completely flawless. It must be stable, understandable, appropriate for its purpose, and suitable for final editing.
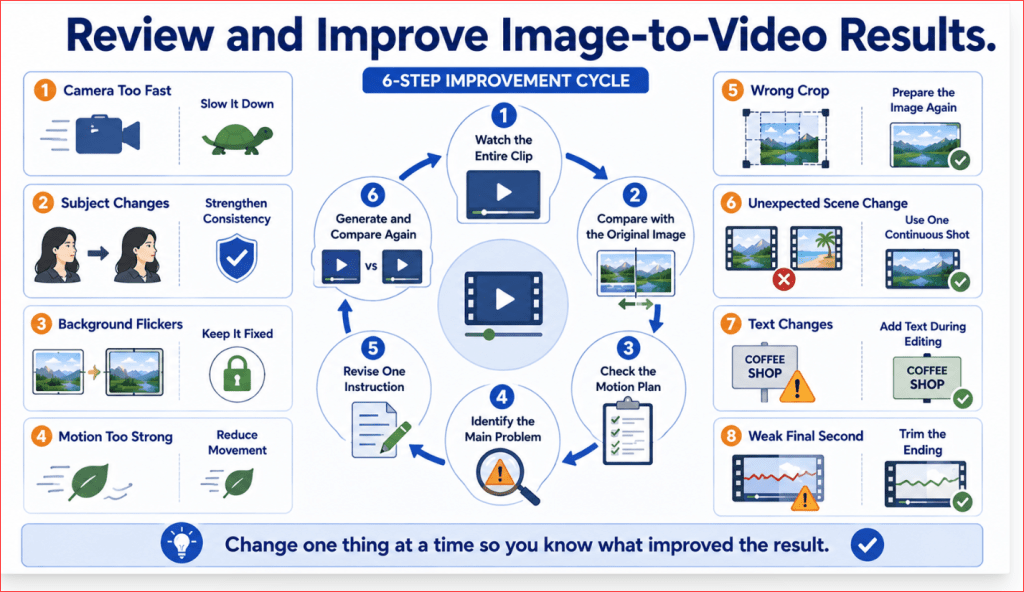
Figure 8. How to review an image-to-video result and correct one problem at a time.
Figure 8 shows a controlled improvement cycle: watch the complete clip, compare it with the original image and motion plan, identify the largest problem, revise one instruction or setting, generate again, and record the strongest version.
How to Edit, Export, and Publish an Image-to-Video Clip
AI-generated video usually needs editing before it is ready for WordPress, YouTube, social media, or a business project.
Editing allows you to:
• Remove weak frames
• Correct the timing
• Combine several clips
• Add accurate text
• Add narration and captions
• Improve audio
• Adjust colours
• Resize the video
• Prepare a smaller web-friendly file
• Add appropriate AI disclosure
The generated clip provides the visual material. Editing turns that material into a finished video.
Save the Original Generated Clip
Before editing, keep an untouched copy of the downloaded video.
Use folders such as:
• 01-original-generated-clips
• 02-working-edits
• 03-audio-and-captions
• 04-final-exports
• 05-wordpress-and-youtube
Example original filename:
red-bicycle-image-to-video-v03-original.mp4
Example edited filename:
red-bicycle-image-to-video-v03-edited.mp4
Do not edit your only copy. You may need to return to the original clip when an editing change produces an unwanted result.
Select the Strongest Version
When you generated several versions, compare them before editing.
Check:
• Subject stability
• Camera movement
• Background consistency
• Face and hand quality
• Product accuracy
• Lighting
• Cropping
• Beginning and ending
• Overall usefulness
Choose the version that requires the fewest major corrections.
Do not choose a clip only because one frame looks attractive. The complete movement must remain usable.
Trim Weak Frames
The beginning or ending may contain:
• A delayed movement
• Sudden distortion
• Background flickering
• An unstable face
• An object disappearing
• An unnecessary pause
• An abrupt camera movement
Trim these sections when the remaining clip still communicates the intended idea.
For example, a six-second generation may contain five strong seconds followed by one defective second. Keeping the first five seconds is often better than spending additional credits trying to regenerate a perfect six-second version.
Do not trim so aggressively that the action appears to begin or end suddenly.
Improve the Pacing
Pacing describes how quickly the video develops.
A clip may feel:
• Too slow
• Too fast
• Too long before the action starts
• Too abrupt at the end
• Uneven when combined with other scenes
You may improve the pacing by:
• Trimming pauses
• Shortening the opening
• Slowing a gentle movement slightly
• Speeding up an unnecessarily long section
• Adding a brief hold before a transition
• Rearranging clips
Use speed adjustments carefully. A large speed change can make people, animals, water, smoke, or camera movement look unnatural.
Combine Several Short Clips
A longer video is normally easier to create by combining several short scenes rather than asking one generation to perform an entire story.
For example:
1. Wide view of the bicycle and country road
2. Slow camera movement toward the bicycle
3. Close view of the bicycle’s handlebars
4. Landscape view with moving grass and clouds
5. Final wide shot
Place the clips in a video editor and arrange them in the correct order.
Check that neighbouring clips have reasonably consistent:
• Aspect ratios
• Resolution
• Lighting
• Colours
• Subject appearance
• Camera direction
• Movement speed
• Visual style
A sudden change in colour, brightness, or character appearance may make the scenes feel unrelated.
Use Simple Transitions
Transitions connect one clip to another.
Useful beginner choices include:
• Straight cut
• Short fade
• Cross-dissolve
• Fade to black
• Fade from black
Do not add a different decorative transition between every scene. Excessive spinning, sliding, flashing, or zooming effects can distract from the video.
A clean cut or short fade is usually sufficient.
Add Accurate Titles During Editing
Important text should normally be added after generation because text created inside AI-generated frames may become distorted or change.
You can add:
• Video title
• Section heading
• Product name
• Short explanation
• Call to action
• Website name
• Source note
• AI disclosure
Use:
• Large readable lettering
• Strong contrast
• Short phrases
• Consistent placement
• Enough display time
Keep text away from the extreme edges because different players and devices may crop or cover those areas.
Add Narration
Narration can explain what the viewer is seeing.
A simple narration workflow is:
1. Write the script.
2. Read it aloud.
3. Correct difficult sentences.
4. Record the narration.
5. Remove long pauses and mistakes.
6. Place the narration on the timeline.
7. Adjust the clips to match the narration.
8. Balance the volume.
For a short article demonstration, narration might say:
Image-to-video tools animate a still image by combining the original visual scene with written movement instructions.
Use a natural speaking pace and simple wording.
Do not make factual claims based only on what appears in an AI-generated scene. Verify all educational, product, health, financial, or business information separately.
Add Captions
Captions help viewers who: [18]
• Cannot hear the narration
• Watch without sound
• Have hearing difficulties
• Speak a different first language
• Need additional reading support
Automatic captions should always be reviewed.
Check:
• Spelling
• Punctuation
• Timing
• Names
• Technical terms
• Line breaks
• Placement
• Speaker changes
WordPress.com’s Video block supports text tracks for captions and chapters, and it also allows a poster image to be displayed before the video begins. Availability of direct video-hosting features depends on the WordPress.com plan being used. [13][14]
Captions should not cover the main subject, product, or important visual details.
Add Music Carefully
Background music can support the mood, but it should not overpower the narration.
Use music that:
• You created
• You licensed correctly
• Is supplied under terms that permit your intended use
• Comes from an authorized music library
• Does not imitate a protected recording without permission
Lower the music volume when narration begins.
Review the beginning and end for abrupt audio cuts. A short fade-in and fade-out can make the music sound more natural.
Add Sound Effects Only When Helpful
Sound effects may include:
• Wind
• Water
• Birds
• Footsteps
• Door movement
• Product clicks
• Traffic
• Room ambience
Use sound that matches the visible action.
Do not add several loud effects simply because the scene contains several objects. Incorrect sound can make an otherwise strong video feel artificial.
Correct Colours and Brightness
Generated clips may differ slightly in:
• Exposure
• Colour temperature
• Contrast
• Saturation
• Shadows
• Highlights
Small adjustments can make several scenes look more consistent.
Avoid extreme corrections that create:
• Unnatural skin tones
• Excessively bright colours
• Lost shadow details
• Pure-white highlights
• Heavy colour casts
• Artificial product colours
For a product or educational video, accuracy is more important than dramatic colour effects.
Add a Poster Image
A poster image is the still image displayed before a visitor starts the video.
Choose a frame that:
• Clearly represents the video
• Shows the subject properly
• Is not blurry
• Contains no distortion
• Works at a small size
• Does not reveal private information
WordPress.com’s Video block currently allows a poster image to be selected from the Media Library or uploaded from the computer.
The poster image can be:
• The original starting image
• A strong frame from the final clip
• A separate 16:9 thumbnail
• A designed image containing a short title
Resize for the Publishing Platform
Prepare the final shape according to its destination:
• 16:9: WordPress, websites, YouTube, and presentations
• 9:16: YouTube Shorts, Reels, and TikTok
• 1:1: Square social posts
• 4:5: Portrait feed posts
Do not simply stretch the video into another shape.
When converting formats:
• Reposition the subject
• Check captions
• Protect heads, hands, and products
• Adjust title placement
• Review every resized version separately
A landscape clip may require a new vertical composition rather than a severe crop.
Export the Final Video
For most beginner projects, export the finished video as an MP4 file.
Before exporting, confirm:
• Correct aspect ratio
• Suitable resolution
• Complete narration
• Correct captions
• Balanced music
• No unwanted blank frames
• No editing guides
• No accidental private information
• No unauthorized material
• Correct final duration
Use a clear filename:
red-bicycle-image-to-video-wordpress-16×9-final.mp4
For a YouTube version:
red-bicycle-image-to-video-youtube-16×9-final.mp4
For a vertical social-media version:
red-bicycle-image-to-video-short-9×16-final.mp4
Compress the Video for the Web
Large video files can slow a webpage and consume storage.
Compression should reduce the file size without making the video visibly blurry.
After compression, inspect:
• Fine details
• Faces
• Product edges
• Captions
• Fast movement
• Dark areas
• Colour gradients
• Audio quality
Keep the higher-quality master file separately. Use the compressed copy for website delivery.
Test the Export Outside the Editor
Play the exported file on your computer before uploading it.
Confirm:
• The file opens
• The full video plays
• Audio is synchronized
• Captions are correct
• The beginning is clean
• The ending is clean
• No watermark appeared unexpectedly
• The resolution is correct
• The colours remain acceptable
Also test the final version on a mobile device when mobile viewing is important.
Publish on WordPress
WordPress.com currently supports several video-publishing methods: [13][14]
• Upload through the Video block
• Use a video already stored in the Media Library
• Insert a video URL
• Embed a video from services such as YouTube
• Use VideoPress when the required plan supports it
The standard Video block can upload or embed video, add text tracks, and display a poster image. WordPress.com states that direct Video block availability and VideoPress access depend on the site’s plan.
For Article 019, a practical method is:
1. Upload the video to YouTube when it is part of your planned channel content.
2. Paste the YouTube URL into the WordPress article.
3. Allow WordPress to create the video embed.
4. Preview the article on desktop and mobile.
Embedding may be more practical than uploading a large video file directly to the website.
Add the Video to the Correct Article Location
Insert the demonstration after the paragraph or step it illustrates.
For example, place a red-bicycle demonstration after the step-by-step generation section rather than placing it randomly near the conclusion.
Add a short introduction before the video:
The following demonstration shows how gentle environmental movement and a slow camera push can animate a still bicycle image.
Add a short explanation after the video:
The bicycle remains the visual anchor while the grass and camera movement create the sense of motion. The final result should be reviewed for wheel shape, fence stability, cropping, and background consistency.
Add Accessible Video Information
Provide:
• A descriptive title
• Captions
• A short written explanation
• A poster image
• A transcript when narration contains important educational information
Do not make essential instructions available only inside the video. Readers should still be able to understand the main lesson from the written article.
Publish on YouTube Responsibly
YouTube currently requires creators to use its AI use disclosure when AI meaningfully generates or alters photorealistic content—for example, when a realistic scene did not actually occur or when a real person appears to do something they did not do. The setting is available during upload in YouTube Studio. [15]
Disclosure is generally not required for minor production assistance or clearly unrealistic content, but realistic generated scenes may require it. YouTube states that making the disclosure does not by itself reduce the video’s audience or monetization eligibility. [15]
A written description may also say:
This video includes visuals created or modified using artificial intelligence.
The platform disclosure setting should still be completed when required. A sentence in the description should not be used as a substitute for the official upload setting.
Review Privacy Before Publishing
Before publication, confirm that the video does not reveal:
• Names
• Addresses
• Telephone numbers
• Email addresses
• Licence plates
• Identification documents
• Private family information
• Confidential business details
• Customer information
• Private computer screens
Also confirm that recognizable people gave appropriate permission.
YouTube allows people to request removal when realistic altered or synthetic content uses their recognizable likeness without appropriate authorization, subject to its privacy-review process. [17]
Keep the Master and Published Copies
Save:
• Original starting image
• Generated clip
• Edited project
• Final high-quality master
• Compressed WordPress version
• YouTube version
• Vertical social-media version
• Captions or transcript
• Music licence
• Prompt and generation record
The published version should not be your only surviving copy.
Recommended AI Mastery Publishing Workflow
For an Article 019 demonstration:
1. Generate a short 16:9 image-to-video clip.
2. Select the strongest version.
3. Trim the weak beginning or ending.
4. Add a brief title when necessary.
5. Add narration and checked captions.
6. Add quiet licensed music only when useful.
7. Export a high-quality MP4 master.
8. Create a compressed website copy.
9. Upload the final video to YouTube when appropriate.
10. Complete YouTube’s AI disclosure when required.
11. Embed the video in the relevant WordPress section.
12. Add a poster image and written explanation.
13. Preview the post on desktop and mobile.
14. Keep all source files, prompts, and permissions.
Editing and publishing should preserve the strongest part of the generated clip while making its purpose, origin, and meaning clear to viewers.
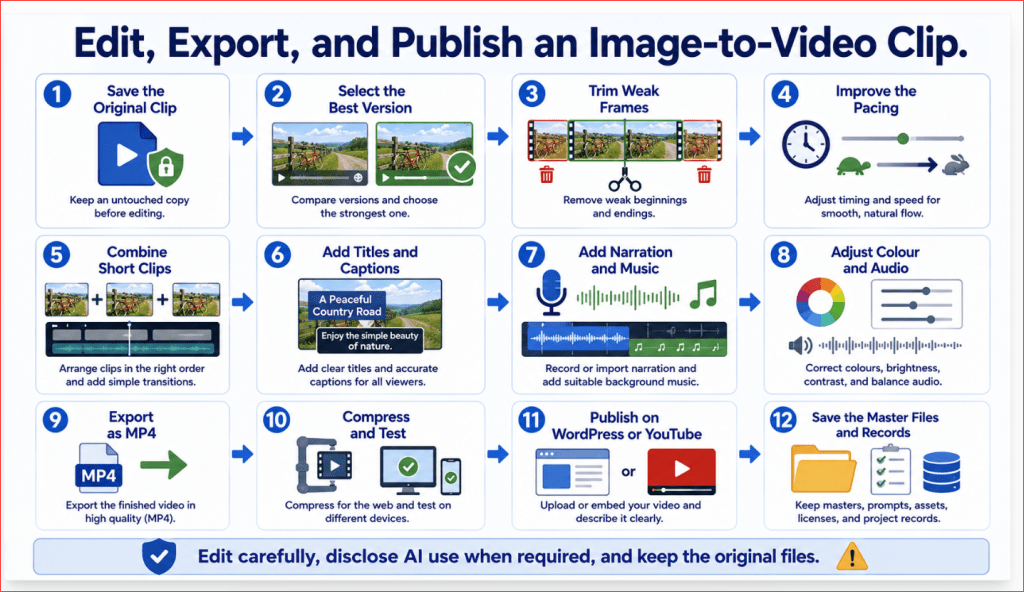
Figure 9. The complete workflow for editing, exporting, and publishing an image-generated video.
Figure 9 shows how a generated clip becomes a finished video through trimming, pacing, titles, captions, narration, audio, colour correction, export, compression, disclosure, and publication. The final video should be tested on different devices and stored with its source files and creation records.
Privacy, Copyright, and Responsible Image-to-Video Use
Image-to-video tools can animate photographs, portraits, product images, illustrations, and AI-generated artwork. Before uploading or publishing any image, confirm that you have permission to use it and that the finished video will not expose private information, misrepresent real people, or violate another creator’s rights.
A technically impressive clip can still be unsuitable for publication when its source image, generated content, music, voice, or intended use creates legal or ethical problems.
Use Images You Own or Have Permission to Use
Suitable starting images may include:
• Photographs you created
• Illustrations you created
• AI-generated images whose terms permit the intended use
• Licensed stock images
• Public-domain material
• Product photographs supplied by the owner
• Client material covered by a clear agreement
• Photographs of people who consented to the intended use
Do not assume that finding an image online gives you permission to animate, modify, republish, or use it commercially. [19]
Avoid using:
• Images copied from another website
• Film or television screenshots
• Copyrighted artwork
• Other people’s social-media photographs
• Protected characters
• Celebrity photographs for misleading purposes
• Client files without authorization
• Stock images whose licence does not cover modification or video use
Save the original licence, receipt, permission message, or source record with the project files.
Platform Permission Does Not Replace Source Permission
An AI platform may permit commercial use of generated output, but that does not give you rights to an image you were not permitted to upload.
Runway currently states that, as between Runway and the user, users retain their rights to content they upload and generate and may use their generations commercially. That platform permission does not remove the user’s responsibility for rights belonging to photographers, artists, brands, or recognizable people in the source material. [4]
Therefore, check two separate questions:
1. Does the AI platform permit the intended use?
2. Do I have permission to use every source element?
Both answers must be acceptable.
Check the Exact Model Used
One platform may offer several different video models.
For example, Adobe Firefly currently provides access to Adobe models and various partner models. Adobe explains that partner models are not developed by Adobe and that creators are responsible for deciding whether a partner model is appropriate for a particular project.
Record:
• Platform name
• Model name
• Model version when displayed
• Date generated
• Account or plan used
• Commercial-use conditions checked
• Whether the feature was marked beta or preview
Do not assume that every model inside the same website has identical terms, training practices, protections, or commercial-use assurances.
Understand Adobe Firefly’s Commercial-Use Distinction
Adobe states that outputs from generally available Firefly features may be used in commercial projects. Adobe also explains that its Firefly models were trained using licensed content, openly licensed material, and public-domain content. [8][10]
However, partner-model outputs should not automatically be treated as having the same commercial-safety position. Adobe states that creators remain responsible for determining whether partner-model outputs are appropriate for their projects. [8]
For an important business project, note whether the clip was generated with:
• Adobe Firefly Video
• A Runway model
• A Google model
• A Luma model
• A Kling model
• Another partner model
The platform name alone is not enough.
Do Not Upload Private Information
Before uploading a photograph, inspect the entire image for:
• Names
• Addresses
• Telephone numbers
• Email addresses
• Identification cards
• Account numbers
• Medical information
• Financial records
• Licence plates
• Private computer screens
• Customer documents
• Children’s identifying information
• Confidential workplace material
Remove, crop, or blur any detail the generator does not need.
Also check reflections in:
• Mirrors
• Windows
• Glass tables
• Computer monitors
• Vehicle surfaces
• Product packaging
A detail that appears small in a still image may become more visible when the camera moves toward it.
Review the Provider’s Data Practices
Check the provider’s current privacy documentation before uploading personal or commercially sensitive material.
Adobe states that it does not train Firefly models on Creative Cloud subscribers’ personal content. Partner models can have different terms and data practices, so users should verify the conditions that apply to the exact model, product, and account. [8][10]
Do not assume that every AI service follows the same approach.
Review:
• Whether uploaded images are retained
• Whether projects are private by default
• Whether generations appear in public galleries
• Whether files can be deleted
• Whether account administrators can access projects
• Whether content may be used for product improvement
• Whether different terms apply to business accounts
Use generic test material until you understand the provider’s settings.
Protect Real People
Do not animate a recognizable person without considering consent, context, and the way the finished video could be understood.
Obtain permission before making someone appear to:
• Speak
• Smile
• Turn toward the camera
• Walk
• Hold a product
• Endorse a service
• Perform an action that did not occur
• Appear in advertising
• Participate in a fictional event
Permission to take a photograph does not necessarily mean permission to animate it or use it commercially.
Record:
• Who gave permission
• What image may be used
• How it may be animated
• Where the video may be published
• Whether commercial use is included
• How long the permission applies
Avoid Misleading Real-Person Videos
Do not create a realistic video that falsely makes someone appear to:
• Recommend a product
• Give medical or financial advice
• Confess to an action
• Support a political position
• Attend an event
• Make a statement
• Commit a crime
• Behave in an embarrassing or harmful way
YouTube allows identifiable people to request review or removal of realistic altered or synthetic content that resembles them. Its evaluation may consider whether the content is synthetic, realistic, disclosed, uniquely identifiable, satirical, or in the public interest.
Disclosure does not make harmful impersonation acceptable.
Use Extra Care with Images of Children
Do not upload or animate a child’s photograph unless:
• Appropriate permission has been obtained
• The purpose is legitimate
• No identifying information is visible
• The content is respectful
• The child is not placed in a misleading situation
• The publishing platform permits the intended use
• The finished video will not expose or embarrass the child
For a public educational website, a licensed generic illustration may be safer than a personal family photograph.
Check Products and Brands
Image-to-video generation may alter:
• Product shape
• Packaging
• Labels
• Colours
• Buttons
• Ingredients
• Safety features
• Logos
• Accessories
• Dimensions
Do not present a generated product animation as an exact demonstration unless every important detail is verified.
Also avoid implying that a brand:
• Created the video
• Approved the video
• Sponsors your website
• Endorses your claims
• Gave permission when it did not
When accuracy is essential, use real product footage.
Check Music, Narration, and Voices Separately
Rights to the starting image do not automatically include rights to:
• Background music
• Sound effects
• Narration
• A cloned voice
• A performer’s likeness
• A separate video clip
• Stock footage
Confirm that every audio element permits:
• Editing
• Online publication
• Commercial use when applicable
• YouTube use
• Social-media use
• Client or advertising use
Do not imitate another person’s voice without appropriate authorization.
Add AI Disclosure When Necessary
Disclosure is particularly important when the generated clip looks realistic and could be mistaken for genuine footage.
A written note may say:
This video includes visuals created or modified using artificial intelligence.
For YouTube, realistic content that has been meaningfully generated or altered must be disclosed through the platform’s upload setting when it:
• Makes a real person appear to say or do something they did not
• Alters a real event or location
• Shows a realistic event or scene that did not occur
YouTube states that completing the disclosure does not by itself reduce audience reach or monetization eligibility. Repeated failure to disclose qualifying content can lead to labels being applied or other platform action.
Distinguish Realistic Content from Minor Assistance
YouTube’s current guidance generally does not require disclosure for ordinary production assistance such as:
• Creating an outline
• Improving a script
• Generating a title
• Creating captions
• Colour correction
• Video sharpening
• Minor aesthetic effects
Disclosure is required when realistic synthetic or meaningfully altered content could cause viewers to misunderstand what actually happened.
For image-to-video, a realistic animation of a real place, person, event, or product should be reviewed carefully against this standard.
Do Not Present Generated Scenes as Evidence
Do not use an image-generated video as proof of:
• A real event
• Product performance
• A medical result
• A financial result
• Customer satisfaction
• An accident
• A crime
• Property damage
• A political event
• A person’s behaviour
Generated video can illustrate an idea, but it is not documentary evidence.
Use a clear label such as:
AI-generated illustration
or:
Simulated visual example
when the context could otherwise confuse viewers.
Preserve Content Credentials When Practical
Some tools attach metadata describing how an asset was generated or edited.
Adobe uses Content Credentials to add information about the application, AI tool, date, and general creation or editing actions associated with qualifying Firefly content. Adobe also states that Content Credentials may be applied when a project containing Firefly-generated material is downloaded or exported. [11]
YouTube may use compatible Content Credentials as one signal for displaying information about how content was made. [16]
Avoid intentionally removing provenance information when it supports appropriate transparency.
Keep Creation Records
For each important video, save:
• Original image
• Image source
• Licence or permission
• Prepared image
• Motion prompt
• Revised prompts
• Platform
• Model
• Date generated
• Generated versions
• Editing project
• Music and voice licences
• Disclosure wording
• Final published file
• Screenshot or copy of relevant terms
Use a record such as:
| Record item | Details |
| Starting image | red-bicycle-original.jpg |
| Image owner | Created by author |
| Platform | Record current platform |
| Model | Record exact model |
| Generation date | Record date |
| Commercial terms checked | Yes |
| Real person included | No |
| AI disclosure needed | Review before publication |
| Final filename | red-bicycle-image-to-video-final.mp4 |
These records help you explain how the video was created and reproduce the workflow later.
Complete a Final Responsible-Use Review
Before publishing, confirm:
1. I own or am permitted to use the starting image.
2. The selected platform and model permit my intended use.
3. No private or confidential information is visible.
4. Recognizable people gave appropriate permission.
5. The video does not create a false endorsement.
6. Product and brand details have been checked.
7. Music, narration, and voices are properly authorized.
8. The clip is not presented as evidence of an event that did not occur.
9. AI disclosure has been added when needed.
10. The publishing platform’s current rules have been reviewed.
11. The source files, prompts, permissions, and final version are saved.
12. A human completed the final review.
Responsible image-to-video creation means checking not only whether the clip looks good, but also whether it is permitted, accurate, respectful, transparent, and suitable for its intended audience.

Figure 10. A responsible-use checklist for creating and publishing image-generated videos.
Figure 10 reminds beginners to verify image rights, privacy, real-person consent, model-specific terms, product accuracy, audio permissions, AI disclosure, and publishing rules. Keeping organized creation records supports both transparency and safer reuse.
Common Mistakes Beginners Make with Image-to-Video
Many weak image-to-video results are caused by preventable decisions made before generation begins. A poor starting image, unclear motion plan, conflicting instructions, or excessive movement can waste credits and make the final clip difficult to correct.
Understanding these common mistakes helps beginners create more stable videos with fewer attempts.
Using a Weak Starting Image
A blurry, distorted, poorly cropped, or low-resolution image gives the video generator an unreliable visual foundation.
Common source-image problems include:
• Unclear faces
• Incorrect hands
• Cropped heads or products
• Heavy compression
• Distorted objects
• Unreadable text
• Inconsistent shadows
• Busy backgrounds
• Insufficient space for movement
Reality: Animation usually does not repair defects already present in the image. It may make them more noticeable.
How to Avoid This Mistake: Inspect the image at full size and correct all important defects before uploading it.
Choosing an Image That Does Not Support the Intended Action
The subject’s position and available space must support the requested movement.
For example, problems may occur when:
• A person should walk right but has no space on the right
• A camera should push forward but the image has little visual depth
• A product should rotate but touches the frame edges
• A seated person is asked to begin running
• A subject faces away from the intended direction
How to Avoid This Mistake: Select or prepare an image whose pose, framing, and composition support the planned movement.
Using the Wrong Aspect Ratio
Uploading a square or portrait image into a landscape video workflow may cause automatic cropping.
Important details may be removed, including:
• A person’s head
• Hands or feet
• Product edges
• Bicycle wheels
• Background space
• Areas intended for captions
How to Avoid This Mistake: Prepare the image in the final video’s aspect ratio before uploading it.
Placing the Subject Too Close to the Edge
Camera movement may push an edge-positioned subject out of the frame.
This is especially risky when requesting:
• A camera pan
• A camera orbit
• A push forward
• A subject walking
• A product rotation
• Conversion from landscape to vertical
How to Avoid This Mistake: Leave comfortable space around the subject and additional space in the direction of movement.
Repeating the Entire Image Description
An image-to-video prompt does not normally need to describe every visible object, colour, and background detail.
An unnecessarily repetitive prompt may distract from the movement instructions.
Weak example:
A red bicycle with black tyres, a black seat, silver handlebars, and two wheels stands beside a wooden fence on a country road surrounded by green grass and trees.
This mostly describes what the image already shows.
Improved example:
Grass moves gently while the camera slowly pushes forward toward the bicycle. Keep the bicycle, fence, road, trees, lighting, and background consistent.
How to Avoid This Mistake: Focus the prompt mainly on movement, camera behaviour, timing, and essential stability instructions.
Using a Vague Motion Prompt
Instructions such as these are too broad:
• Animate the image
• Make it cinematic
• Add natural movement
• Bring the scene to life
• Make everything move
The model must guess which elements should move and how strongly they should move.
How to Avoid This Mistake: Name the exact movement, direction, speed, camera behaviour, and stable elements.
Requesting Too Many Actions
A short clip cannot reliably contain a long sequence of complicated events.
For example:
The woman stands, walks to the window, opens it, waves, turns around, sits down, and picks up a cup.
This request may cause:
• Missing actions
• Abrupt transitions
• Changing faces
• Distorted hands
• Incorrect body movement
• Unwanted scene changes
How to Avoid This Mistake: Use one main action per clip and generate the next action as a separate scene.
Combining Several Camera Movements
A prompt may become unstable when it requests the camera to:
• Pan
• Zoom
• Tilt
• Orbit
• Move forward
• Pull backward
all within one short generation.
How to Avoid This Mistake: Use one simple camera movement at a time. Begin with a fixed camera, slow push forward, or gentle pan.
Allowing Everything to Move
When the subject, camera, background, lighting, and several environmental elements all move simultaneously, the scene may become chaotic.
Possible results include:
• Background flickering
• Product distortion
• Changing faces
• Unnatural speed
• Camera shake
• Objects appearing or disappearing
How to Avoid This Mistake: Choose one main movement and one small supporting movement. Keep permanent structures stable.
Failing to State What Must Remain Stable
The generator may change details that the creator assumed would remain unchanged.
Important stability details may include:
• Face
• Hairstyle
• Clothing
• Product shape
• Product colour
• Packaging
• Furniture
• Building structure
• Road
• Fence
• Lighting
• Background
How to Avoid This Mistake: Add a concise stability instruction naming the most important elements.
Using Conflicting Instructions
A prompt may accidentally request incompatible behaviour.
Examples include:
• “The camera remains fixed” and “the camera moves forward”
• “The person remains still” and “the person walks”
• “Keep the lighting unchanged” and “sunset gradually becomes night”
• “Use one continuous shot” and “cut to a close-up”
How to Avoid This Mistake: Read the prompt once from beginning to end and remove instructions that contradict each other.
Ignoring Motion Cues in the Starting Image
The source image may already suggest movement through:
• Motion blur
• Dust
• Flowing clothing
• Running poses
• Speed lines
• Splashing water
• Leaning vehicles
These cues may influence the generated motion even when the prompt requests something different.
How to Avoid This Mistake: Choose or edit an image whose visual cues match the intended action.
Requesting Fast Motion Too Early
Rapid movement is more likely to cause:
• Distorted bodies
• Changing faces
• Merged objects
• Unstable backgrounds
• Strong motion blur
• Incorrect camera behaviour
How to Avoid This Mistake: Begin with slow, gentle, and natural movement. Increase the speed only after the scene remains stable.
Using Important Visible Text
Text on signs, products, clothing, screens, or packaging may change between frames.
This can create:
• Misspellings
• Random symbols
• Changing numbers
• Distorted logos
• Unreadable product labels
How to Avoid This Mistake: Remove nonessential text from the starting image and add accurate wording during editing.
Expecting Exact Product Accuracy
Image-to-video models may alter:
• Product shape
• Buttons
• Packaging
• Labels
• Materials
• Dimensions
• Colours
• Accessories
Reality: A visually attractive product animation may still be commercially inaccurate.
How to Avoid This Mistake: Use minimal movement, review every frame, and use real footage when exact product operation or appearance is essential.
Ignoring Faces and Hands During Review
Beginners may focus on the overall movement and overlook brief facial or hand distortions.
Problems may appear only:
• Halfway through the clip
• During a blink
• While the head turns
• When a hand touches an object
• In the final second
How to Avoid This Mistake: Review the clip several times and pause at different points.
Generating Several Versions Before Reviewing the First
Requesting multiple variations immediately can consume credits without teaching you what caused the problems.
How to Avoid This Mistake: Generate one version, review it carefully, and revise one instruction before generating again.
Changing the Entire Prompt After One Weak Result
When every part of the prompt changes, it becomes difficult to determine what improved or damaged the result.
How to Avoid This Mistake: Preserve the original prompt and modify only the largest problem.
Assuming a Longer Prompt Is Always Better
A long prompt may contain:
• Repetition
• Conflicting instructions
• Too many actions
• Unnecessary visual descriptions
• Excessive restrictions
Reality: A focused prompt is usually easier to interpret than a complicated paragraph containing every possible instruction.
How to Avoid This Mistake: Include only the movement, camera, timing, and stability details that affect the clip.
Using a Long Duration for a Simple Action
A short movement stretched across a long clip may produce unnecessary changes after the intended action finishes.
For example, after a portrait subject blinks, the remaining seconds may introduce:
• Additional head movement
• Changing expressions
• Background drift
• Facial distortion
How to Avoid This Mistake: Match the clip duration to the action. Five or six seconds may be sufficient for a simple beginner test.
Ignoring the Final Second
The beginning and middle may look strong while the ending contains:
• A changing face
• A disappearing object
• Sudden camera movement
• Background distortion
• Lighting changes
How to Avoid This Mistake: Always inspect the final second. Trim it when the earlier portion remains useful.
Regenerating Problems That Editing Could Fix
Some issues can be corrected more efficiently through ordinary editing.
Editing may solve:
• A weak beginning
• A defective final second
• Slow pacing
• Incorrect audio volume
• Missing captions
• Colour differences
• A necessary crop
How to Avoid This Mistake: Regenerate only when the main subject, movement, product, camera, or background is unusable.
Forgetting to Download Successful Versions
Online project histories may change, expire, or become difficult to navigate.
How to Avoid This Mistake: Download every useful version and store it with its prompt and settings.
Using Unclear Filenames
Names such as video1.mp4 or final2.mp4 make it difficult to identify versions later.
How to Avoid This Mistake: Use descriptive filenames such as:
red-bicycle-image-to-video-slow-camera-v03.mp4
Failing to Record the Model and Settings
The same prompt may behave differently with another:
• Model
• Duration
• Aspect ratio
• Resolution
• Camera preset
• Motion setting
How to Avoid This Mistake: Save the platform, model, prompt, settings, date, and credit use for every important generation.
Uploading Private or Unlicensed Images
A technically successful animation may still be unsuitable because the source image contains private information or was used without permission.
How to Avoid This Mistake: Verify ownership, licences, consent, privacy, and commercial-use conditions before uploading.
Publishing Without Disclosure or Context
A realistic generated scene may be mistaken for genuine footage.
How to Avoid This Mistake: Add AI disclosure when required and clearly describe simulated or illustrative scenes when viewers could misunderstand them.
Beginner Mistake-Prevention Checklist
Before generating, confirm:
1. The source image is clear and corrected.
2. The image supports the intended movement.
3. The aspect ratio is correct.
4. There is enough space around the subject.
5. The prompt focuses on motion.
6. One primary action is requested.
7. Only one simple camera movement is used.
8. Important elements are protected with stability instructions.
9. The prompt contains no contradictions.
10. Visible text is not essential.
11. The duration matches the action.
12. One version will be generated and reviewed first.
13. The platform, model, settings, and prompt will be recorded.
14. The image is permitted for the intended use.
15. The finished video will be reviewed and disclosed responsibly.
Most image-to-video mistakes can be prevented by slowing down before generation. A clear image, simple movement plan, focused prompt, and careful review are more valuable than producing many uncontrolled versions.
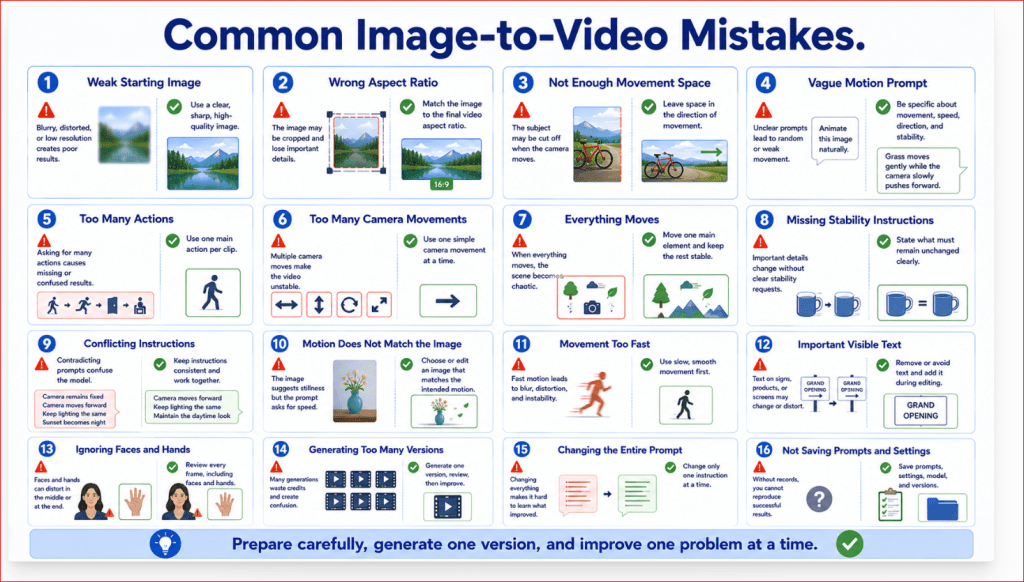
Figure 11. Common mistakes beginners should avoid when creating an AI video from an image.
Figure 11 highlights the decisions that commonly produce unstable movement, cropping, changed subjects, wasted credits, privacy risks, and confusing project files. Preparing the source image, simplifying the movement, reviewing one version at a time, and keeping organized records prevent many of these problems.
Benefits of Creating AI Videos from Images
Image-to-video generation gives beginners more control than asking an AI system to invent the complete scene from text alone.
The starting image already establishes the subject, composition, lighting, colours, background, and visual style. The motion prompt can therefore focus mainly on what should move, how quickly it should move, how the camera should behave, and what should remain stable.
Greater Control Over the Starting Scene
With text-to-video, the AI must create both the visual scene and its movement.
With image-to-video, you begin with a scene that you have already selected, generated, photographed, or designed. This gives you greater control over:
• The main subject
• Subject position
• Camera angle
• Background
• Lighting
• Colour palette
• Visual style
• Opening composition
For example, when animating a red bicycle beside a country road, you already know:
• Where the bicycle appears
• Which direction the road travels
• How much space surrounds the bicycle
• What the lighting looks like
• Which colours dominate the scene
You can then concentrate on adding gentle grass movement and a slow camera push rather than asking the AI to design the entire scene again.
Easier Prompt Writing
Image-to-video prompts can be simpler because they do not normally need to repeat everything visible in the image.
Runway’s current guidance recommends focusing almost entirely on motion, including subject action, environmental motion, camera movement, timing, direction, and speed. It also recommends beginning with the most important motion and adding details only when needed.
Instead of writing:
Create a red bicycle with black tyres beside a wooden fence on a country road surrounded by green grass, trees, hills, and blue sky.
You can write:
Grass moves gently while the camera slowly pushes forward toward the bicycle. Keep the bicycle, fence, road, trees, lighting, and background visually consistent.
This makes the prompt easier to understand, review, and revise.
More Predictable Opening Frames
The uploaded image normally becomes the visual starting point of the generated clip.
This helps when the video must begin with:
• A specific person
• A particular product
• A prepared illustration
• A selected landscape
• A designed website graphic
• A planned storyboard composition
• A precise camera angle
You do not need to generate several text-to-video versions merely to obtain the desired opening composition.
The first frame still may change slightly as the animation develops, but starting from a prepared image reduces uncertainty at the beginning of the clip.
Better Use of Existing AI-Generated Images
A strong AI-generated image does not have to remain a static article illustration.
It can become:
• A short website video
• A presentation background
• A YouTube visual
• A social-media clip
• A storyboard scene
• A cinematic introduction
• An educational demonstration
• A moving article example
For the AI Mastery website, an infographic or realistic article image can sometimes be adapted into a short supporting animation when the composition is suitable.
However, instructional infographics containing substantial text should normally remain static. Important wording may distort when the image is animated.
Useful for Animating Landscapes
Landscapes are practical beginner projects because they can often be animated with small environmental movements.
Possible movements include:
• Clouds drifting
• Leaves swaying
• Grass moving
• Water rippling
• Mist travelling
• Snow falling
• Light changing gradually
• A camera moving slowly along a path
A landscape can appear more engaging without changing the main mountains, buildings, roads, or horizon.
Example:
Clouds drift slowly across the sky while leaves and grass move gently in a light breeze. Small ripples travel across the lake. Keep the mountains, shoreline, trees, lighting, and composition stable.
Helpful for Product Concepts
Image-to-video can turn a prepared product image into a short concept video.
Possible controlled movements include:
• A slow camera orbit
• A gentle push forward
• A limited turntable rotation
• Soft reflections moving across the product
• Background lighting changing gradually
• Steam or particles moving around the product
This can be useful for:
• Early advertising concepts
• Mood boards
• Client previews
• Storyboards
• Website mock-ups
• Product-presentation ideas
The product still must be reviewed carefully. Generated movement may alter packaging, buttons, dimensions, labels, materials, or colours. Use real footage when exact product accuracy is required.
Makes Portrait Animation Possible
A still portrait can be given subtle movement such as:
• Natural blinking
• Gentle breathing
• A small head turn
• Eye movement
• Slight hair movement
• A slow camera push forward
This can make a presentation or educational scene feel more active.
The safest beginner approach is to keep portrait movement limited. Asking for dramatic facial expressions, complex speech, large body movement, and camera movement simultaneously increases the chance of an unstable face or unnatural body motion.
Example:
The woman breathes naturally, blinks once, and slowly turns her eyes toward the window. Her hair moves gently. Keep her facial appearance, age, hairstyle, clothing, body position, lighting, and background consistent.
Supports Storyboarding and Pre-Visualization
A storyboard frame can be animated to demonstrate how a planned scene might work before full production begins.
Image-to-video can help preview:
• Camera direction
• Subject movement
• Scene timing
• Background motion
• Lighting changes
• Product reveals
• Transitions
• Opening and closing compositions
This can help a creator explain an idea to:
• A video editor
• A client
• A teacher
• A business partner
• A designer
• A production team
The generated clip does not have to become the final video. It can serve as a moving visual draft.
First-Frame and Last-Frame Control
Some image-to-video workflows allow users to provide both a beginning image and an ending image.
Adobe Firefly currently supports uploaded keyframes that can guide the beginning, ending, or both ends of a generated clip. Adobe notes that some other composition, style, and camera controls may be disabled when keyframes are used because the uploaded frames take over part of that guidance.
This can help create:
• A book opening
• A lamp turning on
• A product reveal
• A person changing their gaze
• A camera moving from a wide shot to a closer view
• A planned before-and-after transition
The first and last images should remain visually compatible. Large differences in camera angle, lighting, background, or subject position can produce an unstable transition.
Easier Character and Style Planning
When several clips should share a related appearance, a prepared image can provide a consistent visual reference.
You can reuse:
• The same character design
• The same clothing
• The same product
• The same location
• The same colour palette
• The same illustration style
• Similar lighting
• Similar composition
This does not guarantee perfect consistency between generations, but it provides a stronger starting reference than recreating the complete scene from text each time.
For multi-scene projects, keep a consistency sheet containing:
• Character description
• Clothing details
• Product details
• Environment description
• Colour palette
• Lighting
• Aspect ratio
• Model and settings
• Reference images
Faster Testing of Creative Ideas
A still concept can be animated quickly to determine whether an idea is worth developing.
You can test:
• Whether a camera push works
• Whether the composition has enough depth
• Whether environmental movement improves the scene
• Whether a portrait feels natural
• Whether a product should remain still or rotate
• Whether the clip suits a website or presentation
• Whether the scene should be filmed for real
A weak test can still be valuable because it reveals problems before additional time or money is invested.
Lower Filming Requirements
Image-to-video generation can create motion without requiring every scene to be filmed with:
• A camera
• Lighting equipment
• Actors
• A physical location
• A product studio
• Weather conditions
• Travel
• A full production team
This can be useful for visual concepts, educational examples, backgrounds, and short supporting scenes.
It should not replace real filming when authenticity, exact evidence, genuine testimony, or precise product operation is required.
Useful for Difficult-to-Film Scenes
Some scenes may be impractical, expensive, dangerous, or impossible to record.
Examples include:
• Historical environments
• Futuristic cities
• Fantasy landscapes
• Space scenes
• Underwater worlds
• Extreme weather
• Imaginary products
• Abstract educational concepts
A still concept image can be prepared first and then animated with controlled movement.
Generated scenes must be presented honestly. A realistic AI-generated scene that did not occur may require disclosure when published on platforms such as YouTube. YouTube currently requires its AI use setting for photorealistic content that was meaningfully generated or altered, including realistic scenes that did not actually happen.
Easier Scene-by-Scene Production
Longer AI videos are usually easier to build from several short clips.
For example:
1. Establishing image of a landscape
2. Slow movement toward the main subject
3. Close-up of an object
4. Environmental detail
5. Final wide scene
Each image can be prepared separately and animated with one simple movement.
This method allows you to:
• Replace one weak scene
• Use different movement in each clip
• Control the pace
• Protect credits
• Maintain an organized project
• Combine only the strongest results
A single unsuccessful scene does not require recreating the entire video.
Easier Revision and Troubleshooting
A prepared image and written movement plan make it easier to determine why a video failed.
You can separately examine:
• The source image
• The crop
• The motion prompt
• The camera control
• The duration
• The model
• The generated result
For example:
• An incorrect crop usually points to the prepared image or aspect ratio.
• Excessive camera speed may point to the camera instruction or preset.
• A changing face may point to the source image, motion complexity, duration, or model.
• A missing action may point to unclear prompt wording.
Runway recommends starting simply and refining individual motion components as needed. This controlled iteration helps users understand how prompt changes affect the output.
Supports Multiple Publishing Formats
A suitable source image can be prepared for:
• 16:9 landscape
• 9:16 vertical
• 1:1 square
• 4:5 portrait
This allows the same idea to be adapted for:
• WordPress
• YouTube
• Presentations
• YouTube Shorts
• Instagram Reels
• TikTok
• Social-media feeds
Each format should be prepared and reviewed separately. Severe cropping of one generated video into several shapes may remove important subjects or captions.
Helpful for Website Visuals
A short image-generated clip may be used as:
• An article demonstration
• A background section
• A product concept
• A visual explanation
• A moving header
• A before-and-after example
• A tutorial illustration
For WordPress, the video should be:
• Relevant to the article
• Short and focused
• Compressed appropriately
• Supported by written explanation
• Captioned when narration is important
• Tested on desktop and mobile
Do not add video merely for decoration when it slows the page without improving understanding.
Supports Accessible Educational Content
Image-generated video can support an explanation when it is combined with:
• Narration
• Checked captions
• A written transcript
• Clear titles
• A descriptive introduction
• A paragraph explaining the result
For example, a still diagram showing a process can be replaced or supplemented by a short animation that demonstrates movement or sequence.
Important information should still appear in the written article. Readers should not need to watch the video to understand the essential lesson.
Encourages Organized Creative Work
A complete image-to-video project encourages creators to keep:
• Source images
• Prepared images
• Prompt versions
• Generation settings
• Generated clips
• Editing files
• Audio licences
• Final exports
• Publishing records
This organized workflow makes future projects easier and reduces the chance of losing permissions or successful settings.
Supports Human Creativity
The AI creates frames, but the creator still decides:
• Which image to use
• What the video should communicate
• What should move
• What should remain stable
• Which prompt to write
• Which version to keep
• What needs editing
• Whether the result is accurate
• Whether the video is appropriate to publish
The uploaded image and prompt are not substitutes for creative judgment. They are tools the creator uses to guide the production process.
A Practical View of the Benefits
Image-to-video is most useful when you want to:
• Preserve a planned opening composition
• Animate an existing visual
• Add gentle movement
• Test a scene before filming
• Create a short supporting clip
• Build a video scene by scene
• Reuse a strong AI-generated image
• Prepare educational or website visuals
• Control the starting appearance more closely
It is less suitable when you require:
• Exact documentary evidence
• Genuine testimony
• Guaranteed facial consistency
• Precise product operation
• Perfect text preservation
• Verified real-world events
• Completely predictable motion
Use image-to-video for creative flexibility, visual explanation, prototypes, and supporting scenes. Use real footage when authenticity and exact accuracy are essential.
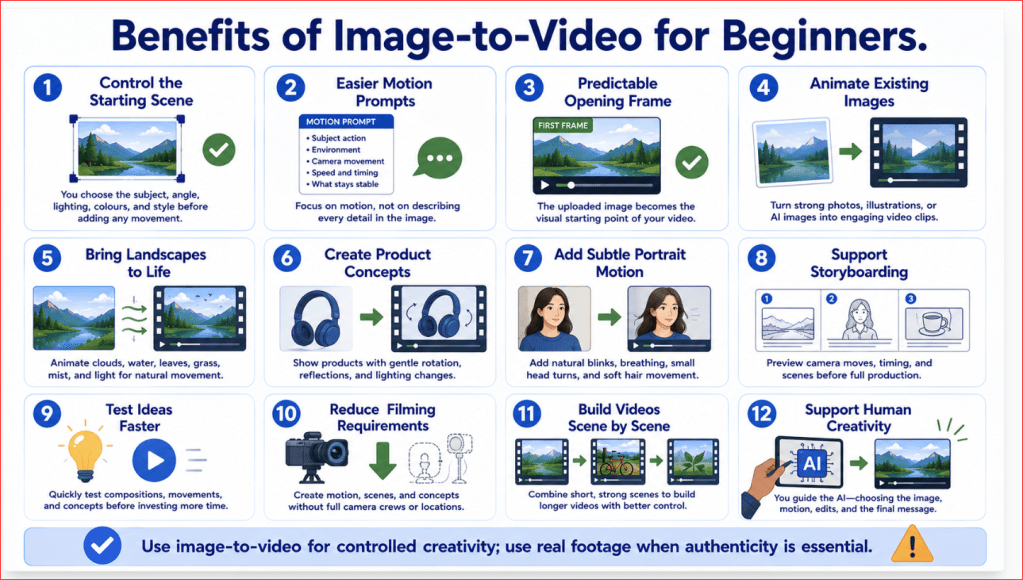
Figure 12. The main benefits image-to-video generation can provide to beginners and content creators.
Figure 12 summarizes how image-to-video can provide greater control over the starting scene, simplify motion prompting, animate existing images, support storyboarding, reduce filming requirements, assist scene-by-scene production, and create useful website and educational visuals
Limitations of Image-to-Video Generation
Image-to-video tools provide more control over the starting composition than text-to-video, but they cannot guarantee that every detail in the uploaded image will remain unchanged.
Faces, hands, products, backgrounds, lighting, and camera movement may become unstable as the AI creates new frames. A clear source image and focused motion prompt reduce some problems, but they do not remove the need for careful review.
Results May Differ Between Generations
Using the same image and prompt more than once may produce different:
• Movements
• Camera paths
• Facial expressions
• Background behaviour
• Lighting changes
• Final frames
• Object details
This variation can help during creative exploration, but it makes exact reproduction difficult.
How to Reduce This Limitation: Save the source image, complete prompt, model name, settings, generation date, and every useful version.
Existing Image Defects May Become Worse
The video generator uses the uploaded image as the first frame and visual foundation. Blurry faces, distorted hands, unclear object edges, or other artifacts may become more noticeable once movement is generated. Runway specifically recommends using a high-quality source image that is free from visible defects.
How to Reduce This Limitation: Inspect the image at full size and correct important defects before uploading it.
Faces May Change During Movement
A person’s:
• Eyes
• Mouth
• Age
• Facial shape
• Hairstyle
• Skin texture
• Expression
may change during blinking, speaking, head turns, or camera movement.
Larger facial movements generally give the model more opportunities to alter the person’s appearance.
How to Reduce This Limitation: Use a clear portrait, request subtle movement, shorten the duration, and keep the camera fixed or moving very slowly.
Hands and Fingers May Become Distorted
Hands can:
• Gain or lose fingers
• Merge with objects
• Change position unnaturally
• Disappear
• Become blurred
• Move independently from the arms
This risk increases when a person handles small objects or performs several hand movements.
How to Reduce This Limitation: Use a wider view, keep hands resting naturally, request one slow action, and avoid complicated object handling.
Products May Change Shape or Details
Image-to-video generation may alter:
• Product dimensions
• Packaging
• Buttons
• Labels
• Colours
• Materials
• Reflections
• Accessories
• Logos
A visually attractive animation may therefore be unsuitable as an exact product demonstration.
How to Reduce This Limitation: Use minimal motion, identify the details that must remain stable, review every frame, and use real footage when precise accuracy is essential.
Text May Change or Become Unreadable
Text on signs, screens, clothing, packaging, or product labels may become:
• Misspelled
• Distorted
• Replaced
• Blurred
• Inconsistent between frames
Important wording should not be trusted simply because it looks correct in the starting image.
How to Reduce This Limitation: Remove nonessential text before generation and add accurate titles, labels, prices, or instructions later in a video editor.
Backgrounds May Flicker or Transform
Background elements may:
• Shift position
• Change shape
• Appear or disappear
• Flicker
• Merge together
• Move when they should remain fixed
Repeated objects such as windows, fence posts, books, chairs, tiles, or trees can be especially difficult to preserve.
How to Reduce This Limitation: Use a simple background, reduce camera movement, shorten the clip, and name the important permanent elements in the prompt.
Objects May Appear or Disappear
The AI may introduce:
• Extra people
• Vehicles
• Furniture
• Plants
• Animals
• Signs
• Products
• Decorative objects
Existing objects may also disappear during camera or subject movement.
How to Reduce This Limitation: Describe the intended scene as one continuous composition and state that the important existing objects remain visible and unchanged.
Movement May Be Too Strong or Too Weak
Words such as gently, slowly, or naturally do not always produce the same level of movement across different models.
The output may contain:
• Barely visible movement
• Excessive motion
• Jerky movement
• Unrealistic speed
• Sudden acceleration
• Unwanted camera shake
How to Reduce This Limitation: Generate one test, observe the actual strength, and revise the speed or motion instruction precisely.
Camera Instructions May Not Be Followed Exactly
The camera may:
• Move in the wrong direction
• Move faster than requested
• Zoom unexpectedly
• Drift when it should remain fixed
• Change framing
• Introduce a different angle
Menu-based camera controls and written prompt instructions may also conflict.
How to Reduce This Limitation: Use one camera movement, check any selected motion preset, and make sure the prompt and settings request the same behaviour.
Cropping May Remove Important Details
Choosing a video format that differs from the uploaded image may crop:
• Heads
• Hands
• Feet
• Product edges
• Wheels
• Background space
• Areas intended for captions
Automatic cropping may also change the balance of the original composition.
How to Reduce This Limitation: Prepare the source image in the final aspect ratio and inspect the platform’s crop before generating.
First and Last Frames May Not Connect Smoothly
When two keyframes are used, the generated transition may contain:
• Warping
• Sudden camera changes
• Altered subjects
• Background transformation
• Lighting changes
• Unnatural intermediate movement
The problem is more likely when the two images have very different compositions, angles, lighting, or object positions.
How to Reduce This Limitation: Use compatible first and last frames or divide a large transformation into several smaller clips.
Short Clips Limit Complex Storytelling
A short generation may not provide enough time for:
• Several actions
• Detailed dialogue
• Multiple camera movements
• Location changes
• Complex character interactions
• A complete narrative
Trying to fit too much into one clip can produce missing actions or unexpected scene changes.
How to Reduce This Limitation: Divide the story into separate storyboard scenes and combine the strongest short clips during editing.
Character Consistency Across Clips Is Not Guaranteed
Even when the same starting character image is reused, separate generations may change:
• Facial details
• Clothing
• Hair
• Age
• Body proportions
• Accessories
• Lighting
This can make several clips feel disconnected.
How to Reduce This Limitation: Reuse the same reference images, repeat essential character details, keep similar framing and lighting, and create a consistency sheet for the project.
Audio May Need to Be Added Separately
Some image-to-video models generate silent clips. Others may produce audio that contains:
• Incorrect words
• Unnatural timing
• Weak synchronization
• Excessive background noise
• Unsuitable music
• Unbalanced volume
How to Reduce This Limitation: Treat generated audio as a draft. Add or replace narration, music, captions, and sound effects during editing.
Tool Features Differ by Model and Account
Image-to-video controls may vary according to:
• Selected model
• Subscription plan
• Geographic region
• Account type
• Browser
• Operating system
• Device
Adobe’s current Firefly video editor supports Chrome and Edge, and its import and editing workflows include specific file-size, duration, resolution, animation, and transparency limitations. [12]
How to Reduce This Limitation: Confirm that the required model and controls work on your own account, browser, and device before purchasing a plan.
Upload and Generation Failures Can Occur
A generation may fail because of:
• Unsupported image format
• Incorrect dimensions
• Missing required settings
• Insufficient credits
• Account restrictions
• Partner-model restrictions
• Temporary service problems
Adobe identifies incomplete settings, unavailable account access, insufficient credits, unsupported reference files, and service disruptions as possible causes of failed video generations. [12]
How to Reduce This Limitation: Check the error message, confirm the file requirements, review available credits, save the prompt, and try another supported model when appropriate.
Credits Can Be Consumed Quickly
One usable scene may require several generations because the first result can contain incorrect motion, unstable subjects, poor cropping, or background changes.
Testing longer durations, higher resolutions, or several models can increase credit consumption.
How to Reduce This Limitation: Generate one version at a time, test with simple movement, and use higher-quality settings only after the scene works.
Built-In Editors May Have Compatibility Limits
A platform’s editor may not support every media type or workflow.
Adobe’s current Firefly video editor limits imported files by size, duration, and resolution. Animated GIF and WebP files display only their first frame when added to its timeline, and transparent generated videos may not appear as expected. [12]
How to Reduce This Limitation: Download a test file and confirm that it works in your preferred editor before starting a large project.
Prompts May Be Interpreted Differently by Each Model
There is no universal prompt formula that produces identical behaviour across all image-to-video models.
Runway explains that rigid prompt structure is less important than communicating the idea clearly and reducing ambiguity. [1]
A prompt that works well in one tool may require different wording in another.
How to Reduce This Limitation: Keep the underlying movement plan consistent, but adjust the wording according to the official guidance for the selected model.
Commercial Permission Does Not Guarantee Accuracy
A platform may permit commercial use while the generated clip still contains:
• Incorrect products
• Unexpected brands
• Altered labels
• Misleading actions
• Unlicensed source material
• A real person used without sufficient permission
Commercial-use permission does not replace human review or source-image rights.
How to Reduce This Limitation: Verify the starting image, model terms, product details, people’s consent, audio rights, and every generated frame before publication.
AI Cannot Determine Whether the Video Is Appropriate
The generator cannot reliably decide whether a clip is:
• Accurate
• Respectful
• Misleading
• Suitable for children
• Appropriate for advertising
• Safe to publish
• Properly disclosed
• Consistent with platform rules
The creator remains responsible for the final decision.
How to Reduce This Limitation: Complete a human review covering visuals, movement, factual claims, privacy, licences, consent, disclosure, and publishing requirements.
When Image-to-Video Is Not the Best Choice
Use real footage instead when the project requires:
• Documentary evidence
• Genuine testimony
• Exact product operation
• Safety instructions
• Medical demonstrations
• Legal evidence
• Verified real events
• Precise actions by a real person
• Completely accurate product labels
Image-to-video is strongest for creative concepts, visual explanations, animation, storyboards, website visuals, and short supporting scenes.
Limitations Checklist
Before using the finished clip, confirm:
1. The main subject remains recognizable.
2. Faces and hands remain acceptable.
3. Product details are accurate enough for the intended use.
4. Important text is correct or will be added later.
5. The background remains reasonably stable.
6. No important object disappears.
7. No unwanted object appears.
8. Camera movement follows the intended direction.
9. Cropping does not remove important content.
10. Lighting and colours remain consistent.
11. The final second remains usable.
12. The clip does not misrepresent a real person or event.
13. Source permissions and model terms have been checked.
14. Editing is complete.
15. A human has approved the final video.
Image-to-video generation offers useful control over the starting scene, but it remains an experimental production method. The strongest results come from realistic expectations, simple motion, controlled testing, careful editing, and responsible human review.

Figure 13. The main limitations beginners should understand when creating AI videos from images.
Figure 13 shows that image-to-video generation may produce changing faces, distorted hands, altered products, unstable backgrounds, incorrect text, cropping, camera errors, inconsistent characters, and high credit use. Recognizing these limits helps beginners choose suitable projects and determine when real footage is more appropriate.
Common Myths About Image-to-Video Generation
Image-to-video tools can make still pictures appear alive, but they are often misunderstood. Promotional demonstrations may suggest that any photograph can become a perfect video with one click.
In practice, the quality of the starting image, movement plan, prompt, model, settings, and human review all affect the result.
Myth 1: Any Image Can Produce a Good Video
Reality: A blurry, distorted, heavily cropped, or poorly composed image gives the AI a weak visual foundation.
Problems in the source image may become more noticeable after movement is added, including:
• Distorted faces
• Incorrect hands
• Blurry product details
• Broken object edges
• Unreadable text
• Unnatural shadows
Prepare and correct the image before spending video credits.
Myth 2: Image-to-Video Automatically Repairs the Starting Image
Reality: The video generator is designed mainly to create movement, not to correct every visual defect.
It may preserve or worsen:
• Incorrect fingers
• Uneven eyes
• Misshapen products
• Duplicate objects
• Broken furniture
• Incorrect text
• Poor lighting
Correct or regenerate the starting image first.
Myth 3: The Prompt Must Describe Everything in the Image
Reality: The image already defines the visible scene.
The prompt should focus mainly on:
• What moves
• How it moves
• Camera behaviour
• Direction and speed
• Timing
• What must remain stable
Instead of repeating the entire image description, use a focused instruction such as:
Grass moves gently while the camera slowly pushes forward toward the bicycle. Keep the bicycle, fence, road, trees, lighting, and background consistent.
Myth 4: A Longer Prompt Always Produces a Better Video
Reality: A long prompt may contain repeated, unnecessary, or conflicting instructions.
A useful prompt does not need to be complicated. It needs to clearly describe:
• One primary action
• One simple camera movement
• Controlled environmental motion
• Important stability details
Add more information only when it helps correct a specific problem.
Myth 5: More Movement Makes the Video More Impressive
Reality: Excessive movement often makes an image-generated video less stable.
Too much movement can cause:
• Camera shake
• Changing faces
• Distorted hands
• Altered products
• Background flickering
• Objects appearing or disappearing
• Unnatural speed
Slow, controlled movement usually looks more professional than several dramatic actions occurring at once.
Myth 6: The Entire Image Should Move
Reality: Many strong image-to-video clips animate only one or two elements.
For example:
• Steam rises while the cup remains still.
• Leaves move while the tree trunk remains fixed.
• A person blinks while their body remains still.
• The camera moves while the product remains unchanged.
• Water ripples while the shoreline remains stable.
Movement becomes easier to control when permanent objects are clearly protected.
Myth 7: Image-to-Video Guarantees Character Consistency
Reality: A person or character may change during the clip or between separate generations.
Possible changes include:
• Face
• Age
• Hair
• Clothing
• Body proportions
• Skin tone
• Accessories
Reuse the same reference image, repeat essential character details, keep motion simple, and review every scene.
Even with careful preparation, perfect consistency is not guaranteed.
Myth 8: One Reference Image Shows the AI Everything It Needs
Reality: One image only shows the subject from one angle and at one moment.
It may not clearly show:
• The opposite side of a product
• Hidden clothing details
• The back of a person
• Objects behind the subject
• How a body should move
• What should appear after a camera rotation
Avoid requesting a large camera orbit or dramatic body movement when the necessary visual information is not present.
Myth 9: Image-to-Video Preserves Products Exactly
Reality: Product details may change as new frames are generated.
The AI may alter:
• Buttons
• Packaging
• Labels
• Materials
• Colours
• Proportions
• Accessories
• Reflections
Image-to-video may be useful for product concepts and early advertising drafts, but real footage is safer when exact product appearance or operation must be demonstrated.
Myth 10: Visible Text Will Remain Correct
Reality: Text may become distorted, misspelled, blurred, or inconsistent between frames.
This affects:
• Signs
• Packaging
• Screens
• Clothing
• Book covers
• Product labels
• Prices
• Website addresses
Generate the scene without essential wording whenever possible. Add accurate text later during editing.
Myth 11: Higher Resolution Fixes Motion Problems
Reality: Higher resolution improves sharpness, but it does not automatically correct:
• Changing faces
• Distorted hands
• Incorrect camera movement
• Background flickering
• Altered products
• Missing actions
• Unexpected objects
Test the movement and composition first. Use higher-quality settings only after the scene works properly.
Myth 12: Longer Clips Are Always Better
Reality: A longer clip gives the model more time to introduce unwanted changes.
After the main action is completed, the remaining seconds may contain:
• Facial changes
• Background drift
• Additional movement
• Object distortion
• Lighting changes
• A weak ending
Match the duration to the action. A stable five-second clip is more valuable than an unstable ten-second clip.
Myth 13: First and Last Frames Guarantee a Smooth Transition
Reality: Two keyframes provide visual guidance, but they do not guarantee a natural transition.
Problems are more likely when the images have different:
• Camera angles
• Subject positions
• Backgrounds
• Lighting
• Colours
• Object sizes
• Compositions
Use visually compatible frames and divide major transformations into smaller scenes.
Myth 14: A Fixed-Camera Instruction Stops All Camera Movement
Reality: The generated camera may still drift, zoom, or change framing.
A stronger instruction is:
The camera remains completely fixed in one stable tripod shot while steam rises gently from the cup.
Describing visible movement within the scene gives the model something to animate while the camera remains still.
Myth 15: Negative Instructions Prevent Every Error
Reality: A long list beginning with “no” does not guarantee that unwanted changes will be avoided.
Instead of writing:
No flickering, no distortion, no camera shake, no changing background, no extra objects, and no colour changes.
Use positive instructions:
Use smooth, stable motion. Keep the subject, background, lighting, colours, and composition visually consistent throughout the clip.
A small number of focused restrictions may still be useful, but they should not replace a clear description of the intended result.
Myth 16: One Prompt Works Equally Well in Every Tool
Reality: Different models may interpret the same prompt differently.
A prompt that works well in one platform may produce:
• Stronger or weaker movement
• A different camera path
• A changed subject
• Different timing
• More background instability
Keep the movement plan consistent, but adjust the wording and settings for the selected model.
Myth 17: The First Generation Shows the Tool’s Full Ability
Reality: A weak first result may be caused by:
• An unsuitable image
• Excessive motion
• An unclear prompt
• Conflicting camera settings
• The wrong duration
• An unsuitable model
Review the result, identify the largest problem, and revise one instruction before deciding that the tool cannot complete the project.
Myth 18: Generating Many Versions Is the Fastest Approach
Reality: Producing several uncontrolled variations may consume credits without teaching you why the results are weak.
A better workflow is:
1. Generate one version.
2. Watch the complete clip.
3. Identify the main problem.
4. Change one instruction.
5. Generate again.
6. Compare the results.
Controlled testing produces more useful information than random repetition.
Myth 19: Image-to-Video Requires No Editing
Reality: Generated clips commonly need:
• Trimming
• Speed adjustments
• Titles
• Captions
• Narration
• Music
• Colour correction
• Audio balancing
• Transitions
• Compression
AI generation creates the moving visual material. Editing prepares it for publication.
Myth 20: A Paid Plan Automatically Gives Full Commercial Rights
Reality: Commercial use may depend on:
• The platform
• The selected model
• The subscription plan
• The starting image
• Real-person consent
• Music and voice rights
• Brands and protected content
• The intended publishing platform
Paying for access does not give you permission to animate an image owned by someone else.
Myth 21: Adding an AI Disclosure Makes Every Use Acceptable
Reality: Disclosure supports transparency, but it does not excuse:
• Copyright infringement
• Unauthorized use of a person’s likeness
• False endorsements
• Misleading advertising
• Harmful impersonation
• Fabricated evidence
• Inaccurate product claims
The video must still be permitted, accurate, respectful, and appropriate.
Myth 22: AI-Generated Video Can Be Used as Real Evidence
Reality: A generated clip is a simulation or creative output. It is not proof that an event occurred.
Do not present it as evidence of:
• An accident
• A crime
• Product performance
• Customer satisfaction
• Medical results
• Financial results
• Property damage
• A person’s behaviour
Clearly identify generated or simulated scenes when viewers could misunderstand them.
Myth 23: Image-to-Video Can Replace All Real Filming
Reality: Image-to-video is useful for:
• Creative concepts
• Visual explanations
• Storyboards
• Animated landscapes
• Website visuals
• Product concepts
• Short supporting scenes
Real footage remains preferable for:
• Genuine testimony
• Documentary evidence
• Exact product operation
• Safety instructions
• Verified events
• Authentic demonstrations
• Precise actions by real people
Myth 24: Human Creativity Is No Longer Necessary
Reality: The creator still decides:
• Which image to use
• What should move
• What should remain stable
• How the prompt should be written
• Which model and settings to select
• Which result is strongest
• What needs editing
• Whether the video is accurate
• Whether it should be published
The AI creates frames. The human provides purpose, direction, judgment, and responsibility.
A Practical Reality Check
Image-to-video generation works best when you:
• Begin with a strong image
• Plan one simple movement
• Use a focused prompt
• Protect important details
• Generate one version at a time
• Review the complete clip
• Correct one problem at a time
• Edit the selected result
• Check permissions and disclosure
• Keep organized records
The goal is not to make every part of the image move. The goal is to add controlled movement that improves the scene without damaging the details that make the image useful.
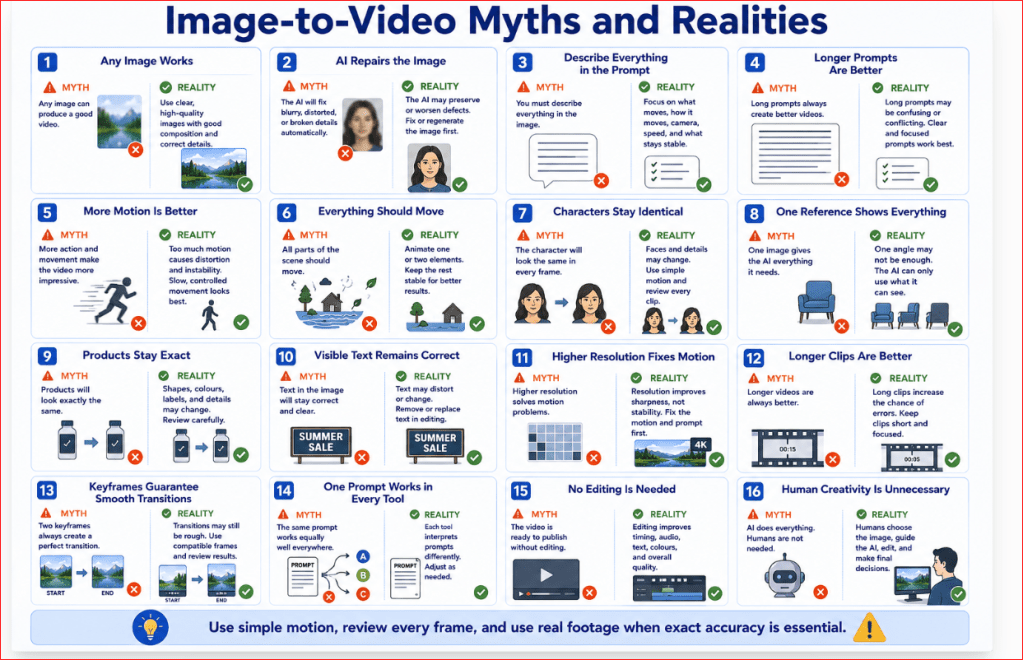
Figure 14. Common myths and realities about creating AI videos from still images.
Figure 14 corrects common misunderstandings about source-image quality, prompt length, movement, consistency, resolution, editing, commercial rights, disclosure, and human creativity. Image-to-video works best as a controlled production process rather than an automatic one-click solution.
Frequently Asked Questions About Creating AI Videos from Images
What Is Image-to-Video Generation?
Image-to-video generation uses an uploaded still image as the opening visual foundation for a newly generated moving clip.
The starting image normally guides the:
• Subject
• Composition
• Lighting
• Colours
• Background
• Visual style
The written prompt mainly explains the motion, camera behaviour, direction, speed, timing, and what should remain stable.
Is Image-to-Video Easier Than Text-to-Video?
It can be easier when you already have a strong image.
With text-to-video, the AI must create both the scene and its movement. With image-to-video, the image has already established the subject and composition, allowing the prompt to focus more directly on animation.
Image-to-video is particularly useful when:
• The opening composition matters
• A specific product or character must appear
• You want to animate an existing photograph
• Several clips should share a similar visual style
• You need greater control over the first frame
It does not guarantee that every detail will remain unchanged.
What Is the Best Image for a First Project?
Choose an image that has:
• One obvious main subject
• Sharp focus
• Correct faces and hands
• A simple background
• Consistent lighting
• Enough space for movement
• The correct aspect ratio
• No unnecessary visible text
• No private information
• No visual defects
Runway recommends using a high-quality image without artifacts because blurry faces, hands, or other weaknesses may become more noticeable during animation.
A landscape, stationary product, coffee cup with steam, or bicycle beside a road is normally easier than a crowded scene containing several people.
Do I Need to Describe Everything Visible in the Image?
No. The image already communicates the visible subject, composition, lighting, and style.
The prompt should mainly describe:
• Subject action
• Environmental movement
• Camera movement
• Direction and speed
• Timing
• Important stability requirements
Runway’s official guidance recommends focusing image-to-video prompts almost entirely on motion rather than repeating what is already visible.
For example:
Grass moves gently while the camera slowly pushes forward toward the bicycle. Keep the bicycle, fence, road, trees, lighting, and background visually consistent.
How Long Should My First Clip Be?
Begin with approximately five or six seconds and one simple movement.
Runway’s current Gen-4.5 workflow allows durations from two to ten seconds. A longer duration may help with sequential actions, but it also gives faces, products, objects, and backgrounds more time to change.
Use several short clips when creating a longer video.
Can I Keep the Camera Completely Still?
You can request a fixed camera, although the generator may still introduce slight movement.
Use wording such as:
The camera remains completely fixed in one stable tripod shot while steam rises gently from the coffee.
Describe some visible movement inside the scene so the model knows what it should animate while the camera remains still.
Positive wording such as locked camera or the camera remains still is generally clearer than relying on a long list of negative restrictions.
Can I Animate a Photograph of a Real Person?
Technically, a compatible tool may animate a portrait, but you should have appropriate permission from the recognizable person.
Begin with subtle movements such as:
• One natural blink
• Gentle breathing
• A slight eye movement
• A small head turn
• Soft hair movement
Do not make a real person appear to give an endorsement, make a statement, perform an action, or participate in an event without authorization.
Realistic synthetic content that makes someone appear to do something they did not do may also require disclosure on YouTube.
How Can I Keep a Face Consistent?
Use:
• A clear, high-quality portrait
• A short duration
• Minimal facial movement
• A fixed or very slow camera
• Clear identity-preservation instructions
• A wider framing when possible
Example:
The woman blinks naturally once. Keep her facial identity, age, hairstyle, skin tone, clothing, body position, lighting, and background visually consistent.
Perfect facial consistency is not guaranteed. Review the eyes, mouth, hairline, expression, and final frame carefully.
Why Does the Product Change During the Video?
The AI must create new frames between the starting image and the end of the clip. During that process, it may reinterpret small commercial details.
Possible changes include:
• Shape
• Colour
• Buttons
• Packaging
• Materials
• Labels
• Proportions
• Reflections
Use minimal movement and identify the details that must remain unchanged. Real footage is preferable when exact product appearance or operation must be demonstrated.
Should I Use Both a First Frame and a Last Frame?
Use both when the video needs to finish in a planned composition.
Suitable examples include:
• A closed book becoming open
• A lamp changing from off to on
• A person changing their gaze
• A packaged product becoming revealed
• A wide shot ending closer to the subject
Adobe Firefly currently supports keyframe images for image-guided video generation. Compatible first and last images can guide how the clip begins and ends.
The frames should have similar subjects, lighting, camera angles, backgrounds, colours, and object positions. Large differences may produce an unstable transition.
Can I Create a Long Video from One Image?
Image-to-video generators commonly produce short clips rather than a complete long-form video.
You can create a longer sequence by:
1. Generating the first short clip.
2. Saving a suitable final frame.
3. Using that frame as the starting image for the next clip.
4. Repeating the process.
5. Combining the clips in a video editor.
Runway specifically describes using the last frame of one generation as the image input for a continuation.
A storyboard and scene-by-scene workflow provide better control than placing an entire story into one prompt.
Can ChatGPT Help Me Create the Video?
ChatGPT can help you prepare:
• The video idea
• Scene plan
• Motion prompt
• Camera instructions
• Narration
• Captions
• Troubleshooting revisions
• File-naming system
• Publishing checklist
The moving footage in this workflow is then created using an image-to-video generator that accepts the prepared image and motion prompt.
Always check that the final prompt still matches the actual image before generating.
How Many Generations Will I Need?
There is no fixed number.
A simple landscape may produce a usable result after one or two attempts. Portraits, products, hands, text, complex actions, and strong camera movements may require more testing.
Iteration is an expected part of generative-video creation. Each result shows how the model interpreted the image and instructions.
Use this process:
1. Generate one version.
2. Watch the entire clip.
3. Identify the largest problem.
4. Revise one instruction.
5. Generate again.
6. Compare the versions.
Do not generate many variations before reviewing the first result.
What Should I Do When Nothing Moves?
Move the missing action closer to the beginning of the prompt and describe it more directly.
Weak prompt:
Maintain the same room and lighting. Steam should be visible.
Improved prompt:
Steam rises clearly and continuously from the coffee throughout the clip. The camera remains fixed.
Keep the rest of the prompt simple so the requested motion remains the main instruction.
What Should I Do When Everything Moves Too Much?
Reduce the number and intensity of the requested actions.
Instead of requesting movement in the subject, camera, background, lighting, and several objects, choose:
• One main action
• One simple camera movement
• One small environmental movement
• Clear stable elements
Example:
Grass moves very gently while the camera pushes forward extremely slowly. Keep the bicycle, fence, road, trees, lighting, and background stable.
Runway recommends beginning with the essential motion and adding one component at a time during refinement.
Can I Upload an Image-Generated Video to WordPress?
Yes. WordPress.com supports embedding a video from another service or adding video using the Video block. It also provides options for text tracks and poster images. Directly hosted video options and VideoPress availability depend on the site’s plan.
Before publishing:
• Export as MP4
• Compress the website copy
• Add a poster image
• Include captions when needed
• Add a written explanation
• Test playback on desktop and mobile
Embedding a YouTube video may be more practical than uploading a large file directly to the website.
Can I Upload the Video to YouTube?
Yes, provided you have the necessary rights to the:
• Starting image
• Generated footage
• Music
• Narration
• Voices
• Additional media
YouTube requires disclosure when content is meaningfully altered or synthetically generated and appears realistic—for example, when it shows a realistic scene that did not happen or makes a real person appear to do something they did not do.
The disclosure is completed through the altered-content setting in YouTube Studio.
Do All Image-Generated Videos Require AI Disclosure?
Not every minor or obviously unrealistic use requires disclosure.
Disclosure becomes more important—and may be required—when the clip:
• Appears realistic
• Uses a recognizable real person
• Alters a real place or event
• Depicts a realistic event that never occurred
• Uses another person’s cloned voice
• Could reasonably mislead viewers
YouTube distinguishes realistic, meaningful synthetic content from minor production assistance such as captions, script improvement, colour adjustment, or ordinary video repair.
A useful written note is:
This video includes visuals created or modified using artificial intelligence.
Use the platform’s official disclosure setting when required.
Can I Use Image-to-Video Clips Commercially?
Possibly, but you must check both the video model’s conditions and the rights to the source image.
Runway currently states that, as between Runway and the user, users retain their rights to uploaded and generated content and may use their generations commercially. [4]
Adobe states that outputs from Firefly features may be used commercially according to the conditions described in its current Firefly documentation. Partner models available through Adobe may require a separate suitability review.
Platform permission does not give you rights to:
• Someone else’s photograph
• Copyrighted artwork
• Unauthorized music
• A protected character
• A person’s likeness
• An unlicensed product image
Review the exact platform, model, plan, source material, and intended use.
What Is the Best First Image-to-Video Project?
Use one clear landscape image containing a small amount of natural motion.
For example:
Clouds drift slowly while grass and tree leaves move gently in a light breeze. Small ripples move across the lake. The camera remains fixed. Keep the mountains, shoreline, trees, lighting, colours, and composition stable.
This project avoids complicated faces, hands, dialogue, text, and product details while teaching the essential workflow.
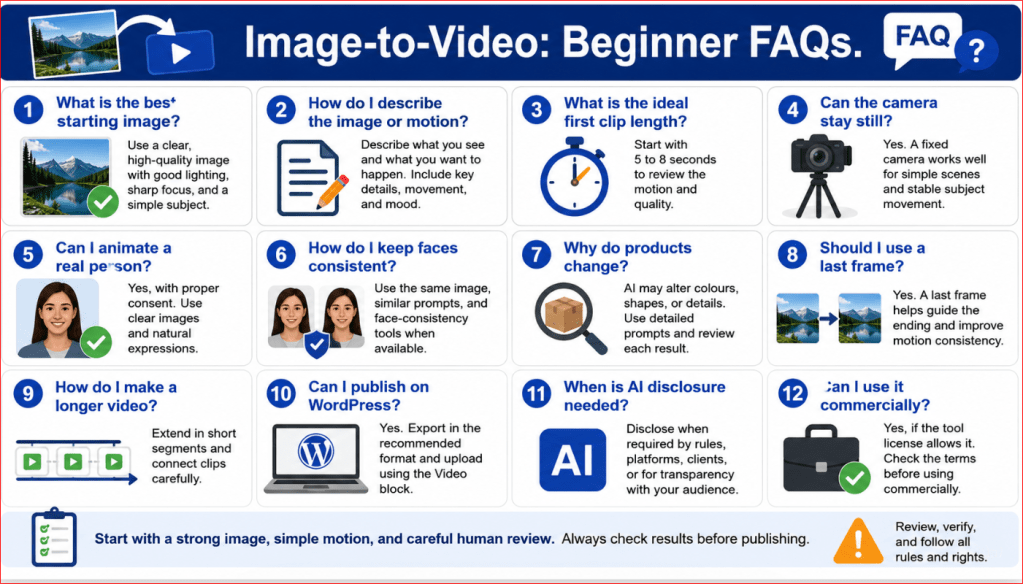
Figure 15. Quick answers to common beginner questions about creating AI videos from images.
Figure 15 summarizes the practical questions beginners ask most often, including source-image quality, motion prompts, duration, camera stability, real-person images, keyframes, longer videos, WordPress and YouTube publishing, disclosure, and commercial use.
Key Takeaways
• Image-to-video generation turns a still image into a short moving clip.
• The uploaded image defines the subject, composition, lighting, colours, background, and opening visual style.
• The written prompt should focus mainly on movement, camera behaviour, speed, timing, and what must remain stable.
• A clear, sharp, properly composed image usually produces a stronger starting point than a blurry or distorted image.
• Correct faces, hands, products, object edges, lighting, and background defects before uploading the image.
• Prepare the source image in the final video’s aspect ratio to reduce unwanted cropping.
• Leave enough empty space around the subject and in the direction of the intended movement.
• Begin with one main action and one simple camera movement.
• Gentle motion is normally easier to control than fast or dramatic movement.
• Suitable beginner movements include blinking, breathing, drifting clouds, moving grass, rising steam, rippling water, and a slow camera push.
• Separate subject movement, environmental movement, camera movement, and stable elements before writing the prompt.
• Use clear movement verbs such as turns, moves, drifts, rises, rotates, or flows.
• Describe direction and speed when they matter.
• State which important elements should remain consistent, including faces, clothing, products, buildings, furniture, lighting, and backgrounds.
• Do not repeat every visible detail from the image unless a detail is essential to preserve.
• Avoid placing several actions or camera movements into one short clip.
• Five- or six-second clips are usually practical for a first beginner project.
• First and last frames can guide a planned transition, but they do not guarantee a smooth result.
• Compatible keyframes should use similar subjects, camera angles, lighting, colours, backgrounds, and object positions.
• Generate one version first instead of requesting several uncontrolled variations.
• Watch the complete clip, including the final second, before deciding whether it is usable.
• Compare the result with the original image and the movement plan.
• Correct the largest problem first and change only one instruction or setting at a time.
• Higher resolution improves sharpness but does not correct unstable movement, distorted faces, altered products, or incorrect camera behaviour.
• Important visible text should normally be added during editing because generated text may change between frames.
• Product videos require careful frame-by-frame review because buttons, packaging, labels, colours, and dimensions may change.
• Real footage remains the safer choice when exact product operation, genuine testimony, documentary evidence, or verified events are required.
• Generated clips usually need trimming, pacing adjustments, captions, narration, music, colour correction, compression, and final testing.
• MP4 is generally the most practical export format for beginner projects.
• Keep the original image, prepared image, prompts, settings, generated versions, editing project, licences, and final exports in organized folders.
• Confirm that you own or are permitted to use the starting image.
• Obtain appropriate permission before animating a recognizable real person.
• Remove private or confidential information before uploading an image.
• Check the commercial-use conditions for the exact platform and model used.
• Add AI disclosure when realistic generated or altered content could mislead viewers or when the publishing platform requires it.
• Image-to-video works best as a controlled creative workflow supported by human planning, review, editing, and responsible publication.
Final Tip
Do not begin your first image-to-video project with a complicated portrait, product demonstration, or multi-scene story.
Begin with one clear image and one gentle movement.
A practical first project is:
• One landscape image
• Five or six seconds
• 16:9 format
• Fixed or slowly moving camera
• Gentle clouds, grass, leaves, mist, or water movement
• No people
• No important text
• No product labels
• No complicated hand movement
Use this workflow:
1. Inspect and prepare the starting image.
2. Decide what should move.
3. Decide what must remain stable.
4. Write one focused motion prompt.
5. Generate one version.
6. Watch the complete clip.
7. Identify the largest problem.
8. Change one instruction.
9. Generate one improved version.
10. Edit and save the strongest result.
For example:
Clouds drift slowly across the sky while grass and tree leaves move gently in a light breeze. Small ripples travel across the lake. The camera remains completely fixed. Keep the mountains, shoreline, trees, lighting, colours, and composition visually consistent throughout the six-second 16:9 clip.
Keep a record of:
• Starting image
• Prepared image
• Original prompt
• Revised prompt
• Platform and model
• Aspect ratio
• Duration
• Resolution
• Camera setting
• Credits used
• Selected version
• Final filename
This record turns one successful experiment into a repeatable workflow.
For the AI Mastery website, the best approach is to create one short demonstration that clearly supports the article. Do not add movement simply because the tool can create it. The video should help the reader understand something that a still image cannot explain as clearly.
The goal is not to animate everything. The goal is to add controlled movement without damaging the subject, composition, accuracy, or meaning of the original image.
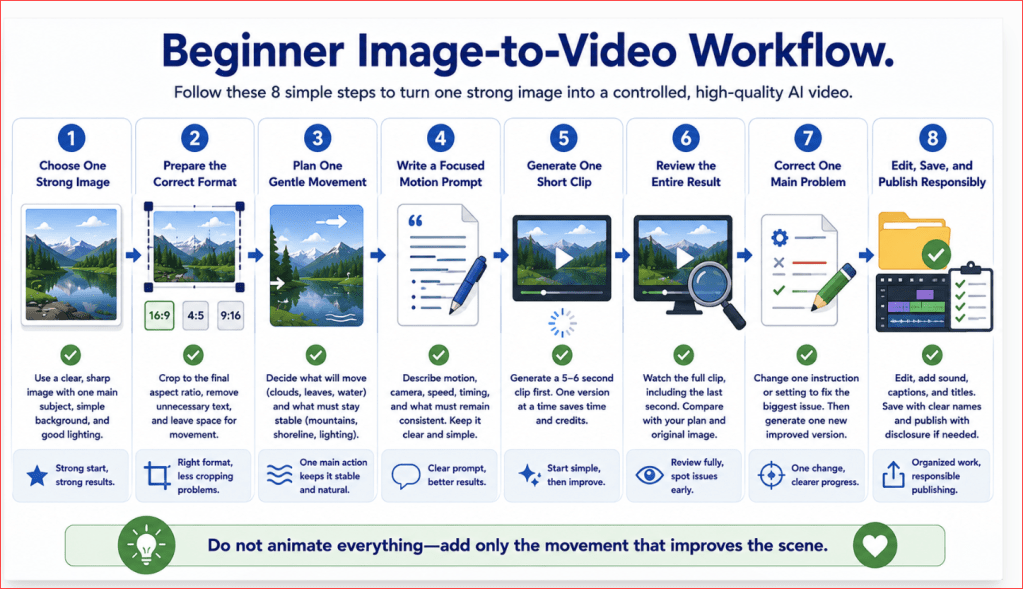
Figure 16. A practical beginner workflow for turning one strong image into a controlled AI-generated video.
Figure 16 summarizes the recommended starting method: prepare one clear image, plan one gentle movement, generate one short version, review the complete result, correct one problem, and save the strongest clip with its prompts and settings.
Conclusion
Image-to-video generation allows beginners to turn a still photograph, illustration, product image, landscape, or AI-generated picture into a short moving video.
The uploaded image provides the visual foundation. It establishes the subject, composition, lighting, colours, background, camera angle, and opening appearance. The motion prompt then explains:
• What should move
• How the movement should happen
• How the camera should behave
• How fast the motion should be
• What should remain stable
The strongest results usually begin with a clear, sharp image that already looks close to the desired first frame.
Before uploading an image:
1. Save the untouched original.
2. Create a separate working copy.
3. Choose the final aspect ratio.
4. Crop or expand the image carefully.
5. Correct visible defects.
6. Remove private information.
7. Confirm that faces, hands, products, and backgrounds are accurate.
8. Verify that you own the image or have permission to use it.
A beginner should not attempt to animate every element in the scene. One main action and one simple camera movement are normally easier to control.
Suitable first movements include:
• Clouds drifting slowly
• Grass moving gently
• Steam rising
• Water rippling
• Curtains moving slightly
• A portrait subject blinking once
• A slow camera push toward a stationary subject
A practical motion prompt should focus on:
• Camera movement
• Subject action
• Environmental movement
• Direction and speed
• Timing
• Stability instructions
For example:
Grass moves gently in a light breeze while the camera slowly pushes forward toward the red bicycle. Use smooth, natural movement and one continuous shot. Keep the bicycle, wooden fence, country road, trees, lighting, colours, and background visually consistent throughout the six-second 16:9 clip.
The first generation should be treated as a test.
Watch the complete clip and compare it with:
• The original image
• The movement plan
• The intended camera behaviour
• The required subject and background stability
When a problem appears, identify the largest issue and revise only one instruction or setting.
For example:
• Slow the camera when it moves too quickly.
• Reduce environmental movement when the scene becomes unstable.
• Strengthen consistency instructions when a face or product changes.
• Prepare the image again when important areas are cropped.
• Trim the final second when only the ending contains a defect.
Changing one element at a time makes it easier to understand what improved the result.
Image-to-video generation has important limitations. It may produce:
• Changing faces
• Distorted hands
• Altered products
• Incorrect visible text
• Flickering backgrounds
• Objects appearing or disappearing
• Unexpected cropping
• Incorrect camera movement
• Inconsistent characters between clips
Higher resolution does not automatically correct these problems. It improves sharpness, not movement accuracy or subject consistency.
Generated clips also normally require editing. A finished video may need:
• Trimming
• Pacing adjustments
• Titles
• Captions
• Narration
• Music
• Sound effects
• Colour correction
• Audio balancing
• Compression
• A poster image
• AI disclosure
For WordPress, a short MP4 file may be uploaded or a hosted video may be embedded. The article should also include a written explanation so readers can understand the lesson without relying only on the video.
For YouTube and other public platforms, review whether realistic AI-generated or meaningfully altered content requires disclosure.
Before publishing, confirm that:
• The starting image is owned or properly licensed.
• Recognizable people gave appropriate permission.
• No private information is visible.
• Product and brand details are accurate.
• Music, narration, and voices are authorized.
• The selected platform and model permit the intended use.
• The clip is not presented as evidence of something that did not happen.
• AI disclosure has been added when required.
• All prompts, permissions, licences, and final files are saved.
Image-to-video generation is most useful for:
• Creative concepts
• Landscapes
• Website visuals
• Educational demonstrations
• Storyboards
• Product concepts
• Presentation backgrounds
• Short supporting scenes
Real filming remains more appropriate when a project requires:
• Genuine testimony
• Documentary evidence
• Exact product operation
• Safety instructions
• Verified events
• Authentic demonstrations
• Precise actions by real people
Image-to-video is not a one-click replacement for filming or editing. It is a controlled production workflow that combines a strong source image, a focused motion prompt, careful testing, human review, and responsible publication.
Begin with one image, one gentle movement, and one short clip. Learn what the selected model does well, keep organized records, and increase the complexity only after the basic workflow produces stable and useful results.
Sources and References
Citations in square brackets refer to the numbered official sources below. These pages were reviewed on July 28, 2026. Features, model names, prices, limits, policies, and plan conditions may change. Readers should check current official information when first using a tool, changing plans or models, receiving a policy-update notice, and periodically for important projects.
[1] Runway. Image-to-Video Prompting Guide. Explains that the input image defines the visual foundation while the prompt should focus primarily on motion, camera work, timing, direction, speed, and temporal progression. Accessed July 28, 2026.
[2] Runway. Introduction to Prompting. Recommends clear language, positive phrasing, simple starting prompts, controlled iteration, and changing one element at a time when troubleshooting. Accessed July 28, 2026.
[3] Runway. Creating with Gen-4.5. Lists current Gen-4.5 image-to-video inputs, durations, aspect ratios, output resolution, generation settings, and iteration controls. Accessed July 28, 2026.
[4] Runway. Usage Rights. Describes Runway-specific ownership and commercial-use information. Source-image rights, third-party permissions, and other legal requirements must still be checked separately. Accessed July 28, 2026.
[5] Runway. Understanding Runway’s Security and Privacy Standards. Provides Runway-specific information about uploaded-asset privacy and sharing. Other providers may use different defaults and data practices. Accessed July 28, 2026.
[6] Adobe Help Center. Generate Videos Using Images. Explains first and last keyframes, crop controls, aspect ratios, resolution, camera motion choices, prompt requirements, generation history, and download or editing options. Accessed July 28, 2026.
[7] Adobe Help Center. Generate Videos Using Firefly Models. Describes image-guided video generation in the Firefly video editor and notes that available settings depend on the chosen model and keyframes. Accessed July 28, 2026.
[8] Adobe Help Center. Partner Models in Adobe Products. Explains that partner models are not developed by Adobe and that users must determine whether a particular model is suitable for their project. Accessed July 28, 2026.
[9] Adobe Help Center. Generative Credits FAQ. Explains how generative credits are consumed and how plan conditions and access can affect available generative features. Accessed July 28, 2026.
[10] Adobe Help Center. Adobe Firefly FAQ. Provides current information about Firefly models, commercial use, model training, user content, and product-specific conditions. Accessed July 28, 2026.
[11] Adobe Help Center. Content Credentials Overview. Explains how Content Credentials can provide tamper-evident information about how qualifying Firefly content was generated or edited. Accessed July 28, 2026.
[12] Adobe Help Center. Known Limitations in Firefly Video Editor. Lists current browser, device, import, media, transparency, and workflow limitations for the Firefly video editor. Accessed July 28, 2026.
[13] WordPress.com Support. Video Block. Explains how to upload, embed, or select videos, add text tracks, choose a poster image, and configure playback. Plan requirements may change. Accessed July 28, 2026.
[14] WordPress.com Support. Working with Video. Summarizes WordPress.com video and VideoPress options, storage, optimization, and plan-dependent features. Accessed July 28, 2026.
[15] YouTube Help. Disclosing Use of GenAI Content. Explains when creators must use YouTube’s AI-use disclosure for realistic, meaningfully generated, or altered content. Accessed July 28, 2026.
[16] YouTube Help. Understanding “How This Content Was Made” Disclosures. Explains how YouTube displays creator disclosures and compatible content-provenance information. Accessed July 28, 2026.
[17] YouTube Help. Protecting Your Identity. Explains the privacy-request process for realistic altered or synthetic content that depicts a recognizable person. Accessed July 28, 2026.
[18] W3C Web Accessibility Initiative. Captions/Subtitles. Explains that captions provide synchronized text for speech and important non-speech audio needed to understand video content. Accessed July 28, 2026.
[19] Canadian Intellectual Property Office. A Guide to Copyright. Provides general Canadian copyright information, including protection for original artistic works such as photographs. This article provides general education, not legal advice. Accessed July 28, 2026.
Continue Learning
Continue developing your AI video skills with these related guides:
• How to Create AI Videos with ChatGPT: Beginner Step-by-Step Guide (2026)
• Best AI Video Tools for Beginners: Complete Guide (2026)
• How to Edit AI-Generated Videos: Beginner Step-by-Step Guide (2026)
• How to Add Voice, Music, and Captions to AI Videos (2026)

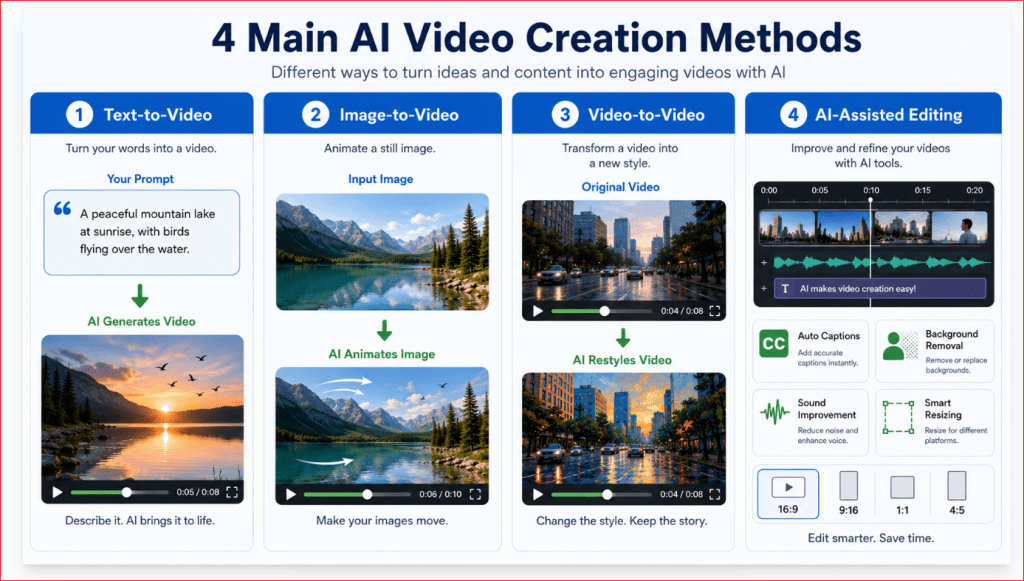


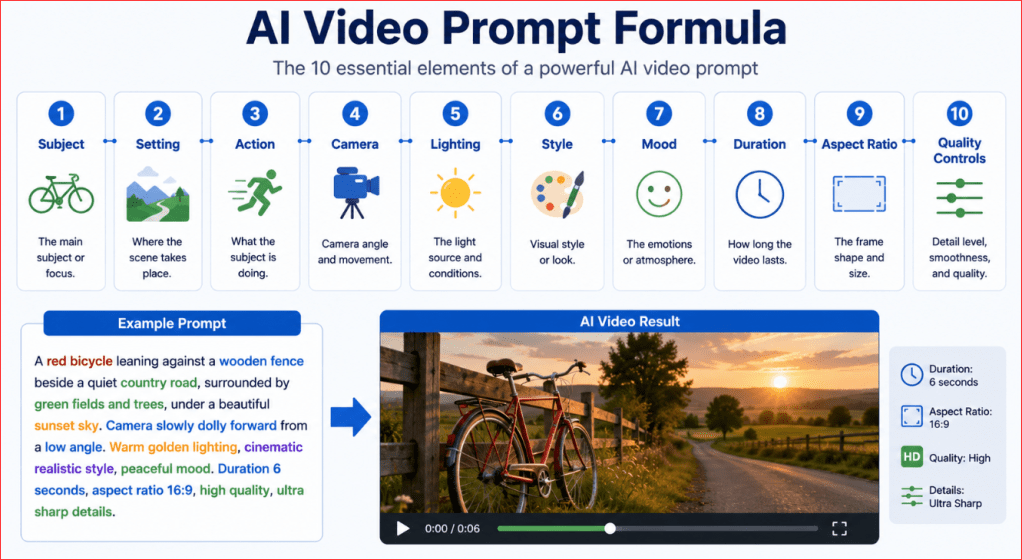

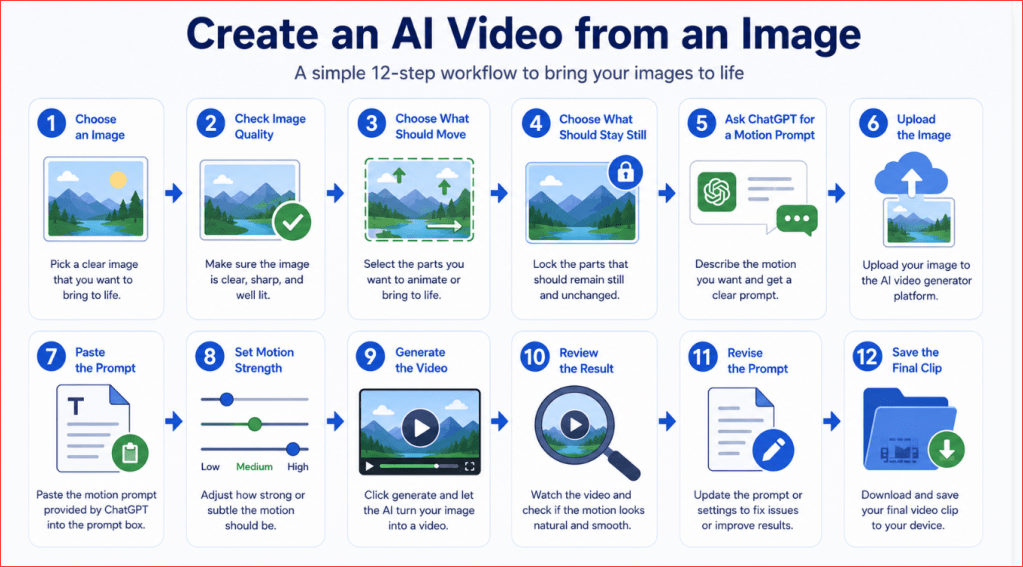
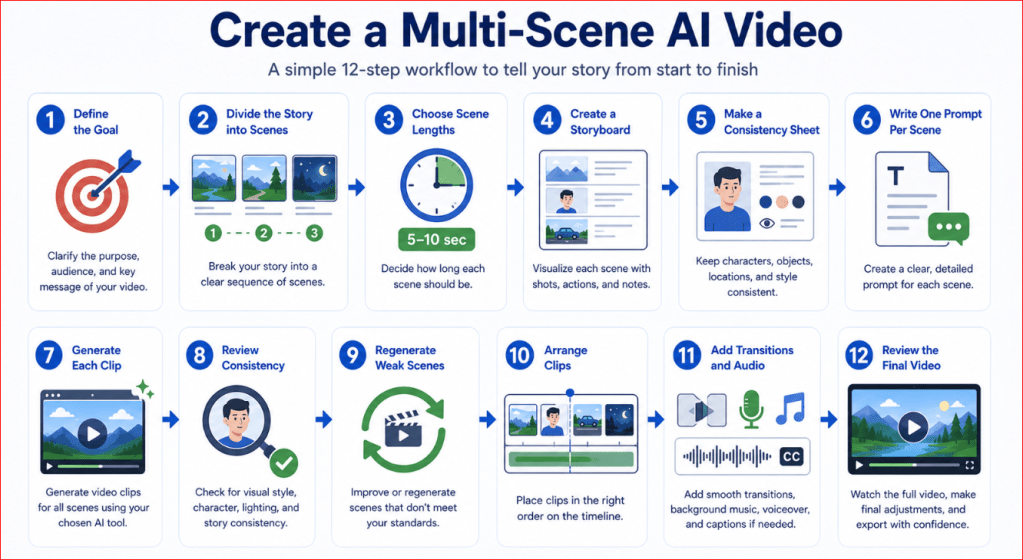



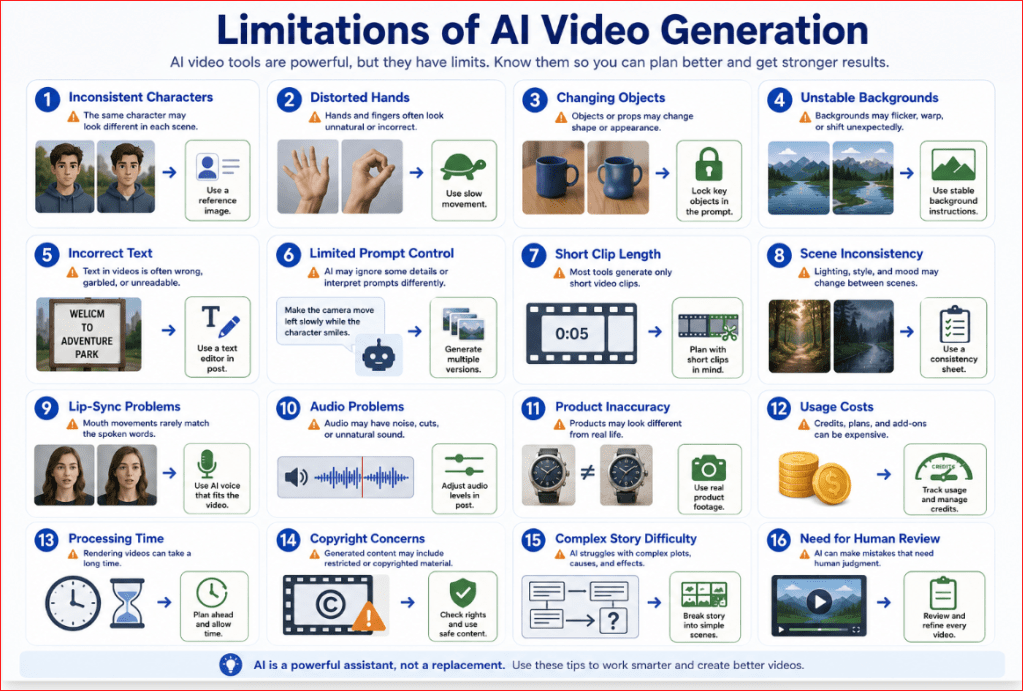
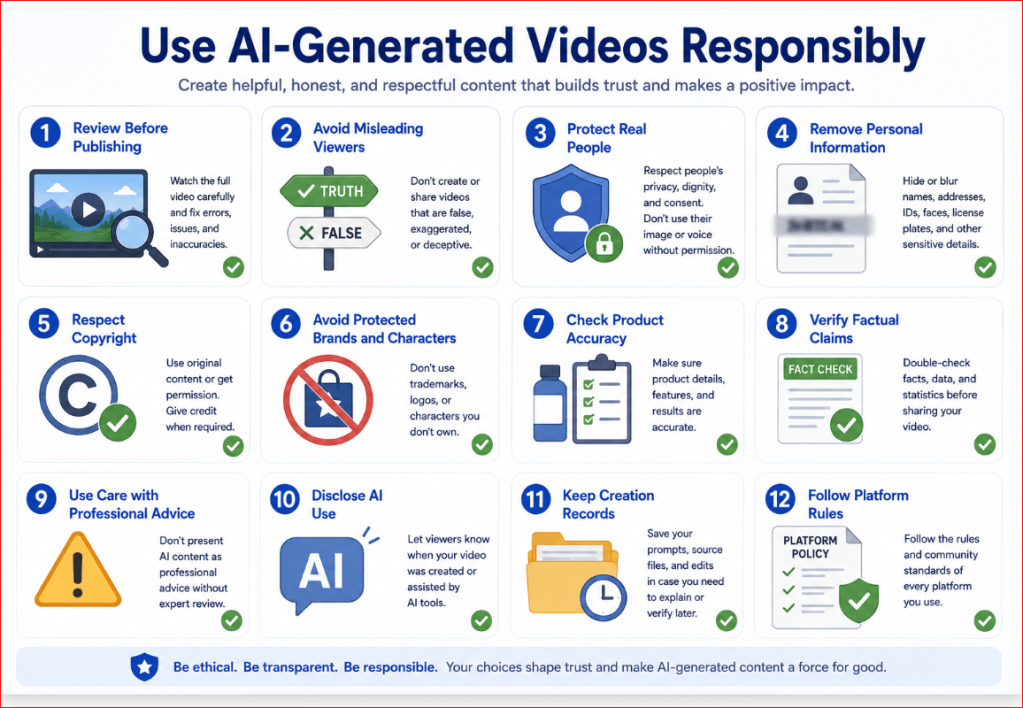


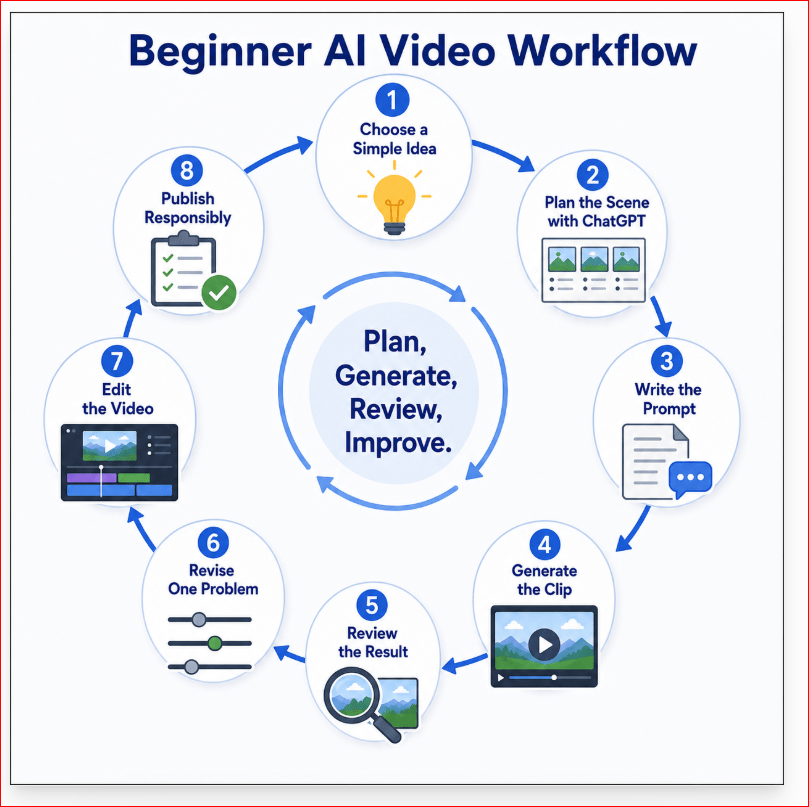
 AI Mastery