

Estimated reading time: 20–25 minutes
Last updated: July 2026
What You’ll Learn
In this beginner-friendly guide, you will learn:
• How to upload an existing image or reopen an image created in ChatGPT
• How to write a clear instruction that explains what must change and what must stay the same
• How to remove, add, or replace objects and backgrounds
• How to change colours, lighting, composition, aspect ratio, text, and visual style
• How to correct hands, faces, small objects, and other image mistakes
• How to make several edits without losing successful corrections
• How to review, save, download, and prepare the final image for WordPress
• How to use AI image editing responsibly
Introduction
Image editing means changing an existing picture instead of creating a completely new one. You might remove a distracting object, replace a background, change a colour, improve the lighting, correct a hand, add open space for a title, or convert the image into another visual style.
ChatGPT Images can edit an image created in ChatGPT or an existing image that you upload. You can describe the edit directly in the conversation, or use the selection tool to highlight one area. The selected boundary is a guide rather than a perfect mask, so nearby details may sometimes change.
OpenAI’s official Images in ChatGPT guide explains the current create, edit, aspect-ratio, selection, and save controls. The exact button names or positions may change as ChatGPT is updated.
The most important beginner rule is simple: make one focused change, protect the details that are already correct, review the entire image, and save every successful version.
What Does Image Editing Mean?
When you generate an image, ChatGPT begins with a written description. When you edit an image, the existing picture becomes the starting point. Your instruction tells ChatGPT which parts to preserve and which parts to change.
A whole-image edit can change the overall mood, lighting, colours, or style. A local edit changes one object or one small area. Local edits usually give you more control because the request is easier to review.
“Keep the person, face, clothing, desk, laptop, lighting, and camera angle unchanged. Remove only the white coffee cup beside the laptop and rebuild the wooden desk surface naturally.”
This example identifies the protected details, the exact object, its location, and the required repair. It is much clearer than writing “Fix the image.”
What Types of Images Can You Edit with ChatGPT?
You can edit many kinds of still images, including:
• Images created by ChatGPT
• Personal photographs that you have permission to use
• Room, garden, travel, food, pet, and household photographs
• Illustrations, posters, digital artwork, and educational graphics
• Blog images, featured images, website headers, and social-media graphics
• Product concepts, office scenes, advertisements, and presentation images
Images with clear subjects, good lighting, and enough resolution are easier to edit. Very blurry, highly rotated, panoramic, fisheye, or heavily compressed images may produce less reliable results.
ChatGPT image inputs support PNG, JPEG/JPG, and non-animated GIF files. The current limit is 20 MB per image. Video clips are not supported as image inputs.
For the current file types and size limit, see OpenAI’s ChatGPT Image Inputs FAQ.
How to Upload an Image to ChatGPT for Editing
1. Open ChatGPT and begin a new conversation, or open the conversation containing the image you want to edit.
2. Select the attachment or plus button beside the message box.
3. Choose Add photos & files, then locate the image on your device.
4. Select the image and wait for its preview to appear.
5. Write the editing instruction and send the image and instruction together.
On a computer, you can also drag an image into the message area or paste a copied image from the clipboard. If an upload fails, check the file type, file size, internet connection, and whether the file is damaged.
Before uploading, remove or cover private information such as addresses, identification numbers, financial details, medical information, children’s identifying information, or confidential business material. Upload only images you are allowed to use and edit.
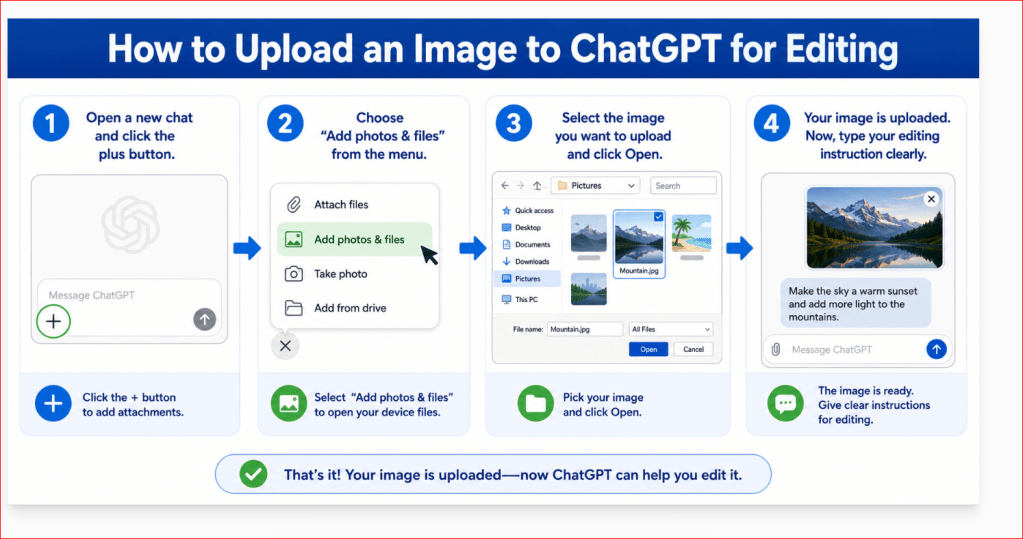
Figure 1. Upload an existing image by selecting the attachment button, choosing the file, and waiting for its preview to appear.
This four-step example shows the basic upload process. After the image preview appears, write a precise editing instruction and send the image and instruction together.
How to Write a Clear Image-Editing Instruction
A strong editing instruction answers four questions:
1. What must remain unchanged?
2. What must change?
3. Where is the change located?
4. How should the edited area match the original image?
Use this simple formula:
“Keep [important details] unchanged. Remove, add, replace, or change [specific object or area] in [exact location]. Match the existing [perspective, lighting, colours, texture, and style]. Do not change [important exclusions].”
Use Exact Location Words
Useful location words include left, right, centre, top, bottom, foreground, background, behind the person, beside the laptop, near the window, and upper-right corner. When similar objects appear, explain which one should remain.
“Remove only the smaller plant on the right side of the shelf. Keep the large plant beside the window.”
Describe the Desired Result
Do not explain only what should disappear. Describe what should appear afterward. When removing an object, mention the background, texture, shadow, or reflection that must be repaired. When adding an object, describe its size, colour, material, position, perspective, and shadow.
“Replace the cup with one small green plant in a plain white ceramic pot. Keep it in the same general position and match the desk perspective, soft daylight, colours, and shadows.”
Avoid Conflicting Instructions
Read the complete instruction before sending it. Do not write “keep the background unchanged” and “replace the background” in the same request. Avoid combining unrelated changes such as removing furniture, changing clothing, correcting a hand, adding text, and resizing the image all at once.
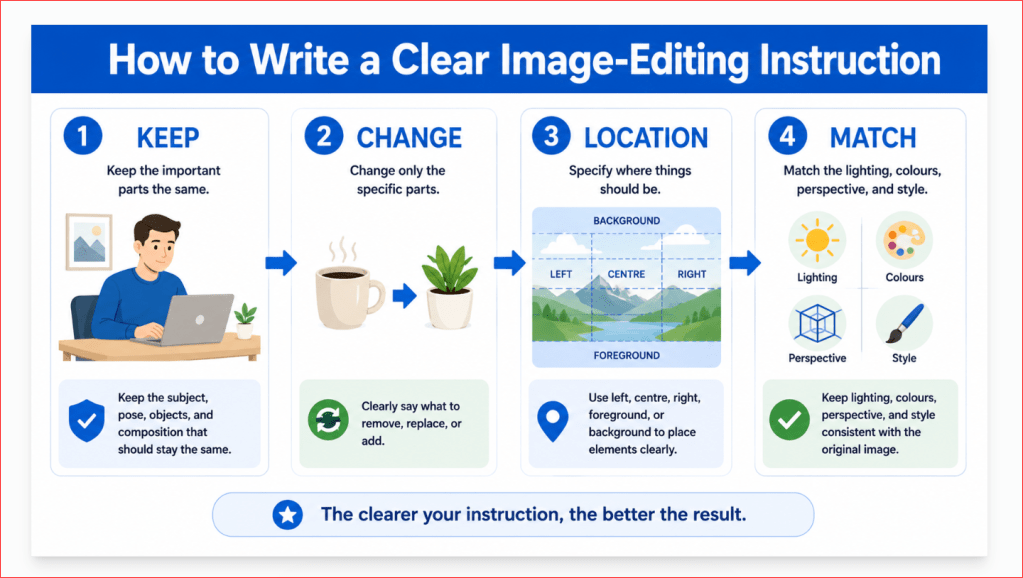
Figure 2. A clear image-editing instruction explains what to keep, what to change, where to make the change, and how the edited area should match the original image.
This four-part structure helps beginners write precise editing requests while protecting successful details.
How to Use the Selection Tool
Use the selection tool when one small object or area needs attention. Open the image, choose Select, highlight the area, and then describe the edit. The highlight does not need to be perfectly exact, but it should cover the complete problem area.
• Include the complete object, its edges, connected parts, shadow, and relevant reflections.
• Avoid selecting a very large area unless the surrounding background also needs rebuilding.
• Protect important nearby details in the written instruction.
• Review the complete image because edits may extend beyond the highlighted area.
“Correct only the selected right hand so it has one thumb and four natural fingers. Match the skin tone, pose, perspective, lighting, and shadows. Keep the face, clothing, laptop, desk, and background unchanged.”
How to Remove, Add, or Replace Objects
Remove an Object
Identify the object clearly and explain what should appear behind it. Include its shadow or reflection when necessary.
“Keep the laptop, notebook, plant, desk, room, and lighting unchanged. Remove only the white coffee cup on the right side of the laptop. Rebuild the wooden desk surface with matching grain, perspective, lighting, and shadows.”
Afterward, check for leftover parts, repeated patterns, blurred patches, bent lines, missing nearby objects, or incorrect background perspective.
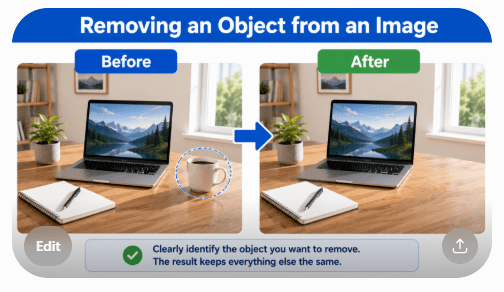
Figure 3. Removing an object also requires rebuilding the hidden background, texture, shadow, and lighting naturally.
The repaired area should match the surrounding surface, perspective, colours, shadows, and lighting.
Add an Object
Describe the new object and how it should relate to the existing scene. A new object should rest naturally on the correct surface and receive light from the same direction.
“Add one small closed navy-blue notebook beside the laptop with a black pen resting on top. Keep it smaller than the laptop and match the desk angle, natural daylight, colours, and contact shadow.”
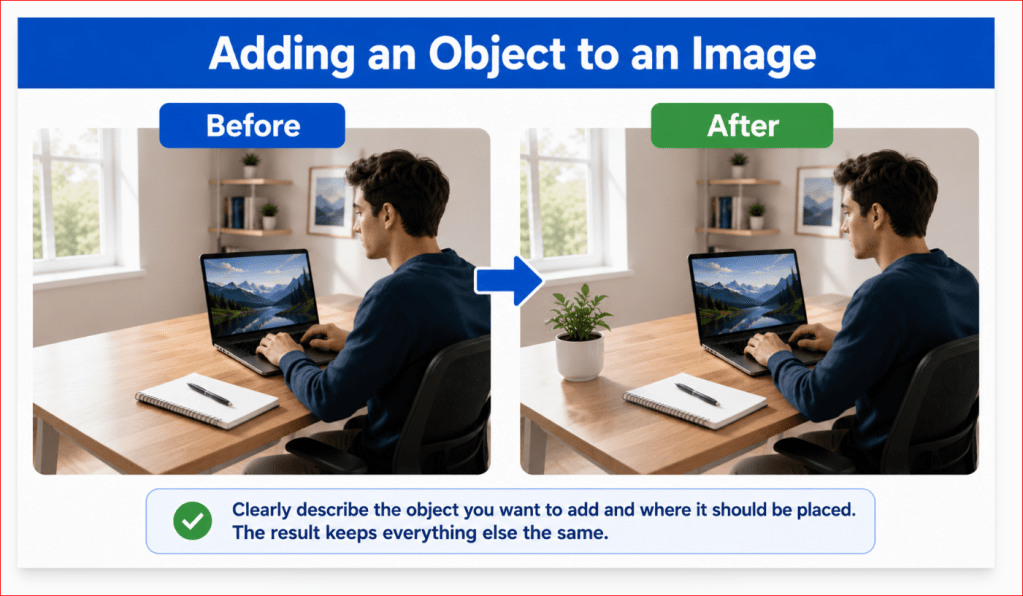
Figure 4. A newly added object should match the original image’s size, position, perspective, lighting, and shadows.
The new item should appear naturally connected to the surrounding scene and surface.
Replace an Object
A replacement combines removal and addition. Identify both the original object and the new object, then explain whether the size and position should remain similar.
“Keep the person, laptop, desk, room, lighting, and camera angle unchanged. Replace only the white coffee cup beside the laptop with a small green plant in a white ceramic pot. Use the same general position and match the existing scale, perspective, lighting, and shadows.”
For products, compare the edited result with the real product. AI may unintentionally change dimensions, materials, labels, buttons, packaging, or features.
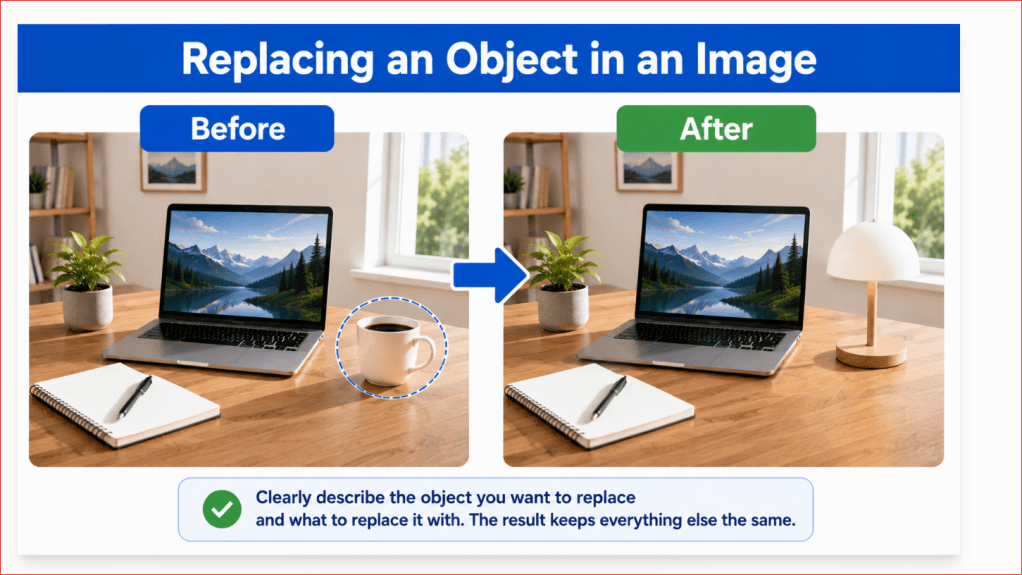
Figure 5. Replacing an object requires the new item to match the original position, scale, perspective, lighting, and shadows.
The replacement should fit the same space and look as though it was part of the original scene.
How to Replace or Change an Image Background
A successful background edit protects the main subject while making the new setting match the original camera angle, lighting, colours, and depth of field.
“Keep the person, face, expression, hair, clothing, pose, desk, laptop, lighting, and camera angle unchanged. Replace only the crowded background with a clean modern home office containing one simple shelf and one small plant. Match the existing perspective and soft daylight.”
For a plain or transparent background, protect the subject’s edges carefully, especially around hair, fingers, glasses, thin objects, and soft shadows. A traditional background-removal tool may be better when perfectly clean edges are required.
After the edit, check for halos, missing hair, distorted furniture, incorrect object placement, mismatched blur, or a background that appears too sharp or too flat.
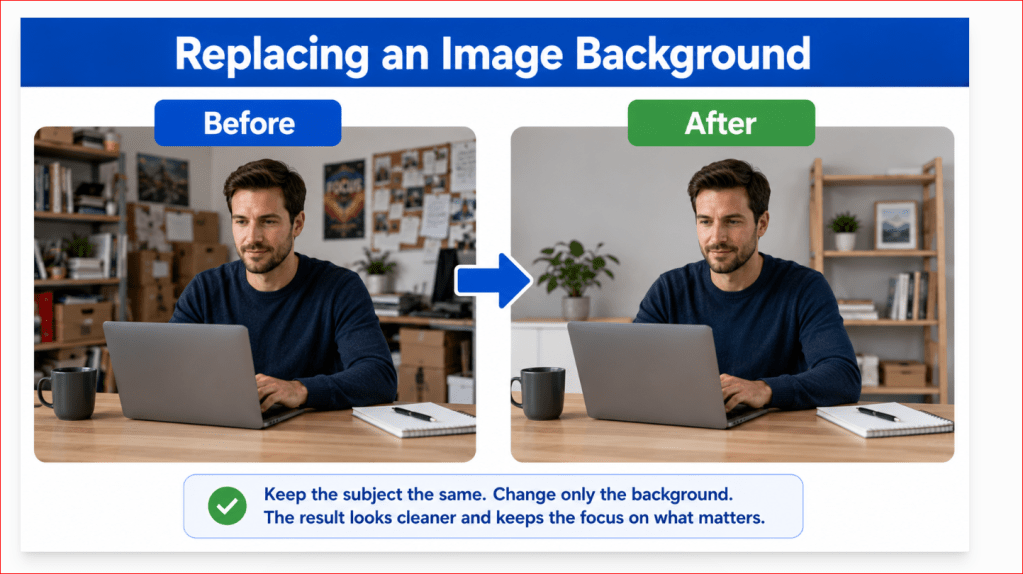
Figure 6. A successful background replacement preserves the main subject while matching the new scene’s perspective, lighting, colours, and depth of field.
The subject should remain consistent while the new background looks natural and supports the image’s purpose.
How to Change Colours and Improve Lighting
Change One Colour
Identify the exact object, its current colour, and its new colour. Protect texture, patterns, folds, highlights, shadows, printed details, and nearby objects with similar colours.
“Change only the red notebook beside the laptop to deep navy blue. Preserve its shape, material, texture, position, highlights, and shadow. Do not apply blue to the desk, laptop, clothing, or background.”
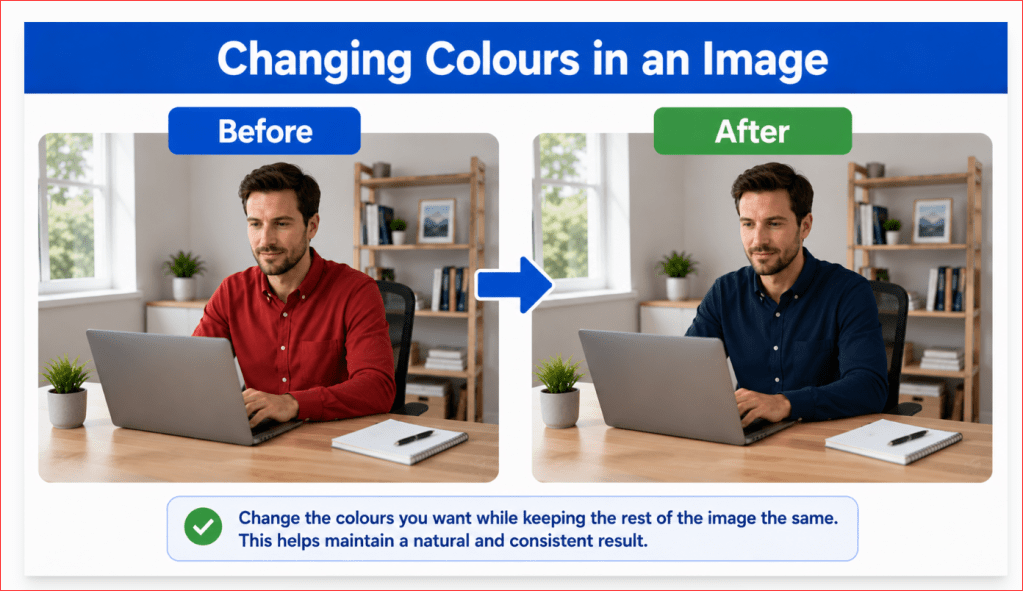
Figure 7. A successful colour change preserves the object’s shape, texture, highlights, shadows, and surrounding details.
Only the requested colour should change while the rest of the image remains consistent.
Improve Lighting
Describe the lighting problem and the desired light source. Useful details include direction, brightness, softness, colour temperature, highlights, and shadows.
“Brighten the room moderately using soft natural daylight from the window on the left. Reduce the dark shadow across the person’s face while preserving natural skin tones, clothing colours, window detail, and realistic shadows.”
Review skin tones, bright windows, product reflections, shadow direction, and colour balance. Do not continue from a version that is washed out, unusually yellow, or inconsistent with the original scene.
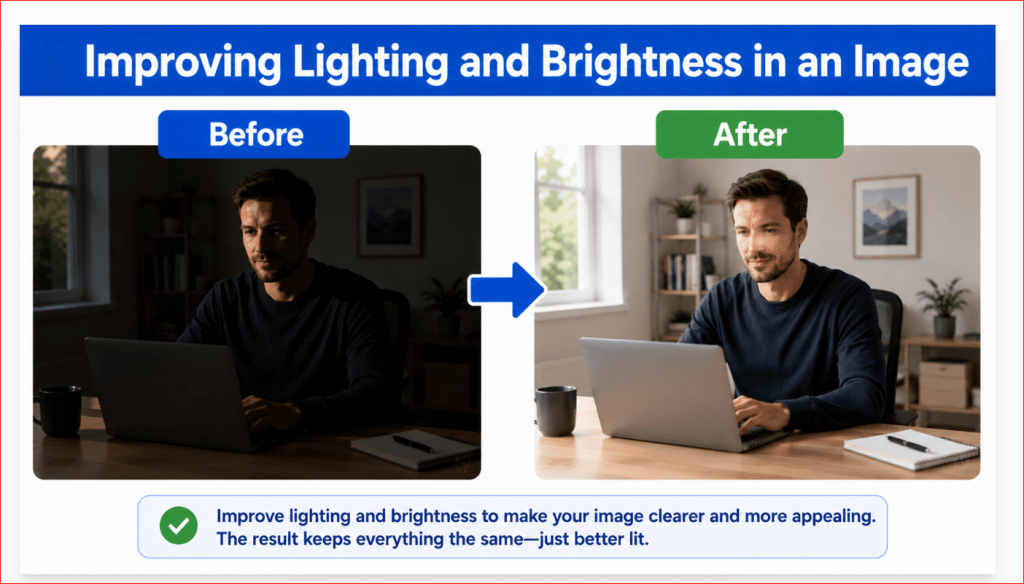
Figure 8. Improved lighting makes important details easier to see while preserving natural colours, highlights, shadows, and depth.
Lighting corrections should brighten the image without washing out details or creating unnatural shadows.
How to Crop, Resize, or Change the Aspect Ratio
Cropping removes part of an image. Resizing changes the dimensions. Extending the canvas creates new space around the existing scene. ChatGPT Images also provides an aspect-ratio control, but a traditional image tool may still be needed for exact pixel dimensions and compression.
• 1:1 square — profile images and square social posts
• 16:9 landscape — WordPress featured images, presentations, and video thumbnails
• 4:5 portrait — portrait-oriented social posts
• 9:16 vertical — Stories, Reels, and short-form video covers
“Change the image to a wide 16:9 landscape format by extending the office background naturally. Position the person on the right and leave clean open space on the left for a title. Keep the complete head, hands, laptop, and desk inside the frame. Do not stretch or distort the person or objects.”
Check that important details are not too close to the edges and that new background areas match the original perspective, lighting, texture, and colours.
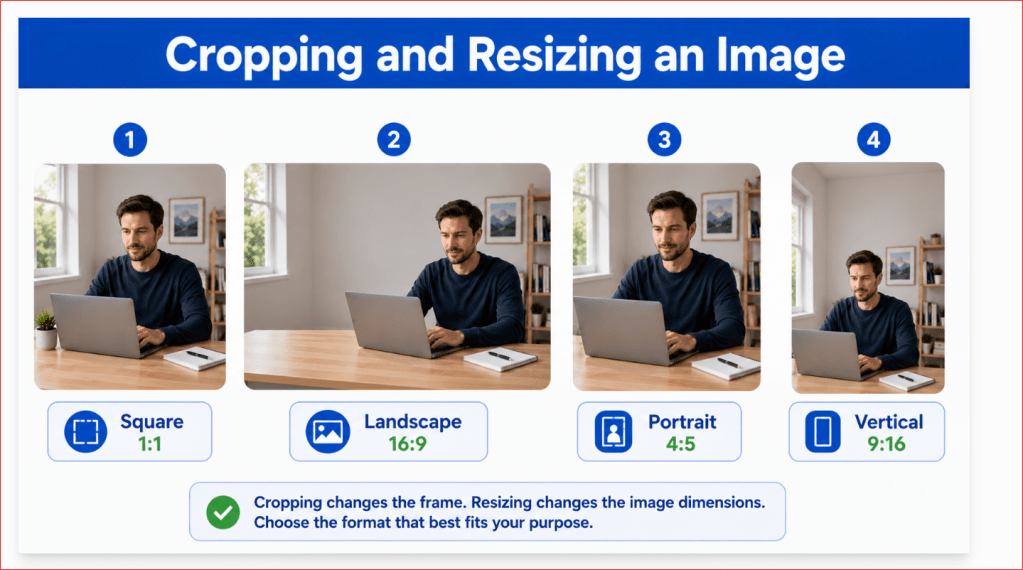
Figure 9. The same image can be adapted to square, landscape, portrait, and vertical formats while keeping the main subject visible and correctly proportioned.
Choose the aspect ratio that matches the platform and avoid stretching or cutting off important details.
How to Add or Correct Text in an Image
ChatGPT can attempt to add or correct short text, but spelling, punctuation, spacing, and letter shapes must be reviewed carefully. Keep the wording short and place the exact text inside quotation marks.
“Replace only the incorrect title with the exact words “AI for Beginners.” Keep the text box, position, size, colour, and background unchanged. Do not change any other letters or design elements.”
For important website titles, prices, instructions, or long labels, a safer method is to create clean open space and add the final text later in Canva, PowerPoint, TextMaker, WordPress, or another design tool. This gives you precise control over spelling, font, alignment, line spacing, and safe margins.
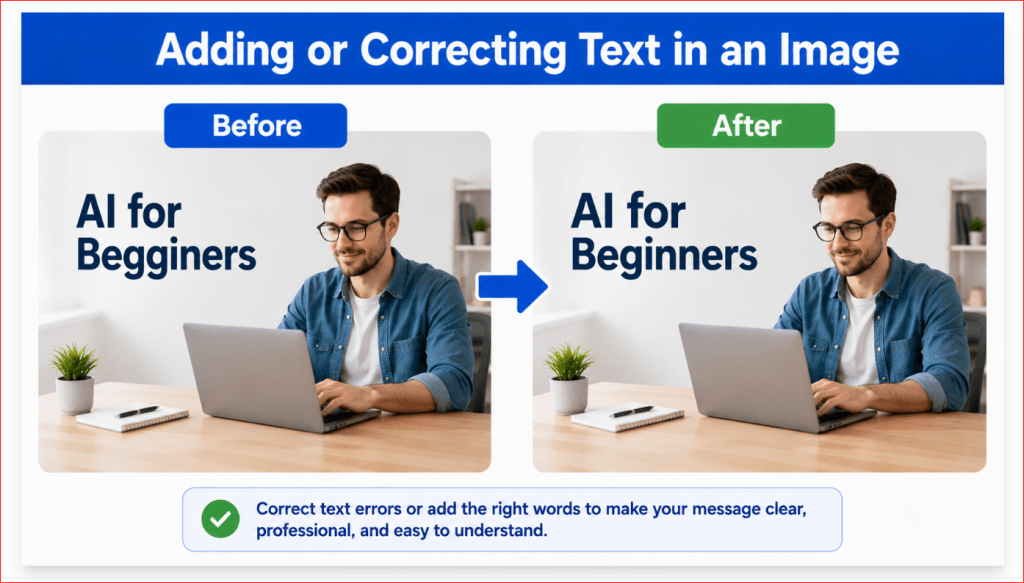
Figure 10. Clear image text requires correct spelling, readable formatting, suitable contrast, safe spacing, and accurate placement.
For important wording, review every character or add the final text later with a design tool.
How to Change the Style of an Image
You can request styles such as digital illustration, watercolour, pencil sketch, minimalist graphic, three-dimensional illustration, storybook artwork, or vintage poster. Describe the visual characteristics rather than asking for an exact copy of a living artist’s style.
“Keep the same person, pose, desk, laptop, and composition. Change the realistic photograph into a clean modern digital illustration with smooth shapes, soft blue and white colours, gentle natural lighting, and a professional beginner-friendly appearance.”
Style changes may alter faces, hands, objects, colours, and composition. Compare the result with the original and protect the details that must remain recognizable.
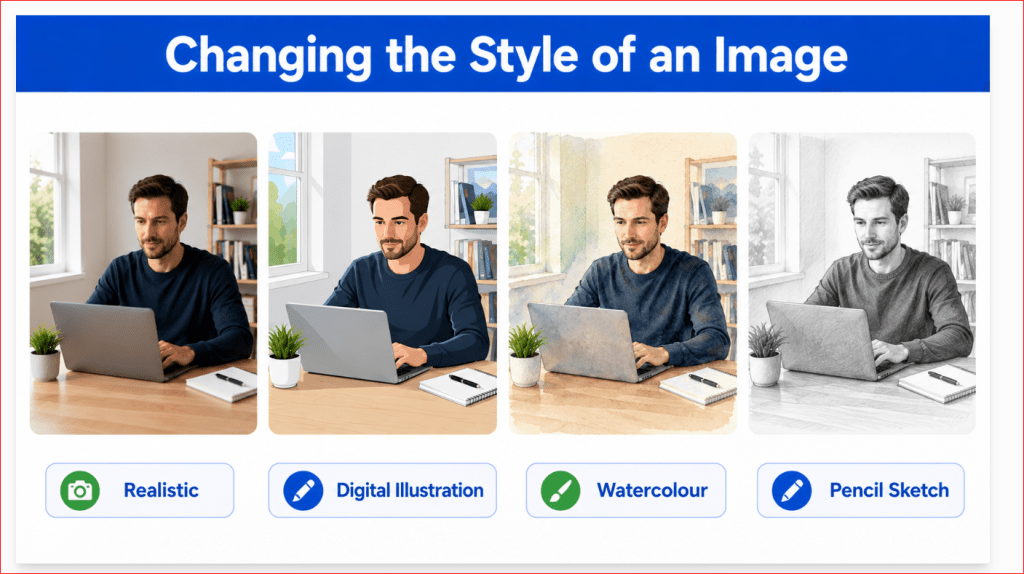
Figure 11. An image can be changed into different visual styles while preserving its main subject, composition, and important details.
Compare the result with the original because style changes may also affect faces, hands, objects, and colours.
How to Fix Hands, Faces, and Small Image Mistakes
Hands, faces, teeth, clothing edges, product shapes, text, shadows, and small background objects can require focused corrections. Fix one area at a time and use the selection tool when helpful.
“Correct only the person’s right hand resting beside the laptop. Show one thumb and four naturally proportioned fingers in a relaxed position. Match the existing skin tone, wrist connection, pose, lighting, and shadows. Keep the face, clothing, desk, laptop, and background unchanged.”
• Check finger count, thumb position, hand size, wrist connection, and contact with nearby objects.
• Protect the person’s identity, expression, hairstyle, skin tone, and pose when correcting a face.
• Compare product shapes, buttons, labels, and proportions with the original or a reliable reference.
• Review shadows, reflections, edges, and textures after every local correction.
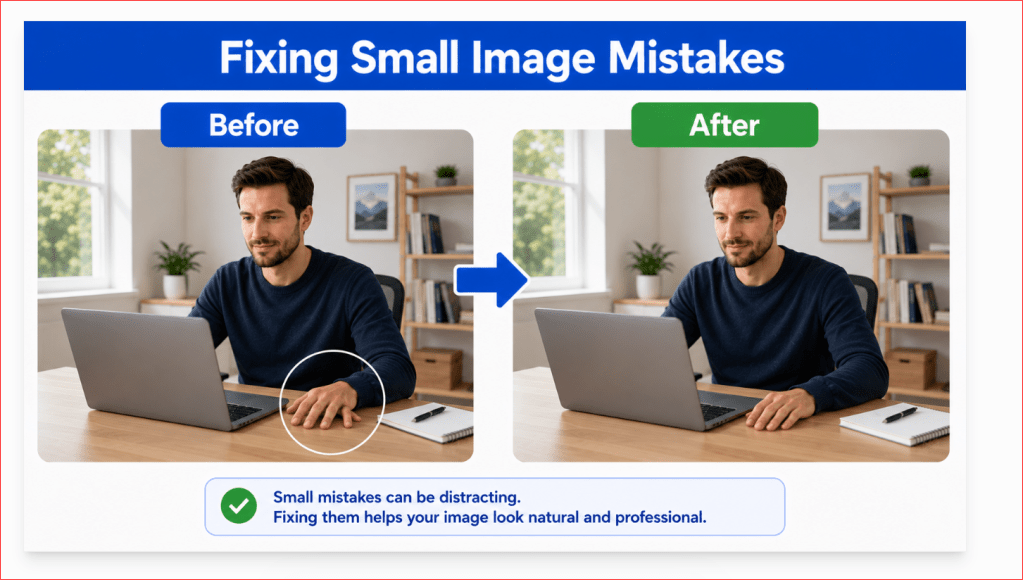
Figure 12. Small image mistakes can be corrected by identifying the exact problem and protecting all nearby details that are already correct.
Focused corrections are especially important for hands, faces, text, product details, and small objects.
How to Make Several Edits Without Changing the Whole Image
Several edits are easier to control when completed in a planned order. Save each successful version before requesting the next change.
1. Correct the background or composition.
2. Remove unwanted objects.
3. Add or replace necessary objects.
4. Fix hands, faces, text, and small mistakes.
5. Improve lighting and colours.
6. Change the aspect ratio or crop the image.
7. Add final text with a design tool when exact typography is required.
8. Review and save the final version.
“Use the current corrected version. Keep the removed chair area, corrected hand, person, face, clothing, desk, laptop, background, lighting, and composition unchanged. Change only the notebook from red to navy blue.”
When a later edit creates several new problems, return to the last successful version. Continuing to repair a poor version can reduce consistency and waste time.
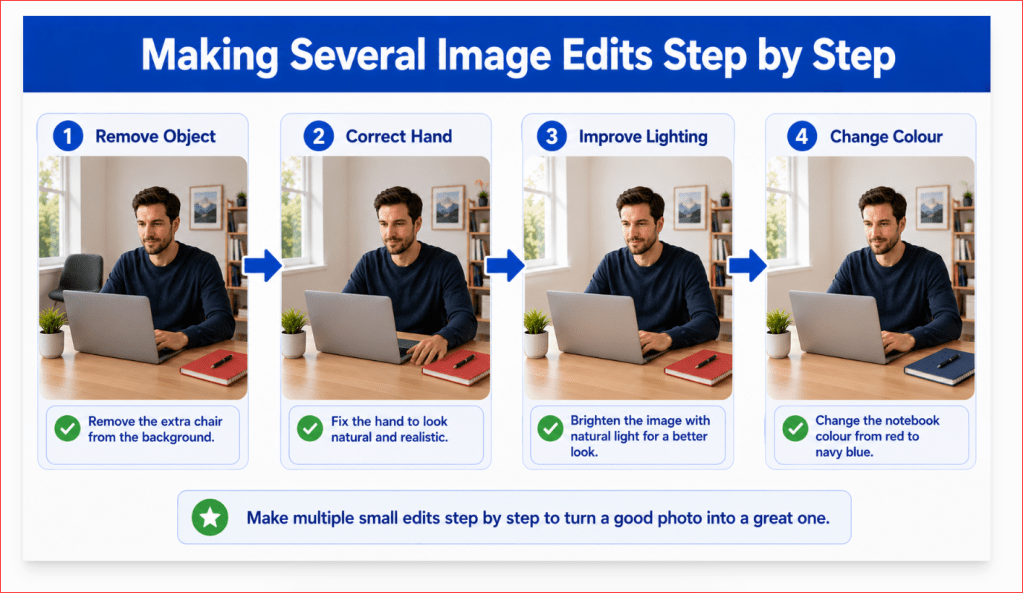
Figure 13. Making one focused edit at a time helps protect previous corrections and reduces unwanted changes to the rest of the image.
A step-by-step sequence makes it easier to identify which instruction caused a problem and return to the last successful version.
Common Image-Editing Mistakes and How to Avoid Them
• Vague instructions — identify the exact object, location, and desired result.
• Too many changes at once — make one or two related edits per step.
• Failing to protect correct details — repeat the important details that must remain unchanged.
• Selecting too much or too little — cover the complete problem area without including unnecessary nearby details.
• Removing an object without repairing the background — mention texture, perspective, shadows, and reflections.
• Ignoring lighting and perspective — match the direction, scale, camera angle, and contact with surfaces.
• Stretching an image — extend or crop the background instead of distorting the subject.
• Adding too much generated text — use short wording or add exact text later with a design tool.
• Reviewing only the edited area — inspect the complete image after every change.
• Publishing the first acceptable result — compare versions and complete a final quality and responsibility review.
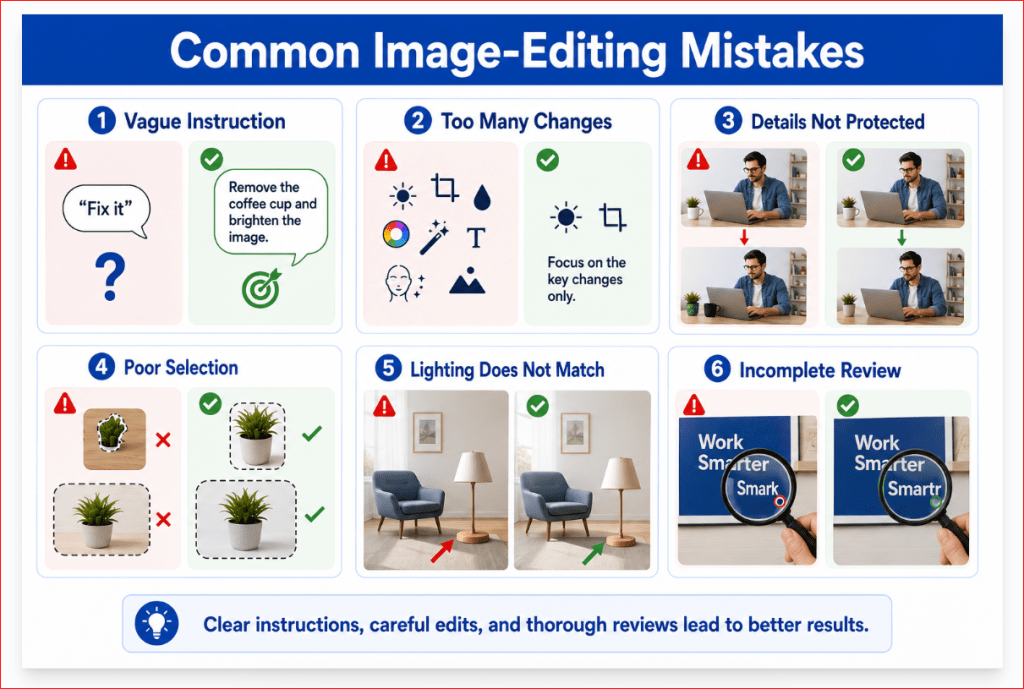
Figure 14. Clear instructions, focused edits, protected details, and careful reviews help prevent common image-editing mistakes.
This checklist summarizes frequent problems such as vague requests, excessive changes, poor selection, mismatched lighting, and incomplete review.
Limitations of Editing Images with ChatGPT
AI image editing is useful, but it is not perfectly predictable. Important limitations include:
• The result may not follow every instruction exactly.
• Unrequested parts of the image may change.
• The selection boundary may affect nearby details.
• Hands, faces, teeth, and small objects may remain inaccurate.
• Text may contain spelling, spacing, or letter-shape errors.
• Product details, packaging, buttons, labels, and proportions may change.
• Rebuilt backgrounds may contain repeated patterns, bent lines, or unnatural textures.
• Lighting, shadows, reflections, and exact colours may not match perfectly.
• Repeated edits may reduce consistency.
• Exact pixel dimensions, typography, and detailed edge work may require another tool.
Treat every AI-edited image as a draft until it has been checked by a person. Human review remains necessary before an image is published, shared, or used commercially.
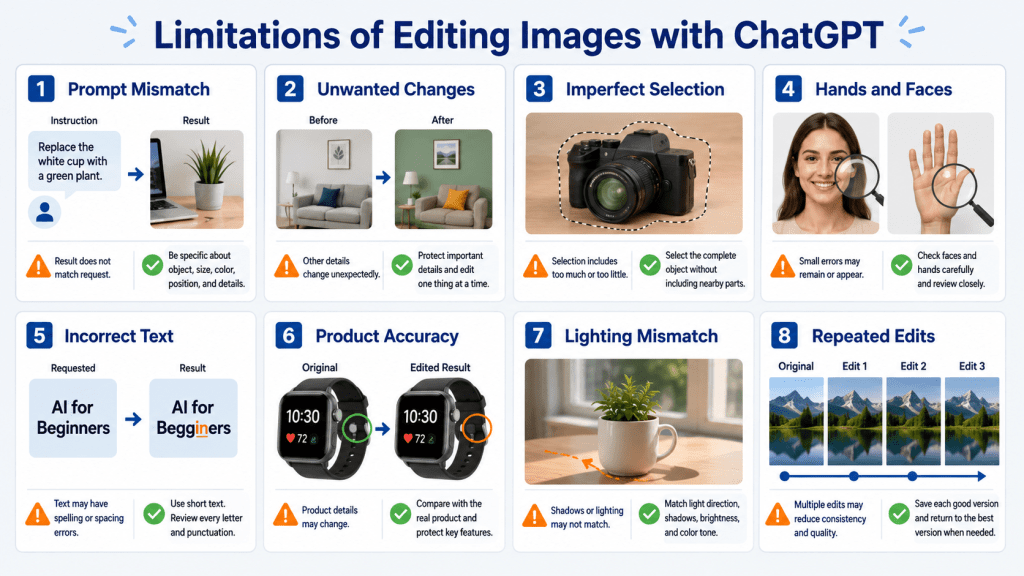
Figure 15. Image-editing limitations may include unwanted changes, inaccurate text, inconsistent faces or hands, imperfect selections, product errors, and mismatched lighting.
This overview helps beginners understand why every edited image should be checked carefully and why successful versions should be saved before making additional changes.
Responsible Use of AI Image Editing
• Edit only images that you own or have permission to use and modify.
• Remove personal, financial, medical, identifying, or confidential information before uploading.
• Do not use edits to misrepresent real people, create false evidence, or invent events that viewers may believe are real.
• Do not change product features, packaging, condition, size, or performance in a way that could mislead customers.
• Review logos, trademarks, copyrighted artwork, and brand names before publication.
• Be especially careful with images of children and real private individuals.
• Disclose major AI edits when the image could otherwise be mistaken for an unedited photograph or exact product representation.
• Keep the original image, editing instructions, intermediate versions, final file, and date.
Responsible AI image editing should improve communication without misleading viewers, violating privacy, or changing important facts.
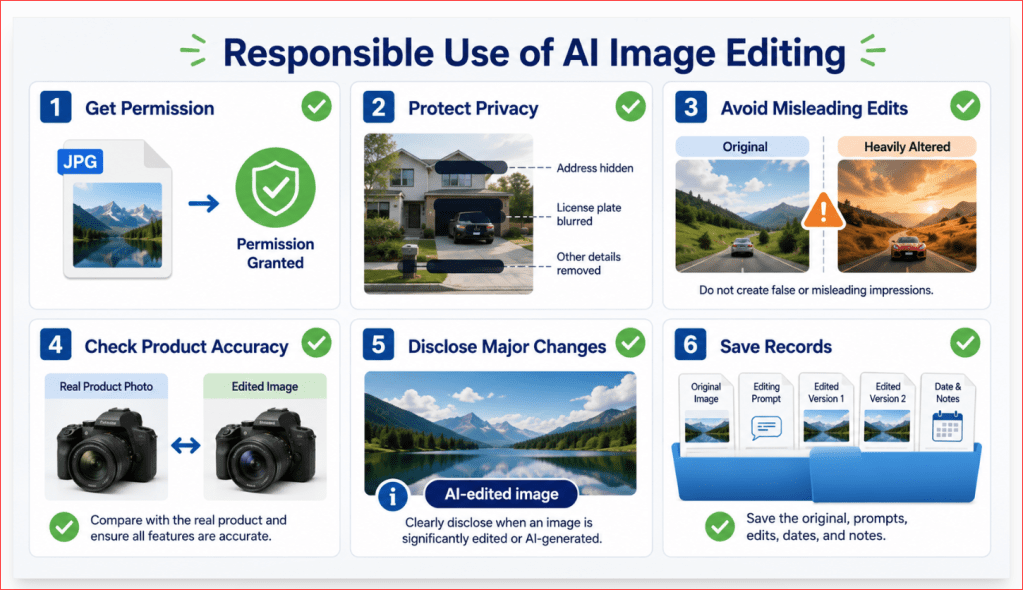
Figure 16. Responsible AI image editing requires permission, privacy protection, accurate representation, careful review, appropriate disclosure, and saved records.
This checklist summarizes the main responsibilities to consider before publishing an AI-edited image. These practices help protect real people, reduce misleading content, and preserve a record of the changes.
Best Practices for Editing Images with ChatGPT
• Begin with the clearest, highest-quality original image available.
• Keep an unchanged copy of the original.
• Decide the image’s purpose and required aspect ratio before editing.
• Make one clear change at a time and protect the successful details.
• Use exact object and location descriptions.
• Ask new areas to match the original lighting, perspective, colours, texture, and shadows.
• Save each successful version with a descriptive filename.
• Compare every new version with the previous successful image.
• Review the image at normal size, enlarged size, and the approximate published size.
• Use another tool for exact text, dimensions, compression, WebP conversion, colour values, or pixel-level repairs.
A successful image edit should be clear, accurate, natural, suitable for its intended purpose, and carefully reviewed before publication.
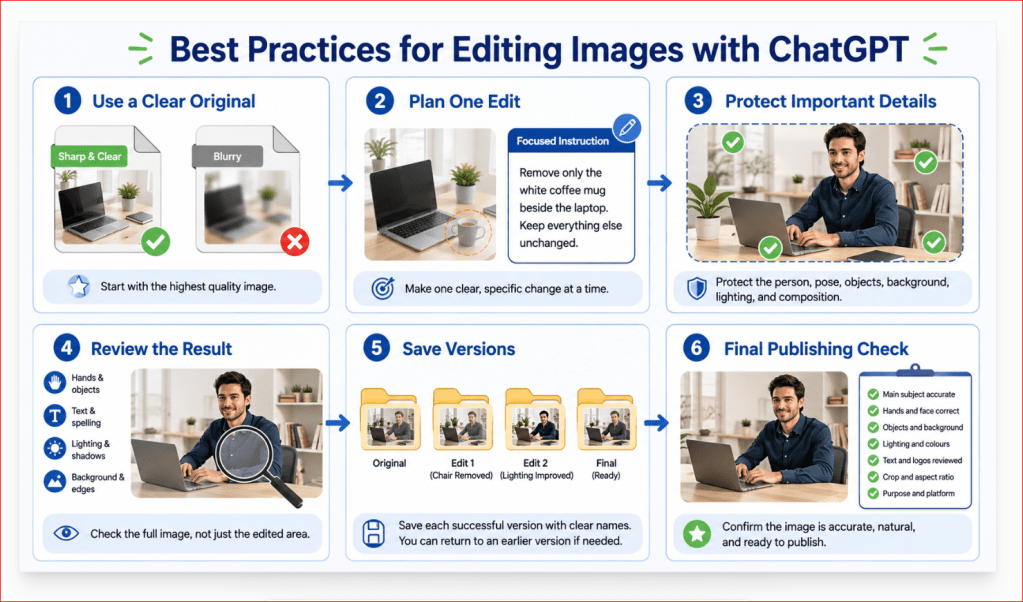
Figure 17. Following a clear editing process helps protect important details and produce more accurate, consistent, and publishable images.
Following this workflow makes it easier to identify mistakes, preserve successful corrections, and return to an earlier version when a later edit creates new problems.
Step-by-Step Example: Editing an Image from Start to Finish
Imagine a square home-office image showing an adult beginner using a laptop. The image contains an extra chair, an incorrect right hand, dark lighting, a red notebook, and no open space for a website title.
1. Save the unchanged original as home-office-image-original.webp.
2. Remove the extra chair and rebuild the wall and floor naturally.
3. Correct only the right hand while protecting the person’s identity and pose.
4. Brighten the room with soft daylight from the left.
5. Change only the notebook from red to navy blue.
6. Convert the composition to wide 16:9, place the person on the right, and leave open space on the left.
7. Add the exact title later with a design tool.
8. Review the complete image and save the final web-ready version.
“Use the current corrected version. Keep the person, face, expression, clothing, pose, corrected hand, desk, laptop, navy-blue notebook, plant, background, improved lighting, colours, and natural proportions unchanged. Change the image to a wide 16:9 format by extending the home-office background. Position the person on the right and leave clean open space on the left for a website title. Do not stretch or crop the person.”
The final image should preserve the original person and scene while presenting a cleaner background, corrected hand, improved lighting, suitable colours, and a wide composition prepared for WordPress.
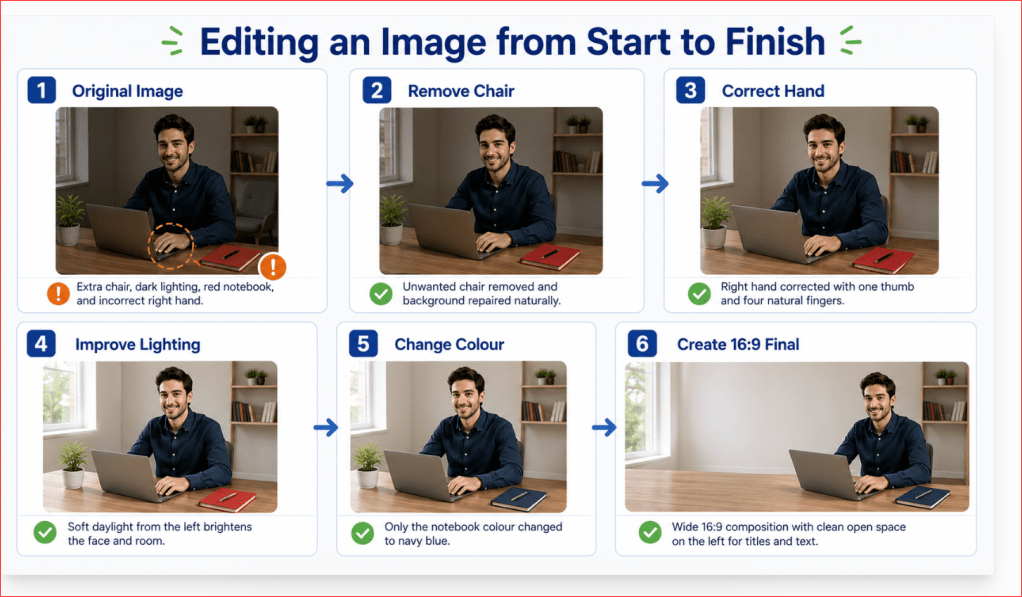
Figure 18. A complete image-editing workflow moves from reviewing the original image to making focused corrections, resizing the composition, and preparing the final file.
This example demonstrates how each edit can build on the previous successful version. Completing the changes in a controlled order reduces accidental changes and makes the final review easier.
How to Save and Download the Finished Image
1. Open the completed image in ChatGPT Images or in the conversation.
2. Review the final version at normal size and zoom in on faces, hands, text, products, edges, shadows, and repaired areas.
3. Select Save to download the image to your device. On supported devices, you may also see Copy or Share.
4. Rename the file with a descriptive name, such as how-to-edit-images-with-chatgpt-featured-image.webp.
5. Use a design or image tool to confirm the final pixel dimensions, convert to WebP when needed, and compress the file without making it blurry.
6. Keep the original image and important intermediate versions in a separate folder.
For WordPress, also prepare the image alt text, title, caption, and description. The alt text should describe the image’s purpose and important visible content rather than repeating the article title word for word.
Frequently Asked Questions About Editing Images with ChatGPT
Can ChatGPT edit an image I upload?
Yes. Upload a supported still image and describe the change you want. Use a clear file and identify the exact object or area.
Can ChatGPT edit only one part of an image?
Yes. Describe the location or use the selection tool. Always review the full image because nearby details may still change.
Can ChatGPT remove, add, or replace objects?
Yes. Explain what must remain unchanged, identify the object and location, describe the new result, and ask the edited area to match the original perspective, lighting, and shadows.
Can ChatGPT change or remove a background?
Yes. Protect the main subject and describe the new background, camera angle, lighting, colours, and depth of field. Transparent edges may need further cleanup in another tool.
Can ChatGPT fix hands and faces?
It can attempt focused corrections, but these areas are complex. Make one correction at a time and compare the result with the previous version.
Can ChatGPT correct text inside an image?
It can attempt short text, but every letter must be reviewed. For exact wording and typography, add the final text later with a design tool.
Can ChatGPT crop or resize an image?
It can change composition and aspect ratio. Use a traditional tool when exact pixel dimensions, compression, or file size are required.
Why did something change that I did not mention?
AI editing can affect nearby or related image details. Reduce this risk by protecting important elements, making one focused edit, and saving each successful version.
Will ChatGPT always produce the exact edit I request?
No. A precise instruction improves the chance of a suitable result but does not guarantee it. Review every image before use.
Do I still need another image-editing tool?
Often, yes. Traditional tools provide better control for exact text, dimensions, colours, layers, compression, transparent edges, and print preparation.
Key Takeaways
• Start with a clear image and keep an unchanged original.
• State what must stay the same before describing the edit.
• Identify the exact object, location, and desired result.
• Make one or two related changes at a time.
• Match the original perspective, lighting, colours, textures, shadows, and style.
• Use the selection tool for small areas, but review the complete image afterward.
• Save every successful version and return to an earlier version when necessary.
• Use another tool for exact typography, dimensions, compression, or detailed finishing.
• Check permission, privacy, product accuracy, and the risk of misleading viewers.
• Treat every AI-edited image as a draft until it has been carefully reviewed.
Final Tip
Do not ask ChatGPT to “fix everything” when most of the image is already correct. Use a focused instruction that protects successful details and identifies only the remaining problem.
“Use the current corrected version. Keep the person, face, clothing, pose, hands, desk, laptop, background, lighting, colours, camera angle, composition, and previous corrections unchanged. Correct only the small problem in the selected area. Match the surrounding perspective, texture, lighting, and shadows. Do not change anything else.”
Small, controlled improvements are usually safer than one long instruction containing many unrelated changes.
Continue Learning
Continue building your AI image-generation and editing skills with these beginner-friendly guides:
• AI Image Generation for Beginners: Complete Guide (2026)
• How to Write Better AI Image Prompts: Step-by-Step Beginner Guide (2026)
• Best AI Image Prompts for Beginners: 50 Examples to Copy and Customize (2026)
• Prompt Engineering for Beginners: Complete Guide (2026)
• Best ChatGPT Prompts for Beginners: Complete Guide (2026)
Each guide provides practical instructions and examples that can help you create clearer prompts, generate more useful images, and improve your results through focused follow-up instructions.


Leave a Reply