Tag: Faceless YouTube Videos

  • How to Choose a Faceless YouTube Niche and Plan Your Channel with AI: Beginner Step-by-Step Guide (2026)

    How to Choose a Faceless YouTube Niche and Plan Your Channel with AI: Beginner Step-by-Step Guide (2026)

    Estimated reading time: 25 minutes

    Last updated: August 6, 2026

    Introduction

    A faceless YouTube channel can teach, explain, demonstrate, compare, or entertain without showing the creator on camera. The videos may use narration, screen recordings, slides, diagrams, original photographs, licensed stock assets, animation, hands-only demonstrations, or carefully reviewed AI-generated visuals.

    Before creating videos, choose a clear niche and prepare a simple channel plan. A niche is the focused combination of subject, audience, problem, and useful result that gives the channel a recognizable direction. Without this direction, beginners often collect unrelated ideas, purchase unnecessary tools, or produce videos that serve different audiences.

    AI can help generate ideas, organize research, compare possible niches, draft content pillars, and plan video topics. It cannot prove that a niche will be successful, profitable, or easy to monetize. Important claims about YouTube features, policies, analytics, licensing, and disclosure should be checked against current official guidance.

    This article provides general educational information. It does not guarantee views, subscribers, monetization, sponsorships, or income, and it is not legal, financial, medical, or other professional advice.

    Before You Begin

    Prepare a simple planning folder before making the first video. Save the niche ideas, audience notes, source links, channel-name options, content pillars, topic lists, licence records, permissions, budget, test-video notes, and later analytics in clearly named files.

    • A computer, tablet, or suitable smartphone
    • A reliable internet connection
    • A document or spreadsheet for planning
    • An AI assistant for brainstorming and organizing ideas
    • Access to current official YouTube help pages
    • A realistic monthly budget
    • Folders for sources, licences, permissions, images, scripts, audio, videos, thumbnails, and exports

    Do not subscribe to several paid services before completing one small test project. Free plans and trials may include watermarks, export limits, lower resolution, restricted commercial use, or limited credits. Review current terms before publishing or monetizing content.

    What You’ll Learn

    • Define a clear audience and useful channel purpose
    • Generate possible niche ideas with AI
    • Evaluate each niche for practical fit
    • Research repeated viewer questions and content demand
    • Choose three to five content pillars
    • Select a repeatable faceless-video format
    • Plan the channel identity, playlists, and first 20 topics
    • Choose a realistic publishing schedule
    • Test the niche before making major purchases
    • Avoid common planning, copyright, privacy, and disclosure mistakes

    What Is a Faceless YouTube Niche?

    A faceless YouTube niche is the specific subject, audience, problem, and useful result that a channel focuses on while the creator remains off camera. The niche is broader than one video topic but narrower than a general category such as technology, education, or entertainment.

    A useful niche is more than a general subject. It combines the topic, the intended audience, the problem being solved, and the result viewers hope to achieve.
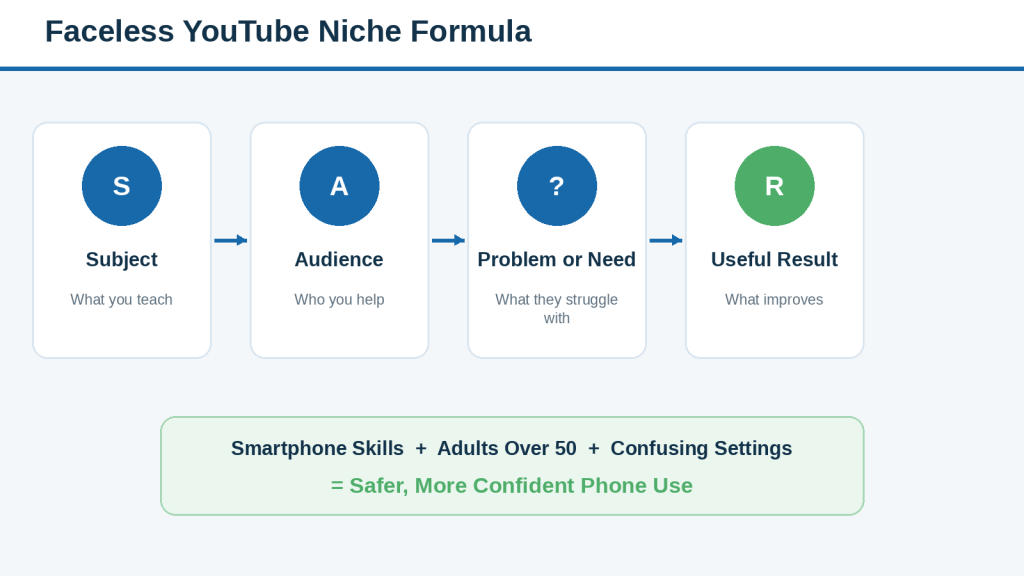
    Figure 1. The four parts of a clear faceless YouTube niche.

    Explanation: A practical niche combines a subject, a specific audience, a problem or need, and a useful result. Defining all four parts makes it easier to choose video topics and explain the channel to new viewers.

    For example, “technology” is broad. “Slow smartphone tutorials for adults over 50” is clearer because it identifies the subject, audience, and teaching approach. A specific niche helps viewers understand the channel and helps the creator decide which ideas belong.

    Why Choosing the Right Niche Matters

    A clear niche improves decision-making. It helps the creator choose topics, research sources, visuals, narration style, thumbnail design, playlists, and publishing frequency. It can also reduce repeated work because the same research methods, file structure, and production format can be reused.

    • Viewers can understand the channel more quickly
    • Related videos can support one another
    • Playlists become easier to organize
    • Research and production systems become more consistent
    • Tool and subscription costs become easier to control
    • Viewer feedback becomes easier to interpret

    A niche does not guarantee success. Its purpose is to create clarity, not certainty.

    Step 1: Identify the Audience You Want to Help

    Begin with the audience rather than the tool. A useful audience description identifies who the viewers are, what they already understand, which problems they face, and what type of explanation will help them.
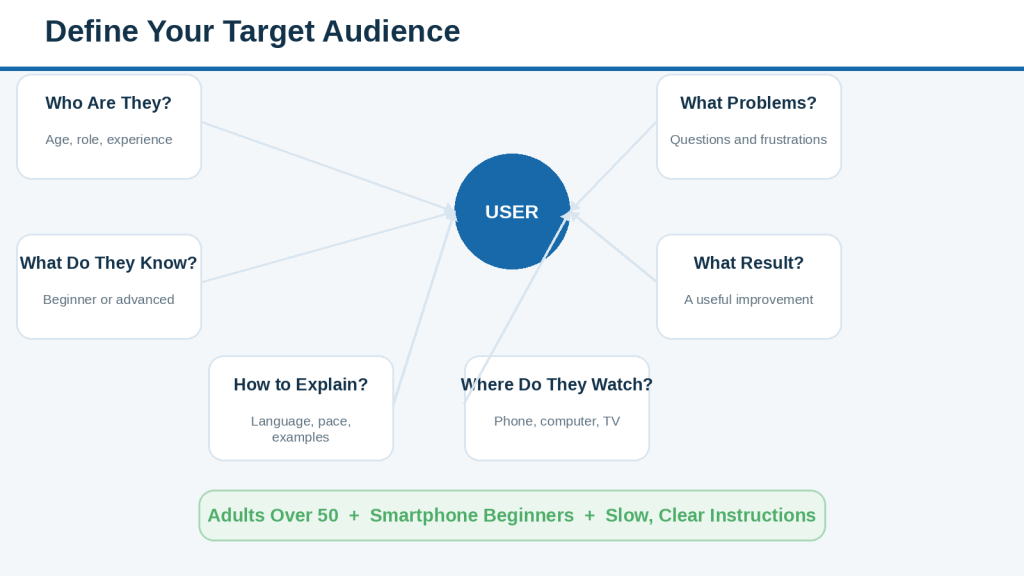
    Figure 2. A simple target-audience profile for a faceless YouTube channel.

    Explanation: Defining the audience helps the creator choose suitable language, examples, video length, narration speed, text size, and topic difficulty.

    Avoid descriptions such as “everyone” or “people who like videos.” A clearer audience might be complete beginners using AI tools, retirees learning smartphone skills, small-business owners creating simple marketing videos, or parents looking for beginner digital-safety guidance.

    Complete this sentence:

    This channel helps [audience] understand or complete [problem or task] so they can achieve [useful result].

    Do not collect unnecessary sensitive information about potential viewers. Public comments, surveys, or community discussions should be used respectfully and without exposing private identities.

    Step 2: Generate Possible Niche Ideas with AI

    Use AI as a brainstorming assistant. Provide your interests, skills, experience, available tools, budget, preferred video style, and intended audience. Ask for several distinct options rather than one “best niche.”
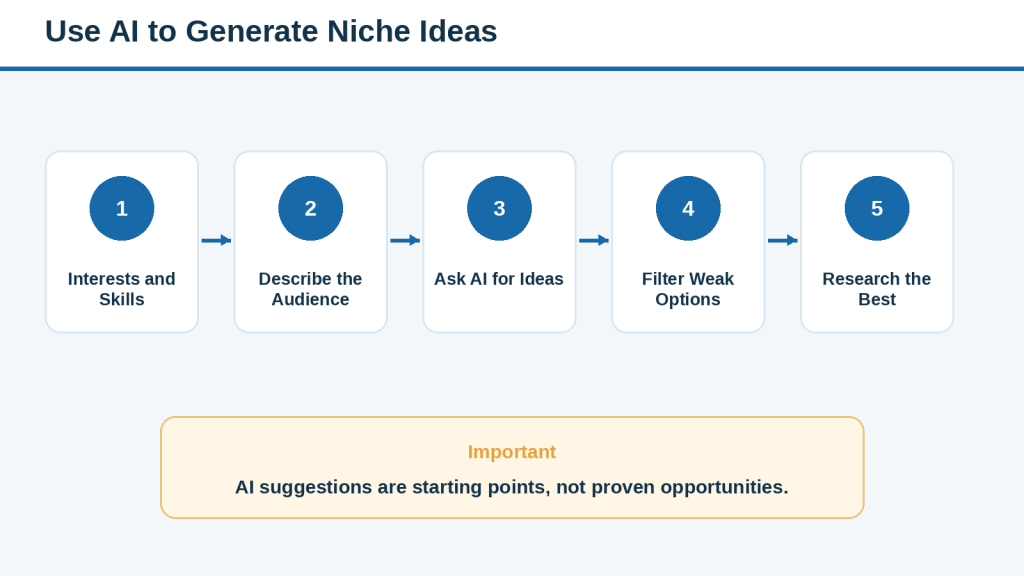
    Figure 3. A responsible workflow for generating niche ideas with AI.

    Explanation: AI can help generate and organize possible niche ideas, but every suggestion still requires human review and independent research.

    Example prompt:

    I want to create a beginner-friendly faceless YouTube channel. My interests are [subjects]. My useful experience includes [skills]. I can publish [frequency] and prefer . Generate 15 niche ideas, identify the audience and useful result for each, and note possible research, cost, copyright, privacy, or professional-advice risks. Do not claim that any niche is guaranteed to grow or earn money.

    Review every suggestion. AI may invent search volumes, competition levels, advertising rates, or growth predictions. Treat those claims as unverified until confirmed through appropriate current sources.

    Step 3: Evaluate Each Niche for Practical Fit

    Compare the strongest ideas using the same criteria. This prevents one exciting idea from receiving special treatment while its difficulties are ignored.
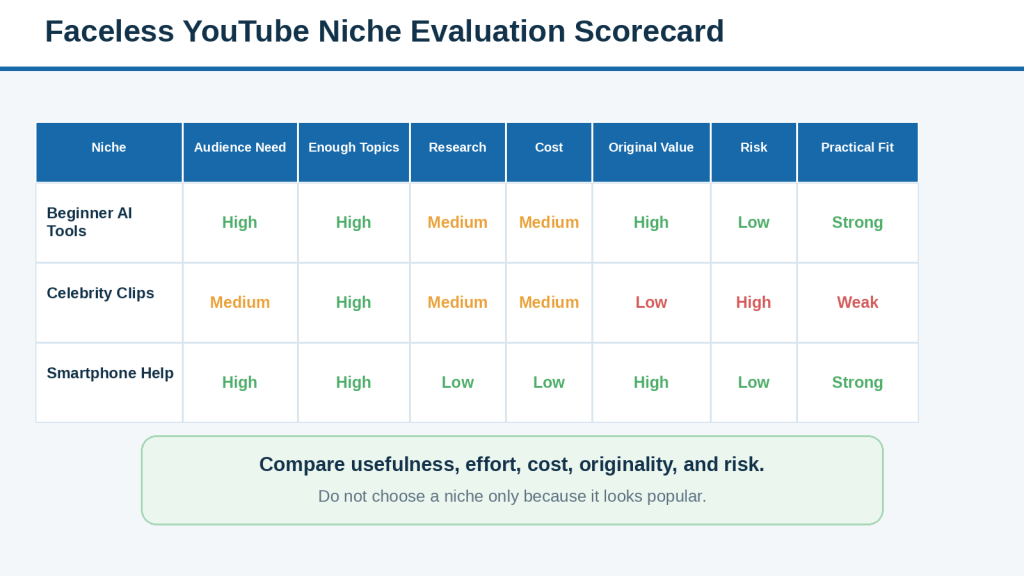
    Figure 4. A practical scorecard for comparing possible channel niches.

    Explanation: A niche should be evaluated for more than popularity. Compare audience value, topic depth, research difficulty, production cost, originality, safety, and sustainability.

    • Clear audience need
    • At least 20 to 30 meaningfully different video topics
    • Reliable and understandable research sources
    • A production format you can repeat
    • Affordable tools and assets
    • Opportunities for original value
    • Manageable copyright, privacy, and safety risks
    • Enough personal interest to continue learning

    A high-risk niche may still be possible, but it requires stronger evidence, more review, and sometimes qualified professional input. Beginners should be cautious with medical, legal, investing, politics, crime, child safety, and fast-changing news content.

    Step 4: Research Viewer Questions and Content Demand

    Look for repeated questions rather than one trend or one successful competitor. Useful evidence may come from search suggestions, video comments, official support pages, forums, community discussions, your own experience, and later YouTube Analytics.
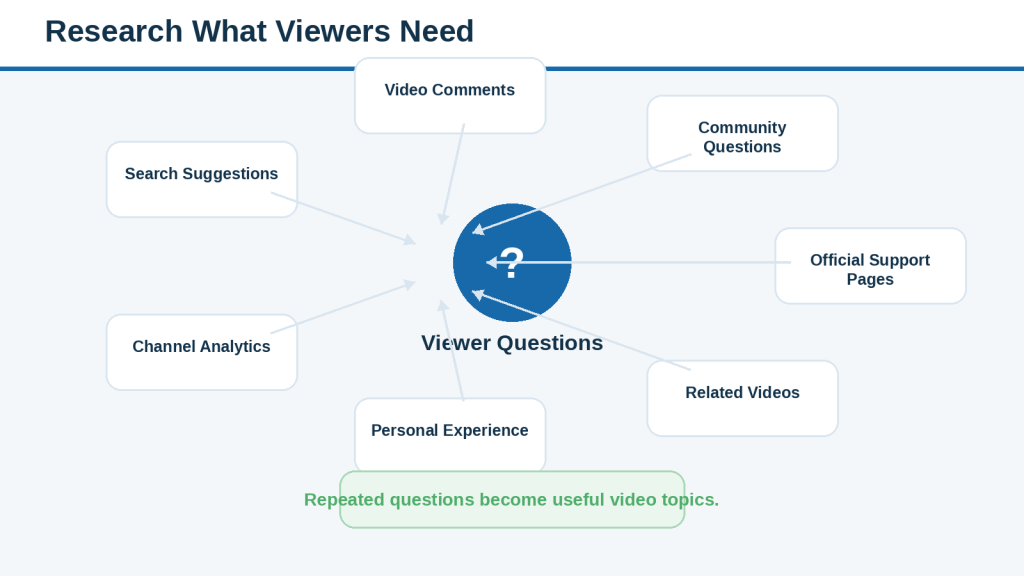
    Figure 5. Sources of useful viewer questions and video ideas.

    Explanation: Repeated questions from search, comments, support pages, related videos, experience, and analytics can become useful video topics.

    Record the exact wording of repeated questions, but do not copy another creator’s script, thumbnail, title pattern, branding, or examples. The purpose of research is to understand the audience, not imitate a channel.

    A topic with some competition may still be useful because competition can show that an audience exists. Very low competition can also mean that few people are searching for the subject.

    Step 5: Choose the Final Niche

    Choose the option that offers the best balance of usefulness, originality, manageable production, acceptable risk, and long-term interest. Write a one-sentence niche statement and a short list of boundaries.

    Example niche statement:

    This channel helps adults over 50 learn essential smartphone skills so they can complete everyday tasks more safely and confidently through slow screen-recorded tutorials and simple visual explanations.

    Also record what the channel will not cover. Boundaries help prevent unrelated trend chasing and reduce the risk of entering subjects that require qualifications or assets you do not have.

    Step 6: Choose Three to Five Content Pillars

    Content pillars are the main subject areas inside the niche. Each content pillar should serve the same audience and support the same overall channel purpose.
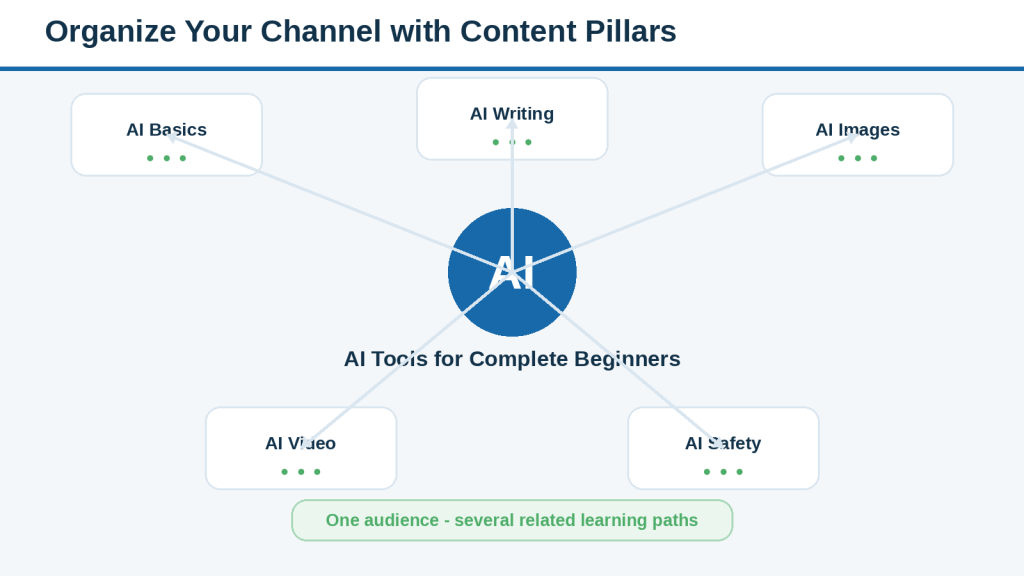
    Figure 6. How one channel niche can be organized into content pillars.

    Explanation: Content pillars divide the niche into related subject areas. Each pillar can support multiple videos and may later become a playlist.

    For an AI-for-beginners channel, the pillars might be AI basics, AI writing, AI images, AI video, and AI safety. For smartphone help, they might be basic settings, communication, photographs and storage, privacy and scam protection, and useful everyday apps.

    Combine pillars that overlap. Avoid adding an unrelated pillar simply because it appears popular.

    Step 7: Choose the Main Video Formats

    Select one practical main format and optional supporting formats. The best choice depends on what viewers need to see, the assets you can create or license, and the amount of editing you can manage.
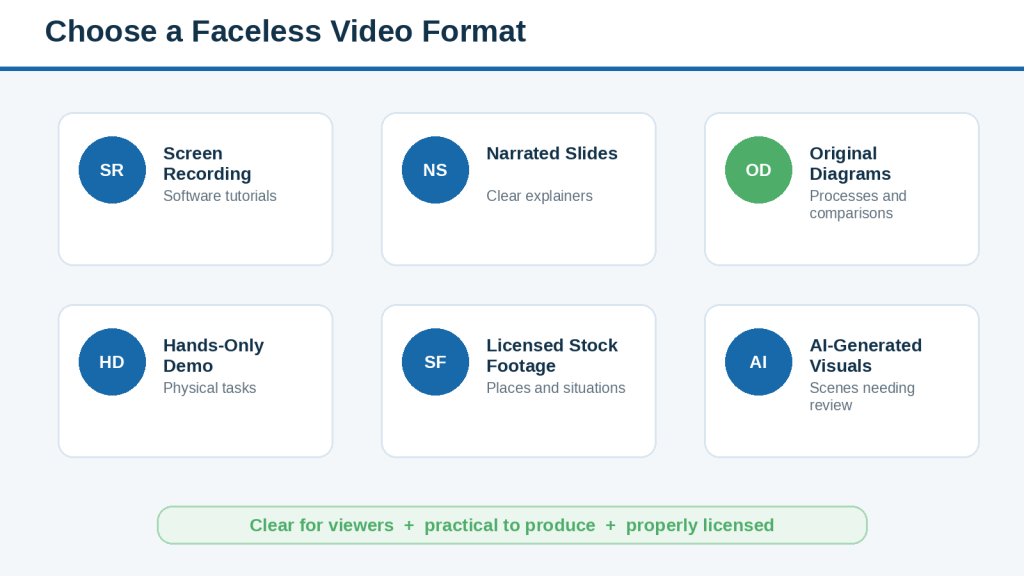
    Figure 7. Common faceless YouTube video formats and their main uses.

    Explanation: Beginners should choose a main format that is understandable, affordable, accessible, and practical to repeat.

    • Screen recordings for software and settings
    • Narrated slides for structured explanations
    • Original diagrams for workflows and comparisons
    • Hands-only demonstrations for physical tasks
    • Properly licensed stock footage for general scenes
    • Carefully reviewed AI-generated visuals when they add real value

    Check every asset licence. “Free” and “royalty-free” do not always mean unrestricted or commercially permitted. Save licences, receipts, permission messages, and the original source files.

    Step 8: Plan the Channel Identity

    A channel identity includes the name, description, viewer promise, visual style, narration style, thumbnail style, and overall experience viewers receive.
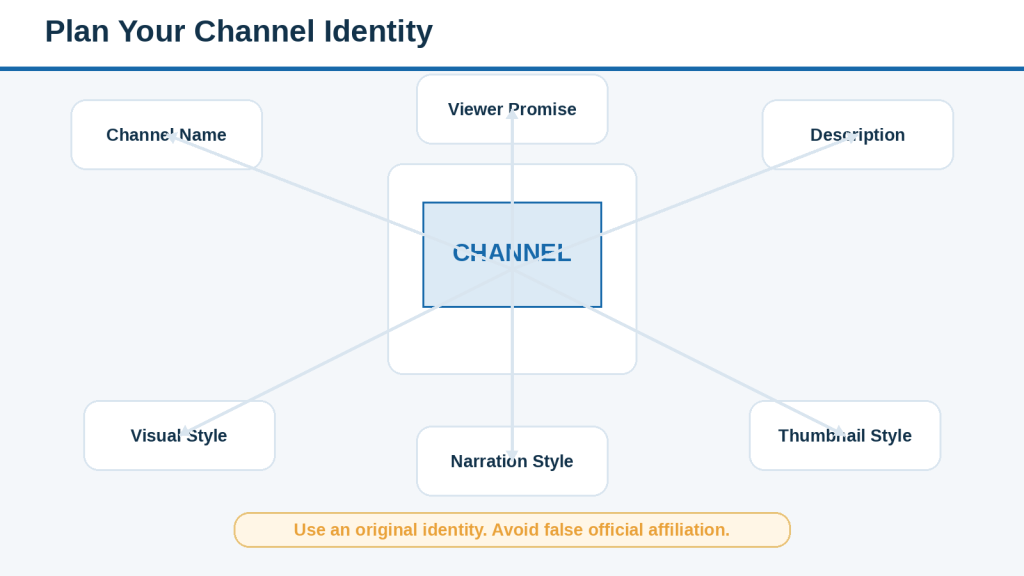
    Figure 8. The main parts of a clear and consistent channel identity.

    Explanation: A simple channel identity helps viewers recognize the channel and understand its purpose.

    Choose a name that is clear, easy to spell, and distinct from existing channels and companies. Do not suggest official affiliation with YouTube, Google, OpenAI, Microsoft, or another organization when no such relationship exists.

    The viewer promise should describe the value accurately. Avoid guaranteed outcomes such as “earn money quickly,” “grow instantly,” or “never make another mistake.”

    Step 9: Plan Your First 20 Video Topics

    Plan approximately 20 initial topics, then select the first five carefully. The first 20 topics should include foundation lessons, practical tutorials, common mistakes, safety guidance, comparisons, and useful projects.
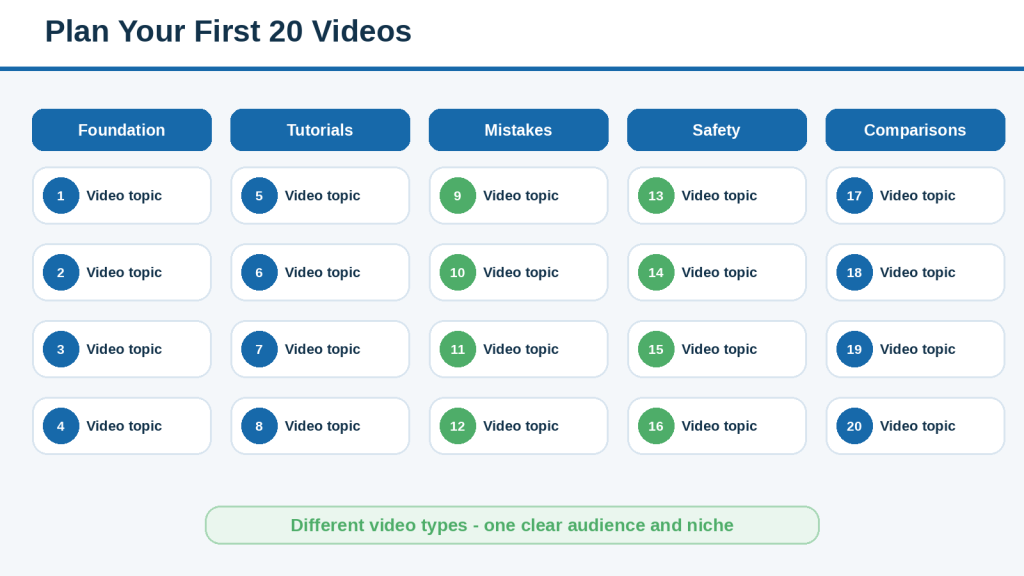
    Figure 9. A balanced plan for the first 20 channel videos.

    Explanation: A balanced topic list includes foundation lessons, tutorials, mistakes, safety guidance, comparisons, and projects without becoming repetitive.

    A balanced list gives beginners a clear starting path while allowing viewers to enter through different questions. Every topic should be meaningfully different and connected to the niche.

    Do not create hundreds of titles before producing a test video. Real production experience may change the format, schedule, or topic priorities.

    Step 10: Create a Realistic Publishing Schedule

    A publishing schedule should reflect the complete workload, not only editing time. Produce one test video, record the actual time required, add a reasonable buffer, and then choose a schedule you can maintain.
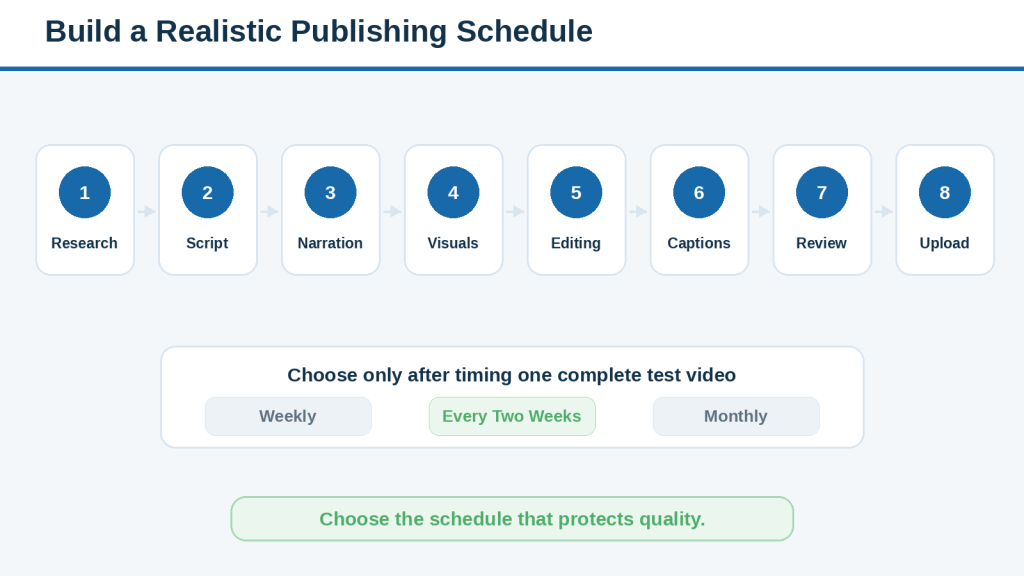
    Figure 10. How to calculate a realistic video-publishing schedule.

    Explanation: A sustainable schedule should be based on the complete workload, including research, scripting, narration, visuals, editing, captions, review, and uploading.

    • Research and source checking
    • Outline and script
    • Narration recording or authorized AI voice preparation
    • Visual creation and licensing checks
    • Editing and audio balancing
    • Caption correction and accessibility review
    • Thumbnail, title, description, upload, and final review

    One carefully reviewed video every two weeks may be more sustainable than rushed daily uploads. Quality, accuracy, permissions, captions, and privacy should not be sacrificed to meet an arbitrary frequency.

    Step 11: Organize the Channel, Playlists, and Launch Plan

    A clear structure helps new visitors understand what the channel teaches, which videos they should watch first, how related topics connect, and what to watch next.
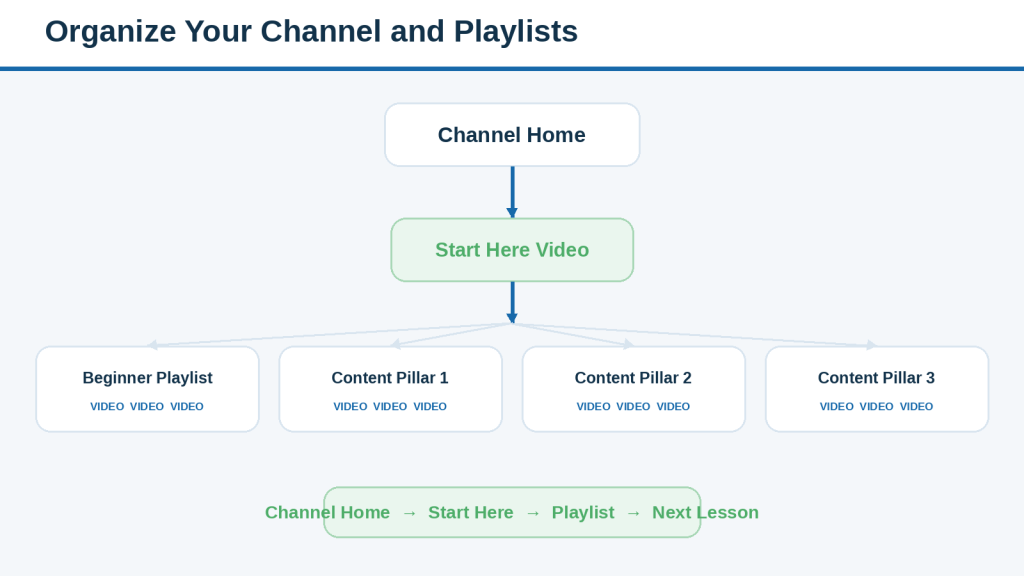
    Figure 11. A simple channel structure that guides viewers to the next lesson.

    Explanation: A well-organized channel uses a clear starting point, related playlists, and natural next-video recommendations.

    Create a simple starting point such as “Start Here” or “Beginner Basics.” Turn established content pillars into playlists after related videos exist. Avoid creating many empty playlists simply to make the channel look larger.

    Plan a brief channel trailer, a featured video for returning viewers, a readable banner, a simple profile image, and only relevant public links. Use a dedicated business contact address when appropriate and do not publish personal family details, private phone numbers, financial information, or exact daily routines.

    Step 12: Test the Niche Before Fully Committing

    Before investing heavily in tools, branding, stock libraries, narration services, or advanced editing, test the niche with a small number of videos.
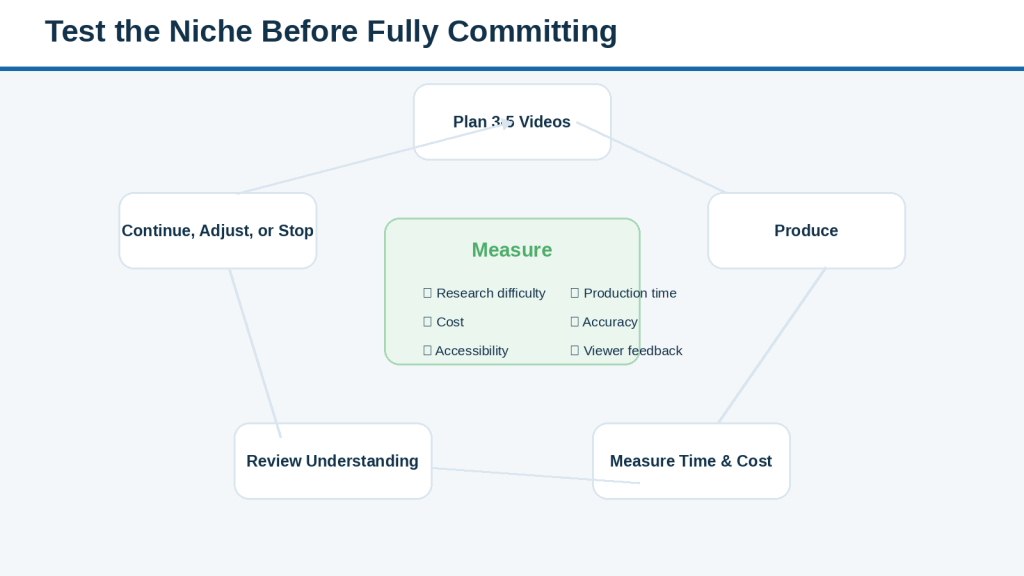
    Figure 12. A small test cycle for evaluating a faceless YouTube niche.

    Explanation: Testing three to five connected videos helps reveal the actual research difficulty, production time, cost, viewer understanding, and practicality.

    Create three to five connected videos. Record research difficulty, production time, cost, narration quality, visual requirements, caption workload, viewer understanding, and your willingness to continue. One completed project provides more useful information than an ambitious unfinished plan.

    After the test, choose one of three paths: continue, adjust, or stop. Stopping an unsuitable plan is not failure; it prevents larger losses of time and money.

    Benefits of Choosing a Clear Niche and Channel Plan

    • Viewers understand the channel more quickly
    • Video ideas become easier to generate
    • Related videos form a useful learning path
    • Production and branding become more consistent
    • Research sources and workflows can be reused
    • Tool choices and costs become easier to control
    • Playlists and internal recommendations become clearer
    • Risks can be identified before publication
    • A written plan reduces creative stress

    The main benefit is clarity. Planning improves decisions and organization, but it does not guarantee views, subscribers, monetization, or income.

    Limitations of Niche and Channel Planning

    A detailed plan may feel complete even though no video has been produced.
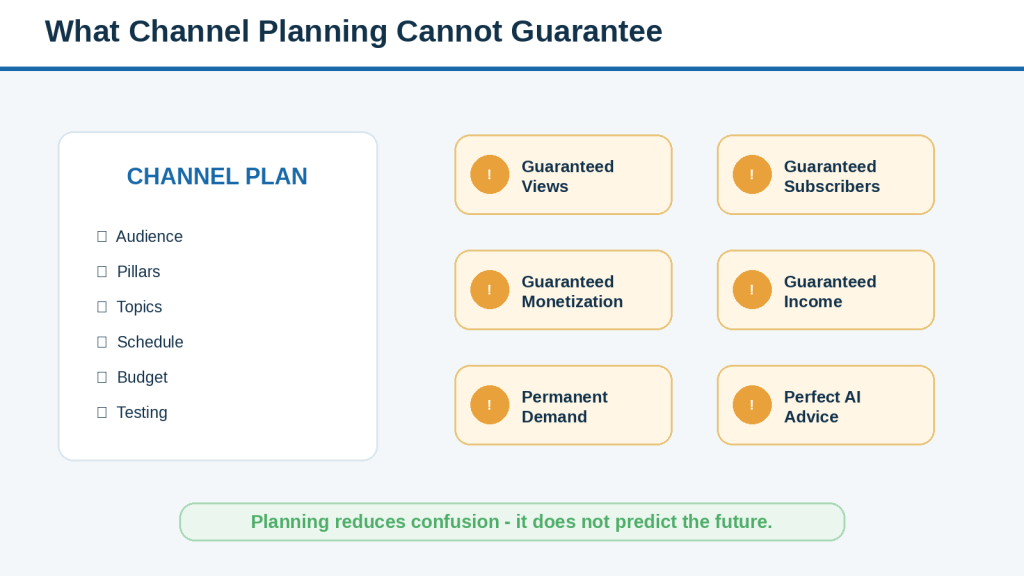
    Figure 13. Important limitations of niche and channel planning.

    Explanation: Planning improves organization but cannot guarantee views, monetization, income, or long-term demand.

    • Planning cannot guarantee views or monetization
    • Search interest and competition can change
    • AI suggestions may be inaccurate or outdated
    • Competitor research cannot reveal every cost or advantage
    • A niche may prove too broad, too narrow, or too expensive
    • Fast-changing tutorials may become outdated
    • New channels may not have enough analytics data
    • Too much planning can delay the first useful video

    Create a small test series and update the plan using real evidence. Do not change the entire niche after one low-view video, but do not ignore repeated evidence that the plan is impractical.

    Common Mistakes

    Choosing a niche only because it looks profitable

    Compare audience usefulness, production difficulty, cost, risk, and personal interest.

    Accepting the first AI recommendation

    Generate several options and verify all important claims.

    Choosing a topic before defining the audience

    Write the audience statement first.

    Copying a successful channel

    Create original research, wording, examples, branding, and visuals.

    Ignoring copyright, privacy, and impersonation risks

    Confirm permissions and licences before committing to the niche.

    Buying tools before producing a test video

    Start with existing or limited tools and upgrade only for a specific need.

    Planning an unrealistic publishing schedule

    Time one complete video and include a buffer.

    Changing direction after one poor result

    Review several related videos and repeated patterns.

    Waiting for the perfect niche

    Choose the strongest practical option and begin a small test.

    Common Myths

    Myth: You must choose the most profitable niche

    Reality: A suitable niche must also be useful, affordable, researchable, and sustainable.

    Myth: AI can identify the perfect niche

    Reality: AI can brainstorm, but it cannot predict demand, growth, monetization, or income.

    Myth: Low competition is always better

    Reality: Low competition may mean limited demand or a very narrow topic.

    Myth: A broad channel reaches more people

    Reality: Unrelated subjects can confuse viewers and weaken the learning path.

    Myth: You need expensive tools before launching

    Reality: Many ideas can be tested with simple screen recordings, diagrams, slides, and basic editing.

    Myth: Daily uploads are necessary

    Reality: A sustainable schedule is more valuable than rushed production.

    Myth: Faceless means fully automatic

    Reality: Human research, review, licensing checks, editing, accessibility, and judgement remain necessary.

    Myth: Good planning guarantees monetization

    Reality: Planning improves clarity but cannot guarantee approval or income.

    Faceless YouTube Niche and Channel Planning Checklist

    Complete this checklist before confirming the niche, purchasing several tools, or producing a large batch of videos.
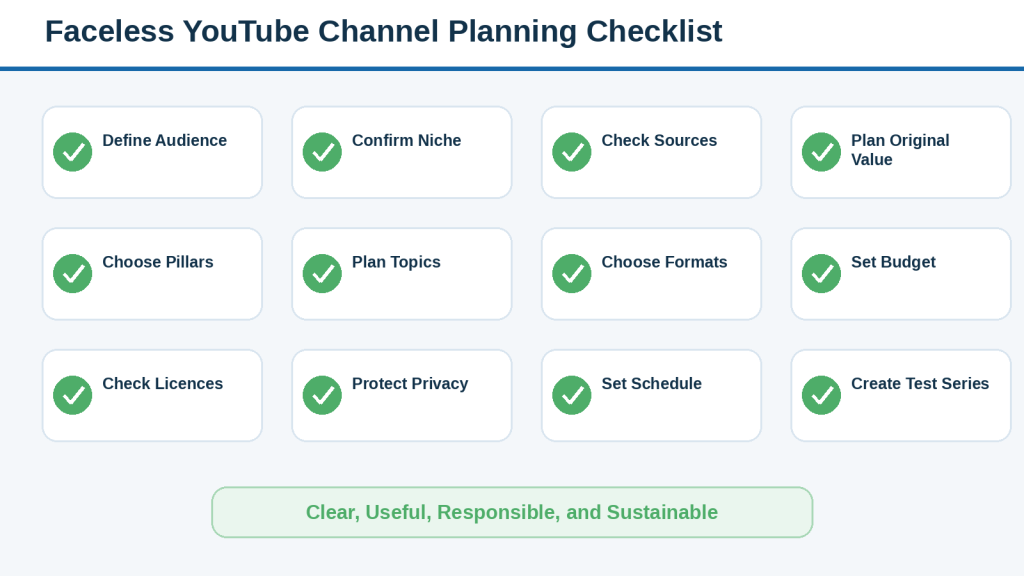
    Figure 14. Final checklist for confirming a faceless YouTube niche and channel plan.

    Explanation: The checklist brings together the main decisions about audience, niche, pillars, topics, format, budget, licences, privacy, schedule, organization, and testing.

    • The audience can be described in one sentence
    • The niche combines a subject, audience, problem, and useful result
    • At least 20 to 30 distinct video topics are possible
    • Reliable sources are available
    • Three to five related content pillars are defined
    • One repeatable main video format is selected
    • The budget is affordable even without channel income
    • Copyright, licences, privacy, permission, and disclosure have been considered
    • The first five videos form a useful starting path
    • One complete test video has been timed
    • The publishing schedule includes review and correction time
    • Planning records and source files will be preserved

    Final planning rule: revise the plan when it depends on uncertain facts, questionable licences, unauthorized real-person content, unaffordable tools, or an unsustainable schedule.

    Practical Example: Plan a Faceless YouTube Channel from Start to Finish

    This example shows how a broad idea can become a practical channel plan through a defined audience, a clear niche statement, five related content pillars, a repeatable video format, twenty connected topics, a realistic publishing schedule, a small test project, and written safety and update procedures.
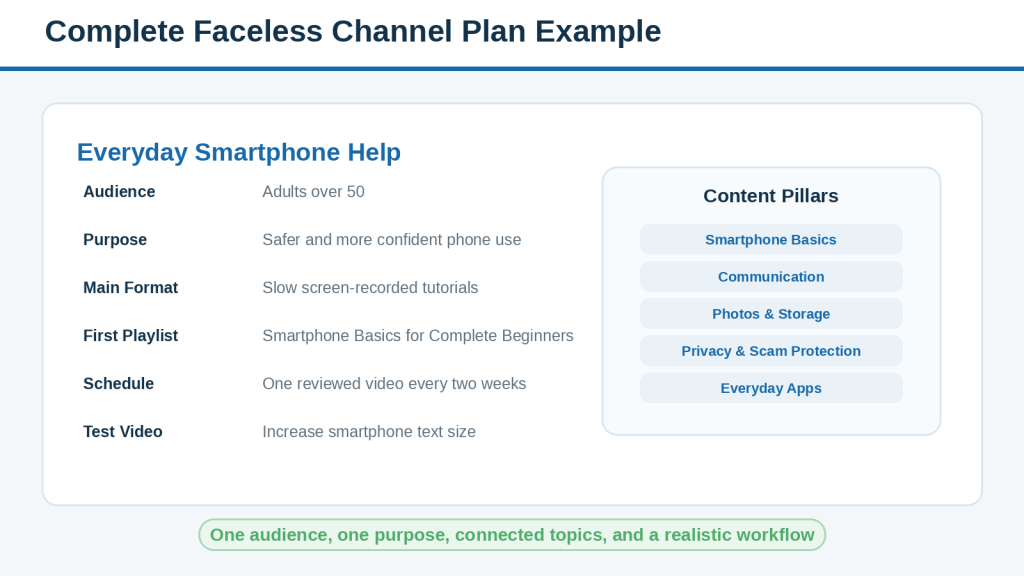
    Figure 15. A complete example of a beginner faceless YouTube channel plan.

    Explanation: The example shows how one audience, one purpose, five content pillars, a repeatable format, a topic list, and a realistic schedule fit together.

    Starting idea: a general technology channel. This is narrowed to adults over 50 who need slow, clear smartphone help. The channel becomes “Everyday Smartphone Help.”

    Niche statement: This channel helps adults over 50 learn essential smartphone and digital skills so they can complete everyday tasks more safely and confidently through slow screen-recorded tutorials and simple visual explanations.

    Content pillars: smartphone basics, communication, photographs and storage, privacy and scam protection, and useful everyday apps.

    First five videos: increase text size, connect to Wi-Fi, add a contact, recognize a suspicious message, and free storage space safely.

    After one test video takes approximately 11 hours from research to upload, the creator chooses one carefully reviewed video every two weeks. The test also reveals that pointer movement should be slower, menu names may vary, and thumbnail text must be larger.

    Frequently Asked Questions

    Is a niche the same as a video topic?

    No. The niche is the channel’s overall direction. A video topic is one individual lesson inside that direction.

    How many content pillars should a beginner choose?

    Three to five related pillars are usually enough at the beginning.

    How narrow should the niche be?

    It should be clear enough to guide the channel but broad enough to support at least 20 to 30 meaningfully different topics.

    Can AI choose the niche for me?

    AI can organize and suggest ideas, but the final decision requires research, testing, and human judgement.

    Do I need to be an expert?

    You need enough knowledge and reliable research to explain the topic accurately. Do not claim qualifications you do not have.

    How many videos should I prepare before launching?

    One fully reviewed video is enough to begin. Two or three connected videos can create a stronger starting path when the workload is manageable.

    How often should a beginner publish?

    Choose a frequency after timing one complete test video. Weekly, every two weeks, or monthly can all be reasonable.

    Can I change the niche later?

    Yes. Make small evidence-based adjustments. A completely unrelated subject may be better on a separate channel.

    What should I do when early videos receive few views?

    Review titles, thumbnails, openings, usefulness, and viewer paths. Look for patterns across several videos before making a major change.

    Can a clear niche guarantee monetization?

    No. Planning cannot guarantee views, subscribers, YouTube Partner Program approval, advertising income, or sponsorships.

    Key Takeaways

    • Define the audience before confirming the niche
    • Use AI for brainstorming and organization, not guaranteed predictions
    • Evaluate usefulness, topic depth, cost, originality, research, and risk
    • Choose three to five related content pillars
    • Plan approximately 20 topics and select the first five carefully
    • Use one practical main video format
    • Measure one complete test video before choosing a schedule
    • Organize the channel with a clear starting point and useful playlists
    • Preserve sources, licences, permissions, versions, and project records
    • Test the niche with three to five connected videos and improve gradually

    The best niche is not simply the most popular or profitable-looking subject. It is a clear, useful, responsible, and sustainable channel direction that you can continue developing through original videos over time.

    Final Thoughts

    Choosing a faceless YouTube niche is not about discovering a secret topic that guarantees success. It is about creating a clear starting direction that serves a real audience and can be produced responsibly with the time, knowledge, tools, and budget available.

    Begin with one audience, one clear niche statement, three to five content pillars, approximately 20 useful topics, and one repeatable format. Then create a small test series and improve the plan with real production experience and viewer evidence.

    Choose a niche you can explain clearly, research responsibly, afford to produce, and continue developing even when early results are limited.

    Continue Learning

    Sources and References

    The following official YouTube and Google resources were reviewed for this article on August 6, 2026. Features, menu names, policies, analytics, plan conditions, and disclosure requirements may change.

    Readers should review the relevant current official guidance when first using a feature, changing tools or plans, receiving a policy-update notice, applying for monetization, publishing realistic altered or synthetic content, and periodically as part of normal channel maintenance.

    This article provides general educational information and is not legal, financial, medical, copyright, or other professional advice.
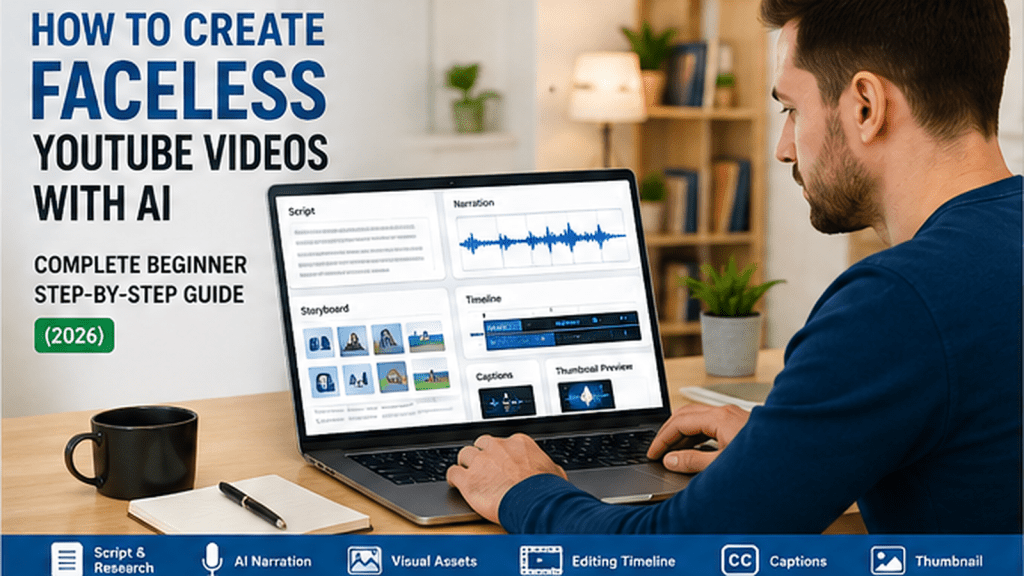
  • How to Create Faceless YouTube Videos with AI: Complete Beginner Step-by-Step Guide (2026)

    How to Create Faceless YouTube Videos with AI: Complete Beginner Step-by-Step Guide (2026)

    Estimated reading time: 28 minutes

    Last updated: August 6, 2026

    Create faceless YouTube videos by combining careful research, AI-assisted scripting, narration, visuals, editing, captions, and responsible publishing.

    Introduction

    You do not have to appear on camera to create useful, professional YouTube videos. A faceless YouTube video communicates through narration, images, video clips, screen recordings, animation, text, music, or a combination of these elements.

    Artificial intelligence can help with topic ideas, research organization, outlines, scripts, narration, images, short clips, captions, thumbnails, titles, and descriptions. However, AI should support your work rather than replace your judgement. A successful faceless video still needs an original purpose, accurate information, useful editing, clear narration, and something valuable for the viewer.

    YouTube’s monetization policies address repetitive, mass-produced, and insufficiently original content. AI-generated material can be used, but channels seeking monetization must still provide authentic, materially varied, creative, educational, or other meaningful value.

    You must also use AI responsibly. Check important claims, protect private information, obtain permission when using real people or their voices, and verify the licences for music, photographs, video clips, fonts, templates, and other assets.

    YouTube requires creators to disclose realistic content that has been meaningfully generated or altered with AI when viewers could mistake it for authentic content. Policies and controls may change, so check the current official guidance when your workflow, tools, or publishing plans change.

    This guide covers the complete process, from choosing a topic to publishing and reviewing the finished video. It is suitable for educational videos, tutorials, explainers, list videos, documentary-style videos, product demonstrations, stories, and YouTube Shorts.

    Before You Begin

    A faceless YouTube channel does not mean a fully automatic channel. You are still responsible for the quality, accuracy, legality, accessibility, and usefulness of everything you publish.

    Before creating your first video, prepare:

    • A clear topic and intended audience
    • A Google account and YouTube channel
    • A computer, tablet, or suitable smartphone
    • A reliable internet connection
    • A quiet place to review narration and audio
    • Folders for research, scripts, narration, images, video clips, music, captions, thumbnails, project files, licences, and final exports
    • An AI writing assistant for planning and drafting
    • A video editor or AI-assisted video tool
    • Properly licensed music, images, video clips, fonts, and templates

    Do not subscribe to several services before you understand your workflow. Start with tools you already have or limited free versions. Upgrade only when a paid feature solves a genuine production problem.

    Important: Free plans may include watermarks, export limits, lower resolution, restricted commercial use, or limited AI credits. Review current plan conditions and licensing rules before publishing or monetizing a video.

    What You’ll Learn

    • Choose a suitable topic and audience
    • Select a practical faceless video format
    • Research responsibly and save sources
    • Create an outline and script with AI assistance
    • Check facts and improve the script
    • Create narration with your own voice or an authorized AI voice
    • Plan and produce suitable visuals
    • Edit narration, visuals, music, and captions
    • Create an accurate thumbnail, title, and description
    • Upload and publish with the correct settings and disclosures
    • Avoid copyright, privacy, impersonation, licensing, and accessibility problems
    • Review performance and improve future videos

    What Is a Faceless YouTube Video?

    A faceless YouTube video is a video in which the creator does not appear on camera as the main presenter. The video may use stock clips, AI-generated visuals, screen recordings, slides, diagrams, animation, text, product demonstrations, hands-only footage, narration, music, and sound effects.

    Common Types of Faceless Videos

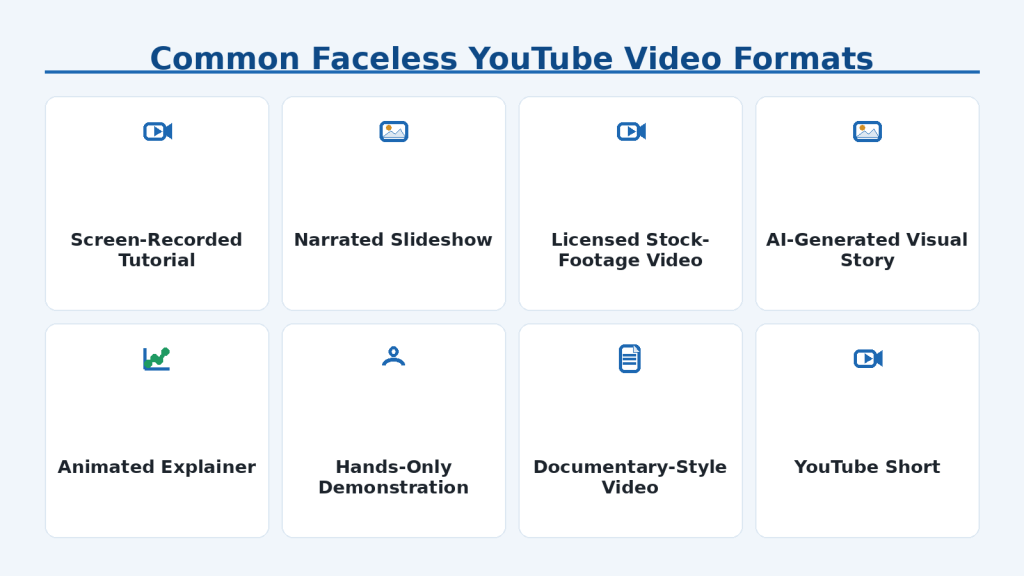
    Popular faceless formats include tutorials, narrated slideshows, documentary-style videos, history and science explainers, travel guides, list videos, stories, meditation videos, recipe demonstrations, product comparisons, animation, and YouTube Shorts.

    Figure 2. Common faceless YouTube video formats include tutorials, slideshows, stock footage, animation, demonstrations, documentary-style videos, AI-generated stories, and Shorts.

    Explanation: Each format needs a different combination of tools, visuals, narration, and editing. Beginners should choose the simplest format that clearly explains the topic and can be completed with their current skills and resources.

    Faceless Does Not Mean Effortless

    AI can reduce repetitive work, but it cannot guarantee that a video will be accurate, original, useful, or successful. You still decide who the video is for, which facts are reliable, which assets are permitted, whether narration sounds natural, whether disclosure is required, and whether the final video follows YouTube’s rules.

    Reality: Viewers usually care more about usefulness, clarity, trust, and entertainment than whether the creator appears on camera.

    How AI Can Help Create Faceless YouTube Videos

    AI can assist with several stages of video production.

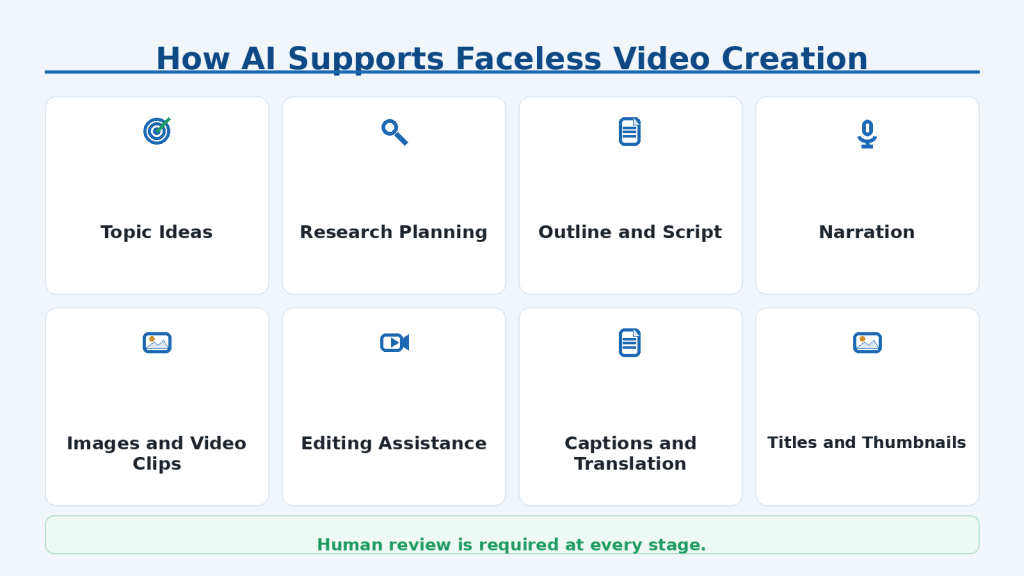
    Figure 3. AI can assist with ideas, research planning, scripts, narration, visuals, editing, captions, titles, and thumbnails, but every output requires human review.

    Explanation: AI is most useful as a production assistant rather than an automatic replacement for the creator. Important facts, wording, pronunciation, visual accuracy, licences, accessibility, disclosures, and final publishing decisions must still be checked by a person.

    Topic and Research Support

    AI can suggest focused topics, organize research questions, explain unfamiliar terms, and summarize notes. Treat these outputs as starting points. Verify important information with official organizations, governments, universities, original research, product documentation, and reputable publishers.

    Script and Narration Assistance

    AI can create outlines, draft scripts, simplify language, improve transitions, generate text-to-speech narration, and suggest pronunciation changes. Review the entire script and audio. Never clone or imitate a real person’s voice without clear authorization.

    Visual and Editing Assistance

    AI tools can create illustrations, backgrounds, diagrams, short clips, captions, translations, background removal, audio cleanup, and editing suggestions. Inspect every result for visual errors, incorrect text, misleading realism, poor timing, and accessibility problems.

    Reality: AI can accelerate production, but the creator remains responsible for every fact, asset, editing decision, licence, disclosure, and published result.

    The Complete Faceless Video Workflow

    A faceless YouTube video is easier to manage when you follow the same production sequence each time.

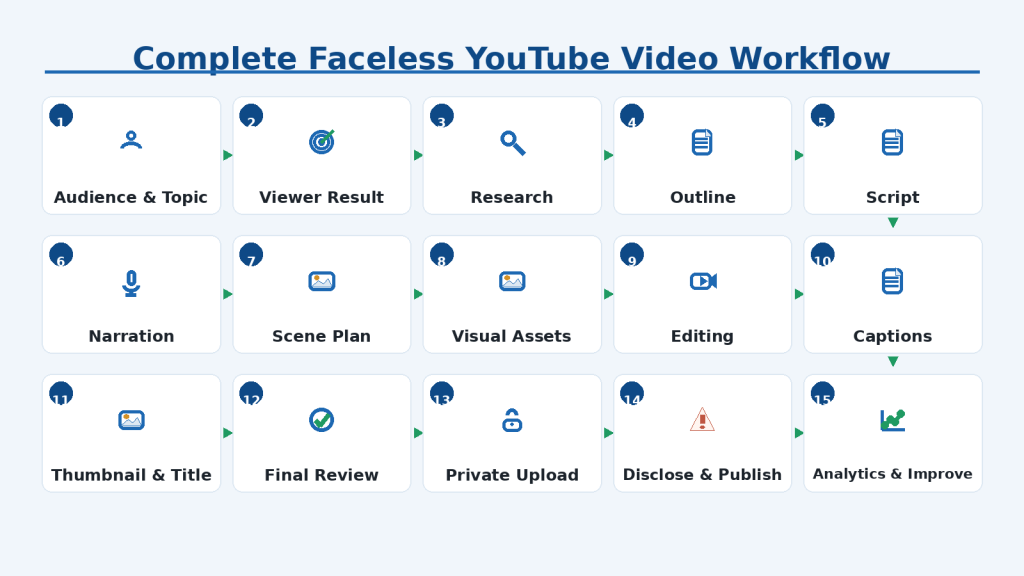
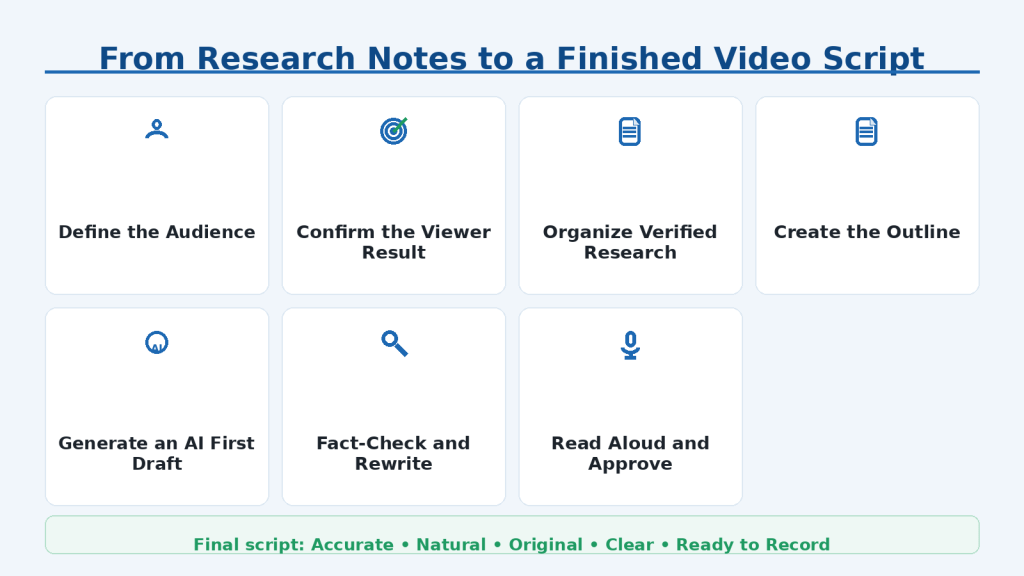
    Figure 1. The complete workflow for planning, creating, reviewing, publishing, and improving a faceless YouTube video.

    Explanation: Following the workflow in order reduces wasted work. Research and script approval should normally happen before narration, visual creation, and editing. The final review should include accuracy, licensing, privacy, accessibility, and AI-disclosure checks before the video becomes public.

    1. Choose the audience and topic.

    2. Define the result the viewer should receive.

    3. Research the topic using reliable sources.

    4. Create a video outline.

    5. Draft and review the script.

    6. Prepare the narration.

    7. Plan the visuals for every scene.

    8. Create or collect authorized visual assets.

    9. Edit narration, visuals, music, and sound effects.

    10. Add and correct captions.

    11. Create the thumbnail, title, and description.

    12. Complete a final quality and compliance review.

    13. Upload privately.

    14. Add disclosures and publish.

    15. Review analytics and improve the next video.

    Why the Order Matters

    Creating images or clips before finishing the script often causes wasted work. A finished script tells you which scenes are needed, how long they should appear, which facts need supporting visuals, how much narration is required, and which assets must be created, licensed, or replaced.

    Use a Scene Plan

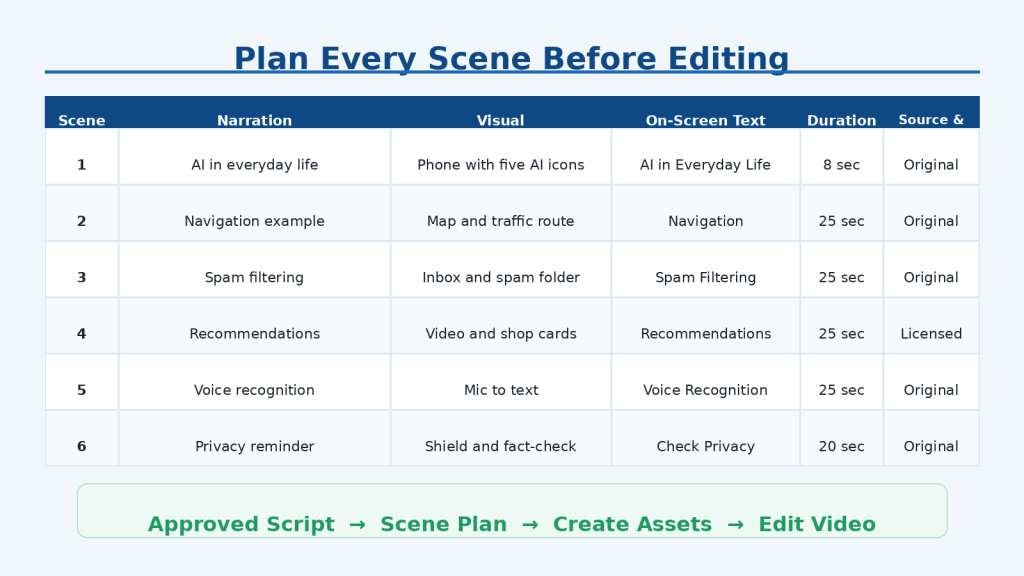
    A simple scene plan records the scene number, narration, visual description, on-screen text, estimated duration, asset source, licence or permission notes, and editing notes.

    Keep the First Video Manageable

    A practical first project may be three to five minutes long, answer one clear question, use one consistent voice, rely on a small number of visuals, use simple cuts, and include accurate captions. A small complete video teaches more than an ambitious project that is never finished.

    Step 1: Choose Your Audience and Video Topic

    Before opening an AI tool, decide exactly who the video is for and what it should help them accomplish. A video made for complete beginners should use different language, examples, and pacing from a video for experienced users.

    Every useful video should answer a question, solve a problem, or provide a clear experience.

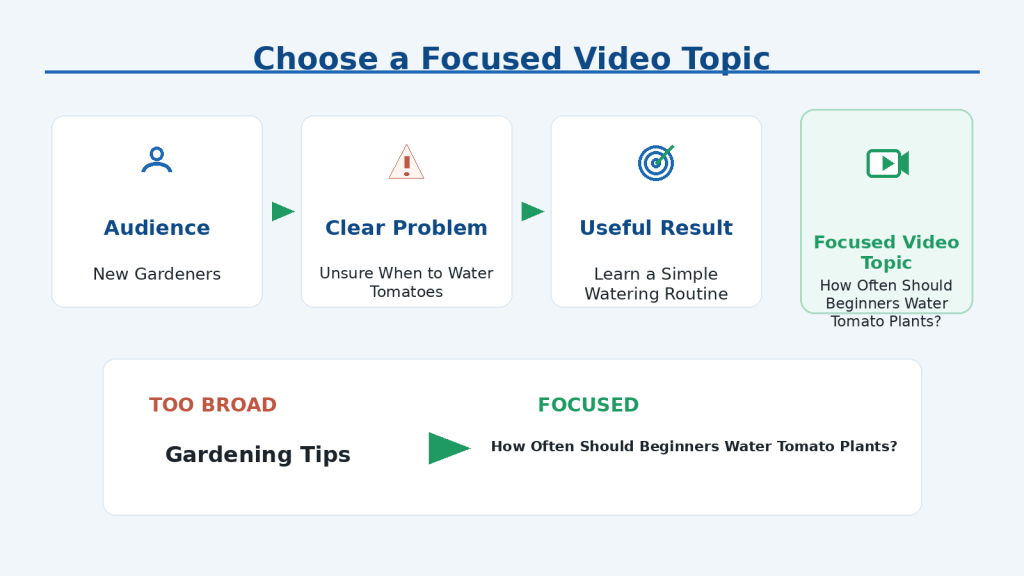
    Figure 4. A focused video topic combines one audience, one clear problem, and one useful result.

    Explanation: A narrow topic is easier to research, script, illustrate, and explain. It also helps viewers understand exactly what the video will teach before they select it.

    Use a Simple Topic Formula

    Use this formula: Audience + problem + useful result. For example, “new gardeners + uncertainty about watering + learn a simple routine” can become “How Often Should Beginners Water Tomato Plants?”

    Ask AI for Topic Ideas

    Prompt example: “I want to create a faceless YouTube channel for [audience]. Suggest 15 focused topics that solve one clear problem each. For every idea, include the viewer’s question, the useful result, and a possible beginner-friendly title. Avoid vague topics, exaggerated promises, and unsupported medical or financial claims.”

    Check Whether the Topic Is Suitable

    • Can I explain it accurately?
    • Can I find reliable current sources?
    • Does it solve one clear viewer problem?
    • Can it be shown effectively without appearing on camera?
    • Can I create or legally obtain suitable visuals?
    • Does it involve legal, medical, financial, safety, or professional advice that needs extra care?

    Common Mistake: Choosing a subject that is too broad. How to Avoid This Mistake: Turn it into one specific question that can be answered clearly within a few minutes.

    Step 2: Choose the Best Faceless Video Format

    The format affects the tools, editing time, number of visuals, cost, and viewer experience. Choose the simplest format that explains the topic clearly.

    Screen Recording

    Screen recordings work well for software tutorials, websites, apps, WordPress instructions, and account setup. Remove or hide private information before recording, including notifications, email addresses, filenames, account details, payment information, and personal photographs.

    Narrated Slideshow

    Narrated slideshows use photographs, illustrations, diagrams, charts, or text slides while a voice explains the topic. Slides should support the narration rather than repeat every spoken sentence.

    Stock Footage and AI-Generated Visuals

    Licensed stock footage can make a video look polished, but random clips may feel generic. AI-generated images and clips can illustrate difficult scenes, but they may contain distorted objects, inconsistent characters, unreadable text, flicker, or unrealistic movement.

    Animation, Hands-Only, Audio-Led, and Hybrid Formats

    Animation suits workflows and concepts. Hands-only footage works for cooking, crafts, repairs, products, and gardening. Audio-led videos rely on narration, stories, meditation, or interviews. Hybrid videos combine formats but should keep fonts, colours, transitions, narration, and pacing consistent.

    Common Mistake: Selecting a complicated format because it looks impressive. How to Avoid This Mistake: Use the format that explains the topic most clearly with the fewest unnecessary steps.

    Step 3: Research the Topic and Save Reliable Sources

    Good research is the backbone of a trustworthy faceless YouTube video.

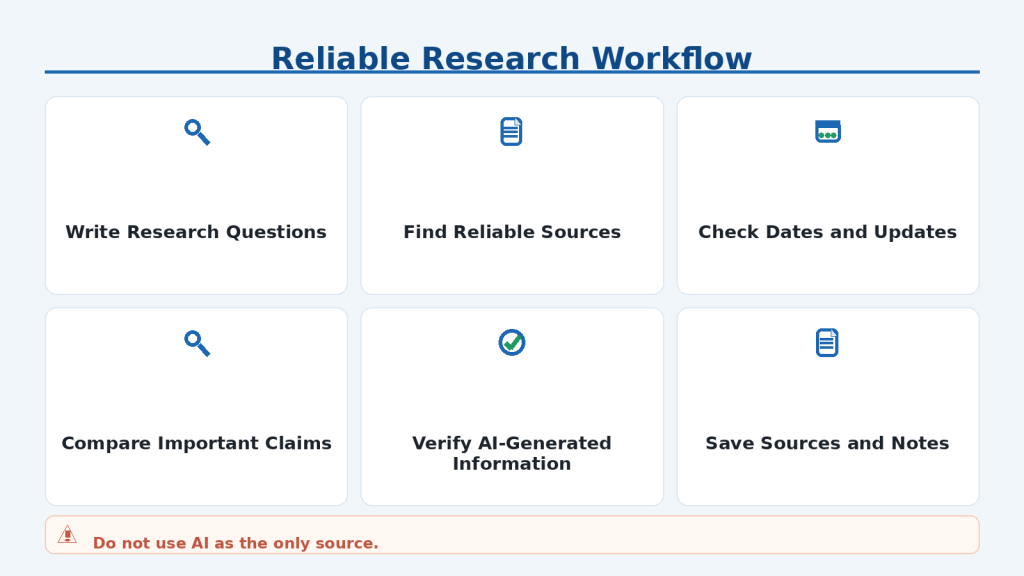
    Figure 5. Reliable video research involves asking focused questions, checking current authoritative sources, comparing important claims, verifying AI outputs, and saving complete source records.

    Explanation: AI can help organize research, but it may produce outdated or incorrect information. Important facts should be confirmed using reliable sources, and the creator should preserve links, dates, notes, permissions, and supporting records for future review or correction.

    Start with Research Questions

    Turn the topic into focused questions. For a smartphone-storage tutorial, ask what uses the most storage, how users check it, which files can be removed safely, what should be backed up, and how menu names differ between devices.

    Use Reliable Sources

    • Official product documentation
    • Government departments
    • Universities and recognized educational institutions
    • Original research papers
    • Standards organizations
    • Professional associations
    • Original statements from companies or creators
    • Reputable news organizations for current events

    Check Dates and Compare Claims

    Older sources may be outdated. Check publication and update dates, product versions, policy changes, and whether the instructions match the current interface. Compare important claims, especially statistics, safety instructions, health information, legal rules, product limits, and statements about real people.

    Keep Research Records

    Record the research question, answer in your own words, source title, organization or author, direct link, publication date, access date, and the script section that relies on the source. Save licence documents, permission messages, and screenshots of important conditions.

    Common Mistake: Asking AI to write the entire script and publishing without checking it. How to Avoid This Mistake: Research first, save reliable sources, verify important claims, and only then begin the script.

    Step 4: Create a Clear Video Outline

    An outline organizes the video before you write the full script. It helps keep the content focused, remove repetition, and arrange ideas logically.

    Use a Simple Structure

    1. Hook

    2. Brief introduction

    3. Main steps or points

    4. Warnings or common mistakes

    5. Summary

    6. Natural call to action

    Write an Honest Hook

    A useful hook identifies the problem or learning result without exaggeration. Avoid promises such as guaranteed income, overnight success, or automatic results.

    Add Visual Notes and Estimate Length

    Beside each section, note what viewers need to see. Time a sample paragraph aloud because narration, pauses, demonstrations, and on-screen reading often take longer than expected.

    Common Mistake: Writing the full script before deciding the structure. How to Avoid This Mistake: Approve a short, logical outline first.

    Step 5: Write the Video Script with AI Assistance

    AI can help create a first draft, but the finished script should be checked, corrected, and rewritten by you.

    Figure 6. A reliable video script develops from a clear audience, verified research, a structured outline, an AI-assisted draft, and careful human revision.

    Explanation: The first AI-generated draft should never be treated as the finished script. The creator should verify every important claim, rewrite generic wording, remove repetition, improve the speaking style, and read the complete script aloud before recording narration.

    Prepare the Information

    • Intended audience
    • Working title
    • Viewer’s main question
    • Desired result
    • Approved outline
    • Verified research notes
    • Warnings and examples
    • Preferred length and tone

    Use a Detailed Script Prompt

    Ask for simple natural language, a brief introduction, explained technical terms, smooth transitions, a practical example, relevant warnings, and a short summary. Instruct the tool not to invent facts, quotations, statistics, sources, personal stories, or guarantees, and to mark statements that still require verification.

    Write for Speaking

    Spoken narration usually works better with shorter sentences, familiar words, clear transitions, natural pauses, and one main idea at a time. Read the entire script aloud and revise any sentence that is difficult to say or understand.

    Keep Your Own Voice

    Make the script original by adding your own explanation, testing, examples, demonstrations, comparisons, warnings, and teaching style. Do not invent personal experience that did not happen.

    Common Mistake: Publishing the first AI-generated script. How to Avoid This Mistake: Treat it as raw material, verify the information, rewrite weak sections, remove repetition, and approve every sentence.

    Step 6: Create the Narration

    You can use your own recorded voice, a hired narrator, an AI-generated voice, or a combination of human and AI narration.

    Figure 7. Narration may use the creator’s voice, an authorized narrator, or a properly licensed AI voice, but every recording must be reviewed before editing.

    Explanation: The chosen voice should be clear, consistent, appropriate for the audience, and authorized for the intended use. Review pronunciation, pacing, pauses, volume, and licence conditions, and never clone or imitate a real person’s voice without clear permission.

    Record Your Own Voice

    Use a quiet location with soft furnishings to reduce echo. Silence notifications, record a test, listen with headphones, and record the script in short sections. Speak naturally and leave brief pauses before and after each section for editing.

    Use an AI Voice Responsibly

    Check commercial-use permission, plan restrictions, export limits, attribution, privacy practices, voice-library conditions, and restrictions on cloning. Generate narration in sections and listen to every file for names, dates, abbreviations, technical terms, pauses, emphasis, and volume.

    Never clone or imitate a real person’s voice without clear permission. This includes celebrities, politicians, employers, teachers, family members, creators, and private individuals.

    Clean and Preserve the Audio

    Remove mistakes, reduce background noise carefully, balance volume, and add gentle fades. Save original recordings, cleaned versions, AI voice settings, pronunciation notes, permissions, and the approved master audio.

    Common Mistake: Publishing generated narration without listening to it. How to Avoid This Mistake: Review every sentence, correct pronunciation and pacing, confirm permission, and keep narration clear above all other audio.

    Step 7: Plan the Visuals for Every Scene

    This stage is often called visual planning or storyboarding.

    Figure 8. A scene plan connects each part of the narration with the required visual, on-screen text, duration, source, and editing notes.

    Explanation: Planning scenes before creating assets reduces wasted work and helps ensure that every visual supports the approved script. Recording the source and licence for each asset also makes the final copyright and publishing review easier.

    Divide the Script into Scenes

    Begin a new scene when the topic changes, a step starts, an example appears, a warning is introduced, or the viewer needs to see a specific action.

    Match Visuals to Narration

    The visual should explain or support what the viewer hears. Avoid unrelated footage merely because it looks attractive. Use on-screen text for headings, numbers, warnings, definitions, and key takeaways, but keep it brief and readable on a phone.

    Keep Safe Areas and a Consistent Style

    Leave comfortable space around titles, captions, diagrams, buttons, and essential objects. Keep fonts, heading sizes, colours, icons, transitions, text placement, and animation speed consistent.

    Plan Accessibility

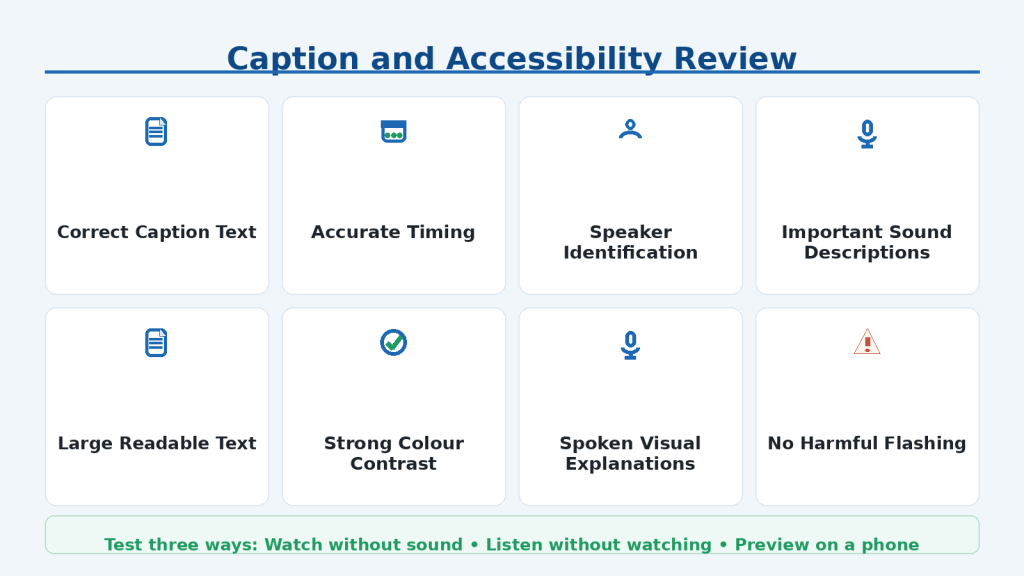
    Use strong contrast, large text, clear narration, accurate captions, sufficient reading time, simple layouts, limited flashing, and spoken explanations of important visual information. Do not communicate a warning through colour alone.

    Common Mistake: Collecting random visuals after editing has started. How to Avoid This Mistake: Complete the scene plan first, then create only the assets required by the approved script.

    Step 8: Create or Collect the Visual Assets

    Once the scene plan is complete, create or collect the images, video clips, screen recordings, diagrams, and text graphics needed for the video.

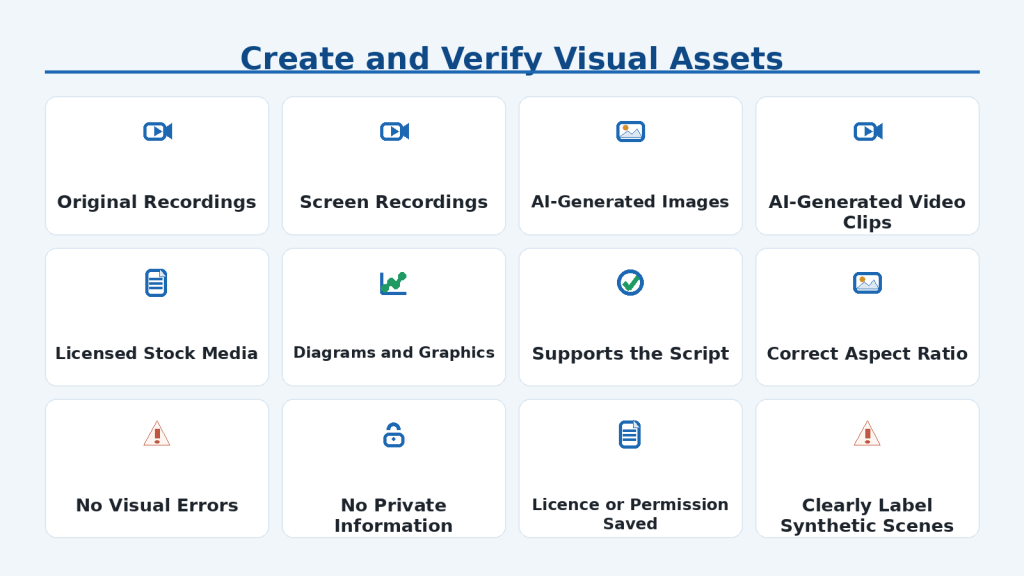
    Figure 9. Visual assets may come from original recordings, screen captures, AI generation, licensed stock libraries, or original diagrams, but every asset must be checked before editing.

    Explanation: The creator should confirm that each visual supports the script, appears correctly, protects privacy, matches the intended style, and has suitable permission or licensing. Realistic synthetic scenes should also be labelled or disclosed when viewers could mistake them for genuine footage.

    Record Your Screen Safely

    1. Close unrelated programs and tabs.

    2. Turn off notifications.

    3. Hide bookmarks and personal files.

    4. Use demonstration information instead of real customer or family data.

    5. Check the entire recording before using it.

    Create AI Images and Video Clips

    Describe the subject, setting, action, style, camera view, lighting, mood, aspect ratio, colours, and unwanted elements. Generate short clips with one simple action. Inspect images at full size and watch clips several times for distorted hands, duplicated objects, changing backgrounds, incorrect text, flickering, unrealistic movement, and misleading realism.

    Use Stock Assets and Open Licences Carefully

    Check whether commercial and monetized use is allowed, whether attribution is required, whether modification is permitted, and whether restrictions apply to people, trademarks, buildings, or sensitive subjects. “Free” may mean free only for personal use or free with conditions. Record the exact Creative Commons licence and version when applicable.

    Organize and Record Assets

    Use descriptive filenames and maintain a record containing the provider, source link, licence type, download date, attribution wording, commercial-use status, restrictions, receipts, prompts, generation date, model, and selected output.

    Common Mistake: Assuming anything found online, generated by AI, or labelled free can automatically be used. How to Avoid This Mistake: Verify the source, licence, permission, commercial-use conditions, and platform rules for every asset.

    Step 9: Edit the Video

    Editing combines the narration, visuals, music, sound effects, captions, and transitions into one finished video.

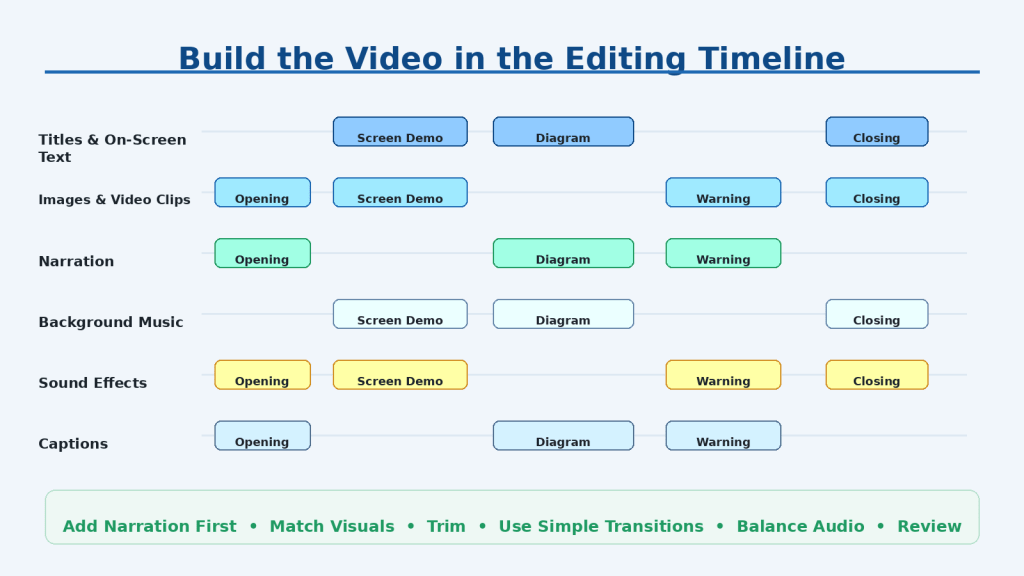
    Figure 10. A clear editing timeline combines narration, visuals, text, music, sound effects, and captions in organized layers.

    Explanation: Adding the narration first creates the timing foundation for the video. Visuals should match the spoken content, while music, effects, transitions, and text should support understanding without distracting from the main message.

    Create the Project and Add Narration First

    Use the correct orientation and resolution for the intended format. Import and organize the files. Place the approved narration on the main audio track first because it provides the timing foundation for the video.

    Match Visuals and Use Simple Transitions

    Place each visual beside the corresponding narration. Trim empty frames, mistakes, repeated footage, unrelated visuals, long silences, and unnecessary introductions. Straight cuts, fades, and simple dissolves are usually enough.

    Add Text, Music, and Sound Effects Carefully

    Keep text large, brief, high-contrast, and visible long enough to read. Keep narration clearly louder than licensed background music. Use sound effects sparingly and test the mix through headphones and ordinary speakers.

    Review the Rough Cut

    Watch the complete rough cut without stopping. Then watch without sound to assess visuals and captions, and listen without watching to assess narration, pacing, and whether essential visuals are described. Save project versions and keep a backup outside the main project folder.

    Common Mistake: Adding every available effect. How to Avoid This Mistake: Use only elements that improve clarity, pacing, accessibility, or understanding.

    Step 10: Add Accurate Captions and Improve Accessibility

    Captions display the spoken words and important sounds as text.

    Figure 11. Accurate captions, readable design, clear narration, and careful testing make faceless videos easier for more viewers to understand.

    Explanation: Accessibility should be planned throughout production rather than added at the end. Captions must match the final audio, important visuals should be explained through narration, and text should remain readable on small screens without relying on colour alone.

    Do Not Rely Blindly on Automatic Captions

    Automatic captions may misunderstand names, technical terms, accents, numbers, dates, abbreviations, quiet narration, music, and multiple speakers. Compare every caption with the final audio and correct both text and timing.

    Make Captions Readable

    Use manageable lines, natural phrase breaks, correct punctuation, accurate timing, speaker identification when needed, and descriptions of important sounds. Avoid captions that cover essential visual information.

    Improve Accessibility Beyond Captions

    Use large text, strong contrast, simple fonts, clear narration, uncluttered layouts, sufficient reading time, limited flashing, and spoken explanations of charts, diagrams, screen actions, and warnings.

    Test Several Ways

    • With sound and captions
    • Without sound
    • With captions off
    • On a desktop screen
    • On a phone-sized screen
    • Through headphones
    • Through ordinary speakers

    Common Mistake: Assuming automatic captions are correct. How to Avoid This Mistake: Compare every caption with the final audio, correct the text and timing, add meaningful sound descriptions, and test readability on a small screen.

    Step 11: Create the Thumbnail, Title, and Description

    The thumbnail, title, and description explain what the video is about before viewers watch it.

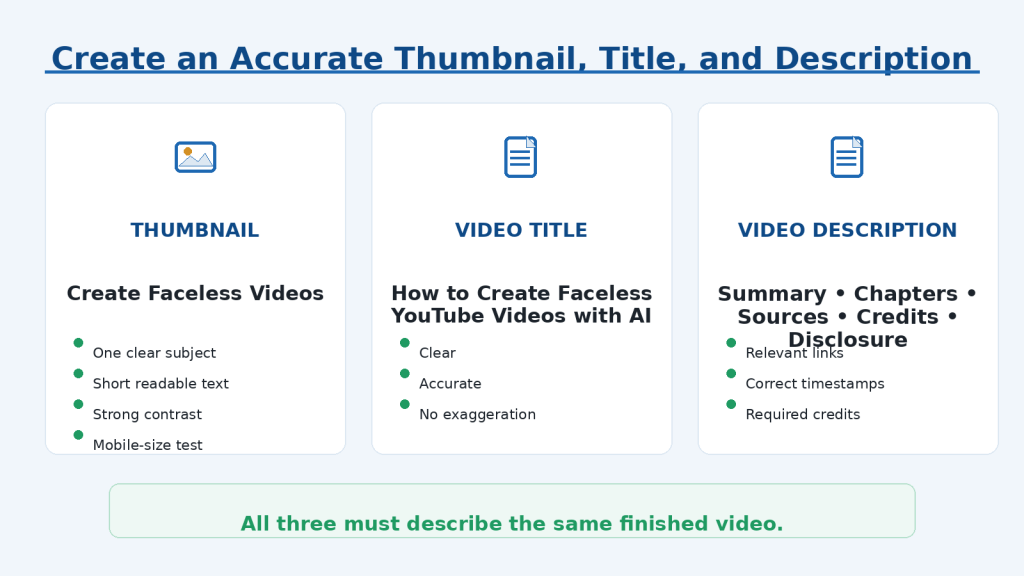
    Figure 12. The thumbnail, title, and description should work together to describe the finished video clearly and honestly.

    Explanation: The thumbnail should remain understandable at a small size, the title should explain the main topic or benefit, and the description should provide useful details, chapters, sources, credits, and required disclosures. None of these elements should promise something the video does not deliver.

    Create a Clear Custom Thumbnail

    Use one clear main subject, strong contrast, large readable text when needed, a simple background, and a direct visual connection to the video. Test the design at a small size. It is often better to generate the background or main image with AI and add final text manually.

    Write an Accurate Title

    Explain the subject and useful result without unbelievable promises, excessive capitals, unrelated trending terms, false urgency, or names of tools and people that do not appear in the video.

    Write a Useful Description

    Use the opening lines to summarize the video. Add chapters, sources, credits, attribution, affiliate or sponsorship disclosures, AI-content context when appropriate, contact information, related videos, and a brief call to action.

    Use YouTube Tags Carefully

    YouTube video tags are separate from WordPress tags. Titles, thumbnails, and descriptions are more important for discovery. Tags may help with common misspellings, but avoid long keyword lists or irrelevant terms.

    Common Mistake: Creating a dramatic thumbnail and title before finishing the video. How to Avoid This Mistake: Complete and review the video first, then create accurate publishing materials based on what it genuinely contains.

    Step 12: Upload and Publish the Video on YouTube

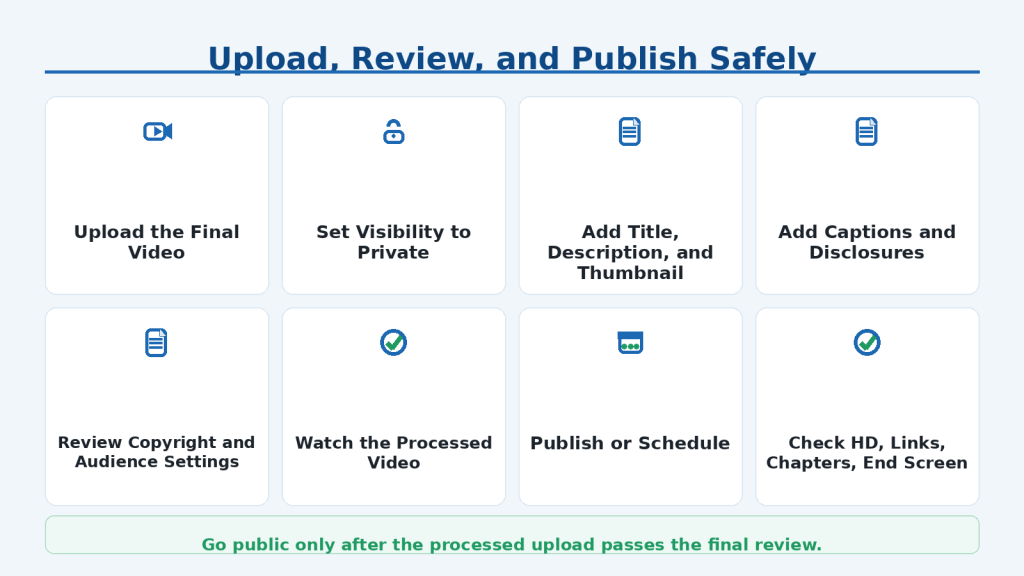
    For a first upload, set the video to Private or Unlisted until you have checked the processed video, captions, thumbnail, links, disclosures, and publishing settings.

    Figure 13. Uploading privately first provides time to review processing, captions, metadata, disclosures, copyright results, and playback quality before publication.

    Explanation: The uploaded version may look or sound different after platform processing. Watching the complete private video on desktop and mobile helps identify caption errors, broken links, unreadable text, incorrect settings, and other problems before viewers see it.

    Prepare and Upload

    Confirm the final export, thumbnail, title, description, chapters, caption file, sources, credits, attribution, disclosure decision, playlist, and related-video choices. In YouTube Studio, select Create, Upload videos, and choose the final file.

    Select the Audience and Additional Settings

    State accurately whether the content is Made for Kids. Review paid promotion, altered or synthetic content, automatic chapters, tags, video language, captions, recording date, licence and distribution, remixing, category, comments, and ratings. Menu names may change.

    Complete the AI Disclosure

    Disclose realistic content that was meaningfully generated or altered when it makes a real person appear to say or do something they did not, alters a real event or place, or creates a realistic-looking scene that did not occur. Ordinary assistance with outlines, scripts, captions, audio cleanup, or clearly unrealistic animation generally does not require the same disclosure. When uncertain, consider whether a reasonable viewer could mistake the content for authentic media.

    Review Checks and Visibility

    Review copyright and other checks, but remember that an automated check does not guarantee that no later claim will occur. Upload privately, wait for high-definition processing, watch the YouTube version completely, test captions and links, and then publish or schedule it.

    Common Mistake: Selecting Public immediately. How to Avoid This Mistake: Upload privately, complete a full review, and publish only after every important setting and asset has been checked.

    Step 13: Review the Results and Improve Your Next Video

    Publishing is not the end of the process.

    Figure 14. Analytics can help creators understand how viewers found the video, what held their attention, and which practical improvement to test next.

    Explanation: One video rarely provides enough information to judge an entire channel. Compare similar videos over time, study patterns in viewer behaviour, and improve one meaningful part of the workflow at a time rather than changing every element after a single result.

    Review the Main Analytics

    YouTube Analytics can show views, watch time, subscribers, traffic sources, impressions, click-through rate, average view duration, audience retention, and viewer comments. These measurements should be interpreted together rather than in isolation.

    Study Retention and the Opening

    A sudden drop may indicate a long introduction, poor audio, confusing visuals, repeated information, a mismatch between title and content, or an answer that arrived too late. A spike may mean viewers replayed a useful or confusing section.

    Correct Errors and Improve One Thing

    Correct important factual, safety, legal, medical, or financial errors openly. Do not change the title, thumbnail, description, topic, and promotion at the same time. Make one meaningful improvement when practical and compare similar videos over time.

    Avoid Artificial Engagement

    Do not buy views, subscribers, comments, or automated engagement. Artificial activity does not build a genuine audience and may violate platform policies.

    Common Mistake: Judging the channel after one upload. How to Avoid This Mistake: Publish several carefully made videos, compare similar content, and improve one practical part of the workflow at a time.

    Benefits of Creating Faceless YouTube Videos with AI

    Faceless video creation can be a practical option for beginners who want to publish useful content without appearing on camera.

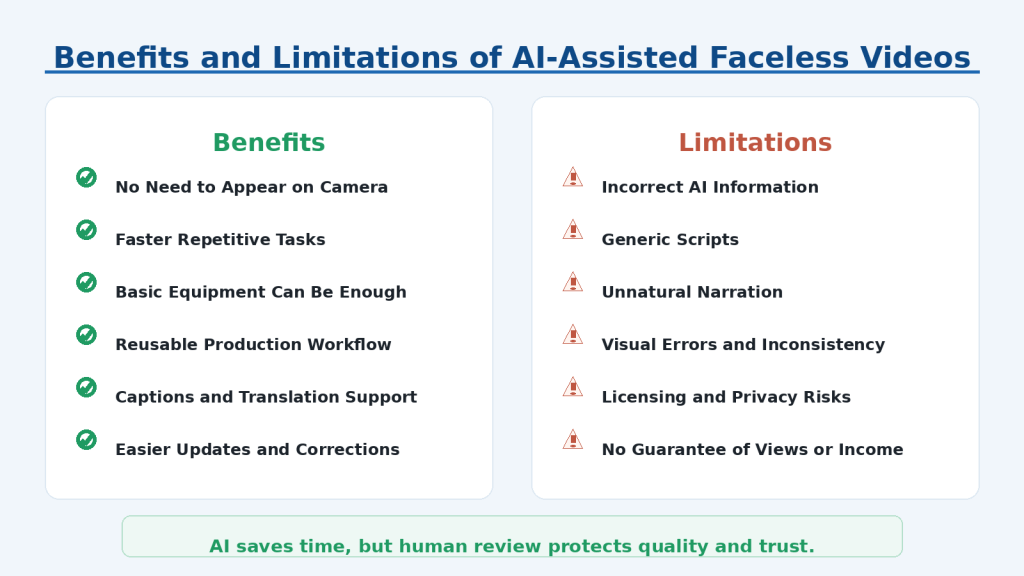
    Figure 15. AI-assisted faceless video creation offers flexibility and production support, but it also introduces accuracy, quality, licensing, privacy, and consistency risks.

    Explanation: AI can reduce repetitive work and help beginners create videos without appearing on camera. It does not guarantee originality, correctness, monetization, or audience growth. Careful human review remains necessary throughout the complete production and publishing process.

    • Create without appearing on camera
    • Reduce repetitive planning and production work
    • Begin with basic equipment
    • Reuse a structured workflow and templates
    • Use captions, transcripts, and translations to improve access
    • Update individual narration or visual sections more easily
    • Test ideas before spending heavily
    • Focus attention on research, explanation, and storytelling
    • Protect some aspects of personal privacy

    Reality: The main advantage is flexibility, not effortless success. AI can simplify production, but useful videos still require research, judgement, creativity, editing, and responsible publication.

    Limitations of Creating Faceless YouTube Videos with AI

    AI may produce incorrect information, generic scripts, unnatural voices, inconsistent characters, distorted visuals, misleading realistic scenes, and poor automatic edits. Free plans may include watermarks, limited credits, low resolution, or restricted commercial use. Several subscriptions can become expensive, and a short finished video may still require many hours of careful work.

    Licensing, privacy, copyright, impersonation, platform rules, prices, product features, and disclosure controls can change. A faceless format can also feel impersonal when it relies on generic narration, random stock footage, and no consistent teaching style.

    How to Reduce This Limitation: Verify facts, rewrite scripts, review every audio and visual asset, check licences and permissions, keep the project small, preserve records, and add human explanation, examples, testing, or commentary.

    Reality: AI can make production more accessible, but it cannot replace originality, judgement, patience, or audience trust.

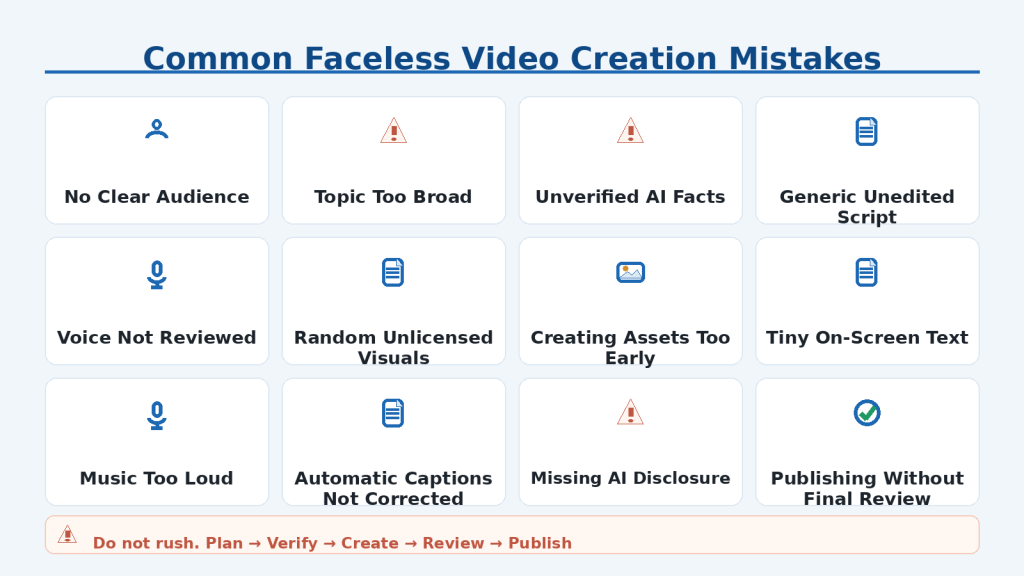
    Common Mistakes When Creating Faceless YouTube Videos with AI

    Beginners often make avoidable mistakes because AI tools make the process look faster and easier than it really is.

    Figure 16. Common mistakes usually result from rushing research, scripting, asset creation, accessibility checks, licensing, disclosure, or final review.

    Explanation: A structured workflow prevents many beginner errors. Completing each stage in order gives the creator time to verify facts, approve scripts, review narration, check visual assets, correct captions, confirm permissions, and inspect the uploaded video before publication.

    • Starting without a clear audience
    • Choosing a topic that is too broad
    • Asking AI to do everything in one prompt
    • Publishing unverified AI information
    • Copying another creator too closely
    • Using a generic AI script without rewriting it
    • Writing a long introduction
    • Using an AI voice without listening
    • Cloning a real person’s voice without permission
    • Using random stock footage
    • Assuming AI-generated assets are automatically safe
    • Using free assets without reading the licence
    • Creating visuals before finishing the script
    • Generating large batches without review
    • Ignoring visual errors
    • Showing realistic synthetic content without context
    • Using tiny text or too many effects
    • Making music louder than narration
    • Trusting automatic captions
    • Forgetting accessibility
    • Revealing private information
    • Using misleading titles or thumbnails
    • Publishing before processing is complete
    • Forgetting required disclosure
    • Assuming a copyright check guarantees safety
    • Buying too many tools
    • Publishing too frequently
    • Deleting source files
    • Giving up after one video

    Final Reminder: Most serious mistakes happen when creators rush. A slower, well-documented workflow usually produces safer, clearer, and more useful videos.

    Common Myths About Faceless YouTube Videos

    Faceless video creation is often surrounded by exaggerated claims.

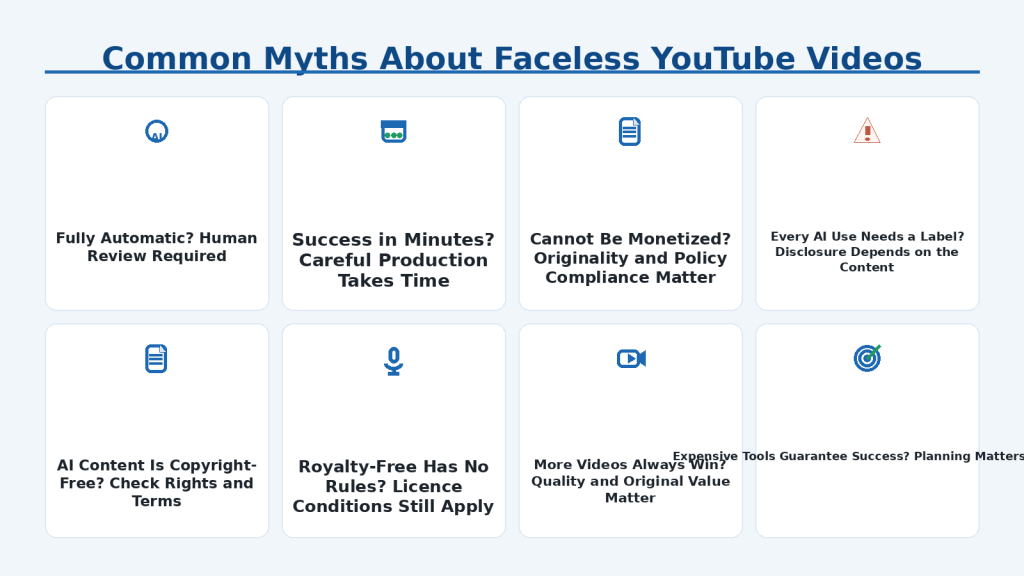
    Figure 17. Common myths can create unrealistic expectations about automation, monetization, copyright, disclosure, production speed, and channel success.

    Explanation: AI can support video creation, but it does not remove the need for research, originality, licensing checks, human review, and patience. Faceless channels succeed by providing useful and trustworthy content, not by relying on automation or expensive tools alone.

    Myth: Faceless Means Fully Automatic

    Reality: AI can assist with production, but a person must still check facts, wording, licences, audio, visuals, captions, disclosures, and final quality.

    Myth: Success Takes Minutes

    Reality: Generating a file is not the same as creating a useful finished video. Responsible production still takes research, revision, editing, captioning, licensing checks, and testing.

    Myth: Faceless Videos Cannot Be Monetized

    Reality: Appearing on camera is not required. Originality, authentic value, rights clearance, and policy compliance matter.

    Myth: Every AI Use Requires a Label

    Reality: Disclosure depends on the actual content and whether realistic synthetic media could be mistaken for something authentic.

    Myth: AI Content Is Automatically Copyright-Free

    Reality: Tool terms, plans, uploaded references, recognizable people, trademarks, voice rights, licences, and applicable law still matter.

    Myth: More Videos or Expensive Tools Guarantee Success

    Reality: Quality, usefulness, planning, judgement, viewer satisfaction, and consistent improvement matter more than volume or subscription cost.

    Faceless YouTube Video Safety and Responsible-Use Checklist

    Complete this checklist before publishing every faceless YouTube video.

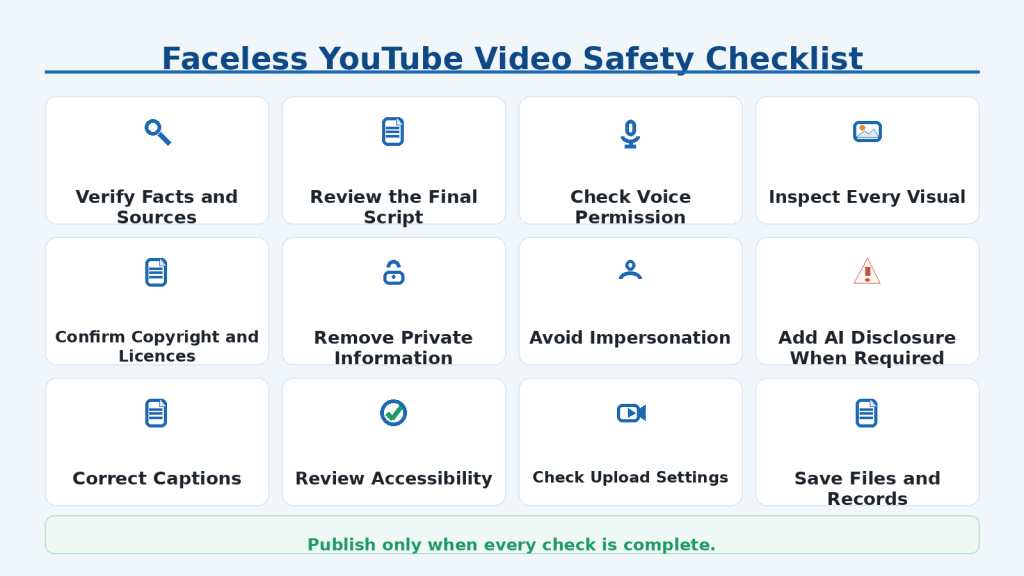
    Figure 18. The final safety checklist covers accuracy, permissions, licensing, privacy, impersonation, disclosure, captions, accessibility, publishing settings, and project records.

    Explanation: A complete pre-publication review reduces avoidable risks and protects viewer trust. When a fact, asset, permission, licence, or disclosure remains uncertain, verify it, replace it, remove it, or obtain appropriate professional advice before publishing.

    Research and Script

    • Verify important facts with reliable sources
    • Check names, dates, numbers, quotations, and technical details
    • Distinguish facts, examples, estimates, and opinions
    • Review and rewrite AI-generated wording
    • Remove unsupported claims and invented sources
    • Explain technical terms for beginners

    Voice, Visuals, and Rights

    • Listen to the complete narration
    • Check voice permissions and commercial-use rights
    • Inspect every image and clip
    • Confirm copyright, licences, and attribution
    • Remove private information
    • Avoid impersonation and misleading use of real people

    Disclosure, Accessibility, and Publishing

    • Add AI disclosure when realistic synthetic content requires it
    • Correct captions and timing
    • Use readable text and strong contrast
    • Explain essential visuals through narration
    • Remove flashing and unexpected flicker
    • Review audience, copyright, language, visibility, captions, links, and end screens
    • Watch the complete processed upload before going public

    Records and Backups

    • Research notes and sources
    • Final script and prompts
    • Narration and source assets
    • Licences, permissions, and receipts
    • Caption file and thumbnail
    • Editing project and master export
    • Disclosure decisions and publication record
    • Backup copy

    Final Safety Rule: When an asset, claim, permission, licence, or disclosure is uncertain, do not guess. Verify it, replace it, remove it, or obtain appropriate professional advice before publishing.

    Practical Example: Create a Simple Three-Minute Faceless YouTube Video

    This example shows how a complete beginner could turn one focused idea into a short faceless video.

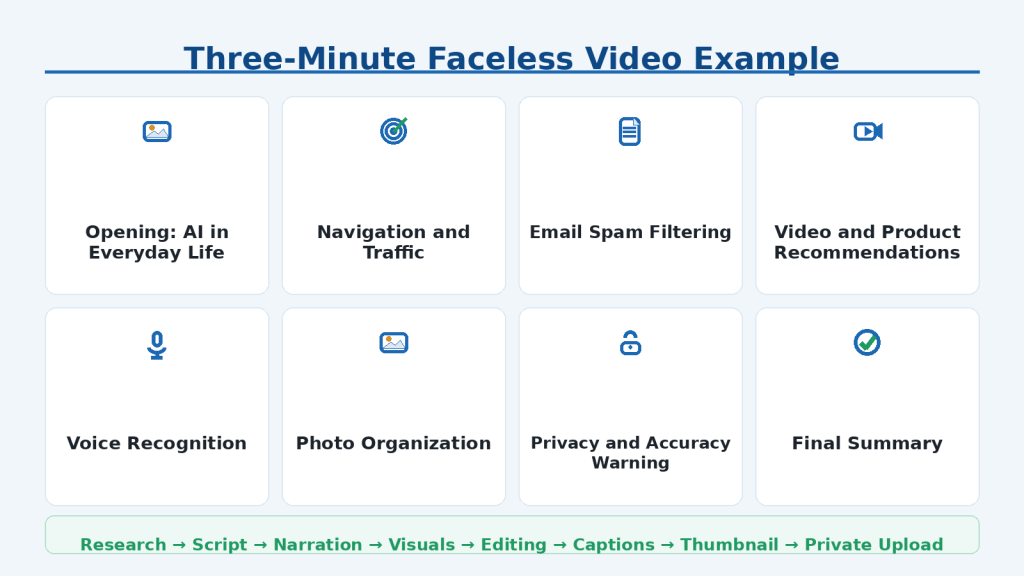
    Figure 19. A short faceless video can use one focused question, several clearly planned scenes, consistent narration, simple visuals, captions, and a final safety review.

    Explanation: This three-minute example demonstrates that a beginner does not need a complex documentary or many tools. One focused topic, a short scene plan, verified information, clear narration, and consistent visuals can produce a complete and useful first video.

    Example Project

    Working title: Five Everyday Ways Artificial Intelligence Is Already Helping You. Audience: Adults with little or no technical knowledge. Desired result: Viewers recognize five familiar examples of AI and understand that AI is not limited to robots or laboratories. Main format: Narrated slideshow. Approximate length: Three minutes.

    Main Points and Scenes

    1. Opening: AI in everyday life

    2. Navigation and traffic predictions

    3. Email spam filtering

    4. Product and video recommendations

    5. Voice recognition

    6. Smartphone photo organization

    7. Privacy and accuracy warning

    8. Final summary

    Production

    Research each example, create a short outline and script, record or generate authorized narration, build a consistent set of simple visuals, edit with restrained transitions and licensed music, correct the captions, create an accurate thumbnail, upload privately, and complete the safety checklist.

    Final Tip: Complete one small video using a reliable workflow before attempting a long documentary, complicated animation, or highly automated channel.

    Frequently Asked Questions

    Do I need to show my face?

    No. You can use narration, screen recordings, demonstrations, animation, diagrams, licensed footage, photographs, or AI-generated visuals.

    Can I create videos using only AI?

    AI can assist with most stages, but fully automatic creation is not recommended. You remain responsible for research, rights, accessibility, disclosure, and final review.

    What is the easiest format for a beginner?

    Screen-recorded tutorials and narrated slideshows are often manageable because the screen or slides provide most of the visuals.

    Do I need expensive equipment?

    No. A computer or suitable phone, a basic microphone, a simple editor, an AI assistant, and authorized visual assets may be enough.

    Can faceless videos be monetized?

    They may be eligible when they provide original, authentic value and comply with YouTube’s monetization, rights, and community policies.

    Does YouTube allow AI-generated videos?

    Yes, when they follow platform rules. Realistic generated or meaningfully altered content may require disclosure.

    Must I disclose every use of AI?

    No. Ordinary production assistance usually does not require the same disclosure as realistic synthetic media that could mislead viewers.

    Can I use an AI voice?

    Yes, when the voice and plan allow the intended use. Review the terms and never clone a real person without authorization.

    Can I use images found through search?

    Finding an asset online does not provide permission. Use original, licensed, verified public-domain, correctly attributed open-licensed, or expressly permitted material.

    How long should my first video be?

    Long enough to answer one focused question clearly. Three to five minutes is often manageable for a first tutorial or explainer.

    How many tools do I need?

    Often one AI assistant, one narration method, one editor, and one reliable source of visuals are enough to begin.

    Should I delete project files after publishing?

    No. Preserve research, prompts, scripts, narration, source assets, licences, captions, thumbnails, projects, and master exports.

    How quickly can a channel succeed?

    There is no reliable timetable. Avoid anyone who guarantees rapid views, monetization, subscribers, or income.

    What is the most important advice?

    Complete one small, useful, original video from beginning to end, review every stage, save the records, and improve the next video.

    Key Takeaways

    • Faceless does not mean automatic.
    • Begin with one audience, one focused topic, and one useful result.
    • Research before asking AI for a full script.
    • Treat AI output as a draft that needs verification and rewriting.
    • Finish the script before producing most assets.
    • Use a scene plan to connect narration and visuals.
    • Review every generated image, clip, and narration file.
    • Use only assets you are authorized to use.
    • Never clone a real person’s voice or likeness without permission.
    • Add accurate captions and design for accessibility.
    • Use honest titles and thumbnails.
    • Complete the altered-content disclosure when realistic generated or modified media could be mistaken for authentic content.
    • Upload privately and review the processed version before publishing.
    • Preserve source files, permissions, licences, projects, and publication records.
    • Review several similar videos and improve one part of the workflow at a time.

    Final Principle: AI can make faceless video production more accessible, but audience trust still depends on accuracy, originality, transparency, and careful human review.

    Final Thoughts

    Creating a faceless YouTube video with AI is not simply a matter of pressing one button and publishing whatever appears. A dependable process requires a focused topic, reliable research, an approved script, authorized narration and visuals, careful editing, corrected captions, licence and disclosure checks, a private upload review, and continued improvement.

    You do not need expensive equipment, several subscriptions, or advanced editing skills to begin. Start with a small project that answers one clear question. Use simple visuals, clear narration, accurate captions, and straightforward editing.

    Final Tip: Do not try to automate an entire channel before completing one carefully reviewed video. Build a reliable workflow first, preserve your records, and improve one practical part of the process with every new video.

    Continue Learning

    The next guides in the Faceless YouTube Video Creation Series will explain channel planning, scriptwriting, narration, visual creation, editing, thumbnails, publishing, and responsible monetization in greater detail.

    Sources and References

    The following official sources were reviewed on August 6, 2026. YouTube features, menu names, policies, limits, and licence conditions may change. Check current official guidance when first using a tool, changing plans or features, receiving a policy notice, or periodically during continued use.

    Official Links

    These references provide general platform and licensing information. They do not replace legal, financial, medical, copyright, privacy, accessibility, or other professional advice for a particular situation.