
Estimated Reading Time: 60 minutes
Last Updated: July 2026
What You’ll Learn
By the end of this guide, you will understand:
· What AI image generation is.
· How ChatGPT creates images from written instructions.
· How to access image-generation tools in ChatGPT.
· How to write a clear AI image prompt.
· How to generate your first image step by step.
· How to improve an image using follow-up instructions.
· How to change colours, objects, backgrounds, text and visual styles.
· How to choose the correct image shape and size.
· How to fix common AI image problems.
· How to save and organize your generated images.
· How to prepare images for WordPress and social media.
· How to use AI-generated images safely and responsibly.
Introduction
AI image generation allows you to create pictures by describing what you want in words. Instead of drawing an image yourself or searching through stock-photo websites, you can ask ChatGPT to create an original image based on your instructions.
You can use ChatGPT to create many types of images, including:
· Featured images for WordPress articles.
· Social media graphics.
· Product images for online stores.
· Educational illustrations.
· Business presentation visuals.
· Cartoon characters.
· Realistic landscapes.
· Logo concepts.
· Simple infographics.
The written instruction you give to ChatGPT is called an image prompt. A good image prompt explains what should appear in the image and how it should look.
For example:
Basic prompt:
Create an image of a modern home office.
Improved prompt:
Create a realistic modern home office with a wooden desk, a laptop, indoor plants, warm natural lighting and a clean white background. Use a professional style and a wide landscape format.
The improved prompt gives ChatGPT more useful details, making it easier for the AI to create an image that matches your idea.
You do not need drawing or graphic-design experience to begin. You can start with a simple description, review the generated image and then ask ChatGPT to make specific changes.
In this guide, you will learn how to create your first AI image, improve the result, correct common problems and prepare the finished image for WordPress, social media or personal projects.
What Is ChatGPT Image Generation?
ChatGPT image generation is a feature that creates pictures from written instructions. You describe the image you want, and ChatGPT uses artificial intelligence to produce a new visual based on your description.
For example, you could write:
Prompt:
Create a friendly robot teaching children about artificial intelligence in a bright classroom. Use a colourful cartoon style and a wide landscape format.
ChatGPT will analyse the prompt and create an image containing the requested subject, setting, style and format.
You can also continue the conversation and ask ChatGPT to improve or change the image.
For example:
· Make the classroom brighter.
· Change the robot to blue.
· Add three students.
· Remove the text from the wall.
· Use a more realistic style.
· Change the image to a square format.
This makes image creation an interactive process. You do not need to describe everything perfectly in your first prompt. You can review the result and give additional instructions until the image is closer to what you need.
How It Works
The basic process has four steps:
1. You describe the image you want.
2. ChatGPT interprets your instructions.
3. The AI generates an image.
4. You review the result and request changes when necessary.
The quality of the image often depends on the clarity of your prompt. A vague prompt may produce a general result, while a detailed prompt gives the AI more guidance.
Vague prompt:
Create a picture of a business meeting.
Detailed prompt:
Create a realistic image of four business professionals having a meeting in a modern office. Include a large window, a conference table, laptops and natural daylight. Use a professional style and a wide landscape format.
The detailed prompt clearly explains the people, setting, objects, lighting, style and image shape.
How to Access Image Generation in ChatGPT
You can create an image directly inside a ChatGPT conversation. You may type your image request in the message box, or open More and select Images when that option appears in your interface. ChatGPT can then generate an image based on your written description. (OpenAI Help Center)
Follow these steps:
1. Open ChatGPT on your computer, tablet or mobile device.
2. Sign in to your ChatGPT account.
3. Start a new conversation.
4. Click inside the message box.
5. Describe the image you want ChatGPT to create.
6. Review your prompt before sending it.
7. Click the Send button.
8. Wait while ChatGPT generates the image.
Your first prompt can be simple.
Example prompt:
Create a realistic image of a beginner learning artificial intelligence on a laptop in a bright home office. Use a clean, professional style and a wide landscape format.
ChatGPT will use your description to create the image. More detailed or complex requests may take longer to complete.
Using the Images Option
Some versions of ChatGPT display an Images option inside the More menu.
To use it:
1. Select More near the message box.
2. Select Images.
3. Enter your image description.
4. Choose an image shape or aspect ratio when the option is available.
5. Send the prompt.
The location and appearance of these controls may differ slightly between the web version and mobile applications.
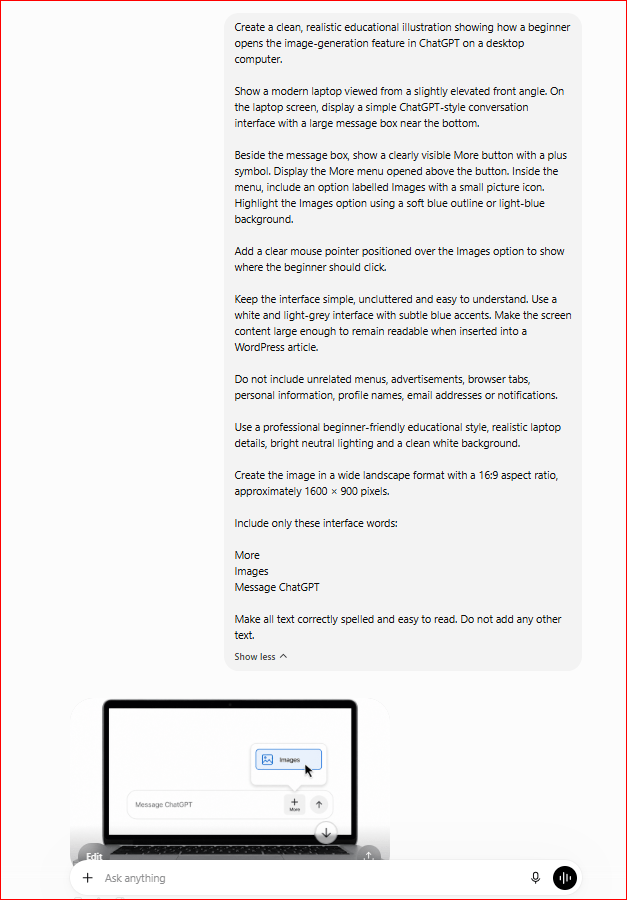
Figure 1. Opening the image-generation option in ChatGPT
This figure shows where the More menu and Images option appear in ChatGPT. Selecting Images opens the image-generation feature, although beginners can also create an image by typing a direct request in the normal message box.
You Can Also Ask Directly
You do not always need to open a separate image tool. You can simply type a direct request into a normal ChatGPT conversation.
For example:
Prompt:
Create an educational illustration showing how artificial intelligence helps people write, study, design images and organize information.
ChatGPT recognizes that you are requesting an image and begins the image-generation process.
What to Do If the Images Option Is Not Visible
When you do not see an Images button, try these steps:
· Start a new conversation.
· Type a direct image request into the message box.
· Refresh the browser or reopen the application.
· Make sure you are signed in.
· Update the ChatGPT mobile application when an update is available.
· Check whether image generation is available in the ChatGPT version you are using.
The simplest method is usually to write:
Create an image of…
Then complete the sentence with a clear description of the image you need.
How to Write Your First AI Image Prompt
An AI image prompt is the written description you give to ChatGPT. It tells the AI what image to create and how the image should look.
A clear prompt usually includes:
· The main subject.
· The background or location.
· Important objects or details.
· The visual style.
· The colours.
· The lighting.
· The mood.
· The image shape.
You do not need to include every detail in every prompt. Begin with the most important information and add more details when needed.
A Simple Image-Prompt Formula
Use this beginner formula:
Subject + Setting + Important Details + Style + Lighting + Image Format
For example:
Subject: A beginner learning artificial intelligence
Setting: A modern home office
Important details: Laptop, notebook, coffee cup and indoor plants
Style: Realistic and professional
Lighting: Bright natural light
Image format: Wide landscape
The complete prompt becomes:
Prompt:
Create a realistic image of a beginner learning artificial intelligence in a modern home office. Include a laptop, notebook, coffee cup and indoor plants. Use bright natural lighting, a clean professional style and a wide landscape format.
Start with the Main Subject
The subject is the most important person, animal, object or scene in the image.
Examples include:
· A friendly robot.
· A business owner using a laptop.
· A family travelling.
· A modern office.
· A travel bag.
· A mountain landscape.
· A teacher explaining artificial intelligence.
A vague subject may produce an unclear image.
Vague prompt:
Create a technology image.
Clearer prompt:
Create an image of a small friendly robot helping a beginner use a laptop.
Describe the Setting
The setting explains where the subject appears.
Possible settings include:
· A bright classroom.
· A modern office.
· A home workspace.
· A busy city street.
· A peaceful beach.
· A professional photography studio.
· A simple white background.
For example:
Prompt:
Create an image of a small friendly robot helping a beginner use a laptop in a bright modern classroom.
The setting gives ChatGPT more information about the environment.
Add Important Details
Include objects or features that are important to the image.
For example:
· A wooden desk.
· A large window.
· Indoor plants.
· A smartphone.
· A notebook and pen.
· A blue travel bag.
· A presentation screen.
Do not overload the prompt with details that do not affect the final result.
Choose a Visual Style
The style controls the overall appearance of the image.
Common styles include:
· Realistic photography.
· Cartoon.
· Watercolour painting.
· Digital illustration.
· Minimalist design.
· Cinematic style.
· Three-dimensional design.
· Professional infographic.
· Children’s-book illustration.
For example:
Prompt:
Create a digital illustration of a friendly robot teaching a beginner how to use artificial intelligence.
Changing the style can create a completely different result, even when the subject remains the same.
Describe the Lighting and Mood
Lighting affects the atmosphere of an image.
Examples include:
· Bright natural lighting.
· Soft morning light.
· Warm indoor lighting.
· Dramatic cinematic lighting.
· Golden sunset light.
· Clean studio lighting.
You can also describe the mood:
· Friendly.
· Professional.
· Peaceful.
· Exciting.
· Modern.
· Playful.
· Inspiring.
For example:
Prompt:
Create a realistic image of a beginner working on a laptop in a modern home office. Use warm natural lighting and a calm, professional mood.
Choose the Image Shape
Tell ChatGPT how the image will be used.
Common image formats include:
· Square: Suitable for many social media posts.
· Wide landscape: Suitable for WordPress featured images, presentations and website banners.
· Portrait: Suitable for posters, mobile content and vertical social media posts.
For example:
Prompt:
Create a wide landscape image for a WordPress article about learning artificial intelligence.
Including the format helps ChatGPT arrange the subject and background more appropriately.
How to Generate Your First AI Image Step by Step
After writing your prompt, you are ready to generate your first image. ChatGPT can create the image directly inside the conversation and allows you to continue refining it with additional instructions. (OpenAI)
Step 1: Start a New Conversation
Open ChatGPT and begin a new conversation. Starting a separate conversation helps keep your image project organized and prevents unrelated messages from affecting the instructions.
You may give the conversation a clear purpose, such as:
· WordPress featured image.
· Social media graphic.
· Product illustration.
· Educational diagram.
· Personal creative project.
Step 2: Decide What the Image Is For
Before writing the prompt, decide where you will use the image.
Ask yourself:
· Is it for a WordPress article?
· Is it for Facebook, Instagram or another social platform?
· Is it for an online store?
· Is it for a presentation?
· Is it for personal use?
The purpose affects the image shape, style and amount of detail you should request.
For example, a WordPress featured image usually works well in a wide landscape format, while a social media profile image may work better as a square.
Step 3: Write the First Prompt
Use the simple prompt formula:
Subject + Setting + Important Details + Style + Lighting + Image Format
Example prompt:
Create a realistic image of a beginner learning how to create AI images with ChatGPT. Show the person sitting at a modern desk with a laptop displaying colourful digital artwork. Include a notebook, a coffee cup and indoor plants. Use bright natural lighting, a clean professional style and a wide landscape format.
Read the prompt once before sending it. Make sure the most important instructions are included.
Step 4: Send the Prompt
Click the Send button after reviewing your prompt.
ChatGPT will begin creating the image. The process may take a few minutes, depending on the complexity of the request. (OpenAI Help Center)
Avoid sending the same prompt repeatedly while the image is being generated.
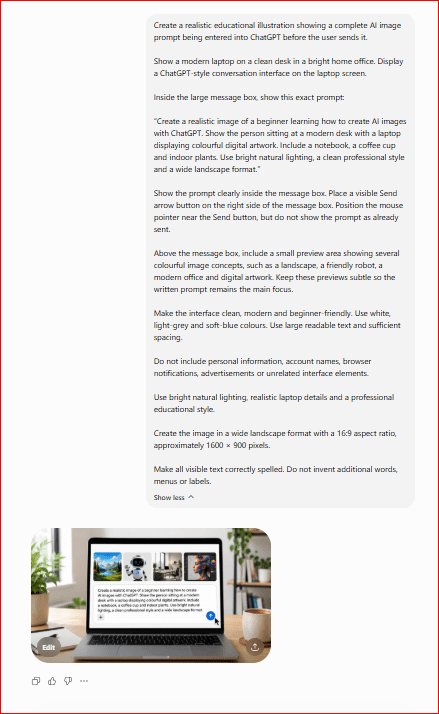
Figure 2. Entering a complete AI image prompt in ChatGPT
This figure shows a complete AI image prompt entered in the ChatGPT message box before it is sent. It demonstrates how the subject, setting, important details, style, lighting and image format can be combined into one clear request.
Step 5: Review the Generated Image
When the image appears, examine it carefully.
Check:
· Is the main subject correct?
· Does the setting match your request?
· Are the important objects included?
· Are the colours suitable?
· Is the lighting appropriate?
· Does the image have the correct shape?
· Is there any unwanted text?
· Are faces, hands and objects displayed correctly?
· Is the image suitable for its intended purpose?
The first result does not need to be perfect. Image generation usually works best as a process of creating, reviewing and improving.
Step 6: Ask for Specific Changes
When something needs improvement, describe the exact change you want.
For example:
· Make the room brighter.
· Change the laptop to silver.
· Remove the coffee cup.
· Add more space above the subject.
· Use softer colours.
· Make the person look more natural.
· Replace the background with a modern office.
· Change the image to a wide landscape format.
· Remove all visible text.
· Make the design simpler and less crowded.
ChatGPT can refine an image through follow-up instructions, including changes to composition, size, style and visual details. (OpenAI)
Try to request one or two important changes at a time. This makes it easier to see whether each correction improved the image.
Step 7: Review the Revised Image
After ChatGPT generates the revised version, compare it with the previous result.
Ask:
· Did the requested change appear?
· Is the new version better?
· Did another part of the image change unexpectedly?
· Does the image now match its purpose?
You may continue giving follow-up instructions until the result is satisfactory.
Step 8: Choose the Best Version
When several versions are available, choose the one that best meets your needs.
Do not choose an image only because it looks attractive. Also consider:
· Whether it supports the article or message.
· Whether the subject is easy to understand.
· Whether the layout leaves enough space for website cropping.
· Whether the image looks professional.
· Whether important details remain visible on smaller screens.
A Complete Beginner Example
First prompt:
Create an image of a person learning AI.
This prompt may produce a general result because it does not explain the setting, style or intended use.
Improved prompt:
Create a realistic wide landscape image for a beginner-friendly WordPress article about learning artificial intelligence. Show an adult sitting at a clean desk and using ChatGPT on a laptop. Include a notebook, a small plant and soft natural lighting. Use a modern, welcoming and professional style. Do not include any visible text.
Follow-up instruction:
Make the room brighter, move the person slightly to the right and leave more open space on the left for a website title.
The follow-up instruction improves the image without requiring you to rewrite the entire prompt.
Beginner Tip
Save your original prompt and your successful follow-up instructions. You can reuse the structure later for similar WordPress images, social media graphics or business projects.
How to Improve an AI-Generated Image with Follow-Up Prompts
The first generated image may not match your idea perfectly. You may notice that the colours are incorrect, the background is too busy, an object is missing or the image has the wrong shape.
You do not need to start again immediately. You can continue the conversation and tell ChatGPT exactly what you want changed.
These additional instructions are called follow-up prompts.
Ask for One Clear Change at a Time
A specific instruction is easier for ChatGPT to follow than a general request.
Unclear instruction:
Make the image better.
Clear instruction:
Make the background brighter and remove the objects from the desk.
The clear instruction tells ChatGPT what needs to change.
Useful follow-up prompts include:
· Make the lighting brighter.
· Remove the text from the image.
· Change the background to white.
· Add more space around the main subject.
· Move the person to the right side.
· Change the shirt colour to blue.
· Replace the laptop with a tablet.
· Make the design simpler.
· Use a more realistic style.
· Change the image to a wide landscape format.
Change the Main Subject
You can ask ChatGPT to change the person, object or main focus of the image.
For example:
Follow-up prompt:
Replace the businessperson with an older beginner learning how to use ChatGPT.
You could also write:
· Replace the car with a bicycle.
· Change the robot into a friendly assistant.
· Add another person beside the main subject.
· Remove the person and keep only the workspace.
· Make the product larger and place it in the centre.
When changing the main subject, explain which parts of the original image should remain unchanged.
For example:
Follow-up prompt:
Replace the person with an older adult, but keep the same office, desk, lighting and wide landscape format.
Change the Background
The background affects how professional and focused the image appears.
You can ask ChatGPT to:
· Remove distracting objects.
· Use a plain white background.
· Replace the room with a modern office.
· Add a natural outdoor setting.
· Blur the background slightly.
· Make the background brighter.
· Use a simple studio background.
· Add more open space around the subject.
For example:
Follow-up prompt:
Replace the busy office background with a clean, modern workspace. Keep the person and laptop unchanged.
A simple background is often better for WordPress featured images because it keeps attention on the main subject.
Change Colours
Colour changes can improve readability, mood and brand consistency.
You may request:
· A blue and white colour scheme.
· Softer colours.
· Brighter colours.
· Warm neutral colours.
· A darker background.
· Less colour saturation.
· Colours that match your website.
For example:
Follow-up prompt:
Change the colour scheme to blue, white and light grey. Keep the image professional and suitable for a beginner AI website.
Avoid asking for too many colour changes at the same time. Start with the main colour scheme and review the result.
Change the Lighting
Lighting can make an image feel bright, warm, dramatic or professional.
Examples of lighting instructions include:
· Use bright natural daylight.
· Add soft morning light.
· Use warm indoor lighting.
· Make the image brighter.
· Reduce dark shadows.
· Use clean studio lighting.
· Create a soft professional atmosphere.
For example:
Follow-up prompt:
Make the image brighter and use soft natural daylight coming through the window.
Change the Visual Style
You can keep the same subject while changing the visual style.
For example:
· Realistic photography.
· Digital illustration.
· Cartoon.
· Watercolour painting.
· Three-dimensional design.
· Minimalist graphic.
· Children’s-book illustration.
· Cinematic style.
Follow-up prompt:
Keep the same scene, but change the visual style from realistic photography to a clean digital illustration.
A realistic style may work well for professional articles, while a cartoon or illustration may be more suitable for educational or children’s content.
Change the Image Shape
The image shape should match where you plan to use it.
You can request:
· Square format.
· Wide landscape format.
· Portrait format.
· Website banner format.
· Social media format.
For example:
Follow-up prompt:
Change the image to a wide landscape format suitable for a WordPress featured image. Keep the main subject in the centre and leave enough space around the edges for cropping.
When changing the shape, some parts of the image may be rearranged. Review the new version carefully to make sure important details remain visible.
Remove Unwanted Text
AI-generated images may sometimes contain unnecessary, misspelled or unclear text.
Use a direct instruction such as:
Follow-up prompt:
Remove all visible text, letters, labels and logos from the image. Keep the rest of the design unchanged.
When you need text in an image, it is often better to add it later using Canva, WordPress or another design tool. This gives you more control over spelling, font size and placement.
Correct Missing or Incorrect Objects
Check whether all requested objects are present and accurate.
You may ask ChatGPT to:
· Add a missing laptop.
· Remove an extra object.
· Correct the number of people.
· Replace an incorrect object.
· Make the product larger.
· Place an object in a different location.
For example:
Follow-up prompt:
Remove the extra coffee cup and add a notebook beside the laptop. Keep everything else unchanged.
Preserve the Parts You Like
When requesting a change, explain which parts should stay the same.
For example:
Follow-up prompt:
Keep the person, desk and lighting unchanged. Only replace the background with a modern home office.
This reduces the chance that ChatGPT will change parts of the image you already like.
Compare Before and After
After each revision, compare the new image with the previous version.
Check:
· Did ChatGPT make the requested change?
· Did it accidentally remove something important?
· Are the colours better?
· Is the subject still clear?
· Is the image now suitable for its intended use?
· Did the image shape remain correct?
You may need several follow-up prompts before the image is ready.
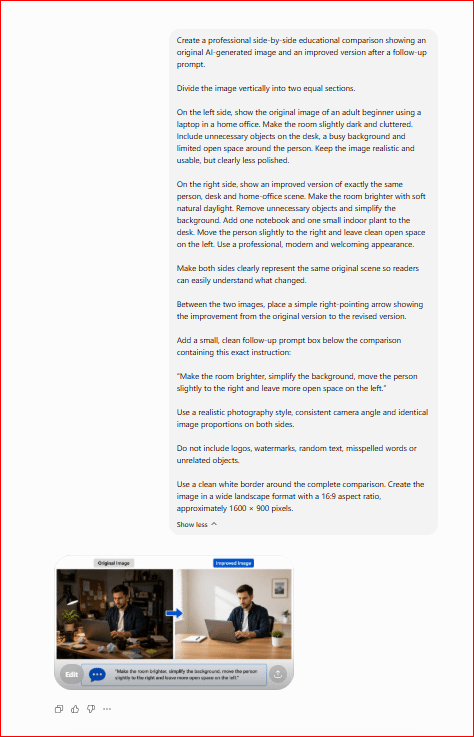
Figure 3. Improving an AI-generated image with a follow-up prompt
This figure compares an original AI-generated image with an improved version. The follow-up prompt brightens the room, simplifies the background, moves the person to the right and creates open space on the left. It demonstrates how specific corrections can improve an image without rewriting the original prompt.
A Complete Improvement Example
Original prompt:
Create a realistic image of a beginner using ChatGPT on a laptop in a home office.
First follow-up prompt:
Make the room brighter and add a notebook and indoor plant to the desk.
Second follow-up prompt:
Move the person slightly to the right and leave more open space on the left.
Third follow-up prompt:
Remove all visible text and change the image to a wide landscape format suitable for a WordPress featured image.
Each follow-up prompt improves one part of the image while preserving the overall idea.
Beginner Tip
Use short, specific instructions and review the result after each change. When too many changes are requested at once, ChatGPT may misunderstand which details are most important.
How to Edit an Existing Image in ChatGPT
ChatGPT can edit an image that it created, or you can upload an existing image and ask ChatGPT to change it. You can describe the change in the conversation, or use the selection tool to highlight a specific part of the image. (OpenAI Help Center)
This is useful when you already have an image but need to:
· Remove an unwanted object.
· Replace the background.
· Change a colour.
· Add a missing object.
· Improve the lighting.
· Change the image shape.
· Make the background transparent.
· Adjust the position of the main subject.
· Convert the image into another visual style.
Edit an Image Created by ChatGPT
Follow these steps:
1. Open the conversation containing the generated image.
2. Select the image you want to edit.
3. Describe the change you want in the text box.
4. Send the instruction.
5. Review the edited image.
6. Ask for another correction when necessary.
For example:
Editing prompt:
Change the background to a bright modern office. Keep the person, laptop, desk and lighting unchanged.
The instruction explains both what should change and what should remain the same.
Upload and Edit an Existing Image
You can also upload an image from your computer or mobile device and ask ChatGPT to modify it. (OpenAI Help Center)
Follow these steps:
1. Start a new ChatGPT conversation.
2. Select the attachment button near the message box.
3. Choose the image from your device.
4. Wait for the image to finish uploading.
5. Describe the change you want.
6. Send the request.
7. Review the edited version.
For example:
Editing prompt:
Remove the objects behind the product and replace the background with a clean white studio background. Keep the product’s shape, colour and position unchanged.
Use the Selection Tool
The image editor may include a selection tool that allows you to highlight the part of the image you want to change. You can select an area and then describe the required edit. (OpenAI Help Center)
For example, you could highlight:
· A person you want removed.
· A product whose colour should change.
· A section of the background.
· An incorrect object.
· An area where a new object should be added.
Follow these steps:
1. Open the image in the ChatGPT image editor.
2. Select Select.
3. Highlight the area you want to edit.
4. Describe the required change.
5. Send the instruction.
6. Review the result.
7. Select Save when the image is ready.
The selected area does not always create a perfectly precise boundary. An edit may sometimes affect nearby parts of the image, so review the complete result carefully. (OpenAI Help Center)
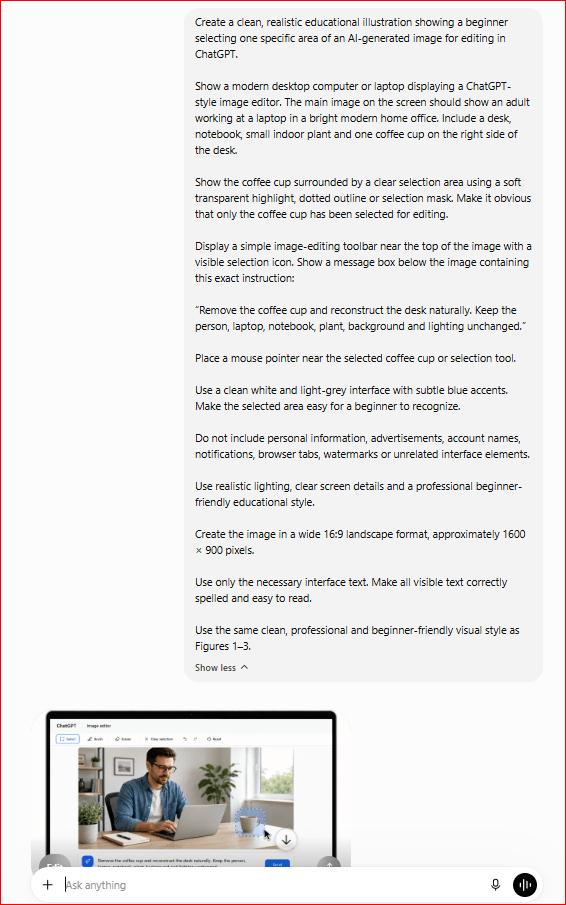
Figure 4. Selecting a specific area of an image for editing
Explanation:
The highlighted area shows the specific part of the image selected for editing. In this example, only the coffee cup is selected, and the follow-up instruction asks ChatGPT to remove it while keeping the person, laptop, notebook, plant, background and lighting unchanged. Selecting a specific area helps ChatGPT understand where the correction should be made, although nearby details may sometimes change and should be reviewed carefully.
Describe the Location Clearly
When editing a specific area, explain exactly where it appears.
Examples include:
· Remove the coffee cup on the left side of the desk.
· Change the blue chair in the background to grey.
· Add a small plant beside the laptop.
· Remove the text near the upper-right corner.
· Make the wall behind the person white.
· Replace the object in the person’s right hand with a smartphone.
Location words help ChatGPT understand which part of the image should change.
Useful location words include:
· Left.
· Right.
· Upper-left corner.
· Upper-right corner.
· Lower-left corner.
· Lower-right corner.
· Centre.
· Foreground.
· Background.
· Beside.
· Behind.
· Above.
· Below.
Explain What Should Stay the Same
An editing prompt should not only explain what to change. It should also explain which parts must remain unchanged.
For example:
Less precise prompt:
Change the background.
Better prompt:
Replace the background with a bright modern office. Keep the person’s appearance, clothing, position, desk, laptop and lighting exactly the same.
The second prompt reduces the chance of unwanted changes.
A useful editing formula is:
Change this + Location + New result + Keep these parts unchanged
For example:
Editing prompt:
Remove the coffee cup from the right side of the desk and replace it with a small green plant. Keep the person, laptop, notebook, background and lighting unchanged.
Remove an Object
Use a direct instruction when removing an unwanted object.
Example prompt:
Remove the extra chair from the background. Reconstruct the wall and floor naturally, and keep everything else unchanged.
Another example:
Example prompt:
Remove all visible logos and text from the image. Preserve the colours, layout, people and background.
After the edit, check whether the empty area looks natural.
Add an Object
Explain what the new object is, where it should appear and how large it should be.
Example prompt:
Add a small closed notebook beside the laptop on the left side of the desk. Make it look naturally placed and match the lighting of the scene.
Avoid requesting an object without explaining its location.
Unclear prompt:
Add a plant.
Clear prompt:
Add a small indoor plant in a white pot on the right side of the desk.
Replace an Object
You can ask ChatGPT to replace one object with another.
Example prompt:
Replace the tablet on the desk with a silver laptop. Keep the same position, angle, size and lighting.
Another example:
Example prompt:
Replace the red travel bag with a blue foldable travel bag. Keep the background, shadows and camera angle unchanged.
Change a Colour
Identify the object and the new colour clearly.
Example prompt:
Change the person’s shirt from red to dark blue. Keep the face, pose, background and lighting unchanged.
Another example:
Example prompt:
Change the wall colour to light grey while keeping all furniture and decorations unchanged.
Replace the Background
Background editing is useful for product images, featured images and social media graphics.
Example prompt:
Replace the current background with a clean white photography-studio background. Keep the product’s shape, colour, size and position unchanged. Add a soft natural shadow beneath the product.
Another example:
Example prompt:
Replace the busy room with a simple modern home office. Keep the person and laptop unchanged.
Make the Background Transparent
ChatGPT can follow instructions to create or edit an image with a transparent background. (OpenAI Help Center)
Use a prompt such as:
Example prompt:
Remove the entire background and make it transparent. Keep only the product with clean, smooth edges and no text or shadow outside the product.
Transparent backgrounds are useful for:
· Website logos.
· Product images.
· Icons.
· Presentation graphics.
· Social media designs.
· Canva projects.
After saving the image, confirm that the file format supports transparency.
Change the Visual Style
You can transform an existing image into another visual style.
For example:
Editing prompt:
Convert this realistic photograph into a clean digital illustration. Preserve the same people, composition, objects and background.
Other possible style changes include:
· Cartoon illustration.
· Watercolour painting.
· Pencil drawing.
· Three-dimensional design.
· Children’s-book illustration.
· Cinematic photography.
· Minimalist graphic.
When changing styles, important details may also change. Check faces, hands, objects and text carefully.
Change the Aspect Ratio
The image editor may allow you to select another aspect ratio, or you can include the desired shape in your prompt. (OpenAI Help Center)
For example:
Editing prompt:
Change this image to a wide 16:9 landscape format suitable for a WordPress featured image. Keep the main subject fully visible and leave safe space around the edges for cropping.
You could also request:
· Square 1:1 format.
· Portrait 4:5 format.
· Vertical 9:16 format.
· Wide 16:9 format.
Changing the aspect ratio may cause ChatGPT to extend, crop or rearrange parts of the image.
Review the edges carefully.
Review Every Edited Version
After an edit, check:
· Was the correct area changed?
· Did any other part change unexpectedly?
· Does the edited area look natural?
· Are faces, hands and objects correct?
· Is the lighting consistent?
· Are the shadows realistic?
· Is the image still the correct shape?
· Is any unwanted text visible?
· Does the final image remain suitable for its purpose?
When the result is not correct, describe the problem specifically.
For example:
Correction prompt:
The background is correct, but the laptop changed. Restore the original silver laptop and keep every other part of the current image unchanged.
Beginner Tip
Save the original image before making major edits. This gives you a clean version to return to when an edit changes too many details.
How to Choose the Right Image Size and Aspect Ratio
The image shape and dimensions should match where you plan to use the image. An image created for a WordPress article may need a different shape from an image designed for Instagram, a website banner or a presentation.
The relationship between an image’s width and height is called its aspect ratio.
For example:
- 1:1 means the width and height are equal.
- 16:9 means the image is much wider than it is tall.
- 4:5 means the image is slightly taller than it is wide.
- 9:16 means the image is designed for a vertical screen.
Choosing the correct aspect ratio before generating the image can reduce unnecessary cropping later.
Square Images
A square image uses a 1:1 aspect ratio.
Common square dimensions include:
- 1024 × 1024 pixels.
- 1080 × 1080 pixels.
Square images are useful for:
- Social media posts.
- Profile images.
- Product thumbnails.
- Icons.
- Simple educational graphics.
- Online-store collections.
Example prompt:
Create a square 1:1 image of a friendly AI assistant helping a beginner use a laptop. Use a clean digital illustration style, a simple background and bright professional colours.
Keep the main subject near the centre so it remains visible when the image is displayed as a thumbnail.
Wide Landscape Images
A wide landscape image is wider than it is tall.
A common wide format is 16:9.
Common dimensions include:
- 1280 × 720 pixels.
- 1600 × 900 pixels.
- 1920 × 1080 pixels.
Wide images are useful for:
- WordPress featured images.
- Blog headers.
- Website banners.
- YouTube thumbnails.
- Presentations.
- Educational diagrams.
Example prompt:
Create a wide 16:9 landscape image for a beginner-friendly WordPress article about creating AI images with ChatGPT. Show an adult using a laptop in a bright modern workspace. Leave safe space around the edges for website cropping. Do not include visible text.
For WordPress featured images, avoid placing important details too close to the edges. Some themes crop featured images differently on desktop computers, tablets and mobile devices.
Portrait Images
Portrait images are taller than they are wide.
A common portrait format is 4:5.
Common dimensions include:
- 1080 × 1350 pixels.
- 1200 × 1500 pixels.
Portrait images are useful for:
- Posters.
- Pinterest graphics.
- Mobile-friendly social media posts.
- Book covers.
- Educational handouts.
- Product advertisements.
Example prompt:
Create a portrait 4:5 educational image showing a beginner learning how to write an AI image prompt. Include a laptop, notebook and simple prompt examples. Use a clean professional illustration style and leave space at the top for a title.
Vertical Images
A vertical image commonly uses a 9:16 aspect ratio.
Common dimensions include:
- 1080 × 1920 pixels.
- 720 × 1280 pixels.
Vertical images are useful for:
- Instagram Stories.
- Facebook Stories.
- TikTok.
- YouTube Shorts.
- Mobile advertisements.
- Smartphone wallpapers.
Example prompt:
Create a vertical 9:16 image of a beginner using ChatGPT to create digital artwork on a smartphone. Use a bright modern style and keep the person and phone centred.
Vertical images should be simple because they are often viewed quickly on small screens.
Website Banner Images
Website banners are usually very wide and relatively short.
Possible dimensions include:
- 1600 × 600 pixels.
- 1920 × 700 pixels.
- 1920 × 800 pixels.
Banner images are useful for:
- Homepage headers.
- Landing pages.
- Course pages.
- Promotional sections.
- Website category pages.
Example prompt:
Create a very wide website banner showing artificial intelligence helping people write, study and create images. Use a clean modern style, a blue and white colour scheme and plenty of open space in the centre for a website heading. Do not include any visible text.
When requesting a banner, explain where the empty space should appear.
For example:
- Leave open space on the left.
- Leave open space in the centre.
- Place the main subject on the right.
- Keep the upper area clear for a heading.
WordPress Featured Images
A WordPress featured image should clearly represent the article topic and remain understandable when displayed at different sizes.
A useful prompt may include:
- The article topic.
- Wide landscape format.
- One clear main subject.
- A simple background.
- Open space around the edges.
- No visible text.
- A professional and beginner-friendly style.
Example prompt:
Create a wide landscape featured image for a WordPress article titled “How to Create AI Images with ChatGPT.” Show an older beginner using ChatGPT on a laptop while colourful digital artwork appears on the screen. Use bright natural lighting, a modern home-office background and a clean professional style. Leave safe space around all edges and do not include visible text.
Avoid including the complete article title inside the generated image. Adding text later in Canva or another design tool usually gives you greater control over spelling, placement and font size.
Social Media Images
Different social media platforms may display images differently. Before creating an image, decide
whether it will appear as:
- A square post.
- A portrait post.
- A vertical story.
- A video thumbnail.
- A profile image.
- A page banner.
When one image will be used on several platforms, create separate versions rather than forcing one design to fit every shape.
For example, you may create:
- A wide version for WordPress.
- A square version for Facebook.
- A portrait version for Pinterest.
- A vertical version for Stories.
This protects the main subject from being cropped.
Product Images
Product images often work best as square images because online stores commonly display products in grids.
A product image should include:
- One clear product.
- A simple background.
- Consistent lighting.
- Natural shadows.
- Enough space around the product.
- No unrelated objects.
- Accurate product colours and proportions.
Example prompt:
Create a square 1:1 studio product image of a blue foldable travel bag on a clean white background. Show the complete product from a slightly elevated front angle. Use soft professional lighting, a natural shadow and no text, logos or additional objects.
When the image is intended to represent a real product, compare it carefully with the actual product. AI may change the shape, colour, pockets, handles or materials.
Presentation Images
Images for presentations should be clear and easy to understand from a distance.
Wide landscape images usually work well because presentation slides are commonly horizontal.
Example prompt:
Create a wide 16:9 educational illustration explaining how a written prompt becomes an AI-generated image. Show three simple stages: written instruction, AI processing and completed image. Use a clean professional design with large visual elements and no small text.
Avoid crowded details because presentation images may be viewed on a large screen from several metres away.
Leave Safe Space Around Important Details
Safe space is the empty area around the main subject.
Safe space helps prevent important details from being removed when an image is:
- Cropped by a WordPress theme.
- Resized for social media.
- Displayed on a mobile screen.
- Used as a website banner.
- Combined with text in Canva.
Use instructions such as:
- Leave generous space around the subject.
- Keep the subject away from the edges.
- Place all important objects inside the central area.
- Leave open space above the subject.
- Leave open space on the left for text.
- Keep the face and hands away from the crop area.
Example prompt:
Create a wide landscape image of a beginner using ChatGPT on a laptop. Place the person slightly to the right and leave clean open space on the left. Keep all important details away from the outer edges.
Do Not Stretch an Image
Stretching an image changes its width or height without maintaining the original proportions. This can make people, objects and text look distorted.
Instead of stretching an image:
- Crop it carefully.
- Resize it proportionally.
- Generate a new version in the correct aspect ratio.
- Ask ChatGPT to extend the background.
- Recreate the image for the intended platform.
Example editing prompt:
Extend this image into a wide 16:9 landscape format. Preserve the person’s proportions and original appearance. Add natural background space on both sides instead of stretching the image.
Check the Image After Resizing
After resizing or cropping an image, check:
- Is the main subject still fully visible?
- Are faces and hands intact?
- Is any text cut off?
- Are objects distorted?
- Is the image still sharp?
- Is there enough space around the edges?
- Does the image still communicate the intended message?
This figure can compare square, landscape, portrait and vertical image formats using simple visual examples.
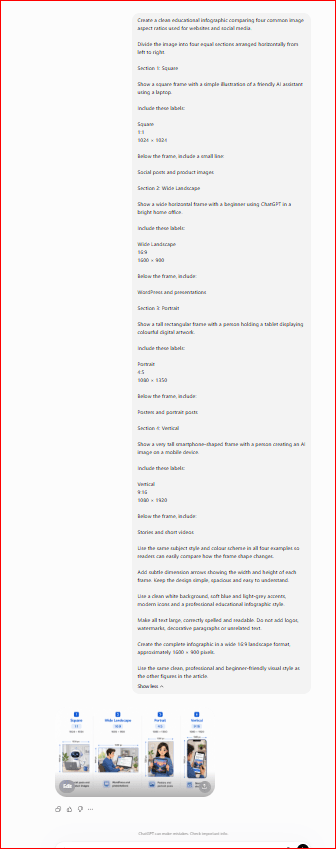
Figure 5A. Using a detailed prompt to create an image-aspect-ratio infographic
Explanation
This figure shows how a detailed image prompt gives ChatGPT instructions about the layout, aspect ratios, dimensions, labels, colours and intended uses. Providing these details helps the AI create a more organized and informative infographic.
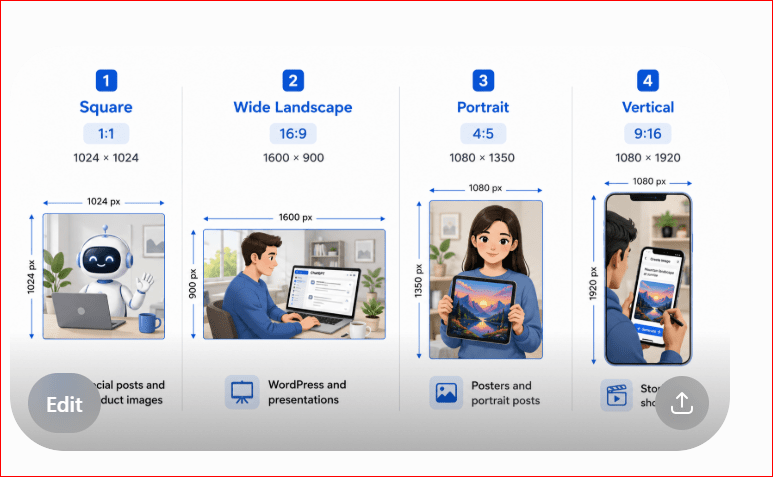
Figure 5B. Common image aspect ratios for websites and social media
Explanation
This figure compares four common image aspect ratios. Square images work well for social media posts and product thumbnails, wide landscape images are suitable for WordPress featured images and presentations, portrait images are useful for posters and taller social media posts, and vertical images are designed for Stories and short-form mobile content. Choosing the correct aspect ratio before generating an image helps prevent unwanted cropping and keeps important details visible.
Beginner Tip
Choose the image’s purpose and aspect ratio before writing the prompt. Generating the correct shape from the beginning is usually easier than trying to repair the layout later.
How to Save and Organize AI-Generated Images
After creating and editing an image, save it carefully so you can find and reuse it later.
ChatGPT automatically keeps generated images in the Images area. You can open an image and select Save to download it to your computer or mobile device. You may also use Copy or Share when those options are available. (OpenAI Help Center)
How to Save an Image from ChatGPT
Follow these steps:
- Select the completed image.
- Review the image one final time.
- Select Save or the download option.
- Choose the folder where you want to store it.
- Give the image a clear filename.
- Confirm that the image opens correctly after downloading.
Do not rely only on the ChatGPT conversation. Keep a separate copy of every image you plan to publish.
Use Clear Image Filenames
Avoid filenames such as:
- image1.png
- picture-final.png
- download.png
- new-image-2.png
These names do not explain what the image contains.
Use descriptive filenames instead.
For example:
Poor filename:
image1.png
Better filename:
how-to-create-ai-images-with-chatgpt.png
A good filename should:
- Describe the main subject.
- Use simple words.
- Use lowercase letters.
- Separate words with hyphens.
- Avoid unnecessary numbers and symbols.
- Match the article or page topic.
Example Filenames for This Article
The figures in this guide could use these filenames:
- open-chatgpt-image-generation-option.png
- enter-ai-image-prompt-in-chatgpt.png
- improve-ai-image-with-follow-up-prompt.png
- select-image-area-for-editing-chatgpt.png
- common-image-aspect-ratios.png
The featured image could use:
how-to-create-ai-images-with-chatgpt-2026.png
Clear filenames help you identify images before opening them and can also support better website organization.
Create a Folder for Each Article
Keep the images for each WordPress article in a separate folder.
For example:
Main folder:
AI Mastery Articles
Article folder:
Article 012 – How to Create AI Images with ChatGPT
Inside that folder, you could create:
- Article document.
- Featured image.
- Figures.
- Screenshots.
- Original images.
- Edited images.
- WordPress-ready images.
This prevents images from different articles from becoming mixed together.
Keep the Original and Final Versions
Do not replace the original image immediately after editing it
.
Save separate versions, such as:
- ai-image-original.png
- ai-image-edited.png
- ai-image-final.png
- ai-image-wordpress.webp
Keeping the original version allows you to return to it when an edit creates an unwanted change.
Use Version Numbers Carefully
When you create several versions, add simple version numbers.
For example:
- featured-image-v1.png
- featured-image-v2.png
- featured-image-v3.png
- featured-image-final.png
Avoid unclear names such as:
- final-final.png
- final-new.png
- final-corrected-2.png
A clear numbering system makes comparison easier.
Save the Successful Prompt
Store the prompt used to create each important image.
You may save it:
- In the article document.
- In a separate prompt document.
- In a spreadsheet.
- In a notes application.
- Inside the image folder.
For example:
Image filename:
common-image-aspect-ratios.png
Prompt used:
Create a clean educational infographic comparing four common image aspect ratios used for websites and social media.
Saving the prompt helps you recreate or update the image later.
Record Follow-Up Instructions
When an image required several corrections, save the most useful follow-up prompts too.
For example:
Original prompt:
Create a wide landscape image of a beginner creating AI images with ChatGPT.
Follow-up prompt 1:
Make the room brighter and simplify the background.
Follow-up prompt 2:
Move the person to the right and leave open space on the left.
Follow-up prompt 3:
Remove all visible text and keep the image in a 16:9 landscape format.
This creates a useful record of how the final image was produced.
Choose the Right File Format
Common image file formats include:
- PNG.
- JPEG or JPG.
- WebP.
Each format has different advantages.
PNG
PNG is useful for:
- Images with transparent backgrounds.
- Logos.
- Icons.
- Screenshots.
- Infographics.
- Images containing sharp lines or text.
PNG files may be larger than JPEG or WebP files.
JPEG or JPG
JPEG is useful for:
- Photographs.
- Realistic images.
- Blog images.
- Social media graphics.
- Images without transparency.
JPEG files are usually smaller than PNG files, but repeated editing and saving may reduce image quality.
WebP
WebP is useful for:
- WordPress images.
- Website featured images.
- Blog figures.
- Product images.
- Faster-loading webpages.
WebP often provides good image quality with a smaller file size.
For your AI Mastery website, WebP is usually a practical choice for finished WordPress images, while PNG can be kept as the original high-quality version.
Keep a High-Quality Original
A useful workflow is:
- Save the original generated image as PNG.
- Edit or resize the image when necessary.
- Create a smaller WebP version for WordPress.
- Keep both versions in the article folder.
For example:
- common-image-aspect-ratios-original.png
- common-image-aspect-ratios-wordpress.webp
This gives you a high-quality backup and a website-ready version.
Check the Image Before Closing ChatGPT
Before leaving the conversation, check:
- Is the correct image saved?
- Is it the final version?
- Does it have the correct aspect ratio?
- Is all visible text spelled correctly?
- Are there any unwanted objects?
- Is the image clear when opened at full size?
- Does the filename describe the image?
- Did you save the prompt?
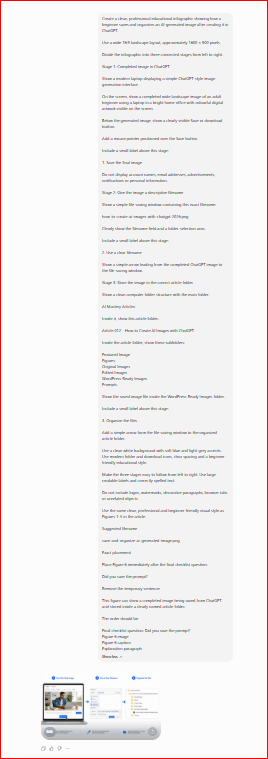
Figure 6A. Using a detailed prompt to create an image-saving workflow
Explanation:
This figure shows the detailed prompt used to create an infographic about saving and organizing AI-generated images. It demonstrates how instructions about the workflow, filename, folder structure and visual design guide ChatGPT when generating an educational figure.
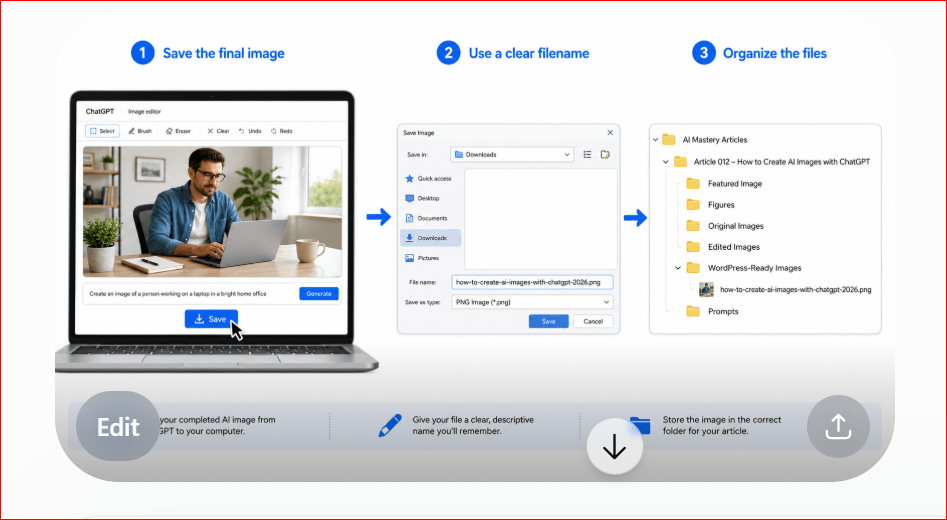
Figure 6B. Saving and organizing an AI-generated image
Explanation:
This figure shows a simple three-step image-management process. First, the completed image is saved from ChatGPT. Next, it is given a clear, descriptive filename that identifies the article topic. Finally, the image is stored in the correct article folder together with its original version, edited versions, WordPress-ready copy and saved prompts. Following this system makes images easier to locate, update and reuse later.
Beginner Tip
Save the image, prompt and edited versions together. A well-organized image folder can save considerable time when you update an article, replace a figure or reuse a design.
How to Prepare AI-Generated Images for WordPress
Before uploading an AI-generated image to WordPress, prepare it carefully. A properly prepared image loads faster, looks clearer and is easier for search engines and visitors to understand.
The preparation process includes:
- Choosing the correct image.
- Cropping it to the right shape.
- Reducing the file size.
- Using a descriptive filename.
- Adding alternative text.
- Adding a title, caption and description.
- Checking the image on desktop and mobile screens.
Choose the Best Version
Review all generated versions before selecting the final image.
Choose the version that:
- Clearly represents the article topic.
- Has the correct image shape.
- Looks professional.
- Contains no spelling errors.
- Has no unwanted text or objects.
- Shows faces, hands and products correctly.
- Leaves enough space around important subjects.
- Matches the visual style of your website.
Do not upload every generated version to WordPress. Keep the unused versions in your article folder and upload only the final image.
Crop the Image Correctly
Cropping removes unnecessary areas and helps the image fit its intended position.
Before cropping, decide whether the image will be used as:
- A featured image.
- An article figure.
- A website banner.
- A thumbnail.
- A social media image.
For a wide WordPress featured image, a 16:9 landscape format often works well.
For example:
- 1600 × 900 pixels.
- 1280 × 720 pixels.
- 1200 × 675 pixels.
Keep important faces, objects and text away from the edges because WordPress themes may crop images differently on smaller screens.
Resize Large Images
Very large images can slow down a webpage.
You usually do not need to upload an extremely large image when it will appear at a much smaller size inside the article.
For example, an image measuring 4000 × 3000 pixels may be unnecessarily large for a blog post.
A practical workflow is:
- Keep the large original image in your article folder.
- Create a smaller copy for WordPress.
- Check that the smaller version still looks clear.
- Upload only the website-ready version.
Do not repeatedly resize the same file because repeated editing may reduce image quality.
Choose a Suitable File Format
Common formats for WordPress images include:
- WebP.
- JPEG or JPG.
- PNG.
WebP is often suitable for:
- Featured images.
- Article figures.
- Product images.
- Website banners.
- General blog images.
JPEG is suitable for:
- Realistic photographs.
- Images with many colours.
- Background images.
- Social media graphics.
PNG is suitable for:
- Screenshots.
- Infographics.
- Logos.
- Images with transparent backgrounds.
- Graphics containing sharp lines.
For the AI Mastery website, keep the original image as PNG when necessary and create a smaller WebP copy for WordPress.
Reduce the File Size
A smaller file can help the article load more quickly.
Reduce the file size without making the image blurry.
Check:
- Is the image still sharp?
- Is the text readable?
- Are the colours accurate?
- Are faces and objects clear?
- Are there visible compression marks?
- Is the file size reasonable for a webpage?
Infographics may require a slightly larger file because small text and icons must remain readable.
Use a Descriptive Filename
Rename the image before uploading it to WordPress.
Avoid filenames such as:
- image.png
- download-1.png
- final-picture.png
- chatgpt-image-2026-07-21.png
Use a filename that describes the image.
For example:
prepare-ai-generated-images-for-wordpress.webp
A good filename should:
- Use lowercase letters.
- Separate words with hyphens.
- Describe the image clearly.
- Avoid unnecessary numbers.
- Avoid spaces and unusual symbols.
- Match the article topic.
Add Alternative Text
Alternative text, commonly called alt text, describes the image for people who use screen readers. It may also appear when the image cannot load.
Alt text should explain the image clearly and naturally.
Poor alt text:
AI image.
Better alt text:
Beginner preparing an AI-generated image for upload to a WordPress article.
Do not fill the alt text with repeated keywords.
Describe what the image shows and how it relates to the article.
Write an Image Title
The image title helps you identify the file inside the WordPress Media Library.
For example:
Preparing AI-Generated Images for WordPress
The title can be similar to the filename but should be written normally with spaces and capital letters.
Add a Caption When Needed
A caption appears below the image inside the article.
Captions are especially useful for:
- Figures.
- Screenshots.
- Educational diagrams.
- Infographics.
- Before-and-after comparisons.
- Step-by-step illustrations.
For example:
Figure 7: Preparing an AI-generated image for WordPress
A decorative featured image usually does not require a visible caption.
Add an Image Description
The description can provide additional information about the image.
For example:
Description:
Educational infographic showing the steps for preparing an AI-generated image before uploading it to WordPress, including resizing, renaming, adding metadata and previewing the final article.
The description is mainly useful for media organisation and detailed records.
Example WordPress Image Metadata
For an image showing the WordPress preparation process, you could use:
Filename:
prepare-ai-generated-images-for-wordpress.webp
Alt text:
Beginner preparing an AI-generated image for upload to a WordPress article.
Title:
Preparing AI-Generated Images for WordPress
Caption:
Figure 7: Preparing an AI-generated image for WordPress
Description:
Educational infographic showing how to resize, rename, describe and upload an AI-generated image to WordPress.
Upload the Image to WordPress
Follow these steps:
- Open the WordPress post editor.
- Place the cursor where the image should appear.
- Add an Image block.
- Select Upload or choose the image from the Media Library.
- Select the prepared image file.
- Add the alt text.
- Confirm the title and caption.
- Choose the appropriate image size.
- Check the alignment.
- Preview the article.
When adding a figure, place the caption directly below the image and the explanation paragraph directly below the caption.
Set a Featured Image
A featured image represents the article on:
- The blog page.
- Search results within the website.
- Related-post sections.
- Social media previews.
- Homepage article listings.
To set it:
- Open the post settings.
- Find the Featured image section.
- Select Set featured image.
- Upload or choose the prepared image.
- Add the image metadata.
- Save the selection.
- Preview the post.
Choose a featured image that clearly represents the article topic even when displayed as a small thumbnail.
Check the Image Alignment
Article figures are usually easiest to view when centred.
Check that:
- The image is not too small.
- The image does not extend outside the article area.
- The caption is directly below it.
- The caption is centred.
- The explanation follows the caption.
- There is enough spacing above and below the figure.
Avoid placing an image in the middle of a sentence or list.
Preview the Image on Different Screens
Before publishing, preview the article on:
- A desktop computer.
- A tablet.
- A mobile phone.
Check whether:
- The complete image is visible.
- The text inside an infographic is readable.
- The image is not stretched.
- The subject is not cropped incorrectly.
- The caption remains connected to the image.
- The page loads properly.
- The image supports the surrounding text.
Check Every Image Before Publishing
Use this checklist:
- Is the final version uploaded?
- Is the filename descriptive?
- Is the file format suitable?
- Is the image size appropriate?
- Is the alt text complete?
- Is the title correct?
- Is the caption included when needed?
- Is the description added?
- Is the image positioned correctly?
- Is the explanation below the caption?
- Does the image look correct on mobile?
- Are all visible words spelled correctly?
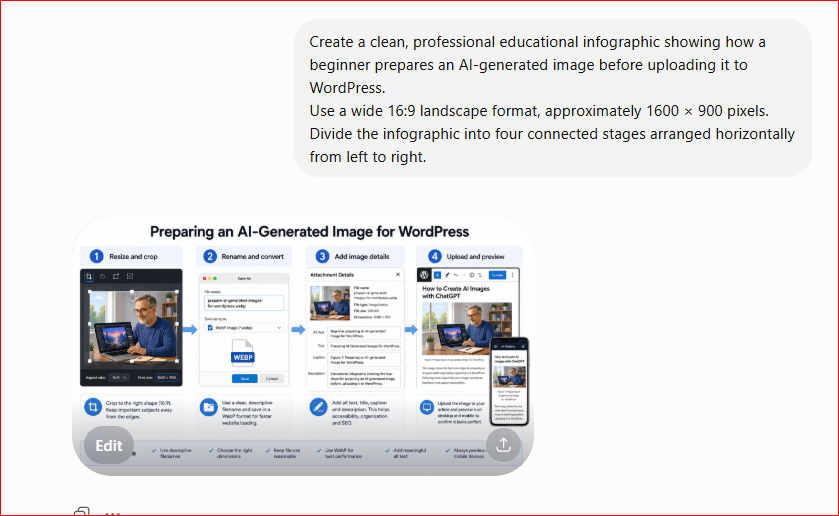
Figure 7. Preparing an AI-Generated Image for WordPress
Explanation
This figure shows the four main steps for preparing an AI-generated image for WordPress. The image is first resized and cropped to the correct shape. It is then given a descriptive filename and converted to a suitable website format. Next, alt text, a title, a caption and a description are added. Finally, the image is uploaded and previewed on desktop and mobile screens to confirm that it displays correctly.
Beginner Tip
Prepare the filename, dimensions and image metadata before uploading the file. Completing these steps in advance makes WordPress publishing faster and keeps the Media Library organised.
Common AI Image Problems and How to Fix Them
AI-generated images can look impressive, but they are not always perfect. The first version may contain incorrect objects, unusual hands, unreadable text, poor lighting or a composition that does not suit your website.
The best approach is to identify the exact problem and give ChatGPT a clear correction prompt.
Incorrect Hands or Fingers
AI-generated hands may sometimes contain:
- Extra fingers.
- Missing fingers.
- Unnatural positions.
- Objects held incorrectly.
- Hands that do not match the person’s pose.
Use a prompt such as:
Correction prompt:
Correct the person’s hands so they look natural and anatomically accurate. Show five fingers on each visible hand. Keep the person’s face, clothing, position, laptop, background and lighting unchanged.
After the correction, zoom in and check both hands carefully.
Distorted Faces
A face may appear uneven, blurred or unnatural.
Use a specific correction prompt:
Correction prompt:
Correct the person’s facial features so the face looks natural, symmetrical and realistic. Keep the same age, expression, hairstyle, clothing, pose and background.
Check:
- Eyes.
- Teeth.
- Ears.
- Eyeglasses.
- Skin texture.
- Facial expression.
When several people appear in the image, inspect every face separately.
Misspelled or Unreadable Text
AI-generated images may contain:
- Misspelled words.
- Random letters.
- Distorted numbers.
- Incorrect logos.
- Inconsistent fonts.
Use this prompt when text is not necessary:
Correction prompt:
Remove all visible text, letters, numbers, labels and logos from the image. Keep the people, objects, colours, background and layout unchanged.
When text is important, it is usually better to generate the image without text and add the wording later in Canva or another design tool.
Missing Objects
Sometimes ChatGPT may leave out an object requested in the prompt.
For example, you may request a laptop, notebook and coffee cup, but the notebook may be missing.
Use a correction such as:
Correction prompt:
Add a closed notebook beside the laptop on the left side of the desk. Match the size, perspective, shadows and lighting of the existing scene. Keep everything else unchanged.
Describe:
- What object is missing.
- Where it should appear.
- Its approximate size.
- Its colour.
- Which parts should remain unchanged.
Extra Objects
ChatGPT may add objects that were not requested.
For example:
- An extra laptop.
- Two coffee cups.
- An unnecessary chair.
- Random decorations.
- Additional people.
Use a prompt such as:
Correction prompt:
Remove the extra laptop from the right side of the desk. Reconstruct the desk surface naturally and keep all other objects unchanged.
Check the revised image to make sure the removed area looks natural.
Incorrect Number of People or Objects
The image may include too many or too few people.
Use an exact instruction:
Correction prompt:
Show exactly three adults sitting around the table. Remove any additional people and keep the office, table, laptops and lighting unchanged.
Words such as exactly, only and no additional can make the instruction clearer.
Unwanted Background Details
A busy background can distract from the main subject.
You may notice:
- Too many decorations.
- Random shelves.
- Unnecessary signs.
- Crowded furniture.
- Objects that compete with the main subject.
Use this correction:
Correction prompt:
Simplify the background by removing unnecessary decorations and furniture. Keep a clean modern office with one plant and one bookshelf. Preserve the person, desk, laptop and lighting.
A simple background often works better for WordPress featured images.
Poor Lighting
An image may appear too dark, too bright or unevenly lit.
Use a prompt such as:
Correction prompt:
Brighten the image using soft natural daylight. Reduce dark shadows on the person’s face and desk. Keep the colours, objects and composition unchanged.
You can also request:
- Warm morning light.
- Soft studio lighting.
- Bright daylight.
- Reduced shadows.
- More balanced exposure.
- Less glare on screens.
Incorrect Colours
The colours may not match your website, product or design plan.
Use a direct instruction:
Correction prompt:
Change the colour scheme to blue, white and light grey. Keep the person’s natural skin tone and preserve the existing composition and lighting.
When editing a real product image, compare the generated colour with the actual product.
A Cluttered Composition
An image may include too many subjects or objects.
A cluttered image can be difficult to understand when displayed as a small thumbnail.
Use a prompt such as:
Correction prompt:
Simplify the composition. Keep only the person, laptop, notebook and small plant. Remove all other objects and leave more open space around the main subject.
One clear focal point usually produces a stronger featured image.
Important Details Too Close to the Edges
WordPress themes and social media platforms may crop the edges of an image.
Use this prompt:
Correction prompt:
Move the person and all important objects toward the centre. Leave generous empty space around all four edges for safe cropping. Keep the same background, lighting and wide 16:9 format.
After the edit, check the image on desktop and mobile previews.
The Wrong Aspect Ratio
ChatGPT may produce an image shape that does not match your intended use.
Use a correction such as:
Correction prompt:
Recreate this image in a wide 16:9 landscape format at approximately 1600 × 900 pixels. Keep the main subject fully visible and extend the background naturally without stretching the person or objects.
Do not stretch a square image to make it wide. Generate or extend the image in the correct format instead.
Blurry or Low-Detail Areas
Some parts of the image may look soft or unclear.
Use a prompt such as:
Correction prompt:
Improve the clarity and detail of the person, laptop and desk. Keep the image realistic and natural. Do not over-sharpen the background.
Check the image at full size before uploading it to WordPress.
Inconsistent Shadows or Reflections
Added or replaced objects may not match the lighting of the scene.
Use this correction:
Correction prompt:
Correct the shadows and reflections so they match the direction and softness of the existing light. Keep the objects, colours and composition unchanged.
Natural shadows help edited objects look like part of the original image.
An Edit Changed Too Much
Sometimes ChatGPT may correct one problem but change other parts of the image.
For example, it may remove a coffee cup but also change the person’s clothing or laptop.
Use a corrective follow-up prompt:
Correction prompt:
Restore the original person, clothing, laptop and background. Keep only the requested removal of the coffee cup. Do not change any other part of the image.
Clearly state which change should remain and which parts should return to the previous version.
When to Start Again
Continuing to edit an image is not always the best choice.
Consider starting again when:
- The main subject is completely wrong.
- Several faces or hands are distorted.
- The composition is too crowded.
- The image style does not match your purpose.
- Repeated edits create new problems.
- The aspect ratio is unsuitable.
- Important product details are inaccurate.
A new prompt may produce a cleaner result faster than many corrections.
A Simple Image-Correction Formula
Use this formula:
Identify the problem + Describe the correction + Explain the location + State what must remain unchanged
For example:
Correction prompt:
Remove the second coffee cup from the right side of the desk. Reconstruct the desk surface naturally. Keep the person, laptop, notebook, plant, background, lighting and wide landscape format unchanged.
This formula helps ChatGPT understand both the requested change and the parts that should be preserved.
Image-Review Checklist
Before accepting the final image, check:
- Are all faces natural?
- Are hands and fingers correct?
- Are objects complete?
- Is the number of people correct?
- Is all visible text correctly spelled?
- Is the background simple and appropriate?
- Are the colours suitable?
- Is the lighting balanced?
- Are shadows and reflections natural?
- Is the image sharp?
- Is the aspect ratio correct?
- Are important details away from the edges?
- Does the image support the article topic?
- Did any part change unexpectedly?
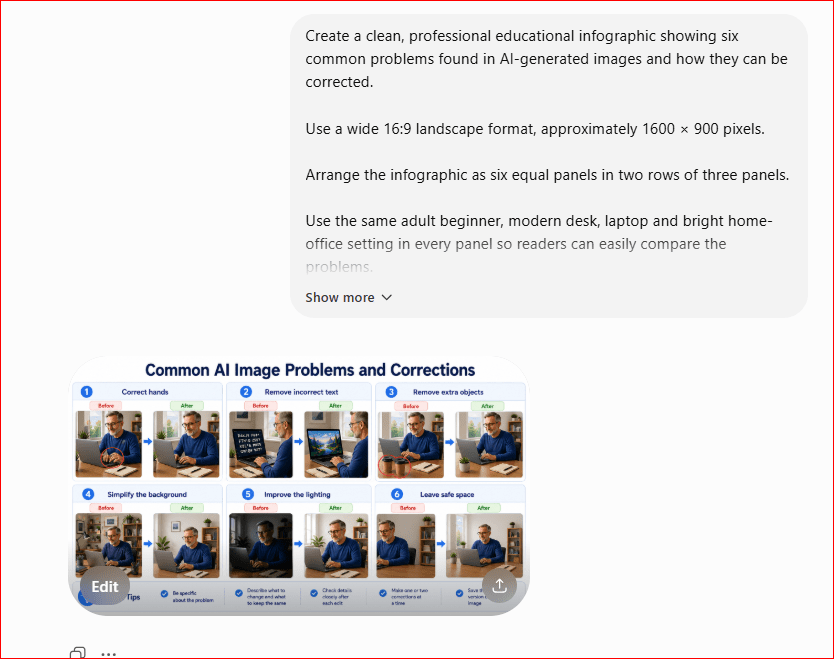
Figure 8. Common AI image problems and how to correct them
Explanation
This figure compares six common AI image problems with improved versions. It shows how clear correction prompts can fix unnatural hands, unreadable text, extra objects, cluttered backgrounds, poor lighting and unsafe subject placement. Reviewing these details before publishing helps ensure that the final image looks clear, professional and suitable for WordPress.
Beginner Tip
Correct one or two problems at a time. Specific follow-up instructions are usually more effective than asking ChatGPT to improve the entire image without explaining what is wrong.
How to Use AI-Generated Images Responsibly
AI-generated images can support articles, presentations, social media posts, advertisements and creative projects. However, you should review every image carefully before publishing or sharing it.
Responsible use means being honest about how the image was created, avoiding harmful or misleading content and checking that the image does not copy protected brands, characters or designs too closely.
Review Every Image Before Publishing
Do not publish an AI-generated image without checking it carefully.
Look for:
- Incorrect or misleading details.
- Unnatural faces or hands.
- Misspelled text.
- Unwanted logos or brand names.
- Offensive or inappropriate content.
- Objects that do not exist in real life.
- People shown in misleading situations.
- Product details that do not match the real product.
Even when an image looks professional, it may contain small errors that are easy to miss.
Do Not Present Fictional Images as Real Events
An AI-generated image should not be used to falsely suggest that a real event happened.
For example, avoid creating an image that appears to show:
- A real person attending an event they never attended.
- A company releasing a product that does not exist.
- A natural disaster in a location where it did not occur.
- A politician making a statement they never made.
- A customer using a product when no such photograph exists.
When an image could be mistaken for a real photograph, clearly explain that it is AI-generated or an illustration.
Avoid Impersonating Real People
Do not create images that falsely represent real people, especially when the image could damage their reputation or mislead viewers.
Be careful when creating images involving:
- Public figures.
- Business owners.
- Employees.
- Customers.
- Teachers.
- Medical professionals.
- Family members.
- Children.
For educational articles, it is usually safer to create fictional people rather than copying the appearance of a real individual.
Do Not Copy Protected Characters or Brands
Avoid asking ChatGPT to reproduce:
- Famous cartoon characters.
- Movie characters.
- Company mascots.
- Product packaging.
- Registered logos.
- Distinctive brand designs.
- Artwork created by another person.
Instead, describe the general visual idea you need.
Less suitable prompt:
Create a character that looks exactly like a famous animated superhero.
Better prompt:
Create an original friendly superhero character wearing a blue and silver suit. Use a colourful children’s-book illustration style. Do not copy any existing character, logo or costume.
This helps create a more original image.
Check Logos and Brand Names
AI-generated images may accidentally include symbols or text that resemble real brands.
Before publishing, check:
- Clothing.
- Laptop screens.
- Product packaging.
- Store signs.
- Vehicles.
- Background posters.
- Watermarks.
- Small labels.
When a logo is not necessary, use this instruction:
Correction prompt:
Remove all logos, trademarks, brand names and watermarks. Keep the objects, colours, composition and lighting unchanged.
Be Careful with Product Images
AI-generated product images may not match the real product accurately.
The AI may change:
- Colour.
- Shape.
- Size.
- Materials.
- Handles.
- Buttons.
- Pockets.
- Accessories.
- Packaging.
Do not use an AI-generated image to make customers believe it is an exact photograph of a real product unless the image accurately represents what they will receive.
For an online store, use real product photographs whenever exact appearance matters.
AI-generated images may still be useful for:
- Background concepts.
- Lifestyle scenes.
- Advertising ideas.
- Mood boards.
- Early design concepts.
- Decorative article images.
Protect Personal Information
Do not include private information inside an image prompt.
Avoid entering:
- Home addresses.
- Personal telephone numbers.
- Email addresses.
- Identification numbers.
- Banking information.
- Passwords.
- Medical records.
- Private family details.
- Confidential business documents.
When editing a screenshot, remove personal information before uploading it.
Be Careful When Using Images of Children
Images involving children require additional care.
Avoid creating images that:
- Place children in unsafe situations.
- Show personal identifying information.
- Present children in inappropriate clothing or settings.
- Suggest a false real-world event.
- Copy the appearance of a real child without permission.
For general educational content, use clearly fictional and age-appropriate illustrations.
Avoid Harmful or Deceptive Content
Do not use AI image generation to create:
- Fraudulent documents.
- Fake evidence.
- False news images.
- Misleading product claims.
- Medical misinformation.
- Dangerous instructions.
- Harassment or humiliation.
- Violent or hateful material.
- Images intended to deceive vulnerable people.
AI-generated images should help explain, educate or create—not mislead or harm.
Explain When an Image Is AI-Generated
A disclosure may be helpful when viewers could reasonably believe the image is a real photograph.
Possible disclosure wording includes:
- AI-generated illustration.
- Image created with artificial intelligence.
- Concept image created using ChatGPT.
- AI-generated visual for educational purposes.
- Illustrative image; not a real photograph.
You may place the disclosure:
- In the caption.
- In the image description.
- In the article text.
- In the social media post.
- Near the product or promotional image.
Keep Records of Important Images
For important website or business images, save:
- The original prompt.
- Follow-up prompts.
- The original image.
- The edited version.
- The final published version.
- The publication date.
- The page where the image was used.
Keeping these records makes it easier to explain how the image was created and update it later.
Responsible-Use Checklist
Before publishing an AI-generated image, ask:
- Does the image accurately support the article?
- Could viewers mistake it for a real event?
- Does it contain a real person’s likeness?
- Are there any visible logos or trademarks?
- Does it copy a protected character or design?
- Is the product shown accurately?
- Does it contain private information?
- Is it suitable for all intended viewers?
- Could it mislead or harm someone?
- Should the image be identified as AI-generated?
- Have I saved the prompt and final image?
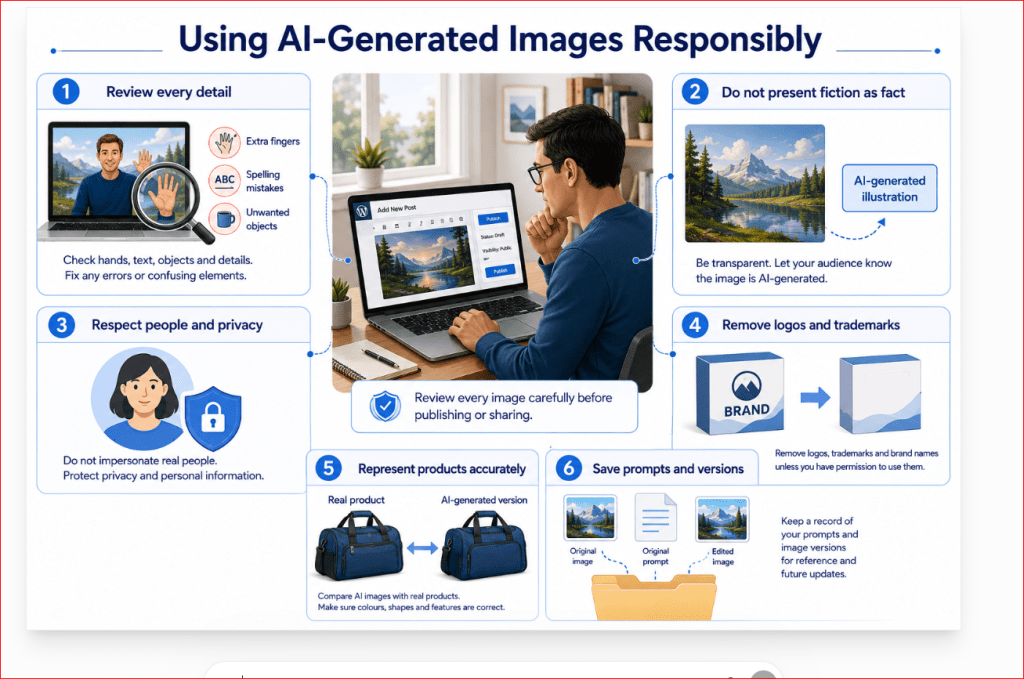
Figure 9. Responsible Use of AI-Generated Images
Explanation
This figure summarizes six important responsibilities when working with AI-generated images. It shows the importance of reviewing every detail, avoiding misleading content, respecting privacy, removing unwanted brands, checking product accuracy and saving the prompts and image versions.
Following these steps helps ensure that published images are clear, honest and appropriate for their intended audience.
Beginner Tip
When an AI-generated image could be mistaken for a real photograph, add a simple disclosure such as “AI-generated illustration.”
Practical Uses of ChatGPT Image Generation
ChatGPT image generation can support many personal, educational and business projects. The most useful results come from choosing a clear purpose before writing the prompt.
WordPress Featured Images
A featured image represents an article on the homepage, blog page and social media previews.
You can use ChatGPT to create:
- Article cover images.
- Tutorial illustrations.
- Technology-themed visuals.
- Category banners.
- Educational diagrams.
Example prompt:
Create a wide 16:9 featured image for a beginner-friendly WordPress article about using artificial intelligence. Show an adult learning on a laptop in a bright modern workspace.
Use a clean professional style, soft blue accents and no visible text. Leave safe space around the edges for cropping.
A featured image should remain clear when displayed as a small thumbnail.
Article Figures and Infographics
Figures can explain information that may be difficult to understand through text alone.
You can create:
- Step-by-step diagrams.
- Before-and-after comparisons.
- Process illustrations.
- Feature comparisons.
- Checklists.
- Educational infographics.
Example prompt:
Create a clean educational infographic showing the four steps of creating an AI image: write a prompt, generate the image, review the result and request corrections. Use simple icons, arrows and a wide landscape layout.
Keep infographic wording short so the text remains readable.
Social Media Graphics
ChatGPT can create images for:
- Facebook posts.
- Instagram posts.
- Pinterest graphics.
- LinkedIn updates.
- Stories.
- Short-video covers.
Choose the image shape before generating it.
Example prompt:
Create a square 1:1 social media image showing a beginner learning how to create AI images. Use a bright modern illustration style, a simple background and clear space at the top for a short title. Do not include visible text.
Add the final text later in Canva when exact spelling and placement are important.
Online-Store Product Backgrounds
AI image generation can help create:
- Clean studio backgrounds.
- Lifestyle settings.
- Seasonal backgrounds.
- Advertising concepts.
- Product-category banners.
Example prompt:
Create a realistic lifestyle background for a blue foldable travel bag. Show a bright airport waiting area with soft natural lighting and enough open space for the product. Do not include people, logos or visible text.
For real products, use an accurate product photograph and edit only the background whenever possible.
Presentations
Images can make presentations easier to understand.
ChatGPT can create:
- Slide illustrations.
- Process diagrams.
- Concept images.
- Simple visual comparisons.
- Background graphics.
Example prompt:
Create a wide 16:9 educational illustration for a presentation explaining how artificial intelligence converts a written prompt into an image. Show three clear stages connected by arrows: written instruction, AI processing and completed artwork.
Use large visual elements and no small text.
Keep presentation images simple because viewers may see them from a distance.
Educational Materials
Teachers, parents and students can create:
- Classroom illustrations.
- Learning diagrams.
- Flashcards.
- Activity-sheet graphics.
- Historical scene concepts.
- Science illustrations.
Example prompt:
Create a colourful children’s-book illustration showing a friendly robot teaching four students about artificial intelligence in a bright classroom. Use an age-appropriate, welcoming style and do not include visible text.
Always review educational images for accuracy before using them.
Business Marketing
Businesses can use AI-generated images for:
- Marketing concepts.
- Website banners.
- Email graphics.
- Advertisement drafts.
- Service illustrations.
- Promotional campaigns.
Example prompt:
Create a professional website banner for a small digital-marketing business. Show a business owner reviewing website analytics on a laptop. Use a modern office setting, blue and white colours, soft natural lighting and open space on the left for a heading.
AI-generated marketing images should not make false claims about products, customers or results.
Blog and Newsletter Graphics
Images can make newsletters and blog posts more attractive.
You may create:
- Section illustrations.
- Header graphics.
- Topic summaries.
- Seasonal visuals.
- Call-to-action images.
Example prompt:
Create a clean wide illustration for an email newsletter about beginner AI tools. Show simple icons representing writing, images, video and productivity around a laptop.
Use a professional blue and light-grey colour scheme and no visible text.
Logo and Branding Concepts
ChatGPT can help explore early branding ideas.
You can create concepts for:
- Logo shapes.
- Icons.
- Colour schemes.
- Brand symbols.
- Website mascots.
Example prompt:
Create three original logo concepts for a beginner AI education website. Use a simple brain-and-circuit idea, blue and silver colours and a modern minimalist style. Do not copy existing brands or include complicated details.
AI-generated logo concepts should be checked and redesigned carefully before being used as an official business logo.
Personal Creative Projects
You can also create images for:
- Greeting cards.
- Invitations.
- Wallpapers.
- Family activity sheets.
- Story illustrations.
- Hobby projects.
Example prompt:
Create a peaceful digital illustration of a family having a picnic beside a lake during sunset. Use warm colours, a friendly atmosphere and a wide landscape format.
Avoid using the exact appearance of real people unless you have permission and understand how the image will be used.
Create Several Versions for Different Uses
One image shape may not work everywhere.
For the same project, you may create:
- A wide version for WordPress.
- A square version for social media.
- A portrait version for Pinterest.
- A vertical version for Stories.
Example follow-up prompt:
Create a square version of this image for social media. Keep the same subject, colours and visual style, but rearrange the composition so all important details remain visible.
Choose Images That Support the Message
An image should help readers understand the topic.
Before using an image, ask:
- Does it match the article or campaign?
- Is the main subject clear?
- Is the style suitable for the audience?
- Is the image shape correct?
- Does it contain unnecessary details?
- Could it mislead viewers?
- Does it look professional at a small size?
Beginner Tip
Start with one practical purpose, such as a WordPress featured image or article figure. After learning the basic process, you can use the same prompting method for social media, presentations and business projects.
Benefits of ChatGPT Image Generation
ChatGPT image generation gives beginners a simple way to create visual content without needing advanced drawing or graphic-design skills.
It can help individuals, students, bloggers and small-business owners turn written ideas into images more quickly.
Easy for Beginners to Use
You can create an image by describing what you want in everyday language.
For example:
Prompt:
Create a realistic image of a beginner learning artificial intelligence on a laptop in a bright home office.
You do not need to understand complicated design software before starting.
You can begin with a simple prompt and improve the image through follow-up instructions.
Saves Time
Searching for a suitable stock image can take time.
You may need to:
- Visit several websites.
- Compare many images.
- Check licence conditions.
- Crop the selected image.
- Edit the colours.
- Remove unwanted objects.
- Resize it for your website.
With ChatGPT, you can describe the image you need and generate a customised result in one conversation.
This can be especially useful when creating several figures for one article.
Creates Images for a Specific Purpose
A stock photograph may not match your exact topic.
ChatGPT allows you to describe:
- The subject.
- The setting.
- The objects.
- The colours.
- The lighting.
- The style.
- The mood.
- The aspect ratio.
- The intended use.
For example:
Prompt:
Create a wide educational infographic showing a beginner writing an AI image prompt, generating an image, reviewing the result and requesting a correction. Use a clean white background, soft blue accents and a professional beginner-friendly style.
This produces an image designed specifically for the article.
Supports Fast Revisions
You can ask ChatGPT to revise an image without beginning a completely new project.
For example:
- Make the background brighter.
- Remove the extra object.
- Change the colour scheme.
- Move the person to the right.
- Add more safe space.
- Change the format to 16:9.
- Remove all visible text.
- Use a more realistic style.
Follow-up prompts make it easier to test different versions.
Offers Many Visual Styles
ChatGPT can create different types of visual content.
Examples include:
- Realistic photography.
- Digital illustration.
- Cartoon artwork.
- Watercolour painting.
- Minimalist graphics.
- Three-dimensional designs.
- Educational infographics.
- Children’s-book illustrations.
- Product concepts.
- Presentation visuals.
This allows you to choose a style that matches your website, audience or project.
Helps Explain Difficult Ideas
Some topics are easier to understand with a diagram or visual example.
ChatGPT can help create:
- Process diagrams.
- Before-and-after comparisons.
- Step-by-step illustrations.
- Aspect-ratio comparisons.
- Educational charts.
- Feature summaries.
- Visual checklists.
For example, a figure comparing square, landscape, portrait and vertical formats can help beginners understand aspect ratios more quickly than text alone.
Supports Consistent Article Design
You can ask ChatGPT to use the same visual style across several figures.
For example:
Consistency instruction:
Use the same clean white background, soft blue accents, realistic illustrations and beginner-friendly educational style as the other figures in this article.
Repeating the same design instructions can help the article look more organised and professional.
However, you should still review every figure because small differences may appear.
Useful for People with Limited Design Experience
A beginner may know what an image should communicate but may not know how to draw it or build it in design software.
ChatGPT can help convert the idea into a visual starting point.
You can then use Canva or another tool to:
- Add exact text.
- Adjust spacing.
- Add your logo.
- Match your website colours.
- Resize the image.
- Correct small layout problems.
ChatGPT can create the main visual, while another tool can provide final design control.
Helps Generate New Ideas
You can ask ChatGPT to create several visual concepts for the same topic.
For example:
Prompt:
Suggest four different visual concepts for a WordPress featured image about creating AI images with ChatGPT. Do not generate the images yet. Explain the subject, setting, style and layout for each concept.
After reviewing the ideas, choose the strongest concept and ask ChatGPT to generate it.
This can help when you are unsure how the article image should look.
Can Create Several Formats
The same concept can be adapted for different platforms
For example:
- Wide landscape for WordPress.
- Square for Facebook.
- Portrait for Pinterest.
- Vertical for Stories.
- Banner format for a homepage.
You can ask ChatGPT to maintain the same subject and visual style while changing the layout.
Follow-up prompt:
Create a square version of this design for social media. Keep the same person, colours and visual style, but rearrange the objects so nothing important is cropped.
Can Reduce Dependence on Stock Images
Stock-image websites are still useful, especially when you need real photography.
However, ChatGPT can help when:
- The exact scene is difficult to find.
- You need an original educational diagram.
- You want a specific combination of objects.
- You need several related visuals.
- You need a customised background.
- You want a concept image rather than a real photograph.
AI-generated images should still be reviewed for accuracy and responsible use.
Supports Personal and Business Projects
ChatGPT image generation can support:
- WordPress websites.
- Online stores.
- Social media pages.
- Presentations.
- Newsletters.
- Training materials.
- School projects.
- Marketing campaigns.
- Personal creative work.
The same prompting skills can be used across many different projects.
The Main Benefits at a Glance
The main benefits include:
- Simple text-based instructions.
- Faster visual creation.
- Custom images for specific topics.
- Easy follow-up revisions.
- Many available visual styles.
- Support for different image formats.
- Useful educational illustrations.
- Consistent article figures.
- New creative ideas.
- Less dependence on stock images.
Human Review Is Still Necessary
ChatGPT can assist with image creation, but it should not replace human judgement.
You must still check:
- Accuracy.
- Spelling.
- Faces and hands.
- Product details.
- Logos and trademarks.
- Privacy.
- Image quality.
- Suitability for the audience.
- Whether the image could mislead viewers.
Limitations of ChatGPT Image Generation
ChatGPT image generation can create useful and attractive visuals, but it also has limitations.
Understanding these limitations helps you set realistic expectations and review every image before publishing it.
The First Result May Not Match Your Idea
ChatGPT may interpret your prompt differently from what you intended.
For example, you may request:
- A modern home office.
- One person using a laptop.
- A blue and white colour scheme.
- A clean background.
The generated image may include extra furniture, different colours or an unexpected camera angle.
How to reduce this limitation
Write a clearer prompt that explains the subject, setting, important details, style, lighting and image shape.
You can also use follow-up prompts to correct the result.
Correction prompt:
Keep one person using a laptop at a clean desk. Remove unnecessary furniture, use a blue and white colour scheme and keep the background simple.
Images May Contain Incorrect Hands
AI-generated hands may show:
- Extra fingers.
- Missing fingers.
- Unnatural positions.
- Incorrect object placement.
- Unusual shapes.
This problem is more likely when several people or complicated hand positions appear in the same image.
How to reduce this limitation
Use simple poses and avoid showing too many hands.
You can also request:
Correction prompt:
Correct both hands so they look natural and anatomically accurate. Show five fingers on each visible hand and keep everything else unchanged.
Faces May Look Unnatural
Faces may appear:
- Uneven.
- Blurred.
- Emotionless.
- Asymmetrical.
- Different from one version to another.
Small faces in the background may contain more errors than the main subject.
How to reduce this limitation
Keep the number of people limited and ask for clear, natural facial features.
Correction prompt:
Improve the person’s facial features so the face looks natural, symmetrical and realistic. Keep the same age, expression, hairstyle and pose.
Text May Be Misspelled
AI image generators may create:
- Incorrect words.
- Random letters.
- Distorted numbers.
- Inconsistent fonts.
- Missing punctuation.
This can be a serious problem for infographics, signs, product labels and educational figures.
How to reduce this limitation
Keep text short and simple.
When exact wording is important, create the image without text and add the wording later in Canva, PowerPoint or another design tool.
Correction prompt:
Remove all visible text from the image. Keep the layout, colours, people and objects unchanged.
Small Details May Be Incorrect
The image may contain incorrect:
- Buttons.
- Pockets.
- Handles.
- Cables.
- Screens.
- Furniture.
- Tools.
- Product features.
These errors may not be obvious until you examine the image closely.
How to reduce this limitation
Zoom in and inspect every important area.
When accuracy matters, compare the generated image with a real reference photograph.
Products May Not Match the Real Item
ChatGPT may change a product’s:
- Shape.
- Colour.
- Size.
- Materials.
- Features.
- Packaging.
- Accessories.
- Logo placement.
This means an AI-generated product image may not accurately represent what customers will receive.
How to reduce this limitation
Use real product photographs when exact product appearance matters.
Use AI mainly for:
- Backgrounds.
- Lifestyle scenes.
- Advertising concepts.
- Decorative article images.
- Early design ideas.
Edits May Change Unrelated Parts
When you ask ChatGPT to remove or replace one object, it may also change:
- The person’s face.
- Clothing.
- Background.
- Lighting.
- Laptop.
- Furniture.
- Image composition.
How to reduce this limitation
Explain exactly what should change and what must remain unchanged.
Correction prompt:
Remove only the coffee cup from the right side of the desk. Keep the person, face, clothing, laptop, notebook, background, lighting and image format unchanged.
Always compare the edited version with the original.
The Same Prompt May Produce Different Results
Using the same prompt more than once may create different:
- People.
- Backgrounds.
- Colours.
- Camera angles.
- Object positions.
- Lighting.
This can make it difficult to create a perfectly consistent series of images.
How to reduce this limitation
Use the same detailed style instructions in every prompt.
For example:
Consistency instruction:
Use the same adult beginner, blue clothing, bright home office, wooden desk, soft natural lighting and clean professional style as the previous figures.
You should still expect some differences between images.
Maintaining the Same Character Can Be Difficult
A person created in one image may look different in another image.
Changes may appear in:
- Face shape.
- Hair.
- Age.
- Clothing.
- Body size.
- Skin tone.
- Eyeglasses.
How to reduce this limitation
Continue editing inside the same conversation and clearly describe the features that must remain consistent.
You can also upload the earlier image as a visual reference when appropriate.
Complex Prompts May Be Partly Ignored
A very long prompt containing many instructions may cause ChatGPT to overlook some details.
For example, the prompt may request:
- Four people.
- Several objects.
- Exact colours.
- Specific text.
- A detailed background.
- A particular visual style.
- Precise object positions.
The result may include only some of these requirements.
How to reduce this limitation
Begin with the main subject and layout.
Add smaller details through follow-up prompts.
A useful process is:
- Generate the main scene.
- Correct the composition.
- Adjust colours and lighting.
- Add or remove objects.
- Review the final details.
Image Sizes May Not Be Exact
You may request a specific size such as 1600 × 900 pixels, but the generated image may use different dimensions.
The image may still have the correct general shape without matching the exact pixel size.
How to reduce this limitation
Request the correct aspect ratio first.
Then resize the final image using an image editor before uploading it to WordPress.
Cropping May Remove Important Details
An image may look correct in ChatGPT but become cropped when used as:
- A WordPress featured image.
- A social media thumbnail.
- A website banner.
- A mobile preview.
Important faces, hands or objects near the edges may disappear.
How to reduce this limitation
Ask for safe space around important details.
Correction prompt:
Move the person and laptop toward the centre and leave generous empty space around all four edges for safe website cropping.
Generated Images May Look Too Artificial
Some images may appear:
- Overly smooth.
- Too perfect.
- Plastic.
- Unnaturally bright.
- Visually repetitive.
- Similar to common AI-generated designs.
How to reduce this limitation
Ask for natural textures, realistic lighting and small imperfections.
Example prompt:
Use realistic photography with natural skin texture, soft daylight, believable shadows and a slightly lived-in home office. Avoid an overly polished or artificial appearance.
Infographics Can Become Too Crowded
An infographic with too many sections, icons and words may be difficult to read.
The problem becomes worse when the image is displayed on a mobile screen.
How to reduce this limitation
Keep the design simple.
Use:
- Short labels.
- Large text.
- Clear spacing.
- Limited colours.
- Fewer panels.
- One main idea per section.
When necessary, divide one complicated infographic into two simpler figures.
AI Cannot Confirm Every Fact
ChatGPT may create a convincing diagram that contains inaccurate information.
This is especially important for:
- Medical topics.
- Legal topics.
- Financial topics.
- Scientific diagrams.
- Historical scenes.
- Technical instructions.
- Product comparisons.
How to reduce this limitation
Verify all important facts using reliable sources before publishing the image.
Do not assume that an attractive image is automatically accurate.
Copyright and Brand Concerns May Arise
A generated image may accidentally resemble:
- Existing characters.
- Company logos.
- Product packaging.
- Famous artwork.
- Brand designs.
How to reduce this limitation
Use original descriptions and avoid requesting exact copies of protected characters, brands or artistic works.
Review the final image for accidental similarities before publishing it.
AI Images Can Be Misleading
A realistic AI-generated image may appear to show a real:
- Event.
- Person.
- Location.
- Product.
- Customer.
- News story.
Viewers may misunderstand the image when it is not clearly identified.
How to reduce this limitation
Add a disclosure when necessary.
For example:
AI-generated illustration
or:
Concept image created using artificial intelligence
Image Generation May Require Several Attempts
A strong final image may require:
- Several prompts.
- Multiple corrections.
- Different layouts.
- Manual editing.
- Text added later.
- Resizing and compression.
This means AI image generation does not always save time on the first attempt.
How to reduce this limitation
Save successful prompt templates and correction instructions.
Reuse them for future articles and similar image projects.
Human Review Is Always Required
ChatGPT cannot decide whether every image is:
- Accurate.
- Ethical.
- Appropriate.
- Legally suitable.
- Clear for beginners.
- Consistent with your brand.
- Ready for publication.
You remain responsible for the final decision.
The Main Limitations at a Glance
The main limitations include:
- Results may not match the prompt exactly.
- Hands and faces may contain errors.
- Text may be misspelled.
- Product details may be inaccurate.
- Edits may change unrelated areas.
- Character consistency can be difficult.
- Complex instructions may be ignored.
- Exact image dimensions may differ.
- Cropping may remove important details.
- Images may look artificial.
- Infographics may become crowded.
- Facts may be incorrect.
- Copyright or branding concerns may arise.
- Realistic images may mislead viewers.
- Several attempts may be necessary.
Limitation-Review Checklist
Before accepting an AI-generated image, check:
- Does the image match the prompt?
- Are the faces and hands correct?
- Is all visible text accurate?
- Are the products and objects realistic?
- Did the edit change anything unexpectedly?
- Are the colours and lighting suitable?
- Is the character consistent?
- Is the aspect ratio correct?
- Are important details away from the edges?
- Is the image clear on mobile?
- Are all facts accurate?
- Are any logos or protected characters visible?
- Could the image mislead viewers?
- Is a disclosure needed?
- Has a person reviewed the final image?
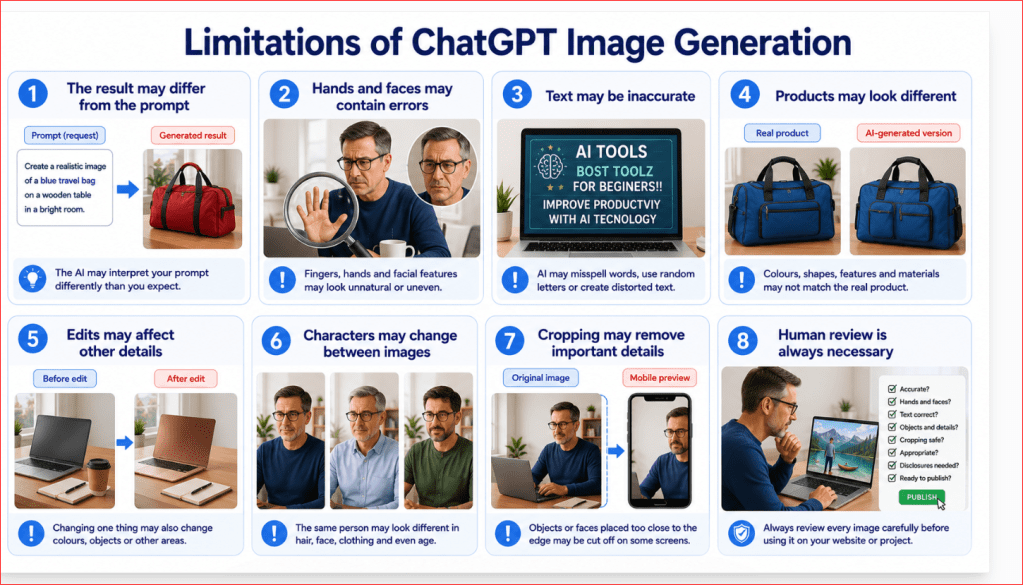
Figure 10. Limitations of ChatGPT Image Generation
Explanation
This figure summarizes eight important limitations of AI image generation. Results may not follow every instruction, hands and faces may contain errors, text and product details may be inaccurate, and editing one area may affect another.
Characters can also change between images, cropping may remove important details and every final image requires careful human review before publication.
Beginner Tip
Treat the first generated image as a draft. Review it carefully, correct the most important problems and use another design tool when exact text, sizing or product accuracy is required.
Common Myths About ChatGPT Image Generation
Beginners may have unrealistic expectations about AI image generation.
Understanding the difference between common myths and reality can help you use the tool more effectively.
Myth 1: ChatGPT Always Creates Exactly What You Request
Reality
ChatGPT may interpret parts of your prompt differently from what you intended. It may change colours, add extra objects, leave out details or arrange the scene in an unexpected way.
Clear prompts and specific follow-up instructions can improve the result, but the first image may still require corrections.
Myth 2: A Longer Prompt Always Produces a Better Image
Reality
A detailed prompt can be helpful, but a very long prompt may contain too many instructions. ChatGPT may overlook some details or create a crowded composition.
Begin with the most important information:
- Main subject.
- Setting.
- Important objects.
- Visual style.
- Lighting.
- Aspect ratio.
Add smaller details through follow-up prompts when necessary.
Myth 3: AI-Generated Images Are Always Accurate
Reality
An image may look realistic while containing incorrect information.
Possible errors include:
- Unnatural hands.
- Misspelled text.
- Incorrect product features.
- Impossible objects.
- Inaccurate diagrams.
- Misleading historical details.
Always review the image carefully and verify important facts before publishing it.
Myth 4: AI Images Do Not Need Human Editing
Reality
Many generated images require additional work.
You may need to:
- Remove unwanted objects.
- Correct spelling.
- Adjust the composition.
- Resize the image.
- Convert it to WebP.
- Add accurate text in Canva.
- Prepare metadata for WordPress.
ChatGPT can create the main visual, but human review and final preparation remain necessary.
Myth 5: ChatGPT Can Reproduce the Same Character Perfectly
Reality
A fictional person may look different across several generated images.
The AI may change:
- Facial features.
- Hair.
- Clothing.
- Age.
- Eyeglasses.
- Body shape.
- Skin tone.
Continuing inside the same conversation and using a reference image may improve consistency, but perfect consistency is not guaranteed.
Myth 6: AI-Generated Text Is Always Correct
Reality
Text inside generated images may be misspelled, incomplete or distorted.
This is especially common in:
- Infographics.
- Signs.
- Book covers.
- Product labels.
- Laptop screens.
- Posters.
When exact wording is important, create the visual without text and add the wording later using Canva, PowerPoint or another design tool.
Myth 7: AI Images Can Replace All Real Photography
Reality
AI-generated images are useful for illustrations, concepts, backgrounds and educational figures, but real photography remains important.
Use real photographs when accuracy is essential, including:
- Real products.
- Properties.
- Employees.
- Events.
- Restaurants.
- Travel destinations.
- Before-and-after evidence.
An AI-generated product image should not mislead customers about what they will receive.
Myth 8: Every AI-Generated Image Is Automatically Safe to Publish
Reality
Generated images may contain unwanted logos, protected characters, misleading details or inappropriate content.
Before publishing, check:
- Logos and trademarks.
- Personal information.
- Real people’s likenesses.
- Product accuracy.
- Possible misleading claims.
- Suitability for the audience.
- Whether an AI disclosure is needed.
You remain responsible for the image you publish.
Myth 9: AI Image Generation Requires No Creativity
Reality
AI can create the image, but you must still decide:
- What the image should communicate.
- Which subject is most important.
- What style suits the audience.
- Which colours match the website.
- Where the subject should appear.
- What should be removed.
- Which version is strongest.
Good results require planning, judgement and clear communication.
Myth 10: One Prompt Is Usually Enough
Reality
Strong images often require several stages:
- Write the first prompt.
- Generate the image.
- Review the result.
- Identify the main problems.
- Request specific corrections.
- Resize and prepare the final version.
- Check it again before publishing.
Treat image generation as a process rather than a one-step task.
Myth 11: More Details Always Make an Image More Professional
Reality
Too many objects, colours, labels and decorative elements can make an image confusing.
A professional image usually has:
- One clear main subject.
- A simple background.
- Consistent colours.
- Balanced lighting.
- Enough empty space.
- A clear purpose.
Removing unnecessary details can improve the final design.
Myth 12: AI Can Decide Whether an Image Is Appropriate
Reality
ChatGPT cannot fully understand every legal, ethical, cultural or business consequence of an image.
A person must decide whether the image is:
- Accurate.
- Respectful.
- Suitable for the audience.
- Consistent with the website.
- Safe to publish.
- Clear and not misleading.
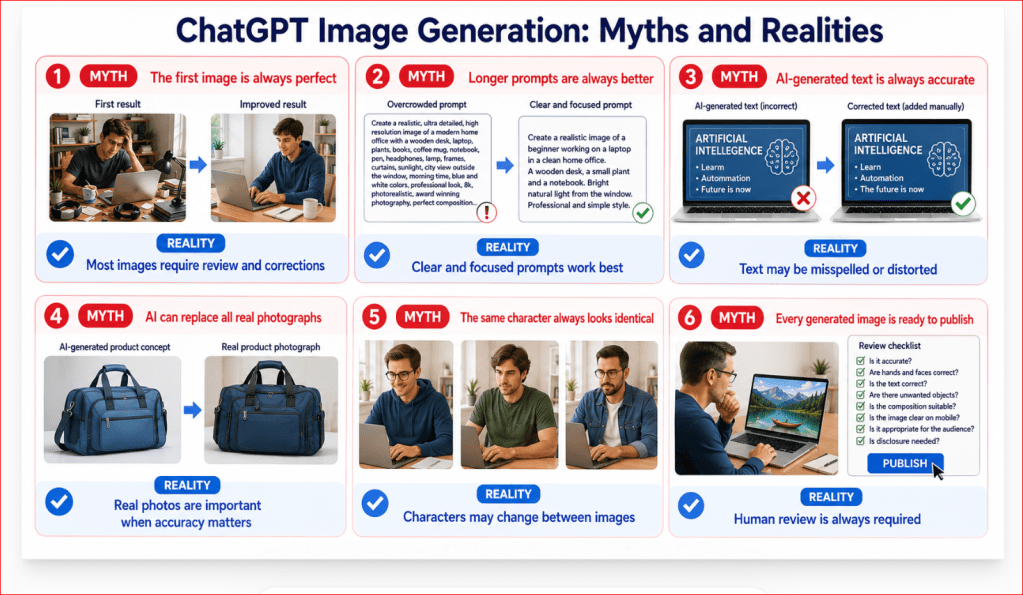
Figure 11. Common myths and realities about ChatGPT image generation
Explanation
This figure corrects six common misunderstandings about AI image generation. It explains that the first result may require changes, longer prompts are not always better, generated text can contain errors, real photography remains important, characters may change between images and every final image requires human review before publication.
Beginner Tip
Treat ChatGPT as a creative assistant. It can help generate and improve images, but you must provide clear instructions, review the results and make the final publishing decision.
Frequently Asked Questions About ChatGPT Image Generation
Can Beginners Create Images with ChatGPT?
Yes. You do not need drawing or graphic-design experience.
Describe the image you want using clear everyday language. You can then review the result and ask ChatGPT to make specific changes.
A beginner can start with a simple prompt such as:
Prompt:
Create a realistic image of a person learning artificial intelligence on a laptop in a bright home office. Use a clean professional style and a wide landscape format.
Do I Need a Special Image Prompt?
You do not need a complicated prompt, but your instructions should explain the most important details.
A useful image-prompt formula is:
Subject + Setting + Important Details + Style + Lighting + Image Format
For example:
Prompt:
Create a digital illustration of a friendly robot helping an adult use a laptop in a modern classroom. Use bright natural lighting, blue and white colours and a wide 16:9 format.
Can ChatGPT Edit an Image I Already Have?
Yes. You can upload an existing image and describe the changes you want.
For example:
Editing prompt:
Remove the coffee cup from the right side of the desk. Reconstruct the desk naturally and keep the person, laptop, notebook, background and lighting unchanged.
Review the edited image carefully because nearby details may also change.
Can I Change Only One Part of an Image?
Yes. You can identify the object and its location in your editing prompt. When the image editor includes a selection tool, you may also highlight the area that needs changing.
For example:
Editing prompt:
Change only the blue chair in the background to light grey. Keep every other part of the image unchanged.
Clear location words such as left, right, foreground, background, above and below can help ChatGPT understand the requested edit.
Can ChatGPT Remove the Background?
Yes. You can ask ChatGPT to replace or remove the background.
For example:
Prompt:
Remove the current background and replace it with a clean white studio background. Keep the product’s shape, colour, position and natural shadow unchanged.
You can also request a transparent background when the image will be used as a logo, icon or product graphic.
Can ChatGPT Add Text to an Image?
Yes, but generated text may sometimes be misspelled or distorted.
For short labels, ChatGPT may produce acceptable results. When exact wording is important, generate the visual without text and add the words later using Canva, PowerPoint or another design tool.
This gives you greater control over:
- Spelling.
- Font.
- Colour.
- Size.
- Alignment.
- Placement.
What Image Shape Should I Use for WordPress?
A wide landscape image usually works well for WordPress featured images and article figures.
A common format is:
16:9
Possible dimensions include:
- 1600 × 900 pixels.
- 1280 × 720 pixels.
- 1200 × 675 pixels.
Leave enough safe space around important subjects because WordPress themes may crop images differently on desktop and mobile screens.
What File Format Is Best for WordPress?
WebP is usually a practical choice for WordPress because it can provide good image quality with a smaller file size.
PNG is useful for:
- Infographics.
- Screenshots.
- Logos.
- Transparent backgrounds.
- Graphics containing sharp text or lines.
JPEG is suitable for realistic photographs and images containing many colours.
Keep a high-quality original and create a smaller WebP version for your website.
Can I Use ChatGPT Images for Social Media?
Yes. You can create images for:
- Facebook.
- Instagram.
- Pinterest.
- LinkedIn.
- Stories.
- Short-video covers.
Choose the correct shape before generating the image.
For example:
- Square 1:1 for many social posts.
- Portrait 4:5 for taller posts.
- Vertical 9:16 for Stories and short videos.
- Wide 16:9 for video thumbnails and website sharing.
Can I Use ChatGPT Images for My Online Store?
AI-generated images can help create:
- Lifestyle backgrounds.
- Category banners.
- Marketing concepts.
- Promotional graphics.
- Decorative website images.
However, use real product photographs when customers need to see the exact product they will receive.
An AI-generated version may change the colour, material, handles, pockets, dimensions or other product details.
Can I Create a Transparent Background?
Yes. Use a clear instruction such as:
Prompt:
Remove the entire background and make it transparent. Keep only the product with clean edges. Do not include text, logos or additional objects.
After saving the result, confirm that the selected file format supports transparency.
PNG is commonly used for transparent images.
Why Does the Same Prompt Create Different Images?
AI image generation can produce different results even when the prompt remains the same.
The following details may change:
- The person.
- Camera angle.
- Background.
- Lighting.
- Colours.
- Object positions.
- Facial features.
Use detailed consistency instructions and continue working inside the same conversation when you want related images.
How Can I Keep the Same Character in Several Images?
Describe the character consistently in each prompt.
For example:
Consistency instruction:
Use the same fictional older adult beginner with short grey hair, black eyeglasses, a blue shirt and a friendly expression. Keep the same bright home office, wooden desk and soft natural lighting.
You may also use an earlier image as a visual reference. Even with these instructions, small differences may still appear.
Why Does ChatGPT Ignore Part of My Prompt?
A prompt may contain too many details or conflicting instructions.
When this happens:
- Begin with the main subject and layout.
- Generate the first image.
- Correct the composition.
- Adjust the lighting and colours.
- Add or remove smaller objects.
- Review the final details.
Breaking the task into stages is often more effective than putting every instruction into one long prompt.
How Many Corrections Should I Request at Once?
Request one or two important changes at a time.
For example:
Clear follow-up prompt:
Make the room brighter and remove the extra chair. Keep everything else unchanged.
Asking for many changes at once can make it harder to determine which instructions ChatGPT followed correctly.
What Should I Do When an Edit Makes the Image Worse?
Return to the earlier version and try a more specific instruction.
For example:
Correction prompt:
Restore the original person, laptop, clothing and background. Keep only the removal of the coffee cup. Do not change anything else.
Saving the original version before editing gives you a clean image to return to.
Should I Disclose That an Image Was Created with AI?
A disclosure is helpful when viewers could mistake the image for a real photograph, real event or real person.
Possible wording includes:
- AI-generated illustration.
- Image created using artificial intelligence.
- Concept image created with ChatGPT.
- Illustrative image; not a real photograph.
Place the disclosure in the caption, description or nearby article text when necessary.
Can I Publish Every Image ChatGPT Creates?
No. Review every image before publishing it.
Check:
- Faces and hands.
- Spelling.
- Logos and trademarks.
- Product details.
- Private information.
- Cropping.
- Image quality.
- Accuracy.
- Suitability for the audience.
- Whether the image could mislead viewers.
You are responsible for deciding whether the final image is appropriate to publish.
Do I Still Need Canva or Another Design Tool?
ChatGPT can create the main visual, but another design tool can help with final adjustments.
You may use Canva to:
- Add exact text.
- Apply your website colours.
- Add your logo.
- Adjust spacing.
- Resize the image.
- Create several social media formats.
- Correct small design problems.
Using ChatGPT and Canva together can provide both creative speed and better control.
What Is the Best Advice for a Beginner?
Start with a simple image and one clear purpose.
For example:
- One featured image.
- One article figure.
- One social media post.
- One product background.
Write a clear prompt, review the result and improve it with specific follow-up instructions. Save the successful prompt so you can reuse its structure later.
Key Takeaways
ChatGPT image generation allows beginners to create and edit images by describing what they want in ordinary language.
The most important lessons from this guide are:
- Begin with a clear purpose for the image.
- Describe the subject, setting, important details, style, lighting and aspect ratio.
- Use a wide 16:9 format for many WordPress featured images and article figures.
- Review the first result carefully instead of expecting it to be perfect.
- Use specific follow-up prompts to improve one or two details at a time.
- Explain what should change and what must remain unchanged.
- Check faces, hands, text, objects, lighting, colours and cropping.
- Use real product photographs when exact product accuracy matters.
- Add important text later in Canva when spelling and placement must be exact.
- Save the original image, edited versions and successful prompts.
- Give every file a clear, descriptive filename.
- Prepare images for WordPress by resizing, compressing and adding metadata.
- Add alt text that clearly describes what the image shows.
- Disclose that an image is AI-generated when viewers could mistake it for a real photograph or event.
- Remove unwanted logos, trademarks and personal information.
- Review every final image before publishing it.
A simple image-generation workflow is:
- Decide what the image is for.
- Choose the correct aspect ratio.
- Write a clear prompt.
- Generate the first image.
- Review the result carefully.
- Request specific corrections.
- Select the best version.
- Resize and prepare the image.
- Add the filename and WordPress metadata.
- Preview the image before publishing.
ChatGPT can make image creation faster and more accessible, but human judgement remains essential.
The strongest results come from combining clear prompts, careful review and responsible publishing.
Final Tip
Start with a simple image prompt and improve the result gradually.
Use this three-step method:
- Describe clearly. Explain the subject, setting, style, lighting and image shape.
- Review carefully. Check the image for incorrect hands, faces, text, objects, colours and cropping.
- Correct specifically. Tell ChatGPT exactly what should change and what must remain unchanged.
For example:
Original prompt:
Create a wide featured image of a beginner creating AI images with ChatGPT in a bright home office.
Specific follow-up prompt:
Make the room brighter, remove the extra coffee cup and move the person slightly to the right. Leave more open space on the left and keep the person, laptop, clothing and background style unchanged.
Clear instructions and careful human review are more important than writing one extremely long prompt.
Continue Learning
Continue building your AI image-generation skills with these related beginner guides:
- AI Image Generation for Beginners: Complete Guide (2026)
Learn what AI image generation is, how it works and where it can be used. - Prompt Engineering for Beginners: Complete Guide (2026)
Learn how to write clearer instructions and improve the responses you receive from AI tools. - Best ChatGPT Prompts for Beginners (2026)
Explore practical prompt examples for writing, learning, business, productivity and creative projects. - ChatGPT Basics for Beginners: Complete Guide (2026)
Review the main ChatGPT features and learn how to communicate with the AI more effectively.
Your next step is to practise creating one simple image for a real purpose. Start with a WordPress featured image, an article figure or a social media graphic. Save the prompt, review the generated result and improve it using specific follow-up instructions.


Leave a Reply