

Estimated reading time: 185–230 minutes
Last updated: July 28, 2026
Before Learning
For the best results, read these beginner-friendly guides first:
• How to Create AI Videos with ChatGPT: Beginner Step-by-Step Guide (2026)
• Best AI Video Tools for Beginners: Complete Guide (2026)
• How to Create AI Videos from Text: Beginner Step-by-Step Guide (2026)
• How to Create AI Videos from Images: Beginner Step-by-Step Guide (2026)
These guides explain how to plan an AI video, select a suitable video generator, create clips from written prompts, and animate a starting image.
What You’ll Learn
By the end of this guide, you will know:
• What AI-video editing is
• Why generated clips usually require editing
• What equipment, software, and files you need
• How to organize an AI-video editing project
• How to choose a suitable beginner-friendly video editor
• How to import AI-generated clips
• How to set the correct aspect ratio and resolution
• How to trim weak beginnings and endings
• How to split, remove, and rearrange video sections
• How to combine several AI-generated clips
• How to correct framing and cropping
• How to resize landscape, vertical, square, and portrait videos
• How to adjust brightness, contrast, colour, and saturation
• How to reduce minor camera shake
• How to control video speed
• How to create smooth transitions between clips
• How to add titles and accurate on-screen text
• How to add narration, music, and sound effects
• How to create and correct captions
• How to remove or replace unwanted audio
• How to prepare different versions for WordPress, YouTube, and social media
• How to export the final video as an MP4 file
• How to balance video quality and file size
• How to create a suitable thumbnail
• How to review an edited video before publication
• How to use AI-generated video responsibly
• Which editing mistakes, limitations, and myths beginners should understand
• How to save the complete editing and publishing record
Introduction
AI-generated videos often look impressive, but the first generated clip is rarely ready to publish without editing.
A generated video may contain:
• A weak beginning
• A distorted final frame
• Unnecessary pauses
• Sudden camera movement
• Changing objects
• Incorrect colours
• Unwanted audio
• Missing captions
• Incorrect visible text
• An unsuitable aspect ratio
• A file size that is too large for a website
Video editing allows you to keep the strongest parts, remove weak sections, improve presentation, and prepare the video for its intended audience.
For example, an AI-generated six-second clip may contain:
• One unstable second at the beginning
• Four seconds of smooth movement
• One distorted second at the end
Instead of discarding the complete video, you can trim the first and final seconds and keep the strongest four-second section.
Editing can also help you:
• Combine several short clips into one longer video
• Rearrange scenes into a clearer order
• Correct framing and cropping
• Adjust brightness and colour
• Add titles and explanations
• Add narration
• Add music and sound effects
• Create accurate captions
• Remove unwanted audio
• Add transitions
• Export different versions for different platforms
AI-video editing does not mean that every generation problem can be repaired.
Editing may correct:
• Weak openings and endings
• Unnecessary sections
• Minor framing problems
• Slight brightness differences
• Missing titles
• Caption errors
• Audio problems
• Incorrect clip order
• File-format and export problems
Editing usually cannot fully correct:
• A changing face
• Distorted hands
• Missing product parts
• A severely unstable background
• Incorrect physical movement
• A completely different subject
• Major object duplication
• A scene that does not match the original idea
When the main subject or action is incorrect, regenerating the clip may be more practical than trying to repair it during editing.
A simple editing workflow normally includes:
1. Organizing the project files
2. Selecting the strongest generated clips
3. Creating a new editing project
4. Setting the correct aspect ratio
5. Importing the video files
6. Trimming weak sections
7. Arranging the clips
8. Correcting framing, lighting, and timing
9. Adding text, narration, captions, music, and sound
10. Reviewing the complete video
11. Exporting the final version
12. Testing it on the publishing platform
13. Saving the master file and project record
For a beginner, the most important editing skills are:
• Trimming
• Splitting
• Rearranging
• Resizing
• Adding text
• Adjusting audio
• Exporting
You do not need to learn every advanced editing feature before completing a useful video.
Begin with one short AI-generated clip. Remove the weak parts, add a simple title or caption, export it as an MP4 file, and watch the result outside the editor.
After becoming comfortable with this basic process, you can work with:
• Several connected clips
• Narration
• Background music
• Sound effects
• More detailed captions
• Platform-specific versions
• Longer educational videos
Editors use different buttons, menus, and feature names, but the core process of importing, trimming, arranging, reviewing, and exporting is broadly similar.
Current Information Note
Video-editing applications change frequently. Available features, export resolutions, caption tools, AI-assisted functions, cloud storage, watermarks, pricing, and commercial-use conditions may differ by application, plan, device, and region.
Always check the current official documentation before paying for a plan or beginning an important business or client project.
The purpose of this guide is to teach the editing process rather than depend on one specific brand or interface.

Figure 1. AI-video editing turns generated clips into organized, polished, and publishable videos.
Figure 1 shows the basic AI-video editing process. Generated clips are imported into a video editor, weak sections are trimmed, the strongest clips are arranged, text and audio are added, and the completed video is reviewed and exported for publication.
What You Need Before Editing an AI-Generated Video
You do not need professional editing equipment to begin. A computer or mobile device, a suitable video editor, organized source files, and a clear editing plan are enough for a basic project.
Preparing these items before opening the editor can prevent missing files, incorrect formats, accidental overwriting, and unnecessary rework.
A Clear Purpose for the Video
Begin by deciding what the finished video should accomplish.
The purpose may be to:
• Explain an AI concept
• Demonstrate a text-to-video result
• Compare two generated versions
• Create a website illustration
• Produce a YouTube video
• Prepare a social-media post
• Present a fictional story
• Show a product concept
• Add visual support to a presentation
• Create promotional material
Write the purpose in one sentence.
For example:
Create a short educational video showing how a written prompt becomes an AI-generated video clip.
A clear purpose helps you decide:
• Which clips to keep
• Which sections to remove
• How long the video should be
• Whether narration is needed
• Which text should appear
• What aspect ratio to use
• Where the finished video will be published
Avoid adding material that does not support the main purpose.
The Strongest Generated Clips
Review all available generations before editing.
Do not automatically choose the newest version.
One version may have:
• Better subject consistency
• Smoother movement
• More accurate lighting
• Cleaner background details
• A stronger opening
• A better ending
• More suitable framing
Create a simple comparison record.
| Clip | Strongest details | Main problem | Decision |
| Version 01 | Good lighting and background | Distorted final second | Keep for trimming |
| Version 02 | Stable subject | Camera moves too quickly | Keep for comparison |
| Version 03 | Smooth camera and stable subject | Slightly dark | Select for editing |
Move the strongest clips into a folder named:
Selected Clips
Keep rejected versions in a separate folder until the final video has been completed.
A rejected clip may still contain a useful section.
The Original Unedited Files
Always preserve the original generated clips.
Do not trim, resize, rename, compress, or replace the only copy.
Store the originals in:
Generated Clips
Create working copies for the editor.
For example:
Original file:
020-ai-video-generated-v03.mp4
Working copy:
020-ai-video-editing-copy-v01.mp4
Keeping the originals allows you to:
• Restart the edit
• Recover a removed section
• Compare the original with the edited version
• Export another format
• Verify what the generator produced
• Preserve a complete creation record
A Suitable Editing Device
Video editing can be performed on:
• A desktop computer
• A laptop
• A tablet
• A smartphone
A computer usually provides more screen space and easier file organization.
A mobile device may be suitable for:
• Trimming short clips
• Adding simple titles
• Creating captions
• Adding music
• Preparing social-media videos
• Exporting quick vertical versions
The device should have enough:
• Storage space
• Memory
• Processing capability
• Battery power
• Screen size
• Internet access when the editor requires it
Editing high-resolution or long videos may require more processing power and storage than editing short standard-resolution clips.
A Beginner-Friendly Video Editor
Choose an editor that supports the features required by the project.
For a basic AI-video project, look for:
• Video importing
• Timeline editing
• Trimming
• Splitting
• Rearranging clips
• Cropping
• Resizing
• Text and title tools
• Audio controls
• Caption support
• Transitions
• MP4 exporting
• Resolution selection
• Aspect-ratio settings
Optional features may include:
• Automatic captions
• Background removal
• Noise reduction
• Colour correction
• Video stabilization
• Speed controls
• AI-assisted editing
• Cloud synchronization
• Templates
Do not select an editor only because it contains the largest number of features.
For a beginner, a clear interface and reliable export process may be more useful than advanced professional controls.
Check the Editor’s Current Conditions
Before beginning an important project, check:
• Free-plan limitations
• Watermarks
• Maximum export resolution
• Maximum project length
• Storage limits
• Cloud-upload requirements
• Caption limitations
• Supported file formats
• Commercial-use conditions
• Template and music licences
• Account requirements
• Export restrictions
A free editor may allow basic editing but add a watermark or restrict high-resolution export.
Confirm these conditions before completing a large project.
Enough Storage Space
Video files can use significant storage.
A project may contain:
• Original generated clips
• Working copies
• Audio files
• Music
• Narration
• Caption files
• Images
• Thumbnails
• Project files
• Preview exports
• Final exports
• Platform-specific versions
Check the available space before importing the files.
Keep additional free space for:
• Temporary files
• Preview rendering
• Automatic backups
• Exported copies
• Software updates
Do not begin a large export when the device is nearly full.
An Organized Project Folder
Create the main folder before opening the editor.
For Article 020, use:
020 How to Edit AI-Generated Videos
Inside it, create:
• Article Document
• Featured Image
• Figures
• Original Generated Clips
• Selected Clips
• Editing Project
• Working Exports
• Final Exports
• Narration
• Music
• Sound Effects
• Captions
• Thumbnails
• Sources and Licences
• Screenshots
• Old Versions
This structure keeps source files separate from final publishing files.
Clear Filenames
Use filenames that identify:
• Article number
• Subject
• Scene
• Version
• Purpose
• Aspect ratio
• Export type
Examples include:
• 020-red-bicycle-original-v01.mp4
• 020-red-bicycle-selected-v03.mp4
• 020-red-bicycle-edit-v01.mp4
• 020-red-bicycle-wordpress-16×9.mp4
• 020-red-bicycle-youtube-16×9.mp4
• 020-red-bicycle-reel-9×16.mp4
• 020-red-bicycle-thumbnail.webp
Avoid names such as:
• Video.mp4
• New video.mp4
• Final.mp4
• Final new.mp4
• Final corrected 2.mp4
Clear names make backups and future updates easier.
A Backup Copy
Before editing, create at least one backup of the important source files.
The backup may be stored on:
• An external drive
• A second computer
• Secure cloud storage
• Another approved storage location
Back up:
• Original generated clips
• Selected clips
• Prompts
• Narration
• Captions
• Licences
• Project records
Do not rely only on the editing application’s project history.
A project may become unavailable because of:
• Account problems
• Device failure
• Accidental deletion
• Software updates
• Storage limits
• Subscription changes
• Corrupted project files
The Correct Aspect Ratio
Choose the aspect ratio before creating the editing project.
Common formats include:
• 16:9 landscape: WordPress, YouTube, websites, presentations, and desktop viewing
• 9:16 vertical: YouTube Shorts, Instagram Reels, TikTok, and mobile-first content
• 1:1 square: Square social-media posts
• 4:5 portrait: Instagram and Facebook feed posts
For the main AI Mastery article video, use:
16:9 landscape
Changing the aspect ratio later may crop:
• Faces
• Hands
• Bicycle wheels
• Products
• Background movement
• Captions
• Titles
When several formats are needed, create separate project copies.
The Intended Resolution
Choose a practical resolution according to the source quality and publishing destination.
Common 16:9 resolutions include:
• 1280 × 720: HD
• 1920 × 1080: Full HD
• 3840 × 2160: 4K
Do not automatically choose 4K.
A larger resolution may:
• Increase file size
• Slow editing
• Increase export time
• Require more storage
• Load more slowly online
It does not correct an inaccurate or distorted generation.
For a WordPress demonstration, HD or Full HD may be sufficient, depending on the original clip quality and website requirements.
A Planned Final Duration
Estimate the final video length before editing.
Possible targets include:
• Five seconds
• Fifteen seconds
• Thirty seconds
• One minute
• Several minutes
A short article demonstration may require only one clean clip.
A longer tutorial may contain:
• Opening title
Introduction
• Several demonstrations
• Narration
• Captions
• Closing message
The target duration helps you decide how much material to keep.
Do not keep weak sections simply to reach a planned length.
A Simple Scene Order
When the video contains several clips, decide their order before placing them on the timeline.
For example:
1. Opening title
2. Original AI-generated clip
3. Weak section highlighted
4. Trimmed version
5. Corrected framing
6. Added captions
7. Final edited result
8. Closing message
A planned order makes the video easier to understand.
Without a scene plan, the editor may become filled with repeated, unrelated, or incorrectly ordered clips.
A Script or Narration Plan
Prepare narration before finalizing the timing.
A simple demonstration narration might say:
This AI-generated clip contains a weak opening and a distorted ending. The editor removes those sections, keeps the strongest movement, adds an accurate caption, and exports the result as a 16:9 MP4 video.
Read the script aloud and measure how long it takes.
This helps determine:
• Clip duration
• Title timing
• Caption timing
• Transition timing
• Music length
Keep narration relevant to what viewers can see.
Text and Caption Content
Prepare all titles, labels, and captions in a separate document.
Possible text may include:
• Original AI-Generated Clip
• Weak Beginning
• Trim Point
• Selected Section
• Corrected Version
• Final Export
• AI-Generated Visuals
Review the text for:
• Spelling
• Grammar
• Punctuation
• Names
• Dates
• Numbers
• Links
• Factual accuracy
Do not depend on the generated video to contain readable text.
Add accurate wording in the editor.
Authorized Music and Sound Files
When the video will include music or sound effects, prepare files that you are permitted to use.
Record:
• Track title
• Creator
• Source
• Licence
• Download date
• Attribution requirement
• Commercial-use conditions
Do not assume that music is safe to use because it is available online or inside an editing application.
Check whether the licence covers the intended publishing platform and purpose.
Real-Person and Voice Permissions
Before editing a video involving a real person, confirm permission to use:
• Their appearance
• Photograph
• Name
• Voice
• Personal story
• Recognizable surroundings
Do not make a person appear to say or do something they did not authorize.
When no real identity is necessary, use a fictional adult character or generic narration.
A Review Checklist
Prepare a checklist before editing.
Check:
• Correct source clip
• Main subject
• Opening
• Ending
• Movement
• Camera
• Background
• Lighting
• Aspect ratio
• Resolution
• Cropping
• Titles
• Captions
• Narration
• Music
• Sound effects
• Privacy
• Brands
• Disclosure
• Export format
• Filename
• Publishing destination
A checklist helps prevent the final export from containing avoidable errors.
A Project Record
Create a document containing:
• Project purpose
• Source filenames
• Selected clips
• Editing application
• Project aspect ratio
• Resolution
• Planned duration
• Scene order
• Narration
• Caption text
• Music and sound sources
• Editing changes
• Export settings
• Final filenames
• Publishing locations
Update the record as the project develops.
Beginner Preparation Example
Suppose you have a six-second AI-generated video of a red bicycle beside a country road.
Your preparation might be:
Purpose: Demonstrate basic AI-video trimming
Selected clip: Version 03
Main problem: Weak first half-second and distorted final second
Strong section: Approximately 00:00.5 to 00:05.0
Aspect ratio: 16:9 landscape
Resolution: 1920 × 1080
Final target length: Approximately four to five seconds
Title: Editing an AI-Generated Video
Caption: The weak beginning and ending were removed.
Audio: No narration for the first test
Final format: MP4
Master filename: 020-red-bicycle-edited-master.mp4
WordPress filename: 020-edit-ai-generated-video-demo-16×9.mp4
This plan is enough to begin the first editing project.

Figure 2. Preparing the clips, editor, project settings, files, permissions, and review plan makes AI-video editing more organized.
Figure 2 summarizes the items beginners should prepare before editing an AI-generated video. Selecting the strongest source clip, preserving the original file, choosing the correct aspect ratio and resolution, organizing the project folder, preparing text and audio, checking permissions, and creating a review checklist can prevent unnecessary problems later.
How AI-Video Editing Works
Video editing is the process of selecting, arranging, shortening, improving, and combining video and audio files inside an editing application.
Most video editors use a timeline.
The timeline shows when each clip, title, sound, caption, or image appears during the finished video.
The editor does not normally change the original source file. Instead, it records editing instructions inside a project.
For example, the project may record:
• Begin the clip at 00:00.5
• End the clip at 00:05.0
• Add a title during the first two seconds
• Reduce the music volume
• Add a caption at 00:02.0
• Export the result as a 16:9 MP4 video
The final video is created when you export the project.
The Main Parts of a Video Editor
The exact layout depends on the editing application, but most editors contain similar areas.
Media Library
The media library contains the files imported into the editing project.
These may include:
• AI-generated video clips
• Photographs
• Graphics
• Narration
• Music
• Sound effects
• Caption files
• Titles
• Logos when authorized
• Thumbnails
The media library may also be called:
• Media Bin
• Project Media
• Assets
• Uploads
• Library
Importing a file does not normally place it automatically in the finished video.
You must add the selected file to the timeline.
Preview Window
The preview window shows the current video frame.
Use it to review:
• Cropping
• Subject position
• Titles
• Captions
• Transitions
• Brightness
• Colour
• Movement
• Audio synchronization
The preview quality may be lower than the final exported quality to help the editor run more smoothly.
Do not assume that a slightly blurry preview means the exported file will also be blurry.
However, always review the final exported video outside the editor.
Timeline
The timeline is the main editing area.
It displays the project from beginning to end.
Video clips may appear as horizontal blocks.
The length of each block represents its duration.
For example:
• A six-second clip appears longer than a three-second clip.
• A two-second title occupies only the first part of the timeline.
• A music track may extend across the complete project.
The timeline allows you to:
• Trim clips
• Split clips
• Delete sections
• Rearrange scenes
• Add titles
• Add captions
• Add audio
• Add transitions
• Adjust timing
• Review the complete sequence
Tracks or Layers
The timeline may contain several horizontal tracks or layers.
A simple project might contain:
• Video Track 1: Main AI-generated clips
• Video Track 2: Titles or overlay images
• Caption Track: Captions
• Audio Track 1: Narration
• Audio Track 2: Music
• Audio Track 3: Sound effects
Items placed on higher video tracks may appear above items on lower tracks.
For example, a title placed above the main video track may appear over the video.
Audio tracks normally play together unless one track is muted.
Too many tracks can make a beginner project difficult to manage.
Begin with only the tracks required for the project.
Playhead
The playhead is a vertical line that shows the current position on the timeline.
When you move the playhead:
• The preview window displays the corresponding frame.
• The time display changes.
• You can choose where to split a clip.
• You can place titles or captions at a precise time.
• You can inspect a problem frame.
For example, move the playhead to:
00:00.5
to inspect the first half-second of the video.
Move it to:
00:05.0
to inspect the beginning of the final second.
Timecode
Timecode identifies a position in the video.
It may appear as:
Hours : Minutes : Seconds : Frames
For example:
00:00:04:12
This means:
• Zero hours
• Zero minutes
• Four seconds
• Twelve frames
Some beginner editors display only minutes and seconds.
You do not need to understand advanced frame calculations for basic editing.
Use the visible time display to record where a problem begins or ends.
Playback Controls
Common playback controls include:
• Play
• Pause
• Stop
• Move forward
• Move backward
• Go to the beginning
• Go to the end
• Previous frame
• Next frame
Use normal playback to judge the complete movement.
Use frame-by-frame controls when checking:
• Distorted hands
• Changing faces
• Object duplication
• Weak opening frames
• Weak ending frames
• Caption timing
• Transition timing
Zooming the Timeline
Timeline zoom changes how much detail is visible.
Zoom in when you need to:
• Make a precise trim
• Inspect a short distortion
• Align a caption
• Remove a brief unwanted sound
• Adjust a transition
Zoom out when you need to:
• View the complete project
• Rearrange several scenes
• Review overall timing
• Check the beginning and ending
Timeline zoom does not enlarge the video itself.
It only changes how the timeline is displayed.
Selecting a Clip
Click or tap a clip before editing it.
The selected clip may show:
• An outline
• Handles
• Editing controls
• A properties panel
• Audio controls
• Speed controls
• Crop controls
Confirm that the correct clip is selected before deleting, trimming, moving, or applying an effect.
Beginners sometimes edit the wrong clip because another item remained selected.
Trimming
Trimming shortens the beginning or ending of a clip. [1]
For example, an AI-generated clip may contain:
• Weak first half-second
• Four and a half strong seconds
• Distorted final second
You can drag the beginning edge inward to remove the weak opening.
You can drag the ending edge inward to remove the distorted ending.
Trimming normally hides the removed section rather than permanently deleting it from the original file.
You may be able to extend the clip again later.
Splitting
Splitting divides one clip into two separate timeline pieces. [2]
For example, suppose a six-second clip contains:
• A strong opening
• A distorted middle section
• A strong ending
You can:
1. Move the playhead to the beginning of the weak section.
2. Split the clip.
3. Move the playhead to the end of the weak section.
4. Split the clip again.
5. Delete the weak middle piece.
6. Move the remaining pieces together.
Splitting may also be called:
• Cut
• Razor
• Blade
• Divide
Deleting
Deleting removes the selected item from the timeline.
Before deleting, confirm whether you selected:
• A video clip
• An audio track
• A title
• A caption
• A transition
• An image
Deleting an item from the timeline does not normally delete the original file stored on the computer.
However, some editors may offer options to remove files from the project or device. Read the message carefully before confirming.
Rearranging Clips
Drag clips left or right to change their order.
For example:
1. Original generated clip
2. Weak section highlighted
3. Trimmed version
4. Final edited version
When moving clips, check whether the editor automatically:
• Closes empty spaces
• Moves connected audio
• Moves captions
• Changes transitions
• Creates gaps
Watch the complete sequence after rearranging clips.
Gaps on the Timeline
A gap is an empty section where no video appears.
During playback, a gap may show:
• A black screen
• A transparent background
• A project background colour
• The previous frame, depending on the editor
Unintended gaps may appear after deleting or moving clips.
Zoom into the timeline and move the clips together.
A deliberate gap may be used for:
• A fade
• A pause
• A title card
• A black screen
Do not leave accidental empty spaces in the final project.
Snapping
Snapping helps timeline items align with:
• Clip edges
• The playhead
• Titles
• Audio
• Captions
• Markers
When snapping is active, a clip may automatically connect to the previous clip without leaving a small gap.
This is useful for beginners.
However, snapping may make very small adjustments difficult. Some editors allow it to be temporarily disabled.
Ripple Editing
Ripple editing automatically closes or creates space when a clip is trimmed, deleted, or moved.
For example, when a clip is shortened, later clips may move left automatically.
This prevents gaps but may change the timing of:
• Captions
• Narration
• Music
• Titles
• Other scenes
Review connected items after using ripple editing.
Linked Video and Audio
A video clip may include both picture and sound.
The video and audio may be linked so they move together.
When linked:
• Trimming the video also trims its audio.
• Moving the clip moves both parts.
• Splitting affects both picture and sound.
Some editors allow the audio to be separated.
This may be useful when you want to:
• Remove unwanted generated audio
• Keep the audio while changing the picture
• Replace the sound
• Adjust timing independently
Do not separate audio unless the project requires it.
Muting and Soloing Tracks
Mute turns off a track temporarily.
Use it to compare:
• Video with and without music
• Narration alone
• Original audio versus replacement audio
Solo plays one selected track while temporarily silencing the others.
Not every beginner editor includes a solo control.
Muting does not normally delete the audio.
Undo and Redo
Undo reverses the most recent editing action.
Redo restores an action that was undone.
Use Undo when you accidentally:
• Delete a clip
• Move an item
• Trim too much
• Remove audio
• Change a title
• Apply an unwanted effect
Save the project regularly even when Undo is available.
The undo history may be lost after closing the editor.
Saving the Editing Project
The editing project is not the same as the exported video.
The project file may contain:
• Timeline arrangement
• Trim points
• Titles
• Captions
• Effects
• Audio levels
• Transitions
• Export settings
Save the project with a clear name:
020-ai-video-editing-project-v01
Create new versions after major changes:
• 020-ai-video-editing-project-v01
• 020-ai-video-editing-project-v02
• 020-ai-video-editing-project-v03
This makes it possible to return to an earlier stage.
Source Files Must Remain Available
Some desktop editors link to the original media files instead of copying them into the project.
If you move, rename, or delete a source file after importing it, the project may show:
• Missing media
• Offline file
• File not found
• Broken link
Create the project folder first and keep the source files in the same location while editing.
When the editor offers a project-packaging or archive feature, it may collect the project and related media into one folder.
Preview Rendering
Some editors create temporary preview files to make playback smoother.
Rendering may be needed when the project contains:
• High-resolution video
• Several tracks
• Colour adjustments
• Stabilization
• Transitions
• Titles
• Effects
A slow or uneven preview does not always mean the final export will be uneven.
Allow the editor to complete preview processing when necessary.
Exporting
Exporting creates a new finished video file from the timeline.
The exported file includes the selected:
• Video clips
• Trims
• Scene order
• Titles
• Captions
• Audio
• Transitions
• Colour adjustments
• Aspect ratio
• Resolution
Export may also be called:
• Render
• Produce
• Share
• Save Video
• Download
Before exporting, review the complete timeline from beginning to end.
A Simple Editing Example
Suppose the selected AI-generated clip is six seconds long.
The review shows:
• 00:00.0 to 00:00.5: Weak opening
• 00:00.5 to 00:05.0: Strong usable section
• 00:05.0 to 00:06.0: Distorted ending
The editing steps are:
1. Import the six-second clip.
2. Add it to the timeline.
3. Move the playhead to 00:00.5.
4. Trim away the opening.
5. Move the playhead to 00:05.0.
6. Trim away the ending.
7. Add a short title above the video.
8. Add an accurate caption.
9. Review the edited four-and-a-half-second clip.
10. Export it as an MP4 file.
The original six-second file remains unchanged in the source folder.
The project contains the editing instructions, and the exported MP4 contains the completed result.
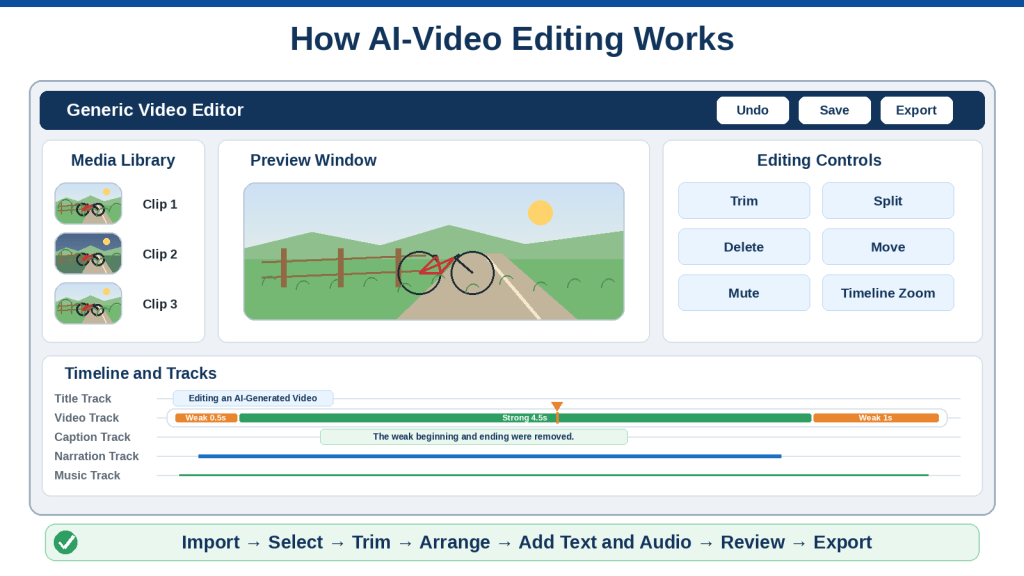
Figure 3. A video editor uses a timeline, tracks, a playhead, preview controls, and export settings to transform source clips into a finished video.
Figure 3 introduces the main parts of a beginner video editor. The media library stores imported files, the preview window displays the selected frame, the timeline controls clip order and duration, and separate tracks hold video, titles, captions, narration, music, and sound effects.
How to Choose a Beginner-Friendly Video Editor
The best video editor is not necessarily the one with the largest number of features.
For a beginner, the most suitable editor is one that allows you to complete the required tasks without making the workflow unnecessarily complicated.
For Article 020, the editor should allow you to:
• Import AI-generated video clips
• Add clips to a timeline
• Trim weak beginnings and endings
• Split and delete unwanted sections
• Rearrange clips
• Change the aspect ratio
• Crop and reposition video
• Add titles and captions
• Adjust audio
• Add simple transitions
• Export the finished video as an MP4 file
Advanced professional features are useful only when the project requires them.
Decide Where You Want to Edit
Video editors are commonly available as:
• Desktop applications
• Browser-based editors
• Mobile applications
• Tablet applications
Each type has advantages and limitations.
Desktop Video Editors
Desktop editors are installed on a computer.
They are often suitable for:
• Longer videos
• Several video and audio tracks
• Detailed trimming
• Precise caption timing
• Higher-resolution projects
• Local file organization
• Projects containing many clips
• More advanced colour and audio controls
Possible advantages include:
• Larger workspace
• Better timeline control
• Easier file management
• More keyboard shortcuts
• Stronger export options
• Less dependence on internet speed after installation
Possible limitations include:
• Installation requirements
• Larger storage needs
• Higher computer requirements
• More complicated interfaces
• Software updates
• Possible paid licences
A desktop editor may be the best choice for an educational article video containing several scenes, narration, captions, and music.
Browser-Based Video Editors
Browser-based editors work inside a web browser.
They may be suitable for:
• Short projects
• Simple trimming
• Adding titles
• Creating captions
• Social-media videos
• Working on more than one device
• Cloud-based collaboration
Possible advantages include:
• No large installation
• Easy project access
• Automatic cloud saving
• Templates
• Simple interfaces
• Direct online sharing
Possible limitations include:
• Internet dependence
• Upload delays
• Download delays
• Cloud-storage limits
• Project privacy concerns
• Browser performance problems
• Export restrictions
• Free-plan watermarks
Large high-resolution clips may take time to upload, especially when internet speed is limited.
Do not begin a large browser-based project until the source files have finished uploading completely.
Mobile Video Editors
Mobile editors are designed for smartphones and tablets.
They may be suitable for:
• Short vertical videos
• Social-media clips
• Simple trimming
• Adding music
• Adding automatic captions
• Quick publishing
• Recording and editing on the same device
Possible advantages include:
• Convenient
• Easy touch controls
• Fast social-media workflow
• Built-in camera access
• Simple templates
• Quick vertical-format editing
Possible limitations include:
• Smaller screen
• Less precise trimming
• Difficult file organization
• Limited timeline space
• Storage restrictions
• Battery use
• Fewer export controls
• Accidental touch changes
A mobile editor can be practical for a simple five-second or fifteen-second clip.
A computer may be easier for a longer educational project containing several tracks and captions.
Compare the Essential Editing Features
Before selecting an editor, confirm that it supports the features required by the project.
Video Importing
The editor should support the format of your AI-generated clips.
A common video format is:
MP4
Other formats may include:
• MOV
• WebM
• AVI
• MKV
Not every editor supports every format.
When the editor cannot import a file, the problem may be caused by:
• Unsupported file format
• Unsupported video codec
• Corrupted download
• Incomplete file transfer
• Very high resolution
• Device limitations
Do not convert the source file unless necessary.
Keep the original unchanged and create a converted copy.
Timeline Editing
A timeline is strongly recommended.
It should allow you to:
• Add clips
• Move clips
• Trim edges
• Split clips
• Delete sections
• Add audio
• Add titles
• View duration
• Inspect transitions
Some template-based editors provide only limited timeline control.
They may be suitable for quick social-media videos but less suitable for precise AI-video corrections.
Precise Trimming
Confirm that the editor allows you to remove small sections from the beginning and ending.
For AI-generated clips, precise trimming is important because a problem may last only:
• Half a second
• Several frames
• The final second
• A short section in the middle
The editor should allow you to zoom into the timeline for more accurate work.
Splitting and Deleting
The editor should allow one clip to be divided into several pieces.
This is necessary when:
• The middle contains distortion
• One short section should be removed
• A title must appear between two parts
• The speed should change during one section
• Different effects are required
Confirm that deleting a split section does not delete the original source file.
Multiple Video and Audio Tracks
A basic project may require:
• One main video track
• One title track
• One caption track
• One narration track
• One music track
An editor with only one combined track may make the project harder to control.
Multiple tracks allow the different elements to be adjusted separately.
Aspect-Ratio Controls
The editor should allow you to choose common video shapes such as:
• 16:9
• 9:16
• 1:1
• 4:5
Confirm whether the aspect ratio can be selected:
• When creating the project
• During editing
• During export
The project aspect ratio should normally be selected before detailed editing begins.
Cropping and Repositioning
The editor should allow you to:
• Move the video inside the frame
• Increase or decrease its size
• Crop unwanted edges
• Keep the subject centred
• Protect important details
This is especially important when adapting one source video for several formats.
However, cropping cannot restore content that was never generated.
Resolution Controls
Check whether the editor can export the resolution you need.
Common options include:
• 720p
• 1080p
• 4K
A free version may limit export resolution.
Confirm the limit before completing the project.
Do not assume that exporting at a larger resolution will improve a low-quality source clip.
Text and Title Tools
The editor should allow you to add accurate text manually.
Useful controls include:
• Font
• Size
• Position
• Alignment
• Background box
• Outline
• Shadow
• Duration
• Fade in
• Fade out
The editor does not need advanced title animation for a basic educational video.
Readable text is more important than decorative effects.
Caption Support
Caption tools may allow you to:
• Type captions manually
• Generate captions automatically
• Import a caption file
• Correct timing
• Change caption appearance
• Export captions separately
• Embed captions into the video
Automatic captions can save time, but they must be reviewed.
Confirm whether the free plan limits:
• Caption duration
• Number of caption minutes
• Languages
• Export options
• Caption styles
Audio Controls
The editor should allow you to:
• Adjust volume
• Mute original audio
• Add narration
• Add music
• Add sound effects
• Fade audio in and out
• Reduce music during narration
• Split audio
• Remove unwanted sections
Optional controls may include:
• Noise reduction
• Voice enhancement
• Equalization
• Automatic volume balancing
These features can be useful, but basic volume control is enough for the first project.
Transition Tools
The editor should include simple transitions such as:
• Direct cut
• Dissolve
• Fade to black
• Fade from black
A beginner does not need a large collection of animated transitions.
Too many transition choices can encourage unnecessary decoration.
Speed Controls
Speed controls may allow you to:
• Slow down a clip
• Speed up a clip
• Create a freeze frame
• Reverse a clip
• Change only one section
These controls are useful when the generated motion is slightly too fast or too slow.
However, large speed changes may create unnatural movement or weak audio.
Colour and Lighting Controls
Useful basic controls include:
• Brightness
• Contrast
• Exposure
• Saturation
• Temperature
• Highlights
• Shadows
These controls can improve small differences between clips.
They cannot repair major generation errors.
Video Stabilization
Stabilization may reduce minor camera shake. [4]
However, confirm whether the feature:
• Requires a paid plan
• Crops the frame
• Takes additional processing time
• Works on the selected device
• Creates edge distortion
Do not choose an editor only because it offers automatic stabilization.
A stable source clip is still preferable.
Export Controls
The editor should allow you to choose:
• File format
• Resolution
• Frame rate when necessary
• Quality
• Filename
• Save location
A suitable beginner export is commonly:
MP4 using H.264 video
The exact available options depend on the application.
The export process should be clear enough that you can find the completed file afterward.
Check for Watermarks
Some free editors add a visible watermark to exported videos.
The watermark may appear:
• In a corner
• At the beginning
• At the end
• Across the complete video
• On premium templates or effects
Check the current export conditions before completing the project.
Do not spend several hours editing before discovering that the free export contains an unwanted watermark.
A watermark is different from an AI disclosure.
A watermark usually identifies the editing application or template provider.
An AI disclosure explains that the content includes synthetic or AI-generated material.
Check Export Limits
A free plan may restrict:
• Maximum resolution
• Maximum video duration
• Number of monthly exports
• Frame rate
• File size
• Cloud storage
• Caption minutes
• Premium effects
• Music tracks
• Background removal
• Noise reduction
Record the limits that affect the project.
Choose an editor whose available free or paid features match the actual requirements.
Check Supported Devices and Operating Systems
Confirm that the editor works with your:
• Windows computer
• Mac computer
• Android device
• iPhone
• Tablet
• Browser version
• Operating-system version
Also check:
• Minimum memory
• Storage requirements
• Graphics requirements
• Internet requirements
• Supported screen size
An editor may install successfully but perform poorly on an older device.
Test it with one short clip before importing the complete project.
Check Whether an Account Is Required
Some editors require an account before you can:
• Save projects
• Export videos
• Use captions
• Access cloud storage
• Remove a watermark
• Use templates
• Synchronize between devices
Review:
• Sign-in requirements
• Project privacy
• Cloud-sharing settings
• Automatic publishing options
• Data-retention conditions
Do not upload private client or family material without understanding where the files will be stored.
Check Automatic Cloud Uploading
Some editors automatically upload source files to online storage.
This may be convenient, but it may not be suitable for:
• Private videos
• Client material
• Confidential business content
• Videos showing children
• Medical information
• Unpublished products
• Personal documents
Review the editor’s privacy and storage settings before importing sensitive files.
Check Commercial-Use Conditions
When the finished video will be used for:
• A business website
• Advertising
• Client work
• A paid course
• A monetized channel
• Product promotion
• Social-media marketing
check whether the editor’s:
• Templates
• Fonts
• Music
• Sound effects
• Stock footage
• AI features
permit the intended use.
The right to use your own edited clip does not automatically confirm that every added template, track, or stock asset is cleared for every commercial purpose.
Check Music and Template Licences
An editor may include built-in:
• Music
• Sound effects
• Stock videos
• Photographs
• Graphics
• Animated titles
• Templates
• Fonts
Review whether each asset is permitted for:
• Personal projects
• Commercial projects
• Client delivery
• Monetized videos
• Paid advertising
• Use outside the editing platform
Keep records for important projects.
Avoid Choosing an Editor Only for AI Features
Many editors promote features such as:
• Automatic editing
• AI background removal
• AI captions
• AI voice
• AI colour correction
• AI scene selection
• AI music
• AI avatars
• AI script generation
These features may be useful, but they should not replace the basic editing controls.
An editor with advanced AI features but weak trimming and export controls may not be suitable for Article 020.
Prioritize:
1. Reliable importing
2. Timeline control
3. Precise trimming
4. Text and caption tools
5. Audio adjustment
6. Correct exporting
Avoid Selecting an Editor That Is Too Complicated
A professional editor may provide hundreds of controls.
This can be useful for advanced work, but a beginner may spend more time learning the interface than editing the video.
A simpler editor may be better when the project requires only:
• Trimming
• Rearranging
• Titles
• Captions
• Music
• MP4 export
Choose the simplest editor that can complete the project correctly.
Avoid Selecting an Editor That Is Too Limited
A very simple editor may allow only:
• One clip
• Automatic templates
• Limited trimming
• Fixed text positions
• No caption editing
• No resolution choice
• No separate audio control
This may be insufficient for an educational video.
Test whether the editor provides enough control before beginning the full project.
Create a Short Test Project
Before committing to an editor, complete a small test.
Use one short AI-generated clip.
Test the following actions:
1. Import the clip.
2. Add it to the timeline.
3. Trim the first half-second.
4. Trim the final second.
5. Add a title.
6. Add one caption.
7. Lower the original audio.
8. Export the result as an MP4 file.
9. Find the exported file.
10. Play it outside the editor.
Confirm:
• The video imports correctly.
• The timeline is understandable.
• Trimming is precise enough.
• Text remains readable.
• Audio controls work.
• The export contains no unexpected watermark.
• The resolution is suitable.
• The saved file plays correctly.
This test can reveal important limitations before you build a larger project.
Beginner Editor Comparison Table
Use a table such as the following when comparing possible editors:
| Requirement | Editor A | Editor B | Editor C |
| Imports MP4 | Yes/No | Yes/No | Yes/No |
| Timeline editing | Yes/No | Yes/No | Yes/No |
| Precise trimming | Yes/No | Yes/No | Yes/No |
| Multiple tracks | Yes/No | Yes/No | Yes/No |
| 16:9 and 9:16 | Yes/No | Yes/No | Yes/No |
| Manual captions | Yes/No | Yes/No | Yes/No |
| Automatic captions | Yes/No | Yes/No | Yes/No |
| Audio controls | Yes/No | Yes/No | Yes/No |
| 1080p export | Yes/No | Yes/No | Yes/No |
| Free export watermark | Yes/No | Yes/No | Yes/No |
| Works offline | Yes/No | Yes/No | Yes/No |
| Commercial asset terms checked | Yes/No | Yes/No | Yes/No |
Do not choose based only on one advertised feature.
Choose the editor that best matches the complete workflow.
Beginner Selection Example
Suppose the project requires:
• One six-second MP4 clip
• Precise trimming
• One title
• One caption
• No music
• 16:9 landscape
• 1920 × 1080 export
• No visible editor watermark
The editor must support:
• MP4 importing
• Timeline trimming
• Text
• Captions
• 16:9
• Full HD export
• Watermark-free output under the selected plan
Advanced controls such as green-screen editing, multi-camera synchronization, and three-dimensional effects are unnecessary for this first project.
Video Editor Selection Checklist
Before choosing the editor, confirm:
• It works on your device.
• It supports your video format.
• It provides a timeline.
• It allows precise trimming and splitting.
• It supports the required aspect ratio.
• It supports the required resolution.
• It includes readable text and caption tools.
• It provides separate audio controls.
• It can export an MP4 file.
• The export does not contain an unwanted watermark.
• Storage and project limits are suitable.
• Cloud-upload and privacy settings are acceptable.
• Built-in music and templates have suitable usage conditions.
• The interface is understandable.
• A short test project exports successfully.
Choose the editor only after completing the small test. A familiar, reliable application that completes the required work is usually more useful than a complicated editor containing features you do not need.
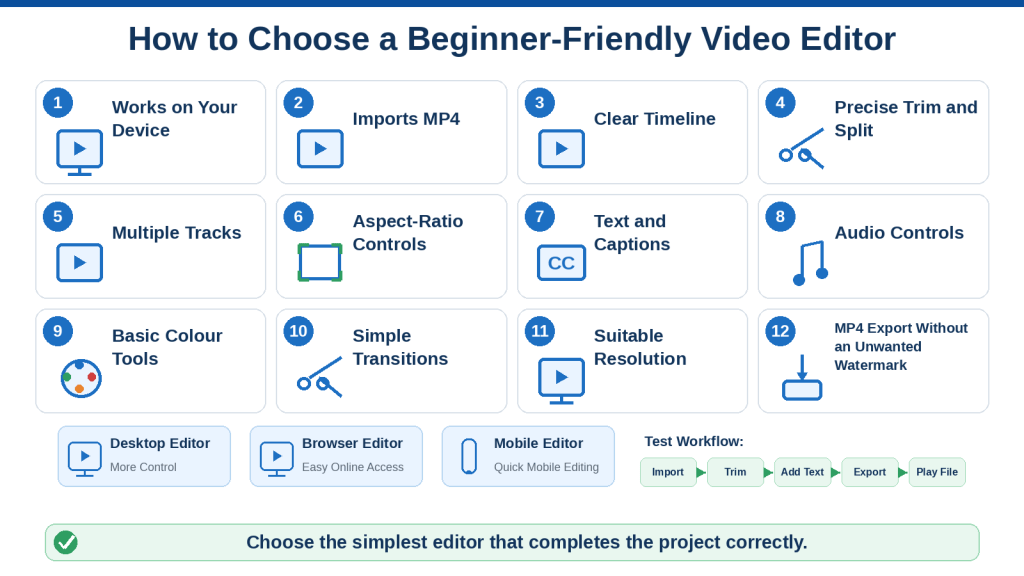
Figure 4. A beginner-friendly video editor should provide reliable importing, timeline control, trimming, text, captions, audio adjustment, and suitable export options.
Figure 4 shows the main features to check before choosing a video editor. Beginners should test the editor with one short clip and confirm that it works on their device, supports the required aspect ratio and resolution, exports without an unwanted watermark, and provides clear controls for trimming, text, captions, audio, and final file creation.
How to Start Your First AI-Video Editing Project
After selecting a suitable video editor, begin with one short AI-generated clip.
The purpose of the first project is to learn the basic workflow:
1. Create the project.
2. Set the video format.
3. Import the source clip.
4. Add it to the timeline.
5. Save the project.
6. Review the complete clip.
7. Mark the sections that need editing.
Do not add music, effects, transitions, or several video tracks until the basic project has been set up correctly.
For this example, use the six-second red-bicycle clip described earlier.
Step 1: Prepare the Project Folder
Before opening the editor, confirm that the project folder already exists.
Use:
020 How to Edit AI-Generated Videos
Inside the folder, confirm that you have:
• Original Generated Clips
• Selected Clips
• Editing Project
• Working Exports
• Final Exports
• Narration
• Music
• Sound Effects
• Captions
• Thumbnails
• Sources and Licences
• Screenshots
• Old Versions
Place the selected working clip in:
Selected Clips
For example:
020-red-bicycle-selected-v03.mp4
Keep the original generation in:
Original Generated Clips
Do not edit or replace the original file.
Step 2: Open the Video Editor
Open the selected video-editing application.
Look for an option such as:
• New Project
• Create Project
• Start Editing
• New Video
• Blank Project
Select a blank project rather than a template for the first exercise.
Templates may automatically add:
• Music
• Transitions
• Text
• Effects
• Stock footage
• Fixed timing
These additions can make it harder to understand the basic editing process.
Step 3: Name the Editing Project
Give the project a descriptive name.
Use:
020 Red Bicycle Basic Editing Project
When the editor creates a project file on the computer, save it inside:
Editing Project
Suggested filename:
020-red-bicycle-basic-edit-project-v01
The exact file extension depends on the editing application.
Some browser-based or mobile editors save projects automatically inside the account instead of creating a visible project file.
When possible, also record the project name in your project document.
Step 4: Choose the Project Aspect Ratio
Select:
16:9 landscape
This is suitable for:
• WordPress
• YouTube
• Websites
• Presentations
• Desktop video players
The editor may call this setting:
• Aspect Ratio
• Canvas Size
• Video Format
• Project Format
• Frame Size
• Page Size
Confirm that the preview window has a wide landscape shape.
Do not choose 9:16 vertical for the main Article 020 demonstration.
Step 5: Choose the Project Resolution
When the editor asks for a project resolution, use:
1920 × 1080
when the source clip and device support it.
This is Full HD in a 16:9 format.
A lower setting such as:
1280 × 720
may be more practical when:
• The source clip is low resolution
• The computer is slow
• Storage is limited
• The project is only a small website demonstration
Do not select 4K unless the source material and publishing purpose require it.
Increasing the project resolution does not correct a low-quality or distorted source clip.
Step 6: Review the Frame-Rate Setting
Some editors ask for a frame rate.
Common options include:
• 24 frames per second
• 25 frames per second
• 30 frames per second
• 60 frames per second
For a beginner project, use the same frame rate as the source clip when the editor can detect it automatically.
Select an option such as:
Match Source
or:
Use Original Frame Rate
when available.
Changing the frame rate unnecessarily may cause:
• Uneven movement
• Repeated frames
• Missing frames
• Larger files
• Longer export time
When the editor does not show a frame-rate option, allow it to use the default project setting.
Step 7: Confirm the Background Colour
A 16:9 clip placed inside a 16:9 project should normally fill the frame.
However, empty space may appear when the source video uses a different shape.
The editor may display:
• Black background
• White background
• Transparent background
• A selected colour
• A blurred copy of the video
For the first project, use a simple black or neutral background when empty space is unavoidable.
Do not add a decorative background until the composition has been reviewed.
Step 8: Import the Selected Video Clip
Use the editor’s import control.
It may be labelled:
• Import
• Upload
• Add Media
• Add Files
• Media
• Browse
• Select from Device
Navigate to:
Selected Clips
Choose:
020-red-bicycle-selected-v03.mp4
Wait until the import is complete.
A browser-based editor may need to upload the complete file before it can be used.
Do not close the browser or move the original file while the upload is in progress.
Step 9: Confirm That the Correct File Was Imported
Check:
• Filename
• Thumbnail
• Duration
• Resolution
• Aspect ratio
• Audio indicator
• File type
The selected clip should be approximately six seconds long.
Do not rely only on the thumbnail.
Open or preview the imported file and confirm that it is the correct red-bicycle generation.
When several versions look similar, compare the filename with your selection record.
Step 10: Import Any Additional Required Files
For the first exercise, the main clip may be the only required file.
You may also import:
• A title background
• A thumbnail image
• A narration file
• A caption file
Do not import every generated version unless you need to compare them inside the editor.
Too many similar files can make the media library confusing.
Import only the files required for the current project.
Step 11: Add the Clip to the Timeline
Drag the selected clip from the media library to the beginning of the main video track.
The clip should begin at:
00:00.0
Confirm that there is no empty gap before it.
The editor may automatically place the clip on:
• Video Track 1
• Main Track
• Primary Track
• Timeline Track
The clip should appear as a horizontal block containing:
• Thumbnail frames
• Filename
• Audio waveform when sound exists
• Duration
Step 12: Check the Clip’s Position
Move the playhead to the beginning of the timeline.
Confirm that:
• The clip begins at zero.
• There is no black gap before it.
• The clip is on the main video track.
• The complete clip is visible on the timeline.
• No second copy was added accidentally.
When duplicate clips appear, delete the unnecessary copy from the timeline.
Do not delete it from the computer.
Step 13: Fit the Clip to the Project Frame
Look at the preview window.
The video may:
• Fill the complete frame
• Appear smaller with borders
• Be enlarged and cropped
• Be positioned incorrectly
• Be rotated
Use the editor’s fit control when necessary.
It may be called:
• Fit
• Fit to Frame
• Scale to Fit
• Contain
• Fill
• Crop to Fill
For the first project, choose the option that keeps the complete bicycle visible.
Protect:
• Both wheels
• Handlebars
• Seat
• Frame
• Wooden fence
• Important surrounding space
Do not choose Fill when it crops important parts of the bicycle.
Step 14: Check the Clip Orientation
Confirm that the clip is not:
• Sideways
• Upside down
• Mirrored
• Rotated
• Flipped unintentionally
Use rotation controls only when the source file was imported incorrectly.
Do not mirror a scene without considering:
• Travel direction
• Visible text
• Logos
• Product controls
• Handedness
• Scene continuity
For the red-bicycle example, no rotation or mirroring should be required.
Step 15: Review the Original Audio
Check whether the generated clip contains audio.
Possible audio may include:
• Wind
• Music
• Voices
• Environmental sound
• Distorted noise
• No sound
The timeline may show an audio waveform below the video thumbnails.
Listen once with the original audio enabled.
Record whether it should be:
• Kept
• Reduced
• Muted
• Removed
• Replaced
For the first trimming exercise, you may mute unwanted generated audio.
Do not permanently remove it until you have confirmed that it is not useful.
Step 16: Save the Project Immediately
Save the project before making detailed changes.
Use:
020-red-bicycle-basic-edit-project-v01
Save it inside:
Editing Project
When the editor saves automatically, confirm that the project appears in the account or recent-project list.
Record:
• Project name
• Date created
• Editing application
• Aspect ratio
• Resolution
• Source filename
Saving early reduces the risk of losing the project setup.
Step 17: Watch the Complete Clip Normally
Play the clip from beginning to end without stopping.
Do not edit during the first viewing.
Ask:
• What is the scene showing?
• Is the movement understandable?
• Is the subject fully visible?
• Does the camera move smoothly?
• Does the clip begin cleanly?
• Does it end cleanly?
• Is the audio suitable?
The first viewing gives you an overall impression.
Step 18: Review the Opening Separately
Return to the beginning.
Watch only the first second several times.
Check for:
• Blurred opening frame
• Incomplete bicycle
• Sudden camera movement
• Lighting changes
• Object formation
• Black frame
• Unwanted pause
• Audio starting abruptly
For this example, suppose the first half-second is weak.
Record:
Opening problem: 00:00.0 to approximately 00:00.5
Do not trim it yet.
First record every important issue.
Step 19: Review the Middle Section
Watch the middle of the clip.
Check:
• Bicycle stability
• Wheel shape
• Fence
• Road
• Lighting
• Grass movement
• Camera speed
• Background
• Audio
Suppose the middle section from approximately 00:00.5 to 00:05.0 is stable.
Record:
Strong section: Approximately 00:00.5 to 00:05.0
This is the section you want to protect.
Step 20: Review the Ending Separately
Watch the final second several times.
Check for:
• Subject distortion
• Camera acceleration
• Sudden zoom
• Background change
• Lighting flicker
• Bicycle movement
• Object disappearance
• Abrupt audio
• Incomplete action
Suppose the bicycle wheel becomes distorted after approximately 00:05.0.
Record:
Ending problem: Approximately 00:05.0 to 00:06.0
This section may need to be trimmed.
Step 21: Review Frame by Frame
Use the previous-frame and next-frame controls when available.
Inspect the points where:
• The weak opening becomes stable
• The stable middle becomes distorted
• Audio changes
• Camera movement accelerates
• The subject begins changing
Frame-by-frame review helps you find a more accurate trim point.
However, do not focus so closely on individual frames that you ignore how the video looks during normal playback.
Step 22: Add Timeline Markers When Available
Some editors allow markers to be added at important times.
Place markers at:
• Beginning of the strong section
• End of the strong section
• Caption positions
• Narration points
• Scene changes
For the example:
• Marker 1: 00:00.5 — Strong section begins
• Marker 2: 00:05.0 — Distortion begins
Markers may appear as small coloured symbols above the timeline.
When the editor does not support markers, write the times in the project record.
Step 23: Create an Editing Plan
Before changing the timeline, write the planned actions.
For example:
Source clip: 020-red-bicycle-selected-v03.mp4
Original duration: Six seconds
Weak opening: 00:00.0–00:00.5
Strong section: 00:00.5–00:05.0
Weak ending: 00:05.0–00:06.0
Planned trim: Remove first 0.5 second and final 1 second
Expected edited duration: Approximately 4.5 seconds
Aspect ratio: 16:9
Resolution: 1920 × 1080
Original audio: Mute for first test
Title: Editing an AI-Generated Video
Caption: The weak beginning and ending were removed.
This plan makes the next editing steps more controlled.
Step 24: Duplicate the Timeline Clip When Useful
Some editors allow you to duplicate the clip on the timeline.
You may keep:
• One unedited timeline copy for comparison
• One working copy for trimming
Place them one after the other or on separate tracks.
For example:
• Clip 1: Original six-second generation
• Clip 2: Working copy to be trimmed
This can be useful for a before-and-after demonstration.
However, do not create unnecessary duplicates in a simple publishing project.
The original file is already preserved in the source folder.
Step 25: Save a Second Project Version
After importing, reviewing, and marking the clip, save a new project version.
Use:
020-red-bicycle-basic-edit-project-v02
Version 01 preserves the initial setup.
Version 02 contains the review notes, markers, or timeline preparation.
Creating versions is useful before major changes such as:
• Trimming
• Splitting
• Deleting
• Rearranging
• Adding audio
• Changing the aspect ratio
Step 26: Confirm That the Project Is Ready for Editing
Before beginning the trim, confirm:
• The correct video was imported.
• The project uses 16:9.
• The resolution is suitable.
• The clip begins at zero.
• The complete subject is visible.
• The original file is preserved.
• The project was saved.
• The weak opening was identified.
• The strong section was identified.
• The weak ending was identified.
• The editing plan was recorded.
The project is now ready for detailed trimming and splitting.

Figure 5. A first AI-video editing project begins by setting the format, importing the correct clip, placing it on the timeline, reviewing it, and marking the strongest section.
Figure 5 shows the preparation workflow inside a beginner video editor. The source clip is imported, placed at the beginning of a 16:9 timeline, reviewed from beginning to end, and divided into a weak opening, strong middle section, and weak ending before any trimming is performed.
How to Trim, Split, Delete, and Rearrange AI-Generated Clips
Trimming and splitting are the most important basic editing skills for improving AI-generated videos.
They allow you to:
• Remove unstable opening frames
• Remove distorted endings
• Delete weak sections from the middle
• Keep only the strongest movement
• Rearrange scenes into a clearer order
• Shorten the finished video
• Prepare clips for titles, narration, and transitions
For the red-bicycle example, the six-second source clip contains:
• Weak opening: 00:00.0 to 00:00.5
• Strong section: 00:00.5 to 00:05.0
• Weak ending: 00:05.0 to 00:06.0
The goal is to keep the strong middle section and remove the weak beginning and ending.
Understand Trimming and Splitting
Trimming shortens a clip from its beginning or ending.
Use trimming when the unwanted section is located at either edge of the clip.
Splitting divides a clip into separate pieces.
Use splitting when:
• The unwanted section is in the middle
• Different parts require different effects
• A title must appear between sections
• You want to rearrange parts of one clip
• Only one section needs a speed adjustment
Both methods normally change only the timeline copy. The original source file remains unchanged.
Step 1: Save the Project Before Editing
Before trimming, save the current project version.
Use:
020-red-bicycle-basic-edit-project-v02
Then create a new working version:
020-red-bicycle-basic-edit-project-v03
This gives you a safe copy of the project before the first major edit.
Step 2: Select the Correct Timeline Clip
Click the red-bicycle clip on the timeline.
The selected clip may show:
• An outline
• Handles at both ends
• A properties panel
• Trim controls
• Editing buttons
Confirm that you selected the video clip rather than:
• A title
• A caption
• An audio track
• A transition
• Another clip
Accidentally editing the wrong item can change the timing of the complete project.
Step 3: Zoom into the Timeline
Increase the timeline zoom until the first second is easy to inspect.
You should be able to identify:
• 00:00.0
• 00:00.5
• 00:01.0
Timeline zoom may use:
• A slider
• Plus and minus buttons
• A magnifying-glass control
• Keyboard shortcuts
• Mouse-wheel controls
Zooming the timeline does not enlarge or change the exported video. It only helps you edit more precisely.
Step 4: Move the Playhead to the End of the Weak Opening
Move the playhead to approximately:
00:00.5
Watch the frame in the preview window.
Move backward and forward until you find the point where:
• The bicycle is fully formed
• Both wheels are stable
• The lighting is correct
• The camera movement becomes smooth
• The background is no longer changing unexpectedly
Do not trim only according to the written time. Use the actual visible result.
The best trim point may be slightly before or after 00:00.5.
Step 5: Trim the Beginning
Place the pointer on the left edge of the clip.
Drag the beginning edge toward the playhead.
Stop when the clip begins at the first stable frame.
The timeline clip should become shorter.
The original source file remains six seconds long.
Play the new beginning several times.
Check that:
• The first frame looks complete.
• The video does not begin in the middle of a sudden movement.
• The bicycle is fully visible.
• The camera starts smoothly.
• No black frame remains.
• The audio does not begin abruptly.
Step 6: Leave a Natural Opening
Do not remove so much of the beginning that viewers have no time to understand the scene.
A good opening should allow viewers to identify:
• The main subject
• The setting
• The direction of movement
• The visual style
For the bicycle example, begin when the complete bicycle and road are clearly visible.
Avoid beginning with the camera already extremely close to the bicycle unless that framing is intentional.
Step 7: Move the Playhead to the Beginning of the Weak Ending
Move the playhead to approximately:
00:05.0
Inspect the final section.
Find the frame immediately before:
• The wheel changes shape
• The camera accelerates
• The background distorts
• The lighting flickers
• The bicycle moves unexpectedly
Move frame by frame when necessary.
Step 8: Trim the Ending
Drag the right edge of the clip inward until it reaches the last stable frame.
Play the final second several times.
A clean ending should:
• Keep the bicycle fully visible
• Preserve both wheel shapes
• Maintain stable lighting
• Avoid sudden camera movement
• Avoid ending during a distortion
• Finish at a visually understandable point
The edited clip should now be approximately four and a half seconds long.
Step 9: Review the Complete Trimmed Clip
Return the playhead to the beginning and watch the entire edited clip without stopping.
Check:
• Opening
• Main movement
• Camera speed
• Bicycle stability
• Background
• Lighting
• Ending
• Audio
Do not assume that the edit is correct only because the weak sections were removed.
The new beginning or ending may feel too sudden during normal playback.
Step 10: Fine-Tune the Trim Points
When the clip begins too abruptly, extend the left edge slightly.
When the ending includes a small distortion, shorten the right edge slightly.
Make small changes.
After each adjustment:
1. Play the opening.
2. Play the ending.
3. Watch the complete clip.
4. Compare the timing with the project purpose.
The cleanest technical trim is not always the most natural storytelling trim.
Step 11: Check Whether the Audio Was Trimmed
When video and audio are linked, trimming the video normally trims the sound as well.
Listen for:
• Abrupt audio start
• Cut-off sound
• Sudden volume change
• Music beginning in the middle
• Environmental sound stopping suddenly
When the original generated audio is unwanted, mute it.
When the audio is useful, apply short fade-in and fade-out adjustments later.
Step 12: Save the Trimmed Project Version
Save the project as:
020-red-bicycle-basic-edit-project-v03
Record:
Original duration: Six seconds
Edited duration: Approximately four and a half seconds
Opening removed: Approximately half a second
Ending removed: Approximately one second
Main reason: Unstable opening and distorted ending
This creates a clear record of the first edit.
How to Remove a Weak Section from the Middle
Trimming cannot remove a problem that appears in the middle of a clip.
Suppose another AI-generated video contains:
• Strong opening
• Distorted middle section
• Strong ending
For example:
• 00:00.0 to 00:02.0: Strong
• 00:02.0 to 00:03.0: Distorted
• 00:03.0 to 00:06.0: Strong
You can remove the middle section by splitting the clip twice.
Step 1: Move the Playhead to the Beginning of the Problem
Move the playhead to:
00:02.0
Use frame-by-frame review to find the exact point where the distortion begins.
Step 2: Split the Clip
Select the clip and choose the split control.
It may be called:
• Split
• Cut
• Divide
• Blade
• Razor
The original timeline clip becomes two pieces.
Step 3: Move the Playhead to the End of the Problem
Move the playhead to:
00:03.0
Find the first stable frame after the distortion.
Step 4: Split the Clip Again
Select the correct timeline piece and split it at the second point.
The timeline should now contain three pieces:
1. Strong opening
2. Weak middle
3. Strong ending
Step 5: Select the Weak Middle Piece
Click the middle section.
Confirm that only the weak section is selected.
Play it separately when necessary.
Step 6: Delete the Weak Section
Delete the selected middle piece.
Depending on the editor, the remaining clips may:
• Move together automatically
• Leave an empty gap
• Shift with connected audio
• Remain in their original positions
Inspect the timeline carefully.
Step 7: Close the Gap
When an empty gap remains, drag the final clip left until it touches the opening clip.
Snapping can help align the two pieces.
Confirm that there is no:
• Black frame
• Empty timeline space
• Unintended pause
• Missing audio section
Step 8: Review the New Connection
Play the point where the two strong sections meet.
The edit may create a visible jump.
For example:
• The bicycle suddenly changes position.
• The camera appears to jump forward.
• The background shifts.
• The subject’s movement skips.
• The lighting changes.
Removing a middle section does not guarantee a smooth result.
Step 9: Decide Whether the Cut Is Acceptable
A direct cut may work when:
• The subject remains in a similar position
• The camera angle is unchanged
• The movement direction remains consistent
• The lighting is similar
• The removed section is very short
The cut may not work when:
• The subject moves a large distance
• The camera angle changes
• The body position changes suddenly
• The background changes
• An action becomes incomplete
When the jump is too noticeable, consider:
• Trimming more from one side
• Using only the first strong section
• Using only the final strong section
• Adding a short dissolve
• Adding a title card
• Covering the cut with another clip
• Regenerating the scene
Step 10: Use a Covering Clip When Appropriate
A second visual can hide an unavoidable cut.
For example, place a short clip of:
• Grass moving
• The country road
• A close-up of the bicycle wheel
• The sunrise sky
• A title card
above the cut while the narration continues.
This type of supporting video is often called B-roll.
B-roll should support the story rather than hide a major factual problem.
How to Rearrange Several AI-Generated Clips
A longer AI video may contain several separately generated scenes.
For example:
1. Bicycle beside the country road
2. Bicycle travelling through green fields
3. Bicycle approaching the lake
4. Bicycle resting beside a bench
Place the clips on the timeline in the intended story order.
Step 1: Review Each Clip Before Arranging It
Confirm that every selected clip has:
• A usable opening
• A usable ending
• Correct subject appearance
• Suitable movement
• Acceptable background
• Matching aspect ratio
• Similar visual quality
Trim each clip before arranging the final sequence when possible.
Step 2: Give Each Clip a Clear Timeline Label
When the editor supports labels, use:
• Scene 01 — Country Road
• Scene 02 — Green Fields
• Scene 03 — Lake Arrival
• Scene 04 — Lakeside Ending
Clear labels reduce the risk of placing clips in the wrong order.
Step 3: Place the First Clip at the Beginning
Move Scene 01 to:
00:00.0
Confirm that no empty space appears before it.
Step 4: Add the Next Clip Directly After It
Move Scene 02 until it touches the end of Scene 01.
Repeat for the remaining scenes.
Snapping can help remove small gaps.
Step 5: Watch the Sequence Without Transitions
Review the clips using direct cuts first.
Check:
• Story order
• Subject consistency
• Travel direction
• Camera direction
• Lighting
• Colour
• Movement speed
• Scene length
Do not add transitions until the basic sequence works.
Step 6: Rearrange Clips When the Story Is Unclear
Suppose the bicycle appears beside the lake before it is shown travelling there.
Move the travel clip earlier.
A clear sequence might be:
1. Introduce the bicycle.
2. Begin the journey.
3. Show travel.
4. Arrive at the destination.
5. End with a resting scene.
The strongest-looking clip is not always the best opening.
Choose the order that communicates the idea clearly.
Step 7: Check Screen Direction
When the bicycle travels from left to right in one clip, the next travel clip should normally maintain the same direction.
A sudden change to right-to-left may make the bicycle appear to reverse direction.
You may correct this by:
• Selecting another generated version
• Rearranging the scenes
• Mirroring a clip only when no text, branding, or directional detail becomes incorrect
• Using a neutral transition shot
• Showing the direction change intentionally
Do not mirror a product demonstration when it would reverse controls, labels, or accurate physical details.
Step 8: Balance the Scene Lengths
Not every clip needs the same duration.
For example:
• Opening scene: Four seconds
• Travel scene: Five seconds
• Lake arrival: Four seconds
• Ending scene: Three seconds
Shorten any section that:
• Repeats the same movement
• Contains unnecessary empty time
• Becomes unstable
• Slows the story
• Adds no useful information
Keep enough time for viewers to understand each scene.
Step 9: Remove Repeated Clips
Several clips may show nearly the same:
• Camera movement
• Bicycle position
• Road
• Lighting
• Action
Using all of them may make the video repetitive.
Select the strongest example and remove unnecessary repetition.
Step 10: Save a New Sequence Version
After arranging the scenes, save a new project version.
For example:
020-red-bicycle-multiscene-edit-project-v01
When testing another order, save:
020-red-bicycle-multiscene-edit-project-v02
This allows you to compare different sequences without rebuilding them.
Use Ripple Editing Carefully
Ripple editing can automatically move later items when a section is trimmed or deleted.
This may help prevent timeline gaps.
However, it can also move:
• Captions
• Narration
• Music
• Titles
• Sound effects
• Later scenes
After every ripple edit, check whether all connected items remain synchronized.
A caption describing Scene 3 should not move over Scene 2.
Lock Tracks When Necessary
Some editors allow timeline tracks to be locked.
Lock a completed track to prevent accidental changes.
For example, lock:
• Final narration
• Correctly timed captions
• Approved music
• Completed title sequence
Do not lock a track that still requires editing.
Avoid Accidental Overwriting
Some editors allow one clip to replace another when it is dragged onto the same timeline position.
Before dropping a clip, check whether the editor will:
• Insert it
• Overwrite existing material
• Replace the selected clip
• Move later clips
• Create another track
Use Undo immediately when the wrong action occurs.
Leave No Unintended Gaps
After trimming, splitting, deleting, or rearranging, zoom out and inspect the complete timeline.
Look for:
• Tiny empty spaces
• Black frames
• Unused audio
• Captions without video
• Music continuing after the ending
• Titles appearing over the wrong scene
Play the timeline from beginning to end after every major structural edit.
Before-and-After Editing Example
Original Clip
Duration: Six seconds
Weak opening: First half-second
Strong middle: Four and a half seconds
Weak ending: Final second
Edited Clip
Duration: Approximately four and a half seconds
Opening: Complete bicycle visible immediately
Middle: Stable movement preserved
Ending: Stops before wheel distortion begins
Audio: Muted for the first test
Aspect ratio: 16:9
Resolution: 1920 × 1080
Result
The edited clip is shorter, but every retained second is more useful.
Removing weak material is usually better than keeping a longer unstable result.
Trimming and Splitting Checklist
Before continuing, confirm:
• The original source file was preserved.
• The project was saved before editing.
• The correct timeline clip was selected.
• The weak opening was removed.
• The weak ending was removed.
• The new beginning feels natural.
• The new ending feels complete.
• Middle problems were split and removed when necessary.
• No accidental timeline gaps remain.
• Video and audio remain synchronized.
• Rearranged clips follow a clear story order.
• Screen direction remains logical.
• Repeated or unnecessary scenes were removed.
• The complete edited sequence was reviewed.
• A new project version was saved.
Trimming and splitting do not create new visual content. They improve the video by protecting its strongest moments and removing sections that weaken the result.
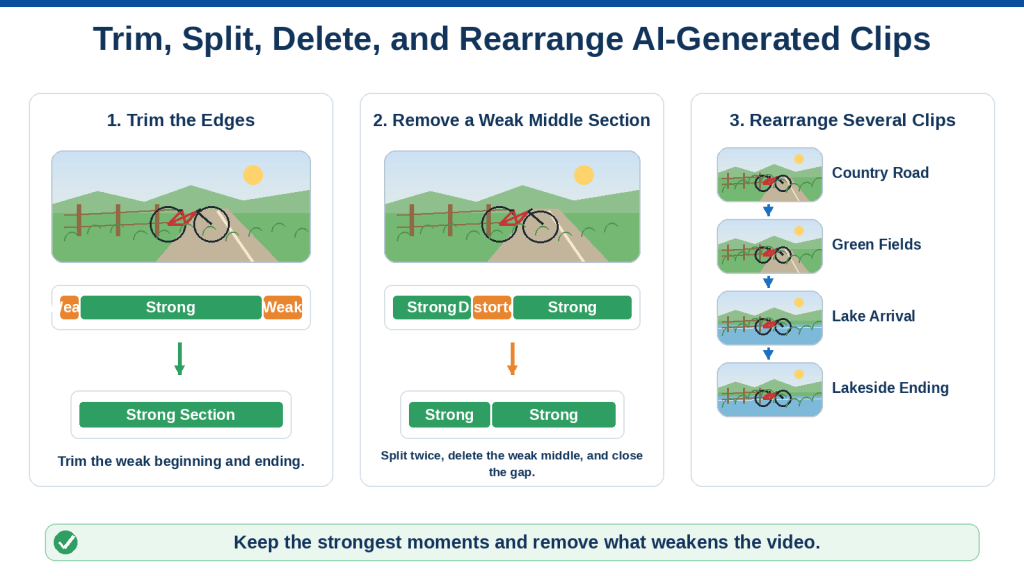
Figure 6. Trimming, splitting, deleting, and rearranging allow editors to preserve the strongest parts of AI-generated clips.
Figure 6 shows how weak opening and ending frames can be trimmed, how a distorted middle section can be isolated with two splits and deleted, and how several selected clips can be arranged in a clear story order without leaving unintended timeline gaps.
How to Crop, Reframe, Resize, and Change the Aspect Ratio
AI-generated clips may not fit the final publishing format perfectly.
A clip may contain:
• Too much empty space
• A subject positioned too close to one side
• Important details near the frame edge
• Black borders
• An unsuitable aspect ratio
• A subject that becomes cropped after resizing
• Captions or titles outside the safe viewing area
Cropping and reframing allow you to improve the composition without generating a completely new video.
However, these tools should be used carefully. Cropping removes parts of the original frame, and enlarging a video may reduce visible quality.
Understand Cropping, Reframing, and Resizing
These editing actions are related but not identical.
Cropping
Cropping removes part of the picture near the edges.
Use cropping to remove:
• Unwanted empty space
• A distorted object near an edge
• Black borders
• An unwanted sign
• A small visual problem outside the main subject
• Excess background
Cropping cannot restore missing content.
After an area is cropped, it is no longer visible in the exported frame.
Reframing
Reframing changes where the video appears inside the project frame.
You may:
• Move the video left or right
• Move it upward or downward
• Centre the subject
• Create more space for a title
• Keep important movement visible
• Protect a person’s face, hands, or feet
Reframing may involve both repositioning and scaling.
Resizing
Resizing makes the video appear larger or smaller inside the project frame.
Increasing the size may fill empty space, but it may also:
• Crop the edges
• Reduce sharpness
• Make distortions easier to see
• Remove important background details
Reducing the size may keep the complete subject visible, but it may create:
• Borders
• Empty background space
• A smaller subject
• A less immersive composition
Changing the Aspect Ratio
Changing the aspect ratio changes the overall shape of the video project.
Common formats include:
• 16:9 landscape
• 9:16 vertical
• 1:1 square
• 4:5 portrait
Changing from one format to another normally requires cropping, repositioning, or adding background space.
Protect the Main Subject Before Cropping
Before changing the composition, identify the details that must remain visible.
For the red-bicycle example, protect:
• Front wheel
• Back wheel
• Bicycle frame
• Seat
• Handlebars
• Space around the wheels
• Wooden fence
• Road
• Important environmental movement
Do not crop the bicycle only to remove a small background problem.
A complete stable subject is more important than perfect background framing.
For a person, protect:
• Head
• Face
• Hands
• Feet when required
• Important clothing
• Objects being held
• Space in the direction of movement
For a product, protect:
• Complete product shape
• Controls
• Labels when verified
• Accessories
• Connections
• Demonstrated features
Use the Safe-Frame Principle
A safe frame leaves enough space around important content.
Do not place the subject directly against the edge unless the composition intentionally requires it.
Leave space around:
• Faces
• Hands
• Feet
• Bicycle wheels
• Products
• Titles
• Captions
• Logos when authorized
• Important movement
Platform interfaces may cover parts of a video with:
• Playback controls
• Captions
• Profile information
• Buttons
• Menus
• Titles
Keep essential content away from the outer edges.
How to Improve a 16:9 Landscape Clip
Suppose the original AI-generated clip is already 16:9 but the bicycle appears too far to the right.
Step 1: Select the Clip
Click the clip on the timeline.
Open the controls for:
• Position
• Scale
• Crop
• Transform
• Canvas
The exact names depend on the editor.
Step 2: Check the Complete Frame
Pause at several points:
• Beginning
• Middle
• End
Confirm whether the bicycle position changes during the clip.
A crop that works at the beginning may cut off the wheel later when the camera moves.
Step 3: Reposition Before Cropping
Move the video slightly left so the bicycle is more balanced inside the frame.
Do not enlarge the clip yet.
Repositioning may correct the composition without removing any image area.
Step 4: Review the Camera Movement
Play the complete clip.
Check whether:
• The bicycle remains visible.
• Both wheels stay inside the frame.
• The camera movement still feels natural.
• The fence and road remain understandable.
• No important detail moves outside the frame.
Step 5: Crop Only When Necessary
When a distorted object appears near one edge, crop only enough to remove it.
Do not apply a large crop when a small adjustment is sufficient.
Step 6: Review at Full Screen
A crop may look acceptable in the small preview but feel too tight at full screen.
Watch the complete clip at normal size before accepting the change.
How to Convert a 16:9 Landscape Video to 9:16 Vertical
A vertical video is much narrower than a landscape video.
Converting 16:9 to 9:16 may remove a large part of the left and right sides.
For the bicycle example, a direct centre crop may cut off:
• One wheel
• The fence
• The country road
• Important grass movement
• Open space around the subject
Method 1: Reposition and Crop
Use this method when the main subject fits inside a narrow vertical area.
Steps:
1. Create a new 9:16 project.
2. Add the landscape clip.
3. Increase its size until the vertical frame is filled.
4. Move the video left or right.
5. Keep the complete subject visible.
6. Review the entire clip.
7. Adjust the position when the camera movement changes the composition.
This method works best when:
• The subject is near the centre.
• The main action occurs in a narrow area.
• Important details are not spread across the full landscape frame.
Method 2: Use a Blurred Background
When cropping removes too much, keep the complete landscape clip visible in the centre and fill the vertical background with a blurred copy.
The editor may:
1. Duplicate the clip.
2. Place one copy on the lower track.
3. Enlarge the lower copy to fill the vertical frame.
4. Apply blur to the lower copy.
5. Keep the original full clip above it.
This preserves the complete video but creates background space above and below or behind it.
Use this method carefully.
The blurred background should not distract from the main video.
Method 3: Use a Solid or Designed Background
Place the landscape clip over a simple background.
The extra space may contain:
• A title
• A short explanation
• A logo when authorized
• Captions
• Article branding
• A neutral colour
Keep the design simple and ensure the video remains the main focus.
Method 4: Create a Separate Vertical Generation
When the landscape composition cannot be adapted without damaging the scene, generate or edit a separate 9:16 version.
This may provide better results than heavily cropping the original.
Use a new prompt that explains:
Use a vertical 9:16 composition. Keep the complete bicycle fully visible with safe space above, below, and around both wheels.
How to Convert a Landscape Video to 1:1 Square
A square format removes less width than a vertical format but still requires careful framing.
Steps:
1. Create a 1:1 project.
2. Add the 16:9 clip.
3. Choose Fit or Fill.
4. Reposition the subject.
5. Check both sides for cropped details.
6. Review camera movement.
7. Protect titles and captions.
A square crop may work well when the subject is near the centre.
It may not work when important objects appear near both sides of the original frame.
How to Convert a Landscape Video to 4:5 Portrait
The 4:5 format is wider than 9:16 and may preserve more of the landscape scene.
It is often suitable for feed posts.
Steps:
1. Create a 4:5 project.
2. Add the landscape clip.
3. Scale the clip until the frame is filled.
4. Reposition the subject.
5. Keep the main action inside the safe area.
6. Review the opening, middle, and ending.
7. Adjust title and caption positions.
A 4:5 crop may provide a useful balance between subject size and visible background.
Use Keyframes When the Subject Moves Across the Frame
Some editors allow the video position to change over time using keyframes.
Keyframes can help when:
• The subject begins on the left.
• The subject moves toward the right.
• A fixed vertical crop would lose the subject.
• The camera pans across a wide scene.
You can place:
• One keyframe at the beginning
• Another keyframe later
• A final keyframe near the end
The editor moves the crop gradually between those positions.
For example:
• Beginning: Frame positioned toward the left
• Middle: Frame centred
• Ending: Frame positioned toward the right
This can keep a moving subject visible inside a vertical frame.
However, keyframe movement should remain smooth.
Avoid rapid or unnecessary repositioning that creates artificial camera motion.
Avoid Excessive Enlargement
Enlarging a video may be necessary to fill a different frame shape.
However, excessive enlargement can cause:
• Blurry details
• Pixelation
• Reduced sharpness
• More visible AI errors
• Cropped subjects
• Unnatural composition
For example, enlarging a 720p clip significantly inside a 1080p project may make the result look soft.
Use the smallest enlargement that achieves the required composition.
When the source quality becomes unacceptable, use:
• A higher-quality source clip
• A new generation
• A different layout
• A background-fill method
• A smaller displayed video area
Do Not Stretch the Video
Stretching changes the width or height without preserving the original proportions.
This can make:
• Faces look wide or narrow
• Bicycle wheels become oval
• Products look distorted
• Buildings lean
• People appear unusually tall or short
Maintain the original proportions.
Use uniform scaling rather than separate horizontal and vertical stretching.
A circular bicycle wheel should remain circular.
Check for Accidental Rotation
A clip may become slightly rotated during repositioning.
Even a small unintended angle can make:
• The horizon appear tilted
• Buildings lean
• The road look uneven
• The composition feel unstable
Use the rotation control to return the video to:
0 degrees
unless a deliberate angle is part of the design.
Use Cropping to Remove Small Edge Problems
Cropping can be practical when an unwanted problem appears only near an edge.
Examples include:
• A duplicated object at the far side
• A distorted fence post
• A small invented logo
• A partial person entering the frame
• An empty border
• A temporary edge artifact
Before cropping, confirm that:
• The problem remains near the edge throughout the clip.
• The crop does not remove important content.
• The composition remains balanced.
• The final resolution remains acceptable.
Cropping should not be used to hide a serious central generation error.
Avoid Cropping Important Context
The background may provide essential information about the scene.
For example, cropping too tightly around the bicycle may remove:
• The country road
• The wooden fence
• The sunrise setting
• The feeling of open countryside
• Environmental movement
The subject may remain visible, but the scene may lose its meaning.
Keep enough context to support the purpose of the video.
Leave Space for Titles and Captions
When titles or captions will be added, decide their position before finalizing the crop.
Possible title areas include:
• Open sky
• Empty wall
• Clear floor space
• Unused side of the frame
• Dedicated title card
Captions are commonly placed near the lower part of the frame.
Do not place important subject details where captions will cover them.
For the bicycle example, avoid placing the wheels directly behind the caption area.
Check Every Platform Version Separately
A single editing project should not be assumed to work for every platform.
Create separate project copies such as:
• 020-red-bicycle-edit-16×9-v01
• 020-red-bicycle-edit-9×16-v01
• 020-red-bicycle-edit-1×1-v01
• 020-red-bicycle-edit-4×5-v01
Review each version for:
• Cropping
• Subject position
• Camera movement
• Text placement
• Caption placement
• Background
• Final quality
Do not simply export one timeline into several aspect ratios without checking the composition.
Check the Beginning, Middle, and Ending
The subject may move or the camera may change during the video.
Review at least:
• First frame
• One middle frame
• Final frame
Also watch the complete movement.
A crop that looks correct in a paused middle frame may fail at the beginning or ending.
Use a Before-and-After Comparison
For an educational demonstration, show:
Before Reframing
• Bicycle too close to the right edge
• Excess empty space on the left
• One wheel at risk of cropping
• Title area unclear
After Reframing
• Complete bicycle visible
• Balanced space around the subject
• Road and fence preserved
• Clear title or caption area
• Camera movement remains smooth
The improved composition should support the video rather than simply make the subject larger.
When to Regenerate Instead of Crop
Create a new generation when:
• The subject is already partly outside the frame.
• Important body parts or object parts are missing.
• The subject moves outside the frame.
• The crop removes essential context.
• The source resolution is too low.
• Heavy enlargement makes the video blurry.
• The landscape composition cannot be adapted to vertical.
• Titles and captions cannot be placed safely.
• The camera movement becomes unusable after cropping.
Cropping improves existing material. It cannot create missing visual information.
Cropping and Reframing Checklist
Before continuing, confirm:
• The correct project aspect ratio was selected.
• The complete main subject remains visible.
• Important background context remains understandable.
• The video was not stretched.
• Bicycle wheels and circular objects remain circular.
• Faces and products retain their correct proportions.
• No accidental rotation was added.
• Titles and captions have enough space.
• The opening, middle, and ending were checked.
• Camera movement remains natural.
• Excessive enlargement was avoided.
• Each platform-specific version was reviewed separately.
• A new project version was saved.
Cropping and reframing should improve the composition without changing the meaning of the scene or damaging the main subject.

Figure 7. Cropping, reframing, and resizing help adapt AI-generated videos to different formats while protecting the main subject.
Figure 7 shows how one landscape AI-generated video can be prepared for 16:9, 9:16, 1:1, and 4:5 formats. The editor must keep the subject visible, preserve correct proportions, leave space for titles and captions, and avoid excessive enlargement or stretching.
How to Adjust Brightness, Colour, Stability, and Video Speed
After trimming and reframing the selected clips, review whether small visual adjustments could make the video clearer and more consistent.
Basic correction tools can help when a clip is:
• Slightly too dark
• Slightly too bright
• Low in contrast
• Overly colourful
• Too blue or too orange
• Different in appearance from the surrounding clips
• Affected by minor camera shake
• Moving slightly too quickly or too slowly
These controls should improve an already usable clip.
They cannot fully repair:
• A changing face
• Distorted hands
• Missing objects
• Incorrect product parts
• Severe background instability
• Impossible movement
• Major camera jumps
• A subject that does not match the prompt
When the central content is incorrect, regeneration or replacement is usually more practical.
Make Small Adjustments First
Do not begin by applying extreme correction settings.
Strong adjustments may create:
• Unnatural colours
• Lost detail
• Harsh shadows
• Bright white areas
• Crushed dark areas
• Visible noise
• Flickering differences between clips
• Skin tones that look unrealistic
Begin with small changes and compare the result with the original.
A useful process is:
1. Duplicate the project version.
2. Select the clip.
3. Adjust one control slightly.
4. Watch the complete clip.
5. Compare before and after.
6. Keep the change only when it improves the complete video.
Save a new project version before making major visual corrections.
For example:
020-red-bicycle-colour-correction-project-v01
Understand the Main Correction Controls
Video editors may use different names, but the most common controls include:
• Exposure
• Brightness
• Contrast
• Highlights
• Shadows
• Saturation
• Temperature
• Tint
• Sharpness
• Fade
• Vignette
You do not need to use every control.
For a beginner project, exposure, contrast, shadows, saturation, and temperature are usually enough.
Exposure
Exposure changes the overall light level of the image.
Increase it slightly when the complete clip is too dark.
Reduce it slightly when the complete clip is too bright.
Too much exposure may remove detail from:
• Clouds
• White clothing
• Bright walls
• Reflections
• Sunrise areas
• Product surfaces
Too little exposure may hide:
• Bicycle details
• Faces
• Dark clothing
• Background objects
• Shadow details
Adjust exposure while watching both the brightest and darkest areas.
Brightness
Brightness also affects how light or dark the picture appears.
Some editors treat brightness and exposure similarly, while others calculate them differently.
Use brightness for small overall corrections.
Do not increase it so much that the video looks faded or grey.
Contrast
Contrast controls the difference between bright and dark areas.
Increasing contrast can make the picture appear clearer and more defined.
However, excessive contrast may cause:
• Dark shadows with no detail
• Bright areas with no detail
• Harsh skin tones
• Strong colour changes
• An unnatural cinematic appearance
Reducing contrast may soften a harsh clip, but too little contrast can make the video look flat.
For the red-bicycle example, use only enough contrast to separate:
• The bicycle from the background
• The road from the grass
• The fence from the fields
Highlights
Highlights control the brightest parts of the image.
Reduce highlights when:
• The sky is too bright
• Sunrise light loses detail
• White objects appear overexposed
• Reflections are distracting
Increasing highlights may make a dull scene brighter, but it can quickly remove detail.
Shadows
Shadows control darker areas.
Increase shadows slightly when important details are hidden.
For example, the bicycle frame or wheels may be too dark to see clearly.
Reducing shadows can deepen the image, but excessive reduction may hide detail.
Saturation
Saturation controls colour intensity.
Increasing saturation makes colours stronger.
Reducing saturation makes colours more muted.
Too much saturation may cause:
• Red objects to look unnatural
• Grass to appear fluorescent green
• Skin tones to become orange
• Sky colours to become unrealistic
• Colour differences between clips to become more noticeable
For the red-bicycle example, keep the bicycle clearly red without making it unnaturally bright.
Temperature
Temperature makes the image appear warmer or cooler.
Increasing temperature adds warmer yellow or orange tones.
Reducing temperature adds cooler blue tones.
Use temperature when:
• A sunrise clip looks too blue
• Indoor lighting looks too orange
• Several clips use different colour temperatures
• Skin tones appear too cool or too warm
Do not use temperature to change the entire time of day unless that effect is intentional.
Tint
Tint adjusts the balance between green and magenta tones.
Use it only when the clip has an obvious colour cast.
For example:
• Faces appear slightly green
• White walls appear magenta
• Neutral objects have an unnatural tint
Small changes are usually enough.
Sharpness
Sharpness can make edges appear more defined.
Too much sharpness may create:
• Bright outlines
• Rough textures
• More visible AI artifacts
• Noisy backgrounds
• Harsh faces
• Distorted object edges
Sharpness does not restore missing detail.
A blurry generation cannot become truly detailed through strong sharpening.
Correct a Slightly Dark Clip
Suppose the selected red-bicycle clip is stable but slightly dark.
Use this process:
Step 1: Duplicate the Project Version
Save a new version before adjusting the picture.
For example:
020-red-bicycle-brightness-test-v01
Step 2: Select the Clip
Open the colour or adjustment controls.
Step 3: Increase Exposure Slightly
Make a small increase.
Check:
• Bicycle frame
• Wheels
• Wooden fence
• Road
• Grass
• Sky
Step 4: Raise Shadows When Necessary
If the bicycle remains too dark while the sky is already bright, increase shadows slightly instead of continuing to raise the complete exposure.
Step 5: Reduce Highlights When Necessary
If the sunrise area becomes too bright, lower the highlights slightly.
Step 6: Review the Complete Clip
Watch for:
• Brightness flicker
• Changing shadows
• Loss of sky detail
• Unnatural colours
• Increased video noise
Step 7: Compare Before and After
Switch the correction off and on when the editor allows it.
Keep the change only when the bicycle is clearer without damaging the sky or background.
Correct a Clip That Is Too Bright
A clip may appear washed out or lack visible detail.
Use:
• Slightly lower exposure
• Slightly lower highlights
• Small contrast increase when appropriate
• Small saturation correction when colours look weak
Check whether the correction restores detail in:
• Clouds
• Roads
• Clothing
• Products
• Bright walls
• Reflections
Do not make the clip unnecessarily dark.
Match Several Clips
A longer video may contain clips with different:
• Brightness
• Colour temperature
• Contrast
• Saturation
• Shadow levels
• Sunrise intensity
The goal is not to make every frame identical.
The goal is to reduce distracting changes between connected scenes.
Step 1: Choose a Reference Clip
Select the strongest clip as the visual reference.
For example:
Scene 1 has the most natural red bicycle, green grass, and warm sunrise light.
Step 2: Compare the Next Clip
Place the playhead near the transition between Scene 1 and Scene 2.
Check:
• Bicycle colour
• Sky colour
• Grass colour
• Brightness
• Contrast
• Shadow strength
Step 3: Adjust the Weaker Clip
Correct Scene 2 to more closely match Scene 1.
Do not change the strongest clip unnecessarily.
Step 4: Watch the Transition
The change should feel natural.
Avoid a sudden jump from:
• Warm to cool
• Bright to dark
• Strong colour to faded colour
• High contrast to flat contrast
Step 5: Repeat for Each Scene
Use the same reference style throughout the project.
Use Automatic Colour Correction Carefully
Some editors provide controls such as:
• Auto Enhance
• Auto Colour
• Match Colour
• Improve Image
• Smart Correction
These tools may improve a clip quickly, but they may also:
• Change skin tones
• Oversaturate colours
• Increase contrast too much
• Change the intended mood
• Create differences between scenes
• Make AI artifacts more visible
Apply the automatic correction, then compare it with the original.
Do not accept it only because the editor describes it as automatic or intelligent.
Avoid Applying Different Filters to Every Clip
Filters may create visual styles such as:
• Vintage
• Cinematic
• Warm
• Cool
• Black and white
• Dramatic
• Soft
• High contrast
Using a different filter on every scene may make the final video feel disconnected.
When a filter is necessary:
• Use the same one across related scenes.
• Use a low strength.
• Confirm that products, skin tones, and brand colours remain accurate.
• Review the complete video.
A filter should support the project rather than hide generation problems.
Correct Minor Camera Shake
Some AI-generated clips contain small unwanted camera movement.
Video stabilization may help when the shake is minor.
Step 1: Review the Original Camera Movement
Determine whether the movement is:
• Intended camera motion
• Minor shake
• Severe jump
• Subject distortion
• Background instability
Stabilization is designed mainly for camera movement.
It will not correct a bicycle wheel that changes shape.
Step 2: Duplicate the Project Version
Create a stabilization test version.
For example:
020-red-bicycle-stabilization-test-v01
Step 3: Apply Low Stabilization
Begin with the lowest useful setting.
Strong stabilization may:
• Crop the frame
• Enlarge the video
• Warp the edges
• Create unnatural movement
• Remove intended camera motion
Step 4: Wait for Processing
Stabilization may require the editor to analyse the complete clip.
Do not close the project while processing is incomplete.
Step 5: Compare the Results
Review:
• Bicycle position
• Wheel visibility
• Background edges
• Camera smoothness
• Cropping
• Sharpness
Turn stabilization off and on when possible.
Step 6: Reject It When It Creates New Problems
Do not use stabilization when it:
• Crops the subject
• Distorts the fence
• Creates moving borders
• Makes the camera movement unnatural
• Reduces quality too much
A small amount of shake may be preferable to a warped stabilized result.
When Stabilization Will Not Help
Stabilization usually cannot repair:
• A changing subject
• Distorted faces
• Missing hands
• Bending objects
• Flickering backgrounds
• Incorrect physics
• Camera movement generated inside changing scenery
• Sudden scene transformations
Regeneration, trimming, or replacing the clip may be necessary.
Adjust Video Speed Carefully
Speed controls change how quickly a clip plays.
They may be useful when:
• Camera movement is slightly too fast
• Environmental motion is slightly too quick
• A demonstration needs more viewing time
• A clip contains unnecessary slow movement
• Timing must match narration
Common speed values may include:
• 0.5×
• 0.75×
• 1×
• 1.25×
• 1.5×
• 2×
The normal speed is:
1×
Slow Down a Clip
Reducing the speed increases the clip duration.
For example, a four-second clip played at 0.5× becomes approximately eight seconds long.
Slowing the clip may make:
• Camera motion gentler
• A short scene easier to understand
• Captions easier to read
• Environmental movement calmer
However, it may also make:
• Movement look unnatural
• Repeated frames more visible
• AI distortions easier to notice
• Audio sound stretched
• The scene feel too slow
Use a small reduction first, such as 0.9× or 0.8× when the editor permits custom values.
Speed Up a Clip
Increasing the speed reduces the duration.
Speeding up may help when:
• The camera moves too slowly
• A pause is too long
• The action takes longer than necessary
• The clip must fit a short format
However, it may create:
• Sudden movement
• Reduced realism
• Fast camera motion
• Difficult-to-read captions
• Audio that sounds unnatural
Do not use speed changes to hide a serious movement error.
Preserve Audio Quality When Changing Speed
Changing video speed may also change the audio.
The sound may become:
• Higher pitched
• Lower pitched
• Faster
• Slower
• Distorted
• Out of synchronization
Some editors include an option such as:
• Preserve Pitch
• Maintain Audio Pitch
• Keep Voice Tone
Use it when narration or dialogue must remain natural.
When the original generated audio is unnecessary, mute it before changing the speed and add suitable audio later.
Change the Speed of Only One Section
Suppose the camera is smooth for most of the clip but moves too quickly during one second.
You may:
1. Move the playhead to the beginning of the fast section.
2. Split the clip.
3. Move the playhead to the end of the fast section.
4. Split again.
5. Select the middle section.
6. Reduce its speed slightly.
7. Review the transitions into and out of the changed section.
This method provides more control than slowing the complete clip.
However, the change may create a visible timing jump.
Use gradual speed controls when the editor supports them.
Use Freeze Frames Carefully
A freeze frame holds one video frame for a selected duration.
It may be useful for:
• Showing a title
• Explaining a problem
• Allowing viewers to inspect a detail
• Creating a before-and-after comparison
• Extending a stable final frame
For example, freeze a stable bicycle frame for two seconds while displaying:
Strongest Usable Section
Choose a frame with:
• Complete subject
• Correct shape
• Stable background
• Suitable lighting
• No distortion
Do not freeze a frame containing AI errors.
A freeze frame should be clearly intentional.
Avoid Reversing a Clip Without a Clear Reason
Some editors allow reverse playback.
A reversed AI-generated clip may create:
• Unnatural movement
• Incorrect wheel rotation
• Water moving backward
• Smoke returning to its source
• Impossible body movement
• Audio playing backward
Use reverse only for a deliberate creative effect.
Do not use it to make a subject travel in the opposite direction when the physical movement becomes unrealistic.
Compare the Corrected Clip at Normal Speed
A clip may look impressive when reviewed frame by frame but unnatural during normal playback.
After every correction:
1. Return the speed to normal playback.
2. Watch from beginning to end.
3. Review the movement and timing.
4. Listen to the audio.
5. Check the transition to the next clip.
Normal playback is the final test.
Save Before-and-After Versions
Keep:
• Original selected clip
• Basic trimmed clip
• Colour-corrected version
• Stabilized test
• Speed-adjusted test
• Final selected version
Suggested filenames include:
• 020-red-bicycle-trimmed-v01.mp4
• 020-red-bicycle-colour-corrected-v01.mp4
• 020-red-bicycle-stabilized-test-v01.mp4
• 020-red-bicycle-speed-adjusted-v01.mp4
Do not replace the strongest earlier version until the new result has been reviewed outside the editor.
Beginner Correction Example
Suppose the trimmed bicycle clip is:
• Slightly dark
• Slightly too warm
• Affected by minor camera shake
• Moving at a suitable speed
The correction plan might be:
Exposure: Increase slightly
Shadows: Increase slightly to reveal wheel and frame details
Highlights: Reduce slightly to protect sunrise detail
Temperature: Reduce slightly to prevent excessive orange colour
Saturation: Leave unchanged
Stabilization: Test at a low level
Speed: Leave at 1×
After reviewing the stabilized result, suppose it crops the front wheel.
The final decision should be:
Keep the colour correction, reject stabilization, and preserve the original camera movement.
The technically available correction is not always the best choice.
Visual-Correction Checklist
Before continuing, confirm:
• The original source and project versions were preserved.
• Adjustments were made gradually.
• Exposure is neither too bright nor too dark.
• Bright areas retain detail.
• Dark areas retain important detail.
• Colours remain natural.
• Skin tones and product colours remain accurate.
• Connected clips have reasonably consistent brightness and colour.
• Automatic corrections were reviewed rather than accepted immediately.
• Filters were used consistently or avoided.
• Stabilization did not crop or warp the subject.
• Video speed remains natural.
• Audio remains synchronized and understandable.
• The complete corrected clip was reviewed at normal speed.
• Before-and-after versions were saved.
Brightness, colour, stabilization, and speed controls can improve a usable clip, but they should not be used to hide major AI-generation errors.

Figure 8. Small adjustments to lighting, colour, stabilization, and speed can improve an already usable AI-generated clip.
Figure 8 shows the main visual-correction tools used during AI-video editing. Beginners should make gradual changes, compare the corrected clip with the original, reject adjustments that create cropping or distortion, and remember that editing controls cannot repair major generation errors.
How to Add Smooth Transitions Between AI-Generated Clips
A transition controls how one video clip changes into the next.
Transitions can help separate scenes, show a change in time or location, and make a sequence feel more organized.
However, transitions should not be used to hide every editing problem.
A strong sequence normally depends first on:
• Suitable clip selection
• Clean trimming
• Logical scene order
• Similar lighting and colour
• Consistent subject appearance
• Compatible camera movement
Add transitions only after the clips work reasonably well with direct cuts.
Understand the Difference Between a Cut and a Transition
A cut changes immediately from one clip to another.
For example:
Country-road scene → lakeside scene
The first clip ends, and the next clip begins without an added visual effect.
A transition adds a visual change between the two clips.
For example:
• One clip gradually disappears while the next appears.
• The screen fades to black before the next scene begins.
• The next clip slides into view.
• The first image becomes blurred before changing.
A direct cut is often the cleanest choice.
Do not assume that every connection requires an animated transition.
Begin with Direct Cuts
Arrange the selected clips on the timeline with no transitions.
Watch the complete sequence.
Check:
• Does the story order make sense?
• Does the subject remain recognizable?
• Does the movement direction remain logical?
• Are the clips trimmed cleanly?
• Do the lighting and colours match?
• Does the camera jump unexpectedly?
• Does the location change clearly?
When a direct cut looks natural, keep it.
Adding an effect may make a strong connection weaker.
When a Direct Cut Works Well
A direct cut is often suitable when:
• The action continues naturally.
• The subject moves in the same direction.
• The camera angle is similar.
• The lighting remains consistent.
• The next scene begins immediately.
• The pace should remain active.
• The clips belong to the same location or moment.
For example:
Scene 1 ends with the bicycle moving from left to right along a country road. Scene 2 begins with the same bicycle continuing from left to right through green fields.
A direct cut may communicate continuous travel effectively.
When a Transition May Help
A transition may improve the sequence when:
• The location changes.
• Time passes.
• The lighting changes significantly.
• The story moves to another topic.
• The next scene has a different camera view.
• A short pause is needed.
• The video begins or ends.
• A direct cut feels too abrupt.
For example:
The bicycle travels along a country road in the morning, and the next scene shows it beside a lake at sunset.
A short dissolve may help communicate the change in time and location.
Use Simple Transitions First
Beginner-friendly transitions include:
• Direct cut
• Cross dissolve
• Fade to black
• Fade from black
• Dip to black
• Dip to white when appropriate
These transitions are usually easier to control than decorative effects.
Avoid beginning with:
• Spinning transitions
• Page turns
• Explosions
• Complex wipes
• Flashing effects
• Three-dimensional rotations
• Rapid zoom transitions
Decorative transitions can distract viewers from the AI-generated content.
Cross Dissolve
A cross dissolve gradually blends the end of one clip with the beginning of the next. [3]
It may be useful for:
• Changing locations
• Showing time passing
• Moving between calm scenes
• Connecting clips with slightly different lighting
• Softening a minor visual jump
For the bicycle project:
Country road → lakeside path
A short dissolve may help connect the two environments.
How to Add a Cross Dissolve
1. Place the two clips directly beside each other.
2. Open the editor’s transition library.
3. Choose Cross Dissolve or Dissolve.
4. Drag it onto the connection between the clips.
5. Set a short duration.
6. Play the transition several times.
7. Adjust or remove it when necessary.
A duration of approximately a fraction of a second to one second may be suitable for a short beginner video, depending on the pace and editor.
Do not make the dissolve so long that both scenes become confusingly visible at the same time.
Fade to Black
A fade to black gradually darkens the current clip until the screen becomes black.
It may communicate:
• The end of a section
• A pause
• A significant change in time
• A change of location
• The end of the complete video
For example:
Bicycle travelling through fields → fade to black → bicycle beside a lake at sunset
A short black screen can give viewers a moment to understand that the story has moved forward.
Fade from Black
A fade from black gradually reveals the next clip.
It is often used:
• At the beginning of a video
• After a fade to black
• After a title card
• At the beginning of a new section
• When introducing a peaceful scene
A video may begin with:
1. Black screen
2. Short title
3. Fade into the first AI-generated clip
Keep the opening brief.
Do not delay the main content unnecessarily.
Dip to Black
A dip to black briefly darkens the connection between two clips without creating a long pause.
It can be useful when:
• The location changes
• A direct cut is too abrupt
• A complete fade feels too slow
• The clips have different brightness levels
The effect should remain subtle.
Dip to White
A dip to white may suggest:
• A bright memory
• A flash
• A dream
• A strong daylight transition
• A creative scene change
Use it carefully because a bright white flash may be uncomfortable or distracting.
Avoid rapid flashing, especially when the video may be viewed by a broad audience.
Choose a Transition That Matches the Purpose
The transition should support the meaning of the change.
Examples include:
| Scene change | Suitable option |
| Same action continues | Direct cut |
| Calm change of location | Short dissolve |
| Significant time change | Fade or dip to black |
| Opening the video | Fade from black |
| Ending the video | Fade to black |
| Fast educational comparison | Direct cut |
| Before-and-after example | Direct cut or short dissolve |
Do not select a transition only because it looks impressive inside the editor.
Keep Transition Durations Short
A transition takes time away from the visible clips.
For example, a two-second dissolve between two four-second clips may occupy a large part of the complete sequence.
Long transitions may:
• Hide important movement
• Make the video feel slow
• Blend unrelated objects
• Create ghosted subjects
• Make captions difficult to read
• Reveal AI inconsistencies
• Reduce the time available for narration
Begin with a short transition and increase it only when necessary.
Watch for Ghosted or Duplicated Subjects
During a dissolve, both clips may be partly visible.
This can create the appearance of:
• Two bicycles
• Two people
• Duplicate faces
• Overlapping wheels
• Double products
• Mixed backgrounds
For example, dissolving between two differently positioned bicycles may temporarily show both bicycles at once.
When this looks confusing:
• Shorten the dissolve.
• Use a direct cut.
• Use a fade to black.
• Select clips with more similar compositions.
• Add a neutral transition shot.
Avoid Transitions During Important Movement
Do not place a long transition while:
• A person is speaking
• A bicycle is turning
• A product is being demonstrated
• A hand is interacting with an object
• Important text is visible
• A caption changes
• A critical movement is occurring
The transition may hide or confuse the action.
Choose a stable point near the end of the first clip and the beginning of the next clip.
Trim Clips Before Adding Transitions
Transitions often use a small portion of the end of one clip and the beginning of another.
When the clip edges contain distortion, the transition may reveal it.
Before adding the transition, confirm that:
• The end of Clip 1 is stable.
• The beginning of Clip 2 is stable.
• Both subjects are fully formed.
• Lighting is acceptable.
• No unwanted object appears.
• The camera is not accelerating suddenly.
A transition cannot make severely distorted frames suitable.
Leave Enough Clip Material
Some editors require additional hidden frames beyond the visible trim point to create a transition.
When there is not enough material, the editor may:
• Shorten the transition
• Repeat frames
• Display a warning
• Refuse the transition
• Freeze the image
• Change the clip timing
Avoid trimming both clips to their absolute limits before adding a transition.
Leave a small amount of stable material when possible.
Review Audio Across the Transition
Visual transitions do not automatically create smooth audio.
The sound may:
• Stop suddenly
• Begin abruptly
• Overlap incorrectly
• Change volume
• Contain two environmental sounds at once
• Reveal an unwanted generated voice
Listen to every transition with audio enabled.
Possible corrections include:
• Audio fade-out
• Audio fade-in
• Crossfade
• Lowering one track
• Removing original generated audio
• Continuing one music track across both clips
• Adding a short ambient sound
Use Audio Crossfades
An audio crossfade gradually reduces one audio clip while increasing the next.
It may help when:
• Two environmental sounds connect.
• Narration continues across a scene change.
• Music tracks change.
• Original clip audio is retained.
• A direct audio cut sounds abrupt.
Keep narration clear and avoid overlapping two spoken voices.
Continue Music Across Visual Cuts
One continuous music track can help several short AI-generated clips feel like one connected video.
Place the music on a separate audio track beneath the complete sequence.
The music can continue across:
• Direct cuts
• Dissolves
• Fades
• Title cards
Adjust its volume so it does not overpower narration or captions.
Use only music that is authorized for the intended project.
Use a Neutral Transition Clip
A short supporting clip can connect two scenes that do not match well.
For the bicycle story, a neutral transition clip might show:
• Moving grass
• Sunrise clouds
• A close-up of the road
• A bicycle wheel
• A lakeside reflection
• A simple title card
Place the neutral clip between the two main scenes.
For example:
Country road → close-up of moving grass → lakeside path
This may create a smoother visual progression than an artificial effect.
Use Title Cards Between Major Sections
An educational video may use a brief title card to separate topics.
For example:
Before Editing
followed later by:
After Editing
A title card can make a large change feel intentional.
Keep the card:
• Brief
• Readable
• Consistent with the video design
• Visible long enough
• Free from unnecessary animation
Do not use a title card between every short clip.
Match Transition Style Across the Project
Choose a small transition system for the complete video.
For example:
• Direct cuts for normal scene changes
• Short dissolves for location changes
• Fade to black at the ending
Using many different transition styles may make the video feel inconsistent.
A simple project rarely needs more than two or three transition types.
Do Not Add a Transition to Every Cut
Too many transitions may cause:
• Slow pacing
• Visual clutter
• Repeated effects
• Reduced professionalism
• Hidden movement
• Viewer distraction
• Increased export time
A useful rule is:
Use a transition only when it improves the meaning or smoothness of a specific scene change.
Direct cuts should remain the default.
Review the Transition at Normal Speed
The transition may look smooth when moved frame by frame but feel too slow during normal playback.
After adding it:
1. Start playback several seconds before the transition.
2. Watch through the connection.
3. Continue several seconds after it.
4. Listen to the audio.
5. Check captions and titles.
6. Review at normal speed.
Do not review only the exact transition frames.
The surrounding timing affects how the connection feels.
Review Transitions on a Full-Screen Export
The editor preview may hide:
• Ghosted objects
• Blended faces
• Frame repetition
• Compression problems
• Sudden brightness changes
• Text overlap
Export a short test section containing the transition.
Play it outside the editor at full screen.
Keep the transition only when the exported result is clear and comfortable to watch.
Before-and-After Transition Example
Suppose the project contains:
Clip 1
• Red bicycle travelling along a country road
• Morning lighting
• Side-tracking camera
• Movement from left to right
Clip 2
• Red bicycle beside a lake
• Warmer evening lighting
• Static camera
• Bicycle remains still
Direct-Cut Result
The location, lighting, and camera movement change suddenly.
The change may feel abrupt.
Short-Dissolve Result
A brief dissolve communicates that the journey has moved to another location and time.
However, a long dissolve shows two bicycles at once.
Final Choice
Use a short dissolve that:
• Clearly separates the locations
• Avoids prolonged double images
• Preserves the story pace
• Keeps the transition under control
Transition Troubleshooting
The Transition Shows Two Subjects
Cause: Both clips remain visible too long.
Correction: Shorten the dissolve or use a fade to black.
The Transition Feels Too Slow
Cause: The transition duration is too long for the short clips.
Correction: Reduce its duration or use a direct cut.
The Transition Reveals Distorted Frames
Cause: Weak clip edges were included.
Correction: Trim to stable frames before applying the transition.
The Screen Flashes Unexpectedly
Cause: A bright transition, exposure difference, or unintended empty frame is present.
Correction: Use a simpler dissolve or fade, and inspect the timeline for gaps.
The Audio Stops Abruptly
Cause: The visual transition was added without an audio fade.
Correction: Add a short audio fade or crossfade.
Captions Overlap the Transition
Cause: Caption timing extends across the scene change.
Correction: End the caption before the transition or reposition it for the next scene.
The Transition Crops or Moves the Video
Cause: Some animated transitions include zooming or movement.
Correction: Use a simple dissolve or direct cut.
The Video Feels Over-Edited
Cause: Too many effects or several transition styles were used.
Correction: Remove unnecessary transitions and keep only those that improve understanding.
Save Transition Test Versions
Create separate project versions when comparing transition options.
For example:
• 020-bicycle-transition-direct-cut-v01
• 020-bicycle-transition-dissolve-v01
• 020-bicycle-transition-fade-black-v01
Export short previews and compare them.
Do not permanently replace the direct-cut version until the selected transition has been reviewed.
Transition Checklist
Before continuing, confirm:
• The clips work reasonably well with direct cuts.
• Every transition supports a clear purpose.
• Transition duration is not excessive.
• No duplicate or ghosted subject appears.
• Weak clip-edge frames were removed.
• Important movement remains visible.
• Audio begins and ends smoothly.
• Captions and titles remain readable.
• Only a small number of transition styles are used.
• No rapid flashing or uncomfortable effect appears.
• The transition was reviewed at normal speed.
• A test export was played outside the editor.
• A new project version was saved.
Transitions should support the story and make scene changes easier to understand. They should not distract viewers or attempt to hide major AI-generation problems.
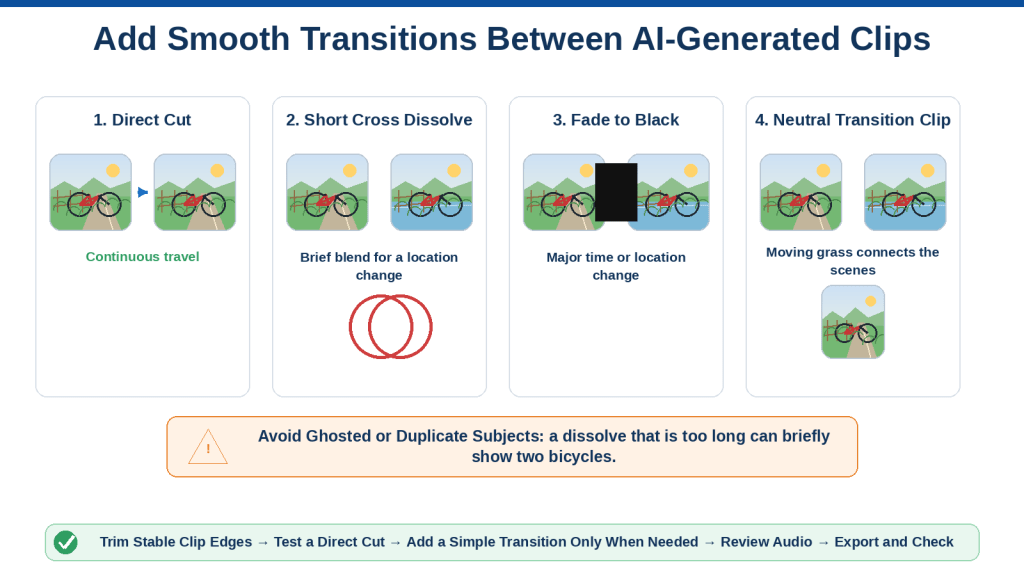
Figure 9. Simple transitions can connect AI-generated clips when they support the scene change and remain brief and unobtrusive.
Figure 9 compares direct cuts, cross dissolves, fades, and neutral transition clips. It shows that direct cuts should remain the normal choice, while short dissolves or fades may help communicate a change in time, location, or topic without creating duplicated subjects or distracting visual effects.
How to Add Titles and Accurate On-Screen Text
Titles and on-screen text help viewers understand:
• What the video is about
• What each scene demonstrates
• Which section is the original version
• Which section was edited
• What problem was corrected
• What action the viewer should take next
AI-generated text inside a video may be misspelled, distorted, incomplete, or unstable between frames.
For important wording, create the visual scene without text and add accurate words manually in the video editor.
Decide Whether Text Is Necessary
Do not add text only to fill empty space.
Every title or label should have a clear purpose.
On-screen text may be useful for:
• Opening titles
• Section headings
• Before-and-after labels
• Step numbers
• Short explanations
• Important reminders
• Names or locations when verified
• AI-use disclosure
• Closing messages
• Website addresses
• Calls to action
A simple red-bicycle editing demonstration might use:
• Editing an AI-Generated Video
• Original Clip
• Weak Opening
• Strongest Section
• Trimmed Version
• Final Export
These labels help viewers follow the editing process without requiring a long explanation.
Keep Text Brief
Viewers need time to read while also watching the video.
Use short wording whenever possible.
Instead of:
This is the section at the beginning of the AI-generated video that contains visual instability and should therefore be removed during editing.
Use:
Weak Opening — Remove
Instead of:
This is the final corrected video after the beginning and ending sections have been trimmed.
Use:
Final Trimmed Version
Short text is easier to:
• Read
• Position
• Time
• Translate
• Resize for mobile
• Keep away from the main subject
Use narration or the article text for detailed explanations.
Prepare the Text Before Opening the Editor
Write all planned wording in a separate document.
For example:
Opening title
Editing an AI-Generated Video
Original-version label
Original Six-Second Clip
Problem label
Weak Opening
Correction label
First 0.5 Second Removed
Final label
Edited Four-and-a-Half-Second Clip
Disclosure
This demonstration includes AI-generated visuals.
Check every line for:
• Spelling
• Grammar
• Punctuation
• Capitalization
• Numbers
• Dates
• Names
• Website addresses
• Factual accuracy
Do not type important wording quickly inside the editor without reviewing it first.
Use a Clear Text Hierarchy
Text hierarchy helps viewers understand which words are most important.
A simple hierarchy may contain:
Main Title
The main title identifies the complete video.
Example:
How to Edit an AI-Generated Video
It should normally be the largest text.
Section Heading
A section heading introduces part of the video.
Examples:
Before Editing
After Editing
Step 1: Trim the Opening
It should be smaller than the main title but larger than supporting text.
Supporting Label
A supporting label identifies a specific detail.
Examples:
Original Clip
Trim Point
00:00.5
16:9 Landscape
Supporting labels should remain readable without competing with the main title.
Choose a Readable Typeface
Use a simple typeface that remains clear on desktop and mobile screens.
Suitable characteristics include:
• Clean letter shapes
• Clear spacing
• Medium or bold weight
• Strong readability
• No excessive decoration
Avoid:
• Very thin fonts
• Script fonts
• Highly decorative fonts
• Narrow condensed fonts
• Several unrelated typefaces
• Fonts with unusual letter shapes
Use one main typeface throughout the project when possible.
A second typeface may be used carefully for a special title, but it is not necessary for a beginner video.
Use a Large Enough Font Size
Text that looks readable in the editor’s enlarged preview may become too small when viewed:
• On a website
• On a mobile phone
• Inside a social-media feed
• In an embedded WordPress player
• At lower video resolution
Test the text at normal viewing size.
The exact font size depends on:
• Video resolution
• Aspect ratio
• Text length
• Typeface
• Publishing platform
Use the largest practical size that fits comfortably.
Reduce the wording before reducing the text to a very small size.
Use Strong Contrast
Text should remain visible against the background.
Useful methods include:
• Light text on a dark background
• Dark text on a light background
• A semi-transparent background box
• A subtle outline
• A restrained shadow
• A separate title card
For example, white text may disappear over:
• Bright clouds
• White walls
• Sunrise reflections
• Light clothing
Add a dark background box or move the text to a clearer area.
Do not rely only on a shadow when the background changes significantly during the clip.
Use a Background Box When Necessary
A background box can improve readability when the video contains changing colours or movement.
The box may be:
• Solid
• Semi-transparent
• Rounded
• Rectangular
• Full-width
• Limited to the text area
Keep it simple.
A large opaque box may hide important content.
For the red-bicycle scene, place a restrained text box in open sky or unused landscape space rather than covering the bicycle.
Keep Text Inside a Safe Area
Do not place essential wording directly against the frame edge.
Leave space around:
• Left edge
• Right edge
• Top edge
• Bottom edge
Video players and social-media interfaces may cover parts of the frame with:
• Playback controls
• Captions
• Usernames
• Buttons
• Progress bars
• Menus
• Platform labels
Keep important titles and labels inside the central safe area.
Avoid Covering the Main Subject
Before positioning text, identify the most important visual details.
For the bicycle example, avoid covering:
• Bicycle frame
• Wheels
• Handlebars
• Seat
• Road movement
• Trimmed problem area
• Important background comparison
Useful text areas may include:
• Open sky
• Empty road space
• Unused side of the frame
• A separate title card
• A dedicated information panel
Watch the complete clip because the subject may move behind the text later.
Position Text According to Its Purpose
Possible placements include:
Top Centre
Useful for:
• Main title
• Section heading
• Short educational label
Avoid using it when the subject’s face or important sky detail appears there.
Lower Third
A lower-third title appears near the lower left or lower right.
It may identify:
• A person
• A location
• A scene
• A version number
• A short explanation
Do not place it so low that playback controls cover it.
Centre
Centre placement may be suitable for:
• A title card
• A short pause message
• Before-and-after labels
• A closing statement
Avoid keeping centred text over important movement for a long time.
Side Panel
A side panel can provide room for:
• Step numbers
• Short instructions
• Comparison notes
• Editing settings
This may work well when the original video already leaves open space.
Create an Opening Title
An opening title should quickly explain the purpose of the video.
For example:
How to Edit an AI-Generated Video
Optional supporting line:
Basic trimming demonstration
Keep the opening brief.
A short video should not spend several seconds showing only the title.
For a four-and-a-half-second demonstration, you may:
• Place the title over the opening video
• Use a one-second title card before the clip
• Add a small title during the first part of the video
Choose the method that does not delay the demonstration unnecessarily.
How to Add an Opening Title
The exact controls vary, but the basic steps are:
1. Open the Text or Titles panel.
2. Choose a simple title style.
3. Add the title above the video track.
4. Type the reviewed wording.
5. Select a readable typeface.
6. Increase the font size.
7. Position it inside the safe area.
8. Add contrast when necessary.
9. Set the display duration.
10. Play the complete opening.
Do not select a highly animated title template for the first project.
A simple fade may be enough.
Set a Suitable Title Duration
A title must remain visible long enough to read.
Consider:
• Number of words
• Reading difficulty
• Video pace
• Viewer age
• Screen size
• Whether narration repeats the text
A short title such as:
Original Clip
may require less display time than:
The Weak Beginning and Distorted Ending Were Removed
Read the text aloud at a comfortable pace.
Keep it visible long enough to understand without stopping the video unnecessarily.
Add Before-and-After Labels
Before-and-after labels are useful for editing demonstrations.
For example:
First Version
Before Editing
Corrected Version
After Editing
Use the same:
• Font
• Size
• Position
• Background style
• Capitalization
• Display duration
Consistency makes the comparison easier to understand.
You may use restrained visual differences, such as:
• Warning symbol for the weak version
• Check mark for the corrected version
Do not depend only on colour to communicate the difference.
Include words such as Before and After.
Add Step Numbers
A tutorial video may use:
• Step 1: Review
• Step 2: Trim
• Step 3: Add Text
• Step 4: Export
Keep each step label short.
Place the number consistently.
Do not display several step labels at the same time unless the video is showing a complete overview.
Add Timing Labels When They Improve Understanding
An editing demonstration may display:
• 00:00.0
• 00:00.5
• 00:05.0
• 00:06.0
For example:
Trim Point: 00:00.5
This helps viewers understand where the edit occurs.
Confirm that the displayed timing matches the actual timeline.
Do not use precise timecodes when they are not necessary.
Add Arrows and Highlight Boxes Carefully
Some editors allow:
• Arrows
• Circles
• Rectangles
• Highlight areas
• Pointer icons
These can identify:
• A distorted wheel
• The trim point
• An unwanted object
• A caption location
• The selected timeline section
Keep annotations:
• Large enough to see
• Visible long enough
• Away from unrelated details
• Consistent in style
• Limited in number
Do not cover the complete subject with arrows and boxes.
Add Text to a Freeze Frame
A freeze frame can give viewers time to inspect an editing problem.
For example:
1. Pause on the distorted final wheel.
2. Hold the frame for two seconds.
3. Add an arrow pointing to the wheel.
4. Add the label:
Distorted Ending — Remove
Then continue to the trimmed result.
Use a stable, clear freeze frame.
Do not freeze a frame containing private information or unintended branding.
Use Text Animation Sparingly
Text animation may include:
• Fade in
• Fade out
• Slide in
• Typewriter effect
• Zoom
• Rotation
• Bounce
For a beginner educational video, a simple fade is usually sufficient.
Avoid:
• Rapid movement
• Repeated bouncing
• Spinning words
• Flashing text
• Complex letter-by-letter effects
• Several animation types in one video
The viewer should notice the information rather than the animation.
Keep Text Animation Separate from Camera Movement
When the camera already moves, strong text animation can make the frame feel unstable.
For example, a fast title sliding across the screen while the camera pushes forward may be distracting.
Use:
• Static text
• Gentle fade
• Minimal motion
The text should remain easy to track.
Use Consistent Text Styles
Create a simple text-style guide.
For example:
Main title
• Bold
• Large
• Centre or upper area
• High contrast
Section heading
• Bold
• Medium
• Upper left
Supporting label
• Medium weight
• Smaller
• Lower left
• Background box when needed
Caption
• Consistent caption style
• Lower safe area
• Strong contrast
Use the same system throughout the video.
Check Capitalization
Choose one capitalization style.
Examples include:
• Title Case: Editing an AI-Generated Video
• Sentence case: Editing an AI-generated video
• Uppercase: EDITING AN AI-GENERATED VIDEO
Avoid changing styles randomly.
Full uppercase may be suitable for a very short label but can be harder to read in longer lines.
Check Hyphenation and Terminology
Use the same terminology throughout the project.
For example:
• AI-generated video
• Video editor
• Text-to-video
• Image-to-video
• Aspect ratio
• On-screen text
Do not alternate unnecessarily between:
• AI video
• Artificial video
• Generated movie
• Synthetic clip
Consistency helps beginners learn the correct terms.
Check Numbers and Measurements
Verify:
• Clip duration
• Resolution
• Aspect ratio
• Version number
• Timecode
• File size
• Dates
• Step numbers
For example:
16:9 Landscape
1920 × 1080
Trimmed to 4.5 Seconds
Do not estimate technical values when the editor provides the exact information.
Add Website Information Carefully
A closing screen may include:
AI Mastery
or the verified website address.
Check:
• Correct spelling
• Correct domain
• Capitalization
• Punctuation
• Display time
Do not place the website address too close to the bottom edge.
Test it at mobile size.
Add a Call to Action Only When Appropriate
Possible calls to action include:
• Read the complete guide
• Watch the full tutorial
• Compare the original and edited clips
• Continue to the next lesson
• Visit the website
Keep the wording brief and accurate.
Do not use unsupported promises such as:
• Guaranteed perfect AI videos
• Edit any video instantly
• Fix every AI error automatically
The call to action should match what the content actually provides.
Add AI Disclosure When Required
A short disclosure may say:
This video includes AI-generated visuals.
Or:
AI-generated demonstration for educational purposes.
Place it where viewers can reasonably notice it.
Possible locations include:
• Opening title
• Closing screen
• On-screen label
• Video description
• Article paragraph
• Platform disclosure setting
The correct method depends on the publishing platform and content.
Do not make the disclosure so small or brief that viewers are unlikely to notice it when disclosure is important.
Do Not Use Text to Hide a Serious Error
A title or caption may cover a small edge problem, but it should not be used to conceal:
• A changing face
• Incorrect product operation
• Missing body parts
• A misleading scene
• A false claim
• A major background transformation
• A safety error
Replace or regenerate the clip when the hidden problem would still affect meaning or accuracy.
Avoid Too Much Text
A video should not look like a full article placed over moving footage.
Too much text can:
• Hide the visual content
• Overload viewers
• Become unreadable
• Compete with narration
• Cause mobile-display problems
• Slow the video unnecessarily
Use the video for visuals and movement.
Use the article, narration, or transcript for detailed explanation.
Avoid Text Near Rapid Movement
Do not place important wording over:
• Fast camera pans
• Moving hands
• Changing backgrounds
• Rapid subject movement
• Bright flashing areas
• Detailed product demonstrations
Use a calmer part of the frame or a separate title card.
Check Text Against Every Frame
A background may change while the text remains visible.
For example:
• White text begins over a dark road.
• The camera moves upward.
• The same text later appears over bright clouds and becomes unreadable.
Watch the complete text duration.
Use a background box or move the text when the scene changes.
Check Spelling at Full Screen
Misspellings can be difficult to notice in a small preview.
Review every title and label:
• Inside the editor
• In the exported file
• At full screen
• At mobile size
Pay particular attention to:
• AI-generated
• Aspect ratio
• Resolution
• Captions
• Text-to-video
• Image-to-video
• WordPress
• Website address
Do not assume a template’s default text is correct.
Check Text Timing
Review when each title:
• Appears
• Becomes readable
• Disappears
• Changes to the next label
A title should not:
• Appear before the relevant scene
• Remain over the next scene
• Disappear before it can be read
• Cover a transition
• Conflict with captions
• Continue after the video ends
Use the timeline zoom for precise timing.
Avoid Overlapping Titles and Captions
A title near the bottom may conflict with captions.
Possible solutions include:
• Move the title upward.
• Display it before narration begins.
• Use a separate title card.
• Shorten the title duration.
• Place the title on the opposite side.
• Reduce the number of simultaneous text elements.
Keep the frame visually organized.
Review Text Without Sound
Watch the video with sound muted.
Ask:
• Is the main idea understandable?
• Are the labels correctly timed?
• Is the text readable?
• Does it cover important visuals?
• Is the scene order clear?
On-screen text should still communicate its intended purpose without depending entirely on audio.
Review Text on Different Screens
Test the exported video on:
• Desktop monitor
• Laptop
• Smartphone
• WordPress preview
• Full-screen player
• Normal embedded size
Text that is readable on a large monitor may become too small on a phone.
Create platform-specific text sizes when necessary.
Save Reusable Text Styles
Some editors allow title styles to be saved.
Create reusable styles for:
• Main title
• Section heading
• Before-and-after label
• Supporting note
• AI disclosure
• Closing screen
This helps maintain consistency across future AI Mastery videos.
Do not save private names, client information, or temporary test wording inside reusable templates.
Beginner Title Example
For the red-bicycle editing demonstration, use:
Opening
Editing an AI-Generated Video
Original Clip
Before Editing — Six Seconds
Weak Opening
Unstable Opening
Strong Section
Strongest Usable Section
Trimmed Result
After Editing — 4.5 Seconds
Disclosure
This demonstration includes AI-generated visuals.
Keep the wording, typeface, placement, and timing consistent.
On-Screen Text Checklist
Before continuing, confirm:
• Every title has a clear purpose.
• Text was prepared and reviewed before being added.
• Wording is brief.
• Spelling and grammar are correct.
• Names, numbers, dates, and links are verified.
• One readable typeface is used consistently.
• Text is large enough for mobile viewing.
• Contrast remains strong throughout the complete display time.
• Important subjects are not covered.
• Text remains inside the safe area.
• Title and caption positions do not conflict.
• Animation is simple and restrained.
• Before-and-after labels are clear.
• AI disclosure was added when required.
• Text timing matches the relevant scene.
• The exported file was checked at full screen and mobile size.
• A new project version was saved.
On-screen text should make the edited video easier to understand. It should remain accurate, readable, brief, and visually secondary to the main content.
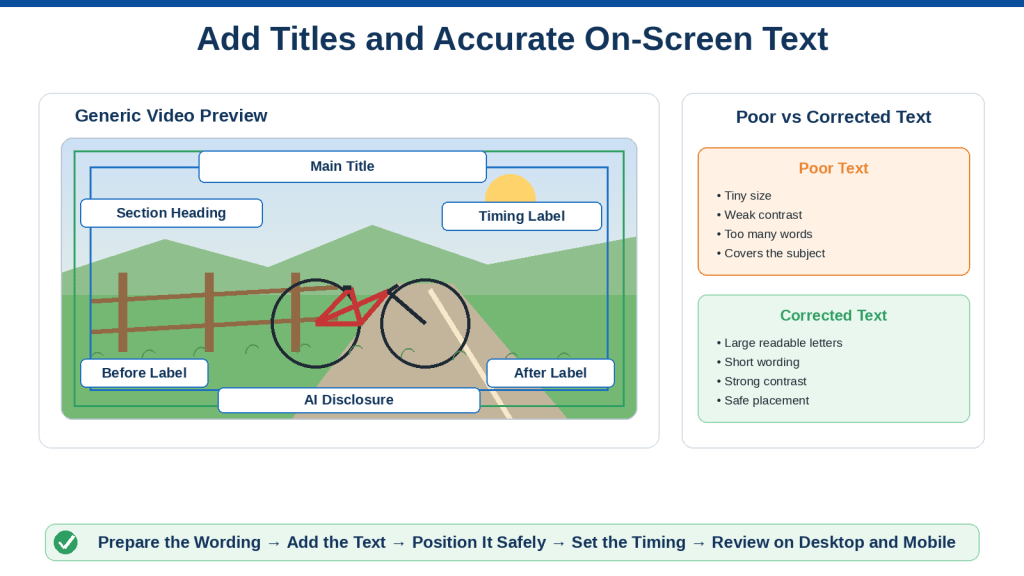
Figure 10. Clear titles and on-screen labels help viewers understand an edited AI-generated video without covering the main subject.
Figure 10 shows how to add accurate text manually during video editing. It demonstrates a readable title hierarchy, safe placement, strong contrast, before-and-after labels, timing controls, and restrained animation while keeping the complete subject visible.
How to Add Narration, Music, Sound Effects, and Captions
Audio helps viewers understand the video, follow the story, and remain engaged.
An edited AI-generated video may include:
• Original generated audio
• Recorded narration
• AI-generated narration
• Background music
• Environmental sound
• Sound effects
• Spoken dialogue
• Captions
Not every video needs all these elements.
A simple educational demonstration may require only:
• Clear narration
• Accurate captions
• Low background music or no music
Adding several audio tracks without a clear purpose can make the video difficult to understand.
The most important audio element should normally be the spoken explanation.
Review the Original Generated Audio First
Before adding new audio, listen to the complete source clip.
The AI-generated video may contain:
• No sound
• Environmental sound
• Music
• Dialogue
• Unwanted voices
• Distorted audio
• Repeated sound
• Sudden volume changes
• Audio that does not match the movement
Record whether the original audio should be:
• Kept
• Reduced
• Muted
• Removed
• Replaced
• Used only in part
Do not assume that automatically generated audio is suitable simply because it was created with the video.
Keep the Original Audio When It Helps
Original audio may be useful when it contains believable:
• Wind
• Water
• Traffic
• Room ambience
• Footsteps
• Birds
• Machinery
• Environmental sound
For the red-bicycle country-road scene, suitable original sound might include:
• Gentle wind
• Distant birds
• Soft countryside ambience
Keep it only when it matches the visual scene and remains clear throughout the clip.
Mute the Original Audio When It Is Distracting
Mute or remove the original audio when it contains:
• Unwanted speech
• Distorted sound
• Incorrect music
• Sudden noise
• Sounds that do not match the scene
• Audio with uncertain permission
• Repeated or artificial effects
For example, loud city traffic would not match a quiet countryside scene.
Muting the timeline clip normally leaves the visual video unchanged.
Understand the Main Audio Tracks
A simple editing project may contain:
• Audio Track 1: Original clip sound
• Audio Track 2: Narration
• Audio Track 3: Background music
• Audio Track 4: Sound effects
Keep each audio type on a separate track when the editor allows it.
This makes it easier to:
• Change volume
• Trim audio
• Move narration
• Replace music
• Mute one element
• Add fades
• Correct timing
Do not place several unrelated sounds on one track unless the editor requires it.
Prepare the Narration Script
Narration explains what viewers should understand from the video.
Write the script before recording.
For the red-bicycle editing demonstration, the narration might say:
This AI-generated clip contains an unstable opening and a distorted ending. The editor removes those sections and keeps the strongest four-and-a-half seconds.
This script is:
• Brief
• Relevant
• Easy to understand
• Directly connected to the visible edit
Do not describe something that viewers cannot see.
Keep Narration Short and Clear
Use simple sentences.
Avoid:
• Long explanations
• Several ideas in one sentence
• Unnecessary technical terms
• Repeating all visible text
• Unsupported claims
• Excessive promotional language
Instead of:
The artificial-intelligence-generated moving visual sequence has undergone a comprehensive post-production editing process involving temporal reduction and optimization.
Use:
The weak beginning and ending were removed during editing.
The narration should sound natural when spoken aloud.
Read the Script Aloud Before Recording
Reading aloud helps identify:
• Long sentences
• Difficult words
• Awkward phrasing
• Repetition
• Incorrect timing
• Unclear pronunciation
Measure how long the narration takes.
For example:
Video duration: 12 seconds
Narration duration: 18 seconds
The script is too long.
You may need to:
• Shorten the script
• Extend the visual sequence
• Add a freeze frame
• Use another supporting clip
• Divide the narration into sections
Do not force fast speech into a short video.
Record Narration in a Quiet Location
When recording your own voice:
• Close doors and windows.
• Turn off nearby televisions and radios.
• Reduce fan or appliance noise.
• Move away from traffic noise.
• Silence phone notifications.
• Keep the microphone at a consistent distance.
• Speak at a comfortable pace.
• Record a short test first.
A simple microphone may produce acceptable narration when the room is quiet.
Do not place the microphone so close that breathing or mouth sounds become distracting.
Maintain a Consistent Recording Position
Keep the same:
• Microphone
• Room
• Distance
• Speaking volume
• Voice direction
• Recording settings
Changes in recording position can make separate sentences sound as though they were recorded in different places.
When re-recording one sentence, listen to the surrounding narration and match its tone and volume.
Record Several Takes
Record more than one version when necessary.
For example:
• Take 1: Normal pace
• Take 2: Slightly slower
• Take 3: Shorter wording
Choose the clearest complete take.
Do not automatically select the last recording.
Save useful versions with descriptive filenames:
• 020-narration-take-01.wav
• 020-narration-take-02.wav
• 020-narration-selected.wav
Use an Authorized AI Voice When Appropriate
An AI-generated voice may be useful when:
• The creator does not want to record
• Several language versions are required
• A consistent generic narration voice is needed
• The project requires quick revisions
Before using one, check:
• Commercial-use conditions
• Voice licence
• Attribution requirements
• Export limits
• Privacy settings
• Whether the voice imitates a real person
• Whether uploaded recordings are retained
Use an authorized generic voice unless you have permission to imitate a specific person.
Do not clone or imitate a real person’s voice without appropriate authorization.
Review Every AI-Generated Spoken Word
AI narration may contain:
• Incorrect pronunciation
• Wrong emphasis
• Missing words
• Incorrect numbers
• Unnatural pauses
• Mispronounced names
• Robotic rhythm
• Changed wording
Listen from beginning to end.
Pay particular attention to:
• AI-generated
• Text-to-video
• Image-to-video
• WordPress
• Website names
• Dates
• Measurements
• Article numbers
• Technical terms
Correct or regenerate unclear sections.
Import the Narration
Import the selected narration file into the editor.
Place it on a separate audio track beneath the video.
Suggested filename:
020-red-bicycle-editing-narration.wav
Move the narration so that it begins at the correct visual moment.
For example:
• Opening title appears
• Video begins
• Narration starts after a brief pause
Avoid beginning narration before viewers can see the subject.
Trim the Narration
Remove:
• Long silence at the beginning
• Long silence at the end
• Mistakes
• Repeated words
• Unwanted breathing
• Background noise between sentences
Do not trim so closely that the first or final word sounds cut off.
Leave a small natural pause.
Split Narration When Necessary
Split the narration when:
• One sentence needs to move
• A mistake appears in the middle
• A pause needs shortening
• Different scenes require separate timing
• Music volume must change during one section
Keep the narration pieces in the correct order.
Listen for abrupt changes between the split sections.
Adjust Narration Volume
The narration should be easy to understand without sounding excessively loud.
Check it using:
• Headphones
• Computer speakers
• Mobile speakers
Avoid:
• Very low speech
• Sudden loud words
• Different volume between sentences
• Distortion
• Clipping
• Music covering the voice
Some editors show an audio meter.
Keep the narration below the level where the meter indicates distortion.
Use Audio Normalization Carefully
Some editors offer:
• Normalize
• Auto Volume
• Voice Leveling
• Loudness Matching
• Enhance Voice
These tools may help make the narration volume more consistent.
However, they may also:
• Increase background noise
• Make breathing louder
• Change the natural voice
• Create abrupt volume changes
Compare the adjusted version with the original.
Reduce Background Noise Carefully
Noise-reduction tools may reduce:
• Fan noise
• Room hum
• Air-conditioning noise
• Computer noise
• Low background hiss
Strong noise reduction may create:
• Metallic voice
• Robotic sound
• Missing word endings
• Unnatural silence
• Audio artifacts
Use a low or moderate setting.
A clean original recording is better than heavy correction.
Add Short Audio Fades
A fade-in gradually increases the audio volume.
A fade-out gradually decreases it.
Use short fades to prevent:
• Sudden narration starts
• Abrupt music
• Environmental sound stopping instantly
• Harsh endings
Do not make narration fade so slowly that the first words become difficult to hear.
Choose Background Music Carefully
Music should support the video’s purpose and mood.
For the bicycle demonstration, suitable music might be:
• Calm instrumental music
• Soft acoustic music
• Gentle ambient music
• Light educational background music
Avoid music that is:
• Too loud
• Too dramatic
• Distracting
• Inconsistent with the scene
• Difficult to license
• Longer or shorter than the project without suitable editing
Music is optional.
A clear educational video may work better without it.
Confirm Music Rights
Before using music, confirm:
• Track title
• Creator
• Source
• Licence
• Commercial-use permission
• Attribution requirement
• Platform restrictions
• Download date
Do not assume that music is safe to use because:
• It appears in a video editor.
• It was found online.
• It is labelled free.
• Another creator used it.
• It was generated by AI.
Keep the licence information in:
Sources and Licences
Import the Music
Place music on a separate audio track.
Trim it to the project duration.
When the music is shorter than the video, decide whether to:
• Use another track
• Extend it carefully
• Repeat it when the loop is natural
• Fade out early
• Leave part of the video without music
Do not repeat a short section when the loop is obvious or distracting.
Keep Music Below Narration
Narration should remain the main audio element.
Lower the music until every word is clear.
A useful listening test is:
1. Play the video at normal volume.
2. Listen without reading the captions.
3. Confirm that every spoken word is understandable.
4. Test on small speakers.
5. Reduce the music further when necessary.
Music that sounds quiet through headphones may still compete with narration on mobile speakers.
Use Audio Ducking When Available
Audio ducking automatically lowers the music when narration is present.
It may also be called:
• Lower Music Under Voice
• Voice Priority
• Auto Duck
• Background Audio Reduction
Review every lowered section.
Automatic ducking may:
• Lower music too much
• Change volume too quickly
• Miss part of the narration
• Create repeated volume movement
Manual volume adjustment may provide more control for a short project.
Add Music Fades
Add a fade-in near the beginning and a fade-out near the ending.
This prevents the music from:
• Starting suddenly
• Ending abruptly
• Continuing after the video
• Cutting off during the final note
Keep the fade consistent with the project length.
A very long fade may not suit a short clip.
Add Sound Effects Only When They Support the Scene
Sound effects may help viewers believe or understand the action.
For the bicycle project, possible effects include:
• Gentle wind
• Birds
• Bicycle wheel movement
• Light road ambience
• Soft transition sound
Use only sounds that match the visible scene.
Do not add:
• Loud traffic to an empty road
• Rain to a sunny scene
• A bicycle bell when no bell is shown
• Fast wheel sounds when the bicycle remains still
• Crowd noise in an empty countryside setting
Sound should support the visual evidence.
Keep Sound Effects Subtle
A sound effect should not overpower narration or music.
Use restrained volume.
Avoid adding an effect for every movement.
Too many sounds can make the video feel artificial or distracting.
Synchronize Sound with the Visible Action
Place the sound effect at the exact point where the action occurs.
For example:
• Door sound when the door begins moving
• Bicycle bell when the bell is used
• Footstep when the foot touches the ground
• Transition sound when the visual change occurs
Move the playhead to the action and align the sound.
Review the synchronization at normal speed.
Remove or Replace Unwanted Audio
When the AI-generated clip contains unsuitable sound:
1. Select the video clip.
2. Open its audio controls.
3. Mute the original audio or separate it.
4. Confirm that the visual clip remains unchanged.
5. Add replacement ambience when needed.
6. Review the complete audio mix.
Do not delete the original source file.
Preserve it in the project folder.
Avoid Using Audio to Mislead Viewers
Do not add audio that makes the scene appear to show something that did not occur.
Examples include:
• Applause suggesting an audience was present
• Speech attributed to a real person
• Product sounds implying a feature works
• Emergency sounds suggesting a real event
• Animal sounds when no animal appears
• Crowd reactions suggesting a genuine public response
Audio should not change the factual meaning of the video.
Create Accurate Captions
Captions display spoken words as text. [9]
They help:
• Deaf and hard-of-hearing viewers
• Viewers watching without sound
• Viewers in noisy locations
• Language learners
• People who have difficulty understanding the narration
• Mobile viewers
Captions should match the spoken words accurately.
Understand Captions and On-Screen Text
Captions reproduce narration or dialogue.
On-screen text provides additional information.
For example:
Narration caption:
This clip contains a weak opening and a distorted ending.
On-screen label:
Before Editing
Do not combine unrelated labels into the caption track.
Keep captions synchronized with speech.
Generate Captions Automatically When Useful
Some editors can create automatic captions from narration. [5]
The process may be:
1. Select the narration track.
2. Choose Automatic Captions.
3. Select the spoken language.
4. Generate the captions.
5. Review every caption.
6. Correct errors.
7. Adjust timing.
8. Choose a readable style.
Automatic captions can save time but are not automatically accurate.
Review Automatic Caption Errors
Common errors include:
• AI written as “A I” or another word
• Text-to-video written incorrectly
• Wrong punctuation
• Missing short words
• Incorrect article numbers
• Misheard names
• Incorrect website addresses
• Incorrect numbers
• Incorrect capitalization
Compare every caption with the narration script.
Do not rely only on listening.
Correct Caption Timing
A caption should appear when the corresponding words are spoken.
It should not:
• Appear too early
• Remain too long
• Continue into another sentence
• Cover unrelated scenes
• Disappear before the speech ends
Zoom into the timeline when necessary.
Split long captions into shorter readable sections.
Keep Caption Lines Short
Long caption lines are difficult to read.
Use:
• Short phrases
• One or two lines
• Natural sentence breaks
• Clear punctuation
• Suitable display time
Avoid placing an entire paragraph in one caption.
Break captions at logical points.
For example:
This clip contains a weak opening
and a distorted ending.
may be easier to read than one long line extending across the frame.
Use a Readable Caption Style
Captions should use:
• Clear typeface
• Large size
• Strong contrast
• Suitable background or outline
• Consistent placement
• Enough spacing
A common position is near the lower centre of the frame.
However, move captions when they would cover:
• Bicycle wheels
• Hands
• Product controls
• Important labels
• Demonstrated actions
Keep captions inside the safe area.
Avoid Decorative Caption Animation
Captions should not:
• Bounce
• Spin
• Flash
• Change colour repeatedly
• Move rapidly
• Appear one letter at a time unnecessarily
Simple appearance and disappearance are usually enough.
The main purpose is readability.
Distinguish Speakers When Necessary
When more than one person speaks, identify the speaker when the identity is not obvious.
For example:
Narrator: The weak section was removed.
Editor: The final clip is now four and a half seconds.
Use a consistent method.
Do not assign speech to a real person unless the audio is genuine and authorized.
Include Important Sound Information
Captions may include meaningful non-speech sounds.
Examples include:
[gentle wind]
[bicycle bell]
[music fades]
Include only sounds that help viewers understand the scene.
Do not caption every quiet background noise.
Check Caption Spelling and Punctuation
Review:
• Sentence beginnings
• Full stops
• Commas
• Question marks
• Names
• Numbers
• Technical terms
• Article numbers
• Website addresses
Captions are part of the published content and should be edited as carefully as the article text.
Decide Between Open and Closed Captions
Open captions are permanently visible inside the video image.
They cannot be turned off.
Closed captions can normally be turned on or off by the viewer.
The available option depends on:
• Editor
• Export format
• Website player
• Publishing platform
• Caption-file support
Closed captions may provide more viewer control.
Open captions may be useful when the platform does not support caption files.
When using open captions, confirm that they remain readable in every export format.
Save a Caption File When Available
Common caption-file formats may include:
• SRT
• VTT
Save the caption file in:
Captions
For example:
020-ai-video-editing-captions-en.vtt
Keep the caption file with the final video and project record.
Confirm that the publishing platform supports the selected format.
Review the Complete Audio Mix
After adding narration, music, sound effects, and captions, watch the complete project.
Review once for narration:
• Is every word clear?
• Is the voice consistent?
• Are pronunciations correct?
Review again for music:
• Is it too loud?
• Does it begin and end smoothly?
• Does it match the scene?
Review again for sound effects:
• Are they synchronized?
• Are they necessary?
• Are they too loud?
Review again for captions:
• Do they match the speech?
• Are they readable?
• Do they cover important visuals?
Review with Headphones and Speakers
Audio problems may sound different on different devices.
Test with:
• Headphones
• Computer speakers
• Mobile phone speakers
• Television speakers when relevant
A low-frequency hum may be clear in headphones but less noticeable on a phone.
Narration may sound clear on headphones but too quiet on small speakers.
Review the Video Without Captions
Turn captions off when possible.
Confirm that the narration remains clear.
Captions should support the audio, not hide poor sound quality.
Review the Video Without Sound
Mute the video.
Confirm that:
• Captions communicate the narration.
• Labels explain the editing steps.
• The scene order remains understandable.
• No essential information depends only on sound.
This improves accessibility and usability.
Audio and Caption Example
For the red-bicycle editing demonstration:
Narration:
This six-second AI-generated clip has an unstable opening and a distorted ending. After trimming, the strongest four-and-a-half seconds remain.
Original audio:
Muted
Background music:
Optional soft instrumental track at low volume
Sound effects:
None required
Caption 1:
This six-second AI-generated clip
has an unstable opening and a distorted ending.
Caption 2:
After trimming, the strongest
four-and-a-half seconds remain.
Disclosure:
This demonstration includes AI-generated visuals.
This audio plan is simple enough for a beginner project.
Audio and Caption Checklist
Before continuing, confirm:
• The original generated audio was reviewed.
• Unwanted audio was muted or removed.
• Narration was written before recording.
• The narration duration matches the video.
• The recording is clear.
• Voice use is authorized.
• AI-generated speech was checked word by word.
• Narration volume remains consistent.
• Noise reduction did not damage the voice.
• Music is authorized.
• Music remains below narration.
• Audio fades are smooth.
• Sound effects match visible actions.
• No audio creates a misleading impression.
• Captions match the spoken words.
• Caption spelling and punctuation are correct.
• Caption timing is accurate.
• Captions remain inside the safe area.
• Important visuals are not covered.
• The complete mix was tested with headphones and speakers.
• The video was reviewed with and without sound.
• Audio sources, licences, and permissions were recorded.
• A new project version was saved.
Audio should support the visuals rather than compete with them. Clear narration, restrained music, accurate captions, and properly authorized sound usually produce a stronger result than a project filled with unnecessary audio effects.
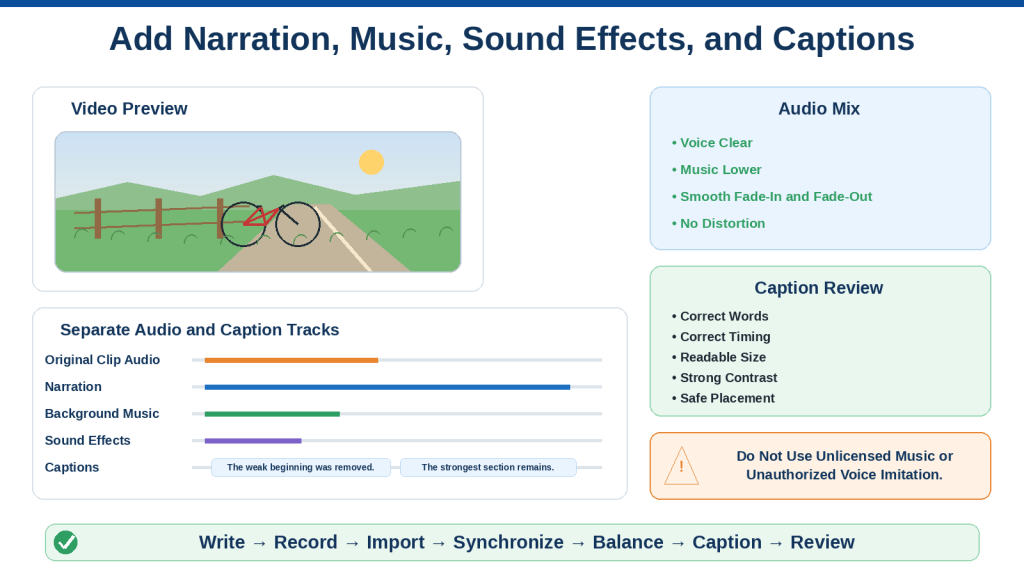
Figure 11. Narration, music, sound effects, and captions should be organized on separate tracks and balanced for clarity and accessibility.
Figure 11 shows a beginner audio-editing timeline containing separate tracks for the original clip sound, narration, music, sound effects, and captions. It emphasizes clear narration, low music volume, accurate caption timing, authorized audio sources, and complete review with and without sound.
How to Export the Final AI-Generated Video
Exporting creates a new video file from the completed editing timeline.
The exported file includes the selected:
• Video clips
• Trim points
• Scene order
• Cropping and reframing
• Brightness and colour adjustments
• Titles
• Captions
• Narration
• Music
• Sound effects
• Transitions
• Aspect ratio
• Resolution
The editing project and exported video are different files.
The project allows you to make future changes. The exported video is the finished file that can be played, uploaded, emailed, or published.
Before exporting, review the complete project carefully. A small error in the timeline will appear in the final video.
Review the Complete Timeline Before Exporting
Move the playhead to the beginning and watch the project from start to finish without stopping.
Check:
• Opening title
• First video frame
• Clip order
• Trim points
• Transitions
• Subject consistency
• Camera movement
• Brightness and colour
• Narration
• Music
• Sound effects
• Captions
• On-screen text
• AI disclosure
• Final frame
• Audio ending
Do not review only individual sections.
An item that looks correct by itself may appear at the wrong time in the complete sequence.
Check for Empty Timeline Gaps
Zoom out and inspect the entire timeline.
Look for empty spaces:
• Before the first clip
• Between clips
• Between a title and the video
• After the final clip
• Inside audio tracks
An unintended gap may create:
• A black screen
• Silence
• A sudden pause
• A missing caption
• An awkward scene change
Move clips together when no gap is intended.
Check the Beginning
The video should begin cleanly.
Confirm that:
• No blank frame appears first.
• The title is readable.
• The narration does not begin too early.
• Music does not start abruptly.
• The first subject is fully visible.
• The aspect ratio is correct.
• No unfinished AI transformation appears.
• Captions do not appear before speech begins.
A short fade-in may be suitable, but it is not required.
Check the Ending
The video should finish at a stable and intentional point.
Confirm that:
• The final subject remains correctly formed.
• No distorted final frame remains.
• The narration finishes completely.
• Music fades out smoothly.
• Captions disappear at the correct time.
• The final title or website address remains visible long enough.
• No empty timeline section follows the ending.
• Audio does not continue after the picture stops.
A short fade to black may provide a clean ending.
Check Every Title and Caption
Review all visible text for:
• Spelling
• Grammar
• Capitalization
• Punctuation
• Numbers
• Dates
• Article numbers
• Website address
• Technical terms
• Caption timing
• Safe placement
Pay particular attention to terms such as:
• AI-generated
• Video editing
• Text-to-video
• Image-to-video
• Aspect ratio
• Resolution
• WordPress
Correct errors before exporting.
Check Narration and Audio
Listen to the video without reading the captions.
Confirm that:
• Every spoken word is understandable.
• Narration volume remains consistent.
• Music does not cover the voice.
• Sound effects match visible actions.
• No unwanted generated voice remains.
• No sudden loud sound appears.
• Audio fades are smooth.
• The ending is not cut off.
Then listen again using headphones.
Small clicks, background noise, and abrupt cuts may be easier to hear through headphones.
Check Captions Against the Narration
Play the video while comparing the captions with the spoken words.
Confirm that captions:
• Match the narration
• Appear at the correct time
• Use correct spelling
• Include suitable punctuation
• Remain visible long enough
• Do not cover important subjects
• Stay inside the safe area
• End when the speech ends
Automatically generated captions must be corrected before publication.
Check the Video Without Sound
Mute the audio and watch the complete video.
Ask:
• Is the main idea still understandable?
• Do the captions communicate the narration?
• Are the editing steps clear?
• Does the scene order make sense?
• Are titles correctly timed?
• Is any important information available only through sound?
A video should remain usable for viewers who cannot or do not want to play the audio.
Check the Video at Full Screen
Watch the project or a preview at full screen.
Look for:
• Blurry subjects
• Distorted faces or hands
• Changing objects
• Cropped bicycle wheels
• Unstable backgrounds
• Unreadable text
• Visible compression artifacts
• Weak transitions
• Accidental borders
• Incorrect aspect ratio
A small editor preview may hide these problems.
Check the Video at Mobile Size
Reduce the preview size or test a draft export on a mobile device.
Confirm that:
• Titles remain readable.
• Captions are large enough.
• The main subject remains visible.
• Thin text does not disappear.
• Background boxes remain suitable.
• The video does not feel overcrowded.
• Important details are not covered by player controls.
A layout that works on a desktop monitor may be difficult to read on a phone.
Save the Final Editing Project
Before exporting, save a new project version.
For example:
020-red-bicycle-final-edit-project-v01
Keep earlier versions such as:
• Basic trimmed project
• Colour-correction test
• Stabilization test
• Transition test
• Audio-and-caption version
Do not replace every earlier project with one final file.
Earlier versions may be useful when a later correction is required.
Understand the Main Export Settings
The editor may ask you to choose:
• Filename
• Save location
• File format
• Video codec
• Resolution
• Aspect ratio
• Frame rate
• Quality
• Bitrate
• Audio format
• Caption options
The available choices vary by editor.
For a typical beginner project, a practical and widely compatible starting export is: [7]
MP4 video using H.264
This combination is widely supported by websites, computers, mobile devices, and many publishing platforms.
Choose the Export Format
A common final format is: [7]
MP4
MP4 is commonly suitable for:
• WordPress
• YouTube
• Social media
• Presentations
• Computers
• Mobile devices
• Email sharing when the file is small enough
Other formats may include:
• MOV
• WebM
• AVI
• MKV
Use another format only when the publishing platform or project specifically requires it.
Choose the Video Codec
The codec controls how the video is compressed inside the file.
A common compatible option is:
H.264
Another option that may appear is:
H.265 or HEVC
H.265 may create smaller files at similar quality, but it may not play correctly on every older device or application.
For broad compatibility, H.264 is often the safer beginner choice.
Choose the Correct Aspect Ratio
The export should match the project format.
For example:
• 16:9 project → 16:9 export
• 9:16 project → 9:16 export
• 1:1 project → 1:1 export
• 4:5 project → 4:5 export
Do not change the aspect ratio only during export without reviewing the complete composition.
Changing it may crop:
• Faces
• Hands
• Bicycle wheels
• Titles
• Captions
• Products
• Background details
Create and review a separate project version for every required format.
Choose the Export Resolution
Common 16:9 resolutions include:
• 1280 × 720: HD
• 1920 × 1080: Full HD
• 3840 × 2160: 4K
For a WordPress or YouTube demonstration, Full HD may be suitable when the source clip supports it.
Use HD when:
• The source quality is limited.
• The computer is slow.
• File size is important.
• The video will appear small on a webpage.
• Internet upload speed is limited.
Use 4K only when:
• The source is high quality.
• The publishing platform supports it.
• The project genuinely benefits from it.
• Storage and upload speed are sufficient.
Exporting a low-resolution source as 4K does not create genuine missing detail.
Match the Source Frame Rate
When possible, export using the same frame rate as the project and source clips. [7]
Common frame rates include:
• 24 frames per second
• 25 frames per second
• 30 frames per second
• 60 frames per second
Choose:
Match Project
or:
Match Source
when available.
Changing the frame rate unnecessarily may create:
• Uneven motion
• Repeated frames
• Missing frames
• Larger files
• Longer exports
For a simple AI-generated clip, keeping the original frame rate is usually practical.
Understand Quality and Bitrate
Bitrate affects how much information is used to store each second of video.
A higher bitrate may provide:
• Better detail
• Cleaner movement
• Fewer compression artifacts
• Larger file size
A lower bitrate may provide:
• Smaller file size
• Faster upload
• Faster website loading
• More visible compression
• Less detail
Some editors use simple choices such as:
• Low
• Medium
• High
• Recommended
• Best
For the final master copy, choose a high-quality setting.
For a website copy, use a practical balance between quality and file size.
Do not reduce the bitrate so much that:
• Text becomes blurry.
• Grass and water become blocky.
• Movement produces visible squares.
• Faces lose detail.
• Captions become difficult to read.
Export a High-Quality Master Copy
The master copy should preserve the strongest practical quality.
Save it in:
Final Exports
Suggested filename:
020-red-bicycle-edited-master-16×9.mp4
The master file should be used to create:
• WordPress version
• YouTube version
• Vertical version
• Square version
• Presentation version
• Smaller email copy
Do not repeatedly create new versions from an already compressed publishing copy.
Return to the master project or master export when another format is needed.
Export a WordPress Version
A WordPress version should balance:
• Visual quality
• File size
• Loading speed
• Website storage
• Visitor internet speed
• Mobile playback
Suggested filename:
020-how-to-edit-ai-generated-video-demo-16×9.mp4
Before choosing the final quality, consider:
• Original video resolution
• Video duration
• Website plan
• Available storage
• Upload limit
• Page-loading performance
• Whether the video will be uploaded directly or embedded from another platform
A very large video may load slowly and affect the reader’s experience.
Export a YouTube Version
A YouTube version may use:
• 16:9 landscape
• Full HD when supported
• MP4
• H.264
• Clear captions
• Suitable thumbnail
• AI disclosure when required
Suggested filename:
020-how-to-edit-ai-generated-videos-youtube-16×9.mp4
Review the exported file before uploading.
Do not depend on the platform to correct:
• Poor audio
• Misspelled captions
• Cropping
• Weak transitions
• Unwanted frames
Export a Vertical Social-Media Version
For a vertical version, use:
9:16
Suggested filename:
020-ai-video-editing-demo-vertical-9×16.mp4
Review:
• Subject position
• Cropping
• Title size
• Caption position
• Safe areas
• Platform-interface coverage
• Mobile readability
Do not simply export the 16:9 project as 9:16.
Create and review a separate vertical project.
Export a Square Version
For a square social-media post, use:
1:1
Suggested filename:
020-ai-video-editing-demo-square-1×1.mp4
Confirm that:
• The main subject remains centred.
• Titles fit inside the frame.
• Captions remain readable.
• Camera movement does not move the subject outside the square crop.
Export a 4:5 Portrait Version
For feed-based portrait posts, use:
4:5
Suggested filename:
020-ai-video-editing-demo-portrait-4×5.mp4
This format may preserve more width than 9:16 while still using a mobile-friendly portrait composition.
Choose the Audio Export Settings
The editor may offer choices for:
• Audio codec
• Audio bitrate
• Sample rate
• Mono or stereo
For a basic project, use the editor’s recommended high-quality audio setting unless the publishing platform requires something different.
Confirm that:
• Narration remains clear.
• Music does not distort.
• Sound effects remain synchronized.
• No channel becomes silent.
• The final audio is not excessively loud or quiet.
Decide How Captions Will Be Exported
Captions may be exported as: [6]
• Open captions permanently visible in the video
• A separate SRT file
• A separate VTT file
• A platform caption track
• Embedded subtitle data
Save separate caption files when the platform supports them.
For example:
020-ai-video-editing-captions-en.vtt
Keep the caption file with the final video and project record.
When captions are permanently visible, review their appearance in every aspect ratio.
Choose a Clear Export Filename
A useful filename should identify:
• Article number
• Subject
• Purpose
• Platform
• Aspect ratio
• Version when needed
Examples include:
• 020-red-bicycle-edited-master-16×9.mp4
• 020-ai-video-editing-wordpress-16×9.mp4
• 020-ai-video-editing-youtube-16×9.mp4
• 020-ai-video-editing-reel-9×16.mp4
• 020-ai-video-editing-square-1×1.mp4
Avoid:
• Final.mp4
• Final final.mp4
• Corrected video.mp4
• New video 2.mp4
• Export latest.mp4
Clear filenames make future updates easier.
Select the Correct Save Location
Export files into the correct folder.
Use:
Final Exports
Do not save the completed video inside:
• Original Generated Clips
• Selected Clips
• Music
• Captions
• Editing Project
Keeping each file type in the correct folder reduces confusion.
Start the Export
Select the export command.
It may be called:
• Export
• Render
• Produce
• Share
• Save Video
• Download
Review the selected settings one final time.
Confirm:
• Filename
• Format
• Resolution
• Aspect ratio
• Frame rate
• Quality
• Save location
• Audio
• Captions
Then begin the export.
Do Not Interrupt the Export
During export:
• Keep the editor open.
• Do not shut down the computer.
• Do not move source files.
• Avoid deleting temporary files.
• Keep the device connected to power when possible.
• Confirm enough storage remains.
An interrupted export may create:
• An incomplete video
• A corrupted file
• Missing audio
• Playback failure
• A file with zero duration
Wait until the editor confirms completion.
Find the Exported File
After export, locate the actual video file.
Confirm that it appears in:
Final Exports
Check:
• Filename
• File extension
• File size
• Date
• Duration
Do not assume the export succeeded only because the editor displayed a completion message.
Play the Export Outside the Editor
Open the exported file in a normal video player.
Watch it from beginning to end.
Check:
• Video starts correctly.
• Audio is present.
• Captions appear correctly.
• Titles are readable.
• Transitions are smooth.
• No black gaps appear.
• Aspect ratio is correct.
• Video ends correctly.
• No unexpected watermark appears.
• Playback remains smooth.
The exported file may reveal problems that were not visible in the editing preview.
Test Full-Screen Playback
Watch at full screen.
Look for:
• Blurry text
• Distorted subjects
• Cropped details
• Compression blocks
• Colour changes
• Ghosted transitions
• Caption problems
• Edge artifacts
• Unwanted borders
Do not publish until the full-screen export has been reviewed.
Test Mobile Playback
Transfer or upload a test copy to a mobile device when relevant.
Confirm:
• Video opens correctly.
• Text is readable.
• Captions are visible.
• Sound is clear.
• Main subject remains visible.
• File loads in a reasonable time.
• Vertical or portrait framing works correctly.
Check the Exported File Size
A long or high-quality video may be large.
Record the file size.
When the file is too large:
• Reduce the bitrate slightly.
• Use HD instead of Full HD when acceptable.
• Remove unnecessary duration.
• Compress a separate publishing copy.
• Use an external video-hosting platform when appropriate.
Do not overwrite the high-quality master copy.
Create a separate smaller version.
Compare the Export with the Editor Preview
The exported file should match the intended project.
Check whether:
• Colours changed
• Audio volume changed
• Captions shifted
• Transitions changed
• Resolution is lower than expected
• A watermark appeared
• The video contains an unexpected final frame
When a problem appears, return to the project and correct it.
Do not attempt to repair the exported file repeatedly when the source project can be corrected properly.
Create a Thumbnail
A thumbnail or poster image represents the video before playback begins.
Choose a frame that:
• Shows the main subject clearly
• Has suitable lighting
• Contains no distortion
• Represents the actual video
• Has space for a short title when needed
• Remains understandable at a small size
For the red-bicycle editing demonstration, choose a stable frame showing:
• Complete bicycle
• Country road
• Wooden fence
• Clear lighting
• Balanced composition
Possible thumbnail title:
Edit AI-Generated Videos
Keep thumbnail wording short.
Suggested filename:
020-edit-ai-generated-videos-thumbnail.webp
Do Not Use a Misleading Thumbnail
The thumbnail should not:
• Show a scene absent from the video
• Hide an important problem
• Exaggerate the result
• Include an unauthorized person
• Make unsupported claims
• Suggest a product feature not shown
• Use unreadable generated text
The thumbnail should accurately represent the final video.
Save a Poster Frame for WordPress
Some video blocks or players allow a poster image to appear before playback.
Use the selected thumbnail or stable frame as the poster image.
Check that it:
• Fits 16:9
• Matches the video
• Loads correctly
• Contains suitable alt or supporting text
• Does not contain private information
Create an Export Record
Record the final settings.
For example:
Project: Article 020 Red Bicycle Editing Demonstration
Final project: 020-red-bicycle-final-edit-project-v01
Master filename: 020-red-bicycle-edited-master-16×9.mp4
WordPress filename: 020-how-to-edit-ai-generated-video-demo-16×9.mp4
Format: MP4
Codec: H.264
Resolution: 1920 × 1080
Aspect ratio: 16:9
Frame rate: Match source
Duration: Approximately 4.5 seconds
Captions: Separate VTT file or open captions
Thumbnail: 020-edit-ai-generated-videos-thumbnail.webp
Export date: Record the date
File size: Record the final size
Review completed: Desktop, full screen, mobile, with sound, without sound
This information makes future updates easier.
Back Up the Final Files
Back up:
• Editing project
• Master export
• WordPress export
• YouTube export
• Social-media versions
• Caption files
• Narration
• Music licences
• Thumbnail
• Project record
Keep at least one backup outside the main editing folder.
Final Export Checklist
Before continuing, confirm:
• The complete timeline was reviewed.
• No empty gaps remain.
• The opening is clean.
• The ending is stable.
• Titles and captions are correct.
• Narration is clear.
• Music and sound effects are balanced.
• The project was saved before export.
• The correct format was selected.
• The correct aspect ratio was selected.
• The resolution matches the project.
• The frame rate matches the source or project.
• A high-quality master copy was exported.
• Platform-specific versions were created separately.
• The export was played outside the editor.
• Full-screen playback was checked.
• Mobile playback was checked.
• No unwanted watermark appeared.
• File size is practical.
• The thumbnail accurately represents the video.
• Caption files were saved.
• Export settings were recorded.
• Final files were backed up.
Exporting is not simply selecting a download button. It is the final quality-control stage that turns the editing timeline into a reliable video file for viewers and publishing platforms.

Figure 12. Exporting converts the completed editing project into tested master and platform-specific video files.
Figure 12 summarizes the final export workflow. The editor reviews the complete timeline, selects the correct format, resolution, aspect ratio, frame rate, audio, and captions, exports a high-quality master copy, creates platform-specific versions, tests each saved file, and records the final settings.
Common Mistakes When Editing AI-Generated Videos
Editing can improve an AI-generated clip, but poor editing decisions may introduce new problems or make the original weaknesses more noticeable.
Most beginner mistakes involve:
• Editing the only copy of a source clip
• Keeping weak sections to preserve duration
• Cropping important details
• Using too many effects
• Adding unreadable text
• Allowing music to cover narration
• Exporting without checking the final file
• Failing to organize project versions
Understanding these mistakes can make the editing process more reliable.
Mistake 1: Editing the Only Copy of the Generated Clip
A beginner may open the original generated video, trim it, and save over the same file.
This removes the ability to:
• Recover deleted sections
• Compare the original and edited versions
• Create another format
• Restart the project
• Verify what the generator originally produced
How to Avoid This Mistake: Preserve the original clip in:
Original Generated Clips
Create a working copy for editing.
For example:
Original:
020-red-bicycle-original-v03.mp4
Working copy:
020-red-bicycle-editing-copy-v01.mp4
Never overwrite the only original file.
Mistake 2: Choosing the Newest Clip Instead of the Strongest Clip
The most recently generated version is not automatically the best one.
A newer clip may correct one problem but introduce:
• Worse lighting
• Less stable movement
• A different subject
• A weaker background
• More camera shake
• A distorted ending
How to Avoid This Mistake: Compare every useful version before editing.
Record:
• Strongest details
• Main problem
• Usable section
• Final decision
Choose the strongest complete clip, not simply the newest file.
Mistake 3: Beginning Without an Editing Plan
Opening the editor without a clear purpose may lead to:
• Unnecessary clips
• Confusing scene order
• Repeated edits
• Inconsistent titles
• Excessive effects
• Incorrect export settings
How to Avoid This Mistake: Write a brief plan containing:
• Video purpose
• Selected clips
• Weak sections
• Final duration
• Aspect ratio
• Resolution
• Scene order
• Planned titles
• Narration
• Captions
• Export destination
A short plan can prevent major rework.
Mistake 4: Using the Wrong Aspect Ratio
A project may be started in 9:16 when the final video is intended for WordPress or YouTube in 16:9.
Changing the format later may crop:
• Faces
• Hands
• Products
• Bicycle wheels
• Titles
• Captions
• Important background details
How to Avoid This Mistake: Choose the publishing destination before creating the project.
Use:
• 16:9 for WordPress, YouTube, websites, and presentations
• 9:16 for Shorts, Reels, TikTok, and vertical mobile video
• 1:1 for square posts
• 4:5 for portrait feed posts
Create separate project versions for different formats.
Mistake 5: Keeping Weak Sections to Preserve Video Length
A six-second clip may contain only four strong seconds.
Beginners may keep the complete duration because they do not want the video to appear too short.
This can leave:
• Distorted openings
• Weak endings
• Camera acceleration
• Changing objects
• Lighting flicker
How to Avoid This Mistake: Keep only the strongest usable section.
A clean four-second clip is usually better than an unstable six-second clip.
Use another supporting clip, title card, or narration pause when additional duration is required.
Mistake 6: Trimming Too Much from the Beginning
Removing an unstable opening can improve the clip, but excessive trimming may cause the video to begin:
• In the middle of an action
• With the camera already moving quickly
• Before the subject is understandable
• Without enough visual context
• With abrupt audio
How to Avoid This Mistake: Begin at the first stable frame while leaving enough time for viewers to identify the subject and setting.
Review the opening at normal speed rather than relying only on individual frames.
Mistake 7: Ending the Clip Too Abruptly
A technically clean trim may still feel incomplete.
The video may stop:
• During movement
• Before the action finishes
• While narration continues
• Before the final caption disappears
• Without a stable closing frame
How to Avoid This Mistake: End at a stable and understandable moment.
When necessary:
• Extend the final stable frame
• Add a short freeze frame
• Add a brief fade to black
• Shorten the narration
• Use another closing clip
Do not keep distorted frames only to create a longer ending.
Mistake 8: Deleting the Wrong Timeline Item
A beginner may accidentally delete:
• Narration
• Music
• A caption
• A transition
• The wrong video clip
• A completed title
How to Avoid This Mistake: Confirm the selected item before deleting.
Use:
• Timeline labels
• Track names
• Lock controls
• Undo
• Regular project saves
Lock completed tracks when the editor supports it.
Mistake 9: Leaving Small Timeline Gaps
Deleting or moving clips may leave a very small empty space.
The final export may show:
• A black flash
• A silent pause
• A missing frame
• An unexpected background colour
How to Avoid This Mistake: Zoom into every clip connection and confirm that the edges touch when no gap is intended.
Use snapping or ripple editing carefully.
Review the complete timeline after structural changes.
Mistake 10: Removing a Middle Section Without Checking the New Cut
Splitting and deleting a distorted middle section may create:
• A sudden subject jump
• An incomplete action
• A camera-position change
• A lighting change
• A background shift
How to Avoid This Mistake: Watch the new connection several times.
When the cut is too noticeable, consider:
• Trimming more
• Keeping only one strong section
• Adding a short neutral clip
• Using a title card
• Applying a brief dissolve
• Regenerating the scene
Mistake 11: Rearranging Clips Without Checking Story Order
Several attractive clips may be arranged in an order that does not make sense.
For example:
1. Bicycle arrives at the lake.
2. Bicycle begins the journey.
3. Bicycle appears beside the starting road.
4. Bicycle travels through the countryside.
How to Avoid This Mistake: Arrange clips according to the video’s purpose.
A logical order might be:
1. Introduce the subject.
2. Begin the action.
3. Show progress.
4. Reach the destination.
5. End with a clear conclusion.
Mistake 12: Ignoring Screen Direction
A bicycle may travel left to right in one clip and right to left in the next.
This can make the subject appear to reverse direction unexpectedly.
How to Avoid This Mistake: Maintain a consistent travel direction across connected scenes when continuity is intended.
Use a neutral transition shot when the direction must change.
Do not mirror a clip when doing so would reverse:
• Text
• Product controls
• Logos
• Road signs
• Physical actions
Mistake 13: Cropping the Main Subject
Changing from landscape to vertical may remove:
• Part of a face
• A person’s feet
• Bicycle wheels
• A product control
• Important background movement
How to Avoid This Mistake: Review the opening, middle, and ending after every crop.
Leave safe space around the main subject.
Create a separate vertical generation when the landscape clip cannot be adapted safely.
Mistake 14: Stretching the Video
Stretching the width or height independently can make:
• Faces appear too wide
• People appear unusually tall
• Bicycle wheels become oval
• Products appear inaccurate
• Buildings lean
How to Avoid This Mistake: Preserve the original proportions.
Use proportional scaling, cropping, repositioning, or a background-fill method.
Do not stretch the video to fill the frame.
Mistake 15: Enlarging a Low-Resolution Clip Too Much
Strong enlargement may make the video:
• Blurry
• Pixelated
• Soft
• Noisy
• More visibly distorted
How to Avoid This Mistake: Use the smallest necessary enlargement.
When quality becomes unacceptable, use:
• A higher-resolution generation
• A different crop
• A smaller display area
• A background-fill layout
• Another source clip
Mistake 16: Using Extreme Brightness or Colour Corrections
A slightly dark clip may be corrected too aggressively.
The result may contain:
• White areas without detail
• Black shadows without detail
• Fluorescent grass
• Overly orange skin
• Unnatural red products
• Visible video noise
How to Avoid This Mistake: Make small changes and compare before and after.
Correct one control at a time.
Review:
• Highlights
• Shadows
• Skin tones
• Product colours
• Sky detail
• Background consistency
Mistake 17: Applying Different Filters to Every Scene
One clip may use a warm filter, another a cool filter, and another a dramatic high-contrast style.
The final video may feel like several unrelated projects.
How to Avoid This Mistake: Use one visual style across connected scenes.
When a filter is necessary:
• Use the same filter
• Use restrained strength
• Check factual product colours
• Review the complete sequence
Mistake 18: Using Stabilization Automatically
Automatic stabilization may reduce small camera shake, but it can also:
• Crop the frame
• Warp the background
• Bend straight lines
• Remove intended movement
• Reduce sharpness
• Cut off the subject
How to Avoid This Mistake: Test stabilization on a duplicate project version.
Begin with a low setting.
Compare the stabilized result with the original and reject it when it creates new problems.
Mistake 19: Trying to Stabilize Subject Distortion
Stabilization cannot correct:
• A changing face
• Oval bicycle wheels
• Moving fence posts
• Missing hands
• A product changing shape
• Flickering objects
How to Avoid This Mistake: Identify whether the problem is camera shake or generation instability.
Use trimming, regeneration, replacement footage, or another clip when the subject itself is changing.
Mistake 20: Changing Video Speed Too Much
A large speed change may create:
• Unnatural movement
• Repeated frames
• More visible distortions
• Unreadable captions
• Strange audio
• Incorrect timing
How to Avoid This Mistake: Use small speed adjustments.
Review the complete clip at normal playback after the change.
Preserve audio pitch when narration or dialogue remains attached.
Mistake 21: Reversing a Clip to Change Direction
A reversed clip may show:
• Bicycle wheels rotating backward
• Water moving unnaturally
• Smoke returning to its source
• Impossible body movement
• Audio playing backward
How to Avoid This Mistake: Reverse a clip only for a deliberate creative effect.
Use another generation or transition shot when the direction must change naturally.
Mistake 22: Adding Too Many Transitions
Using a decorative transition between every clip can create:
• Visual clutter
• Slow pacing
• Repeated effects
• Ghosted subjects
• Distracting movement
• Reduced professionalism
How to Avoid This Mistake: Use direct cuts by default.
Add a short dissolve or fade only when it helps explain:
• A location change
• A time change
• A topic change
• The beginning or ending
Mistake 23: Using Long Dissolves Between Different Subjects
During a dissolve, both clips remain visible.
A long dissolve may create:
• Two bicycles
• Two faces
• Duplicate products
• Overlapping backgrounds
• Ghosted movement
How to Avoid This Mistake: Shorten the dissolve or use a fade to black.
Choose a direct cut when the blended images become confusing.
Mistake 24: Using Transitions to Hide Severe Errors
A transition cannot make distorted source frames acceptable.
It may temporarily hide the problem, but it can also blend the distortion into the next scene.
How to Avoid This Mistake: Trim to stable frames before applying a transition.
Replace or regenerate the clip when the remaining edge frames are unusable.
Mistake 25: Adding Too Much On-Screen Text
A beginner may place long explanations over the video.
This can:
• Cover the subject
• Become unreadable
• Compete with narration
• Overload viewers
• Create mobile-display problems
How to Avoid This Mistake: Use short titles and labels.
Place detailed explanations in:
• Narration
• Captions
• The article
• A transcript
• A separate title card
Mistake 26: Using Small or Low-Contrast Text
Text may look acceptable in the editor but become unreadable after export or on a mobile phone.
How to Avoid This Mistake: Use:
• Large text
• Clear typeface
• Strong contrast
• Short wording
• Safe placement
• Background boxes when necessary
Test the final export at mobile size.
Mistake 27: Covering Important Visual Details with Text
Titles or captions may cover:
• Faces
• Hands
• Products
• Bicycle wheels
• Demonstrated actions
• Comparison areas
How to Avoid This Mistake: Identify the important visual area before placing text.
Move the wording to:
• Open sky
• Empty wall space
• A side panel
• A separate title card
• Another safe area
Watch the complete text duration because the subject may move behind it.
Mistake 28: Using Too Many Fonts and Animations
Several typefaces, colours, movements, and title effects may make the video feel inconsistent.
How to Avoid This Mistake: Use one simple text system:
• One main typeface
• One title style
• One section-heading style
• One caption style
• Restrained fade animation
Readability is more important than decoration.
Mistake 29: Relying on Automatically Generated Captions Without Review
Automatic captions may contain:
• Misspelled technical terms
• Incorrect article numbers
• Wrong punctuation
• Missing words
• Incorrect website addresses
• Poor timing
How to Avoid This Mistake: Compare every caption with the approved narration script.
Correct all important errors before exporting.
Mistake 30: Allowing Music to Cover Narration
Music that sounds quiet through headphones may still make speech difficult to understand on mobile speakers.
How to Avoid This Mistake: Keep narration as the main audio element.
Test the mix:
• With headphones
• With computer speakers
• With mobile speakers
• Without reading captions
Lower the music further when necessary.
Mistake 31: Adding Unnecessary Sound Effects
A sound effect may be added to every movement even when it does not improve understanding.
This can make the video feel artificial.
How to Avoid This Mistake: Add sound only when it supports a visible action or environment.
For a quiet country-road scene, gentle wind may be enough.
Mistake 32: Using Audio That Changes the Meaning of the Scene
Added audio may imply:
• A real crowd
• Product performance
• A genuine speech
• An emergency
• A real public reaction
• An event that did not occur
How to Avoid This Mistake: Ensure that music, speech, and sound effects do not mislead viewers.
Do not use invented audio as evidence of a real event.
Mistake 33: Using Music or Voices Without Checking Permission
Music, sound effects, narration, and AI voices may have separate usage conditions.
How to Avoid This Mistake: Record:
• Source
• Creator or provider
• Licence
• Download date
• Commercial-use permission
• Attribution requirement
• Voice authorization
Do not imitate a real person’s voice without appropriate permission.
Mistake 34: Exporting Before Reviewing the Complete Timeline
A beginner may review individual sections but never watch the complete project from beginning to end.
The export may contain:
• Black gaps
• Wrong scene order
• Captions over the wrong clip
• Music continuing after the ending
• Missing narration
• Unintended duplicate clips
How to Avoid This Mistake: Perform one uninterrupted full review before every final export.
Mistake 35: Selecting the Wrong Export Format
An editor may export in a format that does not play correctly on the intended platform or device.
How to Avoid This Mistake: Use a broadly compatible option when appropriate:
MP4 with H.264 video
Check the platform’s current requirements when a different format is needed.
Mistake 36: Exporting at a Higher Resolution Than the Source Supports
A low-resolution source clip exported at 4K does not gain genuine missing detail.
The file becomes larger without correcting:
• Blurriness
• Distortion
• Weak textures
• Incorrect objects
How to Avoid This Mistake: Choose a resolution appropriate to the source quality and publishing destination.
HD or Full HD may be more practical than 4K.
Mistake 37: Compressing the Master Copy Too Much
A highly compressed master file may contain:
• Blocky movement
• Blurry grass or water
• Unreadable text
• Weak colour detail
• Visible artifacts
How to Avoid This Mistake: Export one high-quality master copy.
Create separate smaller publishing versions from the project or master source.
Do not overwrite the high-quality version.
Mistake 38: Using One Export for Every Platform
A 16:9 video may be uploaded directly to a vertical platform without reviewing the crop.
This may produce:
• Small subjects
• Large empty areas
• Cut-off text
• Poor mobile composition
How to Avoid This Mistake: Create and review separate versions for:
• WordPress
• YouTube
• Vertical social media
• Square posts
• Portrait feeds
Mistake 39: Trusting the Editor Preview Without Checking the Export
The exported file may contain:
• Changed colours
• Missing audio
• Shifted captions
• Lower quality
• Unexpected watermark
• Playback problems
• A repeated final frame
How to Avoid This Mistake: Play every final export outside the editor.
Test:
• Full screen
• Desktop
• Mobile
• With sound
• Without sound
Mistake 40: Using a Misleading Thumbnail
A thumbnail may show a scene, subject, or result that does not appear in the video.
How to Avoid This Mistake: Select a stable frame from the actual final video.
The thumbnail should accurately represent:
• Main subject
• Lighting
• Composition
• Content
• Editing result
Avoid unsupported promises such as:
Fix Every AI Video Instantly
Mistake 41: Using Confusing Project and Export Filenames
Names such as:
• Final
• Final new
• Final corrected
• New final 3
make future maintenance difficult.
How to Avoid This Mistake: Include:
• Article number
• Subject
• Purpose
• Platform
• Aspect ratio
• Version
For example:
020-ai-video-editing-wordpress-16×9-v01.mp4
Mistake 42: Moving Source Files During Editing
Some desktop editors link to the original source files.
Moving or renaming those files may cause:
• Missing media
• Offline clips
• Broken audio
• Export failure
How to Avoid This Mistake: Organize the project folder before importing.
Keep source files in the same location until the project is complete and properly archived.
Mistake 43: Saving Only One Project Version
A major edit may damage a project that previously worked correctly.
How to Avoid This Mistake: Save versions after important stages:
• Initial project
• Trimmed version
• Reframed version
• Colour-corrected version
• Audio-and-caption version
• Final export version
This makes it possible to return to an earlier stage.
Mistake 44: Failing to Back Up the Final Project
A finished video may be lost because of:
• Device failure
• Accidental deletion
• Corrupted project file
• Account problems
• Software changes
• Storage failure
How to Avoid This Mistake: Back up:
• Original clips
• Editing project
• Master export
• Platform copies
• Captions
• Narration
• Music licences
• Thumbnail
• Project record
Keep at least one backup outside the main project location.
Common-Mistake Review Checklist
Before completing an AI-video editing project, ask:
1. Did I preserve the original source clips?
2. Did I select the strongest versions?
3. Is the aspect ratio correct?
4. Did I remove weak openings and endings?
5. Are there any timeline gaps?
6. Does the scene order make sense?
7. Is the main subject fully visible?
8. Did I avoid stretching and excessive enlargement?
9. Are brightness and colours natural?
10. Did stabilization or speed changes create new problems?
11. Are transitions necessary and restrained?
12. Is all on-screen text readable and accurate?
13. Do captions match the narration?
14. Is the music below the voice?
15. Are all audio sources and voices authorized?
16. Does the export use the correct format and resolution?
17. Was the final file tested outside the editor?
18. Were platform-specific versions reviewed separately?
19. Are filenames clear?
20. Were the project and final files backed up?
Avoiding these mistakes does not guarantee that every AI-generated clip can be repaired. It helps ensure that editing improves the strongest source material without creating additional problems.
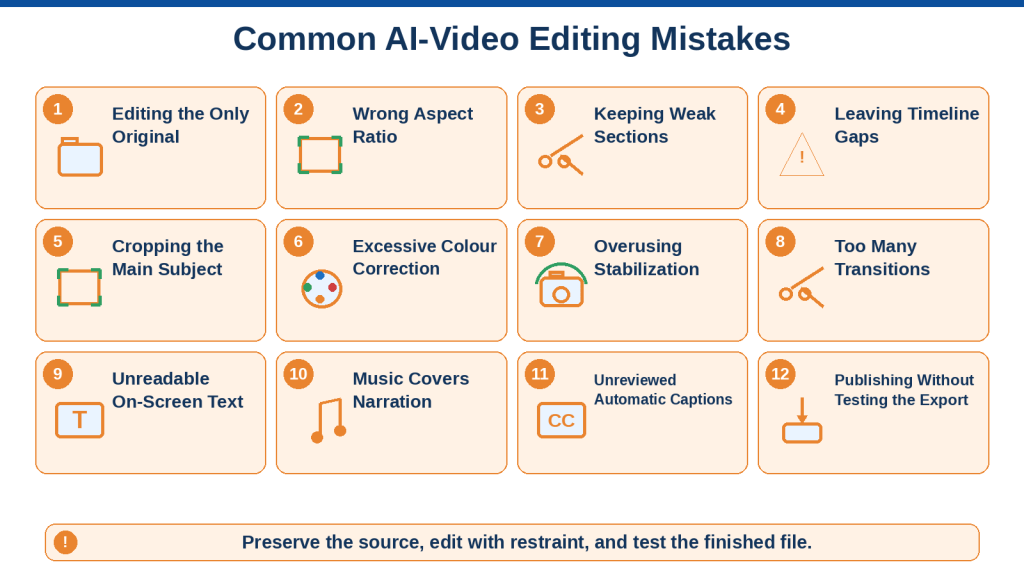
Figure 13. Common AI-video editing mistakes can be reduced through organized files, careful trimming, restrained effects, accurate text and audio, and complete export testing.
Figure 13 highlights the most common problems beginners encounter while editing AI-generated videos. Preserving original files, selecting the correct aspect ratio, avoiding excessive cropping and correction, reviewing captions and audio, exporting suitable platform versions, and testing the final file can prevent many avoidable errors
Limitations of Editing AI-Generated Videos
Video editing can improve the strongest parts of an AI-generated clip, but it cannot correct every problem.
Editing works best when the source video already contains:
• A recognizable subject
• A usable action
• Acceptable movement
• A reasonably stable background
• Suitable lighting
• Several clean frames
• A clear purpose
When the subject, action, or complete scene is fundamentally incorrect, creating another generation or using different source material may be more effective.
Limitation 1: Editing Cannot Reconstruct Missing Visual Information
If the AI-generated clip does not contain part of the subject, the editor cannot restore it accurately.
Examples include:
• A cropped bicycle wheel
• Missing hands
• A person’s head outside the frame
• A product with a missing control
• A building cut off at the edge
• An object hidden behind another object
Cropping, resizing, and repositioning work only with information that already exists in the source frame.
Reality: Editing can rearrange or hide existing pixels, but it cannot reliably create important missing visual details.
How to Reduce This Limitation: Use a wider or better-composed generation. Regenerate the clip with instructions to keep the complete subject inside the frame with safe space around it.
Limitation 2: Severe Subject Distortion Usually Cannot Be Repaired
An AI-generated subject may change shape during the video.
Examples include:
• Bicycle wheels becoming oval
• A face changing identity
• Extra fingers appearing
• Product controls moving
• Clothing changing
• Objects merging together
Basic editing tools cannot make a severely changing subject consistent across every frame.
Reality: Trimming may remove a short distorted section, but it cannot repair a problem that continues throughout the clip.
How to Reduce This Limitation: Keep only the stable portion, use another generated version, or regenerate the scene with simpler movement and stronger consistency instructions.
Limitation 3: Editing Cannot Correct an Entirely Wrong Subject
A prompt may request a red touring bicycle, but the generated clip may show a blue mountain bicycle.
Colour correction may change the general colour, but it cannot accurately change:
• Bicycle type
• Frame design
• Handlebar shape
• Wheel structure
• Product model
• Subject identity
Reality: Editing cannot turn a fundamentally incorrect subject into the exact requested subject without advanced frame-by-frame replacement work.
How to Reduce This Limitation: Generate another clip or use an authorized reference image when exact appearance matters.
Limitation 4: Incorrect Actions May Be Impossible to Fix
The subject may perform the wrong action.
For example:
• A person walks toward the camera instead of left to right.
• A bicycle moves when it should remain still.
• A product opens incorrectly.
• A hand picks up the wrong object.
• A vehicle moves in an impossible direction.
Speed changes, reversing, and cutting may not make the action correct.
Reality: Editing can change timing and order, but it cannot reliably replace the main physical action.
How to Reduce This Limitation: Regenerate the clip using one clear action, direction, speed, and camera instruction. Use verified real footage when precise action is required.
Limitation 5: Background Instability May Continue After Cropping
Cropping may remove a small problem near the frame edge, but it cannot correct an unstable background covering the complete scene.
Background problems may include:
• Buildings bending
• Roads changing shape
• Fence posts appearing and disappearing
• Trees moving incorrectly
• Horizons shifting
• Furniture changing
• New objects forming
Reality: Cropping is useful only when the problem remains outside the important area.
How to Reduce This Limitation: Use a simpler background, select another generated version, place a suitable covering clip over a brief problem, or regenerate the scene.
Limitation 6: Stabilization Cannot Repair Changing Objects
Video stabilization is designed to reduce camera movement.
It does not correct:
• Changing faces
• Distorted wheels
• Moving product parts
• Flickering buildings
• Missing hands
• Objects changing size
• Background elements forming or disappearing
Reality: Camera shake and subject instability are different problems.
How to Reduce This Limitation: Identify the cause before applying stabilization. Use stabilization only for small camera movement and compare the result carefully.
Limitation 7: Stabilization May Crop the Frame
Stabilization often enlarges the video to keep moving frame edges outside the visible area.
This may crop:
• Faces
• Hands
• Bicycle wheels
• Products
• Titles
• Important background details
It may also reduce sharpness.
Reality: A smoother camera may come at the cost of a tighter frame and lower visible quality.
How to Reduce This Limitation: Begin with a low stabilization level and reject it when important content is cropped. A small amount of camera movement may be preferable.
Limitation 8: Colour Correction Cannot Recover Lost Detail
When bright areas are completely white or dark areas are completely black, the original detail may no longer exist in the file.
Examples include:
• White sky with no cloud detail
• Black bicycle frame with no visible shape
• Bright reflections hiding a product surface
• Dark faces with no facial detail
Reality: Exposure and shadow controls can reveal existing information, but they cannot reconstruct detail that was never recorded or generated.
How to Reduce This Limitation: Use another generation with more balanced lighting or select a source clip containing better exposure.
Limitation 9: Strong Colour Correction Can Reveal More AI Artifacts
Increasing brightness, sharpness, contrast, or saturation may make hidden problems easier to see.
It can reveal:
• Noisy textures
• Changing object edges
• Distorted skin
• Unstable grass
• Compression blocks
• Incorrect reflections
• Flickering details
Reality: A correction that makes the picture brighter may also make generation errors more visible.
How to Reduce This Limitation: Make gradual adjustments and inspect the complete clip at full screen before accepting them.
Limitation 10: Upscaling Does Not Create Genuine Missing Detail
Some editors or AI-assisted tools can enlarge a video.
Upscaling may improve the appearance of edges, but it does not guarantee accurate new details.
It cannot reliably correct:
• Distorted faces
• Incorrect hands
• Misspelled text
• Missing product parts
• Unstable backgrounds
• Incorrect movement
Reality: A larger file is not automatically a more accurate video.
How to Reduce This Limitation: Begin with the best available source resolution. Use upscaling only after confirming that the source content is already correct.
Limitation 11: Speed Changes Can Make Movement Unnatural
Slowing or speeding a clip may help timing, but large changes can create:
• Repeated frames
• Jerky motion
• Sliding feet
• Incorrect wheel movement
• Unnatural body movement
• More visible distortions
• Poor audio quality
Reality: Speed controls change playback timing, not the accuracy of the generated movement.
How to Reduce This Limitation: Use small adjustments and review the result at normal playback. Regenerate the clip when the original motion is fundamentally incorrect.
Limitation 12: Removing a Middle Section May Create a Visible Jump
A distorted middle section may be deleted, but the two remaining pieces may not connect naturally.
The subject may suddenly:
• Change position
• Move forward
• Change posture
• Change camera angle
• Change lighting
• Skip part of an action
Reality: Removing weak frames may interrupt visual continuity.
How to Reduce This Limitation: Use a short supporting clip, title card, direct cut at a logical action point, or another source clip. Regenerate the scene when the action must remain continuous.
Limitation 13: Transitions Cannot Hide Severe Differences
A dissolve may soften a location change, but it cannot make two unrelated subjects appear identical.
A transition may temporarily show:
• Two different faces
• Two bicycles
• Different products
• Overlapping backgrounds
• Changing clothing
• Duplicate objects
Reality: Transitions connect clips; they do not correct inconsistency.
How to Reduce This Limitation: Choose clips with similar subjects, lighting, framing, colour, and movement. Use a fade to black or neutral transition clip when a dissolve produces confusing overlap.
Limitation 14: Character Consistency Remains Difficult Across Clips
Separately generated scenes may show different versions of the same character.
Differences may include:
• Face
• Hair
• Clothing
• Height
• Body proportions
• Skin tone
• Accessories
• Age
Colour correction and cropping may reduce small differences, but they cannot make clearly different characters identical.
Reality: Editing can improve continuity, but it cannot guarantee exact character identity across independently generated clips.
How to Reduce This Limitation: Use a consistency sheet, repeat the same character description, use authorized reference controls, and choose clips with similar framing.
Limitation 15: Exact Product Accuracy Cannot Be Created Through Editing
An AI-generated product may contain:
• Incorrect buttons
• Missing connections
• Invented features
• Wrong dimensions
• Changing packaging
• Incorrect labels
Text overlays can add correct wording, but they do not make the underlying product accurate.
Reality: A realistic edited video can still show a technically incorrect product.
How to Reduce This Limitation: Use real verified product footage, authorized manufacturer assets, or an accurate reference-based workflow when factual product details matter.
Limitation 16: Generated Visible Text May Remain Unusable
Generated signs, screens, documents, and packaging may contain changing or distorted text.
An editor may cover a small incorrect word, but it may not be practical to replace text that:
• Moves
• Rotates
• Changes perspective
• Appears on several surfaces
• Changes between frames
• Is partly hidden
Reality: Replacing moving generated text accurately may require advanced motion tracking and frame-by-frame work.
How to Reduce This Limitation: Generate the scene without visible wording whenever possible and add accurate text manually during editing.
Limitation 17: Automatic Captions Can Be Inaccurate
Automatic caption systems may misunderstand:
• Names
• Technical terms
• Article numbers
• Website addresses
• Accents
• Quiet speech
• Noisy recordings
• Several speakers
Reality: Automatic caption generation saves time but does not remove the need for manual review.
How to Reduce This Limitation: Compare every caption with the approved script, correct spelling and timing, and test the final video with sound muted.
Limitation 18: Noise Reduction Can Damage Narration
Strong noise reduction may remove part of the voice along with the background sound.
The narration may become:
• Metallic
• Robotic
• Thin
• Unclear
• Missing word endings
• Uneven in volume
Reality: Audio correction cannot always restore a poor recording cleanly.
How to Reduce This Limitation: Record narration in a quiet location and use low or moderate correction. Re-record the narration when the original audio is seriously damaged.
Limitation 19: Poor Audio Cannot Always Be Fully Restored
Audio containing strong distortion, clipping, echo, or overlapping voices may remain difficult to understand.
Volume controls cannot correct:
• Missing words
• Severe distortion
• Incorrect dialogue
• Loud background speech
• Audio recorded too quietly
• Audio recorded above the distortion limit
Reality: Audio restoration has practical limits.
How to Reduce This Limitation: Replace the audio, record new narration, or use an authorized generic voice rather than relying on heavily damaged sound.
Limitation 20: Music Cannot Make a Weak Video Strong
Music may improve mood, but it cannot correct:
• Incorrect subject appearance
• Poor scene order
• Distorted movement
• Unreadable captions
• Weak narration
• Misleading content
• Inaccurate products
Reality: Attractive music may make a video feel polished while the visual or factual problems remain.
How to Reduce This Limitation: Complete the visual edit and factual review before choosing music. Use music only to support an already understandable video.
Limitation 21: Editing Software May Have Feature Restrictions
Free or lower-cost editing plans may limit:
• Export resolution
• Project duration
• Number of exports
• Caption minutes
• Cloud storage
• Stabilization
• Noise reduction
• Background removal
• Music choices
• Watermark removal
• Commercial-use assets
Reality: A feature shown in a tutorial or advertisement may not be available under every plan, device, or region.
How to Reduce This Limitation: Complete a short test project and check the current official plan conditions before building a large project.
Limitation 22: Large Projects May Perform Slowly
Video editing may become slow when the project contains:
• High-resolution clips
• Many tracks
• Several effects
• Long duration
• Stabilization
• Automatic captions
• Colour correction
• Large audio files
• Limited computer memory
The preview may:
• Freeze
• Skip frames
• Play unevenly
• Take time to load
• Require preview rendering
Reality: The editing device may limit how smoothly the project can be created and reviewed.
How to Reduce This Limitation: Use shorter clips, lower preview quality, fewer unnecessary effects, organized media, and a suitable project resolution. Export a short test before completing the entire video.
Limitation 23: Browser-Based Editors Depend on Internet Access
Online editors may require source files to be uploaded before editing.
Slow or unstable internet may cause:
• Long upload times
• Failed uploads
• Delayed previews
• Incomplete saving
• Slow exports
• Difficulty downloading the final file
Reality: A browser editor may be convenient but unsuitable for large files or unreliable internet connections.
How to Reduce This Limitation: Test one short clip first, keep local backups, and consider a desktop editor when large files or limited internet access make cloud editing difficult.
Limitation 24: Project Files May Depend on the Original Media
Some desktop editors do not copy source files into the project.
If the source file is moved, renamed, or deleted, the editor may report:
• Missing media
• Offline file
• Broken link
• Unavailable audio
• Export failure
Reality: The project file may contain editing instructions without containing the actual video and audio files.
How to Reduce This Limitation: Organize the project folder before importing and keep the source files in the same location. Use a project-archive or packaging feature when available.
Limitation 25: Different Editors May Interpret Projects Differently
A project created in one editing application may not open correctly in another.
Possible problems include:
• Missing titles
• Unsupported transitions
• Changed fonts
• Different colour adjustments
• Missing audio effects
• Caption problems
• Unsupported project files
Reality: Editing project files are often application-specific.
How to Reduce This Limitation: Keep the original editor installed when possible, save high-quality master exports, preserve source files, and record the project settings.
Limitation 26: Exported Quality May Differ from the Preview
The editor preview may use lower quality to improve performance.
The exported video may reveal:
• Compression blocks
• Blurry text
• Colour differences
• Audio changes
• Caption shifts
• Ghosted transitions
• Unexpected final frames
• Watermarks
Reality: A correct editor preview does not guarantee a correct final export.
How to Reduce This Limitation: Play every exported file outside the editor at full screen and on the intended device before publishing.
Limitation 27: Compression Can Reduce Fine Detail
Website and social-media versions may require smaller files.
Compression may reduce detail in:
• Grass
• Water
• Hair
• Clothing
• Text
• Fast movement
• Shadows
• Small objects
Reality: Smaller files generally involve some reduction in visual information.
How to Reduce This Limitation: Preserve a high-quality master copy and create separate publishing versions using the smallest amount of compression needed.
Limitation 28: One Edit Cannot Fit Every Platform Perfectly
A landscape edit may not work well as a vertical or square video.
Different formats may require changes to:
• Cropping
• Subject position
• Text size
• Caption placement
• Title timing
• Background design
• Thumbnail
• Safe areas
Reality: Exporting one timeline into several aspect ratios without reviewing it can damage the composition.
How to Reduce This Limitation: Create a separate project copy for each platform format and review each version from beginning to end.
Limitation 29: Editing Can Make Synthetic Content More Convincing
Trimming, colour correction, sound design, titles, and realistic narration can make an AI-generated scene appear more authentic.
This may increase the risk that viewers mistake it for:
• Real footage
• Documentary evidence
• A genuine testimonial
• A real product demonstration
• A verified event
• An actual statement by a person
Reality: Better editing can increase both visual quality and the potential for misunderstanding.
How to Reduce This Limitation: Add suitable context or disclosure, avoid misleading audio and claims, and never present synthetic content as proof of a real event.
Limitation 30: Editing Does Not Remove Responsibility
A video may be technically polished but still contain:
• Unauthorized people
• Private information
• Unlicensed music
• Misleading claims
• Inaccurate products
• Harmful stereotypes
• Missing disclosure
• Incorrect captions
Reality: Technical editing quality does not confirm that a video is safe, accurate, authorized, or suitable to publish.
How to Reduce This Limitation: Complete a separate review for permission, privacy, factual accuracy, accessibility, disclosure, licences, and publishing rules.
When Editing Is the Right Solution
Editing is useful when the source clip contains:
• A short weak opening
• A short distorted ending
• A removable middle problem
• Slightly dark or bright lighting
• Small framing issues
• Minor camera shake
• Unnecessary audio
• Missing titles
• Missing captions
• Clips that need rearranging
• A file requiring another aspect ratio
• A file requiring compression or another format
When Regeneration May Be Better
Generate another clip when:
• The main subject is incorrect.
• The complete face changes.
• Hands remain distorted throughout.
• The action is wrong.
• The subject is partly missing.
• The background is unstable throughout.
• The camera movement is unusable.
• The product is inaccurate.
• The scene does not match the intended idea.
• Cropping would remove essential content.
When Real Footage May Be Better
Use verified real footage when the project requires:
• Genuine evidence
• Exact product operation
• Accurate machinery
• Real customer testimony
• A specific real person
• Medical instruction
• Safety procedures
• Legal documentation
• Precise hand movement
• Verified locations
• Authentic events
Choosing the correct source material is more important than attempting to repair every problem through editing.
Practical Limitation Review
Before continuing with an edit, ask:
1. Does the source contain a stable usable section?
2. Is the main subject correct?
3. Is the main action understandable?
4. Can the problem be removed through trimming?
5. Will cropping preserve the complete subject?
6. Can a small colour adjustment improve the clip?
7. Will stabilization create unwanted cropping?
8. Can the audio be cleaned, or should it be replaced?
9. Will a transition improve the scene change?
10. Does the video require another generation?
11. Would real footage provide more reliable accuracy?
12. Could improved editing make the synthetic content misleading?
13. Have permissions, rights, privacy, and disclosure been checked?
AI-video editing is most effective when it improves usable source material. It should not be expected to repair every generation error or replace verified footage when authenticity and accuracy are essential.

Figure 14. AI-video editing can improve usable clips, but it cannot fully repair missing content, severe distortion, incorrect actions, or inaccurate products.
Figure 14 summarizes the practical limits of editing AI-generated videos. Trimming, cropping, colour correction, stabilization, audio replacement, and transitions can improve minor problems, but regeneration or verified real footage may be necessary when the main subject, action, identity, product, or factual information is incorrect.
Common Myths About Editing AI-Generated Videos
AI-video editing tools are becoming easier to use, but they are often misunderstood.
Some beginners expect an editor to repair every generation problem automatically. Others believe that AI-generated clips do not require normal editing, fact-checking, permission, or quality review.
The following myths can lead to wasted time, poor results, or misleading published content.
Myth 1: AI-Generated Videos Do Not Need Editing
An AI video generator may produce a complete clip, but the first result may still contain:
• Weak opening frames
• Distorted endings
• Changing subjects
• Unwanted audio
• Incorrect framing
• Lighting differences
• Unreadable generated text
• An unsuitable aspect ratio
Reality: AI-generated videos often require the same basic review and editing as other video content.
The editor may need to:
• Trim weak sections
• Rearrange scenes
• Correct framing
• Add accurate titles
• Replace audio
• Add captions
• Export suitable platform versions
A generated result should be treated as source material rather than automatically finished content.
Myth 2: Video Editing Can Fix Every AI Error
Some users expect cropping, stabilization, colour correction, or enhancement tools to repair any visual problem.
Reality: Editing can improve minor problems, but it cannot reliably correct a fundamentally wrong subject, action, identity, product, or background.
For example, editing may remove a brief distorted bicycle wheel at the end of a clip. It cannot repair a bicycle that changes shape throughout the complete video.
When the main content is incorrect, use:
• Another generated version
• A new prompt
• A reference-based workflow
• Verified real footage
Myth 3: Longer Videos Are Always Better
A beginner may keep every generated second because a longer video appears more valuable.
Reality: Video quality is more important than unnecessary duration.
A four-second clip containing stable movement may be more useful than a seven-second clip containing:
• A blurred opening
• Repeated action
• A distorted ending
• Changing lighting
• Unnecessary empty time
Remove any section that does not improve understanding, story, or visual quality.
Myth 4: More Effects Make a Video Look More Professional
Editors often provide:
• Animated titles
• Filters
• Transitions
• Stickers
• Motion graphics
• Zoom effects
• Decorative overlays
Beginners may assume that using more features creates a more professional result.
Reality: Professional editing usually depends on clarity, consistency, timing, and restraint.
Too many effects can:
• Distract viewers
• Cover the main subject
• Slow the story
• Make text difficult to read
• Reveal more AI inconsistencies
• Make the video look unorganized
Use an effect only when it supports a clear purpose.
Myth 5: Every Scene Change Needs a Transition
A video editor may offer hundreds of transitions, encouraging users to place one between every clip.
Reality: Direct cuts are often the clearest and most natural choice.
Use a transition when it helps communicate:
• A change of time
• A change of location
• A new topic
• The beginning
• The ending
A transition should not be added only because one is available.
Myth 6: A Dissolve Can Hide Any Inconsistency
A cross dissolve may soften a change between clips.
However, it may also show both clips at the same time.
Reality: A dissolve can make inconsistent subjects more noticeable.
It may temporarily display:
• Two faces
• Two bicycles
• Two products
• Different clothing
• Overlapping backgrounds
• Duplicate objects
When this occurs, use:
• A shorter dissolve
• A direct cut
• A fade to black
• A neutral supporting clip
• Better-matched source clips
Myth 7: Stabilization Fixes All Unnatural Movement
Stabilization is commonly described as a method for making video movement smoother.
Reality: Stabilization mainly addresses camera movement. It does not correct changing subjects or impossible motion.
It cannot repair:
• A face changing shape
• A bicycle wheel becoming oval
• A hand merging with an object
• A product changing size
• A road moving incorrectly
• A fence appearing and disappearing
It may also crop the frame or warp the background.
Use stabilization only after confirming that the problem is minor camera shake.
Myth 8: Upscaling Creates Real Detail
An upscaling tool may convert a small video into a larger resolution.
Reality: Upscaling may improve the appearance of some edges, but it cannot guarantee accurate missing detail.
It cannot reliably create:
• Correct fingers
• Accurate facial details
• Missing product components
• Correct visible text
• Stable background objects
• Genuine high-resolution textures
A larger file is not necessarily a more accurate video.
Begin with the strongest available source clip.
Myth 9: Exporting in 4K Makes Every Video High Quality
A beginner may select the highest available export resolution.
Reality: Export resolution cannot replace missing source quality.
A low-resolution or distorted clip exported at 4K may become:
• A much larger file
• Slower to upload
• Slower to process
• More demanding to store
The original blur, distortion, and missing detail will remain.
Choose a resolution that matches:
• Source quality
• Publishing destination
• Available storage
• Internet speed
• Viewer needs
Myth 10: Automatic Colour Correction Is Always Accurate
Some editors provide one-click improvement tools.
Reality: Automatic correction may improve one part of a clip while damaging another.
It may:
• Make skin tones unnatural
• Oversaturate grass
• Change product colours
• Remove highlight detail
• Darken shadows
• Make clips inconsistent
Apply the correction, compare it with the original, and keep it only when the full clip improves.
Myth 11: Filters Can Hide Generation Problems
A dramatic, dark, or vintage filter may make an unstable clip appear visually different.
Reality: A filter changes the style, not the accuracy of the content.
The video may still contain:
• Changing faces
• Incorrect hands
• Distorted objects
• Unstable backgrounds
• Impossible movement
• Incorrect products
A filter may make these problems harder to notice temporarily, but it does not repair them.
Myth 12: Cropping Can Fix Any Composition Problem
Cropping may remove an unwanted edge or improve subject placement.
Reality: Cropping cannot restore content that is already missing.
It may also remove:
• A person’s hands
• Bicycle wheels
• Product details
• Important background context
• Space for captions
• Movement that occurs later
Review the complete clip before accepting a crop.
When the source composition is fundamentally unsuitable, create another generation.
Myth 13: One Landscape Video Can Be Exported Directly for Every Platform
A 16:9 landscape video can technically be placed inside a 9:16, 1:1, or 4:5 project.
Reality: Each format changes the available visual space.
A direct conversion may produce:
• Cropped subjects
• Tiny landscape video
• Large empty areas
• Hidden titles
• Covered captions
• Poor mobile composition
Create and review separate versions for each required aspect ratio.
Myth 14: AI-Generated Text Can Be Corrected Automatically
Generated signs, screens, and packaging may contain misspelled or changing words.
Reality: Moving generated text may be difficult to replace because it changes:
• Position
• Size
• Perspective
• Lighting
• Shape
• Visibility
Generate important scenes without visible wording when possible.
Add correct text manually in the editor.
Myth 15: Automatic Captions Do Not Need Review
Automatic caption tools can create text quickly from narration.
Reality: They may misunderstand:
• Technical terms
• Names
• Dates
• Article numbers
• Website addresses
• Accents
• Quiet speech
• Numbers
Every caption should be compared with the approved narration script.
Correct:
• Wording
• Spelling
• Punctuation
• Timing
• Line breaks
• Placement
Myth 16: Music Automatically Makes a Video More Engaging
Music can affect mood, but it does not improve every project.
Reality: Unnecessary music may:
• Cover narration
• Distract from instructions
• Change the intended mood
• Increase licensing work
• Make a short clip feel crowded
A simple instructional video may be stronger with narration and captions only.
Use music when it genuinely supports the content.
Myth 17: Louder Audio Is Clearer Audio
Increasing the volume may make quiet narration easier to hear.
However, excessive volume can produce distortion.
Reality: Clear audio depends on:
• Suitable recording
• Consistent volume
• Low background noise
• Correct mixing
• No clipping
• Balanced music
A distorted loud voice is less understandable than a properly recorded voice at a moderate level.
Myth 18: Noise Reduction Can Repair Any Recording
Noise-reduction controls may reduce hum or background hiss.
Reality: Strong noise reduction may damage the voice.
It can create:
• Metallic sound
• Robotic speech
• Missing word endings
• Uneven volume
• Unnatural silence
When the original recording is seriously damaged, recording the narration again may produce a better result.
Myth 19: Free Music Is Automatically Safe to Use
A track may be described as free, available inside an editor, or downloadable online.
Reality: “Free” does not always mean unrestricted.
The track may have conditions involving:
• Attribution
• Commercial use
• Platform use
• Modification
• Distribution
• Account plan
• Geographic region
Save the licence information and confirm that the intended use is permitted.
Myth 20: An AI Voice Can Imitate Anyone
Voice-generation tools may be able to create speech resembling a real person.
Reality: Technical capability does not establish permission.
Using a recognizable person’s voice may create concerns involving:
• Consent
• Impersonation
• Deception
• Publicity rights
• Platform rules
• Commercial use
Use authorized generic voices unless appropriate permission exists.
Myth 21: If a Clip Looks Real, It Can Be Presented as Real Footage
Improved editing may make AI-generated content appear highly realistic.
Reality: Visual realism does not prove that the scene happened.
An AI-generated video should not be presented as:
• Documentary evidence
• Real news footage
• A genuine testimonial
• A verified product demonstration
• A real statement
• Proof of an actual event
Add appropriate context or disclosure when viewers may misunderstand the content.
Myth 22: Editing Removes the Need to Check Accuracy
A polished video may contain attractive titles, smooth transitions, and clear narration.
Reality: Good editing does not confirm that the information is correct.
The finished video may still include:
• Incorrect statistics
• Wrong product features
• Misleading labels
• Invented locations
• Inaccurate dates
• Unsupported claims
• Incorrect captions
Complete a separate factual review before publication.
Myth 23: Editing Removes Privacy Concerns
Cropping or blurring one detail does not automatically make a video safe.
Reality: The video may still reveal:
• Faces
• Names
• Addresses
• Licence plates
• Documents
• Computer screens
• Account information
• Private locations
• Voices
Review the complete frame and audio.
Remove or replace private information before exporting.
Myth 24: A Watermark Proves Ownership
A creator may add a logo or website address to the video.
Reality: A watermark identifies the publisher but does not prove ownership of every included element.
The video may still contain:
• Unlicensed music
• Unauthorized footage
• A person used without permission
• Restricted stock assets
• Protected branding
• An unauthorized voice
Check the rights for every source element separately.
Myth 25: Saving the Export Is Enough
A finished MP4 file may play correctly today.
Reality: The export alone may not be sufficient for future updates.
Without the project and source files, it may be difficult to:
• Correct a caption
• Replace music
• Create a vertical version
• Change a title
• Remove a scene
• Produce a higher-quality export
Preserve:
• Source clips
• Editing project
• Narration
• Captions
• Music records
• Thumbnail
• Master export
Myth 26: Cloud Editors Always Save Everything Automatically
Browser-based editors often provide automatic saving.
Reality: Saving may be interrupted by:
• Internet failure
• Account problems
• Storage limits
• Browser crashes
• Expired sessions
• Incomplete uploads
Confirm that the project appears in the account and keep local copies of important files.
Myth 27: Moving Files After Import Will Not Affect the Project
Some editors copy media into the project, while others link to the original file location.
Reality: Moving or renaming source files may create missing-media errors.
Organize the folder before importing.
When files must be moved, use the editor’s project-management or relinking controls.
Myth 28: The Editor Preview Matches the Final Export Exactly
The preview may use reduced quality to improve performance.
Reality: The export may reveal:
• Compression artifacts
• Changed colour
• Audio problems
• Caption movement
• Ghosted transitions
• Unexpected watermarks
• Incorrect final frames
Always play the exported file outside the editor.
Myth 29: One Successful Export Means Every Version Is Correct
A 16:9 master export may work perfectly, while a vertical or compressed version contains problems.
Reality: Every exported version should be reviewed separately.
Check each file for:
• Aspect ratio
• Cropping
• Resolution
• Text size
• Caption placement
• Audio
• Watermarks
• Playback
• File size
Do not approve several files after watching only one.
Myth 30: Editing Is Only a Technical Task
Editing involves more than operating software.
Reality: Good AI-video editing also requires decisions about:
• Meaning
• Accuracy
• Story order
• Accessibility
• Permission
• Privacy
• Disclosure
• Audience
• Publishing format
• Record keeping
The editor is responsible for deciding not only what can be changed, but also what should be published.
Myth-Review Checklist
Before accepting an AI-video editing claim, ask:
1. Does the tool actually correct the problem, or only hide it?
2. Is the source clip already usable?
3. Is the main subject accurate?
4. Will the adjustment damage another part of the video?
5. Does the result remain natural at normal speed?
6. Is every title and caption correct?
7. Are music and voices authorized?
8. Does the export match the intended platform?
9. Was the final file tested outside the editor?
10. Could viewers mistake synthetic content for real footage?
11. Have privacy, permission, and factual accuracy been reviewed?
12. Are the source files and project records preserved?
AI-video editing is a practical method for improving suitable source clips. It is not an automatic repair system, a substitute for accurate source material, or proof that a finished video is safe and truthful.
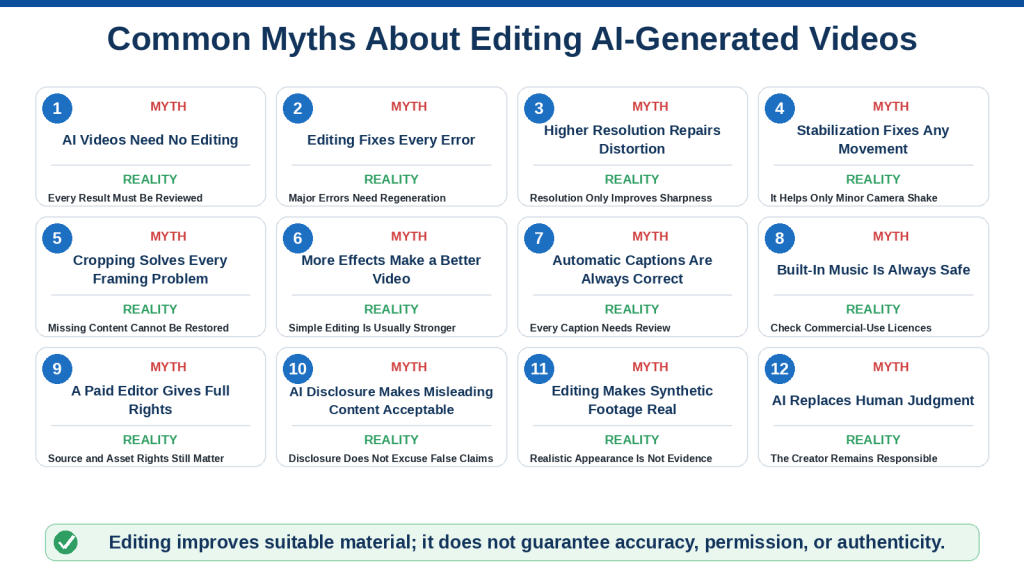
Figure 15. Common myths about AI-video editing often confuse visual improvement with complete correction, accuracy, permission, or authenticity.
Figure 15 corrects common misunderstandings about editing AI-generated videos. Editing can trim, organize, reframe, label, caption, and prepare usable clips, but it cannot automatically repair every generation error, create genuine missing detail, confirm ownership, or prove that realistic-looking footage is real.
How to Edit AI-Generated Videos Responsibly
Responsible editing involves more than improving visual quality.
This section provides general educational information and is not legal advice.
Before publishing an AI-generated video, review:
• Ownership and licences
• Permission from real people
• Privacy
• Voice and music rights
• Factual accuracy
• Product and brand details
• AI disclosure
• Accessibility
• Platform rules
• Project records
A technically polished video may still be unsuitable to publish when its sources, claims, people, audio, or purpose have not been reviewed.
Own or Licence the Source Material
Confirm that you are permitted to use every source included in the project.
Source material may include:
• AI-generated video clips
• Reference images
• Uploaded photographs
• Stock footage
• Real video recordings
• Music
• Sound effects
• Narration
• Fonts
• Graphics
• Templates
• Screenshots
Do not assume that finding a file online gives you permission to edit or publish it. [13][14]
Record:
• Source name
• Creator or provider
• Download location
• Licence
• Download date
• Attribution requirement
• Commercial-use conditions
• Modification conditions
Keep these details inside:
Sources and Licences
Review the AI Tool’s Current Terms
An AI-video generator or editing service may have rules covering:
• Uploaded content
• Generated output
• Commercial use
• Account type
• Storage
• Training use
• Public or private projects
• Watermarks
• Voice generation
• Prohibited content
• Attribution
• Regional availability
These conditions may vary by:
• Tool
• Subscription
• Feature
• Country
• Account
• Date
Review the current official conditions for the specific service being used.
Do not rely only on:
• An old tutorial
• A social-media post
• A previous plan description
• Another user’s account
• A general statement about AI ownership
Record the tool and model used for the project.
Protect Private Information
Review every frame before publishing.
Look for:
• Full names
• Home addresses
• Email addresses
• Telephone numbers
• Account details
• Passwords
• Documents
• Identification cards
• Licence plates
• School information
• Medical information
• Financial information
• Computer screens
• Private messages
• File paths
• Notifications
• Location information
Private information may appear in:
• Source footage
• Screenshots
• Screen recordings
• Reflections
• Background objects
• Audio
• Captions
• Project filenames
Do not assume that a small detail is impossible to read.
View the final export at full screen and pause on frames containing screens, documents, vehicles, or signs.
Remove Private Information Properly
Possible methods include:
• Cropping
• Blurring
• Covering
• Replacing the shot
• Removing the audio
• Re-recording the screen demonstration
• Using fictional demonstration information
Check the complete clip after applying a privacy effect.
A moving person, document, or licence plate may leave the protected area later.
Use motion tracking when available, or replace the clip when the information cannot be hidden reliably.
Do not use a small static blur when the private detail moves across the frame.
Use Fictional Demonstration Information
For educational examples, use invented and clearly non-personal details.
Examples include:
• example@email.com
• Sample Project
• Demo Account
• Example Street
• Fictional names
• Generic profile images
• Non-functional account numbers
Do not use another person’s real details merely because the video is described as a demonstration.
Get Permission from Real People
A real person may appear through: [12][16][17]
• A photograph
• Uploaded video
• Reference image
• Screen recording
• Voice recording
• Face replacement
• Character animation
• Lip synchronization
• Voice cloning
Confirm that the person has given appropriate permission for the intended use. [12][16][17]
Permission should cover relevant details such as:
• Editing
• AI transformation
• Publication
• Commercial use
• Advertising
• Voice use
• Platform distribution
• Duration of use
A person agreeing to be photographed does not automatically mean they agreed to have their appearance animated or transformed with AI.
Be Especially Careful with Children
Do not use a child’s image, video, voice, name, school, location, or other identifying information without appropriate authorization.
Avoid publishing material that reveals:
• School uniform
• School name
• Home location
• Daily routine
• Medical information
• Contact details
• Private family information
Use generic AI-generated characters or properly authorized demonstration assets when a real child is unnecessary.
Do Not Impersonate Real People
Do not edit a video to make a real person appear to: [16][17]
• Say words they did not say
• Support a product they did not support
• Admit to an event
• Give financial or medical advice
• Participate in a fictional event
• Perform an action they did not perform
Realistic face, lip, and voice tools can create convincing results.
Visual realism does not establish consent or truth.
Use fictional or authorized subjects for demonstrations.
Verify Voice Permission
A voice may be personally identifiable even when the speaker is not visible. [16][17]
Before using or transforming a voice, confirm:
• Who recorded it
• Whether the speaker agreed
• Whether cloning is allowed
• Whether commercial use is allowed
• Whether disclosure is required
• Whether the voice resembles a real person
Use an authorized generic voice when specific identity is unnecessary.
Do not use a recognizable imitation to make viewers believe a real person recorded the narration.
Check Music and Sound-Effect Rights
Every music or sound-effect file should have a documented source. [13][14]
Record:
• Track title
• Creator
• Provider
• Licence
• Commercial-use permission
• Attribution requirement
• Date downloaded
Music available inside an editor may have conditions that depend on: [14]
• Subscription level
• Publishing platform
• Region
• Type of project
• Commercial use
• Continued account access
Do not remove attribution when the licence requires it.
Review Brands and Trademarks
AI-generated clips may accidentally contain:
• Invented logos
• Distorted brand names
• Recognizable packaging
• Product designs
• Store signs
• Vehicle badges
• Clothing marks
Review whether these details are:
• Accurate
• Necessary
• Authorized
• Potentially misleading
• Visible long enough to identify
Remove accidental or distorted branding when it is not needed.
Do not edit a brand logo onto a product in a way that implies sponsorship, approval, or authenticity.
Verify Product Accuracy
An AI-generated product demonstration may look realistic while showing incorrect operation.
Check:
• Shape
• Buttons
• Ports
• Packaging
• Connections
• Controls
• Safety features
• Dimensions
• Materials
• Movement
• Results
Do not present an AI-generated demonstration as proof that a real product works in the same way.
Use verified product footage when exact operation matters.
Add clear context when the visual is a concept, illustration, or fictional example.
Check Every Factual Claim
Review:
• Names
• Dates
• Statistics
• Measurements
• Prices
• Locations
• Product features
• Software instructions
• Health claims
• Financial claims
• Historical events
• Quotations
Editing can make incorrect information appear polished and authoritative.
Verify factual claims separately from visual quality.
Do not assume that information is correct because it appears in:
• Generated narration
• Automatic captions
• On-screen text
• A template
• An AI-generated scene
Avoid Misleading Before-and-After Comparisons
A before-and-after demonstration should represent the actual editing result.
Do not:
• Use different source subjects
• Change lighting without explanation
• Replace the product
• Hide important differences
• Claim that editing corrected an error that was actually regenerated
• Present a simulated result as a real customer outcome [19]
For the bicycle example, the Before Editing and After Editing versions should come from the same source clip when demonstrating trimming.
State when the final version was:
• Trimmed
• Cropped
• Colour corrected
• Stabilized
• Regenerated
• Replaced
• Combined with another clip
Do Not Present Synthetic Scenes as Evidence
An AI-generated video may resemble:
• Security footage
• News footage
• Medical evidence
• A product test
• A public event
• A witness recording
• A customer testimonial
• A scientific demonstration
Do not present synthetic content as proof that a real event occurred. [15][19]
Use clearly labelled illustration or simulation language when appropriate.
Examples include:
AI-generated illustration
Simulated demonstration
Concept visualization
This scene did not record a real event.
Disclose AI Use When Needed
Disclosure may be important when viewers could reasonably mistake the content for real footage. [15]
Possible disclosure methods include:
• On-screen text
• Opening title
• Closing note
• Video description
• Article explanation
• Caption
• Platform disclosure control
• Metadata
A simple statement may say:
This video includes AI-generated visuals.
For a simulated demonstration:
AI-generated simulation for educational purposes.
Use wording that accurately describes the role of AI.
Do not describe a heavily generated video as merely “edited” when the main visual content was created by AI.
Make the Disclosure Noticeable
A disclosure should not be:
• Extremely small
• Hidden behind controls
• Visible for only a fraction of a second
• Placed in unreadable colours
• Added only to an inaccessible location
• Written in confusing language
Keep it:
• Clear
• Readable
• Appropriately timed
• Close to the relevant content
When a video contains both real and generated scenes, identify which parts are synthetic when that distinction matters.
Avoid Unsupported Claims About AI
Do not use titles such as:
• Perfect AI Editing
• Fix Every Video Automatically
• Guaranteed Error-Free Results
• Create Any Realistic Event Safely
• No Permission Required
• Copyright-Free AI Content
Use accurate wording.
For example:
Basic Editing Can Improve Usable AI-Generated Clips
This describes the process without promising impossible results.
Preserve the Meaning of the Source
Editing should not change a real person’s statement or action unfairly.
Removing words or rearranging clips may create a different meaning.
For example, cutting:
“I do not recommend this method without careful review.”
into:
“I recommend this method.”
would misrepresent the speaker.
When editing real interviews or recordings:
• Preserve context
• Avoid deceptive rearrangement
• Keep complete statements when necessary
• Confirm quotations
• Mark dramatizations or reconstructions
Use Captions Accurately
Captions should reflect what is actually spoken. [9]
Do not use captions to:
• Add words the speaker did not say
• Change the speaker’s meaning
• Insert unsupported claims
• Hide unclear audio
• Attribute speech to the wrong person
When captions include important non-speech information, keep it accurate.
For example:
[gentle wind]
should not be used when loud traffic is audible.
Support Accessibility
Responsible editing includes making the video understandable to more viewers.
Consider:
• Accurate captions
• Readable text
• Strong contrast
• Suitable font size
• Clear narration
• Limited flashing
• Understandable scene order
• Sufficient reading time
• Meaningful audio descriptions when needed
Do not communicate essential differences only through colour.
For example, use:
• Before
• After
rather than relying only on red and green labels.
Avoid Rapid Flashing and Uncomfortable Effects
Rapid flashes, strong flicker, repeated bright transitions, and fast patterns may be uncomfortable or unsafe for some viewers.
Review:
• Flash transitions
• Bright white effects
• Strobe effects
• Rapid text animation
• Flickering generated lighting
• Fast colour changes
Use restrained effects and remove unnecessary flashing. [11]
When the generated source contains persistent flicker, select another clip or regenerate the scene.
Review Sensitive Content Carefully
Use additional caution when editing content involving:
• Health
• Finance
• Children
• Crime
• Accidents
• War
• Politics
• Disasters
• Public figures
• Personal allegations
• Safety procedures
• Emergency situations
A realistic AI-generated video in these areas may create serious misunderstanding.
Do not present fictional scenes as verified reporting, advice, or evidence.
Confirm Commercial-Use Conditions
A video used for a business, advertisement, sponsored post, product page, or monetized channel may have different requirements from a private experiment.
Check the commercial-use conditions for:
• AI generator
• Video editor
• Stock media
• Music
• Fonts
• Templates
• AI voices
• Reference images
• Plugins
• Generated assets
Do not assume that a personal-use licence covers advertising or paid client work. [13][14]
Check Project Privacy Settings
Cloud-based editors and generators may offer settings such as: [12]
• Public
• Private
• Shared
• Unlisted
• Team workspace
• Community gallery
Before uploading sensitive or unpublished material, confirm:
• Who can access the project
• Whether the output is publicly visible
• Whether sharing links are active
• Whether collaborators still have access
• Whether uploaded files are retained
• Whether projects appear in a community gallery
Use private project settings when the material is not intended for public access.
Do not upload confidential client material without appropriate authorization.
Protect Account and Project Access
Use suitable account protection, including:
• Strong password
• Multi-factor authentication when available
• Secure device
• Updated software
• Controlled sharing links
• Approved collaborators
• Removed access for former collaborators
Do not display:
• Login details
• Licence keys
• Private cloud links
• Account recovery information
• Payment information
inside screenshots or screen recordings.
Save Creation and Editing Records
Keep a project record containing:
• Project title
• Article number
• Source filenames
• Original prompts
• Reference images
• Generator
• Model or feature used
• Generation dates
• Editing application
• Editing changes
• Narration source
• Music and sound licences
• Permissions
• Disclosure wording
• Export settings
• Final filenames
• Publication destination
• Publication date
These records help with:
• Corrections
• Updates
• Rights questions
• Platform reviews
• Recreating the project
• Producing another format
Preserve Original and Edited Versions
Keep:
• Original generated clip
• Selected source clip
• Editing project
• Major project versions
• High-quality master export
• Platform-specific exports
• Caption files
• Thumbnail
• Licence records
Do not preserve only the final compressed upload.
The original and project files may be required when a correction is needed later.
Follow Publishing-Platform Rules
Before uploading, review the current rules for the intended platform. [8][15]
Rules may cover:
• Synthetic-media disclosure
• Impersonation
• Privacy
• Copyright
• Music
• Advertising
• Harmful content
• Medical claims
• Political content
• Children
• Misleading metadata
• Monetization
A video accepted by one platform may require changes for another.
Do not assume that successful upload means the content meets every rule.
Review Metadata Responsibly
Check:
• Title
• Description
• Thumbnail
• Caption
• Tags
• Category
• Alt text or supporting description
• Disclosure
• Links
Metadata should accurately represent the video.
Avoid:
• Misleading titles
• Exaggerated thumbnails
• Unsupported claims
• Irrelevant tags
• Hidden disclosures
• False locations
• False names
When supported, Content Credentials can provide provenance information about how a digital file was created or modified. They support transparency but do not replace human review, permission checks, or factual verification. [18]
Correct Published Errors
When an error is discovered after publication:
1. Confirm the problem.
2. Remove or restrict the video when necessary.
3. Correct the editing project.
4. Export a new version.
5. Replace the published file.
6. Correct captions and metadata.
7. Record the change.
8. Explain the correction when the original error may have misled viewers.
Do not leave a known serious error online only because the video has already been published.
Complete a Human Review
Automated tools may help identify:
• Caption errors
• Background noise
• Framing problems
• Private information
• Copyright risks
• Visual artifacts
However, they may miss:
• Misleading context
• Incorrect meaning
• Inappropriate impersonation
• Product inaccuracies
• Unfair editing
• Sensitive personal information
• Disclosure needs
A person should review the complete final export before publication.
The reviewer should watch it:
• From beginning to end
• At full screen
• With sound
• Without sound
• With captions
• On the intended device or platform
Responsible Editing Review Questions
Before publishing, ask:
1. Do I own or have permission to use every source?
2. Did I check the current terms of the AI and editing tools?
3. Does the video include a real person, image, or voice?
4. Do I have appropriate permission?
5. Does any private information remain visible or audible?
6. Are music and sound effects properly authorized?
7. Are brands and product details accurate?
8. Are the narration, captions, titles, and claims correct?
9. Could viewers mistake the video for real footage?
10. Is an AI disclosure needed?
11. Is the disclosure clear and noticeable?
12. Does the edit preserve the meaning of real source material?
13. Is the video accessible and comfortable to watch?
14. Are project privacy and sharing settings suitable?
15. Does the intended publishing platform permit the content?
16. Were creation, licence, and export records saved?
17. Was the complete final export reviewed by a person?
Responsible AI-video editing protects viewers, creators, subjects, and publishers. A video should be accurate, authorized, accessible, appropriately disclosed, and suitable for its intended platform before it is published.

Figure 16. Responsible AI-video editing requires permission, privacy protection, accurate information, authorized audio, suitable disclosure, and complete publishing records.
Figure 16 presents a final safety and responsibility checklist for AI-video editing. It reminds creators to verify ownership, remove private information, obtain permission from real people, review tool terms, confirm commercial use, check brands and accuracy, verify voice and music rights, disclose AI use when needed, preserve project records, and follow publishing-platform rules.
Frequently Asked Questions About Editing AI-Generated Videos
1. Do I need to edit every AI-generated video?
Every generated video should be reviewed, but not every clip requires major editing.
A strong clip may need only:
• A clean filename
• Correct aspect ratio
• Suitable export settings
• A final quality check
Other clips may require:
• Trimming
• Cropping
• Colour correction
• Audio replacement
• Titles
• Captions
• Transitions
Do not add changes that do not improve the result.
2. What is the most important first edit for a beginner?
Begin with trimming.
Remove:
• Weak opening frames
• Distorted endings
• Long pauses
• Unnecessary repeated movement
• Brief unusable sections
Trimming is usually easier to learn than advanced effects and often produces the greatest immediate improvement.
3. Should I edit the original AI-generated file?
Preserve the original file and edit a copy or timeline version.
Keep the original in:
Original Generated Clips
Place the selected working version in:
Selected Clips
The original may be needed later for:
• Another edit
• A different aspect ratio
• A comparison
• A corrected export
• Recovery after a project problem
4. Can editing fix distorted hands, faces, or objects?
Editing may remove a short distorted section when stable frames remain.
It usually cannot repair distortions that continue throughout the clip.
For example, trimming may remove one second in which a bicycle wheel changes shape. It cannot correct a wheel that remains distorted during the complete video.
When the main subject is consistently wrong, use another generation or source clip.
5. Can I remove an unwanted object from an AI-generated video?
A small unwanted object may sometimes be:
• Cropped out
• Covered with text
• Blurred
• Hidden behind another clip
• Removed with an object-removal feature
However, moving objects and changing backgrounds may require advanced tracking or frame-by-frame correction.
When removal creates new distortions, regenerate the scene without the object.
6. Can I edit an AI-generated video without professional experience?
Yes. A beginner can learn the main workflow:
1. Create a project.
2. Import the clip.
3. Add it to the timeline.
4. Trim weak sections.
5. Add simple titles or captions.
6. Review the result.
7. Export a test file.
Begin with one short clip rather than a long multi-scene project.
7. Do I need an expensive video editor?
Not necessarily.
A suitable beginner editor should provide the functions required for the project, such as:
• Importing video
• Timeline editing
• Trimming
• Splitting
• Cropping
• Text
• Audio adjustment
• Captions
• Exporting
Check whether the selected plan adds:
• A watermark
• Resolution limits
• Export limits
• Storage restrictions
• Commercial-use conditions
A simple reliable editor may be more useful than a complicated application with features you do not need.
8. Can I edit AI-generated videos on a mobile phone?
Yes, especially for short projects.
Mobile editors may be suitable for:
• Trimming
• Cropping
• Titles
• Captions
• Music
• Simple transitions
• Vertical videos
A desktop or laptop may be easier when the project contains:
• Many clips
• Several audio tracks
• Detailed captions
• Precise trimming
• Multiple aspect ratios
• Large source files
Choose the device that can complete the project reliably.
9. What aspect ratio should I use?
Choose the aspect ratio according to the publishing destination.
Common formats include:
• 16:9: WordPress, YouTube, websites, and presentations
• 9:16: Shorts, Reels, TikTok, and vertical mobile video
• 1:1: Square social-media posts
• 4:5: Portrait feed posts
Create a separate project version for each important format.
Do not assume that one crop will work correctly everywhere.
10. What resolution should I use?
For many beginner projects, use:
• 1920 × 1080 when the source supports Full HD
• 1280 × 720 when smaller files or faster editing are important
Use 4K only when the source material, device, storage, and publishing destination genuinely require it.
Exporting a low-quality clip at a higher resolution does not restore missing detail.
11. Should I change the frame rate?
Keep the original or project frame rate when possible.
Select:
Match Source
or:
Match Project
when available.
Changing the frame rate unnecessarily may create:
• Uneven motion
• Repeated frames
• Missing frames
• Larger files
• Longer export times
12. Can I turn a landscape AI video into a vertical video?
Yes, but the composition must be reviewed carefully.
Possible methods include:
• Cropping and repositioning
• Tracking a moving subject with keyframes
• Using a blurred background
• Placing the landscape video over a designed background
• Generating a separate vertical version
Do not crop important details such as:
• Faces
• Hands
• Bicycle wheels
• Products
• Titles
• Captions
A separate vertical generation may produce a stronger result when the original scene is too wide.
13. Should I use stabilization on every AI-generated clip?
No.
Use stabilization only when the main problem is minor camera shake.
Do not use it automatically for:
• Changing faces
• Distorted objects
• Flickering backgrounds
• Incorrect movement
• Missing body parts
Stabilization may crop or warp the frame.
Compare the corrected version with the original before keeping it.
14. Can I slow down a short AI-generated clip?
Yes, but use small changes.
A slight speed reduction may:
• Make camera movement easier to follow
• Give viewers more time to understand the scene
• Provide space for narration or captions
A large reduction may create:
• Repeated frames
• Unnatural movement
• More visible distortion
• Stretched audio
Review the result at normal playback speed.
15. How many transitions should I use?
Use as few as necessary.
Direct cuts should normally be the first choice.
Add a simple transition when it helps communicate:
• A change of location
• A change of time
• A new topic
• The beginning
• The ending
Avoid using a different decorative transition between every clip.
16. How long should a transition be?
Keep most transitions brief.
The correct duration depends on:
• Clip length
• Video pace
• Movement
• Scene meaning
• Transition type
A long dissolve between short clips may create duplicate or ghosted subjects.
Shorten or remove it when both scenes become confusingly visible.
17. Should I add music to every video?
No.
Music is optional.
A beginner tutorial may work well with:
• Narration
• Captions
• Natural environmental sound
Add music only when it supports the video’s mood and does not compete with the voice.
Confirm that the music is authorized for the intended use.
18. How loud should background music be?
Music should remain clearly below narration.
Test the video using:
• Headphones
• Computer speakers
• Mobile speakers
Every spoken word should be understandable without depending on captions.
Lower the music further when it competes with the voice.
19. Can I use music included in a video editor?
Possibly, but check the current conditions.
Music availability may depend on:
• Subscription plan
• Commercial or personal use
• Publishing platform
• Region
• Attribution requirements
• Continued account access
Save the track information and licence record before publishing.
20. Can I use an AI-generated voice?
Yes, when the voice and intended use are authorized.
Review:
• Commercial-use conditions
• Voice licence
• Privacy
• Attribution
• Platform requirements
• Whether the voice imitates a real person
Use a generic authorized voice when a specific real-person identity is unnecessary.
21. Do automatic captions need correction?
Yes.
Automatic captions may contain errors involving:
• Names
• Technical terms
• Article numbers
• Website addresses
• Dates
• Punctuation
• Timing
Compare every caption with the approved narration script.
Correct the wording before export.
22. Should captions be permanently visible?
That depends on the platform and publishing method.
Open captions are permanently visible inside the video.
Closed captions can normally be turned on or off.
Use closed captions when the platform supports them and viewer control is helpful.
Use open captions when the platform does not reliably support separate caption files.
Review caption placement in every aspect ratio.
23. How much on-screen text should I add?
Use only the amount needed to explain the scene.
Suitable text may include:
• Main title
• Step number
• Before-and-after label
• Short reminder
• AI disclosure
• Closing message
Do not place full article paragraphs over the video.
Keep detailed explanations in narration, captions, or the written article.
24. Can I use generated text inside the AI video?
Generated text may be misspelled or unstable.
For important wording:
1. Generate the visual scene without text.
2. Add accurate wording manually in the editor.
3. Review spelling and timing.
4. Test readability on mobile.
This normally produces a more reliable result.
25. What format should I use for exporting?
A common compatible choice is:
MP4 using H.264 video
This is generally suitable for:
• WordPress
• YouTube
• Computers
• Mobile devices
• Presentations
• Many social-media platforms
Check the current requirements of the intended destination when another format is required.
26. Should I export one master file?
Yes.
Create a high-quality master export and preserve it.
Then create separate versions for:
• WordPress
• YouTube
• Vertical platforms
• Square posts
• Portrait posts
• Presentations
Do not repeatedly compress an already small publishing version.
27. Why does the exported video look different from the editor preview?
The preview may use reduced quality to improve editing performance.
The final export may reveal:
• Compression artifacts
• Colour changes
• Caption shifts
• Audio problems
• Ghosted transitions
• Watermarks
• Unexpected final frames
Always play the exported file outside the editor before publishing.
28. How can I reduce the final video file size?
You may:
• Shorten unnecessary duration
• Reduce the bitrate slightly
• Export at HD instead of Full HD when suitable
• Remove unused audio tracks
• Create a separate compressed website version
Do not overwrite the high-quality master.
Check that compression does not make text or movement visibly blurry.
29. Should I upload the video directly to WordPress?
The best method depends on:
• Website plan
• Storage
• File-size limits
• Video duration
• Loading speed
• Visitor internet speed
• Desired playback controls
A short, optimized clip may be suitable for direct upload through the WordPress Video block. WordPress can also embed externally hosted video, add text tracks, and use a poster image. The exact storage and hosting options depend on the site plan and setup. [8]
A longer or larger video may be better hosted on a suitable video platform and embedded in the article.
Review the website’s current storage and media conditions before deciding.
30. How should I name the final video file?
Use a descriptive filename containing:
• Article number
• Subject
• Platform
• Aspect ratio
• Version when required
For example:
020-ai-video-editing-wordpress-16×9-v01.mp4
Avoid vague names such as:
final-video-new-2.mp4
31. Do I need to keep the editing project after publishing?
Yes.
The editing project may be needed to:
• Correct a caption
• Replace music
• Change a title
• Remove a scene
• Create another aspect ratio
• Produce a better-quality export
Keep the project with its original source files.
32. Why does my editor say that media is missing?
Some desktop editors link to the source files instead of copying them into the project.
The media may become unavailable when a source file is:
• Moved
• Renamed
• Deleted
• Stored on a disconnected drive
• Placed in a cloud folder that is not synchronized
Keep the project folder organized and avoid moving source files after importing them.
33. How often should I save project versions?
Save a new version after important stages, such as:
• Initial setup
• Trimming
• Reframing
• Colour correction
• Audio editing
• Captioning
• Final review
Use filenames such as:
• project-v01
• project-v02
• project-v03
This makes it easier to return to an earlier working version.
34. Do I need to disclose that the video was generated by AI?
Disclosure may be appropriate or required when viewers could reasonably mistake the content for real footage or when a platform requires it.
A clear statement may say:
This video includes AI-generated visuals.
Or:
AI-generated simulation for educational purposes.
Use wording that accurately describes the role of AI.
35. Can I publish an AI-generated video containing a real person?
Do so only when you have appropriate permission for the intended use.
Permission may need to cover:
• Image use
• Video use
• AI transformation
• Voice use
• Commercial use
• Advertising
• Platform publication
Do not make a real person appear to say or do something they did not authorize.
36. Can I edit AI-generated product demonstrations?
Yes, but the edited result must not be presented as proof of real product performance unless the demonstration is accurate and verified.
Check:
• Product shape
• Controls
• Connections
• Labels
• Movement
• Safety details
• Claims
Use verified real footage when exact operation matters.
37. Can editing make an AI-generated video misleading?
Yes.
Editing can make synthetic scenes appear more realistic through:
• Trimming
• Colour correction
• Sound design
• Narration
• Captions
• Transitions
• Realistic titles
Do not present AI-generated scenes as genuine evidence, real testimonials, actual events, or verified product demonstrations.
38. What should I check immediately before publishing?
Complete a final review for:
• Visual errors
• Audio clarity
• Caption accuracy
• Text spelling
• Privacy
• Permission
• Licences
• Factual claims
• AI disclosure
• Aspect ratio
• Export quality
• Platform rules
Watch the final exported file rather than only the editing timeline.
39. What should I do when editing cannot repair the clip?
Choose one of these options:
• Use a different generated version.
• Regenerate the scene.
• Simplify the prompt.
• Reduce the movement.
• Use an authorized reference image.
• Replace the problem with supporting footage.
• Use verified real footage.
Do not spend excessive time attempting to repair source material that is fundamentally unsuitable.
40. What is the best advice for a beginner editor?
Start with a short, simple project.
Focus on:
1. Selecting the strongest clip
2. Removing weak frames
3. Keeping the subject visible
4. Adding only necessary text and audio
5. Exporting a test file
6. Reviewing the actual export
A clean basic edit is more useful than a complicated project filled with unnecessary effects.
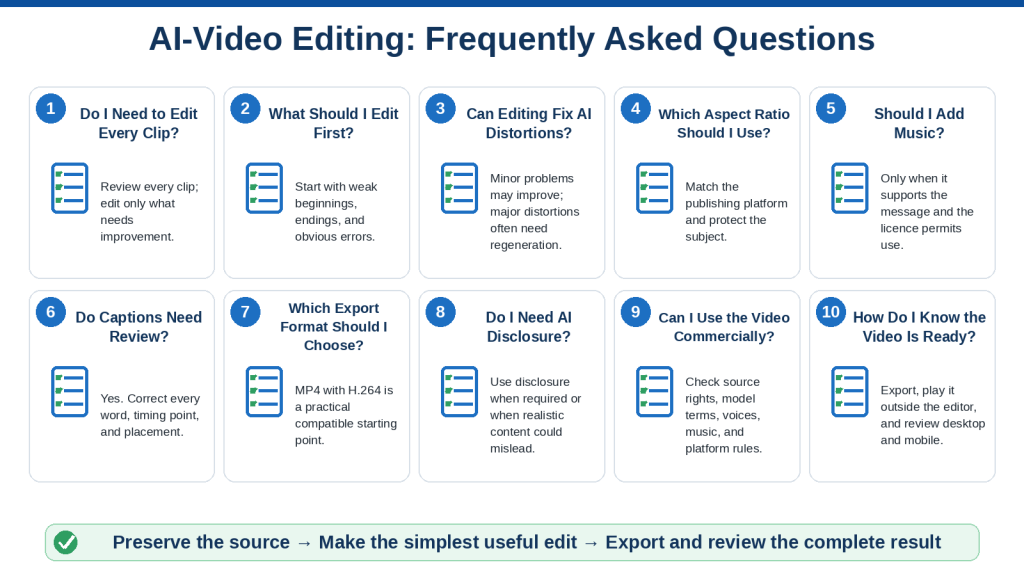
Figure 17. Beginner questions about AI-video editing commonly focus on trimming, aspect ratios, audio, captions, export settings, permissions, and final quality review.
Figure 17 summarizes the most important questions beginners should answer during an AI-video editing project. The workflow begins with preserving the source and selecting a suitable clip, continues through basic editing and accessibility, and finishes with responsible export, testing, disclosure, and backup.
Key Takeaways
Editing turns selected AI-generated clips into clearer, more organized, and more suitable final videos.
The most important lessons from this guide are summarized below.
1. Treat the Generated Clip as Source Material
An AI-generated video is not automatically ready to publish.
Review it for:
• Weak opening frames
• Distorted endings
• Changing subjects
• Unstable backgrounds
• Incorrect movement
• Unwanted audio
• Poor framing
• Generated text errors
Select only the strongest usable material.
2. Preserve the Original Files
Keep the original generation unchanged.
Create separate folders for:
• Original generated clips
• Selected clips
• Editing projects
• Working exports
• Final exports
• Captions
• Narration
• Music
• Licences
• Old versions
Clear organization protects the source and makes future corrections easier.
3. Begin with a Simple Editing Plan
Before opening the editor, decide:
• Purpose
• Audience
• Publishing platform
• Aspect ratio
• Resolution
• Selected clips
• Scene order
• Final duration
• Narration
• Captions
• Export versions
A short plan reduces unnecessary editing.
4. Choose a Suitable Beginner Editor
The editor should provide the functions required for the project.
Important basic tools include:
• Import
• Timeline editing
• Trimming
• Splitting
• Cropping
• Repositioning
• Text
• Audio controls
• Captions
• Export
Complete a small test before committing to a large project.
5. Set the Correct Format at the Beginning
Choose the aspect ratio according to the publishing destination.
Common formats include:
• 16:9 for WordPress, YouTube, websites, and presentations
• 9:16 for vertical mobile videos
• 1:1 for square posts
• 4:5 for portrait feed posts
Create separate project versions for different formats.
6. Review the Complete Clip Before Editing
Watch the clip from beginning to end before making changes.
Then inspect:
• Opening
• Middle
• Ending
• Subject appearance
• Camera movement
• Background
• Lighting
• Audio
Mark the strong and weak sections before trimming.
7. Trim Weak Openings and Endings
Trimming is often the most useful first edit.
Remove:
• Blurred opening frames
• Incomplete subjects
• Distorted endings
• Sudden camera movement
• Unnecessary pauses
• Weak repeated movement
A shorter stable clip is usually better than a longer unstable clip.
8. Use Splitting for Middle Problems
When a problem appears in the middle:
1. Split at the beginning of the problem.
2. Split at the end.
3. Delete the weak section.
4. Close the timeline gap.
5. Review the new connection.
Use supporting footage, a title card, or regeneration when the cut creates an unacceptable jump.
9. Arrange Clips in a Clear Story Order
A simple sequence may:
1. Introduce the subject.
2. Begin the action.
3. Show progress.
4. Reach the destination.
5. End clearly.
Check continuity involving:
• Screen direction
• Subject appearance
• Lighting
• Movement
• Location
• Camera angle
10. Crop and Reframe Carefully
Cropping can improve composition, but it also removes visual information.
Protect:
• Faces
• Hands
• Feet
• Bicycle wheels
• Product details
• Titles
• Captions
• Important background context
Do not stretch the video to fill the frame.
11. Make Visual Corrections Gradually
Small adjustments may improve:
• Exposure
• Shadows
• Highlights
• Contrast
• Saturation
• Temperature
Compare every corrected version with the original.
Reject adjustments that create:
• Unnatural colours
• Lost detail
• Visible noise
• Cropping
• Warping
• More noticeable AI artifacts
12. Use Stabilization Only for Camera Movement
Stabilization may help minor camera shake.
It does not correct:
• Changing faces
• Distorted objects
• Incorrect body movement
• Flickering backgrounds
• Missing subject parts
Test stabilization on a duplicate project version and reject it when it creates new problems.
13. Adjust Speed Conservatively
Small speed changes may help timing.
Large changes may produce:
• Repeated frames
• Jerky movement
• Visible distortions
• Unnatural audio
• Incorrect physical motion
Review every speed-adjusted clip at normal playback.
14. Use Direct Cuts as the Normal Choice
Not every scene change needs a transition.
Use a transition only when it helps communicate:
• A change of time
• A change of location
• A new section
• The beginning
• The ending
Keep dissolves and fades brief.
Avoid decorative effects that distract from the content.
15. Add Accurate Text Manually
Generated visible text may be misspelled or unstable.
Create important wording in the editor.
Use:
• Short titles
• Clear step labels
• Before-and-after labels
• Strong contrast
• Readable typefaces
• Safe placement
• Restrained animation
Do not cover the main subject.
16. Keep Narration Clear
Write and review the narration before recording.
Use:
• Short sentences
• Simple language
• Consistent volume
• Suitable timing
• Correct pronunciation
Record several takes when necessary.
Replace seriously damaged audio rather than applying excessive correction.
17. Keep Music Below the Voice
Music is optional.
When used, it should:
• Match the project
• Remain below narration
• Begin and end smoothly
• Be properly authorized
• Avoid distracting viewers
Test the mix using headphones, speakers, and a mobile device.
18. Review Every Caption
Automatic captions are only a starting point.
Check:
• Wording
• Spelling
• Punctuation
• Technical terms
• Numbers
• Website addresses
• Timing
• Line breaks
• Placement
Captions should remain readable and synchronized with speech.
19. Preserve Accessibility
A useful video should remain understandable for viewers who cannot hear the audio. [10]
Review it:
• With sound
• Without sound
• With captions
• At full screen
• At mobile size
Avoid tiny text, weak contrast, rapid flashing, and overly complex animations.
20. Export a High-Quality Master Copy
Create one strong master export before making smaller publishing versions.
A practical common format is:
MP4 using H.264
Choose settings that match:
• Source quality
• Project aspect ratio
• Resolution
• Frame rate
• Publishing destination
Do not export a low-quality source at 4K expecting genuine new detail.
21. Create Separate Platform Versions
Prepare and review individual versions for:
• WordPress
• YouTube
• Vertical platforms
• Square posts
• Portrait feeds
• Presentations
Check the crop, text size, caption placement, and subject position in every version.
22. Test the Export Outside the Editor
Play the actual exported file from beginning to end.
Check:
• Video
• Audio
• Titles
• Captions
• Transitions
• Aspect ratio
• Resolution
• Ending
• Watermarks
• Playback
The editor preview is not the final quality test.
23. Know When to Stop Editing
Editing is suitable for minor or removable problems.
Regeneration may be better when:
• The main subject is wrong.
• The action is incorrect.
• The character changes throughout.
• The background is unstable.
• Important content is missing.
• Product details are inaccurate.
• The scene cannot be cropped safely.
Do not spend excessive time trying to repair unsuitable source material.
24. Use Verified Footage When Accuracy Is Essential
Real verified footage may be more appropriate for:
• Product operation
• Safety instructions
• Medical demonstrations
• Legal evidence
• Real testimonials
• Specific people
• Authentic events
• Exact machinery
• Precise hand movement
AI-generated video should not replace genuine evidence.
25. Check Rights and Permissions
Before publishing, verify:
• Source ownership
• Reference-image permission
• Music rights
• Sound-effect rights
• Voice authorization
• Real-person consent
• Commercial-use conditions
• Attribution requirements
Keep the records with the project.
26. Protect Privacy
Review every visible and audible detail for:
• Names
• Addresses
• Email addresses
• Telephone numbers
• Documents
• Account details
• Licence plates
• Private screens
• Messages
• Voices
• Location information
Remove or replace private information before publishing.
27. Verify Factual Accuracy
Check:
• Narration
• Captions
• Titles
• Product details
• Dates
• Measurements
• Statistics
• Claims
• Locations
• Names
A polished video can still contain incorrect information.
28. Disclose AI Use When Needed
Use clear wording when viewers could mistake synthetic content for real footage.
Examples include:
This video includes AI-generated visuals.
AI-generated simulation for educational purposes.
Make the disclosure readable and appropriately timed.
29. Do Not Use Editing to Mislead
Do not edit AI-generated content to appear to be:
• Real evidence
• A genuine testimonial
• Verified news footage
• A real statement
• Authentic product proof
• A recorded event
Editing should improve communication without changing the truth of what the video represents.
30. Save Records and Backups
Preserve:
• Original prompts
• Source clips
• Reference images
• Project versions
• Narration
• Captions
• Music licences
• Permissions
• Master export
• Platform exports
• Thumbnail
• Export settings
• Publication details
Keep at least one backup outside the primary project folder.
Beginner Editing Workflow Summary
A reliable beginner workflow is:
1. Define the purpose.
2. Organize the project files.
3. Select the strongest clip.
4. Create the editing project.
5. Set the correct aspect ratio.
6. Import the source material.
7. Watch the complete clip.
8. Mark weak and strong sections.
9. Trim and split.
10. Arrange the scene order.
11. Reframe carefully.
12. Make restrained visual corrections.
13. Add only necessary transitions.
14. Add accurate titles.
15. Add narration and authorized audio.
16. Generate and correct captions.
17. Review privacy, permission, accuracy, and disclosure.
18. Save the final project.
19. Export a high-quality master.
20. Create platform-specific versions.
21. Test every exported file.
22. Back up the complete project.
The best beginner edit is not the one containing the most effects. It is the one that removes weak material, protects the main subject, communicates clearly, and produces an accurate and reliable final video.

Figure 18. A reliable AI-video editing workflow moves from organized source files and careful trimming to accurate audio, captions, export testing, responsibility checks, and backup.
Figure 18 summarizes the complete beginner workflow for editing AI-generated videos. It emphasizes selecting strong source material, using restrained edits, reviewing every title and caption, exporting separate platform versions, protecting privacy and permissions, and preserving the project files and records.
Final Tip
Do not try to repair every AI-generated clip.
First ask:
Does this video contain enough strong material to justify editing?
When the answer is yes, begin with the simplest changes:
1. Preserve the original file.
2. Remove weak opening and ending frames.
3. Keep the strongest usable section.
4. Protect the main subject while cropping.
5. Add only necessary titles, narration, music, and captions.
6. Export a short test.
7. Review the actual exported file.
8. Regenerate the clip when major problems remain.
A clean four-second video is usually more useful than a longer video filled with distortion, unnecessary transitions, unreadable text, or distracting effects.
Editing should make the video clearer—not merely more complicated.
Before publishing, perform one final uninterrupted review and ask:
• Is the main subject stable?
• Is the action understandable?
• Are the titles and captions accurate?
• Is the narration clear?
• Are the music and sound properly authorized?
• Does the video protect privacy?
• Could viewers mistake the AI-generated scene for real footage?
• Is disclosure needed?
• Does the final export work on the intended device and platform?
• Are the original files, editing project, licences, and master export safely stored?
The strongest beginner workflow is:
Select carefully → Edit simply → Review completely → Publish responsibly
Good AI-video editing does not depend on using every available feature. It depends on knowing what to keep, what to remove, what to correct, and when to create a better source clip instead.
Sources and References
Citations in square brackets refer to the numbered official sources below. These pages were reviewed on July 28, 2026. Software features, prices, upload limits, licences, privacy practices, and platform rules can change. Check the current official information when you first use a tool, change a plan or feature, receive a policy-update notice, and periodically for important publishing or commercial projects.
[1] Adobe. Trim Clips in Premiere. Explains how trimming removes unnecessary material from the beginning or end of a timeline clip while preserving the source media. Accessed July 28, 2026.
[2] Adobe. Cut Clips in Premiere. Explains how cutting or splitting creates separate timeline sections that can be removed, moved, or edited independently. Accessed July 28, 2026.
[3] Adobe. Video Dissolve Transitions in Premiere. Describes cross dissolves, dip-to-black transitions, and other dissolve options used to connect clips. Accessed July 28, 2026.
[4] Adobe. Stabilize Shaky Footage Using Warp Stabilizer. Explains stabilization for reducing camera jitter and notes that stabilization requires analysis and compatible sequence settings. Accessed July 28, 2026.
[5] Adobe. Create Captions in Premiere. Explains automatic transcription and caption creation. Automatically generated captions still require human review and correction. Accessed July 28, 2026.
[6] Adobe. Export Caption Tracks in Premiere. Explains caption export choices, including burned-in captions and separate caption tracks. Accessed July 28, 2026.
[7] YouTube Help. YouTube Recommended Upload Encoding Settings. Provides official guidance for MP4 containers, H.264 video, common frame rates, matching the recorded frame rate, resolutions, and upload bitrates. Accessed July 28, 2026.
[8] WordPress.com Support. Video Block. Explains direct upload, external video embedding, text tracks for captions, poster images, and playback settings in the WordPress Video block. Accessed July 28, 2026.
[9] W3C Web Accessibility Initiative. Captions/Subtitles. Explains that prerecorded video with meaningful audio needs accurate synchronized captions for viewers who are Deaf or hard of hearing. Accessed July 28, 2026.
[10] W3C Web Accessibility Initiative. Planning Audio and Video Media. Provides planning guidance for captions, transcripts, audio descriptions, and other accessibility requirements for audio and video. Accessed July 28, 2026.
[11] W3C Web Accessibility Initiative. Three Flashes or Below Threshold. Explains the accessibility requirement to avoid flashing content that may trigger seizures or other physical reactions. Accessed July 28, 2026.
[12] Office of the Privacy Commissioner of Canada. Consent. Explains meaningful consent for collecting, using, and disclosing personal information in Canada. Accessed July 28, 2026.
[13] Canadian Intellectual Property Office. A Guide to Copyright. Provides general Canadian copyright information for literary, musical, dramatic, artistic, sound-recording, and audiovisual material. Accessed July 28, 2026.
[14] Creative Commons. The CC Licenses. Explains attribution, ShareAlike, NonCommercial, and NoDerivatives conditions that may apply to licensed music, footage, images, and other assets. Accessed July 28, 2026.
[15] YouTube Help. Disclosing Use of GenAI Content. Explains when creators must disclose realistic, meaningfully altered, or synthetically generated content during the upload process. Accessed July 28, 2026.
[16] YouTube Help. Protecting Your Identity. Explains YouTube’s privacy-request process for realistic altered or synthetic content that depicts a recognizable person. Accessed July 28, 2026.
[17] U.S. Copyright Office. Copyright and Artificial Intelligence. Provides official reports on digital replicas involving a person’s voice or appearance and the copyrightability of AI-assisted outputs. Accessed July 28, 2026.
[18] Coalition for Content Provenance and Authenticity. Content Credentials: C2PA Technical Specification. Describes the standard used to record and communicate provenance information about digital media and its editing history. Accessed July 28, 2026.
[19] Federal Trade Commission. Consumer Reviews and Testimonials Rule: Questions and Answers. Explains concerns involving false reviews, fake testimonials, AI-generated avatars, and marketing content that could mislead consumers. Accessed July 28, 2026.
Continue Learning
Continue building your AI-video skills with these related guides:
• How to Create AI Videos with ChatGPT: Beginner Step-by-Step Guide (2026)
• Best AI Video Tools for Beginners: Complete Guide (2026)
• How to Create AI Videos from Text: Beginner Step-by-Step Guide (2026)
• How to Create AI Videos from Images: Beginner Step-by-Step Guide (2026)
• How to Add Voice, Music, and Captions to AI Videos: Beginner Step-by-Step Guide (2026)
These guides follow a practical learning order: create the video, review the result, edit the strongest clips, add voice and captions, and publish responsibly.
 AI Mastery