Python programs often need to work with more than one value at a time. A shopping list may contain several products. A quiz may contain several questions. A program may need a fixed pair of coordinates or a group of settings that should stay together. Python provides several sequence types for this purpose, and two of the most useful for beginners are lists and tuples.
A list is an ordered, mutable collection. “Mutable” means its contents can be changed after the list is created. A tuple is also an ordered sequence, but it is immutable: you do not replace, add, or remove its items in place. Python’s official documentation identifies list, tuple, and range as the three basic sequence types, with many common operations shared between lists and tuples.
This guide builds on the Python foundations from Article 087 and the project-and-debugging habits from Articles 088 and 089. You will create small examples, run them yourself, and use ChatGPT as a focused learning assistant rather than treating generated code as automatically correct.
You do not need to memorize every method or rule. The goal is to understand the main patterns well enough to read a small collection, change it when appropriate, troubleshoot common mistakes, and decide when a list or tuple fits your program.
What You’ll Learn
By the end of this guide, you will be able to:
create lists and tuples
read items by index
use positive and negative indexes
select ranges with slicing
replace list items
add and remove list items
sort and reverse lists
loop through sequences
work with nested lists
understand list assignment and copying
create one-item tuples correctly
pack and unpack tuples
compare lists and tuples
convert between lists and tuples
use ChatGPT for focused explanations and troubleshooting
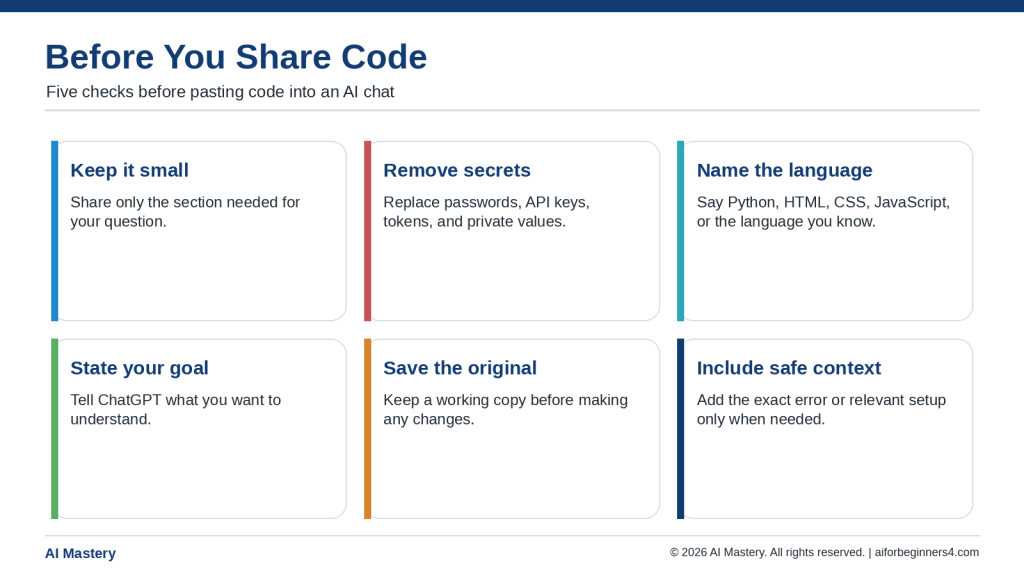
protect private information when sharing code
build a small beginner project using both a list and a tuple
Before Learning
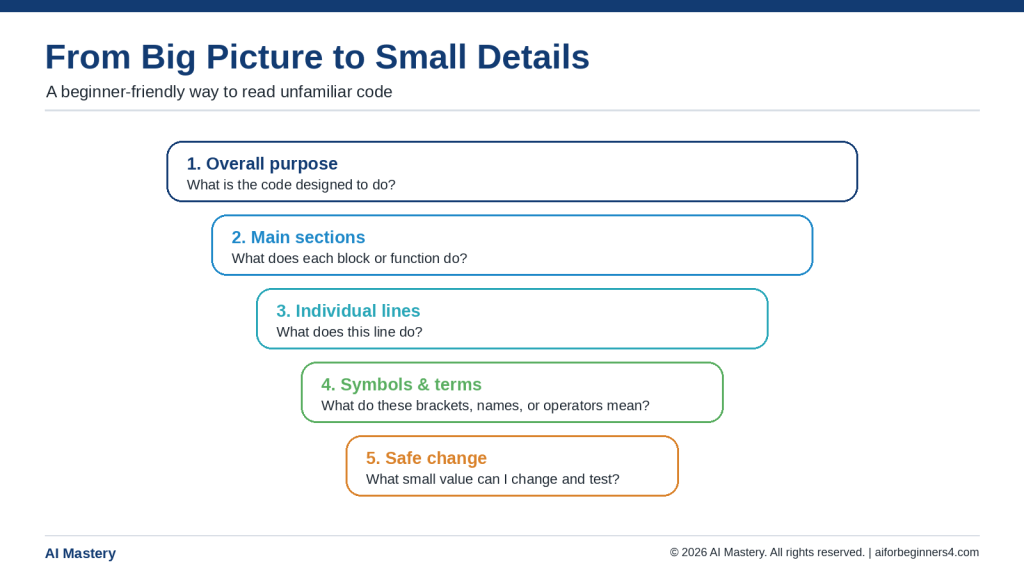
You will get the most from this article if you already understand a few basic Python ideas: variables, strings, numbers, `print()`, simple `if` statements, `for` loops, and how to run a `.py` file. If any of those ideas still feel unfamiliar, review Article 087 before continuing.
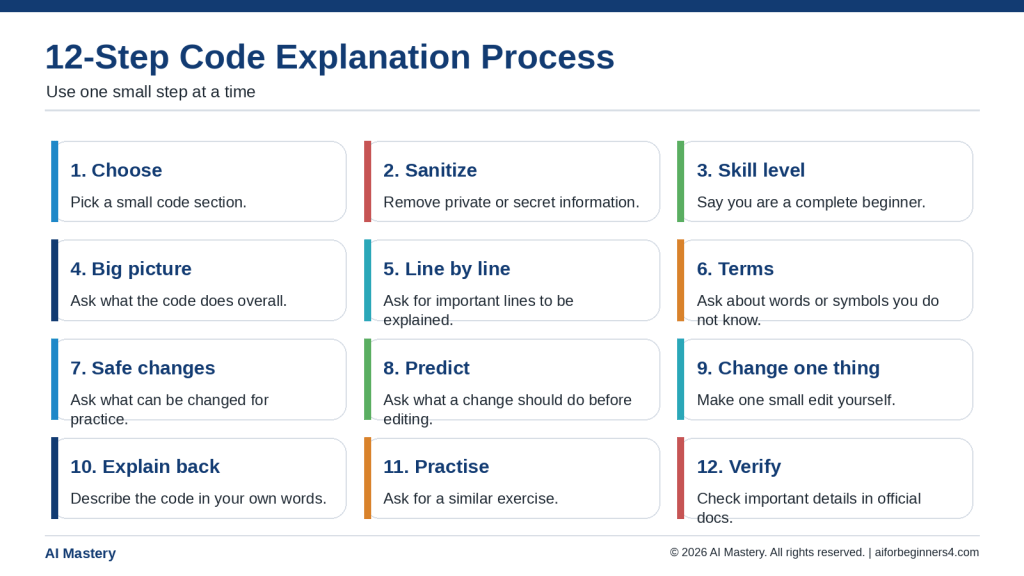
Keep a small practice file open while you read. Type the examples yourself when possible, save the file, run it, and change one value at a time. This turns the tutorial into active practice rather than passive reading.
Use fictional practice data rather than real personal information.
Save a working copy before making a large change.
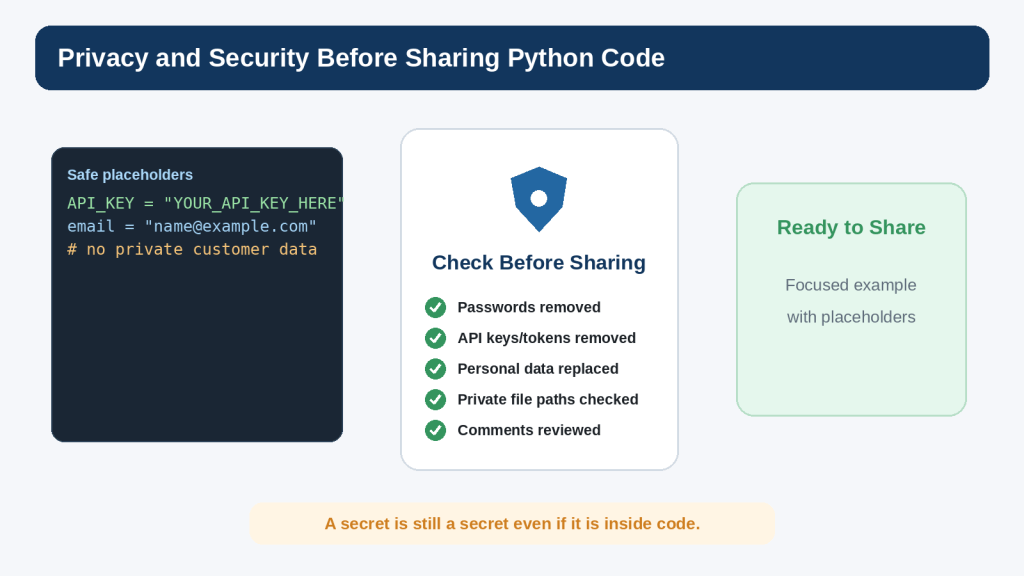
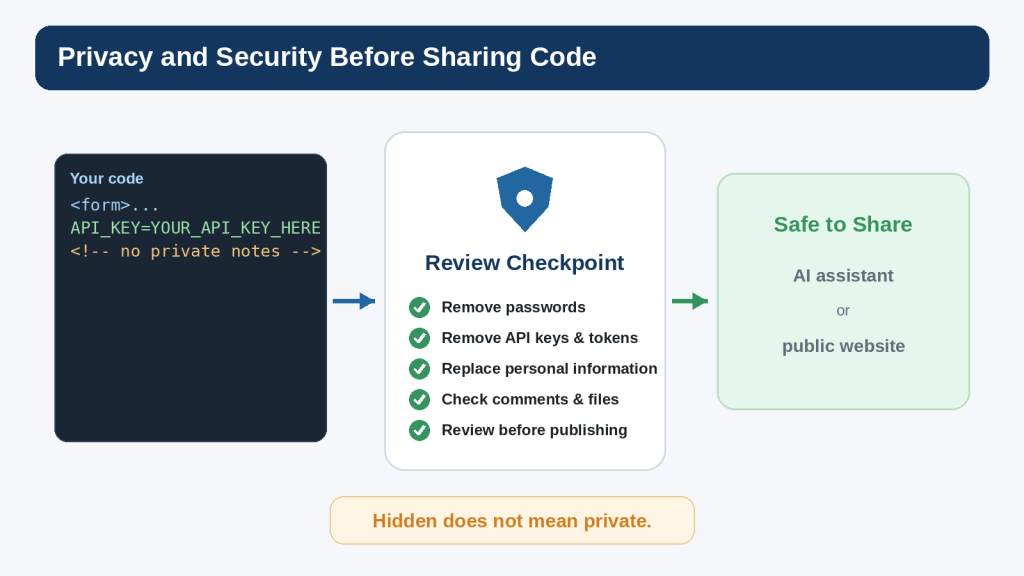
Do not paste passwords, API keys, customer records, or confidential information into an AI conversation.
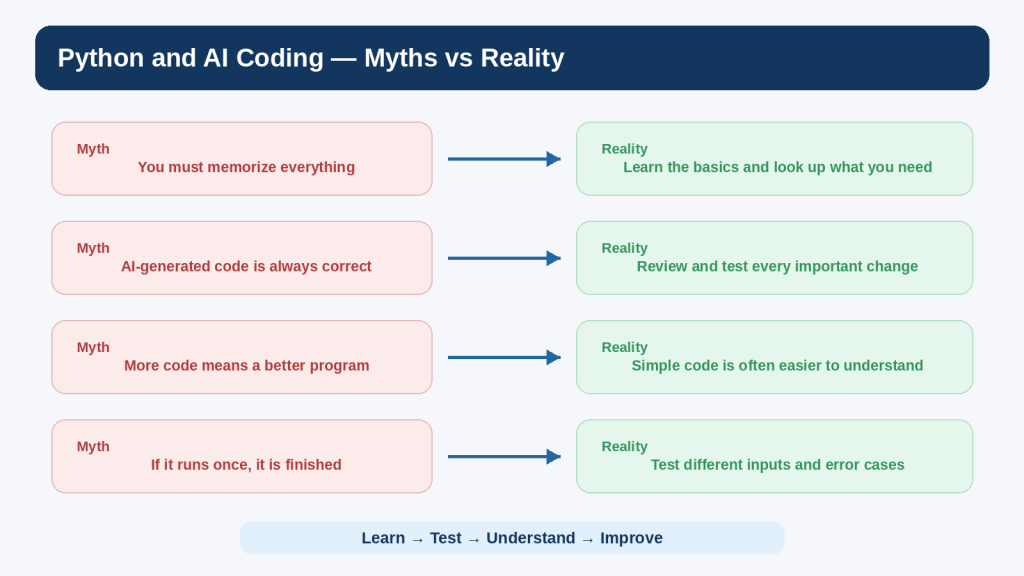
Treat AI-generated code as a suggestion to review and test.
What Is a Python List?
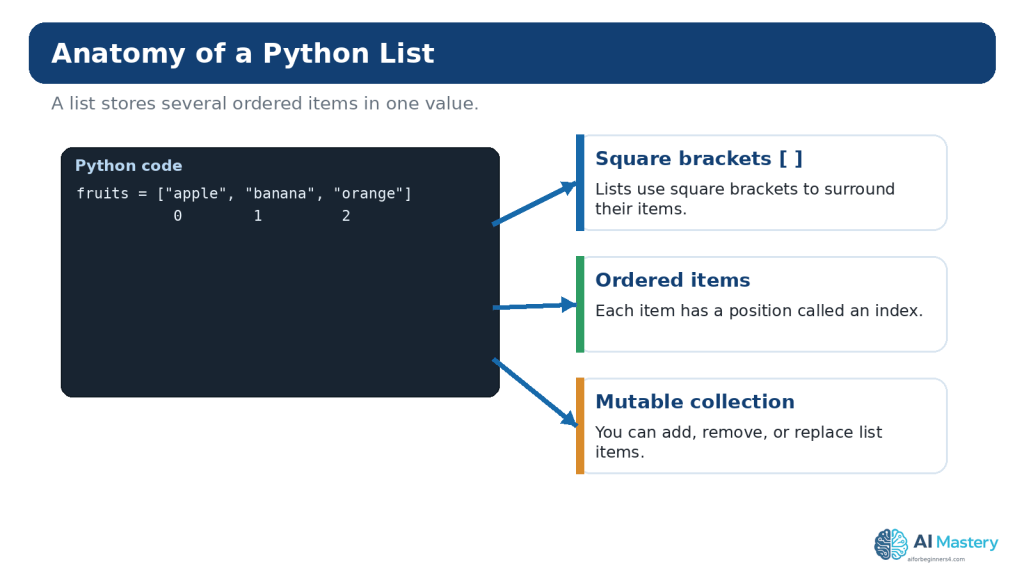
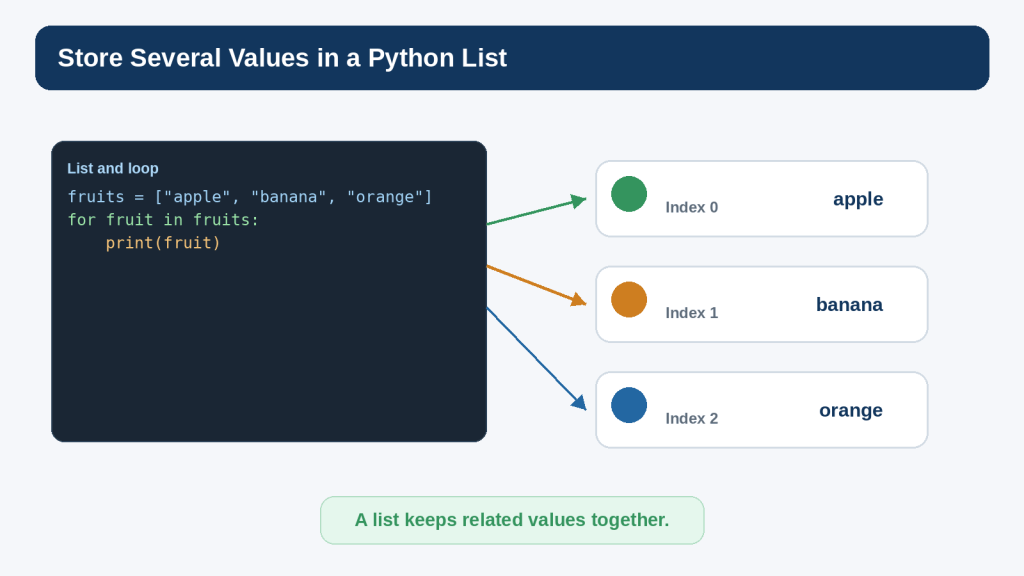
A Python list groups several values inside square brackets. Items are separated with commas. Lists preserve order, so each item has a position, and lists are mutable, so their contents can be changed.
The variable `fruits` refers to one list containing three strings. Lists commonly hold items of the same general kind, although Python permits mixed types.
mixed = [“Alex”, 25, True, 19.99]
Mixed lists are valid, but beginners should use them only when the structure makes sense. A clear data design is easier to understand than a collection with unrelated values.
Figure 1. A Python list stores multiple ordered items inside square brackets, and each item has an index position.
Explanation: Lists are useful when a program needs a collection that can change. The first item normally has index 0, not 1.
Read List Items with Indexes
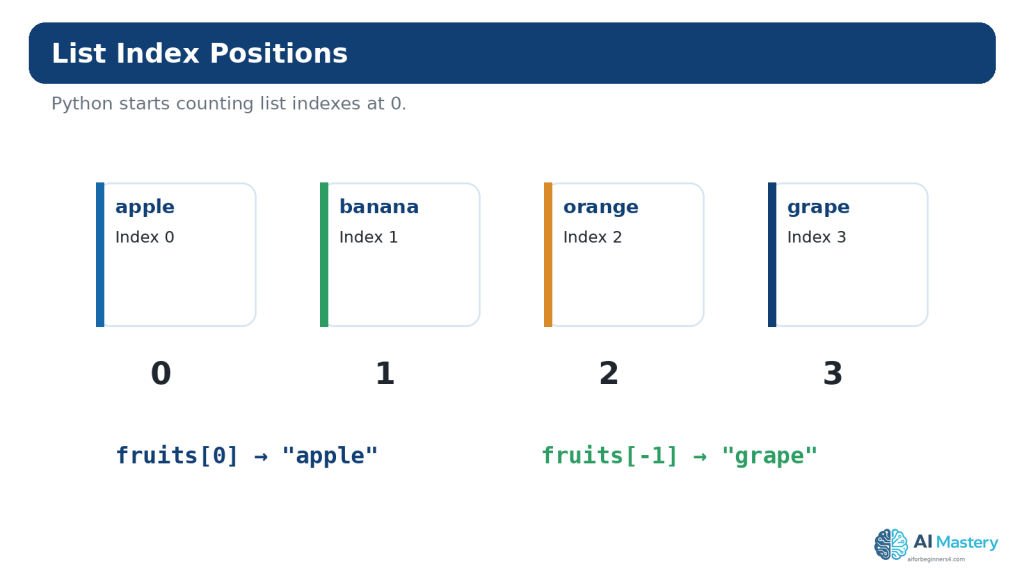
Each item in a list has an index. Python starts counting at 0. In the list below, `”apple”` is at index 0, `”banana”` is at index 1, and `”orange”` is at index 2.
Negative indexes count backward from the end. `-1` refers to the last item, `-2` to the second-last item, and so on.
print(fruits[-1])
Output:
orange
Common Beginner Mistake: Starting at Index 1
A beginner may assume the first item is `fruits[1]`. That actually selects the second item. When the exact position matters, write the indexes beside a short practice list until zero-based indexing becomes familiar.
Figure 2. List indexes begin at 0, while negative indexes can count backward from the end of the list.
Explanation: Understanding index positions prevents many beginner errors. `fruits[0]` selects the first item, while `fruits[-1]` selects the last.
Change Items in a List
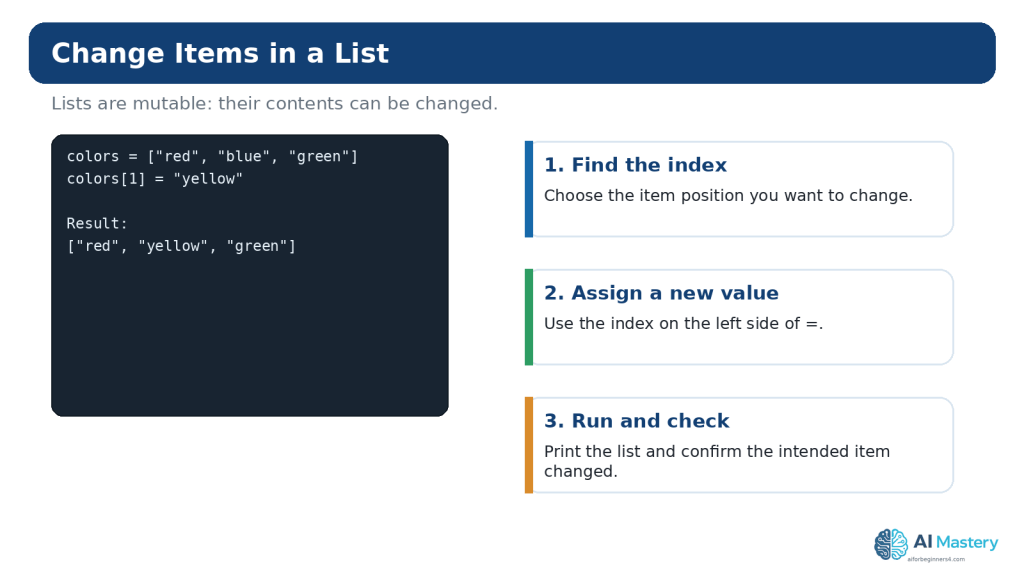
Because lists are mutable, you can replace an item by assigning a new value to an index.
Figure 3. A list item can be replaced by assigning a new value to a specific index.
Explanation: Lists are mutable, so changing one item does not require creating an entirely new list. Check the index carefully before assigning the replacement.
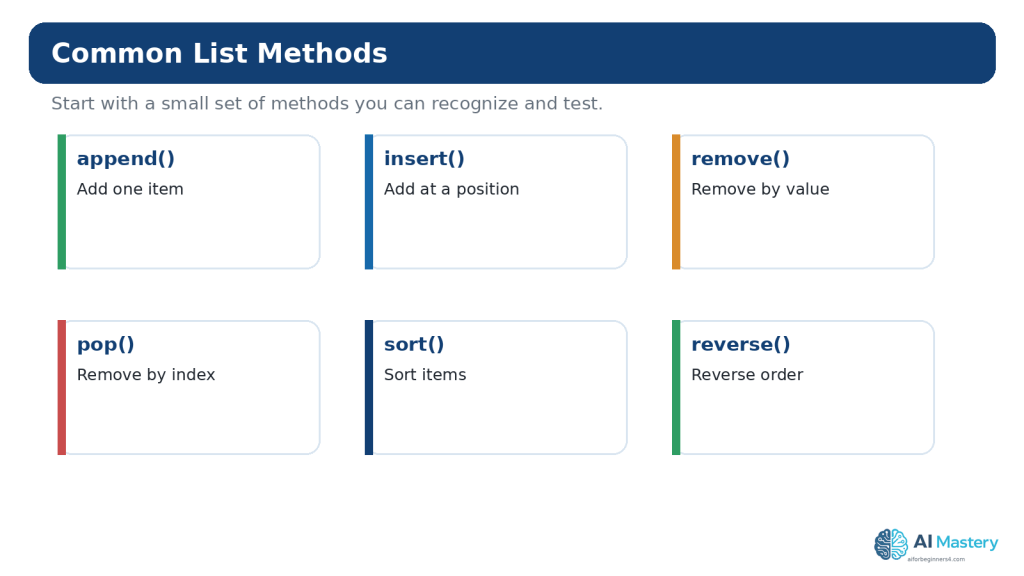
`pop()` removes and returns an item. Without an index, it removes the final item.
Use del for Index-Based Deletion
del fruits[0]
The `del` statement can remove an item or a slice. Beginners should choose the operation that makes the intention clearest rather than trying to use every possible form.
Figure 4. Common list methods let you add, remove, reorder, and sort items without rebuilding the list manually.
Explanation: Beginners do not need to memorize every list method. Learn a few common operations and look up the others when a real task requires them.
Use List Slicing
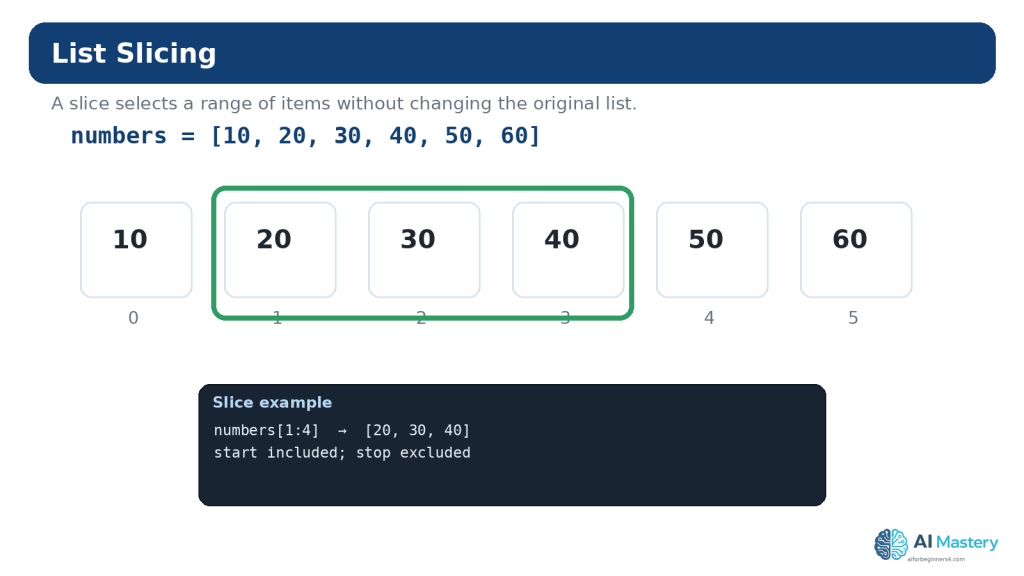
Slicing selects part of a sequence. The common form is `sequence[start:stop]`. The start position is included; the stop position is excluded.
Index 1 begins at 20. The slice continues through index 3 and stops before index 4.
Leave Out the Start or Stop
print(numbers[:3]) # first three items print(numbers[3:]) # from index 3 to the end
Use a Step
print(numbers[::2])
The third slice value is the step. A step of 2 selects every second item. Keep this as an optional extension until ordinary slicing feels comfortable.
Figure 5. A list slice uses start and stop positions to select a range, with the stop position excluded.
Explanation: Slicing is useful for working with part of a list. Test small examples until the start-inclusive, stop-exclusive rule feels familiar.
Loop Through a List
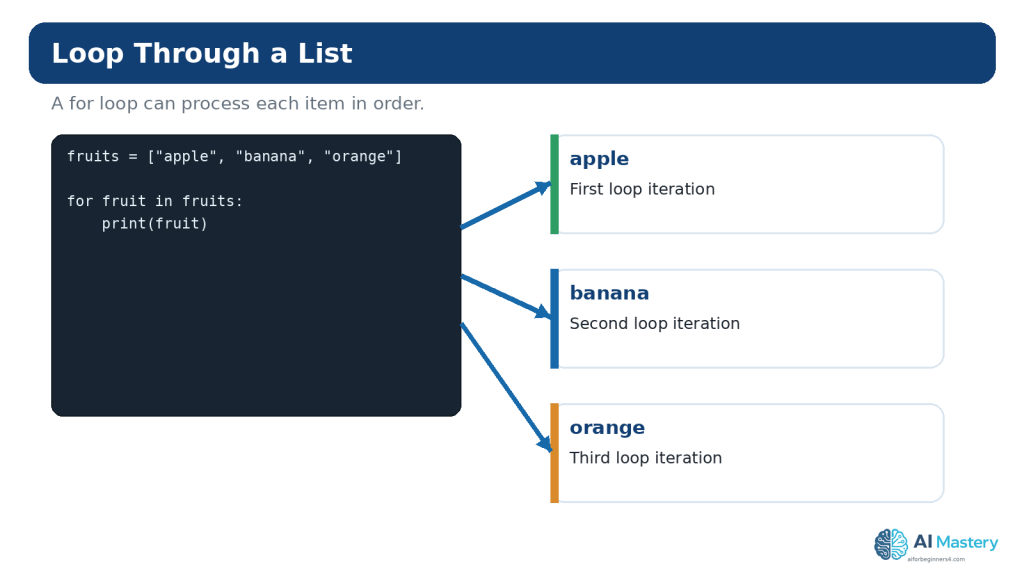
A `for` loop can process each list item in order.
fruits = [“apple”, “banana”, “orange”]
for fruit in fruits: print(fruit)
The variable `fruit` receives one item at a time. The indented statement runs once for each item.
Use enumerate() When You Need an Item Number
for index, fruit in enumerate(fruits): print(index, fruit)
`enumerate()` is useful when both the item and its position matter. For user-facing numbered menus, you can begin the displayed count at 1 with `enumerate(fruits, start=1)` while remembering that the underlying list still uses zero-based indexes.
Figure 6. A `for` loop can work through the items in a list one at a time.
Explanation: Loops are especially useful when the same action should be applied to every item. Keep the loop body small while learning so you can see what repeats.
Check Membership and Length
Use `in` to check whether a value appears in a sequence.
fruits = [“apple”, “banana”, “orange”]
if “banana” in fruits: print(“Banana is on the list.”)
Use `len()` to count the number of items:
print(len(fruits))
Output:
3
These operations work with both lists and tuples because they are common sequence operations.
Sort and Reverse a List
The `sort()` method changes the list itself. For simple text or numbers, it can place items into ascending order.
The `reverse()` method simply reverses the current order rather than sorting by value.
sort() vs sorted()
`list.sort()` modifies a list and returns `None`. The built-in `sorted()` function creates a new sorted list from an iterable. This difference matters when you want to preserve the original order.
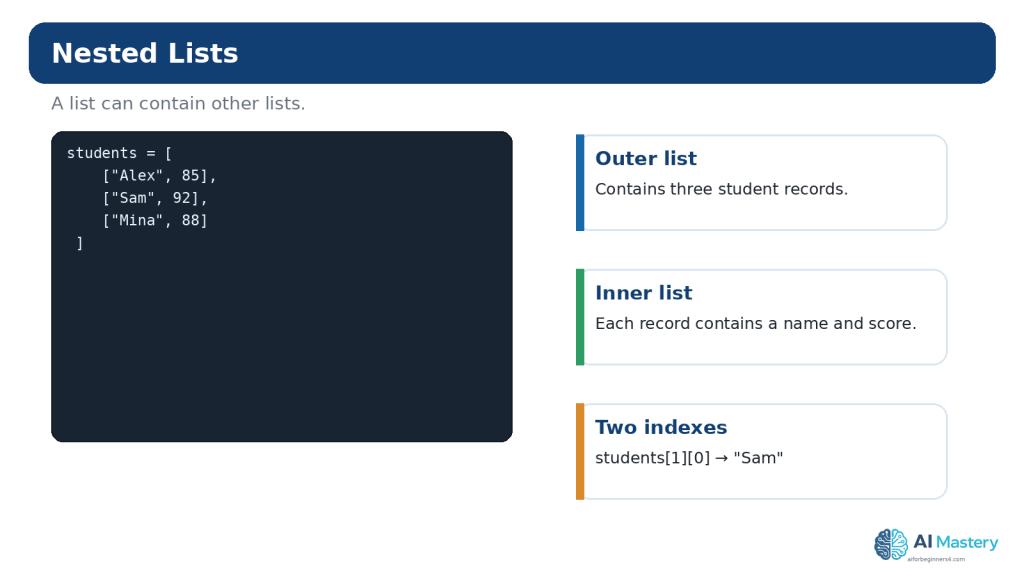
A list can contain other lists. A simple table-like structure can therefore be represented as a list of rows.
students = [ [“Alex”, 85], [“Sam”, 92], [“Mina”, 88] ]
To access Sam’s name:
print(students[1][0])
The first index selects the second inner list. The second index selects the first item inside that inner list.
Reality: Nested Lists Are Useful but Can Become Hard to Read
For a very small exercise, nested lists are appropriate. As data becomes more complex, dictionaries, classes, tables, or other structures may communicate meaning more clearly. Do not keep adding index levels just because Python allows it.
Figure 7. Nested lists let one list contain other lists, which can represent rows, records, or grouped information.
Explanation: Nested structures are useful but can become difficult to read when overused. Start with a simple two-level example and confirm each index separately.
Copy Lists Safely
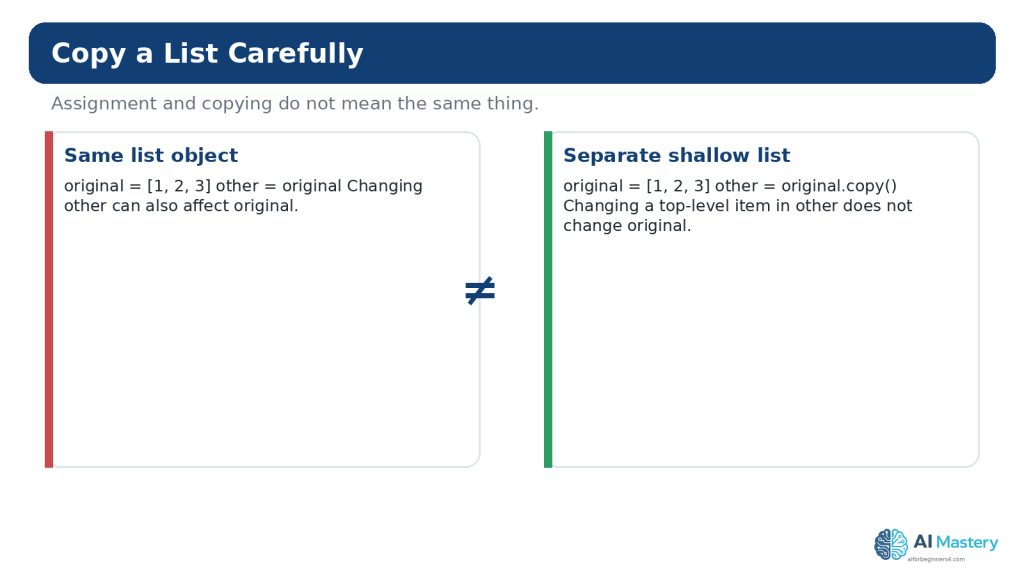
One of the most important mutable-object lessons is that assignment does not necessarily create an independent list.
original = [1, 2, 3] other = original other[0] = 99
print(original)
Output:
[99, 2, 3]
Both names refer to the same list object, so changing the list through `other` is visible through `original`.
Create a Shallow Copy
original = [1, 2, 3] other = original.copy() other[0] = 99
print(original) print(other)
Now the top-level lists are separate. The official `copy` module documentation distinguishes shallow copies from deep copies. Deep copying becomes relevant when mutable objects are nested inside other mutable objects, but beginners should first understand the simpler shared-reference problem.
Figure 8. Assigning one list variable to another shares the same list, while `copy()` creates a separate shallow list.
Explanation: This distinction explains a common beginner surprise: two variable names can refer to the same mutable list. Use a real copy when you need independent top-level changes.
What Is a Python Tuple?
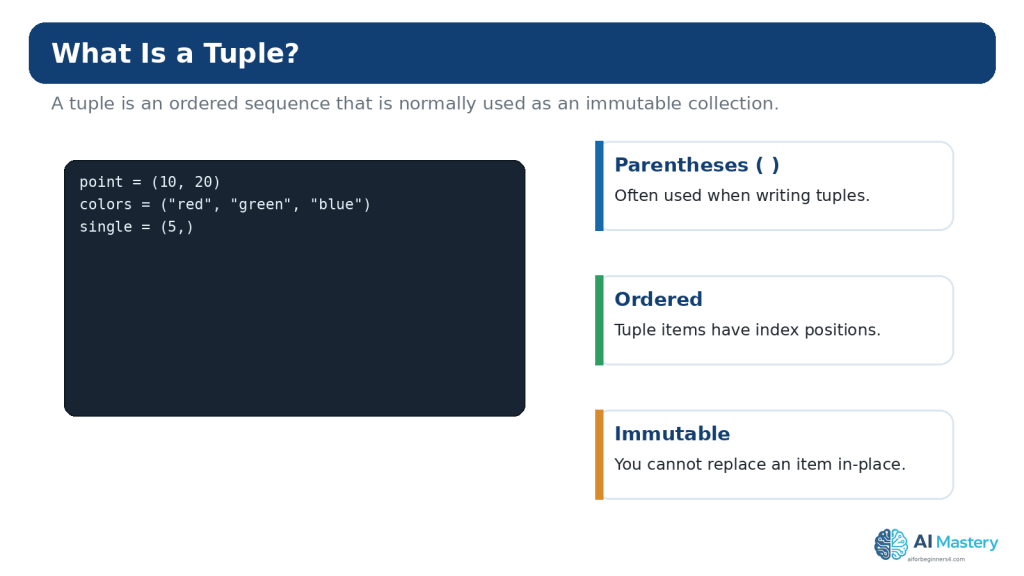
A tuple is an ordered sequence commonly written as comma-separated values inside parentheses. Unlike a list, a tuple is immutable.
point = (10, 20) colors = (“red”, “green”, “blue”)
You can index and slice a tuple much like a list:
print(colors[0]) print(colors[1:])
However, this does not work:
colors[0] = “yellow”
Python raises a `TypeError` because tuple items cannot be replaced in place.
Create a One-Item Tuple Correctly
A one-item tuple needs a comma:
single = (5,)
Without the comma, `(5)` is simply the integer 5 inside grouping parentheses.
Figure 9. Tuples are ordered sequences that are commonly written with parentheses and cannot be changed item by item after creation.
Explanation: The comma is especially important for a one-item tuple: `(5,)` is a tuple, while `(5)` is simply the number 5 inside parentheses.
Tuple Packing and Unpacking
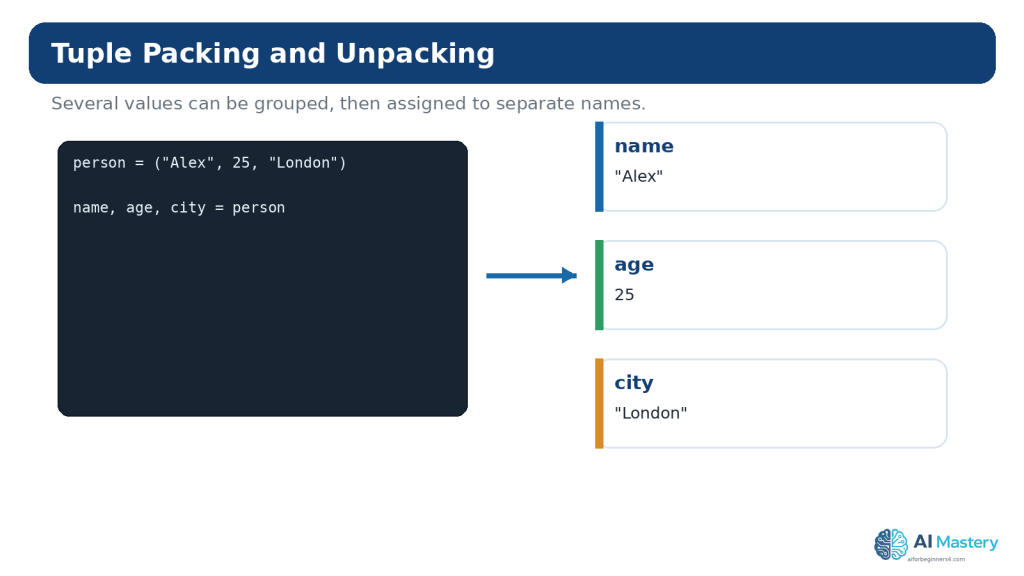
Python can pack several values into a tuple and unpack them into separate variables.
person = (“Alex”, 25, “London”) name, age, city = person
print(name) print(age) print(city)
This is convenient when several values belong together and the structure is small and predictable.
The Number of Variables Matters
Trying to unpack three values into two ordinary variables raises a `ValueError`. Python also supports starred unpacking for more flexible patterns, but that can wait until the basic form is comfortable.
Figure 10. Tuple unpacking assigns the items of a tuple to separate variables in one statement.
Explanation: The number of variables normally needs to match the number of values being unpacked. This makes small fixed groups of related values convenient to work with.
Lists vs Tuples: Which Should a Beginner Use?
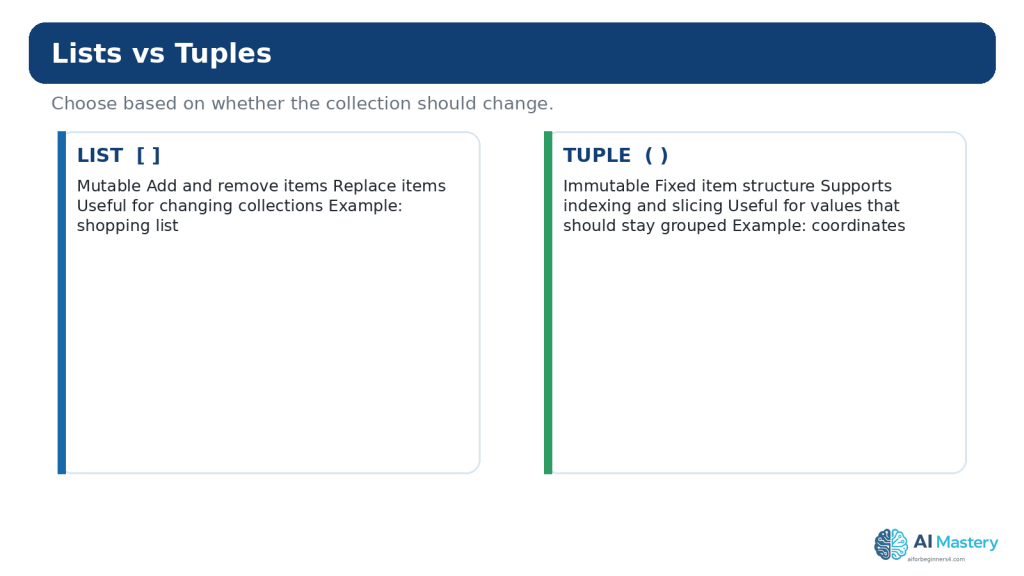
Lists and tuples share indexing, slicing, membership checks, `len()`, iteration, and many other sequence operations. The clearest beginner distinction is mutability.
Use a list when items may be added, removed, reordered, or replaced.
Consider a tuple when a small group of values should remain together without item-by-item changes.
Use whichever type communicates the meaning of the program more clearly.
Examples that naturally fit a list include a to-do list, shopping list, queue of filenames, or scores that may change. Examples that may fit a tuple include coordinates, RGB color components, or a fixed group of settings returned together.
Immutability does not mean that every object contained inside a tuple becomes immutable. A tuple can contain a mutable object such as a list, and that inner list may still change. Beginners should avoid complicated mixed structures until the basic rule is clear.
Figure 11. Lists and tuples are both ordered sequences, but lists can be changed while tuples are immutable.
Explanation: Neither type is universally better. Choose a list when the collection needs to change, and consider a tuple when the grouped values should remain fixed.
Convert Between Lists and Tuples
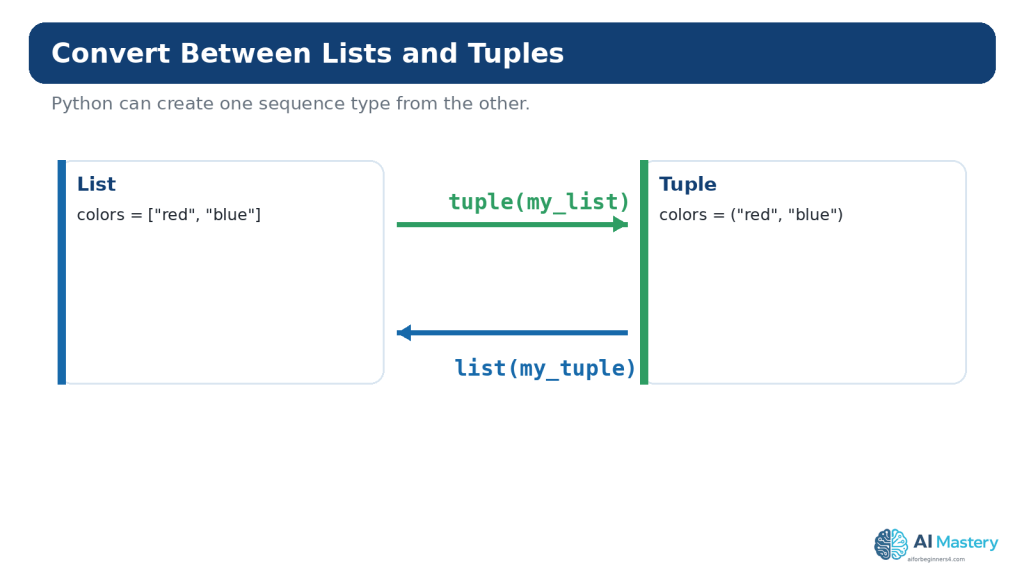
The built-in `tuple()` constructor can create a tuple from a list:
The built-in `list()` constructor can create a list from a tuple:
point = (10, 20) editable_point = list(point) print(editable_point)
Conversion does not automatically make a design better. Use it when the program genuinely needs a different sequence behavior.
Figure 12. The `tuple()` and `list()` constructors can convert between list and tuple representations.
Explanation: Conversion is useful when a task changes from an editable collection to a fixed sequence, or when an API returns a sequence type that you want to work with differently.
A Brief Introduction to List Comprehensions
Python list comprehensions provide a concise way to create lists from other iterables. The official Python tutorial presents them as a common way to build new lists from expressions or conditions.
squares = [number * number for number in range(1, 6)] print(squares)
Output:
[1, 4, 9, 16, 25]
For a complete beginner, the equivalent ordinary loop may be easier to understand at first:
squares = [] for number in range(1, 6): squares.append(number * number)
Learn the longer form first if it makes the logic clearer. Shorter code is not automatically better code.
Use ChatGPT to Learn Lists and Tuples
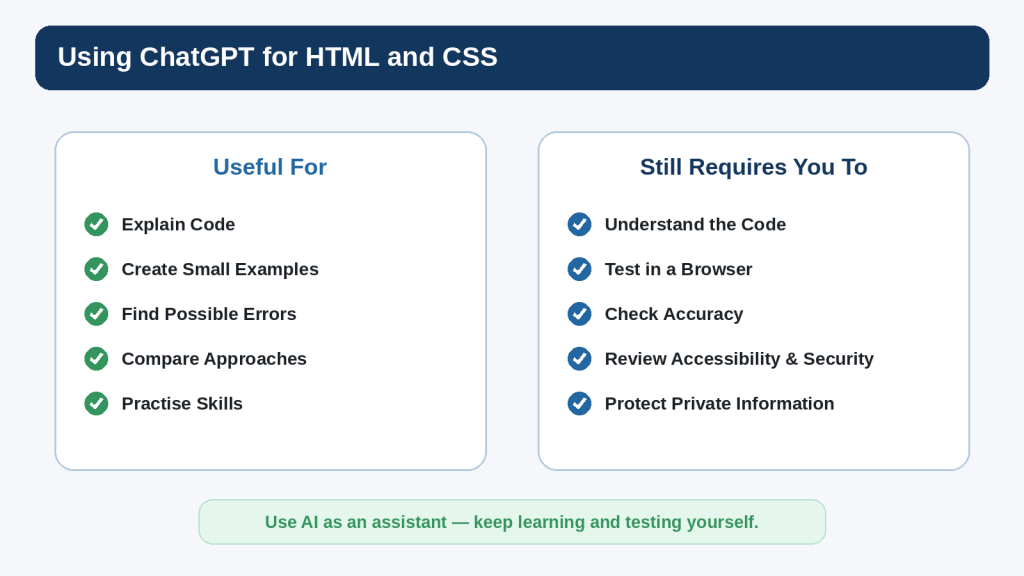
ChatGPT can be useful for focused explanations, small examples, practice exercises, and troubleshooting. OpenAI currently provides Codex as its dedicated software-development experience, while ChatGPT can also provide conversational coding help. Product features can change, so check current official guidance when a workflow depends on a particular feature.
Ask for an Explanation at Your Level
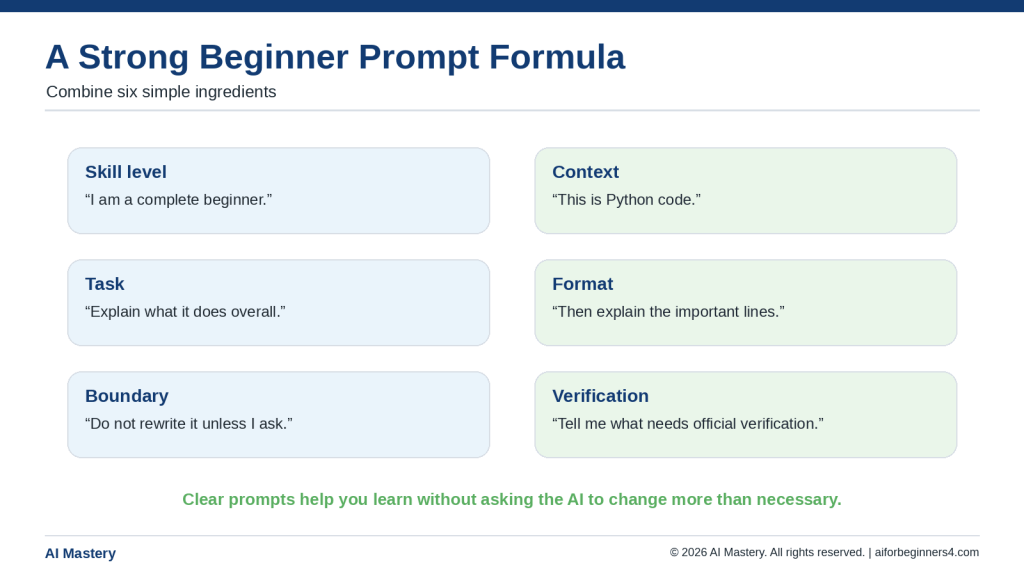
I am a complete Python beginner. Explain this list code line by line. Tell me what each index means and what the list contains after each line. Do not add advanced features.
Ask for a Hint Before the Full Answer
I am practising Python lists. My program should remove the second item, but I want to solve it myself. Give me one hint only. Do not show the final code yet.
Ask AI to Compare a List and Tuple
Compare a Python list and tuple for storing three fixed coordinates. Explain which is clearer for this example and why. Keep the explanation beginner-friendly.
Ask for Focused Troubleshooting
My Python list code gives IndexError: list index out of range. I will paste a small example. Explain why the index is invalid and show the smallest correction.
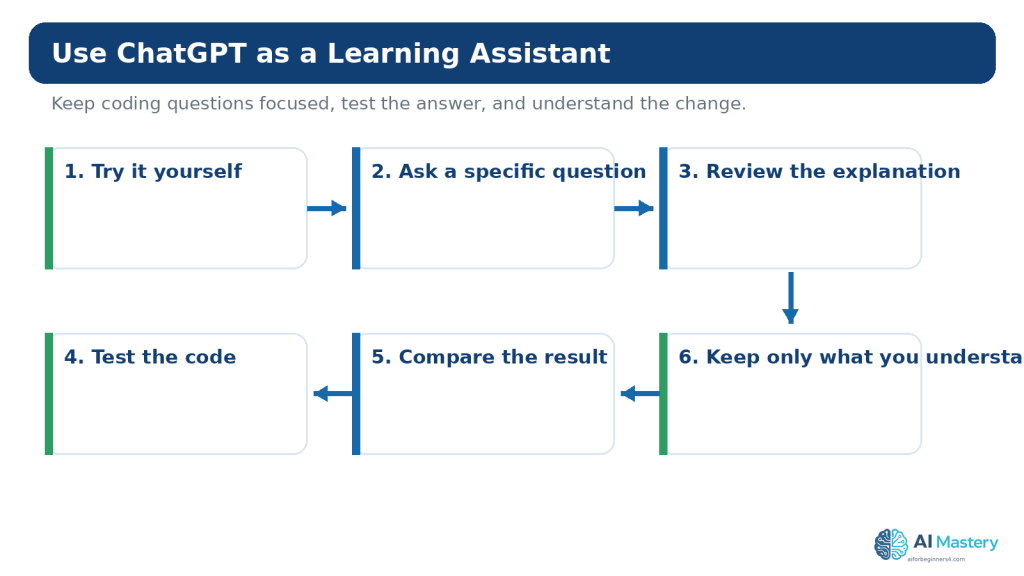
After receiving a suggestion, run the code yourself. Confirm that the output matches the explanation and that the change does not create a new problem.
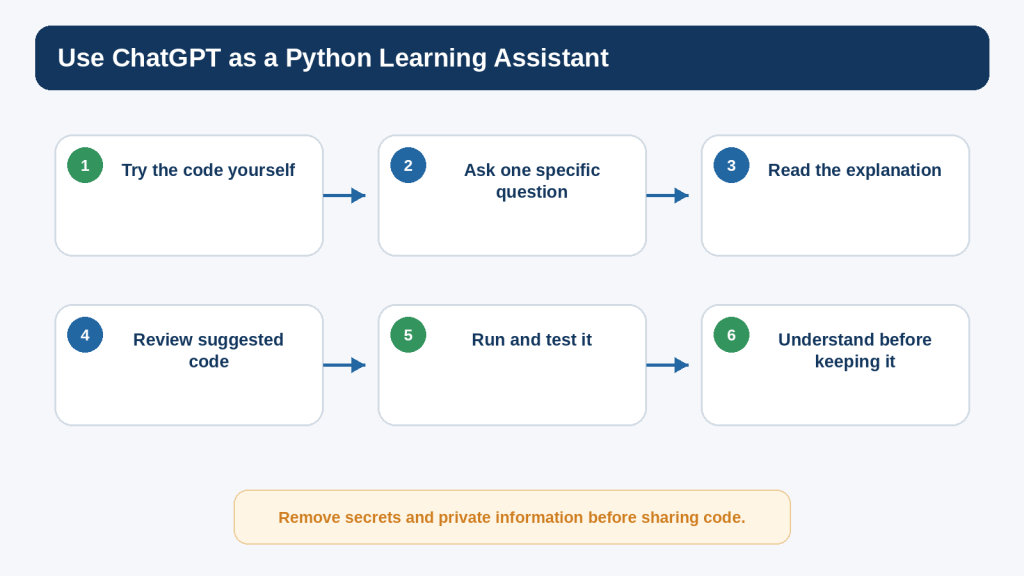
Figure 13. A useful AI-assisted learning workflow combines focused questions with your own review and testing.
Explanation: AI can explain list and tuple code, suggest examples, and help diagnose errors, but you should still run the code yourself and verify that it behaves as expected.
Protect Privacy and Secrets When Asking for Coding Help
A list or tuple may contain real information. Before sharing code with an online AI service, replace sensitive values with safe placeholders.
passwords and authentication tokens
API keys
customer names and account details
private email addresses and phone numbers
confidential business information
private file paths or internal URLs when they are not necessary to the question
For personal ChatGPT accounts, OpenAI provides Data Controls that can disable use of new conversations for model improvement. Temporary Chats are not used to train models, do not appear in normal history, do not create memories, and are deleted from OpenAI systems after 30 days, though they may be reviewed for abuse. These controls are useful, but they do not make it appropriate to paste secrets into a conversation.
Features, privacy controls, and retention practices can change. Check current official information when you first use a relevant feature, change plans or settings, receive an important policy notice, or periodically review your workflow.
Copyright, Licensing, and Reused Code
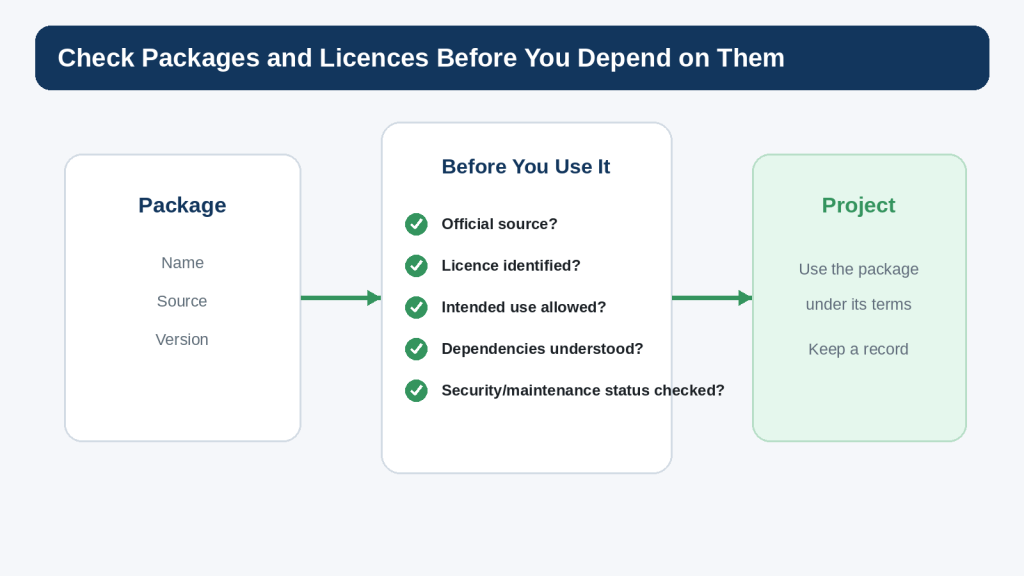
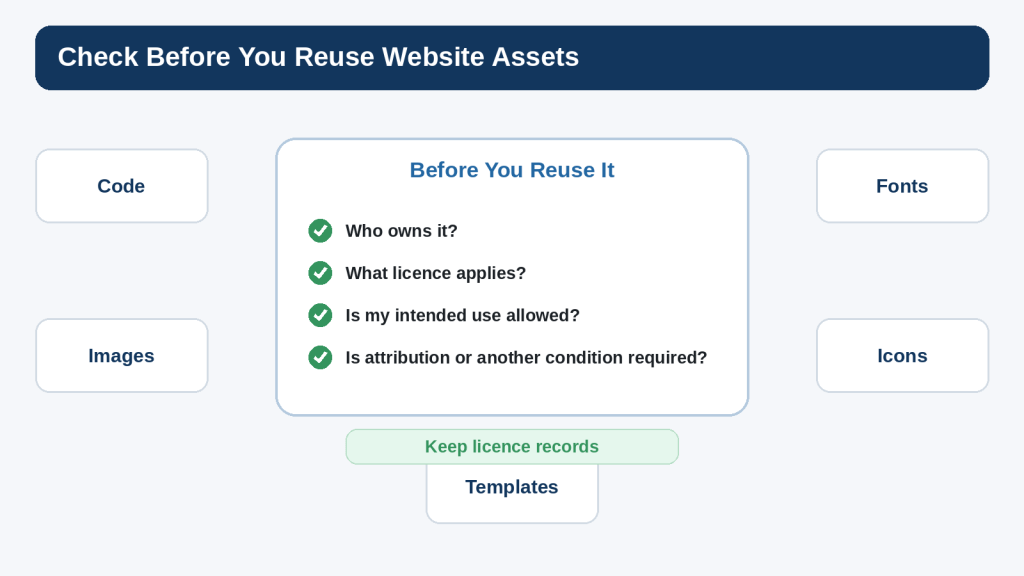
Small language examples such as basic list creation are common learning material, but larger code samples, libraries, templates, datasets, and other assets can have copyright or licence conditions. Finding code online does not automatically grant unrestricted reuse.
Check the original source of third-party code.
Read the licence that applies to the specific project or library.
Preserve notices or attribution when the licence requires it.
Do not assume code suggested by AI is automatically copyright-free or commercially permitted.
Keep a record of licences and permissions for important third-party components.
For an important commercial project, legal question, or unusual licence situation, obtain appropriate professional advice rather than relying only on an AI response.
Mini Project: Build a Simple Packing List
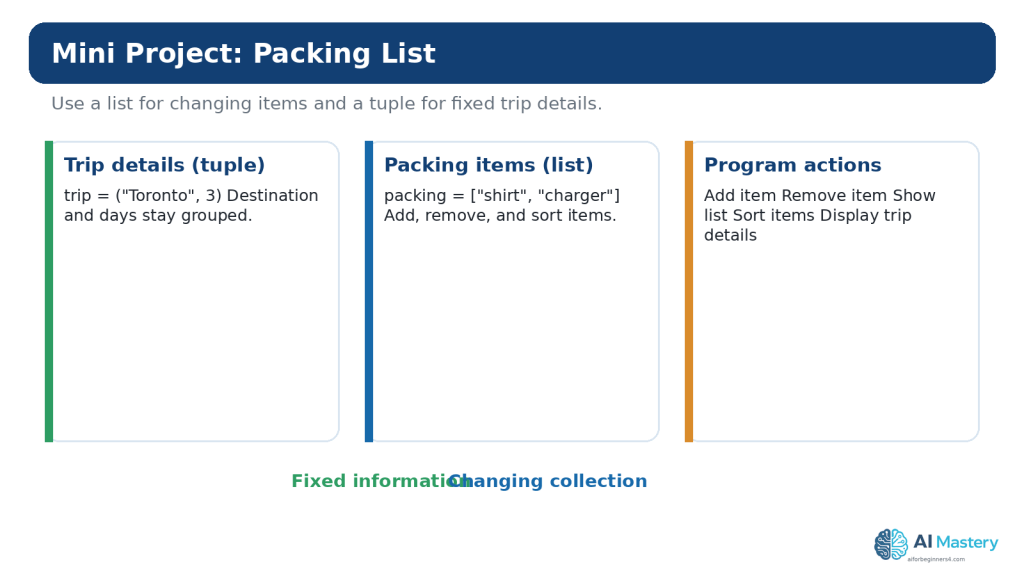
This small project uses a tuple for fixed trip details and a list for packing items that can change. It is deliberately simple so that you can concentrate on the sequence concepts.
4. Try removing a value that is not present while using the membership check.
5. Change the trip tuple and confirm unpacking still works.
6. Add one intentional index mistake, observe the error, then restore the correct code.
This project is small, but it demonstrates a useful design idea: use the structure that matches the behavior of the information. The trip details are treated as a fixed pair, while the packing list is designed to change.
Figure 14. A small packing-list project demonstrates when a tuple and a list can be useful in the same program.
Explanation: The tuple groups fixed trip details, while the list stores items the user may add, remove, or sort. Combining simple concepts in one project helps reinforce the difference between the two sequence types.
Common Beginner Mistakes
Mistake 1: Forgetting That Indexes Start at 0
If a list has three items, the valid positive indexes are 0, 1, and 2. Trying to access index 3 produces an `IndexError`.
Mistake 2: Confusing append() and extend()
`append()` adds its argument as one item. `extend()` adds items from an iterable. Print the result after each method until the difference is clear.
Mistake 3: Expecting remove() to Use an Index
`remove(value)` searches for a matching value. `pop(index)` removes by position and returns the removed item.
Mistake 4: Expecting sort() to Return the Sorted List
`list.sort()` changes the list in place and returns `None`. If you want a new sorted list while keeping the original, use `sorted()`.
Mistake 5: Modifying a List While Iterating Over It
Removing items from the same list you are currently looping through can produce confusing results because item positions shift. For beginner exercises, build a separate result list or iterate over a copy when appropriate.
Mistake 6: Assuming Assignment Copies a List
`other = original` creates another reference to the same list. Use `copy()` or another appropriate copying approach when you need a separate list.
Mistake 7: Trying to Change a Tuple Item
A tuple is immutable. If the values genuinely need to change, a list may be the clearer structure, or you can create a new tuple.
Mistake 8: Forgetting the Comma in a One-Item Tuple
Use `(5,)`, not `(5)`, when you need a tuple containing one item.
Mistake 9: Copying AI-Generated Code Without Running It
A response can look convincing and still contain an invalid index, wrong method, or misunderstanding of your intended structure. Run and test the code.
Mistake 10: Putting Sensitive Data in Practice Collections
Use fictional names, placeholder keys, and non-sensitive sample values when sharing code for troubleshooting.
Benefits and Limitations of Using ChatGPT for This Topic
Benefits
Explain indexing in simpler language.
Generate small practice exercises.
Compare two approaches.
Help identify an off-by-one index error.
Explain an exception message.
Turn a large example into smaller steps.
Quiz you on list and tuple concepts.
Limitations
Suggested code may be wrong.
The response may misunderstand which collection behavior you need.
A short answer may hide an important side effect, such as mutating a list.
AI review does not replace running the code.
AI cannot guarantee that third-party code is appropriately licensed for your project.
How to Reduce This Limitation: Keep prompts focused, show the smallest relevant code, describe the expected result and actual result, and test the proposed change yourself.
Useful ChatGPT Prompts for Practice
1. I am learning Python lists. Give me five very small exercises, one at a time, starting with indexing and ending with a simple loop. Wait for my answer before showing the solution.
2. Explain the difference between append(), extend(), insert(), remove(), and pop() using one short list. Show the list after each operation.
3. I keep confusing zero-based indexes. Give me a four-item list and quiz me on positive and negative indexes.
4. Review this list code for an IndexError. Explain the exact invalid index and show only the smallest correction.
5. Explain why `other = original` does not create an independent list. Use a visual analogy and a three-line code example.
6. Compare a list and tuple for storing latitude and longitude. Explain the tradeoff without claiming one type is always better.
7. Give me a beginner tuple-unpacking exercise. Do not show the answer until I try it.
8. Rewrite this list comprehension as an ordinary for loop and explain each step.
9. Review this small packing-list program for beginner mistakes. Do not redesign it. Check indexes, list methods, tuple unpacking, and error handling.
10. Ask me ten beginner questions about Python lists and tuples, one question at a time, and explain each answer after I respond.
Common Myths About Lists, Tuples, and AI Coding
Myth: Lists and Tuples Are Basically the Same
Reality: They share many sequence operations, but their mutability differs. That difference affects how you design and modify data.
Myth: A Tuple Is Always Faster, So You Should Always Use It
Reality: Performance is rarely the most important beginner decision. Choose the structure that communicates whether the collection should change.
Myth: You Need to Memorize Every List Method
Reality: Learn the common operations and use official documentation when you need something less familiar.
Myth: If Code Runs, the Data Structure Must Be Correct
Reality: Code can run while using a confusing or inappropriate design. Readability and intended behavior still matter.
Myth: ChatGPT Knows Which Collection You Need Without Context
Reality: A useful recommendation depends on whether values change, how they are used, and what the program is trying to represent.
Myth: AI-Generated Code Does Not Need Testing
Reality: Important code and information should still be checked. OpenAI also warns that model output can contain mistakes.
Frequently Asked Questions
How many items can a Python list contain?
Python does not impose a tiny beginner-level item limit. Practical limits depend on available memory and what the program is doing. For learning, keep lists small enough that you can inspect the contents easily.
Can a list contain another list?
Yes. That creates a nested list. Use nested structures when they make the data clearer, not simply to make the code look advanced.
Can a tuple contain a list?
Yes. The tuple itself cannot have its item references replaced, but a mutable object stored inside it can still change. This is one reason the word “immutable” needs to be understood carefully.
Can I sort a tuple?
A tuple has no in-place `sort()` method because it is immutable. The built-in `sorted()` function can read the tuple and return a new list containing the items in sorted order.
Why does Python start indexes at 0?
Zero-based indexing is part of Python’s sequence model and is common in programming languages. As a beginner, the most useful response is to practise until the pattern becomes automatic rather than fighting the convention.
Should I use a list or tuple for coordinates?
A tuple can communicate that a small coordinate group is intended to stay together without item-by-item changes, but a list may be appropriate if your program needs to modify those values in place. Context matters.
Do I need list comprehensions now?
No. They are useful and common, but ordinary loops are often easier to understand initially. Learn the logic first; concise syntax can come later.
Can ChatGPT fix list errors for me?
It can often suggest likely causes and corrections, especially when you provide a small example and exact error message. You should still run the correction yourself and compare it with reliable documentation when the detail matters.
How should I show Python code in WordPress?
Use a WordPress Code block rather than a normal paragraph or Custom HTML block when the goal is to display source code. WordPress.com currently supports language selection and syntax-highlighting options in its enhanced Code block.
Can I upload my .py practice file to WordPress?
The AI Mastery tutorial does not require readers to download a `.py` file. The article can show the code directly in Code blocks. If you later decide to distribute example files, review WordPress file-type support and security implications first.
Key Takeaways
Lists and tuples are ordered sequence types.
Lists are mutable; tuples are immutable.
Python list and tuple indexes begin at 0.
Negative indexes count from the end.
Slicing selects a range and excludes the stop position.
Use append(), insert(), extend(), remove(), and pop() according to the operation you actually need.
Use loops to process sequence items one at a time.
Assignment does not make an independent copy of a list.
Use tuple packing and unpacking for small, fixed groups of related values.
Choose the sequence type based on meaning and behavior, not on a simplistic “one is better” rule.
Use ChatGPT for explanation and focused troubleshooting, but review and test suggested code.
Do not share secrets or unnecessary personal information in coding examples.
Check licences before reusing substantial third-party code or assets.
Final Tip
Do not try to learn lists and tuples by memorizing a table of methods. Build tiny programs that use the operations repeatedly. Create a list, print it, change one item, append something, remove something, loop through it, and then rebuild a similar example without looking at the earlier code.
When something goes wrong, print the list or tuple and check the exact index or value involved. Most beginner collection errors become much easier to understand when you can see the data before and after the operation.
The next useful AI Coding topic can build on collections by introducing dictionaries, which store values using keys instead of relying only on numeric positions.
Sources and References
The following official sources were reviewed for the Python, OpenAI, and WordPress information in this article. Information was checked on August 16, 2026. Software features, policies, and documentation can change, so readers should check current official guidance when it matters to their project.
1. Python Software Foundation — Python 3.14.7: An Informal Introduction to Python.Open official source — Official tutorial introduction to Python lists, indexing, slicing, concatenation, and basic sequence behavior.
2. Python Software Foundation — Data Structures.Open official source — Official tutorial for list methods, list comprehensions, tuples, sets, dictionaries, looping techniques, and sequence comparisons.
3. Python Software Foundation — Built-in Types.Open official source — Authoritative reference for sequence types, common sequence operations, lists, tuples, indexing, membership, and slicing.
4. Python Software Foundation — Errors and Exceptions.Open official source — Official tutorial for common Python syntax and runtime errors used in the troubleshooting guidance.
5. Python Software Foundation — copy — Shallow and Deep Copy Operations.Open official source — Official reference explaining shallow and deep copying for mutable objects.
6. OpenAI — ChatGPT Work and Codex.Open official source — Current OpenAI guidance distinguishing conversational ChatGPT help, Work, and Codex for software-development tasks.
7. OpenAI — Data Controls FAQ.Open official source — Current information about training controls and Temporary Chat, including 30-day deletion of Temporary Chats.
8. OpenAI — How Your Data Is Used to Improve Model Performance.Open official source — Current explanation of model-improvement settings for personal ChatGPT and Codex use.
9. WordPress.com — Display Code Snippets.Open official source — Current instructions for using the WordPress Code block to display source-code examples in posts.
10. WordPress.com — Enhanced Code Block.Open official source — Current WordPress.com guidance for language selection, syntax highlighting, filenames, copy buttons, and line numbers in Code blocks.
11. Open Source Initiative — OSI Approved Licenses.Open official source — Official OSI reference explaining that approved open-source licences permit software use, modification, and sharing according to licence terms.
12. WIPO — Copyright Protection of Computer Software.Open official source — Official WIPO reference explaining that copyright protection applies to computer software in most countries and is addressed by international treaties.
13. OWASP — Secrets Management Cheat Sheet.Open official source — Authoritative security guidance on protecting and managing secrets such as passwords, tokens, and keys.
Important Note: This article provides general educational information about programming, privacy, and licensing. It is not legal, cybersecurity, or other professional advice. For sensitive, commercial, or high-risk projects, use appropriate professional review.
Learning individual Python commands is useful, but a small finished project teaches something different: how separate pieces of code work together. You have to decide what the program should do, divide the idea into manageable parts, build those parts in a sensible order, test them, correct mistakes, and decide when the first version is complete.
This guide continues the AI Mastery AI Coding series after the Python foundations in Article 087 and the debugging workflow in Article 088. Instead of learning another isolated concept, you will use those skills to build one complete beginner project: a command-line to-do list written in Python.
The finished first version will let a user view tasks, add a task, remove a task, and quit the program. The tasks will be kept in memory while the program is running. Saving tasks permanently will be treated as an optional improvement after the first version works, because adding too many features at once makes a beginner project harder to understand and troubleshoot.
ChatGPT or another AI coding assistant can help during the project, but the goal is not to ask for a complete program and paste it without review. A more useful learning process is to ask for one focused explanation or feature at a time, read the suggested code, make the change yourself, run the program, and keep the change only when you understand the result.
OpenAI currently describes Codex as an AI coding agent that can help write, review, and ship code, while conversational ChatGPT can also be used for explanations and focused coding questions. Product features, plan conditions, and interfaces can change, so this article concentrates on a workflow that remains useful regardless of which supported AI coding interface you use.
The project will also include basic privacy, security, licensing, and responsible-use checks. Even a small program can contain personal information, copied code, third-party packages, or secrets if a beginner is not careful. The safest habit is to build with fictional practice data and to review anything before sharing it with an online service or publishing it.
By the end, you should have a working Python project, understand how its main parts fit together, know how to test it, and have a repeatable process for building another small project without depending on a large block of unexplained generated code.
What You’ll Learn
how to choose a project small enough to finish
how to separate must-have features from later improvements
how to describe a project as input, process, and output
how to create a simple project folder and Python file
how to store tasks in a Python list
how to build a repeating text menu
how to write small functions for viewing, adding, and removing tasks
how to validate beginner user input
how to run and test each feature before adding the next one
how to use ChatGPT for focused planning, explanation, and troubleshooting
how to ask AI for one small feature instead of an entire rewrite
how to compare expected and actual results
how to test normal, empty, invalid, and boundary cases
how to keep a working copy before major changes
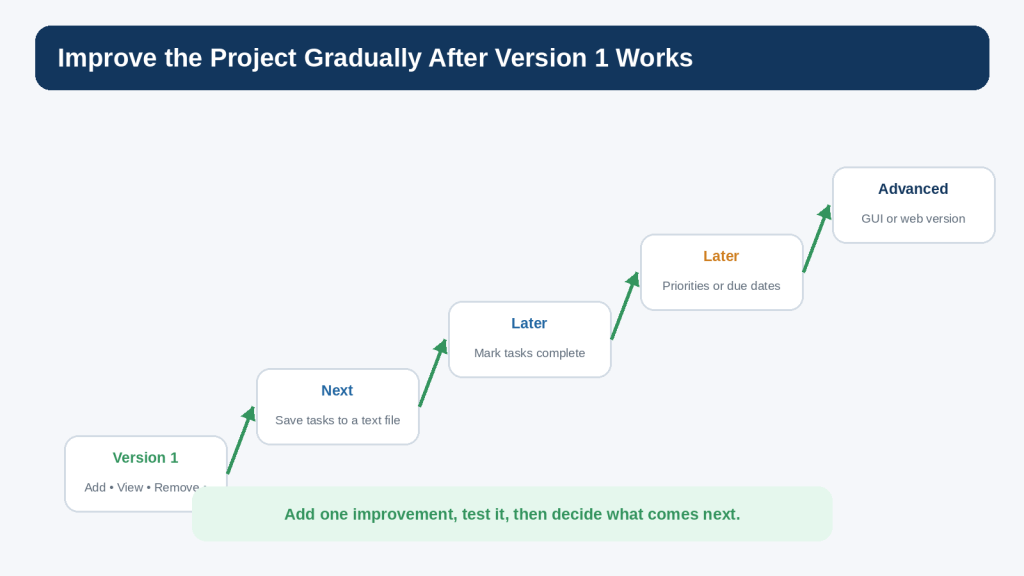
how to improve the project gradually after version 1 works
how to remove passwords, API keys, private data, and unnecessary local details before sharing code
why copied or AI-suggested third-party code and packages still require source and licence checks
how to prepare code examples for WordPress Code blocks when publishing the tutorial
You do not need to build a professional application. The purpose is to finish a small project that you can read, explain, change, and test yourself.
Before Learning
You will get the most from this guide if you already understand the basic Python ideas from Article 087: variables, strings, numbers, lists, input(), print(), if statements, loops, functions, and how to run a .py file. You should also be comfortable reading a simple traceback and changing one part of a program at a time, as covered in Article 088.
Use Python 3
As of August 16, 2026, Python 3.14.7 is the current stable Python 3.14 maintenance release listed by the Python Software Foundation. The project uses ordinary language features that are suitable for current Python 3 releases. Exact menus and installer wording can change, so use current official Python instructions if you need to install or update Python.
Create a Practice Folder
Create a folder such as Python-Projects and, inside it, create another folder named todo-project. Keep only practice files there. A clean folder makes it easier to know which file you are running and reduces the chance of editing the wrong copy.
Use Fictional Information
The project does not need real names, customer records, passwords, API keys, or confidential information. Use ordinary fictional tasks such as “Buy milk,” “Call dentist,” or “Read Python notes.”
Save a Working Copy
Whenever the project reaches a working milestone, save a copy before making a larger change. For example, you might keep todo-v1-working.py before experimenting with todo-v2-test.py. This simple habit makes recovery easier if a new feature breaks something.
What Project Will We Build?
The project is a small command-line to-do list. A command-line program displays text, accepts typed input, and prints a result. It does not need graphics, a database, a website, or third-party packages.
The first version has four essential actions:
View tasks — display the tasks currently stored in the list.
Add a task — ask for text and add it to the list.
Remove a task — let the user choose a numbered task and remove it safely.
Quit — end the menu loop without an error.
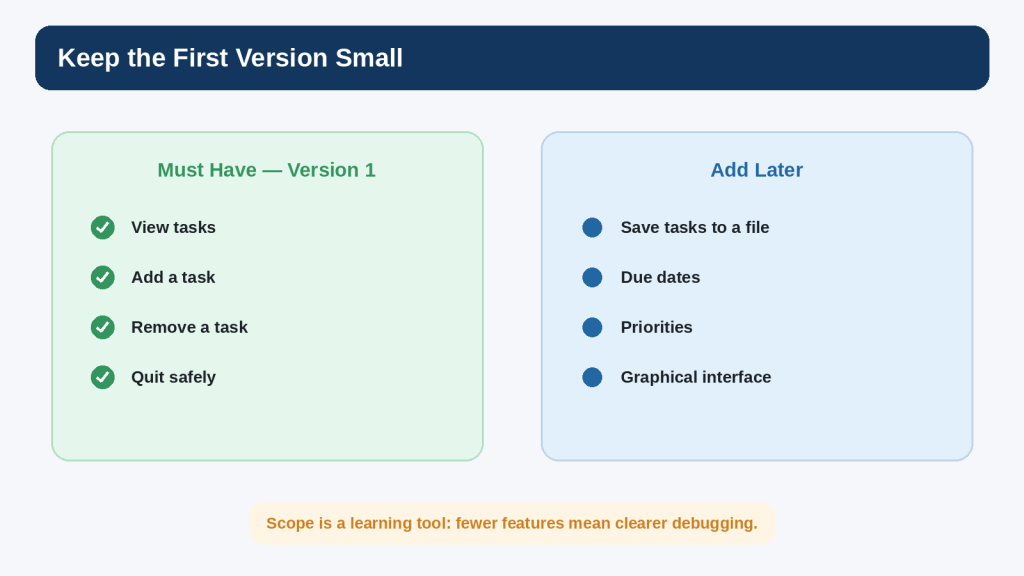
This is enough to create a real interactive program while keeping every part understandable. Features such as saving to a file, due dates, priorities, completion status, a graphical interface, or a web version can be added later.
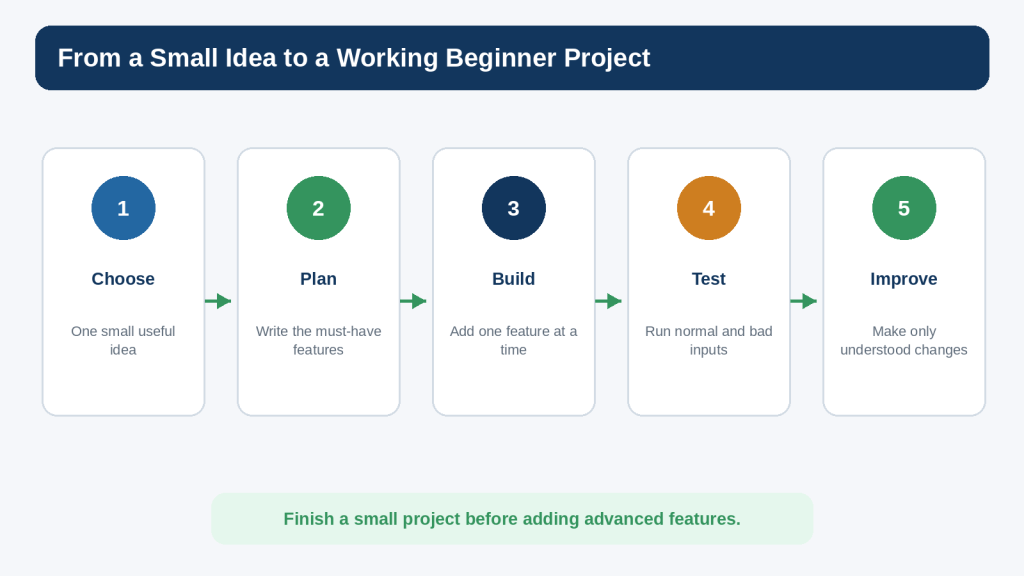
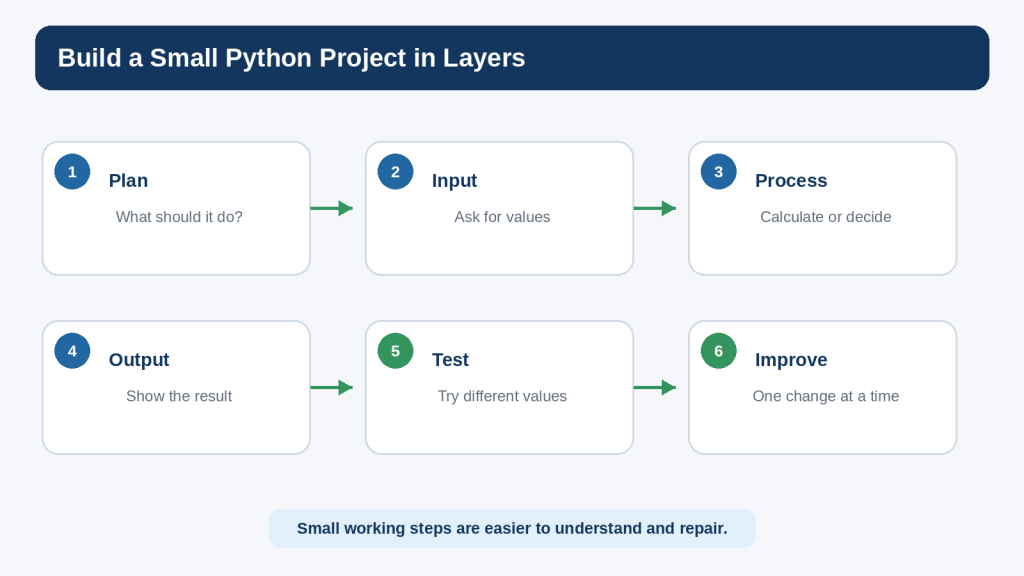
Figure 1. A beginner project becomes manageable when you move from a small idea to a plan, build one feature at a time, test it, and improve it gradually.
Explanation: The purpose of the roadmap is to make the development process predictable rather than trying to create the finished project in one step.
Keep Version 1 Small
One of the easiest ways to make a beginner project fail is to keep adding ideas before the basic version works. A project can quickly expand from “simple to-do list” into accounts, cloud syncing, reminders, categories, search, encryption, mobile notifications, and a database. Those may be useful later, but they are not necessary for the learning goal.
Write a Must-Have List
Before writing code, write down the smallest set of behaviours that would make the project useful. For this project, view, add, remove, and quit are enough.
Create a Later List
When you think of another idea, put it on a later list instead of changing the current plan. This lets you preserve good ideas without turning version 1 into an endless project.
Reality: Finishing a small project teaches more about the complete development process than starting a large project that you cannot explain or test.
Figure 2. Separate the must-have features for version 1 from ideas that can wait until the basic project works.
Explanation: A small scope reduces confusion and makes debugging easier because fewer behaviours are changing at the same time.
How AI Coding Tools Fit into the Project
AI can help at several points: planning the features, explaining unfamiliar syntax, suggesting a small function, reviewing an error message, proposing test cases, or comparing two approaches. The useful question is not “Can AI generate the whole project?” but “What is the smallest help that lets me keep learning and moving forward?”
Ask for a Plan Before Code
I am a complete beginner learning Python. I want to build a command-line to-do list with only four features: view tasks, add a task, remove a task, and quit. Give me a short step-by-step build plan. Do not write the full program yet.
This gives you a structure to review before any code appears.
Ask for One Feature at a Time
Help me write only the add-task feature for my beginner Python to-do list. Explain each new line and keep the code as simple as possible. Do not add file saving, classes, or third-party packages.
The constraints make it easier to compare the suggestion with your current project.
Ask for an Explanation After It Works
The add-task function works. Explain why task.strip() is useful and what tasks.append(task) changes in the list. Use beginner-friendly language.
Understanding the working code is part of finishing the feature.
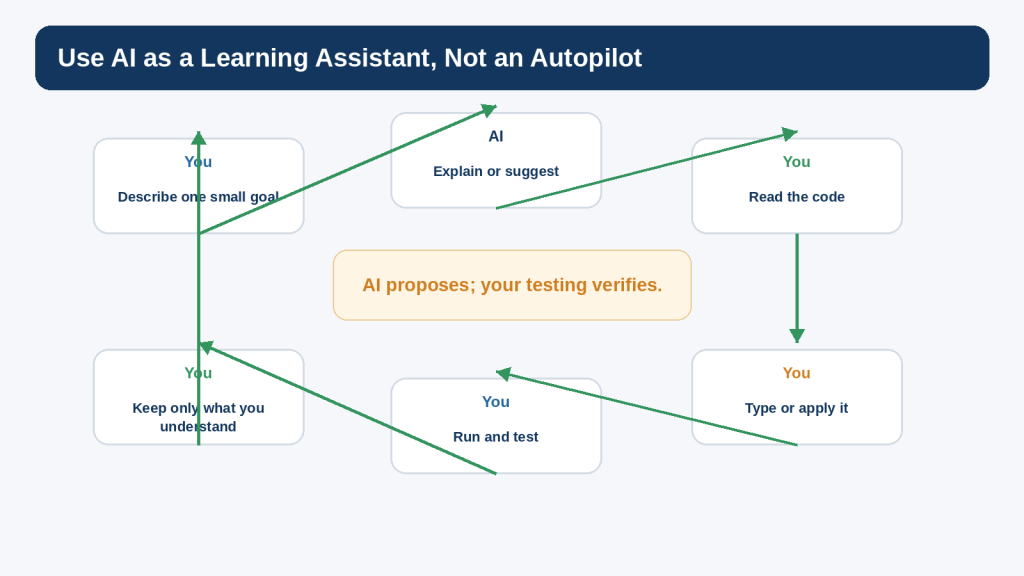
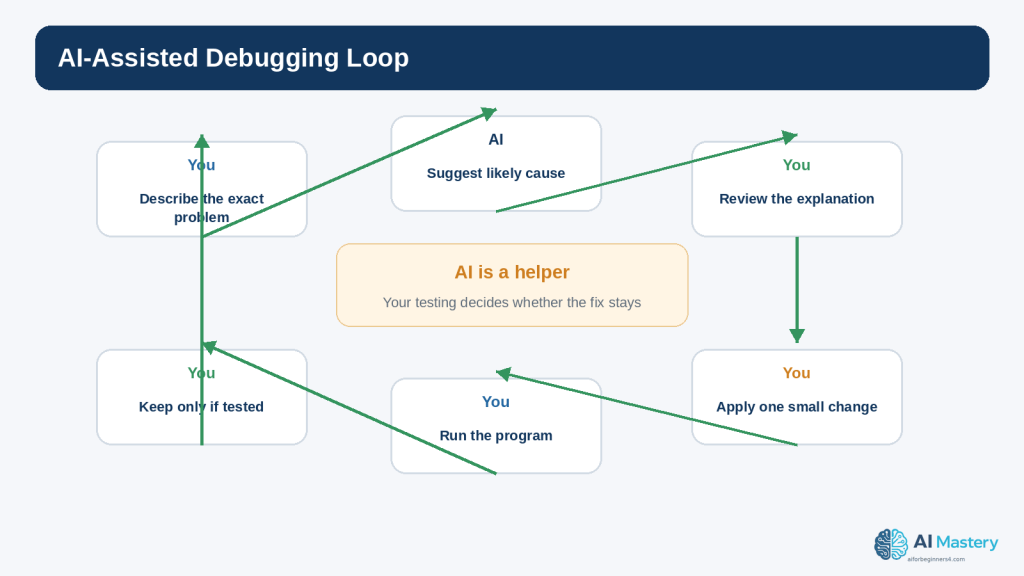
Keep the Human Review Loop
1. Describe one small goal.
2. Read the AI response.
3. Check that it matches the project plan.
4. Apply or type the smallest useful change.
5. Save the file.
6. Run the program.
7. Test the new behaviour.
8. Keep the change only when you understand it.
OpenAI cautions that AI-generated output can be incorrect. Testing and understanding remain necessary even when a suggestion looks professional.
Figure 3. AI assistance works best inside a human review-and-test loop rather than as an automatic replacement for the project.
Explanation: Use the assistant to explain or propose, but rely on your own understanding and the running program to verify the result.
Plan the Project Before Writing Code
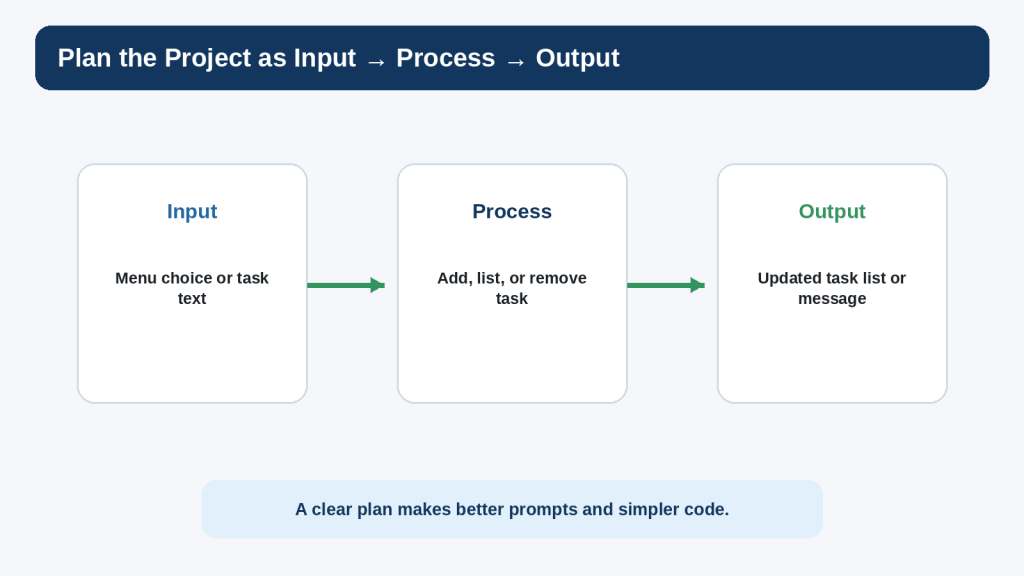
A simple way to plan a beginner program is to describe each feature as input, process, and output.
Input
Input is information the program receives. In this project, the user enters a menu choice, task text, or a task number to remove.
Process
The process is what Python does with the input. It may append a task to the list, loop through the list for display, or remove one item after validating the number.
Output
Output is what the user sees. The program prints the current tasks, a confirmation such as “Task added,” or a helpful error message if the input is invalid.
This simple model also improves AI prompts. If something fails, you can state the input you gave, the process you expected, and the actual output you received.
Figure 4. Describing a feature as input, process, and output helps you plan the code and explain problems clearly.
Explanation: The same model also gives you better context for an AI prompt when the program does not behave as expected.
Set Up the Project File
Inside your todo-project folder, create a file named todo.py. Use a plain-text Python editor such as IDLE or another code editor. Do not write Python code in TextMaker; TextMaker is for the tutorial document, while todo.py is the actual program file.
Start with a Tiny Working File
print(“Beginner To-Do List”)
Save todo.py and run it. You should see the title. This first test confirms that you are editing and running the correct file before the project becomes larger.
Add a Working-Copy Habit
When the project reaches an important milestone, copy todo.py to a working backup such as todo-v1-working.py. Do not create a new version for every tiny edit; use working copies before changes that are difficult to undo.
Step 1: Create the Task List
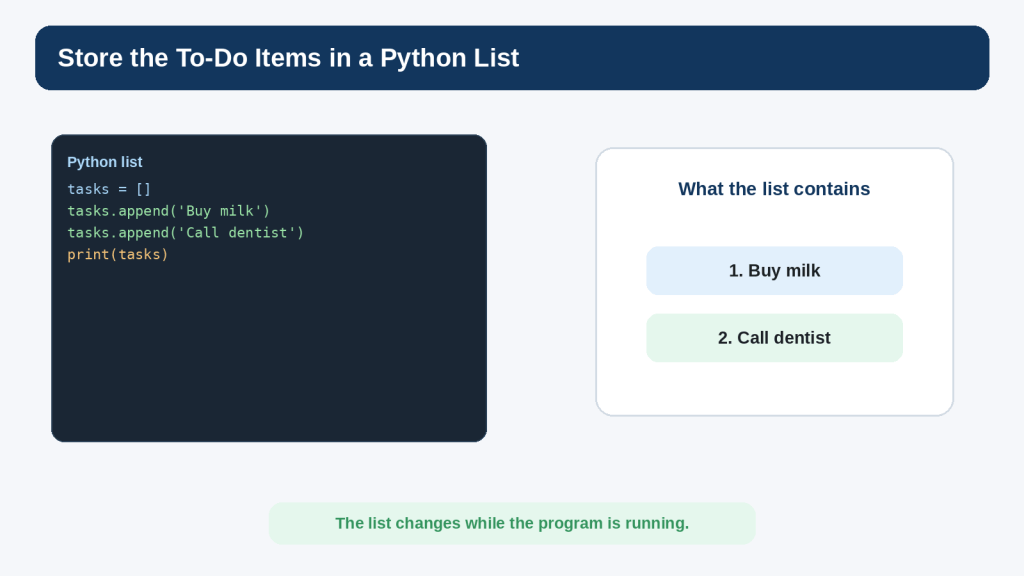
The program needs somewhere to keep tasks while it is running. A Python list is suitable because it stores several values in order and lets you append and remove items.
tasks = []
This creates an empty list named tasks. At the beginning of the program, there are no tasks yet.
Try Adding Sample Values Temporarily
tasks = []
tasks.append(“Buy milk”)
tasks.append(“Call dentist”)
print(tasks)
Running this should display a Python list containing the two strings. This is only a temporary learning test. Once you understand the list, remove the sample append lines so the real program begins empty.
Why Keep One List?
The same tasks list will be used by the view, add, and remove features. Keeping one clearly named list makes the program easier for a beginner to follow than introducing multiple data structures before they are needed.
Figure 5. A Python list can hold the to-do items while the program is running.
Explanation: The same list is shared by the view, add, and remove functions, keeping the first project simple and easy to follow.
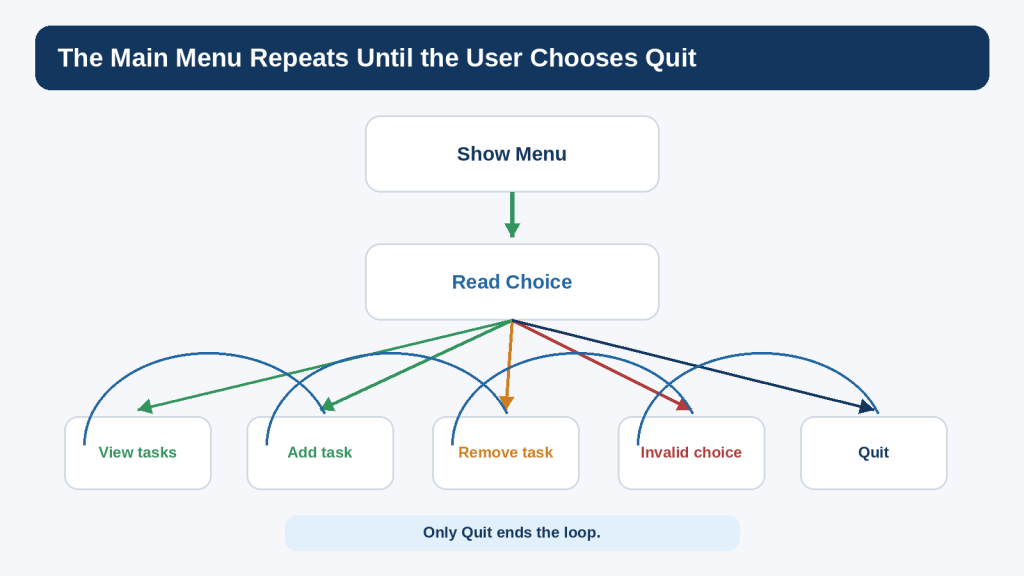
Step 2: Build the Repeating Menu
The program should continue showing a menu until the user chooses Quit. A while loop is a natural fit because the number of menu cycles is not known in advance.
while True:
print(“\nBeginner To-Do List”)
print(“1. View tasks”)
print(“2. Add a task”)
print(“3. Remove a task”)
print(“4. Quit”)
choice = input(“Choose an option: “).strip()
if choice == “4”:
print(“Goodbye!”)
break
At this stage, options 1 to 3 do nothing yet. That is acceptable. The purpose of this step is to confirm that the menu appears repeatedly and that option 4 ends the loop.
Test the Menu Now
9. Run the program.
10. Enter 1 and confirm that the menu appears again.
11. Enter x and confirm that the program still continues.
12. Enter 4 and confirm that Goodbye! appears and the program ends.
The menu is not complete, but one piece of the project now works.
Figure 6. The main menu repeats until the user chooses Quit, while the other choices return to the menu after their work is complete.
Explanation: A simple while loop gives the project its repeated interaction without requiring a graphical interface.
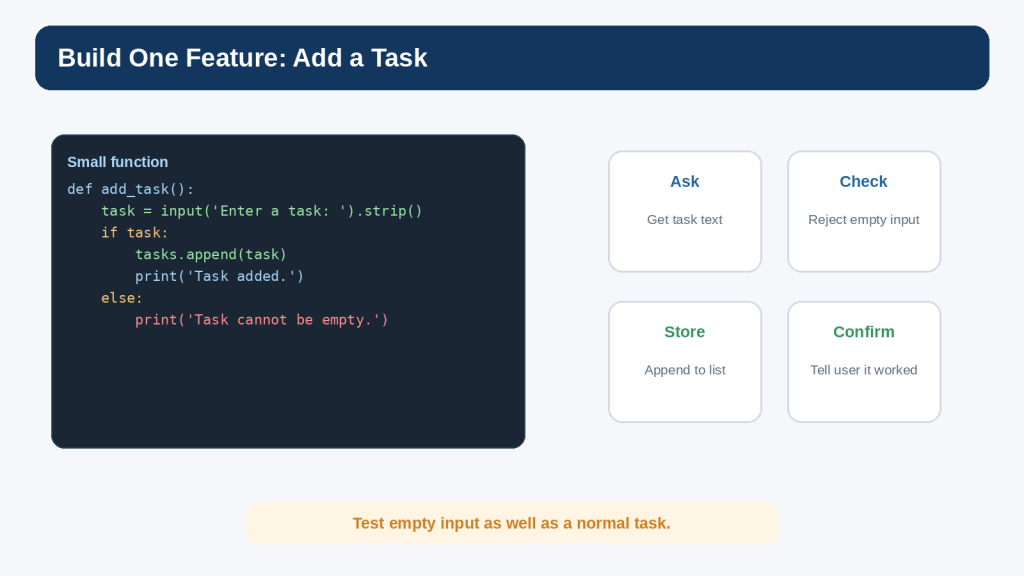
Step 3: Add a Task
The add feature should ask for task text, reject an empty response, append valid text to the tasks list, and confirm the result.
def add_task():
task = input(“Enter a task: “).strip()
if task:
tasks.append(task)
print(“Task added.”)
else:
print(“Task cannot be empty.”)
The strip() method removes extra whitespace from the beginning and end of the text. That means an input containing only spaces becomes an empty string and can be rejected.
Connect the Function to the Menu
Add this branch before the Quit branch:
if choice == “2”:
add_task()
elif choice == “4”:
print(“Goodbye!”)
break
Later, the menu will include the other choices. For now, test option 2.
Test Normal and Empty Input
13. Choose option 2.
14. Enter Buy milk.
15. Confirm that Task added. appears.
16. Choose option 2 again.
17. Press Enter without typing a task.
18. Confirm that the program shows Task cannot be empty. rather than storing a blank item.
Figure 7. The add-task feature asks for text, rejects empty input, appends a valid task, and confirms the result.
Explanation: Testing both a normal task and an empty response helps verify that the feature behaves sensibly.
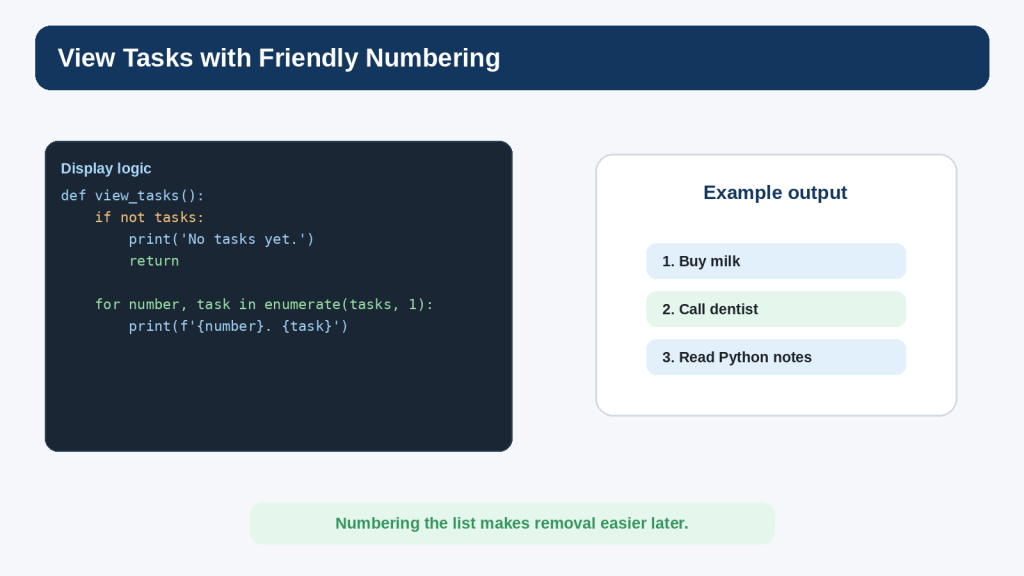
Step 4: View the Tasks
The view feature has two jobs: handle the empty list gracefully and display numbered tasks when items exist.
def view_tasks():
if not tasks:
print(“No tasks yet.”)
return
print(“\nYour tasks:”)
for number, task in enumerate(tasks, 1):
print(f”{number}. {task}”)
The condition if not tasks is true when the list is empty. The return statement ends the function after the message. When tasks exist, enumerate(tasks, 1) produces both a display number beginning at 1 and the task text.
Connect View to the Menu
if choice == “1”:
view_tasks()
elif choice == “2”:
add_task()
elif choice == “4”:
print(“Goodbye!”)
break
Test the View Feature
19. Start with a new run and choose 1 before adding anything.
20. Confirm that No tasks yet. appears.
21. Add two tasks.
22. Choose 1 again.
23. Confirm that the tasks appear as 1 and 2 in the same order they were added.
Figure 8. The view-task feature handles an empty list and uses friendly numbering when tasks exist.
Explanation: Starting the displayed numbers at 1 makes the list easier for a person to read and prepares the interface for removing a numbered task.
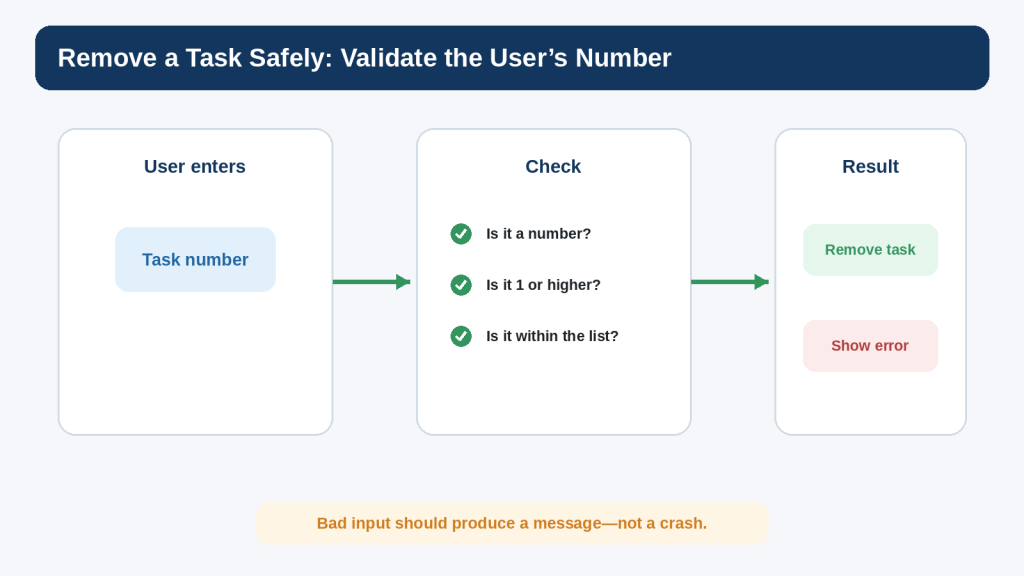
Step 5: Remove a Task Safely
Removing a task is slightly more difficult because the user types a number, input() returns text, and the number must refer to an existing list item. This is a good place to practise validation.
def remove_task():
view_tasks()
if not tasks:
return
try:
number = int(input(“Enter the task number to remove: “))
except ValueError:
print(“Please enter a number.”)
return
if 1 <= number <= len(tasks):
removed = tasks.pop(number – 1)
print(f”Removed: {removed}”)
else:
print(“That task number does not exist.”)
The function first displays the current tasks. If the list is empty, there is nothing to remove. The try and except block handles text that cannot be converted to an integer. The range check confirms that the number refers to an existing task. Because Python list indexes begin at 0 while the displayed numbering begins at 1, the code uses number – 1 when calling pop().
Connect Remove to the Menu
if choice == “1”:
view_tasks()
elif choice == “2”:
add_task()
elif choice == “3”:
remove_task()
elif choice == “4”:
print(“Goodbye!”)
break
else:
print(“Please choose 1, 2, 3, or 4.”)
Test Bad Input Deliberately
24. Try removing a task when the list is empty.
25. Add two tasks.
26. Enter letters instead of a number.
27. Enter 0.
28. Enter 99.
29. Enter a valid number.
30. View the list and confirm that the intended task was removed.
OWASP input-validation guidance emphasizes checking untrusted input against the expected type, format, range, and application rules. This beginner example applies the same principle at a small scale.
Figure 9. Removing a task safely requires converting and validating the user’s number before changing the list.
Explanation: Invalid input should result in a clear message rather than a crash or the removal of the wrong item.
Put the Complete Program Together
You now have all four version-1 behaviours. The complete program below keeps the same simple structure rather than introducing classes, external packages, or file storage.
tasks = []
def view_tasks():
if not tasks:
print(“No tasks yet.”)
return
print(“\nYour tasks:”)
for number, task in enumerate(tasks, 1):
print(f”{number}. {task}”)
def add_task():
task = input(“Enter a task: “).strip()
if task:
tasks.append(task)
print(“Task added.”)
else:
print(“Task cannot be empty.”)
def remove_task():
view_tasks()
if not tasks:
return
try:
number = int(input(“Enter the task number to remove: “))
except ValueError:
print(“Please enter a number.”)
return
if 1 <= number <= len(tasks):
removed = tasks.pop(number – 1)
print(f”Removed: {removed}”)
else:
print(“That task number does not exist.”)
while True:
print(“\nBeginner To-Do List”)
print(“1. View tasks”)
print(“2. Add a task”)
print(“3. Remove a task”)
print(“4. Quit”)
choice = input(“Choose an option: “).strip()
if choice == “1”:
view_tasks()
elif choice == “2”:
add_task()
elif choice == “3”:
remove_task()
elif choice == “4”:
print(“Goodbye!”)
break
else:
print(“Please choose 1, 2, 3, or 4.”)
Save the file before running it. If your editor supports syntax highlighting, use it as a reading aid, but do not assume colour highlighting proves that the code is correct.
Read the Program from the Top
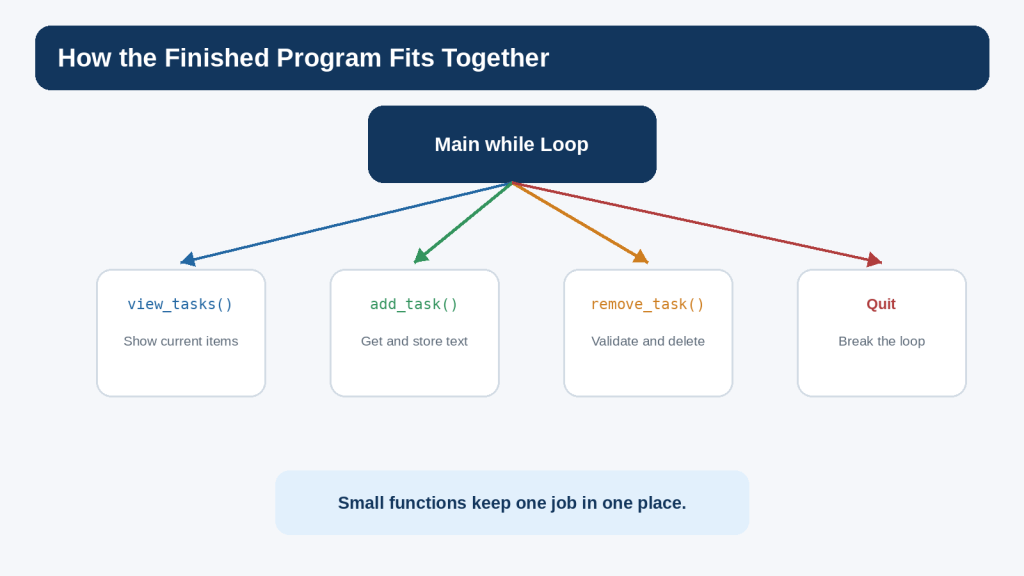
The tasks list is created first. Three functions define the individual jobs. The while loop displays the menu and decides which function to call. Quit uses break to end the loop. The structure is intentionally repetitive and explicit because clarity is more useful than cleverness in a first project.
Figure 10. The finished beginner project uses one menu loop and small functions that each handle one job.
Explanation: Keeping the responsibilities separate makes the program easier to read, test, and change.
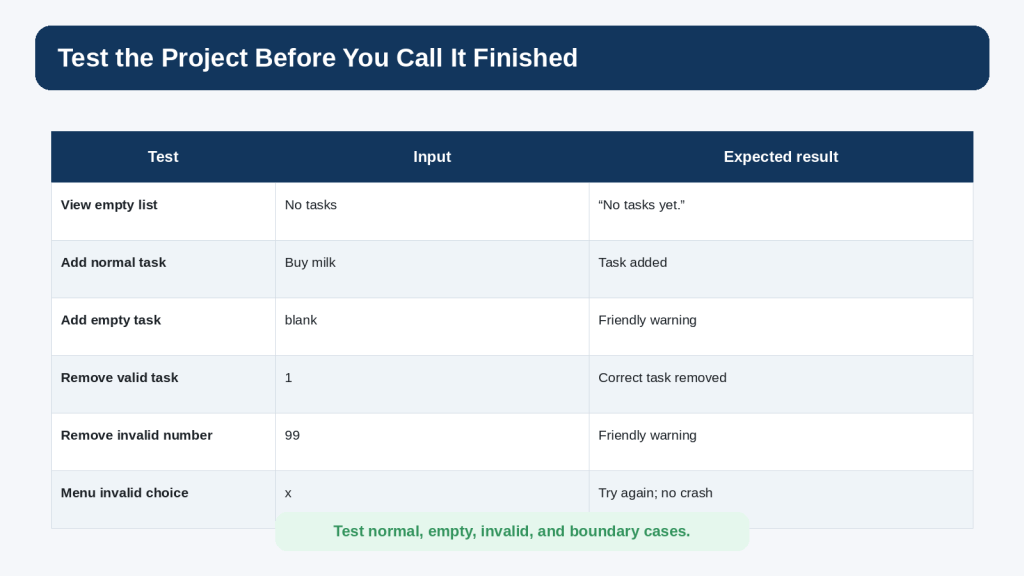
Test the Whole Project
Testing should be planned, not limited to clicking around until the program seems fine. Write down important cases and the result you expect before you run them.
Normal Cases
view an empty list
add one normal task
add several tasks
view the numbered list
remove the first task
remove the last task
quit from the main menu
Invalid Cases
add an empty task
enter letters when a task number is required
enter 0 as a task number
enter a number larger than the list
enter an invalid menu choice
Boundary Cases
Boundary cases sit at the edge of allowed values. For the remove feature, 1 is the lowest valid displayed task number and len(tasks) is the highest valid number. Values immediately outside that range are useful tests.
Keep a Simple Test Record
For a beginner project, a small table is enough. Record the test, input, expected result, actual result, and whether it passed. If a test fails, use the debugging process from Article 088 rather than changing several parts of the program at once.
Figure 11. A useful beginner test plan includes normal, empty, invalid, and boundary cases instead of relying on one successful run.
Explanation: Writing the expected result before testing makes it easier to recognize logic problems and confirm a correction.
Ask AI for Better Help During the Project
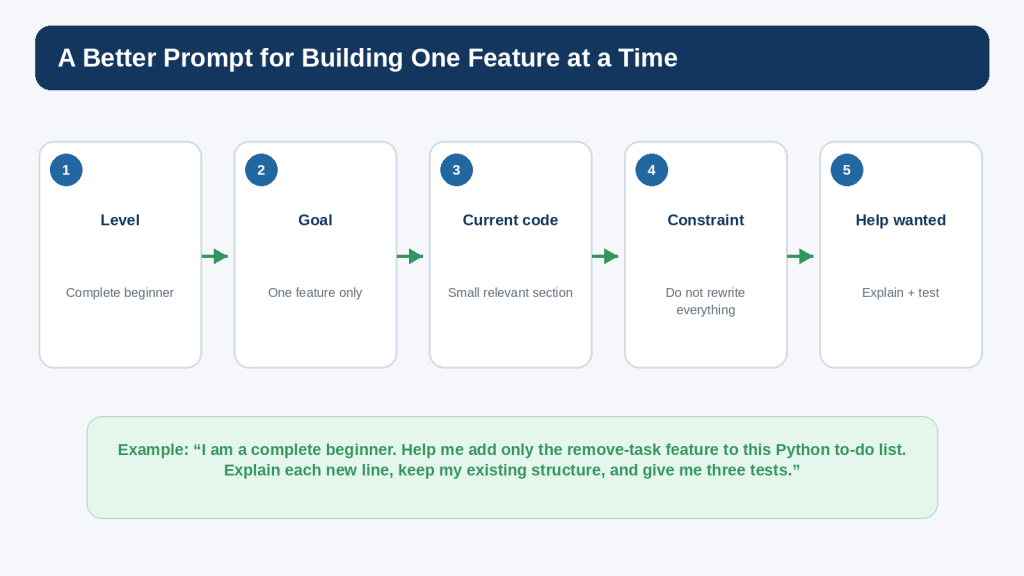
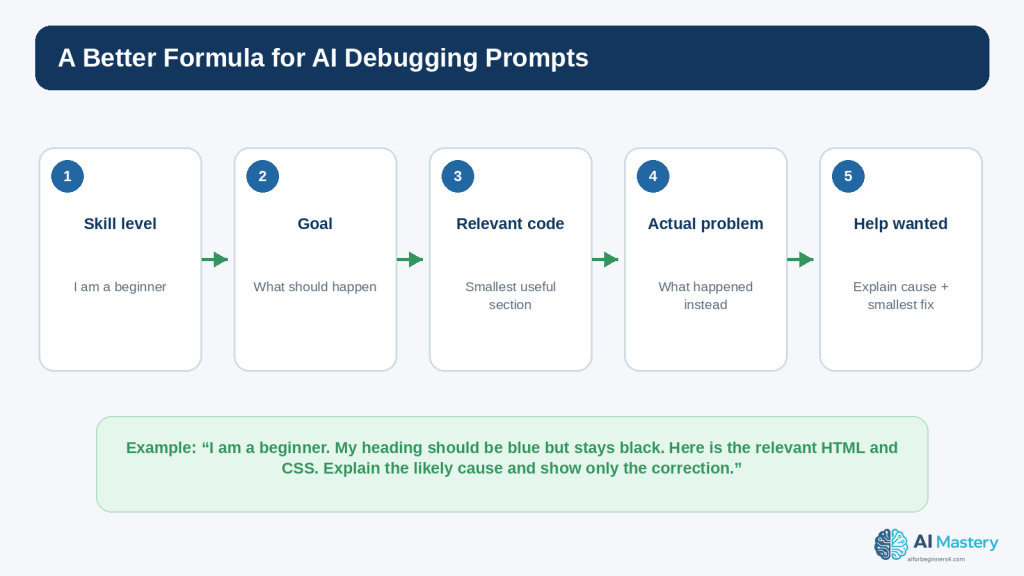
The quality of an AI coding answer depends partly on the context you provide. A useful project prompt usually includes your skill level, one goal, the relevant code, constraints, and the kind of help you want.
Poor Prompt
Make my to-do app better.
Better could mean almost anything, so the response may become much larger than the project.
Focused Feature Prompt
I am a complete beginner. Help me add only the remove-task feature to this Python to-do list. Keep my current list-based structure, do not add classes or external packages, explain each new line, and give me three tests. Here is the relevant code: …
This prompt sets boundaries that make the response easier to compare with your existing program.
Focused Debugging Prompt
I expected task 2 to be removed, but my program removes task 3. Here is the remove_task() function and the task list before the removal. Explain the likely indexing mistake and show only the smallest correction.
Focused Review Prompt
Review this final beginner to-do list for obvious logic errors, unhandled user input, and unnecessary complexity. List the issues first. Do not rewrite the program unless I ask.
Asking for issues before a rewrite keeps you in control of what changes.
Figure 12. A focused project prompt states your level, one goal, relevant code, constraints, and the kind of help you want.
Explanation: Clear boundaries reduce unnecessary rewrites and make the suggested change easier to review and test.
Protect Privacy, Security, and Licensing
This practice project does not require secrets, personal records, or third-party packages. Keeping the first version dependency-free is useful because it reduces both technical complexity and licensing questions. However, the habits you learn should also prepare you for larger projects.
Do Not Paste Secrets into AI Prompts
passwords
API keys
authentication tokens
private keys
database credentials
customer information
payment information
confidential business data
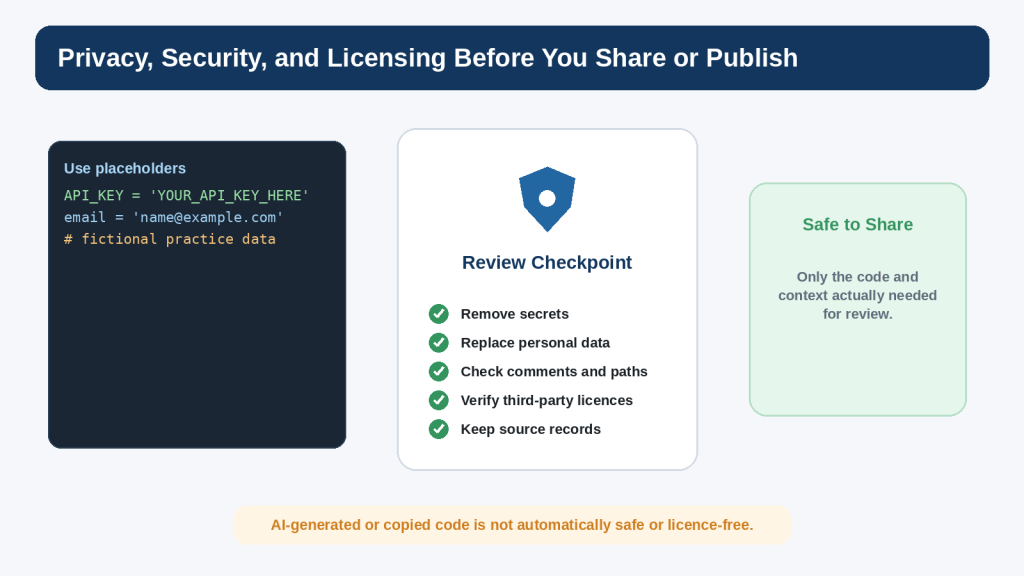
Replace real values with placeholders such as YOUR_API_KEY_HERE or name@example.com. OpenAI’s current Data Controls allow personal ChatGPT users to turn off “Improve the model for everyone” so new conversations are not used to improve models. Temporary Chats have separate retention and training behavior described in OpenAI’s current help documentation. These controls are useful, but data minimization is still the safer practice.
Check Local Paths and Comments
A traceback, screenshot, comment, or file path can reveal a personal name, employer, project code name, or internal directory. Review the information before sharing it.
Check Third-Party Code and Packages
If a later version uses an external library, verify the package at its official source, read the relevant documentation, and check its licence. The Open Source Initiative explains that open-source software is distributed under licences whose terms govern use, modification, and sharing. “Open source” does not mean “no conditions.”
Keep a Simple Source Record
For any third-party code, template, library, icon, font, or other asset used in a real project, keep the source, licence, date checked, and any attribution or notice requirements. Do not assume that an AI suggestion automatically establishes permission to reuse something.
Important Note: This article provides general educational guidance. Projects involving accounts, payments, personal information, authentication, sensitive files, or real customers need additional privacy, security, legal, and professional review appropriate to the situation.
Figure 13. Review code for sensitive information and third-party licence obligations before sharing or publishing it.
Explanation: AI-generated or copied material is not automatically safe, private, copyright-free, or commercially permitted.
Accessibility and Usability for a Simple Command-Line Project
Accessibility is often discussed in relation to websites, but a beginner command-line program can still be made clearer for more users. The goal here is not to claim formal accessibility conformance; it is to use straightforward text and predictable interaction.
Use plain text labels such as “1. View tasks” rather than relying on colour or icons alone.
Keep prompts short and specific.
Print a clear message after success or failure.
Do not make the user remember hidden commands.
Allow the keyboard to perform every action, which is natural for a command-line program.
Avoid unnecessary flashing, animation, or rapidly changing output.
Use meaningful wording such as “Please enter a number” instead of an unexplained error code.
If you later create a graphical or web version, accessibility requirements become broader and should be considered during design rather than added after the project is complete.
Common Beginner Mistakes
Mistake 1: Asking AI for the Entire App Immediately
A complete generated program may work, but it can be difficult to learn from. When you do not understand the structure, even a small bug becomes intimidating.
How to Avoid This Mistake: Ask for a plan first and build one feature at a time.
Mistake 2: Adding Too Many Features Before Testing
If you add saving, priorities, due dates, colours, categories, and search before the add and remove functions are stable, the source of a problem becomes harder to isolate.
How to Avoid This Mistake: Finish and test each must-have feature before moving to the next one.
Mistake 3: Replacing Working Code During a Small Fix
A broad rewrite can remove code that already passed your tests.
How to Avoid This Mistake: Ask for the smallest necessary correction and keep a working copy.
Mistake 4: Testing Only the Happy Path
Beginners often test “Buy milk” but never test an empty task, letters instead of a number, or a number outside the valid range.
How to Avoid This Mistake: Write a short test list before declaring the project finished.
Mistake 5: Treating AI Output as Proof
A confident explanation can still be wrong or inappropriate for your program.
How to Avoid This Mistake: Run the code yourself, compare actual results with expected results, and check important technical information against current official documentation.
Mistake 6: Publishing Practice Data Without Reviewing It
A practice file may contain personal names, comments, local paths, or copied code that you did not intend to publish.
How to Avoid This Mistake: Review every file before sharing or uploading the project.
Benefits and Limitations of Building with AI Coding Tools
Benefits
AI can explain unfamiliar syntax at your level.
AI can break a project into smaller steps.
AI can suggest test cases you may have forgotten.
AI can help explain a traceback or indexing mistake.
AI can compare two simple approaches.
AI can help you practise by giving hints instead of the full answer.
Limitations
Suggested code can be incorrect.
The assistant may misunderstand your intended scope.
A generated solution may be much more complicated than necessary.
A working result may still have security, privacy, accessibility, or licensing problems.
The assistant cannot replace running the program in your own environment.
Product features and documentation can change.
Reality: AI is most useful when it helps you understand and test your own project. It is least useful when it becomes a substitute for knowing what the project does.
Improve the Project After Version 1 Works
Once every version-1 test passes and you can explain the program, choose one improvement. Do not add several upgrades at the same time.
Improvement 1: Save Tasks to a Text File
This teaches file handling and lets tasks survive after the program closes. It also introduces new questions such as file paths, missing files, encoding, and when to save. Treat it as a separate learning step rather than silently adding it to the first version.
Improvement 2: Mark Tasks Complete
You could move from storing plain strings to storing a status with each task. This introduces a richer data structure and more display logic.
Improvement 3: Add Priorities or Due Dates
This introduces additional input validation and decisions about sorting or display. Add one field at a time.
Improvement 4: Create a Graphical or Web Version
A graphical interface or website is a much larger project. It introduces interface design, accessibility, event handling, deployment, and potentially security and privacy requirements. Finish the command-line version first so you have a working reference for the underlying logic.
Figure 14. Improve the project one tested feature at a time after the simple version works.
Explanation: A gradual roadmap lets you keep a working reference while each new idea becomes its own learning step.
Common Myths About Beginner AI Coding Projects
Myth 1: A Real Project Must Be Large
Reality: A project is useful when it solves a defined problem and can be completed, tested, and explained. Size is not what makes it real.
Myth 2: If AI Wrote It, the Project Is Finished
Reality: Generated code still needs review, testing, privacy checks, and sometimes licence or security review.
Myth 3: You Should Add Every Suggested Improvement
Reality: Suggestions are options. The project owner decides what belongs in the scope.
Myth 4: More Advanced Code Is Better Code
Reality: For a beginner project, simple code that you understand is usually more valuable than an advanced pattern you cannot maintain.
Myth 5: One Successful Run Proves the Program Works
Reality: A useful test includes normal, empty, invalid, and boundary cases, not just one example.
Frequently Asked Questions
Do I need Codex to follow this article?
No. You can build the project in an ordinary Python editor and use ChatGPT conversationally for explanations or focused help. Codex is an optional coding-focused OpenAI experience, not a requirement for this beginner project.
Do I need a paid code editor?
No. A basic Python editor such as IDLE is enough for the project. Use a more advanced editor only when its features genuinely help you.
Why does the project not save tasks after I close it?
Version 1 deliberately stores tasks only in memory. File saving is a useful next lesson, but it adds another concept and another source of errors. Finish the basic list first.
Can I ask ChatGPT to generate the complete code?
You can, but that is not the recommended learning workflow in this article. If you do request a complete example, compare it with your own version, ask for explanations, and test every feature before using it.
What if my code is different from the article but still works?
There can be more than one correct approach. Check whether your version is understandable, meets the project requirements, handles the important inputs, and passes the tests.
Should I use classes for the to-do list?
Not for this first version unless you already understand classes and want the practice. Functions and a list are enough for the learning goals.
Can I publish the code on my website?
Yes, if it is your project and you have reviewed it for private information and third-party material. On WordPress, display Python examples in Code blocks rather than expecting WordPress to execute the Python file.
Can WordPress run this Python program?
Not as an ordinary WordPress post. The tutorial shows the code for readers to copy into their own Python environment. WordPress.com provides a Code block for displaying source code; it does not turn the Python snippet into a running server-side program.
How do I know when the project is finished?
Version 1 is finished when the four planned behaviours work, the important tests pass, the code has been reviewed, no unnecessary private information is present, and you can explain the main parts. Additional ideas belong to later versions.
Key Takeaways
Choose a project small enough to finish.
Define the must-have features before writing code.
Use a simple input-process-output plan.
Build one feature at a time.
Run and test after every meaningful change.
Keep a working copy before larger experiments.
Use AI for focused explanations, planning, debugging, and tests rather than automatic full-project replacement.
Validate user input so bad input produces a helpful message instead of a crash.
Test normal, empty, invalid, and boundary cases.
Do not share passwords, API keys, private records, or unnecessary confidential information with an AI service.
Check sources and licences before reusing third-party code or packages.
Do not assume AI-generated code is automatically correct, secure, accessible, copyright-free, or commercially permitted.
Finish version 1 before adding advanced features.
The most important lesson is not the to-do list itself. It is the process: plan a small goal, build one part, test it, understand it, and then continue.
Final Tip
When you start your next project, resist the urge to ask for everything at once. Write the smallest useful goal on one line, list the first three or four features, and build only the first one. A finished small project creates a stronger foundation than a large generated project you cannot explain.
Use AI when it helps you understand a decision, investigate a problem, or practise a skill. Keep yourself responsible for the final code, testing, data, permissions, and decision to publish.
Continue Learning
Article 089 completes an important beginner transition: you have moved from learning isolated Python ideas to assembling a working project. Continue practising by rebuilding the same app without looking at the finished code, changing the project theme, or adding exactly one improvement.
Useful next practice ideas include a simple shopping list, reading list, study checklist, expense list using fictional data, or a small quiz. Keep the same development pattern: define the scope, build one feature, test it, and review every change.
Future AI Coding articles can build on this project workflow with additional Python, automation, and application-development skills.
Sources and References
The following official and authoritative sources were reviewed for the Python, AI-coding, privacy, security, licensing, and WordPress publishing information in this article. Information was checked on August 16, 2026. Software versions, AI product features, policies, security guidance, and licence conditions can change, so readers should check current official information when it matters to their project.
Python Software Foundation — Python 3.14.7. Official release page for the current stable Python 3.14 maintenance release used when checking version-sensitive statements. Open official source
Python Software Foundation — The Python Tutorial. Official introduction to Python language concepts and programming examples. Open official source
Python Software Foundation — More Control Flow Tools. Official reference for if statements, for and while loops, break, functions, and related control-flow concepts. Open official source
Python Software Foundation — Data Structures. Official tutorial material for lists and operations used by the project. Open official source
Python Software Foundation — Built-in Functions. Official reference for built-ins such as input(), print(), enumerate(), int(), and len(). Open official source
Python Software Foundation — Errors and Exceptions. Official beginner reference for exceptions and try/except handling used by the remove-task validation example. Open official source
OpenAI — Using Codex with your ChatGPT plan. Current official description of Codex as an AI coding agent for writing, reviewing, and shipping code. Open official source
OpenAI — Data Controls FAQ. Current official guidance for “Improve the model for everyone” and related ChatGPT data controls. Open official source
OpenAI — How your data is used to improve model performance. Official explanation of model-improvement data use and user controls. Open official source
OWASP — Input Validation Cheat Sheet. Security guidance for validating untrusted input according to expected types, formats, ranges, and rules. Open official source
OWASP — Secrets Management Cheat Sheet. Security guidance for handling passwords, API keys, credentials, and other secrets. Open official source
Python Packaging Authority — Installing packages in a virtual environment using pip and venv. Official Python packaging guidance for isolated environments if a later project adds third-party packages. Open official source
Open Source Initiative — OSI Approved Licenses. Authoritative explanation that open-source software is provided under licences whose terms govern use, modification, and sharing. Open official source
WordPress.com — Display code snippets. Official WordPress.com instructions for adding a Code block to a post or page and displaying source code. Open official source
Important Note: This article provides general educational information about beginner programming, AI-assisted coding, privacy, security, and licensing. It is not legal, cybersecurity, or other professional advice. Readers do not need to reread every policy before every small practice exercise, but they should check current official information when first using a tool, changing plans or features, receiving an important update notice, beginning a commercial or sensitive project, and periodically thereafter.
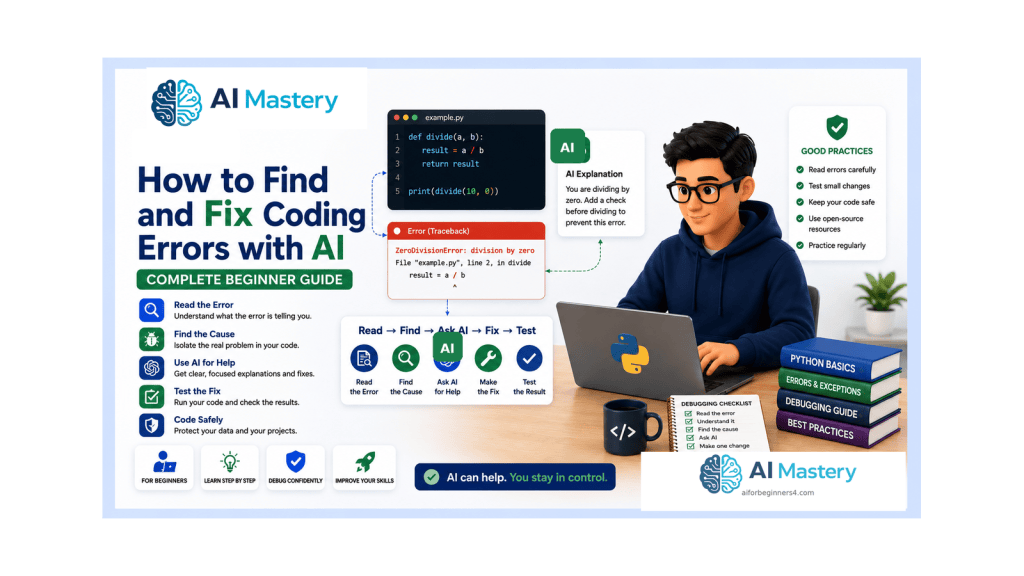
Every programmer encounters errors. A missing colon, a misspelled variable, the wrong type of value, an unexpected input, a missing file, or a calculation that produces the wrong answer can stop a program or make it behave incorrectly. Beginners often see the error message itself as the problem. A better habit is to treat the message as evidence that can help you find the cause.
This guide builds directly on the beginner Python foundations covered in Article 087. You do not need to be an experienced programmer. You only need to understand a few basic ideas such as variables, input, conditions, loops, lists, and functions so that you can follow the examples and recognize what the program is trying to do.
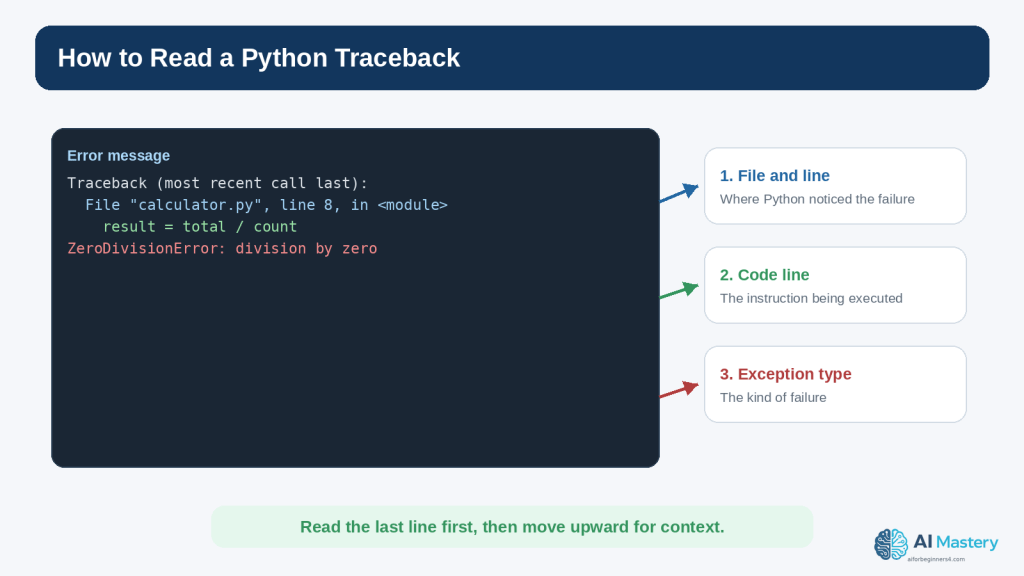
Python is especially useful for learning debugging because it usually reports errors with an exception name, a message, and a traceback that points toward the code involved. The official Python tutorial distinguishes syntax errors from exceptions that occur while otherwise valid code is being executed. Python 3.14 also includes continued improvements to error messages and user-facing diagnostics, which can make some mistakes easier to identify than in older releases.
AI tools can make the debugging process easier to understand when they are used carefully. You can ask ChatGPT to explain a traceback in plain language, identify likely causes, compare the expected and actual result, or suggest a small test. OpenAI currently describes Codex as its dedicated software-development experience for writing or debugging code, running tests and commands, reviewing changes, and working with repositories. Product interfaces and plan conditions can change, so current official information should be checked when a particular feature matters.
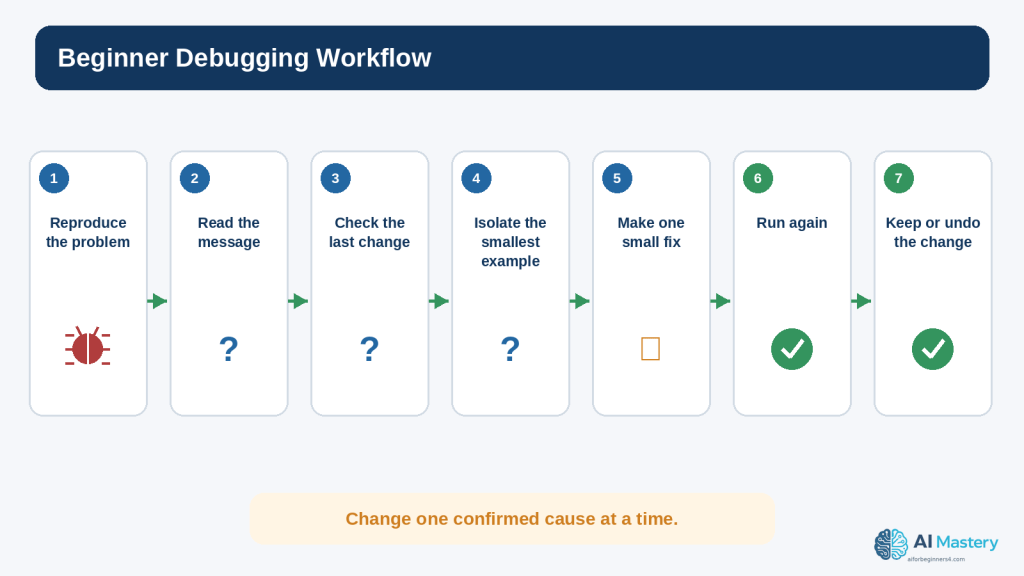
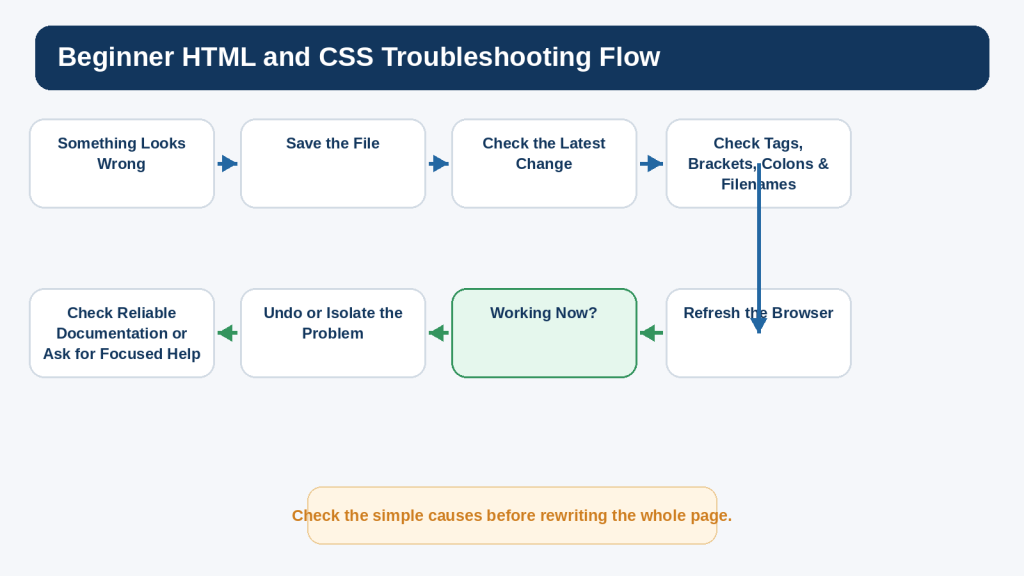
The goal is not to ask AI to replace the entire program whenever something goes wrong. The goal is to learn a repeatable process: reproduce the problem, read the evidence, isolate the smallest likely cause, make one deliberate correction, test again, and keep the change only when you understand the result.
This article also covers privacy, security, licensing, and responsible use. Code can contain passwords, API keys, customer information, private file paths, confidential comments, or third-party dependencies. Those details should be reviewed before code is shared with an online service or published.
By the end of the guide, you should be able to approach a coding error more calmly and systematically, use AI as a focused debugging assistant, and know when a problem requires more testing, official documentation, or professional review.
What You’ll Learn
the difference between syntax errors, exceptions, logic errors, and warnings
how to read a Python traceback
why the last line of a traceback is usually an important starting point
how to reproduce a bug before trying to fix it
how to check the most recent code change first
how to isolate a problem in a smaller example
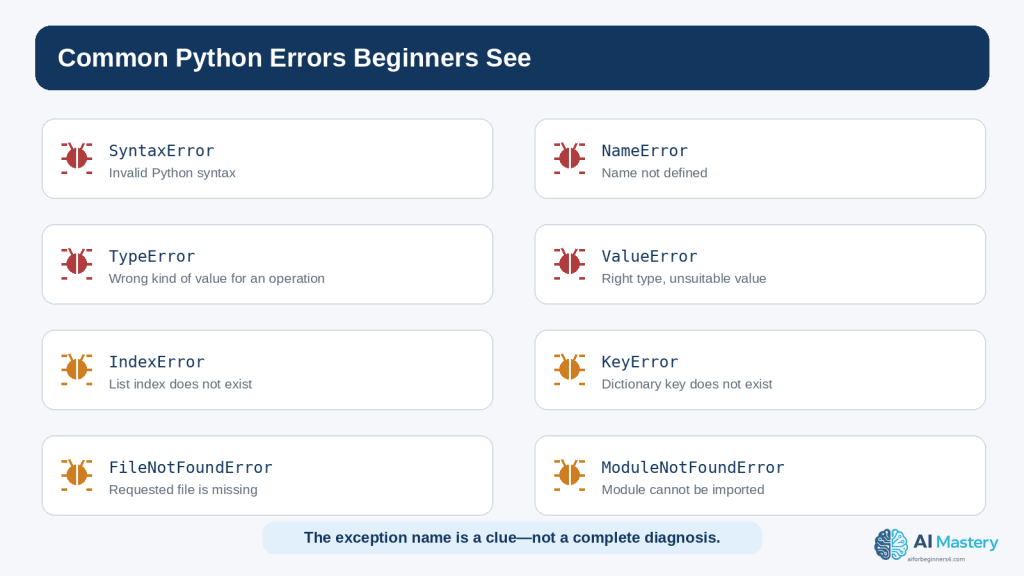
how to recognize common Python exceptions
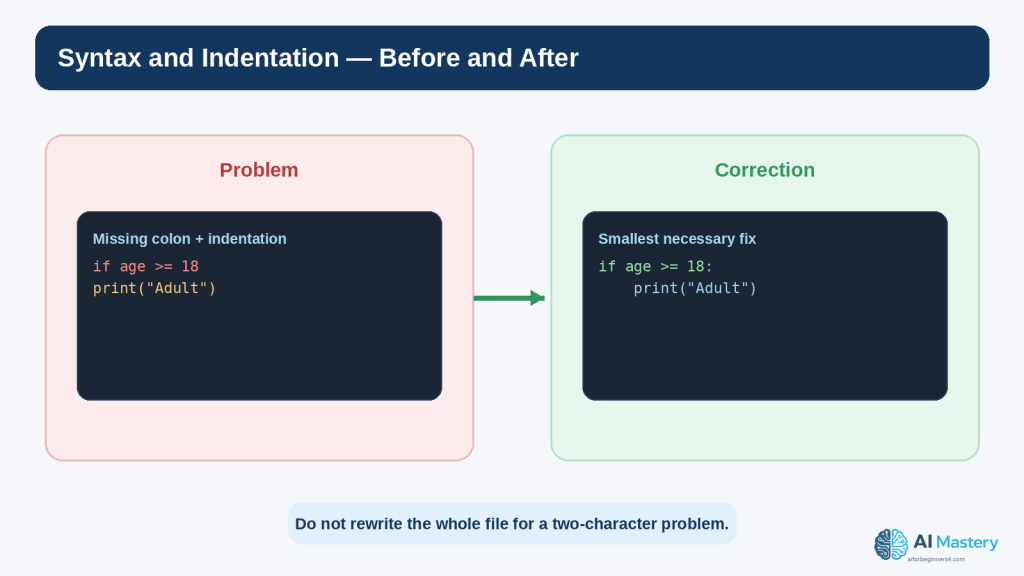
how to fix simple syntax and indentation mistakes
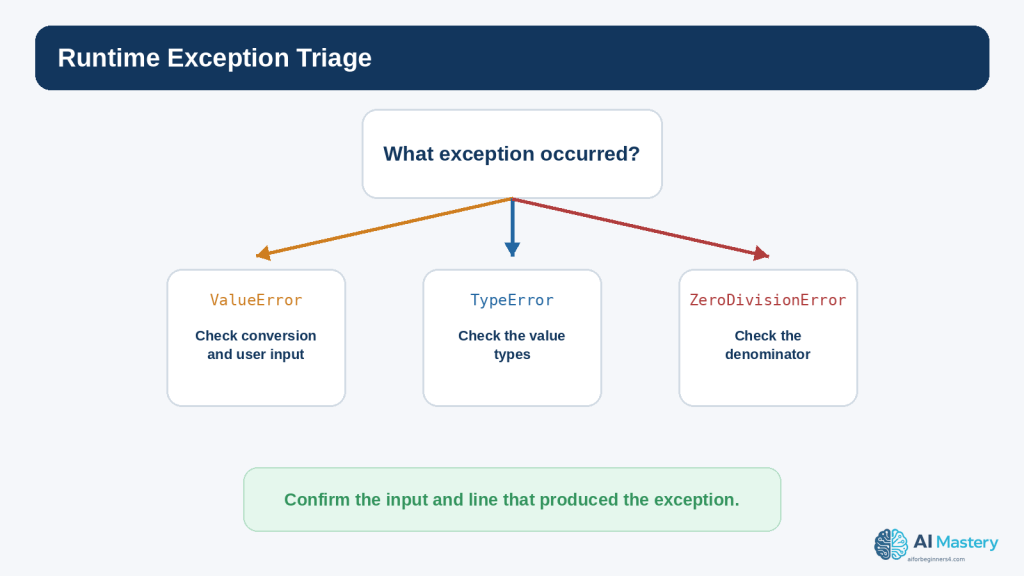
how to investigate runtime exceptions
how to find logic errors when no exception appears
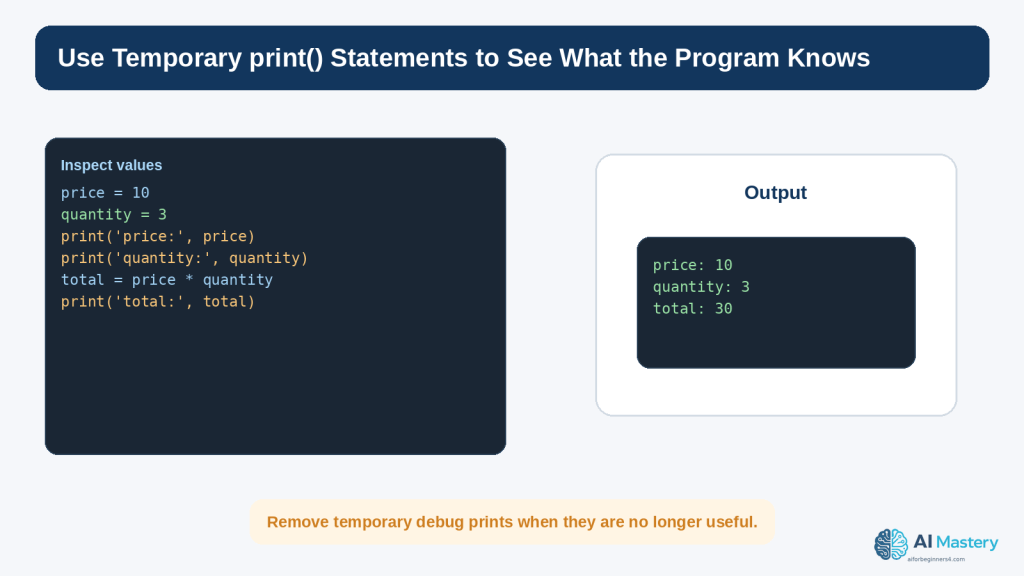
how temporary print() statements can reveal variable values
how to use a debugger and breakpoints at a beginner level
how to ask ChatGPT for focused debugging help
how to use expected result, actual result, and relevant code in an AI prompt
how to test a correction so that it does not create a new problem
how basic regression testing works
how package, version, and virtual-environment problems can cause errors
how to protect passwords, API keys, personal information, and confidential data before sharing code
why third-party packages and copied code still require source and licence checks
the main limitations of AI-assisted debugging
The examples use Python because it follows naturally from Article 087 and provides clear beginner error messages. The debugging habits themselves also apply to many other programming languages.
Before Learning
This article is easiest to follow if you already understand the basic Python ideas introduced in Article 087: running a .py file, variables, strings and numbers, input(), if statements, loops, lists, and functions. You do not need advanced Python knowledge.
Create a Safe Practice Folder
Use a folder containing only practice files and fictional information. Do not learn destructive file operations by experimenting on important personal documents. If you later practise code that writes, renames, moves, or deletes files, use a separate test folder and keep backups.
Keep a Working Copy
Before changing a program that currently works, save a working version. For example, keep calculator-working.py before experimenting with calculator-test.py. This gives you a simple way to return to a known-good state.
Use Current Python Documentation
As of August 16, 2026, the official Python documentation is for Python 3.14.7. Error messages and interpreter features can improve over time, so an old screenshot from an older tutorial may not look exactly like what you see today. Use current official documentation when the exact behaviour matters.
Use Fictional Information in Examples
Replace real names, emails, file paths, credentials, tokens, and customer details with safe placeholders. A debugging question rarely requires the real secret or private record. The code structure is usually enough.
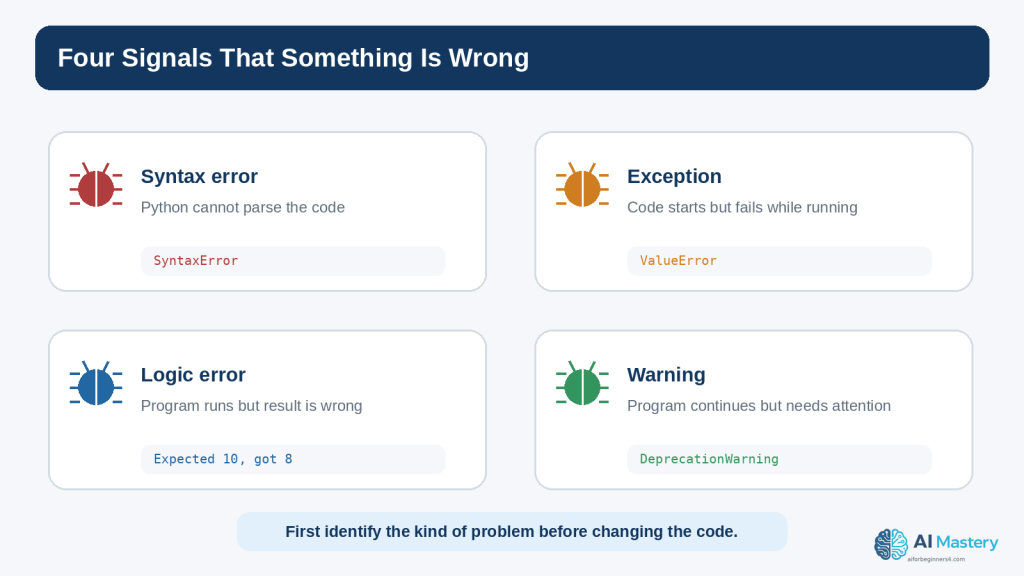
What Is a Coding Error?
The word error is used broadly, but several different situations can produce a problem. Knowing which kind of problem you are looking at helps you choose the next step instead of changing code randomly.
Syntax Errors
A syntax error means Python cannot parse the code according to the language rules. Common causes include a missing colon, unmatched parentheses or quotation marks, or an invalid arrangement of tokens.
if age >= 18 print(“Adult”)
The missing colon after the condition prevents the code from being parsed correctly.
Exceptions
An exception occurs while the program is running. The code can be syntactically valid but fail when it attempts an operation that cannot be completed.
print(10 / 0)
The expression is valid Python, but division by zero raises ZeroDivisionError.
Logic Errors
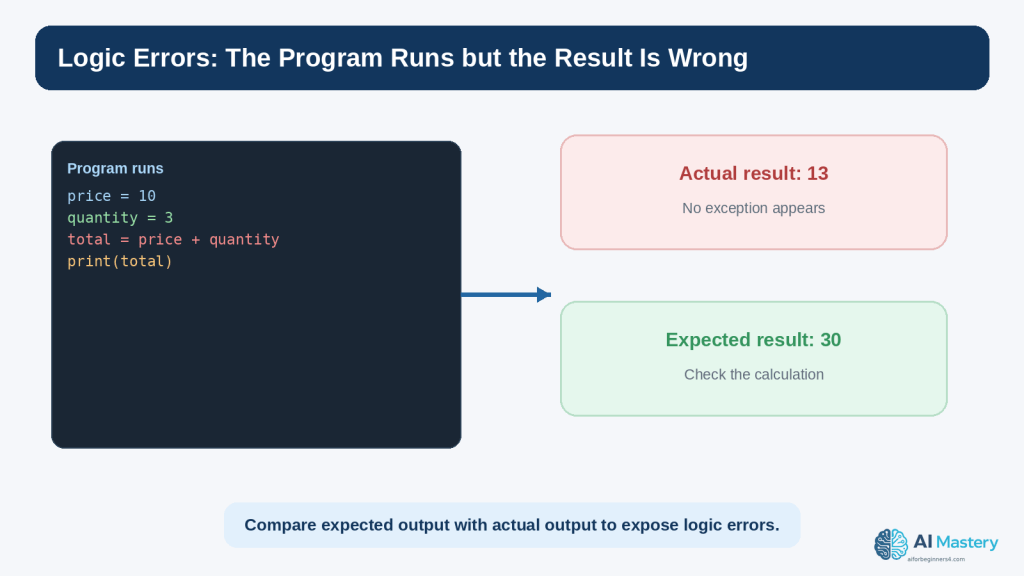
A logic error is different because the program can run without raising an exception and still produce the wrong result.
If the goal was to calculate a purchase total, the program should multiply price by quantity. It runs, but the result 13 is logically wrong for that goal.
Warnings
Warnings are messages about conditions that deserve attention but do not necessarily stop the program. Python has a warnings system for categories such as deprecations and suspicious runtime situations. A warning should be investigated rather than automatically suppressed.
Before changing the code, first ask: is this a syntax error, a runtime exception, a logic error, or a warning?
Figure 1. Coding problems can appear as syntax errors, runtime exceptions, logic errors, or warnings.
Explanation: Identifying the kind of problem helps you choose the right debugging step instead of changing code randomly.
Read the Error Message Before Asking AI
A beginner can save a great deal of time by reading the error message before asking for help. The traceback is not decorative text. It tells you where Python was executing code and what exception was raised.
Start with the Last Line
The final line normally contains the exception type and a short message. For example:
ZeroDivisionError: division by zero
The exception type is ZeroDivisionError. The message explains that a division operation used zero as the denominator.
Then Find the Relevant File and Line
A traceback can include one or several stack frames. In a small beginner program, look for the line mentioning your .py file and the line number. That is usually the first code location to inspect.
File “calculator.py”, line 8, in <module> result = total / count
This does not automatically prove that line 8 is the root cause. For example, count may have received a bad value earlier. But it tells you where the exception became visible.
Read Upward for Context
When functions call other functions, the traceback can contain several frames. The official Python traceback tools and debugger documentation describe the stack information used to understand the path that led to the failure. Beginners do not need to memorize stack terminology, but they should learn that the traceback is a trail rather than a single sentence.
Do Not Delete the Error Message Too Quickly
When asking for help, keep the exact exception type and enough of the traceback to understand the problem. You can remove unrelated personal paths, usernames, tokens, or private data, but do not paraphrase an error so heavily that important details disappear.
Figure 2. A Python traceback shows where the failure became visible and names the exception that occurred.
Explanation: Start with the final exception line, then move upward to find the relevant file, line, code, and call context.
Use a Step-by-Step Debugging Workflow
Debugging is easier when you follow the same order every time. A repeatable workflow reduces guessing and makes it easier to explain the problem to another person or an AI assistant.
Step 1: Reproduce the Problem
Run the program again using the same input or steps. Confirm that the problem happens consistently. If it appears only sometimes, record the exact conditions that make it appear.
Step 2: Read the Evidence
If there is a traceback, read the exception type, message, file, and line number. If there is no exception, write down the expected result and the actual result.
Step 3: Check the Last Change
Many beginner bugs are introduced by the most recent edit. Compare the current code with the last working version. Look for a changed variable name, missing punctuation, altered operator, moved indentation, or changed file path.
Step 4: Reduce the Problem
If the program is long, isolate the smallest part that still demonstrates the problem. A ten-line example is easier to reason about than a five-hundred-line file.
Step 5: Make One Small Correction
Do not accept a complete rewrite when the evidence points to one small mistake. Fix the most likely confirmed cause first.
Step 6: Run the Program Again
Test the original failing case. If the exception disappears, confirm that the result is now correct rather than merely different.
Step 7: Keep or Undo the Change
Keep the correction only when it solves the problem without damaging behaviour you still need. If the change makes the situation worse, return to the working copy and reassess the evidence.
Figure 3. A repeatable debugging workflow reduces guessing and makes each correction easier to verify.
Explanation: Reproduce, read, isolate, change one thing, test again, and keep only the change you understand.
Common Python Errors Beginners See
Python includes many built-in exception types. You do not need to memorize all of them, but recognizing common names helps you know what to inspect first.
SyntaxError
Python could not parse the code. Check punctuation, parentheses, quotation marks, colons, and the location indicated by the message.
IndentationError
The indentation does not match the structure Python expects. Check spaces at the beginning of the affected line and the surrounding block.
NameError
A name was used before it was defined, or the spelling/capitalization does not match.
user_name = “Alex” print(username)
user_name and username are different names.
TypeError
An operation received a value of an inappropriate type.
age = “25” print(age + 1)
The variable age contains text. Converting appropriate input to int can be part of the correction.
ValueError
The general type may be appropriate, but the particular value cannot be used in the requested conversion or operation.
age = int(“twenty-five”)
ZeroDivisionError
A division or remainder operation used zero as the denominator.
IndexError
A sequence index does not exist.
names = [“Alex”, “Sam”] print(names[2])
The valid indexes are 0 and 1, so index 2 is outside this two-item list.
KeyError
A dictionary lookup requested a key that is not present.
FileNotFoundError
The program attempted to open a file that could not be found at the specified path.
ModuleNotFoundError
Python could not find the imported module in the environment being used. This can involve a missing package, the wrong virtual environment, a misspelled import, or a project-file naming conflict.
AttributeError
The program tried to use an attribute or method that the object does not provide. Check the object type and the spelling of the method or attribute.
The exception name narrows the search, but it does not replace reading the surrounding code and values.
Figure 4. Common Python exception names provide clues about what kind of information or operation should be checked.
Explanation: The exception name narrows the search, but the surrounding code and runtime values still determine the real cause.
Find and Fix Syntax and Indentation Errors
Syntax and indentation errors are often the easiest beginner errors to fix because Python usually stops before the program runs and points to a nearby location.
Check the Line Before the Highlighted Location
Sometimes the parser notices the problem only after it reaches the next line. A missing closing parenthesis or quote on the previous line can make the following line look suspicious even though the real mistake started earlier.
Check Colons
if score >= 70: print(“Pass”)
Compound statements such as if, elif, else, for, while, def, try, and except use colons in the appropriate places.
Check Matching Pairs
opening and closing parentheses: ( )
opening and closing square brackets: [ ]
opening and closing braces: { }
matching quotation marks
Check Indentation as Structure
if age >= 18: print(“Adult”) print(“Finished”)
The indented print belongs to the if block. The final line is outside that block. Indentation changes the structure of the program, not only its appearance.
Ask AI for the Smallest Correction
I am a beginner. This Python code gives a SyntaxError. Explain the likely cause in simple language and show only the smallest correction. Do not rewrite the program.
This wording encourages an explanation rather than a large replacement.
Figure 5. Small syntax and indentation mistakes can often be fixed without rewriting the rest of the program.
Explanation: Compare the broken and corrected lines carefully and make the smallest necessary change.
Find and Fix Runtime Exceptions
Runtime exceptions require you to inspect both the code and the values that reached the failing line. The same line can work for one input and fail for another.
Example: ValueError from User Input
age = int(input(“Enter your age: “)) print(age + 1)
If the user enters 25, the conversion works. If the user enters twenty-five, int() cannot convert that text and raises ValueError.
Example: ZeroDivisionError
total = 100 count = 0 average = total / count
The line is syntactically correct. The runtime value of count creates the problem.
Inspect the Values Used by the Failing Line
Ask what each variable contains immediately before the exception. If the line divides total by count, print or inspect both values. If the line indexes a list, check the list length and index. If the line opens a file, check the path.
Do Not Hide Every Exception with a Broad except
A beginner may try to make the error disappear by writing except Exception around a large block. That can hide the useful traceback and make real bugs harder to detect. Catch specific exceptions only when you have a reason to handle them and can respond appropriately.
try: age = int(input(“Enter your age: “)) except ValueError: print(“Please enter a whole number.”)
This example handles one expected conversion failure. It is not a substitute for understanding unrelated exceptions.
Figure 6. Runtime exceptions become easier to diagnose when you connect the exception type to the values used by the failing line.
Explanation: Check the actual inputs and variable values before deciding how the program should handle the situation.
Find Logic Errors When No Exception Appears
Logic errors can be harder than exceptions because Python may have no reason to complain. The instructions are valid; they simply do not implement the intended rule.
Write Down the Expected Result
Before changing the program, state what should happen. For example: price 10 × quantity 3 should produce 30.
The program produces 13. The difference between expected 30 and actual 13 points toward the calculation.
Check Operators and Conditions
Common logic mistakes include using + instead of *, using > instead of >=, checking the wrong variable, placing a calculation inside the wrong branch, or updating a value at the wrong time.
Use Small Test Cases
Choose values that make the correct answer easy to predict. A program that calculates discounts, for example, should be tested with values clearly below, exactly at, and above the threshold.
Ask AI to Compare Expected and Actual Behaviour
This program runs without an exception, but I expected 30 and got 13. Explain the most likely logic error. Show only the line that should change and explain why.
Providing both results is much more useful than saying “the code is wrong.”
Figure 7. Logic errors may produce a normal-looking result even when the program is doing the wrong calculation.
Explanation: Write down the expected result and compare it with the actual output so that you can investigate the relevant rule or operator.
Use Temporary print() Statements to Inspect Values
One of the simplest debugging techniques is to temporarily print values at important points. This helps you see what the program actually knows instead of relying on assumptions.
Print a Variable Before the Failing Line
print(“count:”, count) average = total / count
If the output shows count: 0, the cause of ZeroDivisionError becomes clearer.
Print a Type When Values Look Similar
print(type(age), age)
The value 25 and the string “25” can look similar on the screen but behave differently in arithmetic. type() can reveal the distinction.
Use Labels in Debug Output
A label such as print(“total:”, total) is easier to interpret than print(total) when several values are being checked.
Remove Temporary Debugging Output
After the issue is understood, remove or convert temporary debugging prints into appropriate logging if the program genuinely needs ongoing diagnostic information. Python includes a standard logging system for structured application messages.
Do Not Print Secrets
Never debug an authentication problem by printing a real password, API key, token, private customer record, or other sensitive value into a console, screenshot, log file, or AI conversation. OWASP guidance emphasizes careful secrets management and secure logging practices because logs and diagnostics can become another source of information leakage.
Figure 8. Temporary print() statements can reveal the values Python is using at important points in the program.
Explanation: Label debug output clearly, inspect the important values, and remove temporary diagnostics when they are no longer needed.
Ask AI Better Debugging Questions
AI assistance is much more useful when the prompt contains enough evidence to understand the problem and not so much unrelated material that the key details are lost.
Use This Five-Part Formula
Skill level: tell the assistant you are a beginner if you want beginner language
Goal: describe what the program should do
Relevant code: provide the smallest section that demonstrates the problem
Actual problem: include the exception or wrong result
Help wanted: ask for an explanation, likely cause, smallest correction, or test plan
Weak Prompt
Fix my Python.
This gives almost no context and encourages a broad answer.
Better Prompt
I am a beginner learning Python. My program should divide a total by the number of items, but I get ZeroDivisionError. Here is the relevant code and traceback. Explain the cause in simple language and show only the smallest correction. Then tell me one test I should run.
This request identifies the goal, observed failure, relevant evidence, desired explanation level, correction scope, and test requirement.
Ask the AI to Explain Before Changing Code
Do not rewrite the code yet. First explain what the traceback means and which value I should inspect.
This can keep the learning process focused on diagnosis rather than replacement.
Ask for Uncertainty
List the two most likely causes based on the code I provided. Tell me what evidence would distinguish them.
This encourages the assistant to treat debugging as a process of testing hypotheses rather than pretending that one guess is certainly correct.
Figure 9. A focused AI debugging prompt explains your level, goal, relevant code, observed problem, and the kind of help you want.
Explanation: Specific context makes the response easier to evaluate and reduces the temptation to replace the entire program.
Use ChatGPT and Codex Without Giving Up the Debugging Process
OpenAI currently distinguishes Chat, Work, and Codex. Chat can be useful for conversational explanations and focused questions. Codex is the dedicated software-development experience for writing or debugging code, running tests and commands, reviewing changes, and working with repositories. Availability and interfaces can change, so the current OpenAI Help Center should be checked when a specific capability matters.
Good Uses for a Beginner
explain a traceback
identify a likely typo
compare expected and actual behaviour
explain what a proposed fix changes
suggest small test cases
simplify an error message
review a short code section for obvious problems
help create a minimal reproducible example
Risky Use: Accepting a Large Rewrite Without Review
A large replacement can make the original problem disappear while introducing new logic, dependencies, security assumptions, or behaviour you did not ask for. Smaller corrections are easier to inspect and test.
Ask for a Diff-Style Explanation
Show me the original line, the corrected line, and one sentence explaining why the change fixes this error. Do not change anything else.
This makes the proposed change easier to compare.
Keep the Human Testing Loop
1. Describe the exact problem.
2. Review the assistant’s explanation.
3. Inspect the suggested change.
4. Make one small change.
5. Run the program yourself.
6. Test the original failing case.
7. Test one nearby case.
8. Keep the change only when you understand and accept the result.
AI does not turn an untested guess into a verified fix. The program still needs to be run and checked.
Figure 10. AI-assisted debugging still depends on your own review, testing, and decision about whether a proposed fix should stay.
Explanation: Use AI to generate explanations and hypotheses, but let evidence from the running program determine the result.
Use a Debugger When print() Is Not Enough
As programs become larger, repeated print() statements can become inconvenient. Python includes pdb, an interactive source-code debugger that supports breakpoints, stepping through code, inspecting stack frames, and evaluating expressions in the current context.
What Is a Breakpoint?
A breakpoint tells the debugger to pause execution at a particular point so that you can inspect the program before it continues.
def divide(total, count): breakpoint() return total / count
When execution reaches breakpoint(), Python can enter the debugger in an appropriate environment. You can then inspect variables such as total and count before the division happens.
What Does Step Mean?
Stepping allows you to run the program one line or one call at a time so you can observe how values and control flow change. The exact debugger commands are more advanced than this article requires, but the concept is important: debugging tools let you watch the program rather than guess what happened.
When a Beginner Should Use a Debugger
the error depends on several steps
a variable changes unexpectedly
a function receives the wrong value
the code path is not the one you expected
temporary print statements are becoming too numerous
Do Not Expose Sensitive Values While Inspecting
Debuggers can display the contents of variables. Use the same privacy and security discipline you would use with logs or screenshots. Do not capture or share sensitive values unnecessarily.
Figure 11. A debugger lets you pause execution and inspect program state instead of relying only on guesses or print statements.
Explanation: Breakpoints and stepping become useful when a problem depends on several lines, functions, or changing values.
Test the Fix So You Do Not Create a New Bug
A correction is not complete just because the original exception disappeared. A change can fix one case and break another. Testing the surrounding behaviour is therefore part of debugging, not a separate optional activity.
Retest the Original Failure
Use the same input or steps that produced the bug. Confirm that the original problem is actually resolved.
Test Nearby Cases
If the bug involved an age threshold of 18, test 17, 18, and 19. If it involved a list index, test an empty list, one-item list, and normal list when those cases are relevant.
Test Invalid Input
If users can enter values, test clearly invalid input so the program does not fail unexpectedly. OWASP guidance recommends validating untrusted input according to the expected type, format, length, range, and business rules.
Use Automated Tests as Projects Grow
Python’s unittest module provides tools for constructing and running tests. Beginners do not need a large test suite immediately, but even one small automated test can preserve the behaviour that a bug fix is supposed to protect.
import unittest
class TestMath(unittest.TestCase): def test_total(self): self.assertEqual(10 * 3, 30)
This tiny example is only a demonstration. Real tests should call the actual function or code being tested rather than redoing the same expression separately.
Understand Regression Testing
A regression is a previously working behaviour that stops working after a change. Regression testing means checking that a fix or new feature did not reintroduce an old problem or break something that used to work.
Figure 12. A fix should be tested against the original failure and nearby cases so that a new regression is not introduced.
Explanation: Testing after the correction is part of debugging because a change can solve one case while breaking another.
Protect Privacy and Security While Debugging
Debugging often involves copying code, error messages, logs, screenshots, or configuration details. Those materials can contain sensitive information even when the visible problem seems unrelated.
Remove Secrets Before Sharing Code
passwords
API keys
authentication tokens
private keys
database credentials
session identifiers
private URLs
customer or employee records
payment or health information
confidential business data
Replace these values with placeholders such as YOUR_API_KEY_HERE or name@example.com.
Check File Paths and Usernames
Tracebacks can include local file paths. A path may expose a real name, company name, project code name, or internal directory structure. Keep only the parts necessary for diagnosis.
Check Comments and Logs
A code comment or log line may contain information that is not visible in the main program output. OWASP secure-code-review and secrets-management guidance treats source code, logs, and configuration as places where sensitive values can leak.
Understand ChatGPT Data Controls
OpenAI’s current Data Controls FAQ states that signed-in users can turn off “Improve the model for everyone” so new conversations are not used to improve models. OpenAI also states that Temporary Chats are not used to train models, do not appear in normal history, do not create memories, and are deleted from its systems after 30 days, although they may be reviewed to monitor abuse. These settings can change, so check current official information when the details matter.
Privacy controls reduce certain uses of conversation data, but they do not make it appropriate to paste passwords or unnecessary sensitive information. Data minimization remains the safer habit.
Be Careful with Error Messages in Public
Do not automatically post a complete production traceback, environment dump, or log file to a public forum. Review it first for secrets, personal information, internal system details, and customer data.
Figure 13. Review code, tracebacks, logs, and screenshots for sensitive information before sharing them with an AI service or publishing them.
Explanation: Privacy settings are useful, but the safer habit is to avoid sharing secrets and unrelated private information in the first place.
Troubleshoot Package, Version, and Environment Errors
Some coding errors are not caused by the line you wrote. They come from the environment in which the program is running, the package versions installed there, or the difference between one Python interpreter and another.
ModuleNotFoundError
import requests
If Python reports ModuleNotFoundError, possible causes include a missing package, an inactive virtual environment, using a different Python interpreter than expected, a misspelled module name, or a local file that shadows a package name.
Check Which Python Is Running
On Windows, current Python packaging guidance commonly uses commands such as py –version and virtual environments created with py -m venv .venv. The exact command can vary by installation. Confirm that the environment where you installed a package is the same environment running the program.
Use Virtual Environments for Third-Party Packages
The Python Packaging User Guide recommends virtual environments for third-party packages. A virtual environment isolates project installations so one project’s package versions are less likely to interfere with another project.
Do Not Install a Package Solely Because an AI Suggested It
Before installing a dependency, confirm the package name at its official project source, understand why it is needed, review its maintenance and security context when appropriate, and check its licence. A plausible-looking package name can still be wrong or unsuitable.
Check Version Compatibility
A code example may target a different Python or library version. Read current release notes and documentation when a method, parameter, or behaviour differs from what the AI or an old tutorial described.
Keep Dependency Records
For real projects, record important package versions and dependencies so that the environment can be reproduced. Modern Python packaging provides mechanisms for declaring dependencies and reproducible environments, but the exact tool choice depends on the project.
Figure 14. Some errors come from the Python environment or third-party packages rather than from the visible code line.
Explanation: Confirm the active interpreter, virtual environment, package installation, version compatibility, official source, and licence before making larger changes.
Copyright and Licensing When a Debugging Answer Adds Code
Debugging assistance can introduce third-party packages, copied snippets, templates, or other materials. Finding code online or receiving a recommendation from an AI system does not automatically establish that the code is unrestricted or commercially permitted.
Check the Original Source
If a suggested fix says to install a library or copy code from a project, locate the official project and identify the licence that applies. The Open Source Initiative maintains a list of approved open-source licences, but different licences can impose different conditions.
Open Source Still Has Terms
Open-source software allows use, modification, and sharing under the terms of the relevant licence. Conditions can include preserving notices, providing source under certain circumstances, or other obligations depending on the licence.
Keep a Simple Record
package or code name
official source
version checked
licence
date checked
attribution or notice requirements
notes about modifications
This record becomes useful when a project is published, shared, sold, or maintained over time.
AI Assistance Does Not Remove Your Responsibility
Do not assume that a suggestion is automatically copyright-free, licence-compatible, secure, or suitable for commercial use. Verify important dependencies and reused materials at their original source.
This section provides general educational information and is not legal advice.
Common Beginner Debugging Mistakes
Mistake 1: Changing Many Things at Once
If you change the calculation, variable names, file path, and input handling together, you may not know which change fixed or broke the program.
How to Avoid This Mistake: Make one deliberate correction, run the program, and record the result before changing something else.
Mistake 2: Ignoring the Exact Error Message
Replacing “ValueError: invalid literal for int()” with “it does not work” removes useful evidence.
How to Avoid This Mistake: Keep the exception type and relevant message when asking for help.
Mistake 3: Copying a Fix Without Understanding It
A copied fix can appear to work while introducing behaviour you do not understand.
How to Avoid This Mistake: Ask what changed, why it fixes the problem, and what tests you should run.
Mistake 4: Catching Every Exception
A broad except block can hide useful failures and make debugging harder.
How to Avoid This Mistake: Catch only expected exceptions you know how to handle, and let unexpected errors remain visible during development.
Mistake 5: Assuming the Highlighted Line Is Always the Root Cause
The line where an exception appears may be using a bad value created earlier.
How to Avoid This Mistake: Trace the important values backward to where they came from.
Mistake 6: Testing Only the Case That Failed
A correction can repair one input and break another.
How to Avoid This Mistake: Retest the original failure and nearby or boundary cases.
Mistake 7: Sharing Full Logs or Code Without Reviewing Them
Logs, stack traces, comments, and configuration files can contain secrets or private details.
How to Avoid This Mistake: Redact unnecessary sensitive information before sharing.
Mistake 8: Installing Unverified Packages
A package suggested as a quick solution may be unnecessary, outdated, incompatible, or from the wrong source.
How to Avoid This Mistake: Verify the package at its official source and check its licence and compatibility before installing it.
Mistake 9: Treating a Warning as Noise
Some warnings indicate deprecated behaviour or a situation that may become a future failure.
How to Avoid This Mistake: Read the warning, identify why it was issued, and decide whether the code should change.
Mistake 10: Deleting the Working Version
When experimentation replaces the only working copy, you lose an easy comparison point.
How to Avoid This Mistake: Keep a known-good copy or use version control as your projects grow.
Benefits and Limitations of Using AI for Debugging
Benefit: Faster Explanation of Error Messages
A beginner can ask for an exception or traceback to be translated into plain language without searching through several unrelated pages.
Benefit: Generating Small Test Ideas
AI can suggest boundary cases, invalid inputs, and simple examples that you can run yourself.
Benefit: Comparing Two Versions
You can provide a working and broken version and ask which differences are most likely to matter.
Benefit: Narrowing a Large Problem
An assistant can help you create a smaller reproducible example when the original project is difficult to inspect.
Limitation: The Diagnosis Can Be Wrong
AI can confidently propose a cause that does not match the actual runtime environment or missing context. The suggested fix must be tested.
Limitation: It May Rewrite Too Much
A large replacement can hide the original lesson and create new dependencies or behaviour.
How to Reduce This Limitation: Ask for the smallest correction and request an explanation of each changed line.
Limitation: It Cannot See Information You Did Not Provide
If the problem depends on a hidden configuration file, environment variable, package version, operating system, or user input, the assistant may infer incorrectly.
How to Reduce This Limitation: Provide relevant version, environment, expected result, actual result, and a minimal code example without exposing sensitive data.
Limitation: Passing Tests Do Not Prove Everything
A few successful tests provide evidence, not absolute proof. Important systems can require broader automated testing, security review, performance testing, accessibility review, and domain expertise.
Limitation: Product Features Change
OpenAI product capabilities, interfaces, plan conditions, and limits can change. Check official documentation when your workflow depends on a specific current feature.
Useful AI Debugging Prompts for Beginners
Prompt 1: Explain a Traceback
I am a beginner. Explain this Python traceback in simple language. Tell me what the exception type means, which line I should inspect first, and what value I should check. Do not rewrite the code yet.
Prompt 2: Find the Smallest Likely Cause
This code worked before my last change. Compare the working and broken versions and identify the smallest difference most likely to cause the error. Explain your reasoning before suggesting a correction.
Prompt 3: Find a Logic Error
The program runs without an exception. I expected 30 but got 13. Here is the relevant code. Find the most likely logic error and show only the line that should change.
Prompt 4: Ask for One Hint
Give me one debugging hint only. Do not show the corrected code yet.
Prompt 5: Generate Test Cases
The fix appears to work. Give me five small test cases, including one boundary case and one invalid input, that I can run to check it.
Prompt 6: Review a Proposed Fix
Explain exactly what this proposed change does, what assumptions it makes, and what could still go wrong. Do not suggest new features.
Prompt 7: Check for Exposed Secrets
Review this small code example for obvious exposed passwords, API keys, tokens, personal data, or private file paths. Do not claim that this guarantees security.
Prompt 8: Simplify a Debugging Example
Reduce this problem to the smallest beginner-friendly example that still reproduces the same error. Keep the exception visible.
Prompt 9: Compare Two Error Messages
Compare these two tracebacks and explain what changed between them. Tell me whether the second error is likely a new problem or the next issue revealed after the first fix.
Prompt 10: Ask for Official Documentation
Tell me which official Python documentation page is most relevant to this exception or feature. Summarize what I should verify there instead of relying only on your answer.
Common Myths About Debugging with AI
Myth 1: Good Programmers Do Not Get Errors
Reality: Errors and debugging are normal parts of programming. Skill comes from diagnosing problems effectively, not from never making mistakes.
Myth 2: The Error Message Tells You Exactly How to Fix the Code
Reality: An error message identifies a failure and provides clues. The root cause may be earlier in the program or depend on runtime values.
Myth 3: If AI Gives a Fix, the Bug Is Solved
Reality: A suggestion becomes a credible fix only after you understand the change and test the relevant behaviour.
Myth 4: If the Program Runs, It Is Correct
Reality: Logic errors can produce wrong answers without raising exceptions.
Myth 5: Bigger Changes Fix Bugs Faster
Reality: Small, isolated changes are usually easier to understand and verify.
Myth 6: More Error Handling Always Makes Code Safer
Reality: Catching exceptions without understanding them can hide failures and make problems harder to detect.
Myth 7: Temporary Chat Means It Is Fine to Share Secrets
Reality: Privacy controls are useful, but passwords, private keys, API tokens, and unnecessary sensitive data should still be withheld.
Myth 8: A Package Recommended by AI Is Automatically Safe and Licensed for My Use
Reality: Verify packages, source, versions, security context, and licence terms at the original project source.
Myth 9: Unit Tests Prove a Program Has No Bugs
Reality: Tests provide evidence for the cases they cover. Uncovered inputs, environments, integrations, and security issues may still exist.
Myth 10: Debugging Means Staring at the Code Until the Answer Appears
Reality: Good debugging uses evidence: reproduce the problem, inspect messages and values, isolate the case, form a hypothesis, test it, and compare the result.
Frequently Asked Questions
What should I do first when Python shows an error?
Read the final line of the traceback for the exception type and message, then find the relevant file and line. Check the most recent change before rewriting anything.
What is the difference between a bug and an exception?
Bug is a broad term for a defect in a program. An exception is a specific runtime event Python reports. A bug can cause an exception, but a logic bug may produce the wrong result without an exception.
Why does the traceback show several files and lines?
Functions and libraries can call one another. The traceback records the call path that led to the exception. In a beginner project, focus first on frames that refer to your own code while keeping the surrounding context in mind.
Should I always use try and except to stop crashes?
No. Handle exceptions that you expect and can respond to meaningfully. During development, unexpected exceptions are valuable because the traceback exposes problems that need investigation.
Can ChatGPT fix any coding error?
No. It can help explain and suggest possibilities, but it may lack the real environment, inputs, configuration, dependencies, or context. Important fixes must be tested in the actual program.
What should I paste into ChatGPT when I have an error?
Share the smallest relevant code, the exact exception or wrong result, what you expected, and necessary version or environment information. Remove passwords, API keys, personal data, private URLs, and other unnecessary sensitive details.
What is Codex?
OpenAI currently describes Codex as its dedicated software-development experience for writing or debugging code, running tests and commands, reviewing changes, and working with repositories. Check current OpenAI documentation for availability and plan conditions.
What is a breakpoint?
A breakpoint pauses execution at a chosen location so you can inspect variable values and program state before continuing.
When should I use print() versus a debugger?
Temporary print() statements are excellent for small beginner programs. A debugger becomes more useful when the program has several functions, changing state, or a path that is difficult to observe with a few prints.
How do I know if a fix is correct?
Retest the original failing case, test nearby or boundary cases, and verify that previously working behaviour still works. For larger projects, add automated tests where appropriate.
Why do I get ModuleNotFoundError even after installing a package?
You may have installed the package into a different Python environment from the one running the script. Check the active interpreter and virtual environment, package name, and official installation instructions.
Can I ignore warnings?
Not automatically. Read the warning and determine why it was issued. Some warnings signal deprecated or questionable behaviour that can become a future problem.
Should I post a complete traceback publicly?
Review it first. Tracebacks and logs can reveal usernames, local paths, project names, configuration, or sensitive data. Share only what is needed for diagnosis.
Do I need to learn every exception type?
No. Learn the common ones and become comfortable looking up unfamiliar exceptions in the official Python documentation.
What should I learn after this article?
The next planned article is Article 089 — How to Build a Simple Beginner Project with AI Coding Tools (2026). It will use the coding and debugging habits from Articles 084–088 in a small project workflow.
Key Takeaways
Errors are normal evidence during programming, not proof that you cannot code.
Identify whether you are dealing with a syntax error, runtime exception, logic error, or warning.
Read the last line of a Python traceback first, then find the relevant file and line.
Check the most recent change before rewriting the program.
Reduce large problems to the smallest example that still reproduces the issue.
Make one correction at a time and test after each change.
Common exception names such as SyntaxError, NameError, TypeError, ValueError, ZeroDivisionError, IndexError, FileNotFoundError, and ModuleNotFoundError provide useful clues.
Logic errors require comparing expected and actual behaviour because no exception may appear.
Temporary print() statements can reveal variable values and types.
A debugger can pause execution and let you inspect the program when print() is no longer enough.
Use AI prompts that include your skill level, goal, relevant code, exact problem, and the help you want.
Ask for explanations and small corrections rather than accepting large rewrites blindly.
Test the original failing case and nearby cases after every fix.
Automated tests can help prevent regressions as projects grow.
Remove passwords, API keys, tokens, personal information, and other sensitive data before sharing code or logs.
ChatGPT privacy controls are useful but do not replace data minimization.
Use virtual environments for third-party packages and confirm which Python environment is actually running.
Verify package sources, versions, and licences before depending on them.
AI debugging can speed up explanations, but it can also be wrong. Your own testing remains essential.
The most useful debugging habit is simple: read the evidence, change the smallest thing you can justify, run the program again, and keep only the change you understand.
Final Tip
When an error appears, resist the urge to paste the entire project into an AI tool and ask for a complete replacement. First write down three things: what you expected, what actually happened, and the exact error message or wrong result. Then identify the smallest relevant code section.
1. Reproduce the problem.
2. Read the traceback or compare expected and actual output.
3. Check the last change.
4. Inspect the important values.
5. Ask for focused help only when needed.
6. Make one small correction.
7. Run the original failing case again.
8. Test at least one nearby case.
9. Remove temporary debugging output and sensitive information.
10. Keep the fix only when you can explain why it works.
This process may feel slower than replacing the code immediately, but it builds the skill that matters most: being able to diagnose and verify your own programs.
Continue Learning
Article 088 belongs to the AI Mastery AI Coding series. It follows Article 087 — Python for Complete Beginners with ChatGPT (2026), where you learned the Python concepts used throughout these examples.
If you need additional background, review Article 084 — What Is AI Coding? Complete Beginner Guide (2026), Article 085 — How to Ask ChatGPT to Explain Code (2026), and Article 086 — HTML and CSS for Beginners with ChatGPT (2026). Together, these articles establish the foundations for understanding code, asking useful AI questions, and testing changes responsibly.
The next planned article is Article 089 — How to Build a Simple Beginner Project with AI Coding Tools (2026). It will combine planning, code generation, explanation, debugging, testing, and responsible-use habits in one small project.
Do not rush into a large production application. A short program you can debug confidently is a stronger foundation than a large generated project you cannot explain.
Sources and References
The following official and authoritative sources were reviewed for the technical, privacy, security, licensing, and product-information statements in this article. Information was checked on August 16, 2026. Python versions, AI product features, policies, security guidance, package versions, and licence conditions can change, so readers should verify current official information when it matters to their project.
OpenAI Help Center — ChatGPT Work and Codex. Current OpenAI guidance distinguishing Chat, Work, and Codex, with Codex dedicated to software-development tasks such as debugging and testing.
Important Note: This article provides general educational information about debugging, Python, AI-assisted coding, privacy, security, and licensing. It is not legal, cybersecurity, or other professional advice. Sensitive, regulated, financial, medical, safety-critical, or production systems may require qualified professional review.
Python is a general-purpose programming language that can be used to give a computer instructions for many different kinds of work. It is widely used for automation, data analysis, web development, scientific computing, artificial intelligence, testing, scripting, and many other software tasks. For a complete beginner, however, the most useful starting point is much smaller: learn how to read a few lines of code, run them, change one part, and check what happens.
Unlike HTML, which describes the structure of web content, Python is a programming language. It can calculate values, compare information, make decisions, repeat actions, store groups of values, read input, and organize reusable instructions into functions. Those ideas are the foundation of many larger programs.
A first Python program can contain only one line:
print(“Hello, world!”)
When Python runs that instruction, it displays the text Hello, world!. The example is small, but it introduces an important programming habit: write an instruction, run it, observe the result, and then make a deliberate change.
You do not need previous programming experience to follow this guide. You also do not need expensive development software. The examples use current Python 3 and stay deliberately small so that you can focus on understanding what each part does.
This article also shows how ChatGPT can support the learning process. You can ask for a simpler explanation, request a short exercise, compare two approaches, or get help investigating an error. OpenAI currently provides Codex as its dedicated software-development experience, while ChatGPT can still be useful for conversational explanations and focused learning questions. AI assistance should be treated as help to review and understand code, not as proof that the code is correct.
Throughout the guide, you will also see privacy, security, copyright, licensing, and responsible-use reminders. These habits matter even in beginner practice because code can contain passwords, API keys, personal information, copied material, or third-party packages with their own licence conditions.
The goal is straightforward: by the end of the article, you should be able to create, read, modify, and troubleshoot small Python programs while understanding the main concepts well enough to keep learning independently.
What You’ll Learn
By the end of this guide, you will understand the basic role of Python and how several core programming ideas work together.
what Python is and what it is commonly used for
how to install and run current Python 3 on Windows
how to use print() to display output
how variables store values
the difference between strings, integers, floating-point numbers, and Boolean values
how input() receives user input and why conversion may be necessary
how to perform basic arithmetic
how comparisons and if statements make decisions
how for and while loops repeat work
how lists store several related values
how functions package reusable work
how to read common error messages and troubleshoot small programs
how to build a small beginner project in layers
how ChatGPT can help with explanations, practice, and focused troubleshooting
why AI-suggested code still needs review and testing
how to protect secrets and private information in code
why third-party packages and copied code need licence and source checks
what to learn next after the foundations are comfortable
You will not build a large application in this article. The examples stay small so that you can see why each line exists and what changes when you modify it.
Before You Start
You need only a computer, a current Python 3 installation, a simple editor such as IDLE, access to ChatGPT if you want AI-assisted explanations, and a folder for saving practice files.
Use the Current Stable Python 3 Release
As of August 16, 2026, Python.org lists Python 3.14.7, released August 5, 2026, as the latest stable Python 3 release. Python 3.15 is still a pre-release branch at this date. Versions change, so a beginner should normally use the current stable Python 3 release available from the official Python website rather than following an old download link from an outdated tutorial.
Create a Practice Folder
Create a folder somewhere easy to find, for example Python-Practice. You can keep every exercise in that folder and use descriptive filenames such as hello.py, variables.py, conditions.py, loops.py, and mini_project.py.
Use Fictional Practice Information
Do not practise with real passwords, API keys, customer details, payment information, private file paths, or confidential business data. Use placeholders such as YOUR_API_KEY_HERE and name@example.com. This matters especially if you later paste part of the code into an online service for help.
Save Working Versions
When a program works, save a copy before making a large change. Simple filenames such as mini_project-v1.py and mini_project-v2.py are enough for beginner practice. Version-control systems become useful later, but a basic working copy already gives you a safe point to return to.
Use the Edit, Run, Check Routine
1. Make one small change.
2. Save the file.
3. Run the program.
4. Read the output or error message.
5. Compare the result with what you expected.
6. Continue only after you understand what changed.
This routine is one of the most useful habits you can develop. It makes errors easier to isolate and turns each change into a learning step.
What Is Python?
Python is an interpreted, general-purpose programming language. The official Python tutorial describes it as easy to learn and powerful, with high-level data structures and a straightforward approach to programming. Python source files normally use the .py filename extension.
Your First Python Instruction
print(“Hello, world!”)
The built-in print() function displays values. In this example, the value is a string: text surrounded by quotation marks.
Python Is Case-Sensitive
Python treats uppercase and lowercase names as different. print is the built-in function name. Print is a different name and will not call the same function unless you have defined it yourself.
Comments
# This is a comment
print(“Hello”)
A comment beginning with # is ignored as an instruction. Use comments to explain a useful reason or reminder, but avoid filling simple code with comments that merely repeat what is obvious.
Indentation Matters
if 5 > 2:
print(“Five is greater than two.”)
The indented line belongs to the if statement. In Python, indentation is part of the language structure rather than only visual formatting. You will use indentation repeatedly with conditions, loops, and functions.
Do not try to memorize the entire language. At this stage, become comfortable recognizing instructions, names, text values, punctuation, comments, and indentation.
Figure 1. A simple Python program contains instructions that Python processes to produce a result.
Explanation: Even a one-line program introduces functions, text values, punctuation, and output. Begin with small examples and change one part at a time so you can see how each change affects the program.
Install Python and Run Your First Program
Download Python only from an official source. On Windows, Python now documents the Python install manager as the normal way to obtain and manage Python runtimes. Installer wording can change over time, so use the current instructions shown on Python.org.
Step 1: Download Python
7. Open the official Python downloads page.
8. Choose the current stable Python 3 download for Windows.
9. Follow the current Python installation instructions.
10. Allow the installation to complete.
Step 2: Check That Python Works
Open Windows Terminal or Command Prompt and type:
python
If Python starts, you should see version information and an interactive prompt. Depending on the installation and Windows configuration, the py command may also be available. Use the current official Windows documentation if the expected command does not work.
Step 3: Try an Instruction
print(“Hello, world!”)
Then try a calculation:
print(10 + 5)
The result should be 15.
Step 4: Use IDLE for a Saved File
IDLE is Python’s Integrated Development and Learning Environment and is commonly included with Python installations. It provides a Python Shell for quick experiments and an editor for saved .py files.
11. Open IDLE.
12. Choose File > New File.
13. Type print(“Hello from my first Python file!”).
14. Choose File > Save As.
15. Save the file as hello.py in your Python-Practice folder.
16. Use Run > Run Module.
17. Read the output in the Python Shell.
Common Beginner Mistake: Typing the >>> Prompt
Tutorials sometimes show >>> before interactive examples. The >>> characters are the Python Shell prompt. You normally type only the code after them.
Common Beginner Mistake: Saving hello.py.txt
How to Avoid This Mistake: Check the complete filename when you save the program. A Python source file should end in .py, not .py.txt.
Figure 2. A beginner Python workflow is to install Python, create a .py file, write a small instruction, save it, run it, and check the result.
Explanation: Repeating the same write, save, run, and check process helps you understand which change caused each result and makes beginner troubleshooting easier.
Use Variables and Basic Data Types
Programs become more useful when they can remember information. A variable is a name that refers to a value.
name = “Alex”
age = 25
print(name)
print(age)
The equals sign performs assignment: the value on the right is assigned to the name on the left.
Choose Clear Variable Names
student_age = 25
total_price = 19.99
is_member = True
Clear names are easier to understand than vague names such as x or a when the value has a real meaning.
Strings: str
city = “London”
message = “I am learning Python.”
Strings represent text. Single or double quotation marks can be used for ordinary string literals.
Integers: int
students = 12
score = 100
Integers represent whole numbers.
Floating-Point Numbers: float
temperature = 21.5
price = 19.99
Floating-point values represent numbers with a fractional part. For ordinary beginner calculations they are convenient, but binary floating-point arithmetic cannot represent every decimal value exactly. For important financial calculations, learn the appropriate decimal-handling approach rather than assuming float gives exact decimal arithmetic.
Booleans: bool
is_beginner = True
is_finished = False
Boolean values represent True or False. The capitalization shown here matters.
Check a Type
name = “Alex”
print(type(name))
The built-in type() function can help you see what kind of value Python is working with.
Common Beginner Mistake: Quoting Numbers
price = “10” # text
price = 10 # number
How to Avoid This Mistake: Ask whether the value is supposed to be text or something you want to calculate with. The quotation marks change the type.
Store information in variables, use those variables in instructions, and change the values when the program needs different information.
Figure 3. Python variables give names to values, and those values can have different types such as text, whole numbers, decimal numbers, and Boolean values.
Explanation: Understanding whether a value is text, a number, or a true-or-false value helps you predict how Python will use it. Clear variable names also make programs easier to read.
Get Input from the User
The built-in input() function lets a program display a prompt and wait for the user to type a response.
name = input(“What is your name? “)
print(“Hello”, name)
If the user types Sam, the variable name receives the text Sam and the program displays Hello Sam.
input() Returns Text
A very important beginner rule is that input() returns a string. Even if a person types 25, the program initially receives the characters “25” as text.
age_text = input(“Enter your age: “)
print(type(age_text))
Convert Text to an Integer
age = int(input(“Enter your age: “))
print(age + 1)
The int() function converts suitable text such as “25” into the integer 25. If the user types something that cannot be converted to an integer, Python raises an exception. You will learn a simple way to handle that later.
Convert to a Floating-Point Number
price = float(input(“Enter a price: “))
print(price)
Use float() when a decimal value is appropriate. Remember that float is not exact decimal arithmetic.
Keep Prompts Clear
A prompt should tell the user what information is expected. Compare input(“Value: “) with input(“Enter the number of tickets: “). The second is easier to understand.
Do Not Collect Information You Do Not Need
For practice exercises, use fictional information. In a real program, collecting names, addresses, account details, health information, payment information, or other personal data can create privacy and security responsibilities beyond the scope of a beginner exercise.
Figure 4. User input starts as text and can be converted to a numeric type when the program needs to calculate with it.
Explanation: Remember that input() returns a string. Convert only when the entered value is supposed to become a number, and be prepared for invalid input.
Perform Basic Calculations
Python supports familiar arithmetic operators. You can use numbers directly or store them in variables first.
print(10 + 5)
print(10 – 5)
print(10 * 5)
print(10 / 5)
+ adds values
– subtracts values
* multiplies values
/ performs division
// performs floor division
% gives the remainder
** performs exponentiation
Use Variables in a Calculation
price = 12
quantity = 3
total = price * quantity
print(total)
The program calculates 12 × 3 and stores the result in total.
Order of Operations
result = 2 + 3 * 4
print(result)
Multiplication is performed before addition, so the result is 14. Use parentheses when you want the grouping to be explicit.
result = (2 + 3) * 4
print(result)
Now the result is 20.
Round Only When It Is Appropriate
value = 10 / 3
print(round(value, 2))
round() can make displayed results easier to read, but rounding is not a substitute for choosing an appropriate numeric representation for the problem.
Practice Exercise
Create a program that stores a fictional item price and quantity, calculates the total, and prints the result. Then change only the quantity and run the program again.
Make Decisions with if Statements
Programs often need to choose between different actions. An if statement evaluates a condition and runs an indented block when that condition is true.
age = 20
if age >= 18:
print(“Adult”)
Comparison Operators
== equal to
!= not equal to
> greater than
< less than
>= greater than or equal to
<= less than or equal to
Do not confuse ==, which compares values, with =, which assigns a value to a variable.
Add an else Branch
age = 16
if age >= 18:
print(“Adult”)
else:
print(“Under 18”)
Use elif for Another Possibility
score = 82
if score >= 90:
print(“Excellent”)
elif score >= 70:
print(“Good progress”)
else:
print(“Keep practising”)
Python checks the conditions in order. When one matches, its block runs and the later branches in that chain are skipped.
Combine Conditions Carefully
age = 25
has_ticket = True
if age >= 18 and has_ticket:
print(“Entry allowed”)
The Boolean operators and, or, and not can combine or modify conditions. Keep early examples simple so you can see why each condition is true or false.
Common Beginner Mistake: Missing the Colon
if age >= 18:
print(“Adult”)
How to Avoid This Mistake: Remember the colon at the end of the if, elif, and else line, followed by an indented block.
Figure 5. An if statement evaluates a condition and chooses which indented block of code should run.
Explanation: Conditions let a program make decisions. Test boundary values so you know the comparison behaves the way you intended.
Repeat Work with Loops
A loop repeats a block of code. This saves you from writing the same instruction many times.
A for Loop
for number in range(1, 4):
print(number)
The output is 1, 2, and 3. range(1, 4) starts at 1 and stops before 4.
Loop Through Text Values
names = [“Alex”, “Sam”, “Mina”]
for name in names:
print(“Hello”, name)
The for loop takes each item from the list in order and runs the indented block.
A while Loop
count = 1
while count <= 3:
print(count)
count = count + 1
A while loop continues while its condition remains true. The line that changes count is important; without it, the condition could remain true indefinitely.
Avoid Accidental Infinite Loops
How to Avoid This Mistake: When you use while, identify what will eventually make the condition false. If you cannot explain that, the loop may never stop on its own.
Use break Sparingly at First
while True:
answer = input(“Type quit to stop: “)
if answer == “quit”:
break
break exits the nearest loop. It is useful, but do not use it to hide logic you do not understand.
Figure 6. A loop repeats the same kind of work without requiring you to write the instruction again for every item.
Explanation: Use loops when an action needs to repeat. Keep the stopping condition understandable, especially with while loops.
Store Several Values in Lists
A list stores several values in one ordered collection.
fruits = [“apple”, “banana”, “orange”]
print(fruits)
Access an Item by Index
fruits = [“apple”, “banana”, “orange”]
print(fruits[0])
Python uses zero-based indexing, so the first item is at index 0.
Change an Item
fruits[1] = “pear”
print(fruits)
Add an Item
fruits.append(“grapes”)
Check the Length
print(len(fruits))
len() returns the number of items in the list.
Loop Through the List
for fruit in fruits:
print(fruit)
Lists and loops are often used together because a program can apply the same kind of action to every item.
Common Beginner Mistake: Asking for an Index That Does Not Exist
If a list contains three items, valid positive indexes are 0, 1, and 2. Trying to access fruits[3] raises an IndexError.
How to Avoid This Mistake: Remember that the first index is 0 and use len() when you need to understand how many items are present.
Figure 7. A Python list keeps related values together, and a loop can process the items one by one.
Explanation: Lists are one of the first useful data structures for beginners. Remember that the first positive index is zero.
Create Reusable Work with Functions
A function groups instructions under a name so that the work can be reused.
def greet():
print(“Hello!”)
greet()
The def statement defines the function. The later greet() call runs it.
Pass Information into a Function
def greet(name):
print(“Hello”, name)
greet(“Alex”)
greet(“Sam”)
The parameter name receives the value supplied by each call.
Return a Result
def add_numbers(a, b):
return a + b
total = add_numbers(5, 3)
print(total)
return sends a value back to the code that called the function.
Why Functions Help
they reduce repeated code
they give a useful name to a task
they make a larger program easier to divide into smaller parts
they allow one part to be tested separately
they can make code easier to read when the function name is clear
Keep Beginner Functions Small
A first function does not need to handle many unrelated jobs. If you cannot describe its purpose in one short sentence, consider whether it should be divided into smaller functions.
Figure 8. A function packages a reusable task and can receive information, process it, and return or display a result.
Explanation: Small functions make programs easier to organize. Give each beginner function one clear responsibility when possible.
Understand Errors and Troubleshoot Your Code
Errors are normal when learning to program. The goal is not to avoid every error; it is to learn how to read what Python tells you and investigate the smallest likely cause.
Syntax Errors
A syntax error means Python could not understand the structure of the code.
print(“Hello”
The closing parenthesis is missing. The exact message may point near the place where Python detected the problem, which is not always exactly where the mistake began.
Exceptions
Code can be syntactically valid and still fail while it is running. Python calls many runtime problems exceptions.
number = int(“hello”)
The text hello cannot be converted to an integer, so Python raises a ValueError.
Read the Last Line of the Traceback
A traceback can look intimidating, but the final line often tells you the exception type and a short description. Then look upward for the line in your own file that caused the problem.
Common Beginner Errors
NameError: a name is used before it is defined or is misspelled
TypeError: an operation is used with an inappropriate type
ValueError: a value has the right general type of input but cannot be converted or used as requested
IndexError: a sequence index is outside the available range
IndentationError: indentation is inconsistent or missing where Python requires it
SyntaxError: the code does not follow Python syntax
A Simple Troubleshooting Routine
18. Read the error message.
19. Check the most recent change.
20. Check spelling, capitalization, brackets, quotation marks, colons, and indentation.
21. Confirm you saved the file you are actually running.
22. Reduce the problem to a smaller example when possible.
23. Compare the feature with current official Python documentation.
24. Ask ChatGPT or another helper a focused question only after you can describe what you expected and what actually happened.
Use try and except for Expected Input Errors
try:
age = int(input(“Enter your age: “))
print(“Next year you will be”, age + 1)
except ValueError:
print(“Please enter a whole number.”)
This example handles one expected conversion error. Do not use a broad except block to hide every possible problem. Catch only errors you understand and can respond to appropriately.
Figure 9. Beginner Python errors are easier to solve when you read the message, check the latest change, and isolate one problem at a time.
Explanation: A traceback is useful information. Start with the exception type and the line in your own file before replacing large parts of the program.
Build a Small Beginner Project
A small project helps connect several concepts. The following program asks for a fictional study goal and minutes available, then gives a simple message. It uses input, conversion, a condition, variables, and output without requiring personal information.
Step 1: Plan the Program
ask for a fictional study topic
ask how many minutes are available
convert the minutes to an integer
give one message when the time is at least 30 minutes and another when it is shorter
print a short summary
Step 2: Write the First Working Version
topic = input(“What would you like to practise? “)
minutes = int(input(“How many minutes do you have? “))
if minutes >= 30:
message = “You have time for a focused practice session.”
else:
message = “Keep the session small and practise one concept.”
print(“Topic:”, topic)
print(“Minutes:”, minutes)
print(message)
Step 3: Test Several Inputs
topic = Python variables, minutes = 45
topic = Python loops, minutes = 15
a whole-number value exactly at 30 minutes
Testing different inputs helps you see whether the condition behaves at the boundary you intended.
Step 4: Add Simple Error Handling
topic = input(“What would you like to practise? “)
try:
minutes = int(input(“How many minutes do you have? “))
if minutes >= 30:
message = “You have time for a focused practice session.”
else:
message = “Keep the session small and practise one concept.”
print(“Topic:”, topic)
print(“Minutes:”, minutes)
print(message)
except ValueError:
print(“Please enter the minutes as a whole number.”)
Step 5: Improve One Thing at a Time
Possible beginner improvements include rejecting negative minutes, placing the message logic inside a function, or repeating the program until the user chooses to stop. Add only one improvement at a time and test it before continuing.
This layered approach scales well: plan, create one working version, test it, and then improve it deliberately.
Figure 10. Build a beginner Python project in layers: plan, collect input, process it, show output, test, and improve one step at a time.
Explanation: A small working version gives you a stable base. Add improvements only after the current version behaves as expected.
Use ChatGPT as a Python Learning Assistant
ChatGPT can be useful when you need a focused explanation, a small practice exercise, or help interpreting an error. OpenAI currently distinguishes Chat from Codex: Chat is suitable for conversational questions, while Codex is dedicated to software-development work such as writing or debugging code, running tests and commands, reviewing changes, and working with repositories.
Ask for an Explanation
Example prompt:
I am a complete beginner learning Python. Explain this code line by line. Tell me what each variable, function, operator, and indentation level does. Do not add new features.
Ask for a Hint Instead of the Answer
I am stuck on this Python exercise. Give me one hint only. Do not show the finished code yet.
Hints can preserve the learning process better than immediately replacing your code.
Ask for Focused Troubleshooting
My program should print 15, but I get a TypeError. I will paste the smallest relevant section. Explain the likely cause first and show only the smallest correction.
Ask Why the Correction Works
The correction worked. Explain why my original code failed and why the corrected version works. Use beginner-friendly language.
Ask for a Practice Exercise
Give me a short Python exercise using variables, input, one if statement, and print(). Do not show the answer until I ask.
Do Not Paste Unnecessary Secrets or Private Data
Before sharing code with an online service, remove passwords, tokens, API keys, personal records, confidential file paths, customer information, and other details that are not needed to understand the coding problem.
Do Not Assume Suggested Code Is Correct
AI-generated code can contain syntax mistakes, logic errors, insecure patterns, outdated approaches, unnecessary complexity, or assumptions that do not match your project. Read it, run it in an appropriate test environment, compare important technical details with official documentation, and keep only changes you understand.
Figure 11. ChatGPT can support Python learning when you ask focused questions, review the suggested code, test it, and understand the change before keeping it.
Explanation: AI assistance is most useful when it strengthens your understanding rather than replacing it. Remove private information before sharing code.
Learn the Basics of Modules, Packages, pip, and Virtual Environments
Python includes a large standard library, and additional third-party packages can extend what your programs can do. You do not need to install packages to understand the core concepts in this article, but beginners should know the basic vocabulary before following package-installation instructions found online.
Modules
A module is a Python file that contains definitions and statements that another Python file can import.
import math
print(math.sqrt(25))
The standard-library math module provides mathematical functions. The import statement makes the module name available to your program.
Third-Party Packages
Third-party packages are created and distributed separately from the Python standard library. They may be available from the Python Package Index, commonly called PyPI, or from other sources.
pip
pip is the reference Python package installer. Do not copy an installation command from an unknown website without first checking which package it will install and where it comes from.
Virtual Environments
The Python Packaging User Guide recommends virtual environments when working with third-party packages. A virtual environment gives a project an isolated Python environment so package installations for one project do not interfere with another.
py -m venv .venv
.venv\Scripts\activate
Those are the current Windows examples in the official packaging guide. Installation commands and platform details can change, so check the current guide when you begin using packages.
Do Not Install Packages Just Because an AI Suggests Them
If ChatGPT or another tool recommends a package, first identify the official project, review its documentation, check its licence, understand why you need it, and consider whether the project appears maintained and appropriate for your purpose.
Protect Privacy and Security While Learning Python
Python can read files, make network requests, automate applications, call external services, and modify information. Those capabilities become powerful quickly, so safe habits should begin before you write advanced programs.
Never Hard-Code Real Secrets into Code You Plan to Share
passwords
API keys
authentication tokens
database credentials
private encryption keys
account recovery codes
confidential customer information
OWASP treats credentials, API keys, and similar values as secrets that require appropriate management. A placeholder such as YOUR_API_KEY_HERE is enough for most learning examples.
Check More Than the Visible Lines
Secrets can also appear in comments, configuration files, environment files, notebooks, screenshots, copied terminal output, error messages, or version-control history. Removing one visible line does not necessarily remove every copy.
Be Careful with Code That Deletes or Overwrites Files
Before running unfamiliar code that changes files, use a safe test folder and keep backups. Do not give beginner experiments unnecessary access to important documents.
Be Careful with exec() and eval()
Python provides powerful built-in functions such as exec() and eval(). A beginner should not use them with untrusted input. They can execute code or evaluate expressions and can create serious security risks when used incorrectly.
Understand ChatGPT Data Controls
For individual ChatGPT and Codex services, OpenAI states that content may be used to improve models unless the user opts out through the available data controls. OpenAI also states that Temporary Chats do not appear in normal history, do not use or create memories, and are not used for training. Product settings and retention practices can change, so check the current official OpenAI information when privacy matters to your work.
Privacy controls are useful, but the safest rule is still not to share information that is unnecessary for the coding question.
Figure 12. Review Python code for secrets and private information before sharing it with an AI tool, another person, or a public repository.
Explanation: Placeholders let you demonstrate the structure of a problem without exposing real credentials or personal information.
Check Copyright and Licensing Before Reusing Code or Packages
Code being visible online does not automatically mean it can be reused without conditions. Software, documentation, examples, templates, libraries, and other project materials can be protected by copyright and distributed under specific licences.
Python Itself Has a Licence
Python software and documentation are licensed under the Python Software Foundation License Version 2. The Python documentation also states that, starting with Python 3.8.6, examples, recipes, and other documentation code are additionally available under the Zero-Clause BSD licence. Some software incorporated into Python has different licences.
Third-Party Packages Have Their Own Terms
Installing a package does not make its licence disappear. Before using a third-party dependency in a published or commercial project, identify the project’s licence and understand conditions that may apply to redistribution, modification, notices, attribution, source availability, patents, trademarks, or bundled dependencies.
Open Source Does Not Mean No Rules
Open-source software grants permissions under a licence. Different open-source licences have different conditions. Check the specific licence rather than assuming every open-source project works the same way.
AI Assistance Does Not Remove Licensing Responsibility
If an AI tool suggests a library, code fragment, repository, template, or data source, verify the original source and current licence before relying on it. Do not assume that AI-generated or AI-suggested material is automatically copyright-free or commercially permitted.
Keep a Simple Dependency Record
package or resource name
official source
version used
licence
date checked
required notices or attribution
reason the dependency is needed
Keeping a small record makes later maintenance and licence review much easier.
Figure 13. Before depending on a third-party Python package, check its source, licence, intended use, dependencies, and maintenance information.
Explanation: Installing a package does not remove its licence conditions or security implications. Keep a simple record of important dependencies.
Accessibility and Inclusive Beginner Programs
Accessibility is often discussed in the context of websites and graphical interfaces, but even a command-line or text-based Python program can be easier or harder for people to use depending on how prompts and output are designed.
Use Clear Prompts
Ask for one thing at a time and explain the expected format. “Enter your age as a whole number:” is clearer than “Value:”.
Do Not Rely on Colour Alone
If a future terminal tool uses coloured text, do not make colour the only way to communicate an error, warning, or success state. Include meaningful text as well.
Write Understandable Error Messages
Instead of “Invalid,” say what the user can do next, for example “Please enter the minutes as a whole number.”
Avoid Unnecessary Complexity
Simple prompts, predictable output, and understandable choices can make a beginner program easier for many users. More advanced accessibility requirements depend on the interface and purpose of the application.
Benefits and Limitations of Using ChatGPT for Python
Benefits
Explain unfamiliar syntax at a beginner level
Create short practice exercises
Suggest small examples
Help interpret traceback messages
Compare two simple approaches
Ask you questions to test understanding
Help divide a larger task into smaller steps
Limitation 1: Code Can Be Wrong
A response can contain incorrect syntax, faulty logic, an inappropriate library, an insecure pattern, or a misunderstanding of your goal.
How to Reduce This Limitation: Run the code yourself, test more than one input, and compare important technical details with current official documentation.
Limitation 2: Working Code May Still Be Poor Code
A program can run and still be difficult to maintain, insecure, inaccessible, inefficient, or inappropriate for its intended use.
How to Reduce This Limitation: Ask what the code does, why each part is needed, what assumptions it makes, and what risks or limitations remain.
Limitation 3: Large Generated Projects Can Hide the Learning
Hundreds of lines of generated code may produce an impressive result while leaving a beginner unable to explain or repair it.
How to Reduce This Limitation: Request the smallest useful step, understand it, test it, and then continue.
Limitation 4: Features and Tools Change
Python, ChatGPT, Codex, package versions, and documentation continue to evolve. You do not need to reread every policy before every practice session. Check current official information when you first use a tool, when behaviour changes, when you change plans or features, when you receive an important update notice, and periodically for projects that depend on a specific capability.
Reality: AI can accelerate some parts of coding, but understanding, testing, privacy, security, licensing, and final responsibility still matter.
Common Python Mistakes Beginners Make
Mistake 1: Forgetting Quotation Marks Around Text
name = “Alex”
Mistake 2: Using = When You Mean ==
if age == 18:
print(“Exactly 18”)
Mistake 3: Incorrect Indentation
Statements that belong to an if, loop, or function need consistent indentation.
Mistake 4: Forgetting a Colon
Statements such as if, elif, else, for, while, def, try, and except use a colon before an indented block.
Mistake 5: Mixing Text and Numbers
input() returns text. Convert it when a numeric operation is required.
Mistake 6: Misspelling a Variable
user_name and username are different names.
Mistake 7: Using an Index Outside a List
The first list item is index 0, and the largest positive index is one less than the list length.
Mistake 8: Creating an Infinite while Loop
Make sure something inside or around the loop can eventually make its condition false, unless an intentional break condition controls the loop.
Mistake 9: Changing Too Much at Once
How to Avoid This Mistake: Make one small change, save, run, and inspect the result before moving to the next change.
Mistake 10: Copying Code Without Understanding It
How to Avoid This Mistake: Ask for an explanation and reduce the example until you can describe what each important part does.
Mistake 11: Ignoring Error Messages
The traceback is information, not merely a failure message. Read the exception type and the line Python points to.
Mistake 12: Installing Unknown Packages
Check the official project, source, licence, documentation, and reason for using a package before installing it.
Mistake 13: Sharing Secrets in a Troubleshooting Example
Replace private values with placeholders before sharing code or screenshots.
Mistake 14: Assuming AI Output Is Automatically Safe
AI assistance does not remove the need to test code, review permissions, understand dependencies, and check security implications.
Useful ChatGPT Prompts for Practising Python
The most useful beginner prompts explain your level, goal, relevant code, observed result, and the kind of help you want.
Prompt 1: Explain Code Line by Line
I am a complete beginner learning Python. Explain this code line by line. Define unfamiliar terms and do not add new features.
Prompt 2: Find the Smallest Error
My Python program produces this error. Find the smallest likely cause, explain it first, and show only the correction that is necessary.
Prompt 3: Give Me One Hint
Give me one hint for this exercise. Do not show the answer yet.
Prompt 4: Create a Practice Exercise
Give me a beginner Python exercise using variables, input, one calculation, and print(). Give me the requirements only.
Prompt 5: Test My Understanding
Ask me five beginner questions about this Python code, one at a time. Wait for my answer before explaining.
Prompt 6: Compare Two Approaches
Compare these two beginner Python solutions. Explain what each does and which is easier to understand for this small task.
Prompt 7: Explain a Traceback
Explain this Python traceback in beginner-friendly language. Tell me what the exception type means and which line I should inspect first.
Prompt 8: Review for Privacy and Security
Review this small Python example for obvious exposed secrets, unsafe handling of private data, or risky file operations. Do not claim this guarantees security.
Prompt 9: Simplify Code
Rewrite this example using the simplest Python suitable for a complete beginner while keeping the same basic result. Explain what you removed.
Prompt 10: Review Before I Keep the Change
Before I keep this suggested change, explain what it changes, what assumptions it makes, and what I should test.
A focused prompt is easier to evaluate than a request such as “fix everything.”
Common Myths About Python and AI-Assisted Coding
Myth 1: You Must Memorize Python Before You Can Build Anything
Reality: Learn a small set of common concepts and become comfortable looking up less familiar features when needed.
Myth 2: Python Is Only for Professional Developers
Reality: Python is used in professional systems, but it is also practical for small scripts, learning exercises, automation, data exploration, and many personal projects.
Myth 3: If the Program Runs Once, It Is Correct
Reality: One successful run proves only that one path worked with one set of inputs. Test boundaries, invalid input, and other expected cases.
Myth 4: More Code Means a Better Program
Reality: Extra complexity is useful only when it serves a purpose. Simple code is often easier to understand and maintain.
Myth 5: AI-Generated Code Is Always Correct
Reality: AI-generated code can be wrong, incomplete, insecure, or unsuitable. Review and test important changes.
Myth 6: If ChatGPT Wrote It, Licensing No Longer Matters
Reality: Check third-party code, packages, assets, and suggested dependencies at their original source and review their licence conditions.
Myth 7: Python float Is Exact Decimal Arithmetic
Reality: Binary floating-point arithmetic cannot exactly represent every decimal fraction. This matters when exact decimal behaviour is required.
Myth 8: Installing a Package Is Always Harmless
Reality: Packages execute code and bring dependencies into your environment. Use reputable sources, virtual environments, and appropriate review.
Myth 9: Learning with AI Means You No Longer Need Documentation
Reality: Official documentation remains an important source for syntax, behaviour, version changes, and technical details.
Myth 10: Python Knowledge Means You Are Ready to Build Any Production System
Reality: The beginner foundations are valuable, but production systems can also require architecture, testing, security, deployment, databases, networking, accessibility, privacy, and domain-specific expertise.
Figure 14. Common myths can make Python and AI-assisted coding seem easier or harder than they really are.
Explanation: Python is approachable when learned gradually. AI can help, but testing, understanding, privacy, security, and licensing still require attention.
Frequently Asked Questions
Is Python difficult for a complete beginner?
Python is commonly used for teaching and beginner programming because small programs can be written with relatively little syntax. Some topics become more complex as projects grow, but you can start productively with print(), variables, input, conditions, loops, lists, and functions.
Which Python version should I install?
Use a current stable Python 3 release from the official Python website unless a course or project specifically requires another supported version. As of August 16, 2026, Python.org lists 3.14.7 as the latest stable Python 3 release.
Do I need a paid code editor?
No. IDLE or another simple editor is enough for the exercises in this article. More advanced editors can be useful later, but they are not required to understand the foundations.
Should I type code or copy and paste it?
Both can be useful. Typing short examples helps you notice punctuation and spelling. Copying can save time for longer examples, but read and modify the code so that you understand what it does.
What is the difference between Python and HTML/CSS?
HTML structures web content, CSS styles it, and Python is a general-purpose programming language that can perform calculations, decisions, loops, file operations, automation, and many other tasks.
Why does input() give me text?
input() returns a string. Use int() or float() when the entered text needs to become a number and is suitable for that conversion.
Why does Python care about indentation?
Indentation defines blocks of code. It tells Python which statements belong to a condition, loop, function, or other compound statement.
Can ChatGPT write Python for me?
It can generate and explain Python code, but generated code should still be reviewed and tested. For a beginner, requesting small examples and explanations is usually more educational than requesting a complete large application.
What is Codex?
OpenAI currently describes Codex as its dedicated software-development experience for writing or debugging code, running tests and commands, reviewing changes, and working with repositories. Availability, interfaces, and plan conditions can change, so check current OpenAI documentation when you want to use it.
Do I need to learn every Python function?
No. Learn common concepts and become comfortable using official documentation. Even experienced developers look up details.
What is pip?
pip is the reference Python package installer. It is used to install and update packages, commonly inside a virtual environment.
Do I need a virtual environment now?
Not for the basic examples in this article. When you begin using third-party packages, the Python Packaging User Guide recommends virtual environments so project dependencies remain isolated.
Can I publish the practice programs from this guide?
You can publish your own practice work, but first remove private information, check any third-party code or packages and their licences, test the program, and make sure you understand what it does. Projects involving sensitive data, accounts, payments, security controls, or other high-impact functions may need professional review.
Can Python automate files on my computer?
Yes, Python can work with files and operating-system functions, but that also means mistakes can overwrite, move, or delete data. Use test folders and backups while learning file automation.
What should I learn after this article?
A logical next step is error-finding and debugging with AI, then deeper practice with files, modules, packages, and small projects. Continue gradually rather than jumping immediately into a large production application.
Key Takeaways
Python is a general-purpose programming language, and small programs are enough to learn the foundations.
Use the current stable Python 3 release from the official Python website.
print() displays output; variables give names to values.
Strings, integers, floats, and Booleans are common beginner data types.
input() returns text, so conversion is needed when a number is required.
Arithmetic operators perform calculations, while comparison operators help form conditions.
if, elif, and else let a program choose between paths.
for and while loops repeat work.
Lists store several related values, and loops can process them one by one.
Functions package reusable tasks and can accept inputs and return results.
Errors are part of programming. Read the traceback and investigate the smallest likely cause.
Build projects in layers: plan, create a working version, test, and improve one thing at a time.
Use ChatGPT for explanations, hints, exercises, and focused troubleshooting rather than blindly replacing your code.
AI-generated code can be wrong or inappropriate and should be tested.
Do not share passwords, API keys, authentication tokens, customer information, or other secrets unnecessarily.
Use virtual environments when you begin working with third-party packages.
Check the source and licence of code and packages before relying on them in published or commercial work.
Keep working copies, licence records, and notes about important dependencies.
The most important beginner habit is simple: understand the change you are making, run the code, check the result, and keep only what you can explain.
Final Tip
Do not measure your progress by how many lines of code you can generate. Measure it by how confidently you can look at a small program and explain what the variables contain, what each condition checks, what each loop repeats, what each function does, and how you would test a change.
25. Read the code before running it.
26. Run it with a simple input.
27. Change one thing.
28. Run it again.
29. Read any error message rather than immediately replacing the code.
30. Use official documentation for important technical details.
31. Ask ChatGPT a focused question when you need an explanation or second pair of eyes.
32. Keep the change only when you understand and accept the result.
That learning habit is more valuable than memorizing large amounts of syntax.
Continue Learning
Article 087 follows Article 086 — HTML and CSS for Beginners with ChatGPT (2026) in the AI Mastery AI Coding series. If you need to review basic ideas about code structure, safe AI-assisted learning, accessibility, privacy, security, or licensing, Article 086 provides useful supporting context.
You can also review Article 084 — What Is AI Coding? Complete Beginner Guide (2026) and Article 085 — How to Ask ChatGPT to Explain Code (2026). These earlier articles help establish the broader AI-coding workflow and the habit of asking for explanations instead of blindly accepting generated code.
The next planned article is Article 088 — How to Find and Fix Coding Errors with AI (2026). It will build directly on the troubleshooting habits introduced here.
Continue practising with small Python files. A five-line program you understand completely is more valuable for learning than a five-hundred-line project you cannot explain.
Sources and References
The following official and authoritative sources were reviewed for the technical, privacy, security, copyright, and licensing information in this article. Information was checked on August 16, 2026. Software versions, product features, policies, and licence conditions can change, so readers should verify current official information when it matters to their project.
WIPO — Copyright. General copyright reference for software and other protected works.
Important Note: This article provides general educational information about Python, AI-assisted coding, privacy, security, copyright, and licensing. It is not legal, cybersecurity, or other professional advice. For sensitive, regulated, commercial, or high-impact systems, obtain appropriate professional review.
Every website has a structure and a visual design. HTML and CSS are two of the main technologies used to create them.
HTML, which stands for HyperText Markup Language, provides the structure and meaning of a web page. It identifies content such as headings, paragraphs, links, images, lists, tables, and forms. HTML is the Web’s core markup language.
CSS, which stands for Cascading Style Sheets, controls how that content is presented. It can be used to change fonts, colours, spacing, borders, sizes, positioning, and page layouts. CSS is a core language of the open web platform for styling documents such as HTML pages.
A simple way to remember the difference is:
· HTML provides the structure and content.
· CSS controls the appearance and layout.
Think of a house. HTML is similar to the rooms, doors, windows, and walls that give the house its structure. CSS is similar to the paint, flooring, furniture arrangement, and decoration that determine how the house looks.
You do not need previous coding experience to begin learning HTML and CSS. You can start with a small web page, learn what each part does, make simple changes, and gradually build your knowledge.
This guide also shows how ChatGPT can be used as a learning and coding assistant. For example, you can use it to explain unfamiliar code, suggest a simple example, identify possible errors, or help you understand why something is not working. The purpose is not to replace learning the basics. It is to make the learning process easier to follow while you remain responsible for understanding and testing what you create.
Throughout the guide, you will work with small practical examples. You will learn how to create basic HTML content, apply CSS styling, connect the two together, preview the results in a web browser, and correct common beginner mistakes.
You will also learn several habits that matter when creating web content. A page should not only look correct; it should also be understandable and usable by different people. Web accessibility involves designing and developing websites and technologies so that people with disabilities can use them, and accessibility should be considered from the beginning rather than treated as an afterthought.
As you progress, the guide will also point out situations where you should consider privacy, security, copyright, licensing, and factual accuracy. These issues become especially important when code contains personal information, when you use images or other assets created by someone else, or when a website collects information from visitors.
The goal of this article is straightforward: to help you understand the foundations of HTML and CSS well enough to create, read, modify, and troubleshoot a simple web page with confidence, while using ChatGPT appropriately when it is useful.
You are not expected to memorize everything. Understanding what the main parts do and knowing how to find reliable help are far more useful first steps.
What You’ll Learn
By the end of this guide, you will understand the basic role of HTML and CSS and how they work together to create a web page.
You will learn how to:
· understand the difference between HTML and CSS
· recognize the basic structure of an HTML document
· create headings, paragraphs, links, images, and lists with HTML
· understand common HTML elements and attributes
· use CSS to change colours, fonts, spacing, borders, and layout
· understand the difference between inline, internal, and external CSS
· connect a CSS file to an HTML page
· create and save simple HTML and CSS files correctly
· preview your work in a web browser
· make simple changes and test the result
· use ChatGPT when you need help explaining, reviewing, or troubleshooting code
· recognize that suggested code may still contain mistakes and should be tested
· follow basic accessibility practices when creating web pages
· avoid common privacy and security mistakes when working with code
· recognize when images, fonts, templates, code libraries, or other assets may have licensing conditions
You will not need to build a large website in this article. The examples will stay small and practical so that you can concentrate on understanding what each part does.
The aim is to give you a solid foundation. Once the basics are clear, you will be better prepared to create more detailed pages and continue learning web development.
Before You Start
You do not need previous coding experience to follow this guide. You also do not need expensive software or a professional development setup.
For the exercises in this article, you will need:
· a computer
· a modern web browser
· a plain-text editor
· access to ChatGPT
· a folder where you can save your practice files
A simple text editor is enough for the first exercises. On Windows, for example, you can use Notepad. Later, you may choose a dedicated code editor, but that is not required to understand the basics.
Create a Practice Folder
Before writing any code, create a folder somewhere easy to find.
For example:
HTML-CSS-Practice
You can use this folder to store the HTML files, CSS files, and images you create while following the guide.
Keeping everything together will make it easier to understand how the files connect to one another.
Understand the Two Main File Types
For this article, you will mainly work with two filename extensions:
· .html for HTML documents
· .css for CSS stylesheets
For example:
index.html
style.css
The filename extension tells the computer what type of file it is.
A common beginner mistake is accidentally saving an HTML file as:
index.html.txt
If this happens, the browser may treat it as a normal text file instead of a web page.
When saving practice files, check the full filename carefully.
Use a Plain-Text Editor
HTML and CSS files contain plain text.
A word processor such as Microsoft Word or TextMaker is designed for formatted documents, so it is not the best choice for writing website code.
Use a plain-text editor for the coding exercises and keep TextMaker for writing or reviewing documents.
Keep Your First Project Small
Your first practice page does not need to be complicated.
A good beginner page might contain:
· one main heading
· one short paragraph
· one image
· one link
· one list
· a small amount of CSS
Starting with a simple page makes it easier to see what each line of code does and to identify problems when something does not work.
Protect Private Information
Practice with fictional information rather than real personal or confidential details.
Do not include passwords, account credentials, API keys, private customer information, payment details, or other sensitive information in examples that you share with an AI tool or other online service.
If you need help reviewing code that contains sensitive information, replace the private values with safe placeholders before sharing the relevant section.
For example, instead of using a real email address, use:
name@example.com
Instead of a real API key, use:
YOUR_API_KEY_HERE
This allows you to get help with the structure of the code without exposing information that should remain private.
Save Your Work as You Go
Make a habit of saving your files before making major changes.
When experimenting with a new idea, you can also keep a copy of the version that already works.
For example:
index-v1.html
index-v2.html
This simple habit makes it much easier to return to an earlier version if a change causes a problem.
Test One Change at a Time
When learning HTML and CSS, avoid changing many things at once.
A better approach is:
1 Make one small change.
2 Save the file.
3 Refresh the page in your browser.
4 Check what changed.
5 Continue only when you understand the result.
This method makes troubleshooting much easier and helps you learn what each piece of code actually does.
You are now ready to begin with the basic structure of HTML.
What Is HTML?
HTML stands for HyperText Markup Language. It is the language used to organize and describe the content of a web page.
HTML gives different parts of a page a specific meaning. For example, it can identify:
· the main heading
· smaller section headings
· paragraphs
· links
· images
· lists
· tables
· forms
HTML documents are made from elements, and those elements form the structure of the page.
A useful way to think about HTML is as the framework of a house. Before choosing paint colours, furniture, or decorations, the house needs walls, rooms, doors, and windows. In the same way, a web page needs structure before its appearance is added with CSS.
HTML Uses Elements and Tags
Consider this simple example:
<h1>My First Web Page</h1>
<p>Welcome to my website.</p>
The first line creates a main heading:
<h1>My First Web Page</h1>
The second line creates a paragraph:
<p>Welcome to my website.</p>
The browser recognizes the HTML elements and displays the content according to their meaning. The HTML standard defines a paragraph using the <p> element, for example.
Most HTML elements have an opening tag, some content, and a closing tag.
For example:
<p>Hello, world!</p>
This contains:
· <p> — opening tag
· Hello, world! — content
· </p> — closing tag
Together, these parts form the paragraph element.
The / in the closing tag tells the browser that the element ends there.
HTML elements can also be placed inside other elements. This is called nesting. Correct nesting matters because HTML elements should fit completely inside one another rather than overlap incorrectly.
What Are HTML Attributes?
HTML elements can contain additional information called attributes.
<img src=”garden.jpg” alt=”Red flowers growing in a garden”>
This image element contains two important attributes:
· src identifies the image file.
· alt provides a text alternative for the image when appropriate.
Attributes are written inside the opening tag.
You do not need to memorize all HTML elements or attributes. It is more useful at this stage to understand what they are and learn the common ones as you need them.
The Basic Structure of an HTML Page
A small HTML page can look like this:
<!doctype html>
<html lang=”en”>
<head>
<meta charset=”utf-8″>
<title>My First Web Page</title>
</head>
<body>
<h1>Welcome to My Page</h1>
<p>This is my first HTML page.</p>
</body>
</html>
This may look complicated at first, but there are only a few main parts.
Understanding the Main Parts
<!doctype html>
This declaration appears at the beginning of the document and tells the browser to process the page using modern HTML rules.
<html lang=”en”>
The <html> element contains the document.
The lang=”en” attribute identifies English as the main language of the page. Identifying the page language is also important for accessibility because assistive technologies can use this information when presenting content to users.
<head>
The <head> contains information about the document rather than the main content displayed on the page.
It can include information such as:
· the page title
· character encoding
· links to CSS files
· other document information
<meta charset=”utf-8″>
This specifies the character encoding used by the document.
<title>My First Web Page</title>
The <title> provides the document title. Browsers and other software can use this title when identifying the page.
<body>
The <body> contains the main content of the web page.
In our example, the visible content is:
<h1>Welcome to My Page</h1>
<p>This is my first HTML page.</p>
The heading and paragraph appear in the browser window.
HTML Describes Meaning, Not Just Appearance
A heading should normally be marked as a heading because it is a heading, not simply because you want the text to look large.
For example:
<h1>Beginner Gardening Guide</h1>
identifies the text as the main heading.
A section heading might use:
<h2>Choosing Your Plants</h2>
A normal paragraph might use:
<p>Choose plants that are suitable for your local climate.</p>
Using HTML elements according to the purpose of the content creates a clearer document structure. This is often called semantic HTML.
Good structure is useful for browsers, search technologies, assistive technologies, developers, and people who may need to maintain the page later.
You Do Not Need to Memorize HTML
Beginners sometimes believe they must memorize dozens of tags before they can build a web page.
That is not necessary.
Start by becoming familiar with a small group of commonly used elements, such as:
· <h1> to <h6> for headings
· <p> for paragraphs
· <a> for links
· <img> for images
· <ul> and <ol> for lists
· <li> for list items
As you practise, these elements will become familiar naturally.
The important first step is understanding the basic idea:
HTML gives the content of a web page its structure and meaning.
Figure 1. HTML organizes the different parts of a web page and gives each part a specific purpose.
Explanation: The HTML code provides the structure, while the browser interprets that structure and displays the page. At this stage, focus on recognizing the main parts rather than memorizing every tag.
What Is CSS?
CSS stands for Cascading Style Sheets. It is the language used to control the appearance and layout of web content.
HTML provides the structure of a page, while CSS determines how that structure is presented. The W3C describes CSS as a core language of the open web platform used to add styling such as fonts, colours, and spacing to web documents.
For example, HTML can create this heading:
<h1>My First Web Page</h1>
Without additional styling, the browser decides how the heading looks using its default styles.
CSS can then change its appearance:
h1 {
color: blue;
font-size: 36px;
}
This CSS tells the browser to display <h1> headings in blue with a font size of 36 pixels.
The HTML still identifies the text as a heading. CSS changes how that heading is presented.
Understanding a Simple CSS Rule
Consider this CSS:
p {
color: darkblue;
font-size: 18px;
}
This is called a CSS rule.
It contains several important parts.
Selector
p
The selector identifies which HTML element the rule should affect.
In this example, p means paragraphs.
Property
color
A property identifies what you want to change.
Examples of CSS properties include:
· color
· font-size
· background-color
· margin
· padding
· border
Value
darkblue
The value tells the browser what setting to use for the property.
Together:
color: darkblue;
is called a declaration.
The semicolon ; separates CSS declarations.
The declarations are placed inside curly brackets:
{
}
So this complete rule:
p {
color: darkblue;
font-size: 18px;
}
means:
Apply dark-blue text and an 18-pixel font size to paragraph elements.
CSS consists of rules that determine how elements in structured documents such as HTML are rendered.
HTML and CSS Work Together
Suppose your HTML contains:
<h1>My Gardening Guide</h1>
<p>Welcome to my beginner gardening page.</p>
The HTML identifies:
· a main heading
· a paragraph
You could then add this CSS:
h1 {
color: green;
}
p {
font-size: 18px;
}
The browser combines the HTML structure with the CSS styling.
The result is still a heading followed by a paragraph, but the heading is green and the paragraph uses the specified font size.
This separation is useful because you can change the appearance without rewriting the actual page content.
CSS Can Control Much More Than Colour
CSS is not limited to changing text colour.
It can control many aspects of a web page, including:
· fonts
· text sizes
· text alignment
· backgrounds
· borders
· spacing
· widths and heights
· positioning
· columns
· flexible layouts
· grid layouts
· how pages adapt to different screen sizes
You will begin with only a few basic properties in this guide.
There is no need to learn every CSS feature at once.
Why Is It Called “Cascading” Style Sheets?
The word cascading refers to the system CSS uses when more than one style rule could affect the same element.
A web page can receive styling from different sources and different rules. CSS defines how browsers determine which declaration takes precedence when rules compete and how some values can be inherited from other elements.
For a complete beginner, you do not need to understand all of these rules yet.
For now, remember:
More than one CSS rule can affect the same element, and CSS has rules for deciding which styling is ultimately used.
You will see simple examples later in the article.
Three Common Ways to Add CSS
CSS can be added to HTML in several ways. The three methods beginners commonly encounter are:
· inline CSS
· internal CSS
· external CSS
Inline CSS
Inline CSS is written directly inside an HTML element using the style attribute.
For example:
<p style=”color: blue;”>This paragraph is blue.</p>
This can be useful for understanding a very small example, but using inline styles extensively can make pages harder to maintain.
Internal CSS
Internal CSS is placed in a <style> element, normally within the document’s <head>.
For example:
<head>
<style>
p {
color: blue;
}
</style>
</head>
This keeps the styling together inside the same HTML document.
The HTML standard defines the <style> element for embedding styling information in a document.
External CSS
External CSS is stored in a separate file.
For example:
style.css
The CSS file might contain:
p {
color: blue;
}
The HTML document can then connect to that stylesheet with:
<link rel=”stylesheet” href=”style.css”>
HTML provides the link element with the stylesheet relationship for linking an external CSS stylesheet to a document.
External stylesheets are especially useful because the same CSS file can be used to style multiple HTML pages.
Later in this guide, you will create a separate CSS file and connect it to your HTML page.
A Simple Before-and-After Example
Imagine this HTML:
<h1>My Recipe Page</h1>
<p>Welcome to my collection of simple recipes.</p>
Without your own CSS, the browser uses its normal default appearance.
Now add:
body {
background-color: lightgrey;
}
h1 {
color: darkblue;
}
p {
font-size: 18px;
}
The content has not changed.
It still contains:
· one heading
· one paragraph
But the page now has:
· a light-grey background
· a dark-blue heading
· larger paragraph text
This demonstrates the basic relationship:
HTML says what the content is. CSS says how the content should look and be laid out.
Common Beginner Mistake: Using CSS Instead of Proper HTML Structure
CSS can make ordinary text large and bold, but visual appearance does not change the meaning of the HTML.
For example, you could make a paragraph look like a heading:
<p class=”large-text”>My Main Heading</p>
with CSS:
.large-text {
font-size: 36px;
font-weight: bold;
}
It might visually resemble a heading, but it is still a paragraph in the HTML structure.
When the content really is the main heading, use the appropriate HTML element:
<h1>My Main Heading</h1>
Then use CSS to control how the heading looks.
Keeping structure in HTML and presentation in CSS generally produces clearer, more maintainable, and more accessible web pages. HTML itself is designed to describe document structure, while CSS provides the styling layer.
Figure 2. HTML provides the structure and content of a web page, while CSS controls its appearance and layout.
Explanation: Keeping HTML and CSS in their proper roles makes a page easier to understand and maintain. The HTML describes the content, and the CSS provides the visual presentation.
Create Your First HTML Page
Now that you understand the basic purpose of HTML, you can create a simple web page yourself.
You do not need a web server or special development software for this exercise. A basic HTML file can be saved on your computer and opened directly in a web browser.
The HTML standard defines an HTML document as a structured collection of elements and text, with the document element represented by <html>.
Step 1: Open Your Practice Folder
Open the HTML-CSS-Practice folder you created earlier.
This folder will contain the files for your first small web page.
Step 2: Open a Plain-Text Editor
On Windows, you can use Notepad for this exercise.
Do not use a word processor for the HTML file. HTML code needs to be saved as plain text.
Step 3: Enter the Basic HTML
Type or carefully copy the following code:
<!doctype html>
<html lang=”en”>
<head>
<meta charset=”utf-8″>
<title>My First Web Page</title>
</head>
<body>
<h1>Welcome to My First Web Page</h1>
<p>I am learning how HTML works.</p>
<p>This page was created as a beginner practice project.</p>
</body>
</html>
This document follows the basic HTML structure discussed earlier. The HTML syntax places the DOCTYPE before the document’s <html> element, while the <head> contains document metadata and the <body> represents the document’s content.
Step 4: Save the File as HTML
In Notepad:
1 Select File > Save As.
2 Open your HTML-CSS-Practice folder.
3 Enter the filename:
index.html
4 If a Save as type option appears, choose All Files.
5 If an encoding option appears, choose UTF-8.
6 Select Save.
The important part is that the file ends with:
.html
and not:
.txt
Your finished filename should be:
index.html
Why Use the Name index.html?
You could name a practice HTML file something else, such as:
practice.html
or:
about.html
However, index.html is a common filename for the main or starting page of a simple website.
Using it now also prepares you for later exercises when several website files may be stored together.
Step 5: Open the Page in Your Browser
Locate index.html in your practice folder.
Double-click the file.
Your normal web browser should open it and display something similar to:
Welcome to My First Web Page
I am learning how HTML works.
This page was created as a beginner practice project.
The browser reads the HTML and interprets the elements to create the page you see. HTML documents are composed of elements and text arranged in a structured tree.
You have now created a real HTML document.
It is simple, but the basic principle is the same for much larger web pages: HTML describes the structure and meaning of the content.
<p>This page was created as a beginner practice project.</p>
<h2>My Favourite Plants</h2>
<p>I enjoy growing tomatoes, herbs, and flowers.</p>
</body>
Save the file and refresh your browser again.
You should now see a main heading, paragraphs, and a smaller section heading.
Add a Simple List
Suppose you want to list three plants.
Add this below the last paragraph:
<ul>
<li>Tomatoes</li>
<li>Basil</li>
<li>Marigolds</li>
</ul>
The <ul> element represents an unordered list, while each <li> represents an item in the list. These elements are part of HTML’s structural vocabulary for representing content according to its meaning.
After saving and refreshing the browser, the three items should appear as a bulleted list.
Your page is becoming more structured, even though you have not added CSS yet.
Do not worry about making the page attractive yet.
Right now, the objective is to create a clear HTML structure that works correctly.
CSS will handle the visual design later.
What If the Page Does Not Work?
If the page does not appear as expected, check the simple problems first.
Look for:
· a missing < or >
· a closing tag that is missing
· a misspelled element name
· incorrectly nested elements
· a file accidentally saved as .txt
· changes that were not saved
· a browser page that was not refreshed
HTML elements need to be nested correctly rather than overlapping one another.
For example, this nesting is incorrect:
<p>This is <strong>important.</p></strong>
A correctly nested version is:
<p>This is <strong>important.</strong></p>
When troubleshooting, check one problem at a time rather than changing the entire document.
Using ChatGPT to Check a Small HTML Example
If you cannot identify a problem after checking the basics, ChatGPT can be useful as a second pair of eyes.
For example, you could use:
Prompt:
I am learning HTML as a complete beginner. Please check the following small HTML page for errors. Explain any problems in simple language and show me only the corrections that are necessary.
Then paste the relevant practice code below the prompt.
Before sharing code, remove passwords, private information, API keys, or anything else that should remain confidential.
Also remember that a suggested correction should still be tested in your browser. The browser result and reliable documentation remain important checks.
Common Beginner Mistake: Changing Too Much at Once
When a page works, it is tempting to add several headings, links, images, colours, and layout changes at the same time.
That can make troubleshooting difficult.
How to Avoid This Mistake: Make one small change, save the file, refresh the browser, and confirm the result before moving on.
This may seem slower at first, but it usually saves time because you can identify exactly which change caused a problem.
Figure 3. A simple HTML workflow is to write the code, save the HTML file, open it in a browser, and then edit, save, and refresh as you make changes.
Explanation: Testing small changes immediately makes HTML easier to learn and troubleshoot. If something stops working, you can compare the latest change with the version that worked before.
Add CSS to Your First HTML Page
Your practice page now has HTML structure, but it still uses the browser’s default appearance.
The next step is to add CSS.
For this exercise, you will create a separate CSS file and connect it to your HTML document. Keeping the CSS in a separate file is a useful habit because the same stylesheet can later be used by more than one HTML page.
HTML supports linking an external stylesheet with a <link> element using the stylesheet relationship.
Step 1: Create a CSS File
Open your plain-text editor.
Create a new blank file.
Enter:
body {
background-color: #f5f5f5;
font-family: Arial, sans-serif;
}
h1 {
color: darkblue;
}
h2 {
color: darkgreen;
}
p {
font-size: 18px;
}
Save this new file inside the same HTML-CSS-Practice folder as your HTML file.
Name it:
style.css
Your folder should now contain:
· index.html
· style.css
Keeping both files in the same folder makes the first exercise easier because the HTML file can refer directly to style.css.
Step 2: Connect the CSS File to HTML
Open:
index.html
Inside the <head> section, add:
<link rel=”stylesheet” href=”style.css”>
Your <head> should now look similar to this:
<head>
<meta charset=”utf-8″>
<title>My Gardening Page</title>
<link rel=”stylesheet” href=”style.css”>
</head>
The important part is:
href=”style.css”
This tells the browser where to find the stylesheet.
Because index.html and style.css are in the same folder, the filename alone is enough for this simple example.
Step 3: Save and Refresh
Save both files.
Return to the browser and refresh the page.
You should notice several changes:
· the page background becomes light grey
· the main heading becomes dark blue
· the section heading becomes dark green
· the paragraph text becomes larger
· Arial is used when it is available, with a generic sans-serif font as the fallback
The HTML content has not changed.
The CSS changed its presentation.
This demonstrates the central relationship between the two technologies:
HTML describes the page structure. CSS controls its presentation.
CSS is specifically designed to describe how structured documents such as HTML are rendered.
Step 4: Change One CSS Value
Open style.css.
Find:
h1 {
color: darkblue;
}
Change it to:
h1 {
color: green;
}
Save the CSS file.
Refresh the browser.
The main heading should now appear green.
Notice that you did not need to change the HTML heading:
<h1>Welcome to My Gardening Page</h1>
The HTML still describes the content as the main heading. Only its appearance changed.
This separation becomes increasingly useful as a website grows.
Step 5: Add Some Spacing
Pages are generally easier to read when content is not pressed against the edges of the browser window.
Add this property to your existing body rule:
padding: 20px;
The complete rule becomes:
body {
background-color: #f5f5f5;
font-family: Arial, sans-serif;
padding: 20px;
}
Save and refresh the page.
The content should now have additional space around it.
Step 6: Improve Paragraph Readability
You can also control the space between lines of text.
Change your paragraph rule to:
p {
font-size: 18px;
line-height: 1.6;
}
Save the file and refresh the page.
The lines in your paragraphs should now have more vertical space between them.
Small adjustments such as font size, line spacing, and surrounding space can make content easier to read.
However, visual choices should not be based only on personal preference. Later in this article, we will look at accessibility considerations such as readable text, colour contrast, keyboard use, meaningful structure, and alternative text.
Your CSS File So Far
At this point, style.css could contain:
body {
background-color: #f5f5f5;
font-family: Arial, sans-serif;
padding: 20px;
}
h1 {
color: green;
}
h2 {
color: darkgreen;
}
p {
font-size: 18px;
line-height: 1.6;
}
Your HTML remains in:
index.html
and your styling remains in:
style.css
This is an example of using an external stylesheet.
What Happens If the CSS Does Not Appear?
If you refresh the page and nothing changes, check the simple causes first.
Look for:
· whether style.css was saved
· whether it was accidentally saved as style.css.txt
· whether index.html was saved after adding the <link> element
· whether the filename in href=”style.css” exactly matches the CSS filename
· whether both files are in the expected folder
· whether a {, }, :, or other important character is missing from the CSS
For example, this is correct:
h1 {
color: green;
}
This is incorrect:
h1
color: green;
}
The second example is missing the opening {.
Common Beginner Mistake: Mixing Up HTML and CSS Syntax
HTML commonly uses angle brackets:
<p>Hello</p>
CSS commonly uses selectors, curly brackets, properties, and values:
p {
color: blue;
}
These are two different languages with different syntax.
How to Avoid This Mistake: Keep your HTML in index.html and your external CSS in style.css. When an error occurs, first determine whether the problem is with the page structure or with its styling.
Using ChatGPT When a CSS Rule Does Not Work
If you have checked the filename, file location, and basic syntax but still cannot find the problem, you can ask ChatGPT to examine a small relevant section of the code.
For example:
Prompt:
I am a beginner learning HTML and CSS. My CSS is not changing the heading colour. Check the HTML and CSS below for the likely problem. Explain the cause in simple language and show only the correction I need.
Then provide the relevant HTML and CSS.
Do not include passwords, API keys, confidential information, or other sensitive data.
After receiving a suggested correction, make the change yourself, save the files, and test the page again. This helps you understand both the problem and the solution instead of simply replacing your code without knowing why.
Figure 4. The HTML document links to the external CSS file, allowing the browser to combine the page structure with its visual styling.
Explanation: Separating HTML and CSS makes their different roles easier to understand. The HTML file contains the page structure and content, while the CSS file contains the styling instructions.
Use Common CSS Properties
Once your HTML page is connected to style.css, you can begin experimenting with a few common CSS properties.
You do not need to learn dozens of properties at once. Start with the ones that make an obvious visual difference, then build from there.
Change Text Colour
The color property controls the foreground colour of text. CSS supports named colours as well as other colour formats.
For example:
h1 {
color: darkblue;
}
This makes the text inside <h1> elements dark blue.
You can also use hexadecimal colour values:
h1 {
color: #003366;
}
For beginners, named colours are often easier to understand. As you gain experience, hexadecimal and other colour formats provide more precise control.
Change the Background Colour
You can give the whole page a background colour:
body {
background-color: #f5f5f5;
}
Or you can apply a background to a particular element:
h2 {
background-color: lightgrey;
}
When choosing text and background colours, appearance is not the only consideration. The text must also remain easy to read.
We will look more closely at colour contrast in the accessibility section later in this guide.
Change the Font
The font-family property tells the browser which font family or families to use.
For example:
body {
font-family: Arial, sans-serif;
}
CSS allows you to provide a prioritized list of font families. If the first font is unavailable, the browser can try the next suitable choice.
In this example:
· Arial is the preferred font.
· sans-serif is a generic fallback.
A fallback is useful because a particular font may not be installed on every visitor’s device.
Change the Font Size
Use font-size to control text size:
p {
font-size: 18px;
}
You can also give headings different sizes:
h1 {
font-size: 36px;
}
h2 {
font-size: 28px;
}
Avoid using CSS size alone to create document structure.
For example, a large bold paragraph is still a paragraph. If the text is genuinely a heading, use the appropriate HTML heading element and then style that element with CSS.
Add Space Inside an Element
The padding property adds space between an element’s content and its border.
For example:
body {
padding: 20px;
}
This creates space between the page content and the edges of the body area.
Another example:
h2 {
padding: 10px;
}
This adds space around the content inside the <h2> element.
Add Space Around an Element
The margin property controls space outside an element’s border area. CSS treats content, padding, border, and margin as parts of an element’s box model.
For example:
h2 {
margin-top: 30px;
}
This adds space above the heading.
Or:
p {
margin-bottom: 20px;
}
This adds space below paragraphs.
A simple way to remember the difference is:
· padding = space inside the element’s border
· margin = space outside the element’s border
Add a Border
A border can help you see where an element begins and ends.
For example:
p {
border: 1px solid grey;
}
You can combine the border with padding:
p {
border: 1px solid grey;
padding: 10px;
}
The padding prevents the text from sitting directly against the border.
Try a Simple Content Box
Add the following HTML inside your <body>:
<div class=”tip-box”>
<h2>Gardening Tip</h2>
<p>Check the soil before watering your plants.</p>
</div>
The <div> creates a container that can group related content.
The attribute:
class=”tip-box”
gives the container a class name that CSS can target.
Now add this to style.css:
.tip-box {
background-color: #ffffff;
border: 1px solid #cccccc;
padding: 20px;
margin-top: 20px;
}
Save both files and refresh the browser.
You should now see a simple box containing the heading and paragraph.
What Does the Dot Mean?
Notice this selector:
.tip-box
The dot . tells CSS that tip-box is a class name.
It matches HTML such as:
<div class=”tip-box”>
This allows you to create a reusable style and apply it to different elements that share the same class.
For example:
<div class=”tip-box”>
<p>Tip number one.</p>
</div>
<div class=”tip-box”>
<p>Tip number two.</p>
</div>
Both containers can use the same CSS rule.
Improve Your Practice Page
Your CSS could now look similar to this:
body {
background-color: #f5f5f5;
font-family: Arial, sans-serif;
padding: 20px;
}
h1 {
color: darkblue;
font-size: 36px;
}
h2 {
color: darkgreen;
font-size: 28px;
margin-top: 30px;
}
p {
font-size: 18px;
line-height: 1.6;
}
.tip-box {
background-color: #ffffff;
border: 1px solid #cccccc;
padding: 20px;
margin-top: 20px;
}
You have now used several important CSS concepts:
· selectors
· properties
· values
· colours
· fonts
· font sizes
· margins
· padding
· borders
· classes
That is already enough to make meaningful changes to a simple page.
Common Beginner Mistake: Adding Too Many Styles
When you discover CSS, it can be tempting to change every colour, add several borders, use many different font sizes, and fill the page with visual effects.
The result can quickly become difficult to read.
How to Avoid This Mistake: Start with a small number of consistent styles. Use clear headings, readable text, comfortable spacing, and restrained colours. Add extra styling only when it improves the page.
Simple and readable usually works better than complicated and decorative.
Figure 5. The CSS box model describes an element as content surrounded by padding, a border, and margin.
Explanation: Understanding the box model makes spacing much easier to control. Padding creates space inside an element’s border, while margin creates space outside it.
Use ChatGPT as an HTML and CSS Learning Assistant
Once you understand the basic roles of HTML and CSS, ChatGPT can be useful when you need an explanation, an example, or help finding a problem.
ChatGPT can be useful for focused coding explanations, examples, and troubleshooting. OpenAI currently provides Codex as its dedicated software-development experience for tasks such as writing or debugging code, running tests and commands, and reviewing changes.
For a beginner, however, the most useful approach is not simply asking for a complete website and copying the result.
A better approach is to use ChatGPT for small, understandable tasks.
Ask for an Explanation
Suppose you see this CSS:
.tip-box {
padding: 20px;
margin-top: 20px;
}
and you do not understand it.
You could ask:
Example prompt:
I am a complete beginner learning CSS. Explain this code in simple language. Explain what .tip-box, padding, margin-top, and 20px mean. Give me one small example of what would happen if I changed each value.
This type of prompt does more than ask for an answer. It asks for an explanation that helps you understand the code.
Ask for a Small Example
If you are learning links, for example, you could ask:
Example prompt:
Show me a very simple HTML example containing one heading, one paragraph, and one link. Explain each line. Do not add CSS or JavaScript.
Keeping the request small makes the result easier to examine and test.
After receiving the example:
1. Read the explanation.
2. Type or copy the code into your practice file.
3. Save the file.
4. Open or refresh it in your browser.
5. Check whether the result matches the explanation.
6. Change one part and test it again.
This turns the example into a learning exercise rather than a copy-and-paste exercise.
Ask ChatGPT to Review Your Own Code
You can also write the code yourself first and then ask for help reviewing it.
For example:
Example prompt:
I wrote the HTML below myself. Check it for basic HTML errors and incorrect nesting. Do not redesign the page. List the problems first, explain them simply, and then show the corrected version.
Then paste the relevant code.
This approach is particularly useful because you attempt the task before seeing a suggested solution.
Ask for Help with One Specific Problem
When something does not work, describe the problem precisely.
Instead of:
My CSS doesn’t work. Fix it.
try:
My <h1> text remains black even though I tried to make it dark blue. I have included my HTML and CSS below. Find the most likely cause, explain it simply, and show only the change I need to make.
A specific question gives important context:
· what you expected
· what actually happened
· which part of the page is affected
· what kind of explanation you need
This also makes it easier for you to understand the proposed correction.
Ask Why a Correction Works
Finding a working answer is useful. Understanding why it works is more valuable for learning.
After correcting an error, you can ask:
Example prompt:
The correction worked. Explain why my original code failed and why the corrected version works. Use beginner-friendly language.
You can then compare the explanation with your original and corrected files.
Ask for Alternatives
There is often more than one way to achieve a result with HTML or CSS.
For example:
Example prompt:
Show me two beginner-friendly ways to add space around this box with CSS. Explain the difference between margin and padding and tell me when each is appropriate.
This can help you understand that web development is not always about finding one single correct line of code.
Different approaches can have different effects, advantages, and limitations.
Give ChatGPT Enough Context
If you ask for troubleshooting help, provide the smallest amount of code needed to understand the problem.
For example, if the problem concerns one heading and its CSS, you may only need to provide:
<h1 class=”page-title”>My Gardening Page</h1>
and:
.page-title {
color: darkblue;
}
You usually do not need to provide an entire website for a small styling question.
Providing focused examples can make both the question and the answer easier to understand.
Do Not Share Secrets or Private Information
Before pasting code into an online AI service, check it for information that should remain private.
Remove or replace information such as:
· passwords
· API keys
· authentication tokens
· private URLs
· database credentials
· customer information
· personal contact details that are not needed for the question
· confidential business information
For example, change:
API_KEY=real-secret-value
to:
API_KEY=YOUR_API_KEY_HERE
The code can still demonstrate the problem without exposing the real secret.
Do Not Assume Suggested Code Is Correct
A code suggestion can look convincing and still contain mistakes.
It might:
· use the wrong HTML element
· contain invalid syntax
· misunderstand your intended design
· introduce an accessibility problem
· create unnecessary complexity
· use an approach that is inappropriate for your project
· solve one problem while creating another
For this reason, treat suggested code as something to review and test, not as automatically correct.
A useful beginner workflow is:
1. Ask for help with a specific problem.
2. Read the explanation.
3. Examine the suggested code.
4. Make the change in your practice file.
5. Save the file.
6. Test it in your browser.
7. Check that the rest of the page still works.
8. Keep the change only when you understand and accept the result.
Keep the Original Working Version
Before replacing a large section of working code with a suggested version, save a copy.
For example:
index-before-change.html
and:
index-after-change.html
This makes it easier to compare the two versions or return to the earlier one if the change causes problems.
For larger projects, professional developers often use version-control systems, but simple backup copies are enough for the beginner exercises in this article.
A Useful Prompt Formula for Beginners
You can build clearer coding questions using this simple formula:
Skill level + Goal + Current code + Problem + Type of help wanted
For example:
I am a complete beginner learning CSS. I want a light-grey box around a paragraph. My current HTML and CSS are below. The border appears, but there is no space between the text and the border. Explain what is missing and show the smallest correction.
This is much more useful than simply saying:
Fix my code.
Common Beginner Mistake: Copying a Large Block of Code Without Understanding It
It can be tempting to request a complete page, paste everything into a file, and stop when the browser displays something attractive.
The problem is that when the page later breaks, you may have no idea which part controls the heading, spacing, colours, or layout.
How to Avoid This Mistake: Build the page in small pieces. Understand each addition before moving to the next one.
ChatGPT is most valuable to a beginner when it helps make the code more understandable, not when it hides the learning process.
Figure 6. Use ChatGPT to support the learning process: ask a focused question, review the explanation and suggested code, test the result, and understand the change before keeping it.
Explanation: The most useful beginner workflow combines assistance with your own testing and judgement. This helps you gradually learn how HTML and CSS work instead of depending on code you do not understand.
Make Your Page Work on Different Screen Sizes
People may view a website on a large desktop monitor, a laptop, a tablet, or a small phone.
A page that looks comfortable on a wide screen can become difficult to read if its layout is too wide or if elements cannot adapt when the available space becomes smaller.
Designing a page so that it adapts to different screen and window sizes is commonly called responsive web design.
CSS provides several tools for creating flexible layouts. One of the most important is the media query, which allows CSS rules to be applied when particular conditions are met, such as the width of the display area.
Start with a Flexible Page Width
Your practice page currently allows the content to use most of the available browser width.
On a very wide monitor, long lines of text can become uncomfortable to read.
You can place the main content inside a container.
Change the HTML inside <body> so that it begins with:
<p>I enjoy growing tomatoes, herbs, and flowers.</p>
</div>
</body>
Now add this CSS:
.container {
max-width: 900px;
margin: 0 auto;
}
The max-width property limits how wide the container can become.
The declaration:
margin: 0 auto;
allows the browser to distribute the remaining horizontal space around the container when space is available.
The result is a page that can remain narrower on a large display while still becoming smaller when the browser window narrows.
Avoid Fixed Widths That Cause Problems
Consider this:
.container {
width: 1200px;
}
A fixed width of 1200 pixels may fit on a large monitor but can be much wider than the available space on a small screen.
That can cause horizontal scrolling or make part of the page difficult to reach.
For simple beginner layouts, a flexible approach is often safer:
.container {
width: 100%;
max-width: 900px;
}
This allows the container to use the available width while preventing it from becoming excessively wide.
Make Images Flexible
Images can also become wider than a small screen if their dimensions are not handled carefully.
A useful beginner rule is:
img {
max-width: 100%;
height: auto;
}
This allows an image to shrink when necessary instead of extending beyond its available container.
The height: auto declaration helps preserve the image’s proportions when its displayed width changes.
Responsive images can involve more advanced HTML features as well, but this simple CSS rule is a good starting point for a basic practice page.
What Is a Media Query?
A media query allows you to apply certain CSS only when a condition is true.
For example:
@media (max-width: 600px) {
h1 {
font-size: 28px;
}
}
This means:
When the viewport is 600 CSS pixels wide or narrower, use a 28-pixel font size for the main heading.
Media queries can test characteristics of the display environment and are used with CSS @media rules to apply styles conditionally.
Try a Simple Responsive Change
Suppose your normal styles include:
body {
padding: 20px;
}
h1 {
font-size: 36px;
}
You could add this at the bottom of style.css:
@media (max-width: 600px) {
body {
padding: 10px;
}
h1 {
font-size: 28px;
}
}
On a wider screen, the original styles remain.
When the available width reaches 600 pixels or less:
· the page padding becomes smaller
· the main heading becomes smaller
This is a simple example of adapting a design to the available space.
Test It Without a Phone
You can perform a basic test on your computer.
1. Open your HTML page in the browser.
2. Make the browser window wide.
3. Slowly make the window narrower.
4. Watch the content change.
5. Check whether text remains readable.
6. Check whether anything extends unnecessarily beyond the window.
When the window becomes narrow enough to meet the media-query condition, you should see the smaller heading and reduced padding.
Browser developer tools can provide more advanced device testing later, but simply resizing the browser window is enough to demonstrate the basic idea.
Responsive Design Is Also an Accessibility Issue
Responsive layouts are not only about making websites look attractive on phones.
Users may enlarge text or zoom the page because they need larger content to read comfortably.
WCAG 2.2 includes requirements concerning reflow, with the aim of allowing content to be presented at narrow widths without requiring two-dimensional scrolling for ordinary content, except where a two-dimensional layout is necessary for its use or meaning.
A layout that adapts to available space can therefore benefit:
· people using smaller screens
· people who enlarge text
· people who zoom a page
· people who use a browser window that is not full screen
Responsive design and accessibility often support the same goal: allowing people to use content in different circumstances.
Do Not Hide Important Content Just to Make the Page Fit
A common shortcut is to remove content whenever the screen becomes small.
For example, a design might hide an important instruction simply because there is less room.
That can create an accessibility problem because users on smaller or enlarged views may lose information available to other users.
W3C accessibility guidance identifies loss of content at narrow viewport widths as a potential failure of the reflow requirement.
Instead, try to make the content:
· wrap onto additional lines
· move below other content
· resize appropriately
· reflow into a simpler layout
The information should normally remain available.
Common Beginner Mistake: Designing for Only Your Own Screen
It is easy to create a page on a desktop computer, see that it looks correct, and assume everyone will see the same thing.
They will not.
Different visitors can have:
· different screen sizes
· different browser-window sizes
· different zoom settings
· different default font settings
· different accessibility needs
How to Avoid This Mistake: Regularly resize the browser window while you work. Check that text remains readable, images fit within the available space, and important content does not disappear.
You do not need to create a perfect responsive website during your first HTML and CSS lesson. The important concept is that a web page should be able to adapt rather than depending on one exact screen size.
Figure 7. Responsive CSS allows the same web content to adapt to different available screen and browser widths.
Explanation: A responsive page should preserve important content while allowing the layout to adjust as the available space changes. Media queries are one CSS tool that can apply different styling under specified conditions.
Build Accessibility into Your HTML and CSS
Accessibility means designing and developing web content so that people with disabilities can use it.
This can include people who have:
· visual disabilities
· hearing disabilities
· limited mobility
· cognitive or learning disabilities
· speech disabilities
· temporary limitations or injuries
The W3C Web Accessibility Initiative explains that accessibility involves making web content perceivable, operable, understandable, and robust. WCAG 2.2 is the current W3C Recommendation in the WCAG 2 series.
For beginners, accessibility may sound complicated. You do not need to understand every WCAG requirement before creating your first practice page.
Start with a few good habits.
Use Proper HTML Headings
Headings should describe the structure of the page.
For example:
<h1>Beginner Gardening Guide</h1>
<h2>Choosing Plants</h2>
<p>Choose plants suited to your climate.</p>
<h2>Watering Plants</h2>
<p>Check the soil before watering.</p>
The heading elements provide more than visual formatting. They identify relationships and structure in the document. WCAG requires information and relationships conveyed visually to also be programmatically determinable or available in text.
Do not use a paragraph simply because CSS can make it look like a heading.
For example:
<p class=”big-text”>Choosing Plants</p>
may look large after styling, but it still remains a paragraph in the HTML.
When the content really is a section heading, use the appropriate heading element.
Provide Useful Alternative Text for Images
Consider this image:
<img src=”tomatoes.jpg” alt=”Ripe red tomatoes growing on a garden plant”>
The alt attribute provides a text alternative.
Alternative text can help when an image cannot be seen or when assistive technology is being used.
However, there is no single description that is correct for every image in every situation. W3C guidance emphasizes that appropriate alternative text depends on the image’s purpose and context.
For example, an informative gardening photograph might use:
alt=”Ripe red tomatoes growing on a garden plant”
A purely decorative image may need different treatment.
Do not automatically fill every alt attribute with a long description of everything visible in the picture.
Ask instead:
What information or purpose does this image provide in this particular page?
That question usually leads to more useful alternative text.
Do Not Use Colour Alone to Communicate Important Information
Imagine a form that says:
Fields shown in red are required.
A person who cannot distinguish the colour may miss the information.
A better approach is to provide another indicator, such as:
Colour can still reinforce the message, but it should not be the only way important information is communicated.
WCAG 2.2 includes a requirement that colour must not be the only visual means used to convey information, indicate an action, prompt a response, or distinguish a visual element when that information matters.
Make Sure Text Has Enough Contrast
Text should be easy to distinguish from its background.
For example, very pale grey text on a white background may look elegant to some people but can be difficult for others to read.
WCAG 2.2 Level AA generally requires a contrast ratio of at least 4.5:1 for normal text and 3:1 for qualifying large text, subject to specific exceptions.
For example, this may be difficult to read:
p {
color: #dddddd;
background-color: #ffffff;
}
A darker text colour will generally provide stronger contrast:
p {
color: #333333;
background-color: #ffffff;
}
Do not judge colour contrast only by looking at your own screen.
Contrast-checking tools can help you measure the actual ratio before publishing a website.
Keep Links Understandable
Compare these two links:
<a href=”watering.html”>Click here</a>
and:
<a href=”watering.html”>Read the beginner watering guide</a>
The second version gives the reader more information about where the link leads.
Clear link text is especially useful when users navigate through links separately from the surrounding paragraphs.
Whenever practical, describe the destination or purpose rather than relying on vague phrases such as:
· Click here
· More
· Read this
The surrounding context still matters, but meaningful link wording usually makes navigation easier.
Make Interactive Features Work with a Keyboard
Not everyone uses a mouse.
A visitor may navigate with:
· a keyboard
· a switch device
· assistive technology that works through keyboard-style interaction
WCAG requires functionality to be operable through a keyboard interface where applicable, subject to limited exceptions for interactions that depend on a path of movement rather than just endpoints.
For a beginner page containing ordinary HTML links and form controls, using the correct native HTML elements gives you a strong starting point.
For example, use a real link:
<a href=”contact.html”>Contact Us</a>
rather than trying to make an unrelated element behave like a link using styling alone.
Similarly, use a real button when the user needs to activate a button action:
<button type=”button”>Show Details</button>
Native HTML controls already provide useful browser behaviour that can be difficult to reproduce correctly with custom code.
Keep Keyboard Focus Visible
When a keyboard user presses the Tab key, the browser normally moves focus from one interactive element to another.
There should be a visible indication of which element currently has focus.
Do not remove that indication simply because you dislike how it looks.
For example, avoid blindly adding:
a:focus {
outline: none;
}
without providing an accessible replacement.
WCAG includes requirements for visible keyboard focus, and WCAG 2.2 also contains additional focus-related criteria.
If you customize the focus appearance later, make sure the replacement remains clearly visible.
Make Text Comfortable to Read
Accessibility is not achieved by one special HTML tag.
Many small design decisions matter.
Helpful beginner practices include:
· using readable font sizes
· providing comfortable line spacing
· avoiding unnecessarily long lines of text
· keeping paragraphs reasonably short
· using clear headings
· leaving adequate space around content
· avoiding excessive animation or flashing
· allowing layouts to adapt when text or the page is enlarged
W3C’s preliminary accessibility checks specifically include headings, colour contrast, text resizing, keyboard access, visible focus, form labels, image alternatives, and basic page structure among useful areas to examine.
Accessibility Is Not Something to Add at the End
A common mistake is to finish an entire website and then ask:
How do I make this accessible?
It is usually easier to consider accessibility while creating the page.
For example:
· choose the correct HTML element when you create the content
· write meaningful link text when adding the link
· provide appropriate alternative text when adding an informative image
· check colour contrast when selecting colours
· test keyboard navigation when adding interactive features
· test narrow layouts while designing the page
These habits reduce the amount of correction required later.
Common Beginner Mistake: Assuming an Attractive Page Is Automatically Accessible
A page can look polished and still be difficult or impossible for some people to use.
For example, it may have:
· weak colour contrast
· missing image alternatives
· unclear heading structure
· controls that cannot be reached with a keyboard
· important information communicated only with colour
· content that disappears when the page is enlarged
How to Avoid This Mistake: Treat visual design and accessibility as related but separate checks. Test both.
Can ChatGPT Check Accessibility?
ChatGPT can help identify possible accessibility issues in small HTML and CSS examples, but it should not be treated as proof that a page conforms to WCAG.
For example, you could ask:
Example prompt:
Review this small HTML and CSS example for obvious beginner accessibility problems. Check the heading structure, image alt text, link wording, colour use, and keyboard-related HTML. Explain possible problems, but do not claim that the page passes WCAG.
The final wording is important.
Automated or AI-assisted review can help identify issues, but accessibility evaluation also requires human judgement and testing. W3C provides accessibility evaluation guidance and describes preliminary checks as only an initial review rather than a complete conformance assessment.
Figure 8. Beginner accessibility starts with good structure, useful text alternatives, readable contrast, meaningful links, keyboard usability, and flexible page design.
Explanation: Accessibility should be considered throughout the design and coding process. These beginner checks do not cover every WCAG requirement, but they establish better habits for creating web content that more people can use.
Protect Privacy and Security While You Practise
HTML and CSS are beginner-friendly technologies, but good privacy and security habits should start from your first project.
The most important rule is simple:
Do not place secrets or sensitive information in code that may be shared, uploaded, published, or sent to an online service.
Never Put Passwords or API Keys in HTML or CSS
HTML and CSS used by a normal web page are delivered to the visitor’s browser.
That means information placed directly in those files should not be treated as secret.
Do not put information such as:
· passwords
· private API keys
· authentication tokens
· database passwords
· private access codes
· confidential customer information
into front-end files.
OWASP warns that sensitive information such as private API keys can be exposed when it is hard-coded into client-side web content.
For example, do not write something like:
<p>My API key is ABC123SECRET</p>
You should also avoid placing a real secret in code simply because the value is hidden from the visible page.
Something that does not appear on the screen can still be present in the page source.
Use Safe Placeholder Information
When practising or asking for coding help, use fictional values.
For example:
YOUR_API_KEY_HERE
or:
name@example.com
This allows you to demonstrate the structure without exposing real information.
If code already contains sensitive details, remove or replace them before sharing it.
Be Careful with HTML Comments
HTML comments can be useful for leaving notes in your code.
For example:
<!– Main page heading –>
<h1>My Gardening Page</h1>
However, comments are part of the document source.
Do not use comments to store private information such as:
<!– Admin password: secret123 –>
Removing information from the visible page does not automatically make it private.
Forms Need More Than HTML and CSS
HTML can create a form:
<form>
<label for=”email”>Email address</label>
<input type=”email” id=”email” name=”email”>
<button type=”submit”>Send</button>
</form>
This creates the visible form controls, but HTML and CSS alone do not provide a complete secure system for collecting and processing personal information.
A real form may require additional work involving:
· secure data transmission
· server-side processing
· validation
· storage
· access controls
· privacy notices
· appropriate retention practices
The HTML standard defines form controls and how they submit information, but protecting the data received by a real web application requires security measures beyond the visible HTML form.
For this beginner article, keep form exercises fictional unless you already understand the system that will receive and protect the submitted information.
Do Not Rely Only on What Happens in the Browser
A future project may use JavaScript to check information before a form is submitted.
Browser-side checks can improve usability, but they should not be treated as the only security protection.
OWASP notes that client-side protections can be bypassed and should not be relied upon as the sole defence for sensitive operations.
This is an important distinction:
HTML and CSS create the page interface. They do not replace the security controls required behind a real website or application.
Check Code Before Sharing It with ChatGPT
If you use ChatGPT to review a coding problem, examine the code before pasting it.
Remove information such as:
· passwords
· access tokens
· API keys
· private URLs
· customer records
· personal contact information that is unnecessary for the question
· confidential company information
For example, change:
API_KEY=sk-real-secret-value
to:
API_KEY=YOUR_API_KEY_HERE
The important part of a coding question is normally the structure or behaviour of the code, not the real secret.
Understand ChatGPT Data Controls
For personal ChatGPT accounts, OpenAI states that content may be used to improve its models depending on the user’s settings. Users can turn off Improve the model for everyone in Settings > Data Controls so that new conversations are not used for model training.
OpenAI also provides Temporary Chat. According to current OpenAI documentation, Temporary Chats do not appear in normal chat history, do not create memories, and are not used to train models. OpenAI states that Temporary Chats are deleted from its systems after 30 days and may be reviewed only to monitor for abuse.
These controls are useful, but they are not a reason to paste passwords or other secrets into a conversation.
The safest beginner rule remains:
Do not share information that does not need to be shared.
OpenAI’s privacy features, product settings, and retention practices can change, so check the current official information when you first use a relevant feature, when you change plans or settings, when you receive a policy-update notice, and periodically thereafter.
Be Careful Before Publishing Your Practice Files
Before uploading a practice project to a public website, hosting service, portfolio, or code-sharing platform, inspect the files first.
Look for:
· personal names or addresses you did not intend to publish
· private email addresses
· account information
· secret keys or tokens
· private comments
· confidential filenames
· images containing private information
· copied material you may not have permission to publish
Anything placed on a public website should be treated as potentially viewable by other people.
Common Beginner Mistake: Assuming Hidden Means Private
A value can be absent from the visible page and still exist in the HTML, JavaScript, metadata, browser storage, or other client-side resources.
OWASP specifically recommends checking web-page content for information leakage because sensitive details can be exposed in client-side resources.
How to Avoid This Mistake: Never depend on visual hiding as a security measure. Do not put a secret into public-facing code in the first place.
Common Beginner Mistake: Publishing AI-Suggested Code Without Reviewing It
A suggested piece of code may contain features you did not request or fully understand.
Before publishing it:
1 Read the code.
2 Identify what information it uses.
3 Remove anything private.
4 Check unfamiliar features.
5 Test it locally.
6 Review accessibility and security implications.
7 Publish only when you understand what the code is doing.
For anything that handles passwords, payments, accounts, personal information, or other sensitive data, beginner experimentation is not a substitute for appropriate professional security review.
Figure 9. Review code for passwords, keys, personal information, private comments, and other sensitive data before sharing or publishing it.
Explanation: Front-end code should not be treated as a safe place for secrets. Remove unnecessary sensitive information before asking for assistance or making files publicly available.
Check Copyright and Licensing Before Reusing Code and Assets
As you learn HTML and CSS, you will probably encounter code examples, images, fonts, icons, templates, and other resources created by other people.
Finding something online does not automatically mean you have permission to copy, modify, or publish it.
Copyright can apply to many types of creative work, including computer programs, photographs, illustrations, written material, and other original works.
The rules can vary by country and by the particular material involved. This section provides general educational guidance, not legal advice.
Your Own Practice Code Is Different from Third-Party Material
When you write a simple HTML page yourself, such as:
<h1>My Gardening Page</h1>
<p>Welcome to my website.</p>
you are creating your own practice material.
The situation becomes different when you copy substantial code, a template, an image, a font, an icon collection, or another resource created by someone else.
Before reusing third-party material, find out:
· who created or owns it
· what licence applies
· whether modification is permitted
· whether commercial use is permitted
· whether attribution is required
· whether notices or licence information must be preserved
· whether other restrictions apply
Do not rely only on where you found the material.
“Open Source” Does Not Mean “No Rules”
You may encounter code described as open source.
Open-source software is distributed under licences that permit activities such as use, modification, and redistribution according to the terms of the particular licence. The Open Source Initiative maintains a list of licences that have passed its review process and comply with the Open Source Definition.
Examples of widely used open-source licences include:
· MIT License
· Apache License 2.0
· BSD licences
· GNU General Public License
Different licences can impose different requirements.
Therefore:
Do not assume that “open source” means you can remove the licence information and use the material in any way you want.
Read the licence that applies to the specific resource.
Free Does Not Always Mean Copyright-Free
The word free can be confusing.
A resource may be:
· free of charge
· available under an open licence
· available only for personal use
· available for commercial use with conditions
· available with an attribution requirement
· subject to another specific licence
These are not the same thing.
Before using a resource on a real website, check the licence terms rather than assuming that a zero-dollar price means unrestricted use.
Check Images Before Publishing Them
Images are especially easy to copy from websites or search results, but visibility online does not automatically grant permission to reuse them.
Copyright can apply to photographs, illustrations, and other visual works.
For a real project, use images that you:
· created yourself
· obtained with appropriate permission
· licensed for the intended use
· obtained from a source whose terms allow your intended use
· can lawfully use under an applicable copyright exception or limitation
If an image carries a licence, follow its requirements.
Understand Creative Commons Licences
Some creators publish material under Creative Commons licences.
Creative Commons provides standardized licences that allow creators to give the public specified permissions while retaining copyright. There are several Creative Commons licence types, and their conditions differ.
Depending on the licence, conditions can concern matters such as:
· attribution
· commercial use
· modifications
· sharing adaptations under particular terms
For this reason, seeing a Creative Commons symbol is not enough.
Check which Creative Commons licence applies and follow its conditions.
Check Font Licences Too
Fonts are another resource beginners may overlook.
For example, Google Fonts states that fonts in its collection are released under open-source licences. That does not mean every font you find elsewhere on the internet has the same terms.
Before downloading and publishing a font, verify:
· its source
· its licence
· whether web use is permitted
· whether commercial use is allowed for your project
· whether any notices or licence files must be retained
Be Careful with Templates, Icons, and Code Libraries
A website template may contain several separately licensed components.
For example, it might include:
· HTML
· CSS
· JavaScript
· fonts
· icons
· photographs
· illustrations
· third-party code libraries
Do not assume that one permission automatically covers every component.
Check the documentation and licence information for the materials you actually use.
AI Assistance Does Not Remove Licensing Responsibilities
The same rule applies when ChatGPT or another AI tool suggests:
· a library
· a framework
· a font
· an icon set
· a template
· an image source
· a block of third-party code
Do not assume that a suggested resource is automatically copyright-free, open source, commercially permitted, or suitable for your project.
Check the original source and its current licence before relying on it.
For example, if a coding suggestion tells you to install a particular library, locate the project’s official documentation and licence information before using it in a published or commercial project.
Keep a Simple Licence Record
As your projects become larger, record where important third-party assets came from.
A simple record might contain:
· resource name
· creator or publisher
· source
· licence
· date checked
· attribution required
· copy of the licence or permission where appropriate
For example:
Resource: Example Font
Source: Official provider
Licence: Licence name
Checked: August 2026
Attribution: Check licence requirements
Keeping records is much easier than trying to reconstruct the information months later.
If the licence terms later matter, you will have a record of what you checked when the asset was added.
Common Beginner Mistake: Copying Code Because It Is Publicly Visible
A beginner may find a useful website, open its page source, copy a large portion of the code, and assume that this is acceptable because the browser displayed it publicly.
Public visibility and permission to reuse are not the same thing.
Copyright can apply to computer programs and other original works.
How to Avoid This Mistake: Learn from examples, but check ownership and licensing before copying substantial third-party material into a project you intend to publish.
For the exercises in this article, we will continue using small original examples created specifically for learning HTML and CSS.
Common Beginner Mistake: Assuming AI-Generated Means Automatically Safe to Use
An AI tool may produce code or recommend an asset quickly, but that does not eliminate your responsibility to check what you are using.
How to Avoid This Mistake: Before publishing, identify any third-party code, libraries, templates, fonts, images, icons, or other assets and verify their current licences and usage conditions at the original source.
For important commercial or legal questions about copyright or licensing, obtain appropriate professional advice rather than relying solely on an AI response.
Figure 10. Before reusing code, images, fonts, icons, or templates, identify the source, check the applicable licence, and confirm that your intended use follows its conditions.
Explanation: A resource being available online or free of charge does not by itself determine how it may be reused. Keeping licence and permission records helps you document the sources and conditions of third-party materials used in a project.
Common HTML and CSS Mistakes Beginners Make
Mistakes are a normal part of learning HTML and CSS. Many beginner problems are caused by a small typo, a missing character, or a file saved in the wrong place.
Learning how to recognize these problems is more useful than trying to avoid every mistake.
Mistake 1: Forgetting a Closing Tag
Some HTML elements use both an opening and a closing tag.
For example:
<p>This is a paragraph.</p>
A beginner may accidentally write:
<p>This is a paragraph.
Browsers may try to recover from incomplete HTML, but the result may not be what you intended.
How to Avoid This Mistake: When an element requires a closing tag, check that the opening and closing tags match.
Mistake 2: Nesting Elements Incorrectly
HTML elements should be nested correctly.
This is incorrect:
<p>This text is <strong>important.</p></strong>
The <strong> element starts inside the paragraph but ends outside it.
A correctly nested version is:
<p>This text is <strong>important.</strong></p>
Think of nested elements like boxes: a smaller box placed inside a larger box should close before the larger box closes.
Mistake 3: Misspelling an HTML Element
HTML element names must be written correctly.
For example:
<paragraf>Hello</paragraf>
is not the standard HTML paragraph element.
Use:
<p>Hello</p>
If something does not behave as expected, check the element name before making larger changes.
Mistake 4: Forgetting CSS Curly Brackets
A CSS rule normally uses curly brackets:
h1 {
color: darkblue;
}
This is incorrect:
h1
color: darkblue;
}
The opening { is missing.
A single missing character can stop part of a stylesheet from being interpreted correctly.
Mistake 5: Forgetting the Colon Between a Property and Value
A CSS declaration should contain a colon between the property and its value:
color: blue;
This is incorrect:
color blue;
The basic pattern is:
property: value;
For example:
font-size: 18px;
Mistake 6: Using the Wrong CSS Selector
Suppose your HTML contains:
<p class=”intro”>Welcome to my page.</p>
To target the class, the CSS selector needs a dot:
.intro {
color: darkblue;
}
Writing:
intro {
color: darkblue;
}
would target an element named <intro> instead of the class intro.
For beginners, remember:
· p targets <p> elements
· .intro targets class=”intro”
· #main targets id=”main”
You will encounter more selector types as you continue learning CSS.
Mistake 7: Saving the CSS File with the Wrong Name
Your HTML might contain:
<link rel=”stylesheet” href=”style.css”>
but the actual file might be named:
styles.css
or:
style.css.txt
The browser will not find the expected file if the filename or path is wrong.
How to Avoid This Mistake: Compare the filename in your HTML with the actual filename character by character.
Mistake 8: Saving HTML as a Text File
On some computers, a file intended to be:
index.html
may accidentally become:
index.html.txt
The browser may then treat it as an ordinary text file.
When saving files, verify the complete filename and extension.
Mistake 9: Forgetting to Save Before Refreshing
You change the code, refresh the browser, and nothing happens.
Sometimes the problem is simply that the file was never saved.
A useful routine is:
1 Make one change.
2 Save the file.
3 Refresh the browser.
4 Check the result.
This simple sequence prevents a surprising amount of confusion.
Mistake 10: Editing the Wrong File
Once you have several versions, you may accidentally edit:
index-v1.html
while the browser is displaying:
index.html
The code can be perfectly correct and still appear unchanged because you are working in a different file.
How to Avoid This Mistake: Check the filename in the editor and the file opened in the browser.
Mistake 11: Making Too Many Changes at Once
Suppose a page works correctly and you simultaneously change:
· the HTML structure
· several colours
· the font
· the layout
· the image size
· the CSS file location
If the page then breaks, identifying the cause becomes difficult.
How to Avoid This Mistake: Change one small thing at a time and test after each change.
Mistake 12: Using CSS to Fix Incorrect HTML
CSS can control appearance, but it should not be used to disguise incorrect page structure.
For example, if text is a real heading, write:
<h2>Watering Tips</h2>
rather than creating a paragraph and styling it to imitate a heading:
<p class=”fake-heading”>Watering Tips</p>
Correct HTML structure should come first. CSS should then control presentation.
Mistake 13: Relying Only on How the Page Looks
A page may look correct while still containing structural, accessibility, or usability problems.
For example:
· an image may have inappropriate or missing alternative text
· keyboard focus may be difficult to see
· colour contrast may be too weak
· heading levels may be confusing
· important information may disappear on a narrow screen
Visual appearance is only one part of a successful web page.
Mistake 14: Copying Code You Do Not Understand
A large block of code may work immediately, but that does not mean you understand how to maintain it.
If a future change causes a problem, unfamiliar code can make troubleshooting much harder.
How to Avoid This Mistake: Build in small sections and understand the purpose of each important part before moving on.
Mistake 15: Assuming Every Error Requires New Code
Sometimes beginners respond to a small problem by replacing the entire file.
That can introduce additional problems.
Start with the simplest possibilities:
· Was the file saved?
· Is the filename correct?
· Is a bracket missing?
· Is a tag misspelled?
· Is the CSS file connected?
· Is the selector correct?
· Did you refresh the browser?
Only make larger changes after checking the basics.
A Simple Troubleshooting Routine
When something does not work, use this sequence:
1. Identify exactly what is wrong.
2. Check the most recent change.
3. Save the file.
4. Confirm the filenames and file locations.
5. Check HTML tags and CSS punctuation.
6. Refresh the browser.
7. Undo the last change if necessary.
8. Test a smaller version of the problem.
9. Consult reliable documentation when needed.
10. Ask for help only after you can clearly describe the problem.
This method keeps troubleshooting focused.
If you use ChatGPT for assistance, include the relevant small piece of code and explain what you expected to happen and what actually happened. Remove sensitive information before sharing the code, and test any suggested correction yourself.
Figure 11. Most beginner HTML and CSS problems are easier to solve when you check the latest change, syntax, filenames, and saved files before making larger changes.
Explanation: Troubleshooting works best when you isolate one problem at a time. Small, deliberate checks make it easier to find the cause and understand the correction.
Benefits and Limitations of Using ChatGPT for HTML and CSS
ChatGPT can be useful while learning HTML and CSS, especially when you need an explanation, a small example, or help investigating an error. OpenAI currently describes ChatGPT and its coding tools as supporting tasks such as understanding, writing, testing, and reviewing code.
However, it should be used as an assistant, not as a replacement for understanding, testing, or reliable technical documentation.
Benefits for Beginners
Explain Code in Simple Language
When you encounter unfamiliar HTML or CSS, you can ask for an explanation at your own level.
For example:
Example prompt:
Explain this CSS to me as a complete beginner. Tell me what each selector, property, and value does. Then show what would happen if I changed one value at a time.
This can make unfamiliar code easier to examine without requiring you to understand every technical term immediately.
Break a Large Problem into Smaller Steps
Instead of requesting an entire website at once, you can work through one task at a time.
For example:
1. Create the HTML heading.
2. Add a paragraph.
3. Add a list.
4. Connect the CSS file.
5. Change the colours.
6. Add spacing.
7. Test the page.
Working in small steps makes it easier to understand what each change does.
Help Identify Simple Errors
ChatGPT can review a small section of HTML or CSS and suggest possible reasons something is not working.
For example:
Example prompt:
My heading is not changing colour. Check the HTML and CSS below for a beginner mistake. Explain the problem first, then show the smallest correction.
This can be useful for problems such as:
· a missing bracket
· a misspelled selector
· an incorrect filename
· an unclosed HTML element
· a CSS rule targeting the wrong element
The suggested correction should still be tested in your browser.
Show Alternative Approaches
There is often more than one way to achieve a result.
For example, you might ask:
Show me two simple ways to centre this content with CSS. Explain the difference and recommend the easier method for a beginner.
Comparing alternatives can help you understand why one approach may be more appropriate than another.
Help You Practise
You can also ask for small exercises rather than answers.
For example:
Give me a beginner HTML exercise using one heading, two paragraphs, one link, and one unordered list. Do not show the solution until after the exercise.
This can make ChatGPT useful as a practice partner rather than simply a code generator.
Limitations You Should Understand
ChatGPT can produce incorrect or misleading information, including answers that sound confident even when they are wrong. OpenAI explicitly warns users that ChatGPT can make mistakes and recommends checking important information.
That matters when learning code because an incorrect answer may still look convincing.
Limitation 1: Suggested Code May Contain Errors
A response may contain:
· invalid HTML
· incorrect CSS
· unnecessary code
· a misunderstanding of your request
· an outdated or unsuitable approach
· a change that fixes one issue but creates another
How to Reduce This Limitation: Test the code yourself and compare important technical information with reliable documentation.
Limitation 2: It May Misunderstand Your Goal
Suppose you ask:
Make my page look better.
That request is very broad.
The result may be completely different from what you wanted because “better” can mean many things.
A clearer request would be:
Keep my existing HTML structure. Make the page easier to read by improving spacing and text size. Do not add animations, JavaScript, or additional sections.
The more clearly you describe the task, the easier it is to evaluate whether the response actually meets your needs.
Limitation 3: A Working Page Is Not Necessarily a Good Page
Code can display correctly in a browser while still having problems involving:
· accessibility
· privacy
· security
· maintainability
· licensing
· responsive behaviour
· incorrect semantic HTML
Testing whether the page looks right is therefore only one check.
You should also consider whether the page is structured properly and appropriate for its intended use.
Limitation 4: Large Generated Projects Can Be Difficult for Beginners to Understand
If you ask for an entire website containing hundreds of lines of HTML and CSS, you may receive something that works but is difficult to learn from.
When you do not understand the code, even a small future change can become confusing.
How to Reduce This Limitation: Request small sections and build the project gradually.
For example:
Create only the HTML structure for a simple profile page. Do not add CSS yet. Explain each part before we continue.
After you understand the HTML, you can move to the CSS.
Limitation 5: It Cannot Replace Testing
Even when code appears reasonable, you still need to:
1 Save it.
2 Open it in a browser.
3 Test the result.
4 Resize the browser window.
5 Check links and interactive elements.
6 Review accessibility.
7 Confirm that no private information is exposed.
For more important projects, additional browser, device, security, and accessibility testing may also be required.
Limitation 6: Information and Features Can Change
ChatGPT itself continues to change, and OpenAI maintains current release notes and product documentation for updated capabilities.
You do not need to reread every product page before every coding exercise.
A practical approach is to check current official information when:
· you first begin using a feature
· you change plans or tools
· a feature behaves differently from what you expect
· you receive an update notice
· an important project depends on a particular capability
· you periodically review your workflow
Reality: ChatGPT Does Not Remove the Need to Learn HTML and CSS
It may be possible to generate a page without knowing much about the underlying code.
That may produce a quick result, but it leaves you dependent on outside help whenever something needs to be changed or repaired.
For beginners, the more useful goal is:
Use ChatGPT to make HTML and CSS easier to learn, not to avoid learning them.
If you understand the foundations, you can judge suggested code more effectively, recognize obvious mistakes, make your own changes, and ask much better questions.
Figure 12. ChatGPT can support learning, explanation, practice, and troubleshooting, but beginners still need to understand, review, and test the code they use.
Explanation: AI assistance is most useful when it strengthens your understanding rather than replacing it. OpenAI also cautions that ChatGPT can produce incorrect or misleading answers, so important code and information should be checked.
Useful ChatGPT Prompts for Practising HTML and CSS
Good prompts make it easier to get useful explanations and practice exercises.
For beginners, the most effective prompts are usually specific, limited in scope, and focused on learning.
You do not need complicated wording. Simply explain:
· your skill level
· what you are trying to do
· what code you already have
· what is going wrong
· what kind of help you want
Prompt 1: Explain HTML Line by Line
I am a complete beginner learning HTML. Explain the following code one line at a time in simple language. Tell me what each tag and attribute does. Do not add new code unless something is incorrect.
Use this when you receive or find HTML that you do not fully understand.
Prompt 2: Explain CSS Line by Line
I am a complete beginner learning CSS. Explain this CSS rule one line at a time. Tell me what the selector, properties, and values mean, and describe what I should see in the browser.
This is useful when a CSS rule works but you are not sure why.
Prompt 3: Check a Small HTML Page
Review this small HTML page for beginner mistakes. Check the document structure, closing tags, nesting, headings, links, and image attributes. Explain each problem before showing the corrected code.
This helps you learn from your own work rather than simply replacing it.
Prompt 4: Find a CSS Problem
My CSS is not producing the result I expected. I will give you the relevant HTML and CSS. Identify the most likely problem, explain it in beginner-friendly language, and show the smallest correction needed.
When using this prompt, also describe what you expected to happen.
For example:
I expected the heading to be dark blue, but it remains black.
That extra detail can make troubleshooting more focused.
Prompt 5: Ask for a Practice Exercise
Give me a beginner HTML exercise using one main heading, two paragraphs, one link, and one unordered list. Do not show the solution until after I try it.
You can adjust the exercise as your skills improve.
For example:
Give me a beginner CSS exercise using text colour, background colour, padding, margin, and a border.
Prompt 6: Ask for a Hint Instead of the Answer
Sometimes you learn more when you do not receive the complete solution immediately.
Try:
I am stuck on this HTML exercise. Give me one hint only. Do not show the corrected code yet.
If you are still stuck, ask for another hint.
This encourages you to think through the problem yourself.
Prompt 7: Compare Two Pieces of Code
Compare these two HTML examples. Explain how they are different, which structure is clearer for this purpose, and why. Use beginner-friendly language.
Or for CSS:
Compare these two CSS approaches. Explain what each one does and which is simpler for this beginner project.
Comparisons are useful when more than one solution appears to work.
Prompt 8: Improve Accessibility Without Redesigning the Page
Review this small HTML and CSS example for obvious beginner accessibility problems. Check headings, image alt text, link wording, colour use, keyboard-related HTML, and readable structure. Do not redesign the page. Explain each suggested change.
Remember that this type of review can identify possible issues but does not prove complete accessibility compliance.
Prompt 9: Make a Page More Responsive
Review this simple HTML and CSS page for problems on narrow screens. Suggest only beginner-friendly changes that help the layout adapt. Explain each change and do not add JavaScript.
You can then resize your browser and test the suggested changes yourself.
Prompt 10: Simplify Complicated Code
If you receive code that looks too advanced, ask:
Rewrite this example using the simplest HTML and CSS suitable for a complete beginner. Remove unnecessary features, keep the same basic result, and explain what you removed.
Simpler code can be easier to learn, maintain, and troubleshoot.
Prompt 11: Explain an Error Without Rewriting Everything
Find the error in this HTML or CSS. Do not rewrite the entire file. Tell me where the problem is, why it causes an issue, and show only the corrected line or small section.
This is especially useful when most of your page already works.
Prompt 12: Test Your Understanding
Ask me five beginner questions about the HTML and CSS concepts in this code. Ask one question at a time. Wait for my answer before explaining whether I am correct.
This turns your own practice page into a learning exercise.
Prompt 13: Create a Small Project Challenge
Give me a small beginner project using only HTML and CSS. It should include headings, paragraphs, one image, one link, one list, and simple styling. Give me the requirements only. Do not provide the finished code until I ask for help.
Possible projects could include:
· a personal profile page using fictional information
· a simple recipe page
· a gardening tips page
· a hobby page
· a basic information page for an imaginary business
Keep practice projects free of real confidential or sensitive information.
Prompt 14: Review Before Publishing
For a small practice project that you are considering publishing, you could ask:
Review this HTML and CSS as a beginner pre-publication check. Look for obvious structural errors, broken links, accessibility concerns, exposed private information, and unnecessary code. List the issues first. Do not claim that the review guarantees security, accessibility, or legal compliance.
This can provide an additional review, but it should not replace appropriate testing or professional review where the project involves sensitive information or important legal, security, or accessibility requirements.
A Better Prompt Usually Includes Context
Compare these two requests:
Too vague:
Fix my website.
More useful:
I am a beginner learning CSS. My heading should be dark blue, but it remains black. The HTML and CSS are below. Find the likely cause, explain it simply, and show only the correction needed.
The second prompt makes the task clearer because it explains:
· your experience level
· the expected result
· the actual result
· the type of help you want
Keep Prompts Focused
Avoid asking for ten unrelated changes in one request.
Instead of:
Fix the colours, make it responsive, improve accessibility, add a contact form, change the fonts, redesign the menu, and fix every error.
work through the project in smaller stages.
For example:
1. Check the HTML structure.
2. Fix the CSS problem.
3. Test the page.
4. Review the responsive layout.
5. Review basic accessibility.
6. Check for private information.
7. Make final visual improvements.
This makes each change easier to understand and verify.
Common Beginner Mistake: Asking for a Complete Replacement Too Quickly
If a small part of your code is wrong, replacing the entire page may remove code that already works and introduce new problems.
How to Avoid This Mistake: Ask for the smallest necessary correction first.
A useful phrase is:
Show only the part that needs to change.
This keeps the troubleshooting process manageable and makes it easier to learn what actually caused the problem.
Figure 13. A useful coding prompt explains your skill level, goal, relevant code, the problem you observed, and the type of help you want.
Explanation: Clear prompts make troubleshooting and learning more focused. For beginners, small and specific requests are usually easier to understand and test than requests for an entire replacement project.
Common Myths About HTML, CSS, and ChatGPT
Beginners often hear simplified claims about web development and AI-assisted coding. Some contain a little truth, but they can create the wrong expectations.
Understanding these myths early can make learning easier.
Myth 1: HTML and CSS Are the Same Thing
They work together, but they have different purposes.
Reality: HTML describes the structure and meaning of web content, while CSS controls its presentation. The HTML standard defines the elements and structure of HTML documents, while W3C describes CSS as a core web language for adding styling such as fonts, colours, and spacing.
A simple way to remember this is:
· HTML = structure and content
· CSS = appearance and layout
Myth 2: HTML Is a Programming Language Like JavaScript or Python
HTML contains instructions that browsers interpret, but it is normally classified as a markup language rather than a general-purpose programming language.
Reality: HTML defines elements, attributes, document structure, and semantics for web content.
This distinction is useful because HTML is mainly concerned with describing content and structure.
Myth 3: You Must Memorize Every HTML Element and CSS Property
HTML and CSS include many features, and CSS continues to be developed through multiple specifications.
Reality: Beginners do not need to memorize everything.
A better approach is to learn the most common concepts first and become comfortable looking up less familiar features when needed.
For HTML, start with elements such as:
· headings
· paragraphs
· links
· images
· lists
For CSS, begin with:
· colours
· fonts
· sizes
· margins
· padding
· borders
Your knowledge will grow naturally through practice.
Myth 4: If the Page Looks Correct, the Code Must Be Correct
Browsers are designed to handle many imperfect documents, so a page may still display even when the code contains problems.
Reality: Appearance alone does not prove that the structure is appropriate, accessible, maintainable, or error-free.
You should also check:
· HTML structure
· CSS syntax
· accessibility
· links
· responsive behaviour
· privacy and security concerns
A visually attractive result is only one part of a good page.
Myth 5: CSS Is Only for Colours and Fonts
Colours and fonts are common beginner examples, but CSS does much more.
Reality: CSS can control spacing, sizing, borders, positioning, flexible layouts, grid layouts, responsive behaviour, and many other aspects of how a document is presented. W3C maintains the CSS specifications covering these capabilities.
You do not need these advanced features immediately, but CSS becomes much more powerful as your skills develop.
Myth 6: ChatGPT Always Produces Correct Code
A coding answer can look professional while still containing mistakes.
Reality: OpenAI states that ChatGPT can produce incorrect or misleading output and may sometimes sound confident even when it is wrong.
That means you should still:
1. read the suggested code
2. understand the important parts
3. test it in your browser
4. check unfamiliar features
5. compare important technical details with reliable documentation
Myth 7: If ChatGPT Generated the Code, You Do Not Need to Understand It
A generated page may appear to work immediately.
That can be convenient, but it can become a problem when you need to change or repair it.
Reality: Understanding the main HTML and CSS concepts makes you better able to evaluate suggestions, identify mistakes, and make your own changes.
OpenAI currently describes its coding tools as supporting activities including understanding, writing, testing, and reviewing code. They are tools within the development process, not a substitute for knowing what your project does.
Myth 8: More Code Means a Better Website
A long stylesheet or complicated HTML structure can look impressive.
Reality: Extra code is useful only when it serves a purpose.
For a beginner project, simpler code is usually easier to:
· understand
· test
· correct
· maintain
· explain
Do not add complexity simply because you can.
Myth 9: You Need Expensive Software to Learn HTML and CSS
Professional tools can make development more convenient, but basic HTML and CSS are plain-text technologies.
Reality: You can learn the fundamentals with a text editor and a browser.
More advanced tools can be introduced later when they provide a real benefit.
Myth 10: A Website Is Finished Once It Works on Your Computer
A page may work perfectly on your own screen and still cause problems elsewhere.
Reality: A real website should be checked under different conditions, including different screen widths, browsers, zoom levels, and input methods.
It may also require additional accessibility, privacy, security, licensing, and performance reviews depending on what the website does.
Myth 11: Anything Found Online Can Be Copied into Your Website
Publicly visible material may still be protected by copyright or subject to licence conditions.
Reality: Check the source and licence before reusing third-party code, images, fonts, icons, templates, or other assets.
Availability online does not automatically mean unrestricted reuse.
Myth 12: Once You Learn HTML and CSS, You Know Everything Needed to Build Any Website
HTML and CSS are foundational, but modern websites can involve many additional technologies.
These may include:
· JavaScript
· servers
· databases
· content-management systems
· APIs
· authentication
· security controls
· testing and deployment tools
Reality: HTML and CSS give you an important foundation. They are the beginning of web development, not the end.
That is good news for beginners: you do not need to learn the entire web-development ecosystem at once.
Learn the foundation first and add new skills only when you need them.
Figure 14. Common beginner myths can make HTML, CSS, and AI-assisted coding seem either harder or easier than they really are.
Explanation: HTML and CSS are approachable when learned gradually. ChatGPT can support that learning process, but understanding, testing, accessibility, security, and responsible reuse still require your attention. OpenAI also advises users to verify important information because ChatGPT can make mistakes.
Frequently Asked Questions
Is HTML difficult for a complete beginner?
HTML is generally one of the easier web technologies to begin learning because you can create a useful page with only a small number of elements.
You do not need to memorize the entire language before starting. Begin with headings, paragraphs, links, images, and lists, then add more elements as you need them.
The best way to learn is to create small pages and test each change in your browser.
Is CSS harder than HTML?
CSS can feel more complicated because several styling rules may affect the same element and because layouts become more advanced as a website grows.
For a beginner, start with simple properties such as:
· color
· background-color
· font-family
· font-size
· margin
· padding
· border
Once those concepts are familiar, you can gradually learn responsive layouts, Flexbox, Grid, and other CSS features.
You do not need advanced CSS to create your first useful web page.
Do I need to learn HTML before CSS?
It is helpful to understand basic HTML first because CSS styles HTML elements.
For example, if you understand that:
<h1>My Page</h1>
creates a main heading, it is easier to understand what this CSS does:
h1 {
color: darkblue;
}
You do not need to master HTML before touching CSS. Learn a small amount of HTML, style it with CSS, and continue building both skills together.
Can I create a website using only HTML and CSS?
Yes, you can create many useful static web pages with HTML and CSS alone.
For example, you can create:
· an information page
· a simple portfolio
· a recipe page
· a basic business-information page
· a personal hobby page
· a landing page
More advanced features may require additional technologies.
For example, interactive applications, account systems, databases, payments, or complex forms usually require technologies beyond HTML and CSS.
Do I need JavaScript to learn HTML and CSS?
No.
JavaScript is an important web technology, but you do not need it to begin learning HTML and CSS.
Learning the page structure and visual styling first can make JavaScript easier to understand later because you will already know how the page itself is organized.
Can ChatGPT build the whole page for me?
It can generate HTML and CSS examples, including complete page suggestions, but receiving the code is not the same as understanding it.
For a beginner, a better learning approach is to build the page in smaller parts.
For example:
1 Create the HTML structure.
2 Test it.
3 Add basic CSS.
4 Test again.
5 Add one feature at a time.
6 Ask for help when you encounter a specific problem.
This makes it much easier to understand what each part does.
Should I type the code myself or copy and paste it?
Both can be useful.
Typing short examples yourself can help you become familiar with:
· HTML tags
· CSS punctuation
· filenames
· indentation
· common spelling patterns
Copying a longer example can save time, but read it carefully before using it.
For beginner exercises, a good compromise is to copy the basic example and then make several changes yourself.
Does HTML care about uppercase and lowercase letters?
HTML syntax is generally written using lowercase element and attribute names in modern examples.
For example:
<p>Hello</p>
rather than:
<P>Hello</P>
Using lowercase consistently makes your code easier to read and matches common modern practice.
CSS selectors and values can have their own case-sensitivity rules depending on what they refer to, so consistency is a useful habit.
Why is my CSS not changing the page?
Common causes include:
· the CSS file was not saved
· the HTML file links to the wrong filename
· the CSS file was accidentally saved as .txt
· a selector does not match the HTML
· a bracket, colon, or other character is missing
· another CSS rule is overriding the style
· the browser has not been refreshed
Check the simplest possibilities first.
Do not replace the entire stylesheet because one colour or spacing rule is not working.
What is the difference between a class and an ID?
A class can be used for multiple elements.
For example:
<p class=”note”>First note</p>
<p class=”note”>Second note</p>
CSS can target that class with:
.note {
background-color: lightgrey;
}
An ID identifies a particular element and should be unique within the document.
For example:
<h1 id=”page-title”>My Gardening Page</h1>
CSS can target it with:
#page-title {
color: darkblue;
}
For many reusable styles, classes are usually the more flexible choice.
Do I need a paid code editor?
No.
A plain-text editor is enough for the exercises in this guide.
Dedicated code editors can later provide useful features such as:
· syntax highlighting
· automatic indentation
· code completion
· file navigation
· error hints
These features can make coding more convenient, but they are not required to understand HTML and CSS.
Can I use HTML and CSS in WordPress?
Yes, although the amount of direct HTML and CSS you can or should add depends on the WordPress setup, theme, editor, plan, and available features.
WordPress normally creates much of the underlying page structure for you, so beginners do not need to manually code every page.
Learning basic HTML and CSS can still help you understand:
· how web pages are structured
· what certain blocks produce
· why formatting behaves in a particular way
· how custom styling works
· how to communicate more clearly when troubleshooting a website
Always test custom changes carefully and keep a backup before making substantial modifications.
Does learning HTML and CSS still matter when AI can generate code?
Yes.
AI tools can make coding faster in some situations, but basic knowledge helps you determine whether the result actually makes sense.
When you understand HTML and CSS, you can more easily:
· recognize incorrect structure
· modify generated code
· troubleshoot problems
· spot unnecessary complexity
· review accessibility
· explain what you want more precisely
· decide whether a suggested change should be used
The ability to generate code makes understanding more valuable, not less.
Can I publish the practice page created in this guide?
You can publish your own practice work, but review it first.
Before publishing, check:
· that private information has been removed
· that links work
· that images and other assets have appropriate permissions or licences
· that the page works on different screen sizes
· that basic accessibility has been considered
· that no secret keys, passwords, or confidential information appear in the files
If your project begins collecting personal information, accepting payments, handling accounts, or performing other sensitive functions, additional privacy, security, legal, and technical requirements may apply.
Do I need to become a professional developer to benefit from HTML and CSS?
No.
Even a basic understanding can help you:
· make small website changes more confidently
· understand what a web developer is talking about
· troubleshoot simple formatting problems
· evaluate code suggestions more carefully
· understand how WordPress and other website tools create pages
· continue into more advanced coding if you choose
For a beginner, the goal is not to know everything. It is to understand the foundation well enough to know what you are looking at and what to learn next.
Key Takeaways
HTML and CSS become much easier to understand when you learn them in small steps and test each change as you go.
Remember these main points:
· HTML provides structure and meaning. Use it for headings, paragraphs, links, images, lists, forms, and other page content.
· CSS controls presentation. Use it for colours, fonts, spacing, borders, sizing, and layout.
· Keep HTML and CSS in their proper roles rather than using visual styling to imitate meaningful HTML structure.
· Start with simple files such as index.html and style.css.
· Save your files and refresh the browser after each change.
· Check filenames, tags, brackets, selectors, colons, and file locations before assuming a problem is complicated.
· Make one change at a time so that mistakes are easier to identify.
· Use semantic HTML whenever possible because meaningful structure improves clarity and supports accessibility.
· Design pages so that they can adapt to different screen sizes rather than depending on one fixed display width.
· Consider accessibility while building the page, not only after the visual design is finished.
· Protect passwords, API keys, authentication tokens, personal information, and confidential data. Do not place secrets in public-facing HTML or CSS.
· Check licences before reusing third-party code, images, fonts, icons, templates, or other website assets.
· Do not assume that something is free to reuse simply because it is available online.
· Use ChatGPT for focused tasks such as explanations, small examples, troubleshooting, comparisons, and practice exercises.
· Review and test code suggested by ChatGPT rather than assuming that it is correct.
· Remove private or sensitive information before sharing code with an online service.
· Keep copies of working versions before making substantial changes.
· Learn the foundations instead of depending on large blocks of code you do not understand.
The most important beginner habit is simple:
Understand what you are changing, make one change at a time, and test the result.
Once that routine becomes familiar, HTML and CSS stop looking like mysterious code and start becoming understandable building blocks for the web.
Final Tip
Do not try to learn HTML and CSS by memorizing large amounts of code.
A better approach is to build one small page, understand what each part does, and improve it gradually.
When you are unsure about something:
1. Check the part of the code you just changed.
2. Test the page in your browser.
3. Compare the result with what you expected.
4. Look up the relevant HTML or CSS feature in reliable documentation.
5. Use ChatGPT for a focused explanation or troubleshooting help when needed.
6. Keep the change only when you understand what it does.
The strongest beginner habit is not writing code quickly. It is developing the confidence to look at a small piece of HTML or CSS and say:
“I understand what this does, why it is here, and how to test it.”
That foundation will make future web-development topics much easier to learn.
Continue Learning
HTML and CSS are the foundation of web pages, but they are only the beginning of the coding skills you can develop.
After completing this guide, a useful next step is to keep practising with small projects rather than jumping immediately into a large website.
Try creating:
· a simple personal profile page using fictional information
· a recipe page
· a gardening or hobby page
· a basic information page for an imaginary business
· a one-page portfolio
· a simple landing page
For each project, practise the same workflow:
1. Plan the page structure.
2. Write the HTML.
3. Open it in your browser.
4. Add CSS gradually.
5. Test one change at a time.
6. Check the page at different widths.
7. Review basic accessibility.
8. Check for private information and licensing issues.
9. Ask ChatGPT for focused help only when needed.
10. Keep a working copy before making major changes.
Continue with the AI Mastery AI Coding Series
Article 086 continues the AI Mastery AI Coding series after Articles 084 and 085.
If you are following the series in order, review the earlier lessons when you need help understanding coding concepts or asking ChatGPT to explain unfamiliar code.
As later articles are published, they can build on the HTML and CSS foundation covered here and introduce additional coding topics gradually.
The goal is not to learn every web technology at once.
Build a strong foundation first. Once HTML and CSS feel familiar, more advanced topics become much easier to understand.
Sources and References
The following official and authoritative sources were reviewed for the technical, accessibility, privacy, security, copyright, and licensing information in this article. Information was checked on August 16, 2026. Web standards, product features, policies, and licence conditions can change, so readers should check current official information when it matters to their project.
HTML and CSS Standards
WHATWG — HTML Living Standard. Primary technical reference for current HTML syntax, document structure, elements, attributes, links, images, forms, and semantic markup. The Living Standard was current during this review in August 2026.
W3C — CSS Snapshot 2026. Collects the specifications that define the state of CSS in 2026 and describes CSS as a language for rendering structured documents such as HTML.
W3C — Media Queries Level 5. Technical reference for media queries used to apply CSS conditionally, including responsive styling based on viewport characteristics.
W3C — CSS Box Model Level 4. Technical reference for content, padding, borders, margins, sizing, and the CSS box model.
W3C — CSS Fonts Module Level 4. Technical reference for font families, fallback fonts, font sizing, and related CSS font behavior.
Accessibility
W3C Web Accessibility Initiative — WCAG 2.2. Current WCAG 2 Recommendation used for guidance on structure, text alternatives, contrast, keyboard access, focus, and responsive reflow.
W3C WAI — An Alt Decision Tree. Practical guidance for choosing appropriate alternative text based on an image’s purpose and context.
OpenAI — ChatGPT Work and Codex. Current OpenAI product guidance distinguishing conversational ChatGPT use from Codex, which is dedicated to software development and technical work.
OpenAI — Data Controls FAQ. Current guidance for the “Improve the model for everyone” setting and Temporary Chat behavior, including the 30-day deletion period stated by OpenAI.
OpenAI — Privacy Policy. Current privacy-policy reference for personal-data handling in OpenAI services. Product settings and practices can change, so readers should check current official information when it matters.
Security
OWASP — Review Web Page Content for Information Leakage. Security guidance showing that sensitive information such as private API keys, credentials, internal routes, and other details can leak through client-side resources.
OWASP — Secrets Management Cheat Sheet. Best-practice guidance for managing passwords, API keys, credentials, and other secrets without exposing them in application code.
OWASP — Input Validation Cheat Sheet. Explains that client-side validation can be circumvented and that security-relevant validation must also be enforced on the server side.
Copyright and Licensing
WIPO — Copyright. General copyright reference explaining that protected works can include computer programs, photographs, drawings, written material, databases, and other creative works.
Creative Commons — CC Licenses. Official reference for Creative Commons licence types and conditions involving attribution, commercial use, modifications, and share-alike requirements.
Google Fonts — Frequently Asked Questions. Official Google Fonts information about the open-source licences used for fonts in the Google Fonts collection. Individual font licence information should still be checked before use.
Important Note
This article provides general educational information about HTML, CSS, accessibility, privacy, security, copyright, and licensing. It is not legal, cybersecurity, or other professional advice.
Policies, standards, software features, and licence conditions can change. Readers do not need to reread every policy before every small practice exercise, but they should check current official information when first using a tool or resource, changing plans or features, receiving an important policy update, beginning a commercial or sensitive project, and periodically thereafter.
Estimated reading time: 45–50 minutes Last updated: August 16, 2026
Introduction
Code can look confusing when you are a complete beginner.
You may see symbols, brackets, functions, commands, and unfamiliar words without knowing what any of them mean.
ChatGPT can help by explaining code in conversational language. OpenAI describes ChatGPT as a system designed to respond to questions and instructions in dialogue, and its current interface supports working with code blocks for coding tasks.
For example, you can paste a short piece of code and ask:
“Explain this code line by line for a complete beginner.”
You can also ask:
· What does this code do?
· Which programming language is this?
· What does this function mean?
· Which part controls the button?
· Why is this line needed?
· What happens if I remove this part?
· Can you explain this using simpler words?
· Can you show me a small example?
This can make unfamiliar code easier to understand.
For example, suppose you see:
print(“Hello”)
You could ask:
“Explain this Python code as if I have never coded before.”
ChatGPT could then explain that:
· print is an instruction that displays something.
· The quotation marks contain the text.
· Hello is the text that will appear.
The important point is not simply to get an explanation.
You should use the explanation to gradually understand:
· What the code is supposed to do
· Which parts you can change
· Which parts are important
· What may cause an error
· What you should test afterward
You can also continue asking follow-up questions.
For example:
“I still do not understand what print means. Explain it using an everyday example.”
This back-and-forth approach can be useful because you do not need to understand every technical term in the first explanation.
However, ChatGPT can make mistakes or give an explanation that is incomplete, especially when code is long, unusual, outdated, or depends on information that was not included in your prompt.
For important code, you should compare technical details with current official documentation and test the code yourself.
In this guide, you will learn how to ask ChatGPT to explain code clearly, how to provide the right amount of context, how to ask useful follow-up questions, how to avoid sharing sensitive information, and how to tell when an explanation still needs verification.
Figure 1. How ChatGPT can help explain code.
Explanation: The workflow moves from a small code sample to a clear question, a simple explanation, follow-up questions, and finally testing and verification.
Before You Start
You do not need to understand programming before asking ChatGPT to explain code.
You mainly need:
· A short piece of code you want to understand
· The programming language if you know it
· A clear question about what confuses you
· Any relevant error message
· A safe copy of the code without private information
Start with a Small Code Sample
Beginners should avoid pasting a very large program at first.
A smaller example is easier to explain.
For example, instead of pasting hundreds of lines of code, start with the section that contains the part you do not understand.
You could ask:
“Explain only this section of the code. Tell me what each line does and how the lines work together.”
Tell ChatGPT Your Skill Level
ChatGPT can adjust the explanation when you clearly say that you are a beginner.
For example:
“Explain this code as if I have never programmed before. Avoid technical words unless you explain them.”
This can produce a simpler explanation than asking only:
“Explain this code.”
Tell ChatGPT What You Want to Understand
Different questions need different explanations.
You might want to know:
· What the whole code does
· What one line means
· What a function does
· Why a variable is used
· Which part controls an output
· Why an error appears
· What you can safely change
· How two parts of the code connect
For example:
“Explain what this function does and why it is needed.”
Include the Programming Language When You Know It
If you know the language, mention it.
For example:
“This is Python code. Explain it line by line for a beginner.”
or:
“This is HTML and CSS. Explain what the HTML does first, then explain the CSS.”
This can help keep the explanation focused.
Ask for One Type of Explanation at a Time
If you ask for too much at once, the answer can become overwhelming.
Instead of asking:
“Explain everything, fix the code, improve it, make it secure, and add new features.”
start with:
“First, explain what the code currently does.”
Then continue with another question after you understand it.
Keep the Original Code
Before changing anything, save the original version.
For example:
· code-original.txt
· project-before-changes
· webpage-v01-working.html
This gives you something to return to if a later change causes a problem.
Remove Sensitive Information
Before pasting code into ChatGPT, check for:
· Passwords
· API keys
· Access tokens
· Database credentials
· Private URLs
· Customer information
· Personal information
· Confidential comments
· Internal company details
Replace sensitive values with placeholders such as:
YOUR_API_KEY_HERE
or:
PRIVATE_DATABASE_NAME
Include the Exact Error When Relevant
If you want help understanding an error, include the complete error message when it is safe to share.
For example:
“This Python code gives me this error: [error message]. Explain what the error means before showing me how to fix it.”
This is more useful than saying:
“My code does not work.”
Ask ChatGPT Not to Change the Code Yet
If your goal is learning, you can say:
“Do not rewrite or fix the code yet. First explain what it does and where the problem may be.”
This keeps the focus on understanding.
Reality: ChatGPT can make unfamiliar code easier to understand, but the explanation is still AI-generated. For important technical details, compare the explanation with current official documentation and test the code yourself.
Figure 2. Checklist before sharing code with ChatGPT.
Explanation: Before pasting code, keep the sample small, remove secrets, identify the language when possible, state your goal, save the original, and include only the context needed.
What You’ll Learn
By the end of this guide, you will know how to:
· Ask ChatGPT to explain unfamiliar code in simple language.
· Tell ChatGPT that you are a complete beginner.
· Ask for line-by-line explanations.
· Ask what a function, variable, command, or symbol means.
· Separate HTML, CSS, JavaScript, Python, or other code explanations when needed.
· Provide enough context without sharing unnecessary private information.
· Ask useful follow-up questions when the first explanation is still confusing.
· Ask ChatGPT to explain an error before fixing it.
· Ask what parts of the code can be safely changed.
· Compare expected behavior with what the code actually does.
· Keep the original working code before making changes.
· Recognize when an AI explanation may be incomplete or incorrect.
· Verify important technical details using current official documentation.
· Use ChatGPT as a learning assistant rather than simply copying code you do not understand.
You will also learn how to make coding explanations more useful by asking focused questions instead of requesting one large explanation of an entire project.
The goal is to gradually become more comfortable reading and understanding code so that you can recognize what each part is doing, ask better questions, and make safer changes.
How to Ask ChatGPT to Explain Code Clearly
The quality of the explanation often depends on how clearly you ask the question.
A short prompt such as:
“Explain this code.”
may work, but a more specific prompt usually gives a more useful answer.
Ask for a Beginner-Level Explanation
Tell ChatGPT exactly how simple the explanation should be.
For example:
“Explain this code for a complete beginner. Avoid technical terms unless you define them.”
This can make the response easier to follow.
Ask for a Line-by-Line Explanation
If the code is short, you can ask:
“Explain this code line by line. For each line, tell me what it does and why it is needed.”
This helps you connect each line with the result it produces.
Ask for a Section-by-Section Explanation
Longer code is often easier to understand in sections.
For example:
“Divide this code into logical sections and explain each section separately.”
This can help you understand:
· Setup code
· Variables
· Functions
· Main program logic
· Output
· Error handling
Ask What the Code Does Overall
Before looking at every line, it can help to understand the main purpose.
Ask:
“Before explaining the details, tell me in one short paragraph what this code is designed to do.”
Then you can ask for a deeper explanation.
Ask About One Specific Line
If only one line is confusing, focus on that line.
For example:
“What does this line mean?”
or:
“Explain why this line is needed.”
This can prevent the response from becoming unnecessarily long.
Ask About Functions
A function is a reusable section of code designed to perform a task.
You can ask:
“Explain what this function does, what information goes into it, and what result comes out.”
If the explanation is still too technical, ask:
“Explain the same function using an everyday example.”
Ask About Variables
A variable stores a value that the program can use.
For example:
“Explain what each variable in this code represents and where it is used.”
This can help you understand how information moves through the program.
Ask About Symbols and Punctuation
Programming languages use symbols that may look unfamiliar.
You can ask:
“What do the parentheses, quotation marks, commas, and equals sign mean in this line?”
This is especially useful when you are completely new to coding.
Ask What You Can Safely Change
Once you understand the basic code, you can ask:
“Which values or text can I change without changing how the program works?”
For example, you may be able to change:
· Visible text
· Colours
· Names
· Simple values
· Labels
Be more careful when changing functions, file paths, security settings, or other important logic.
Ask What Not to Change Yet
You can also ask:
“Which parts should I leave unchanged until I understand them better?”
This can help reduce accidental mistakes.
Ask for an Everyday Analogy
If the technical explanation is difficult, ask:
“Explain this code using an everyday analogy.”
For example, a function might be compared to a small machine that receives something, performs a task, and returns a result.
Analogies are useful for learning, but they are simplified explanations and should not replace the actual technical meaning.
Ask for a Simpler Version
If the code is more complicated than necessary, ask:
“Can you show me a simpler version that demonstrates the same basic idea?”
A smaller example can make the concept easier to understand.
Ask ChatGPT to Check Your Understanding
After reading the explanation, try describing the code yourself.
Then ask:
“This is how I understand the code: [your explanation]. Tell me which parts I understood correctly and which parts need correction.”
This can turn the conversation into a learning exercise rather than simple answer copying.
Ask for a Short Summary at the End
After a detailed explanation, ask:
“Summarize the code in five simple bullet points.”
This gives you a quick reference after reading the longer explanation.
A Strong Beginner Prompt
A useful complete prompt is:
“Explain this code for a complete beginner. First tell me what the code does overall. Then explain it section by section and line by line where necessary. Define any technical terms, tell me which parts I can safely change, and do not rewrite the code unless I ask.”
Reality: You do not need to understand an entire program immediately. Start with the overall purpose, then work through smaller sections and individual lines until the code begins to make sense.
Figure 3. Move from the big picture to individual lines.
Explanation: Beginners can reduce confusion by first understanding the overall purpose, then the main sections, individual lines, symbols and terms, and finally one safe change to test.
Step-by-Step: Ask ChatGPT to Explain a Piece of Code
A simple process can make code explanations easier to understand and more useful for learning.
Step 1: Choose a Small Section of Code
Start with a short piece of code rather than an entire large project.
For example:
name = input(“What is your name? “)
print(“Hello, ” + name)
A small example makes it easier to understand each line.
Step 2: Remove Sensitive Information
Before pasting code into ChatGPT, check for:
· Passwords
· API keys
· Access tokens
· Customer information
· Private file paths
· Confidential comments
· Database credentials
· Internal company information
Replace sensitive values with placeholders.
For example:
YOUR_API_KEY_HERE
Step 3: Tell ChatGPT Your Skill Level
Say clearly that you are a beginner.
For example:
“I am a complete beginner. Explain this Python code without assuming I already know programming.”
This helps set the level of the explanation.
Step 4: Ask What the Code Does Overall
Before examining individual lines, ask:
“First, explain in one short paragraph what this code does overall.”
For the example above, ChatGPT might explain that the program asks the user for a name and then displays a greeting.
Understanding the main purpose first can make the individual lines easier to follow.
Step 5: Ask for a Line-by-Line Explanation
Then ask:
“Now explain each line separately. Tell me what every important word, symbol, and value means.”
For example, you could learn that:
· name is a variable.
· input() asks the user to enter information.
· The text inside quotation marks appears on the screen.
· print() displays information.
· The + joins pieces of text in this example.
Step 6: Ask About Anything You Still Do Not Understand
Do not move on simply because ChatGPT provided an explanation.
If the word “variable” is still confusing, ask:
“What is a variable? Explain it with an everyday example before explaining the code again.”
You can repeat this process for any unfamiliar term.
Step 7: Ask Which Parts You Can Change
Once you understand the basic code, ask:
“Which parts of this example can I change safely without changing the main idea?”
For example, you might change:
“Hello, “
to:
“Welcome, “
Then run the code again and observe the result.
Step 8: Ask What Would Happen Before Making a Change
Before changing unfamiliar code, you can ask:
“What would happen if I changed this line? Do not modify the code yet.”
This helps you predict the effect before making the edit.
Step 9: Make One Small Change Yourself
Try changing something simple.
For example:
print(“Welcome, ” + name)
Run the program again.
Check whether the result matches what you expected.
Step 10: Ask ChatGPT to Check Your Understanding
Explain the code in your own words.
For example:
“I think the first line asks for the user’s name and stores it, and the second line displays a greeting using that name. Is my understanding correct?”
ChatGPT can then identify anything you misunderstood.
Step 11: Ask for a Similar Practice Example
Once you understand the original code, ask:
“Give me a similar beginner exercise using the same idea, but do not show me the answer yet.”
This helps you practise rather than simply reread the explanation.
Step 12: Verify Important Technical Details
For simple learning examples, ChatGPT may be enough to help you understand the basic idea.
For unfamiliar functions, libraries, commands, security features, or code that matters to a real project, check the current official documentation as well.
A Useful Complete Prompt
You can use:
“I am a complete beginner. First explain what this code does overall. Then explain each important line in simple language. Define technical terms, tell me what I can safely change, and do not rewrite the code unless I ask. If anything is uncertain or depends on information I have not provided, tell me instead of guessing.”
How to Avoid This Mistake: Do not read a long AI explanation once and assume you understand the code. Ask smaller follow-up questions, make a simple change yourself, test the result, and explain the code back in your own words.
Figure 4. The 12-step code explanation process.
Explanation: This checklist summarizes the full learning process from choosing a small sample and removing sensitive information through testing, explaining the code back, practising, and verifying important details.
Useful ChatGPT Prompts for Understanding Code
Reusable prompts can help you get clearer explanations from ChatGPT. Replace the bracketed parts with your own code, programming language, or question.
Prompt for a Complete Beginner
“I am a complete beginner. Explain this [programming language] code in simple language. Do not assume I already know programming terms.”
Prompt for an Overall Explanation
“Before explaining individual lines, tell me in one short paragraph what this code is designed to do.”
This gives you the big picture first.
Prompt for a Line-by-Line Explanation
“Explain this code line by line. For each line, tell me what it does and why it is needed.”
This works best with short code samples.
Prompt for a Section-by-Section Explanation
“Divide this code into logical sections. Give each section a simple name and explain what it does.”
This can be easier than reviewing a long program one line at a time.
Prompt for Explaining Technical Terms
“Explain every technical term in this code that a complete beginner may not understand.”
You can also ask about one term:
“What does ‘function’ mean in this example? Explain it using an everyday analogy.”
Prompt for Explaining Symbols
“Explain the important symbols in this line, including the parentheses, quotation marks, commas, brackets, equals signs, or other punctuation.”
This can be especially useful when you are learning your first programming language.
Prompt for Understanding Variables
“Identify the variables in this code. Explain what each variable stores and where it is used.”
Prompt for Understanding Functions
“Identify the functions in this code. For each function, explain what information goes into it, what it does, and what result it produces.”
Prompt for Explaining HTML
“This is HTML code. Explain what each element does and what I would see in the browser.”
Prompt for Explaining CSS
“This is CSS. Explain which webpage element each rule affects and what visual change it creates.”
Prompt for Explaining JavaScript
“This is JavaScript. Explain what causes the code to run, what it changes, and what the user would notice.”
Prompt for Explaining Python
“This is Python code. Explain it step by step for someone who has never used Python before.”
Prompt for Asking What You Can Change
“Which parts of this code can a beginner safely change for practice? Explain what each change would affect.”
Prompt for Asking What Not to Change
“Which parts of this code should I leave unchanged until I understand them better? Explain why.”
Prompt for Predicting a Change
“Do not change the code yet. Tell me what would probably happen if I changed [specific line or value] to [new value].”
Afterward, make the change yourself and test whether the result matches the explanation.
Prompt for Comparing Two Versions
“Compare these two versions of the code. Explain exactly what changed and what effect those changes should have.”
This can be useful after ChatGPT or another person modifies your code.
Prompt for Understanding an Error
“This code produces this error: [error message]. First explain what the error means in beginner-friendly language. Do not fix the code yet.”
Once you understand the problem, you can ask for the smallest correction.
Prompt for Explaining Why Code Works
“This code works, but I do not understand why. Explain the sequence of events from the first line to the final result.”
Prompt for Simplifying an Explanation
“I still do not understand. Explain the same code again using shorter sentences, simpler words, and one everyday example.”
There is no problem with asking for a second or third explanation.
Prompt for Creating a Simple Example
“Create a much smaller example that demonstrates the same coding idea. Explain how the small example relates to my original code.”
This can help when the original program is too complicated.
Prompt for Checking Your Understanding
“This is my explanation of the code: [your explanation]. Tell me what I understood correctly and correct only the parts I misunderstood.”
Prompt for a Short Review Summary
“After explaining the code, give me five short bullet points summarizing the most important things I should remember.”
Prompt for Creating Practice Questions
“Based on this code, create five beginner questions that test whether I understand it. Do not show the answers until I ask.”
Prompt for a Practice Modification
“Give me one small change I can make to this code myself for practice. Do not show me the finished answer immediately.”
Prompt for Explaining Without Rewriting
“Explain this code only. Do not rewrite, optimize, or replace it unless I specifically ask.”
This is useful when your goal is learning rather than modification.
Prompt for Identifying Missing Context
“Tell me whether you have enough information to explain this code accurately. If important files, libraries, settings, or other context are missing, list what you need instead of guessing.”
Prompt for Verification
“Identify any functions, libraries, commands, versions, or technical claims in this explanation that I should verify using current official documentation.”
Final Check Before Using Any Prompt: Remove passwords, API keys, private information, and confidential code before sharing it. Keep your original code, ask focused follow-up questions, and verify important technical details when the code affects a real project.
Figure 5. A strong beginner prompt formula.
Explanation: A useful prompt combines your skill level, context, task, preferred explanation format, boundaries on changes, and a request to identify anything that needs verification.
Practical Example: Ask ChatGPT to Explain a Simple Webpage
Suppose you receive a small HTML file and can see the webpage in your browser, but you do not understand how the code creates what you see.
A short example might look like this:
<!DOCTYPE html>
<html>
<head>
<title>My First Page</title>
</head>
<body>
<h1>Welcome</h1>
<p>This is my first webpage.</p>
<button>Learn More</button>
</body>
</html>
Instead of asking ChatGPT to redesign the page, use it first to understand the existing code.
Stage 1: Ask What the Code Does Overall
Start with:
“I am a complete beginner. Tell me in one short paragraph what this HTML code does. Do not change the code.”
ChatGPT may explain that the code creates a simple webpage containing:
· A browser-tab title
· A main heading
· A paragraph
· A button
This gives you the overall purpose before you study individual lines.
Stage 2: Ask About the Main Structure
Next ask:
“Explain the main parts of this HTML document and what <html>, <head>, and <body> mean.”
A beginner-friendly explanation may describe:
· <html> as the container for the webpage
· <head> as information about the page
· <body> as the visible page content
If any term is unclear, ask another question before continuing.
Stage 3: Ask About One Visible Element
Suppose you want to understand the heading.
Ask:
“Which line creates the word ‘Welcome’ that I see on the webpage?”
ChatGPT should identify:
<h1>Welcome</h1>
Then ask:
“What does h1 mean?”
This focuses the explanation on one idea.
Stage 4: Connect the Code to What You See
Ask:
“Show me which line creates each visible part of the webpage.”
You can then connect:
· <h1> with the heading
· <p> with the paragraph
· <button> with the button
This makes the code less abstract because you can match it to the browser result.
Stage 5: Ask About Something You Cannot See
You may notice that this line does not appear inside the visible page:
<title>My First Page</title>
Ask:
“Where would I see the text ‘My First Page’ if it is not inside the webpage itself?”
ChatGPT can explain that the title normally appears in the browser tab or similar browser interface.
This teaches an important lesson: not every line of code creates visible page content.
Stage 6: Ask What You Can Change Safely
Now ask:
“Which text in this example can I change for practice without changing the basic page structure?”
For example, you could change:
<h1>Welcome</h1>
to:
<h1>Welcome to My Website</h1>
You could also change the paragraph or button text.
Stage 7: Predict the Result Before Editing
Before making the change, ask:
“If I change only the text inside the <h1> element, what should happen in the browser?”
Then make the change yourself, save the file, and refresh the page.
Compare the result with what ChatGPT predicted.
Stage 8: Ask About the Button
The button appears on the page, but clicking it may do nothing.
Ask:
“Why does this button appear but not perform an action when I click it?”
This is a useful learning question because appearance and behavior are different concepts.
ChatGPT may explain that the HTML creates the button, but additional code such as JavaScript would normally be needed to give it interactive behavior.
Stage 9: Do Not Add the Feature Yet
Instead of immediately asking for JavaScript, continue learning.
Ask:
“Explain what JavaScript would add to this example without writing any JavaScript yet.”
This helps you understand the purpose of another technology before adding more code.
Stage 10: Explain the Page in Your Own Words
After working through the example, write your own explanation.
For example:
“The HTML document contains information about the page and the visible page content. The heading, paragraph, and button are inside the body. The title is used by the browser rather than displayed as normal page content.”
Then ask:
“Is my explanation correct? Correct only the parts I misunderstood.”
Stage 11: Ask for a Small Practice Task
Once you understand the example, ask:
“Give me one small change I can make to this HTML myself. Do not give me the answer.”
ChatGPT might ask you to:
· Change the heading
· Add another paragraph
· Change the button text
· Add a second heading
Make the change yourself and test it in the browser.
What This Example Teaches
This simple exercise demonstrates a useful learning process:
1 Understand the overall purpose.
2 Identify the main sections.
3 Connect visible results with specific code.
4 Ask about unfamiliar elements.
5 Predict what a change will do.
6 Make one small change yourself.
7 Test the result.
8 Explain the code back in your own words.
Reality: Asking ChatGPT to explain code is most useful when you interact with the explanation. Read it, ask follow-up questions, predict changes, edit a small part yourself, and check whether the result matches your understanding.
Figure 6. Connecting HTML code with the browser result.
Explanation: This visual connects common HTML elements with what a beginner sees in the browser, helping make code less abstract.
Benefits of Asking ChatGPT to Explain Code
Using ChatGPT to explain code can make programming easier to approach, especially when you are still learning basic terms and concepts.
Makes Unfamiliar Code Less Intimidating
A block of code can look difficult when you do not recognize the language, symbols, or structure.
ChatGPT can break the code into smaller pieces and explain:
· What the code is trying to do
· What each section controls
· Which lines are most important
· Which parts are connected
This can make the code feel more manageable.
Lets You Ask Follow-Up Questions
A tutorial or textbook gives you one explanation.
With ChatGPT, you can continue asking questions such as:
· “Can you explain that more simply?”
· “What does this word mean?”
· “Why is this line needed?”
· “Can you give me another example?”
· “What would happen if I changed this value?”
This can help you work through confusion one step at a time.
Helps Explain Technical Terms
Programming includes many unfamiliar terms.
ChatGPT can explain concepts such as:
· Variable
· Function
· Loop
· Condition
· Parameter
· String
· List
· HTML element
· CSS rule
· JavaScript event
You can also ask for an everyday analogy before returning to the technical explanation.
Helps Connect Code with Results
When you can see what a program or webpage does, ChatGPT can help identify which code creates each result.
For example, you can ask:
“Which line controls the button text?”
or:
“Which CSS rule changes the background colour?”
Connecting the visible result with the code can make learning easier.
Helps You Understand Errors Before Fixing Them
When an error appears, beginners may be tempted to ask only for corrected code.
A better approach is to ask:
“Explain what this error means before fixing it.”
Understanding the problem can help you recognize similar errors later.
Helps Compare Different Versions of Code
If your code changes, you can ask ChatGPT to compare the old and new versions.
For example:
“Compare these two versions and explain exactly what changed.”
This can help you identify:
· Added lines
· Removed lines
· Changed values
· New functions
· Possible effects of the changes
Helps You Learn from Existing Code
You do not always need to write code yourself before learning from it.
ChatGPT can help explain code from:
· Your own practice projects
· Tutorials
· Documentation examples
· A colleague or teacher
· An earlier version of your project
Before sharing third-party or workplace code, make sure you have permission and remove confidential or sensitive information.
Helps You Practise Active Learning
Instead of only reading explanations, you can ask ChatGPT to turn the code into a learning exercise.
For example:
“Ask me five questions about this code and do not show the answers until I respond.”
or:
“Give me one small change to make myself.”
This encourages you to think about the code rather than simply copy it.
Lets You Adjust the Explanation Level
If the first explanation is too difficult, ask for something simpler.
For example:
“Explain this as if I am 12 years old and have never programmed.”
If the explanation becomes too simple later, you can ask:
“Now explain the same code using the correct programming terms.”
This allows the explanation to grow with your understanding.
Helps You Identify What to Learn Next
After explaining the code, you can ask:
“What are the three programming concepts in this example that I should learn next?”
This can turn one code example into a simple learning path.
Can Save Time When Reading Small Code Samples
Instead of searching separately for every unfamiliar term, you can ask ChatGPT to explain several related parts together.
This can be especially useful for small beginner examples.
However, important technical details should still be checked against current official documentation when accuracy matters.
Benefit: ChatGPT can make code easier to understand by breaking it into smaller parts, answering follow-up questions, explaining technical terms, connecting code with visible results, and helping you practise what you learned.
The greatest benefit comes when you use the explanation to build your own understanding rather than relying on ChatGPT to make every coding decision for you.
Figure 7. Benefits of asking ChatGPT to explain code.
Explanation: Code explanations can reduce intimidation, support follow-up questions, teach terminology, connect code with results, clarify errors, and encourage active practice.
Limitations and Common Mistakes
ChatGPT can make code easier to understand, but its explanations should not automatically be treated as correct.
Limitation: ChatGPT Can Misinterpret the Code
If you provide only part of a program, ChatGPT may not know what happens in other files or sections.
Missing context might include:
· Imported libraries
· Configuration files
· Other functions
· Database settings
· Framework rules
· Earlier variable definitions
· Software versions
How to Reduce This Limitation: Ask:
“Do you have enough context to explain this accurately? Tell me what information is missing instead of guessing.”
Limitation: An Explanation Can Sound Correct but Still Be Wrong
AI can provide confident explanations even when a technical detail is incorrect.
This is especially important with:
· Unfamiliar functions
· Libraries
· Frameworks
· APIs
· Security features
· Version-specific behavior
How to Reduce This Limitation: Check important technical details against the current official documentation for the language, library, framework, or service.
Limitation: Long Code Can Produce Overwhelming Explanations
Pasting hundreds of lines at once can lead to a very long response that is difficult for a beginner to follow.
How to Reduce This Limitation: Work with smaller sections.
For example:
“Explain only this function first. We will review the next section afterward.”
Limitation: ChatGPT May Explain More Than You Asked
You may ask about one line and receive a large rewrite or several additional suggestions.
How to Reduce This Limitation: Be specific:
“Explain only this line. Do not modify or rewrite the code.”
Limitation: Simplified Explanations Can Leave Out Important Details
A beginner-friendly analogy may help you understand the basic idea, but it may not describe every technical detail accurately.
How to Reduce This Limitation: After the simple explanation, ask:
“Now explain the same concept using the correct programming terminology.”
Common Mistake: Asking Only “What Does This Code Do?”
This question is useful, but it may produce an explanation that is still too technical.
How to Avoid This Mistake: Include your level and preferred format.
For example:
“I am a complete beginner. Explain what this code does overall, then explain each important section using simple language.”
Common Mistake: Pasting Too Much Code
A beginner may paste an entire project when only one small section is confusing.
This can make the explanation harder to follow and may expose unnecessary information.
How to Avoid This Mistake: Start with the smallest relevant section.
Common Mistake: Sharing Sensitive Information
Code can contain information that should remain private.
Examples include:
· Passwords
· API keys
· Access tokens
· Customer data
· Personal information
· Private URLs
· Database credentials
· Confidential business information
How to Avoid This Mistake: Review the code before sharing it and replace sensitive values with clear placeholders.
Common Mistake: Asking ChatGPT to Fix the Code Before Understanding the Problem
If ChatGPT immediately replaces the code, you may get a working version without learning what caused the problem.
How to Avoid This Mistake: Ask:
“Explain the problem first. Do not fix the code until I understand the cause.”
Common Mistake: Copying the Explanation Without Testing It
An explanation may describe what the code should do, but the actual behavior may be different.
How to Avoid This Mistake: Run the code in an appropriate test environment and compare what happens with the explanation.
Common Mistake: Changing Several Things at Once
After receiving an explanation, you may be tempted to change several lines.
If something breaks, it becomes harder to identify the cause.
How to Avoid This Mistake: Make one small change, save the file, test it, and then continue.
Common Mistake: Not Keeping the Original Code
If you replace working code with an AI-generated version, you may lose the version you were trying to understand.
How to Avoid This Mistake: Save a copy before making important changes.
For example:
· original-code
· before-ai-change
· working-v01
· test-v02
Common Mistake: Assuming ChatGPT Knows the Programming Language
Some code can look similar across languages.
How to Avoid This Mistake: If you know the language, say so.
For example:
“This is JavaScript. Explain it for a complete beginner.”
If you do not know, ask:
“Which programming language does this appear to be? Explain why, and tell me if you are uncertain.”
Common Mistake: Ignoring Software Versions
Code behavior can change between versions of a language, library, framework, or tool.
How to Avoid This Mistake: When version information matters, include it if you know it and verify the explanation against current official documentation.
Common Mistake: Assuming an Explanation Proves the Code Is Safe
Understanding what code appears to do does not prove that it is:
· Secure
· Private
· Accessible
· Efficient
· Properly licensed
· Appropriate for production use
How to Avoid This Mistake: Treat explanation, testing, security review, accessibility review, privacy review, and licensing review as separate tasks when they matter.
Common Mistake: Using Workplace or Third-Party Code Without Permission
Code from an employer, customer, paid product, private repository, or another developer may be confidential or subject to restrictions.
How to Avoid This Mistake: Make sure you have permission before submitting third-party or workplace code to an AI service.
Common Mistake: Stopping After the First Explanation
If you still do not understand something, continuing anyway can create confusion later.
How to Avoid This Mistake: Ask another question.
For example:
“I still do not understand this line. Explain only this line using a simpler example.”
Reality: ChatGPT can help you understand code more quickly, but a clear explanation is not proof that the explanation or the code is correct, secure, current, or suitable for a real project. Use small code samples, protect sensitive information, ask focused follow-up questions, test the code, and verify important technical details.
Figure 8. Common mistakes and better actions.
Explanation: The safer alternative is usually to share less code, remove secrets, understand the cause before fixing, make one change at a time, verify important claims, and respect permissions.
Common Myths About Asking ChatGPT to Explain Code
ChatGPT can be a useful coding tutor, but beginners should not assume that every explanation is complete or correct.
Myth 1: If ChatGPT Explains the Code Clearly, the Explanation Must Be Correct
A confident explanation can still contain errors.
Reality: Clear wording does not guarantee technical accuracy. Verify important functions, commands, libraries, APIs, and version-specific behavior using current official documentation.
Myth 2: ChatGPT Always Knows What Every Part of the Code Does
ChatGPT may be missing important context from:
· Other files
· Imported libraries
· Configuration settings
· Earlier variable definitions
· Framework settings
· Database connections
Reality: Ask whether more context is needed before relying on the explanation.
Myth 3: You Should Paste the Entire Project for a Better Explanation
More code does not always produce a better answer.
A very large project can make the explanation harder to follow and may expose unnecessary information.
Reality: Start with the smallest relevant section and expand only when necessary.
Myth 4: You Need to Understand Programming Before Asking Questions
You do not need advanced knowledge to begin.
You can ask very basic questions such as:
“What does this symbol mean?”
or:
“What is a function?”
Reality: Telling ChatGPT that you are a complete beginner can help produce simpler explanations.
Myth 5: Asking for an Explanation Is the Same as Learning the Code
Reading an explanation does not automatically mean you understand it.
Reality: Try explaining the code back in your own words, make a small change yourself, and test what happens.
Myth 6: ChatGPT Should Fix the Code at the Same Time It Explains It
Combining explanation, debugging, rewriting, and improvement in one request can make the answer harder to follow.
Reality: First understand the existing code. Then ask for changes separately.
Myth 7: If ChatGPT Says a Change Is Safe, It Must Be Safe
A change may affect parts of the project that were not included in the prompt.
Reality: Keep backups, make one small change at a time, and test the result.
Myth 8: ChatGPT Can Automatically Detect Every Security Problem
AI may notice some obvious issues, but it cannot guarantee that code is secure.
Reality: Security-sensitive projects require current security guidance and, when appropriate, experienced human review.
Myth 9: Code That Works Is Easy to Explain Correctly
Working code can still contain:
· Hidden dependencies
· Unusual logic
· Outdated methods
· Security weaknesses
· Poor design choices
Reality: Running successfully does not prove that an explanation covers every important issue.
Myth 10: Public Code Is Always Safe to Paste into ChatGPT
Code found online may still be copyrighted, licensed, confidential, or connected to private information.
Reality: Check permission and remove unnecessary sensitive information before sharing code.
Myth 11: ChatGPT Always Knows Which Programming Language You Are Using
Some languages share similar syntax.
Reality: Tell ChatGPT the language when you know it. If you do not know, ask it to identify the likely language and explain any uncertainty.
Myth 12: One Explanation Should Be Enough
Beginners often need the same concept explained more than once.
Reality: Ask for:
· Simpler wording
· A smaller example
· An everyday analogy
· A line-by-line explanation
· A practice question
Different explanations can make the same idea easier to understand.
Myth 13: Longer Explanations Are Always Better
A long answer can sometimes make a simple idea harder to understand.
Reality: Ask for shorter explanations when needed.
For example:
“Explain only this line in three simple sentences.”
Myth 14: ChatGPT Can Replace Official Documentation
ChatGPT can make documentation easier to understand, but it should not replace authoritative sources when accuracy matters.
Reality: Use ChatGPT to help interpret unfamiliar technical information, then verify important details using current official documentation.
The best way to use ChatGPT for code explanations is to treat it as a learning assistant. Ask focused questions, protect sensitive information, test your understanding, and verify important technical details rather than accepting every explanation automatically.
Figure 9. Myths and realities about AI code explanations.
Explanation: Clear explanations can still be wrong, more code is not always better, AI may lack context, working code is not automatically secure, and official documentation still matters.
When ChatGPT Can Help and When Human Review Matters Most
ChatGPT can be useful for explaining many types of code, but the level of human review needed increases when the code becomes more complex, private, security-sensitive, or important to real users.
Good Uses for ChatGPT Code Explanations
ChatGPT can be especially helpful when you want to:
· Understand a short code example
· Learn what a programming term means
· Identify what each section of code does
· Understand variables and functions
· Connect webpage code with what appears in the browser
· Understand a basic error message
· Compare two versions of code
· Learn why a small change affects the result
· Turn an example into a practice exercise
· Check whether your own explanation makes sense
These are generally useful learning tasks because the goal is understanding rather than immediately relying on the code in an important system.
Use More Care with Unfamiliar Libraries and Packages
Code may depend on third-party:
· Libraries
· Packages
· Frameworks
· Plugins
· Extensions
· APIs
ChatGPT may explain what one of these appears to do, but the explanation could be outdated or incomplete.
Before relying on the explanation, check:
· The exact package or library name
· Its official documentation
· The version being used
· Whether the feature still exists
· Whether the documented behavior matches the explanation
Ask ChatGPT:
“Which parts of your explanation depend on this library or its version and should be checked against the official documentation?”
Human Review Matters for Security-Sensitive Code
Use extra care when code involves:
· Passwords
· Authentication
· User accounts
· API keys
· Access permissions
· Encryption
· Databases
· File uploads
· User input
· Private information
ChatGPT can help explain what the code appears to do, but an explanation does not prove that the implementation is secure.
For example, code may appear to check a password while still containing a security weakness.
For important systems, use current security guidance and appropriate experienced review.
Human Review Matters for Payment Code
Code involving:
· Credit cards
· Purchases
· Subscriptions
· Refunds
· Banking information
· Payment-provider integrations
should not rely only on an AI explanation.
Ask ChatGPT to help you understand the general structure, but verify the implementation using the payment provider’s current official documentation and appropriate technical review.
Do not assume that understanding what the code does means the payment system is safely implemented.
Human Review Matters for Personal Information
Some programs collect or process information about real people.
Examples include:
· Names
· Email addresses
· Addresses
· Account details
· Student information
· Employee records
· Health information
· Financial information
ChatGPT may help explain how the program handles the data, but privacy requirements depend on what information is collected, how it is used, where it is stored, and which laws or organizational rules apply.
Do not share real personal information merely to obtain a code explanation.
Use fictional or test data whenever possible.
Human Review Matters for Production Code
Production code is code used by real customers, employees, visitors, or other users.
Before relying on a ChatGPT explanation of production code, consider whether the code affects:
· Important data
· User accounts
· Website availability
· Business operations
· Customer records
· Permissions
· Backups
· External services
· Security controls
A correct-looking explanation does not guarantee that changing the code will be safe.
Keep a working version and use the project’s normal testing and review process.
Accessibility May Need Additional Review
ChatGPT can explain HTML, CSS, JavaScript, and some accessibility-related code.
For example, it may help explain:
· Heading elements
· Form labels
· Image alternative text
· Button names
· Keyboard-related code
· Error messages
However, understanding these elements does not prove that the finished website or application is accessible.
Important projects may require additional automated and human accessibility testing.
Be Careful with Code You Did Not Write
Before sharing code from:
· An employer
· A customer
· A private repository
· A paid product
· A contractor
· Another developer
· A confidential project
make sure you are permitted to submit it to an AI service.
If permission is uncertain, do not paste the code simply because you want an explanation.
You may be able to create a small fictional example that demonstrates the same programming concept without exposing the original code.
Know When the Missing Context Is Too Important
Sometimes a short code sample cannot be accurately explained by itself.
For example, a function may depend on:
· Another file
· A configuration setting
· An imported library
· A database
· An environment variable
· Earlier code
· A particular software version
Ask:
“Can this section be explained accurately by itself, or do you need additional context?”
If more information is required, provide only what is necessary and safe to share.
Know When to Ask an Experienced Person
Consider experienced technical help when the code involves:
· Real customer data
· Authentication
· Payments
· Important databases
· Business-critical systems
· Complex security controls
· Regulatory requirements
· Significant accessibility requirements
· Large existing applications
· Systems where an error could cause significant harm or loss
ChatGPT can still help you understand terminology and individual code sections, but it should not be the only source of review for high-risk systems.
Reality: ChatGPT is particularly useful for explaining small examples and helping beginners learn how code works. As code becomes more important, private, complex, or security-sensitive, official documentation, testing, permission checks, and experienced human review become increasingly important.
Figure 10. When human review matters more.
Explanation: The need for experienced review rises from low-risk practice examples to libraries and APIs, production systems with customer data, and very high-risk payment, authentication, or critical systems.
Privacy, Security, Licensing, and Responsible Use
When you ask ChatGPT to explain code, think about what the code contains before you paste it into the conversation.
Code can contain more sensitive information than a beginner may realize.
Check the Code Before Sharing It
Before submitting code, look for:
· Passwords
· API keys
· Access tokens
· Database credentials
· Private URLs
· Account numbers
· Customer information
· Employee information
· Personal email addresses
· Internal server names
· Confidential comments
· Private file paths
· Proprietary business information
Remove anything that is not necessary for the explanation.
Replace Sensitive Values with Placeholders
You normally do not need to provide a real password or secret key for ChatGPT to explain how the code works.
Instead of:
API_KEY = “real-secret-key”
use:
API_KEY = “YOUR_API_KEY_HERE”
The programming concept can still be explained without exposing the real credential.
Treat Exposed Credentials Seriously
If you accidentally share a real password, API key, token, or other secret, simply removing it from the code afterward may not be enough.
Follow the service provider’s current instructions for:
· Revoking the credential
· Rotating or replacing it
· Updating affected applications
· Checking for unauthorized use when appropriate
Do not continue using a credential that should be considered exposed without checking the provider’s guidance.
Use Fictional Information for Learning
When possible, replace real personal information with fictional examples.
For example, use:
student@example.com
instead of a real student’s email address.
For a database example, you could use fictional names such as:
· Alex Example
· Jamie Sample
· Morgan Test
The goal is to preserve the code structure without exposing a real person’s information.
Be Careful with Workplace Code
Code from a workplace may contain:
· Proprietary business logic
· Internal system information
· Customer data
· Security settings
· Confidential comments
· Licensed third-party components
Before sharing workplace code with ChatGPT, make sure you are permitted to do so under your employer’s or organization’s policies.
If you are uncertain, ask the appropriate person or use a small fictional example that demonstrates the same coding concept.
Be Careful with Customer or Client Code
The same principle applies to code belonging to a:
· Customer
· Client
· Contractor
· Business partner
· School
· Nonprofit organization
Having access to code does not automatically mean you have permission to submit it to an AI service.
Third-Party Code May Have Licence Conditions
Code from tutorials, repositories, libraries, templates, plugins, or other developers may be subject to licence terms.
Those terms can affect:
· Copying
· Modification
· Redistribution
· Attribution
· Commercial use
· Inclusion in another project
ChatGPT can help explain how code works, but an explanation does not change the licence that applies to the original code.
Do Not Assume Public Code Has No Restrictions
Code being visible on a public website or repository does not automatically mean that you can use it for any purpose.
Before reusing important third-party code, check:
· The licence
· Copyright notices
· Attribution requirements
· Distribution conditions
· Commercial-use conditions
If no licence is clearly provided, do not assume unrestricted permission.
Separate Explanation from Security Review
You might ask:
“What does this authentication code do?”
ChatGPT may explain the apparent logic.
That does not mean the code has passed a security review.
A useful follow-up question is:
“Now identify any security-sensitive parts that should be reviewed separately. Do not assume the code is secure.”
For important systems, use current security documentation and appropriate technical review.
Separate Explanation from Accessibility Review
Understanding webpage code does not prove that the finished page is accessible.
For example, ChatGPT may correctly explain:
<img src=”photo.jpg” alt=”Person using a laptop”>
but accessibility also depends on the purpose of the image, surrounding content, page structure, keyboard behavior, contrast, forms, and other factors.
Accessibility should therefore be reviewed as a separate part of the project.
Be Careful When Code Handles Real People’s Information
Programs may process information such as:
· Names
· Addresses
· Email addresses
· Account information
· Student records
· Employee records
· Health information
· Financial information
Only share information that is necessary and appropriate.
For learning, use fictional or anonymized examples whenever possible.
Preserve Your Original Code
Before making changes based on an explanation, keep a copy of the original.
For example:
· project-original
· project-v01-working
· project-before-chatgpt-review
· project-v02-test
This allows you to compare changes and return to a working version if something goes wrong.
Keep Important Records
For projects that may be published, shared, or used commercially, consider preserving:
· Original source files
· Important prompts
· Working versions
· Library and package names
· Software versions
· Licence files
· Permission records
· Source links
· Testing notes
These records can make future troubleshooting, updates, and compliance checks easier.
Use ChatGPT Responsibly
A responsible beginner workflow is:
1 Remove sensitive information.
2 Share only the code needed for the question.
3 Ask for an explanation before requesting changes.
4 Keep the original working version.
5 Test any changes separately.
6 Verify unfamiliar technical details.
7 Check relevant licences and permissions.
8 Use additional human review when the consequences of an error are significant.
Reality: Asking ChatGPT to explain code can be useful for learning, but the code may contain private information, secrets, confidential business material, or third-party content. Review what you share, protect sensitive information, respect permissions and licences, and keep important technical, security, accessibility, and legal checks separate from the AI explanation.
Figure 11. Privacy, security, licensing, and responsible-use checks.
Explanation: Before sharing or changing code, check personal information, secrets and credentials, permission and licence conditions, and the need for testing and official verification.
Frequently Asked Questions
Can ChatGPT explain code if I know nothing about programming?
Yes.
Tell ChatGPT that you are a complete beginner and ask it to avoid unexplained technical terms.
For example:
“Explain this code as if I have never programmed before. Define every important technical term.”
Should I paste an entire program into ChatGPT?
Usually not at first.
Start with the smallest section that contains the part you want to understand.
A shorter sample is easier to explain and reduces the chance of sharing unnecessary private or confidential information.
What should I ask first?
A useful first question is:
“Tell me in one short paragraph what this code does overall.”
After that, ask for a section-by-section or line-by-line explanation.
Can ChatGPT explain every line of code?
It can often explain short and moderately sized code samples line by line.
For longer programs, it is usually easier to work through one function, section, or file at a time.
What if the explanation is too technical?
Ask for a simpler version.
For example:
“I still do not understand. Explain this using shorter sentences and an everyday example.”
You can ask for another explanation as many times as necessary.
Can I ask ChatGPT what individual symbols mean?
Yes.
You can ask about:
· Parentheses
· Brackets
· Braces
· Quotation marks
· Colons
· Semicolons
· Equals signs
· Operators
· Indentation
For example:
“What do the parentheses and quotation marks mean in this Python line?”
Can ChatGPT identify the programming language?
Often, yes.
If you do not know the language, ask:
“Which programming language does this appear to be? Explain how you identified it and tell me if you are uncertain.”
Do not assume the identification is guaranteed to be correct.
Can ChatGPT explain HTML and CSS separately?
Yes.
For example:
“This code contains HTML and CSS. Explain the HTML first, then explain the CSS separately.”
This can make webpage code easier for beginners to understand.
Can ChatGPT explain JavaScript?
Yes.
A useful prompt is:
“Explain what causes this JavaScript to run, what it changes, and what the user sees as a result.”
Can ChatGPT explain Python code?
Yes.
You can ask for explanations of variables, functions, loops, conditions, lists, errors, and other Python concepts.
For example:
“Explain this Python code line by line for a complete beginner.”
Can ChatGPT explain an error message?
Yes.
Include the exact error message when it is safe to share.
Ask:
“Explain what this error means before showing me how to fix it.”
This can help you understand the problem instead of immediately replacing the code.
What if ChatGPT gives me a corrected version before explaining the problem?
Ask it to stop changing the code.
For example:
“Do not rewrite the code yet. First explain why the error is happening.”
Then ask for the smallest correction only after you understand the cause.
Can I ask ChatGPT which parts of the code I can change?
Yes.
Try:
“Which parts of this code can I safely change for practice, and what will each change affect?”
Keep a copy of the original code before experimenting.
How can I tell whether I really understand the code?
Try explaining it yourself.
Then ask:
“This is how I understand the code: [your explanation]. Tell me what I understood correctly and what I misunderstood.”
You can also make one small change and predict what will happen before running the code.
Should I trust every explanation ChatGPT gives me?
No.
ChatGPT can make mistakes, misunderstand missing context, or provide outdated technical information.
Verify important details using current official documentation, especially for:
· Libraries
· Frameworks
· APIs
· Security features
· Version-specific behavior
· Production systems
Can ChatGPT tell me whether code is secure?
It can help identify possible concerns, but an AI explanation is not proof that code is secure.
Security-sensitive projects involving authentication, payments, databases, private data, or public systems may require current security guidance and experienced review.
Can I paste passwords or API keys if ChatGPT needs them to explain the code?
Normally, no.
Replace real secrets with placeholders such as:
YOUR_API_KEY_HERE
or:
YOUR_PASSWORD_HERE
The programming concept can usually be explained without revealing the actual credential.
What should I do if I accidentally share a real secret?
Follow the provider’s instructions for revoking, rotating, or replacing the exposed credential.
Do not assume that deleting it from your code or conversation automatically makes it safe again.
Can I submit code from my workplace?
Only if you have permission.
Workplace code may contain confidential information, proprietary logic, customer data, or security details.
If permission is uncertain, create a small fictional example that demonstrates the same programming concept.
Is public code automatically safe to reuse?
No.
Publicly visible code may still have copyright or licence conditions.
Check the applicable licence before copying, modifying, redistributing, or using third-party code commercially.
Can ChatGPT replace official programming documentation?
No.
ChatGPT can make technical information easier to understand, but official documentation remains important for verifying current functions, commands, versions, libraries, APIs, and other technical details.
What is the best beginner workflow for understanding code with ChatGPT?
A useful process is:
1 Choose a small code sample.
2 Remove sensitive information.
3 Tell ChatGPT you are a beginner.
4 Ask what the code does overall.
5 Ask for a line-by-line or section-by-section explanation.
6 Ask about unfamiliar terms.
7 Predict what a small change will do.
8 Make one small change yourself.
9 Test the result.
10 Explain the code back in your own words.
11 Verify important technical details using official documentation.
Reality: ChatGPT can make code explanations much easier for beginners, but the most useful learning happens when you ask follow-up questions, test your understanding, protect sensitive information, and verify important technical details instead of accepting the first explanation automatically.
Key Takeaways
ChatGPT can make unfamiliar code easier to understand, but the explanation is most useful when you actively work with it instead of accepting it automatically.
Remember these main points:
· Start with a small section of code.
· Remove passwords, API keys, private information, and confidential details before sharing code.
· Tell ChatGPT that you are a complete beginner.
· Ask what the code does overall before studying individual lines.
· Ask for line-by-line or section-by-section explanations when needed.
· Ask about unfamiliar words, symbols, functions, variables, and commands.
· Ask ChatGPT to explain the code before asking it to rewrite or fix it.
· Ask which parts you can safely change for practice.
· Predict what a change will do before making it.
· Make one small change at a time.
· Keep the original working version of the code.
· Test the result after each important change.
· Explain the code back in your own words to check your understanding.
· Ask for a simpler explanation if the first one is too technical.
· Do not assume a clear explanation is automatically correct.
· Verify unfamiliar functions, libraries, frameworks, APIs, commands, and version-specific behavior using current official documentation.
· Use extra care with security-sensitive, private, commercial, workplace, or production code.
· Respect software licences, permissions, privacy requirements, and confidentiality.
· Use experienced human review when the code affects payments, authentication, customer data, important databases, or other high-risk systems.
The most useful way to ask ChatGPT to explain code is to treat it as a learning assistant. Use it to help you understand what the code does, ask better questions, practise small changes, and gradually become more confident reading code yourself.
Figure 12. The beginner code-understanding loop.
Explanation: Learning improves through a repeated cycle: ask, understand, predict, test, explain the code back, and verify important details.
Final Tip
When code looks confusing, do not try to understand everything at once.
Start with one question:
“What is this code trying to do?”
Then continue with smaller questions such as:
· What does this line mean?
· What is this variable storing?
· Why is this function needed?
· Which part creates the result I can see?
· What would happen if I changed this value?
· Which part should I avoid changing until I understand it better?
A useful prompt is:
“I am a complete beginner. Explain only the part of this code that I need to understand right now. Use simple language, define unfamiliar terms, and do not rewrite the code unless I ask.”
After reading the explanation, try to describe the code in your own words.
If you cannot explain it yet, ask another question before making changes.
A small piece of code that you understand is more useful for learning than a large amount of code that you can only copy.
Continue Learning
After learning how to ask ChatGPT to explain code, continue with these related AI Mastery guides:
· Article 086 — HTML and CSS for Beginners with ChatGPT (2026)— Continue with a practical introduction to webpage code and learn how ChatGPT can help you understand HTML and CSS. Link after Article 086 is published.
· Article 088 — How to Find and Fix Coding Errors with AI (2026) — Learn a more focused debugging process for identifying, understanding, and correcting coding problems. Link after Article 088 is published.
As you continue through the AI Coding series, keep using the same beginner workflow: work with small examples, ask for explanations before major changes, protect sensitive information, test what you learn, and verify important technical details using current official documentation.
Sources and References
The following official and authoritative sources were reviewed for this guide. ChatGPT features, programming languages, security guidance, software licences, privacy practices, and accessibility standards can change, so readers should check current documentation when first using a tool, after important updates, and periodically.
· OpenAI — Working with Writing Blocks and Code Blocks in ChatGPT. OpenAI documents ChatGPT’s current support for working with code blocks, including editing and supported code-related functionality. This supports the guide’s use of ChatGPT as a conversational tool for examining and discussing code. Official source
· OpenAI — How ChatGPT and Our Foundation Models Are Developed. OpenAI explains that ChatGPT is designed to understand and respond to user questions and instructions. This supports the beginner workflow of providing code together with clear instructions and asking follow-up questions. Official source
· OpenAI — ChatGPT and Codex. OpenAI currently distinguishes conversational ChatGPT use from its dedicated Codex coding experience; its documentation describes Codex as supporting activities such as writing and debugging code, running tests, and reviewing changes. Features and product interfaces may continue to change. Official source
· GitHub Docs — Best Practices for Using GitHub Copilot. GitHub recommends understanding suggested code before implementing it and reviewing suggestions for functionality, security, readability, and maintainability. This supports the article’s recommendation to understand code rather than accepting AI-generated material automatically. Official source
· GitHub Docs — Responsible Use of GitHub Copilot Chat. GitHub’s responsible-use documentation recommends secure coding and code-review practices and warns that AI-assisted coding still requires appropriate human review. Official source
· Python Software Foundation — The Python Tutorial and Python Documentation. The official Python documentation provides current language references, tutorials, and guides. These are appropriate sources for checking Python syntax and behavior when an AI explanation needs verification. Official source
· MDN Web Docs — HTML, CSS, and JavaScript Documentation. MDN documents HTML as the technology that defines web-content structure, CSS as the technology used for presentation, and JavaScript as a programming language used for web behavior and other applications. These references support the beginner webpage examples used in this guide. Official source
· OWASP — Secrets Management Cheat Sheet. OWASP provides guidance for storing, managing, auditing, and rotating secrets. This supports the article’s warnings about passwords, API keys, tokens, and other credentials contained in code. Official source
· OWASP — Secure Code Review and Secure Coding Practices. OWASP recommends secure code-review practices covering areas such as authentication, input handling, access control, secrets, and error handling. This supports the distinction made in the guide between understanding what code does and establishing that code is secure. Official source
· Office of the Privacy Commissioner of Canada — Privacy and Artificial Intelligence. The OPC provides guidance concerning AI and personal information and recommends privacy-protective practices when using AI technologies. This supports the article’s recommendation to limit unnecessary personal information when submitting code to an AI system. Official source
· Canadian Intellectual Property Office — Copyright and Intellectual Property Rights in Software in Canada. CIPO explains Canadian copyright and intellectual-property considerations relating to software. These sources support the article’s warning that software and code can involve copyright, licensing, and other intellectual-property rights. Official source
· Open Source Initiative — OSI Approved Licenses. OSI maintains information about approved open-source licences and explains that open-source software is distributed under licence terms. This supports the recommendation to check the specific licence rather than assuming publicly available code has no conditions. Official source
· W3C Web Accessibility Initiative — WCAG 2.2. WCAG 2.2 provides recommendations for making web content more accessible. This supports the article’s reminder that understanding webpage code is separate from verifying whether the completed website meets accessibility requirements. Official source
· OpenAI — Terms of Use. OpenAI’s current Terms explain that users are responsible for the content they provide and, as between the user and OpenAI and to the extent permitted by applicable law, users retain ownership rights in input and own output. This does not remove the need to have appropriate rights and permissions for third-party code or other material submitted to a service. Official source
These sources support the guide’s main recommendations: provide clear instructions, work with manageable code samples, understand code before changing it, protect sensitive information, verify technical details against authoritative documentation, review security separately, respect licences and permissions, and consider accessibility and privacy throughout a project.
For important workplace, commercial, privacy-sensitive, security-sensitive, or legally significant projects, this guide provides general educational information and is not a substitute for appropriate technical, security, accessibility, privacy, or legal advice.