
Estimated Reading Time: 48 minutes
Last Updated: August 8, 2026
Introduction
You do not need to appear on camera yourself to create presenter-style TikTok videos. An AI virtual presenter is a computer-generated person or character that can appear on screen and speak a script using an AI-generated or properly authorized voice.
For example, you could create a fictional virtual presenter who explains simple AI tips, introduces products, presents educational facts, summarizes information, or guides viewers through short tutorials. Instead of recording yourself for every video, you prepare the script, generate the presenter video, edit it for TikTok, add captions and supporting visuals, and then review the finished video before publishing.
This type of workflow can be useful for beginners who:
• Do not want to appear on camera.
• Want a consistent presenter across many videos.
• Have limited video-recording equipment.
• Want to produce educational or informational TikTok content.
• Prefer creating and editing videos on a computer.
• Want to combine AI-generated presenters with images, screen recordings, captions, music, or other visuals.
However, an AI virtual presenter does not automatically make a TikTok video accurate, engaging, legal to use, or acceptable under TikTok’s rules. You still need to check your script, verify factual claims, use properly licensed material, respect people’s privacy and likeness rights, and follow TikTok’s current content policies.
TikTok currently requires creators to label AI-generated content that contains realistic images, audio, or video. TikTok can also automatically label some AI-generated material. Policies and detection systems can change, so creators should check current official guidance when publishing realistic AI content.
For beginners, the simplest approach is usually to create a fictional virtual presenter rather than copying a real person’s face or voice. If you use the image, likeness, or voice of a real person, obtain appropriate permission and make sure the intended use is allowed. Avoid creating content that could falsely make viewers believe a real person said or did something that never happened.
In this guide, you will learn the complete beginner workflow for creating an AI virtual presenter video specifically for TikTok – from planning the idea and writing the script to generating the presenter, adding supporting visuals and captions, formatting the video vertically, reviewing it for accuracy and safety, and preparing it for publication.
The goal is not simply to generate a talking AI character. The goal is to create a clear, useful TikTok video in which the virtual presenter supports the message instead of distracting from it.
Before You Start
You do not need advanced video-editing skills or professional recording equipment to follow this guide. However, preparing a few things before you begin will make the process easier.
You should have:
• A clear idea for the type of TikTok videos you want to create.
• A TikTok account if you plan to publish the finished videos.
• Access to an AI virtual presenter or avatar tool.
• A computer, tablet, or smartphone capable of creating and editing video.
• A simple video-editing tool for adding captions, images, screen recordings, music, or other supporting material.
• A folder where you can save scripts, images, videos, licences, permissions, and final exports.
You should also understand that an AI virtual presenter is only one part of the video. A successful workflow normally includes several stages:
1. Choose the video topic.
2. Decide what the viewer should learn or understand.
3. Write a short script.
4. Select or create the virtual presenter.
5. Generate the presenter video.
6. Add supporting visuals.
7. Add readable captions.
8. Format the video for TikTok.
9. Review the video for mistakes, permissions, and accuracy.
10. Add any required AI-content disclosure and publish the video.
For TikTok, short and clear scripts are especially useful. Instead of asking the presenter to deliver a long explanation at once, it is often easier to divide the information into several short scenes. This also gives you more opportunities to add images, demonstrations, text, or screen recordings that keep the video visually interesting.
Decide Whether You Need a New Virtual Presenter
If you already created a fictional AI virtual presenter while following Article 068 – How to Create an AI Virtual Presenter for YouTube Videos: Beginner Guide (2026), you may be able to use the same presenter for TikTok.
You do not necessarily need to create another character. However, the TikTok version of your videos may need:
• A vertical layout instead of a horizontal layout.
• Shorter scripts.
• Faster scene changes.
• Larger captions that remain readable on a phone.
• Different presenter positioning so TikTok interface elements do not cover important content.
• Supporting visuals designed for a smaller vertical screen.
This article therefore focuses on creating the TikTok video with your virtual presenter, rather than repeating the complete presenter-creation process covered in Article 068.
Keep Your Original Files
Before producing multiple videos, create an organized project folder and keep your important source files.
For example:
• Original script.
• Presenter or avatar source.
• Voice settings.
• Images.
• Video clips.
• Screen recordings.
• Music and sound-effect licence information.
• Permission records.
• Editing project.
• Draft exports.
• Final master video.
• Published version.
Keeping these files can save considerable work if you later need to correct a mistake, change a caption, create another aspect ratio, replace music, update a disclosure, or prove that you had permission to use an asset.
Important: Do not upload private, confidential, or sensitive information to an AI service unless you understand how that service handles your data and you are comfortable with its current privacy terms.
What You’ll Learn
By the end of this guide, you will understand how to create a TikTok video that uses an AI virtual presenter from beginning to end.
You will learn how to:
• Choose a suitable topic for a virtual-presenter TikTok video.
• Plan a short video around one clear idea.
• Write a script that works well for vertical short-form video.
• Choose an appropriate AI virtual presenter.
• Generate the presenter’s spoken video.
• Position the presenter correctly for a vertical 9:16 layout.
• Add supporting images, screen recordings, graphics, or B-roll.
• Add readable captions for viewers watching without sound.
• Use music and sound effects carefully.
• Review the finished video for factual accuracy and visual mistakes.
• Check privacy, permissions, licensing, and commercial-use conditions.
• Decide when AI disclosure may be required or appropriate.
• Export the finished video in a format suitable for TikTok.
• Organize your project files so the video can be updated or reused later.
You will also learn the common mistakes beginners make when using AI presenters for TikTok and how to reduce them.
The main workflow is simple:
Idea -> Script -> Virtual Presenter -> Supporting Visuals -> Captions -> Review -> Export -> Publish
Once you understand this workflow, you can reuse it for many types of short educational, informational, promotional, or tutorial-style videos without rebuilding your process from the beginning each time.
How AI Virtual Presenter TikTok Videos Work
An AI virtual presenter video combines several separate pieces into one finished TikTok video.
The basic process is:
Script -> AI Presenter -> Voice -> Supporting Visuals -> Captions -> Editing -> TikTok
Understanding these pieces separately makes the workflow much easier for beginners.
1. You Write the Script
Everything begins with the message you want the presenter to communicate. You can write the script yourself or use an AI assistant to help you brainstorm, shorten, simplify, or organize it. You should always review the final script yourself because AI-generated writing can contain incorrect information, awkward wording, outdated information, or claims that need verification.
2. The Virtual Presenter Delivers the Script
You then place the script into an AI presenter or avatar tool. Depending on the service, you may select a fictional presenter, create your own fictional presenter, choose clothing or background, select an authorized synthetic voice, and enter the script. The system then generates video in which the presenter appears to speak the script.
The presenter does not independently verify your subject. It produces a generated presentation based on your instructions and the capabilities of the service. You remain responsible for reviewing what the finished video communicates.
3. You Place the Presenter Inside a Vertical Video
TikTok is strongly associated with vertical mobile viewing, so this guide uses a 9:16 vertical project for presenter videos.
Your presenter does not always need to fill the entire screen. You could place the presenter in the lower half while an example appears above, on one side while text appears beside them, full screen for the introduction, or in a small picture-in-picture area over a screen recording.
4. You Add Supporting Visuals
Supporting visuals help show what the presenter is discussing. These might include AI-generated images, your own photographs, properly licensed stock footage, screen recordings, charts, simple graphics, icons, short demonstrations, or text highlighting an important point.
Only use material you have permission or appropriate rights to use. Do not assume that an image, video, song, voice, template, font, or other asset found online is automatically available for commercial use.
5. You Add Captions and Other Editing
After generating the presenter footage, you can edit it like other video footage. You may add captions, titles, images, transitions, background music, sound effects, zooms, crops, screen recordings, and calls to action. TikTok Studio currently includes tools such as automatic captions, but available features can change by device, region, account, or app version.
6. You Review the Complete Video
Do not publish immediately after the AI tool finishes generating the presenter. Watch the complete video from beginning to end. Check whether the information is accurate, the voice pronounces words correctly, captions are spelled correctly, visuals are timed correctly, permissions are in place, and synthetic material could be mistaken for genuine footage.
7. You Handle AI Disclosure Before Publishing
TikTok requires creators to label all AI-generated content that contains realistic images, audio, and video. TikTok can also automatically label some AI-generated content. A fictional presenter can still look realistic, so disclosure should be part of your standard publishing review.
A Simple Example
Suppose you want to create a 40-second TikTok called “3 AI Prompt Mistakes Beginners Make.” Your workflow could be:
11. Write a short four-part script: introduction plus three mistakes.
12. Generate the introduction with your fictional AI presenter.
13. Show a simple graphic while explaining Mistake 1.
14. Bring the presenter back briefly for Mistake 2.
15. Show an example prompt for Mistake 3.
16. Finish with the presenter giving one final tip.
17. Add captions throughout.
18. Check facts, visuals, audio, permissions, and disclosure.
19. Export the vertical master video.
20. Upload and complete the TikTok post settings.
The AI presenter therefore becomes one component of the video, not necessarily the entire video.
Choose the Right Type of TikTok Video for Your Virtual Presenter
Before writing your script, decide what kind of TikTok video you want to create. Trying to explain too many things in one short video usually makes the result confusing. For beginners, choose one clear purpose for each video.
Educational Tips
An AI virtual presenter can explain one useful idea quickly, such as three beginner AI tips, one common ChatGPT mistake, how to write a better prompt, or a simple explanation of an AI term.
Step-by-Step Mini Tutorials
Use a virtual presenter to introduce a short process and then switch to screen recordings or instructional graphics. For detailed tutorials, do not force a long process into a very short TikTok. Divide it into several videos when necessary.
Lists and Quick Tips
List-style videos are easy for beginners to organize. Examples include three AI tools beginners should understand, five prompt-writing mistakes, or four things to check before publishing AI content.
Myth and Reality Videos
Virtual presenters can explain common misunderstandings. For example:
Myth: AI-generated images are automatically copyright-free.
Reality: Rights and commercial-use conditions can depend on the tool, its terms, source material, and applicable law.
Question-and-Answer Videos
Start with a question that a beginner might genuinely ask, then provide a short answer and point viewers toward a more detailed article or video when appropriate.
Before-and-After Videos
A virtual presenter can introduce a transformation such as a weak prompt versus improved prompt, an unedited image versus corrected image, or a basic video versus captioned and edited version.
Tool Demonstrations
Introduce an AI tool and then show what it does. Use screen recordings or your own example files where possible. Do not present temporary interface details, prices, plan limits, or features as permanent facts.
Product or Service Explanations
If the video discusses a product, service, affiliate offer, or business, separate factual information from promotional claims. Avoid unsupported guarantees such as “This will make you money” or “This tool is best for everyone.”
Choose One Main Goal
Before creating your video, finish this sentence:
“After watching this video, I want the viewer to understand or do ______.”
If you cannot complete it clearly, your idea may still be too broad.
Plan Your TikTok Video Before You Generate Anything
A common beginner mistake is opening an AI presenter tool before deciding exactly what the video should say. A better approach is to create a simple plan first.
Start With One Clear Topic
Choose one main subject such as how to write a better AI prompt, three beginner mistakes, one privacy tip, or how to summarize a document with AI.
Decide Who the Video Is For
Ask who you are trying to help. For AI Mastery, the audience is complete beginners, so use simple words, explain unfamiliar terms, avoid unnecessary jargon, and show examples when possible.
Choose the Main Message
Write one sentence that describes the main point. Every scene should support that sentence.
Plan a Simple Beginning, Middle, and End
21. Beginning: Tell viewers what they will learn.
22. Middle: Explain or demonstrate the main information.
23. End: Give a short conclusion, next step, or useful tip.
Break the Video Into Scenes
Think of the TikTok as several short scenes rather than one long recording. This makes editing easier and gives viewers visual variety.
Create a Simple Scene Plan
A plan might include Scene 1 – hook, Scene 2 – Tip 1, Scene 3 – Tip 2, Scene 4 – screen recording, and Scene 5 – final presenter tip. Note the approximate length and main visual for each scene.
Decide Where the Presenter Should Appear
Use the presenter at the beginning, between major sections, when explaining an important idea, or at the end. If you are showing where to click, a screen recording is usually more useful than a talking face.
Plan for the Vertical Screen
Keep important text large, the presenter’s face clearly visible, key objects near the central viewing area, and captions away from crowded interface areas. Preview the final video at mobile size.
Decide What Supporting Material You Need
Create a short asset list before generating presenter footage. Collecting or planning these items early reduces interruptions during editing.
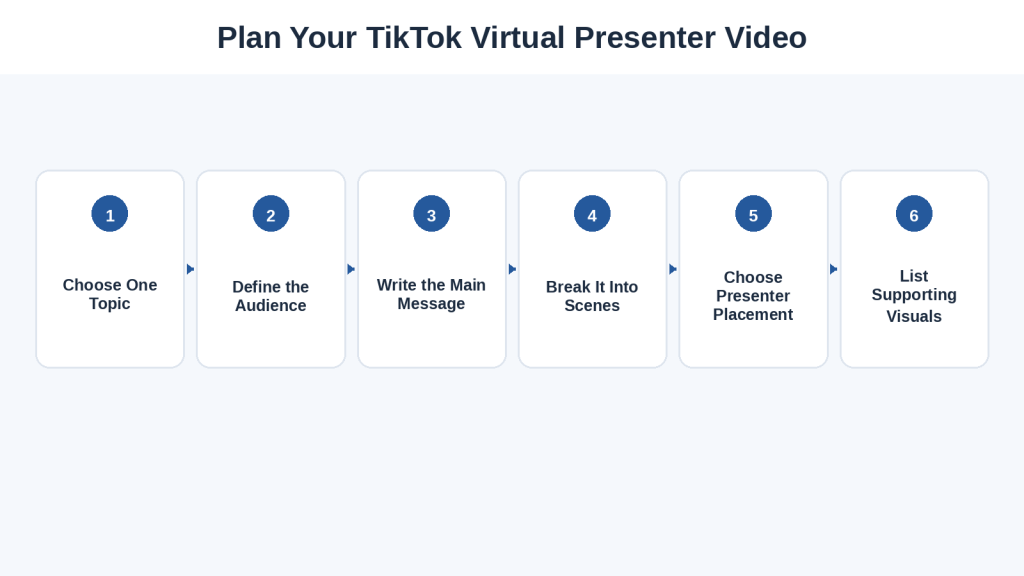
Figure 1. A simple planning workflow for an AI virtual presenter TikTok video.
Explanation: Planning the topic, audience, main message, scenes, presenter position, and supporting visuals before generation can reduce unnecessary AI generations and make editing easier.
Save the Plan With Your Project
Keep the scene plan with your project files. A simple folder could contain script, scene-plan, presenter-clips, images, screen-recordings, audio, editing-project, exports, and licences-and-permissions.
Final Tip: Plan first and generate second. A few minutes spent organizing the video can prevent much more work later.
Write a Short TikTok Script for Your AI Virtual Presenter
Your script is the foundation of the video. Even a realistic virtual presenter will not make a confusing script useful.
Start With One Clear Hook
The first sentence should quickly tell viewers why the video is worth watching. Examples include “Here are three AI mistakes beginners often make” or “Before you upload a private document to an AI tool, check this.” Avoid exaggerated hooks that promise guaranteed results.
Keep the Introduction Short
Reach the useful information quickly rather than spending time on a long welcome.
Write for Speaking, Not Reading
Use short sentences, familiar words, natural pauses, clear transitions, and one main idea at a time. Read the script aloud before placing it into the presenter tool.
Give Each Scene One Main Point
Match the script to the scene plan. This gives the presenter clear, manageable pieces of dialogue.
Keep Sentences Easy for the AI Voice to Pronounce
AI voices may struggle with unusual names, abbreviations, acronyms, numbers, website addresses, technical terminology, symbols, and multiple languages. Always listen to generated audio rather than assuming pronunciation is correct.
Use Punctuation to Improve Delivery
Periods create stopping points and commas can create shorter pauses. Different tools interpret punctuation differently, so test a short sample first.
Avoid Very Long Paragraphs
Do not paste an entire article section into the presenter tool and expect it to become an effective TikTok video. Break information into smaller pieces.
Show Instead of Explaining Everything
Not every detail needs to be spoken. The presenter can say “Give the AI clear instructions” while on-screen text shows Topic, Audience, Length, Style, and Format.
Add Visual Notes to the Script
Separate production notes from spoken dialogue. For example, note when a prompt example or screen recording should appear.
End With a Useful Next Step
Finish with a natural action such as “Try this with your next prompt” or “Save this checklist before creating your next AI image.”
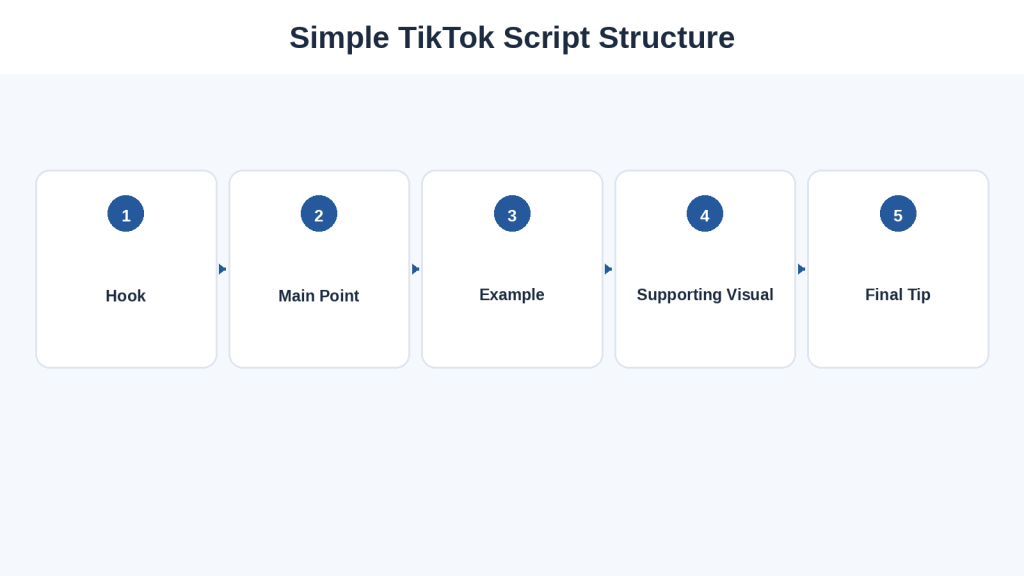
Figure 2. A simple structure for writing an AI virtual presenter TikTok script.
Explanation: A short script is easier to follow when it begins with a clear hook, develops one main idea, uses an example or supporting visual, and finishes with a useful next step.
Common Script Mistake: Trying to Say Too Much
Reality: One TikTok does not need to explain everything about a subject.
How to Avoid This Mistake: Choose one main message and save additional information for another video.
Final Script Check
Before generating the presenter, confirm that the hook is clear, each sentence sounds natural, technical terms are explained, facts are checked, names and numbers are correct, and visual instructions are separated from spoken dialogue.
Choose or Prepare Your AI Virtual Presenter for TikTok
If you already created a fictional presenter for Article 068, you can usually begin with the same presenter. The important difference is how you prepare and position the presenter for a vertical short-form video.
Use a Fictional Presenter When Possible
A fictional presenter is usually the simplest choice for beginners. Keep the face, hairstyle, clothing style, voice, background style, and speaking style consistent across related videos.
Avoid Copying a Real Person
Do not create your presenter by copying a celebrity, politician, business leader, influencer, friend, relative, other creator, or private individual without appropriate permission. TikTok restricts some realistic synthetic uses of real people’s likenesses even when labelled.
Use Your Own Likeness Only With Care
If an AI presenter service lets you create an avatar based on yourself, check what it requires, how uploaded material is stored, whether it may be used to improve the service, whether you can delete it, whether commercial use is allowed, and what happens if you stop using the service.
Choose a Presenter That Works on a Phone Screen
Favor a presenter whose face remains visible at smaller size, clothing contrasts with the background, expressions are clear, and framing leaves room for captions and graphics.
Do Not Put Important Details at the Extreme Edges
Keep the presenter’s face, important text, captions, numbers, and calls to action closer to the main viewing area.
Choose the Voice Carefully
For beginner educational content, choose a voice that is clear, easy to understand, natural in pace, appropriate for the audience, and consistent across related videos.
Test the Voice Before Generating the Full Video
Generate a short test sentence and listen for incorrect pronunciation, strange pauses, robotic rhythm, incorrect numbers, unnatural emphasis, or excessive speed.
Be Especially Careful With Voice Cloning
Do not clone another person’s recognizable voice without appropriate permission. An authorized synthetic voice supplied by the presenter service is generally simpler for a fictional presenter.
Choose a Simple Background
Use a plain light background, simple office, clean studio, soft gradient, minimal technology-themed background, or transparent background when supported.
Decide How Much of the Presenter to Generate
Possible layouts include full-screen presenter, half-screen presenter, side presenter, picture-in-picture presenter, or no presenter when another visual is clearer.
Generate Separate Presenter Scenes
Create separate clips for individual scenes when possible. If one sentence is wrong, you can regenerate only that scene.
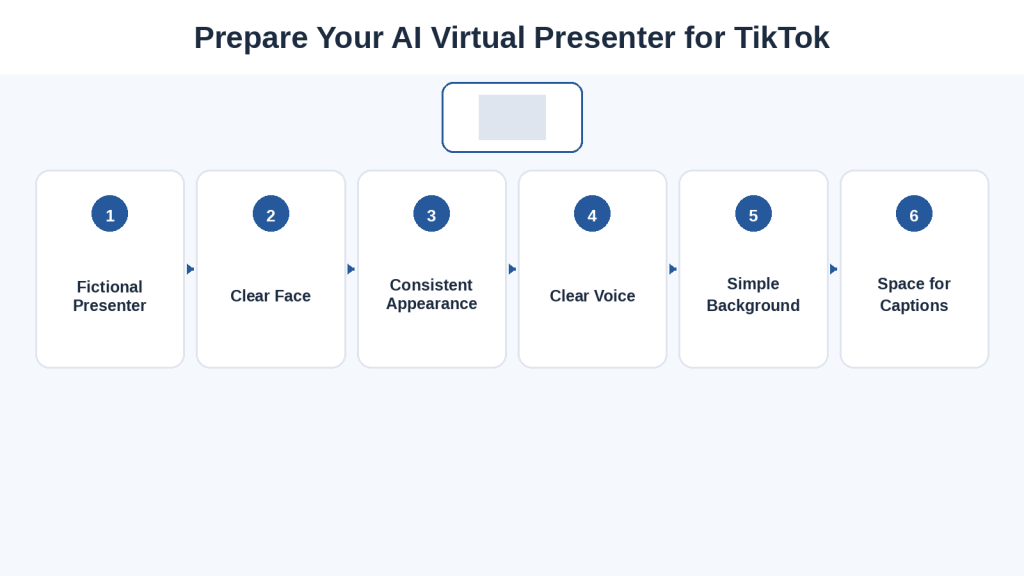
Figure 3. Prepare the virtual presenter so it remains clear and useful in a vertical TikTok video.
Explanation: A good TikTok presenter should remain recognizable on a small screen while leaving enough room for captions, examples, and supporting visuals.
Check the Generated Presenter Carefully
Look for strange mouth movements, lip-sync mistakes, distorted teeth or eyes, unnatural blinking, appearance changes, clothing changes, background inconsistencies, pronunciation errors, missing words, audio cutoffs, and unnatural pauses.
Check Whether Disclosure Will Be Needed
A realistic fictional presenter is still AI-generated content. TikTok requires creators to label realistic AI-generated images, audio, and video covered by its rules.
Final Tip: Keep your first presenter simple. A consistent fictional character with a clear voice and clean background is more useful than an elaborate presenter that creates extra editing problems.
Generate Your AI Virtual Presenter Video Scenes
Once your script, presenter, voice, and scene plan are ready, begin generating the presenter footage. Exact buttons depend on the service, but the workflow is similar.
Create the Video Project
Create a new project and select a vertical 9:16 layout when available. Confirm the correct presenter, voice, background, framing, and final script before continuing.
Generate One Scene at a Time
For beginners, separate short scenes are easier to manage than one long presentation.
Step 1: Paste the First Scene Script
Start with the opening scene and do not paste visual instructions into the spoken-script box unless the service provides a separate production-notes area.
Step 2: Confirm the Presenter and Voice
Make sure you have not accidentally selected a different avatar, voice, language, background, or speaking style.
Step 3: Check the Language and Pronunciation
Pay particular attention to personal names, product names, acronyms, technical terms, numbers, dates, website names, and words from another language.
Step 4: Choose the Presenter Framing
Choose head-and-shoulders, upper body, waist-up, or full body depending on your layout. Avoid cramped framing.
Step 5: Leave Space for Other Visuals
Think about where text, captions, examples, and screen recordings will appear later.
Step 6: Generate a Preview When Available
Use a preview to check presenter position, background, text placement, voice, pronunciation, and approximate timing.
Step 7: Generate the Scene
Generate the first presenter clip and watch it immediately before moving on.
Step 8: Review the Presenter’s Face and Movement
Watch for unnatural mouth movement, poor lip sync, strange blinking, facial changes, awkward gestures, distorted hands, clothing changes, or background inconsistencies.
Step 9: Listen Without Watching
Concentrate only on the audio. Check whether every word is spoken, names and numbers are correct, speed is comfortable, and no audio is cut off.
Step 10: Regenerate Only What Needs Fixing
Identify the cause before regenerating. Fix pronunciation, pacing, framing, or script issues first.
Step 11: Generate the Remaining Scenes
Keep presenter, voice, pace, clothing, background, and general visual style consistent.
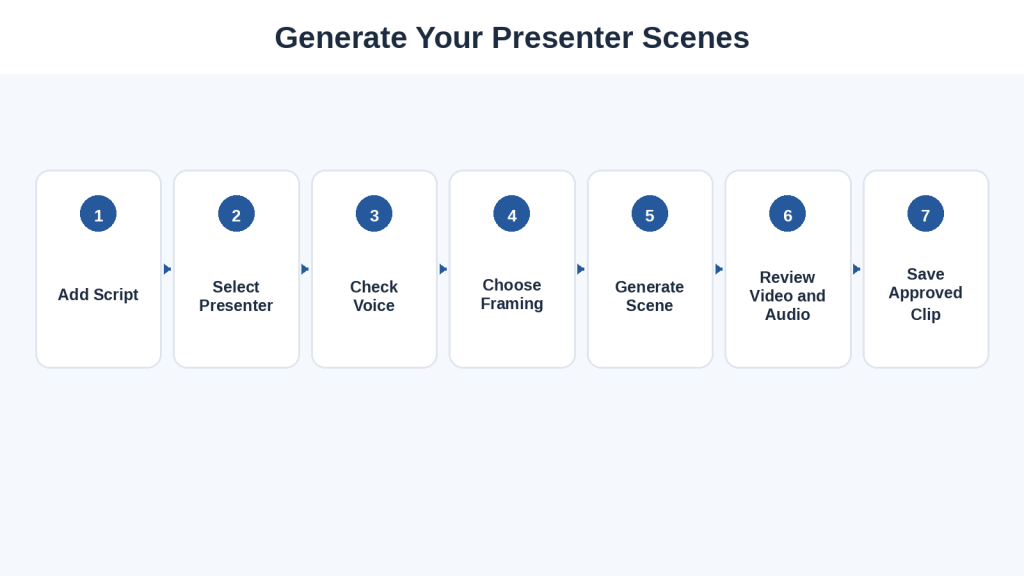
Figure 4. Generate and review short presenter scenes individually before combining them into the complete TikTok video.
Explanation: Creating separate scenes makes corrections easier because one pronunciation or animation problem can be fixed without regenerating the whole video.
Save Every Approved Scene Clearly
Use descriptive filenames such as `069-tiktok-scene-01-hook.mp4` and version numbers for regenerated clips.
Keep the Original Generated Files
Keep original clips until the finished video has been reviewed and published successfully.
Remember That Generation Is Not Publication Approval
A presenter tool successfully generating a video does not mean the content automatically complies with TikTok’s rules.
Add Supporting Visuals and B-Roll Around Your Virtual Presenter
An AI virtual presenter can explain your message, but showing the same talking face continuously can become visually repetitive. Supporting visuals help viewers see what the presenter is talking about.
Use the Presenter When the Presenter Adds Value
Use the presenter for introductions, important explanations, transitions, warnings, reminders, and final tips. When something can be shown more clearly, show it.
Use Screen Recordings for Software Tutorials
Screen recordings can show where to click, what to type, which setting to choose, and how a result appears. Remove or hide private information before publishing.
Crop Screen Recordings for Vertical Video
A desktop screen is much wider than a TikTok frame. Crop to the important area, zoom in, show one part of the interface at a time, or recreate a simple instructional graphic.
Use AI-Generated Images When They Help Explain an Idea
Review generated images for distorted hands or faces, misspelled text, duplicate objects, incorrect symbols, unwanted logos, misleading details, and impossible objects. Do not present a realistic AI-generated scene as evidence that a real event occurred.
Use Stock Footage Carefully
Verify the licence, attribution requirements, commercial-use rights, modification rights, social-media use, and restrictions involving recognizable people, buildings, or trademarks. Keep a record of the licence information.
Use Your Own Visuals When Possible
Your own screenshots, recordings, photographs, diagrams, and examples can simplify some licensing questions. Still check that they do not reveal private information or third-party material you do not have permission to publish.
Add Short Text to Reinforce Important Points
Keep on-screen text short and readable. Avoid putting full paragraphs on a phone screen.
Make Text Large Enough for Mobile Viewing
Use large text, strong contrast, simple fonts, clear spacing, and only a few elements on each screen.
Match Each Visual to the Spoken Words
Show examples at the moment they are relevant. Avoid unrelated footage simply because it looks attractive.
Keep Visual Changes Purposeful
Change visuals to support a new point, example, warning, demonstration, or section transition. Too many effects can distract from the lesson.
Use Picture-in-Picture When Helpful
A screen recording can fill most of the frame while the presenter appears in a small corner, provided the presenter does not cover important controls or text.
Build Visual Variety Into the Video
Alternate between full-screen presenter, prompt example, presenter beside a graphic, screen recording, and final presenter scene.

Figure 5. Supporting visuals can replace or accompany the virtual presenter when they explain the information more clearly.
Explanation: Alternating between the presenter, examples, graphics, and screen recordings can make a tutorial easier to follow while keeping the presenter as a consistent guide.
Common Mistake: Using Random B-Roll
Reality: Supporting visuals are most useful when they reinforce the spoken message.
How to Avoid This Mistake: Ask, “Does this help the viewer understand what the presenter is saying?” If not, leave it out.
Common Mistake: Making Every Scene Too Busy
How to Avoid This Mistake: Give each scene one clear visual priority and remove unnecessary competing elements.
Save Source and Licence Information
Keep source information, download dates, licence terms, and permission records for outside assets.
Add Captions and On-Screen Text for TikTok
Captions are important because viewers may watch with the sound down or off. They also improve accessibility for people who are deaf or hard of hearing. TikTok Studio currently includes automatic captions, but they still need human review.
Understand the Difference Between Captions and On-Screen Text
Captions show the spoken words. On-screen text highlights an important idea. You can use both, but they should not compete for attention.
Add Captions for the Spoken Dialogue
Automatic transcription can make mistakes with names, technical terms, acronyms, product names, numbers, accents, unusual pronunciations, and fast speech. Review every caption against the audio.
Keep Captions Easy to Read
Use large clear text, strong contrast, short groups of words, consistent placement, simple fonts, and enough space around the text.
Break Long Sentences Into Smaller Caption Groups
Divide dense sentences into shorter caption groups synchronized with the voice.
Do Not Cover the Presenter’s Face
Position captions so they do not cover the eyes, mouth, expressions, demonstration controls, or important graphics.
Leave Room for TikTok Interface Elements
Keep critical text away from the extreme edges of the video and preview the uploaded result before publishing when possible.
Use On-Screen Text to Highlight Key Ideas
Examples include Tip 1: Be Specific, Check Privacy First, Verify the Licence, Use 9:16 Vertical Video, and Review Before Publishing.
Do Not Put Too Much Text on One Screen
Replace full paragraphs with short headings and bullets when possible.
Use Text Hierarchy
Make it obvious which text is a heading, which is the important message, and which is the spoken caption.
Keep the Style Consistent
Reuse the same font, general size, position, background treatment, capitalization, and highlighting style throughout the video.
Be Careful With Animated Captions
Use animation only when it improves understanding. For beginner tutorials, readability matters more than elaborate effects.
Check Captions Against the Script
Look for missing or added words, punctuation errors, misspelled names, wrong numbers, wrong technical terms, and poor timing.
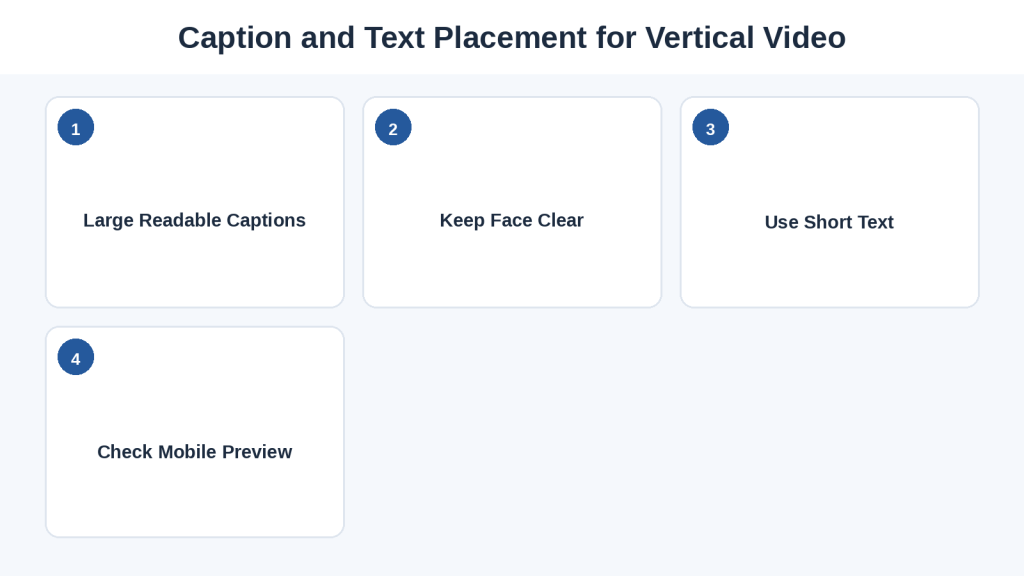
Figure 6. Keep captions and important text readable while leaving the presenter’s face and other essential visuals unobstructed.
Explanation: Vertical videos have limited screen space. Clear caption placement, short text, and a mobile preview help prevent important information from being obscured.
Common Mistake: Trusting Automatic Captions Without Checking Them
Reality: A single caption error can change the meaning of an instruction.
How to Avoid This Mistake: Watch the entire video with captions enabled and compare them with the spoken audio before publishing.
Accessibility Check
Confirm that captions communicate the main spoken information, text is large enough for a phone, contrast is sufficient, captions stay visible long enough, and important information is not communicated by colour alone.
Add Music and Sound Effects Without Overpowering the Presenter
Music and sound effects can make a video feel more polished, but the presenter’s voice should normally remain the most important audio element.
Decide Whether the Video Actually Needs Music
Not every TikTok video needs background music. Add it only if it creates useful mood, connects scenes, or improves the finished experience.
Keep the Presenter Easy to Hear
Reduce music volume so every spoken word remains clear. Listen carefully when music contains vocals or changes volume.
Avoid Music With Distracting Lyrics
Instrumental music is often easier to combine with educational narration.
Use Sound Effects Sparingly
Use subtle effects for a new tip, warning, check mark, before-and-after change, or section transition. Avoid a sound on every animation.
Understand That Music Has Usage Rights
Music is protected by copyright in many circumstances. Uploading or buying a song for personal listening does not automatically give you permission to reuse it in a TikTok video.
Be Especially Careful With Commercial Content
TikTok recommends its Commercial Music Library for content that promotes a brand, product, or service because that library contains music pre-cleared for commercial use on TikTok.
Do Not Assume “Royalty-Free” Means Unlimited Use
Check commercial use, social-media use, advertising, attribution, modification, project limits, subscription status, geographic restrictions, and distribution conditions.
Music From Outside TikTok Needs Extra Checking
If you import music from another editor or service, verify that the licence covers your intended TikTok use, especially for commercial content.
Check Music Provided by AI Video or Editing Tools
Built-in music is not automatically approved for every use. Check the service licence and whether rights depend on your subscription plan.
AI-Generated Music Also Requires Checking
Review ownership or licensed rights, commercial use, social-media use, restrictions on reference audio, voice imitation, and content-identification systems.
Do Not Clone a Singer or Speaker Without Permission
Use your own authorized recordings, a licensed synthetic voice, a fictional presenter’s voice, or music for which you have appropriate usage rights.
Create a Simple Audio Mix
The hierarchy should normally be Presenter Voice -> Background Music -> Sound Effects.
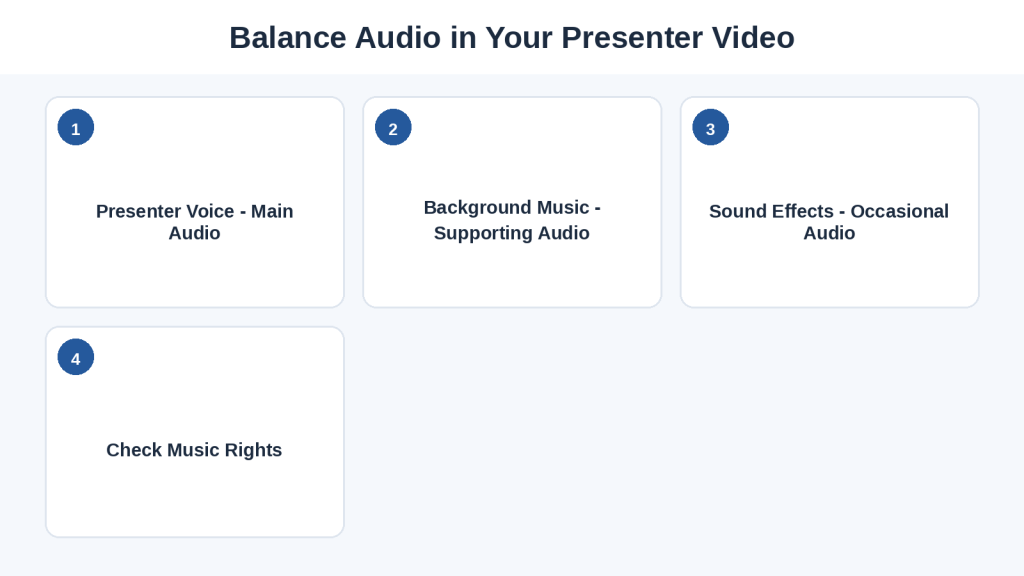
Figure 7. Keep the virtual presenter’s voice dominant while using music and sound effects as supporting audio.
Explanation: A simple audio hierarchy helps viewers understand the presenter. Background music should remain quieter, while sound effects should appear only when useful.
Test the Video With Headphones and Speakers
Listen on headphones and ordinary speakers, at moderate and low volume.
Watch Once With Your Eyes Closed
Listen for sudden volume changes, music that is too loud, speech that is hard to understand, awkward pauses, effects covering words, audio cutoffs, or inconsistent voice levels.
Common Mistake: Choosing Music First
Reality: The message and narration are more important than the soundtrack.
How to Avoid This Mistake: Finish the script and presenter narration first. Add music later only if it improves the video.
Common Mistake: Assuming TikTok Availability Means Universal Permission
Reality: Music conditions can differ for personal, business, sponsored, and advertising uses.
Save Your Audio Records
Keep the music filename, source, licence information, download date, permissions, subscription information when relevant, and original voice files.
Edit the Complete Video in a Vertical 9:16 Timeline
Once presenter clips, supporting visuals, captions, music, and sound effects are ready, combine them in one vertical 9:16 project.
Step 1: Create a Vertical Project
Start in the final vertical format rather than editing horizontally and cropping at the end.
Step 2: Import Your Files
Import presenter clips, images, screen recordings, stock footage, graphics, captions, music, sound effects, and backgrounds.
Step 3: Place the Presenter Clips in Order
Add hook, Tip 1, Tip 2, Tip 3, and final tip according to the scene plan. Check the spoken sequence before adding effects.
Step 4: Trim Unnecessary Pauses
Remove long empty beginnings, endings, awkward gaps, and accidental repeated sections without making the speech unnaturally rushed.
Step 5: Add Supporting Visuals
Place images, graphics, screen recordings, and B-roll where they directly support the narration.
Step 6: Resize Horizontal Material Carefully
Do not stretch faces, text, interfaces, products, or graphics. Crop, reposition, zoom, use backgrounds, or use picture-in-picture.
Step 7: Check the Presenter Position
Confirm that the face is not too close to the edge, captions have room, and important text remains visible.
Step 8: Add Your Captions
Review timing, spelling, line breaks, readability, position, and contrast.
Step 9: Add Short On-Screen Headings
Use brief headings such as Tip 1: Be Specific rather than large blocks of text.
Step 10: Add Music After the Main Edit
Add music after dialogue and visuals are working correctly, then add only necessary sound effects.
Step 11: Use Transitions Sparingly
Simple cuts are often enough for educational videos. Use noticeable transitions only when they help show a clear change.
Step 12: Check the Pacing
Make sure the opening starts quickly, viewers have time to read examples, demonstrations are not rushed, and speech is comfortable to follow.
Step 13: Remove Anything That Does Not Help
Remove unnecessary animations, repeated sentences, decorative graphics, long pauses, duplicate examples, excessive transitions, and unrelated B-roll.
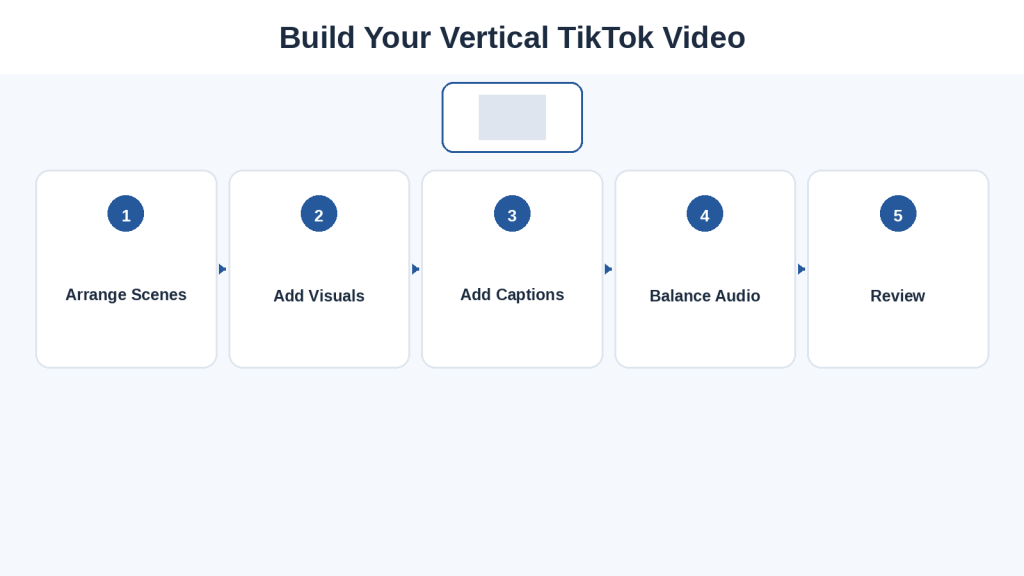
Figure 8. Build the complete TikTok video by combining presenter clips, supporting visuals, captions, and audio in a vertical 9:16 timeline.
Explanation: Editing all elements together in the final vertical format helps you see whether the presenter, text, visuals, and audio work together before export.
Perform a First Full Review
Watch the entire edit without stopping, note problems, then correct them afterward.
Perform a Mobile-Size Review
Shrink the preview or watch a test export on a phone. If you cannot comfortably understand a visual at phone size, simplify or enlarge it.
Common Mistake: Editing Everything for a Desktop Screen
How to Avoid This Mistake: Check the project repeatedly at a smaller viewing size.
Common Mistake: Filling Every Empty Space
Reality: Clear spacing can make the presenter and main information easier to understand.
Save an Editable Project Version
Keep the editable project and numbered versions as needed.
Review the Video for AI Mistakes, Accuracy, Privacy, and Permissions
Finishing the edit does not mean the video is ready to publish. Perform a separate content and safety review.
Check the Presenter for AI-Generation Mistakes
Look for lip-sync errors, distorted teeth, strange eye movements, unusual expressions, distorted hands, appearance changes, clothing changes, background objects changing, skipped words, incorrect pronunciation, and audio ending too early.
Check Every Factual Claim
Verify dates, statistics, prices, software features, subscription conditions, laws, medical information, financial information, product specifications, platform policies, names, and quotations using reliable current sources.
Separate Facts From Opinions
Do not make an opinion sound like an established fact. Avoid unsupported claims such as “This is the best AI video generator” or “This will make your video go viral.”
Be Careful With Legal, Medical, and Financial Subjects
Make clear when content is general educational information rather than professional advice. Use current reliable sources and avoid false confidence.
Check Screen Recordings for Private Information
Look for email addresses, phone numbers, home addresses, account numbers, passwords, personal messages, financial details, medical information, browser tabs, notifications, private filenames, and other people’s information.
Check AI Prompts and Screenshots Too
A prompt may contain a customer’s name, private document excerpt, email address, business information, or personal notes. Small text can still be paused and zoomed.
Get Permission From Real People
If a video contains a recognizable real person, obtain appropriate permission for the photograph, video, voice, and likeness. This is especially important when AI alters how a person looks, moves, or speaks.
Avoid Unauthorized Voice Cloning
Do not clone another person’s recognizable voice without appropriate permission.
Check Every Outside Asset
Review the source and rights for photographs, stock video, music, sound effects, graphics, illustrations, fonts, templates, voice recordings, and reference images.
Check Commercial-Use Conditions
If you promote a website, product, service, affiliate offer, sponsor, or business, check whether your AI services and assets permit that use.
Check Logos, Brands, and Product Claims
Avoid creating a misleading impression that TikTok, an AI company, or another business sponsors or endorses your video when it does not.
Check Realistic AI Scenes Carefully
Do not present fictional fires, public events, interviews, demonstrations, or other synthetic scenes as proof that a real event happened.
Check the Video With the Sound Off
Confirm that captions make sense, warnings are visible, text is readable, and the main lesson remains understandable.
Check the Audio Without Watching
Confirm that sentences are understandable, names and numbers are correct, music does not interfere, voice is consistent, and no words are missing.
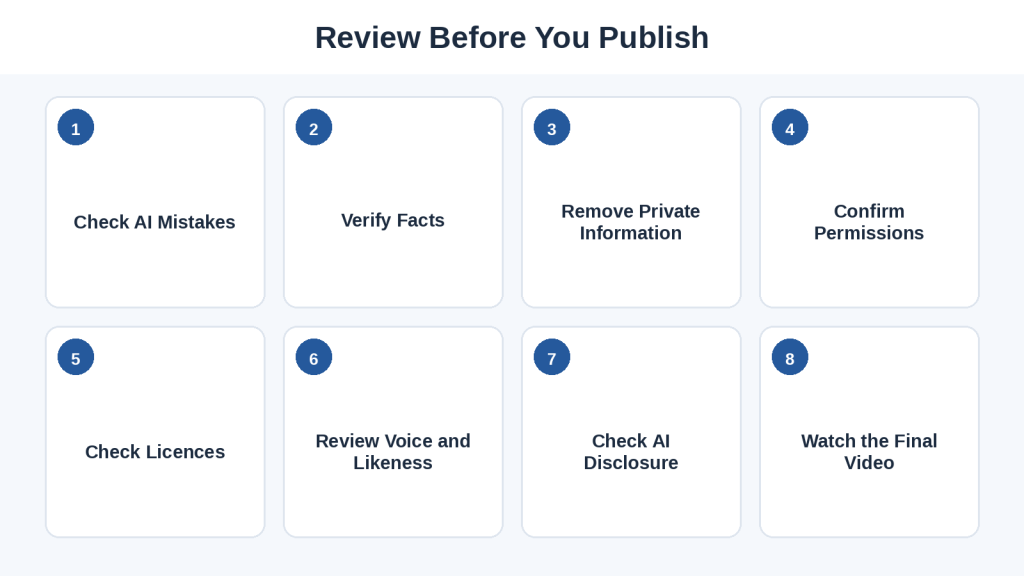
Figure 9. Review AI mistakes, facts, privacy, permissions, licences, and disclosure before publishing the virtual presenter video.
Explanation: A separate pre-publication review helps catch problems that may have been missed while concentrating on editing, captions, music, and visual design.
Create a Final Review Checklist
Confirm presenter consistency, acceptable lip sync, correct pronunciation, captions matching the spoken words, checked facts, correct names and numbers, removed private information, permissions and licences, commercial-use conditions, AI disclosure, mobile readability, and a full beginning-to-end review.
Common Mistake: Assuming the AI Tool Checked Everything
Reality: Generation does not verify every fact, permission, licence, privacy issue, or TikTok requirement.
Common Mistake: Reviewing Only the Edited Timeline
How to Avoid This Mistake: Export a test copy and watch the exported file from beginning to end.
Keep Your Review Records
Keep the approved script, source list, presenter settings, generated clips, permissions, asset licences, AI-tool information, final master, publication date, and disclosure information used.
Understand TikTok’s AI-Generated Content Disclosure and Labelling Rules
An AI virtual presenter can look and sound realistic enough that some viewers may believe a real person recorded the video. AI disclosure is therefore an important publishing step.
TikTok currently requires creators to label all AI-generated content that contains realistic images, audio, and video. TikTok also allows creators to add context through text, hashtags, stickers, or descriptions, and it can automatically label some content.
What TikTok Means by AI-Generated Content
AI-generated content includes images, video, or audio generated or modified through AI processes. Examples can include a fictional AI presenter, realistic generated person, generated speech, voice modification, altered real-person footage, or a realistic generated scene.
Your Virtual Presenter May Need a Label Even Though the Person Is Fictional
Do not assume that a fictional character removes disclosure requirements. Ask whether an ordinary viewer could reasonably believe the presenter is genuine footage of a real human presenter.
How to Turn On TikTok’s AI-Generated Content Setting
TikTok provides an AI-generated content setting during posting. The exact location can change, so follow the current in-app labels and official instructions.
TikTok states that turning on the AI-generated-content setting does not affect distribution by itself as long as the content does not violate the Community Guidelines.
The Label Does Not Give Permission to Post Prohibited Content
AI disclosure and content permission are separate questions. A label does not override restrictions involving impersonation, privacy, copyright, harmful deception, or other platform rules.
Do Not Use a Label to Justify Impersonation
Making a recognizable person appear to endorse a product, say words they did not say, or participate in an event they did not attend can raise serious consent and platform-policy concerns even if labelled.
TikTok May Add an AI Label Automatically
TikTok uses automated systems and industry technologies to identify and label some AI-generated material. Your workflow should not depend on trying to remove metadata or avoid detection.
Do Not Remove AI Information to Mislead Viewers
Do not deliberately remove Content Credentials, metadata, labels, or other AI-identification signals for the purpose of deceiving viewers.
You Can Also Give Viewers Clear Context
Depending on the video, simple wording such as AI virtual presenter or Created using an AI-generated presenter can provide additional clarity.
Do You Need to Explain Every AI-Assisted Edit?
Minor correction can be different from generating a realistic person. For this article, the virtual presenter is a substantial part of the finished video, so disclosure belongs in the normal publishing checklist.
Example: Fictional AI Teacher
If a realistic fictional teacher uses a licensed synthetic voice and has never stood in front of a camera, keep records showing the character is fictional, avoid claiming that the character is a real expert or employee, and use TikTok’s AI labelling tools when the content falls under its requirements.
Example: AI Presenter Over a Screen Recording
If only part of the video is synthetic but a realistic presenter is clearly present, review the finished post under TikTok’s AI-content rules.
Example: Completely Animated Character
An obvious cartoon may present different disclosure considerations from a photorealistic person, but clear context remains a good practice when AI substantially creates or alters the content.
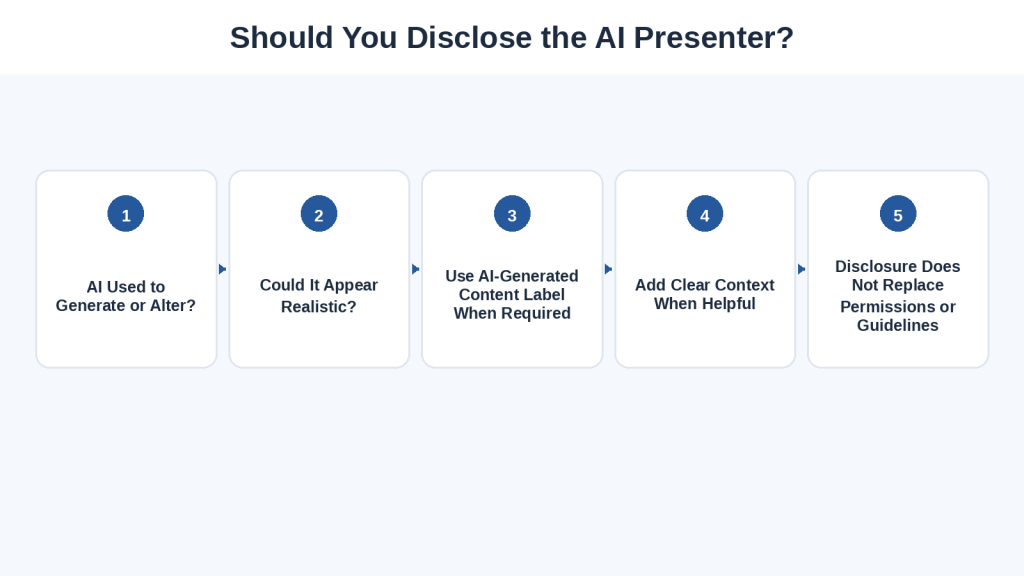
Figure 10. A simple way to think about AI disclosure when publishing a virtual presenter video.
Explanation: A realistic AI virtual presenter should be reviewed for TikTok labelling requirements. Disclosure does not replace permission, licensing, accuracy, or other platform rules.
Common Mistake: Thinking the AI Label Will Hurt the Video Automatically
Reality: TikTok states that enabling the AI-generated-content setting does not affect distribution by itself when the content follows the Community Guidelines.
Common Mistake: Adding Only #AI
A hashtag can provide context, but it should not replace the platform’s designated AI-generated-content setting when that setting is required.
Common Mistake: Assuming an Automatic Label Replaces Your Responsibility
Do not rely solely on TikTok to identify the content for you.
Policies Will Continue to Change
Check current rules when you first begin, when you use a new AI technique, when you use a real person’s likeness or voice, when you start commercial content, when TikTok announces updates, and periodically.
Export Your AI Virtual Presenter Video for TikTok
After editing and review, export a master video file and watch it before uploading.
Use a Vertical 9:16 Export
For this workflow, use 9:16 vertical and a practical target of 1080 x 1920 pixels for a clear Full HD master.
Do Not Stretch a Horizontal Video
Crop, reposition, zoom, or place horizontal material inside a vertical layout rather than stretching it.
Choose a Suitable Video File Format
MP4 is a practical choice when available. If TikTok rejects a file, check its current upload guidance and supported formats.
Export at Good Quality
Use a high-quality or Full HD option when practical rather than intentionally creating a blurry export.
Keep the Frame Rate Consistent
If most of your footage uses one frame rate, keep the project and export consistent unless you have a reason to change it.
Check the Audio During Export
Confirm the presenter narration, music, sound effects, and final sentence are all present.
Save a High-Quality Master Copy
Use a clear filename such as `069-ai-virtual-presenter-tiktok-master-final.mp4`.
Do Not Add a TikTok Watermark Yourself
Keep the master export clean so you can correct or repurpose it appropriately later.
Watch the Exported File From Beginning to End
Check orientation, scene order, black frames, missing clips, sharpness, captions, audio, music level, private information, and final scene.
Check the Beginning and Ending Carefully
Make sure the hook is not cut off, the first frame is intentional, the final word is complete, and no unnecessary empty frames remain.
Check the Video at Phone Size
Confirm captions, prompt examples, presenter size, screen recordings, and important graphics remain readable.
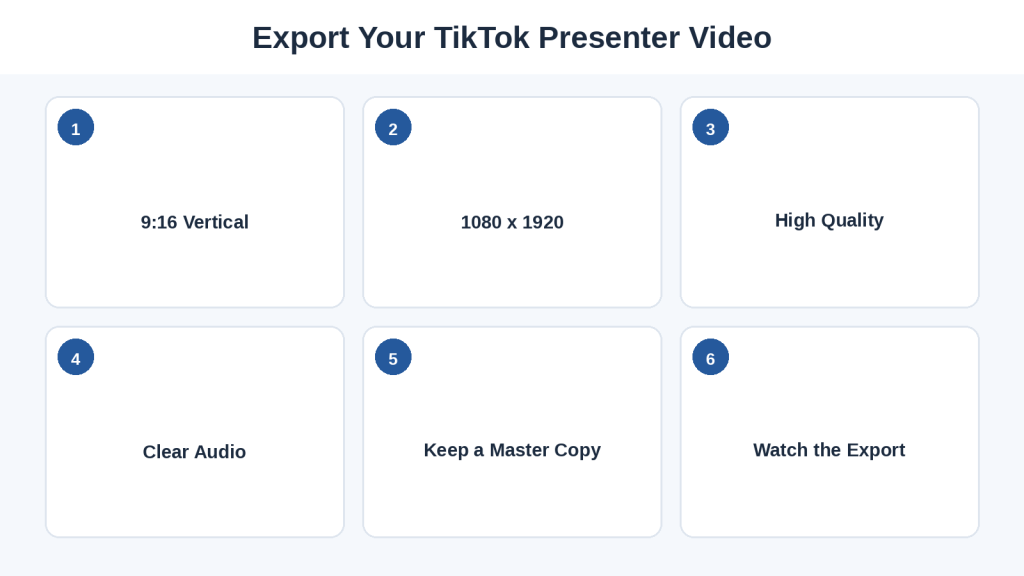
Figure 11. Export a clean high-quality vertical master and review the actual exported file before uploading it to TikTok.
Explanation: Exporting is a separate production stage. Reviewing the actual exported file helps catch missing clips, unreadable text, audio problems, and framing errors.
Keep the Editable Project Too
Keep the project, original assets, licences, permissions, and final export together.
Common Mistake: Uploading the First Export Immediately
Reality: Problems can become visible only after rendering.
How to Avoid This Mistake: Treat the first export as a review copy.
Upload and Publish Your AI Virtual Presenter Video on TikTok
Once the final exported master is approved, upload it to TikTok. Exact interface wording can change over time.
Step 1: Open TikTok and Start a New Post
Use the Add Post control, select the approved video from your device, and continue to the editing and posting screens.
Step 2: Check the Uploaded Video Before Continuing
Confirm the correct file, vertical orientation, presenter visibility, captions, audio, beginning, ending, and safe placement of important content.
Step 3: Make Only Necessary TikTok Edits
Because you already reviewed the master, avoid unnecessary last-minute effects, filters, music, or text changes. If you make an important change, review the video again.
Step 4: Add a Clear Post Description
Describe the video accurately. Avoid unsupported claims, guarantees, or misleading promises.
Step 5: Use Relevant Hashtags Carefully
Use hashtags that accurately describe the subject rather than unrelated popular tags.
Step 6: Check the Video Language and Captions
If using platform-generated captions, review names, numbers, technical terminology, AI product names, punctuation, and timing.
Step 7: Turn On the AI-Generated Content Setting When Required
For realistic AI presenter content, review TikTok’s AI disclosure requirement and enable the designated setting where required.
Step 8: Check Whether the Video Promotes a Brand, Product, or Service
TikTok’s commercial-content disclosure is a separate question from AI disclosure. A post can sometimes require both.
Step 9: Check Music Again if the Video Is Commercial
TikTok recommends its Commercial Music Library for commercial content because it contains music pre-cleared for commercial use on TikTok.
Step 10: Choose Your Privacy and Interaction Settings
Review who can view the post, comments, reuse options, and other available controls.
Step 11: Decide Whether to Publish or Save as a Draft
Save a draft if you still need to check a fact, verify a licence, confirm permission, review disclosure, or correct captions.
Step 12: Perform One Last Pre-Publish Check
Confirm the final video, description, hashtags, captions, presenter framing, facts, privacy, licences, AI disclosure, commercial disclosure, music rights, and privacy settings.
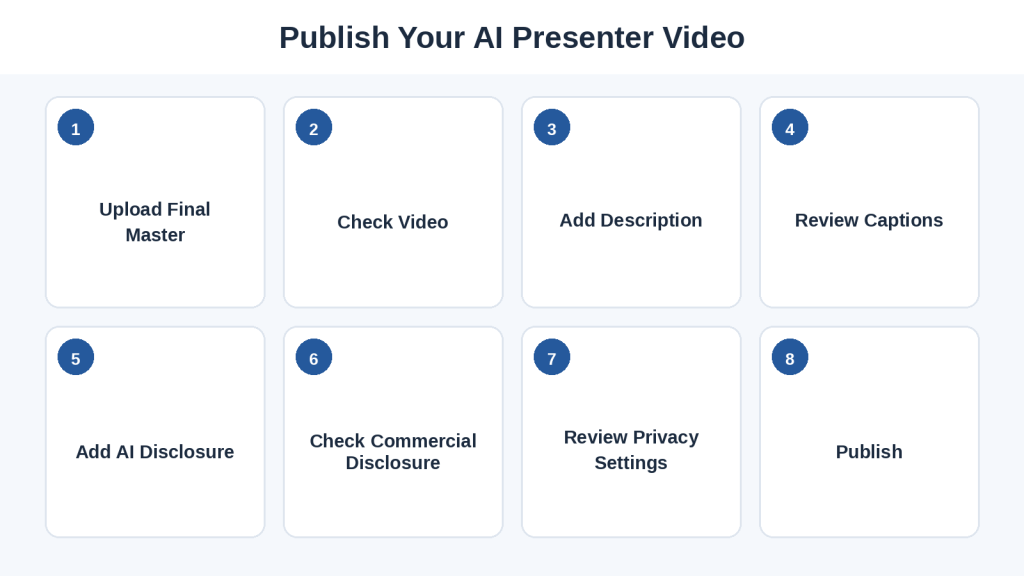
Figure 12. Review the complete TikTok post – including AI and commercial disclosures – before publishing.
Explanation: Uploading the video is only part of publication. Description, captions, privacy controls, music rights, AI disclosure, and commercial disclosure should also be reviewed.
Common Mistake: Confusing AI Disclosure With Commercial Disclosure
Reality: The AI-generated-content label explains applicable synthetic content. Commercial disclosure tells viewers that a post promotes a brand, product, or service.
Common Mistake: Making Major Changes Immediately Before Posting
If you make a substantial change inside TikTok, treat it as a new version and review the complete video again.
After Publishing
Watch the published version and check playback, audio, captions, description, disclosure labels, and mobile appearance. Keep your original master and project files.
What to Do After Your TikTok Video Is Published
Publishing is not the end of the workflow. Check the live video, monitor useful feedback, review performance data, and keep your original project files.
Step 1: Watch the Published Version
Confirm the correct video, complete beginning and ending, presenter quality, captions, audio, description, and disclosure labels.
Step 2: Correct Important Problems
Do not ignore incorrect facts, private information, serious caption errors, missing disclosure, unlicensed material, incorrect audio, or misleading synthetic content simply because the video is already public.
Step 3: Keep Your Master Files
Keep the approved script, scene plan, presenter settings, clips, images, recordings, music, licence records, permissions, editing project, master export, publication information, and fact-checking records.
Step 4: Review Viewer Comments
Comments can reveal what viewers did not understand and can provide ideas for future educational videos. Verify factual suggestions before changing your content.
Step 5: Use Analytics to Learn What Happened
TikTok Studio provides tools to manage content and review analytics. Depending on your account, useful information can include views, likes, comments, shares, audience information, individual post performance, and broader trends.
Do Not Panic Over One Video
Reality: Performance can vary between posts. One video gives limited information.
Compare Similar Videos
Look for patterns in topics, opening styles, viewer questions, presenter use, supporting visuals, and video length. Change one or two elements at a time when possible.
Review Search Performance When Useful
Creator Search Insights can help creators understand topics people search for and track how posts perform in search.
Turn Good Questions Into New Videos
A viewer question can become the next video in a connected educational series.
Keep Your Presenter Consistent
Maintain similar appearance, authorized voice, speaking style, caption style, and visual identity across related videos.
Update Outdated Information
Menus, buttons, features, policies, and subscription conditions can change. Publish corrections or updated versions when leaving old information online would mislead viewers.
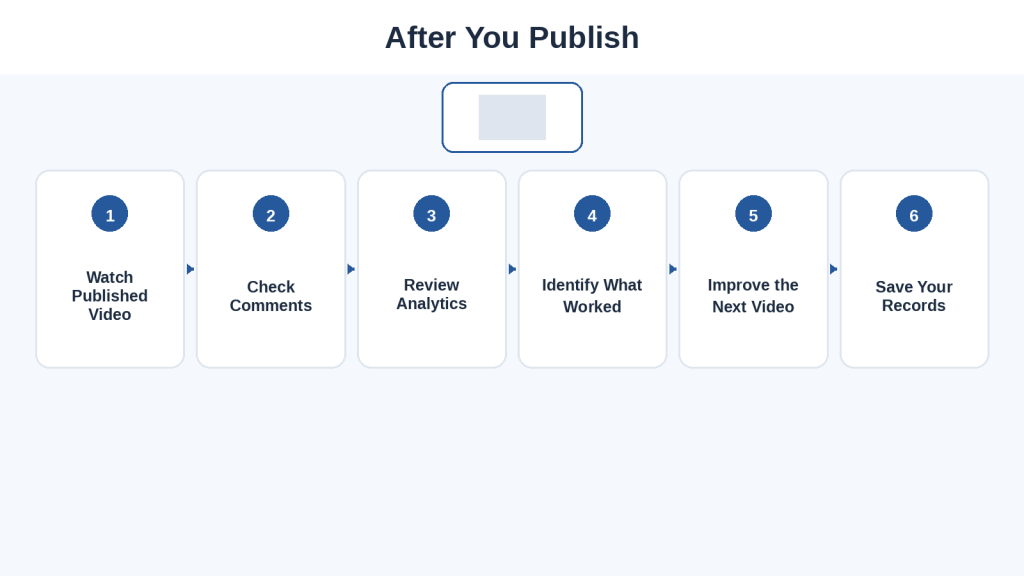
Figure 13. Use each published video as information for improving the next AI virtual presenter video.
Explanation: Reviewing the published video, viewer questions, and useful analytics can help improve future topics, scripts, visuals, captions, and presenter scenes.
Common Mistake: Chasing Views Instead of Helping the Viewer
Reality: A high number alone does not tell you whether viewers understood, trusted, or benefited from the information.
Common Mistake: Deleting Your Project After Publishing
Reality: You may need the source files later to correct an error, update information, replace music, change a disclosure, or create another version.
Create a Repeatable Workflow
Your process can become Choose Topic -> Write Script -> Plan Scenes -> Generate Presenter -> Add Visuals -> Add Captions -> Edit -> Review -> Disclose -> Export -> Publish -> Analyze -> Improve.
Common Mistakes When Creating AI Virtual Presenter Videos for TikTok
Most beginner problems come from trying to generate too much too quickly or relying too heavily on the AI tool.
Mistake 1: Making the Presenter the Entire Video
Reality: The presenter should support the explanation, not replace useful visuals.
Mistake 2: Writing a Script That Is Too Long
Reality: One short video does not need to teach everything about a subject.
Mistake 3: Starting With a Long Introduction
Begin with the subject rather than a long welcome.
Mistake 4: Using an Unrealistic or Distracting Presenter
Review every generated clip and regenerate distracting scenes when necessary.
Mistake 5: Using a Real Person’s Face or Voice Without Permission
Use a fictional presenter, your own properly authorized likeness, or an authorized synthetic voice.
Mistake 6: Forgetting AI Disclosure
Include AI disclosure in your publishing checklist and use TikTok’s current AI-generated-content setting when applicable.
Mistake 7: Trusting the AI Script Without Checking It
Verify important claims before generating the presenter.
Mistake 8: Making Captions Too Small
Preview at phone size and enlarge or simplify text when necessary.
Mistake 9: Trusting Automatic Captions Without Reviewing Them
Compare captions with the final narration from beginning to end.
Mistake 10: Covering Important Content With Text
Give each scene one main visual focus and keep essential information away from the extreme edges.
Mistake 11: Using Too Many Effects
Clarity should come before decoration.
Mistake 12: Making the Background Music Too Loud
Keep background music noticeably quieter than narration.
Mistake 13: Assuming Music Is Free to Use
Check licences, social-media permissions, commercial-use conditions, attribution, and current platform rules.
Mistake 14: Using Random B-Roll
Use visuals that help the viewer understand the spoken sentence.
Mistake 15: Showing a Full Desktop Screen Inside a Vertical Video
Crop or zoom into the specific area being demonstrated.
Mistake 16: Uploading Private Information Accidentally
Review every screen recording and hide private data.
Mistake 17: Treating Realistic AI Content as Proof of a Real Event
Realistic appearance does not prove something actually happened.
Mistake 18: Assuming an AI Label Makes Everything Permitted
Disclosure does not replace permissions, licences, accuracy, privacy, or other platform rules.
Mistake 19: Confusing AI Disclosure With Commercial Disclosure
Ask separately whether realistic AI-generated content is present and whether the post promotes a brand, product, or service.
Mistake 20: Publishing Immediately After Export
Watch the actual exported file from beginning to end before uploading it.
Mistake 21: Deleting the Original Project
Keep the script, scene plan, presenter clips, source files, editing project, permissions, licences, master export, and publication records.
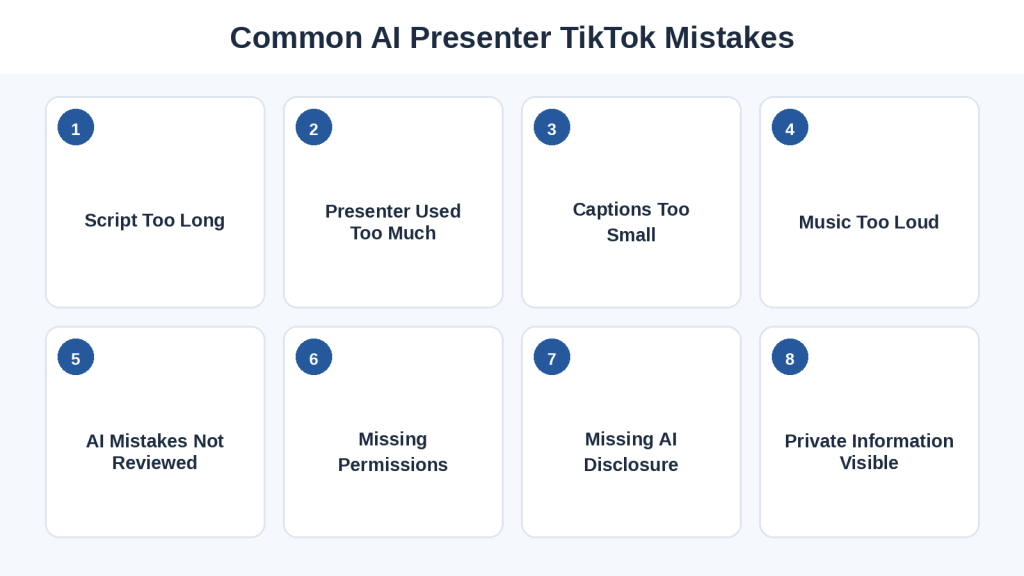
Figure 14. Common mistakes beginners should check before publishing an AI virtual presenter TikTok video.
Explanation: Most beginner problems can be reduced by keeping the script focused, reviewing AI output carefully, making captions readable, protecting privacy, and checking permissions.
A Simple Rule to Remember
Before publishing, check four things:
Is it clear? Can a beginner understand the video?
Is it accurate? Have important facts been verified?
Is it permitted? Do you have appropriate rights and permissions?
Is it transparent? Have you disclosed realistic AI use and commercial relationships when required?
Benefits and Limitations of AI Virtual Presenter Videos for TikTok
AI virtual presenters can make short-form video production easier, but they also introduce limitations.
Benefits
• You do not need to appear on camera.
• The presenter can stay visually consistent.
• Individual scenes can be corrected without re-recording everything.
• You may not need traditional camera equipment or a studio.
• Presenter videos can work well for educational tips, definitions, lists, and mini tutorials.
• Preserved project files can make updates and additional versions easier.
• Some tools support multilingual workflows, although translations and pronunciation still require review.
Limitations
Limitation 1: The Presenter Can Look Artificial
How to Reduce This Limitation: Generate short scenes, review every clip, and replace distracting footage when necessary.
Limitation 2: The Voice May Sound Unnatural
How to Reduce This Limitation: Test pronunciation before full generation and use short conversational sentences.
Limitation 3: AI Presenters Can Feel Repetitive
How to Reduce This Limitation: Combine presenter footage with screen recordings, examples, graphics, illustrations, short B-roll, and on-screen text.
Limitation 4: Generation Can Cost Money
Tool limits, export quality, voice choices, and commercial-use conditions can depend on the service and plan.
Limitation 5: Regeneration Can Waste Time and Credits
How to Reduce This Limitation: Review the script, presenter, voice, framing, and scene plan before generation.
Limitation 6: You Still Need Editing
How to Reduce This Limitation: Create a repeatable vertical editing template.
Limitation 7: AI Can Introduce Factual Errors
How to Reduce This Limitation: Verify important facts before generation and review the finished video again.
Limitation 8: Disclosure Requirements Add Another Publishing Step
How to Reduce This Limitation: Make AI disclosure a standard part of the publishing checklist.
Limitation 9: Privacy and Consent Still Matter
How to Reduce This Limitation: Use fictional presenter assets when practical and keep permission records for real people’s likenesses or voices.
Limitation 10: Licensing Can Become Complicated
How to Reduce This Limitation: Keep a simple asset-and-licence record for each project.
Limitation 11: Platform Rules Can Change
How to Reduce This Limitation: Check official guidance when adopting a workflow, when relevant changes are announced, and periodically.
Limitation 12: Viewers May Prefer Human Presenters for Some Topics
Reality: AI virtual presenters are one production option, not a universal replacement for human presenters.
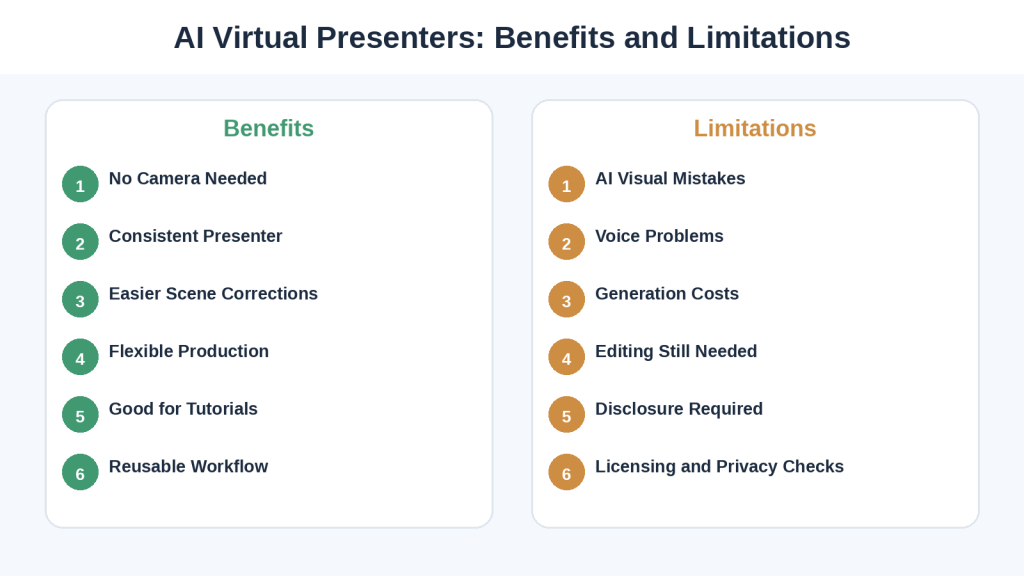
Figure 15. AI virtual presenters can simplify some parts of TikTok production, but they still require editing, review, disclosure, and responsible use.
Explanation: Understanding both advantages and limitations helps beginners decide when a virtual presenter is genuinely useful instead of assuming AI automatically improves production.
Is an AI Virtual Presenter Right for You?
A virtual presenter may be useful if you prefer not to appear on camera, create educational content, want consistency, can review AI output, can manage basic editing, and are willing to check licences, permissions, and disclosure requirements.
There is no requirement to use AI simply because the technology is available.
Myths About AI Virtual Presenter Videos for TikTok
Myth 1: “An AI Presenter Means I Do Not Need to Edit the Video”
Reality: Generating the presenter is only one stage. You may still need to trim scenes, add visuals, correct captions, position the presenter, balance audio, and review the final layout.
Myth 2: “The More Realistic the Presenter Looks, the Better the Video Will Be”
Reality: Realism does not automatically make a video clearer or more useful.
Myth 3: “A Fictional AI Presenter Does Not Need AI Disclosure”
Reality: TikTok requires creators to label AI-generated content that contains realistic images, audio, or video. A fictional presenter can still look realistic.
Myth 4: “If TikTok Automatically Detects AI, I Do Not Need to Do Anything”
Reality: Automatic labelling does not replace the creator’s own disclosure responsibilities.
Myth 5: “Adding an AI Label Makes Any AI Video Acceptable”
Reality: A label does not override consent, privacy, copyright, impersonation, or other platform rules.
Myth 6: “AI-Generated Means Copyright-Free”
Reality: Using AI does not automatically remove copyright or licensing concerns.
Myth 7: “If an Asset Is Available Online, I Can Put It in My TikTok”
Reality: Online availability is not the same as permission to reuse something.
Myth 8: “Giving Credit Always Makes Copyrighted Material Safe to Use”
Reality: Credit and permission are different things.
Myth 9: “AI Voices Are Automatically Safe to Use”
Reality: An authorized synthetic voice is different from imitating a recognizable real person without permission.
Myth 10: “The AI Presenter Knows Whether the Script Is Correct”
Reality: A presenter can confidently deliver incorrect or outdated information.
Myth 11: “Longer Videos Always Teach More”
Reality: A focused video explaining one useful idea can be clearer than a rushed video containing ten different ideas.
Myth 12: “Fast Speech Is Better for TikTok”
Reality: Very fast narration can make unfamiliar terms, captions, and demonstrations difficult to follow.
Myth 13: “Every Second Needs Movement”
Reality: Constant animation can become distracting.
Myth 14: “More Hashtags Guarantee More Views”
Reality: Hashtags do not guarantee distribution or audience growth.
Myth 15: “One Poorly Performing Video Means the Idea Failed”
Reality: One upload gives limited information. Look for patterns across several videos.
Myth 16: “AI Presenters Automatically Save Time”
Reality: They can save time in some workflows but also create work through regeneration, pronunciation fixes, licensing checks, and disclosure review.
Myth 17: “A Virtual Presenter Can Replace Every Type of Human Video”
Reality: Personal experience, emotional storytelling, interviews, and genuine demonstrations may be better suited to a real person.
Myth 18: “Once I Make the Presenter, I Never Need to Review It Again”
Reality: Every new generated clip still needs review.
Myth 19: “I Must Use the Most Expensive AI Presenter Tool”
Reality: Choose the tool that fits your actual needs, workflow, licence conditions, privacy expectations, and budget.
Myth 20: “Successful AI Presenter Videos Are Fully Automated”
Reality: You still choose the topic, audience, script, sources, presenter, visuals, permissions, editing, disclosure, and final approval.
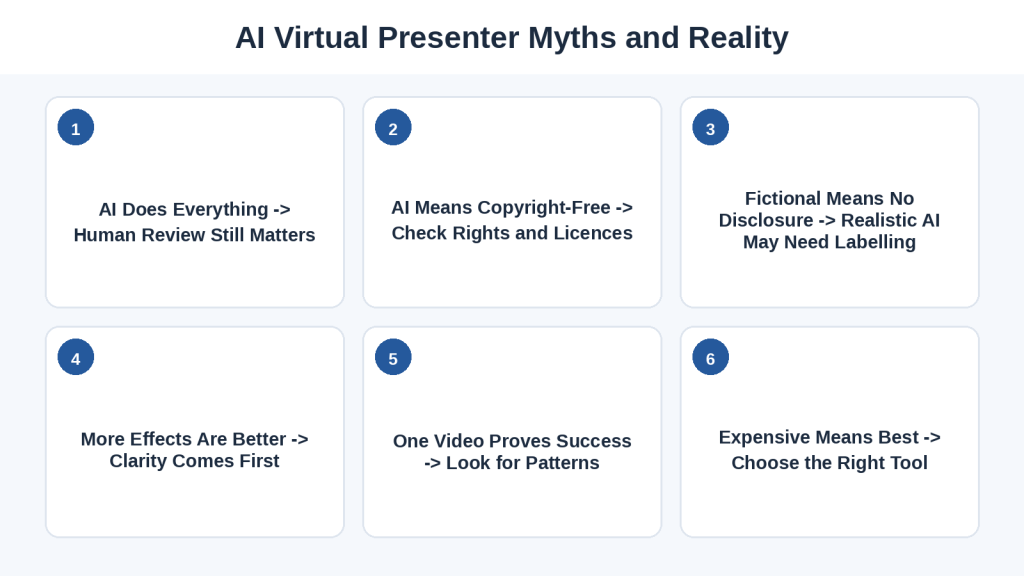
Figure 16. Common myths can make AI virtual presenter production seem easier, safer, or more automatic than it really is.
Explanation: AI can simplify parts of production, but creators still need to plan content, verify information, review generated material, check rights, and handle disclosure.
The Simple Reality
An AI virtual presenter is a production tool. It can help you create videos without appearing on camera, but it does not automatically provide a good topic, accurate script, useful lesson, permissions, perfect captions, guaranteed growth, or compliance with platform rules.
Frequently Asked Questions About AI Virtual Presenter Videos for TikTok
What Is an AI Virtual Presenter?
An AI virtual presenter is a computer-generated person or character that appears to present spoken information in a video using generated appearance, synthetic voice, facial animation, and lip synchronization.
Do I Need to Show My Own Face?
No. You can use a completely fictional presenter instead.
Can I Use the Same Presenter From My YouTube Videos?
Yes, if the presenter service and licence allow the intended use. You may need to adapt aspect ratio, scene length, presenter position, caption size, visuals, and pacing.
Should My TikTok Video Be Vertical?
For this workflow, yes. Use a 9:16 vertical project, commonly exported at 1080 x 1920 pixels.
Does the AI Presenter Need to Be on Screen for the Whole Video?
No. Alternate between presenter, screen recording, graphic, prompt example, image, and short demonstration as appropriate.
How Long Should My Script Be?
There is no single perfect length. Focus on one clear idea and divide longer subjects into several videos.
Can AI Write the Script for Me?
AI can help brainstorm, outline, simplify, shorten, and reorganize. You should still review and fact-check the final script.
Can I Clone Someone Else’s Voice?
Do not clone a recognizable person’s voice without appropriate permission.
Can I Make My Presenter Look Like a Celebrity?
For a beginner educational channel, use an original fictional presenter instead of copying a celebrity, politician, influencer, or other recognizable person.
Do I Need to Label My AI Presenter Video?
If it contains realistic AI-generated images, audio, or video covered by TikTok’s rules, TikTok requires the content to be labelled.
Does an AI Label Reduce My Video’s Reach?
TikTok states that turning on the AI-generated-content setting does not affect distribution by itself as long as the content follows the Community Guidelines.
Will TikTok Label AI Content Automatically?
TikTok can automatically label some AI-generated content, but creators should not depend on automatic detection instead of following their own disclosure responsibilities.
Is Writing #AI Enough?
Not necessarily. A hashtag should not replace TikTok’s designated AI-generated-content setting when that setting is required.
Can I Use AI-Generated Images With My Presenter?
Yes, when appropriate and when the tool’s terms and intended use have been checked. Review images for distortions, misspelled text, unwanted logos, and misleading details.
Can I Use Stock Footage?
Yes, when you have appropriate rights to use it and have checked social-media use, commercial use, attribution, modification, and other restrictions.
Can I Use Any Music I Find on TikTok?
Do not assume all music is cleared for every use. Commercial content has additional music considerations, and TikTok recommends the Commercial Music Library for content promoting a brand, product, or service.
What If I Use Music From My Video Editor?
Check the licence. The fact that an editor lets you insert a track does not necessarily mean the licence covers TikTok, advertising, sponsored content, or commercial use.
Can I Promote My Business With an AI Presenter?
Yes, provided the content follows applicable platform rules and your assets are licensed appropriately. Commercial-content disclosure is separate from AI disclosure.
Can I Use an AI Presenter for Affiliate Marketing?
Potentially, but review current commercial-content rules, affiliate conditions, disclosures, asset licences, music rights, and product claims.
Are Automatic Captions Good Enough?
They can be useful, but they still need review for names, technical terms, numbers, and acronyms.
Should I Add Captions if the Presenter Already Speaks Clearly?
Yes. Captions support viewers who are deaf or hard of hearing, viewers watching without sound, and people following unfamiliar terminology.
Can I Upload Private Information to an AI Presenter Tool?
Avoid sensitive or confidential information unless you understand and accept the service’s current privacy practices.
Do I Need Permission to Use Someone’s Photograph?
If a recognizable real person’s photograph is used to create or modify a presenter, obtain appropriate permission and review the service’s terms.
Can I Reuse the Same TikTok Video on Other Platforms?
Possibly, but check the other platform’s AI disclosure, music rights, asset licences, commercial-use restrictions, and formatting requirements.
Do I Need an Expensive AI Presenter Service?
No. Compare ease of use, presenter quality, voice quality, vertical-video support, export quality, generation limits, commercial-use conditions, privacy terms, and price.
Will an AI Presenter Make My TikTok Videos Successful?
No tool can guarantee views, followers, engagement, or income.
What Should I Do if the AI Presenter Makes a Mistake?
Identify the exact problem, correct the script or settings, regenerate only the affected scene when possible, replace it, and review the full video again.
Should I Delete Old Project Files After Publishing?
No. Keep the approved script, presenter clips, editing project, master export, sources, permissions, licences, and publication information.
How Often Should I Check TikTok’s Rules?
Review relevant official guidance when you first begin, when you use a new AI technique, when you use real people’s likenesses or voices, when you start commercial content, when TikTok announces changes, and periodically.
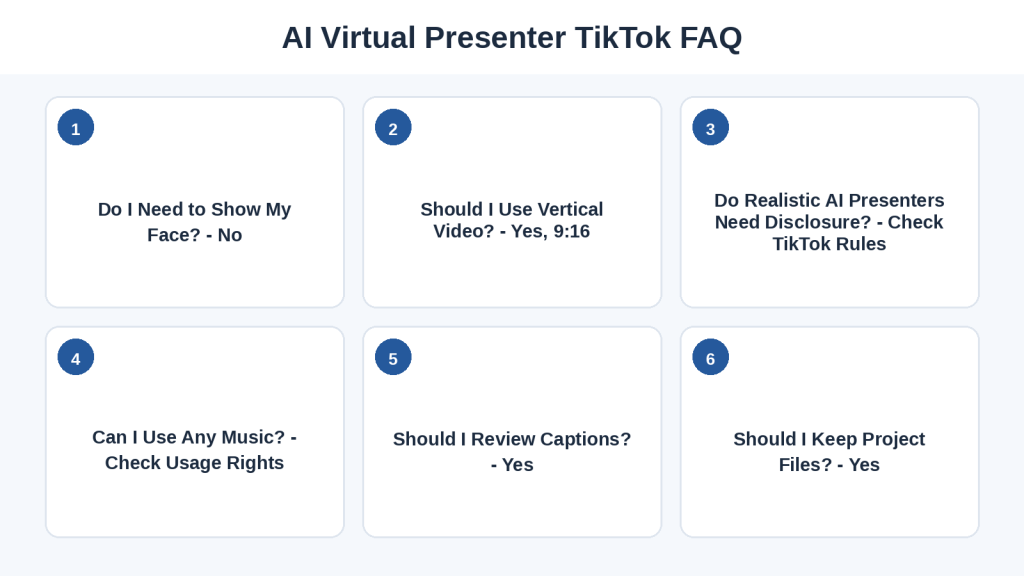
Figure 17. Quick answers to common beginner questions about creating AI virtual presenter videos for TikTok.
Explanation: The essential workflow remains simple: use an appropriate presenter, design for vertical viewing, check facts and permissions, review captions and audio, and keep project files.
Key Takeaways
Remember these main points:
• Start with one clear topic and one main goal.
• Write a short script that sounds natural when spoken aloud.
• Use a fictional or properly authorized presenter rather than copying a real person’s face or voice.
• Design the video for a vertical 9:16 layout from the beginning.
• Generate presenter scenes separately so mistakes are easier to fix.
• Combine the presenter with screen recordings, graphics, examples, and useful supporting visuals.
• Add accurate readable captions and check them manually.
• Keep background music quieter than the presenter voice.
• Verify music, stock footage, images, templates, fonts, and other assets before publishing.
• Check the finished video for AI-generation mistakes, factual errors, privacy problems, and missing permissions.
• Do not present realistic AI-generated scenes as proof that a real event happened.
• Review TikTok’s current AI-generated-content disclosure requirements before publishing realistic synthetic content.
• Remember that AI disclosure and commercial-content disclosure are separate requirements.
• Export a clean vertical master and watch the actual exported file before uploading.
• Preview the video at phone size.
• Keep the editable project, source files, licences, permissions, scripts, and master exports after publication.
• Use comments and analytics as feedback rather than judging your strategy from one post.
• Check official policies periodically because features and rules can change.
The complete workflow can be summarized as:
Topic -> Script -> Scene Plan -> AI Presenter -> Supporting Visuals -> Captions -> Audio -> Edit -> Accuracy and Safety Review -> AI Disclosure -> Export -> Publish -> Review Performance -> Improve
The most important principle is simple:
AI can help create the presenter, but you remain responsible for the accuracy, permissions, privacy, disclosure, quality, and final decision to publish.
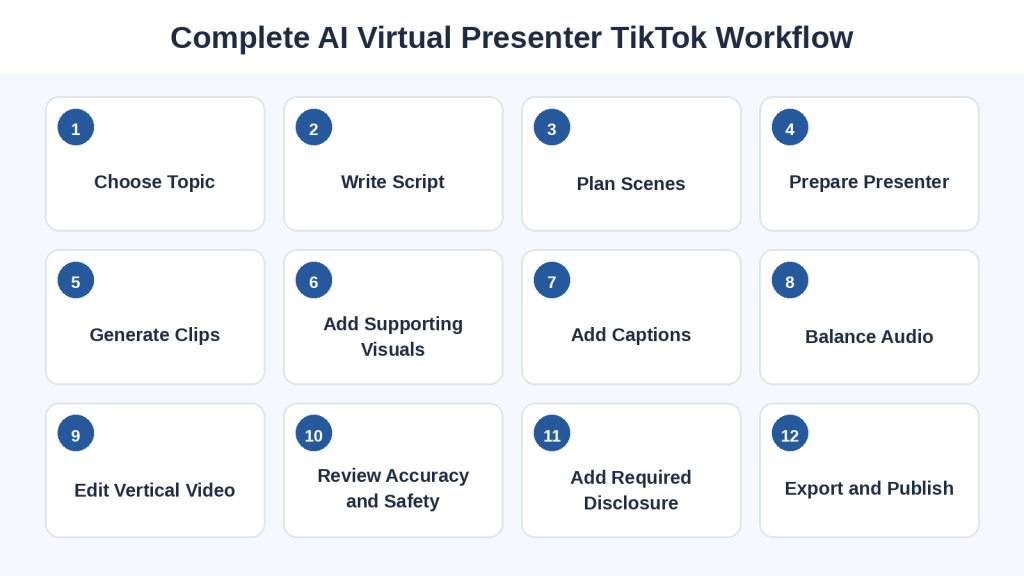
Figure 18. The complete beginner workflow for creating, reviewing, disclosing, and publishing an AI virtual presenter video for TikTok.
Explanation: Following the workflow in order helps reduce unnecessary generations, editing mistakes, privacy problems, licensing issues, and publishing errors.
Final Tip
Do not try to automate every decision. Use AI where it genuinely saves work, but keep human control over the script, facts, permissions, editing, disclosure, and final publication.
Continue Learning
How to Create an AI Virtual Presenter for YouTube Videos: Beginner Guide (2026)
Use this guide if you still need to create your fictional AI virtual presenter or want more detail about choosing a presenter style, creating a fictional avatar, selecting an authorized synthetic voice, keeping appearance consistent, and handling privacy and consent.
Best AI Video Tools for Beginners: Complete Guide (2026)
Use this guide to compare beginner-friendly AI video tools and choose a suitable tool for your video-creation workflow.
How to Create AI Videos from Text: Beginner Step-by-Step Guide (2026)
Use this guide when you want to create AI-generated video clips directly from written prompts or descriptions.
How to Add Voice, Music, and Captions to AI Videos: Beginner Step-by-Step Guide (2026)
Use this guide for additional help with AI voices, music, sound effects, captions, audio rights, voice permissions, accessibility, and responsible audio use.
Continue With the Workflow
The core workflow remains Plan -> Script -> Generate -> Edit -> Review -> Disclose -> Publish -> Improve. Platform-specific details may change, but clear information, privacy protection, licence checks, accessible captions, responsible disclosure, and preserved project files remain useful habits.
Sources and References
This article uses current official TikTok guidance for platform-specific information. TikTok features and policies may change, so readers should check current official guidance when beginning a new workflow, when changing account or content type, when using new AI techniques, and when TikTok announces relevant updates.
• TikTok Support – About AI-generated content.
• TikTok Support – Promoting a brand, product, or service.
• TikTok Support – Commercial use of music on TikTok.
• TikTok Support – Copyright.
• TikTok Support – Accessibility for your videos.
• TikTok Support – TikTok Studio.
• TikTok Support – Tools for creators.
• TikTok Support – Creator Search Insights.
• TikTok Support – Account types on TikTok.
• TikTok Support – Editing TikTok videos and photos.
This article provides general educational information and does not replace legal, medical, financial, or other professional advice.
Conclusion
AI virtual presenters can give beginners a practical way to create presenter-style TikTok videos without appearing on camera.
The strongest results come from treating the presenter as only one part of the production process. A complete workflow still requires you to choose a clear topic, review the script, plan scenes, check presenter clips, add useful visuals, create readable captions, balance audio, review facts and permissions, handle disclosure, inspect the final export, and learn from the published result.
AI can reduce some of the work involved in filming, but it does not remove your responsibility for the finished content. A realistic AI presenter should never be used to make viewers believe a real person said or did something that did not happen. Realistic AI-generated scenes should not be presented as evidence of real events.
For beginners, the simplest approach is usually to start with a fictional presenter, one short educational topic, a few well-planned scenes, readable captions, and a straightforward vertical edit.
Do not worry about making your first TikTok elaborate. A clear educational video with a useful message, accurate information, clean visuals, and responsible disclosure can teach you more about the workflow than spending days trying to create a complicated first production.
Once you complete the process successfully, save your presenter settings, script structure, editing layout, caption style, folders, and review checklist as a reusable template.
Then your next project becomes much simpler:
Choose a new topic -> update the script -> generate the required scenes -> add useful visuals -> review -> publish.
Final Tip
Build a reliable process before trying to build a large volume of videos. A consistent workflow makes it easier to produce AI virtual presenter TikToks that are clear, organized, accurate, accessible, and responsibly published.
Official Links
TikTok Support – About AI-generated content
TikTok Support – Promoting a brand, product, or service
TikTok Support – Commercial use of music on TikTok
TikTok Support – Accessibility for your videos
TikTok Support – TikTok Studio
TikTok Support – Tools for creators
TikTok Support – Creator Search Insights
TikTok Support – Account types on TikTok
 AI Mastery