
What You’ll Learn
In this beginner-friendly guide, you will learn how to:
• add a recorded voice or AI-generated voice to an AI video
• choose background music that matches the video
• adjust voice, music, and sound-effect volume levels
• create accurate captions automatically
• correct caption mistakes and improve readability
• position and format captions for different screen sizes
• synchronize voice, music, captions, and video scenes
• avoid copyright, privacy, and permission problems
• export and review a finished video before publishing it
By the end of this guide, you will understand how to turn a silent AI-generated video into a clearer, more engaging, and more professional finished video.
Introduction
AI-generated video clips often begin as silent visual scenes. The images may look impressive, but a video can feel incomplete when it has no narration, background music, or captions.
Voice helps explain the message and guide the viewer through each scene. Music creates mood and makes the video feel more polished. Captions display spoken words as text, helping viewers understand the video when the sound is turned off or difficult to hear.
You do not need professional recording equipment or advanced video-editing skills to add these elements. Many beginner-friendly video editors can generate voices, add music, create automatic captions, and synchronize everything on a simple timeline.
The basic process is:
1. Prepare the video and script.
2. Add a recorded or AI-generated voice.
3. Add suitable background music.
4. Generate and correct captions.
5. Adjust timing and volume.
6. Review and export the completed video.
This guide explains each step in simple language. The exact buttons may differ between video-editing tools, but the main process is similar in most applications.
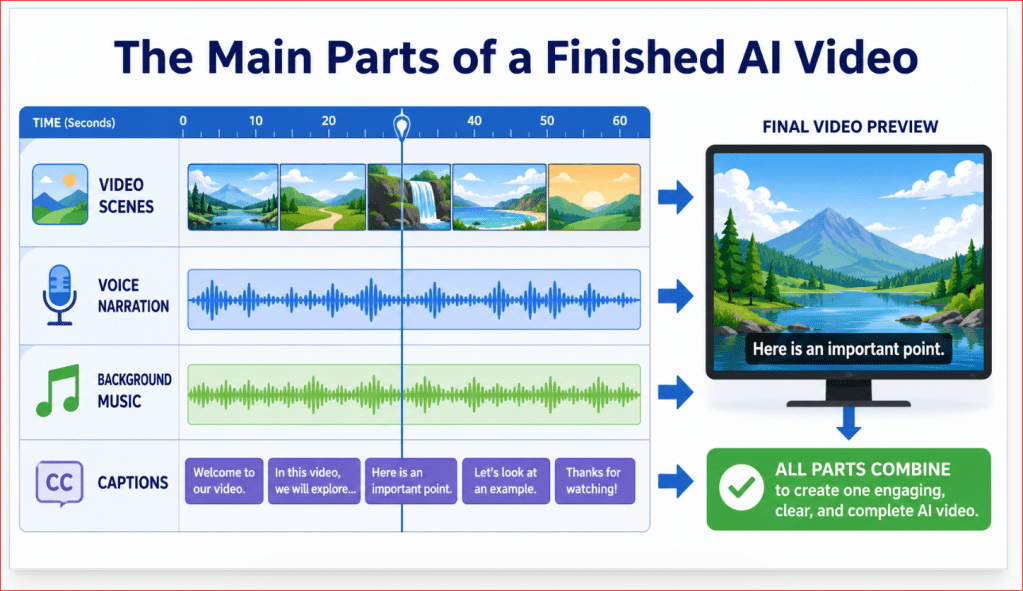
Figure 1. The main parts of a finished AI video arranged on separate editing tracks.
A finished AI video usually combines visual scenes, narration, background music, and captions. These elements are arranged on separate tracks so their timing and volume can be controlled independently
What You Need Before You Start
Before adding voice, music, and captions, gather the main files and tools you will use. Preparing them first will make the editing process faster and help you avoid missing audio, incorrect timing, or lost files.
Your AI Video
Use the best available version of your AI-generated video. Watch it from beginning to end and check for:
• unwanted objects or visual mistakes
• scenes that are too short or too long
• incorrect cropping or aspect ratio
• missing scenes
• poor image quality
Correct major video problems before adding audio and captions. Replacing scenes later may change the timing of your narration, music, and text.
A Final Script
Prepare the exact words that will be spoken in the video. A final script helps you create smoother narration and more accurate captions.
Read the script aloud before recording. Rewrite sentences that sound too long, complicated, or unnatural. Spoken language should usually be simple and direct.
A Video-Editing Tool
You need a video editor that allows you to work with separate video, voice, music, and caption tracks.
Useful features include:
• audio recording or audio-file import
• AI voice generation
• background-music controls
• automatic caption generation
• caption editing and formatting
• volume and timing adjustments
• video export settings
The names and locations of these features may differ between editing tools, but the overall process is usually similar.
A Voice Option
Decide whether you will use:
• your own recorded voice
• another person’s voice with permission
• an AI-generated voice
Using your own voice can make the video feel more personal. An AI-generated voice may be useful when you do not want to record or when you need a consistent narration style.
Music You Are Allowed to Use
Choose music that you created, licensed, purchased with suitable usage rights, or obtained from a source that clearly allows your intended use.
Do not assume that music is free to use simply because it is available online. Check whether it can be used in personal, public, or commercial videos.
Headphones or Speakers
Use headphones or reliable speakers when reviewing the video. Laptop speakers may make it difficult to notice background noise, uneven volume, or music that is covering the narration.
An Organized Project Folder
Create one main folder for the video project. Inside it, you can create separate folders for:
• video clips
• voice recordings
• music
• sound effects
• captions
• exported versions
• licences and permission records
Use clear filenames so you can identify each file quickly.
For example:
article-021-main-video.mp4
article-021-narration-final.wav
article-021-background-music.mp3
article-021-final-video.mp4
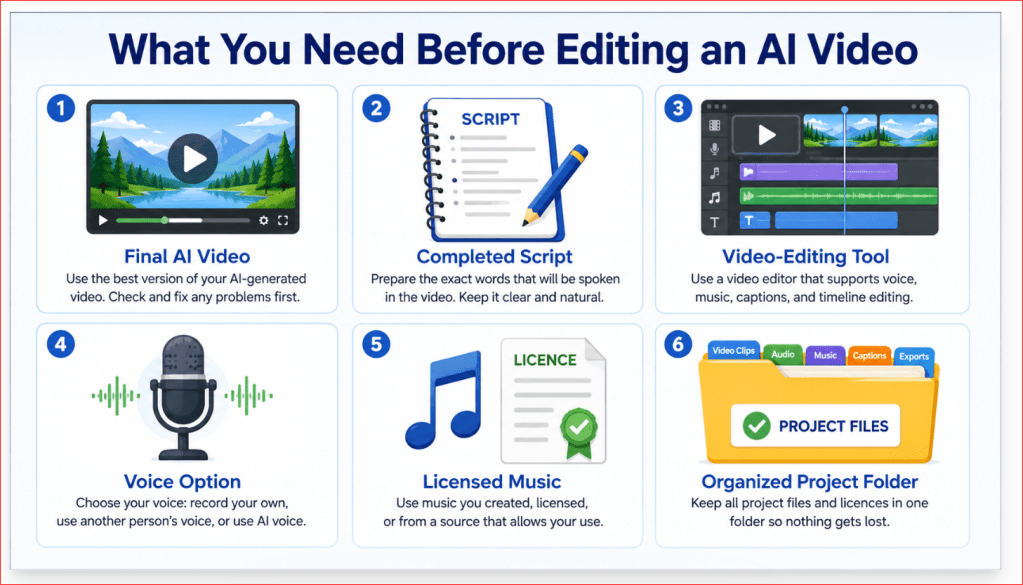
Figure 2. The main files and tools to prepare before adding voice, music, and captions.
Preparing the video, script, voice, music, editing tool, and project folder before you begin helps keep the project organized and reduces avoidable mistakes.
Understand the Video-Editing Timeline
A video-editing timeline is the main workspace where you arrange your video, voice, music, captions, and other elements.
The timeline usually runs from left to right. The left side represents the beginning of the video, while the right side represents the end.
Each element appears on its own horizontal track. Figure 1 shows how these tracks work together.
Video Track
The video track contains your AI-generated clips, images, transitions, and visual scenes.
You can use this track to:
• arrange scenes in the correct order
• shorten or extend clips
• remove unwanted sections
• add transitions between scenes
• match scenes with the narration
The video track is usually placed near the top of the timeline.
Voice Track
The voice track contains your recorded narration or AI-generated voice.
The audio appears as a waveform. A waveform is a visual pattern that shows where the voice becomes louder, quieter, or silent.
You can move the voice recording along the timeline so that each spoken sentence matches the correct scene.
Music Track
The music track contains your background music.
Music should normally support the narration rather than compete with it. You can shorten the music, repeat it, fade it in, fade it out, and lower its volume.
Caption Track
The caption track contains the written words displayed on the screen.
Each caption block should appear at the same time as the matching spoken words. You can move, shorten, or extend caption blocks to improve their timing.
The Playhead
The playhead is a vertical line that shows your current position in the video.
When you move the playhead, the preview screen displays what appears at that exact moment.
Use the playhead to check:
• where a voice sentence begins
• when music starts or ends
• when a caption appears
• where one video scene changes to another
Zooming In and Out
Most video editors allow you to zoom in or out on the timeline.
Zoom in when you need to make small timing adjustments. Zoom out when you want to see the complete video structure.
For example, zooming in can help you move a caption by a fraction of a second so that it appears exactly when the speaker begins talking.
Locking Tracks
Some editors allow you to lock a track. Locking prevents the items on that track from moving accidentally.
After your video scenes are arranged correctly, you may lock the video track before editing the voice, music, or captions.
Muting and Hiding Tracks
You may also be able to mute an audio track or temporarily hide a visual track.
This can help you review one part of the project at a time. For example, you can mute the music while checking the narration or hide captions while reviewing the video scenes.
Keep Related Elements Aligned
Always check that the video, narration, music, and captions remain synchronized.
If you move or remove a video clip, the other tracks may no longer match. Review the timeline after every major change to make sure nothing has shifted out of position.
Step 1: Prepare Your Video and Narration Script
Before recording or generating a voice, make sure the video scenes and narration script are ready.
Adding narration too early can create extra work. If you later change the video scenes or rewrite the script, you may need to record the voice again and correct the captions.
Review the Video First
Watch the complete AI video without adding any audio.
Check that:
• the scenes appear in the correct order
• each scene remains on screen long enough
• there are no unwanted visual mistakes
• the video uses the correct aspect ratio
• the beginning and ending are complete
• there are no long blank sections
Fix major visual problems before continuing.
Match the Script to the Video Scenes
Divide the narration script into short sections. Match each section with the scene it explains.
For example:
Scene 1: A person opens an AI video tool.
Narration: “AI video tools can help beginners create short videos from written instructions.”
Scene 2: A written prompt changes into a video.
Narration: “The tool uses your prompt to generate the visual scene.”
This method helps you see whether the video scenes are long enough for the spoken words.
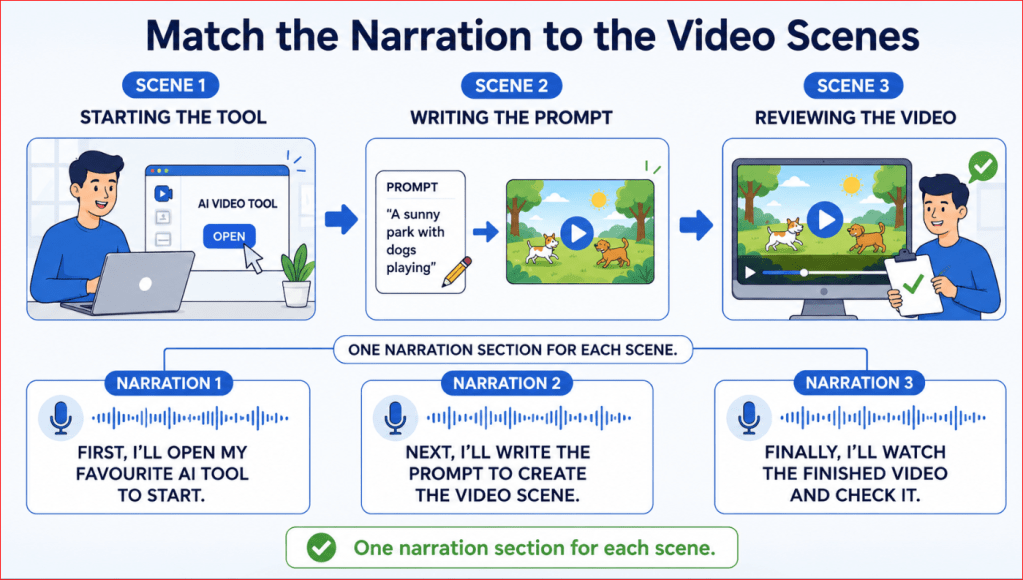
Figure 3. Matching each narration section with the correct AI video scene.
Dividing the script into short sections and matching each section with a video scene makes narration easier to record and synchronize.
Keep Narration Sentences Short
Short sentences are easier to record, understand, caption, and synchronize.
Instead of writing:
“Artificial intelligence video-generation tools provide users with several different options that can be used to produce, modify, and improve videos for many types of personal and business projects.”
Write:
“AI video tools can create and improve videos. They can be used for personal, educational, or business projects.”
Read the Script Aloud
Read the complete script at a natural speaking speed.
While reading, check for:
• sentences that are difficult to pronounce
• words that sound unnatural
• sentences that are too long
• repeated ideas
• technical terms that need explanation
• sections that do not match the video
Rewrite anything that sounds confusing.
Estimate the Narration Length
A script may take longer to speak than expected.
Read the script aloud and time it before recording. The total length will depend on your speaking pace, pauses, pronunciation, and the style of the video.
Do not force the narrator to speak too quickly just to fit the existing video. Extend the scene, shorten the script, or divide the information across more scenes.
Add Pauses to the Script
Mark places where the narrator should pause.
A simple script may look like this:
“Welcome to this beginner guide. [Pause]
Today, you will learn how to add voice, music, and captions to an AI video. [Pause]
Let us begin with the narration.”
Pauses make the voice sound more natural and give viewers time to understand the message.
Check Difficult Names and Terms
Confirm how names, abbreviations, and technical terms should be pronounced.
This is especially important when using an AI-generated voice because the tool may pronounce unfamiliar words incorrectly.
You can sometimes improve pronunciation by:
• spelling the word phonetically
• adding spaces between letters
• writing an abbreviation in full
• replacing a difficult word with a simpler alternative
Save the Final Script
Save the approved script before creating the narration.
Use a clear filename such as:
article-021-final-narration-script.docx
Keep an unchanged copy of the final script. This will help when checking the narration, correcting captions, and updating the video later.
Step 2: Add Voice Narration
Voice narration explains what is happening in the video and guides the viewer from one scene to the next.
You can record your own voice or create an AI-generated voice. Both options can work well when the narration is clear, natural, and correctly synchronized with the video.
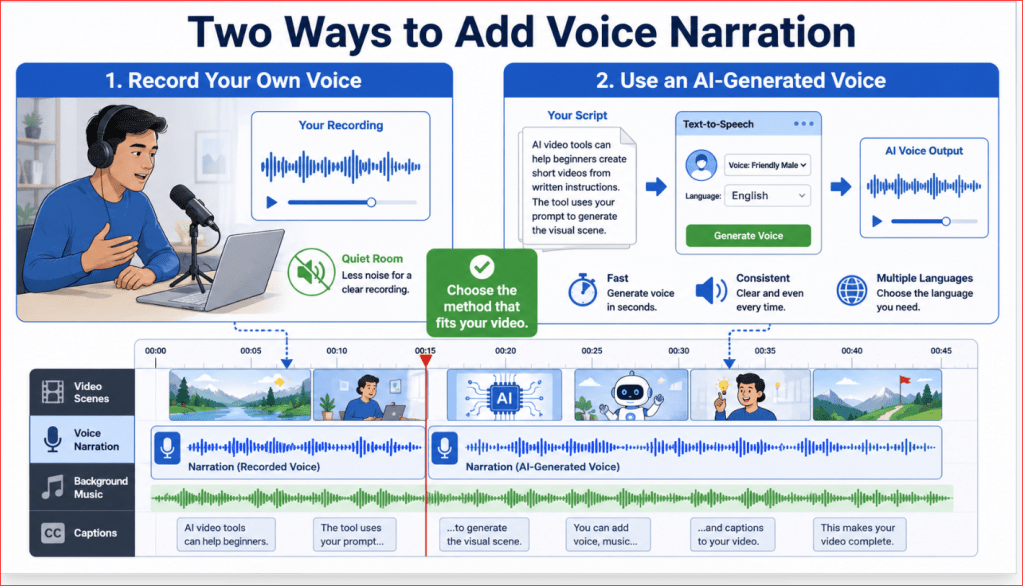
Figure 4. Two common ways to add voice narration to an AI video.
Recording your own voice can create a personal connection, while an AI-generated voice can provide speed and consistency. The best choice depends on the video, the audience, and the available recording environment.
Choose Your Voice Method
Before adding narration, decide which method best suits the video.
Record Your Own Voice
Recording your own voice can make the video feel more personal and trustworthy.
This option may be suitable when:
• you are comfortable speaking
• you want viewers to recognize your voice
• the video represents you or your website
• you want natural emotion and pronunciation
• you can record in a quiet location
You do not need an expensive microphone. A headset microphone, smartphone, or computer microphone may be sufficient when the room is quiet and the recording is clear.
Use an AI-Generated Voice
An AI-generated voice reads your written script aloud.
This option may be useful when:
• you do not want to record yourself
• you need consistent pronunciation and volume
• you want to test several voice styles
• you need narration in another language
• you need to correct individual sentences easily
AI voices have improved, but some may still sound unnatural or pronounce names incorrectly. Always listen to the complete narration before using it.
Record in a Quiet Location
Choose a room with as little background noise as possible.
Turn off or move away from:
• televisions
• fans
• air conditioners
• open windows
• noisy appliances
• mobile-phone notifications
Rooms with curtains, carpets, furniture, and soft materials usually create less echo than large empty rooms.
Position the Microphone Correctly
Place the microphone close enough to capture a clear voice, but not directly against your mouth.
A useful starting position is approximately 15 to 20 centimetres away.
Speak slightly past the microphone instead of directly into it. This can reduce harsh sounds caused by letters such as P, B, and T.
Test the Recording First
Record one or two sentences before recording the complete script.
Listen for:
• background noise
• echo
• distorted sound
• very low volume
• sudden loud sounds
• unclear pronunciation
Fix these problems before continuing.
Record Short Sections
Do not feel that you must record the complete script in one attempt.
Record one paragraph or scene at a time. Short recordings are easier to repeat, correct, organize, and synchronize.
Use clear filenames such as:
scene-01-narration.wav
scene-02-narration.wav
scene-03-narration.wav
Keep the original recordings until the entire video is completed.
Speak Clearly and Naturally
Use a calm, steady pace.
Avoid speaking too quickly. Give viewers enough time to understand each sentence and look at the video.
Try to:
• pronounce each word clearly
• pause between important ideas
• use a natural tone
• keep a consistent distance from the microphone
• maintain a similar volume throughout the recording
Do not exaggerate every word. The narration should sound like a helpful person explaining the subject.
Create an AI Voice
The exact steps vary between tools, but the basic process is usually similar:
1. Open the text-to-speech or AI voice feature.
2. Paste one section of the final script.
3. Select a voice.
4. Choose the language and accent when available.
5. Adjust the speaking speed if necessary.
6. Generate the narration.
7. Listen to the complete result.
8. Correct pronunciation or timing problems.
9. Export or add the voice to the project timeline.
Generate short sections separately when possible. This makes corrections easier because you do not need to regenerate the entire narration when one sentence is wrong.
Choose a Suitable AI Voice
Select a voice that matches the subject and intended audience.
For a beginner tutorial, the voice should normally sound:
• clear
• calm
• friendly
• confident
• easy to understand
Avoid voices that sound rushed, overly dramatic, robotic, or distracting.
The most realistic voice is not always the best choice. Clear pronunciation is more important than style.
Correct AI Pronunciation Problems
Listen carefully for names, abbreviations, numbers, and technical terms.
When a word is pronounced incorrectly, try:
• spelling it phonetically
• writing an abbreviation in full
• adding punctuation to create a pause
• dividing a long sentence into shorter sentences
• replacing the word with a simpler alternative
For example, an AI voice may pronounce “AI” incorrectly in some contexts. Writing “A.I.” or “artificial intelligence” may improve the result.
Import the Narration
After recording or generating the narration, add the audio files to the video-editing project.
Place each recording on the voice track below the matching video scene.
Arrange the clips in the correct order and leave short natural pauses between them.
Synchronize the Voice with the Video
Move each narration clip along the timeline until the spoken words match the correct visual scene.
Check that:
• the narration begins after the opening scene appears
• each explanation matches what viewers see
• the voice does not continue after the related scene ends
• pauses occur at natural points
• the final sentence ends before the closing screen disappears
When the narration is longer than the video scene, you can:
• extend the scene
• slow the scene slightly
• shorten the narration
• divide the information between two scenes
Do not speed up the voice so much that it becomes difficult to understand.
Adjust the Narration Volume
The narration should be the clearest audio element in the video.
Use the volume control or audio meter to check that the voice is strong without becoming distorted.
If the narration volume changes between clips, adjust each clip so the complete video sounds consistent.
Some editors include a normalize or automatic-volume feature. This can help balance clips, but you should still listen to the result.
Remove Unwanted Silence and Noise
Trim excessive silence from the beginning and end of each recording.
You may also use noise-reduction tools to reduce steady background sounds. Apply noise reduction carefully because excessive processing can make the voice sound metallic or unnatural.
Keep short natural pauses between sentences. Removing every pause can make the narration feel rushed.
Add Gentle Fades
A short fade-in can prevent a voice recording from starting abruptly. A short fade-out can soften the ending.
Voice fades should normally be subtle. Long fades may make the first or last words difficult to hear.
Review the Complete Voice Track
Play the video from beginning to end with only the voice track active.
Check for:
• missing sentences
• repeated recordings
• incorrect scene placement
• sudden volume changes
• unnatural pauses
• pronunciation errors
• clipped words
• background noise
Correct these problems before adding background music.
Step 3: Add Background Music
Background music can make an AI video feel more polished, engaging, and complete. It can create emotion, support the pace of the scenes, and help different parts of the video flow together.
Music should support the message without distracting viewers from the narration.
Choose Music That Matches the Video
Select music that suits the subject, audience, and mood of the video.
For example:
• calm music may suit a beginner tutorial
• energetic music may suit a short promotional video
• soft inspirational music may suit an educational introduction
• gentle ambient music may suit a technology demonstration
Avoid music that feels too dramatic, aggressive, or busy for the subject.
A simple instrumental track is often easier to use beneath narration than a song containing lyrics. Lyrics can compete with the spoken words and make the video difficult to understand.
Confirm That You Can Use the Music
Before adding music, check its usage rights.
Use music that:
• you created yourself
• came with the video-editing tool and is licensed for your intended use
• was purchased with suitable usage rights
• is available under a licence that permits your type of project
• was provided by a source that clearly explains how it may be used
Do not assume that music is free to use because it can be downloaded or heard online. [5]
Check whether the licence permits:
• personal use
• public publishing
• commercial use
• social-media use
• website use
• editing or shortening the track
Save a copy of the licence, receipt, or permission record in the project folder.
Import the Music File
Add the music file to the video-editing project.
Place it on the Background Music track below the narration. Start the music near the beginning of the video unless the opening requires silence.
Use a clear filename such as:
article-021-background-music-final.mp3
Keep the original music file until the project is complete.
Trim the Music to Fit the Video
The music track may be longer than the video.
Move the playhead to the end of the video and trim the music so it stops at the correct point.
When the music is shorter than the video, you may:
• repeat the track
• choose a longer version
• use a second compatible track
• extend a loopable section
Avoid repeating a short section so often that the repetition becomes noticeable.
Lower the Music Volume
Narration should normally be louder and clearer than background music.
Begin by lowering the music substantially. Then play the video and adjust it while listening through headphones or reliable speakers.
The music should still be audible, but viewers should not need to struggle to hear the voice.
There is no single volume setting that works for every recording. The correct level depends on the narration, music, and editing tool.
Use Audio Ducking
Audio ducking automatically lowers the music while someone is speaking and raises it during silent sections.
The basic process is:
1. Select the background-music track.
2. Open the audio or volume controls.
3. Find the ducking, voice-priority, or narration-detection option.
4. Apply the effect.
5. Play the complete video.
6. Adjust the strength if the music drops too much or not enough.
Not every video editor includes automatic ducking. You can create a similar effect manually by adding volume points to the music track.
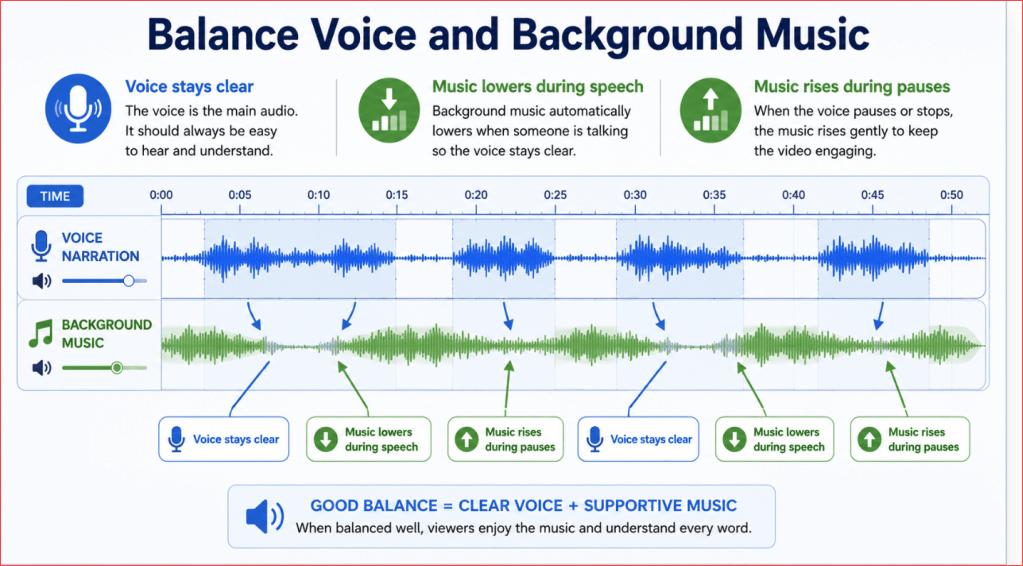
Figure 5. Lowering background music during narration helps keep the spoken message clear.
The narration should remain the main audio element. Lowering the music during speech and raising it gently during pauses helps viewers hear the message clearly.
Adjust Music Manually with Keyframes
Keyframes are small control points that change a setting at specific moments.
For example, you can use keyframes to:
• lower the music when narration begins
• raise it during a pause
• reduce it beneath an important sentence
• lower it gradually near the end
Keep the changes smooth. Sudden volume jumps can distract viewers.
Add a Fade-In
A fade-in makes the music begin quietly and become louder gradually.
This can prevent the video from starting abruptly.
A short fade-in is usually enough. Make sure the music does not become louder than the narration when the voice begins.
Add a Fade-Out
A fade-out gradually lowers the music near the end of the video.
Place the fade-out before the final scene finishes so the music ends smoothly instead of stopping suddenly.
The ending should still be audible, but it should not cover the final spoken words.
Use Silence When It Helps
Background music does not need to play throughout every second of the video.
A short silent section can:
• emphasize an important statement
• separate two major sections
• create a calm opening
• make the ending feel more deliberate
Music is useful, but constant sound is not always necessary.
Avoid Too Many Music Changes
Changing music repeatedly can make a short video feel disorganized.
For most beginner tutorials, one suitable background track may be enough.
Use more than one track only when the mood or subject changes clearly. Make sure the tracks have compatible volume levels and do not create an abrupt transition.
Review the Music with the Narration
Play the video with both the voice and music tracks active.
Check that:
• every spoken word is easy to understand
• the music matches the mood
• the volume remains consistent
• the music does not begin or end suddenly
• the track does not contain unwanted lyrics or sounds
• the music licence permits your intended use
Lower the music further when uncertain. Clear narration is more important than loud background music.
Step 4: Add Captions
Captions display spoken words as text on the screen. They help viewers understand the video when the sound is muted, the narration is difficult to hear, or the viewer prefers to read along.
Captions can also make tutorials easier to follow because important words remain visible while the viewer watches the scene.
Understand Captions and Subtitles
The words captions and subtitles are sometimes used as though they mean the same thing, but they can serve different purposes.
Captions usually include the spoken dialogue and may also describe important sounds, such as:
• [Music begins]
• [Door closes]
• [Phone ringing]
Subtitles usually translate spoken words into another language. They may not describe sound effects or identify speakers.
For a beginner tutorial, captions normally display the narration in the same language used in the video. [2]
Generate Automatic Captions
Many video editors can listen to the narration and create captions automatically.
The basic process is usually:
1. Confirm that the final narration is on the timeline.
2. Open the captions, subtitles, or text section.
3. Select the automatic-caption feature.
4. Choose the spoken language.
5. Select the narration or audio track.
6. Start the caption-generation process.
7. Wait for the editor to analyse the voice.
8. Review every caption before publishing.
Automatic captions can save time, but they are not always accurate. [3]

Figure 6. Automatic captions must be checked for wording, spelling, punctuation, and timing.
Automatic caption tools can create a useful first draft, but every word, punctuation mark, and timing point should be checked before the video is published.
Select the Correct Language
Choose the language actually spoken in the narration.
Some tools also ask you to select a regional variation, such as:
• English (Canada)
• English (United States)
• English (United Kingdom)
• French (Canada)
• French (France)
Selecting the closest language and accent can improve accuracy.
Review Every Caption
Never assume that automatically generated captions are correct.
Compare the captions with the final script and listen to the narration carefully.
Check for:
• incorrect words
• missing words
• repeated words
• incorrect names
• wrong numbers
• poor punctuation
• technical terms written incorrectly
• captions that appear too early or too late
Even one incorrect word can change the meaning of a sentence.
Correct Names and Technical Terms
Automatic caption tools may struggle with names, abbreviations, product terms, and technical language.
For example, the tool may incorrectly write:
• “artificial intelligent” instead of “artificial intelligence”
• “A eye” instead of “AI”
• “voice over” when “voice-over” is intended
• “caption track” as “captain track”
Use the final script as the main reference when correcting these mistakes.
Divide Long Captions
Do not place an entire paragraph on the screen at once.
Long captions are difficult to read and can cover important parts of the video.
Break the narration into short caption blocks containing one clear phrase or sentence.
Instead of:
“Before adding voice, music, and captions, you should organize your project files and review the complete video carefully.”
Use two caption blocks:
“Organize your project files first.”
“Then review the complete video carefully.”
Keep Captions on Screen Long Enough
Viewers need enough time to read each caption comfortably.
A caption should not disappear immediately after it appears. It should remain visible for the duration of the matching spoken phrase.
When a caption changes too quickly, you can:
• shorten the text
• divide it into smaller blocks
• slow the narration slightly
• extend the caption duration
• remove unnecessary words
Do not keep an old caption on screen after the speaker has moved to a different idea.
Match Captions with the Narration
Move each caption block so it begins when the matching words are spoken.
The caption should not appear several seconds before the narration. It should also not arrive after the viewer has already heard the sentence.
Use the timeline playhead and zoom controls to make small timing adjustments.
Check the beginning and ending of every caption block.
Use Easy-to-Read Text
Choose a simple font that remains clear on phones, tablets, and computer screens.
Good caption text should normally be:
• large enough to read
• bold or medium weight
• clearly separated from the background
• written with correct capitalization
• displayed in a consistent style
Avoid decorative, handwritten, or very thin fonts.
Create Strong Contrast
Captions must remain readable over both light and dark scenes.
Common methods include:
• white text with a dark outline
• white text inside a semi-transparent dark box
• dark text inside a light box
• a subtle shadow behind the text
Do not rely on text colour alone when the background changes throughout the video.
Position Captions Carefully
Captions are commonly placed near the bottom centre of the screen.
Leave enough space between the captions and the bottom edge. Some video platforms place controls, titles, or buttons in this area.
Avoid placing captions over:
• a person’s face
• important demonstrations
• menus or buttons
• product details
• charts or diagrams
• other text already shown in the video
Move captions higher when the bottom of the screen contains important information.
Keep Captions Inside the Safe Area
The safe area is the part of the screen that is less likely to be covered or cropped on different devices and platforms.
Keep caption text away from the extreme top, bottom, left, and right edges.
This is especially important for vertical videos because social-media buttons and descriptions may cover the sides or bottom of the screen.
Use Consistent Formatting
Apply the same caption style throughout the video.
Keep the following consistent:
• font
• text size
• capitalization
• colour
• outline or background box
• screen position
• line spacing
• animation style
Frequent style changes can make the video look unprofessional and distract viewers.
Use Caption Animation Carefully
Some editors allow captions to appear word by word, line by line, or with animated effects.
Simple animation may work well in short social-media videos. However, excessive movement can make educational videos harder to read.
Use a plain appearance or gentle animation for beginner tutorials.
The caption should support the narration, not compete for attention.
Identify Different Speakers
When more than one person speaks, make it clear who is talking.
You may use:
• the speaker’s name
• a short label
• different but consistent text positioning
• carefully selected text colours with strong contrast
For example:
Instructor: Open the video-editing timeline.
Student: Where should I place the narration?
Do not use colour as the only way to identify speakers because some viewers may not distinguish the colours easily.
Include Important Sound Information
When an important sound affects the meaning of the video, describe it in brackets.
Examples include:
• [Background music]
• [Notification sound]
• [Applause]
• [Warning tone]
Do not describe every minor sound. Include only sounds that help viewers understand what is happening.
Edit Captions After Changing the Voice
Any change to the narration may affect the captions.
After replacing, shortening, or moving a voice clip:
1. Review the matching caption text.
2. Correct any words that changed.
3. Adjust the caption timing.
4. Remove captions that no longer match.
5. Generate new captions when necessary.
Always review the complete caption track after major audio changes.
Export a Caption File When Needed
Some editors allow you to export captions as a separate file.
Common caption-file formats include:
• SRT
• VTT
A separate caption file can allow viewers to turn captions on or off. It can also make translation and future corrections easier. [4]
Other videos use burned-in captions. Burned-in captions are permanently displayed as part of the video image and cannot be turned off.
Choose the method that suits the publishing platform and audience.
Review Captions Without Sound
Mute the video and watch it from beginning to end.
Check whether the captions alone make the main message understandable.
Look for:
• missing information
• text that disappears too quickly
• poor contrast
• captions covering important content
• incorrect timing
• inconsistent formatting
• spelling and punctuation mistakes
Then watch the video again with the sound turned on to confirm that the captions match the narration.
Step 5: Synchronize Voice, Music, Captions, and Video
After adding the narration, music, and captions, the next task is to make sure every element appears at the correct time.
This process is called synchronization. A synchronized video feels smooth because the spoken words, visual scenes, music, and captions work together.
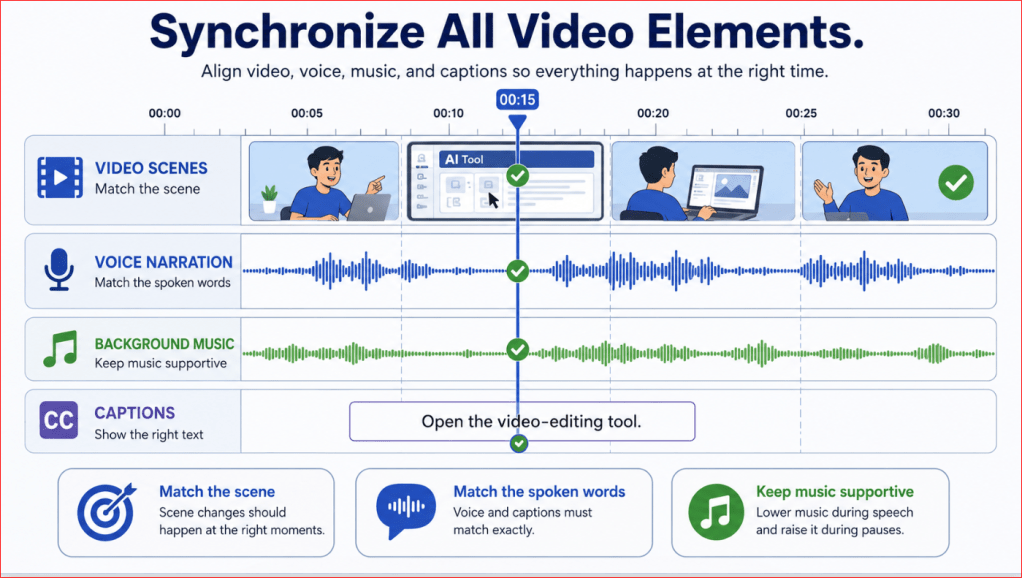
Figure 7. Voice, music, captions, and video scenes aligned at the correct point on the timeline.
Voice, captions, visuals, and music should align on the same timeline so each element appears at the correct moment. Reviewing short sections and using the playhead helps identify timing problems before the video is exported.
Start with the Voice Track
Use the narration as the main guide for the timeline.
Move each voice clip so the spoken explanation matches the correct video scene.
Check that:
• the scene appears before the narrator begins describing it
• the voice does not start too early
• the narration ends before the related scene disappears
• pauses occur at natural points
• no voice clips overlap accidentally
When the narration and video do not match, decide whether to adjust the voice, the scene, or both.
Align Captions with the Spoken Words
Each caption should appear when the matching words are spoken.
Move the caption block until its beginning matches the start of the spoken phrase. Then adjust its ending so it disappears when the phrase finishes.
Captions should not:
• appear before the speaker begins
• remain after the speaker changes subjects
• disappear before the sentence ends
• overlap with the next caption
• move too quickly for viewers to read
Use the timeline zoom control when making small timing changes.
Match Scene Changes with the Narration
Scene changes should normally occur at logical points in the narration.
Good places for a scene change include:
• after a complete sentence
• when a new idea begins
• when the narrator introduces a new step
• during a short pause
• when the viewer needs to see a new example
Avoid changing scenes in the middle of an important word or sentence unless the visual change is intentional.
Adjust Scene Length When Needed
Some scenes may be too short for the narration.
When this happens, you can:
• extend the scene
• freeze the final frame briefly
• slow the clip slightly
• shorten the spoken sentence
• divide the explanation between two scenes
Other scenes may be too long and create unnecessary silence. Shorten them when they do not add useful information.
Do not force every scene to have the same length. The timing should follow the information being explained.
Synchronize Music with Important Moments
Background music should support the structure of the video.
You may align music changes with:
• the opening title
• the beginning of a new section
• a major scene change
• a silent pause
• the closing message
When the music contains a noticeable beat or transition, try to match it with a visual change only when it feels natural.
Do not move important narration just to match the music.
Keep Music Lower During Speech
Play the video with the voice and music tracks active.
Lower the music whenever narration is present. Raise it gently during pauses only when this improves the video.
Watch for sudden changes in volume. Music should rise and fall smoothly.
Check Transitions
Transitions connect one video scene to the next.
Simple transitions such as a cut or gentle fade are usually suitable for beginner tutorials.
Make sure transitions do not:
• cover important captions
• remove the beginning of a spoken sentence
• create unwanted silence
• make the scene change feel slow
• distract from the explanation
Avoid using a different transition for every scene. Consistency usually produces a cleaner result.
Use Timeline Markers
Some video editors allow you to place markers on the timeline.
Markers can help identify:
• where a narration section begins
• where a caption should appear
• where the music should change
• where a new scene starts
• where a correction is required
For example, you can place a marker at the beginning of every major section before arranging the remaining tracks.
Review One Section at a Time
Do not try to correct the entire video at once.
Review a short section, such as 10 to 30 seconds, and check:
1. the video scene
2. the narration
3. the music level
4. the captions
5. the transition to the next scene
Correct that section before moving forward.
Watch the Complete Video
After checking each section, play the complete video from beginning to end.
Do not stop after every small issue during the first review. Write down the problems and correct them afterward.
Watch for:
• delayed captions
• narration that does not match the scene
• long silent gaps
• music that becomes too loud
• sudden scene changes
• missing words
• repeated clips
• awkward pauses
Repeat the review after making corrections.
Test the Video Without Looking at the Timeline
Watching only the timeline can make small problems difficult to notice.
Use the full preview screen and watch the video as a normal viewer would.
Ask:
• Is the message easy to follow?
• Does each scene appear at the right time?
• Can every word be heard clearly?
• Are the captions easy to read?
• Does the music support the video?
• Does anything feel rushed or delayed?
A technically correct timeline can still feel unnatural. The final viewing experience is what matters.
Step 6: Review and Export the Finished Video
Before exporting the video, review the complete project carefully. Small errors in narration, music, captions, or timing are easier to correct before the final file is created.
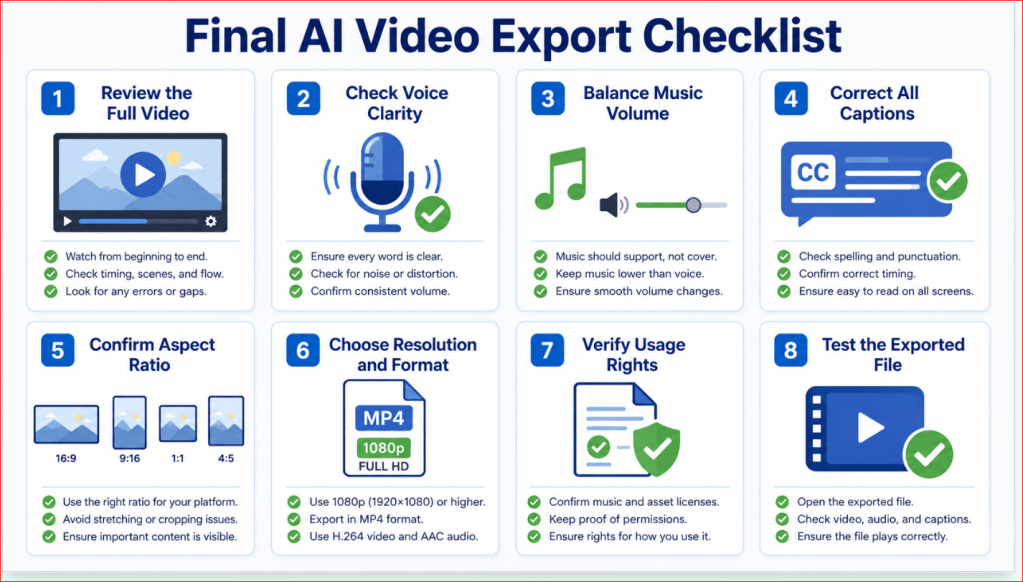
Figure 8. The essential checks to complete before publishing an AI video.
A final review should confirm the video format, resolution, sound, captions, timing, permissions, and exported file. Checking the exported file separately helps catch problems before the video is published.
Save a Review Copy
Save the project before making final changes.
Use a clear project filename such as:
article-021-ai-video-editing-project
Do not delete the original video clips, narration recordings, music files, caption files, or licence records. The editing project may need these files when it is opened again.
Watch the Video from Beginning to End
Play the complete video without stopping.
Watch it as a normal viewer rather than concentrating only on the editing timeline.
During the first review, write down problems such as:
• incorrect or delayed captions
• narration that does not match the scene
• music that covers the voice
• sudden volume changes
• long silent sections
• missing or repeated scenes
• abrupt transitions
• spelling mistakes
• an incomplete beginning or ending
Correct the problems after the first viewing, then watch the video again.
Review the Audio Separately
Close your eyes or look away from the screen while listening to the video.
Check whether:
• every spoken word is clear
• the narration volume is consistent
• the music remains below the voice
• there is unwanted background noise
• pauses sound natural
• the music begins and ends smoothly
• no audio clip stops in the middle of a word
Listening without watching the visuals can make audio problems easier to notice.
Review the Captions Without Sound
Mute the video and read the captions from beginning to end.
Confirm that:
• the main message remains understandable
• every caption matches the narration
• spelling and punctuation are correct
• captions stay visible long enough
• text does not cover important visual content
• the caption style remains consistent
• the text stays inside the safe area
Correct every caption error before exporting.
Test the Video on Different Screen Sizes
A video that looks clear on a large computer monitor may be difficult to read on a phone.
Preview the video at a smaller size and check:
• caption readability
• text size
• image clarity
• cropping
• important details near the edges
• controls or platform elements that may cover captions
Pay special attention to vertical videos because social-media buttons may cover the sides or lower part of the screen.
Confirm the Aspect Ratio
Export the video using the aspect ratio required by the publishing platform.
Common formats include:
• 16:9 for websites, presentations, and standard landscape videos
• 9:16 for vertical short-form videos
• 1:1 for square social-media posts
• 4:5 for portrait social-media posts
Do not stretch a landscape video into a vertical format. Reframe or crop the scenes properly so people, text, and important objects remain visible.
Choose the Export Resolution
The export resolution determines the number of pixels in the finished video.
A common landscape resolution is:
1920 × 1080 pixels
This is often called 1080p or Full HD.
A common vertical resolution is:
1080 × 1920 pixels
Higher resolution can improve image quality, but it also creates a larger file. Exporting at a resolution higher than the original video does not automatically restore missing detail.
Choose a Suitable File Format
MP4 is widely supported by websites, video platforms, phones, and computers.
When available, a common beginner-friendly choice is:
• file format: MP4
• video codec: H.264
• audio codec: AAC
• resolution: 1080p
• frame rate: the same as the original project
A codec is the method used to compress and store video or audio data. Most beginners can use the editor’s recommended or standard-quality export preset.
Keep the Original Frame Rate
Frame rate is the number of video frames displayed each second.
Common frame rates include:
• 24 frames per second
• 25 frames per second
• 30 frames per second
• 60 frames per second
Use the same frame rate as the original video or project unless there is a clear reason to change it.
Changing the frame rate unnecessarily may create uneven movement or duplicated frames.
Choose an Appropriate Quality Setting
Many editors offer settings such as:
• low quality
• standard quality
• high quality
• recommended quality
Use a high or recommended setting when the video will be published online.
Very high settings may create unnecessarily large files. Very low settings can make captions, faces, and fine details look unclear.
Decide How Captions Will Be Included
Captions can be included in two main ways.
Burned-In Captions
Burned-in captions become a permanent part of the video image.
They:
• appear automatically
• cannot be turned off
• remain visible on most platforms
• are useful for social-media videos
However, mistakes cannot be corrected without exporting the video again.
Separate Caption File
A separate SRT or VTT file can be uploaded with the video on supported platforms.
This allows viewers to turn captions on or off and may make translation easier.
Check whether the publishing platform supports separate caption files before choosing this method.
Export the Video
The exact export buttons differ between editors, but the basic process is usually:
1. Save the editing project.
2. Open the Export, Share, Render, or Download section.
3. Select the required aspect ratio.
4. Choose the resolution.
5. Select MP4 or another suitable format.
6. Confirm the quality and frame rate.
7. Choose whether captions are burned in or exported separately.
8. Select the destination folder.
9. Enter a clear filename.
10. Start the export.
11. Wait for the process to finish.
12. Open and review the exported file.
Do not close the editor or turn off the computer while the video is exporting.
Use a Clear Final Filename
Use a descriptive filename without unclear names such as final2-new-revised.mp4.
A better filename is:
how-to-add-voice-music-captions-ai-video-2026.mp4
When creating additional versions, add a clear identifier:
how-to-add-voice-music-captions-ai-video-vertical.mp4
how-to-add-voice-music-captions-ai-video-landscape.mp4
Review the Exported File
Do not assume the exported file is correct simply because the project preview looked correct.
Open the exported video in a separate media player and check:
• the complete video plays
• the sound is present
• the narration is clear
• the music level is suitable
• captions appear correctly
• the image is not stretched or cropped incorrectly
• the beginning and ending are complete
• there are no frozen or missing frames
Reviewing the exported file can reveal problems that were not visible inside the editing tool.
Save the Final Project Records
Keep the following files together:
• final exported video
• editable project file
• original AI video clips
• final narration script
• voice recordings
• music and sound files
• caption file
• music licence or permission record
• AI tool and model information
• final export date
These records make corrections, updates, and permission checks easier later.
Common Mistakes to Avoid
Even when the editing tool is easy to use, a few common mistakes can make an AI video difficult to understand or unpleasant to watch.
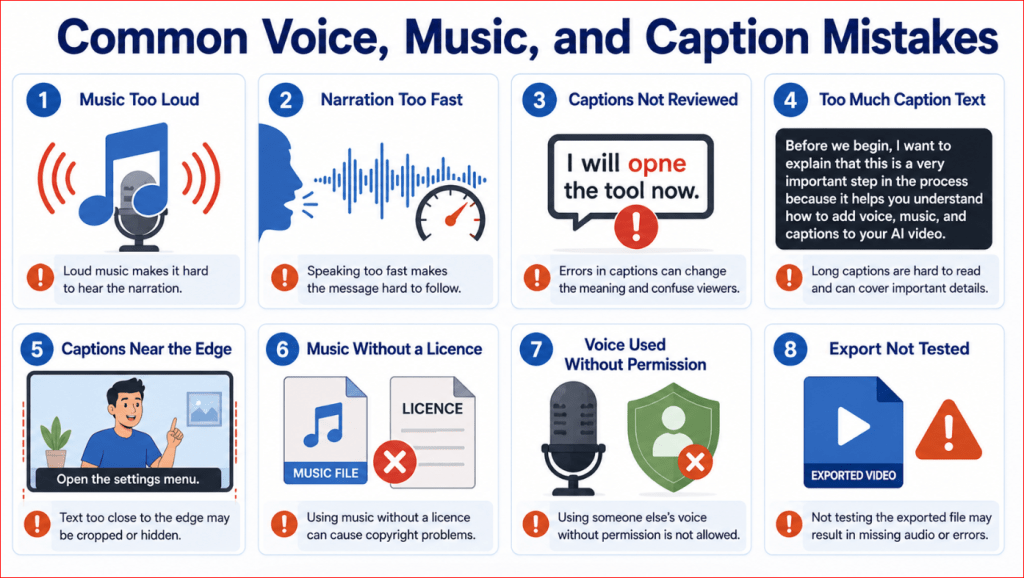
Figure 9. Common mistakes that can reduce the clarity and quality of an AI video.
Recognizing these common mistakes can help beginners correct problems before exporting and publishing an AI video. Clear narration, supportive music, accurate captions, proper permissions, and a final export test are the main quality controls.
Making the Background Music Too Loud
Background music should support the narration, not compete with it.
When the music is too loud, viewers may miss important words or stop watching because they must struggle to understand the message.
How to Avoid This Mistake
Lower the music while narration is playing. Review the video with headphones and ordinary speakers to confirm that every spoken word remains clear.
Using Narration That Sounds Too Fast
Speaking too quickly can make a tutorial feel rushed and confusing.
This problem may occur when the script contains too many words for the available video length.
How to Avoid This Mistake
Shorten the script, extend the visual scene, or divide the explanation into additional scenes. Do not increase the voice speed simply to force the narration into a short clip.
Accepting Automatic Captions Without Checking Them
Automatic captions may contain incorrect words, names, numbers, punctuation, or technical terms.
A caption error can change the meaning of the narration and reduce the credibility of the video.
How to Avoid This Mistake
Compare every caption with the final script. Correct spelling, punctuation, wording, and timing before exporting the video.
Displaying Too Much Caption Text
Long caption paragraphs are difficult to read, especially on a phone.
They may also cover faces, demonstrations, buttons, or other important visual details.
How to Avoid This Mistake
Break long sentences into short caption blocks. Keep each caption focused on one phrase or idea and leave enough time for viewers to read it.
Placing Captions Too Close to the Screen Edge
Captions near the bottom or sides of the video may be cropped or covered by platform controls.
This is especially common in vertical videos.
How to Avoid This Mistake
Keep captions inside the safe area and preview the video at different screen sizes before publishing it.
Using Music Without Checking Its Licence
Music found online is not automatically free to use.
Publishing unlicensed music may lead to muted audio, removed content, copyright claims, or other restrictions from the publishing platform.
How to Avoid This Mistake
Use music that you created or obtained with suitable usage rights. Save the licence, receipt, or permission record with the project files.
Using Another Person’s Voice Without Permission
A real person’s voice should not be recorded, copied, cloned, or published without appropriate permission.
An AI-generated voice that imitates a recognizable person may also mislead viewers.
How to Avoid This Mistake
Use your own voice, a properly licensed AI voice, or another person’s voice with clear permission. Do not suggest that a real person said something they did not say.
Adding Too Many Sounds and Effects
Too many music changes, sound effects, transitions, and animated captions can make the video feel cluttered.
The viewer may pay more attention to the effects than to the lesson.
How to Avoid This Mistake
Use only effects that improve understanding. A clear voice, simple music, readable captions, and consistent transitions are usually enough for a beginner tutorial.
Using Inconsistent Volume Levels
One narration clip may sound quiet while the next sounds much louder.
Sudden volume changes can startle viewers and make the video feel poorly edited.
How to Avoid This Mistake
Review all voice clips together and adjust them to a similar level. Use normalization carefully when the editing tool provides it, and listen to the complete result.
Changing the Video After Finishing the Captions
Removing, moving, or shortening a scene can shift the narration and captions out of position.
This may create captions that appear too early, too late, or over the wrong scene.
How to Avoid This Mistake
Complete major visual changes before finalizing narration and captions. After any later edit, review every affected track and correct the timing.
Exporting Without Testing the Final File
The editing preview may look correct even when the exported file contains missing audio, incorrect cropping, frozen frames, or caption problems.
How to Avoid This Mistake
Open the exported video in a separate media player. Watch it from beginning to end before uploading or publishing it.
Recognizing these common mistakes can help beginners correct problems before exporting and publishing an AI video.
Copyright, Privacy, and Permission Rules
Adding voice, music, and captions involves more than technical editing. You must also make sure that you have the right to use every recording, music track, image, video clip, and personal detail included in the finished video.
The exact legal requirements may vary by country, publishing platform, and type of project. This section provides general information, not legal advice. When the rights are unclear, do not publish the material until you have checked the licence, permission, or platform rules.
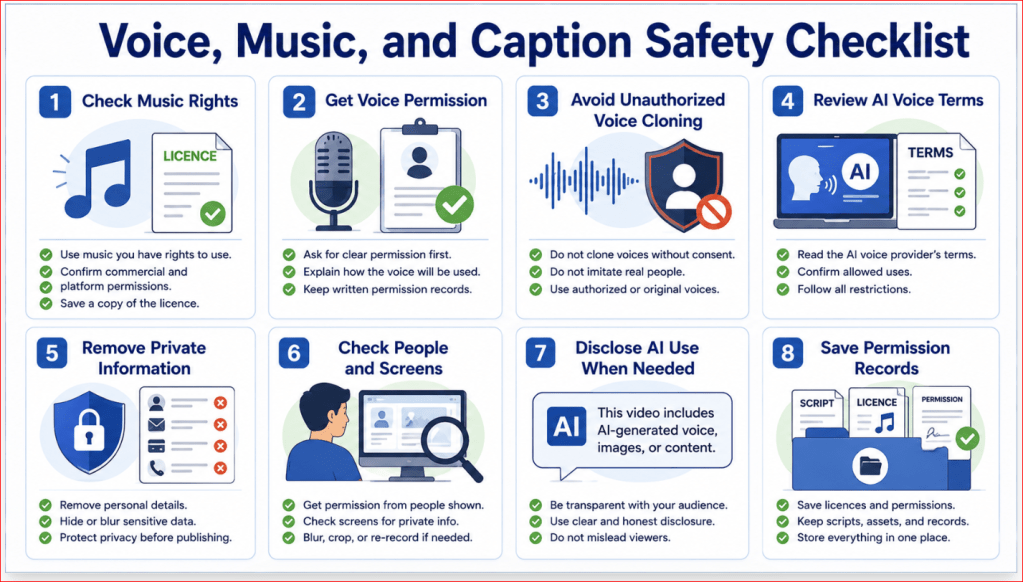
Figure 10. Important permission, privacy, and disclosure checks for AI video audio and captions.
Following a simple permission and privacy checklist helps protect the people involved, the video creator, and the audience. Check the current licence and platform terms whenever the intended use is unclear.
Use Music with Suitable Rights
Do not use a music track simply because you found it online or can download it.
Before using music, confirm whether the licence allows:
• public publishing
• commercial use
• website use
• social-media use
• editing or shortening the track
• use in monetized videos
• use on more than one platform
Some music may be free for personal projects but restricted for business or commercial use.
Save a copy of the licence, receipt, or permission page. Website terms can change, so keeping a record of the terms that applied when you obtained the music can be helpful.
Check Music Included with Editing Tools
Many video editors provide built-in music libraries.
Do not assume every included track has identical usage rights. Some may be limited to videos created or published through that particular service.
Before exporting, check:
• where the music may be published
• whether attribution is required
• whether commercial use is permitted
• whether the licence continues after a subscription ends
• whether the music can be exported to another platform
Use the tool’s current licence information as the main reference.
Get Permission Before Using Another Person’s Voice
Do not record or publish another person’s voice without their knowledge and appropriate permission.
Permission is especially important when:
• the person can be recognized
• the voice is used in advertising
• the video represents a business
• the recording includes private information
• the voice will be edited or translated
• an AI tool will imitate or clone the voice
Keep a written record explaining how the voice may be used.
Permission to record a person does not always mean permission to publish, edit, reuse, or commercially distribute the recording. Make the intended use clear.
Be Careful with AI Voice Cloning
Voice cloning uses AI to create speech that sounds like a particular person.
Do not clone the voice of a real person without clear authorization. This includes public figures, family members, customers, employees, and people heard in online recordings.
A cloned voice can mislead viewers into believing that a person said something they never said.
Use:
• your own authorized voice
• a licensed synthetic voice
• a contributor who agreed to the intended use
• a non-imitative voice supplied by the AI tool
Do not present an AI-generated voice as a real person’s statement when that person did not make the statement.
Review the AI Voice Provider’s Terms
Before using an AI-generated voice, check the provider’s current rules.
Confirm whether the voice may be used for:
• personal projects
• public videos
• business content
• advertising
• monetized content
• client work
Also check whether the provider requires attribution or restricts certain subjects, impersonation, or misleading use.
Do not assume that paying for a tool automatically grants unlimited rights.
Protect Private Information
Review the script, narration, captions, and visible video content for private information.
Remove unnecessary details such as:
• home addresses
• private telephone numbers
• personal email addresses
• account numbers
• identification documents
• private messages
• medical or financial details
• children’s personal information
• passwords or security codes
Automatic captions may display information that was spoken quietly or accidentally. Review the caption text as carefully as the video image.
Check Screens and Documents Shown in the Video
A screen recording or demonstration may reveal information that is easy to overlook.
Before publishing, check for:
• open browser tabs
• saved usernames
• email addresses
• recent documents
• account balances
• customer information
• private photographs
• notifications
• file paths containing personal names
Blur, crop, replace, or rerecord any section that displays information that should remain private.
Get Permission from People Shown or Heard
When a real person appears or speaks in the video, make sure you have suitable permission for the intended use.
Explain:
• where the video will be published
• whether it may be edited
• whether it will be used commercially
• whether it may remain online permanently
• whether clips may be reused later
Extra care is required when children or vulnerable people are involved. Do not include them merely as decoration or without appropriate authorization.
Use Captions Responsibly
Captions should accurately represent what was spoken.
Do not change captions in a way that makes a person appear to say something different.
Correct obvious speech-recognition errors, punctuation, and readability problems, but preserve the intended meaning.
When spoken words are unclear, verify them with the speaker or original script instead of guessing.
Disclose AI Use When Appropriate
Some publishing platforms, clients, employers, or audiences may expect disclosure when a video uses AI-generated voices, visuals, or realistic synthetic media.
A simple disclosure may state:
“This video includes AI-generated visuals and narration.”
The wording should accurately describe what was created or changed.
For example, YouTube requires disclosure when realistic content is meaningfully altered or generated with AI. [6]
Do not claim that the complete video was recorded naturally when important parts were generated or substantially altered by AI.
Avoid Misleading Viewers
Do not use AI voice or editing tools to create false evidence, fake endorsements, fabricated interviews, or misleading statements.
Be especially careful when the video discusses:
• health
• finance
• legal matters
• elections
• emergencies
• public figures
• news events
• products or services
Viewers should be able to understand what is real, what is recreated, and what was generated by AI when that distinction matters.
Save Creation and Permission Records
Keep a simple record of how the video was created.
Save:
• the final script
• original voice recordings
• AI voice settings
• music source and licence
• permission records
• caption files
• original video clips
• image-generation prompts
• editing project file
• export date
• published version
These records can help you correct the video, answer questions about permissions, or confirm how an AI-generated element was produced.
Review Platform Rules Before Publishing
Every publishing platform may have its own rules for copyrighted music, synthetic media, impersonation, privacy, advertising, and captions.
Review the current rules of the platform where the video will appear.
A video accepted on one platform may not automatically meet the requirements of another.
When You Are Unsure
Do not guess about usage rights.
When the licence or permission is unclear:
1. Stop using the material temporarily.
2. Check the original source and current terms.
3. Contact the rights holder or service provider when necessary.
4. Replace the material with something clearly licensed.
5. Seek qualified legal advice when the risk is significant.
Using a simpler, properly authorized asset is better than publishing material with uncertain ownership or permission.
Tips for Better Results
Small editing improvements can make voice, music, and captions feel more professional without making the project complicated.
Complete the Video Structure First
Arrange the main video scenes before finalizing narration, music, or captions.
Changing scenes later may cause the audio and captions to move out of synchronization.
Complete major visual edits first, then work in this order:
1. Add and synchronize the narration.
2. Add and balance the music.
3. Generate and correct the captions.
4. Review the complete video.
5. Export and test the final file.
Use One Final Script
Keep one approved version of the narration script.
Do not record from several different drafts because the spoken words may no longer match the captions or scenes.
Give the final script a clear filename, such as:
article-021-final-script.docx
Record Short Narration Sections
Record or generate narration one scene or paragraph at a time.
Short sections are easier to:
• repeat
• correct
• rename
• synchronize
• replace
• organize
Avoid creating one very long recording unless the narration is simple and unlikely to change.
Keep the Voice Consistent
Use the same microphone, room, speaking distance, and voice settings throughout the project.
When using an AI voice, keep the same:
• voice
• language
• accent
• speaking speed
• tone
• volume
Sudden changes can make separate narration clips sound as though they came from different videos.
Leave Natural Pauses
Do not remove every silent moment from the narration.
Short pauses help viewers understand the information and give them time to look at the visual scene.
Add pauses:
• after an important statement
• before a new section
• between numbered steps
• when the visual scene changes
• before the closing message
The narration should feel steady rather than rushed.
Use Music Sparingly
One suitable music track is often enough for a beginner tutorial.
Choose music that supports the subject without drawing attention away from the lesson.
When uncertain, lower the music. Viewers must be able to understand every spoken word.
Keep Captions Short
Use short phrases or sentences instead of large paragraphs.
Captions should be easy to read before the next caption appears.
Remove unnecessary words only when doing so does not change the speaker’s meaning.
Highlight Important Words Carefully
Some editors allow important caption words to use a different colour, weight, or background.
This can help emphasize:
• step numbers
• tool names
• warnings
• key actions
• important settings
Do not highlight too many words. When everything is emphasized, nothing stands out.
Use a Simple Caption Style
Choose one readable font and use it consistently.
A reliable caption style normally includes:
• large text
• strong contrast
• a dark outline or background box
• consistent positioning
• limited animation
• enough space from the screen edges
Test captions on a phone-sized preview before exporting.
Save Versions During Editing
Save new project versions after major stages.
For example:
article-021-project-01-video-arranged
article-021-project-02-voice-added
article-021-project-03-music-added
article-021-project-04-captions-corrected
article-021-project-final
Versioned files make it easier to return to an earlier stage when something goes wrong.
Review with Headphones and Speakers
Headphones can reveal background noise, clipped words, and small timing problems.
Ordinary speakers help you judge how the video may sound to a typical viewer.
Review the final video using both when possible.
Ask Someone Else to Review It
After working on a video for a long time, you may stop noticing mistakes.
Ask another person to check:
• whether the narration is clear
• whether the music is distracting
• whether captions are readable
• whether the timing feels natural
• whether any part is confusing
A first-time viewer may notice problems that the editor overlooks.
Keep the First Version Simple
Do not try to use every available effect.
A strong beginner video usually needs only:
• clear scenes
• understandable narration
• quiet supportive music
• accurate captions
• simple transitions
• a clean export
Frequently Asked Questions
Do I Need an Expensive Microphone?
No. A computer microphone, headset, or smartphone may produce acceptable narration when you record in a quiet room.
Clear speech, low background noise, and consistent microphone placement usually matter more than expensive equipment.
Is My Own Voice Better Than an AI Voice?
Neither option is automatically better.
Your own voice may feel more personal and natural. An AI-generated voice may provide consistent volume, faster corrections, and support for additional languages.
Choose the method that best fits the video and audience.
How Loud Should the Background Music Be?
The music should remain noticeably quieter than the narration.
There is no single setting that works for every video. Lower the music until every spoken word is easy to understand, then test the result using headphones and speakers.
Should Music Play During the Entire Video?
Not necessarily.
Music can play throughout the video when it remains quiet and suitable. You can also use silence during important explanations, transitions, or the opening and closing scenes.
Can I Use Any Music I Find Online?
No. Being able to hear or download music does not automatically give you permission to use it.
Check the licence and confirm that it permits your intended personal, public, commercial, website, or social-media use.
Are Automatic Captions Accurate?
Automatic captions can create a helpful first draft, but they may misunderstand names, numbers, accents, abbreviations, and technical terms.
Review and correct every caption before publishing the video.
How Much Text Should Appear in One Caption?
Use one short phrase or sentence whenever possible.
Avoid displaying large paragraphs. Captions should remain on screen long enough for viewers to read them comfortably.
Where Should Captions Be Placed?
Captions are usually placed near the bottom centre of the video.
Keep them inside the safe area and move them when they cover faces, demonstrations, menus, charts, or other important details.
Should I Add the Voice or Music First?
Add and synchronize the voice narration first.
The voice carries the main message. After the narration is correct, add the music and lower it so it supports rather than covers the voice.
What Should I Do When the Narration Is Longer Than the Scene?
You can:
• extend the scene
• slow the visual slightly
• shorten the narration
• divide the explanation between two scenes
• add another relevant visual
Do not make the voice uncomfortably fast merely to fit the scene.
Can Viewers Turn Captions Off?
That depends on how the captions are added.
Burned-in captions are permanently visible. Separate caption files, such as SRT or VTT files, may allow viewers to turn captions on or off on supported platforms.
Should I Review the Exported Video?
Yes. Open the exported file separately and watch it from beginning to end.
Check the video, narration, music, captions, timing, cropping, and final image quality before publishing it.
Key Takeaways
Adding voice, music, and captions can turn a silent AI-generated clip into a clear, polished, and easier-to-understand video.
Remember these main points:
• prepare the video and final script before editing the audio
• use your own recorded voice or a properly licensed AI-generated voice
• record or generate narration in short sections
• synchronize each voice clip with the correct video scene
• keep background music quieter than the narration
• use audio ducking or manual volume adjustments during speech
• generate captions only after the narration is final
• review every automatic caption for wording, spelling, punctuation, and timing
• keep captions short, readable, and inside the safe area
• check licences, permissions, privacy, and AI disclosure requirements
• export using the correct aspect ratio, resolution, and file format
• watch the exported file from beginning to end before publishing
The best results usually come from keeping the editing simple. Clear narration, supportive music, accurate captions, and careful timing are more valuable than complicated effects.
Final Tip
Complete the editing process in the correct order:
1. Finalize the video scenes.
2. Add and synchronize the narration.
3. Add and balance the background music.
4. Generate and correct the captions.
5. Review the complete timeline.
6. Export and test the finished file.
Avoid trying to perfect every element at the same time. Working in stages makes mistakes easier to find and prevents later changes from disrupting the entire project.
Keep the final result simple. Viewers will remember a clear message, understandable voice, supportive music, and readable captions—not how many editing effects were used.
Sources and References
The following authoritative sources support the article’s guidance on captions, accessibility, copyright, automatic captioning, and AI disclosure:
1. World Wide Web Consortium (W3C). “Understanding Success Criterion 1.2.2: Captions (Prerecorded).” Explains synchronized captions for prerecorded audio and their accessibility purpose.
2. W3C Web Accessibility Initiative. “Captions/Subtitles.” Explains captions, subtitles, open and closed captions, positioning, and the need to correct automatic captions.
3. YouTube Help. “Use Automatic Captioning.” Explains that speech-recognition captions can contain errors and should be reviewed and edited.
4. YouTube Help. “Add Subtitles & Captions.” Explains common methods for adding caption tracks to videos.
5. Canadian Intellectual Property Office. “A Guide to Copyright.” Explains copyright protection for musical works, performances, sound recordings, and other creative works.
6. YouTube Help. “Disclosing Use of GenAI Content.” Explains disclosure requirements for realistic content that is meaningfully altered or generated with AI.
Accessed July 27, 2026.
Continue Learning
Continue building your AI video skills with these related guides:
• How to Create AI Videos from Text: Beginner Step-by-Step Guide (2026)
• How to Create AI Videos from Images: Beginner Step-by-Step Guide (2026)
• How to Edit AI-Generated Videos: Beginner Step-by-Step Guide (2026)
 AI Mastery