
Estimated reading time: 30–35 minutes
Last updated: July 2026
What You’ll Learn
In this beginner-friendly guide, you will learn:
· How to use ready-made AI image prompts
· How to customize a prompt for your own needs
· Which prompt details should be changed
· How to create images for blogs, social media, business, education, products, and personal projects
· How to choose suitable styles, lighting, colours, camera angles, and aspect ratios
· How to avoid common image-generation problems
· How to improve a copied prompt when the first result is not satisfactory
· How to review AI-generated images before publishing or sharing them
This guide includes 50 practical AI image prompts that you can copy, paste, and modify. Each example is designed to help beginners create clearer, more useful, and more professional-looking images.
Table of Contents:
- What You’ll Learn
- Table of Contents:
- Introduction
- How to Use These AI Image Prompts
- Blog and Website Image Prompts
- Social-Media Image Prompts
- Business and Marketing Image Prompts
- Product Image Prompts
- Educational Illustration Prompts
- People and Professional Portrait Prompts
- Nature and Travel Image Prompts
- Creative and Artistic Image Prompts
- Seasonal and Special-Event Image Prompts
- Personal Project Image Prompts
- How to Customize These Prompts for Better Results
- How to Improve a Prompt When the First Image Is Not Satisfactory
- Common Mistakes When Using Ready-Made AI Image Prompts
- Copying the Prompt Without Changing It
- Adding Too Many Unrelated Details
- Combining Conflicting Styles
- Requesting Too Much Text Inside the Image
- Forgetting the Aspect Ratio
- Using Vague Correction Requests
- Failing to Check Hands, Faces, and Small Objects
- Using AI Images as Exact Product Representations
- Presenting Fictional Places as Real Locations
- Publishing Without a Final Review
- Benefits of Using Ready-Made AI Image Prompts
- Limitations of Ready-Made AI Image Prompts
- The Result May Not Match the Prompt Exactly
- The Prompt May Not Suit Every Project
- Some Details May Be Ignored
- Hands and Faces May Contain Errors
- Generated Text May Be Incorrect
- Products May Be Inaccurate
- Characters May Change Between Images
- Corrections Can Change Unrelated Details
- Real Places May Be Represented Incorrectly
- Copyright and Brand Concerns Still Apply
- Human Review Is Still Necessary
- Common Myths About Ready-Made AI Image Prompts
- Myth 1: A Ready-Made Prompt Always Produces the Same Image
- Myth 2: You Should Copy Every Prompt Without Changing It
- Myth 3: Longer Prompts Are Always Better
- Myth 4: The AI Understands Every Instruction Perfectly
- Myth 5: The First Image Should Be Perfect
- Myth 6: AI-Generated Text Will Always Be Correct
- Myth 7: AI-Generated Product Images Are Always Accurate
- Myth 8: Ready-Made Prompts Remove the Need for Creativity
- Myth 9: One Prompt Works Equally Well on Every Platform
- Myth 10: Attractive Images Are Automatically Safe to Publish
- Frequently Asked Questions
- What Is a Ready-Made AI Image Prompt?
- Can I Copy These Prompts Exactly?
- Do These Prompts Work with Every AI Image Generator?
- Why Does the Same Prompt Create Different Images?
- How Much Detail Should I Include?
- What Should I Do When the Image Is Incorrect?
- Can I Ask the AI to Add Text to the Image?
- Which Aspect Ratio Should I Use?
- Can I Use AI-Generated Images for Business?
- Should I Save the Prompts That Work Well?
- Do I Need to Mention That an Image Was Created with AI?
- Are Ready-Made Prompts Suitable for Complete Beginners?
- Key Takeaways
- Final Tip
- Continue Learning
Introduction
AI image prompts are written instructions that tell an AI image generator what kind of picture to create. A clear prompt can describe the subject, action, setting, visual style, lighting, colours, mood, camera angle, composition, and image format.
Writing a strong prompt from the beginning can be difficult, especially for someone who is new to AI image generation. You may know what kind of image you want, but you may not know which details to include or how to organize them.
Ready-made prompts provide a practical starting point. Instead of writing every prompt from scratch, you can copy an example and change the parts that matter to your project.
For example, you could change:
· The subject
· The action or pose
· The setting
· The visual style
· The colours
· The lighting
· The mood
· The aspect ratio
· The details to avoid
·
A prompt for a business image can be changed into a blog image, social-media design, educational illustration, product concept, or personal project by replacing a few important details.
The 50 prompts in this guide are organized into clear categories so you can quickly find an example that matches your purpose. Each prompt can be copied, pasted into an AI image generator, and customized to create a more suitable result.
How to Use These AI Image Prompts
The prompts in this guide are ready-made starting points. You can copy them exactly as written, but changing a few important details will usually produce an image that better matches your needs.
Step 1: Choose the Right Prompt Category
Begin by selecting a prompt from the category that matches your project.
For example:
· Blog and website images
· Social-media images
· Business and marketing images
· Product images
· Educational illustrations
· People and professional portraits
· Nature and travel images
· Creative and artistic images
· Seasonal and special-event images
· Personal projects
Choosing the correct category gives you a suitable starting structure, style, composition, and image format.
Step 2: Copy the Complete Prompt
Copy the entire prompt rather than selecting only one sentence.
A complete prompt may contain instructions about:
· The main subject
· The action
· The setting
· The visual style
· The lighting
· The colours
· The mood
· The camera angle
· The composition
· The aspect ratio
· Details to avoid
Keeping these elements together gives the AI more complete instructions.
Step 3: Change the Important Details
Replace the parts that do not match your project.
For example, the original prompt might say:
“Create a realistic image of a young woman working on a laptop in a modern home office.”
You could customize it as:
“Create a realistic image of an elderly man learning how to use artificial intelligence on a tablet in a bright living room.”
You may change:
· The person, animal, object, or place
· The clothing or appearance
· The activity
· The background
· The colours
· The visual style
· The lighting
· The image format
Keep the details that already suit your purpose.
Step 4: Paste the Prompt into the AI Image Generator
Paste the customized prompt into ChatGPT or another AI image generator.
Read it once before generating the image. Check that the instructions are clear and do not contain conflicting details.
For example, avoid combining instructions such as:
“Bright midday sunlight with a dark nighttime atmosphere.”
Choose one clear lighting condition unless the contrast is intentional.
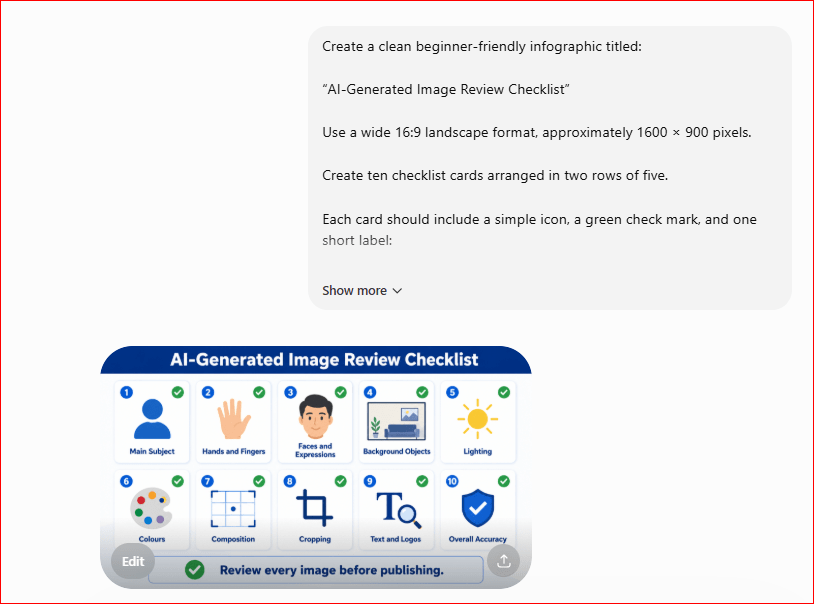
Step 5: Review the Generated Image
After the image is created, check whether it matches the prompt.
Review:
· The main subject
· Hands and faces
· Background objects
· Lighting and colours
· Composition
· Cropping
· Text and logos
· Aspect ratio
· Overall accuracy
Do not publish the image immediately simply because it looks attractive. A visually appealing image can still contain incorrect or misleading details.
Step 6: Request Specific Improvements
When something is wrong, explain the exact correction required.
Instead of saying:
“Make it better.”
Write:
“Keep the same person, clothing, setting, and camera angle. Remove the extra chair, brighten the background, and place the laptop fully inside the frame.”
Changing one or two details at a time usually gives the AI clearer direction and reduces unwanted changes.
Step 7: Save the Prompt That Worked
When a prompt produces a useful image, save it in a document or prompt library.
Record:
· The final prompt
· The generated image
· The date
· The image purpose
· Any corrections that improved the result
A successful prompt can later be reused as a template for similar images.
The prompts in this guide are not rigid instructions. Treat them as flexible templates that can be shortened, expanded, or adapted for different people, subjects, platforms, and projects.
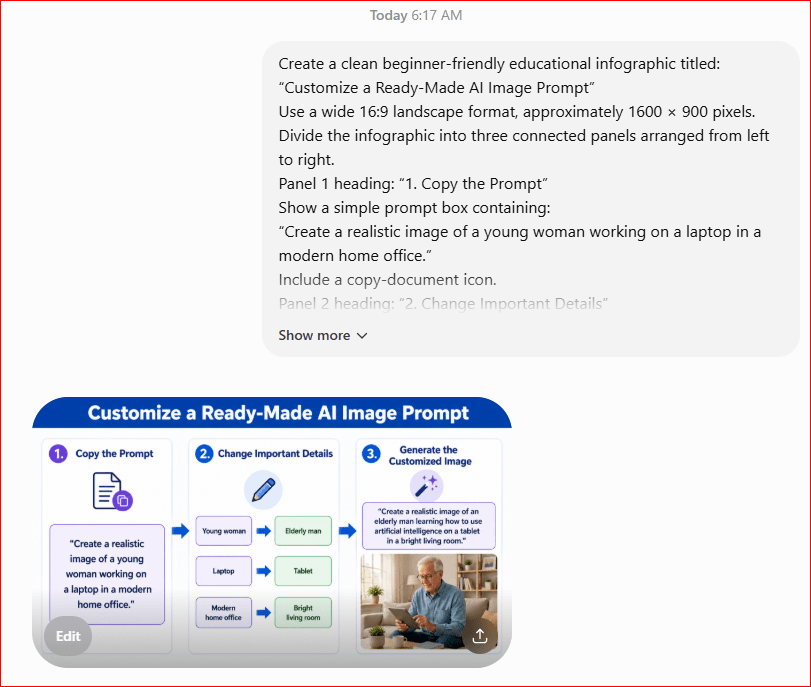
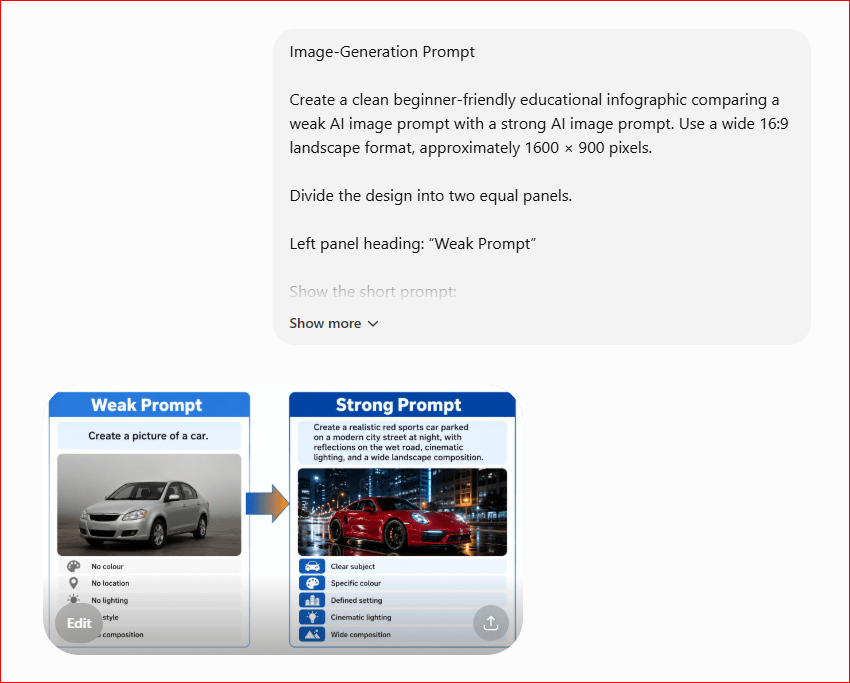
Figure 1. A ready-made AI image prompt can be customized by replacing the details that do not match your project.
This example shows how a complete prompt can be reused without starting from the beginning. By changing the subject, device, and setting while keeping the useful structure, beginners can create a prompt that better matches their intended image.
Blog and Website Image Prompts
The following prompts are designed for blog posts, website pages, online tutorials, and digital articles. Most use a wide landscape format because this shape works well for WordPress featured images and website content.
Prompt 1: Beginner Learning Artificial Intelligence
“Create a realistic image of an adult beginner learning about artificial intelligence on a laptop in a bright home office. Show a clean desk with a notebook, pen, and small plant. Use soft natural daylight, blue and white colours, and a calm educational atmosphere. Place the person on the right side and leave open space on the left for a website title. Use a wide 16:9 landscape format. Do not include brand logos, watermarks, unreadable text, extra people, or a cluttered background.”
Customize: Change the learner’s age, device, room, colours, or position to match your article.
Prompt 2: Step-by-Step Tutorial Featured Image
“Create a clean professional image representing a step-by-step online tutorial. Show a laptop displaying a simple sequence of numbered visual steps, with a notebook and checklist beside it. Use a modern realistic digital-illustration style, soft natural lighting, blue and light-grey colours, and an organized educational mood. Keep the main visual elements centred and leave safe space around the edges. Use a wide 16:9 landscape format. Do not include brand logos, watermarks, tiny text, or unnecessary objects.”
Customize: Replace the tutorial topic with AI images, email writing, business planning, website design, or another subject.
Prompt 3: Technology Article Header
“Create a modern website header image showing a laptop surrounded by subtle artificial-intelligence symbols, connected data points, digital icons, and soft glowing interface elements. Use a clean futuristic style with blue, purple, white, and light-grey colours. Keep the composition professional and uncluttered, with open space on the left for a headline. Use a wide banner format. Do not include readable text, company logos, watermarks, or dark distracting backgrounds.”
Customize: Change the technology symbols to represent chatbots, automation, cybersecurity, coding, cloud computing, or digital marketing.
Prompt 4: Comparison Article Image
“Create a clean split-screen comparison image for a blog article. Divide the image into two balanced panels showing two different digital tools being used for the same task. Use simple visual differences in layout, colours, and features without displaying real brand logos. Add a neutral centre divider, soft studio lighting, and a professional educational style. Use a wide 16:9 landscape format. Do not include brand names, watermarks, unreadable interface text, or excessive decoration.”
Customize: Replace the two digital tools with AI assistants, image generators, writing tools, productivity platforms, or research tools.
Prompt 5: Beginner Guide Cover Image
“Create a welcoming featured image for a complete beginner guide. Show an adult learner looking confidently at a laptop while simple visual icons represent learning, questions, progress, and achievement. Use a realistic digital-illustration style, soft natural lighting, blue, white, and subtle green colours, and a friendly professional mood. Place the learner on the right and leave open space on the left for a title. Use a wide 16:9 landscape format. Do not include logos, watermarks, unreadable text, distorted hands, or crowded background details.”
Customize: Change the guide topic, learner, icons, colour palette, or background to match your website article.
Social-Media Image Prompts
These prompts are designed for social-media posts, profile content, announcements, educational graphics, and promotional campaigns. Choose the aspect ratio that matches the platform where the image will be published.
Prompt 6: Educational Social-Media Post
“Create a clean educational social-media image showing an adult beginner learning one simple artificial-intelligence skill on a tablet. Include a notebook, pencil, and a few clear visual icons representing learning and progress. Use a friendly modern illustration style, bright natural lighting, blue, white, and light-green colours, and a welcoming atmosphere. Keep the main subject centred with safe space around the edges. Use a square 1:1 format. Do not include brand logos, watermarks, unreadable text, distorted hands, or unnecessary background objects.”
Customize: Change the skill, learner, device, colour palette, or visual icons.
Prompt 7: Social-Media Announcement
“Create a professional social-media announcement image showing an open laptop, a calendar, and a glowing notification symbol on a clean desk. Use a modern digital-illustration style, soft studio lighting, blue, purple, and white colours, and an organized professional mood. Leave clear open space in the upper half for announcement text to be added later. Use a square 1:1 format. Do not include visible words, logos, watermarks, clutter, or cropped objects.”
Customize: Adapt the image for a new article, product launch, event, course, update, or website announcement.
Prompt 8: Motivational AI Learning Image
“Create an uplifting image of an adult learner making progress with artificial intelligence. Show the person confidently using a laptop while a simple visual path leads from a question symbol to a completed goal. Use warm natural lighting, blue, gold, and white colours, and an encouraging modern style. Keep the composition clean and balanced, with open space for a short motivational message. Use a portrait 4:5 format. Do not include visible text, brand logos, watermarks, distorted hands, or crowded details.”
Customize: Change the goal to learning, business, productivity, career development, or creative work.
Prompt 9: Social-Media Tips Graphic
“Create a clean social-media graphic presenting three simple visual tips for writing better AI prompts. Use three balanced cards with clear icons representing clarity, detail, and review. Use a modern infographic style with blue, white, light-grey, and subtle green accents. Leave space beneath each icon for short text to be added later using a design tool. Use a square 1:1 format. Do not generate readable text, logos, watermarks, decorative clutter, or tiny details.”
Customize: Replace the three topics with safety tips, productivity tips, image-generation tips, research tips, or business advice.
Prompt 10: Vertical Story or Reel Cover
“Create a vertical social-media cover showing a beginner using an AI tool on a smartphone while colourful visual ideas appear around the screen. Use a polished realistic digital-illustration style, bright modern lighting, blue, purple, pink, and white accents, and an energetic but uncluttered atmosphere. Place the person in the lower half and leave open space in the upper half for a title. Use a vertical 9:16 format suitable for Stories, Reels, or Shorts. Do not include logos, watermarks, unreadable text, extra fingers, or cropped facial features.”
Customize: Change the activity to AI image creation, writing, research, planning, or video generation.
Business and Marketing Image Prompts
These prompts are designed for business websites, advertisements, presentations, email campaigns, customer communication, and digital-marketing content.
Prompt 11: Small Business Owner
“Create a realistic image of a small business owner working at a clean desk in a bright modern office. Show the person reviewing a business plan on a laptop, with a notebook, calculator, and coffee cup nearby. Use soft natural daylight, neutral colours, and a calm professional atmosphere. Place the business owner on the right side and leave open space on the left for promotional text. Use a wide 16:9 landscape format. Do not include brand logos, watermarks, unreadable documents, extra people, or a cluttered background.”
Customize: Change the business type, person, office setting, desk objects, colours, or composition.
Prompt 12: Digital-Marketing Campaign
“Create a modern digital-marketing image showing a laptop surrounded by simple visual symbols for email, social media, website traffic, advertising, and analytics. Use a clean professional infographic style, blue, purple, white, and light-grey colours, and subtle glowing connections between the elements. Keep the layout balanced and leave open space for a campaign title. Use a wide 16:9 landscape format. Do not include real company logos, readable statistics, watermarks, tiny text, or excessive visual effects.”
Customize: Focus the symbols on social-media marketing, email marketing, SEO, paid advertising, affiliate marketing, or e-commerce.
Prompt 13: Customer-Service Representative
“Create a realistic image of a friendly customer-service representative wearing a headset and assisting a customer through an online support session. Use a bright, organized office setting, soft studio lighting, blue and white colours, and a welcoming professional mood. Show a clear facial expression and natural hand position. Use a wide landscape composition with open space on one side for a headline. Do not include brand logos, visible customer information, unreadable screen text, watermarks, distorted hands, or crowded desks.”
Customize: Change the representative’s age, clothing, workplace, communication device, or customer-service industry.
Prompt 14: Business Growth Concept
“Create a clean professional image representing business growth. Show a small business owner standing beside a simple upward-moving visual path made of steps, arrows, and progress symbols. Include a laptop, planning document, and subtle financial-chart elements without readable numbers. Use a modern realistic digital-illustration style, bright natural lighting, blue, green, white, and gold accents, and an optimistic professional mood. Use a wide 16:9 format. Do not include logos, watermarks, unrealistic money piles, unreadable text, or exaggerated promises.”
Customize: Change the growth goal to sales, website traffic, customer satisfaction, productivity, or market expansion.
Prompt 15: Professional Email Campaign
“Create a clean marketing image showing an email campaign being prepared on a laptop. Surround the laptop with simple icons representing a subject line, audience, message, image, call to action, and performance review. Use a modern infographic style, soft blue, white, light-grey, and subtle green colours, with balanced spacing and a professional atmosphere. Leave open space for a campaign title. Use a wide landscape format. Do not include readable email addresses, real company names, watermarks, tiny text, or distracting background objects.”
Customize: Adapt the image for a newsletter, promotional email, welcome message, product announcement, or customer follow-up.
Product Image Prompts
These prompts are designed for product concepts, e-commerce listings, advertisements, catalogues, packaging ideas, and promotional content. Always compare AI-generated product images with the real product before publishing them.
Prompt 16: Simple Product Photograph
“Create a realistic product photograph of a reusable water bottle standing upright on a clean white surface. Use soft studio lighting, natural reflections, sharp details, and a simple light-grey background. Keep the bottle centred and fully visible, with safe space around the edges. Use a square 1:1 format. Do not include logos, labels, text, extra bottles, people, watermarks, or distracting objects.”
Customize: Replace the water bottle with a coffee mug, lamp, notebook, kitchen tool, container, or another simple product.
Prompt 17: Product in a Lifestyle Setting
“Create a realistic lifestyle image of a modern ceramic coffee mug placed on a wooden table beside an open book and a small plant. Use warm morning sunlight, soft neutral colours, and a comfortable home atmosphere. Keep the mug as the main focus and softly blur the background. Use a wide 16:9 landscape format. Do not include visible brand names, unreadable text, extra mugs, watermarks, distorted objects, or excessive clutter.”
Customize: Change the product, room, supporting objects, lighting, colour palette, or intended customer.
Prompt 18: Product Feature Presentation
“Create a clean product-feature image showing a wireless desk lamp in the centre, surrounded by four simple visual icons representing adjustable brightness, flexible positioning, energy efficiency, and compact design. Use a modern infographic style with white, blue, light-grey, and subtle green colours. Leave space beneath each icon for verified feature text to be added later. Use a wide landscape format. Do not include generated claims, readable specifications, brand logos, watermarks, or tiny text.”
Customize: Replace the lamp and feature icons with accurate features from the product you are presenting.
Prompt 19: Product Colour Variations
“Create a clean studio image showing the same reusable travel cup in four colour variations: navy blue, white, soft green, and light pink. Arrange the cups evenly in one row on a neutral background. Use soft studio lighting, consistent shadows, accurate proportions, and a balanced composition. Use a wide landscape format. Do not change the shape between versions. Do not include logos, labels, text, watermarks, extra cups, or decorative clutter.”
Customize: Change the product, number of variations, colours, arrangement, or background.
Prompt 20: Product Advertisement
“Create a polished advertisement image featuring a modern desk organizer on a clean office desk. Show the organizer holding pens, a notebook, and small office tools while keeping the product fully visible. Use bright professional lighting, blue, white, and natural wood colours, and a clean modern atmosphere. Place the product on the right side and leave open space on the left for advertising text to be added later. Use a wide 16:9 landscape format. Do not include logos, generated prices, promotional claims, watermarks, unreadable text, or unnecessary objects.”
Customize: Replace the organizer with another product and adjust the setting, supporting objects, colours, or composition to match the advertisement.
Educational Illustration Prompts
These prompts are designed for lessons, tutorials, classroom materials, training guides, presentations, and beginner-friendly explanations. Keep educational visuals simple, accurate, and easy to understand.
Prompt 21: Teacher Explaining a Lesson
“Create a friendly educational illustration of a teacher standing beside a whiteboard and explaining a simple lesson to a small group of students. Show the students paying attention and taking notes. Use bright natural lighting, blue, green, white, and warm neutral colours, and a welcoming classroom atmosphere. Use a wide landscape format. Do not include school logos, unreadable writing, distorted hands, crowded desks, or distracting decorations.”
Customize: Change the lesson topic, age group, classroom setting, teaching tools, or illustration style.
Prompt 22: Simple Process Diagram
“Create a clean educational infographic showing a four-step process from beginning to completion. Arrange four numbered cards from left to right, connected by clear arrows. Use simple icons, short placeholder labels, blue, white, light-grey, and subtle green colours, and generous spacing. Use a wide 16:9 landscape format. Do not include long paragraphs, brand logos, watermarks, tiny text, or unnecessary decoration.”
Customize: Replace the four stages with steps for creating an AI image, writing an email, completing a project, conducting research, or learning a new skill.
Prompt 23: Scientific Concept Illustration
“Create a clear beginner-friendly educational illustration explaining the water cycle. Show evaporation, condensation, cloud formation, precipitation, and water returning to rivers and oceans. Use simple arrows, recognizable natural elements, bright daylight, and blue, green, and white colours. Use a wide landscape format. Do not include complicated scientific notation, unreadable labels, logos, watermarks, or unrealistic environmental details.”
Customize: Replace the water cycle with another verified scientific process, such as plant growth, the solar system, weather formation, or the human digestive system.
Prompt 24: Before-and-After Learning Comparison
“Create a clean split-screen educational illustration comparing a beginner before learning a skill and after completing a lesson. On the left, show the learner appearing uncertain beside a question symbol. On the right, show the same learner confidently completing the task beside a check mark. Use a friendly modern illustration style, balanced composition, soft natural lighting, and blue, white, and subtle green colours. Use a wide 16:9 format. Do not include readable text, brand logos, watermarks, exaggerated emotions, or cluttered backgrounds.”
Customize: Change the skill to artificial intelligence, computer use, writing, mathematics, language learning, or business planning.
Prompt 25: Educational Checklist
“Create a clean educational checklist infographic with six evenly spaced cards. Each card should include a simple icon, a green check mark, and space for one short label to be added later. Use a modern beginner-friendly style with blue, white, light-grey, and green colours. Keep the layout organized and easy to scan. Use a wide landscape format. Do not generate long text, brand logos, watermarks, tiny details, or decorative clutter.”
Customize: Use the checklist for reviewing AI images, checking research sources, preparing a presentation, completing a tutorial, or following safety steps.
People and Professional Portrait Prompts
These prompts are designed for professional profiles, business websites, author pages, training materials, social media, and personal branding. AI-generated portraits should not be presented as photographs of real people unless clearly disclosed.
Prompt 26: Professional Business Portrait
“Create a realistic head-and-shoulders portrait of a confident middle-aged business professional wearing a navy-blue suit and white shirt. Show a natural friendly expression and direct eye contact with the camera. Use soft studio lighting, natural skin texture, and a simple light-grey office background. Use a portrait 4:5 format. Do not include brand logos, watermarks, exaggerated facial features, distorted clothing, unnatural skin, or distracting background objects.”
Customize: Change the person’s age, clothing, expression, background, colour palette, or profession.
Prompt 27: Friendly Website Author Portrait
“Create a warm professional portrait of an adult website author sitting at a clean desk beside a laptop and notebook. Show the person smiling naturally and looking toward the camera. Use soft window light, warm neutral colours, and a comfortable home-office background with a small plant and bookshelf. Use a portrait 4:5 format. Do not include readable screen text, logos, watermarks, distorted hands, excessive decorations, or artificial-looking skin.”
Customize: Change the author’s appearance, desk items, room, lighting, clothing, or website subject.
Prompt 28: Customer-Service Team Portrait
“Create a realistic professional image of three friendly customer-service representatives standing together in a bright modern office. Show natural expressions, neat business-casual clothing, and a welcoming team atmosphere. Use balanced studio lighting, blue, white, and neutral colours, and a wide landscape composition. Do not include company logos, visible customer data, watermarks, identical faces, distorted hands, or crowded background details.”
Customize: Change the number of people, clothing, industry, office setting, team roles, or composition.
Prompt 29: Professional Working at a Desk
“Create a realistic image of a focused professional working at a modern desk with a laptop, notebook, and organized documents. Show the person reviewing information on the screen with a calm and confident expression. Use soft natural daylight, neutral colours, and a clean office background. Place the person on the right side and leave open space on the left for website text. Use a wide 16:9 landscape format. Do not include logos, watermarks, unreadable documents, extra people, distorted hands, or excessive clutter.”
Customize: Change the profession to teacher, accountant, marketer, consultant, writer, engineer, or small business owner.
Prompt 30: Public Speaker or Trainer
“Create a realistic image of a confident adult trainer standing beside a presentation screen and speaking to a small professional audience. Show a natural hand gesture, attentive listeners, and a clean conference-room setting. Use bright balanced lighting, blue, white, and warm neutral colours, and a professional educational atmosphere. Use a wide landscape format. Do not include company logos, readable presentation text, watermarks, duplicated audience members, distorted hands, or crowded details.”
Customize: Change the topic, audience, room, presenter’s clothing, presentation style, or camera angle.
Nature and Travel Image Prompts
These prompts are designed for travel blogs, destination guides, nature articles, environmental content, posters, and personal projects. AI-generated locations should not be presented as exact photographs of real places unless they have been carefully verified.
Prompt 31: Mountain Landscape
“Create a realistic wide landscape image of snow-covered mountains surrounding a calm blue lake at sunrise. Show soft golden light reflecting on the water, green pine trees in the foreground, light morning mist, and a peaceful natural atmosphere. Use a wide 16:9 landscape format. Do not include people, buildings, logos, watermarks, unrealistic reflections, or excessive colour saturation.”
Customize: Change the season, time of day, weather, vegetation, water, or overall mood.
Prompt 32: Tropical Beach Destination
“Create a realistic travel image of a quiet tropical beach with clear turquoise water, soft white sand, palm trees, and gentle waves. Use bright natural daylight, warm colours, and a relaxing vacation atmosphere. Leave open space in the upper-left area for a travel-title overlay. Use a wide 16:9 landscape format. Do not include resort logos, crowds, litter, watermarks, unreadable signs, or unrealistic ocean colours.”
Customize: Change the beach type, weather, time of day, number of visitors, or composition.
Prompt 33: Historic City Street
“Create a realistic image of a charming historic city street with stone buildings, small cafés, flower boxes, and people walking peacefully. Use warm late-afternoon sunlight, natural colours, and a welcoming travel atmosphere. Show a balanced street-level perspective and use a wide landscape format. Do not include real business logos, unreadable signs, distorted architecture, duplicated people, watermarks, or modern objects that conflict with the historic setting.”
Customize: Change the architectural style, season, country-inspired setting, street activity, or lighting.
Prompt 34: Forest Walking Trail
“Create a peaceful realistic image of a walking trail through a green forest. Show tall trees, soft sunlight filtering through the leaves, small plants along the path, and light mist in the distance. Use natural green and brown colours, an eye-level viewpoint, and a calm restorative mood. Use a wide 16:9 landscape format. Do not include people, signs, buildings, rubbish, logos, watermarks, or unnatural lighting.”
Customize: Change the forest type, weather, season, trail surface, viewpoint, or atmosphere.
Prompt 35: Travel Planning Scene
“Create a realistic top-down image of a travel-planning workspace with an open notebook, printed map, smartphone, camera, sunglasses, and a cup of coffee arranged neatly on a wooden desk. Use soft natural daylight, warm neutral colours, and an organized adventurous mood. Leave clear space for a title and use a wide landscape format. Do not include readable personal information, brand logos, watermarks, airline names, distorted objects, or excessive clutter.”
Customize: Change the destination theme, travel equipment, desk surface, colour palette, or image format.
Creative and Artistic Image Prompts
These prompts are designed for digital art, posters, book concepts, imaginative scenes, decorative images, and personal creative projects. Artistic prompts allow more freedom, but the main subject and style should still be described clearly.
Prompt 36: Watercolour Landscape
“Create a soft watercolour painting of a peaceful countryside with rolling green hills, a small stone cottage, wildflowers, and a narrow path leading into the distance. Use gentle blue, green, yellow, and pink colours, soft morning light, and visible watercolour textures. Use a wide 16:9 landscape format. Do not include logos, watermarks, harsh outlines, modern buildings, or excessive detail.”
Customize: Change the season, cottage style, landscape, colours, weather, or time of day.
Prompt 37: Futuristic City
“Create a cinematic digital painting of a futuristic city at night with tall glass buildings, elevated walkways, glowing blue and purple lights, and clean electric vehicles. Show light reflections on wet streets and a wide street-level viewpoint. Use a dramatic but organized composition and a wide landscape format. Do not include brand logos, readable advertisements, watermarks, duplicated vehicles, or overcrowded visual details.”
Customize: Change the city style, lighting, technology, weather, colour palette, or camera angle.
Prompt 38: Fantasy Forest
“Create a detailed fantasy illustration of an enchanted forest with glowing plants, ancient trees, a winding path, and soft light passing through the branches. Use rich green, blue, gold, and purple colours and a mysterious but welcoming mood. Place the path in the centre and use a wide landscape composition. Do not include frightening creatures, logos, watermarks, unreadable signs, or excessive darkness.”
Customize: Add a small cottage, bridge, traveller, magical animal, waterfall, or different atmosphere.
Prompt 39: Minimalist Poster Design
“Create a clean minimalist poster featuring a single mountain silhouette beneath a large rising sun. Use simple geometric shapes, a limited colour palette of dark blue, soft orange, cream, and white, and generous open space. Keep the composition balanced and use a portrait 4:5 format. Do not include readable text, logos, watermarks, decorative clutter, or complex textures.”
Customize: Replace the mountain with a city skyline, ocean wave, tree, desert, planet, or abstract symbol.
Prompt 40: Storybook Illustration
“Create a warm storybook illustration of a child reading beside a bedroom window while stars and imaginative shapes appear outside. Use soft rounded forms, gentle blue, gold, purple, and cream colours, warm evening lighting, and a peaceful magical atmosphere. Use a portrait 4:5 format. Do not include readable book text, brand logos, watermarks, frightening elements, distorted hands, or excessive clutter.”
Customize: Change the child, room, story theme, weather, time of day, colour palette, or illustration style.
Seasonal and Special-Event Image Prompts
These prompts are designed for holidays, celebrations, seasonal campaigns, greeting cards, event announcements, and themed website content. Avoid using protected logos, characters, or branded decorations.
Prompt 41: Winter Holiday Scene
“Create a warm realistic winter holiday scene in a comfortable living room with a decorated tree, wrapped gifts, soft lights, a fireplace, and snow visible through the window. Use red, green, gold, cream, and natural wood colours, soft evening lighting, and a welcoming family atmosphere. Leave open space on one side for a greeting to be added later. Use a wide 16:9 landscape format. Do not include brand logos, readable text, watermarks, distorted decorations, or excessive clutter.”
Customize: Change the decorations, room, colours, weather, cultural details, or image format.
Prompt 42: New Year Celebration
“Create a polished New Year celebration image with elegant gold and silver decorations, soft sparkling lights, a modern city skyline in the background, and a festive but sophisticated atmosphere. Leave clear open space in the centre for a year or message to be added later using a design tool. Use a wide landscape format. Do not generate readable numbers, brand logos, watermarks, overcrowded fireworks, or distorted objects.”
Customize: Change the city setting, colours, decorations, mood, or composition.
Prompt 43: Spring Celebration
“Create a cheerful spring celebration image with blooming flowers, fresh green leaves, colourful decorations, and soft morning sunlight in a garden setting. Use pastel pink, yellow, blue, green, and white colours and a bright welcoming atmosphere. Leave open space for a short event message. Use a square 1:1 format. Do not include logos, watermarks, unreadable signs, excessive decorations, or unnatural flower shapes.”
Customize: Adapt the image for a spring sale, community event, family celebration, garden article, or seasonal greeting.
Prompt 44: Birthday Celebration
“Create a joyful birthday celebration image with a decorated table, colourful balloons, wrapped gifts, a simple cake, and soft festive lighting. Use bright but balanced colours and a clean welcoming composition. Leave open space in the upper area for a birthday message to be added later. Use a portrait 4:5 format. Do not include readable names, branded characters, logos, watermarks, distorted candles, or excessive clutter.”
Customize: Change the age group, colour theme, decorations, setting, cake style, or image format.
Prompt 45: Community Event Announcement
“Create a friendly community-event image showing people gathering in a clean outdoor park with simple event tents, tables, decorations, and families participating in activities. Use bright natural daylight, blue, green, orange, and white colours, and a welcoming inclusive atmosphere. Leave open space for event details to be added later. Use a wide 16:9 landscape format. Do not include real organization logos, readable signs, watermarks, duplicated people, distorted faces, or crowded background details.”
Customize: Adapt the image for a workshop, market, school activity, charity event, neighbourhood gathering, or public celebration.
Personal Project Image Prompts
These prompts are designed for hobbies, family projects, home organization, personal learning, creative planning, and non-commercial activities. Avoid using AI-generated images to imitate real people without their permission.
Prompt 46: Personal Learning Workspace
“Create a realistic image of an adult learning a new digital skill at a tidy desk in a comfortable home office. Show a laptop, notebook, pen, reading glasses, and a small plant. Use soft natural daylight, warm neutral colours, and a calm focused atmosphere. Use a wide 16:9 landscape format. Do not include brand logos, watermarks, unreadable screen text, distorted hands, extra people, or excessive clutter.”
Customize: Change the learner, skill, device, room, desk objects, colours, or time of day.
Prompt 47: Weekly Planning Scene
“Create a clean top-down image of a weekly-planning workspace with an open planner, calendar pages, coloured pens, sticky notes, a smartphone, and a cup of coffee arranged neatly on a wooden desk. Use soft morning light, blue, green, cream, and natural wood colours, and an organized productive mood. Leave open space for a title. Use a wide landscape format. Do not include readable personal information, logos, watermarks, duplicated objects, or clutter.”
Customize: Change the planning purpose to household tasks, study, exercise, appointments, travel, or business activities.
Prompt 48: Home Organization Project
“Create a realistic before-and-after image showing a cluttered home workspace on the left and the same workspace neatly organized on the right. Include a desk, shelves, papers, storage boxes, and office supplies. Use bright natural lighting, neutral colours, and a clear balanced split-screen composition. Use a wide 16:9 landscape format. Do not include brand logos, readable documents, watermarks, distorted furniture, or unrelated objects.”
Customize: Replace the workspace with a kitchen, closet, garage, bedroom, craft room, or storage area.
Prompt 49: Family Activity Illustration
“Create a warm realistic illustration of a family enjoying a quiet indoor activity together around a table. Show adults and children completing a puzzle, drawing, or reading while interacting naturally. Use soft evening lighting, warm neutral colours, and a comfortable welcoming atmosphere. Use a wide landscape format. Do not include real family likenesses, brand logos, watermarks, distorted hands, duplicated people, or crowded background details.”
Customize: Change the activity, family size, room, season, clothing, lighting, or illustration style.
Prompt 50: Personal Goal and Progress Image
“Create an uplifting image representing progress toward a personal goal. Show an adult moving along a simple visual pathway from planning to practice to achievement, using clear symbols such as a notebook, footsteps, progress markers, and a completed goal. Use a modern realistic digital-illustration style, soft natural lighting, blue, green, white, and subtle gold colours, and an encouraging atmosphere. Use a wide 16:9 landscape format. Do not include readable text, logos, watermarks, exaggerated success symbols, or clutter.”
Customize: Change the goal to learning, fitness, saving, home improvement, creativity, career development, or another personal objective.
How to Customize These Prompts for Better Results
The 50 prompts in this guide are templates. You do not need to use every word exactly as written.
Begin by identifying which details already match your project and which details need to change.
Change the Main Subject
Replace the person, animal, object, product, or location with the subject you need.
Original:
“Create a realistic image of an adult beginner learning about artificial intelligence on a laptop.”
Customized:
“Create a realistic image of a retired adult learning about artificial intelligence on a tablet.”
Keep the remaining prompt structure when it still supports your purpose.
Change the Action
Explain what the subject should be doing.
Possible actions include:
· Reading
· Writing
· Working
· Teaching
· Presenting
· Planning
· Walking
· Holding a product
· Looking at the camera
· Using a laptop or smartphone
A clear action helps the AI create a more meaningful scene.
Change the Setting
Replace the background or location to suit your project.
For example, you could change:
· A home office to a business office
· A classroom to a training room
· A city street to a quiet park
· A wooden desk to a clean studio surface
· A living room to a public library
The setting should support the main subject rather than compete with it.
Change the Visual Style
Choose a style that matches the purpose of the image.
Possible styles include:
· Realistic photograph
· Digital illustration
· Cartoon illustration
· Watercolour painting
· 3D render
· Minimalist design
· Cinematic image
· Educational infographic
· Vintage poster
· Storybook illustration
Avoid combining several unrelated styles in one prompt.
For example, “realistic cartoon watercolour photograph” gives the AI conflicting instructions.
Change the Lighting
Lighting can completely change the appearance and mood of an image.
You may request:
· Soft natural daylight
· Warm morning light
· Golden-hour sunlight
· Bright studio lighting
· Warm evening lighting
· Dramatic cinematic lighting
· Soft indoor lighting
· Neon city lighting
Choose lighting that matches the setting and atmosphere.
Change the Colours
Adjust the colour palette to match your website, brand, event, or subject.
For example:
· Blue and white for a clean professional look
· Green and brown for nature content
· Gold and navy for a premium appearance
· Pastel colours for a gentle friendly mood
· Bright colours for children’s content
· Neutral colours for product photography
Using a consistent colour palette can make several images look connected.
Change the Composition
Explain where the subject should appear inside the image.
For example:
· Place the subject in the centre.
· Place the person on the right.
· Leave open space on the left for a title.
· Use a top-down view.
· Show the full product.
· Keep important details away from the edges.
· Blur the background slightly.
· Use a balanced split-screen layout.
Composition is especially important when you plan to add text later.
Change the Aspect Ratio
Select an image shape that matches where the image will be used.
Common choices include:
· 1:1 square for social-media posts and products
· 4:5 portrait for social-media feeds and portraits
· 9:16 vertical for Stories, Reels, and Shorts
· 16:9 landscape for WordPress featured images and presentations
· Wide banner format for website headers
Changing the aspect ratio may also require changing the composition.
Change the Details to Avoid
Add exclusions based on the type of image you are creating.
For example:
· Do not include brand logos.
· Do not include readable personal information.
· Do not include watermarks.
· Do not include extra people.
· Do not include duplicated objects.
· Do not include distorted hands.
· Do not include text inside the image.
· Do not crop the main subject.
· Do not use a crowded background.
Specific exclusions are more useful than general instructions such as “avoid mistakes.”
Keep the Prompt Consistent
Read the complete customized prompt before generating the image.
Check that the instructions do not conflict.
For example, avoid asking for:
· Bright midday sunlight and dark moonlight
· A crowded scene and a minimalist composition
· A realistic photograph and a cartoon illustration
· A close-up portrait and a wide aerial view
· A centred subject and a subject placed at the edge
A customized prompt works best when the subject, style, lighting, colours, mood, and composition support one clear visual idea.
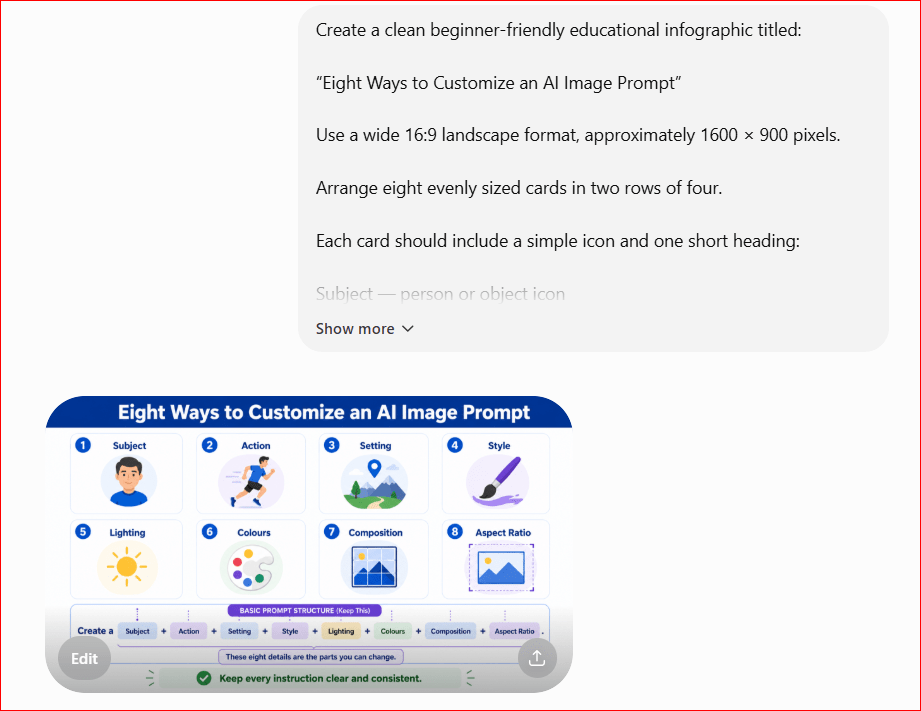
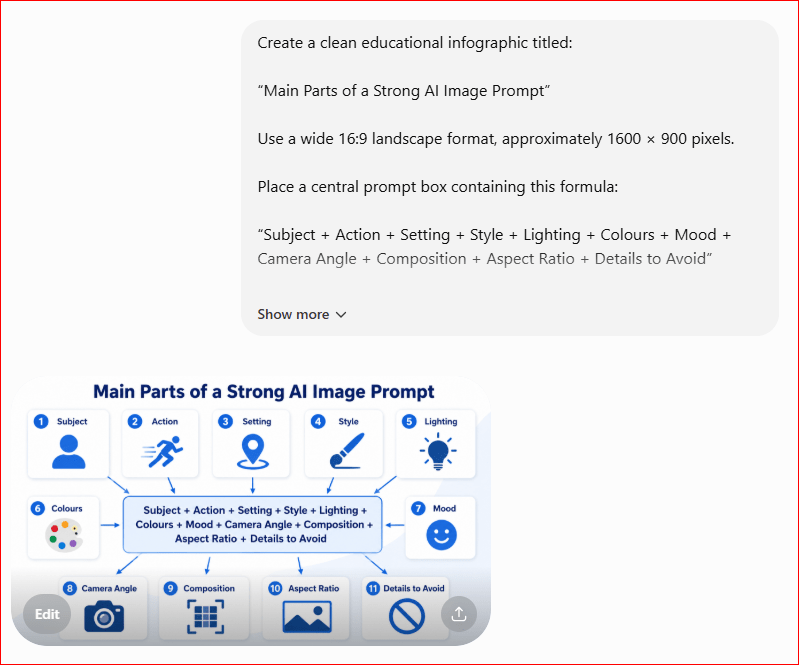
Figure 2. The main parts of a ready-made AI image prompt can be changed to match a different project or platform.
This infographic provides a simple customization checklist. Beginners can keep the useful structure of a ready-made prompt while changing the subject, action, setting, style, lighting, colours, composition, and aspect ratio.
How to Improve a Prompt When the First Image Is Not Satisfactory
The first generated image may not match your expectations. This does not always mean that the complete prompt is wrong. Often, one or two instructions need to be clarified.
Review the image carefully before changing the prompt.
Identify the Main Problem
Start by deciding what is incorrect or unsatisfactory.
Common problems include:
· The subject looks different from the description
· The action is unclear
· The background is too crowded
· The lighting does not match the requested mood
· The colours are unsuitable
· The image is cropped incorrectly
· Important objects are missing
· Extra objects have appeared
· Hands or facial features look distorted
· Text inside the image is incorrect
· The aspect ratio is unsuitable
Focus on the most important problem first.
Give a Specific Correction
Avoid instructions such as:
“Make the image better.”
This does not explain what needs to change.
Use a specific request instead:
“Keep the same person, clothing, and office setting. Remove the extra chair and place the laptop completely inside the frame.”
A clear correction tells the AI which parts should remain and which parts should change.
Keep the Successful Details
When part of the image is already correct, say so.
For example:
“Keep the same background, lighting, colour palette, and camera angle.”
This may help prevent the AI from changing details that you already like.
You can then add the required correction:
“Change the person’s expression to a natural smile and remove the unreadable text from the laptop screen.”
Change One or Two Details at a Time
Making too many corrections in one request may create new problems.
A better approach is to improve the image gradually.
For example:
First correction:
“Keep the same composition. Remove the extra plant and simplify the desk.”
Second correction:
“Keep all remaining details. Brighten the background and use softer natural daylight.”
This makes it easier to understand which instruction improved the result.
Clarify the Main Subject
When the subject is unclear, describe it more precisely.
Instead of:
“Create a person using a computer.”
Use:
“Create a realistic image of a middle-aged small business owner sitting at a desk and reviewing a marketing plan on a laptop.”
You can add clothing, expression, position, or activity when these details are important.
Simplify a Crowded Prompt
A very long prompt can sometimes contain too many competing instructions.
Remove details that do not support the main image.
For example, this prompt may be too crowded:
“Create a business owner using a laptop in an office with several workers, many charts, plants, shelves, posters, products, documents, phones, and large windows.”
A clearer version would be:
“Create a realistic image of a small business owner using a laptop at a clean desk in a bright modern office. Include one notebook and one small plant. Keep the background simple.”
The simplified prompt gives greater attention to the main subject.
Correct the Composition
When the image does not leave enough room for a title or crops the subject, describe the layout more clearly.
For example:
“Place the person on the right side of the image. Leave clear open space on the left for a website title. Keep the person’s head, hands, and laptop fully inside the frame.”
This is especially useful for featured images, advertisements, and social-media graphics.
Remove Incorrect Text
AI image generators may produce misspelled or unreadable words.
You can request:
“Remove all generated text from the image and leave a clean empty area where text can be added later.”
Add the correct wording afterward using WordPress, Canva, or another design tool.
Regenerate When Necessary
Sometimes an image contains several serious problems. In that situation, starting again may be faster than requesting many corrections.
Use the original prompt, simplify unclear instructions, add the most important exclusions, and generate a new version.
The goal is not to correct every small detail in one attempt. Generate, review, correct, and repeat until the image is suitable for its intended purpose.
Common Mistakes When Using Ready-Made AI Image Prompts
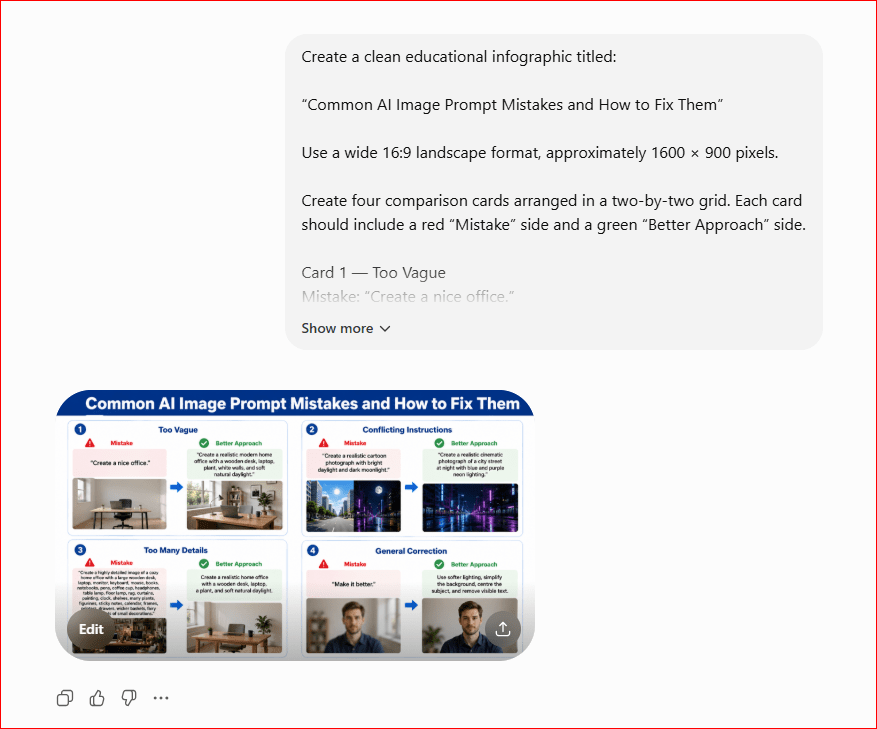
Ready-made prompts can save time, but copying them without reviewing or customizing them may produce unsuitable results. The following mistakes are common among beginners.
Copying the Prompt Without Changing It
A prompt may be well written but still describe the wrong person, setting, colours, or image format for your project.
Before generating the image, check whether you need to change:
· The subject
· The action
· The setting
· The visual style
· The lighting
· The colours
· The composition
· The aspect ratio
· The details to avoid
A few small changes can make the prompt much more relevant.
Adding Too Many Unrelated Details
More detail does not always create a better image.
A prompt may become confusing when it includes too many people, objects, actions, styles, or lighting conditions.
For example:
“Create a realistic cartoon watercolour image of a business owner, teacher, student, customer, and family working in an office, classroom, café, and garden.”
This prompt contains several conflicting ideas.
Choose one main subject, one setting, and one clear purpose.
Combining Conflicting Styles
Avoid mixing visual styles that do not work well together.
For example:
· Realistic photograph and cartoon illustration
· Minimalist design and highly detailed background
· Vintage poster and futuristic 3D render
· Soft watercolour and sharp studio photography
Choose one primary style and describe it clearly.
Requesting Too Much Text Inside the Image
AI image generators may create misspelled, distorted, or unreadable text.
Instead of asking the AI to create a complete headline, paragraph, price, or list inside the image, request open space for text.
For example:
“Leave clear open space on the left for a title to be added later.”
Add the correct text afterward using WordPress, Canva, or another design tool.
Forgetting the Aspect Ratio
The wrong image shape can lead to poor cropping.
For example, a square image may not work well as a wide WordPress featured image, and a landscape image may not fit a vertical Story.
Choose the required format before generating:
· 1:1 for square social-media posts
· 4:5 for portrait social-media posts
· 9:16 for Stories, Reels, and Shorts
· 16:9 for featured images and presentations
· Wide banner for website headers
Placing Important Details Near the Edges
Faces, hands, products, and other important objects may be cropped when they are too close to the image boundary.
Add an instruction such as:
“Keep the main subject fully inside the frame with safe space around the edges.”
This is especially important when WordPress or social-media platforms automatically crop images.
Using Vague Correction Requests
Instructions such as “fix it,” “make it better,” or “improve the image” do not explain what needs to change.
Use a specific correction:
“Keep the same person and background. Remove the extra notebook, brighten the lighting, and move the subject slightly to the right.”
Specific corrections usually produce more useful results.
Failing to Check Hands, Faces, and Small Objects
An image may appear attractive at first but still contain errors.
Examine:
· Fingers and hands
· Eyes, teeth, and facial features
· Product shapes
· Repeated objects
· Background people
· Reflections
· Shadows
· Signs and labels
· Clothing details
Zoom in before publishing the image.
Using AI Images as Exact Product Representations
AI may change a product’s shape, colour, size, material, features, or packaging.
Do not use an AI-generated product image as an exact representation unless it has been carefully compared with the real product.
Customers should not be misled about what they will receive.
Presenting Fictional Places as Real Locations
AI-generated travel images may contain invented buildings, roads, landmarks, or environmental details.
Do not describe an AI-generated location as an exact photograph of a real destination unless the details have been verified.
A safer description is:
“AI-generated illustration inspired by a historic European street.”
Publishing Without a Final Review
Do not publish an image immediately because it looks attractive.
Check that the image:
· Matches the article or project
· Contains no obvious visual errors
· Uses the correct aspect ratio
· Leaves enough space for text
· Does not contain logos or personal information
· Does not misrepresent a person, product, place, or event
· Is suitable for the intended audience
A careful final review helps prevent misleading or unprofessional images.
Benefits of Using Ready-Made AI Image Prompts
Ready-made prompts provide a practical starting point for beginners who are not yet confident writing detailed image instructions.
Saves Time
You do not need to build every prompt from the beginning.
A complete example already includes useful elements such as:
· The main subject
· The setting
· The visual style
· The lighting
· The colours
· The composition
· The aspect ratio
· The details to avoid
You can change only the parts that do not match your project.
Makes Prompt Writing Easier
A ready-made prompt shows how different instructions can be combined into one clear description.
By reading and modifying complete examples, beginners can gradually learn how strong prompts are structured.
Reduces Missing Details
Short prompts often leave out important information.
For example:
“Create a business image.”
This does not explain the person, activity, setting, lighting, colours, composition, or format.
A ready-made prompt reminds you to include these details when they are important.
Produces More Consistent Results
Using the same basic prompt structure can help several images look connected.
This is useful when creating images for:
· A series of blog articles
· A social-media campaign
· A training course
· A business presentation
· A product catalogue
· A website section
You can keep the same style, lighting, colours, and composition while changing the main subject.
Helps Beginners Learn by Example
Each prompt demonstrates how to describe a specific image.
Over time, you may begin to recognize which words control:
· The style
· The mood
· The camera angle
· The background
· The placement of the subject
· The image shape
This makes it easier to write original prompts later.
Supports Different Projects
A single ready-made prompt can often be adapted for several purposes.
For example, a prompt showing a person using a laptop could be changed into:
· A blog featured image
· A business advertisement
· A training illustration
· A social-media post
· A website banner
· A personal learning image
Changing the setting, colours, format, and open space can make the same basic idea suitable for another platform.
Encourages Clearer Corrections
A detailed starting prompt makes it easier to identify what went wrong.
You can compare the generated image with the original instructions and request a specific correction.
For example:
“Keep the same person, lighting, and colour palette. Remove the extra chair and leave more open space on the left.”
Creates a Reusable Prompt Library
Prompts that produce good results can be saved and reused.
You can organize them into categories such as:
· Blog images
· Social-media graphics
· Business images
· Product scenes
· Educational illustrations
· Portraits
· Nature images
· Creative artwork
A personal prompt library can reduce the time required for future image projects.
Ready-made prompts are most useful when they are treated as flexible templates rather than permanent instructions. Review each prompt, customize the necessary details, and check every generated image before using it.
Limitations of Ready-Made AI Image Prompts
Ready-made prompts are useful starting points, but they do not guarantee a perfect image. The AI may still misunderstand instructions, ignore details, or create visual errors.
The Result May Not Match the Prompt Exactly
An AI image generator interprets the prompt rather than following it like a precise technical drawing.
It may change:
· The subject’s appearance
· The number of objects
· The position of people
· The background
· The lighting
· The colours
· The camera angle
· The composition
A detailed prompt improves direction, but the final result may still require correction.
The Prompt May Not Suit Every Project
A prompt written for a blog image may not work well for a product advertisement, social-media Story, or educational diagram.
You may need to change:
· The aspect ratio
· The amount of open space
· The level of detail
· The visual style
· The colours
· The intended audience
Always adapt the prompt to the platform and purpose.
Some Details May Be Ignored
Long prompts can contain many instructions. The AI may give more attention to some details and ignore others.
For example, it may create the correct subject and setting but forget to leave open space for a title.
Place the most important information near the beginning of the prompt and repeat critical layout instructions clearly when necessary.
Hands and Faces May Contain Errors
AI-generated people may have:
· Extra or missing fingers
· Unnatural hand positions
· Uneven eyes
· Distorted teeth
· Unusual facial features
· Inconsistent skin texture
Carefully inspect portraits and images containing people before publishing them.
Generated Text May Be Incorrect
AI image generators may create misspelled words, random letters, or unreadable labels.
This can affect:
· Signs
· Book covers
· Computer screens
· Product packaging
· Posters
· Infographics
· Clothing
A safer approach is to request an empty area and add the correct text later using a design tool.
Products May Be Inaccurate
The AI may change a product’s:
· Shape
· Size
· Colour
· Material
· Features
· Buttons
· Packaging
· Accessories
Ready-made product prompts are better suited to concepts, backgrounds, and promotional ideas than exact product representations.
Characters May Change Between Images
When generating several images of the same person or character, the AI may change the face, clothing, hairstyle, age, or body shape.
Repeated descriptions may improve consistency, but they may not produce an identical character every time.
Corrections Can Change Unrelated Details
You may request one small correction, but the AI may also change parts that were already correct.
For example, asking it to remove one object may also change:
· The person’s face
· The clothing
· The background
· The lighting
· The camera angle
Include instructions such as:
“Keep the same person, clothing, lighting, background, and composition.”
Even then, some variation may occur.
Real Places May Be Represented Incorrectly
AI-generated travel images may include invented landmarks, inaccurate architecture, or unrealistic geography.
They should not be presented as exact photographs of real locations unless carefully verified.
Copyright and Brand Concerns Still Apply
A ready-made prompt may accidentally request:
· A protected character
· A company logo
· A branded product
· A recognizable artistic style
· A public figure
· A copyrighted design
Review the prompt before generating and remove unnecessary brand or character references.
Human Review Is Still Necessary
Ready-made prompts reduce writing time, but they do not replace human judgement.
You must still decide whether the image is:
· Accurate
· Appropriate
· Clear
· Ethical
· Relevant
· Visually professional
· Safe to publish
The best results usually come from combining a useful prompt template with careful customization, review, and correction.
Common Myths About Ready-Made AI Image Prompts
Ready-made prompts are useful, but beginners may have unrealistic expectations about what they can do. Understanding the following myths can help you use them more effectively.
Myth 1: A Ready-Made Prompt Always Produces the Same Image
Reality: AI image generators usually create a different result each time, even when the same prompt is used.
The subject, background, lighting, colours, and composition may change between generations. The prompt provides direction, but it does not create an identical image every time.
Myth 2: You Should Copy Every Prompt Without Changing It
Reality: A prompt should be customized to match your project.
You may need to change:
· The subject
· The setting
· The colours
· The visual style
· The aspect ratio
· The amount of open space
· The details to avoid
A useful template becomes more effective when it reflects your specific purpose.
Myth 3: Longer Prompts Are Always Better
Reality: A long prompt can become confusing when it includes unnecessary or conflicting details.
A strong prompt should be detailed enough to explain the image clearly, but focused enough to support one main idea.
Clear and relevant instructions are more important than the total number of words.
Myth 4: The AI Understands Every Instruction Perfectly
Reality: The AI may misunderstand, ignore, or combine some details incorrectly.
For example, it may:
· Add an extra object
· Place the subject incorrectly
· Change the requested colours
· Ignore the open space
· Use the wrong camera angle
· Crop an important part of the image
Reviewing and correcting the result is a normal part of AI image generation.
Myth 5: The First Image Should Be Perfect
Reality: Many useful AI-generated images require more than one attempt.
You may need to:
1. Generate the first image.
2. Review the result.
3. Identify the main problem.
4. Request a specific correction.
5. Generate another version.
This gradual improvement process is normal.
Myth 6: AI-Generated Text Will Always Be Correct
Reality: Text inside AI-generated images may contain spelling mistakes, random letters, or distorted words.
For important titles, labels, prices, and instructions, request a clean empty area and add the correct text later using WordPress, Canva, or another design tool.
Myth 7: AI-Generated Product Images Are Always Accurate
Reality: AI may change a product’s shape, colour, material, packaging, size, or features.
AI-generated product images should not be used as exact representations unless they have been carefully compared with the real product.
Myth 8: Ready-Made Prompts Remove the Need for Creativity
Reality: Prompts provide a starting structure, but you still choose the subject, style, mood, colours, setting, and purpose.
Your decisions determine how the prompt is adapted and whether the final image supports your project.
Myth 9: One Prompt Works Equally Well on Every Platform
Reality: Different AI image generators may interpret the same prompt differently.
A prompt that works well in one tool may need adjustments in another. You may need to simplify the wording, change the order of details, or clarify the composition.
Myth 10: Attractive Images Are Automatically Safe to Publish
Reality: A visually appealing image may still contain inaccuracies, misleading details, logos, distorted people, incorrect products, or invented locations.
Every image should be checked carefully before it is published, shared, or used commercially.
Frequently Asked Questions
What Is a Ready-Made AI Image Prompt?
A ready-made AI image prompt is a complete written instruction that can be copied into an AI image generator.
It usually includes details such as the subject, setting, style, lighting, colours, composition, aspect ratio, and elements to avoid.
You can use it as written or change the details to match your project.
Can I Copy These Prompts Exactly?
Yes. You can copy and paste any of the prompts in this guide.
However, you will usually get a more suitable image by changing details such as:
· The main subject
· The activity
· The background
· The colours
· The image style
· The aspect ratio
· The open space for text
Review the complete prompt before generating the image.
Do These Prompts Work with Every AI Image Generator?
They can be used with many AI image generators, including ChatGPT and other platforms.
However, different tools may interpret the same instructions differently. You may need to shorten, reorganize, or clarify a prompt depending on the tool you are using.
Why Does the Same Prompt Create Different Images?
AI image generators normally create new variations each time.
Even when the prompt remains unchanged, the person, background, colours, lighting, and composition may be different.
This variation is a normal part of AI image generation.
How Much Detail Should I Include?
Include enough information to explain the main visual idea clearly.
Important details may include:
· Who or what should appear
· What the subject should be doing
· Where the scene should take place
· Which visual style should be used
· What type of lighting and colours you want
· Where the subject should be positioned
· Which image format is required
Avoid adding details that do not support the main purpose of the image.
What Should I Do When the Image Is Incorrect?
Identify the most important problem and request a specific correction.
For example:
“Keep the same person, clothing, background, and lighting. Remove the extra chair and place the laptop fully inside the frame.”
Changing one or two details at a time usually makes the correction easier to control.
Can I Ask the AI to Add Text to the Image?
You can ask the AI to include text, but the generated words may be misspelled or distorted.
For important titles, labels, prices, and instructions, ask the AI to leave open space and add the correct text later using WordPress, Canva, or another design tool.
Which Aspect Ratio Should I Use?
Choose the aspect ratio according to where the image will appear.
· Use 16:9 for WordPress featured images and presentations.
· Use 1:1 for square social-media posts.
· Use 4:5 for portrait social-media posts.
· Use 9:16 for Stories, Reels, and Shorts.
· Use a wide banner format for website headers.
The exact display and cropping may vary between platforms.
Can I Use AI-Generated Images for Business?
AI-generated images may be used for many business purposes, but you should review the rules of the image generator and the platform where the image will be published.
You should also check that the image does not contain:
· Unauthorized logos
· Misleading product details
· Personal information
· Protected characters
· Inaccurate claims
· Distorted people or objects
Commercial use does not remove the need for careful review.
Should I Save the Prompts That Work Well?
Yes. Save successful prompts in a personal prompt library.
For each prompt, you may record:
· The final prompt
· The generated image
· The date
· The intended purpose
· The aspect ratio
· The corrections that improved the result
This makes it easier to create similar images later.
Do I Need to Mention That an Image Was Created with AI?
Disclosure requirements may depend on the platform, publication, industry, and purpose of the image.
Disclosure is especially important when an AI-generated image could be mistaken for:
· A real person
· A real event
· An exact product
· A real location
· Documentary evidence
Use clear descriptions when necessary and avoid presenting fictional content as verified reality.
Are Ready-Made Prompts Suitable for Complete Beginners?
Yes. They help beginners understand how a complete image prompt is organized.
By copying and customizing the examples, you can gradually learn how to control the subject, setting, style, lighting, colours, composition, and image format.
Key Takeaways
· Ready-made AI image prompts save time and provide a clear starting structure.
· Every prompt should be reviewed and customized before it is used.
· Important details include the subject, action, setting, style, lighting, colours, composition, and aspect ratio.
· Clear instructions usually produce more suitable images than vague requests.
· A longer prompt is not automatically better; every detail should support one main visual idea.
· Different image formats are suitable for different platforms, such as 16:9 for WordPress featured images and 9:16 for Stories and Reels.
· Important people, products, and objects should remain fully inside the frame with safe space around the edges.
· AI-generated text may be incorrect, so titles and labels are often better added later using WordPress or a design tool.
· Product images, portraits, and real locations require careful accuracy checks.
· Specific correction requests are more useful than instructions such as “make it better.”
· Changing one or two details at a time can make image improvements easier to control.
· Successful prompts should be saved in a personal prompt library for future projects.
· Every generated image should be reviewed for distorted hands, faces, duplicated objects, incorrect text, logos, cropping problems, and misleading details.
· Ready-made prompts are flexible templates, not guaranteed instructions.
· Human judgement is still necessary before an AI-generated image is published, shared, or used commercially.
The 50 examples in this guide can help you begin quickly, but the best results come from combining a useful prompt with careful customization, review, and improvement.
Final Tip
Do not try to create the perfect image with one prompt.
Start with a suitable example, customize the most important details, generate the image, and review the result carefully. When something is incorrect, request one or two specific changes instead of rewriting the entire prompt.
A simple improvement process is:
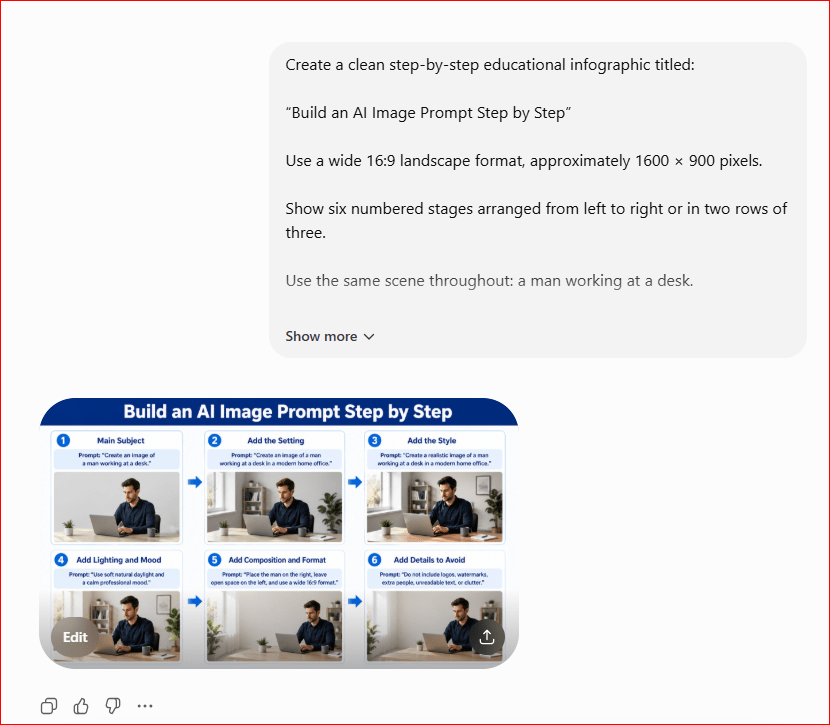
1. Choose a ready-made prompt.
2. Change the subject, setting, style, and aspect ratio.
3. Generate the first image.
4. Check the subject, hands, faces, text, background, and cropping.
5. Request specific corrections.
6. Save the final prompt that produced the best result.
The more successful prompts you save, the faster and easier your future image projects will become.
Continue Learning
Continue building your AI image-generation skills with these beginner-friendly guides:
· AI Image Generation for Beginners: Complete Guide (2026)
· How to Write Better AI Image Prompts: Step-by-Step Beginner Guide (2026)
 AI Mastery